


战争召唤——地狱之门:东线
 Steam Deck
 家庭共享
家庭共享 云存档
云存档 创意工坊
创意工坊 可用手柄
可用手柄 在线合作
在线合作


《战争号令——地狱之门:东线》(Call to Arms - Gates of Hell: Ostfront)作为《战争号令》的DLC,以东线苏德战场即“伟大的卫国战争”为特色。它将带领您从1941年6月出发直到1945年5月战争结束。 《战争号令——地狱之门:东线》提供多种游戏模式,包括单人游戏、动态战役、PvE、PvP和合作战役。凭借可即时切换的视角,每种类型的玩家都能找到合适的选择。第一人称与第三人称视角可即时切换,包括所有载具的第一人称炮镜视角、载具和步兵的第三人称视角、单个单位的经典的自顶向下直接控制或经典RTS自顶向下视角。 征服(动态战役)模式可供单人游玩或是与您的朋友联机合作。这两种模式都允许您组建自己的军队,研发新的单位,并在不同的路线上进行战略推进,以主导战场。动态战役的时长可以很短,也可以是无限长。 PvP/PvE提供了对战规模从1v1到4v4的各种地图,以及“学说”的使用。“学说”设定让您可以选择适合您个人游戏风格的特殊单位。也可以选择战争的阶段(早期/中期/晚期),随着战争的进展,体验装备和载具的演变。 单人模式战役根据历史记录的地点制作,游戏团队极力还原战役之貌,让您身临东线地狱。 《战争号令——地狱之门:东线》提供如下内容: 12个还原历史的单机或多人合作模式关卡。 30张PvE和PvP地图。 在PvE动态战役模式中,你可以不断发展自己的部队,并带领他们在一系列地图上打一场不断变化的战争。 PvP多人模式提供了让你的部队专精于某一方面的“学说”选择。 可即时切换步兵的第三人称/RTS直接控制模式。 可即时切换载具的第一人称/第三人称/RTS直接控制模式。 超过250款载具和100种重武器供您使用。 空军支援机制和来自地图外的炮火支援。 真实的装甲车辆,具有准确的装甲布局、还原历史的弹药装载和完全建模的内部组件。 这是所有RTS游戏中最真实的弹药和装甲穿透机制。 地雷、磁性雷、障碍物布设、散兵坑修筑、刺刀、烟幕和医疗兵等等数不胜数的游戏机制带给您更好的体验。 写实的音效设计和视觉效果。 支持游戏编辑器、模组制作以及创意工坊。
游戏圈
共63条帖子

0770
2026-02-14 22:00:13 · 发布在 「Call to Arms - Gates of Hell: Ostfront」
这是一份详尽的指南,将根据我们自身的经验,详细介绍目前为止我们所了解的关于《地狱之门》模组制作的内容,直至开发者发布他们自己的模组制作文档。
简介
与《英雄连》等游戏相比,《地狱之门》的模组制作相对简单直接。例如,《英雄连》需要第三方模组工具(如Corsix),而《英雄连2》的官方工具在功能上则相对有限。虽然这里呈现的所有信息乍一看可能令人望而生畏,但一旦你真正深入研究,就会发现其实并非如此。《地狱之门:东线》支持基于文本的模组制作,相关文件易于获取,您可以在以下路径找到:
您的驱动器盘符:\Steam\steamapps\common\Call to Arms - Gates of Hell
或者更简单的方法是:在Steam库中右键点击《地狱之门:东线》,依次选择【管理】和【浏览本地文件】。在游戏目录的mods文件夹中,你会找到一个模板文件夹,可将其作为制作自己mod的基础。该模板最初仅包含一个.info文件和基本的文件夹结构。
注意事项:
- 文件夹名称的书写需格外注意,所有字母需连在一起,例如GoH。
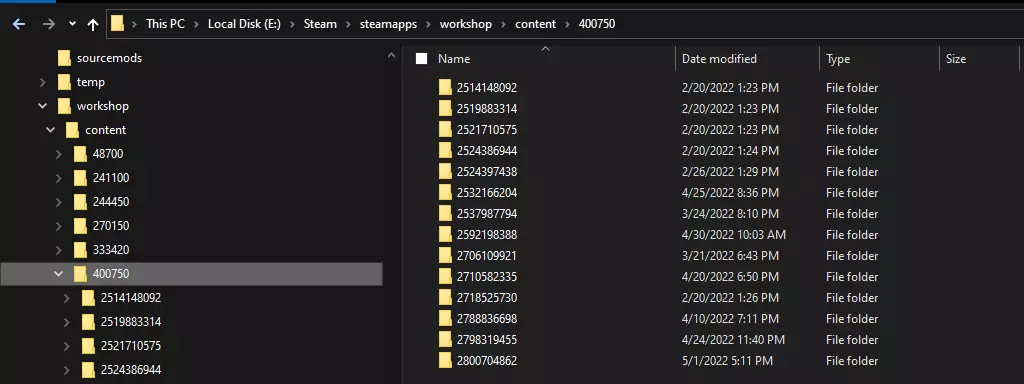
- 如果你希望mod文件夹名称更完整,比如想使用“Gates of Hell”作为名称,游戏将无法识别,此时需要将其命名为Gates_of_Hell。否则你可以像我一样,只保留最必要的字母并缩写,以节省时间和精力,反正只有你能看到。该模组在Steam创意工坊文件夹中会显示为一串由Steam分配的数字。如果模组文件夹名称存在拼写错误,游戏将无法识别该文件夹。例如,若将“resource”误写为“resources”,游戏就无法“看到”该文件夹,从而不会加载模组的更改,这一点需要注意。
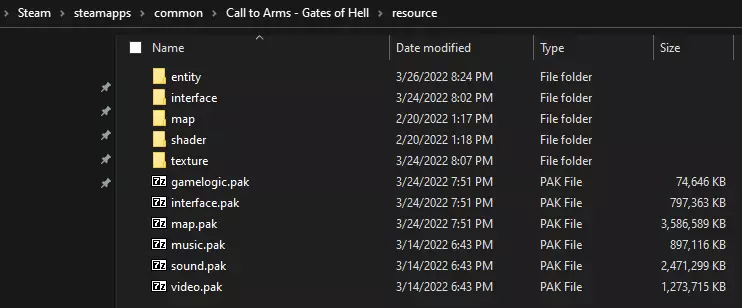
最后,你在此处看到的资源文件夹实际上是游戏自身资源文件夹中的.pak文件。这意味着你无需自行创建.pak文件,游戏能够识别并加载这些文件夹中的文件。不过,如果模组文件未打包成.pak文件,游戏加载这些文件的时间可能会稍长一些,除此之外没有其他影响。如果你想从一个简单的模组开始,以了解游戏文件夹结构,并确认游戏是否能识别我们的更改(例如,如前所述,如果某些文件夹名称存在拼写错误,游戏可能无法识别更改),你可以查看本指南的音乐和背景编辑部分。然后前往之前讨论过的游戏文件位置,点击资源文件夹,你将会看到以下内容。大多数游戏文件都位于此处,你也可以看到其中大部分是.pak文件,类似于虚幻引擎游戏所使用的文件类型。这些文件可以通过ZIP或RAR解压程序打开,例如WinZIP和WinRAR,或者我个人更推荐的替代工具7zip。如果你想开始编辑游戏的征服模式和多人游戏部分,那事情就会变得比较复杂了。我认为这属于更高级的模组制作,因为如果你在代码方面不够谨慎,很容易出现问题。根据我的经验,当我对某个文件做了简单修改后游戏开始崩溃时,我曾无数次感到头疼,往往需要花很长时间查看错误日志和文件本身,才能找出真正的原因。如果你想了解如何进行此操作,请查看本指南中专门的征服模式和多人游戏编辑部分。
说到错误日志,它可以在你的游戏文档文件夹中找到,路径如下:C: Users YourUserNameHere Documents My Games gates of hell log打开后就是这样,游戏崩溃后实际错误信息通常在底部,所以不要被这些代码块吓到。介绍到此结束,下一部分我们将讨论基础的模组制作,之后再深入更高级的内容。
这里还有一个《战争召唤》的基础教程,虽然与《地狱之门》相比有些地方有所不同,但两款游戏的大部分内容基本相同。
工具
注意:首先说明,这里列出的所有程序都是免费的,且不含病毒。
Notepad++:一款强大的文本编辑工具,适用于编程和编码,对模组制作也有很大帮助。
7zip:主要是一款ZIP和RAR文件解压工具,也可以打开游戏的.pak文件。在线转换器,如果你像我一样不想安装任何第三方转换程序,这个会很有用。
GIMP 2,功能强大的图像编辑程序,适用于处理纹理和图标等内容。
Sandels推荐的DDS Viewer,从名称就能看出它的具体功能。
Blender,3D建模软件,可通过专用插件进行模型导入。
这里还有Blender的插件,用于导入实际模型。3ds Max是唯一的例外,因为它是一款付费应用程序,但我还是要提到它,因为《战争召唤》有适用于它的插件,该插件允许编辑和导出模型。你需要将《战争召唤》文件夹中的插件复制到3ds Max目录,插件位置如下:你的驱动器盘符:SteamsteamappscommonCall to Armsmodstoolsplug-ins。我目前没有安装它,所以无法提供截图,但如果有任何问题请告诉我,我会更新此内容。此外,ModDB上还有Cromtec的载具导出教程,以及GeneralJ927撰写的另一篇关于3ds Max导出的指南。在游戏目录内的mods文件夹中,你会找到一个模板文件夹,其中包含一个.info文件。你可以使用任何文本编辑器打开它,但我强烈建议你使用Notepad++。这基本上就是你会看到的内容,需要说明的是,我在这里使用了我们的模组MACE的.info文件作为示例,而不是模板文件,目的是实际展示每个部分的作用。
名称的含义不言自明,它是模组在游戏模组管理器菜单中的名称;描述是标题下方的文本;版本则关系到你是否会收到模组或游戏已过时且无法游玩的警告。我通常会在这里填写“any”,因为对于某些模组来说,版本并不重要。例如,一些仅修改主菜单音乐的模组,其文件夹结构和文件保持不变,但由于写入了版本要求,即使模组实际上可以正常运行,游戏仍然会提示它们已过时。音乐编辑
使用7zip或其他ZIP、RAR解压软件打开介绍中提到的游戏资源文件夹内的music.pak文件,操作后界面应类似如下所示。我们要找的是main_theme.wav文件,这是你启动游戏并加载到主菜单时听到的歌曲。
我拿到游戏后做的第一件事就是把它换成Sabaton的《Ghost Division》,当然也是为了测试一下mod制作的可行性,因为我以前从未真正为《战争之人》系列游戏制作过mod,所以当时也不知道自己会遇到什么。
至于音乐,我已经通过某个网站将一个.mp3音频文件重命名并转换为.wav格式了。其余音乐文件的用途基本不言自明,你也可以根据自己的意愿将它们全部替换成你自己的文件。
声音和语音编辑
与上述音乐编辑类似,我们需要打开sound.pak文件,该文件同样位于【你的驱动器盘符】:SteamsteamappscommonCall to Arms - Gates of Hellresource中。
用7zip打开该文件后,再进入相应的声音文件夹,你就会看到以下内容。这些文件夹的作用基本不言自明,例如【人类】文件夹包含步兵行走声等内容,【载具】文件夹存放引擎声,【对话】文件夹则有游戏中单位实际说话的语音文件,【武器】文件夹里是武器开火的“砰砰”声等等。
音乐部分讨论过的基本概念在这里同样适用,只需遵循正确的文件夹结构,用你自己模组中的声音替换想要更改的声音,但要确保它们是相同的文件格式,例如【.wav】格式,你可以通过工具部分链接的网站进行转换。这里特别说明一下语音相关内容:语音是用各自的语言编写的(俄语语音则采用拉丁字母转写),因此如果您不懂这些语言,可能很难理解其含义。如果您想替换某些特定文件,可能需要进行一些猜测或使用谷歌翻译。此外,每个单位都有多种不同的语音变体,例如在原版游戏中,步兵有8种不同的可选语音。单位语音由talk.set文件控制,感谢Shimakaze提供。主菜单背景图片编辑
为了展示主菜单的可用功能,我将以胜利之日:起源模组为例。可以看到,我遵循了与原版游戏相同的游戏文件夹结构。关于背景,它会比音乐稍微复杂一些,因为这是一个用于修改主菜单背景的.dds文件。
如你所见,它还需要一些额外的子文件夹,再次注意之前提到的拼写错误。若要获取原始文件并将其用作修改模板,建议你按照游戏资源文件夹中interface.pak内的相同路径进行操作。
接下来要介绍的工具是GIMP 2。为了打开.dds文件以及之后会涉及的.tga文件,你需要一个比大多数人常用的简单便捷的画图软件(我有时也会用)更专业的程序。安装GIMP后,用它打开video_bkg.dds文件,并在弹出的提示窗口中点击确定以加载mipmap等内容。之后,你需要找到一张分辨率为2560x1440像素的图片,或者对现有图片进行放大,但放大可能会导致图片像素化,这一点需要注意。然后,只需将图片复制粘贴到旧图片上方,确保其完全贴合边框,否则会留下多余部分,看起来可能很奇怪。之后,点击文件,然后选择导出为,将其命名为与之前相同的名称,即video_bkg,将其保存到你的mod目录中interface文件夹下的主文件夹,此时会弹出一个窗口提示。保持选项不变,尤其是【压缩:无】和【无多级纹理】,所以基本上不要改动任何设置,只需点击窗口右下角的【导出】按钮。
如果您已正确完成所有步骤,例如文件夹结构正确且文件名没有拼写错误,那么就可以启动游戏了。进入【附加内容】,从【创意工坊】标签中激活该模组,再次加载后,主菜单应该会显示新的背景图片。征服模式编辑
你主要需要访问两个位置来获取相关文件,这两个位置都位于gamelogic.pak文件中。为避免混淆,我会提供提取后的路径:
第一个路径为:你的驱动器盘符:Steam steamapps common Call to Arms - Gates of Hell resource set dynamic_campaign这涉及到每个国家的科技树以及其他因素,例如初始可用资源数量、每个阶段可用于召唤单位的自由指挥点(CP)数量、资源获取比例等等。更具体地说,unit_research_ger.set和unit_research_rus.set文件用于处理原版国家的科技树,这里以德国的科技树为例。文件顶部是解锁所需的条件和成本信息。虽然上述内容决定了每个单位在科技树中的位置,但如你所见,目前它在Notepad++中始于大约224行。至于行和列,这是我能在Paint 3D中给出的最佳解释,并且要记住,列最多可以到8,因为9会显示一半被截断,而行则几乎可以无限延伸。dcg_easy.inc、dcg_normal.inc、dcg_hard.inc和dcg_heroic.inc文件负责处理我提到的大多数其他内容,例如关卡CP值大小,默认设置为:第一关50、第二关60、第三关70、第四关80、第五关90。你还可以在此处编辑其他内容,如AI军队规模、初始资源、AI防御点数等。以下是原版heroic文件的示例,其中关卡CP值已突出显示。需要说明的是,我还没有接触过map_points.set和values.set文件,所以无法解释它们的用途。不过如果你愿意,可以自行尝试操作看看会发生什么。如果游戏崩溃,那就说明操作有误,你也可以查看游戏日志,这或许能帮助你找出问题所在。
下一个与征服模式相关的位置在这里:
你的驱动器盘符:Steam steamapps common Call to Arms - Gates of Hell resource set multiplayer units conquest这里是《征服》中单位相关数据的存放位置,例如一个小队的人数、一辆载具的乘员数量以及单位的成本等。更具体地说,这些内容在units_ger.set和units_rus.set文件中有详细说明,这里仍以德国文件为例。文件中列出的三种基本单位类型为步兵、混合单位(我称之为“机械化单位”,通常由步兵和单独配备的载具组成),以及代码中载具单位的基础示例——若在同一文件中向下滚动,可看到更完善的版本。
接下来,inf_ger.set和inf_rus.set文件列出了每个小队可用的士兵模型。settings.set文件的功能我尚未测试,所以可以像之前一样随意尝试。以下是德国步兵设置文件的示例,请注意顶部的说明。关于步兵单位,游戏中组成小队的特定角色可通过以下路径进行编辑:你的驱动器盘符:SteamsteamappscommonCall to Arms - Gates of Hell/resource/gamelogic.pak/set/breed/mp。每个国家都有各自的特定文件夹,其中包含三个子文件夹,分别名为early(早期)、mid(中期)和late(晚期),这些文件夹中显然存有代表战争各阶段装备和士兵类型的相应.set文件。如果你已正确设置了文件夹结构、文件名以及文件内的单位名称等所有内容,且在研究文件和单位.set文件中没有任何拼写错误,那么当你启用模组启动游戏后,无论是修改现有单位还是添加新单位,所做的更改都应会生效。后续可能会在此处发布更多示例截图甚至视频以进一步说明。
多人编辑
关于多人游戏部分,相关文件位于【你的驱动器盘符】:Steam steamapps common Call to Arms - Gates of Hell/resource/gamelogic.pak/set/multiplayer/units/有多个文件用于处理多人游戏的设置,目前还有两个名为“mid”和“late”的文件夹,与“Conquest”文件夹类似,其中包含各个国家的步兵和单位.set文件,详细说明了单位的可用时间、成本等信息。
现在我们将查看“late units_ger.set”文件,因为我发现后期阶段拥有最有趣且最多样化的单位,因此最适合作为示例。从文件顶部开始,这里列出了学说及其单位。正如你将在下一张图片中看到的,它们的编写方式与常规单位相比非常独特,但需要注意的是,据我所知,任何学说单位也需要像常规单位一样列出,例如猎豹坦克歼击车。它也被列为这里的【常规】单位,注意括号中仅提及的【学说】这就引出了我们的下一个话题,也就是常规单位部分。这里是位于文件最底部的自行火炮(SPG)部分,如你所见,它与学说对应代码有很大不同。
我必须再次强调,如果你想在学说中包含某个单位,那么将其作为常规单位包含在内至关重要,最好在括号中添加“doctrineonly”标签。如果你不希望某个单位专门与学说绑定,就像我对黄蜂自行火炮、野蜂自行火炮和旋风自行高炮所做的那样,那么只需在括号中填写载具类别,在我们的示例中就是轻型和中型。
多人游戏部分的内容就这些了。在我看来,它比征服模式部分更简单直接,但你仍然需要注意拼写错误等问题。其他代码部分则较为相似,尽管存在一些细微差异,但目前大部分代码的功能都比较容易理解。
与“征服”部分类似,日后可能会在此处发布更多示例图片,甚至视频。
纹理编辑
纹理编辑相当简单直接,但需要一些耐心。纹理文件位于common.pak文件中,路径为:你的驱动器盘符:SteamsteamappscommonCall to Arms - Gates of Hellresource texturecommon更准确地说,士兵纹理位于【_human】和【_humanskin】文件夹中,而载具纹理显然在【_vehicle】文件夹里。我提到这些是因为之前不知道它们的名称前有个下划线,所以花了很多时间在错误的地方查找,直到查看该位置的底部并检查了这些文件夹才找到。
这里我将专门用一段来介绍载具,因为这些是我处理最多的纹理。载具纹理有多个“阶段”。如果以虎式坦克H型为例——它有16个所谓的“关卡”。【#camo】指某种迷彩图案,【#grey】指纹理为纯灰色,在我们的情况中即德军灰,【#winter】用于雪地地图。【bp】代表蓝图,【sp】我猜是单人模式,用于战役或特定任务的皮肤。【_x】和【_xx】分别代表受损和被摧毁状态的纹理。以下是在GIMP 2中打开第一个迷彩的示例,注意铁十字标志及其位置,如果你想替换它们或添加额外标记,需要进行一些试验才能正确完成。这是打开后的载具纹理效果,我知道乍一看可能有点突兀,但相信我,它其实没那么复杂。你现在看到的是尚未应用到载具上的“平面”版本,当游戏开始在画面中渲染载具时,会通过UV映射告诉图形引擎纹理各部分在模型上的位置,这就是实现这一效果的原理。
我绝不是什么图形艺术家,我的解释在某些人看来可能很不专业,但我只是想用通俗易懂的语言来解释,让像我这样没什么纹理制作或编辑经验的人也能理解,仅此而已。以下是关于《战争召唤》纹理模组创建的教程,可能对部分玩家制作本游戏模组有所帮助。
Sandels提供的纹理编辑补充说明:
关于_humanskin子文件夹:例如芬兰有两个子文件夹,“Finland”文件夹包含旧版人物皮肤(游戏中通常不再使用),“Finnish”文件夹则是新版。另外,_human文件夹包含头部装备纹理。以id=2875301257为例,因其文件结构简单,便于学习新知识和查找文件位置,其中还包含肖像等素材。里面甚至有我编辑肖像时使用的Photoshop文件。
2D美术编辑
游戏的大部分2D美术和图片位于 - 你的驱动器盘符:Steam steamapps common Call to Arms - Gates of Hell/resource/interface.pak/interface/scene/我们在此查看的6个子文件夹示例包括:portrait、portrait_squad、unit_icon、unit_icon_small、squad和vehicle_view。
portrait文件夹包含士兵图片,你可以在比赛中于左下角找到这些图片。肖像小组包含了所有征服模式单位的图片以下是用于创建自定义模板的基础模板、框架模板和锁定模板。unit_icon文件夹包含所有多人游戏中出现在屏幕右侧呼叫菜单内的图片。以及他们各自的德国和苏联模板unit_icon_small和squad文件夹包含所有你在小地图上方左侧看到的单位图标。再次使用相应的模板 -vehicle_view文件夹与步兵肖像文件夹相对应,用于展示载具示意图。不过与步兵的不同,载具示意图是动态的,能显示载具所受的损伤。我们将以虎王坦克为例,先从它的正常外观开始介绍。然后是受损状态,此时炮管和履带被击毁,因此显示为红色现在你可能会问这种效果是如何实现的,其实很简单,每个受损部件都有自己独立的图片,叠加在你现在看到的主静态图片之上。这就是主体文件本身,就像我说的,它是一张静态图片,受损组件会添加在这张图片之上。在损伤文件夹中,你可以找到损伤状态图片,例如枪支损坏的图片。或者左侧轨道如果你希望载具看起来自然,那么为每个新添加的载具创建其专属的vehicle_view子文件夹并包含所有相关文件至关重要。再次强调,请以原版游戏文件作为参考和示例,遵循相同的文件夹结构即可。
实体编辑
实体是指游戏中所有可见的模型,例如载具、动物、建筑等。
它们位于:
你的驱动器盘符: Steam steamapps common Call to Arms - Gates of Hell resource entity
并且包含两个子文件夹 -第一种,【建造】,顾名思义,包含所有模型,例如建筑物、防御结构以及沙袋等掩体。而实体一是其余模型,例如之前提到的载具、动物等等。我个人访问过并了解其内容的4个文件夹分别是:动物群(fauna),即前面提到的动物;载具(vehicle),内容显而易见;植物群(flora),包括草、灌木和树木等;最后是物品栏(inventory),包含弹药、武器、头盔等模型。
在本节中,我们将详细介绍载具文件夹及其内容,特别是德国载具文件夹,以此作为示例。如你所见,它有多个文件夹,将载具按各自的类别分开,以便于导航。
我们以虎王坦克为例,但需要注意的是,这里还有一个x子文件夹,里面包含载具的损毁版本,就像纹理文件那样。该文件夹位于tank_heavy文件夹中,我们将打开它的.def文件来查看其中的内容。再次强调,不要被这里数量庞大的文件吓到,这些文件大多是模型的一部分,其作用是让模型在移动时显得更自然,而不是一个静止的物体。
总之,当我们找到def文件(在我们的示例中,该文件几乎位于底部)后,点击它以打开,在文本编辑器中打开后,你将看到这样的窗口。What you can see here are several things, first off is the inventory at the top of the picture. This lists all of the ammunition and other items which will be considered as a standard loadout for the vehicle once it spawns and also will be auto-regenerated once it's near a supply truck.
Next we have the weaponry, this lists all of the available guns and positions that the vehicle has and that you can control if you're in the direct-control mode. They are pretty self-explanatory with the standard being 1 main gun, the 88 in our case here, 2 machine guns, 1 hull mounted and 1 co-axial and turret top-mounted machine gun which is normally used as additional firepower but can also be used to shoot at enemy planes for example. Just a quick note here but not all vehicles have the last turret top-mounted MG and some vehicles like the Tiger Ausf. H for example have smoke dispensers here instead, while other vehicles might not have anything or have more guns so just keep that in mind, it's different for each vehicle pretty much.
Lastly we have the chassis at the bottom of the picture there which lists all hard stats of the vehicle below it, for example the speed, weight and fuel capacity for example.
Just a quick note but some .def files may sometimes contain armor values as well which from my understanding come from the older Men of War: Assault Squad 2 engine, normally they should be located in the vehicle .mdl file which is in the same entity folder but I won't go into that here because I don't have a lot experience dealing with it but again as always feel free to experiment with it if you feel like it and see what happens.
zverofaust was nice enough to provide a correction on this information which you can read here -
In GoH most armor values for vehicles are located in an [vehiclename].ext file in the same folder (and alluded to in the .def with the tag (include "[vehiclename].ext"). This file lists all of the armour values for the various hit volumes for the unit.
Infantry editing
Our friend BBQ has been nice enough to make this mini-guide detailing the addition of infantry squads to the conquest.
So credits go to him and also here is his mod where you can try out his work as well - https://steamcommunity.com/sharedfiles/filedetails/?id=3100056378
The entities/units must already exist.
Use the provided folder structure in "new_unit_template" to copy all necessary files.
We will add an MG13 detachment to Germany as an example.
Decide which units your new squad will consist of.
1. You can find all of the squads in resource set multiplayer units conquest units_faction.set
Example:
We want the MG13 operator, which is used by the Luftwaffe Rifle Squad.
Ctrl+F in units_ger.set for a keyword, such as "luft"
We find the the squad "name(squad_luftwaffe_con)"
The squad consists of c1(luft_1:1) c2(luft_5:1) c3(luft_2:6) c4(luft_3:1) c5(luft_4:1)) ;//The value after the colon represents how many of that unit is in the squad
2. You can find more info on all of the units in in resource set multiplayer units conquest inf_faction.set
To see the inventory and appearance of those units, find the corresponding unit name in that file.
Example:
Searching in inf_ger.set for "luft_", we find the following:
{"mp/ger/mid/luft_1"("ger_strafbatallion" side(ger) lvl(lvl1)) {cost 10.0}}
{"mp/ger/mid/luft_2"("ger_strafbatallion" side(ger) lvl(lvl1)) {cost 8.0}}
{"mp/ger/mid/luft_3"("ger_strafbatallion" side(ger) lvl(lvl1)) {cost 30.0}} ; has mg
{"mp/ger/mid/luft_4"("ger_strafbatallion" side(ger) lvl(lvl1)) {cost 8.0}}
{"mp/ger/mid/luft_5"("ger_strafbatallion" side(ger) lvl(lvl1)) {cost 8.0}}
We see that luft_3 has the comment "; has mg", indicating that's likely the mg operator.
We know the Luftwaffe Rifle Squad has only one MG, so that seems likely.
3. To confirm the inventory of the unit, locate their breed file. This will be the short path just to the left of the name in the list above ;// Unless the breed file was modified by a mod you are using, you will use the file in the base game directory
The breed files are located in SteamLibrary steamapps common Call to Arms - Gates of Hell/resource/gamelogic.pak/set/breed/mp/
Example:
Open "resource/gamelogic.pak/set/breed/mp/mp/ger/mid/luft_3.set"
{breed;//a breed file states what the unit will spawn with
{behaviour soldier}
{skin "ger_lw_39_mg"} ;//refers to the appearance loaded from resource/entity/entity.pak/humanskin/[germans]
{portrait "ger_luftwaffe"} ;//the portrait the specific units uses in game
{icon "mg"} ;//the icon over the unit in game
{icon_priority 0} ;//if multiple unit types are selected, the priority indicates which one will be displayed
{tags "soldier"}
{nationality ger}
{armors
{head ger_m38_luftschutz_helmet}
}
{perks ;//stats and abilities found in resource/gamelogic.pak/set/breed/presets
(include "ability.inc");//
("mg_skill_rank_1");//
}
{veterancy;//
(include "ability.inc");//
("veterancy_lvl_0");//
}
{inventory
{item "mg13_no_bipod" filled};//a weapon that the unit spawns with. "filled" indicates the weapon will be loaded with ammo. If a weapon uses a magazine, the magazine must be listed after the word "filling" (replace "filled")
{item "mgun_ger mg13 ammo" 300};//the ammo the unit will spawn with. The value indicates the amount of ammo
{item "m24 grenade" 1.25 0.5};//there are two values here. The left is the base amount of grenades, the right is the possible variation upon spawning.
{item "m24_smoke grenade" 0.15 0.5};//So 0.15 0.5 means that they can spawn with 0.15 + or - 0.5 (don’t ask me why the lack of whole numbers). If you want it to be a static number, just use one value.
{item "bandage_ger" 2.5 0.5}
{item "shovel_ger"}
{in_hands 0};//Not sure what this means as the unit usually spawns with the weapon equipped.
}
}
We confirm that this is the unit we want for the MG operator.
Doing the same for "luft_4" shows {skin "ger_lw_39_mg_asst"}, so this is the MG Assist. This is also what we want.
Add new squad to units_faction.set file.
1. Copy the units_faction.set file for the faction you are modifying.
Example:
Copy units_ger.set into resource set multiplayer units conquest
2. At the very end of the new units_faction.set file, add a statement to include an extension file
Example:
(include "units_ger_ext.set")
3. Create the extension file
Example:
resource set multiplayer units conquest units_ger_ext.set
4. In the extension file, add a header and copy the unit type separators from the units_faction.set file
Example:
;_________________________________________________
;| inf2 |
;|________________________________________________|
5. Add the configuration of the squad you want to add.
Example:
("squad_with2types_conquest" side(ger) period(mid) min_stage(2) max_stage(99) name(single_mg13)c1(luft_3:1) c2(luft_4:1))
Let's break down what each section means.
"squad_with2types_conquest" ;//this is how many different units are in the squad. It corresponds with the "c[x]" before the unit names
side(ger);//which side the unit is found in set breed mp
period(mid);//which side the unit is found in set breed mp ger. Make sure the period() is correct for the unit you you are using or the game will crash.
min_stage(2) max_stage(99);//the minimum and maximum turn this unit will be available to be used by bots.
name(single_mg13);//the name of the squad that correlates to the research tree and portrait it uses
c1(luft_3:1) c2(luft_4:1));//the units in the squad. The value after the colon represents how many of that unit is in the squad
6.Review everything. It should like this
Example:
;_________________________________________________
;| inf2 |
;|________________________________________________|
("squad_with2types_conquest" side(ger) period(mid) min_stage(2) max_stage(99) name(single_mg13)c1(luft_3:1) c2(luft_4:1))
Create research entry in an extension file
1. Copy the unit_research_faction.set file for the faction you are modifying.
Example:
Copy unit_research_ger.set into resource set dynamic_campaign
2. At the very end of the new unit_research_faction.set file, add a statement to include an extension file
Example:
(include "unit_research_ger_ext.set")
3. Create the extension file
Example:
resource set dynamic_campaign unit_research_ger_ext.set
4. In the extension file, add a unit type header by copying from the unit_research_faction.set file
Example:
;//---SQUADS---
5. Add the squad into the extension file
Example:
;//---SQUADS---
{"single_mg13(ger)"requires""costs 2 position 0 7}
Let's break down what each section means.
"single_mg13(ger)" ;//The squad this will unlock and the portrait it uses
requires"";//What needs to be researched prior to being available for research. Syntax uses the squad name ("single_mg13(ger)"). Emtpy means it has no prerequisite
costs 2;//How many research points the squad costs to unlock
position 0 7;//Where the portrait is located in the research tree. First value is the column, second is the row. Numerical order is 0,1,2,3,etc
Example:
0 1 2 3 4 5
1 2 3 4 5 6
2 3 4 5 6 7
3 4 5 6 7 8
4 5 6 7 8 9
5 6 7 8 9 10
Create new portraits in resource interface scene portrait_squad
1. Find the portraits you want to use in base game directory SteamLibrary steamapps common Call to Arms - Gates of Hell/resource/interface.pak/interface/scene/portrait_squad/
2. Copy all four portraits
3. Rename them to your new squad name (make sure to include (faction))
Example:
single_mg13(ger)_00.png
single_mg13(ger)_01.png
single_mg13(ger)_02.png
single_mg13(ger)_03.png
Create portrait text in localizations default interface text desc desc_squad.pot. Text is at the bottom under the USA signaller
Example:
msgctxt "desc/squad/single_mg13(ger)"
msgid "MG13 Detachment"
Entity porting
This tutorial for Call to Arms mentions most of the procedure on how to port over for example a vehicle from Men of War: Assault Squad 2 and while it's similar to Gates of Hell there are still some differences that you should watch out for, however it can hopefully provide you with at least some directions to get started on porting over things from older games to this one -
https://calltoarms.fandom.com/wiki/Modding/Examples
And as recommended by Hjelmern, SturmFuhrerPK's video guides on modding GEM engine games such as Men of War: Assault Squad 2, Call to Arms and Gates of Hell which include also porting assets from the older games to the new ones - https://www.youtube.com/playlist?list=PLfmWj_TzuPMCbyOjxGHtMEE33Q1naXTHh
This section will be expanded upon as time goes on.
Localization editing
The localization files are all of the text that you see in the game. For example unit names and descriptions for the vehicles, weapons, ammo and so on and so forth.
They can be found here -
Yourdriveletterhere: Steam steamapps common Call to Arms - Gates of Hell/localizations/default.pak/default/interface/text/我们将主要查看desc文件夹,但这里有个小提示——tips.pot文件包含你在加载界面看到的引用文字,所以如果你想加入一些有趣或励志的内容,现在知道该怎么做了。
好了,言归正传,回到前面提到的desc文件夹,打开后你会看到以下内容——再次以我们的模组MACE的载具描述文件为例,该文件由Shimakaze友好提供。我们将其命名为desc_vehicles_ger_new.pot,但你也可以将描述文件命名为其他名称,以避免使用原版游戏或其他模组可能会修改的相同文件。
无论如何,这里就是你列出每辆载具的地方,包括它们在游戏中的名称以及描述。
模型转换与编辑
由于我在实际操作此流程方面经验有限,我会链接几个专门针对该主题的其他教程,并可能会随着时间的推移为这一部分添加更多信息,但就目前而言,这些教程至少在理论上应该足以让人们至少开始着手处理相关事宜。这些教程主要适用于旧版游戏的GEM编辑器,但结合工具部分的其他教程,至少目前能为你提供一个良好的起点。编辑器使用指南
在此处可访问编辑器,当你点击【地狱之门】的开始按钮后,会出现编辑器选项。这就是你加载完成后将会看到的内容。我对这个工具的全部功能了解不多,但我知道两个基本操作,其中之一是生成单位。比如,生成单位可以用来摆姿势拍照,之后用于制作单位头像和图标。要创建这些精美的截图,你可以按键盘上的Esc键,然后选择“加载”,接着选择“单人”或“多人”地图文件夹,再从中加载一个地图,例如 -Basic GEM Editor hot keys taken from here - https://www.moddb.com/groups/men-of-war-fan-club/features/basic-instructions-for-men-of-war-map-editor
F1 - Game interface
F2 - Map interface
F3 - Mission interface
F6 - Environment
F9 (in F3 mode) - Mission Properties
1-0 - Go to submenu in F2/F3 modes
1-0 (Numpad) - Choose side (colors Red, Blue, etc...)
F2 Map Menu
1. Entities
2. Terrain
3. Camera (Global)
4. Edifice (to be able to see through buildings)
F3 Mission Menu
1. View
2. Entities
3. Squads
4. Waypoints
5. Zones
6. Triggers
7. Camera (Cinematic)
8. Covers
CTRL +
Q - Camera Lock
T - Add new Tags
I - Inventory modification
O - Open
S - Save
F - Find entitiy and zoom in
0 - Center on the Map
M - Map
ALT +
W - Polygon view of terrain and objects
R - Call Functions (Or select animation when a unit is selected in F3 mode)
T - Show Tags
I - Show MIDs
G - DO NOT PRESS - CRASHES THE EDITOR
S - Show XYZ Orientation of entities
H - Show Heightmap
V - Show entity polygons
X - Shut down editor
B - Show entity collision space?
A - Switching obstacles on and off
P - Switching ai chosen waypoints on and off
Z - Undo, redo window
F - Fog of war on and off
SHIFT +
T - Bring up Textures
F - First Person View (editor only)
Single letters
W - brings up menu of IK Parameters, Bone Colors, Function call, Tags and Inventory.
IK Parameters - Inverse Kinematics (for animation purposes)
Bone Colors - No idea what that is
Function call - Call functions you create in mission properties
Tags - Same as Ctrl-T
Inventory - Same as CTRL-I
T - parse map properties and replace
C/Z/X - Rotate a selected entity
A - Change Altitude of an entity
S - Change Scale of an entity
Misc-Commands
CTRL-ALT-LSHIFT-D - Hide all of the UI in the game/editor.
CTRL-ALT-D - Hide the UI in the game/editor except the Map and player side.
Hold Space + Drag - Move the map with the left mouse pointer
Shift+ Drag - Smooth terrain
Numlock +/- - Increases/Decreases brush size.
ALT+A - Switching obstacles on and off
ALT+P - Switching ai chosen waypoints on and off
ALT+Z - Undo, redo window
ALT+F - Fog of war on and of
To delete the camera angle lines in gem editor you have to ways:
- Reinstall the game
- Open the profile you are using for modding and delete "editor_desktop.set" file
How to create a minimap tutorial, again taken from moddb - https://www.moddb.com/groups/gem-2-editor-fan-club/tutorials/how-to-create-a-minimap
How to create mission localization, once again taken from moddb - https://www.moddb.com/groups/gem-2-editor-fan-club/tutorials/how-to-create-localization-for-missions
And lastly how to create a mod .info file from ModDB - https://www.moddb.com/groups/gem-2-editor-fan-club/tutorials/making-modinfo
A couple of quick notes, once you start a mission in the editor you can actually enable and disable mods to test them out and can even change unit values from their files and all you need to do is just reload the mission in the editor and they should take effect.
Working example mods
In this section we will be exploring how some things are done in the game through modding by giving specific examples of mods that do certain things.
Using the knowledge of where to find the files of our subscribed mods from the workshop in the introduction section we will begin looking at the following examples -
Scripting and a lot of other improvements to the UI, AI and so on -
https://steamcommunity.com/sharedfiles/filedetails/?id=2899823515
This mod has been influential in some of the things that we see in the game currently such as the icons above characters like medics or engineers, the arrow icons showing where the enemy is coming from in Conquest missions and of course a lot of AI improvements making it more aggressive and thus a challenge so if you're interested in any of those things definitely give it a look.
Conquest and Multiplayer editing as well as adding new models, units and nations to the game -
https://steamcommunity.com/sharedfiles/filedetails/?id=2905667604
Out latest mod, it adds a lot of content such as a lot of new units and new nations in both the Conquest and Multiplayer so if you're interested in seeing how to do any of those feel free to check it out.
First person improvements which makes the game similar to what is present already in Call to Arms -
https://steamcommunity.com/sharedfiles/filedetails/?id=2945745901
If you're looking for how to add Call to Arms' iconic first person feeling through weapon sights and control then you know where to go.
Main menu music and background changing -
https://steamcommunity.com/sharedfiles/filedetails/?id=2522640954 and
https://steamcommunity.com/sharedfiles/filedetails/?id=2805930341
If you want to give your mod a bit more style then we come to our first 2 mods on the list of examples.
Adding captured enemy tanks to another faction -
https://steamcommunity.com/sharedfiles/filedetails/?id=2514846911
An old and outdated mod which we will need to update at some point, you can look at how we made captured Soviet tanks available for the Germans.
Unit voices and portraits -
https://steamcommunity.com/sharedfiles/filedetails/?id=2660904985
A small personal mod of mine mostly made to bring some improvements to MACE. Again if you want to see how to do at least some of the things that were mentioned in the Sound and 2D art sections you can take a gander here.
Sandels' Finnish Infantry Overhaul mod - https://steamcommunity.com/sharedfiles/filedetails/?id=2875301257
In his own words, it has an easy file structure for editing textures as well as new portraits, icons and photoshop templates as well.
How to upload a mod to the workshop
The workshop uploader tool is located here -
Yourdriveletterhere: Steam steamapps common Call to Arms - Gates of Hell binaries x64点击应用程序.exe文件后,你将看到这个窗口。点击创建按钮后,会弹出以下界面。目前选项相当有限,但能满足基本需求。
几点说明:
- 不知为何,名称中不能包含冒号等符号。
- 这里也是更新已上传模组的地方。只需从列表中选择模组,然后点击编辑按钮即可。
- 最后要注意,更新已有的模组后,描述会被删除,原因同样不明,所以务必在模组文件夹中备份描述文件,例如:结语
感谢您阅读本指南,希望它能在您的模组制作之路上提供一些帮助。
如前所述,本指南主要基于我们自身的经验编写,内容可能会根据实际情况进行更新、修改或补充,至少在开发者发布官方模组制作文档之前会持续完善。


冰豆鲨
2026-02-14 04:00:07 · 发布在 「Call to Arms - Gates of Hell: Ostfront」
这是一份全面指南,旨在帮助你根据自身需求修改《征服增强版》及《征服增强版v2》。
按个人喜好进行调整
本指南是关于对模组进行二次修改的教程。如果有任何问题未在本文中得到解答,请前往该模组的Discord服务器向我们提问:https://discord.gg/ztvgWhD5py
**请注意,当模组更新时,你所做的任何修改都将被重置,因此请务必备份你的更改。**
如果你希望AI拥有更多/更少的单位:
1. 前往路径:steamapps workshop content 400750 2899823515 resource set dynamic_campaign
2. 打开你正在游玩的resources_xxx文件。你可以使用记事本打开,但更推荐使用Notepad++。
3. 修改“Base value”(基础值)以增加或减少AI的军队规模。其模板如下:
已流逝秒数 : AI拥有的CP数量。-如果你希望AI在玩家防御任务中增加或减少单位数量,请修改第13行的攻击乘数。如果你不使用Notepad++,附图将显示需要修改的部分。
-请记住,每个任务都有一个基于任务星级的风险系数。你可以从第37行开始调整风险系数。如果你希望玩家拥有更大或更小的军队
- 前往 steamapps workshop content 400750 2899823515 resource set dynamic_campaign resources_xxx,修改 StageCP——每个条目都与特定的召唤阶段相关联。如果进行此操作,还需将“Budget start”行增加到所有阶段的总和。如果你希望玩家获得更多或更少的资源:
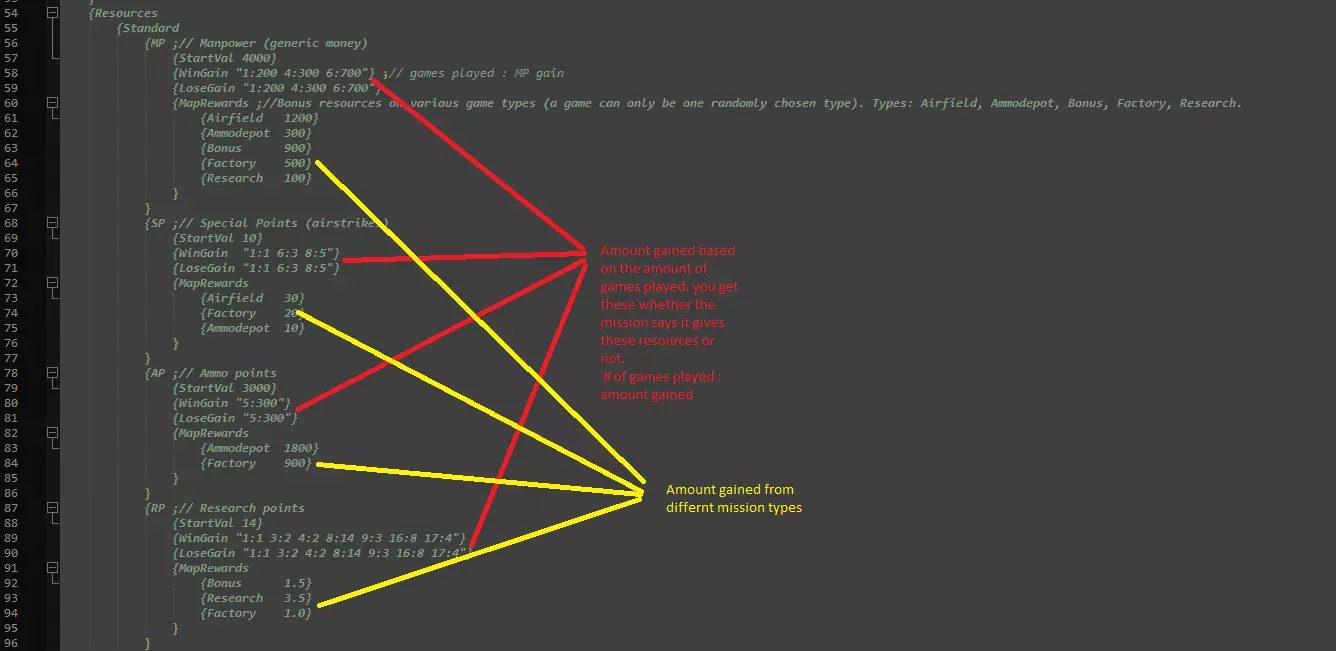
- 前往 steamapps workshop content 400750 2899823515 resource set dynamic_campaign,打开你正在游玩的任意 resources_xxx 文件。
- 在“资源”标签下修改数值。
- 请注意,所有奖励都会乘以“风险乘数”部分下的“奖励系数”。若你希望AI升级防御的速度变慢:
- 前往 steamapps workshop content 400750 2899823515 resource set dynamic_campaign,将第19行、24行和29行中的“unlock games progress”(解锁游戏进度)修改为你想要的游戏数量。
[注意:如果将防御等级1修改为非零的任何数值,AI的据点将完全没有任何单位或工事。]
若你想更改游戏时长:
- 前往 steamapps workshop content 400750 2899823515 resource set multiplayer games,在 campaign_capture_the_flag 中,将第47行的“score final”(最终分数)修改为更大或更小的数值。若你想修改单位的MP或CP消耗,可前往steamapps workshop content 400750 2899823515 resource set multiplayer units conquest路径,在units_ger或units_rus文件中,将(cp)修改为CP,将cost修改为MP。
若你想禁用AI的场外火炮:
- 需在steamapps workshop content 400750 2899823515 resource set multiplayer units conquest路径下编辑敌方阵营的单位文件。打开敌方阵营的Units_“阵营名称”.set文件,将信号兵(signaller)的min_Stage值修改为99。以下是德国阵营的示例。若你想更改AI援军的到达时间:
- 前往 steamapps\workshop\content\400750\2899823515\resource\conquest_configuration 路径,用记事本编辑器打开该文件。
- 当你作为进攻方时,若要更改AI的出现时间,需修改“Bot is defender”(AI为防守方)的值,其中第一个数字代表分钟数。
- 当你作为防守方时,若要更改AI的出现时间,需修改“Attackmin”(进攻最小时间)和“Attackmax”(进攻最大时间)的值。
- 你需要针对所有旗帜类型进行上述修改。若你想加快或减慢AI的研究进度:
- 前往 steamapps workshop content 400750 2899823515 resource set dynamic_campaign 路径。
打开你正在游玩的 duration_XXX 文件,找到对应战役时长的“Research stage”行。每行条目中的第一个数字是已进行的游戏局数,第二个数字是AI的研究阶段。你可以在 2899823515 resource set multiplayer units conquest units_nation 文件中查看AI在哪个阶段可以购买哪些单位(min stage 是它们开始购买该单位的阶段,max stage 是它们停止购买该单位的阶段)。
若你想让AI更早或更晚购买特定单位:
- 前往 steamapps workshop content 400750 2899823515 resource set multiplayer units conquest units_nation 文件(min stage 是它们开始购买该单位的阶段,max stage 是它们停止购买该单位的阶段)。目前关卡与战役天数相等。
若要修改研究成本:
- 前往 steamapps workshop content 4007502899823515 resource set dynamic_campaign unit_research_nation,在其中修改成本。
若要移除防守时丢失旗帜的时间惩罚:
- 前往 G: SteamLibrary steamapps workshop content 400750 2899823515 resource set multiplayer games,在 campaign_capture_the_flag 中,将 {parameters "points_table_player=0/0.000,0.34/4.5,0.50/5.5,0.67/6.5,1.00/11.2 修改为 {parameters "points_table_player=0/0.000,0.34/11.2,0.50/11.2,0.67/11.2,1.00/11.如果你想拥有更长的进攻时间
- 前往G: SteamLibrary\steamapps\workshop\content\400750\2899823515\resource\set\multiplayer\games\campaign_capture_the_flag路径,将{parameters"points_table_player=0/0.000,0.34/5,0.50/5,0.67/7,1.00/10;points_table_ai=0/0.0,0.35/6.603,1.0/15;flag_capture_time=75;flag_release_time=25;flag_capture_factor=0.9"}修改为{parameters"points_table_player=0/0.000,0.34/5,0.50/5,0.67/7,1.00/10;points_table_ai=0/0.0,0.35/1,1.0/1;flag_capture_time=75;flag_release_time=25;flag_capture_factor=0.9"}
如果你想在所有阶段都能进行呼叫
- 前往steamapps\workshop\content\400750\2899823515\resource\set\dynamic_campaign路径,打开你正在游玩的resources_XXX文件。你可以用记事本打开,但更推荐使用Notepad++。将第98行的“Budget Start”修改为{Start "0:400"}。然后在下方两行处,将{limit #}修改为limit 400。
[如果你为军队分配了更多指挥点数(CP)以携带更多部队,则400这个数值需要提高。将所有阶段的指挥点数值相加,并将其修改为该总和。]
如果你想禁用特定地图:
- 前往steamapps workshop content 400750 2899823515 resource map multi,找到你想要禁用的地图,并打开campaign_capture_the_flag文件。信息文件并将地图选择更改为99。
若你想禁用某些脚本:
- 要禁用你不喜欢的部分脚本,请前往 steamapps workshop content 400750 2899823515 resource conquest_configuration,然后在那里修改它们的概率。
### 错误与崩溃报告
- 如果你遇到崩溃问题,请前往 C: Documents My Games gates of hell log 和 C: Documents My Games gates of hell log_ds,或 AppData Local digitalmindsoft gates of hell log,将“game”文件通过Discord发送给我们,或截图这些文件的结尾部分,包含崩溃信息以及崩溃前后的相关内容。
- 如果你遇到其他错误,请在创意工坊讨论区的错误板块进行报告。请尽量附上截图。同时,请务必报告错误或崩溃发生的地图。如果发现某些单位数值有误,请在漏洞反馈区进行报告。


下载233乐园APP
专心推荐好游戏
纠纷处理及不良内容举报电话:
4006600910 (工作时间: 9:00-12:30,14:00-18:00)
北京市朝阳区启阳路4号院2号楼15层1803室
本公司产品适合10周岁以上玩家使用 未成年人家长监护