


战斗与舰船设计:综合指南
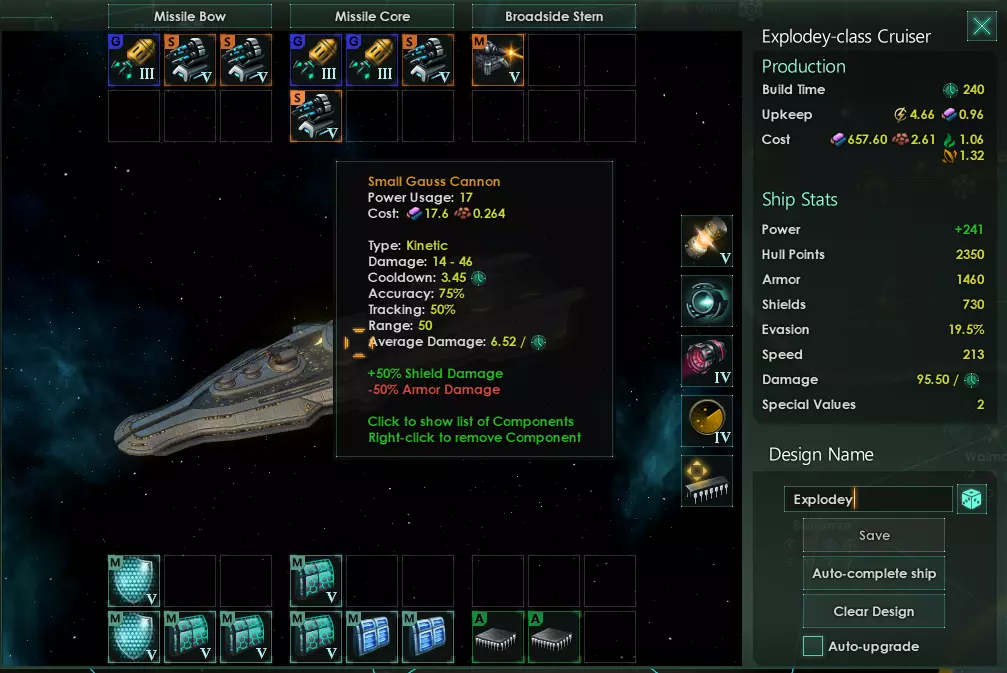
在本指南中,我将详细介绍舰队战斗中武器类型、护盾、装甲、命中率以及其他相关方面的所有知识。你将学习如何设计舰船,以在造成最大伤害的同时将损失降至最低。 简介 我们都曾有过这样的经历:打开舰船设计器,对着一堆数据感到困惑不已(不管你的母星是什么)。于是你直接点击自动填充按钮,建造了一堆这样的舰船就投入了战争。然后你遭遇了敌方舰队。“太好了!”你心想,“他们的舰队战力只有2k,而我的有3k!”于是你发起攻击,结果却被对方彻底击溃。“为什么?”你百思不得其解,“我到底哪里做错了?” 在设计舰船时,你需要关注很多信息:船体?护盾?冷却时间?威力?伤害?追踪?射程?这些都是什么意思?哪些重要,哪些不重要? 你可能觉得这些没那么重要。毕竟,舰船设计有个便捷的自动完成按钮,能差到哪里去呢?当然,大多数时候它确实够用。但如果你想真正精通 warfare,用一支易于管理且经济高效的舰队击败比你强大数倍的敌人,就需要了解 combat 的运作机制。 我会把这一切都告诉你。首先,我会通过一个例子来解释不同属性的含义。我们会向敌方舰船开火,并逐步了解 combat 中的每个环节。 然后,我们会更深入地探讨不同模块和武器类型的工作原理。护盾和装甲有什么区别?何时使用激光,何时使用导弹?这些晦涩的稀有武器类型都是什么? 一旦我们了解了舰船的构成,我们就来谈谈《群星》战斗中最重要却最常被忽视的方面之一:撤退与脱离。在战败时如何将损失降到最低,与在胜利时如何最大化造成的伤亡同样重要。 最后,我们将看一个敌方舰队配置的实际案例,并探讨如何组建自己的舰队来尽可能地对抗它。 属性都是什么意思?! 在本节中,我们将通过一个实际案例来了解所有与战斗相关的不同属性。让我们来看看这款驱逐舰的设计及其武器之一——小型线圈炮。
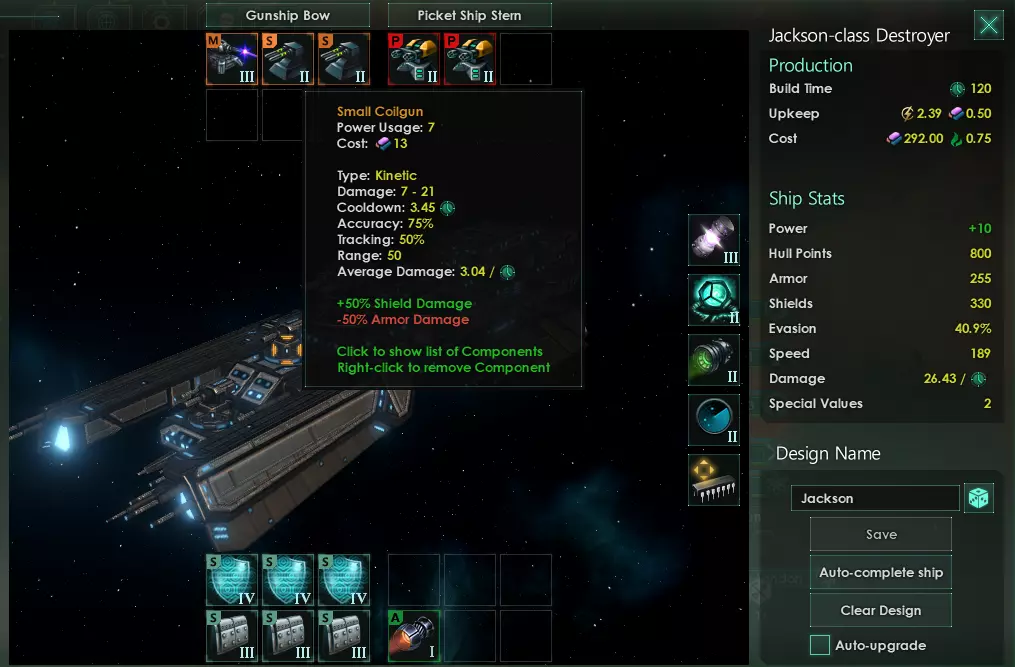
在我们的示例中,一艘采用这种设计的舰船——杰克逊级驱逐舰,将作为我们引以为傲的战力,与这艘敌方轻型护卫舰交战:
: There are a lot of stats to look at here, both ship-wide like Speed, Hull, and Evasion, and stats specific to the weapon like Range and Damage. We will now see how each stat comes into play during combat. Getting in close: Speed and Range Before fighting can begin, our ships first need to find the enemy and get close enough for combat. Speed (also known as Sublight Speed) is the speed your ship will have when travelling through a system. Smaller ships tend to be faster. Having faster ships is always good, as it allows your ships to get in range quicker. Our destroyer has a speed of 189 while the enemy corvette has a speed of 176. So our ship is slightly faster than the enemy's, which is good if the enemy is trying to flee from us, since we'll eventually overtake them. That brings us to Range. Each weapon has a range value. Our highlighted weapon, the Small Coilgun, has a range of 50. This means that unless there's a target within distance 50 of the destroyer, this gun isn't shooting at anything. This is why speed is useful, especially for weapons with low range. It allows you to get close and fire those guns as fast as possible. Aiming and Evading Now we've engaged the enemy corvette and our weapon is in range to fire. Now we're going to see if we actually hit. There are three stats that together form the total Chance To Hit . First and foremost is the enemy's Evasion. This is a measure of how maneuverable the ship is and how well it can react to enemy fire. Smaller ships with good thrusters tend to have good evasion. After all, it's much easier to turn a small fighter than a three-mile long battleship. The enemy corvette has an evasion of 63%. The attacker's counter to evasion is Tracking. Tracking means how good a gun is at predicting where the enemy will move next and adapt accordingly. Our coilgun has a tracking of 50%, and our lvl 2 sensors add another 5%, giving our shot a tracking value of 55%. The tracking value is subtracted from the enemy's evasion to form Effective Evasion. In our example, the enemy has an effective evasion of 63 - 55 = 8%. Finally we have Accuracy. Accuracy describes how good the weapon is at firing at an enemy ship in general. The coilgun has an accuracy of 75%. Now Effective Evasion is subtracted from the accuracy to get the Chance to Hit. So here we get a CtH of 75 - 8 = 67%. This means that there's a 67% chance of the shot connecting and doing damage. You might be wondering what the real difference is between accuracy and tracking. After all, they both increase your eventual chance to hit. Weapons tend to have either fairly good accuracy and low tracking, or medium accuracy and a lot of tracking. The difference in their performance depends on how good the enemy is at evading. If your weapon has accuracy 70 but 0 tracking, and the enemy has 60% evasion (common for corvettes), that means only 10% of your shots are going to land. But if your enemy has 5% evasion (common for battleships) you hit 65% of the time. If, however, you use a weapon with 40% accuracy and 70% tracking, the corvette will have 0% effective evasion (the tracking completely negates the evasion, and even has a bit of overkill), and you'll hit 40% of the time. However, against the battleship you will also hit only 40% of the time. So it very much depends on the enemy ship types how much tracking and accuracy you want. Blowing stuff up: Health, damage, and reloading So we hit our enemy ship! It'll go down now, right? If only it was that simple. The first thing that happens is the Damage Roll. All weapons have a range of possible damage values they can inflict, and the game will randomly pick one within this range. Our coilgun has a range of 7-21, meaning it'll do 7 damage at the least, and 21 damage at most. All values in the range are equally likely to be rolled. Note that over the course of a battle you tend to fire hundreds or thousands of times. Over all these shots damage will average out to the middle of the range (in this case 14), so RNG really doesn't have as much of an impact through damage as it might seem at first. Once the game has rolled for damage, it then needs to inflict that damage. Ships have 3 main stats related to their health. The first and most important stat any ship has is hull. Hull is, simply put, the amount of hitpoints a ship has. A ship is destroyed and removed from the game when its hull level reaches 0. The corvette has 440 hull. The next stats are armor and shields. These are additional health bars. When you design a ship from scratch, it starts with 0 shields and armor, but by adding defensive components you increase this value. The way they work is that any damage you take is subtracted from shields first, and only when all shields are gone, armor will be damaged. Only when armor is gone, hull is damaged. If shields are damaged, they will automatically recharge once out of combat. Hull and armor has to be repaired at a starport. The corvette starts with 170 shields and 65 armor. Weapons have different advantages against the different health types. Our coilgun, for example, does 50% extra damage against shields but 50% less damage against armor. So let's say we get lucky and we roll a 18 on the 7-21 damage roll. If the enemy corvette has 12 shields left at that point, we use 8 of our damage to remove the last of those (with the extra 50% damage) and then the remaining 10 damage is inflicted on armor, which is lowered by 5 (because of the 50% damage reduction to armor). We'll be looking at weapon types in greater detail in the next section, where we see all kinds of different weapons and the way they counter or avoid these defense strategies. The last value we need to look at is Cooldown Time. After a weapon fires, it needs some time to reload and prepare another shot. Our coilgun takes 3.45 days to fire again. A bunch of techs and bonuses in the game improve your Firing Rate. These modifiers lower cooldown time. So getting 100% more firing rate simply halves cooldown. The game helpfully provides an Average Damage per day value, based on cooldown time, damage, and accuracy. Obviously in practice this won't always be the damage you inflict, since that also depends on evasion, tracking, and damage increase/reduction, but it's a good baseline to quickly compare different weapons. Countless ways to kill people: A guide to weaponry In this, we'll be looking at the different components you can put on your ships, and the pros and cons of each of them. Now, I won't be min-maxing here. I'm not going to calculate absolute DPS or maximum damage for every weapon type here, or tell you which one is objectively best. Because first of all, the game might get rebalanced after I write this, so any advice I'd give in that regard might become obsolete. Second of all, I think you, the reader, can very well find that out by yourself, if you're interested. I'm simply trying to teach you the basic ideas of combat and ship design, not tell you what to do in every situation. Sections and Weapons Sizes The first thing you have to do when you start a new ship design is pick Sections for your ships. You get several choices, each with different weapon types and sizes.
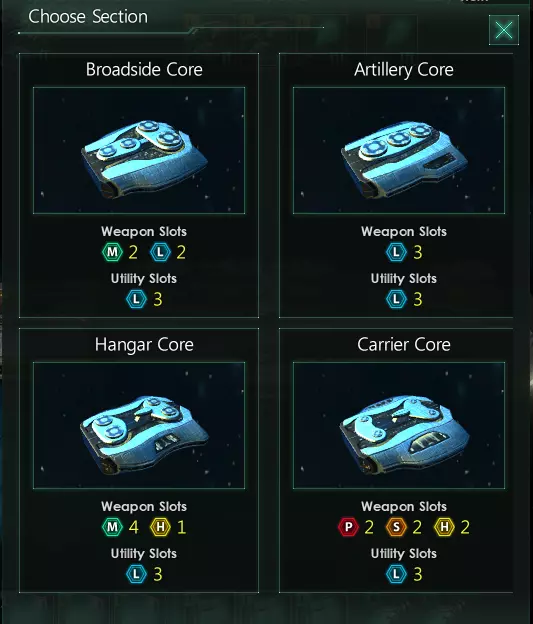
在设计舰船时,你会注意到武器和防御组件(即你放置激光炮和护盾的小方块)分为三种尺寸:小型、中型和大型。通常来说,中型组件的“性能”是小型的两倍,而大型组件的“性能”又是中型的两倍。这里的“性能”具体含义取决于组件类型。例如,中型护盾提供的护盾值是小型护盾的两倍,大型激光炮造成的伤害约为中型激光炮的两倍。虽然存在一些例外情况,但这是基本规律。注意观察(战舰分段的)图片,你可以选择安装三门大型武器,或者两门中型武器加两门大型武器。这两门中型武器的性能大致能与第三门大型武器相平衡。不过,不同尺寸的组件往往各有取舍。大型武器通常拥有更高的伤害和射程,但追踪能力较低。总体而言,大型武器的强度仍高于同等级的小型武器,但在对抗一群高闪避的护卫舰时,你可能需要使用与对抗闪避为0的星堡时不同尺寸的武器。如果你拥有足够多的大型远程武器,尽管护卫舰闪避很高,你或许能在它们进入攻击范围前就对其造成伤害或将其摧毁。 除了按尺寸划分的标准武器外,部分舰体模块还提供一些特殊武器类型:爆破武器(G)、点防御武器(P)和机库(H)。我们稍后会对这些进行说明。 动能武器与能量武器
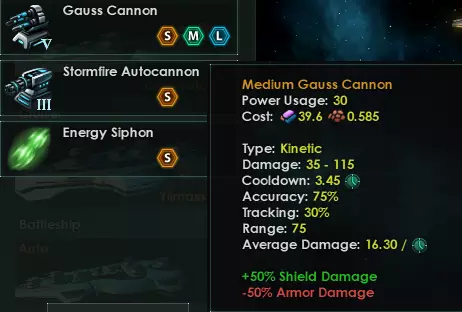
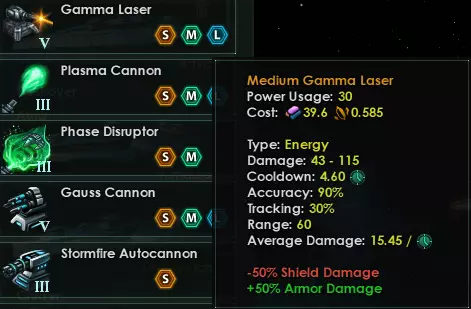
主武器槽位(可装备S、M或L型武器)通常会装备动能武器或能量武器。动能武器会将弹丸加速到极高速度射向敌方舰船,类似《质量效应》中的枪炮。动能武器对护盾效果较好,但对装甲效果较弱。 能量武器则完全相反。它们使用等离子、激光、电力等直接能量来损伤敌方舰船。能量武器对装甲效果较好,但对护盾效果较弱。 总体而言,能量武器和动能武器是你装备配置的核心:你的大部分武器槽位都会装备这两类武器,而关键在于平衡它们的比例。如果敌人有大量护盾,就选择动能武器;如果有大量装甲,就选择能量武器。为了对抗各种敌人,你需要混合搭配不同类型的武器。 注意,射程在这里也很重要。动能武器的射程通常比能量武器更远,并且会优先攻击护盾。因此,在设计舰队时,你或许可以将远程火炮设为动能武器,因为它们会先开火并削弱护盾,此时短程能量武器再近距离接战以摧毁装甲。 点防御、爆炸物与打击 craft 爆炸武器
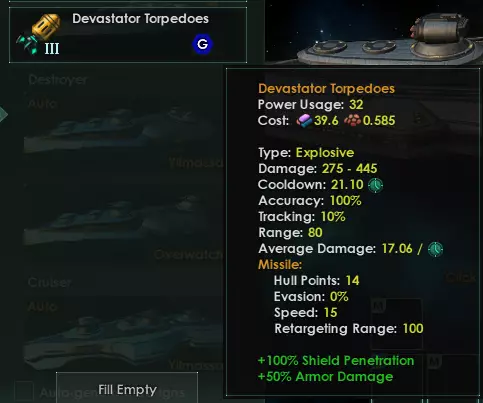
爆炸类武器使用鱼雷和导弹等自推进装置,向敌人投放大型炸弹。如果仅看日均伤害值并将其与动能武器和能量武器进行比较,你会发现爆炸类武器的伤害往往远高于同科技等级的常规武器。此外,爆炸类武器通常具有穿透属性。穿透意味着它会完全无视生命值条,直接对其下方的血条造成伤害。例如,这款爆炸武器拥有100%的护盾穿透,这意味着它能对装甲和船体造成全额伤害,因此无需先摧毁护盾就能消灭敌人。 那么看到这些数据,你可能会想,为什么不尽可能在飞船上装载鱼雷呢?它们肯定是胜利的关键,对吧?确实,爆炸物有造成巨大伤害的潜力,但它们也存在一些主要缺点。首先,与动能武器或能量武器不同,后者在开火瞬间就能命中目标,而爆炸物需要时间飞行到目标处。这段时间取决于导弹的速度。你会在上面的图片中注意到,导弹有其独立的属性。这会导致你造成伤害的延迟,而在这段时间里,常规武器可能已经在摧毁敌方舰船了。 你还会看到另一个属性——重新锁定范围。爆炸物会瞄准特定目标(通常是第一个进入射程的目标)。如果该目标在爆炸物抵达前被摧毁,它将尝试重新锁定目标。如果在其重新锁定范围内存在另一艘敌方舰船,它将尝试攻击该目标。通常重新锁定范围足够覆盖整个敌方舰队,但例如,若敌人分为近战护卫舰和远程战列舰,摧毁最后一艘护卫舰可能意味着战列舰超出重新锁定范围,这会导致所有仍在飞行的导弹因没有新目标而在造成伤害前自毁。 但最大的缺点是,由于……近程防御系统(Point-Defense),爆炸物可能完全无法造成伤害。
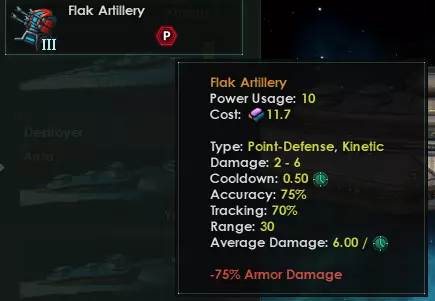
点防御(PD)模块是专门设计用于击落小型快速移动目标的微型高射炮或激光炮。与其他武器不同,它们可以击落向你袭来的爆炸物,防止其造成伤害。点防御会优先攻击其(较小)射程内的任何爆炸物,造成的伤害遵循与攻击常规舰船相同的规则。如果舰队配备了足够的点防御,几乎可以拦截所有敌方爆炸物,使其失效。 不过需要注意的是,使用点防御意味着要牺牲常规武器槽位,这意味着你对敌方舰船造成的伤害将不如不装备点防御时高。点防御的最大射程仅为30。我们将在战斗电脑部分详细探讨不同射程,但目前只需知道,只有护卫舰和驱逐舰会希望保持如此近的距离。因此,如果你在护卫舰上安装了点防御(PD),且该护卫舰与敌方舰船的距离在30以内,点防御系统就会攻击敌方舰船,造成可观伤害。然而,如果你在巡洋舰上安装点防御,而巡洋舰会保持在50距离外,那么只有当敌人主动靠近你时(例如一群护卫舰冲过来),点防御才能发挥作用。 当你考虑为舰船配备爆炸武器时,要注意爆炸武器通常是一种“要么大获全胜,要么一败涂地”的策略。爆炸武器只有在你能压制敌方反制措施时才有效。如果你发射的数量太少,敌人可以轻松拦截,那么这些爆炸武器将完全无法造成伤害。但如果你能压制住敌人,每多发射一枚鱼雷几乎都能确保命中。爆炸物是歼灭敌人的绝佳手段,但前提是你要全力投入。 strike craft
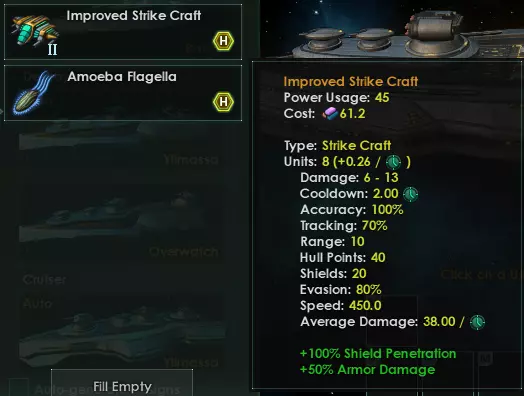
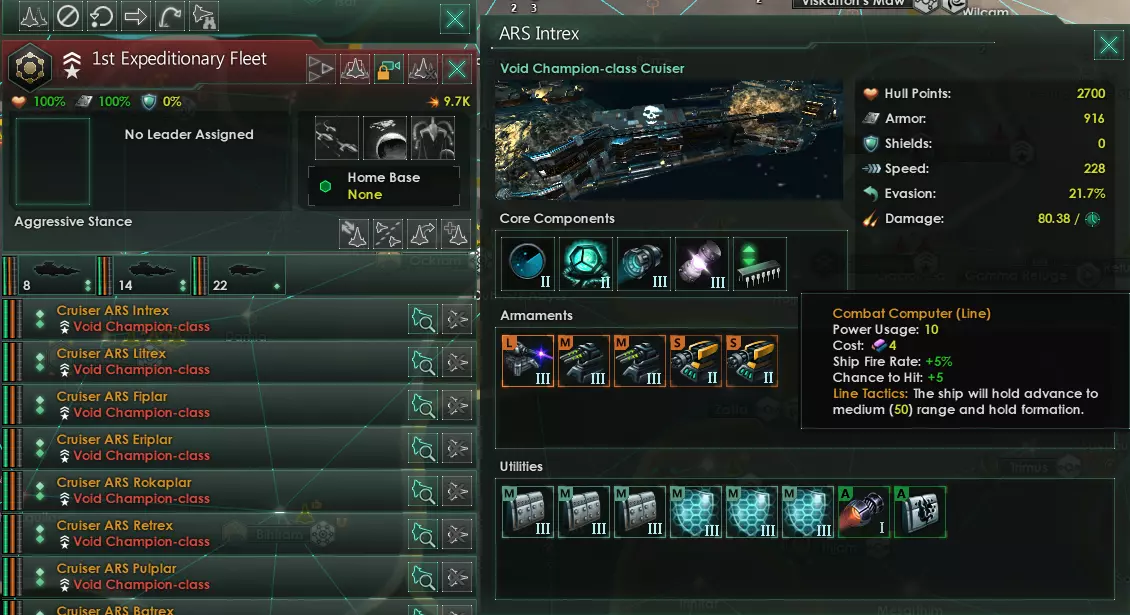
Finally there's Hangars providing Strike Craft. Strike craft are small spacecraft launched from the bigger ships. Think TIE-Fighters from Star Wars. Strike craft act as a combination of explosives and PD, existing as separate entities that can attack explosives, other strike craft, and enemy ships, but who can also be targeted by PD. Strike craft don't just fly into the enemy ship and go BOOM like explosives, however. They stick around, acting as additional ships providing continuous fire. A hangar launches a set number of strike craft (in this case 8). If a ship's strike craft get shot down, it will launch more every now and then (about once every 4 days for this one) until it has reached the max again. This means that, if the enemy cannot shoot down strike craft, they will all get in close and whittle down their targets with a lot more damage than other weapons do. Like explosives, they are hard-countered by PD or an overwhelming amount of enemy strike craft. Although strike-craft have the potential to inflict more damage than explosives, they do so over a longer period of time, while explosives inflict a lot of damage instantly if they get through. So if your enemy has a strong defense array, your strike craft will be shot down before they can fire that much. For defensive purposes, smaller ships tend to have PD, while only bigger ships (cruiser and up) can have hangars. This effectively gives you two choices to protect yourself against enemy explosives and strike craft: one is to use a picket line of PD-carrying small ships (usually destroyers) to intercept them. The other is to have carrier cruisers or battleships that launch strike craft to engage enemy small movers. Both options can also do damage to enemy ships, either through direct short-range fire from the PD modules, or from your strike craft engaging the enemy ships directly. Which choice is best depends on your preferred playstyle and enemy fleet composition. One other thing to note here is that there are two different types of Point-Defense: One is Flak, the other is also called Point-Defense, but I like to call them PD lasers. They function mostly the same way, with the only major difference being that PD lasers do more raw damage, but flak has good tracking. This makes flak a lot better at fighting strike craft, who have good evasion, while PD lasers are a little better at fighting explosives that have no evasion. If you want to use strike craft offensively, the same point applies as to explosives: Go big or go home. Adding just a couple of hangars to an otherwise regular-weapon-focused fleet isn't really gonna do extra damage to most enemy fleets. Either play it safe and go for a regular weapons build that can't be intercepted, or overwhelm the enemy with more strike craft and torpedoes than they can handle. There's no real middle road here, especially if you want to use the Carrier type combat computer, which puts the carrier at a range where no regular weapon can hit the enemy. The non-shooting parts of your ship As much as you might hate it, not every single part of your ship is a weapon. There are three other categories of components: Defensive components, support, and essentials. We'll start with the essential components. These are located on the right-hand side of the ship designer. These are your ship's most basic functions: Generating power, movement, and sensors. Unlike with weapons there's not much choice in which type of component to pick: if you unlock a better version it's almost always better to update to that newer version. ReactorFirst and foremost we have the Reactor. This is what generates your ship's Power. Nearly all modules, from weapons to shields to other essentials, cost power to operate, and this reactor provides it. Your ship design must have positive power, or you can't build it. Higher level components cost more power, so as you research better weapons and shields you have to improve your reactor as well to keep up. Excess power is not entirely wasted: for every 10% of power generated by the reactor that is not used, you get a 1% improvement in fire rate, evasion, and sublight speed. So if your reactor generates 1500 power and you only use 1200, you get a 2% improvement in those stats. In practice using older modules to save power is never worth it. Such small bonuses mean nothing in battle compared to the strength you get from putting that power to use with better shields and weapons. HyperdriveThe hyperdrive is what allows your ship to travel along the hyperlane network at FTL speeds. Improving it doesn't help in combat at all, but it allows your fleets to move around the galaxy quicker, as with each upgrade it takes less time to charge a jump. Eventually you can research the dangerous tech Jump Drive, which replaces the hyperdrive. In addition to the old hyperlane travelling it allows you to jump to any system in a set radius almost instantly, giving a major strategic advantage. However, note that using a jump drive will halve your sublight speed and firing rate for the next 200 days, making the fleet much weaker and much less capable of avoiding enemies. ThrustersThrusters are the main engines on your ship. Better thrusters improve both sublight speed and evasion. Like the hyperdrive, thrusters allow your fleets to move around the galaxy quicker, as they can travel through systems to other hyperlane entry points much faster. In combat they are particularly good for small ships, both improving their evasion and allowing them to close in on the enemy faster. When you have a corvette with a maximum range of 30 on its weapons, you want it next to the enemy battleships ASAP, and thrusters help a lot with that. SensorsSensors serve two purposes: They allow you to sense fleets that are several systems away, making it easier to prepare for an enemy attack or chase down a fleet trying to hide from you. Note that having just one ship in a system with good sensors gives you just as much sensor range as having an entire fleet, so if you're low on power getting worse sensors on some ships can give you that extra 5 power you need to break even without losing any sensor range. The second purpose of sensors is that they give a flat tracking bonus to any weapon you use. This is particularly useful for big ships using large weapons, as those tend to have bad tracking. Combat Computer and influence on ranged combatThe final essential module is the Combat Computer. This is the one essential part where there is a meaningful choice between different options. Depending on your combat computer, your ship will use different tactics and stay at different ranges. Each tactic also gives a small bonus to firing rate and one other stat.
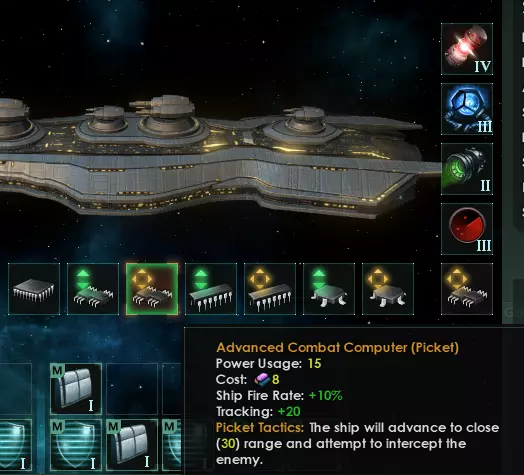
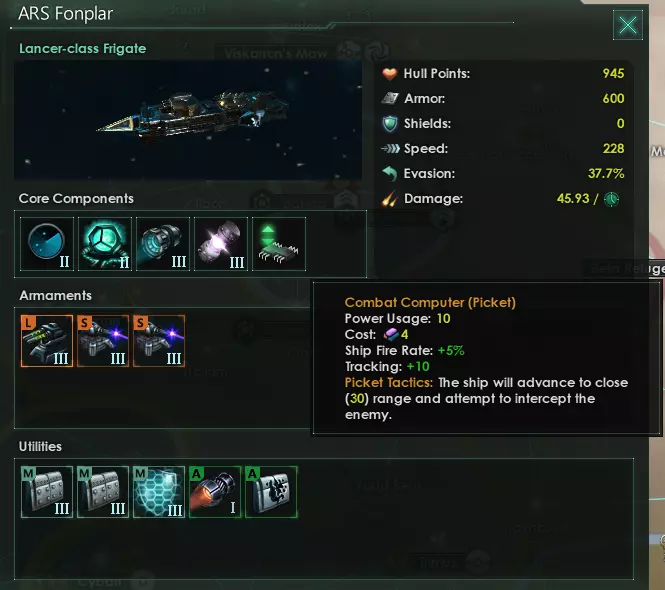
共有5种不同战术:集群、警戒、阵线、火炮和航母。你应当始终选择所有武器都能进入射程的战术。如果将驱逐舰设为射程50的“阵线”战术,而该驱逐舰配备了射程30的激光,那么除非敌方护卫舰自行靠近,否则激光将无法开火。不过,除非使用集群战术,否则你通常希望保持尽可能远的距离,因为这能让你有更多时间拦截敌人以及飞向你的爆炸物。 集群是护卫舰的默认战术。它会迫使护卫舰尽可能靠近敌人,并在近距离开火。如果你的护卫舰配备了爆炸武器,这种情况会特别有利,因为爆炸武器无需飞行太远就能抵达敌人,从而被点防御系统拦截的几率更低。“蜂群”战术能提供闪避加成。 “警戒”是下一种战术,它会迫使舰船逼近至30距离并拦截敌人。这通常是驱逐舰的理想姿态,因为驱逐舰的小型和中型武器往往射程较短。“警戒”战术能让舰船成为出色的“炮灰”。敌人必须突破你的前线,才能攻击后方的火炮。 “战线”是驱逐舰或巡洋舰等中型舰船相当标准的战术。它会使舰船保持在50距离并从该位置开火。“战线”战术能提升命中率,使其在攻击任何敌人时都十分有用。不确定时,“横列”通常是个不错的战术。 接下来是“火炮”。它能提升武器射程,对于战列舰和泰坦这类移动缓慢的远程舰船而言,有助于尽早开火。火炮的射程为80,因此使用前需确保所有武器都达到该射程。 最后是“航母”。航母将射程设定在极远的150,远超任何常规武器的射程。这专门适用于完全专注于舰载机的舰船,无论是用于防御敌方鱼雷和舰载机,还是代替常规武器对敌方舰船进行攻击。航母能增加舰船的交战范围,使其更容易开启战斗,并尽早派出舰载机。防御组件 正如你需要模块进行攻击一样,你也需要模块来进行防御。防御组件用于为你的飞船增加护盾和装甲,通过一些回收的科技,甚至还能增加更多船体强度。
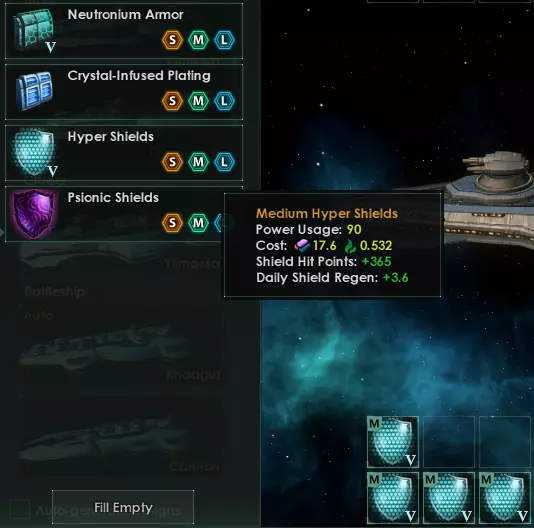
在前几节中,我们已经讨论了护盾、装甲和船体生命值之间的区别,因此这里就不再赘述。动能武器对护盾效果较好,能量武器对装甲效果较好,还有一些武器可以穿透其中一种或两种防御。 不过需要注意的是,护盾需要能量供应,而装甲和船体则不需要。通常情况下,同等级的护盾模块比装甲模块能提供更多的总生命值,但需要消耗能量。设计舰船的一个好方法是:首先选择武器、必要设备和辅助模块,最后添加护盾直至能量耗尽。此时,用装甲或船体填充剩余空间,这样可以获得最高的总体生命值。 辅助模块 最后是舰船设计界面右下角的辅助模块。支援模块通常会小幅提升某一项属性:例如反应堆增强器可提供额外动力,辅助火控系统能提高命中率,护盾电容器能增强护盾效果,而推进器则能提升速度和闪避率。此外,还有一些隐藏科技,若能找到它们,就能获得秘密支援模块。
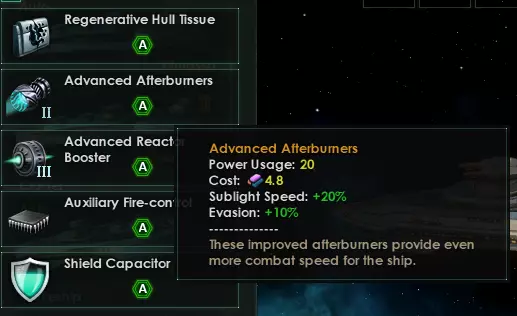
哪个支援模块最佳很大程度上取决于你的舰船和策略,但我通常会说辅助火控系统(auxiliary fire control)是不会出错的选择。命中率(CtH)总是好的。加力燃烧室(Afterburners)也很有用,其提供的速度和闪避加成效果显著,尤其对于舰队中速度较慢的舰船,如战列舰和泰坦舰。 为了来日再战:脱离战斗与紧急超光速(Emergency FTL) 你不可能赢得所有战斗。即使你的舰队比敌方强大,舰船仍会受到损伤,而且即便是最伟大的舰队统帅也可能遭遇霉运或被敌人以数量压制。即便从名义上看你正在赢得战斗,适时撤退并在更有利的条件下继续战斗也可能是明智之举。与撤退相关的有两大机制:一是脱离战斗,这是单舰在不受你控制的情况下自行进行的操作;二是紧急超光速(Emergency FTL),即由你作为玩家下令舰队立即撤离。脱离战斗
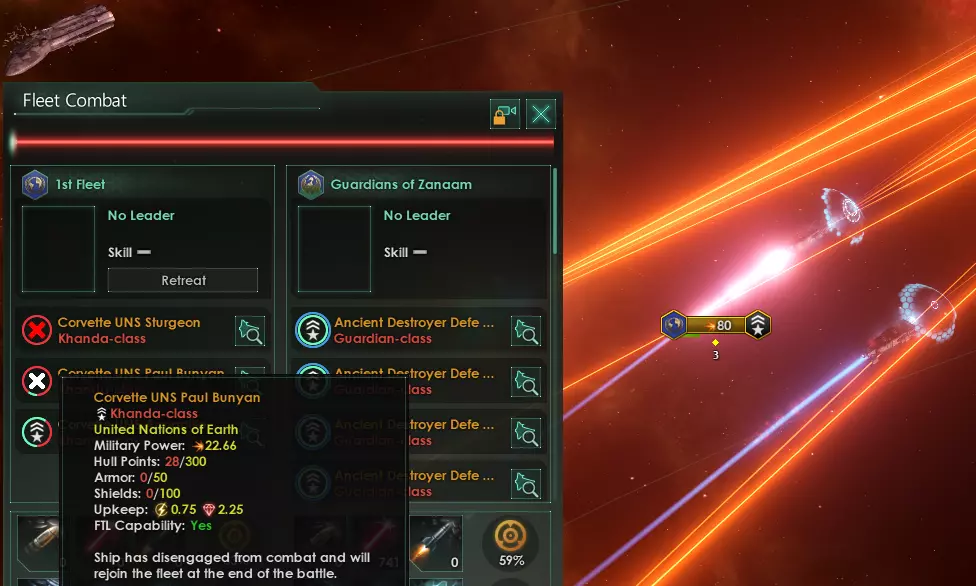
当舰船受损并试图自行逃离战斗时,便会发生脱离。当舰船的船体生命值已低于50%,且再次受到船体伤害时,就会尝试脱离。脱离是否成功取决于脱离几率。游戏并未明确显示具体数值,但我们知道它取决于多个因素:首先且最重要的是此次攻击造成的伤害。攻击越猛烈,脱离几率就越高,这可能是模拟当舰船一半被炸烂时,船员远比只是遭受轻微擦伤时更急于逃离的情况。 舰船类型也会产生影响:驱逐舰和巡洋舰的脱离几率最高,其次是泰坦和战列舰。护卫舰的脱离几率最低。一种解释是,大型舰船拥有更多空间来容纳反应堆和超光速引擎,从而能立即进入亚空间;而像泰坦这样的巨型舰船,相比小型驱逐舰,更难找到安全的撤离路径。 最后,有几种方法可以提高舰船的生存几率。部分海军上将拥有“谨慎”等特质,能够提升脱离几率,“打了就跑”的战争学说也有此效果。同时,诸如“通讯干扰器”之类的星港模块、在黑洞星系作战,或是泰坦的“亚空间陷阱”,都能降低敌方舰船的脱离几率。 舰船成功脱离后将不再参与战斗,而是在亚空间中待命,待战斗结束(无论胜负)后重新加入舰队。请注意,脱离战斗的前提是你的舰船在 hull 值低于 50% 时承受一次直接命中后仍能幸存。这意味着当面临毁灭性伤害时(在对抗爆炸武器时极为常见),舰船的 hull 值可能会从 60% 直接降至 0,根本没有脱离的机会。这也是为什么提升 hull 值的科技尤为有用,因为即使在战斗中失利,它们也能提高舰船幸存逃脱的概率。 永远记住:维修是免费的,替换则需要消耗大量合金。你应该始终致力于最大化己方的脱离概率,同时最小化敌方的脱离概率。 紧急超光速(Emergency FTL) “优秀士兵的一个标志是,要么按自己的条件战斗,要么干脆不战斗。”“兵者,诡道也。”——孙子 当你在战斗中处于劣势,舰船不断爆炸或四散撤离时,鸣金收兵往往是保存剩余舰队的良策。这正是紧急超光速(Emergency FTL)的用武之地:一种危险的机动方式,即便舰队仍处于星系引力井内,也会尝试跳跃撤离。 在战斗进行30天后,任意一方均可点击“紧急超光速”按钮,将己方舰船立即撤离。此操作会产生以下效果: 所有当前正在战斗的舰船(即尚未成功撤离的舰船)将受到20%的船体损伤。 撤退时船体已低于20%的舰船有50%的概率被摧毁。若未被摧毁,它们将以1点船体值脱出。每艘舰船,无论其生命值如何,在撤离过程中都有1%的概率被摧毁。舰队将失踪数月,具体时长取决于战斗地点与友方空域的距离。由于处于亚空间,在此期间舰队不会在银河地图上“存在”,这使其能免受敌方攻击,但也无法对抗入侵者。所有已脱离战斗的舰船将在亚空间与舰队会合。请注意,若舰队中所有舰船均已脱离战斗或被摧毁,脱离战斗的舰船也会执行相同的失踪流程。这听起来确实很糟糕,对吧?所有舰船都会受损,部分可能被摧毁,并且会有数月无法行动,之后还需要进行维修!没错,这并非一个可以轻率采取的行动。这和《欧陆风云4》中的撤退不同,后者只会损失士气。但在很多情况下,这么做仍然是值得的。 最明显的情况就是战败。当战局对你不利时,仍在战斗的舰船会受到越来越多的伤害,同时造成的伤害却越来越少,这会降低它们通过脱离战斗幸存下来的几率。很少有必要战斗到最后一人。就像我之前说的,维修是免费的,替换却很昂贵。 不过,紧急超光速航行(Emergency FTL)也值得用来避免陷入惨胜的局面。想想我最近经历的这场战斗:
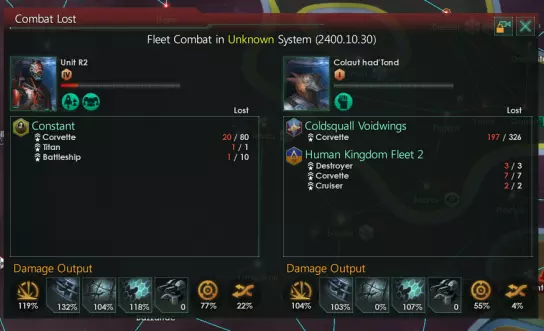
我的舰队在左边,敌人在右边。我只损失了20艘护卫舰、1艘战列舰和我的泰坦,而敌人的伤亡要惨重得多!但这场战斗还是“输了”。我按下了紧急超光速按钮。我为什么要这么做? 简单来说,战斗时只看舰队下方的数字并不能告诉你战斗的全部情况。当然,我的舰队还有60艘护卫舰,但当我查看战斗界面时,其中近40艘已经脱离战斗。战列舰也是如此:剩余的9艘中有5艘已经成功脱离。我当时采用的是“打带跑”作战 doctrine,而且我的舰队司令拥有“诡诈者”特质,极大地提高了我的脱离几率。所以实际上,我当时仅用20艘护卫舰和4艘战列舰作战,其中很多都已严重受损,而敌方有100多艘护卫舰,还有更多援军正在赶来。与此同时,敌方舰队有足足4艘护卫舰成功撤离,而被摧毁的则接近200艘。 因此,尽管从那个屏幕上看,我摧毁的舰船数量似乎是我损失的10倍,但实际上比例更接近3:1。我的舰船只是更擅长撤离而已。 我本可以赢得那场战斗,或者至少摧毁更多的舰船吗?我认为我可以。我的舰船在技术上更具优势,即便在数量上处于劣势。 但当我暂停游戏,考虑下一步行动时,我问自己,这里是否是摧毁那些剩余舰船的最佳地点。我并不着急:我们当时在中立空间作战,距离我的任何星球都相当遥远,而且敌方舰队很可能也需要修理和重整。 于是我选择撤退,在紧急超光速(Emergency FTL)过程中又损失了一艘护卫舰,但保住了其他所有舰船。所有脱离战斗的舰船重新归队,不到三个月,60艘护卫舰和9艘战列舰便返回一座星堡进行维修。 与此同时,敌人的舰船损失是我的十倍。那场战斗虽然游戏判定我战败,但实际上为我赢得了整场战争。我能廉价且快速地补充损失的少数舰船,而敌人却再也没能恢复元气。当我再次遭遇那支舰队时,我的舰队已全面修复,轻松击溃了他们的残部。 永远不要低估紧急超光速(Emergency FTL)的价值。即便是在你正占据优势的战斗中,也应始终考虑是否值得撤退,以便在更有利的条件下再战。或许你的舰队司令在战斗中阵亡了,或者你发现敌方援军正在赶来。也可能友方另一支舰队即将前来接手战斗。尽管存在风险,但紧急超光速(Emergency FTL)能挽救你绝大多数的舰船,让它们安全返航(即便可能受损)。它总是比脱离战斗更可靠,而且敌人对此几乎无能为力。
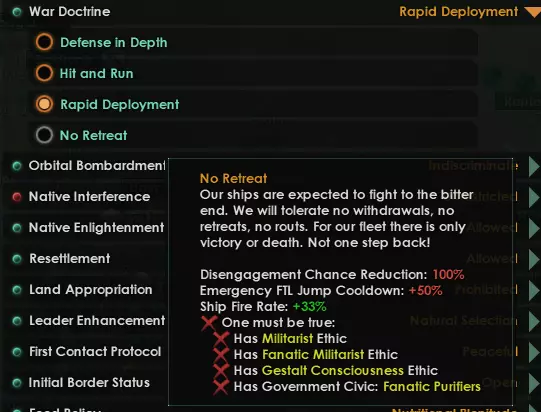
这里需要额外考虑的是“绝不撤退”战争学说。“绝不撤退”仅适用于军国主义和格式塔帝国,它能使你的舰船射速大幅提升33%,这非常强大,可能是游戏中最强的增益效果,而且是叠加在军国主义者和种族灭绝者已有的高额加成之上。当然,它也有一个巨大的缺点:你将完全无法脱离战斗,这意味着任何被摧毁的舰船都将彻底损失。你的紧急超光速(Emergency FTL)充能时间也会大幅延长,使其可靠性和实用性大打折扣。 这是否值得取决于你的游戏风格。如果你依赖一场大型战役来击败敌人(例如在终局危机中很常见),那么这通常是值得的。额外的射速可以将许多险败转化为辉煌的胜利。但这些胜利仍会让你方付出原本可以避免的更多伤亡。 运用所有这些知识:一个实际案例 我刚刚告诉了你大量信息。如果你仍然觉得有些困惑,并且难以判断如何在自己的游戏进程中应用这些知识,这是完全正常的。所以,让我们以一个实际案例来结束。我们将分析一支敌方舰队,并设计我们自己的舰船来尽可能地对抗它。 在这个案例中,我们要击败的是这支掠夺者舰队,它由巡洋舰、驱逐舰(被称为护卫舰)和护卫舰(被称为突袭舰)混合组成。
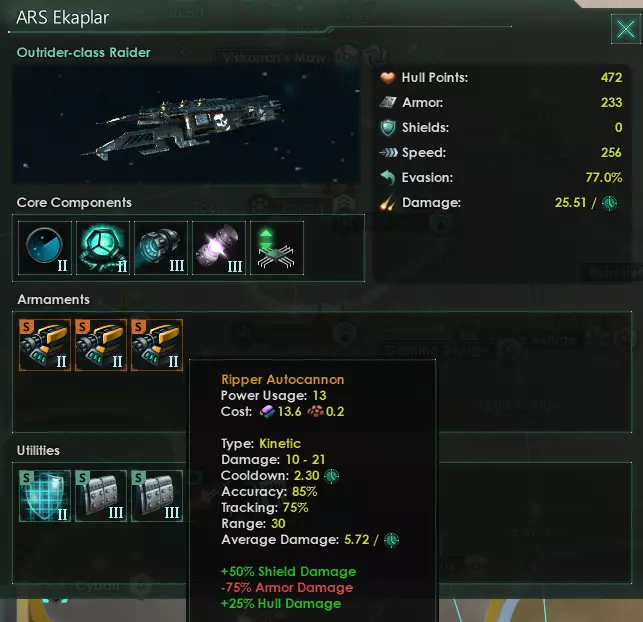
查看这些设计方案,有几点立刻引起了注意:首先,它们使用的动能武器远多于能量武器。只有护卫舰的激光武器比火炮略多一些,其他舰船则大量使用动能武器。这意味着我们应该专注于装甲而非护盾。 其次:敌人只使用常规武器,没有爆炸物或机库。这意味着我们的舰队不需要近防炮来进行自我防御。 补充一点,敌人自身也没有近防炮。这意味着我们可以使用爆炸物和攻击机来造成毁灭性的效果。 敌人拥有相当比例的护盾和装甲(右上角的数据显示护盾为0,这是一个显示错误),不过小型舰船更倾向于装甲。这意味着我们的舰船也应倾向于使用能量武器,尤其是那些专注于击落小型飞行器的武器。 敌方突袭舰拥有77%的高闪避率,驱逐舰为37%,巡洋舰则是21%。这些都是相当高的闪避数值,因此我们需要通过追踪来进行弥补(不过也要注意避免过度追求追踪性能)。 有个小细节需要注意:敌方巡洋舰的战斗电脑设定射程为50,但其部分武器,如撕裂者自动加农炮,射程仅为30。因此,除非我方舰船进入其射程范围内,否则这些敌方舰船不会动用全部武器。 基于以上分析,让我们来设计我们自己的舰船吧! 护卫舰
这艘轻型护卫舰配备了导弹模块,使其拥有那些掠夺者无法抵挡的强力鱼雷。至于小型武器,我实际上选择了干扰器,尽管它的平均伤害相对较低:干扰器和鱼雷一样具有穿透力,这意味着它能对船体造成直接伤害。这与爆炸物配合得很好。如果我们改用动能武器,它只会攻击鱼雷已经穿透的护盾,造成无关紧要的伤害。 防御方面则完全依靠装甲,以对抗敌人偏重动能武器的配置。这还有一个额外好处,就是节省了原本用于护盾的大量能量,通过“过剩能量”特性为我们提供了少量(3%)的闪避、速度和射速加成。虽然不多,但有总比没有好。战斗电脑已设置为“集群”模式,这能让护卫舰抵近作战,确保鱼雷以最快速度命中目标,同时还能提升其闪避能力。支援模块配备了辅助控制单元(ACU),可提高命中率。由于鱼雷的追踪性能相对较低,ACU将有助于打击那些快速移动的敌方突袭舰。驱逐舰
驱逐舰实际上不能搭载任何爆炸物或机库,因此它们对这类舰队不是很有用。如果非要我设计一艘的话,我会这样设计:大量使用干扰器来支援舰队中其他使用爆炸物的舰船,但说实话,在这种情况下我根本不会建造驱逐舰。注意,护卫舰的日均伤害几乎相同,建造成本却低了近一半,而且闪避率也更高。 巡洋舰
对于巡洋舰,我们可以选择使用高爆武器或舰载机。在这种情况下,我选择了高爆武器,主要是因为机库模块本身通常自带近防炮,而面对这支舰队,我们并不需要近防炮。 至于常规武器,尽管我之前提到能量武器对付敌方装甲效果更好,但实际上我主要选用了动能武器。原因是作战电脑设置为“战线”模式,射程为50。小型能量武器的射程为40,因此它们实际上无法开火。不如使用射程50的动能武器,至少能造成一些伤害。需要注意的是,中型模块确实配备了一门激光炮,因为它拥有参与战斗所需的额外射程。防御方面,我选择了一些护盾,主要是为了承受部分伤害,这样就不用在造船厂进行维修了。我还加装了几个船体模块,以增加最大船体值,从而在必要时提高成功脱离战斗的几率。除此之外,依旧以装甲为主。辅助方面,我们再次配备了ACU(先进火控单元),以提高鱼雷的命中率。 战列舰
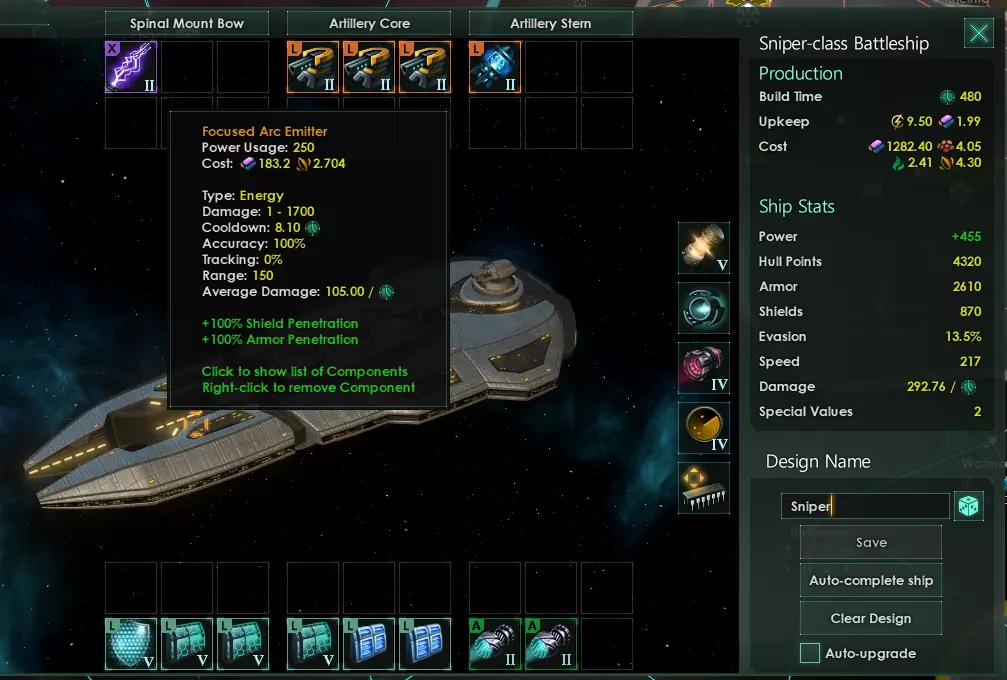
最后,关于战列舰,我本可以选择搭载 strike craft(舰载机),但我还是放弃了,因为它们会配备小型武器模块和点防御系统,而像这样的远程舰船根本不需要这些。和驱逐舰一样,它并非对抗掠夺者的最佳舰型,但这是我在当前情况下能设计出的最佳方案。它被设定为火炮姿态,射程80。要达到这个射程,我们需要全身配备大型或X型武器。 火炮武器混合了动能武器和火炮,主要设计用于在战斗初期摧毁敌方护盾,然后造成尽可能多的伤害。X型武器是电弧发射器。和干扰器一样,它能穿透所有装甲和护盾,直接对船体造成巨大伤害。由于这种尺寸的武器已具备极高的精准度,所以战列舰无需ACU支援模块。将精准度从100%提升至105%,除了对抗高闪避的护卫舰外意义不大,而且大型(L)或超大型(X)武器本来就对护卫舰效果不佳。相反,它配备了加力燃烧室以获得额外速度,从而能跟上舰队的其他舰船。 舰队方面,以上就是我们的设计方案。我们该选用哪些舰船,以及各占多少比例呢?在这种情况下,我肯定不会使用驱逐舰,战列舰也可能不会用太多。取而代之的是,护卫舰与巡洋舰的混编舰队将凭借鱼雷和干扰器火力压制掠夺者,同时凭借出色的闪避能力、较高的脱离战斗概率以及厚重的装甲来应对敌方的动能武器。几艘战列舰或许能在敌方舰船进入射程前就将其摧毁,但它们不会造成主要的船体伤害。 结论 以上就是我关于舰船和 naval combat 的全部介绍了!还有一些话题我没有深入探讨,比如运兵船、泰坦光环、巨像、星港和海军上将,但我认为凭借你现在掌握的知识,完全有能力自己弄明白这些内容。 希望这些能帮助你更好地保卫自己的帝国,如果你有此意愿,也可以将自己的意志强加于银河系的其他势力。 一路顺风, admiral,记住:在太空中,没人能听到你的敌人尖叫。
2026-02-11 10:31:07 发布在  群星
群星


说点好听的...
收藏
0
0