换一换
换一换 


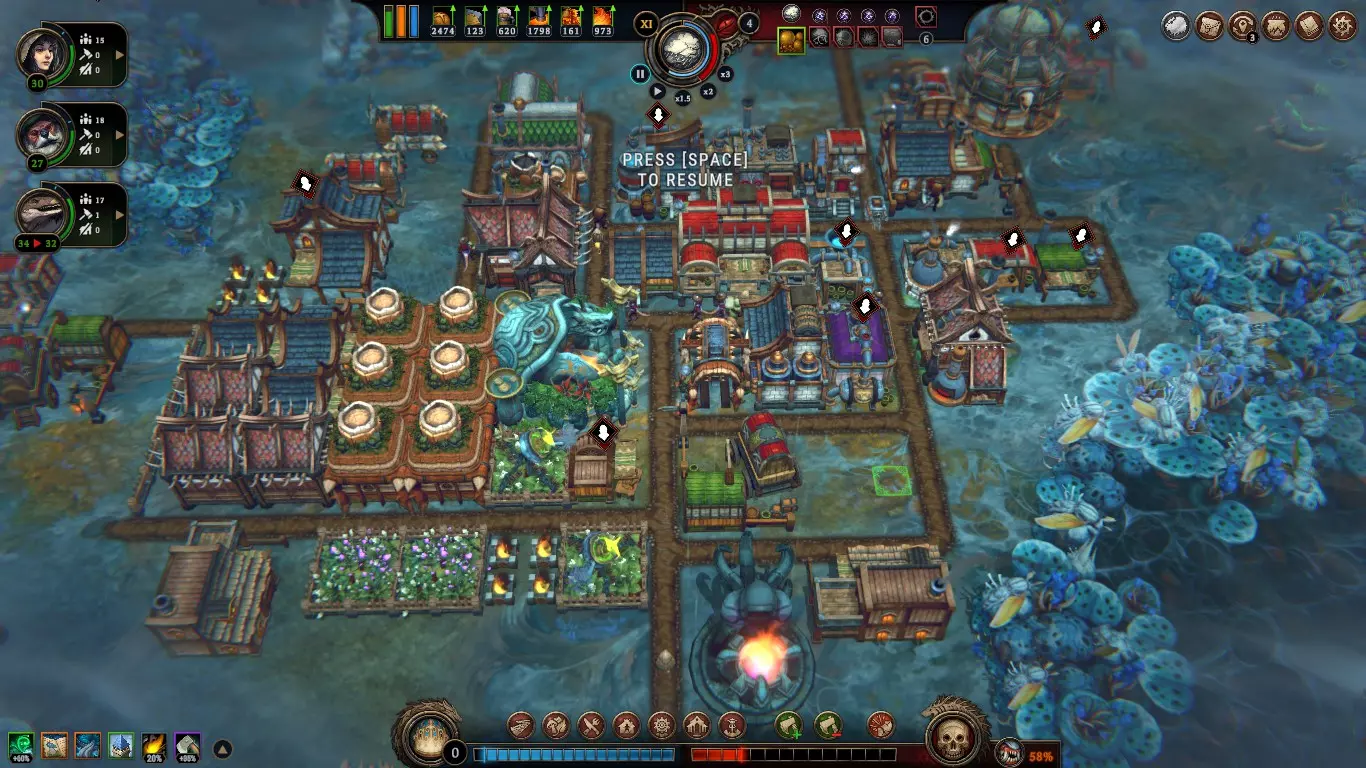
蓝图建筑布局指南(适用于住宅、工业乃至服务设施)。本指南旨在确保你的工人多干活、少走路。 如何判断自己的游戏效率? 游戏为你完成定居点提供了相当宽裕的时间限制。在10年内,你每年都能获得一个免费的【基石】。我们姑且假设10年为时间限制。 在《声望1》游戏中,你需要积累18点声望才能获胜。 通常,玩家的通关时间大致如下: 速通玩家/完全升级烬城玩家:5年 封印速冲玩家/资深玩家:6-8年 哦糟了,我忘了在商人那里买东西的玩家/运气差的玩家:8-10年 普通玩家:9-12年 城市建造爱好者:8年-无限年 7年是一个不错的时间限制,即使是在“精金封印”目标中,你面临诸多障碍,仍能获得105个封印碎片(不过前提是你选择了高风险的世界修正器)。 但要注意,你完成定居点建设的时间越长,市民就越容易离开城镇,因为在这款游戏中,你获得的资源并非无限。而且在更高声望等级的游戏中,尤其是在世界地图修正值不佳的情况下,要在6-8年内完成游戏并非易事。 所以请慢慢游玩,不要急于挑战更高难度,尤其是当你的【余烬之城】升级程度较低时。 (另外,我制作本指南图片时只是在悠闲地玩游戏,并没有打算快速通关,所以请不要对我过于苛刻。: )) 基础初始布局 此布局仅为帮助你直观了解道路和建筑的摆放位置,因为所有 hearth 的生成位置都是随机的。 * 为了方便你放置建筑,建议先修建道路/路径,这样建筑就能顺利放置了。

如果你遇到这种布局,那恭喜你获得了大奖(前提是没有被小空地破坏)
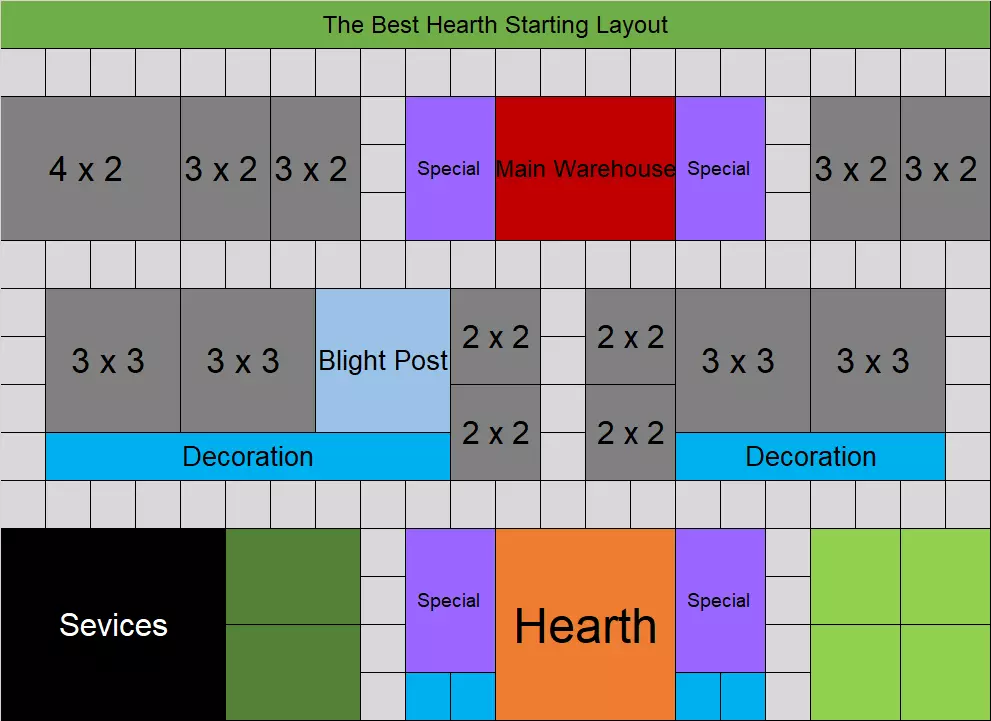
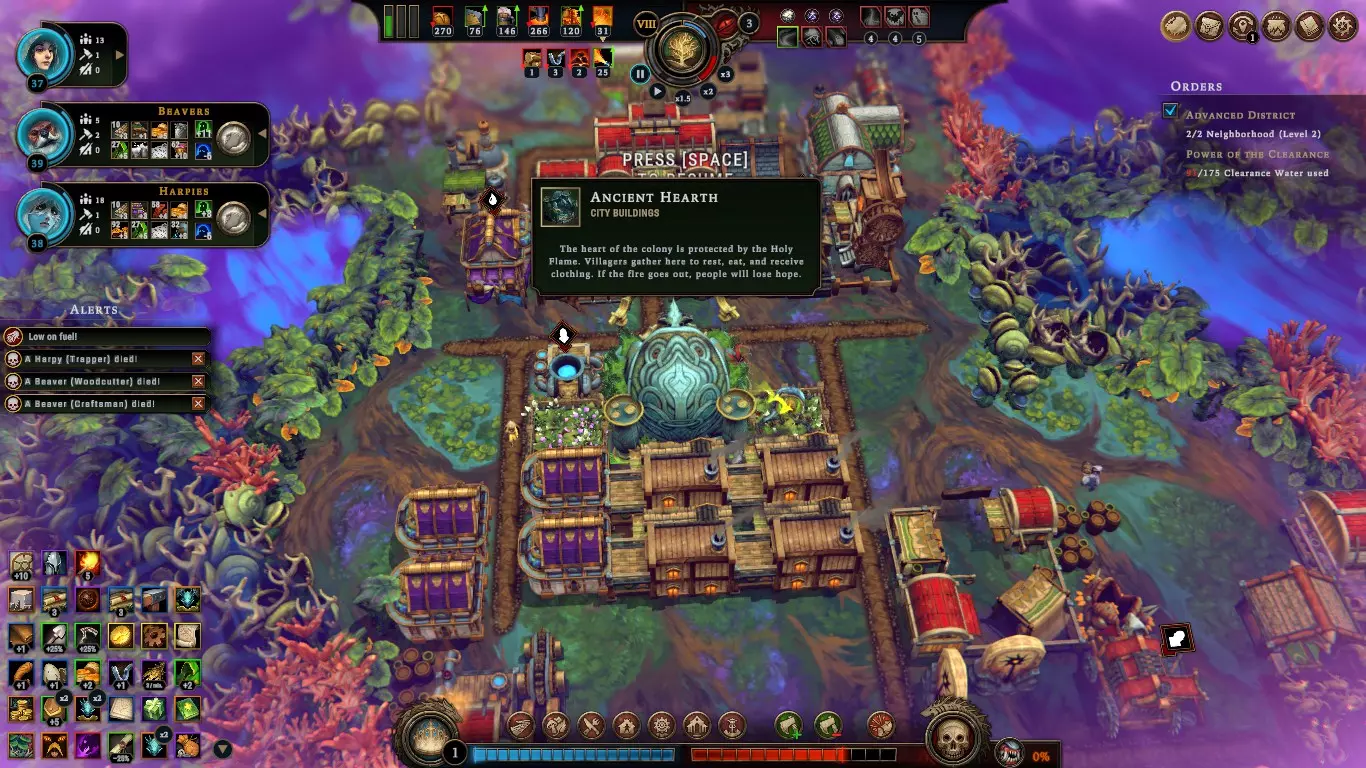
布局规则:此布局专为快速从声望1提升至20而优化,但在总督及更低难度下同样适用(注意部分林间空地的位置可能会阻碍布局,尤其是小型空地,但只要按照我的布局指南进行扩建,仍然是可行的)。 此布局适用于从1级初始 hearth 到3级区域,包括: - 20-24人口(25-50人口需要第二个hearth) - 1个服务建筑 - 16点舒适度、8点美观度和4点和谐度的装饰 - 12-16个种族住房 - 1-2个枯萎哨站 - 1个交易站(远离hearth) 我是一名追求速度的玩家,所以此布局是为快速游戏设计的。我通常使用3倍速并结合暂停功能进行游戏,因此对于想要打造美观城镇的玩家来说可能不太合适,因为我通常只放置长椅/木桶和花卉作为装饰。装饰(你花在装饰上的时间越多,意味着工人的工作时间就越少)——先修建道路/路径,之后放置建筑会更容易——最重要的材料是木板,它能加快 hearth( hearth)升级和种族住房的建造速度。设置1个伐木营地用于砍伐树林,1个伐木营地用于扩展你的hearth( hearth)区域。 建造优先级: 1. 住房位置(建在hearth( hearth)后方且远离仓库) 2. 工业区域(建在仓库和枯萎哨站附近) 3. 装饰区域(建在空地上且远离仓库) 如果你的城镇即使在风暴期间仍有5个闲置的建造者,那你一定在某个环节出了问题。 *建筑蓝图优先级(无论是来自商人、声望奖励还是订单奖励): 1. 建筑材料 = 木板 > 砖块 > 布料(工坊优先) 2.1级复合食物=肉干、粥/营地(在你的生物群系或林间空地生成的那种) 3. 从额外燃料、面粉、补给包、农场这4种中选择1种(这取决于你的种族人口数量) 4. 2级复合食物=烤串、饼干、馅饼 5. 1座服务建筑 6. 服务建筑消耗品制作机(即使是你未拥有的那种) 7. 更多服务建筑 为什么我不在第一个 hearth( hearth)周围铺设道路?因为你的工人的活动路线总是这样的:工作地点→仓库(取食物)→hearth(休息)→返回工作地点。所以重要的道路是连接仓库和hearth的那条,而且在游戏初期空间有限,你又想尽快建造房屋,少铺一点道路其实完全不是坏事。
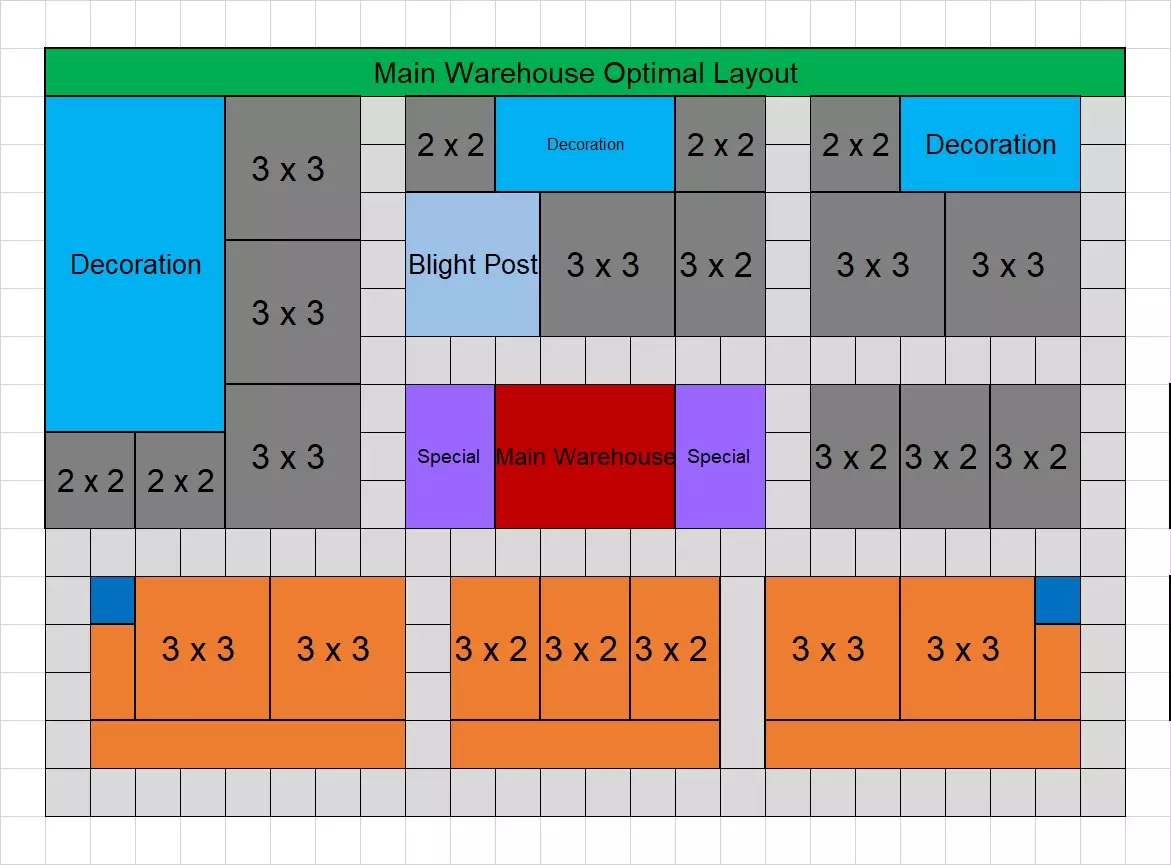
最佳主核心布局
第二壁炉的最佳布局及与主壁炉的距离范围
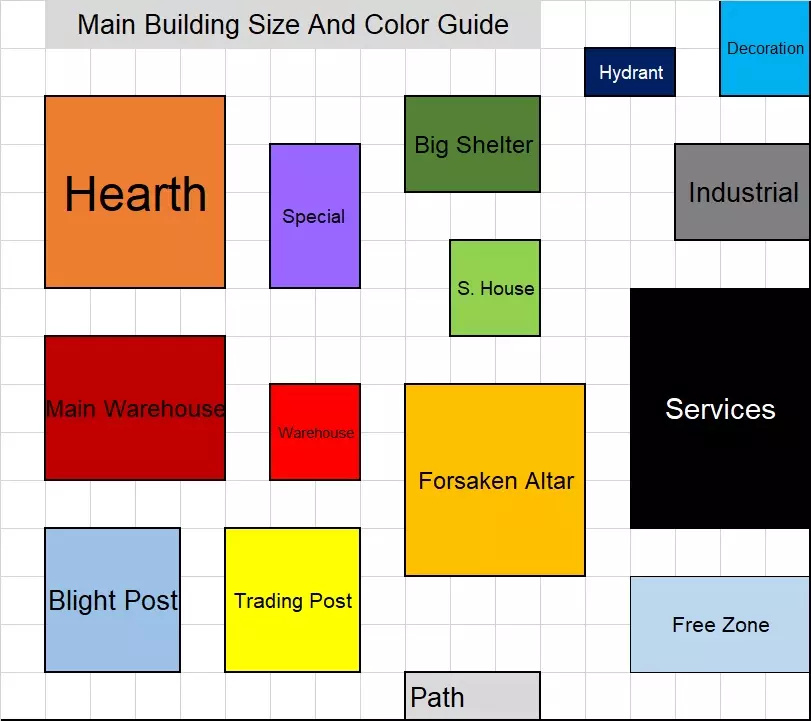
主楼尺寸与颜色指南及部分技巧
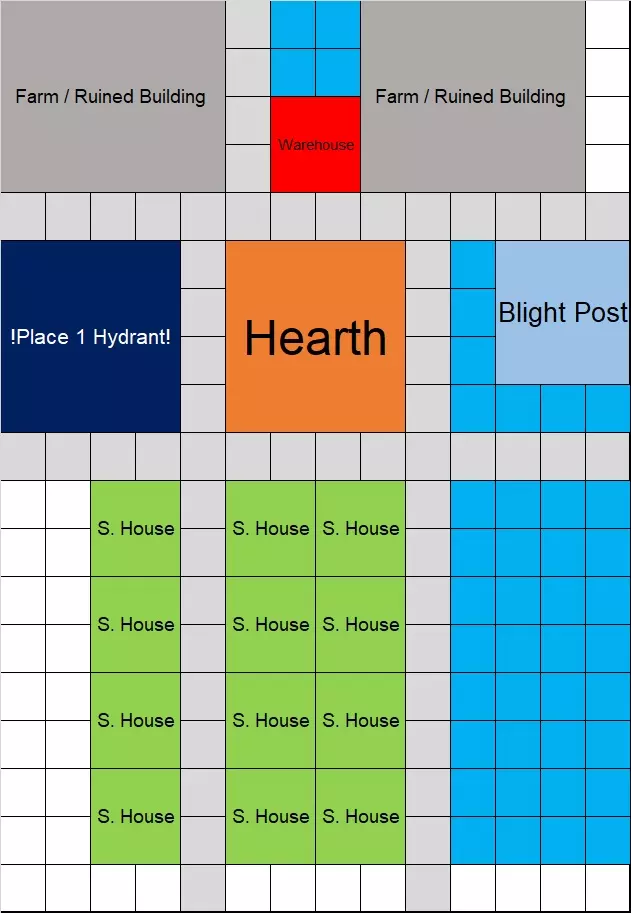
*Special zone consist of 2 x 3 area and perfect if you find 2 x 3 industry building, other wise just build the 4 regular starting building type 2 x 2 and put 2 decoration so you can level up your hearth fast in early game. the spot near warehouse is good for industrial building while the one near the hearth is good for industrial or home if its far from the main warehouse ( i usually use the one beside the warehouse and place 4 decoration) its called special because no tree,farm or harvestable thing can spawn on that location so its a guarantee spot for your building before the season start 2 x 2 building = crude workstation , rain collector, make shift post, field kitchen You can even move 3 of this building to make space for more important one, that's why this area is special *Trading Post = unless you got some market / trader Corner stone i usually refrain from building this thing, because u want to have a backup plan when opening your first dangerous glade, build this thing when u want to open that glade! trading/ buying things early year 1 is rarely worth it and making early pack of provision is bad for your food. (place it in inside your first glade or outside your hearth zone) *Blight post = on early prestige 1 - 9 blight corruption is less dangerous but its better to build it early in year 2 - 3 always place 1 worker to keep this thing working, make 20 because better safe than sorry, if your corruption start at 200 % abandon every worker job and start building the 2nd blight post or you will suffer 6 + death villager. ( this thing require stone / brick so its better to build it early, because some times you didn't get stone deposit and forgot to buy it at the trader and some glade event require purging fire ) building 2 of these can be useful if u want to abuse rainwater to max and good for your idle woodcutter Prestige 10 ++ game require you to build 2-3 of this * Hydrant = one of this thing will save your time and make your blight fighter burn more corruption place it near the furthest industrial zone from your blight post ( remember unburned cyst stay and make your next storm harder) how hydrant help blight fighter worker take 1 purging fire from blight post >> use it to burn the nearest building >> then return to blight post to take 1 more purging fire >> burn the next nearest building hydrant is just a tiny blight post for your worker to take purging fire and by using it you save time by allowing your worker to walk less between burning cyst *Big Shelter = The reason i prefer this over shelter because it save time and space and 4 shelter itself is enough to upgrade the hearth to level 3, and it easy enough to build a species housing when u want to replace it. comparing it if you replacing shelter to a species house you maybe need the extra space from the main hearth and also more builder time since your builder walk more far away . *Species Housing = Provide a little resolve Boost to your specific population, some people just prefer to not built it. but i remind you this bonus resolve is permanent and unlike Complex Food or Services where u need to make it every time you want it (Some Glade event rarely affect Housing while Food glade draining event is Plenty) *Decoration = better place and built it early for the extra resolve district bonus, Place it far away from your main warehouse, i usually place 4 in special zone early for a quick level up. building 1 (2 x 2) decoration is faster than 4 (1 x 1) ( start mass building this thing in the storm with your idle woodcutter) * Forsaken Temple = build this thing far from your hearth and your small hearth , quickly build this thing if your reputation almost pass the red mark the Corner Stone you get is worth it. this building is also useful if you got an overpopulation problem ( you can even demolish it after max sacrifice to get the material back) *Small hearth = usually people never expand and keep abusing the first heart until it got no space left, the quicker you expand the more people you can take, small hearth is usually used at farm location or 2- 3 abandoned building. try to expand before year 6 (just place it in the center of 3 dangerous or forbidden glade). *Service Building = take 1 for upgrading your heart even if you cant produce the service, this thing is good for your idle woodcutter, place it far away from your main warehouse( my recommendation is monastery,guild house , tea house , forum) Main Warehouse Layout This is the most optimal layout but in reality your building blueprint size may vary and even if you fill all of this space you probably playing your game for too long (some small glade may even block this layout) Your first warehouse is the center of your city production. you don't really need to make another industrial zone in another hearth (except you found a 3 good ruined building in dangerous glade)
橙色区域表示【炉火】可能会在该位置生成(这也是建造建筑的最佳位置,优先选择) * 在距离【枯萎哨站】最远的一侧放置一个【消防栓】 * 你有足够的空间建造所有【工人建筑】,如果空间不足,则需要第二个【炉火】来重新安置住房
这是一个适合发展工业的良好熔炉布局起点,当然我的左侧熔炉被挡住了,但由于熔炉正面是敞开的,我的工人工作效率更高。 * 即使建筑物的入口不是道路而是另一栋建筑物,你的工人仍然可以进入该建筑物。 特殊区域布局
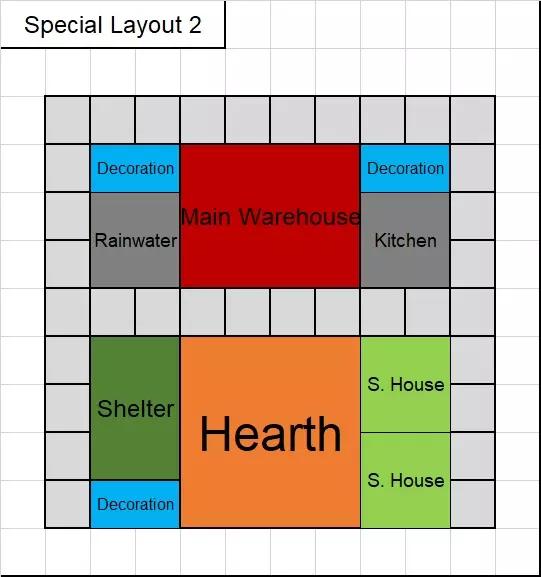
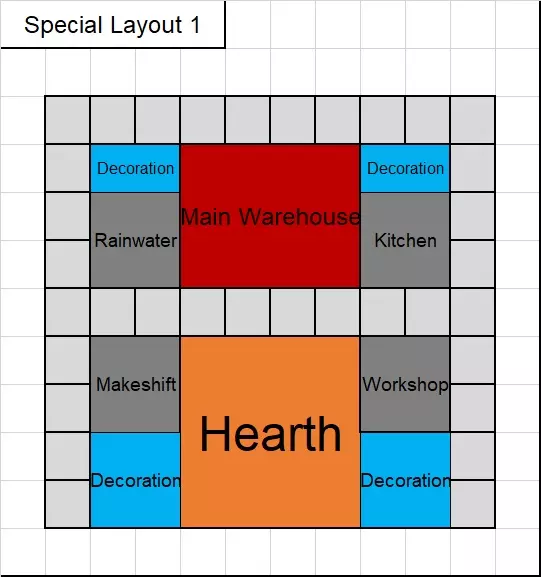
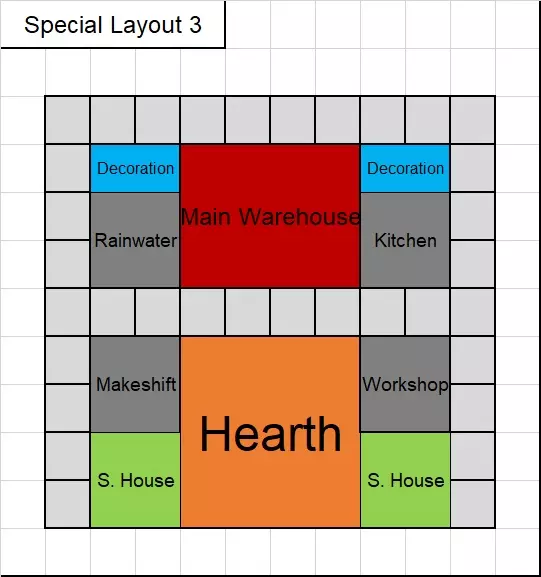
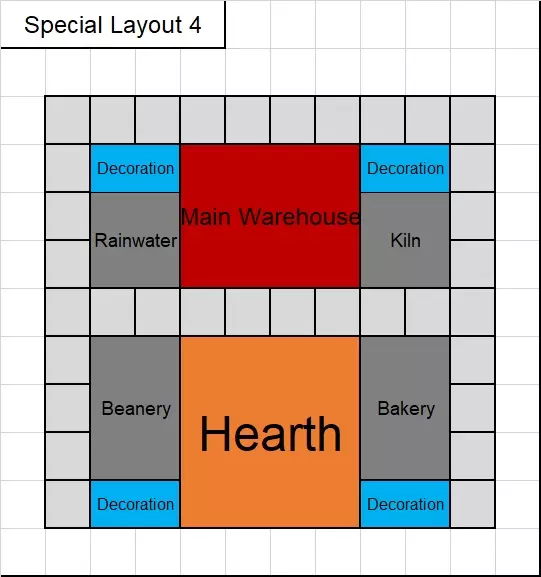
* 布局1是早期游戏的工业聚焦型布局,你可以像布局4那样将建筑替换为更好的版本。 * 布局2适用于你的 hearth( hearth)与主仓库距离较远,或者你只想尽早建造房屋的情况。 * 布局3是平衡的初始建造顺序,适用于你不打算拆除或替换建筑的情况。 * 布局4是你后期重要工业建筑的布局(当然,前提是你已经拥有了这些建筑)。 总之,布局的选择取决于你在早期游戏的游玩风格。 工业区域布局 这适用于那些想要将第二个hearth( hearth)打造为工业区域的玩家。
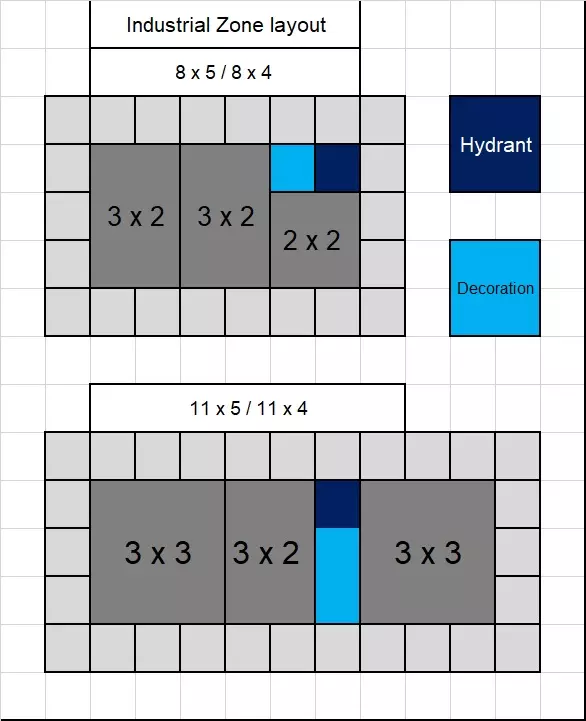
*如果在建筑上使用雨水,消防栓是必备设施。 *在声望等级10以下游玩时,消防栓并非必需,只需建造更多建筑即可。 *为少于5栋建筑建造小型仓库是浪费,但如果有多余零件,也可以建造。 *与工业建筑不同,2个农场区域是放置仓库的理想位置。 住宅区布局 所有这些布局都包含额外的房屋,这意味着如果建造所有房屋,你的 hearth 区域将会人口过剩,因为3级 hearth 区域只需要20人,所以请高效建造!
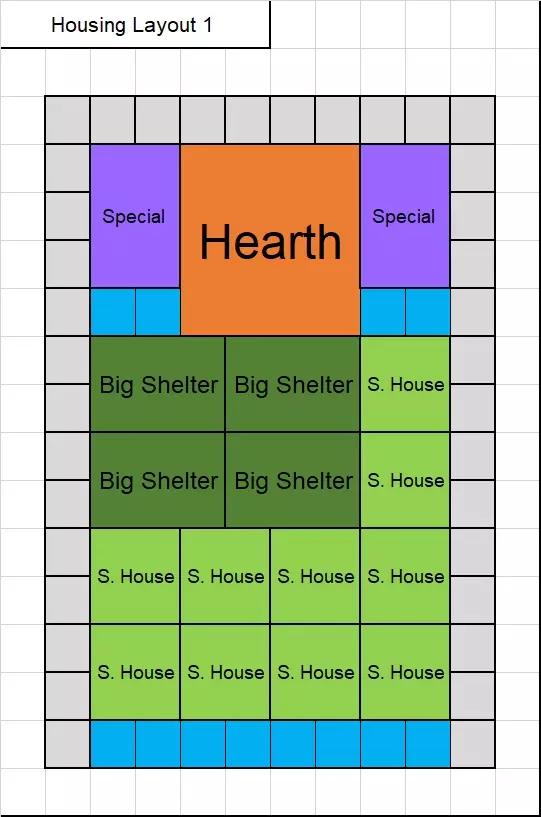
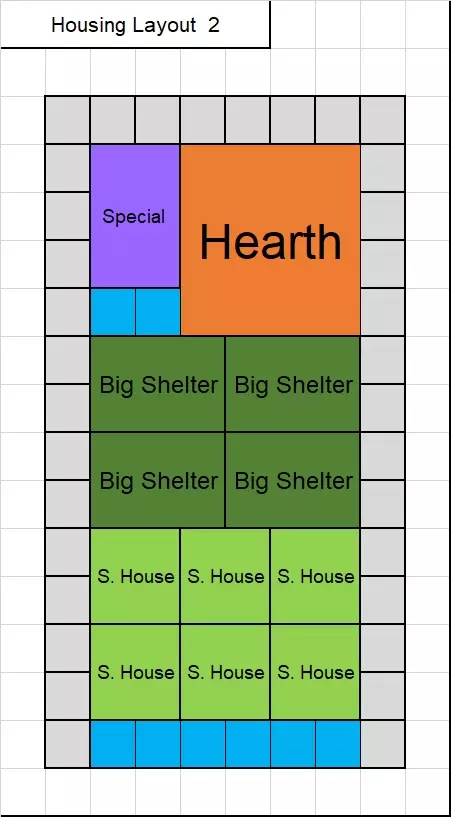
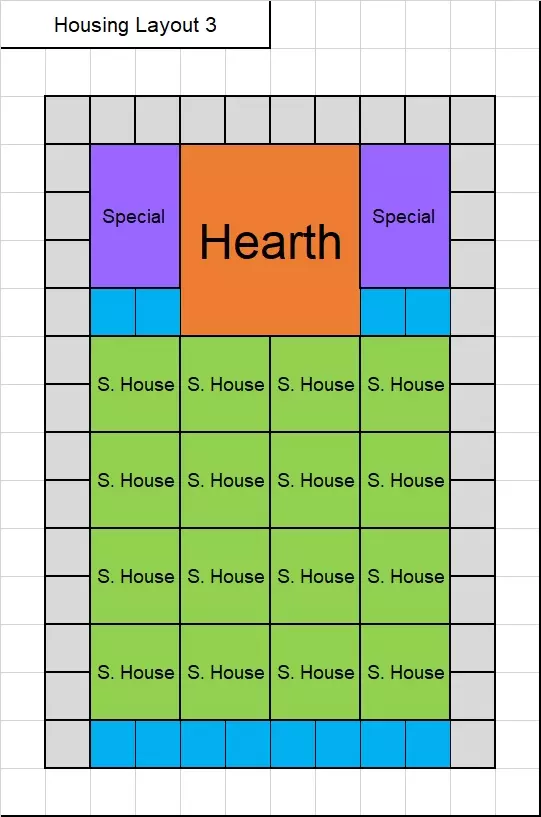
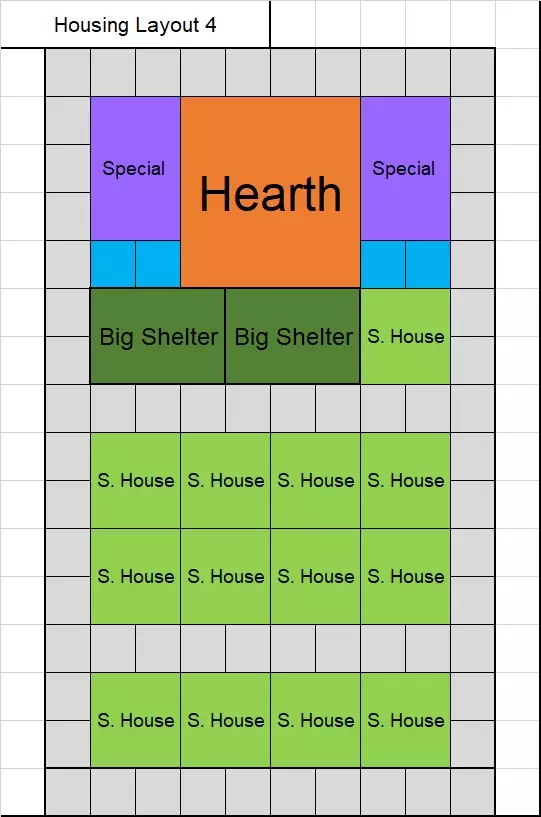
通常,你需要将早期房屋建在篝火后方(远离主仓库)。 如果篝火未被主仓库或小型林间空地阻挡,使用布局1;否则使用布局2。 布局3是游戏后期的最终住房布局,如果你未找到任何木板建筑蓝图,也可以在早期使用。 布局4适合那些希望城镇看起来功能齐全、有道路的玩家,即使村民很少走那条路。 *如果篝火后方区域被小型林间空地阻挡,可将房屋建在右侧或左侧道路旁,但要远离仓库。 *当人口开始接近25时,就该扩展到第二个篝火了!技巧与窍门 * 4个大型庇护所对于因未留意的林间空地事件或基石奖励而突然增加的人口来说也是安全数量(也有助于规划第二个壁炉的种族住房,只需查看4个大型庇护所并建造居住其中的种族住房即可) * 风暴结束后且有新移民时,用种族住房替换大型庇护所(摧毁大型庇护所仍可收回全部建筑材料) * 最好在新移民到达前尽早建造更多空房子(有些林间空地事件会禁用房屋空间) * 游戏初期,始终将房屋建造优先级设为1,因为建造者更倾向于建造道路而非房屋
住宅区布局2示例(工业区选址比住宅区更重要)
房屋布局1示例 小型壁炉布局
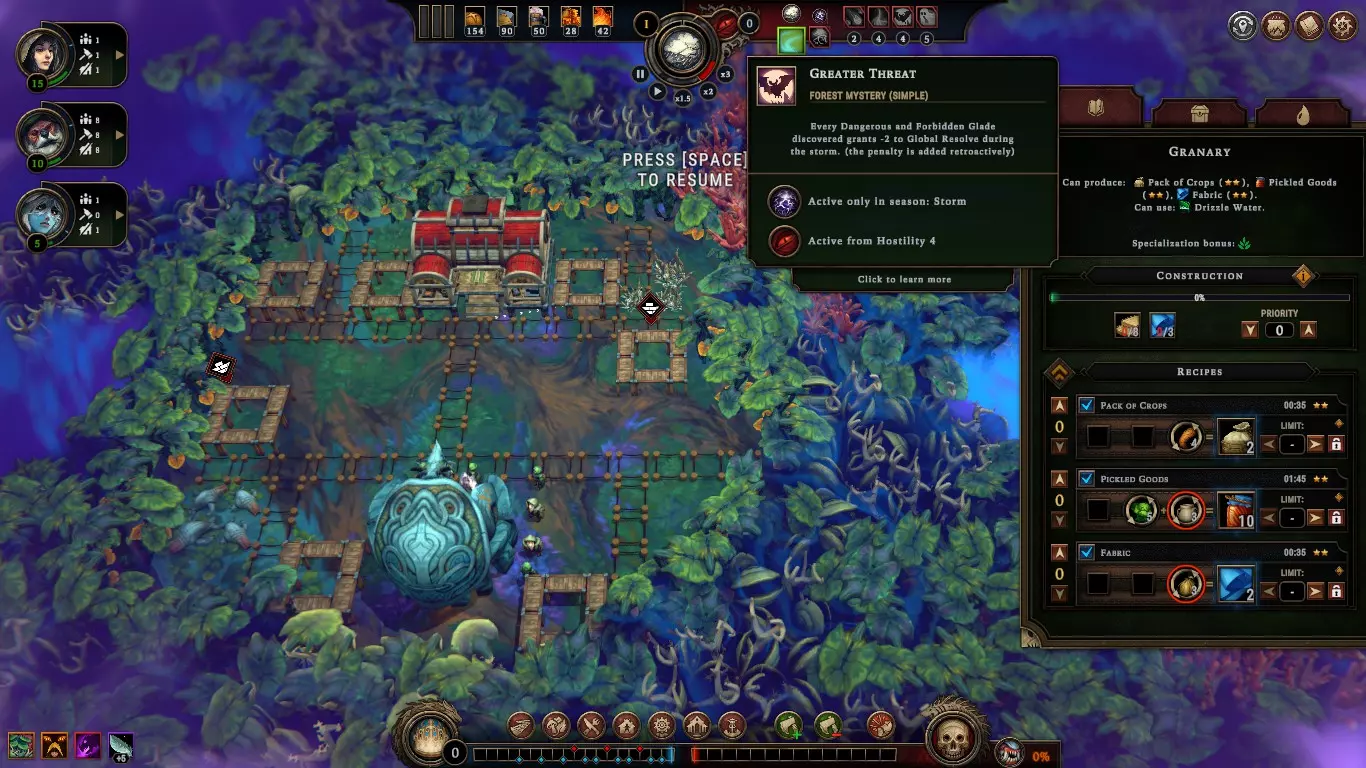
开个玩笑,你完全可以忽略布局问题。我通常甚至不会把房屋或装饰摆放整齐,因为缓存问题以及一些无法收集的可收获材料。 - 游戏开始时就要考虑你的第二个壁炉,并迅速清理其周围的树木。 - 重要的是在建造壁炉之前先建造小型仓库,并迅速将壁炉至少升级到2级。 - 即使没有工人建筑或枯萎哨所,也要放置一个消防栓,因为囊肿可能随时随地生成。 第二个壁炉的理想位置是在3个危险林地或禁忌林地之间,不要在其周围建造工业设施,这会增加枯萎战士的工作难度。(在游戏初期规划你的第二个壁炉) 第二个理想地点或你的第二个壁炉,是当你找到一个包含3座可修复建筑的废弃城镇时(不过你需要建造另一个枯萎哨站)。 第三个地点在农田附近。 绝佳的第二个壁炉位置示例(标记的树木区域)
登船奖励选择
登船奖励通常用于让你的前期游戏更容易管理。当然,你可以选择两条服务配送路线来为轻松的后期游戏或解决林间空地事件做准备,但你的村民在游戏初期通常存在一些明显的弱点,需要将这些弱点降到最低,以避免村民在前期离开。如果成本较高就不要选择。 不错的通用选择: - 1分:肉类或蔬菜(如果只需1分,建议全拿) - 2分:木板(游戏早期、中期甚至后期都一直需要) - 3分:补给包(这是游戏早期的赚钱工具,每次只卖1堆叠的物品) - 3分:琥珀(通常对所有声望游戏都有帮助,但4分的价格太贵了) - 1分:木材(在声望5及以上难度中,这其实非常好用,因为开局有56木材,可以在季节开始时建造3个庇护所(消耗45木材)和2个伐木营地,之后再建造4个装饰槽位,并在细雨中期尽早将核心升到2级。这样做的好处是可以让人口提前处于饥饿状态以节省食物) - 3分:零件(用于在交易站早期出售,能换取不少琥珀)情境选择 - 2点砖块(若以蜥蜴人开局)- 2点布料(若以鹰身女妖开局)- 4点油料(如果你有信心在没有准备的情况下开启林地,通常这是不必要的,会浪费点数)- 陷阱营地(当你在沼泽地开局时,即使花费5点也要选择它)- 1点新移民=以人类和海狸开局,并选择蔬菜和肉类。(它们是基于贸易的种族,早期工人越多,可出售的东西就越多),或者你以8个鹰身女妖或8个狐狸开局(因为该种族单独存在时表现不佳)。鹰身女妖早期的理想人口是2-6,而狐狸火夫在游戏早期毫无用处,因此随机的3个新移民会有所帮助。- 5-6点训练装备运输路线(用于开箱子的剑类装备) - 4点任意农场(如果从被诅咒的皇家林地开始,最佳选择是药草园) - 2点石料(选择石料不是为了制作砖块,而是将其用作道路以加快移动速度,这其实相当小众) - 5点农场(仅在声望11级及以上可用) - 1点根茎(仅适合生吃,或作为早期获取面粉材料的途径) 不推荐选择: - 皇家许可证(为了解决随机性而选择随机性,后期选择基石更为稳妥) - 任何服务类消耗品运输路线(花费1点却只能随机获取1件物品,成本过高) - 零件(通常有人在第二天商人处出售零件,但零件足够建造2个营地、2个枯萎哨站、2个伐木站和1个雨水收集器)收集者) - 芦苇或皮革(你的生物群落树木会产出足够的织物,除非涉及鹰身女妖)- 黏土(与石头不同,黏土无法用于早期游戏的资源提升。只需获取砖块即可,危险林地会提供足够的出现机会) - 煤炭(除非你也获取石油用于第1天鲁莽地开启林地) - 草药师、觅食者、陷阱营地(这类建筑风险高回报也高,即使你初始选择了最适合该营地的种族使用者。不过如果你喜欢赌博,可以选择它) - 鸡蛋(仅适合早期作为生食,因为早期它无法用于其他用途/如果你想制作补给品,但为什么要这么做呢?第1年你没有东西可以交易) 小型林地与大型林地的区别

Note : Big glade = Dangerous Glade / Forbidden Glade * Small Glade (0 - 3 per game) Positive - You can almost harvest everything in this glade at the start of the game ( Except Glade event) - You don't need big camp upgrade to use everything inside it (Trapper , Forager, etc) - You can always open it on every season without any risk - Good choice if you low on food - Good choice if you still learning the game ( Settler - Veteran Difficulty) - Small caches is a good and cheap early boost reputation while still good enough late game - Require less tree cleaning from your woodcutter and less road for your builder ( This means you got more wood efficiency) Negative - 2 small glade got less resource than 1 big glade while costing the same hostility - Opening small glade at mid or late game is considered a bad move if you play at high prestige game - Less resource make you open more glade more easily and make your hostility rising more quickly - It sometimes ruin your first hearth layout even if you don't open it - Bad place for your 2 - 3 hearth expansion When You Should Open it ? - Human Passive Ability = Farm Field Provide unlimited food supply and its worth it - Fox Passive Ability = only open it if its a drizzle water or storm water - When your first 4 blueprint offer you no camp building - early game when you bring 12 + citizen and no food at embarkation choice (And your starting node resource provide Farm Field and stone) - When you open your 1 - 3 big glade and found no food ( while also cant harvest it because you got the wrong camp building) * Big Glade ( 3 - ∞ Per game ) Positive - More Reputation and Resource can be gained than small glade - You can also find a good cornerstone from the glade event - Big caches Is a solid game plan for almost every map and every difficulty - Finding Building in Glade means you just safe 20 - 40 amber and your blueprint building stock - Good Place For your 2 - 3 hearth expansion - Good for opening your first hearth layout Negative - Require Big Camps blueprint if you want to use it fully ( Trapper , Forager , etc) - The only time you can safely open it without spending burnable fuel is at late storm and early drizzle because some glade event can make your storm season harder by messing with the people resolve or even your ability to manage the town - Even if you are prepared at opening it in year 2 only 75 % of its event can be solved by your starting resource and building, that's why its called dangerous glade ( this drop by 50 % if you open it at year 1) - You lost your town efficiency by sending 2 - 3 people at the glade event, this means you usually need to abandon some workforce every time you do that if you open the glade early ( this means less food, less wood and that means slower hearth upgrade) - Require More tree cleaning from your woodcutter and More road for your builder ( This means you got Less wood efficiency) - Failing to solve the glade event makes your game harder and also punish you with some impatience point ( generally 3 fail event is the maximum you can take more than that require some experienced player to win) When You Should Open it ? - You got Big Camps blueprint - In late storm season so you can prepare the necessary resource needed to solve it - You prepare enough resource to solve the glade event - The trader arrive in your settlement so you have a backup plan in case you don't have the resource - You got some idle builder / worker to sent * General Tips About Glade - The most important tips I can give you is use all the resource in the first and second glade you open because opening the glade without using it only make your town condition worse, remember that hostility itself is a resource and should not be used recklessly. this means i really don't recommend the 1 year 1 glade opening strategy because the glade reward in those glade isn't worth the hostility and your woodcutter time you sacrifice - The ideal big glade you should open is 4 glade because 4 is usually got enough resource you can use to trade or consume to win the game - never open big glade without having at least 1 big camp you usually only get to use 1 resource and cant harvest the camp resource - experienced player can almost fix all the negative big glade because they learn enough about the map resource and the embarkation choice they should take at year 1, but don't be discouraged 1 - 3 mistake is fine if you still learning the game - its better to quickly drain 1 type of resource in glade than slowly drain it because you can save part for your camp when u need it - You can win by using small glade so don't be discouraged - unlike dangerous glade forbidden glade offer more reputation from the event at the cost of more complex resource you should offer but the risk is also high ( that's why its a bad idea to open this glade early year 1-2) General Year 1 Layout Set Up I bring a safe embarkation resource and not seeing my first 3 building to show a general starting strategy
why do i rush building blight post and rain collector ? because some glade event need it and in high prestige rushing to build and make the stuff is usually too late for finishing the event - The first area you should clear with wood cutter is housing zone then top industrial zone for blight post. then you can start working to your first glade - Always use 2 - 3 builder and make them work if all building is complete - I usually make my citizen hungry year 1 to save some food and make them eat mid storm. because my hearth lvl is upgraded early starving them is less risky ( You can also use lizard fire keeper for a safer condition) - Quickly harvest the starting Resource, because you might need to re use parts for something else (Mine , Event, Etc) - The Field kitchen is a really good building, and i really recommend you unlock it early. you save so many food by using this thing for porridge and jerky ( you can see i feed my population with complex food early) Random Tips And Tricks - Main Hearth Keeper Tier List (D - S) Keep in mind a lower tier in hearth keeper doesn't mean the overall species is bad, i value species based on map usually 1. Human (Slower Impatience Generation): The Safest Option early game when your smoldering city lack any upgrade and you still learning the game, human is good for a late game ending resolve because they give more time, and time is a good resource for a good player or even a bad player. don't be fooled though later in prestige 10 - 19 permanent human fire keeper can be used to make risky play using a full forsaken temple sacrifice ( A Tier in any prestige game ) 2. Beaver (Slower hearth Fuel Usage): a niche and situational usage when you don't find a plank building and in rare wood biome, beaver provide a nice fuel reduction, the weird thing is beaver also help producing wood so its really a strange scenario. but in high prestige game you also make a lot of purging fire in blight post so this make beaver good at least ( C tier in low prestige game , B tier in prestige 10 ++) 3. Lizard (+ 1 Resolve Bonus): A good pick if you want to utilize hunger early game, early resolve reputation,live saver at certain glade event, and a reliable helper at storm season. but it usually a bad idea to make lizard a permanent fire keeper, because the bonus resolve is too little (B Tier in any prestige Game) 4. Fox (Glade Grant Less Hostility): Fox is like lizard but far worse early game, but better late game pick. The thing is if you open too many glade just for using a fox fire keeper its a bad play. this mean fox fire keeper need to be used at the right time. starting with all foxes population is as hard as harpy ( D Tier early game , B Tier late game if used correctly ) 5. Harpy (+ 5 Population carrying capacity) : The best all around, because harpy upgrade all of your population capacity, be it for : Glade worker, Builder , wood cutter , industrial worker, etc. it goes both ways from storage or to storage usage. harpy save time and give your worker more things to do. but sadly easily replaceable by marketplace building ( S Tier in any Prestige game) 6. Frog (50 % Faster Newcomer Arrival Rate) A medium risk and high reward choice that help faster building expansion or more workforce in early game. usually i just use it at year 1 to year 4 because too many people in your settlement also means more food and hostility. frog fire keeper beat harpy at early game but lose at medium to late game. ( A Tier in any prestige game) -Trading Post Buy and Sell Recommendation *Buy this thing if trader have it 1. 10 - 20 Plank, you always need more ( for quicker hearth and house building ) 2. 10 - 20 fabric and brick if you use crude workstation or cant produce it fast enough 3. Food if you low :Vegetable , herb, wheat , Meat, and insect. ( this is good for field kitchen to save food ) 4. 10 Pipe ( its cheaper to buy it than make it if. you only use crude workstation) 5. 20 Copper Bar / Dew Bar ( If your tool production building set up) 6 . All Complex Food and service building material in late game ( Don't hoard your amber, just spend it for a quick game) 7. Always buy Camp And 1 Farm building from trader even if you dont see the resources now. *Sell this thing be it from trader or trading 1. 150 ++ basic Food ( its better to pack it into pack of crops or provision ) 2. 100 ++ Complex food 3. 30 ++ building material, : plank , brick , fabric ( only sell it if you max 2 hearth and your species housing) 4. 100 ++ Fuel : oil, coal, Sea marrow ( you only need 100 for certain sacrifice) 5. 2 ++ wild fire essence (after you expand enough and having a steady supply of all rain water) - How to save Some Food From Blood Flower glade event (the important one ) 1. Use field kitchen and makeshift post 2. Go make pack of crops, pack of provision and all complex food 3. Enable all recipe. set to only make 1, then remove your worker when he began working something 4 . now your food will be stored in the workspace inventory 5. Take it back by removing it. after the event end this is also working with thermite event for building material (you can also use more than 1 makeshift post) - How to Safe time with some little micro management 1. Make an empty 2x2 spot in front of your main warehouse or warehouse 2. use it to quickly build decoration or camp. after its done then place it in your desired spot (also useful for a quick house building, but it cost some wood) 3. this spot is also useful when your wood cutter camp or any camp when its full, just place it there to empty the storage quickly then move it back to the last spot. your worker will walk less. - 1 farmer can usually handle 4 farm field but for general rule is 3 farmer for a small glade farm. 4 farmer for a dangerous glade farm ( only if your warehouse and hearth is close to the farm) - Always favour lizard at the end of clearance season (10 - 30 second before the storm start) after the storm starts cancel it, the extra +5 resolve is useful for keeping the lizard happy in the storm because it drop very slowly compared to other species ( it can even help the other species by favoring them in the storm) -Recipe Limit Always make 10 of each item because its good for trading in trade route ( except pack of thing) 1. Building Material ( Plank, Brick, Cloth) = 7 Early - 30 mid / late 2. Complex Food (Jerky, Skewer, etc) = 150 3. Service building Consumable item ( Wine , Ale , Incense) = 33 4. Other Consumable item (Coats) = 50 5. Pipes = 10 (dont make it early with crude workstation) 6. Crafting Resources ( Water skin ,Pigment, Flour, Copper bar) = 30 Minimal - 100 if its important (Flour) 7. Fuel ( Coal, Oil,) = 200 for Coal - 50 For Oil 8. Tools = 50 9 . Trading goods ( Pack Of building , Provision, Crops , Etc) = 3 For Trading - 20 For Selling to trader Real Example *this is my prestige 1 play where i take oil and trapper camp because meat is plenty in this biome, i choose beaver because wood are rare in this biome and must find plank building for sustaining my resolve. i choose housing layout 2 because my left hearth is blocked.
游戏初期,在倒计时开始前,我会先建造2个伐木小屋。运气不错的是,我为我的种族住房抽到了锯木厂和谷仓。由于人口较少,我没有开启危险的林地,而是优先升级我的 hearth。当你的2个建造者停止建造时,开始收集雨水。
在第二年开始前,我已经解决了住房问题并升级了 hearth(炉心),现在准备开启第一个危险的林间空地。
游戏中期,我一获得献祭仪式就会立即使用。现在承受损失总比以后再承受要好(海狸和鹰身女妖一直是我优先记恨的目标)
在这场漫长的游戏中,我向大家展示了住房和 hearth( hearth )升级的重要性。即使在风暴期间,我也从未使用过服务建筑,以此来展现提升 resolve( resolve )的住房和 hearth 的强大作用。我没有打开过任何箱子,并且完成了所有女王的订单。我唯一的死亡是在被遗忘的祭坛献祭以及腐坏林地事件中的祭坛献祭导致的。我甚至没有在风暴期间向 hearth 献祭木材或煤炭。

我的第二个壁炉已完全升级 *威望等级10 前期游戏(我建造了普通避难所而非大型避难所,因为我没有木板建筑)
第二颗心脏位置(我选择这个位置是因为我要建造农场建筑)
后期游戏
声望20游戏 我以琥珀和陷阱营地开局,选了谷仓和药草园。【神秘森林】这个高级威胁在持久战中很危险,所以我尝试速战速决。
第二个炉石位置
我运气不错,用1星饼干找到了铁匠铺。如果你的人口中有鹰身女妖,你需要建造野外厨房来获得良好的决心加成。现在我只需要面粉建筑了。

后期游戏 这次游戏我运气真的很好,找到了裁缝店和派食谱建筑,而且令人惊讶的是,鹰身女妖成了我的最佳伙伴。复杂面粉类食物对我的游戏很有帮助(我还充分利用森林来降低敌意威胁)。

游戏玩法示例 这是新存档中的第二局总督难度游戏(第一局很无聊,因为没有贸易,雨水甚至第二个生命值升级都被禁用了)。 这是一局相当平衡的游戏,有好有坏。我用新存档来展示在极少升级的情况下也能击败总督难度。 在视频中你将看到我如何应对以下一些场景: 1. 食物短缺情况 2. 糟糕的早期订单 3. 无法清理的林地事件 4. 早期没有复杂食物 5. 人口过剩且有闲置工人导致致命风暴 6. hearth扩张过晚 7. 一些早期甚至晚期无用的基石(无用是指即使到了游戏后期我也用不上) 8. 为快速胜利而速通 极少升级的缺点是你确实无法有效利用雨水。而且甚至无法选择食物消耗方式,导致了不良的饮食习惯。有趣的是,我在没有打开宝箱的情况下获胜了,虽然我很早就建造了工具房,而且没有使用考古学家站。【完全升级的烬城声望20游戏玩法示例】我在这款游戏中最大的问题是食物短缺,但我的建筑材料从林间空地获得了保障,林间空地里的额外村民营地也没什么帮助,因为我需要食物才能使用他们,我的订单在后期还算不错。成功通关声望20的关键在我看来是在任何情况下都要灵活调整你的理想人口数量。始终燃烧所有腐败,在声望20中,人口死亡是非常糟糕的事情。(我因为这个原因很少使用遗弃神庙) - 野外厨房的肉干和粥是节省食物的最佳选择 - 优先选择容易完成的订单(焚烧枯疫根/收集雨水)或免费订单(解决林间空地事件/开启林间空地)。需要特定建筑的订单很糟糕,因为太随机了(酒馆+麦芽酒/行会屋+葡萄酒)。限时订单是陷阱,因为如果失败2个危险的林间空地事件,你的城市就会毁灭,而且很难恢复(在定居者难度下刷限时订单,这样更容易也更快)