换一换
换一换 


Some general and area-specific tips that I learned during my attempts at One Life difficulty; hopefully these will help increasing your survivability and get through the whole game without dying. General Tips First of all, it should be obvious that you need to know the game very well before even thinking of attempting this; other achievements require you to go through the game a number of times if you want all of them, but that's still not enough: you need to know the game by heart. And you need to master Ori's movement and abilities to have the confidence necessary for every situation. So in short, you need to play this game a lot. Prepare a savefile for each section that you might find especially difficult. This will allow you to practice it every time you want, and particularly when you have to go through those specific sections on your one-life run, for maximum confidence. For instance, I personally kept saves just before the first 2 lasers on the way to Moon Grotto, the Ginso Tree escape, the Forlorn Ruins escape, the section just before Mount Horu, Mount Horu itself, 2 specific rooms in Mount Horu and the final escape sequence. Remember you can pause the game and exit at any time, so if you're not feeling confident at one point, just save and try to go; if you see you're ending up in a tough spot or your health is too low or you're falling into lava or other scary stuff, just pause, go back to the main menu and try again. Watch speedruns. Since you'll probably die a lot and end up repeating the same things over and over again, learning how to do it quickly could prevent potential loss of sanity. If you're already a speedrunner, you're awesome. ALT+U hides the UI - this will automatically skip all of Sein's messages and various textboxes, so you don't have to break your spacebar to quickly advance the dialogue each time. Delete the savefile each time you die. This is actually really important for 2 main reasons: first, it will prevent a bug that causes your savefile's difficulty to change when you die, it will still say you're in one-life if you check, but you won't get the achievement at the end. Of course this really doesn't matter if you just want to do a no-death run and don't care about the Steam achievement popping up. Second, whenever you die in one-life mode the game will automatically put you back at the beginning, and leave a "Wisp" in the exact place where you died... think of it as the equivalent of bloodstains in Dark Souls... it contains some experience ("spirit light") probably based on how much time you managed to stay alive the previous time, or how much experience you had, I don't know, the important thing is that they are evil. Thanks to the fact that they spawn in the exact place where your HP reached zero, you will find them in the most dangerous of places, specifically on top of insta-kill lasers. This wouldn't be a problem if you could just walk over them, but if you come in contact with them Ori will stop and will execute a pickup animation. You don't want this to happen in front of a laser. You won't have enough time to jump out of the way and you will die again in the same spot. This is not a problem if you're sure you died in a safe spot, but to avoid wasting your time for nothing it is generally better to just delete your save and start a new one. Grab as much spirit light containers and ability cells as you can along the way, but no need to risk your life trying to reach the really tough ones. The order in which you get your abilities doesn't really matter, but I usually aim for: - Ultra Spirit Magnet first, just so I don't have to worry about losing experience because I'm going too fast; this way you'll also have Life Efficiency and I don't need to explain why that's really helpful. - Then second is Ultra Soul Link, which will allow you to heal 2 life cells whenever you want, provided you have energy; this will also give you Charge Flame Efficiency allowing you to use Charge Flame more freely. - And finally I dump everything else into the attack abilities. The reason for this is that you don't really need to use the Spirit Flame that much, most of the time you can dispose of enemies quickly with Charge Flame, Stomp or Bash. Nearing the end of the game having a powerful Spirit Flame can potentially save your life though, so that's why I leave the attack upgrades for last. I also decided to not go for Ultra Defense since the real danger in the endgame are not enemies but insta-kill environmental hazards, rendering that ability pretty much useless. I also didn't feel the need for Triple Jump at all. Be careful while bashing off those green exploding enemies, if you aim too close to the ground they can explode in your face, and they will oneshot you if you don't have enough health. Always aim a little bit up when launching them. Area-specific tips Area specific tips follow below. Moon Grotto The first thing you might find useful if you hadn't noticed is that you can reach this Energy Cell here from below after you get Double Jump, instead of risking taking damage from the spikes coming from the other side on the right. This is probably something really obvious but it took me a while to figure it out... so I'll just leave it here. Just double jump from the crystal to the wall directly above it and then you can climb up no problem.
另一个看似简单但比之前那个稍复杂一点的技巧,是获取这个生命细胞(实心点表示需要二段跳)。
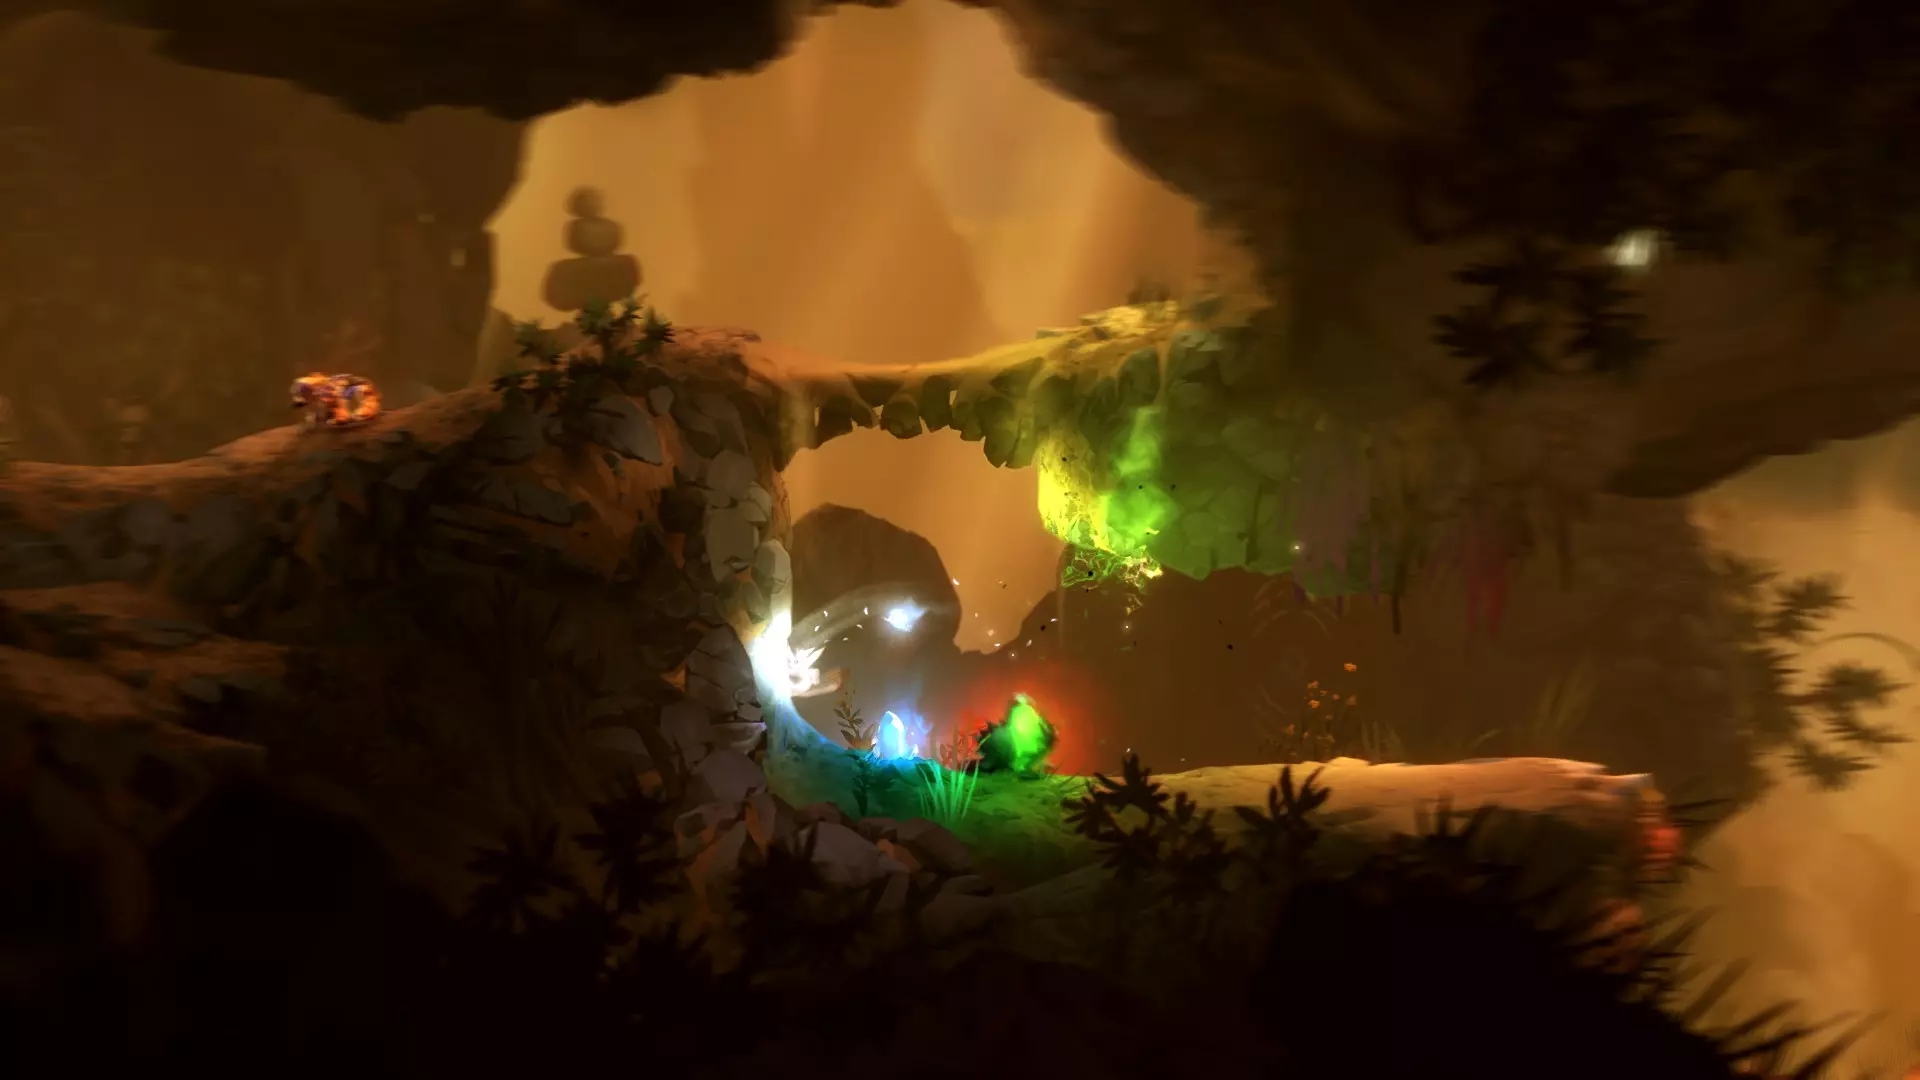
获得水脉后,从这里跳下去并一直向左走,你会发现面前有一个免费的能力单元。
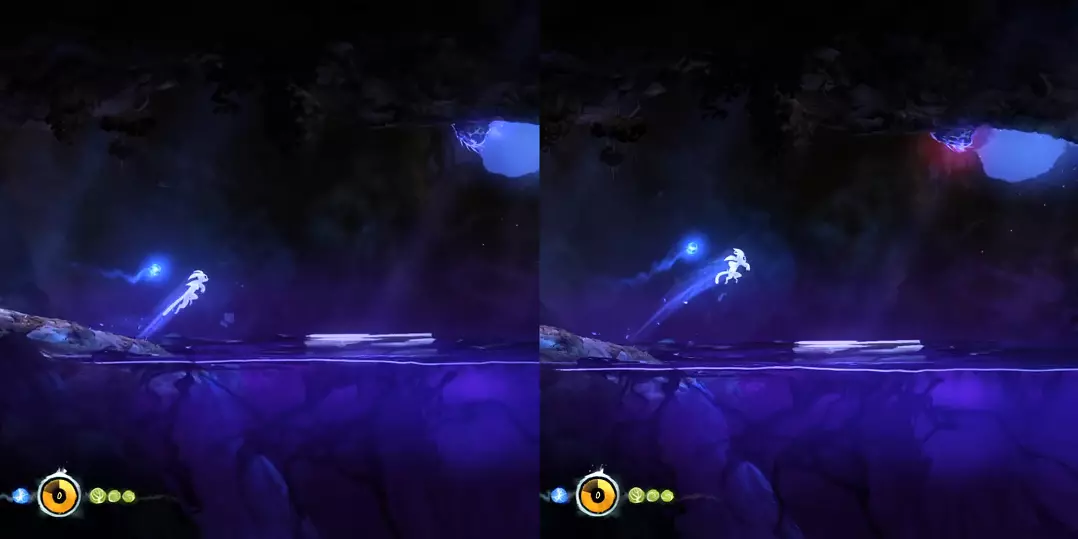
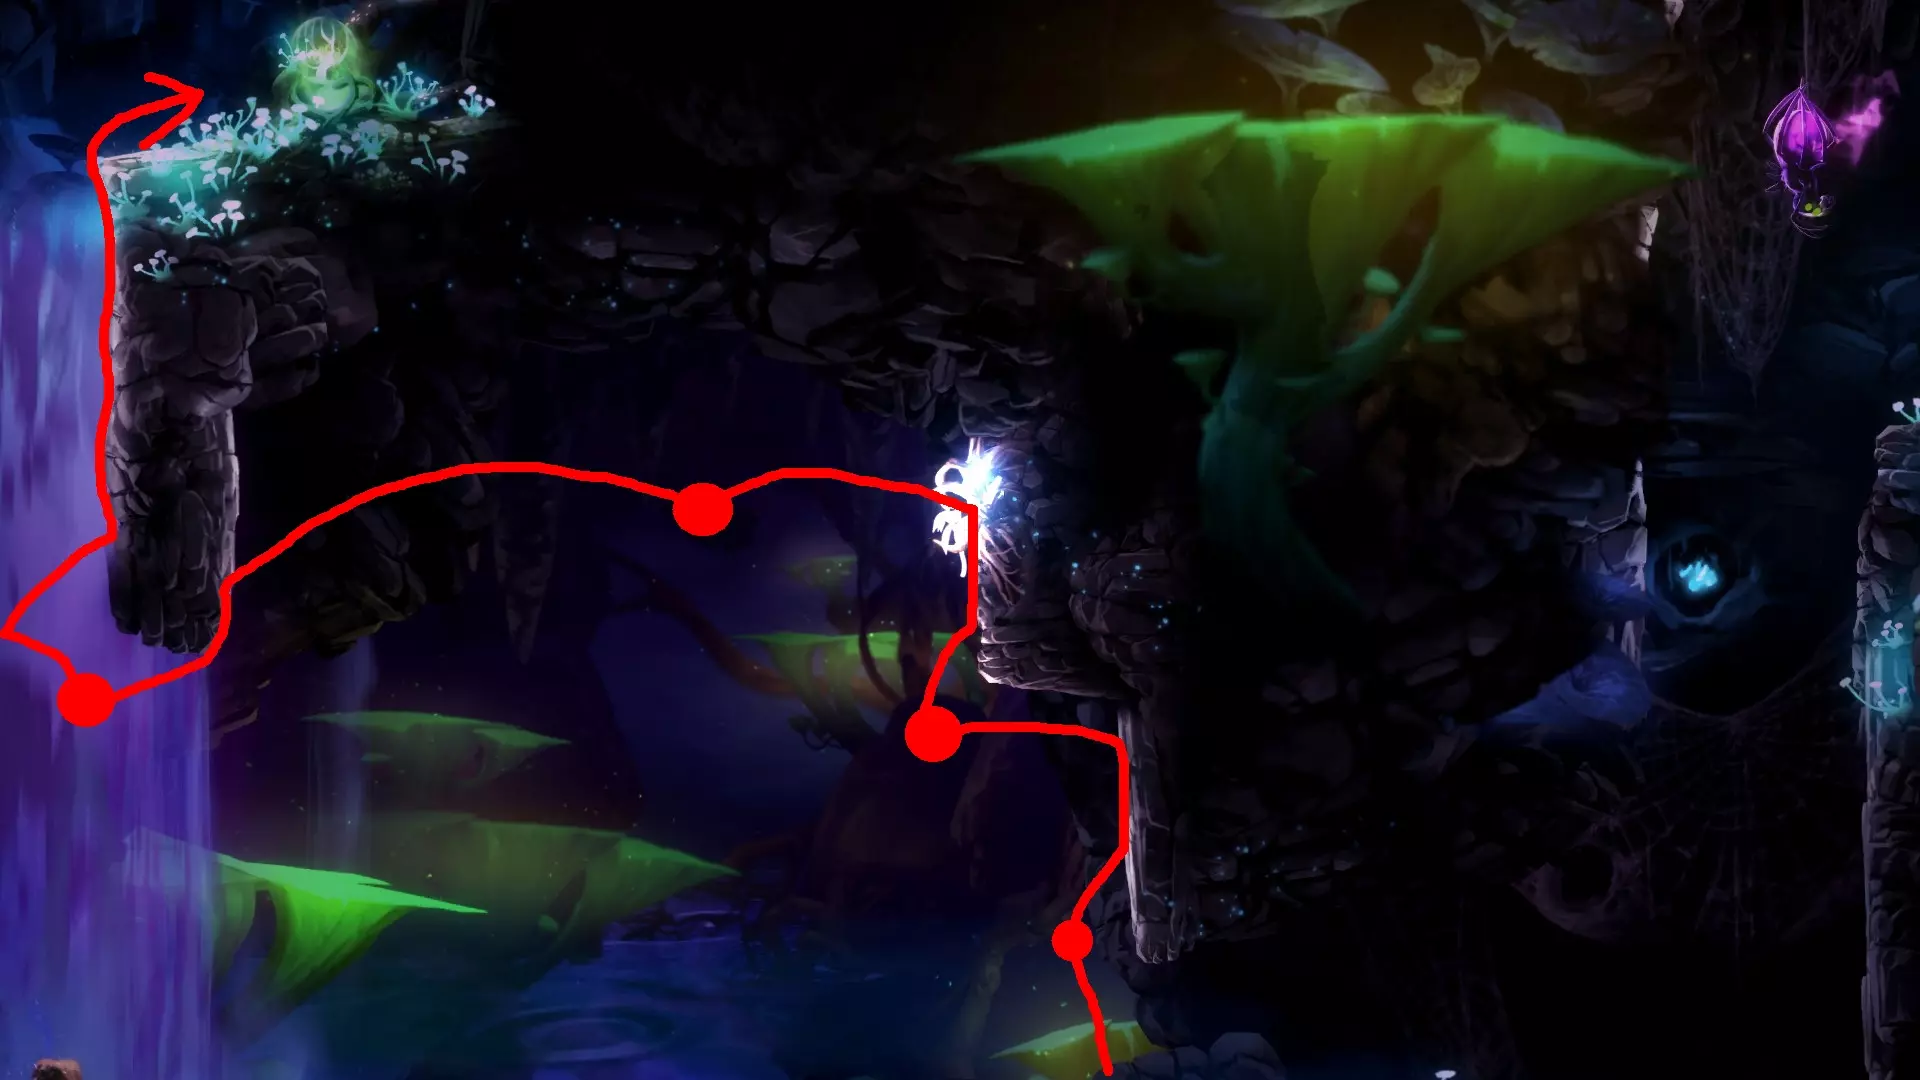
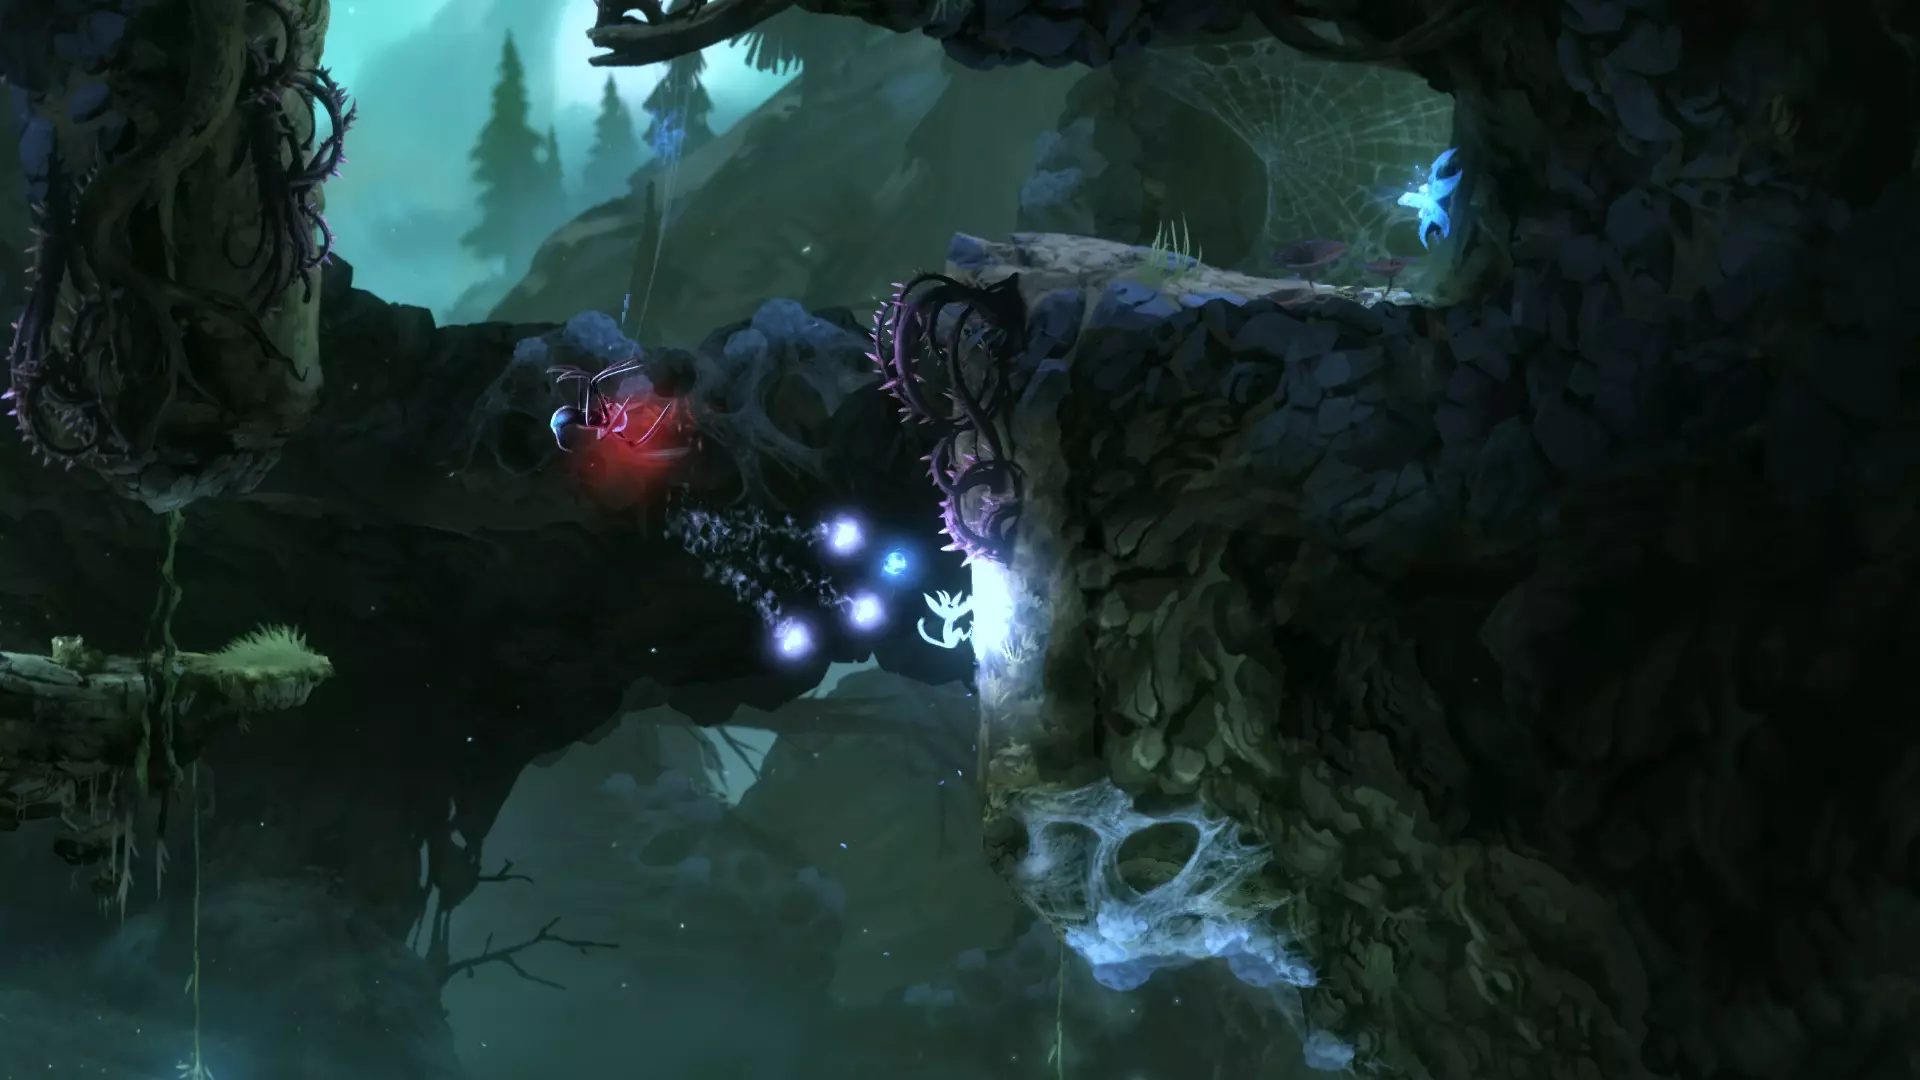
在离开月亮石窟的路上,你会发现一扇需要3点能量才能打开的锁着的门,门后有一个生命细胞;你肯定想要那个生命细胞。 通常情况下,你必须从房间左侧下去再上来,在毒水上二段跳,在尖刺之间攀爬,还要射击 blob,每次跳跃都可能有生命危险……但实际上,你可以直接从右侧到达那里,通过几次非常精确的二段跳跳过所有这些麻烦。 我已经标记了你需要起跳的位置和着陆的位置。我不会说这是一个像素级精准的操作,但你需要精确,可能需要尝试几次,但你不会有任何风险。再次说明,这些点代表二段跳。
前往银之树 获得二段跳后,你可以立即在这里拿到一个能力细胞。
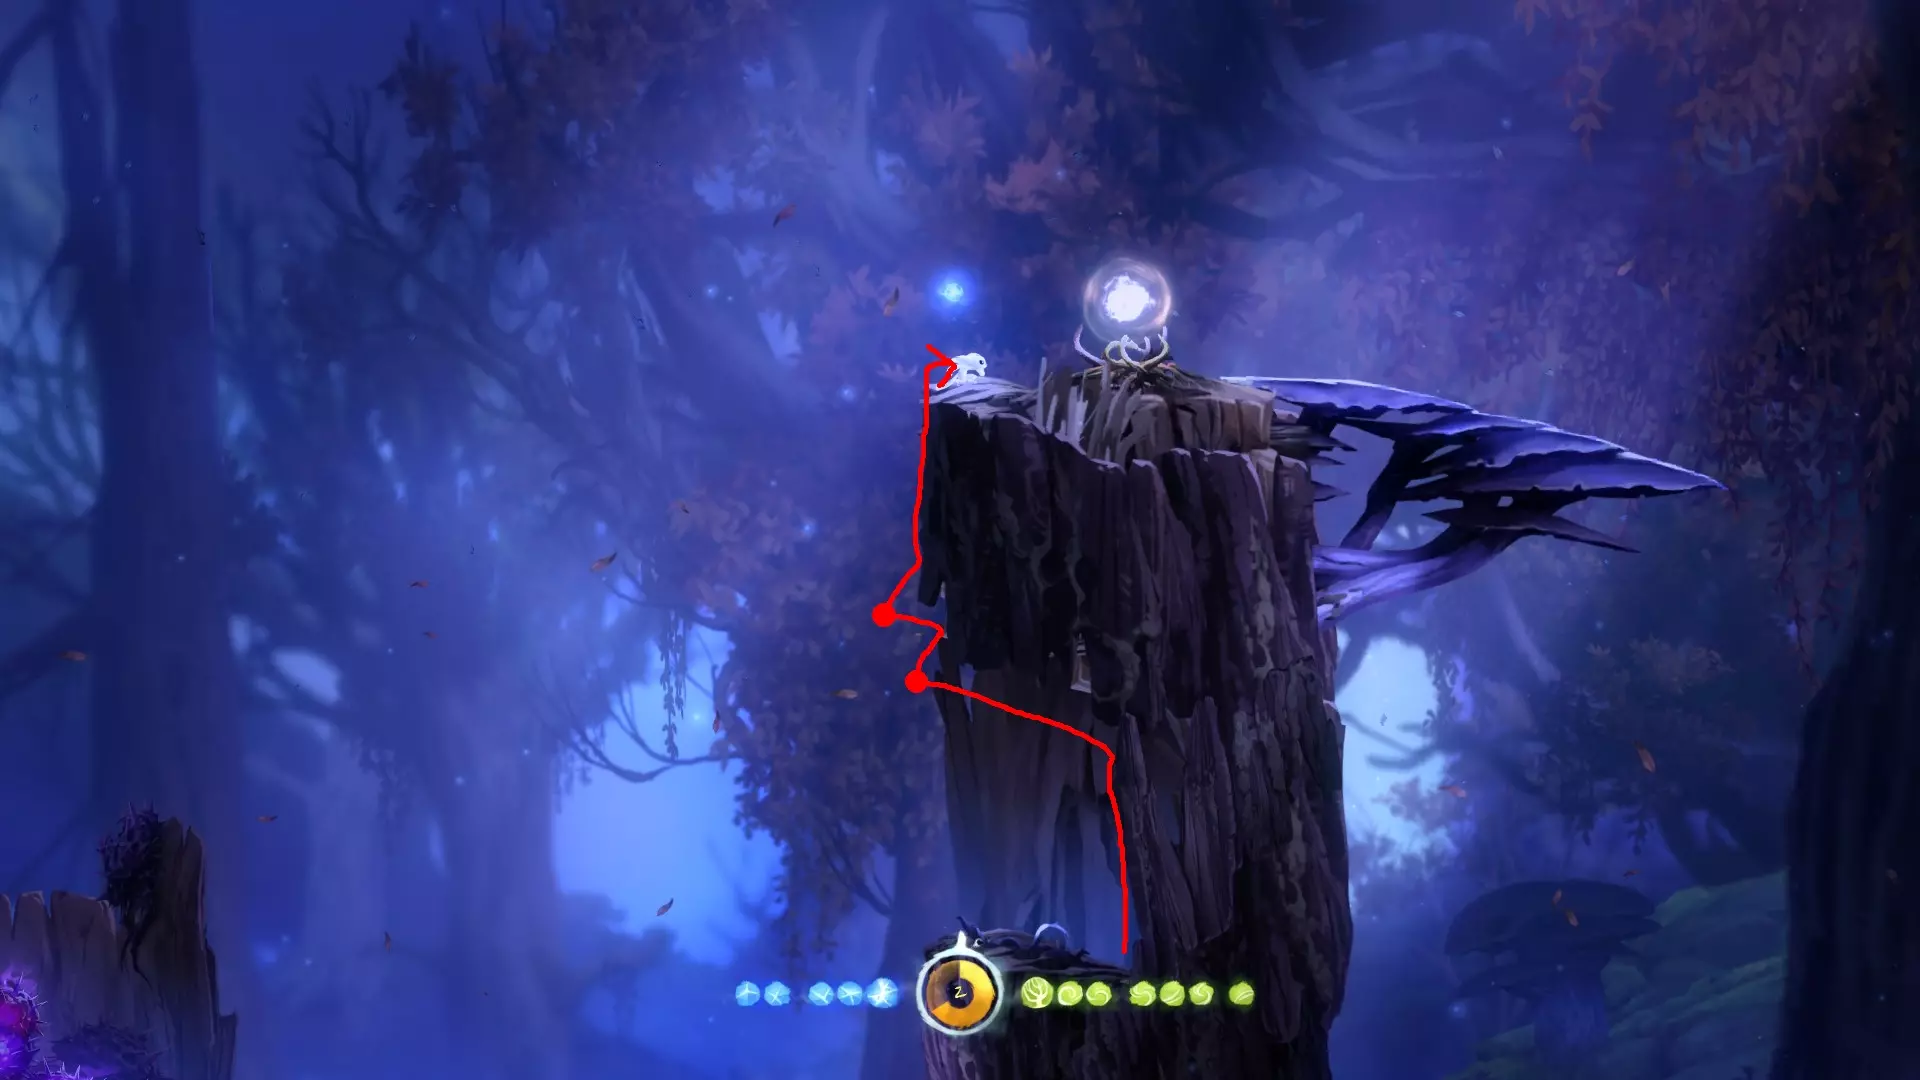
不过第二次二段跳确实不太好掌握,所以如果你发现实在跳不过去,就放弃然后继续前进吧。 银之树 这里没什么太多可说的,只要确保你已经牢记逃脱流程就行。 不过当你到达这个地方时:

不要依赖蜘蛛向上发射另一个球来借力弹跳;而是到右侧墙壁,向上爬一点,然后对着发光的树枝二段跳,不用蜘蛛帮忙也能到达那里。 前往迷雾森林 小心这只蜘蛛:
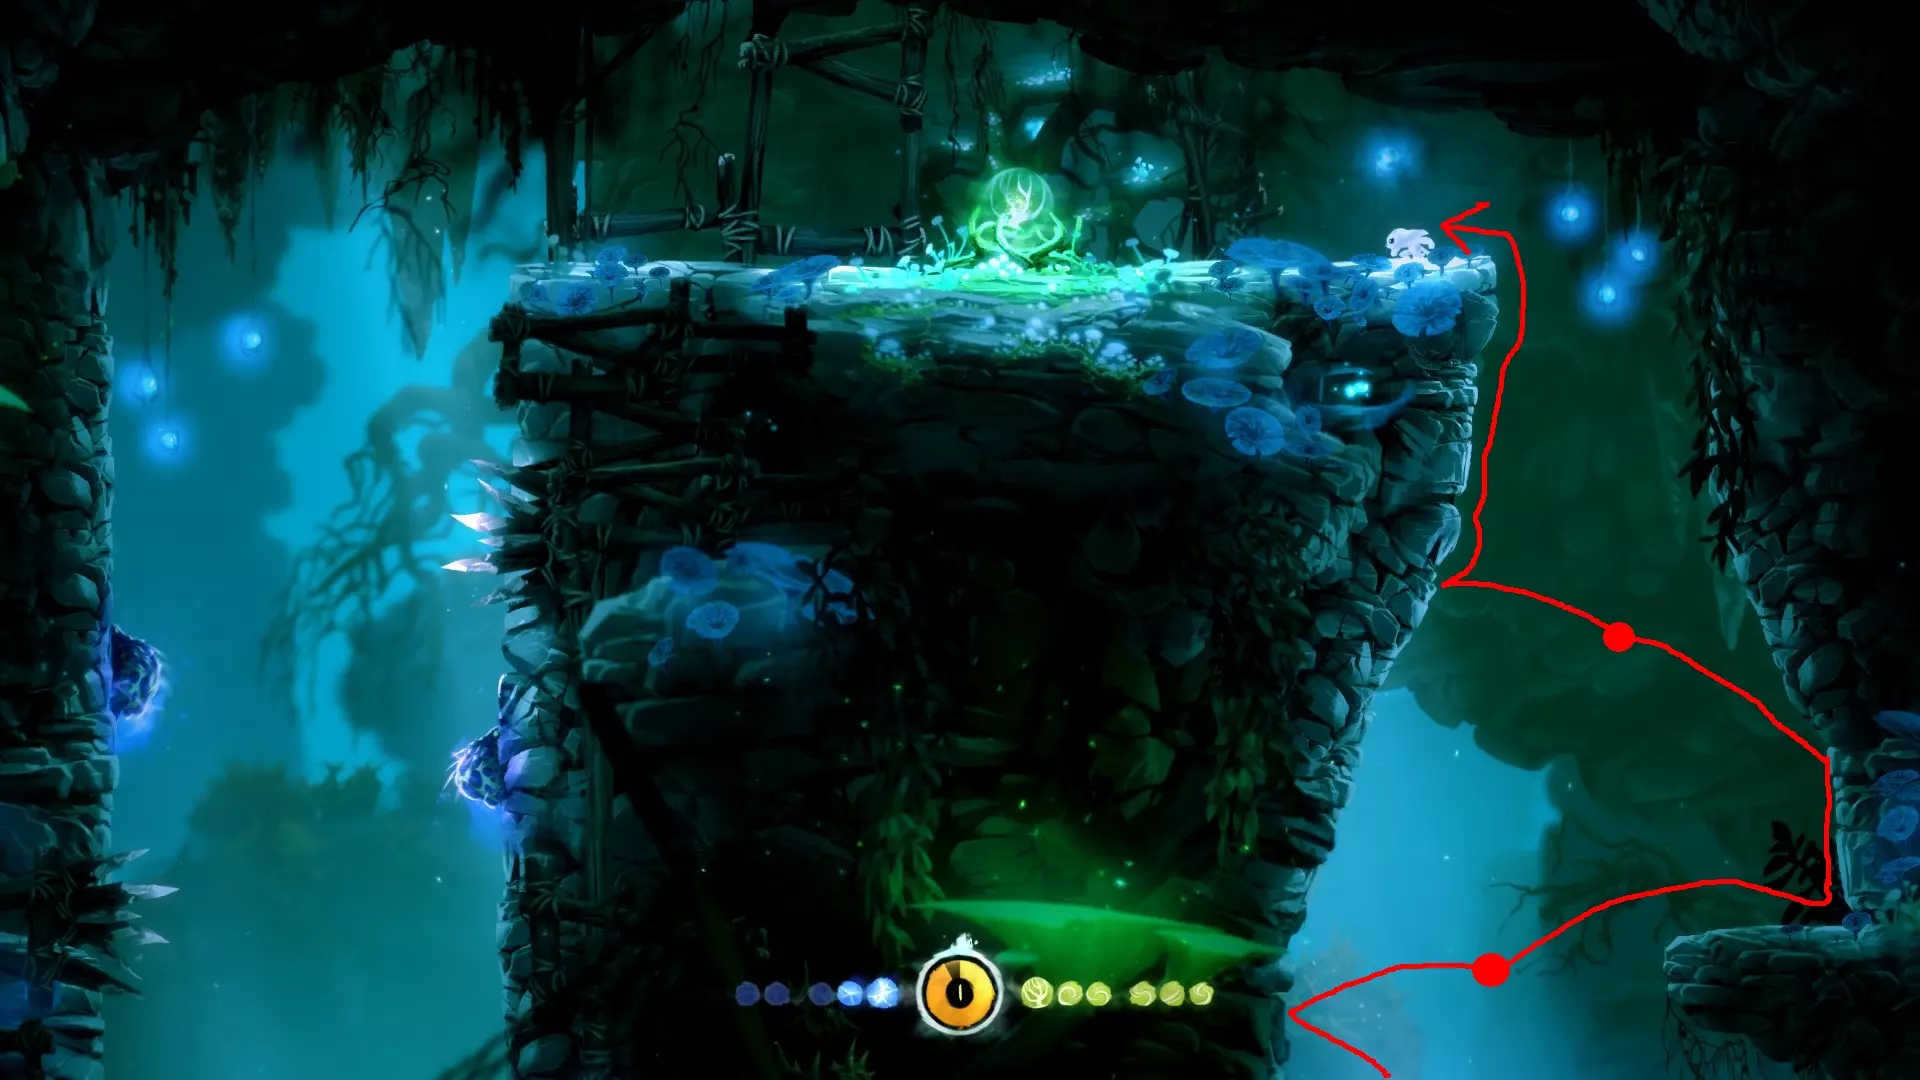
通常你只需向上猛击他就能获得足够高度,从而够到上方发光的树枝,无需猛击他的射击;我这么说是因为有时候如果你等着他向上射击,他可能不会配合。 接下来要立即猛击那4只鸟时要小心;如果你漏掉一只,开始向下坠落,库罗会在你反应过来之前就将你一击秒杀。 迷雾森林 当你到达这个位置时:
通常情况下,你需要向下和向右移动,并穿过移动平台和尖刺……这很危险。有一种更快更安全的上去的方法,利用那个跳跃的敌人:只需在木制平台的边缘等待,等他跳到你身上,然后向斜上/右方向从他身上弹开,并尝试落在尖刺上方。此时你就可以爬上这里的秘密通道了。
然后正常前进。小心那个会爆炸的敌人。 另外,按理说不用我多说,但……拿着火炬的时候一定要非常小心。在这种情况下,拥有强大的灵火确实能让你轻松不少,但暂时放下火炬,踩死那些 blob(黏糊糊的东西)也是个办法。 遗忘废墟 这只蜘蛛想毁了你的一天:
显然,当蜘蛛还活着且你携带冰冻球装置时,不要尝试穿过这里。相反,你应该将蜘蛛击退到安全区域,然后把它的攻击反弹回去,直到它被消灭。 这里有很多一击必杀的激光。我猜你已经知道如何通过这个关卡了,所以……在这些激光附近一定要小心。 这个房间的右侧有一个生命细胞。
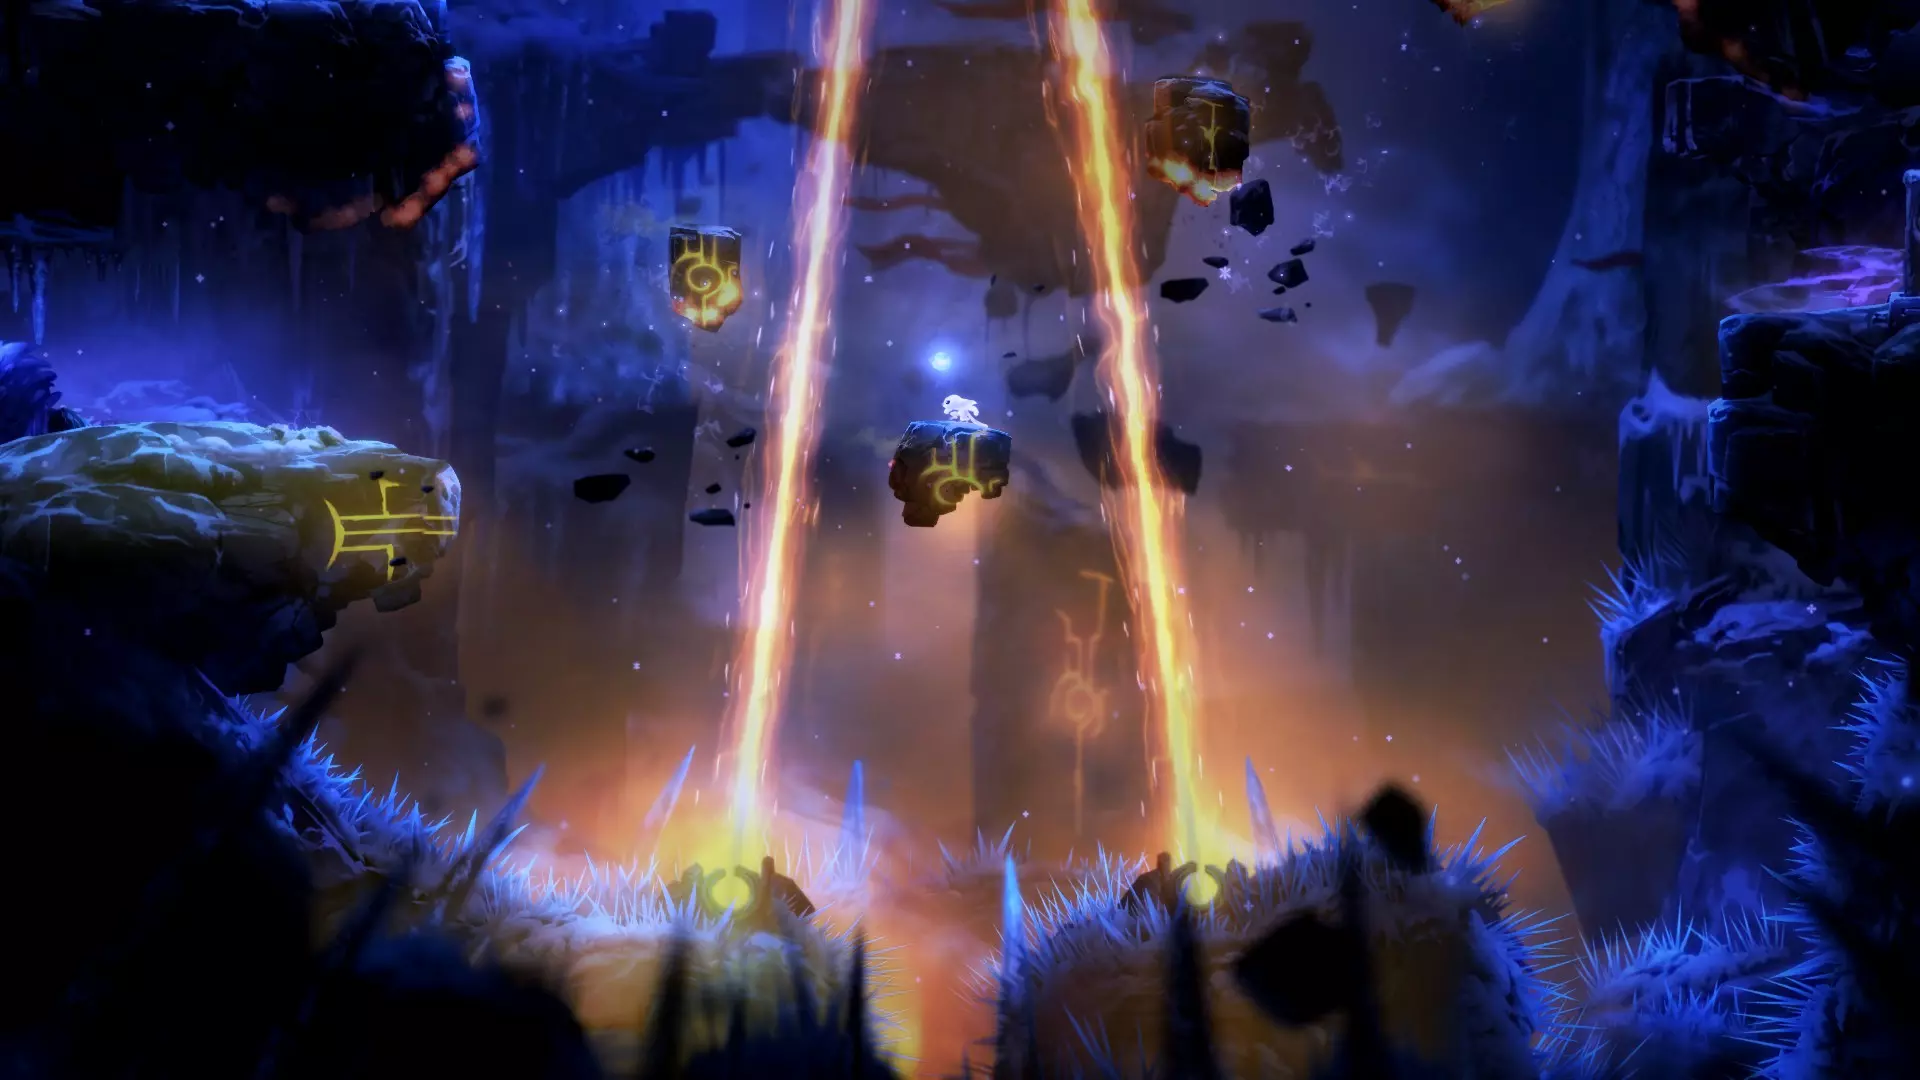
你看到那些激光了吧?通往生命细胞的路上还有更多。我们可不能在这上面浪费时间。别管它们,直接前往关卡终点。 悲伤通道 这里被称为悲伤通道可不是没有原因的。 这里的尖刺会造成4点生命值伤害,而且到处都是。 还有出其不意的即死激光。 绿色青蛙也很凶狠。 首先,上去收集你能立刻拿到的4把钥匙,但不要用它们去打开你通常会打开的那扇门:我们稍后需要用它们来跳过一个烦人的部分(你知道是哪个)。 而是从这里下去(路上要小心那2道间歇性激光):
不要杀死青蛙;先用它的攻击打破你上方的地板,然后再正常前进。 现在我们来到了大家一直期待的部分:

这就是我们一直留着那4把钥匙的原因……正常情况下,你得小心翼翼地在这片尖刺地狱里绕一大圈,再收集4把钥匙才能打开门……不过现在我们已经有钥匙了。只需要在到达门的过程中小心一点就行。 另外,还有一种方法可以完全跳过这个区域,我在速通视频里见过这种操作,需要用猛击把一只绿色青蛙一路拖到这里(它的生命值刚好能撑住),然后用它的攻击打破上层地面。如果你能做到,那就太厉害了。 注意在上去和下来的路上最后那两道间歇性激光。 霍鲁山 正如人们所说,这里才是“真正的考验”,因为到处都是即死陷阱。我们逐个房间来看: 左侧第一个房间 难度不算大,只要把握好跳跃时机就行。不过我得提醒一下,拿到左侧的拉杆后,应该在平台向你移动时跳过去,然后用右侧的灯笼向上猛冲。我这么说是因为我之前一直用一种更复杂且可能危险得多的方式过这个房间,所以如果有人想用什么其他“创意”方法,别这么做。 (感谢评论区各位的指正) 第二个房间 这个不难,注意躲避激光就行。 第三个房间 这可能是最难的一个……几乎整个地面都是岩浆,而且到处都有敌人向你射击。冲刺是你在这里生存的关键;如果你遇到困难,可以参考相关视频。 第四房间 这个小型逃生环节应该不算太危险,但之后的旋转激光肯定会带来麻烦。 右侧第一房间 那些下落的尖刺很烦人。它们当然是一击必杀,而且你甚至不能碰到它们的侧面,所以在返回平台上方时,要小心不要从平台侧面滑下去。 第二房间 换个口味,这是另一个相当简单的房间…… 第三房间 在激光区域要快速且精准…… 第四房间 那些红色激光“只会”造成4点生命值伤害,所以如果你有足够的生命值,你可以承受一次甚至两次攻击。不过在靠近下一个激光时冲刺要小心…… 最终逃生 这里没什么好说的,你应该把它牢记于心。祝你好运 你能做到的 ヽ(ʘ ͜ʖʘ)ノ