换一换
换一换 


这是一份面向新手的基础指南,旨在帮助刚接触游戏的玩家入门。 简介 这是一份面向新手的基础指南,旨在帮助刚接触游戏的玩家入门。 如果您完全没有玩过这款游戏,想要了解游戏内所有用户界面(UI)及相关流程,可以参考 Bulldozer 的指南。 游戏目标是击败所有波次及其对应的两到三个 Boss。每次游戏结束后,无论成功与否,您都将获得绿色硬币,用于解锁永久加成,从而让后续的游戏体验更加轻松。 本指南仍在完善中,并非包罗万象,有时我可能也会有理解不到位的地方。如果你发现任何错误或想要添加/更正内容,请告诉我。同时请记住,尝试和失败也是游戏的一部分。祝你好运,玩得开心!准备界面

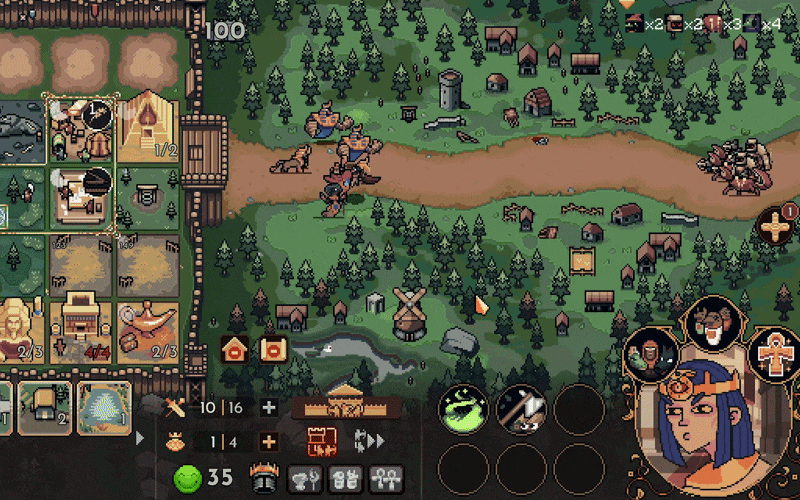
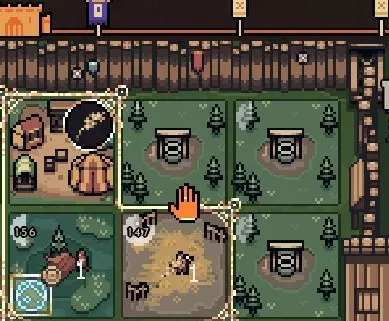
这是你开始一局游戏的地方。 左侧是你的国王,右侧是关卡/地图(村庄)。 关卡下方是修正值,其数值取决于关卡和威胁等级。 击败前一关后,威胁等级可以逐步提升,最高至10级。 注意提升威胁等级后修正值的变化! 要开始游戏,点击教程按钮上方的蜡质徽章。 另外还有三个快速提示: - 鼠标悬停在国王的画像上,可以查看其士气加成的额外信息。 - 首次在特定威胁等级下击败关卡后,你将获得一个升华水晶。与绿色硬币奖励不同,你需要在威胁等级旁边(红色发光处)拾取该水晶。- 我强烈建议完成教程 开局指南 本节旨在为游戏初期提供一些基本指导,帮助玩家明确早期目标和策略方向。 资源建筑和军事建筑分为三个等级:1级——基础/征召级,2级——正规/老兵级,3级——高级/精英级。所有基础和正规资源建筑在失效前会产出有限数量的资源(通常为200/1000)。 显然,建筑顺序会因情况而异,但在解锁内容不多的情况下,以下顺序对我来说效果不错:
Build the three wells immediately (water is mainly needed for wood and wheat but also for the research table) and put your gaze on it Build a tree asap and switch your gaze to 2 water, 1 wood (wood is needed for the next couple of basic buildings and troop capacity upgrades) Build a small field asap and switch your gaze to 1 water, 1 wood, 1 wheat (wheat is needed for the next couple of basic buildings and gaze upgrades) As shown in the picture above, place the buildings in 2x2, then 2x3, etc shape in the beginning in a way that enables you to rotate your gaze and always have all three tiles of it cover three of your buildings. Keep in mind that all buildings can be moved (hold shift, then drag and drop) and wells receive no temporary production malus after being moved. Wells can also be destroyed and rebuild for free. The malus for all other buidlings inst that significant, I'd say, so dont be afraid to move stuff if benefical in the long run. You do not want to gaze at unused tiles. As a kind of last ressort, move a well to at least produce some water instead of gazing at an empty tile (lots of water could be handy later). From here, you can focus on different areas: As a beginner prio #1: defense Build the peasant hut asap. The first wave is only one wimpy goblin but still. After the first wave, you always get a military building (levy barracks), which hopefully will be the backbone of your early army. Scaling your army strength will be an ongoing task. Market for gold for quick gaze upgrade Build the market (30 wood, 30 gold, 30 wheat), click on the ? and select wheat. Now you trade one wheat for one gold per cycle. Gold is used for gaze upgrades and buildings/units. With 60 wheat and 60 gold, you can upgrade your gaze. This first gaze upgrade is really important since it makes one more tile productive, increasing your productivity by 33% (potentially). Research bench for general or specific basic resources Build the bench for 100+ water, click on the ? and select the only icon available. Now you'll get a new basic resource building every cycle. It will pop up in the middle of the right side of the screen. This is somewhat important to ensure a steady supply of basic resource buildings. Otherwise, your are reliant on the wave rewards and the trader and might run into shortages for basic resources. While some form of defense is mandatory, the market and the research bench could be skipped entirely. But usually you definately want to build the market since it is the only gold source available in the beginning (the small gold mine requires gold to be build..). The circumstances can change drastically once you got more meta upgrades which provide starting resources/units etc. After these intial goals, I go with what the rewards offer me and what is rather easy/quick to actually build. F. e., swordmen need iron ore. So only pick them up-especially as your first military building-, if you have access to iron ore (a tier 1 basic resource which could be produced by your research table). For the first reward offered, you can either pick the resource building first and see which barrack matches that second. Alternatively, you could just gamble a bit and pick the most attractive barrack first, then try to get the required resource(s) asap. On threat level 0, pretty much every composition of units should be sufficient to beat the first couple of waves, as long as you are at full troop capacity (5+) on the field when they attack. Usually, in the beginning you will be fine if you have more or an equal amount of units than the wave. But pay attention to the different enemy types and their quality/stats. First there will be only goblin bandits, then goblin swordsmen, mages etc. Keep an eye out for an enemy type call wall buster. These guys ignore your troops and go straight for your walls to which they do quite some damage. So they are basically a dsp check for your army. They can also be abused/face-tanked since they ignore your troops but thats another story. After these inital waves, try to slowly but constantly expand your army by increasing troop capacity and building capacity, as well as building new military buildings (and the needed resource buildings). Upgrades for military buildings also can make a huge difference but you get those via rewards/trader only. This is the main task during the game, since the amount of enemies constantly increasse, also they get +15% on their stats after every boss and the bosses themselves are pretty though in general and can be way harder to beat than the waves leading up to them. A good mix of troop types (see next section) can be benefical. Like some melee tanks with some ranged units behind. On the other hand, focusing strongly on one unit class (again, see next section), makes unit class upgrades (which you get from rewards/the trader) more efficient. Either way, from this point on, I'd suggest to experient a bit, play and learn how your units behave as well as the enemies to get a feeling for their strength. Or you continue with the Goals&Strategies section of this guide ;) Goals and Strategies In this section I'll try to give a rough overview about possible goals and some basic strategies. Scaling your armyLike I already said in the previous section, scaling the strength of your army is the most important task in this game. In order to do that, you can increase the size and the quality of your army: Size of your army = Build untis til barrack capacity, build more barracks, upgrade barracks, increase battle field capacity Quality of your army = Build better (/higher tier) units, upgrade barracks, get unit class upgrades Size of your army Build untis til barrack capacity Easy enough Build more barracks For this you need more military buildings which you'll get via rewards afer waves (helmet symbols) and from the trader (upper row) Upgrade barracks More capacity. Building upgrades can only be bought from the trader ( second two items lower right section) or gained as wave rewards (saw symbol). Not all type of barracks have +capacity upgrades. Increase battle field capacity This is straight forward: you'll need wood, lots of wood. Every upgrade gives +3 capacity. First upgrade costs 80 wood, the next 160 wood, then 320, 640, 1200. Quality of your army Build better (/higher tier) units Higher tier units are way better than the tier 1 ones in their roles and have higher stat. And since this game gives good options to add +%, higher base stats scale better with +% in absolute numbers. The problem is, that most higher tier units require higher tier resoruces, not just basic ones. So you not only need to aqcuire a veteran/elite barrack but also the related advanced resource building and all the resources needed to build those buildings. See more on this "dilemma" in the trader section. Upgrade barracks Mostly stuff like more hp or more dps. Building upgrades can only be bought from the trader (second two items lower right section) or gained as wave rewards (saw symbol). Get unit class upgrades +15% bonus on hp or dps for one class(+25% with the Panther advisor). Unit class upgrades can only be bought from the trader (first item lower right section) or gained as wave rewards (hand with dumb bell symbol). Well and produce via the Hero Statue which is a Kingdom Infrastrucutre Upgrade (shield icon) Improving your economyThe economy part of this game is about producing enough resources in time to always stay on top of your army scaling needs (and/or whatever else you want/need to build) as well as your gaze upgrade needs. I already mentioned some basic tips about gaze and building placement in the beginning. Now I'll try to get into more details. Building placement - I usually use the outer ring of tiles for barracks and misc buildings (once meta upgraded) since you dont need/want them to be active all the time - That leaves the central 3x3 tiles for resource production - This is a bit dependent on the randomly placed +20% tile enchanments (once you unlocked them in meta upgrades, see sub-section below), since these boni really can make a difference in the beginning and should be utilized if not too unconvenient - With this approach, I have maximum flexibility with resources in the middle while also being able to still produce with most tiles under my gaze when switching to a barrack at the edge - If really needed, cluster barracks to be able to mass produce units Building priorities - In the beginning, wheat and especially gold are the most important so you can upgrade your gaze asap (gold mines are actually helpful) - After that, you'll have to see what resoruces are needed for the first barracks you picked up - Wood (battlefield troop limit), wheat and gold (gaze upgrades) stay relevant and should be continued to be produced when in doubt - Grapes and crystal are only needed for veteran barracks/their units and misc buildings and therefor could be ignored at the very beginning (until needed or first boss) - So while staying focused is benefical, more different resources offer more options when new buildings are offered later - Try to get and fully stack T2 barracks asap (usually offered after the 2nd boss but might appear as rewards/at the trader's earlier) - T3 buildings and units require advanced (T3) resources (flour, metal, oil, meat) and are your mid-late game goal Gaze Every king has a somewhat different gaze and gaze improvement path. Improving your gaze is important since it increases your productivity by increasing the maximum amount of tiles working at the same time. Each upgrade yields diminishing returns and often you cant really use all tiles of your gaze optimally. Still, upgrading is very important and in the late game it might be necessary to build lots of units in parallel f. e. which requires lots of resources. The starter king has this gaze upgrade path: 3 tile (square with one tile missing) - start gaze 4 tiles (square) - costs 60 gold and 60 wheat 5 tiles (square with one extra tile hanging over in the lower right) - costs ~140 gold, ~120 wheat and ~80 clay 6 tiles (2x3) - costs 600 gold Tile enchantments One other eco improvement early on are the blue tile bonuses which give 20% productivity. You get them via meta upgrades (green coins) and they are not bad especially at the beginning when you dont have much other boni. Roles, Units and Classes In this section I try to give a very basic overview of the roles, classes and units. After the first wave, you always get a military building (levy barracks), which hopefully will be the backbone of your early army. If it isnt what you wanted/isnt good, either reroll or make due with what has been offered until the next military building reward. But again, dont be afraid to test out stuff that looks mid on paper. Roles There are four basic "roles" for units. "Roles" because hybrid isnt really a role but is helpful to classify units in the beginning. Cavalry - Highly mobile DPS with unique attack maneuvers (mostly glass cannons) DPS - Damage via melee or ranged (often glass canons with low hp) Hybrid - Jack of all trades with decent hp and dps Support - Healing/buffing or otherwise helping w/o doing much if any damage Tank - Binding enemies, taking damage & catching arrows (high hp)This lists are based on my own opinion and experience with the game and is supposed to just give some orientation. The letters after the unit's cost are their class (see section below) Basic Levy (Tier 1) Units

刺客(190生命值,33每秒伤害;消耗30小麦+10铁,等级G)- 非常出色的混合型单位,但每个建筑仅限1个(需要大量铁矿石) 黑羊(...小麦10份+水晶10份,A+W)- 辅助型单位,在没有高级/资深建筑的初期毫无用处 十字弓手(50生命值,13每秒伤害;小麦10份+黄金8份,Ra)- 不错的远程单位,每秒伤害较高(需要黄金来建造兵营和训练单位) 地精(30生命值,13每秒伤害;黄金8份,G)- 每秒伤害尚可,输出不错但生命值太低(需要黄金来建造) 猎人(99生命值,3每秒伤害;小麦15份+木材5份,Ra+W)- 辅助能力差,能减速敌人,每秒伤害极低 疯子(70生命值,10每秒伤害)- 没有升级的话每秒伤害一般,擅长打带跑因此无法真正担当坦克/混合型角色(需要黏土来建造兵营和训练单位) 民兵(140生命值,7每秒伤害;小麦12份+木材15份,W)- 最优秀的一阶坦克(只需要谷物和木材) 农民(35生命值,10每秒伤害)- 坦克能力一般,生命值低(但造价便宜) 投石兵(46生命值,8每秒伤害;小麦10份+铁5份,Ra)- 远程能力一般,每秒伤害低 小骷髅(80生命值,10每秒伤害;水13份,G+U)- 还不错混合单位(仅需水即可建造) 剑士(80生命值,13每秒伤害;10小麦+6铁,W)- 最佳1级混合单位(需要铁来建造兵营和单位) 鞭手(60生命值,无每秒伤害)- 不错的支援单位,可提升其他单位的每秒伤害(需要黄金来建造) 老兵(2级)单位

Bumblebee (400/11; 50 Grapes, W+F) - good tank, boosts champions Centaur (../..; 25 Flour, ..) - have not used it yet, build in Fairy barrack Druid of the Badger (100/16; 50 Wood, A+W) - decent ranged/support, boosts .. Druid of the Bear (290/43; 40 Iron, A+W) - expensive ranged, only 1 per barrack, boosts riders Druid of the Owl (290/43; 10 Wheat + 40 Grapes, A+W) - expensive ranged, only 1 per barrack, boosts .. Fairy (200/20; 25 Flour, A+F) - decent ranged, barrack randomly produces these or Centaurs, boosts .. Fire Mage (70/29; 50 Wheat, A+Ra) - good ranged, boosts .. Goose Rider (240/38; 50 Wheat, C+Ri) - good cavalry, boosts .. Healer Mage (70/19; 55 Wheat, A) - very good support, constantly heals your troops, boosts Horse Man (200/38; 25 Wheat + 25 Grapes, Ri) - okay cavalry with pretty low hp, boosts .. Longbowman (120/25; 20 Wheat + 30 Gold, Ra) - very good ranged, boosts .. Mushroom Warrior (220/20; 25 Crystals + 25 Grapes, A+W) - decent tank, boosts .. Musketeer (120/19; 60 Wheat + 8 Iron, Ra) - good ranged, boosts champions Pumpkin Warrior (200/17; 40 Water, W) - okay tank, boosts .. Worm Rider (160/34; 40 Wheat, Ri) - very good cavalry (with desert barrack upgrade), boosts .. Classes Every unit belongs to one or more classes. Every unit has a unit trait which often gives bonuses to other classes/their class. Classes can get improved stats in a run via unit class upgrades which are a form of rewards after waves and can be bought from the trader. Classes become very important in later runs because of strategies&tactics that rely on synergies between classes/units. Arcane (A) Champion (C) Flying (F) Grunt (G) Ranged (Ra) Rider (Ri) Undead (U) Warrior (W) Battle The first draft of this guide is already too long, so only one tip regarding battles for now: There are three common scenarios regarding new units and deployment: Build a new unit and have it directly deployed to the battle field (up to battle field capacity) Red setting for "Spawn Troops" button (see below) Build a new unit and have it stay in the barracks (up the the particular barracks' capacity) Blue setting for "Spawn Troops" button (see below) Send a already build unit from the barracks to the battle field (up to battle field capacity) Click the "Quick Replenishment" button right of the deployment button So basically, what you want most of the time, is to field all units up to battle field capacity to maximize your army's strength. Then it makes sense to continue building units until all barracks are at their capacity (if you have the resources). That way, you build up a reserve of units to deploy from instantly in order to reinforce after losses (via "Quick Replenishment"). The red button in the lower center of the screen ("Spawn Troops") determines how newly build units are deployed. It has three settings (red, blue, mixed) which are important to understand: red = for immediate reinforcements - troops get deployed onto the battle field until you reach your battle field capacity (upper number left to this button, the one with the crossed swords) blue = for building up a reserve - troops get deployed into their barracks until the barracks' capacity (the number of units of this type the buidlings allows you to have) is reached. mixed = best setting until you learned the ropes - troops get deployed onto the battle field, then into the barracks until both capacities are at their limitUnfortunately, there is no option to auto-reinforce the battel field from barracks. So no matter the deployment setting, you have to manually sent troops from the barracks to the battle field via "Quick Replenishment" (unless they are newly build, then red and mixed are triggering). Wave Rewards and the Trader In this section I'll try to give a first orientation regarding the rewards available from waves and the things the trader offers as well as some general tips for interaction with them. Wave RewardsYou pick these when a prophecy is triggered after a wave and receive them by beating the future waves which you set up in said prophecy. The first prophecy comes after wave 5 (these first 5 waves before it are preset). Some tips about setting up a prophecy: I always check the optional section first and look for things I really need/want. As most of the time, this is dependent on circumstances. Esp. if the tier of the rewards just increased, like if the first tier 2 veteran barracks are offered just now, I'll probably pick them over anything else. But if I'm basically good on units for now, they drop in priority. But the general order for me is: Artifacts (chest icon): Extremely powerful, even game-changing (potentially) Advanced Resource Buildings (purple ...compass? and ruler icon): These seem to have a chance to come up early (on higher threat levels?), grab em if you see em! Meat, Metall, Flour and Oil (which are all the advanced resources) can be hard to get a hold on and should be picked in advance if offered (and if one wants to actually use them later, ofc). Current tier leve Resource Buildings (compass? and ruler icon): No resources, no nothing. See above. Also dependent on the units and strategy you choose, some basic resources might be in way higher demand while others are barely needed. So plan accordingly, running out of a resource entirely without an option to produce more can be the end of a run. Building Upgrades (saw icon): Be it more capacity or a boost to stats, military building upgrades are mostly great and somewhat mandatory IMO, plus you cant "produce" them. Upgrades for other type of buildings can be great as well, but I feel like the overall quality of them is lower than for military buildings, more hit and miss and/or more circumstantial. Unit Class Upgrades (hand with dumb bell icon): Can help massively with scaling army strength, esp. for dps but RNG is a thing here as well (more dps for my tanks, yay..). Resources (bag/box icon): Good for getting advanced resources early/without producing them yourself. Current tier level Barracks (helmet icon): More/better units! If you have the resources... Also somewhat mandatory. But usually once you freshly picked one, you are busy getting the resources together and building it and then its unis, so the interval for these is higher. Denari (pink coins icon): Money means freedom of choice at the trader's Kingdom Infrastructure Upgrade (shield icon): Very hit or miss IMO. Some of these are awesome, like the hero statue, but most of them are either expensive and/or rather mediocre. Spells (book icon): Can be very help- and powerful but rng and circumstances usually let me pick something else
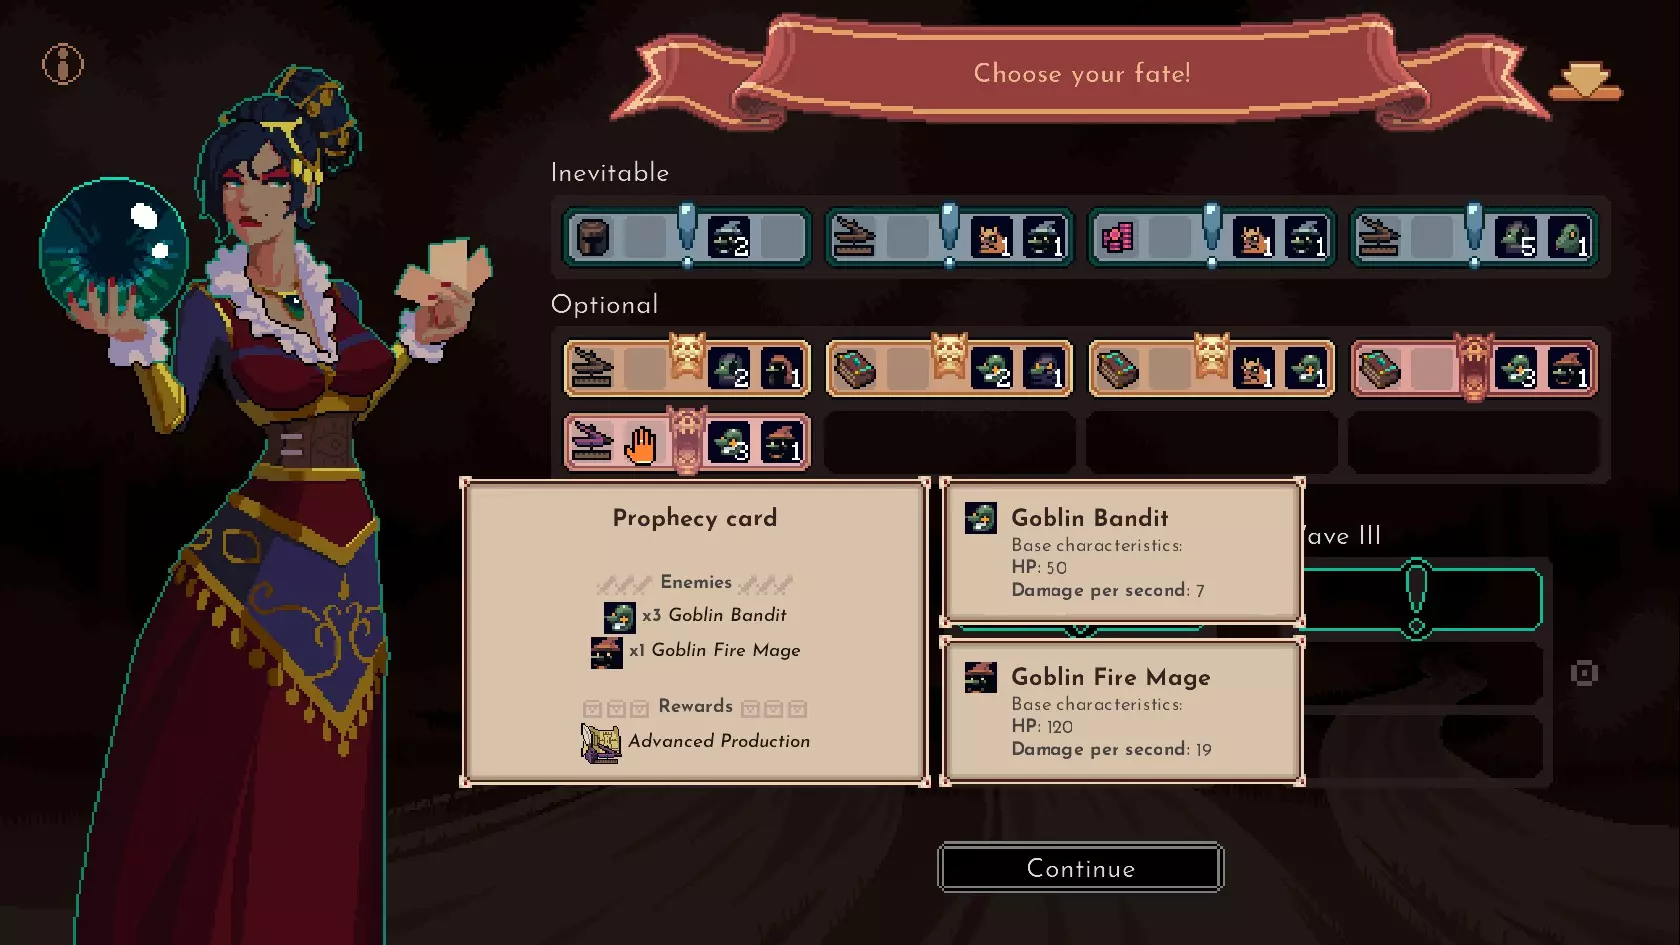
然后,在挑选出奖励最好或最需要的可选敌人后,我会查看哪些必选敌人拥有最好或最需要的奖励,以及哪些可以与已选择的敌人组合,形成易于应对的波次。 大多数时候,如果提供的奖励值得或敌人足够弱,我会在第一波填满除一个槽位外的所有位置。但尤其是在打赢 Boss 战后,当敌人变得更强、数量更多时,你可以考虑留两个甚至三个槽位空着。你不需要获取所有东西就能成功,平衡损失和奖励很重要,因为重建单位需要时间和资源。 关于领取波次奖励的一个提示:你可以花费 10 第纳尔(底部按钮)重 roll 除神器外的所有奖励。在关键时刻使用此道具,可提高获得有用或特定物品的几率。 领取不同奖励的顺序很重要!例如,领取军事奖励前(或相反),先查看是否有需要的资源。 另一种情况是建筑升级和新建筑:如果想有机会获得新建筑的升级,先选择新建筑,再选择升级。如果更想获得已有建筑的升级,则先领取升级,再领取新建筑。 不要拾取本次游戏中不需要且尚未获取的蓝图。由于上次更新的改动,这一点已变得不那么重要。 最后,对于解读预言后出现的事件,我建议优先选择单位,其次是 artifacts(遗物)、单位阶级升级和建筑升级。如果必须选择资源,通常优先选择高级资源。 商人 上述关于波次奖励的大部分内容也适用于商人,他提供的物品与我列出的相同。 但与他互动时存在以下差异: 始终尽量在商人到来时拥有至少60第纳尔,最好是110/120第纳尔(50或60的倍数,这是单个物品较贵的基础价格)。 检查你的未建造蓝图,看看是否有无用的等。你可以以每个5第纳尔的价格出售蓝图。如果目前确实没有什么对你有帮助的东西,不要害怕什么都不买或只买很少的东西。你可以在商人那里一次性花很多钱,所以稍微存点钱也不一定是坏事。 在商人那里,我通常会先查看遗物,然后是军事建筑升级,最后是顶部的资源和军事蓝图。我会尽量避免在这里花70购买单位等级升级,因为和他的其他物品相比,这似乎有些贵(但如果你有钱多余,还是可以买的,它确实不错,只是在这里有点贵)。 升级 好吧,我至少要在这里写点有用的东西,这样这个部分就不会一直空着了^^ 升级优先级 显然,这只是我的个人意见。 我会优先选择更多的顾问/顾问槽位和初始奖励。顾问非常强大,能极大地改变你的策略(蓝色技能树)。或许可以从织丝者开始,他能解锁华丽胡须。这家伙确实不错,可以在初期作为你的第一个顾问使用一段时间。此外,他还能解锁弄臣,而弄臣会带来一个额外的顾问槽位。 初始加成(【运行开始加成】,红色升级树,左侧,礼盒图标)对启动经济/防御帮助巨大,解锁后无需花费即可被动生效。 接下来/在此过程中,我建议解锁更多地块(【驱逐贵族】),因为你需要这些地块来充分利用资源,并建造足够的兵营(红色技能树,左侧 - 在【运行开始加成】的路径上/附近)。 其他早期值得解锁的还有【地块封印】(红色技能树,左侧和右侧),它们价格低廉、实用性强且为被动效果。