换一换
换一换 


如何最大化每位员工的食物数量指南(v0.65) 食物消耗与食物生产 所有种族的平民每天消耗0.5单位食物。不过,游戏中存在与人口数量无关的每日额外消耗。游戏初始时(拥有10名平民),这部分额外消耗为0.5单位,因此每日总消耗为5.5单位。随着游戏进程,该数值会逐渐增加。目前尚不确定具体原因,但推测可能与人口达到特定阈值或等级提升有关。若您了解具体机制,欢迎分享,以便更新本指南。总体而言,这部分额外消耗远低于人口本身的消耗,因此每位平民的日均总消耗通常在0.5至0.6单位之间。不过,你的产量会因员工种族、气候、土地肥力以及所生产的食物种类等因素而有所不同。每个员工的粮食产量差异极大,范围在0.5到2.8之间,通常为1到2。每个员工生产1单位粮食与2单位粮食的差异,相当于总人口中50%与25%的人致力于粮食生产的区别,这是一个巨大的差距。如果你想实现自给自足(即不过度依赖粮食贸易),那么你需要尽量减少致力于粮食生产的人口比例。 本指南提供了不同场景下各类食物的劳动效率数据。劳动效率由每个员工的粮食产量决定。获取食物并非只有劳作这一种方式,你也可以通过采集、狩猎或交易来获得,但本指南暂不考虑这些方式。如果你的平民因物种、气候或土地肥力低下等原因,不擅长生产某种食物,那么生产他们擅长的产品,再用其交易换取食物,可能是完全可行的策略。不过这类策略不在本指南的讨论范围内,本指南仅关注自主生产食物的劳动效率。 影响食物生产的因素 基础产量 当你将鼠标悬停在待建造的建筑上时,会看到每个员工的基础产量。这个数值已考虑了气候等部分因素,但未包含肥力(默认肥力为100%)和员工技能等其他因素。
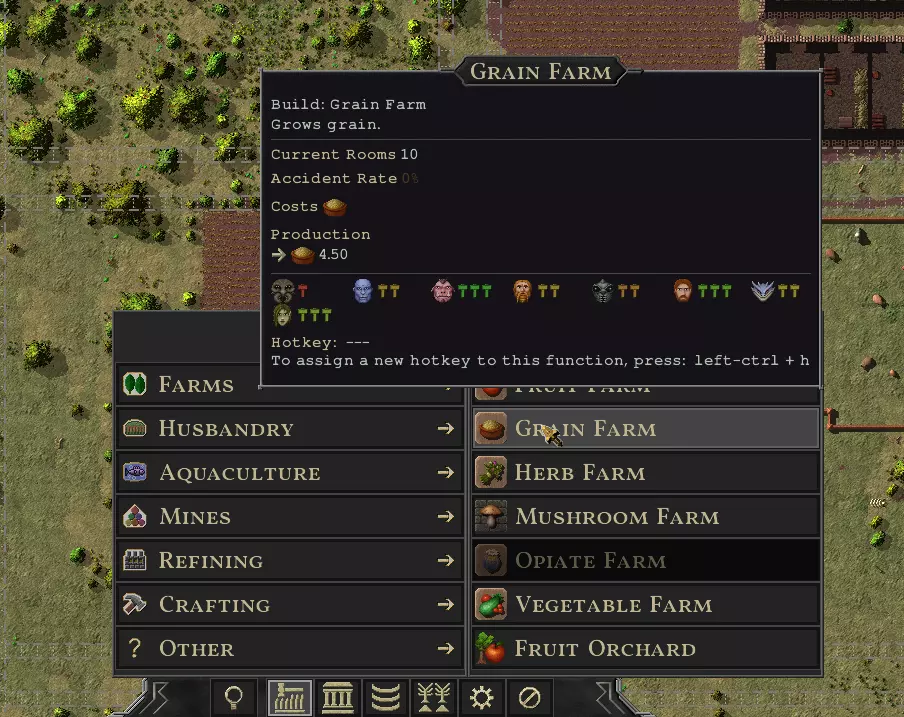
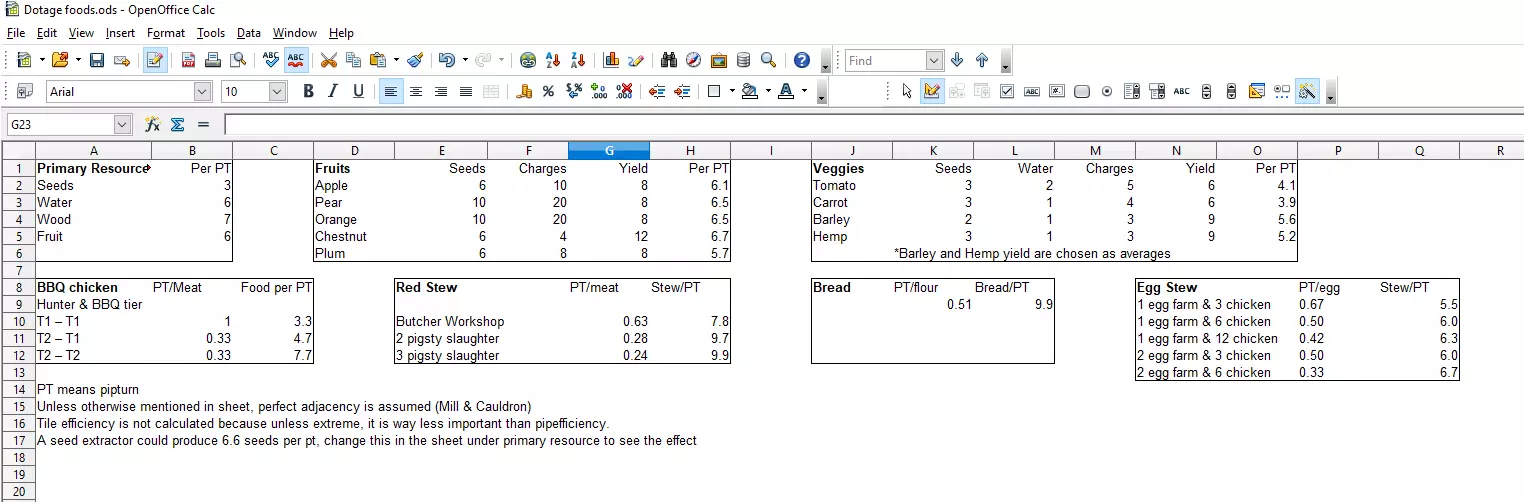
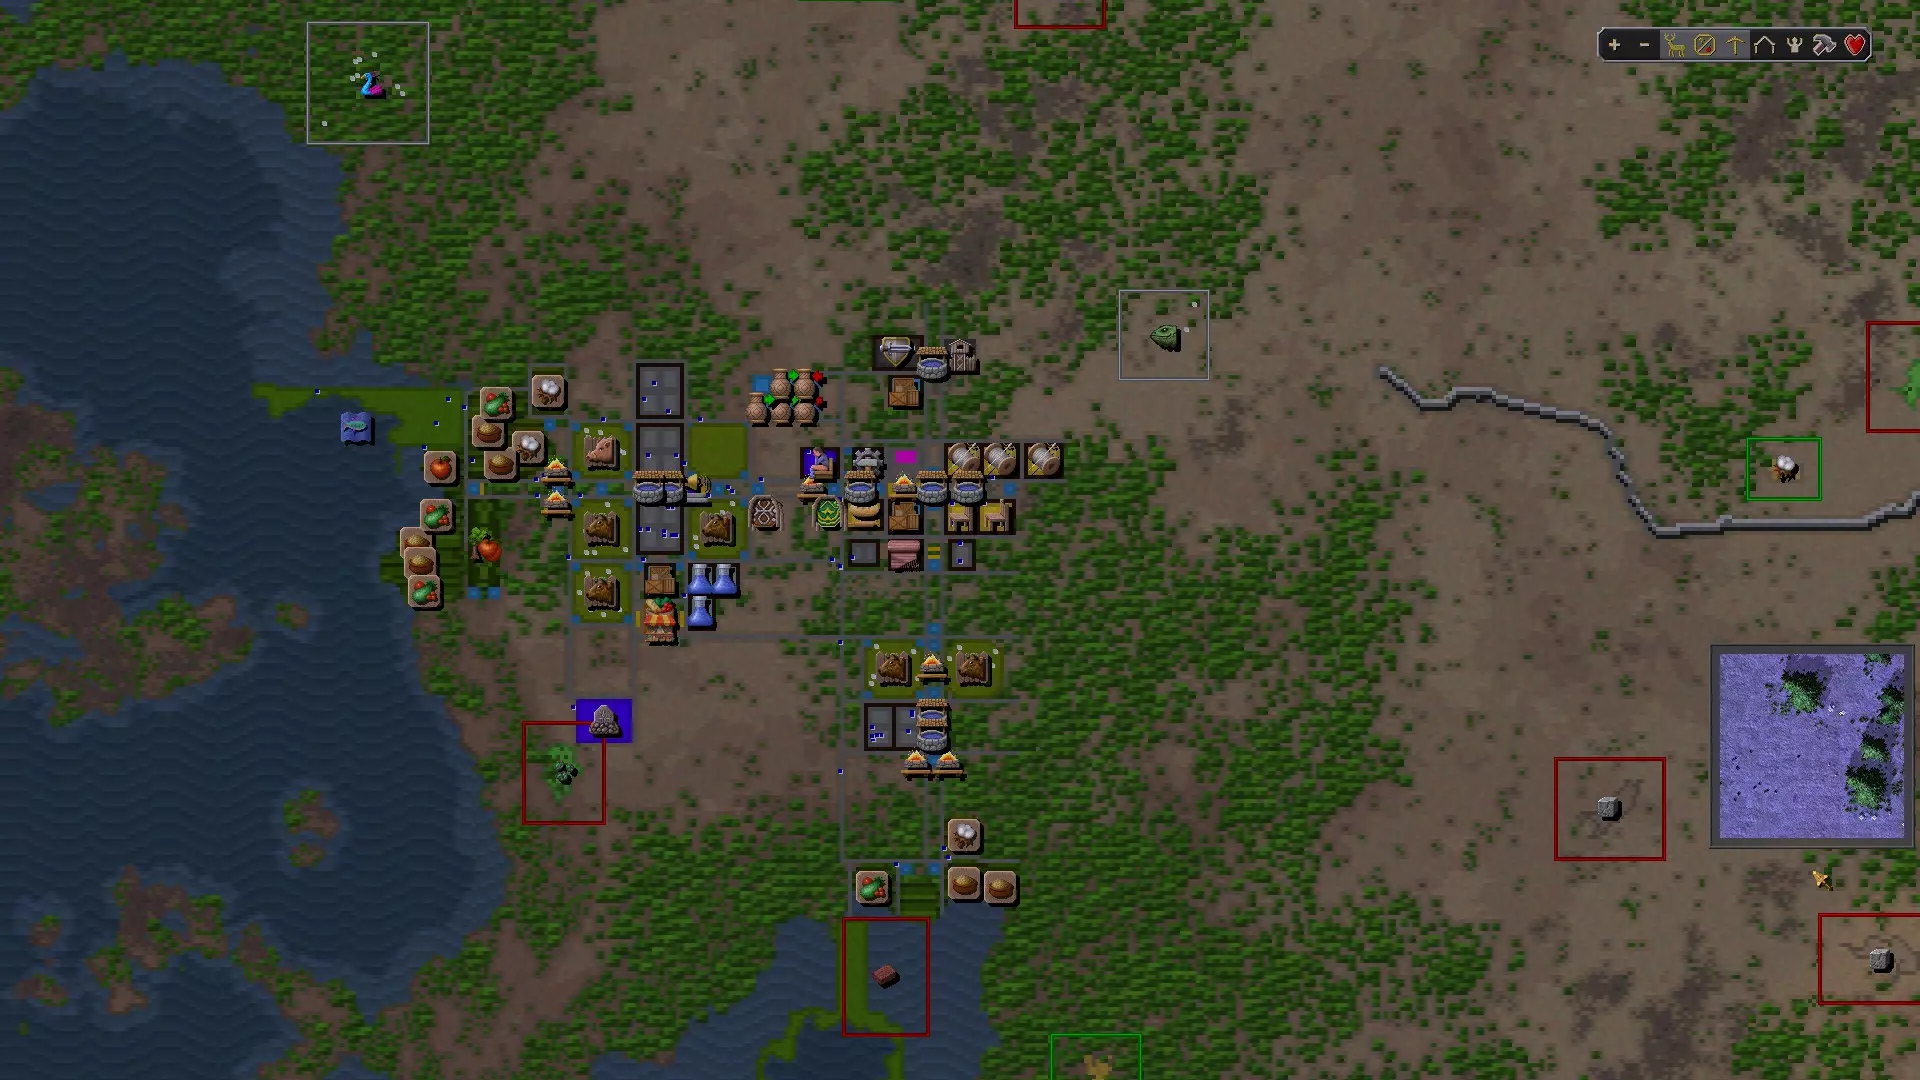
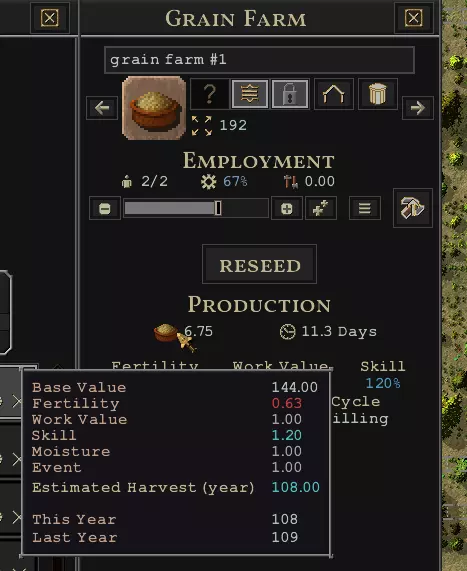
以下是各食品建筑的每名员工基础产量: 食品建筑 每名员工基础产量 备注 水果农场 1.5 谷物农场 4.5 蘑菇农场 1.0 蔬菜农场 1.5 果园 2.0 野牛牧场 0.5 同时产出等量皮革 波罗的海爬行者养殖场 1.0 完齿兽牧场 1.0 Globdien牧场 1.0 15%产出为肉类,85%产出为蛋类 Onx牧场 0.5 同时产出等量棉花 渔场 1.0 面包房 6.0 这些数字表面上具有误导性,因为它们未考虑肥力、员工技能或气候因素,而这些因素可能会极大地影响产量。 如何查看你的乘数: 当你选择一个食品生产建筑时,你会看到如下所示的菜单。
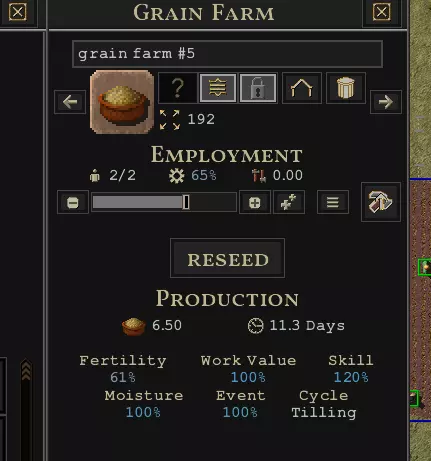
建筑产出图标旁“生产”下方的数字显示该建筑当前的每日总产出。将鼠标悬停在该数字上,会显示一个子菜单,其中列出所有影响产出的乘数,如下所示。请注意,此明细有时会显示年产出,有时会显示日产出。一年有16天。
当你看到标有【技能】的数字时,可以将鼠标悬停在上面,查看下方的子菜单。需要注意的是,【技能】不仅考虑员工的技能水平,还会受到环境因素的影响,这可能与直觉相反。有些建筑没有可悬停查看的技能数字,而是如前所述,当你将鼠标悬停在【生产】下方的数字上时,会显示详细的技能分解信息。
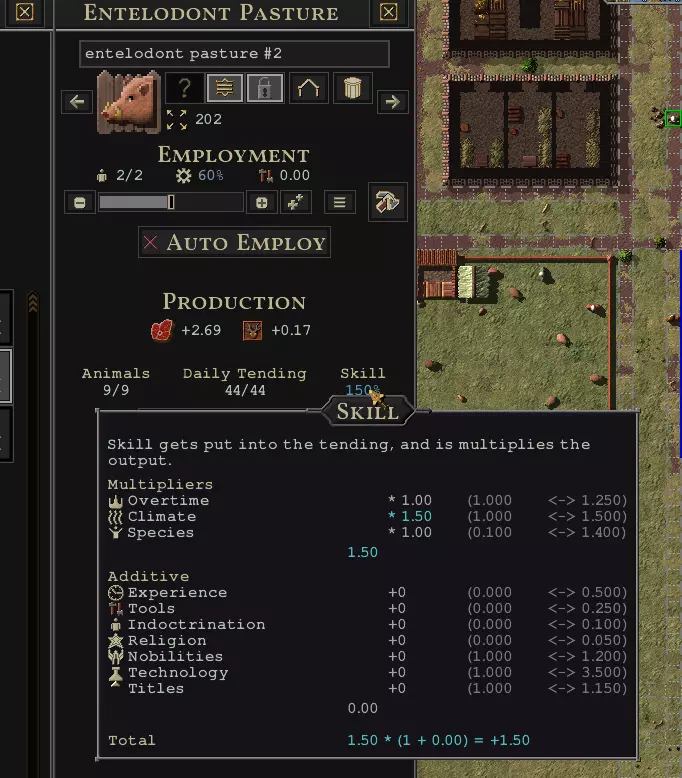
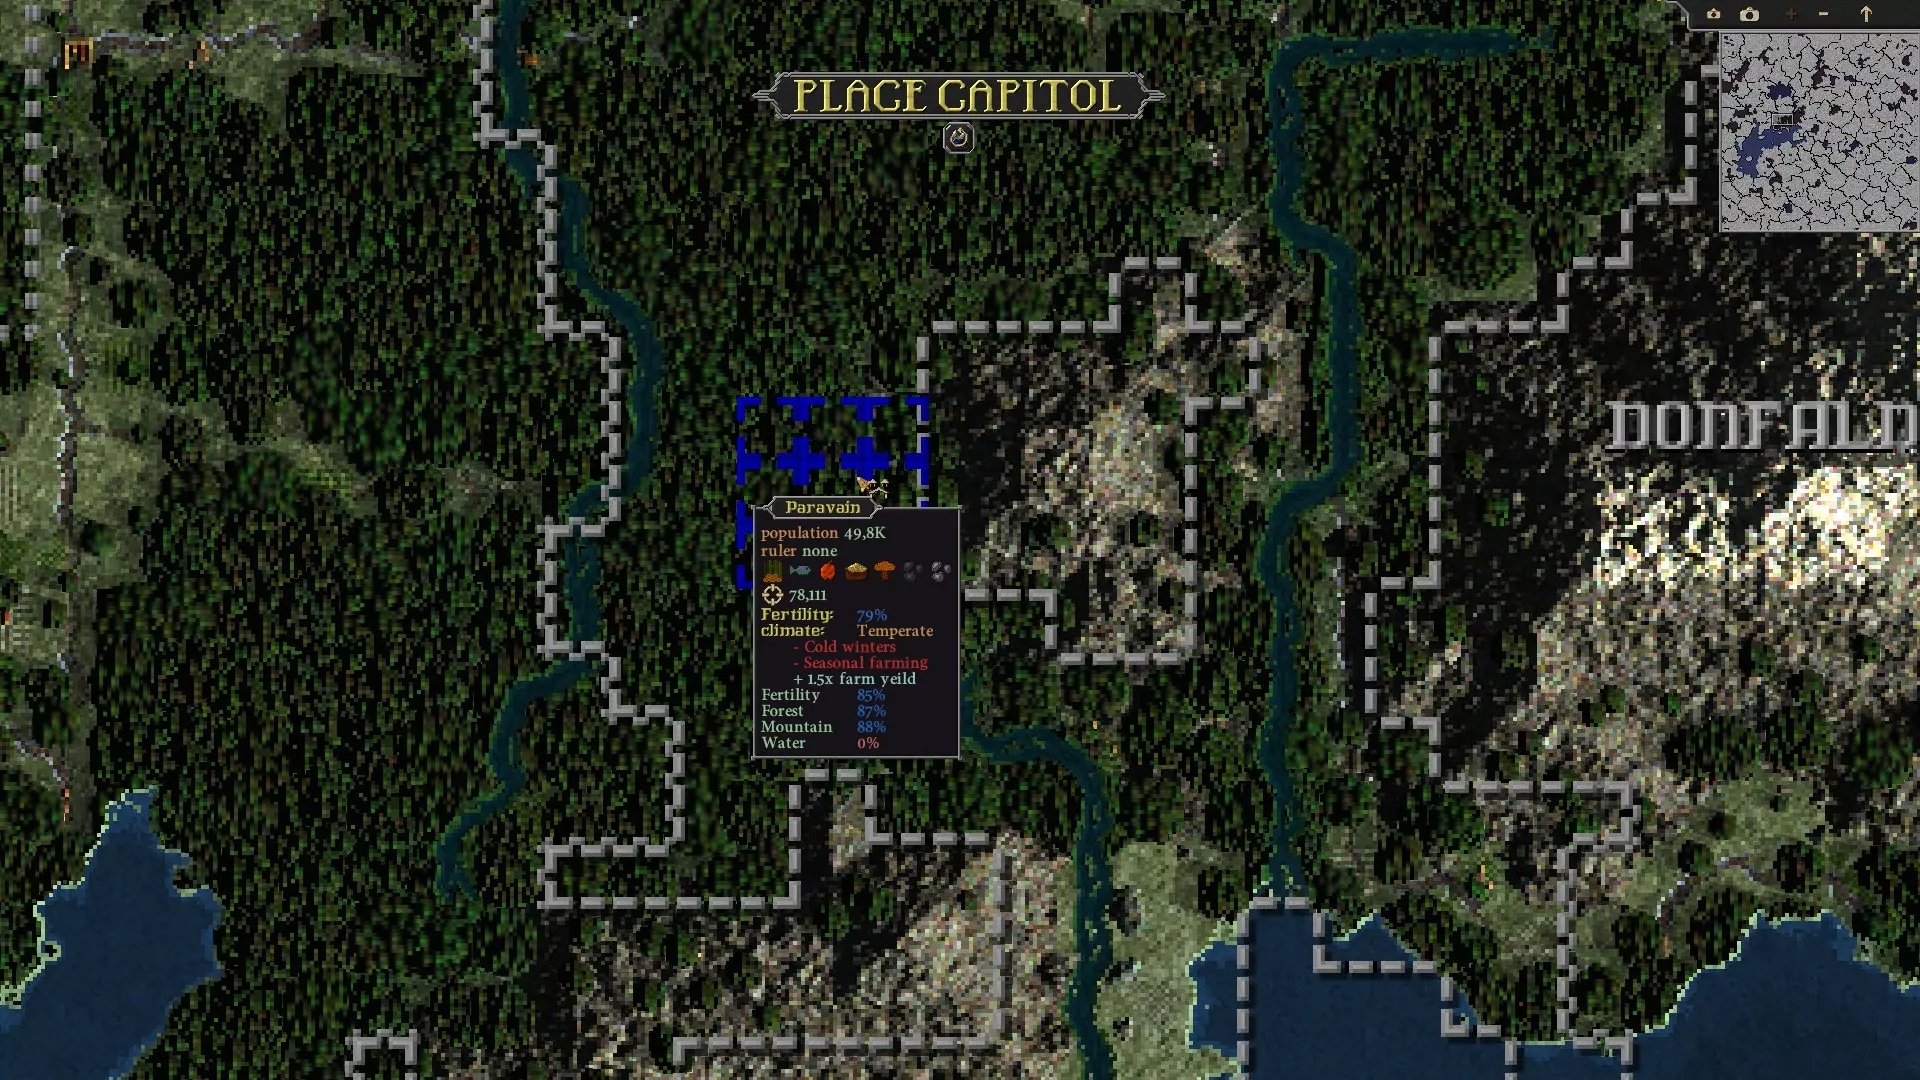
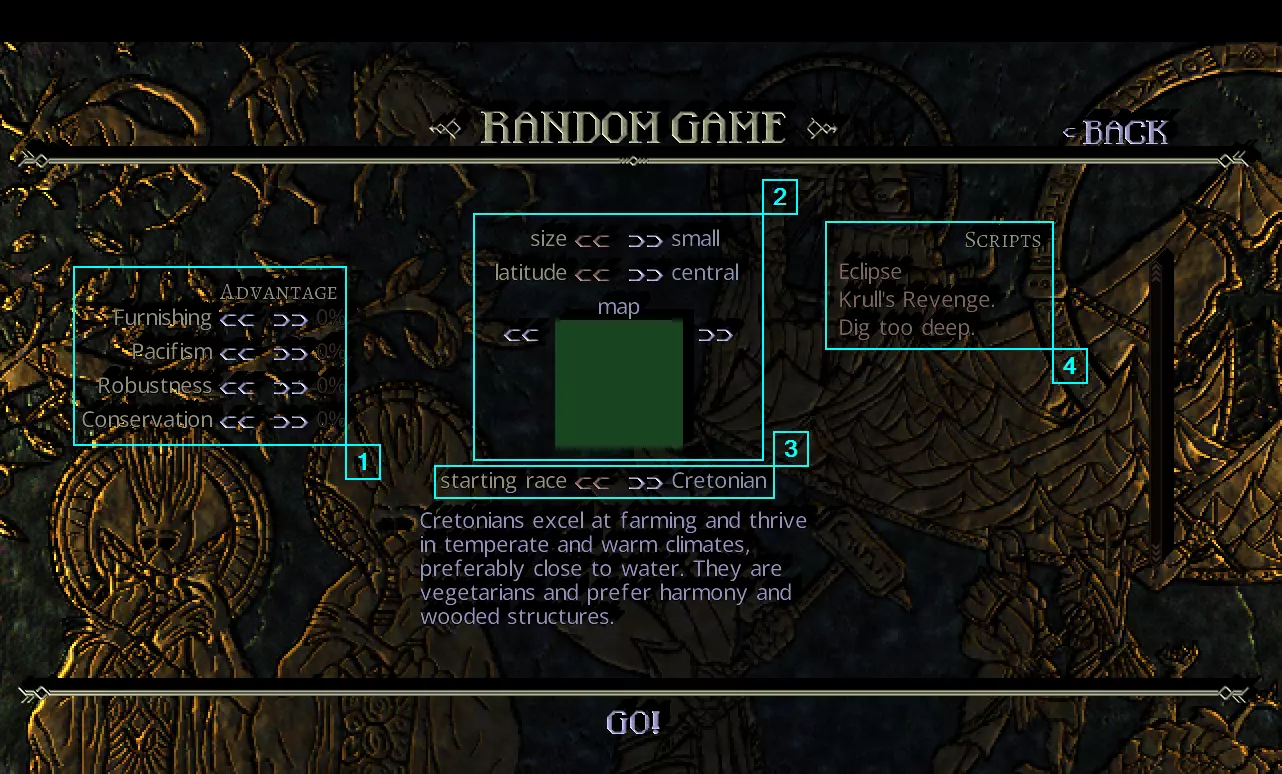
### 乘数机制说明 当鼠标悬停在【生产】下方的数字上时,会显示一个子菜单,其中包含所有相关的乘数(请注意,技能会考虑气候因素)。这些乘数是相乘关系。例如,若基础产出为100,技能乘数为1.50,肥力乘数为0.75,那么最终产出为100×1.5×0.75=112.5。 ### 物种 不同物种在不同工作上拥有不同的技能。该技能作为一种乘数,是决定应重点生产哪些食物的最重要因素之一。 ### 气候 不同气候也会对不同的食物建筑施加不同的乘数。在世界生成期间选择首都位置时,可以查看地图的气候和修正值,如下方截图所示。在世界生成过程中,寒冷气候区块通常分布在地图顶部,温暖气候区块通常分布在地图底部,而中部区块则多为温带气候。
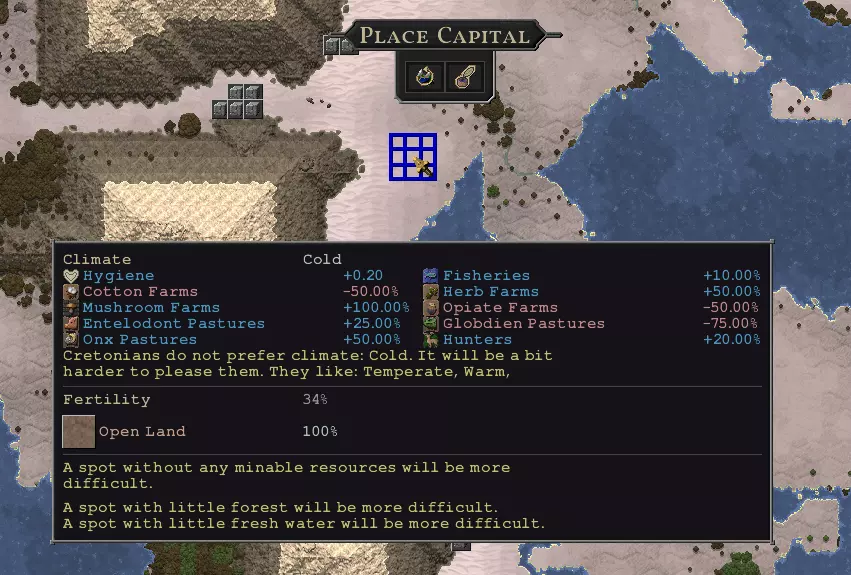
Fertility Fertility greatly affects all crops and pastures. Note that when selecting the location of your capital during world generation you will see the average fertility as well as your climate. These numbers vary greatly, from around 80-85% in forested areas near rivers to 10-40% in rocky areas near mountains. Fertility doesn't just affect output of farms, but also the size of your stables. Fertility, unlike with farms, is not actually a modifier that directly modifies your stables' production. Instead, it affects capacity, which is a similar but slightly different factor. With lower fertility, you will require larger stables to have the same output and same number of employees as a stable on higher fertility. Because of this, you can think of fertility as affecting the size of your stables rather than its output per employee. The output per employee will stay roughly the same, regardless of fertility. Other Factors The following multipliers also go into production, but are not used in the calculations in this guide. These numbers are nonetheless extremely important, it would just not be feasible to show numbers that cover every scenario. Work Value: The default value of this multiplier is 1.0 and it goes down if your farm is understaffed or if your workers are not putting in enough work for any reason. Moisture: The default value of this multiplier is 1.0. It goes up after rain and goes down with high temperatures. Event: Events such as blights or blessings can help or hurt output. There are also the following ADDITIVE values. These are Experience, Tools, Indoctrination, Religion, Nobilities, Technology, and Titles. When I say that they add into the skill multiplier after all the multiplicative modifiers are considered (such as environment and species). This makes them in effect multipliers, since they add into a multiplier. So if you have +0.30 to grain farming due to technology, and your skill was 1.5 otherwise, it will now be 1.8, resulting in a 30% increase in farming output due to technology. Effects of Species In-Depth The table below shows the skill of every species at every food-related job. FOODAmeviasArgonoshCantorsCretoniansDondoriansGarthimisHumansTilapisFruit0.70.10.61.40.650.51.21Grain0.70.10.61.40.650.51.21Mushrooms0.70.10.61.410.51.21Vegetables0.70.10.61.40.650.51.21Orchards0.70.10.61.40.650.51.21Auroch0.70.10.810.80.2511.4Blaticrawler10.10.810.81.510.1Entelodont0.70.10.810.80.2511.4Globdien1.30.10.810.80.2511Onx0.70.10.810.80.2511.4Fish1.40.10.8111.311Bakery10.1211.20.7511 The bottom line per species is as follows: Amevias: They are efficient with globdien and fish. Amevias prefer warm climates which further boost globdien, making this a particularly good choice for them. Argonosh: As their description says in-game, do not put these guys to work at anything. Cantors: They are somewhat bad at all forms of farming and husbandry, being slightly less bad at husbandry. They actually have a decent boost in bakeries. Cretonians: These guys are very good at all farming. They also do not have any food they are particularly bad at producing, making their food options particularly diverse. Dondorians: They do not have a positive modifier for anything outside of bakeries. You will need to rely on either mushrooms or fish. Mushrooms do much better at cold climates (and fish do slightly better as well). As Dondorians prefer cold climates, you should consider placing your capital there. Garthimis: They are bad at pretty much everything except balticrawler breeding and fishing. Neither of these get a large boost from any climate. Humans: These are much like Cretonians in that they are have a boost at all farming, but the boost isn't as extreme. Tilapis: They are very good at auroch, entelodont, and onx ranching. They are somewhat the opposite of Cretonians/Humans in this regard: being generally better at animal husbandry but having no penalties to farming. Effects of Climate In-Depth The table below shows the multiplier due to climate on food production. The foods not shown have a multiplier of 1.0 for all climates. FOODTemperateWarmColdMushrooms10.52Auroch1.50.751Entelodont1.511.25Globdien11.50.75Onx10.51.5Fish111.1 The bottom line per climate is as follows: Temperate: This is your default climate. Aurochs and entelodonts get a strong boost but nothing else is affected. Warm: A few foods are negatively affected but globdien, notably, are positively affected. Amevias prefer warm climates and are efficient at globdien husbandry, so are suitable here. Cold: Entelodonts get a slight boost while onx and especially mushrooms get large boosts. Dondorians prefer cold climates and mushrooms are the only foods they have a decent multiplier for, so are suitable here. Scenarios Overview What follows are sets of numbers for various scenarios showing the food production per employee for the various kinds of food taking into account species skill, climate, and fertility. Each scenario is for a specific species on a specific climate. The foods that species prefers will have an asterisk(*) before them, e.g. "Fruit" will be listed as "*Fruit" in the table. If you want to know how these numbers are derived, the derivations are self intuitive in most cases: the base output per employee (from the beginning of the guide) * the fertility (if the food is a farm) * the skill of the species at producing that food. The number for bread produced per employee considers both the employees farming grain and the employees baking bread. As an example humans with their 1.2 skill at farming grain would produce 5.4 grain per farmer on farms with 100% fertility. 10 farmers would then produce 54 grain, which would require 9 bakers to convert to bread (-6 grain, +6 bread per baker, 6 * 9 = 54). So for 54 total bread you would need 19 employees, which gives you a food per employee of 54 / 19 = ~2.84, which is what you will see for the human scenario at 100% fertility. Pastures are more complex in that they depend on a multiplier called "Capacity." Capacity depends on the size of the pasture and the fertility, but it is unclear how exactly it scales. In my experiments I was not able to determine an exact formula for capacity. This is the bad news. The good news is that the amount of workers also depends on the size. The bottom line is this: when you are placing a pasture, you will be able to see the number of workers the pasture will require. Your capacity will be roughly 90% of this number (according to my experiments). The lower the fertility is, the larger your pasture will need to be to staff the same amount of workers, and thus the larger your pasture will need to be to have the same capacity. If anyone knows the exact formula for capacity let me know. The numbers I show for pastures assume that the capacity multiplier is 100% the number of workers required. Scenario: Cretonians in Temperate Climate FOODPER EMPLOYEE*Fruit (100% Fert)2.1*Fruit (75% Fert)1.575*Fruit (50% Fert)1.05*Bread (100% Fert)3.073170732*Bread (75% Fert)2.643356643*Bread (50% Fert)2.06557377Mushrooms (100% Fert)1.4Mushrooms (75% Fert)1.05Mushrooms (50% Fert)0.7*Vegetables (100% Fert)2.1*Vegetables (75% Fert)1.575*Vegetables (50% Fert)1.05*Orchards (100% Fert)2.8*Orchards (75% Fert)2.1*Orchards (50% Fert)1.4Auroch (100% Cap)0.75Balticrawler (100% Cap)1Entelodont (100% Cap)1.5Globdien (100% Cap)1Onx (100% Cap)0.5Fish1 Bottom line: Their significant boost to all forms of farming makes them incredibly efficient at baking bread. This is probably the most efficient any race is at producing any food on any climate. They are also very good a producing fruit and vegetables, especially fruit when raised in orchards. Their efficiency with the various animals are decent. Scenario: Garthimi in Warm Climate FOODPER EMPLOYEEFruit (100% Fert)0.75Fruit (75% Fert)0.5625Fruit (50% Fert)0.375Bread (100% Fert)1.35Bread (75% Fert)1.125Bread (50% Fert)0.84375Mushrooms (100% Fert)0.25Mushrooms (75% Fert)0.1875Mushrooms (50% Fert)0.125Vegetables (100% Fert)0.75Vegetables (75% Fert)0.5625Vegetables (50% Fert)0.375Orchards (100% Fert)1Orchards (75% Fert)0.75Orchards (50% Fert)0.5*Auroch (100% Cap)0.09375*Balticrawler (100% Cap)1.5*Entelodont (100% Cap)0.25*Globdien (100% Cap)0.375*Onx (100% Cap)0.0625*Fish1.3 Bottom line: Their numbers are almost universally bad here. Garthimi are bad at producing every food except baliticrawlers and fish, but these are not incredibly efficient food sources to begin with. This is the only starting race that isn't most efficient with bread. Scenario: Humans in Temperate Climate FOODPER EMPLOYEEFruit (100% Fert)1.8Fruit (75% Fert)1.35Fruit (50% Fert)0.9*Bread (100% Fert)2.842105263*Bread (75% Fert)2.417910448*Bread (50% Fert)1.862068966*Mushrooms (100% Fert)1.2*Mushrooms (75% Fert)0.9*Mushrooms (50% Fert)0.6Vegetables (100% Fert)1.8Vegetables (75% Fert)1.35Vegetables (50% Fert)0.9Orchards (100% Fert)2.4Orchards (75% Fert)1.8Orchards (50% Fert)1.2*Auroch (100% Cap)0.75*Balticrawler (100% Cap)1*Entelodont (100% Cap)1.5*Globdien (100% Cap)1*Onx (100% Cap)0.5Fish1 Bottom line: Humans are much like Cretonians in that they are decent with animals but good with all forms of farming, except that they are less good at farming as Cretonians. Of note, however, is that their food preferences are different. They prefer meat so you may want some entelodont stables despite the low efficiency, and they also prefer mushrooms which they are just not particularly efficient at producing except in cold climates. In cold climates you can double the numbers listed for mushrooms which makes it a very good food source for them. Like most species they maximize efficiency with bread. Scenario: Avemias in Warm Climate FOODPER EMPLOYEE*Fruit (100% Fert)1.05*Fruit (75% Fert)0.7875*Fruit (50% Fert)0.525Bread (100% Fert)2.06557377Bread (75% Fert)1.695067265Bread (50% Fert)1.247524752Mushrooms (100% Fert)0.35Mushrooms (75% Fert)0.2625Mushrooms (50% Fert)0.175Vegetables (100% Fert)1.05Vegetables (75% Fert)0.7875Vegetables (50% Fert)0.525*Orchards (100% Fert)1.4*Orchards (75% Fert)1.05*Orchards (50% Fert)0.7Auroch (100% Cap)0.2625Balticrawler (100% Cap)1Entelodont (100% Cap)0.7*Globdien (100% Cap)1.95Onx (100% Cap)0.175*Fish1.4 Bottom line: Like most species, they are decent with bread. They are slightly less good, but still pretty good, with Globdien, which is ostensibly their specialty. They also get a decent boost to fish and fruit (from orchards), which they both prefer. Scenario: Tilapis in Temperate Climate FOODPER EMPLOYEE*Fruit (100% Fert)1.5*Fruit (75% Fert)1.125*Fruit (50% Fert)0.75Bread (100% Fert)2.571428571Bread (75% Fert)2.16Bread (50% Fert)1.636363636Mushrooms (100% Fert)1Mushrooms (75% Fert)0.75Mushrooms (50% Fert)0.5Vegetables (100% Fert)1.5Vegetables (75% Fert)1.125Vegetables (50% Fert)0.75*Orchards (100% Fert)2*Orchards (75% Fert)1.5*Orchards (50% Fert)1*Auroch (100% Cap)1.05*Balticrawler (100% Cap)0.1*Entelodont (100% Cap)2.1*Globdien (100% Cap)1*Onx (100% Cap)0.7Fish1 Bottom line: In addition to being labor efficient with bread, like most species, they are also very efficient with entelodonts and fruit orchards, which they both prefer. In temperate climate, they are the most efficient species at aurochs husbandry, but aurochs are not food efficient to begin with, which is offset by the fact that they also produce leather with the same labor efficiency. Scenario: Dondorians in Cold Climate FOODPER EMPLOYEEFruit (100% Fert)0.975Fruit (75% Fert)0.73125Fruit (50% Fert)0.4875*Bread (100% Fert)2.185214008*Bread (75% Fert)1.74953271*Bread (50% Fert)1.25077951*Mushrooms (100% Fert)2*Mushrooms (75% Fert)1.5*Mushrooms (50% Fert)1Vegetables (100% Fert)0.975Vegetables (75% Fert)0.73125Vegetables (50% Fert)0.4875Orchards (100% Fert)1.3Orchards (75% Fert)0.975Orchards (50% Fert)0.65Auroch (100% Cap)0.4Balticrawler (100% Cap)0.8Entelodont (100% Cap)1Globdien (100% Cap)0.6Onx (100% Cap)0.6*Fish1.1 Bottom line: All the numbers here are bad except bread and mushrooms. Even though Dondorians are bad at farming grain, they are good in bakeries, so bread is still a more efficient food source per same level of fertility than mushrooms. Dondorians also like to eat bread, which is a plus. They also like fish, which is absurdly easy to set up and receives a small bonus in the cold climate, making it a decent early food source. A Note on Space Efficiency Space efficiency is important too. Luckily, it is much more simple to consider. Farms: All farms require 1 employee per 96 tiles. Orchards: Orchards require 2 employees per 7 trees or 1 employee per 3.5 trees. Each tree requires 16 tiles (maximum), meaning 56 tree tiles requires 1 employee. This makes fruit orchards not only more labor efficient than fruit farms but space efficient as well. I say that a tree requires 16 tiles maximum because if you actually place trees in larger groups (by pressing 'e' on your keyboard when placing a tree) it will place trees in a row/column, but some of their tiles will overlap, making them even more efficient. Stables: I can't offer you a formula for how large a stable needs to be to sustain any number of employees. On a map with ~80% fertility, I notice I need something like 100 tiles per employee, roughly equivalent to a farm. On a map with ~10% fertility, a stable that was 1051 tiles required 1.45 employees. So assume stables will be slightly less space efficient than farms on high fertility maps and absurdly poor on space efficiency in low fertility maps. Bread: Obviously bread doesn't just require grain farms but bakeries. Bakeries can vary in size depending on how good you are at designing rooms. My personal 24 employee bakery room setup that I default to requires 351 tiles. At 100% fertility, this requires 3072 tiles of grain farm, so the space required by your bakeries is probably going to be negligible compared to the space required for the grain to sustain said bakeries. Closing Notes In conclusion, bread is powerful! Unless you are a Garthimi... This guide is written for version 0.65. If the game updates drop a comment and I will update the guide if any of the numbers change, time permitting. Also, I am not an expert at this game nor do I claim to be. I am just someone who likes crunching numbers and thought I would share the numbers I derived with the community. If I said anything drastically wrong in this guide, or if there is anything that you think I should mention but didn't, drop a comment and I might include it. Thanks for reading my guide. I hope it helped you out in some way!