换一换
换一换 


关于城市忠诚度、幸福感和顺从度管理指南。核心机制解析,值得与不值得做的事。 简介 大家好,本指南将介绍如何管理你的子民,并解释确保他们成为你马基雅维利式宏伟计划中安分守己的顺民的相关机制。 我会提及游戏中大部分幸福感来源(抱歉,是游戏内的),但不会涵盖每一个细节,因为那样做实在不值得。不过,我会描述看待这个问题的方法,希望能帮助你决定应该处理哪些事情、如何处理以及何时处理。 幸福感与忠诚度 有两个主要属性代表子民的状态——幸福感和忠诚度。幸福感源于子民的需求得到满足,高幸福感会吸引移民。忠诚度则更多关乎对臣民的控制。忠诚度降低可能会引发骚乱、工人罢工及其他负面后果。 乍一看,忠诚度和幸福感似乎几乎相同,但它们并非一回事。实际上,忠诚度源于幸福感,因此两者通常处于非常接近的水平。在游戏过程中,你甚至可能注意不到两者的区别,可能只会因事件产生微小差异。 两者的一个区别是,你可以通过临时措施影响忠诚度,例如给民众放一天假或发放金钱补偿。这会在一段时间内提升忠诚度(从而避免他们骚乱),但不会让你接纳更多移民。 两者的主要区别在玩家游玩更高难度时才真正显现出来。例如,如果你将忠诚度设置为【高+】。
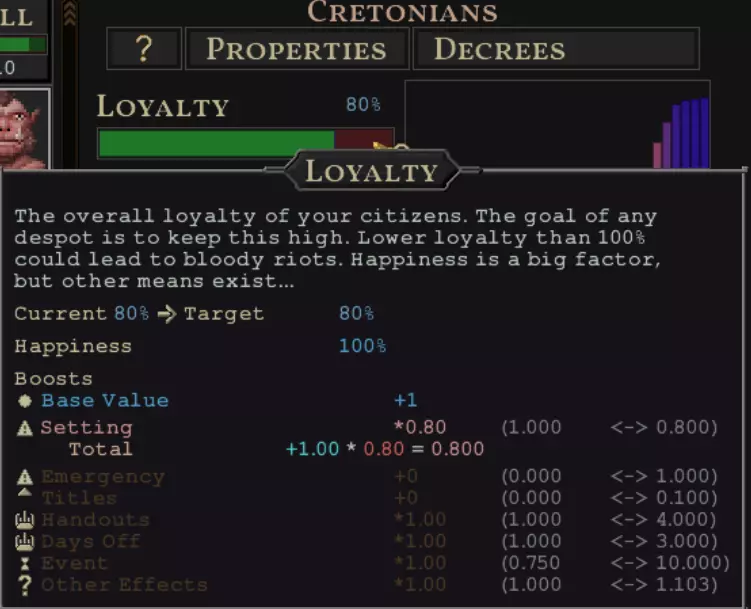
You can see a modifier here, it causes loyalty to have a 0.8 multiplier. Happiness will never be higher than 100%, so with this setting you will not be able to hit 100% loyalty with just happiness. Also keep in mind that there aren't many ways to increase this stat except +0.10 from the title. Combining facts, that `Hard++` is 0.6 multiplier and loyalty below 75% causing negative events, you will have a lot of riots all the time without any way to mitigate them. If you want to fiddle difficulty, I strongly recommend instead to tweak happiness difficulty, because this one you have influence over(you have to provide more services more early for the same amount of happiness). Overall, increasing difficulty in this game in any aspect goes pretty much exponentially, likewise same goes for easier difficulties. Happiness will never go above 100%. If you have much higher fulfillment than expectations, these are just empty points. If you notice it, you can cheapen out on some furniture to save resources, unless you swim in it and don't want to micromanage. Both happiness and loyalty are split by race. Negative events also occur with this in mind, so you might have loyal humans, but disloyal amevians and garithmis. In case of riots, it can be amevian, garithmi, amevian AND garithmi, but humans won't participate. Adjusting racial preferences Each race has different preferences and your settlement has to reflect that. Most of the things are common - no one likes to starve. But not everyone appreciates cannibalism, only Garithmi and Tilapia like it. Some are scaled - everyone gets bonus from taverns, but Cretonians get much more from it. Next parts of the guide will mention most significant of these differences, but if you want to fill all their hopes and dreams - just check the population tab of the relevant race, everything is there. If you are unsure, tooltips are your friends too. Expectations To manage happiness well it is crucial to understand how expectations grow and its not very intuitive. It is calculated separately for each race and depends on the following factors: - your starting race - race modifier - race population - total population Race modifier: Race Expectations factor Argonosh 1.0 Amevian 0.65 Cantor 1.0 Cretonian 0.8 Dondorian 0.6 Garithmi 1.0 Human 0.9 Tilapi 0.55 This modifier is a divisor in expectations formula, lower is worse. The contribution of this factor is linear - in short 60 dondorians will have same expectations as 80 cretonians or 100 garithmi. Then there is your starting race which matters A LOT. Starting race counts as your faction race and non-faction pops have their expectations contribute double as much as a faction race. This is only about this particular race expectations, so 200 dondorians don't contribute twice as much to tilapi expectations, but if you are non-primary dondorian, their expectation counts as if there were 400. Your starting race should be the one you plan to have the most pops with. The population itself counts almost everyone. Plebeian, slave, child, retiree or deployed soldier contribute the same to the expectations. While expectations highly depend on the race population, the total population counts as well, so even a single tilapi in a 12k dondorian city will have somewhat high expectations. Also, because everyone counts, you might have 2000 cretonian slaves and a single cretonian freeman, and this one free cretonian will have expectations as high as if there were 2001 free cretonians. Soldiers that are deployed on the world map also count, so while they are no longer take capacity of your services, they still contribute to that. Therefore you should rely on conscripts as much as possible to reduce this drain. As far as I understand criminals and insane people don't count towards it. Fullfillment Fulfillment, except for the titles, is pretty much the only way you can control happiness. It represents all the needs a given race has fulfilled and it's represented as a percentage. The fulfillment has two components: expectations and reality, both represented as a percentage. On normal difficulty when expectations and reality are equal, then your citizens will have 100% happiness(assuming no other bonuses/penalties). On other difficulties happiness has a penalty multiplier, which has to be offset with fulfillment proportionally. Like if you play on Hard+ happiness(multiplier x0.8), when your expectations are 20%, fulfillment at 20% will only give 80% happiness. You actually need 25(20 / 0.8 = 25) to reach 100% happiness. There are other bonuses, mostly from titles, that can give a lot of happiness. These in turn allow your population to be much happier despite not meeting fulfillment. Keep in mind, that multiplier also affects these bonuses! 0.15 bonus on Hard++(x0.6) is reduced to only 0.09. Alternatively playing on normal with full title bonus to happiness might trivialize a lot. Considering this is flat +0.5 boost to a value that is a multiplier to your happiness, it gives you x1.5 multiplier. This basically means that 60% happiness from fulfillment will result in 90% final happiness(assuming normal difficulty). Use these bonuses freely! They are hard to get for all the races and if you unlocked them you 100% deserve to get some boost. You might notice, that these values are very small, like 0.078%. This is normal, as the formula is, as the tooltip indicates, exponential function of fulfilled needs compared to all possible fulfilled needs. Before we discuss sources of fulfillment, keep the following in mind: there are things below that I describe as not worth it etc, I mostly mean they're not worth going for initially. When game goes on, your populations hits late 4 digits or maybe 5 digits(or perhaps if you play on higher difficulty), at some point all low hanging fruits will already be picked and you'll have to go for more expensive solutions. Larger food rations might be hard to justify early on, but at some point you will introduce them. You don't need 100%, but there are a lot of non-trivial population needs and you will have to make your choices. Fullfillment points If you look at your population tab, you will see several categories, every category with its own fulfillment bar and point value.
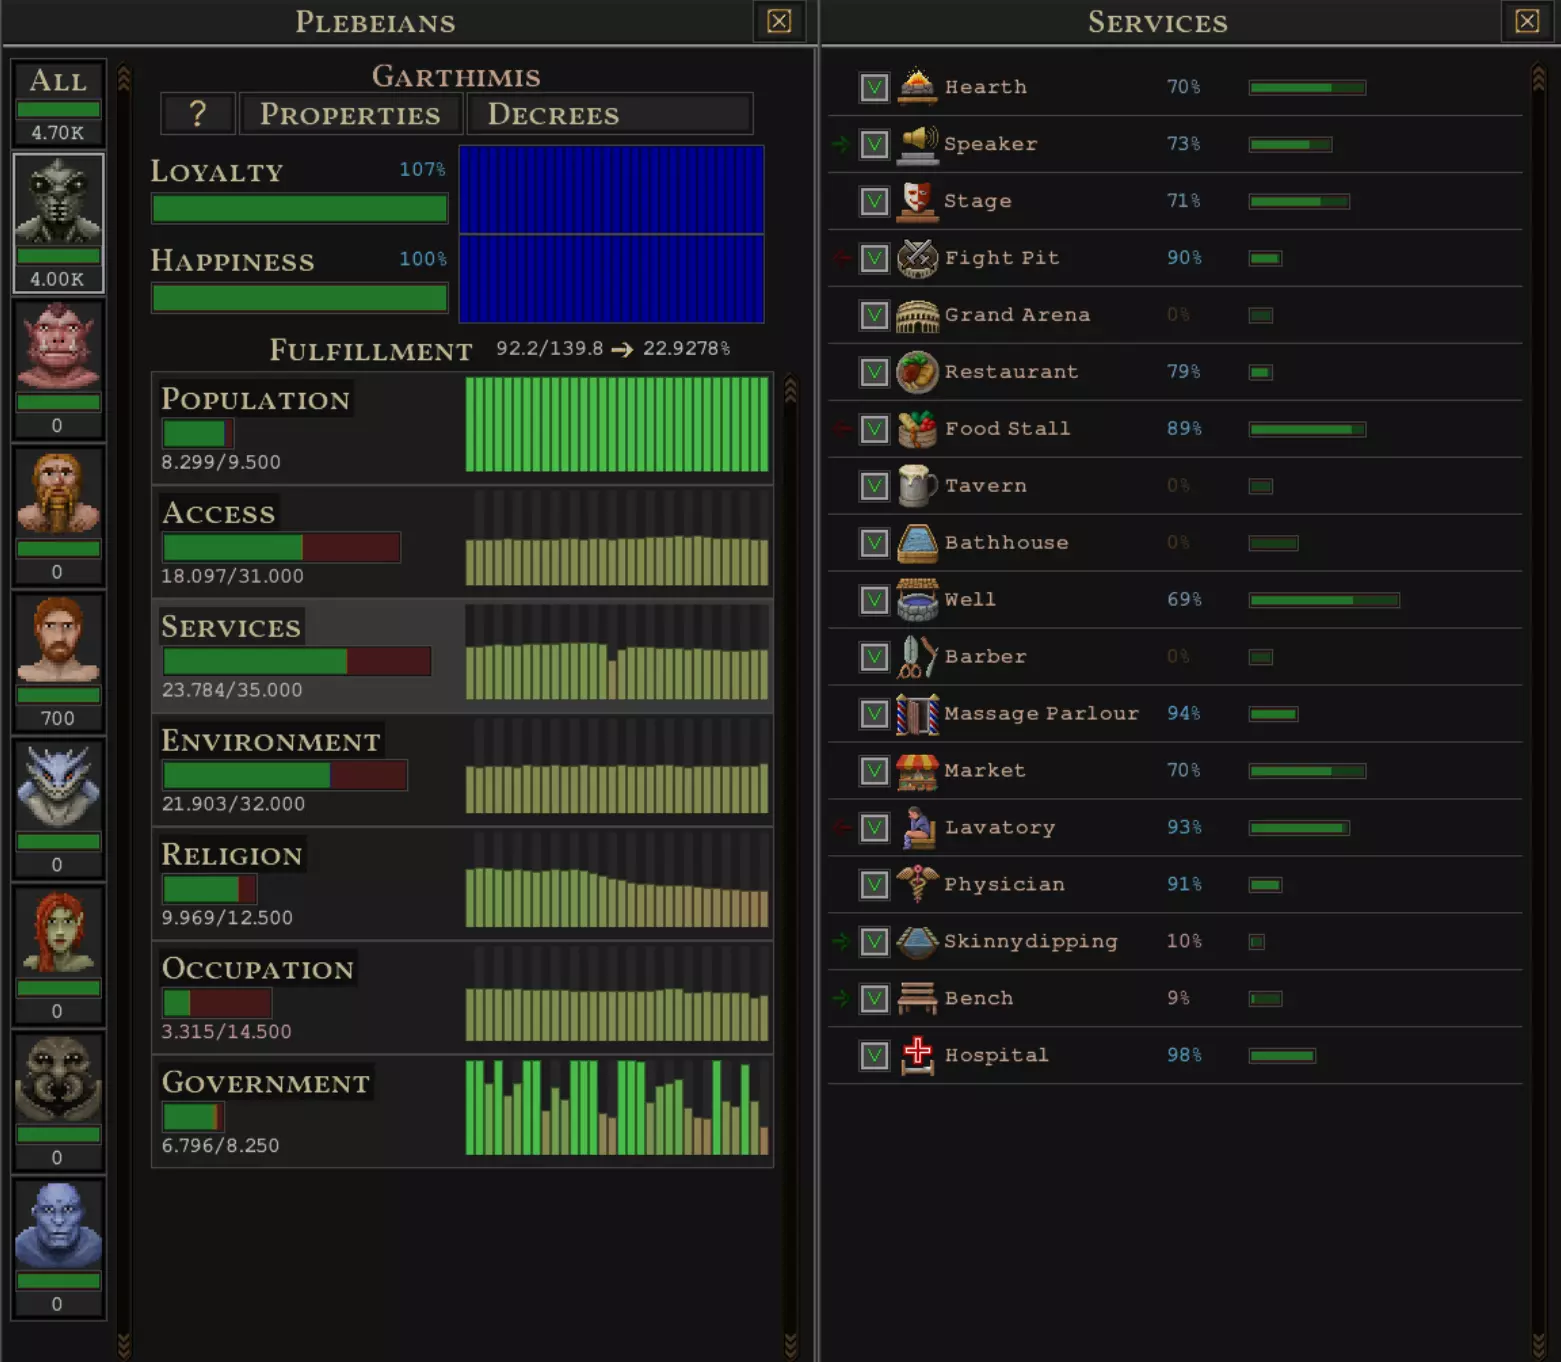
之前我们讨论过幸福度是满足度百分比的结果,现在我们来了解这些百分比所基于的数值。你可以看到所有满足度类别,以及每个类别可以获得的点数。每个种族在这方面的分配都不同,尤其是坎托人和阿格诺什人。 这些点数的应用有两种方式,取决于某个种族是喜欢还是厌恶某事物。 喜欢的事物在向居民提供时会获得进度。例如,居民喜欢能进入食品市场,因此他会获得满足度点数。 厌恶的事物则保持100%并提供“免费点数”,只要他们厌恶的事情没有发生。例如,居民可能厌恶同类相食。只要你的城市中不将尸体加工成肉类,这项满足度就会保持满值。一旦发生这种情况,进度条会清空并需要缓慢恢复。虽然意外的同类相食可能很棘手,但例如当暴徒摧毁你的墓地时,所有人都会因亵渎行为而失去满足感,这可能会造成沉重打击。大多数种族都强烈厌恶这种情况(会扣除大量点数),且恢复过程相当漫长。 重要的是要关注各项内容提供的点数,有很多容易实现却能提供大量点数的“低垂果实”,比如厕所;也有很多需要付出巨大努力却几乎没有回报的“陷阱”,比如珠宝。 现在让我们简要浏览各个类别。 人口: 人口类别基于你的人口构成。如果你是多物种聚居地,这个类别就不可能填满。每个种族都希望拥有本族的贵族。每个种族都希望自己是多数种族。大多数人憎恨自己的同类沦为奴隶,但有些人却希望他人成为奴隶。 这算是一种长期的满足来源。你对其有影响力,但改变人口构成需要很长时间。其中唯一的短期影响点来自“枉死”,这要么会引起不满,要么是中性反应。 这些大多是成比例的,但并非全部——贵族就不是。如果你有9个东多里安贵族和1个人类贵族——人类和东多里安人都会获得100%的加成,所以可以放心地让每个种族各有一个。 获取 这一类别关乎你的子民获取他们所需物品的途径。包括食物、饮料、配给量、衣物、珠宝、家具。 住房是满足需求的基本条件,也是获得家具的必要前提。注意:房屋隔热性低时,家具会更快损坏。 这因种族不同而有很大差异。例如,多恩多里安人主要想要可开采的资源,而罗非鱼人更喜欢自然类资源。加里斯米人有些独特,他们只想要石头和黏土,但他们最多只能获得3.5点满足度,而其他种族最多能获得8点。这些加成会以非线性方式增长,从而对玩家有利。以食物配给为例:
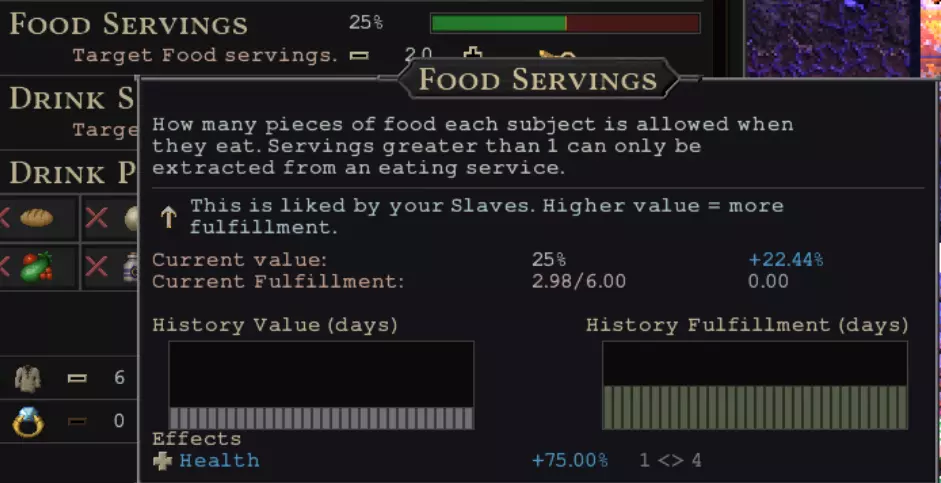
口粮的数值范围在1.0到5.0之间,然而将口粮提升至2.0就能使满意度从0/6提高到3/6。因此,给市民提供越来越多的口粮会产生边际效益递减的情况,但最初的配给能带来巨大回报。需要注意的是,2.0的口粮意味着他们的食量会增加一倍,这在游戏初期并非易事。口粮超过1.0时还需要饮食服务,市民无法直接“领取”口粮。 仅1单位的衣物就能提供约3点满意度。至于家具,仅用一种资源制作的一件家具(例如吧台)可能就能提供约20%的加成,两件则能提供30%的加成,以此类推。有趣的是,与“低成本”的加里思米族相比,使用相同数量的资源,你将获得比任何种族都更多的满足度点数(不过公平地说,那些点数仍然是计入最大值的待填充点数)。此外,任何资源条提供的满足度都是相同的,因此在填满基础木材之前,给居民更昂贵的东西(比如家具)从来都不是明智之举。 注意:较高的食物配给会显著改善健康状况,而增加饮品配给则会降低健康状况。 服务 服务是满足度的重要组成部分,也是最灵活的部分。所有这些服务都来自提供它们的建筑。除了水井等最简单的服务外,大多数服务都需要工人为居民准备。有些建筑会获取资源进行分配(如市场/食品摊),或者需要资源来提供优质服务,例如浴场。大多数服务在达到饱和前会受到多种因素的影响。

例如,你可以在工具提示中看到市场的四个组成部分:可访问性、邻近度、质量和升级。某些服务的组成部分是固定的(市场没有质量属性,餐厅没有升级属性)。这些参数是经过加权计算的——如你所见,尽管大多数数值接近100%,但由于未完全升级,总分仅为72%。 服务的满足度点数是线性计算的,如果某项服务的总值为72%,它将提供72%的满足度点数,因此在引入新服务时,通常需要全力提升各项参数。 注意:许多服务都有副作用。其中有几项能提升健康值。医院能帮助病人和伤者更快恢复健康(并防止死亡)。水井帮助居民降温,壁炉帮助居民取暖。这些行为独立于服务系统。即使居民的服务满意度达到100%,如果你的殖民地处于裸体状态,他们在冬天仍会前往壁炉取暖。市场和食品摊位分别有助于家具和食物的分配。 环境 这是一个相对宽泛的类别,涉及居民无法直接使用但能观察到并受其影响的事物。如果你浏览环境相关内容,会发现大多数都很直观地符合“环境”的定义,不过在我看来,它们的子类别划分可能有些混乱。但我会简要描述一下你大致能在其中找到的内容。 环境的一个组成部分是基础设施——道路类型、墙壁类型以及建筑物的形状(有些形状无关紧要,而像方形/圆形建筑等其他形状则会产生影响)。这些通常都相当小,不值得投入,尤其是在游戏初期(不过如果你喜欢圆形建筑,对于某些种族来说,这些基本上是免费的点数)。 这种基础设施同时也是装饰——各个种族有不同的需求,比如火把、雕像、柱子等等。这些装饰通常体积较小,但后期成本相对较低(不过需要宽阔的道路)。种族混合会带来一些小麻烦,尤其是与加里希米族(所有人都讨厌他们的加湿器)。相关机制有点混乱,实现起来可能比较困难。每个居民每天会多次检查周围环境,如果满足条件(例如附近有柱子),他们的满意度就会提升。据我所知,这在工作场所或家里不会发生,所以把它们放在人流量大的区域(比如市场)可能会有最佳效果。 关于装饰的注意事项:它们不必真的无处不在。当你将鼠标悬停在它们上方时,会看到这样的文字:
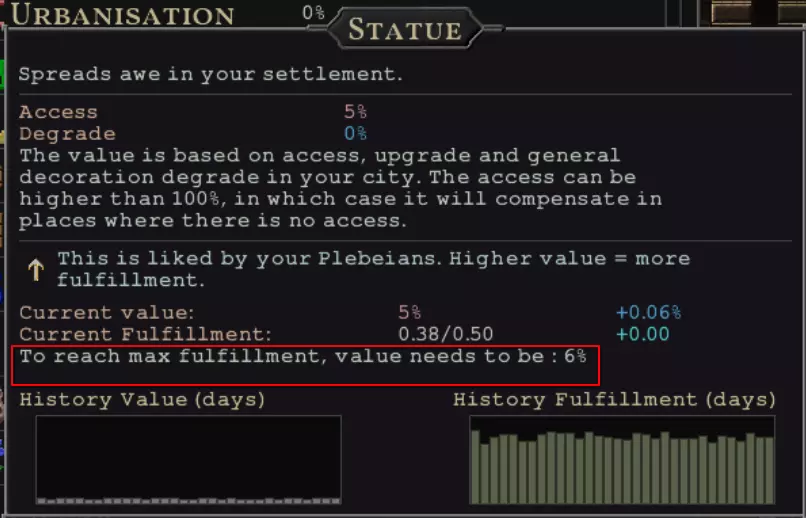
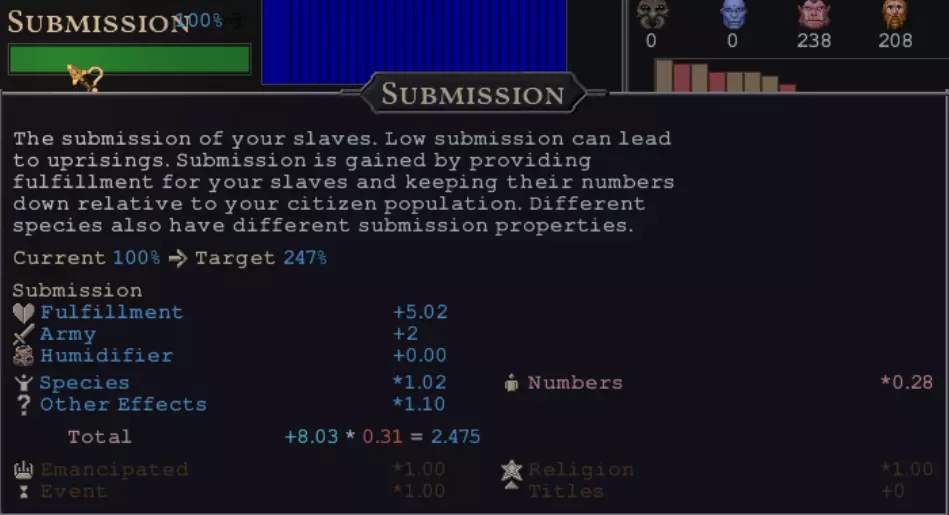
So your people are fine if they are 6% filled with this. Often they hang around statues and reach values like 20% and then don't need to see it for many days. The negative part is: these are calculated per pop. If you have 40 people with 100% fulfilled statue need and 10 people with 0% - you will have 80% fulfillment points. Note about cantors: they have a lot of sources for fulfillment disabled, they don't care about a lot of services. However in their case, decorations are somewhat large. As a result, annoyingly enough, this is a big pool of points to get for them that you need to spam and they want to view them much more often than other races too. Note about amevians: they have somewhat large bonus from having access to water Second component is social - some species are racist and dislike spending time around other. There is also cannibalism and corpses on the street(e.g. after a disease). Third one is military, which is mostly very minor - some races prefer to have military training. Most you will get passively by winning battles and either being chivalrous or cruel and just by default existence - two largest ones are being at war and being besieged, which is disliked by everyone. You should ideally never be besieged and wars should be somewhat short. And the last one is storage. Most races like to have some amounts of a specific resource(scaled with population) to be content. This is essentially free since mid game, as you will probably just have some lying around in your warehouses as a part of the game. Religion A straightforward category. There are two buildings - shrine and temple - that function similar to services. The main difference from typical services is that citizens follow their faith and won't use buildings for other faiths. You probably don't want to host more than one faith, especially since some are hostile to each other and can cause religious murders on your streets. This might be fine in the early game if you race-mix, as some races are really inclined towards particular faiths and won't be converted until temple is built. Temples also consume resources for function and if it won't be there - their quality of service will decrease tanking the entire fulfillment. Other than that there is burial and most races care about it to some degree, bar from amevians who you can ditch into a hole all the time. Burial becomes cheap relatively early in the game and its maintenance, while requires gems, needs very low amount of workers relatively to other services you provide - as long as there is no catastrophe where 1/3 of your city dies... but hey! When they die there are less people, and when there are less people, their expectations drop! So just keep an emergency mass grave just in case, mostly to prevent diseases. As for desecration - most hate it, but sometimes the burial site might be damaged outside out of your control by riots or events, so just keep in mind that it exists. Occupation and education This one is hard to move. Getting everyone employed is easy and some racial segregation will push work fulfillment up. You can put humans into libraries, laboratories and administration. Throw dondorians in the crafting business, cretonians into farms, nurseries and food services. Unfortunately someone has to man the warehouses, work themselves to death in mines(which most hate and some just tolerate) and someone has to clean lavatory after Bob had a diarrhea. Fortunately for us there is an answer - slaves. Otherwise you will never entirely fill it. The next part is retirement which... is problematic. Not only almost everyone universally likes it - it provides whopping 8 points to everyone. This is one of the largest modifiers. Now there are a lot of bad news: - this is scaling linearly, so not like 5% retirees will give you half the points - they still eat(ugh) and want services - they count towards your total population for expectations unlike children - they want a specific facility just for them, which, considering how many you'd need to fulfill it, is a massive strain, otherwise they aren't fulfilled and give almost nothing - you can't cheese it by having accidents happen to old people - the bonus is based as a percentage of your population there is no "gotcha!" about you setting retirement bar to max and being smug, because no one is old enough for it I never had to implement it and I really hope it stays that way. This is probably the last place I would look for the extra fulfillment, unless roleplaying. Education/indoctrination This is pretty straightforward. People dislike being educated but like being indoctrinated. Think of it like this - educated are more knowledgeable and will whine because of that. On the other hand indoctrinated people were taught to be happy to perform what their beloved despot wants. Early game it's probably not worth it due to resource consumption. Late game the bonuses might be a bit too small to matter due to bonuses from technology. Remember - this is additive, not multiplicative. The obvious exception is humans - bonuses to their specializations, libraries, laboratories and administration are massive - go for it, they also learn faster. As for other races: Amevians - debatable, they live long and learn well enough to use the bonuses, but they are kind of jack of all trades master of (almost) none, I'd say depending on what you use them for, consider for yourself if it's worth it and which one, def do it while they are in school Cretonians - just no, they learn slowly and most of their bonuses relate to work, that gets bonuses from indoctrination. Even then, probably not worth indoctrinating too, except for schooltime Dondorians - don't even try, they have a learning disability. They have long lifespan, so maaaaaybe if you stack university bonuses from Athurii and titles... STOP, I told you not to try. Even stacking all of this will take 5 years of their work-years. In exchange for additive bonus and happiness penalty... Garithmi - not really, they learn slowly and have too short lifespan to be worth it, due to short time until becoming adult, their school time is also not enough to learn a lot, in any case if you insist - indoctrinate for sure Tilapi - as for me the best candidate aside from humans, the stuff they are most skilled at get bonuses from indoctrination, so likely you will get both happy frogs and some better output Government Those are mostly minor, either go with what your species prefer or go for execution/arena for better law determent. Other than that, just check whether your species care about judges and add them if that's the case as it's pretty cheap. Others will fill themselves, if you have a lot of cash you will get a bonus. If you don't care about tourism ban tourists(or at least those your main species hate). Slavery and submission Let's discuss last part of a healthy community - slaves. They have just one stat, that is called submission. As long as it stays high, they will work without issues. There are several reasons to get slaves: - less requirements to fulfill, don't care about many things - their furniture demands are simpler - they don't brawl with citizens(but can brawl with other slaves) - they don't count towards your citizen population expected fulfillment - some races are happy to have slaves - racist species who dislike other races only worry about "other" citizens, slaves don't count Now let's have a look at sources of submission:
首先,最明显的要素是满足度。这基本上和你的市民幸福度完全一样。不过你可能会注意到有些类别是完全禁用的:工作、政府、人口。你只需要关注以下方面: - 生活保障:食物/饮料/衣物非常相似,家具仅限于基础和廉价商品 - 服务:大部分服务已禁用,启用的服务实际上是最便宜且最容易提供的 - 宗教:从神社/寺庙获得少量点数,不需要坟墓或地穴,奴隶只需集体墓地 处理它们时一个值得注意的区别是:你需要同时处理所有奴隶,而不是按物种分别处理。你不能单独分配家具、口粮等物品。我不会对此进行深入探讨,因为基本上所有这些都与市民幸福度相关,其运作方式完全相同,只是部分内容有所精简。如果你不相信它们的需求较低,看看它们需要哪些服务就知道了:

第二部分是军队。其上限为2,基本上只要你拥有庞大的军队,就能保持这一数值。我认为这更多关乎数量而非质量,因此让大量市民接受最基础的训练应该会很有效。 其他影响相对较小,例如加湿器或头衔。不过,有一些乘数值得留意: - 如果你选择万物有灵教,将获得最高1.2倍的乘数 - 种族会带来另一个乘数影响:克雷托尼亚人1.25倍,东多里安人0.75倍,阿梅维安人0.5倍,阿戈纳什人0.3倍,康托人0.2倍,其他种族均为1倍。若为混合种族,则取所有奴隶人口的平均值 - 某些事件会提供永久的1倍乘数1 倍乘数,但随机性很强 - 解放部分奴隶会给剩余奴隶带来持续时间很短但效果显著的增益,增益效果随解放奴隶的数量而提升 - 遗憾的是,奴隶人口会带来快速增长的惩罚倍乘数,你必须通过其他所有方式来缓解这一惩罚 由于军队上限为2,如果你想维持庞大的奴隶人口,在某些时候就不得不满足他们的许多基本需求。 注意:据我所知,奴隶制系统可能会在下一次更新中重做,因此如果你是在v70版本之后阅读本文,这部分内容很可能已经过时。 最后 以上就是全部内容。希望下次当你不得不让那些人强颜欢笑时,这些概念能让你感觉不那么陌生。这些知识都是我通过玩游戏和向别人请教一些“蠢问题”积累起来的。如果你发现任何错误,请告诉我,我会进行修正。