换一换
换一换 


《猎人:荒野的呼唤》基础指南:如何游玩及猎取你的第一只动物。我将介绍 controls(操作)、equipment(装备)、gameplay(游戏玩法)和后续步骤。更新至2020年3月24日。2023年1月3日对部分内容进行了小幅更新。 简介
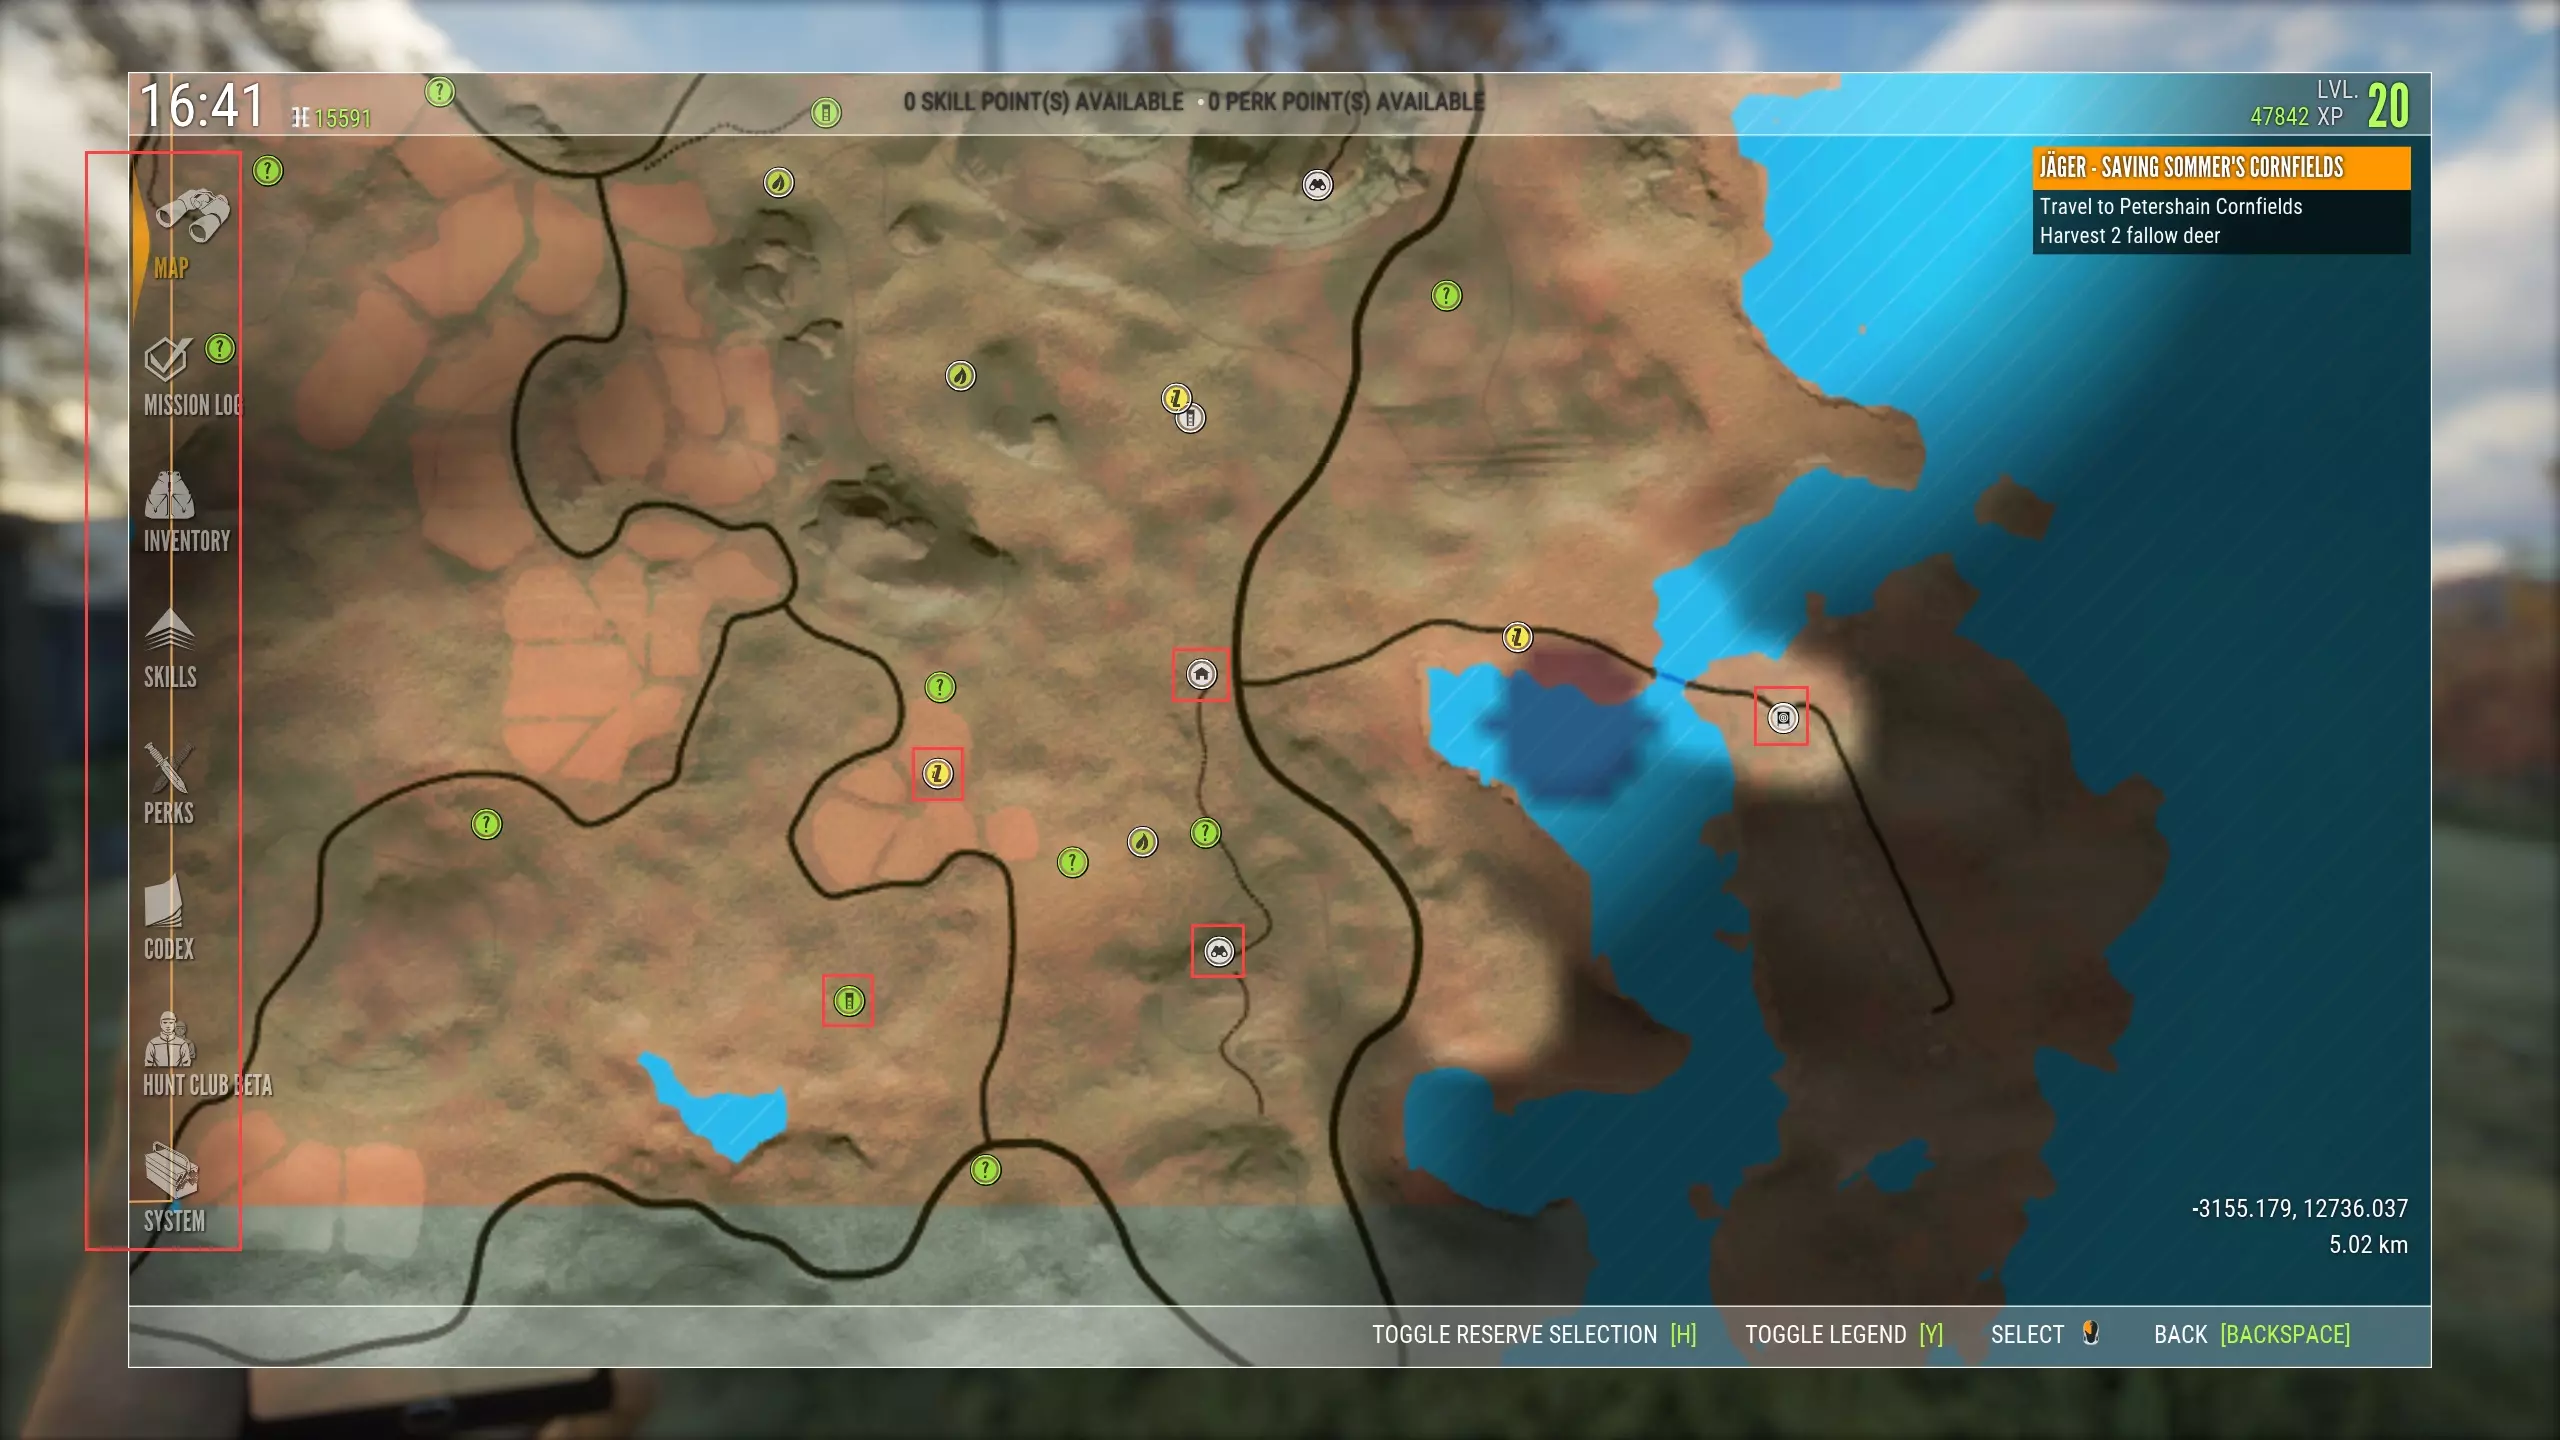
《猎人:野性的呼唤》是一款开放世界写实(大体上如此)狩猎游戏。游戏玩法围绕使用各种可用装备和技巧寻找、接近、击倒并收获猎物展开。对于追求激烈动作体验的玩家来说,这款游戏可能并不适合——它更像是潜行与狙击相结合的游戏。知识和耐心是你最重要的两个工具。 如果你有过现实狩猎经验,那么《猎人:野性的呼唤》中的许多原则都是适用的。保持耐心。熟悉你的装备和猎物。只进行你有把握且能实现快速、人道击杀的射击。为每种动物使用合适的口径和弹药。 除此之外——它终究是一款游戏。享受眼前的风景,学习新知识,当你收获第一只鹿时感受那份成就感。最重要的是——玩得开心! 游戏玩法基础 开始新游戏时,你会带着一把步枪、一些装备和脑海中的提示音进入广阔的开放世界。别担心,让我们先清点一下你拥有的物品。 移动控制 WASD键移动。 E键互动。 Ctrl键切换蹲下。 Z键趴下。要退出趴下状态,按Ctrl键蹲下或按空格键站立。 按住Shift键加速移动,但会增加可见度并产生更多噪音。蹲下或趴下时也可以加速移动。 站立时按空格键跳跃。 G键自动移动。自动移动时可以侧向移动,但向前或向后移动会停止自动移动。自动移动时也可以奔跑。非常适合远距离追踪或移动。 工具控制:F键使用技能。使用前需先在技能或特长界面装备主动技能,主动技能背景为绿色。 L键开关头灯。头灯不会影响动物在夜间发现你的几率,因此可以一直开启。夜间时,足迹只有在头灯照射下才会高亮显示,这意味着你需要四处查看以高亮附近的足迹。 1-0键选择工具或武器。装备时需将其从左侧拖动到侧边栏,后续会详细说明。 鼠标中键切换瞄准镜和机械瞄具。说实话,有了初始瞄准镜后,你基本不需要使用机械瞄具。切换功能对于霰弹枪这类武器更为实用。 按Tab键可切换猎人助手。这是你最有用的追踪/潜行工具。 按P键切换至相机。部分任务中会用到。 按H键收枪/拔枪。如果遇到武器消失的故障,用这个方法可以找回武器。 地图 按M键打开地图。你会看到各种按钮和图标,随着探索游戏世界,图标会逐渐增多。绿色图标表示你尚未访问或激活的地点,白色图标则是你已经去过的地方。 在地图界面时,按H键可前往不同的狩猎区。
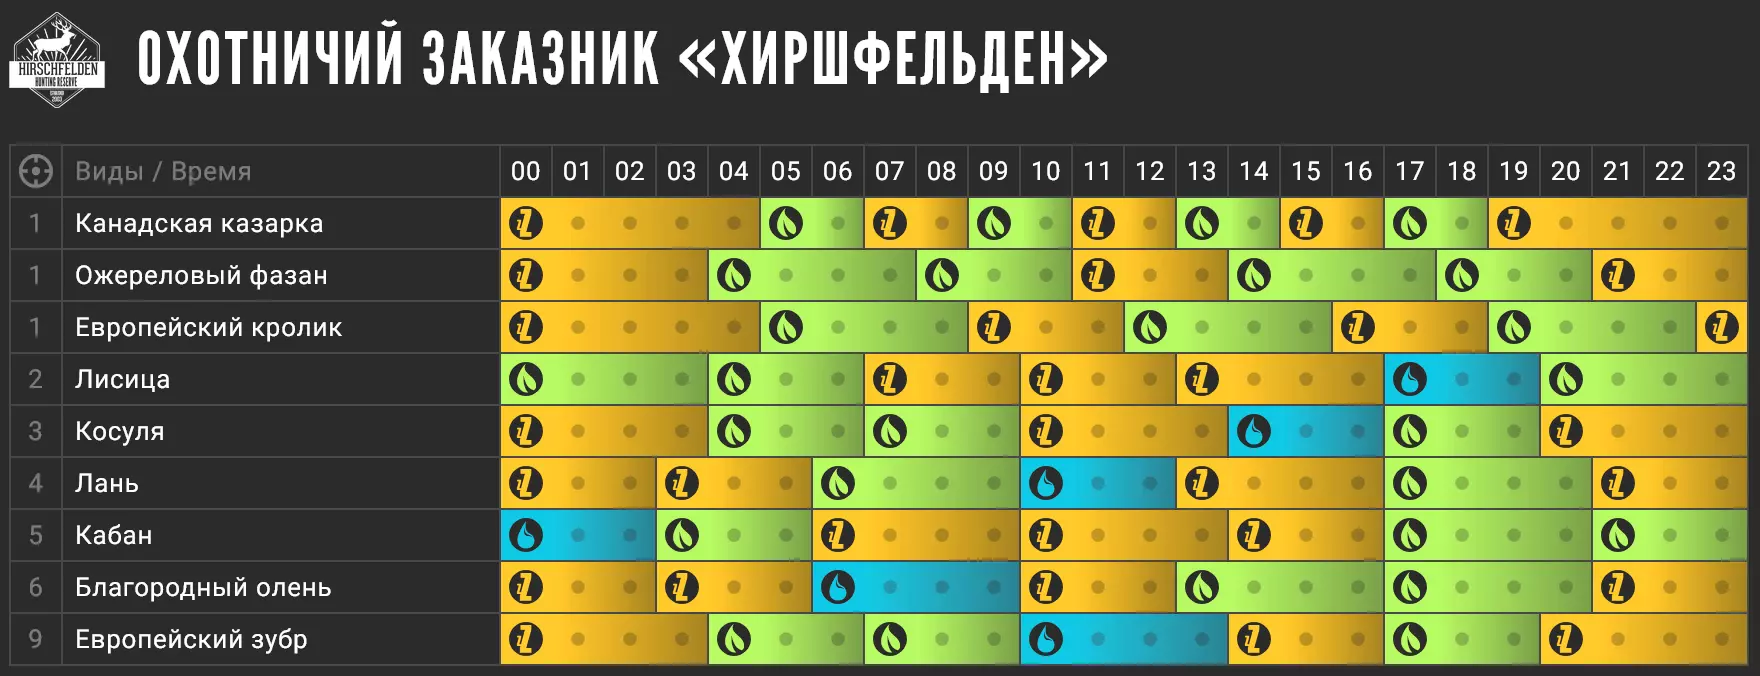
瞭望塔以 binoculars 图标标记。当你首次抵达狩猎 reserve 时,它们是你唯一能看到的图标。瞭望塔会显示其周围的兴趣点位置。 前哨站以小房子图标标记。它们是最重要的地点,你可以在此度过时间、购买和更换装备,以及快速旅行。 需求区以水滴、睡眠 Zzz 或树叶图标标记。它们表示特定种类的动物会在该区域进行相应的活动以满足需求。需求区还与一天中的特定时间相关联。 射击场是位于 Hirschfelden 东南部的特殊地点。在射击场内,你拥有无限弹药,并且可以在多种目标距离下测试你的武器。如果你对自己的射击不太自信,我强烈建议你在这里试用你的初始步枪。游戏画面简单,但包含了所有你需要了解的信息。
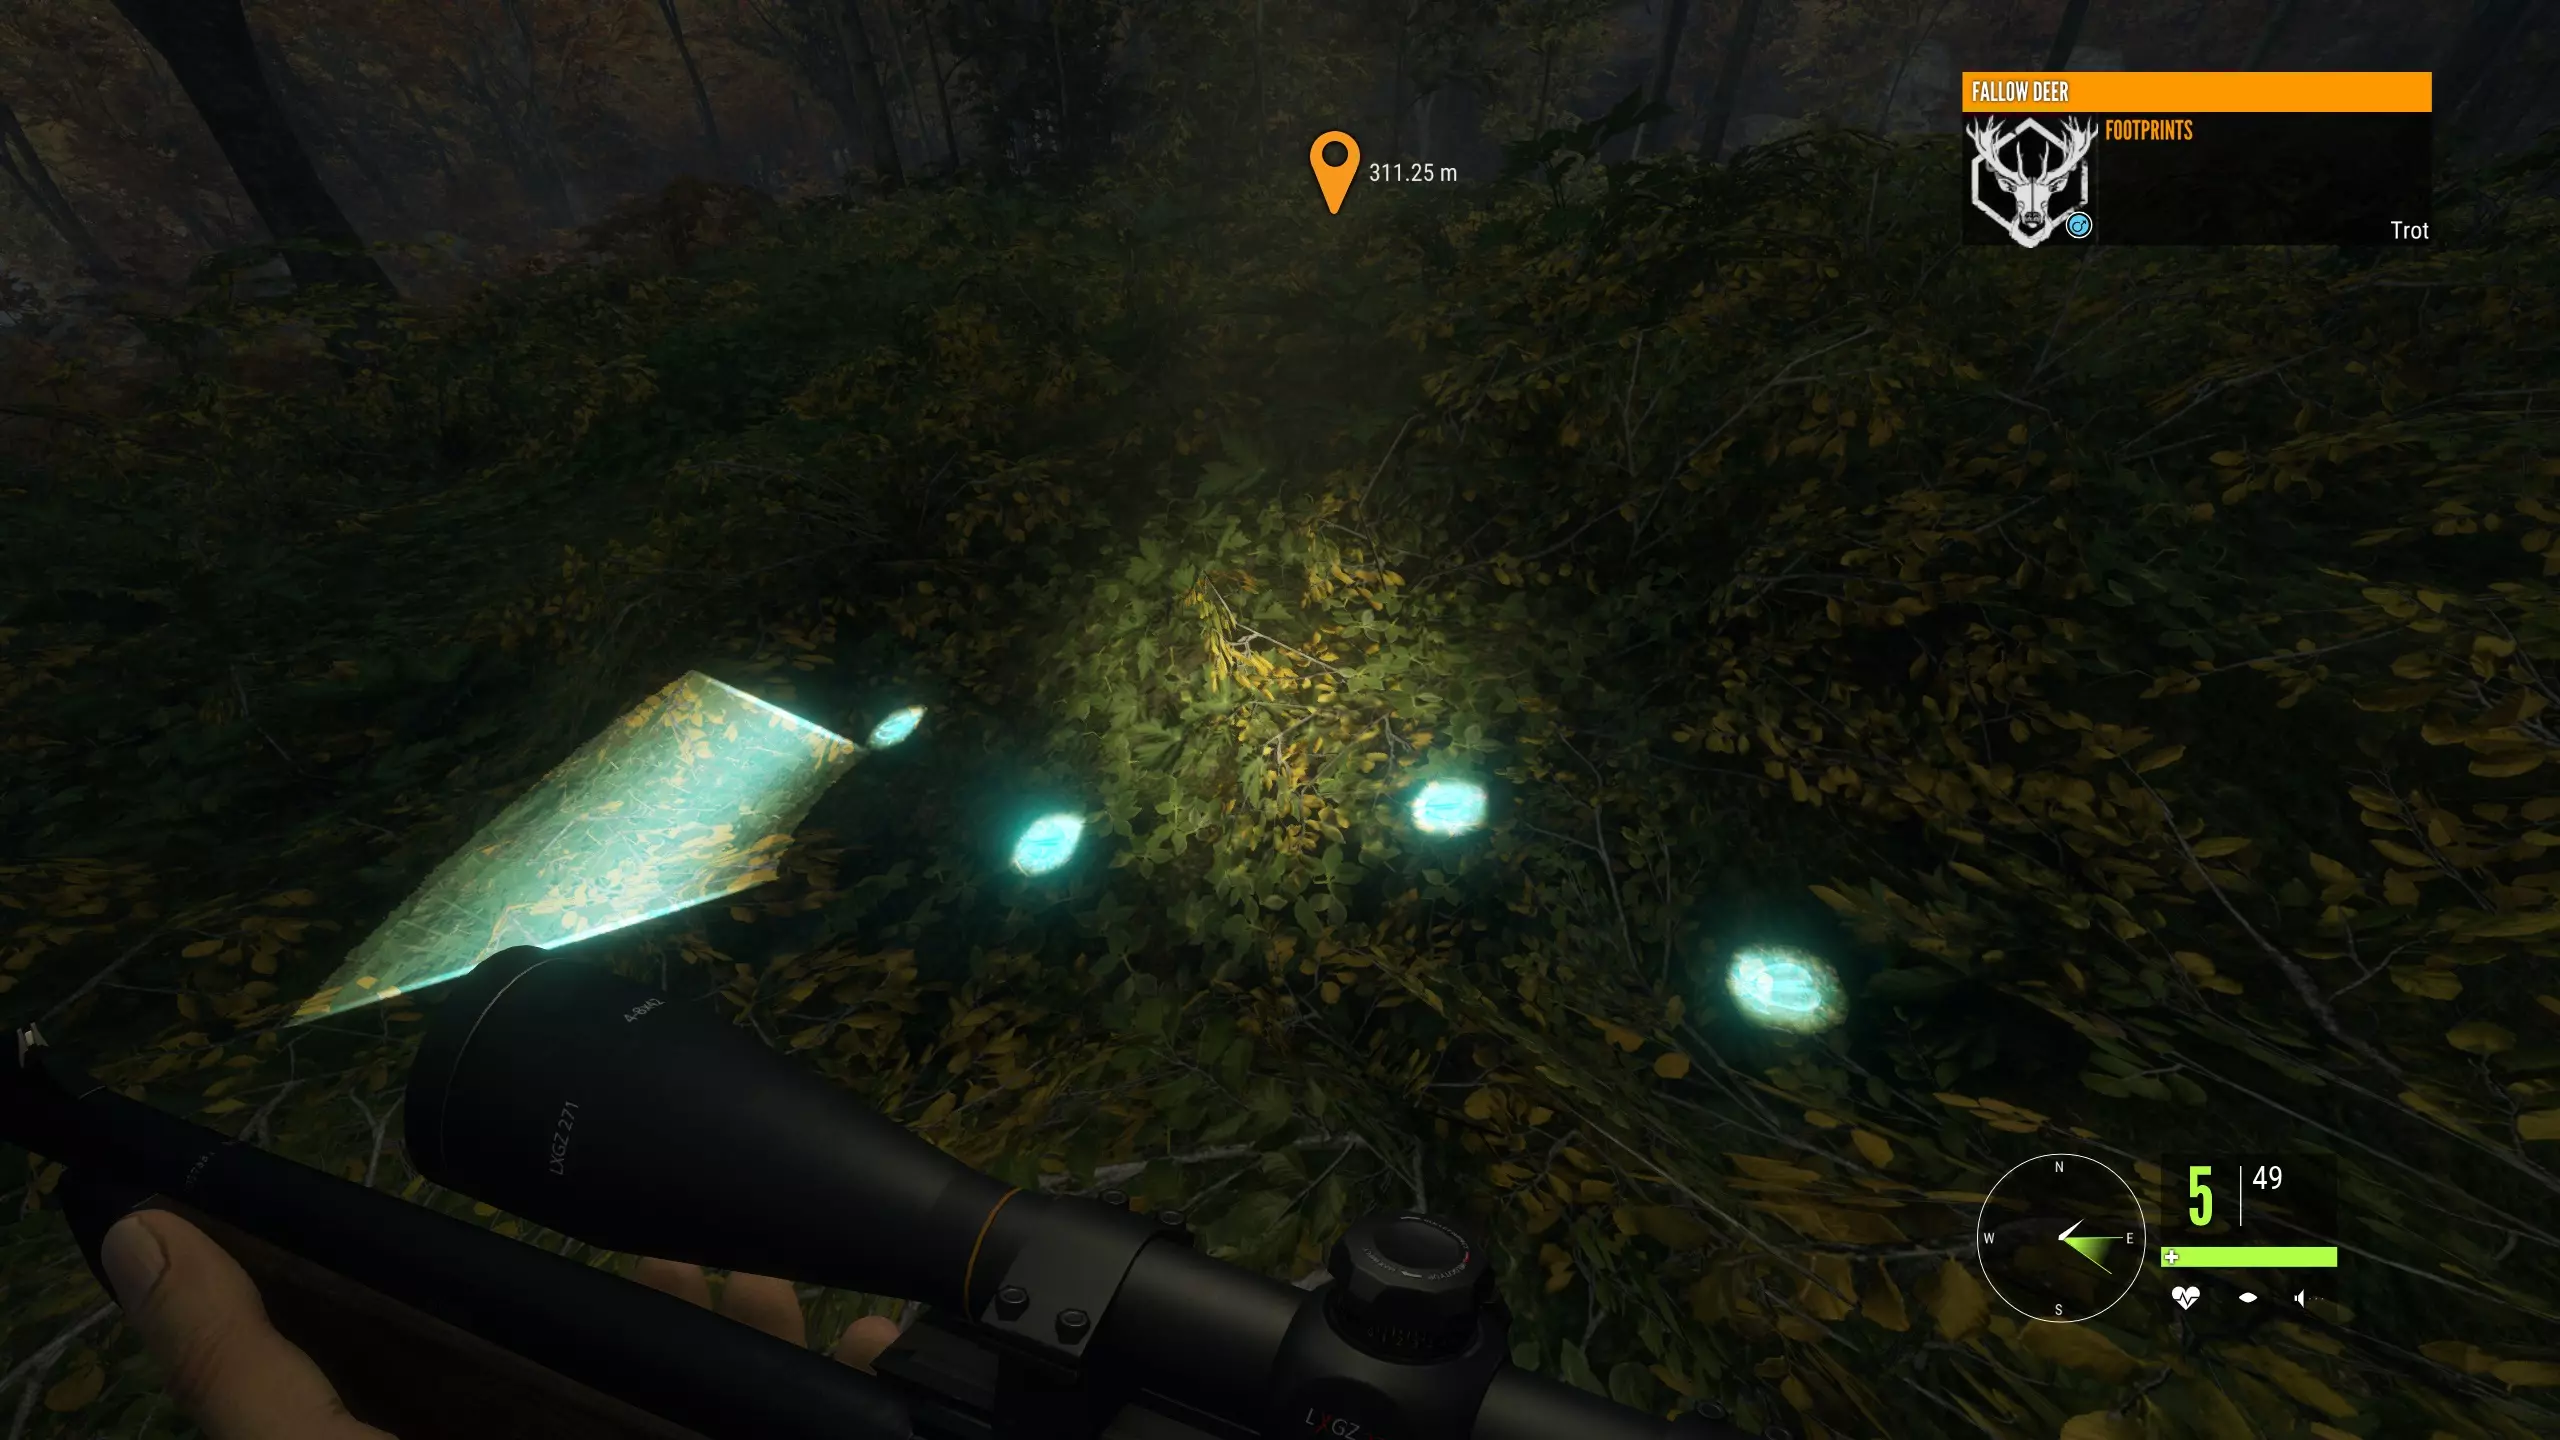
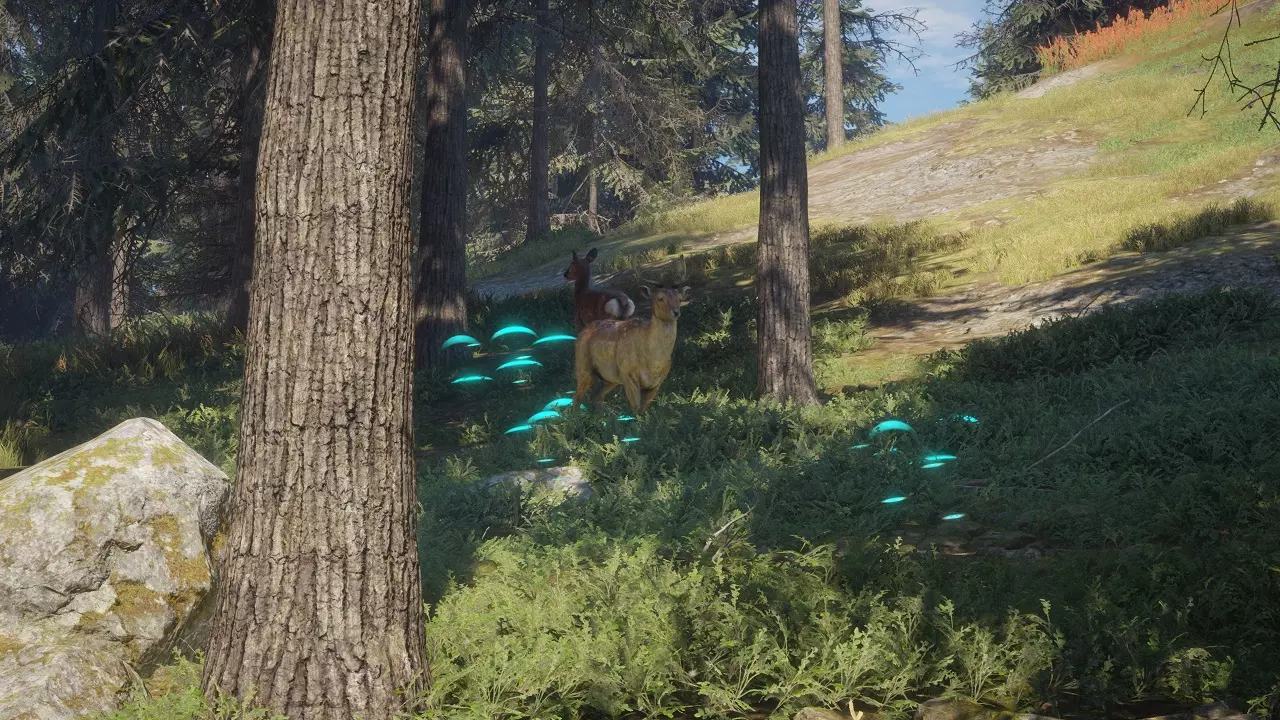
未追踪动物的足迹会发出白光,而当前正在追踪的动物足迹则呈蓝色。足迹还会显示一个大致的锥形区域,指示下一个足迹的方向。请注意,这只是一个大致的锥形范围,你可能会在锥形边缘或远离锥形的地方发现足迹。另外,你不会自动追踪被射击或击倒的动物。 当你与足迹互动(按E键)时,屏幕右上角会弹出一个小窗口,显示这些足迹属于什么物种以及它们的移动步态——行走、小跑或奔跑。某些技能可以增加你从检查足迹中获得的信息量。其他类型的踪迹包括血迹,它能显示动物因伤口的出血量,以及粪便,它能显示动物最近在该区域出现的时间。 当附近有动物发出声响时,你会看到特定方向传来声波。观察声波并按下E键,可查看物种和叫声类型的摘要。 界面 屏幕右下角包含大量关于你状态的信息。
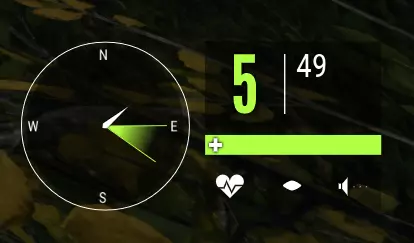
指南针上的指针显示你当前的朝向。 指南针上的绿色锥形图标显示风向和风速。锥形越窄,风速越快。这也大致显示了你的气味被吹向的区域,以及对气味敏感的动物发现你的难易程度。 大号和小号数字分别显示你武器弹匣内的当前子弹数和备用子弹数。 弹药数量下方是你的生命值。 心脏图标显示你的心跳速度,当你进行剧烈活动(屏住呼吸、奔跑、跳跃)时,它会变成红色。心跳越快,你的呼吸声越大,瞄准也越不稳定。 心脏图标右侧是你的可见度指示器。完整的圆圈表示你完全暴露在开阔地带,而短灰色水平线则表示你几乎处于隐蔽状态。蹲下、趴下以及穿过植被都可以降低可见度。看到你的动物会受到惊吓并逃跑。 可见度指示器右侧是声音指示器。当你发出声响时,扬声器图标会先显示白色条形,然后变为红色条形。放慢移动速度可以减少噪音,尤其是在穿过植被时。同样,听到你声音的动物会受到惊吓并逃跑。 猎人伴侣 你的猎人伴侣本质上是一款智能手机应用,它能追踪你的位置、你目前发现的所有踪迹,以及你附近的任何需求区/地图特征。这是你追踪动物时最有用的工具。按Tab键切换猎人助手。
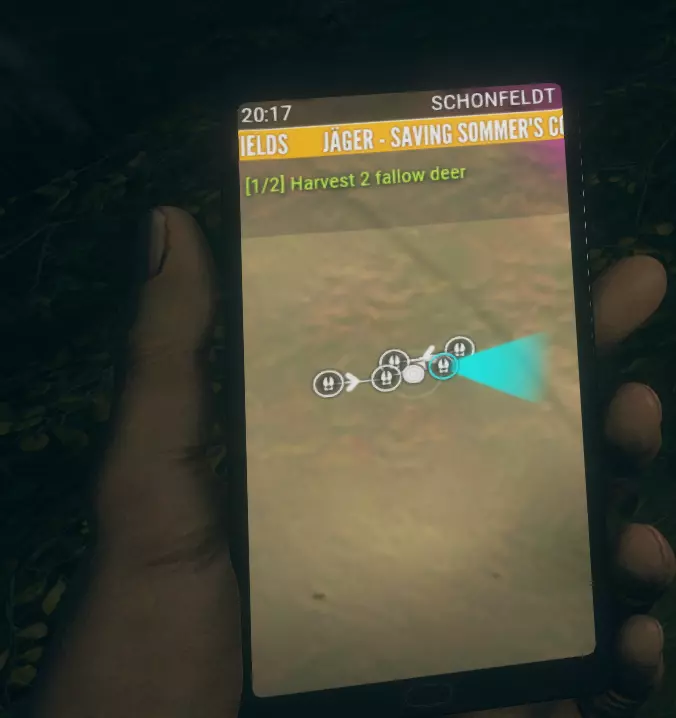
注意我当前追踪的动物,其足迹显示为蓝色,并有一个蓝色锥形图标指示它接下来的方向。我的猎人伴侣(HunterMate)会用线连接足迹,这是因为我解锁了一项技能。刚开始游戏时,你的猎人伴侣不会为你自动连线。 装备方面,你一开始会拥有多种装备。掌握如何使用所有装备是成为一名成功猎人的关键。你的初始装备实际上用途广泛,能在游戏中让你使用很长时间。 你的任何装备都无需清洁、维护或翻新。一旦购买,它们就会永久使用(当然,气味剂和弹药除外)。也许这就是它们价格昂贵的原因——你正在为优质产品买单!不锈钢枪管和枪机,以及防风雨、抗冲击的光学设备。 双筒望远镜 你一开始会获得一副不错的双筒望远镜,它拥有出色的变焦能力和良好的视野。当通过双筒望远镜观察动物时,按E键进行标记。动物会被蓝色高亮显示,你将看到所标记动物的一些基本信息。不过,这个轮廓会很快消失。在游戏初期,当你学习各种物种时,它们非常有用,而且默认步枪瞄准镜很难看清。不过(与现实不同),随着你获得技能和特长, binoculars(望远镜)和 rangefinders(测距仪)的用处可能会越来越小。 需要注意的是,在现实狩猎中,你绝不能用步枪瞄准镜来观察目标!这涉及安全问题。你可能会不小心扣动扳机,射中并非目标的物体,比如其他猎人。只有当你想要射击时,才应该瞄准武器。《猎人:荒野的呼唤》作为一款游戏,对此更为宽容,但养成这个习惯很有必要。 使用 binoculars(望远镜)观察的另一个好处是,它会在你最后发现动物的位置在地图上标记一个图钉。如果你打算进行远距离射击,在猎物最后已知位置标记一个图钉,会让你在射击后更容易追踪它。 不过要注意,在你成功狩猎第一个猎物之前,不要去标记另一个动物! 诱饵 诱饵主要有三种类型:哨子、气味和诱饵。要留意每种诱饵的详细信息——它们有不同的范围、吸引力强度和有效时间。每种诱饵通常只对一到两种物种有效,但你可以通过技能提升它们的效果。 你初始会获得鹿鸣哨、狍哨和麝气味。鹿鸣哨在莱顿地区很有用,它能吸引黑尾鹿和白尾鹿,而狍哨则在 Hirschfelden 地区更适用。 哨子就像小型乐器一样。你可以使用它们来吸引动物。哨子通过声音发挥作用,不受风向影响——在你周围一定半径内且会对哨子做出反应的动物会受到影响。哨子可以无限次使用,持续时间为90秒。 气味会随风传播,从而从下风处吸引动物向你靠近。它们通常持续时间更长,约200秒,但与哨子不同的是,气味的使用次数有限。 有一种特殊的气味消除剂,可以减少(但不能完全消除)你自身的气味,这能让你更近距离地悄悄接近处于你下风处的敏感动物。 诱饵基本上是塑料假鸟,你放置它们来吸引真鸟。鹅是很敏感的动物——如果它们看到田野里已经有其他鹅,就更有可能觉得那里安全,并降落下来。鸭饵也是如此,但需要放置在水中。 步枪 你初始获得的步枪是游骑兵.243。一定要好好熟悉它!这是一款栓动步枪,配备5发弹匣,从游戏一开始就能在你手中实现150米内的精准射击。
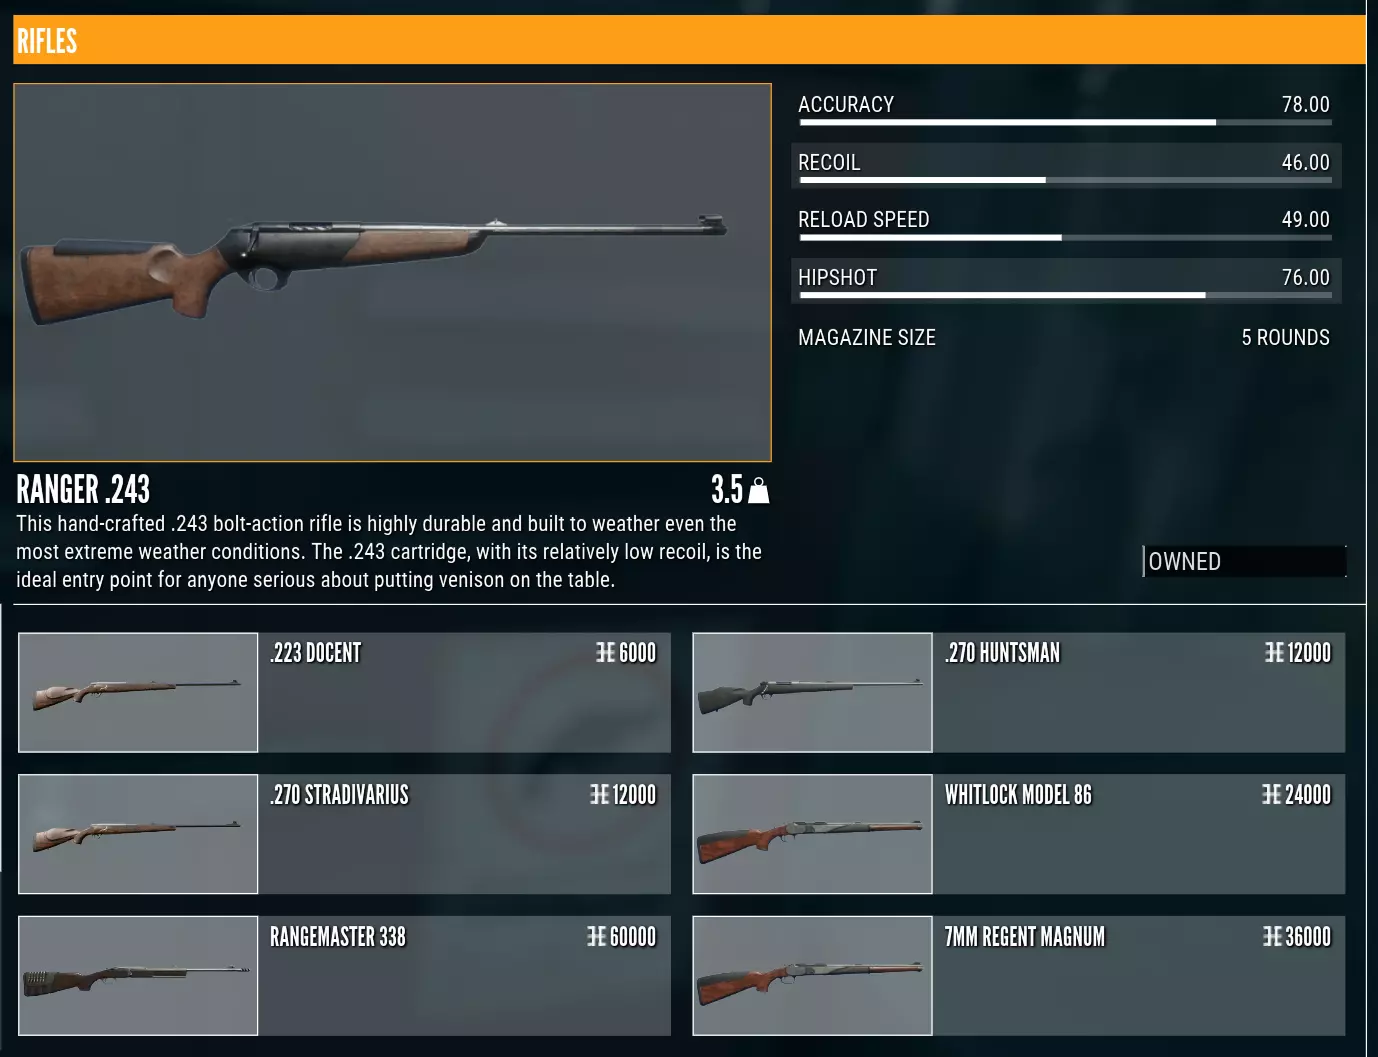
与许多其他第一人称射击游戏不同,在《猎人:荒野的呼唤》中,系统鼓励你花时间仔细瞄准,只在准备充分时才开枪。在解锁相应技能前,你只能在瞄准状态下发射一发子弹——必须放下步枪拉动枪栓、装填另一发子弹后才能再次射击。即便解锁技能后,武器的后坐力依然相当大,装填时间也较长,而且弹匣容量只有5发。这绝对不是一款靠扫射来猎杀毛茸茸小动物的游戏。 我强烈建议你刚开始游戏时,先去赫希费尔登的射击场练习,熟悉步枪操作。射击场位于地图最东南边的孤岛上,就在通往岛屿的小路尽头,你很容易就能找到。瞄准镜 你初始配备的是Ascent 1-4x24步枪瞄准镜。对于新手瞄准镜来说,它已经足够好用。记住,在瞄准镜状态下可以通过鼠标滚轮进行放大和缩小,点击鼠标滚轮可以在瞄准镜和机械瞄具之间切换。
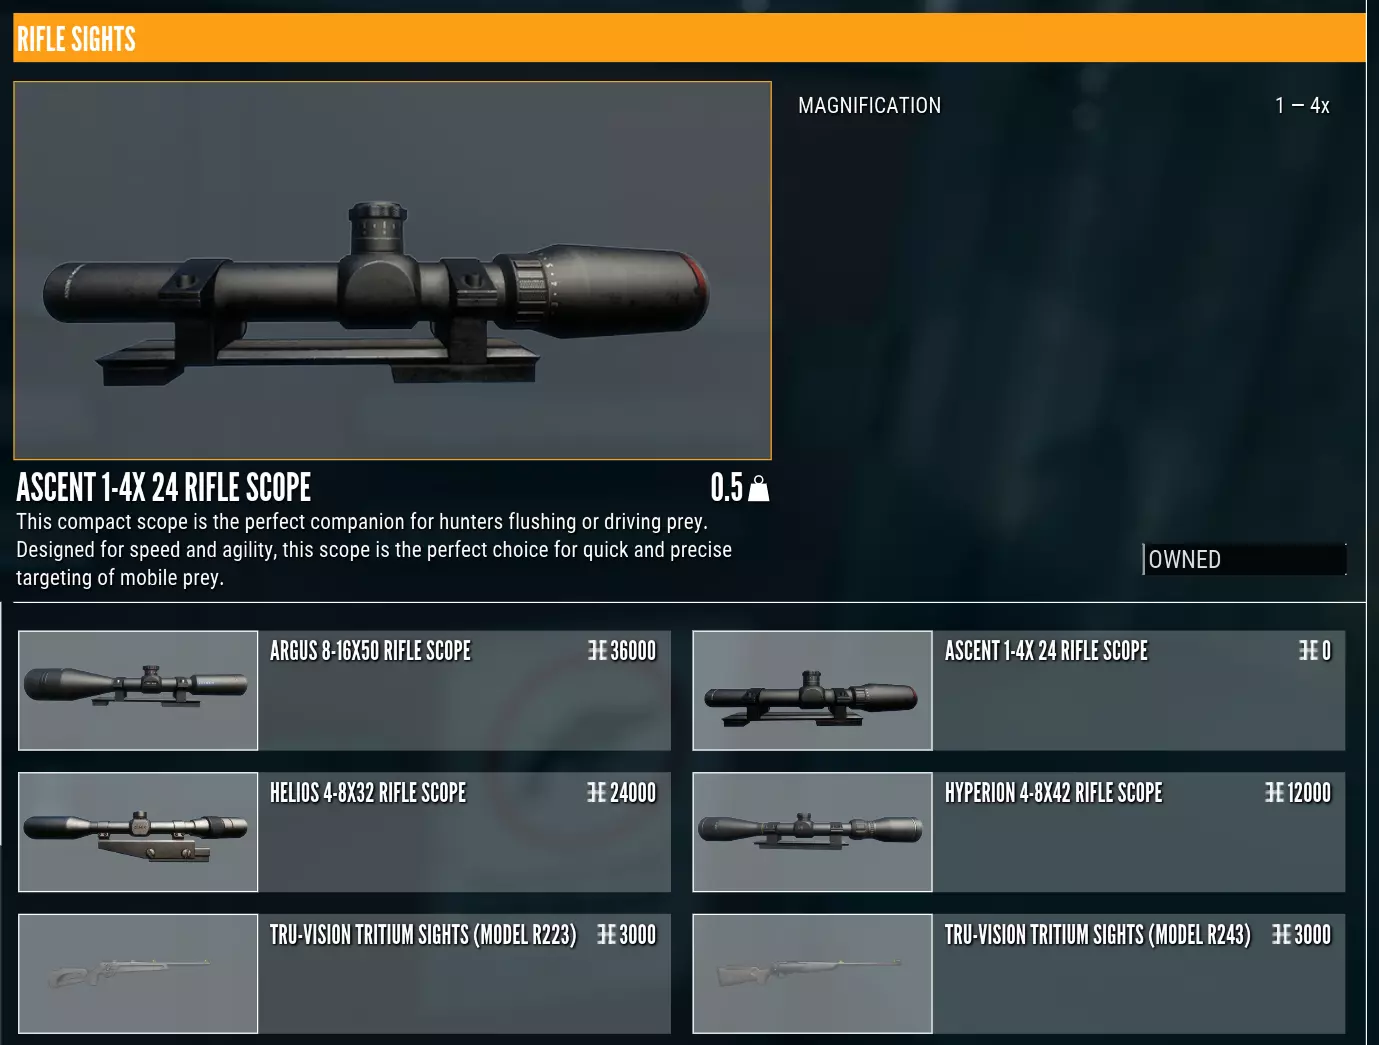
我建议一直开启它。十字准星比机械瞄具更容易瞄准射击。即使你紧挨着猎物,也可以一直缩小视野,同时仍能保持精确的瞄准线。 另外,我建议跳过最贵的瞄准镜【Argus 8-16x50】。它只在非常特定的场景下有用,而且会让近距离射击变得更困难。【Hyperion 4-8x42】是一款适用于各种用途的优秀瞄准镜。 弹药 你一开始使用的是.243软尖弹。这种弹药的软铅弹头暴露在外,击中目标时铅弹头会膨胀,造成更大的伤口和更多伤害。然而,这会导致穿透力降低和空气动力学性能变差,意味着子弹的精准度不高,下坠速度也更快。另请注意,建议对2-6级的动物使用。在每种动物的图鉴条目中,你可以查看其等级评级。
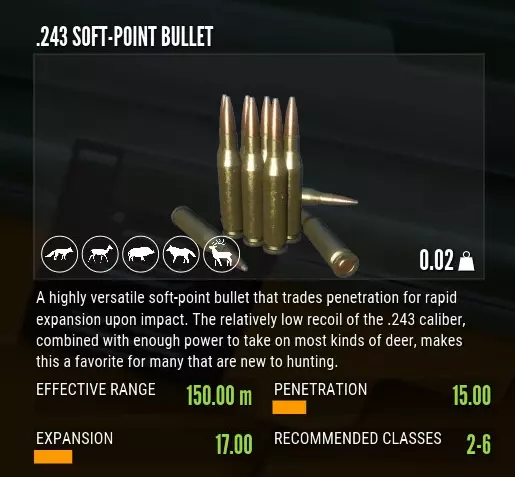
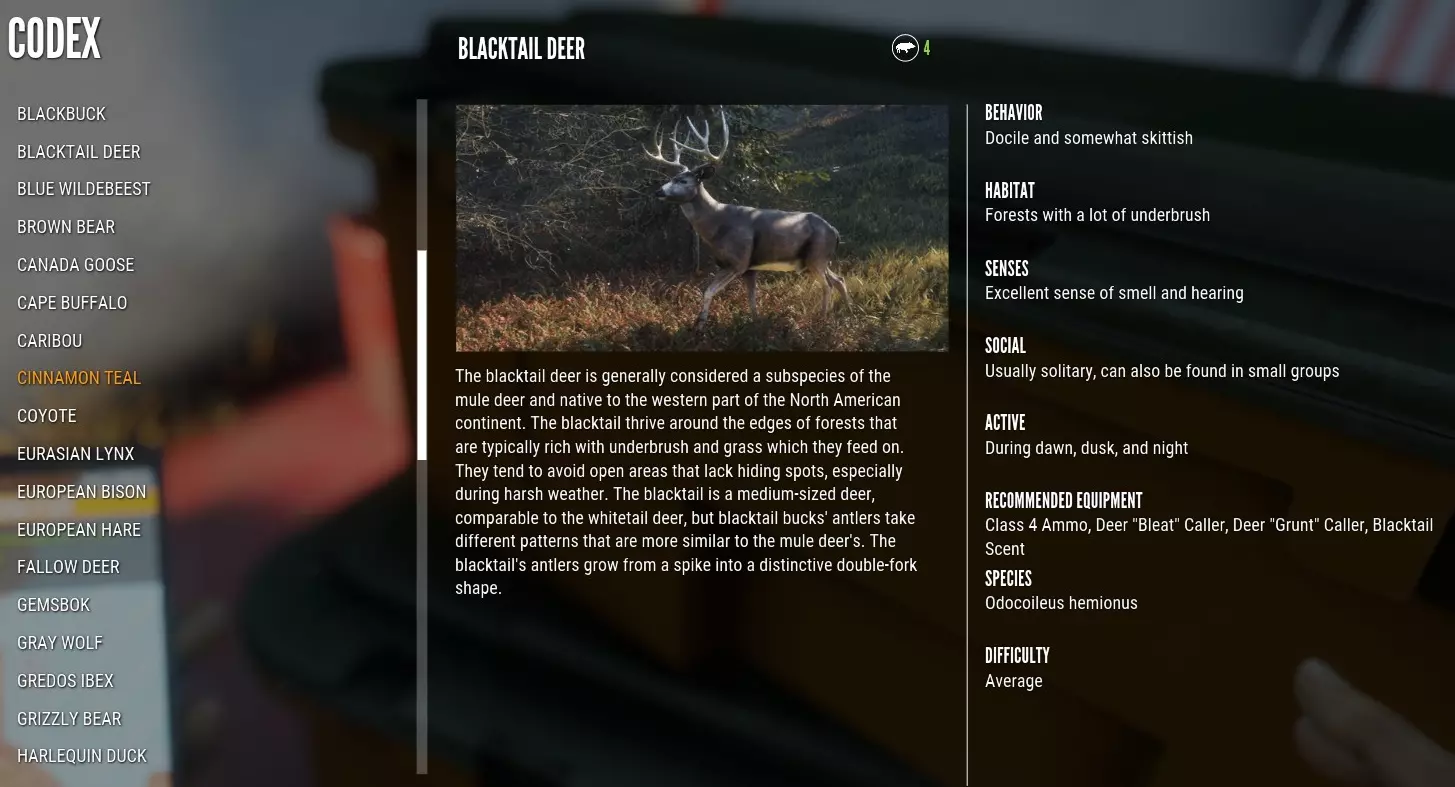
不过,在150米范围内,只要瞄准得当,这款子弹对所有预期目标乃至更多目标都具有致命性。更棒的是,这款子弹始终可以免费购买。请注意,它并非用于爆头。 当.243聚合物尖头弹可用时,你可能会忍不住购买。这种子弹飞行更稳定、射程更远,穿透力也更强,这意味着即使角度不佳,你也更有可能命中要害。 在现实中,这类子弹的聚合物尖头实际上有助于子弹膨胀,对软目标造成严重伤害。但在这款游戏中,聚合物尖头弹的膨胀程度明显低于软尖弹。 你会注意到区别吗?其实不会。用保罗·哈雷尔的话说,精准瞄准是无可替代的。我在游戏里用了一段时间的聚合物弹头(现实中聚合物弹头确实很不错),之后又换回了软尖弹,只是因为这种弹药更便宜。 商店里也有一些步枪的全金属被甲弹,这样你就能像卡拉莫乔·贝尔那样,放心地瞄准脑部射击。不过说真的,除非你真的是卡拉莫乔·贝尔,否则永远都不该尝试脑部射击。 猎物 了解你的猎物至关重要。你要猎捕的是什么动物?它的行为模式是怎样的?它对视觉、气味和声音的敏感度如何?在什么时间、什么地点可以找到它?它的要害部位在哪里?使用多大口径的武器射击它才合适?所有这些问题在狩猎的各个阶段——发现、追踪、射击和剥皮——都会变得非常重要。打开暂停菜单,选择【法典】,然后点击【野生动物】。阅读你将要狩猎的各种猎物的相关信息。在物品栏中查看你使用的步枪和弹药,确认它们是否适合该猎物。注意,从下方截图可以看出,黑尾鹿属于4级猎物。由于.243软尖弹适用于2-6级猎物,因此它适合猎杀黑尾鹿。
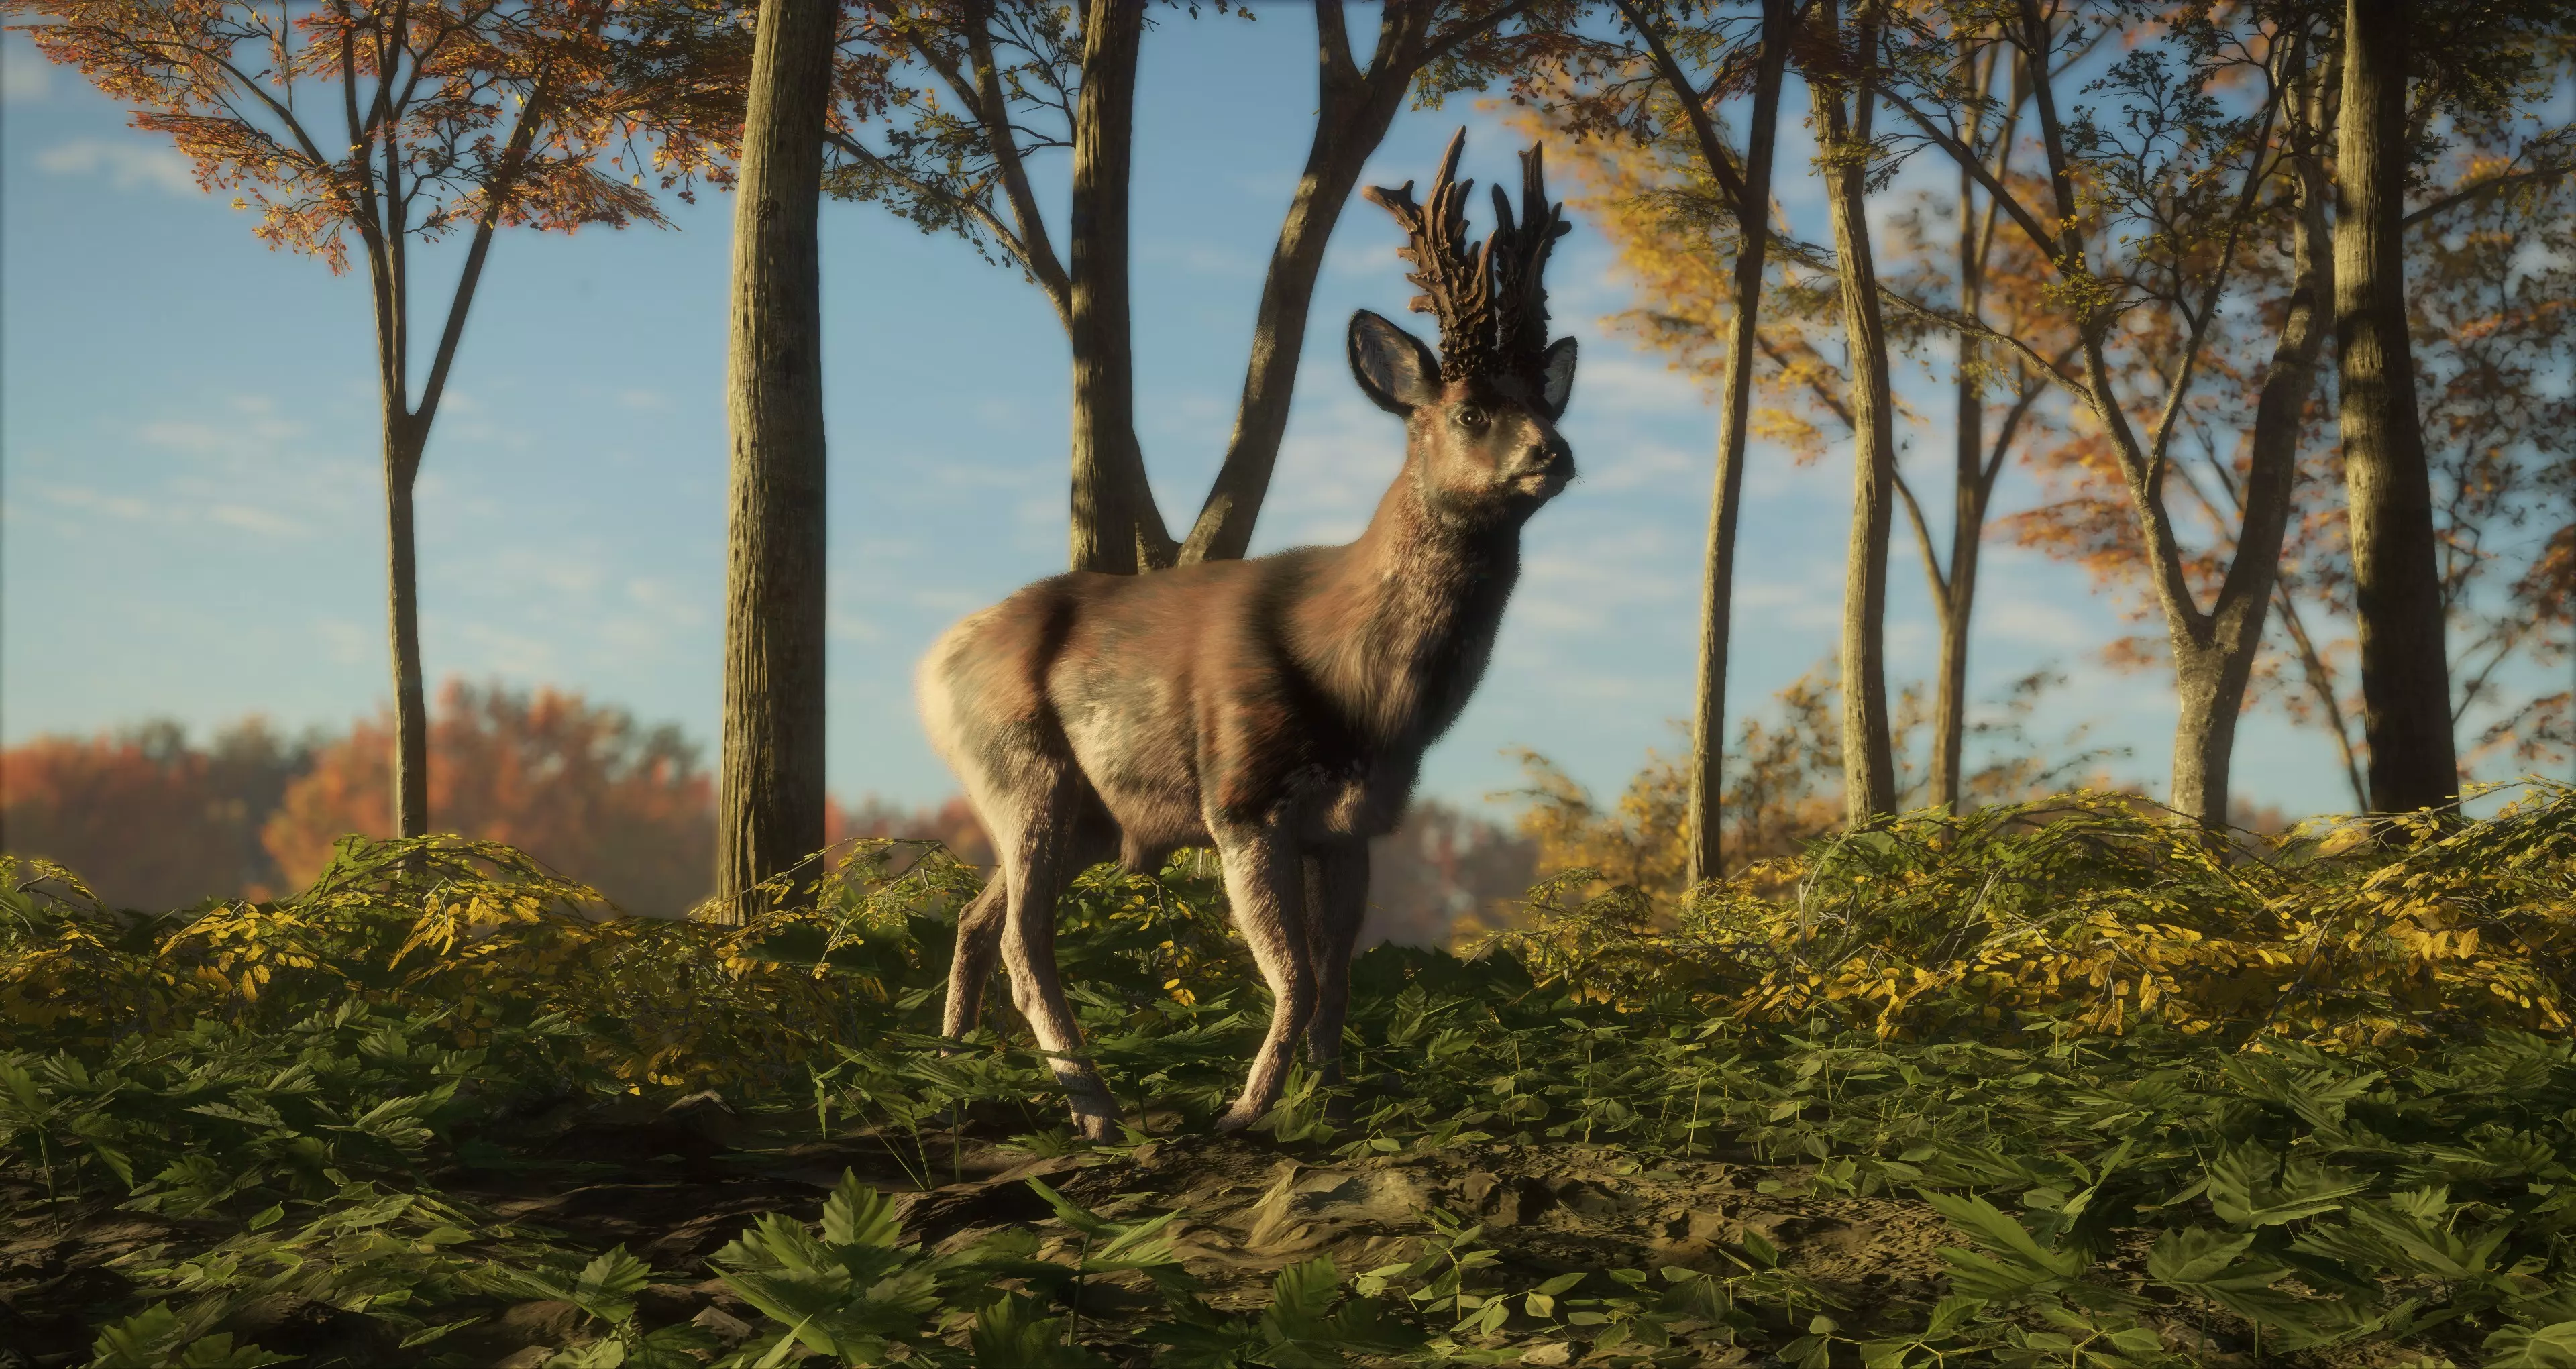
请注意,《猎人:荒野的呼唤》的游戏内容与现实存在差异。请勿将游戏中的有效方法视为现实中的可行做法!请务必参加适当的课程,进行充分研究,并向有经验的人学习。 你的首个猎物将是中型鹿类——在 Hirschfelden 有狍子和黇鹿,在 Layton Lakes 有白尾鹿和黑尾鹿。.243 步枪也适用于在 Layton Lakes 射杀郊狼,以及在 Hirschfelden 射杀马鹿,但这些都已接近该口径子弹有效射程的极限。尤其是马鹿,可能因其过于强壮而难以被可靠击倒。 行为特点 所有动物都十分警惕。经过数百万年的进化和数千年的人类狩猎,它们天生就变得胆小,尤其会惧怕人类。这意味着要想成功射击,你需要非常隐蔽。 当它们在活动时,你会发现它们在需求区附近徘徊、四处寻找配偶,或者只是休息。它们会经常停下来抬头张望。如果你在被它们发现之前先发现了它们,立即蹲下并缓慢移动。 在《猎人:荒野的呼唤》中,它们会对你的视觉、听觉或嗅觉做出反应。一旦它们察觉到你,就会对威胁保持警惕;它们可能会发出警告叫声、开始移动到其他位置,或者直接逃跑。 【动物解剖学】:直击要害
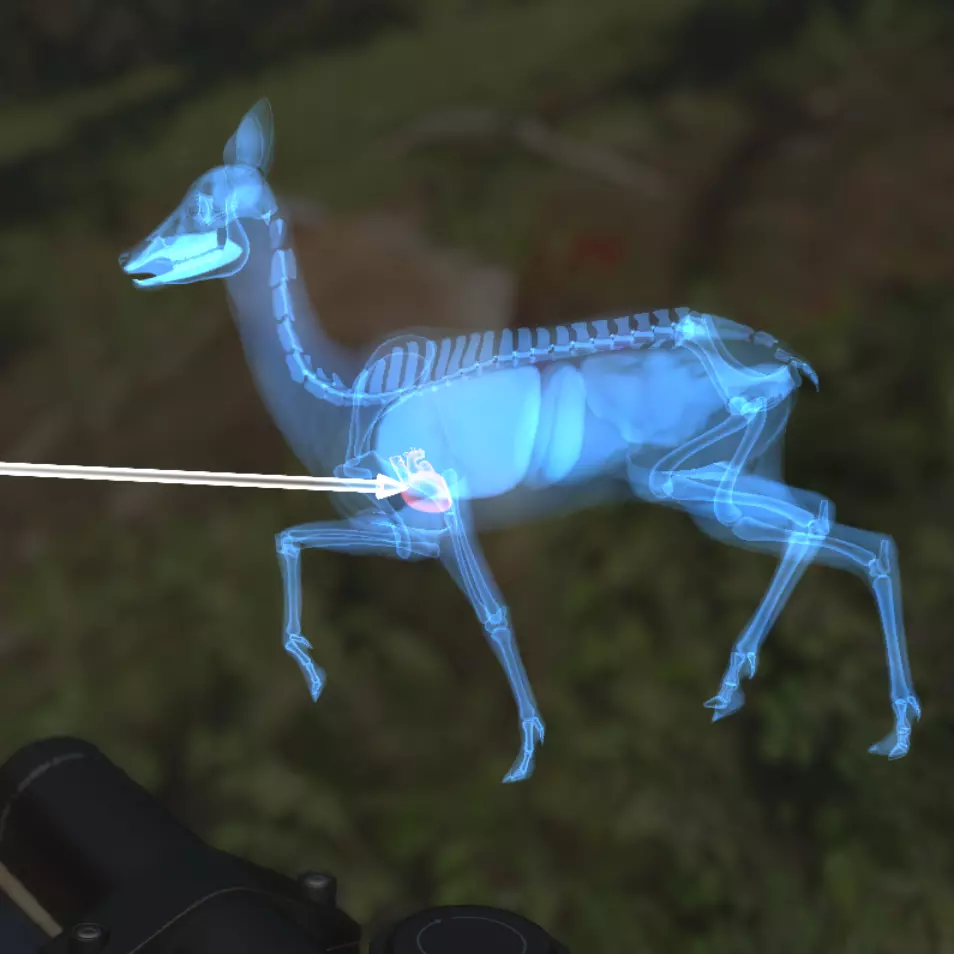
你的目标应该是尽快放倒动物。对于新手猎人(在现实生活中,对所有猎人而言也是如此),这意味着要进行心肺射击。子弹穿过单侧或双侧肺部会迅速使动物失去行动能力,并让它当场倒下。 这样做有三个目的:首先,快速杀死动物是人道的做法。其次,这能省去你追踪受伤流血动物的麻烦。最后,快速杀死动物能获得更高分数,从而为你带来更多经验和金钱。这些你都会需要的! 上面的图片是一只狍子,但所有鹿科动物都具有相同的基本解剖结构。心脏以红色突出显示,肺部位于心脏的正上方和后方。注意位于前腿肩部正后方的巨大心肺区域。同时注意前腿的粗壮程度,以及可能会阻碍射击的大量肌肉——你需要在靠近你的那条腿位于前方时开枪,以暴露要害部位。尤其是在《猎人:荒野的呼唤》中,子弹的穿透力并不像现实中那么强! 一个实用的经验法则是:瞄准靠近你的前腿后方,大约在胸部高度的三分之一处。 另外需要说明的是,为了让本指南更容易展示,我是从正面射击这只鹿的心脏,但我将图片旋转了方向,以便你能看到首选的射击角度和要害部位——即侧向射击,穿过心肺区域。发现 发现猎物是整个过程中最重要的部分。你无法射击你不知道的东西!有很多方法可以让你开始追踪动物。
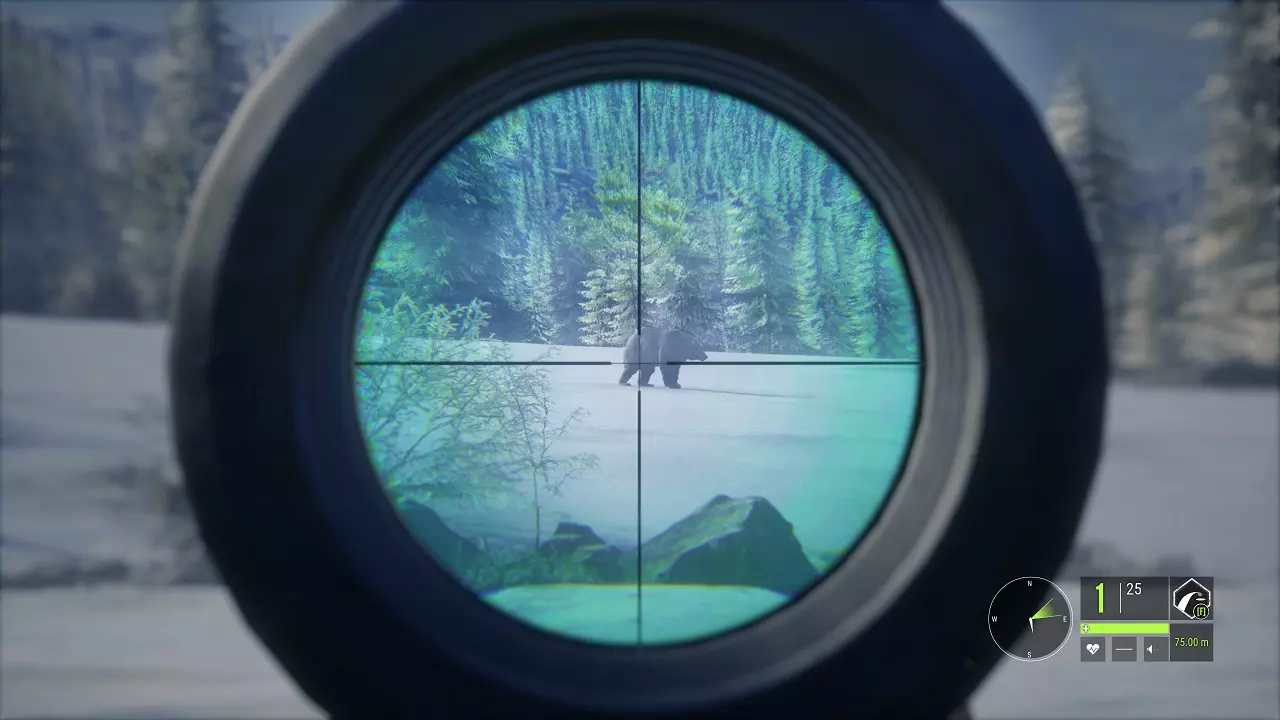
用初始配备的瞄准镜发现了一只棕熊。注意,棕熊仅在【Medved-Taiga】DLC中出现。(补充:“medved”意为“熊”) 视觉 最明显也最直观的发现动物的方式就是用眼睛观察。在游戏初期,当你四处摸索、发出大量噪音且不留意周围环境时,你很可能会看到更多动物逃跑,而非它们正常活动的样子。但坚持下去,很快你就能本能地从灌木丛中发现微小的移动模糊身影。 发现动物还有另一个巨大优势——你能确切知道它的位置,并且可以判断与它的距离。如果它还没发现你,那你基本上就进入最后的接近阶段了!根据掩护物的多少选择蹲下或趴下,留意风向,并找到合适的射击位置。 使用 binoculars(望远镜)观察动物时按下【E】键,即可自动追踪该动物:其足迹和血迹会以蓝色高亮显示,而非正常的白色。此外,标记动物后会在地图上其所在位置放置一个标记,便于从远处追踪。 即使动物受惊逃跑,通常也不会跑太远,你可以追踪并再次尝试。 需要注意的是,距离过远的动物不会显示在屏幕上,但它们确实存在。如果你正眺望开阔区域,可拿出望远镜,或直接通过瞄准镜/机械瞄具观察。你可能会发现,当你这样做时,一些动物会突然“出现”。它们其实一直都在那里,只是因为距离太远,游戏没有渲染它们。 声音 声音是《猎人:荒野的呼唤》体验中极为重要的一部分。你依靠声音来判断猎物的接近、它们的叫声以及你自身的噪音水平。如果猎物足够近,你甚至能听到它们的脚步声——戴上耳机的话,即使看不到它们,你也能转身面向它们。 所以——关掉音乐,调大音量,戴上耳机。你会发现沉浸感更好,追踪和潜行的效果也会提升。 足迹 足迹随处可见,但解读它们并不容易。你需要寻找以下3个信息: 动物是什么时候在这里的?它朝哪个方向去了? 它察觉到我了吗? 通过粪便和踪迹,你能获取所有这些信息。一旦发现粪便,检查它的“形成”时间。是新鲜的还是刚留下的?那动物就在附近。非常陈旧?你可能需要寻找另一条踪迹。 动物叫声 动物叫声是另一个重要的信息来源。它们意味着有动物就在附近——近到你能听到。如果你戴着耳机,可以根据叫声的清晰或模糊程度,大致判断它们的距离。 叫声有两种——求偶叫声和警告叫声。警告叫声意味着动物已经感觉到不对劲。大多数情况下它们不会立刻逃跑,但会保持警惕。这既是好事也是坏事!这意味着附近有动物,但也意味着你必须非常小心地移动。 交配叫声是一个信号,表明你可以使用呼叫器来吸引特定物种,或者直接悄悄接近。同样,判断它有多远,并相应地计划你的潜行。 潜行 潜行是悄悄跟踪鹿以猎杀它的技巧。潜行确实是整个行动的关键,不过能够追踪踪迹自然也是必要条件。这意味着耐心和谨慎是会得到良好回报的品质。
适当的潜行能让你极其接近猎物。 追踪 正如在观察部分所提到的,你大部分时间都将用于追踪踪迹。 粪便能帮助你判断一条踪迹是否值得追踪,以及你应该以多快的速度追踪。“刚刚留下”的粪便意味着动物就在附近——你应该立即蹲下,缓慢移动,并留意周围环境。如果你使用了呼叫器或气味,或许应该完全保持静止并倾听脚步声。另一方面,“非常陈旧”的粪便已有超过半小时的时间——你可能需要去追踪其他猎物了。 踪迹会显示猎物的行进方向以及当时的步态,即无论是行走、小跑还是奔跑。行走或小跑属于正常行为。奔跑意味着它们发现了你,并且很可能已经察觉到你的存在。注意,许多动物喜欢顺风逃跑,这会让追踪变得更加困难——现在它们也能闻到你的气味了。 潜行 移动总会产生噪音,而且相比静止不动,移动时更容易被发现。不过,如果你想追上目标,就必须比目标移动得更快。幸运的是,快速蹲伏(按住奔跑键)会让你比游戏中的大多数猎物跑得更快,一段时间后你就能追上它们。 当你正在追踪并且知道自己离目标很近时,快速蹲伏能在速度和被发现风险之间取得良好的平衡。当你靠近动物,或是一听到警告叫声,就应该缓慢蹲下——你会发现自己发出的噪音大幅减少。 如果动物非常容易受惊,或者你已经离得很近,卧倒也是个不错的选择。卧倒移动是最隐蔽的方式,但由于身体贴近地面,有时很难进行精准射击。我发现缓慢蹲下是接近目标并进行良好射击的最佳方法——记住要待在灌木丛中以降低可见度。 随着技能点数的提升,潜行会变得更加容易,因为你会产生更少的噪音,并且更难被发现。 气味 最后需要注意的是气味,这很简单——只需待在目标的下风向即可。只需查看指南针——如果航向针(白色指针)指向绿色风锥内,那么你追踪的动物很可能会闻到你的气味。 有时逆风追踪动物有效,有时则无效。如果没有成功,试着转向顺风方向追踪。如果你确定不会跟丢踪迹,绕到不同方向接近可能是值得的,这样你就不会直接处于猎物的上风向。 不同动物对视觉、声音和气味的敏感度不同,你可以在它们的图鉴条目中查看。这将帮助你决定是否值得,例如,逆风追踪嗅觉灵敏的动物。 射击 你已经追踪到猎物。它就在视线范围内。你已经靠近目标,处于下风向,目标正侧对着你。是时候开枪了。这就是所有练习发挥作用的时刻。再次强调,我强烈建议你花些时间在【Hirschfelden】靶场熟悉你的武器、瞄准镜以及它的操作方式。
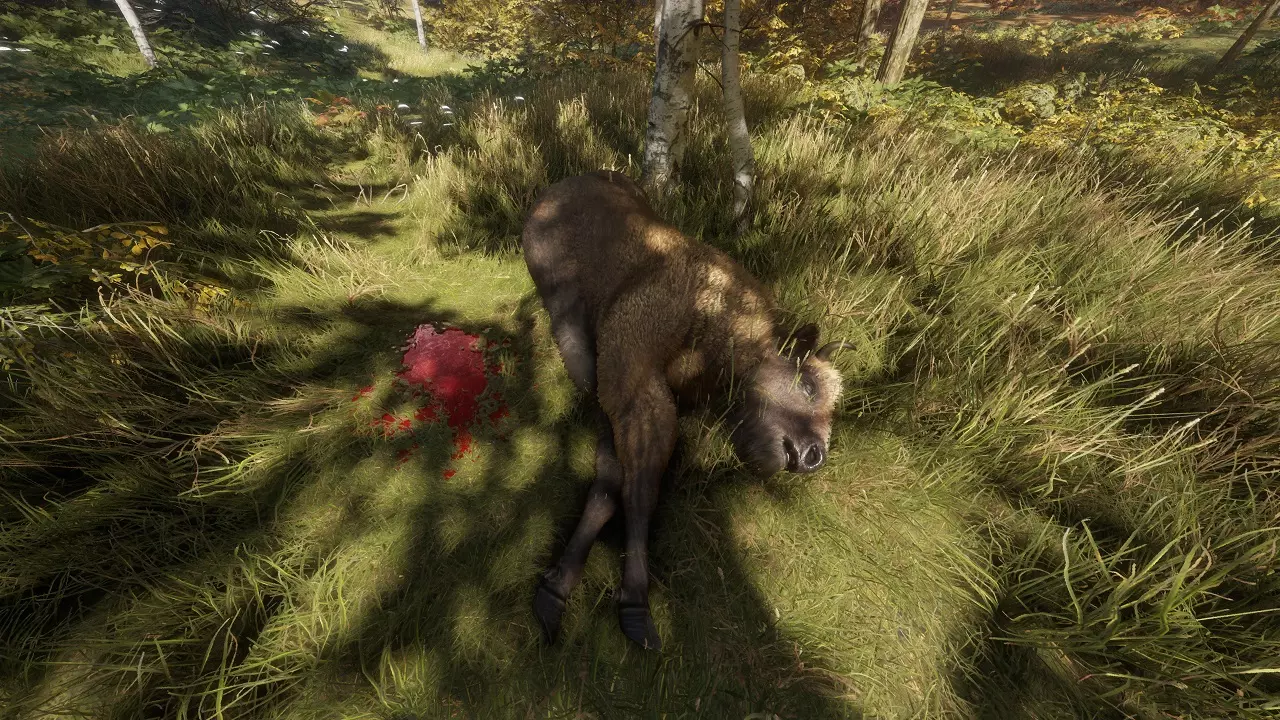
一头野牛,肺部被精准射中。大量的血迹表明它被击中了要害器官。它当场倒下。 干净击杀 射击的目标是实现干净击杀。在《猎人:荒野的呼唤》中,这取决于四个要素: 1. 使用适合该动物的口径武器, 2. 射中其要害器官——目前指心脏/肺部, 3. 射击次数不超过2次, 4. 不击中任何 trophy 部位,例如鹿的鹿角。 目前,你需要进行一次能轻松满足这些条件的射击。这意味着要射击侧身站立的动物(直接面向左或右,侧身正对着你),并瞄准前腿稍后方的心脏-肺部区域。 武器操作 如果需要,可以用 binoculars 发现动物。使用望远镜时,按住【E】键可以标记目标。这会将目标高亮为蓝色,使其轮廓更清晰,即使在树叶遮挡下也能显示轮廓,对新手非常有帮助。 按住鼠标右键进行瞄准。游戏中几乎没有腰射的必要!务必瞄准后再射击,花时间仔细瞄准。 点击鼠标中键可以开关瞄准镜。对于初始瞄准镜,通常无需关闭——如果目标非常近,只需将倍率调到最低即可。 使用鼠标滚轮控制瞄准镜倍率。选择一个你觉得舒适的倍率,这样就能精准命中目标。如果你已经完全放大但仍然对射击感觉不自在,说明你距离太远了。 所有武器在瞄准射击时都会晃动,这是正常现象,你又不是士官长!按住Shift键可以屏住呼吸,这能显著稳定瞄准。不过,你只能屏息一段时间,而且只有在心率正常时才能这样做。练习屏息和瞄准,习惯你有多少时间来射击。 射击后,你需要拉动枪机完成抛壳和上膛动作。这需要时间,在刚开始时,基本上不可能快速进行后续射击。所以一定要让第一枪命中目标!选择合适口径的武器。由于你刚开始游戏,你选择的猎物适合使用.243步枪——黇鹿、狍子或黑尾鹿。最后,按R键为武器装弹。 解剖学/射击部位
Remember our earlier lesson? Let's review it. You'll want to place your shot into the heart-lungs area, from a broadside shot of the animal. You want to avoid shooting through thick muscle and especially avoid shooting through bone. This means you should look to take a shot at the animal's broadside, and put it about a third to halfway up the chest, behind the front leg. For a more in-depth guide, and as you move on to different quarry, check out Frorton's great guide: https://steamcommunity.com/sharedfiles/filedetails/?id=877148380 Great distances will affect how you place your shot, but within 100m- you should not shoot any further than this for now, and in fact try to get as close as you can- no compensation for bullet rise or drop is necessary. Wind also won't be a factor at this distance. There are some no-nos. Unlike other FPSs, do not go for head shots. It's very difficult to penetrate the skulls of most animals, and you're very likely to miss and hit the jaw instead- which is not a lethal kill. Imagine a deer running around with its jaw flapping in the wind. You should never be the cause of something like that. If the animal is quartering- not directly sideways or head-on, but turned slightly towards or away from you- you could still try to take the shot. Quartering away (animal is facing away from you) is a little easier than quartering towards (animal is looking at you), but of course broadside is always preferred. When quartering away, use the animal's leg further away from you as a reference instead of the nearer leg. When quartering towards, use the front of the shoulder of the nearer leg as a reference. Since you're starting out, you should simply wait for a broadside, then take the time to examine the animal's x-ray after you harvest it. Patience is a virtue in this game! An animal facing away from you is a gigantic no-no in real life. Same for when the animal is facing towards you. Learn proper shot placement first. With the changes to hunt scoring, going for spine or brain shots is now penalized in most cases. Stick with what works. Pulling the trigger Stabilize yourself. Stop moving, secure a firing position- either crouched or prone. Avoid shooting while standing. Hold your breath. Steady your aim. Squeeze the trigger gently. In theHunter as in real life, jerking on the trigger will throw your aim off-course. Squeeze it slowly and purposefully. Observe Don't release your aim yet. Look at the animal. Remember where you shot it. Did it fall where it stood? If not, which direction did it run off in? If it ran off, you will need to stalk it all over again. It's good ethics to never leave an animal running around wounded- put it out of its misery. If you downed an animal, you will notice a purple circle area on your HunterMate and your map around the area where the first bullet hit it. This is hunting pressure, and it shouldn't affect you for now- just note that, if you're ever doubting if an animal died from one of your shots, look for the hunting pressure to appear as soon as it dies. As you hunt and harvest more animals in an area, hunting pressure will increase and start to overlap. Animals will start avoiding areas with high levels of hunting pressure, meaning that you will have to change your hunting grounds. As well, need zones in areas of high hunting pressure will disappear. The good news is that hunting pressure disappears over time and with harvests in different locations. Also, hunting from a tree stand or a tripod immensely reduces the hunting pressure from any harvest. Skin Sometimes an animal doesn't die where it stands. It runs away, and takes some time to bleed out. If it dies, you will see hunting pressure appear- a purple circle area on your HunterMate and your map centered on where it first got shot. In real life, if the animal doesn't fall where it stands, it's generally recommended to wait for at least half an hour before starting to track it. Going after it right away risks spooking it and sending a rush of adrenaline through it, making it run away and take longer to expire naturally. You can apply the same thinking to theHunter. If the animal doesn't fall where it stands, make a mental note of where it fell and which direction it ran off in. Then wait and check your map until you see the hunting pressure appear, which is a sign that it has died. Now you can begin tracking it. Look out for bloodstains. These are clear signs that you hit an animal. Once you've found the first bloodstain and examined it, if you approach another trail marker and it glows blue instead of white, then you know that you're on the trail of the right animal. Look for tracks that show the animal running- that means it was fleeing after it took the bullet. You may have to track it for a very long time! A large splatter means that you hit a vital organ, but doesn't mean the animal will die very quickly- the size of the next splatter will tell you how fast it's losing blood. If you leave a dead animal unharvested, that's unethical in real life, and in theHunter it is penalized by you forfeiting any accumulated consecutive harvest bonus. Tracks are sometimes interrupted. If you cannot find the next set of tracks, broaden your search area. It's usually enough to simply look a little further to the left or right, but sometimes you need to start at a known track (most commonly a blood splatter) and move in an ever-widening circle to look for the next blood splatter. The cones are generally accurate, but many tracks are at the edge or slightly out of the edges of the cones. If it's at night, make sure your headlamp is on!
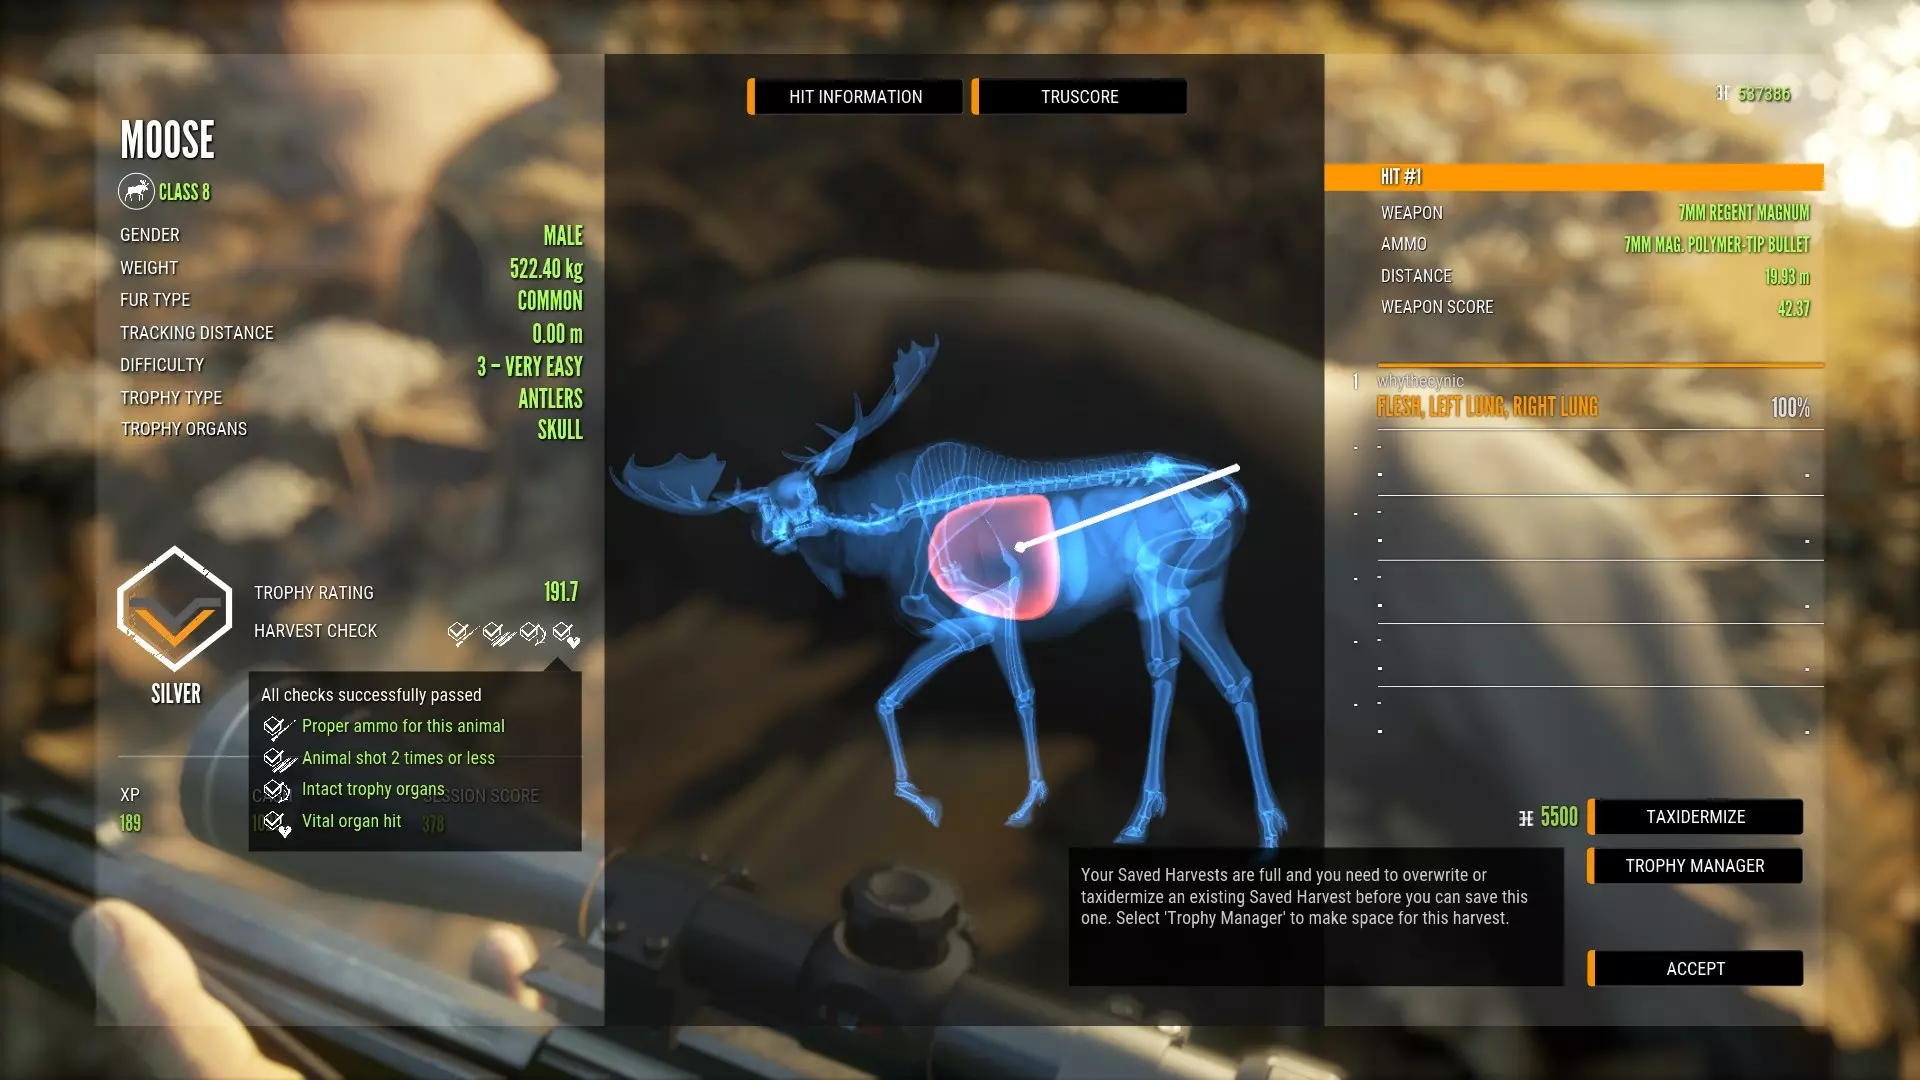
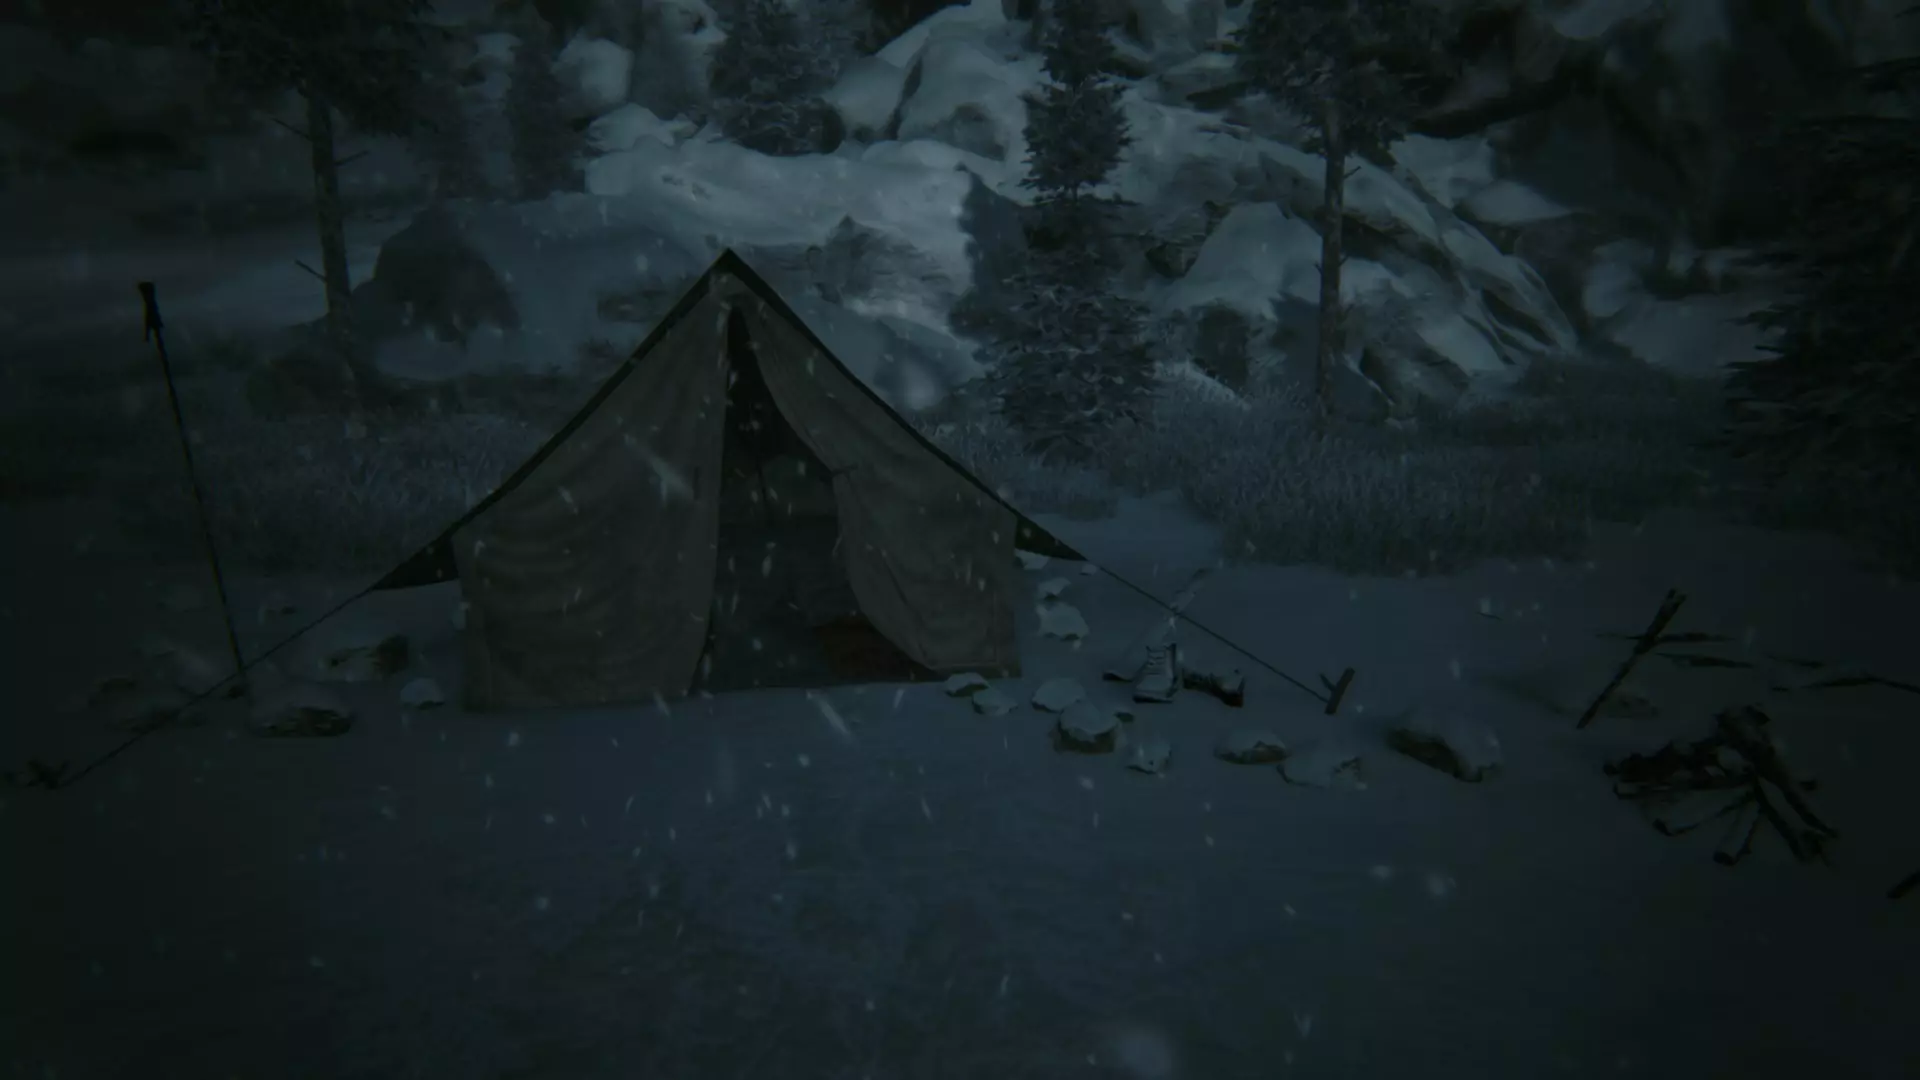
Once you find the downed animal, you will see it lying in a pile. It will glow blue. Move closer until you see the prompt to interact with it. Congratulations, you've harvested your first animal! Don't hit "accept" immediately. Take the time to look at the screen. This will be the best learning experience for you. You can see where your shot(s) landed on the animal. You'll get an x-ray of the animal in the pose the bullet hit it in, which is useful for anatomy lessons and especially useful for learning how the animals move. You can click and drag the x-ray to look around. On the left, you'll see the trophy rating for the animal, which is purely based on its trophy characteristic- antlers, skull size, weight, and so on depending on the species. Below it is the harvest check, which shows you how well you hunted the animal. If you used the proper ammo, shot it 2 times or fewer, hit it in a vital organ, and did not hit any trophy organs, you will achieve the maximum score for this particular harvest. This drives home the importance of responsible hunting! Next Steps Congratulations! You've successfully shot your first deer. It took a lot, but all the lessons you've learned go directly to your next hunt. As you hunt, you might want to take on different kind of game. You'll want bigger rifles (at first, at least), better sights, and better lures. You'll wonder what skills and perks to get. What's your playstyle? Are you more of an ambusher, relying on calls and scents? Or are you a stalker, stealthily creeping through the woods? I personally am more of a deerstalker. I got the Stalker skills that improve my stealth, and the skill that lets my HunterMate connect the dots. Most of my perks so far have been rifle perks. Note that the Zeroing perk will be useless until you're shooting at very long range, or if you're hunting with bows- within 150m, your rifles shoot essentially flat, and the short-range zero is useless for rifles. Try out polymer-tip ammo and see if it works better for you. If all else fails, you can go back to soft-nose. Although, to be honest, you probably won't notice the difference until you've put quite a few more hours into the game. If you want a new scope, the 4-8x scope is much better than the 8-16x, since you'll only rarely be shooting at really long ranges. I'd get that first instead of saving up for the big one. As for new rifles, I'd save up for a 7mm first, which will take down classes 4-9 and is extremely useful in general, though I'd still buy a bigger rifle if you plan to regularly go after class 9. A .270 rifle is also a decent first purchase, and puts you in the running for bigger game, but not the biggest. A .223 rifle is useful only if you plan to shoot lots and lots of Canada geese and red fox. Avoid the lever-action rifles until you're more familiar with the game- there's just not enough money to splurge on everything, especially since you'll need to buy a separate sight for them. The inventory system is actually very simple. You have 2 storage locations- your stash, shared between all outposts, and your backpack, which you carry with you. So after buying something, you need to move it from your stash to your backpack. This is done from inside the "Backpack" tab in the outpost menu. Once something is in your backpack, you still need to assign it to a hotkey in order to use it. If you're equipping a weapon, you must assign it ammunition, and optionally assign it sights. Yes, you can re-use a single sight for multiple rifles! This is done from the "Inventory" screen in the pause menu. Remember that tripods and tree stands greatly reduce hunting pressure, and too much hunting pressure will push animal populations out of an area. Tents act as fast travel / store points, and I usually pair them up with each other. Once I've found a good hunting spot close by lots of need zones, I put down a tripod or tree stand about 100-200m away, and a tent next to it. This lets me fast travel there without spooking animals, use callers to bring them in, and then harvest many animals without creating too much pressure. Bird hunting is a different matter altogether. You'll want a shotgun and birdshot, the appropriate bird callers, the decoys do help (up to 20 in the same location), and then lots of patience. However it is easy once you get the hang of it, and historically bird hunting has put food on many tables. Have fun, and good hunting! Bugs and Fixes theHunter has many bugs, some worse than others. Weapon disappears Sometimes your weapon disappears. Your HUD changes, but you don't see it in your hands, and you can't aim with it. This happens usually when switching between items very quickly. To fix this, hit the Holster hey (H) twice. Weapon keeps reloading after aiming down sights This is extremely irritating for single-shot rifles, and usually happens after a session at the shooting range. Unfortunately there is no fix for this that I've found other than actually shooting a round of ammo. GEESE Geese are horribly bugged. Sometimes (especially during rain) you'll see solo geese fly really slowly and not go anywhere. Don't shoot these, unless they're literally right in front of you and you have a deer rifle- they're invulnerable at long range to the usual weapons. There's no fix for these other than leaving and rejoining the game. Map doesn't load It takes some time. Give it a couple of seconds for the textures to load properly.