换一换
换一换 


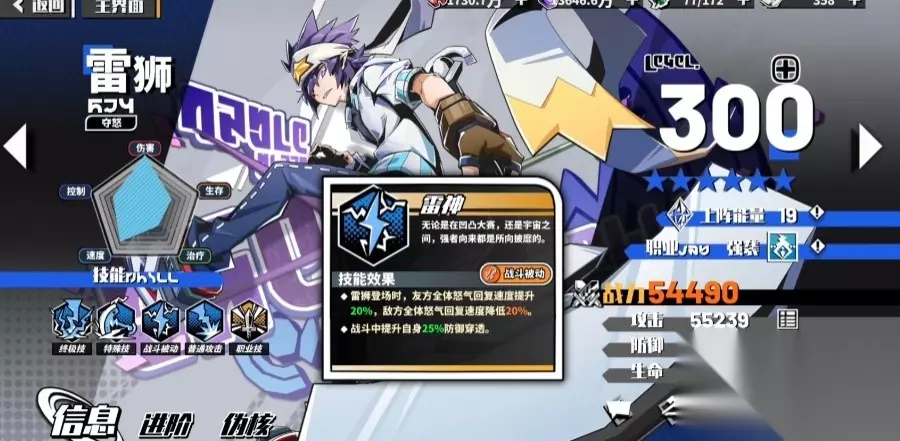
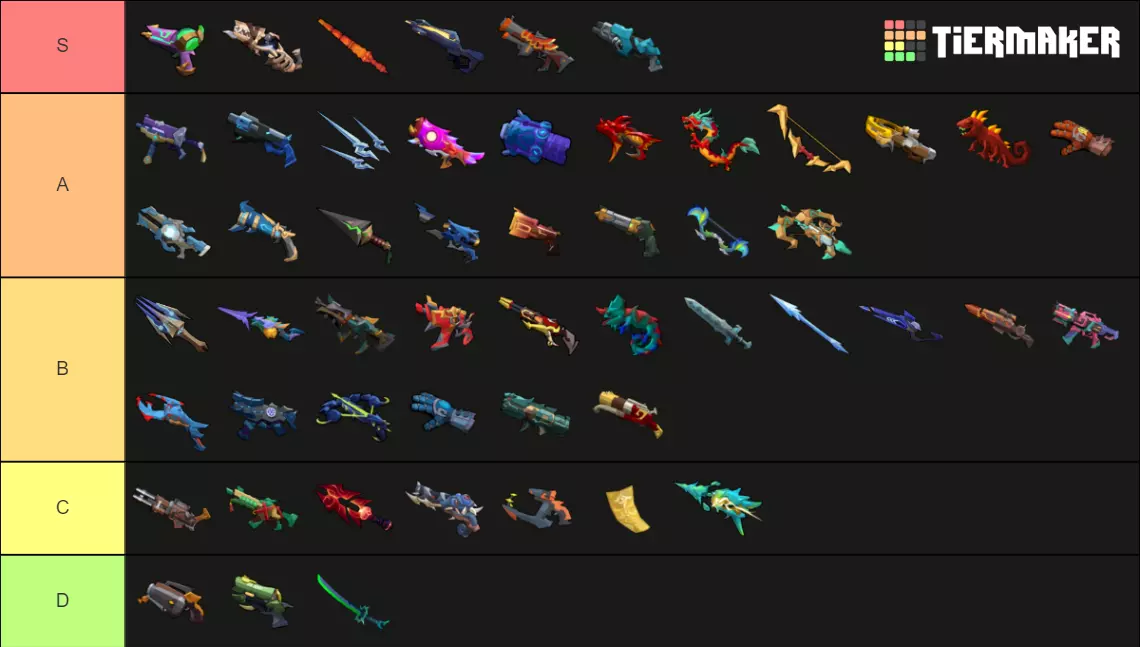
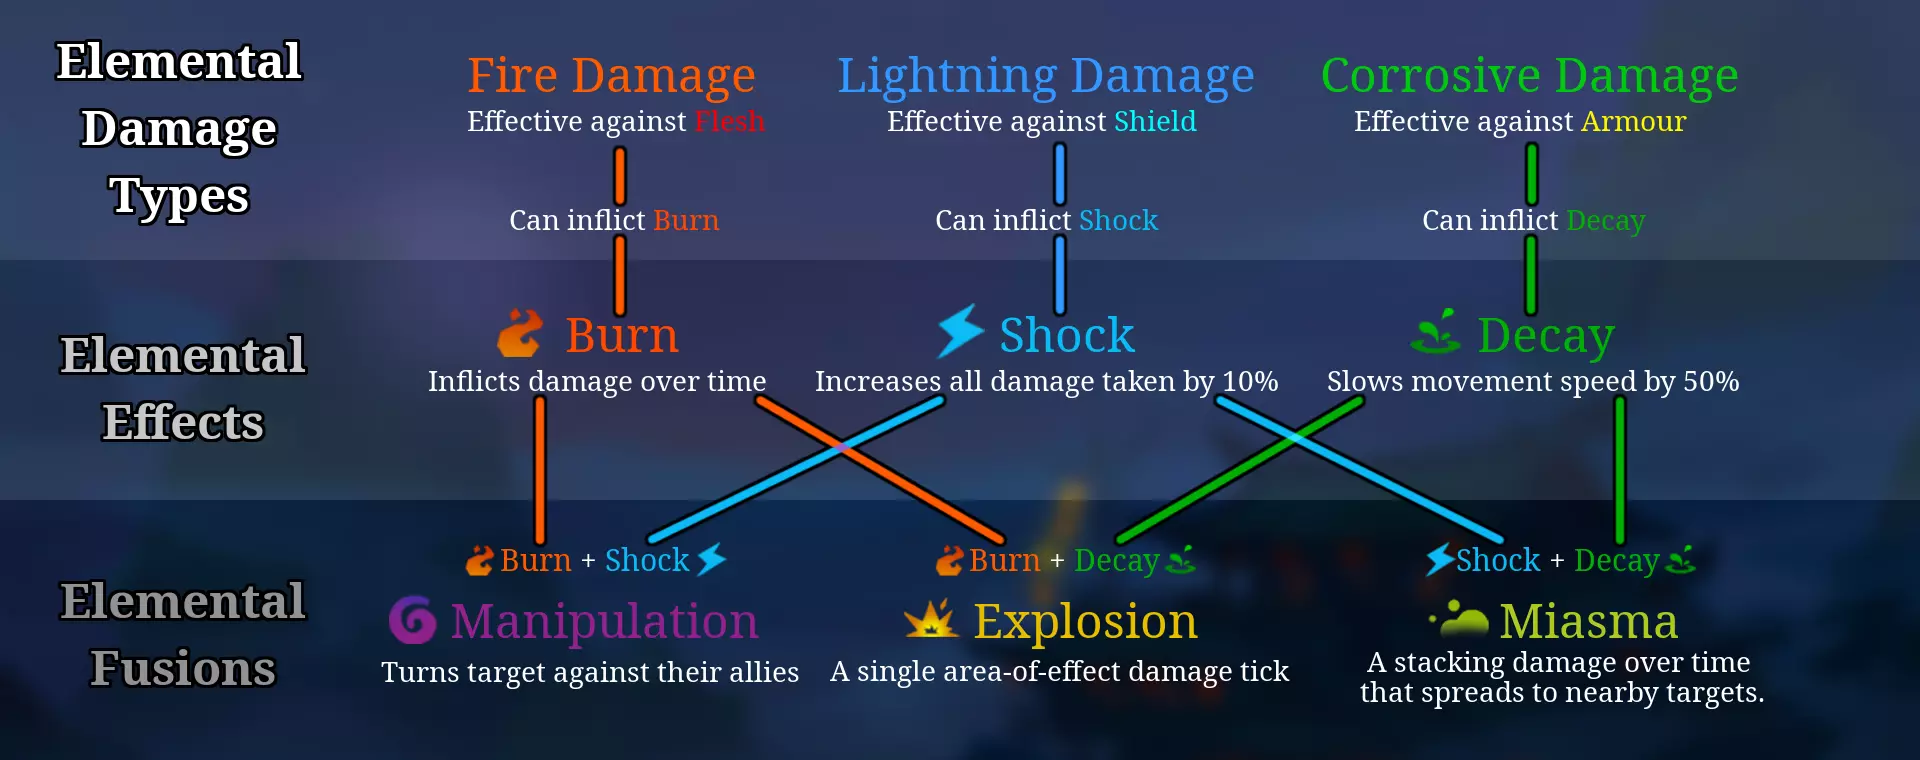
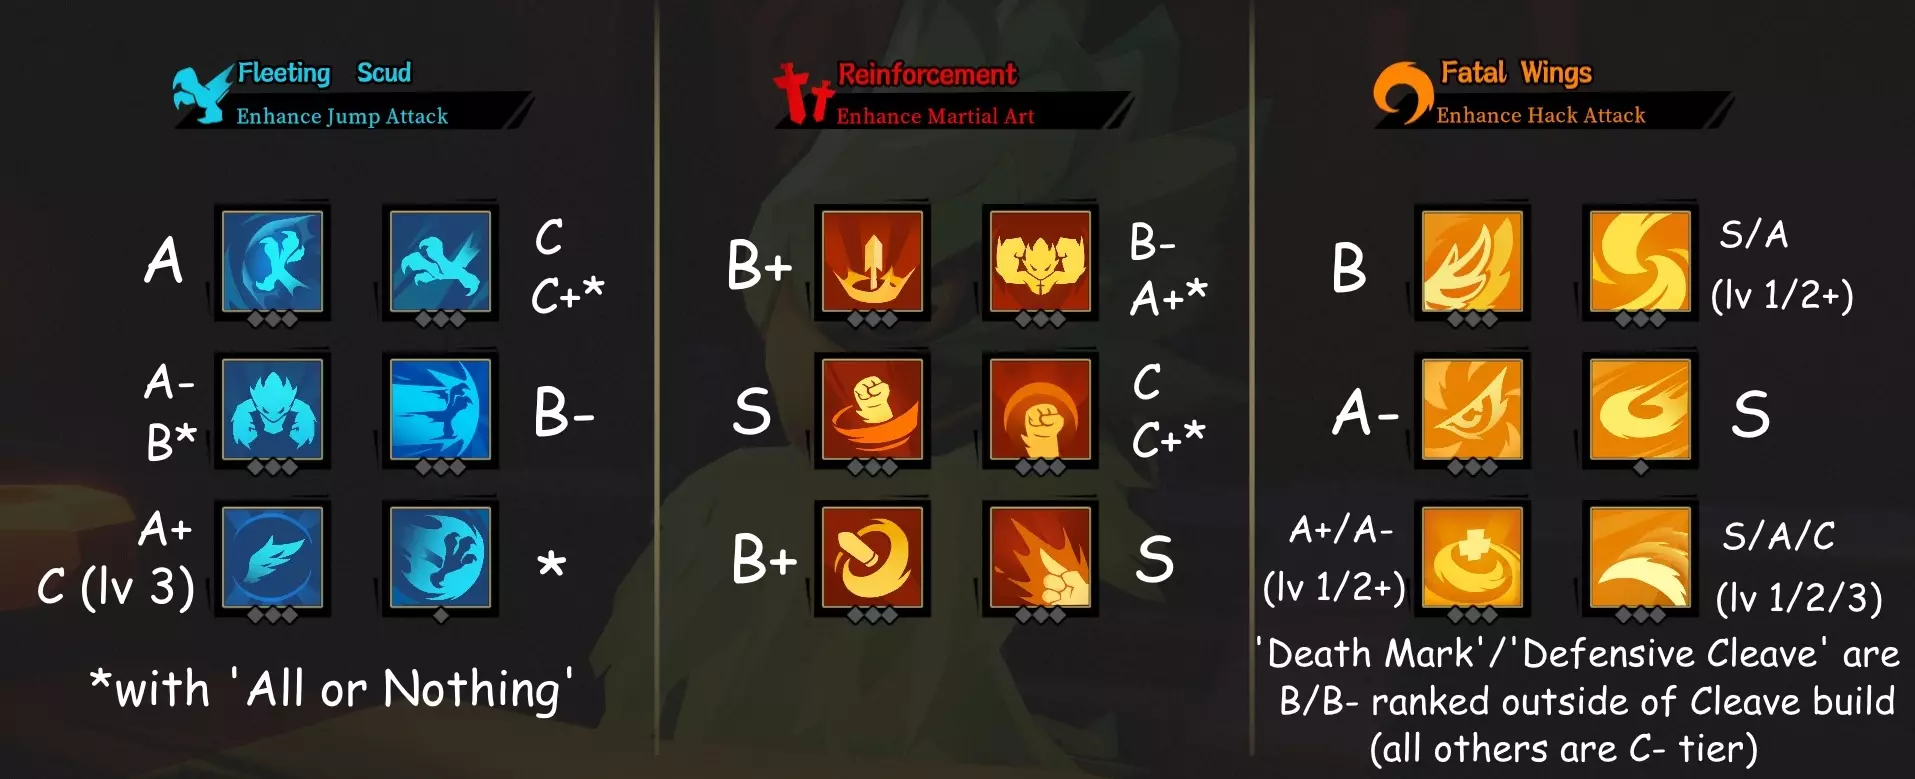
Rating all of Qing Yan's Ascensions, along with miscellaneous gameplay tips. This guide is focused on Reincarnation+7 difficulty and Solo Play. Occult scrolls are not factored, as this is a general guide and you cannot rely on getting specific scrolls. Impact of Talent 2.0 and Reincarnation changes -The new general talent 'Emergency Protocol' that reduces overflow damage when your shield/armor breaks has very good synergy with Qing Yan's character talent 'Emergency Defence' that provides 2s of normal damage immunity after his armor breaks. Both talents also recharge whenever you fill your armor to max. -Leap and Cleave DMG builds got even less consistent at higher Reincarnation levels due to the increased enemy HP. Neither of these builds are recommended for higher Reincarnation levels. -1 of Qing's Spirtual Blessings is strong though the other 2 are quite weak (see 'Spiritual Blessing' section for details). -Gemini Inscriptions are now relatively accessible in Area 2 thanks to 'etching'. (see the 'etching' section in the guide for details). Overall Qing Yan's excellent natural defences make him a solid choice for Reincarnation+7, though the lack of damage early on can be an issue. Why to Play Qing Yan (or why not to play) + Very high natural sustain and mobility, can recover armor in the middle of combat + Leap skill provides full damage immunity during the animation + Armor has -25% damage reduction for all elements except corrosive + Preference for the Shotgun weapon type, and close range playstyles = Probably the easiest of the current 4 characters to do consistently well with - Enemies with Corrosive attacks effectively deal double damage to armor relative to other elements - Generally weak Spiritual Blessings - Building Skill Damage builds is inconsistent - Most Cleave ascensions are worthless outside of dedicated Cleave builds Notes about Skill Damage builds *At high reincarnation levels, Cleave additionally requires the Spirtual Blessing that doubles secondary damage ('Skill Freak'), and Leap/Nova DMG builds are mostly unviable. Neither of these builds are recommended to use on Reincarnation+7, especially not Leap and Nova builds since they don't benefit from 'Skill Freak'. Qing has 3 different paths that make heavy use of damage from non-weapon sources (Skill damage): Cleave builds, Leap DMG builds, and Nova builds (from the ascension 'Nova Release'). I'll only categorize them as Cleave and Leap builds since Leap and Nova builds have a lot of overlap. Cleave +Can be used as a primary damage source for room clearing +Has the potential for higher stable damage output compared to Leap DMG builds -Requires very heavy ascension commitment. -Requires 'Easy Kill' being offered early (can sometimes work with lv3 'Fierce Wings' and no 'Easy Kill' but that is not consistent) -Has to manage secondary ammo consumption (before getting a source of ammo recovery) -Still reliant on weapons for Bosses/Elites and tougher targets. In general, follow these rules to maximize consistency: 1. If you do not get the 'Easy Kill' Ascension early on (By the end of the first boss at the latest), do not invest in Cleave Ascensions for the rest of the run. 2. If you don't have 'Easy Kill' yet, try to avoid investing in Cleave ascensions if better options are available. 3. If you do get 'Easy Kill' early, always keep an eye out for weak enemy groups you can Cleave. For Cleave to end up being worthwhile you need to fulfil the following criteria: 1. Enough base damage boosters (early 'Easy Kill', 'Fierce Wings', and the 'skill freak' blessing at minimum). 2. A way to manage secondary ammo, usually lv 1 or 2 'Max Cleave' (can occasionally be replaced with occult scrolls) 3. While not strictly necessary but having at least lv 1 'Defensive Cleave' is a massive help. I'm not a big fan of Cleave builds personally, attempting to build for it can get quite annoying when you just don't get offered the ascensions you need and it being so demanding in investment means all your ascension decisions are very straightforward. It does have a pretty solid power level though when you get all the pieces together (though at that point the gameplay gets pretty mindless as you can just run forward and mash the Cleave button). Leap +Much less committal in terms of ascension investment (only 4 points needed to max all dedicated Leap DMG multipliers, and no need to farm kills for it) +Potential to chain Leaps from one enemy to another, resulting in lots of armor recovery and invincibility frames (and fun) =Supplements normal weapon damage rather than replacing it entirely -Very reliant on being able to kill enemies with Leap. -These builds can't scale damage as high as Cleave builds -Doesn't really help against bosses -'All or Nothing' reduces your defence a lot if taken early with no way to mitigate it. When building for Leap, don't entirely neglect +Weapon DMG, you're still very reliant on that. As for Nova, it's a somewhat weaker version of Leap DMG without as much payoff (less range and no natural cooldown reduction bonuses), but it does work better with 'Fully Equipped' and 'Last Stand' since they only apply after a Leap. If choosing between 'To Last Breath' and 'Nova Release', I'd usually pick 'To Last Breath' though sometimes you can also take both of them together. Again, neither of these two builds scale to match higher Reincarnation levels, because they lack a spiritual blessing damage multiplier. Spiritual Blessings (new) Unstoppable Momentum "Each enemy killed with Leap grants you a stack for 6s (up to 6 stacks) that give +100% Leap base DMG each (New stacks refresh all stacks duration)." This suffers from Leap's inability to scale well at higher difficulties. Even the weaker enemies in act 3 can have upwards of 100,000 HP. Even with heavy investment in Leap DMG ascensions, killing enemies from full HP with Leap is typically impossible, and you'll have the whittle them down with your weapons first. Without a fair amount of Leap cooldown reduction, you don't have enough time to even be able to use Leap before the buff expires, making it completely useless. Way too much work for little payoff. Oppressor "When your current HP% is equal to or greater than an enemy, +150% DMG is dealt to them; Otherwise, take -30% less damage from them." The easy pick for Qing Yan blessings, Provides a massive damage bonus if you can maintain high HP, but you also get a pretty heavy defensive bonus if you can't. It's not great to rely entirely on this as a source of damage, as if you're not on full HP then the damage bonus won't activate against shielded or armored enemies (since it only factors the enemies HP and not shield or armor). Bladed Cleave "Cleave instantly kills normal/elite enemies under 25% HP, and bosses under 15% HP." A rather ineffective blessing that is ironically even worse in Cleave builds that it is otherwise. Cleave builds have access to 'Easy Kill' which massively boosts damage to low HP enemies already, making this completely redundant. Outside of dedicated Cleave builds, this is quite clunky to use, requiring you to be within range and reduce enemies to low enough HP that they'd probably just die with a weapon shot anyways. Naturally, it's also far less effective against armored or shielded enemies (which is most of them) since you have to break through all their shield/armor before you can even start lowering their HP. There really isn't much payoff to this regardless of what build you're running. Gemini Etching (new) This is the new core strategy for basically every character at higher reincarnation levels. It let's you setup endgame gemini weapons as early as area 2, before enemy HP starts to scale to a silly degree. Gemini inscriptions can be etched onto any weapon for a fee at the craftsman if either one of two conditions is fulfilled: 1. The weapon already has 4 inscriptions before etching (every naturally dropped weapon starting in Area 2 qualifies for this). 2. The weapon is enhanced to +5 (This lets you bring a weapon from the first area, but is more expensive as you have to spend money to upgrade it first. Usually used for bringing a secondary weapon, though if sometimes you may have a good primary you want to bring instead). As Qing Yan, the you have a choice between 3 of the geminis "damage share', 'critx share' and 'magazine share'. While the 'damage share' gemini is usually the most powerful one (as elemental fusions are all extremely strong), if you're not using an elemental weapon you can also use a sniper secondary weapon to share its high critx with your primary weapon. 'Magazine share' is the most niche of the 3 geminis, however it's especially good for the 'Wild Hunt' shotgun, as the increased magazine offers a massive damage increase when you rarely need to reload that weapon. The next paragraph will detail 'damage share' gemini as the other two are fairly self-explanatory. If using 'damage share', the secondary weapon (the 'gemini fodder') should have an element your primary does not have, and will rarely be used in combat; the only stat that matters on it is 'elemental effect chance'. This stat is directly applied to the first weapon on top of its existing elemental effect chance. As such Melee weapons are very good candidates for fodder as they have very high elemental effect chances. (ex. Lightning Blast gemini'd with Fire Tower results in Lightning Blast having a 20% chance to inflict shock AND a 50% chance to inflict burning with every bullet). Which elemental combination you use depends on your preference, Miasma guarantees stable damage output, Manipulation offers great defence, and Explosion amplifies an already high damage output. Most of your money should be reserved for etching and reforging the gemini's until they match. Do not waste money upgrading weapons you don't intend to use for gemini etching as the process can be expensive and the sooner you get it done the better off you will be. Ascension Tier List This list covers Ascensions in a vacuum. Specific ratings will shift as your build progresses in a run. Use your own judgement. (ex. defensive Ascensions may have more value if you have only found offensive occult scrolls) Some Ascensions are also rated differently depending on how many points you have in them already. (ex. lv3 rating assumes you already have 2 points invested). The Tiers are divided as follows: S: Excellent Ascension. Almost always pick if it doesn't conflict with your build, A: Great Ascension. Can't usually go wrong with these. B: Good Ascension. Good to have, just not as high priority. C: Mediocre Ascension. Not necessarily 'bad' but you probably shouldn't pick these over other ones.
暂无法识别该内容,无法进行准确汉化。

巨型爆炸:“跳跃技能的范围增加2米、4米、6米,冷却时间减少20%、40%、60%。等级3时,对范围内所有敌人造成20%额外劈砍伤害。” 范围扩展很不错(尤其对跳跃伤害流派而言),但冷却时间减少才是选择这个技能的主要原因。跳跃是你主要的防御型冷却技能,无论最终选择什么流派,能更频繁地使用它总是好的。等级3的额外效果影响不大,所以做决定时无需考虑。

钢铁护甲:使用跳跃攻击命中敌人后,接下来2秒内受到的伤害降低50%-100%。等级3时,在此期间受到的伤害将转化为护甲值。 此技能非常适合激进型玩法,能为你提供一个缓冲窗口,让你可以跳入敌群并快速解决高优先级目标(或通过范围攻击将他们全部击杀)。需要注意的是,跳跃过程中你默认处于无敌状态,该技能的效果在你落地后才会生效。它与另一个进阶技能【全副武装】有很好的协同作用,能让你安全地利用提升后的伤害(不过如果你拥有【全副武装】,此进阶技能的3级效果就显得有些多余了)。但它与【孤注一掷】存在反协同效果。“孤注一掷”可以破坏你的护甲并触发晴的被动天赋【紧急防御】,该天赋能为他提供2秒的普通伤害免疫,且会与【钢铁护甲】同时激活;【钢铁护甲】确实能抵御元素伤害,并且不需要你先将护甲完全充满,所以它并非无用,只是优先级降低了。

再生打击:“使用跳跃后,若命中目标,恢复40%..100%..100%护甲值;若未命中,则恢复20%..25%..100%护甲值。” 这是一个能帮助你更快补充护甲的优秀技能,但它存在收益递减的问题。在1级时,你只需命中两个目标就能恢复80%的护甲值。将其提升至2级以上并不会带来任何效果,除非你有故意让跳跃未命中敌人的习惯,这样可以完全恢复护甲值,并且因跳跃未命中而获得50%的冷却时间减少。不过在实际操作中这相当别扭,因为你很可能会随机命中一个罐子或敌人,尤其是当你通过【巨型爆炸】技能增加了跳跃范围之后。这个升华对于【孤注一掷】成就相当重要,因为它能减轻护甲消耗(护甲增益会在现有护甲被消耗后生效)。现在能够将护甲回满非常关键,因为这会重新激活【紧急协议/防御】天赋,以保护你免受爆发伤害。

【至死方休】“跃击造成+200%…+400%…+600%基础伤害。跃击剩余冷却时间-1秒…-2秒…每击杀一名敌人则重置冷却时间。” 作为跃击基础伤害强化技能,若想让跃击的伤害变得可观,此技能是必备的。遗憾的是,在较高难度下,无论投入多少资源,跃击的伤害往往都难以达到理想效果,因此这里的大部分细节仅适用于较低难度。该技能能从“孤注一掷”升华中获得显著增益。跃击的冷却缩减是一项很有价值的能力,尤其是在3级时,只要通过跃击不断击杀敌人,就能连续释放跃击。如果你的跃击无法一击杀死敌人,可以先用枪械削弱敌人,再使用跃击,这样就能通过击杀触发冷却缩减。与“新星释放”(一种在伤害输出和功能上相似的升华)相比,“至死方休”拥有较少能轻松强化它的升华,但提供了更好的次要效果(跳跃冷却时间减少对比额外最大护甲),不需要护甲先完全恢复,也不完全依赖“孤注一掷”。此外,这两种升华对精英怪或 Boss 都不会提供任何实际增益,因此不要完全忽视通用的伤害加成。

护甲强化:“在跳跃开始时获得+30…+60…+100最大护甲和+10%…+20%…+30%移动速度,持续7秒。等级3时,在效果激活期间受到攻击后,还有25%的几率获得0.5秒无敌效果。” 作为一个独立的强化,额外护甲还算不错,移动速度加成也还行,但投入点数的影响不大;攻击性强化从一开始就往往更值得选择,而其他提供伤害减免或减少跳跃冷却时间的防御性强化,比单纯增加固定数值的最大护甲更能有效减少受到的伤害。【孤注一掷】和【新星释放】这两个升华天赋存在一定的协同效应,提升最大护甲值会在一定程度上增强它们的威力,但这种增强并不足以让它比大多数其他升华天赋更值得选择(而且在同时投资这两个天赋和该天赋的情况下,很难有足够的点数去兼顾一些伤害加成天赋)。另外需要注意的是,最大护甲值的提升会保持当前的护甲百分比,因此如果没有足够的护甲恢复能力来填满护甲值,你将无法获得全部收益。

孤注一掷:使用跳跃攻击敌人时消耗所有护甲。每消耗1点护甲,跳跃伤害提升0.8%。 跳跃伤害提升为乘法计算,因此能与其他跳跃伤害加成良好叠加。但遗憾的是,在较高难度下,这仍然无法将跳跃/新星伤害提升到足以值得投入的显著水平。就其本身而言,这个升华是一个主动减益,基本上会减少你的可用护甲量(例如,用跳跃攻击单个目标会将你的护甲降低至20%,无论你之前有多少护甲)。升华【回复打击】和【全副武装】在之后帮助恢复护甲时会变得更有用。不过,能够安全地将护甲设为0确实有一些特定的应用场景。它可以触发被动天赋【紧急防御】,在跳跃后提供2秒的非元素伤害免疫(不过需要将护甲充能至最大值才能重新激活)。这也是其他几个升华天赋【至死方休】【背水一战】【新星释放】的启动条件。如果没有这个天赋,那些升华天赋的效果会大打折扣,因此如果投资了它们却之后没有获得这个天赋,会是个风险。虽然这些协同效果可能很有趣,但大多数时候,为了这个天赋而承受护甲获取减少的负面影响并不值得。选择更稳定的优秀升华天赋通常更稳妥。此外,只有在你用它击中敌人时才会消耗护甲,你仍然可以通过攻击罐子和木桶来安全地充满护甲。 强化升华天赋

全副武装:“使用飞跃技能后,造成的武器和技能伤害提升75%..100%..150%,每击杀一名敌人,恢复20%..30%..50%护甲值,并减少飞跃技能冷却时间1秒..1.5秒..2秒。效果持续2秒..3秒..3秒。” 这是一个强大的伤害提升技能,同时附带额外收益,但持续时间非常短是其短板。将该技能升至2级或更高等级能显著改善这一问题。确保使用爆发型武器,如发射器或霰弹枪(或劈砍流派),以便在2或3秒的持续时间内输出最大伤害。与【钢铁护甲】、【背水一战】和【孤注一掷】有良好协同效果,可在你专注于快速击杀敌人时减少受到的伤害。与【新星释放】也有不错的协同,因为该升华技能的所有加成会在新星触发前激活。请注意,由于该技能在跳跃后生效,因此它不会强化跳跃本身的伤害(除非你能大幅减少跳跃的冷却时间,以便在增益效果消失前再次使用跳跃)。

【范围内】“对7米内敌人造成+40%伤害,7米内+80%,12米内+120%伤害” 这是一个通用伤害加成,唯一条件是靠近敌人,而晴通常就会这么做。由于它也能 buff 技能伤害,如果你不想专注于特定流派,这是前期的绝佳选择。虽然其上限不如其他一些伤害加成技能高,但选择它基本不会出错。

弹幕齐射:“ reload后,前3/4/5发子弹造成+30%/+40%/+90%武器伤害,拥有+20%/+30%/+40%幸运一击几率,且不消耗弹药。” 这个天赋可能非常强大,但不像青的其他增伤天赋那样具有普遍适用性。你需要搭配一把射速较慢、伤害较高的武器,以充分利用免费子弹。此天赋与许多【铭文】和【秘卷】存在协同效应,能使其变得强大,但也存在一些问题。有多个【秘卷】可以减少 reload需求,这与此天赋不兼容。许多强大的元素武器往往射速较高,或者根本无法触发 reload,因此也无法从中受益。此外,虽然它曾是强大的“狂野狩猎”霰弹枪连招的主要激活方式,但随着双子座铭文的获取难度降低,现在你也可以用“弹匣共享”铭文来实现相同的效果。这仍然是一个潜在的强力提升,只是你有很多其他选择可能会让它显得不那么必要。

【背水一战】当护甲被击破时,获得30%..60%..100%武器/技能伤害加成,20%..35%..50%攻击速度加成,以及20%..35%..50%受到伤害减免,持续6秒..6秒..10秒。 如果没有【孤注一掷】来稳定触发它,这个技能的效果就没那么好了。虽然其原始伤害加成比其他选项略低,但攻击速度加成对某些武器非常有用,伤害减免效果也相当不错,有助于抵消【孤注一掷】的负面效果。在较低等级或没有减少飞跃冷却时间的情况下,很难保持该技能的全程覆盖,而且这需要你浪费飞跃技能,而不是留到真正需要的时候使用。虽然在某些情况下,它可能比其他提升伤害的升华技能效果更好,但相比之下,它需要满足的条件要多得多。如果你同时拥有【孤注一掷】和稳定的护甲回复来源(通常是【回复打击】),那么这个升华效果会非常好。在较高的轮回等级下,敌人的巨额伤害很容易击破你的护甲,因此即使没有【孤注一掷】,这个升华也并非完全无效。

新星释放:每次击杀后获得一层效果,每层效果在8秒、9秒、10秒内提供5点、10点、15点最大护甲值(每层效果拥有独立计时器)。等级3时,当护甲被打破,释放新星对周围敌人造成伤害(受技能伤害加成)。 如果没有【孤注一掷】,这个技能完全不值得选择(在更高难度下,也基本不值得选择)。该技能提供的护甲增益大多微不足道,所以选择它的唯一理由是为了新星效果。新星需要你在护甲重新充能前完全回满护甲,因此你可能还需要其他升华技能【再生打击】或【全副武装】来恢复护甲(以抵消【孤注一掷】的惩罚)。它需要大量投入,但较短的攻击范围和有限的伤害成长使其显得不太值得,而且对首领或精英敌人完全没有帮助。不过与【至死方休】不同,它确实能与【全副武装】和【背水一战】产生额外的协同效果,因为这些效果也会在跳跃后触发。

胜利突袭:“一次射击至少命中敌人4/3/2次后,获得50%/100%/150%武器伤害加成,持续5秒/5秒/10秒。” 这是一个巨额伤害加成,而且基本是免费获取的,这是晴使用霰弹枪的最大原因。其触发条件明确为“一次射击造成4/3/2次直接伤害”,因此发射器击中多个敌人时也能触发该效果。铭刻提供的额外投射物会计入触发次数,但像骑兵步枪这类 burst 射击的半自动武器在技术上属于“多次射击”,无法自然触发该效果。此外,你可以用一把武器触发该效果后切换到另一把武器,仍能保持伤害加成(持续5-10秒,之后需要再次触发)。 致命羽翼升华

绝对优势:“劈砍的范围增加2米、3米、5米,且范围内每有一个敌人,劈砍伤害就提升20%、30%、40%。” 范围扩展很不错。伤害加成也还行,但劈砍在对抗强大的单个目标时是最弱势的,而这一点对此并没有太大帮助。劈砍对晋升投资的要求很高,这个技能不算弱,但往往不如其他选项优先考虑。

死亡印记:“顺劈会对敌人施加持续4秒..5秒..6秒的死亡印记。被标记的敌人受到来自你的伤害增加20%..40%..60%(这也适用于初始的顺劈攻击)。击杀被标记的敌人后,获得20%..25%..30%移动速度加成,持续6秒..6秒..10秒。” 这是一个 multiplicative 增伤,因此能很好地与普通的伤害加成 modifiers 叠加。移动速度 buff 也是一个不错的额外奖励。 multiplicative 伤害提升非常有价值,该技能未获得更高评级的唯一原因是,顺劈流派对升华点数的要求很高,导致它们通常没有足够高的通用技能伤害加成 modifiers 来充分利用这一效果。这也是非劈砍流派的最佳劈砍升华选择;你可以在开始战斗时快速使用一次劈砍,或者在对抗 Boss 或强大敌人时装填弹药期间使用,以充分利用伤害倍率。

防御型顺劈:顺劈每击中/击杀一名敌人可恢复10%/20%..20%/40%..30%/60%护甲值,且每击杀一名敌人可减少跳跃技能剩余冷却时间-1秒..-1.5秒..-2秒。这是顺劈流派最佳的生存能力选择。对于频繁使用顺劈的玩家来说,护甲值提升效果显著,还能额外减少跳跃技能的冷却时间。如果可能的话,至少将其升至1级是你会尝试去做的事。在顺劈流派之外,它也并非毫无用处,但当顺劈无法造成可观伤害时,试图通过敌人群来补充护甲值可能会有些危险。

凶猛之翼【劈砍技能基础伤害提升100%..200%..300%。劈砍后,下一发子弹武器伤害提升50%..100%..150%】 劈砍伤害更高,还有什么可奢求的呢?作为基础伤害提升,它明显优于普通的技能伤害加成,任何优秀的劈砍流派至少都需要投入1点,可能的话投入更多。武器协同效果大多时候难以充分利用,因为它只对一发子弹生效(通常情况下,搭配霰弹枪或发射器效果最佳)。

【轻松击杀】“劈砍对低生命值敌人造成最高+100%伤害。使用劈砍击杀敌人后,永久增加5点劈砍基础伤害” 这是劈砍流派可行的主要原因。尽早获取此技能并开始通过击杀敌人叠加效果,否则完全不必考虑使用劈砍。决定走劈砍流派后,尝试调整武器配置以有效击杀精英/ boss,因为劈砍将负责处理大部分其他敌人。(如果武器伤害不足,可尝试利用瘴气融合效果[腐蚀+闪电融合])

【最大劈砍】“劈砍的容量增加+3…+6…+10,且每次击杀恢复1…2…3点充能。” 在获得“轻松击杀”和“凶猛之翼”成就后,这个技能几乎是必备的。一旦升至2级,你就可以毫无顾虑地到处狂放劈砍,不用担心弹药问题。不过3级往往有些过头,这也是它评分明显较低的原因。根据你拥有的秘卷,它可以停留在1级,有时甚至可以完全不点(如果你同时拥有“防御性劈砍”天赋,它可以被特定秘卷“容量透支”替代)。 通用技巧 关于跳跃 -跳跃期间全程无敌,这使它成为一个极佳的接近手段。 -跳跃是一种“重型”攻击(类似爆炸物和某些特定的投射武器)。这意味着它有几率使你击中的敌人进入硬直状态。如果敌人已经处于攻击动画中,这一效果并非必定生效,但当它成功触发时,确实能有效缓解你的压力。 - 不要过于鲁莽地使用“跳跃”技能。确保你能快速消灭跳跃落点附近的高优先级威胁,否则你会发现自己被困在一群敌人中间,几乎没有退路。有时,正常接近敌人是更好的选择。 - 箱子和罐子等环境物体可被视为“跳跃”技能的目标,因此你可以通过跳向它们来回复护甲。如果你护甲值较低且已清除房间内的敌人,这是个不错的做法。 - 如果你已开始装填弹药,“跳跃”(以及“劈砍”)技能不会中断你的装填过程。使用飞跃(或劈砍)前,记得先换弹。 关于武器: - 通常来说,青使用霰弹枪不会出错,他的所有伤害提升天赋都对霰弹枪有加成。 - 重型霰弹枪(【荒野猎手】和【地狱】)最有价值的词条是【+精准度】,这能大幅增加射程,让大部分弹丸更容易打出暴击。 - 务必携带一把至少具备中距离作战能力的武器。某些敌人阵型和 Boss 会让你直接近距离作战变得非常危险,甚至是自杀行为。【门徒】和【豪猪】都是元素霰弹枪,射程比普通霰弹枪更远,是不错的选择。 - 如果使用技能伤害流派,可尝试使用【瘴气】等元素融合效果,以弥补 Boss 战中伤害输出较低的问题。前面提到的“学徒”和“豪猪”是这方面的优秀人选。 关于敌人: - 许多通常远程攻击的敌人,如果你离它们太近太久,它们会发动快速的近战攻击。要小心不要被这些攻击命中,因为它们的伤害相当高。 - 带有【腐蚀】前缀的敌人是你的克星。务必迅速消灭它们,或者通过摧毁它们头顶的毒球来阻止其伤害光环。 - 在一定程度上,第三阶段的章鱼怪和河童怪也要格外小心,它们也能让你陷入腐蚀状态,并大幅降低你的移动能力(除非你有能抵御该状态的卷轴)。 - 第二阶段的纵火犯拥有看似范围过大的火焰喷射器,但如果你直接站在它们旁边,火焰其实无法击中你。如果附近有其他敌人,请注意不要这样做,因为在此期间你将无法移动,视野也会受到很大限制。 结语 感谢维基贡献者提供的技能图标和描述。 如果你对本指南中的某些内容有不同看法,欢迎留言。