换一换
换一换 


Unlock the full potential of your towers with our comprehensive Modules Guide for The Perfect Tower 2! Discover the intricacies of offensive and defensive modules, learn about their unique abilities, and master the art of tower customization. Whether you're looking to boost your damage output or fortify your defenses, this guide provides invaluable insights and upgrade strategies to help you dominate every level. Elevate your gameplay to new heights with our expert tips and unleash the ultimate tower-building experience! Types of Modules There are various kinds of modules to find. Active vs Passive Modules will be either active or passive. Active Active modules require manual activation. Some need to be aimed, while others activate immediately on use. Passive Passive modules can be improvements to the core stats of your tower. They can also activate automatically upon meeting their conditions. Offensive, Defensive, Utility & Ultimate A module is either Offensive, Defensive, Utility, Ultimate, Special, or Legendary. Offensive Offensive increase the damage of your tower in some way. This can be by boosting the damage of your bullets, doing a unique attack upon activation, or meeting the modules conditions. Defensive Defensive modules improve your tower's ability to survive attacks. They can be improvements to health/health regeneration, or damage reduction, etc. Utility Utility modules do not directly improve offense or defense, but instead have other effects. They can do things like supply energy for skills, or generate resources for example. Ultimate Ultimate modules provide special, usually powerful bonuses. Special & Legendary Special modules provide unusual bonuses or alter the Tower in some way, while Legendary modules usually have extremely powerful effects, sometimes even moreso than Ultimate modules. Both types are quite rare to find, though Legendary modules do not count towards Museum statictics and achievements. Upgrading Modules Modules can be upgraded in a Tower Testing run with experience or gems, or permanently upgraded inside the workshop. Upgrading modules will increase their effects or their chance to activate. In tier I, the cost to level up a typical module from 0 to 1 is 1 resource, and the cost of upgrade increases by 1 for each subsequent upgrade. For example, the final upgrade from level 99 to 100 would cost 100 resources. This means that for a tier 1 module, the total number of resources necessary to upgrade to the max level would be 5050. (There are exceptions: Attack Speed, for example, costs 25 resources to level up from 0 to1. Each subsequent upgrade increases the cost of upgrade by 25 until level 20.) Tiers You can extend the maximum tier of most modules by prestiging inside the headquarters. Increasing the tier of a module will reset it's level to 0, but will raise it's max level by 100 or whatever the max level of the module was for its initial tier (e.g. 20 for Attack Speed). Tiering up also increases the upgrade cost of the modules. For tier II, each upgrade costs 8 times as much as it does for tier I. Percentage based modules usually cap at tier 5, while other modules usually cap at tier 250, with other modules capping at 100. Unlocking Modules Modules are unlocked in a variety of different ways. For details on unlocking each module, see List of Modules. Modules can be unlocked in a variety of ways: Regions (see below) Laboratory Completing Challenges Arcade Workshop Researching Artifacts Asteroid Mining Regions Each region drops a unique selection of modules. Some modules are dropped upon reaching specific waves, and others are dropped as a random chance. When exiting the round (either by quitting manually, fulfilling the victory condition or dying), each module in the region has a chance to drop. Multiple modules can drop in the same round, and dropped modules are not lost when restarting the round from the round-over screen, or using auto-restart. The formula for calculating the final drop chance of a module is: Bdc × Pb × Df × Log10(Cw / 10) Where: Bdc is the base drop chance of the module Pb is the multiplier from any player bonuses Df is the difficulty factor from the current region difficulty Cw is the current wave reached upon round end In general, when attempting to unlock modules, it is better to do many short runs than it is to do one long run, this is because the formula for the wave is based off a logarithmic function, which scales really poorly based off of time. Doing a run to wave 1000 only has a 2x drop chance compared to wave 100, but it takes a lot longer to get there making it faster to do 2+ runs to wave 100 rather than 1 run to wave 1000 in the same time. Note that you must reach at least wave 11 on a given run in order for modules to have a chance at dropping which makes the optimal wave to get to around 30-50. For farming modules base there are 3 methods based on your Military Tier For Military Tier 0-4 it is best to go to the highest difficulty you can reach on a region and then do tons of short runs to wave 30-50 with every software you have unlocked turned on. For Military Tier 5+ it is best to go to the highest endless mode you have unlocked on a region since Wave Momentum and other software allow you to get to wave 100+ in around 3 seconds which takes less time than before but gets you to a higher wave for much better unlock chance For Military Tier 8+ Drop Chance Bonuses There are 3 player drop chance bonuses currently: The Analysis skill obtained from the workshop The Power Plant 2nd floor The Sign Artifact in the museum Winter Challenge 1 Global Boosts Difficulty Factor Higher difficulties have a greater chance of dropping modules. The multiplier is equal to the pack size/4, the pack size is the number of enemies that spawn per path per wave on a specific difficulty, so on Forest Hard, there are 24 enemies that spawn per normal wave, 4 paths times 6 pack size. The difficulty factor for each difficulty is as follows: Difficulty Factor Easy x1 Medium x1.5 Hard x1.5 Insane x2 Nightmare x2.25 Impossible x2.5 My Modules MT8: XVFBbgMxCPxKlQdY6rW+Vf1F1QO2yS6N114BThRV/XvZrHeT9GQYAzMDP4eQG85MReXw9vJ5eN9SD6oQT05mxOQjk7oAQnHDLRm3eGpZSca6N4XaSkR/JEZHJVJBBqVatn+aZtQm61ickAcs8br9Lm2BEXQniHUKTR4nyAx82hKGmdLS5WXOpstBOoMJSFtBWoZdTKLvzG6tbkFI1LhxBR4ErNqW6GMavIKV/cN9qFWewoJNGXLPENgcrBZvYS8CbduYHnfVmG0VRZ+kPO28FTojizF0INMRTZgBxxrN1b3Azpaz+baXIdX/FJ04NDZFQNyjTMOoXkbCnB6Gab0gO2k2y736tdcxfrczWoIe7b7DtWvtCeOA+9k7Jq3cv+M1ZiqDbaWY8gsYF0ptHFHMTSvp1uomGCbwCY9YBJ0o0wmDed8he2k59r1mxKzIHhqDmRhrvvZ1iF0/47jua2cQrQX9o97VyeHr9w8=
模块指南

2026-02-18 04:00:11
转载

导读
这是《The Perfect Tower 2》的模块指南,介绍了模块的类型(主动/被动、攻击/防御等类别)、升级方式、解锁途径及掉落概率计算方法,能帮助玩家掌握塔的定制技巧,提升塔防玩法水平。

评论
共0条评论

阿卡伊卡斯的挑战指南
Provides tested and guaranteed builds and strategies for completing challenges. …
2026-02-20 07:000赞 · 0评论

猛鬼宿舍森林有鬼吗?恐怖猛鬼宿舍游戏攻略与社区分享
-
2026-05-22 08:350赞 · 0评论
FPS 逆战:毁掉塔防3次超标的起源(终究是无能之人上位~)
-
2026-05-18 17:070赞 · 0评论
游戏实况 究极抽卡氪阳光模式!植物大战僵尸融合版呱呱菌
我的天!这就是抽卡模式吗!老呱呱榨干了啦!
2026-05-07 13:060赞 · 0评论
一起来挖宝吧!!!
一起来挖宝吧!!!
2026-02-27 22:017赞 · 0评论
蜃梦 创魔番外125 蜃梦之墟副本玩法攻略详解
省流 0:00-1:05蜃梦之墟副本位置&奖励设置 1:05-1:55基础UI和游戏目标介绍 1:55-2:23 尽量不要肉身挡线,塔防游戏中塔的重要性 2:2…
2025-12-19 12:420赞 · 0评论
黑客 [创游世界]Troll山姆TNSY: 死亡的游戏:如何获得1万游玩量限定角色阿斯特黑客最详细攻略!(下期介绍其他游戏)
总结:最强的限定角色
2025-12-14 22:190赞 · 0评论
一期视频带你通关原神千星奇域玩法希穆兰卡保卫战!
一期视频带你通关原神千星奇域玩法希穆兰卡保卫战!#王牌达人营
2025-10-22 11:042赞 · 1评论
速度 蛋仔派对:蛋仔躺平发育?不能说像,简直是一模一样!
蛋仔派对:蛋仔躺平发育?不能说像,简直是一模一样!
2025-10-19 02:210赞 · 0评论
二次元 【鸣潮】再送20抽?奥古斯塔&尤诺登场!塔防玩法+全新版本活动!鸣潮2.6前瞻直播总结攻略 兑换码
2025-09-29 02:180赞 · 0评论
暂无更多
最新更新
- 《完美之塔2》v1.0.12更新内容 — 大家好! 本次更新包含多项小改进与修复,其中有一项变化我们想特别强调: 在过去几个月里,我们一直在致力于改进《完美之塔2》的本地化系统。通过本次更新,游戏中约9…
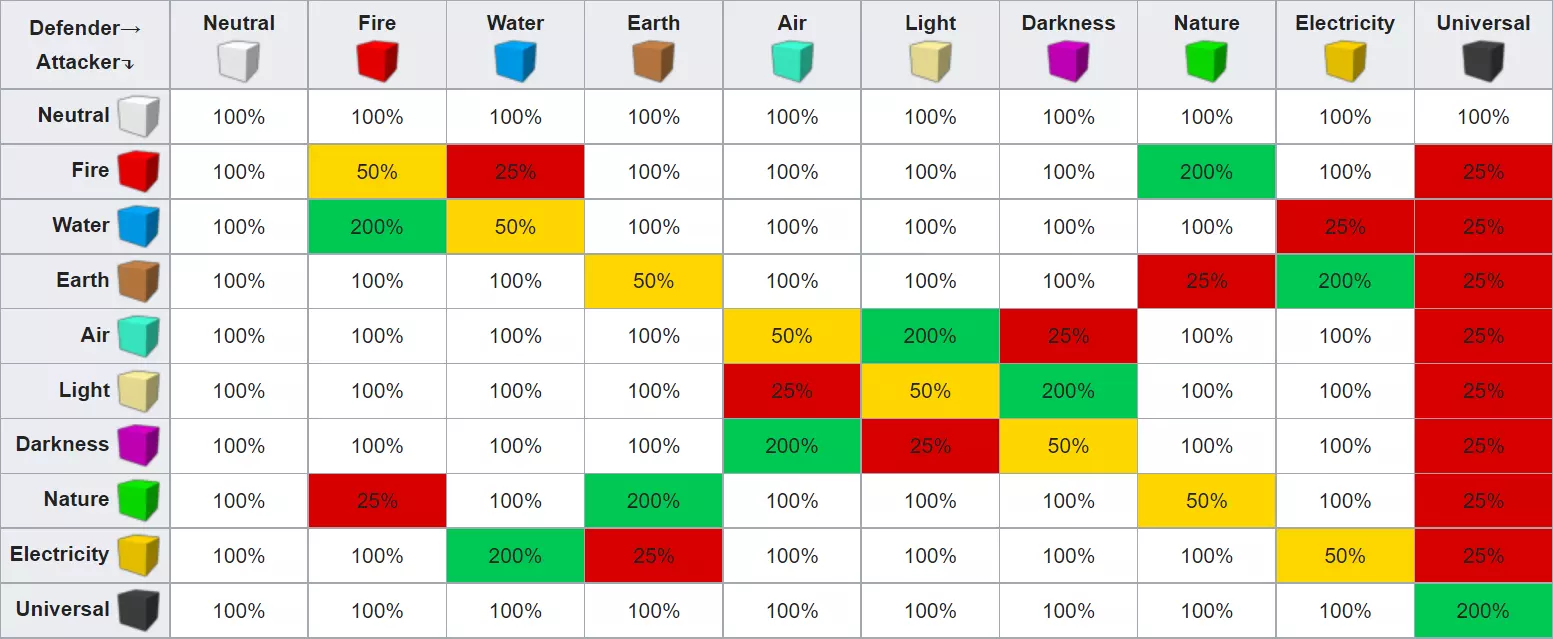
- 元素指南 — 元素克制指南(个人经验分享) 注:所有信息均来自维基百科,旨在帮助Steam平台的玩家。 元素克制关系 以下表格列出了各元素对其他元素的克制效果。
- 时代快速实验脚本人工智能 — 在时代实验标签页中,当你积累了大量击杀和命中数后,反复点击开始实验、完成实验、再次开始等操作会非常耗时。因此我制作了一个简单的脚本用于自动执行这些操作。 只需定…
- 快速自动采矿机V2 — This is about as fast as autominers get - it is throttled by the game's ability …
- 阿卡伊卡斯的挑战指南 — Provides tested and guaranteed builds and strategies for completing challenges. …
- 一个简单的AI自动挖矿机(已更新至V0.3版本) — This is just a simple auto miner I've made and a explanation as to what each lin…
- 军事T13-T14+蓝图 — the best blueprint i've found/used so far the blueprint V1: bWFpbjtmb3VuZGF0aW9u…
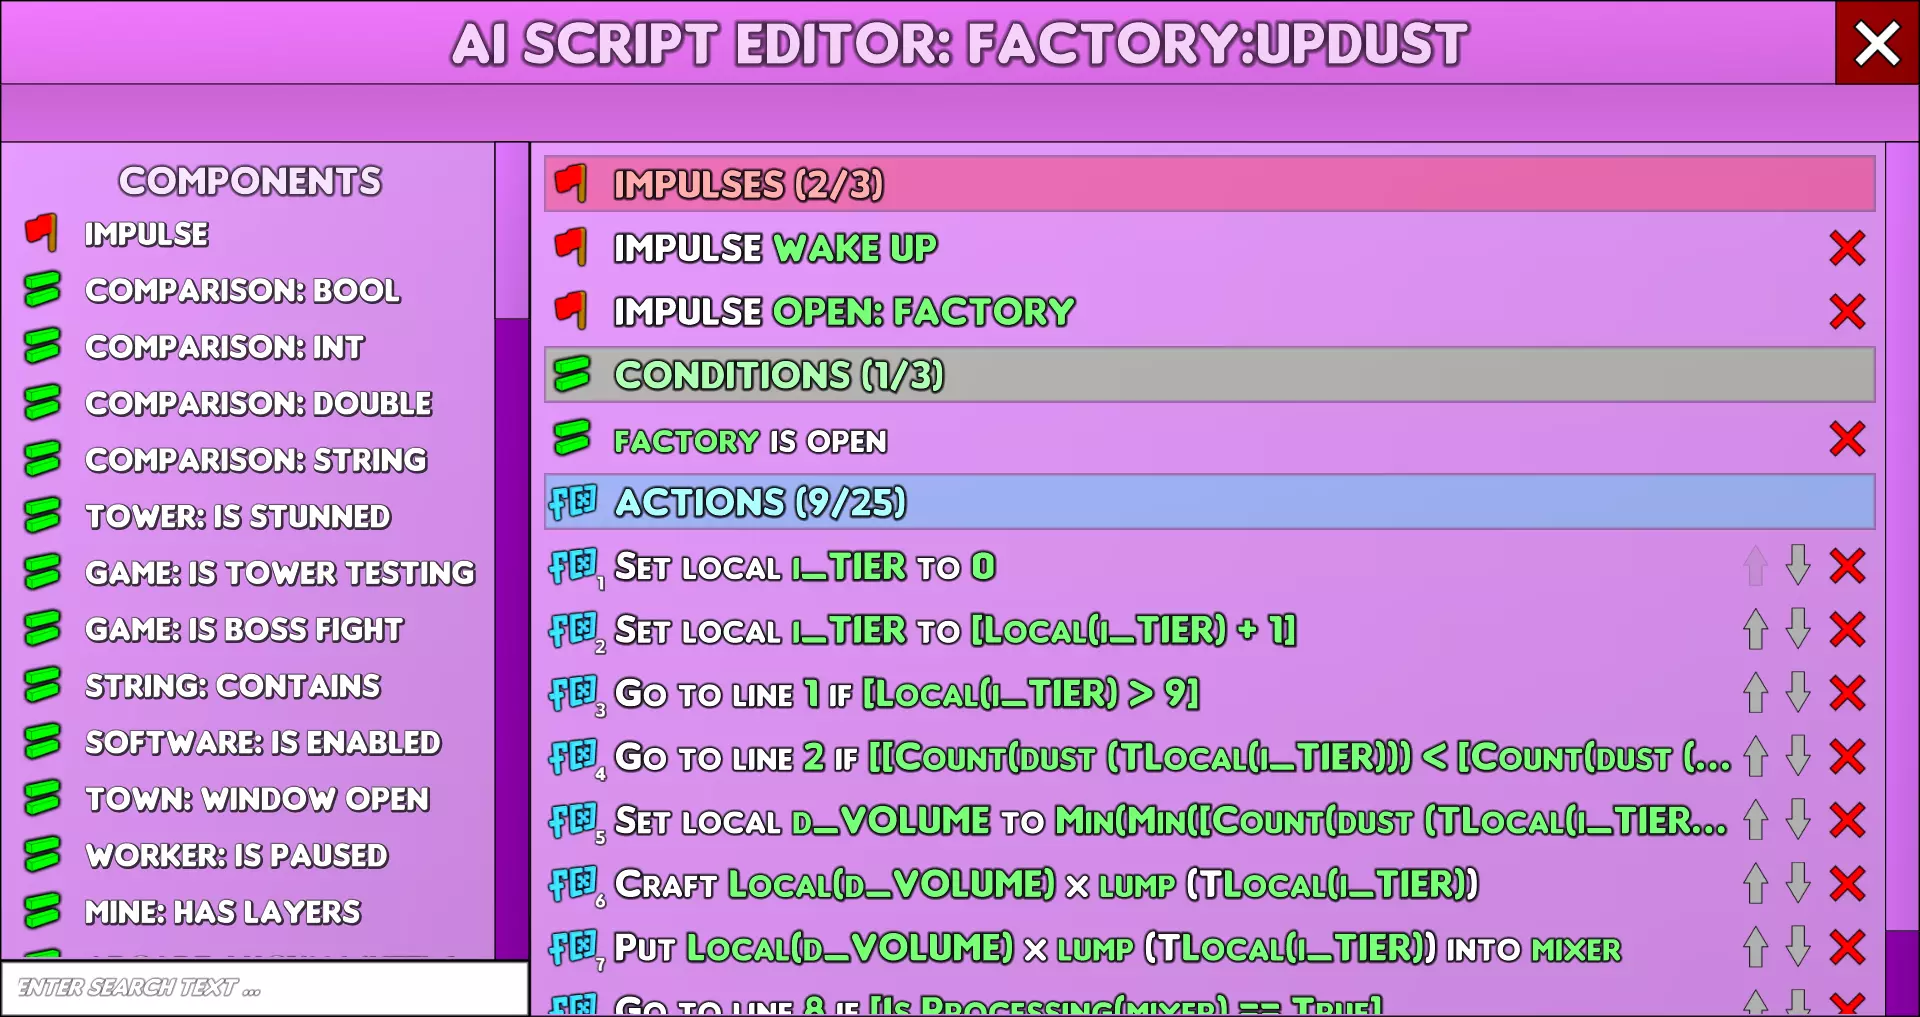
- 阿卡伊卡斯的AI脚本 — AI脚本使用参考以及用于自动化繁琐任务的实用脚本。 脚本程序 创建脚本有两种方法。 第一种是使用游戏内编辑器。
- 15区的【不可能】难度模块 — 区域15模块密钥导入 免责声明和说明 若没有其他增强功能,此密钥将无法使用。导入方法:将密钥复制到剪贴板,然后前往创意工坊,在模块列表上方找到当前模块集的标题,…
- 工厂自动化(自动建造机) — 这套脚本可管理工厂内所有物品的自动制造。 它会优先使用你背包中已有的物品,而非重新制造,并且始终会为每种等级的粉末至少保留一份。该脚本能够管理矿石加工、粉末升级…