换一换
换一换 


大家好!感谢阅读我的这份小指南。这份指南我已经打磨了很长时间。我的初衷是制作一份尽可能全面且内容丰富的“新手/回归/资深玩家指南”,同时也兼顾了最基础的游戏要素;因为尽管游戏中许多内容会不断变化,但有些核心机制始终保持不变。 引言

大家好!今天我想和大家分享一份我过去几个月一直在制作的指南。这份指南旨在帮助新玩家、回归玩家甚至老玩家熟悉用户界面菜单、游戏玩法和图形设置,同时帮助新玩家配置自己的技能栏——无论他们是在免费世界还是会员世界,并帮助他们理解其中的一些基本原理。这些信息有时会因为数量庞大而让人感到有些难以应对。
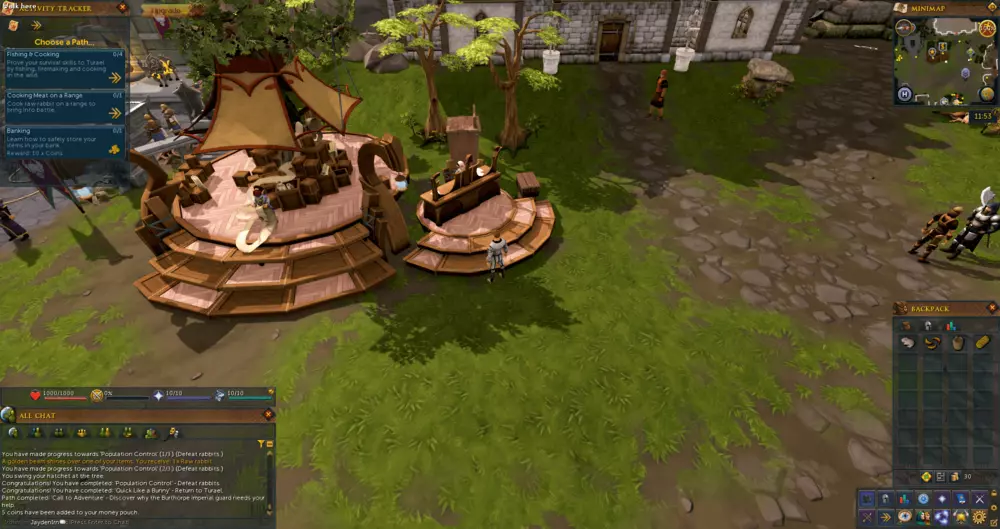
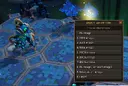
这是默认的【新玩家界面】(图片来源:The RS Wiki)。 话虽如此,本指南中包含一些“速查表”,这些速查表经过精心设计,包含了尽可能多的信息和视觉示例,旨在丰富内容并使指南的每个部分更易于理解。好了,废话不多说,让我们直接进入正题。 用户界面

毫无疑问,任何游戏最重要的元素之一,无论其类型如何,都是用户界面,因为这里包含了所有的控制、按钮和重要信息。作为《RuneScape》的新玩家,你会面对一个相当混乱的界面,所有元素似乎都杂乱无章(如上图所示),且没有明确的功能说明。 大多数情况下,新玩家刚进入游戏时,最初的大约一小时都在通过反复尝试来“弄清楚”各个功能的作用,而最终往往会更加困惑,还花费了大量时间。现在,如果你看一下下面的第一份速查表,你会注意到有很多窗口和信息分散在各处,但不用担心,接下来几段我会引导你了解它们。
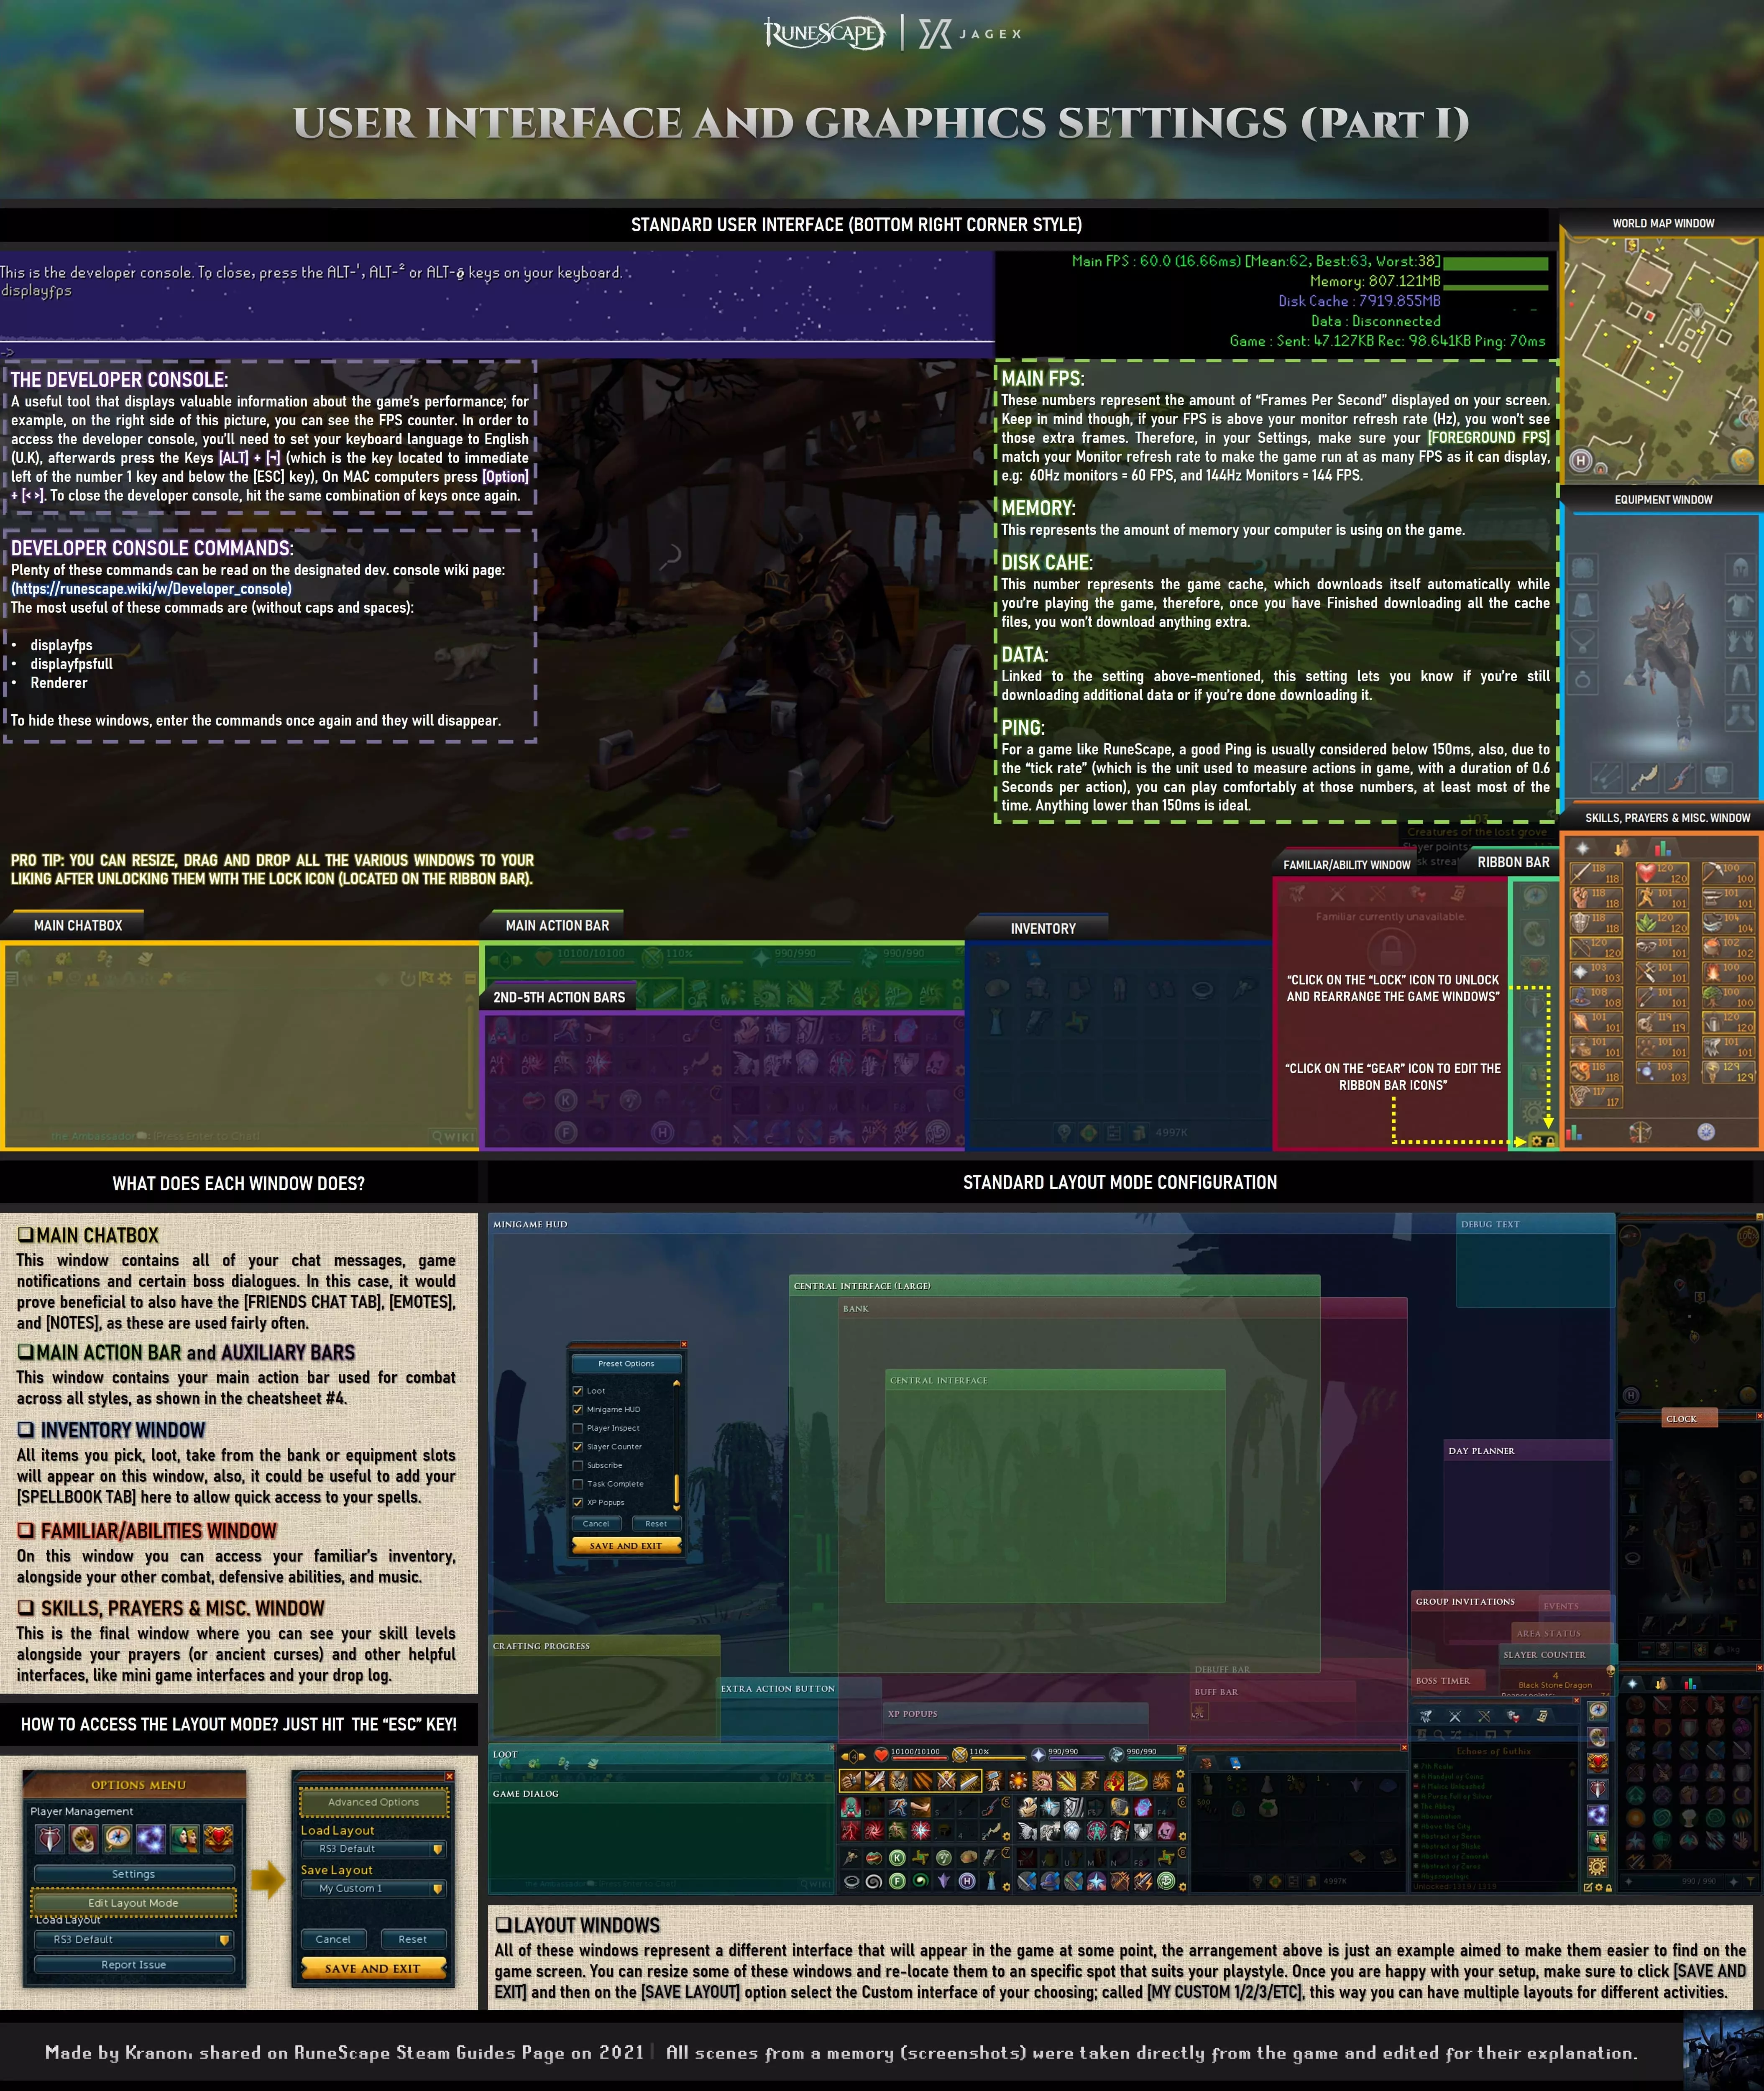
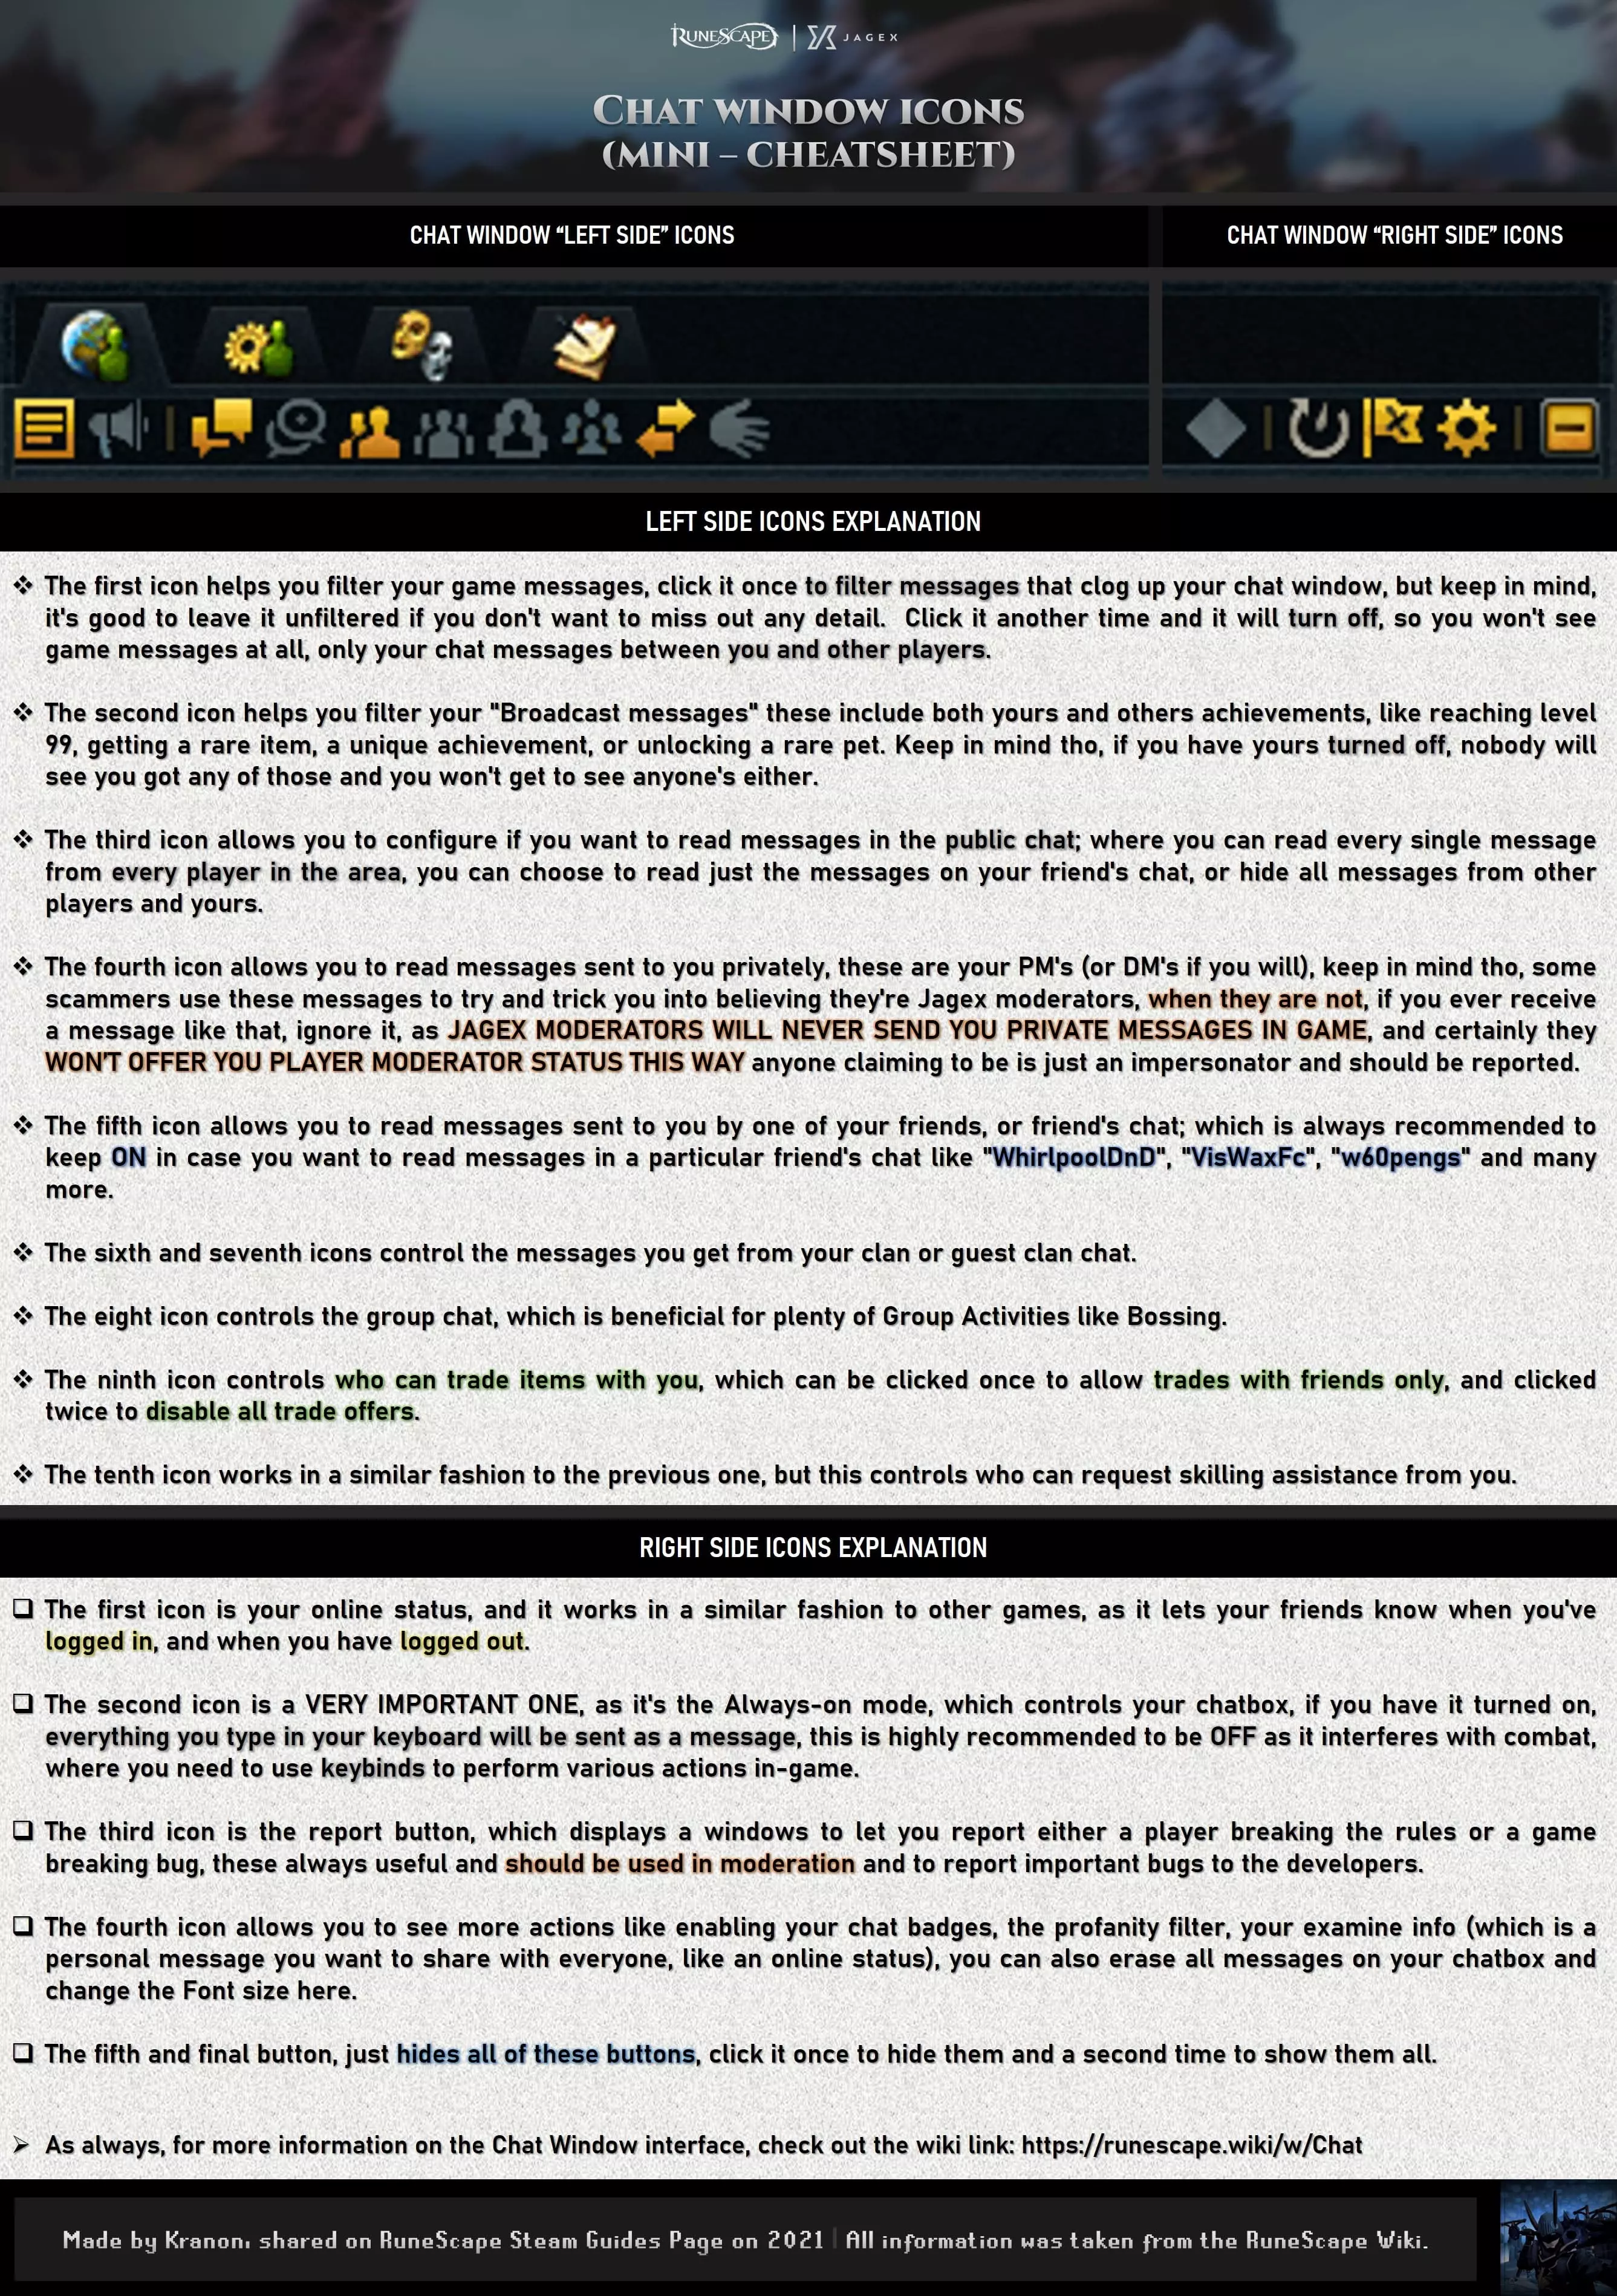
这是对你的用户界面及其众多窗口的概述。 主聊天框 首先,你需要将注意力集中在【主聊天框窗口】上,在那里你可以找到游戏中显示的所有信息;无论是地精的检查文本、好友炫耀他们的小鸡击杀数、游戏内公告、稀有掉落、技能升级,还是告诉你又一次烤糊了虾的消息。这里是所有文字信息的展示地,但不用担心会收到大量垃圾信息,因为你可以通过点击这个便捷标题栏的第一个按钮来过滤这些消息;有关这些图标的更多信息,请参考下方的迷你速查表。
"Here's the magic behind the Chat Message filters". Returning to the yellow window, there you can also drag and drop your friend’s, group or clan chat windows, the cool thing about it is that you can configure it to your heart’s content and see what works best for your playstyle; wether if you want to have only your friends chat window, or you prefer to talk to your clan, the choice is yours. The main action bar and secondary action bars.Moving on, we have the Green and Purple windows, where you can see your Main Action Bar (who might be minimized, so click on the top right yellow icon to maximize it) alongside your Auxiliary action bars, to not delve too much into what these action bars do, they allow you to cast your abilities, use items directly from them (if they have an associated keybind) use prayers to help you in combat and even use teleports to different locations. Sounds amazing right? That’s why it’s recommended to have them on the center of your screen and in your line of sight. The Inventory window.The blue window contains your inventory, which also contains your items; such as food, potions, Weapon Switches, Logs, Raw fish and others, this window should also be within your line of sight in order to keep track of the items you’re carrying, looting or making. The Familiar and ability spellbooks window.The red window is equally important as it serves as an expansion for both your inventory; if you’re using a "beast of burden" familiar, or your ability spellbooks; if you’re not using a familiar. As you make your way through the game, you’ll unlock a wide array of useful familiars (through the Summoning Skill) which can help you with your skilling (by offering invisible boosts), with combat (by offering Passive abilities and Powerful special attacks) and, some of them are sworn to carry your burdens (namely the Terrorbirds, War Tortoise, Pack Yak and Pack Mammoths, known as Beasts of Burden), the latter can help you bring extra food to your Bossing trips, or even help you stay longer at certain skilling spots, so you can stay there a bit longer without needing to visit your bank as often. You can customize your familiar options by right clicking on the Summoning Medallion (That Blue Icon with a Wolf Head). When you’re not using a familiar, switch to the other tabs, as these will help you use abilities you couldn’t include in your main action bars. If you’re not doing any of the above, then drag and drop the Music tab here, that way you can enjoy some amazing tracks while you play. The Ribbon.The small Mint Green window is your ribbon bar, here you can unlock your interface (by clicking on the little lock icon, or just by clicking the letter "L" in your keyboard, assuming you haven't configured your keybinds yet), this will let you re-arrange the interface windows to your liking. On the cheatsheet above, you can see a standard “Bottom right corner style", which isn’t too terrible and a good foundation to change and improve progressively throughout your playthrough. The Skills window, Prayers/Ancient Curses and logs.The orange window contains your skills levels, prayers/ancient curses (useful when you’re in combat) and your Drop log/RuneMetrics stats, which helps you keep track of your items or damage/XP. During minigames or Treasure trails compass clues, the interface also goes here, so it helps you out by keeping track of those interfaces in a comfortable spot. The Equipment window.The light blue window contains your equipment, here you can see a mini-you version of your character alongside the items you have equipped. The Minimap.Finally, the golden window on the upper right corner displays the minimap, here you can see where you stand in a current area, also, it helps you change skyboxes, filters, open the world hop interface (if you want to switch to a more active/quiet world) and Teleport to the various Lodestones you have unlocked. Once again, make sure you right click every single icon here, you’ll find plenty of useful and cool options to try out. The Developer Console.Now, leaving all these interface windows to the side there’s a useful tool known as the “Developer console”, which can be accessed by pressing the Keys [Alt] + [¬] (the key on the left of the number 1 key and below the ESC key) or the keys [Option] + [< >] if you’re using a MAC. The purpose of the developer console is to display some performance information of your game, like the amount of FPS you’re getting, how much memory the game is consuming, how much of the Game Disk Cache has been downloaded; and if the game’s still downloading the cache files, and finally, it shows your ping. All available commands will be shown in the next table: CommandActionhelpLists the available commands clsClears the developer console screendisplayfpsToggles the frames per second (FPS) counter and alll information above-mentioneddisplayfpsfullToggles the same data of the previous command, but adds expandable graphsdisplayfpssmallOnly toggles you FPS counter without any extra informationrendererShows information about your graphics card renderer and its capabilitiesgetcameraposShows the location and direction of the game camera; mostly used in bug reportsdeletejs5cachesDeletes the ENTIRE game cache, you will need to redownload all of it once again if you delete itenablesnowEnables the snow particle effect in the developer consoledisablesnowDisables the snow particle effect If you type the command a second time, the information window will be hidden and, in order to close the developer console, just click the same combination of keys used previously. LAYOUT WINDOWS

上面快速指南下半部分显示的所有窗口,都代表游戏中会在特定时刻出现的不同界面;例如银行界面、对话窗口、经验值计数器、成就、升级进度图标、战利品界面等等。快速指南中展示的布局只是一个示例,旨在让这些窗口更易于查找。 你可以调整部分窗口的大小,并将它们重新定位到适合你游戏风格的特定位置。完成设置后,确保点击【保存并退出】,然后在【保存布局】选项中选择你创建的自定义界面,名为【我的自定义1/2/3等】,这样你就可以为不同活动保存多个布局。要访问布局窗口编辑器,只需点击ESC键并选择【编辑布局模式】选项,然后点击【高级选项】按钮,勾选你想要显示的各种窗口,总体而言,你只需根据自己的喜好调整它们的大小和排列即可。 图形设置(第一部分)

你可能已经在Reddit或Steam社区页面上看到过一些令人惊叹的截图,没错,就是那些“值得设为壁纸”且令人屏息的截图。为了让你的电脑能呈现出如此精美的画面,你需要了解每个设置的作用以及它们如何影响游戏性能;因为正如你所预料的,更高的画质会给电脑带来沉重负担,在一些旧笔记本电脑上,它们甚至能达到煎锅的温度(非常适合烹饪虾仁)。默认情况下,当你首次运行游戏时,它会启动“自动设置”以确定最适合你电脑的选项。不过,你可能仍需要对某些设置进行自定义,因为部分选项可能仅带来微小提升,却会牺牲更流畅的性能。在以下内容中,我将详细解释所有这些选项,并附上一些视觉示例。 当前可用的屏幕分辨率包括:【950 x 540】、【1920 x 1080】和【2560 x 1440】。【全屏模式】会使用整个屏幕区域,而【窗口模式】则允许你根据喜好调整游戏窗口大小。

"Here's where you can configure your graphics to look as good as they can, or optimize the performance of your PC by lowering them". DRAW DISTANCEOne of the most impactful settings on the game is the [DRAW DISTANCE]; which can be helpful on some Bossing arenas (like Solak, Nex: Angel of Death, Raids, Araxxor, Elite Dungeons and The Wilderness; to see potential attackers on the horizon), paired with a camera set on [FREEDOM - CLASSIC] mode, will let you see your target’s a lot more clearly. Overall, i’d recommend something like Medium or High depending on your PC specs. But, If you have a bottlenecked PC or laptop, choose the lower setting. https://www.youtube.com/watch?v=GrPR5k-LLfs&ab_channel=Minde95s VsyncVsync or Vertical Synchronization, will help you prevent screen tearing in your game by matching the frame rate of the game and your monitor refresh rate, for this feature keep in mind the following: if you set your game at 120 FPS but only have a 60 Hz monitor, you won’t be able to see any extra FPS, but, if you were to play on a 144Hz monitor, you will be able to see those 120 FPS. [Here a couple of quick videos about this topic]: https://www.youtube.com/watch?v=rg_0D96ZGSY&ab_channel=NeonCipher https://www.youtube.com/watch?v=Tx-tLVuyJ6c&ab_channel=GregSalazar ANTIALIASING QUALITYOn the other hand, [Anti aliasing quality], will help you produce a smoother image quality, for the most part, this feature won’t be really noticeable unless you zoom your camera very close, and give how impactful this setting is, it’s adviced to turn it off if you’re having performance issues. ANTIALIASING MODEThe [Antialiasing mode] included in the game are the high performance option [FXAA] which is slightly less taxing than the [MSAA] option; which consumes a bit more of resources, and the combination of [FXAA+MSAA] which makes certain objects in the game blurry. LIGHTING DETAIL and BLOOMThe next couple of settings are [Lighting detail] and [Bloom], in the most essential sense of the word, these settings will only help you produce a more realistic image, by simulating accurate light bounces on a specific areas and objects and “Enhancing” light sources (like suns, moons, fires and lava), keep in mind tho, the latter can be pretty aggresive to the eyes, so use moderately. https://www.youtube.com/watch?v=02t_75b90cg&ab_channel=GameSpot ANISOTROPIC FILTERING[Anisotropic Filtering], what this setting does is add a little more of detail to far away objects by making them sharper the higher this filter goes, for instance, if set to [OFF], far off textures will look slightly blurry, whereas in a high setting [16x] these far off textures will look sharper and nicer. In a similar fashion to Draw distance, if the game performance starts to dwindle down, it’s recommended to set this setting to OFF. https://www.youtube.com/watch?v=IzeJlBomZ_s&ab_channel=Techquickie FOREGROUND & BACKGROUND FPSThe [Foreground FPS], will define the amount of FPS your game will output and, like mentioned in the [Vsync] setting paragraph, one must take the Monitor Hz into consideration when setting the amount of FPS desired. Similarly, the [Background FPS] should be set to a low number, because this is the amount of FPS you game will run at when you’re not actively playing the game (or in other words, when the game is running in the background). INTERFACE SCALINGThe [Interface Scaling Setting] is mainly used for big monitors where your interface may look small, the higher this setting is at, the bigger your interface will be displayed at. SHADOWSThe game [Shadows] setting is pretty self explanatory, as it will display the environment shadows of a particular area. Disabling this setting will make the game look “flat” and slightly similar to the Oldschool RuneScape graphics. it is also suggested to disable this setting if you’re experiencing performance issues. SHADOW QUALITYThe [Shadow Quality] on the other hand, will only work if you have enabled the in game shadows and this setting will help define their “sharpness”, with [ULTRA] being the better looking one, or [LOW] which makes them slightly “blurrier”. The shadows setting can be somewhat taxing to your PC or Laptop, so disable this setting if you’re experiencing a poor performance. LOADING SCREENSDepending on your personal preference, you can either enable the game [Loading Screens] or disable them. TERRAIN BLENDING[Terrain Blending] is, in simple terms, a setting allows the different floor textures to “blend together” in order to make them more fluid, if this setting is turned OFF, Textures will automatically get disabled aswell. SMOOTH CAMERA FADEThe [Smooth Camera Fade] is only visible when certain objects get “cut” by your camera zoom; like walls, trees, rocks, buildings, etc.], the purpose of this setting is to “smoothen” the look of these cut objects, but other than that, it doesn’t really change anything important. MOUSE OVER ENTITY HIGHLIGHTS[Mouse over entity highlights] This setting consists of an “outline” that appears around anything “clickable” when hovering the cursor over it. Depending on the object (item/npc/players/etc.), it will appear as a different colour, e.g: for the majority of NPC’s, it will appear as a Yellow outline, for interactable objects like Fishing Spots, Trees, Archaeology Hotspots, etc, the outline colour will be Cyan, on the other hand attackable NPC’s will glow with a Red outline when clicked. REMOVE ROOFS[Remove roofs] This setting will remove the roofs and first floors from the buildings in the game, you can either set it to [ALL] to remove it from all buildings, or [SELECTIVELY] to remove them only after entering the buildings. GRAPHICS SETTINGS (Part 2) WATER DETAIL[Water detail] In short, the [LOW] setting makes the water look like a flat surface, without reflections or depth and it gets progressively "realistic" by adding more reflectivity: [MEDIUIM] to [ULTRA], keep in mind this setting is also taxing, so adjust according to your preference. AMBIENT OCCLUSION[Ambient occlusion] simply put, this setting determines how much lighting should a space have depending on its features in order to make it more realistic. [SSAO] (Screen Space) is the least demanding, while [HBAO] (Horizon Based) has a higher performance hit. [OFF] would be the best option if you don’t mind losing this little feature in order to maximize the performance. https://www.youtube.com/watch?v=hbWV58AH9eg&ab_channel=Techquickie TEXTURES[Textures] this setting only has two options available, with those being [OFF] and [Compressed], disabling textures in the game will make everything look like a mesh of polygons without depth or detail, therefore, this can also greatly improve the performance of your game. VOLUMETRIC LIGHT[Volumetric Light] this setting adds more realism to light emitting sources on certain skyboxes (like the suns or moons); similar to the Bloom setting, this feature depends, mostly, on personal preference and only if the brighter effects are desired. https://www.youtube.com/watch?v=cwbpWY8PH5w&ab_channel=Aputure GAME RENDERING SCALING[Game rendering Scaling] the higher this setting goes, the higher the overall image quality will look, however, this can be somewhat taxing for your computer. On the other hand, a lower setting will make the overall image quality look blurred out, but will increase the performance. Therefore, it’s recommended to leave this setting at 100% and adjust based on your performance and preference. CUSTOM CURSORS[Custom Cursors] to keep it simple, these custom cursors are the iconic RuneScape icons displayed when hovering your mouse over literally anything in the game, like the attack icons, the food icons, the “use item” icon, among others. GROUND DECORATION[Ground decoration], the purpose of this setting is to add more elements to certain areas of the game to make it more “rich looking”, things like Grass, Pebbles, Flowers, etc, are added to the ground. DEPTH OF FIELD[Depth of field] this setting is often seen in photography, and what it does in RuneScape is blur far off objects in order to make them look less “Sharp” on the horizon and, provide a more pleasant effect. Keep in mind tho, this setting is only available if you have your draw distance setting on [ULTRA] or [HIGH]. https://www.youtube.com/watch?v=qfkvw-Lrn7Q&ab_channel=KellanReck TREE CANOPY FADE[Tree canopy fade] in short, will fade out any and all Tree canopies around the character, in order to prevent the canopies from obstructing the visibility of the character. Futher information about the graphics settings If you'd like to learn more about these settings, check out the following RS Wiki Link.[runescape.wiki] "All videos linked on this section belong to their respective authors, if you liked their content, consider subscribing to their channels, I do not take any credit on the content displayed and, my only goal is to provide useful information to new, returning and veteran player audiences". WEAPONS, ABILITIES & FUNDAMENTALS (Part 1)

现在,既然你的用户界面已经设置完成,并且你也了解了游戏中各项图形设置的作用,接下来我们来了解战斗技能及其基本原理。 需要注意的是,速查表上显示的技能栏需要通过升级和完成任务才能完全解锁其潜力。作为新玩家,你只能使用它们的“初级版本”,但随着等级提升,这些初级版本会被实际技能所取代。 无论如何,我强烈建议你在游戏初期的目标之一是通过升级和完成任务来解锁尽可能多的战斗技能,因为这些技能栏将帮助你在之后挑战首领。Wiki链接 描述 当前可用任务 共有229个任务,其中40个免费,189个会员专属 任务技能要求 按技能分类 任务完成顺序 这是一份根据你的等级推荐最佳任务完成顺序的指南 任务系列 包含所有系列和剧情线 物品及其他奖励 实用便捷的物品 经验奖励wiki] 提升额外等级是个不错的选择。任务攻略播放列表,创建者:ImSikovit。 在升级过程中,你可以自然解锁一些技能(如速查表所示)。其中部分技能专属于特定战斗风格和武器(即双手武器和双持武器),有些技能通过完成任务解锁,还有些可在【大交易所】或从其他玩家处购买。不过,部分技能的价格可能较高,因此在买卖物品前,务必研究当前市场价格。一定要进行研究,因为【大交易所】或交易报价窗口中显示的某些价格可能并非100%准确,尤其是新物品或低交易量物品。
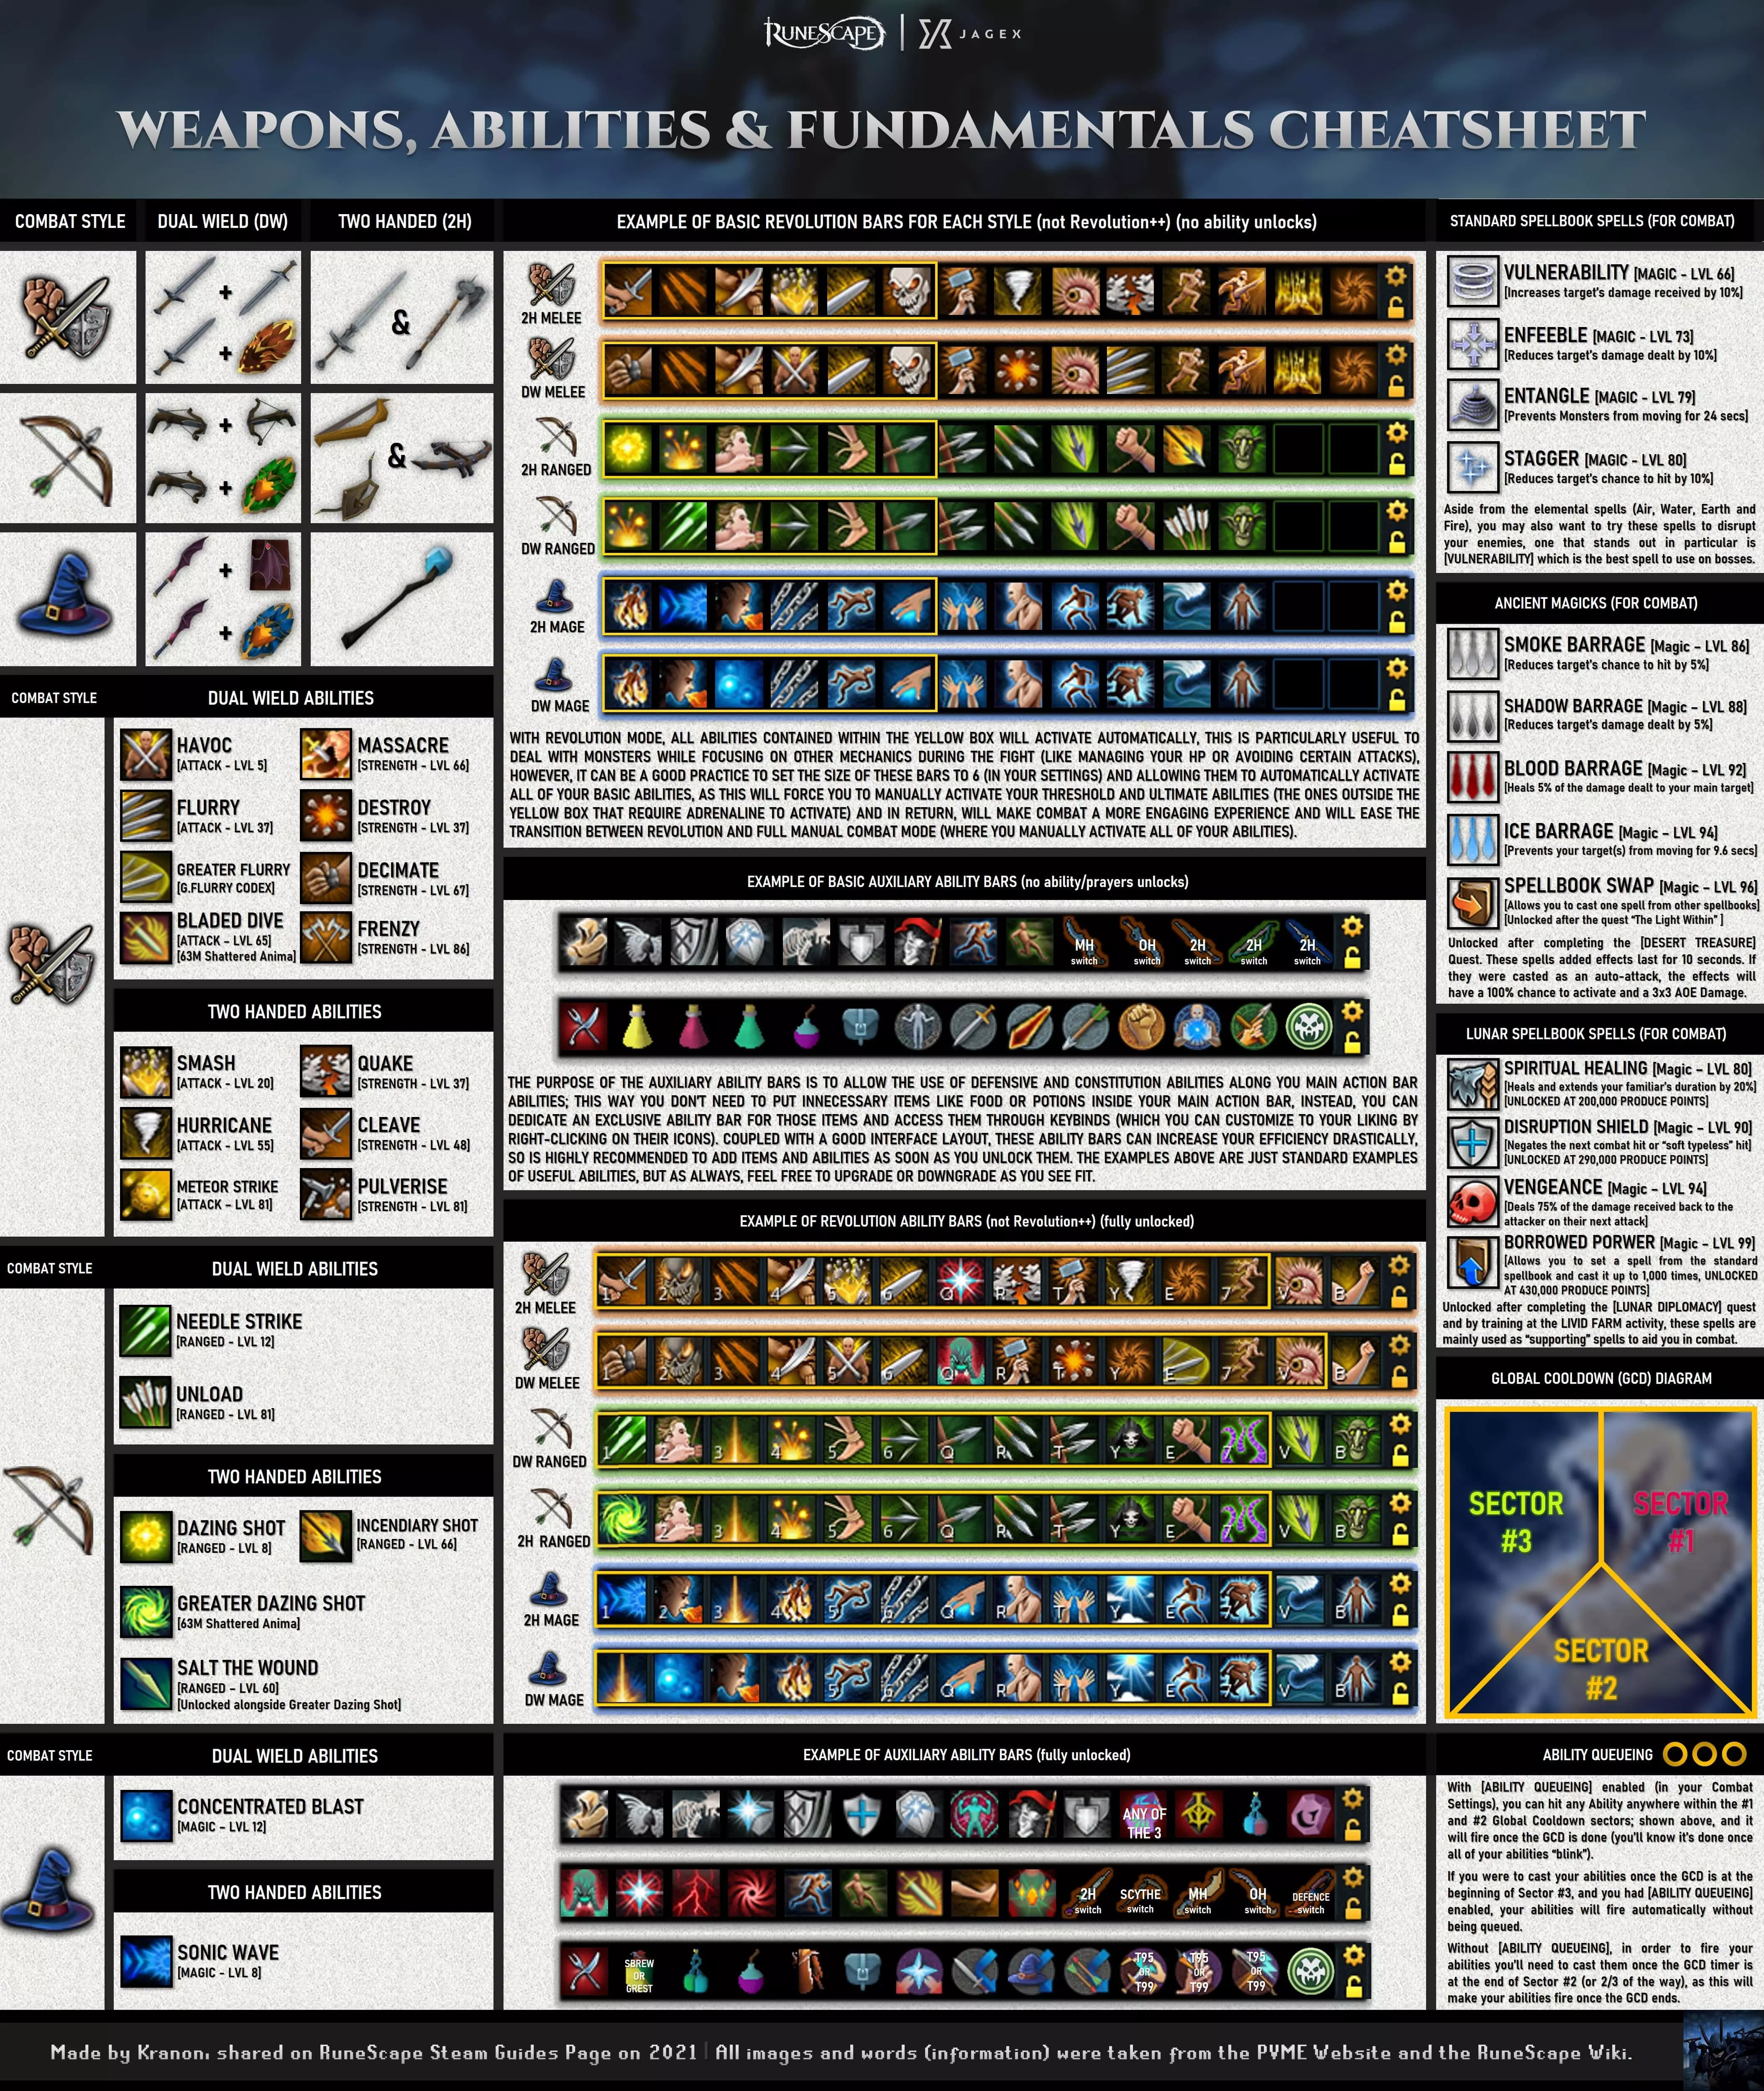
“了解你的技能和技能栏”。 你可能会注意到这些条是“革新条”,但什么是革新模式呢?简单来说,革新模式会在你的战斗技能可用时自动触发,从左到右依次释放,且会在公共冷却时间结束后进行。不过,有三种使用“革新”战斗模式的方式,你可以在战斗设置菜单中自定义“革新”是否自动释放你的基础、阈值或终极技能(稍后会详细说明): 第一种方式适用于你希望手动释放阈值技能的情况(这会让战斗稍微更具参与感),这意味着“革新”只会自动释放黄色框内的基础技能,该黄色框内包含的任何阈值技能都不会被自动释放,需要你手动激活。 第二种方式是允许“革新”自动使用阈值和基础技能。这种方法更适合让游戏自动处理这些技能,而你只需管理自己的生命值、祈祷点、祈祷或诅咒,并手动激活终极技能。最后一种方法是让【自动战斗系统】自动激活各种技能,无需任何手动操作,但一直使用这种【自动战斗系统】的战斗模式可能会让你之后更难过渡到“全手动操作”。 说到这里,仅针对基础技能的【自动战斗系统】模式相当不错,是一个完美的折中选择,因为它的学习曲线应该会很有吸引力和趣味性,同时也为长期提升和过渡到全手动操作留出了空间。 经过足够的练习后,你可能会达到一个阶段,想要主动使用所有基础技能,并自然地过渡到全手动操作;或者,你也可以继续使用【自动战斗系统】来释放基础技能,同时自己手动激活一些基础技能和阈值技能。通常来说,这确实取决于你的游戏风格,但请记住:“《符文之地》没有正确的玩法,只有高效的方法,而这些方法也会随着时间不断变化和发展,这正是游戏真正的魅力所在。这是一款不断进化的游戏,你可以按照自己喜欢的任何方式去玩。” 不妨尝试使用你所有的技能,逐步构建自己的技能栏。 类似地,游戏中有公共冷却时间(Global Cooldown),它分为3个部分(如技能冷却速查表所示),还有技能排队机制。在战斗设置中启用【技能队列】后,你可以在上述所示的1号和2号公共冷却(GCD)区域内的任意位置按下任意技能,该技能将在公共冷却结束后释放(当所有技能“闪烁”时,即表示公共冷却已结束)。 如果在公共冷却处于3号区域开始时施放技能,且已启用【技能队列】,你的技能将自动释放,无需排队。 若未启用【技能队列】,则需要在公共冷却计时器到达2号区域末尾(或三分之二处)时施放技能,这样技能才会在公共冷却结束后释放。武器作用范围 双持武器需要双手装备,分别为主手和副手,此外,所有盾牌和防御者装备均固定装备在副手栏位。 对于近战武器,区别非常简单:双手剑有助于使用范围效果(AOE)技能,而长戟是清剿各种怪物群的绝对最佳双手武器。 双持武器有助于提升灵活性和单体目标战斗能力,你可以切换为盾牌或防御者装备来使用防御技能,但要注意,如果你打算切换盾牌来使用【共鸣】或【反射】技能,盾牌始终是更好的选择,因为防御者装备会使这些技能的效果减半。
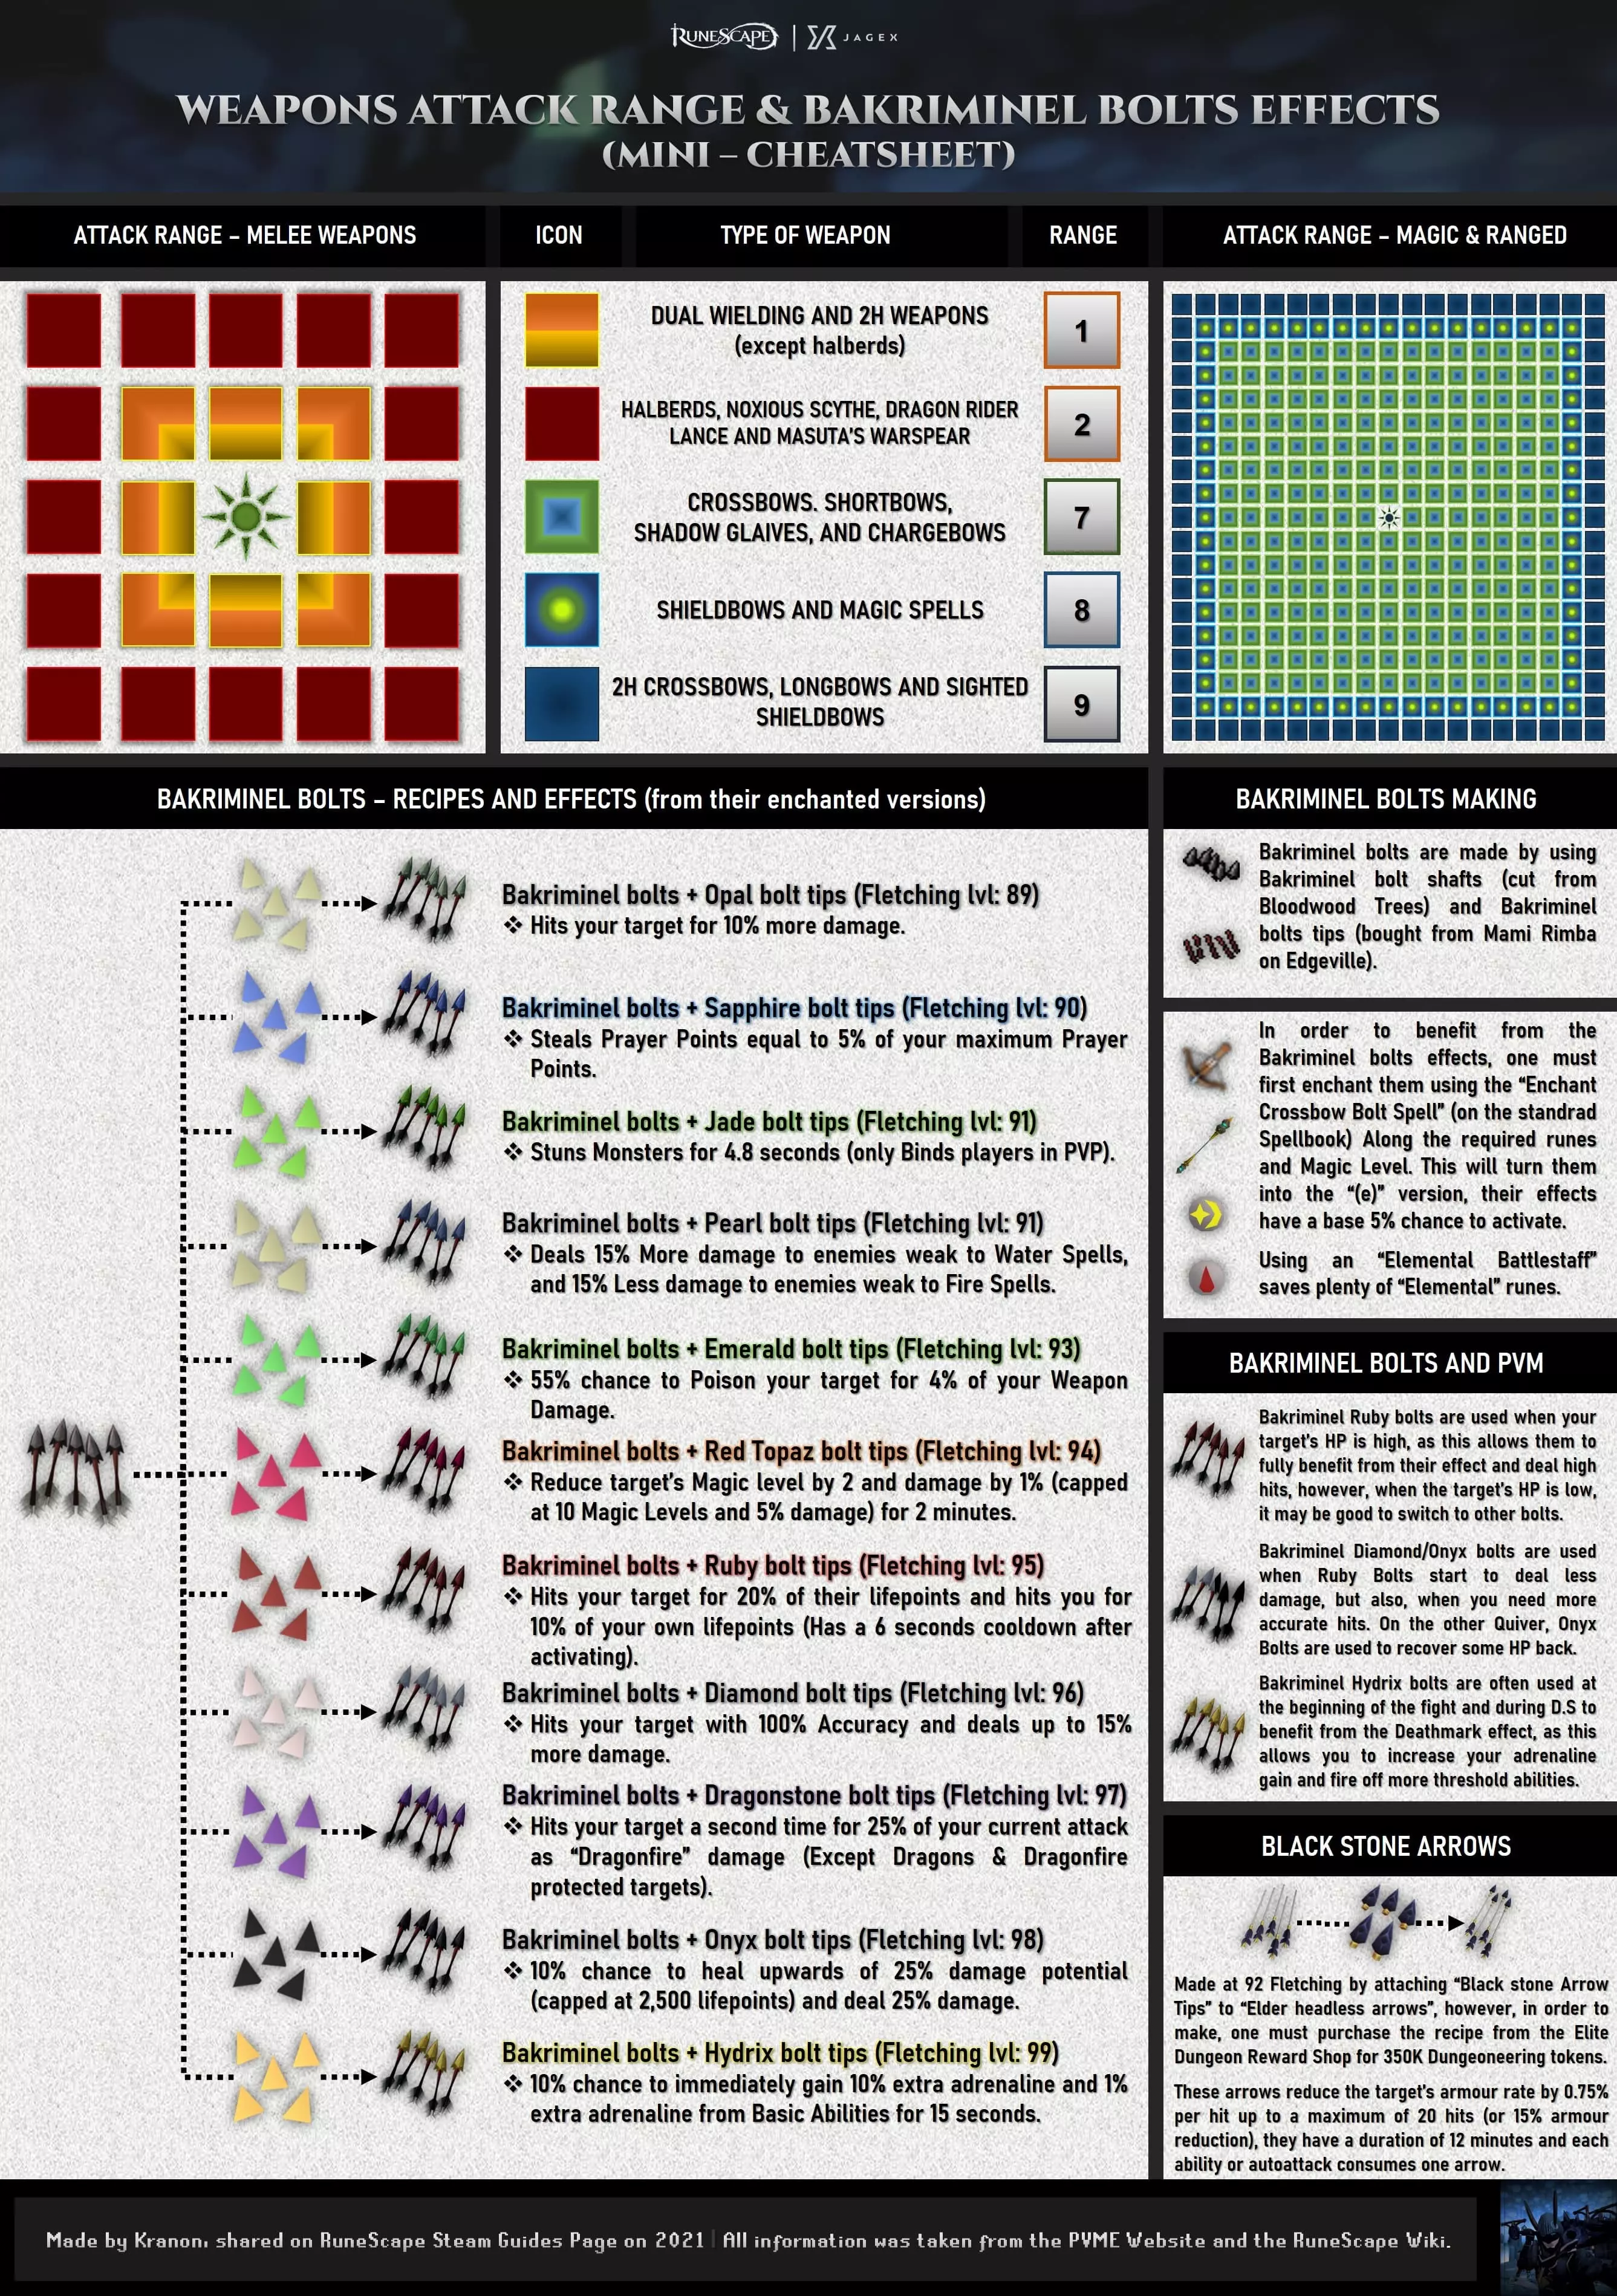
武器范围伤害与巴克里米尼尔螺栓简易说明 武器、技能与基础机制(第二部分) 对于远程武器而言,不同之处在于每种武器可使用的弹药类型: 1. 双手弓和长弓使用箭矢,部分特殊弓(称为充能弓)会自行生成弹药,无需额外操心。 2. 还有“盾弓”,它既可以使用防御技能,也能使用进攻技能。 3. 另一方面,双手十字弓使用螺栓而非箭矢,这就引出了一种很酷的螺栓——巴克里米尼尔螺栓,这种螺栓可以通过附魔来激活一些强大且实用的效果。这些螺栓是双手十字弓比双手弓更优选择的原因,因为这类武器没有专用箭矢;不过【黑石箭矢】除外,它能对目标施加持续12分钟或直至目标被击败的防御减益效果。 与双持近战类似,防御者(其远程变体称为反击者)对武器切换帮助很大,而且还能受益于一种名为【机械沙鼠】的武器,该武器可使每个技能都成为范围技能。关于魔法武器:法师遵循相同规则,但双手武器被称为法杖。对于法师而言,双手武器和双持武器的范围伤害技能没有太大区别(某些阈值技能存在差异),且两者使用相同的法术书技能。因此,选择哪种武器主要取决于各武器的特效,以及你是否想通过使用魔杖+防御者(法师中称为反弹者)或盾牌来实现灵活的战斗风格。遗憾的是,魔法系没有炸鱼炮,但有多种干扰性法术可在战斗中提供帮助。 每套武器都能启用特定的技能,且每种武器都有其独特的特效子集,不过有些武器没有特效。例如:双手剑擅长范围攻击,当同时面对多个敌人时,你可以使用【飓风】、【地震】和【流星打击】等技能对周围造成伤害,但如果想最大化命中目标数量,你可能需要使用长戟武器。如果你想了解更多关于任务、游戏进度、技巧、窍门和指南的深入信息,可以参考以下视频内容: 视频主题:PVM 按键绑定 作者:The RSGuy 视频主题:公共冷却时间 作者:Pixel Green 视频主题:重要技能解锁教程 作者:Sage Vanburo 视频主题:破碎世界技能解锁教程 作者:Protoxx 视频主题:巴克里米内尔螺栓基础 作者:Teh Proez 视频主题:巴克里米内尔螺栓综合分析 作者:Teh Proez 【本部分链接的所有视频均归其各自作者所有,我不对所展示内容拥有任何版权,仅旨在为新玩家、回归玩家和老玩家群体提供有用信息】 游戏玩法设置

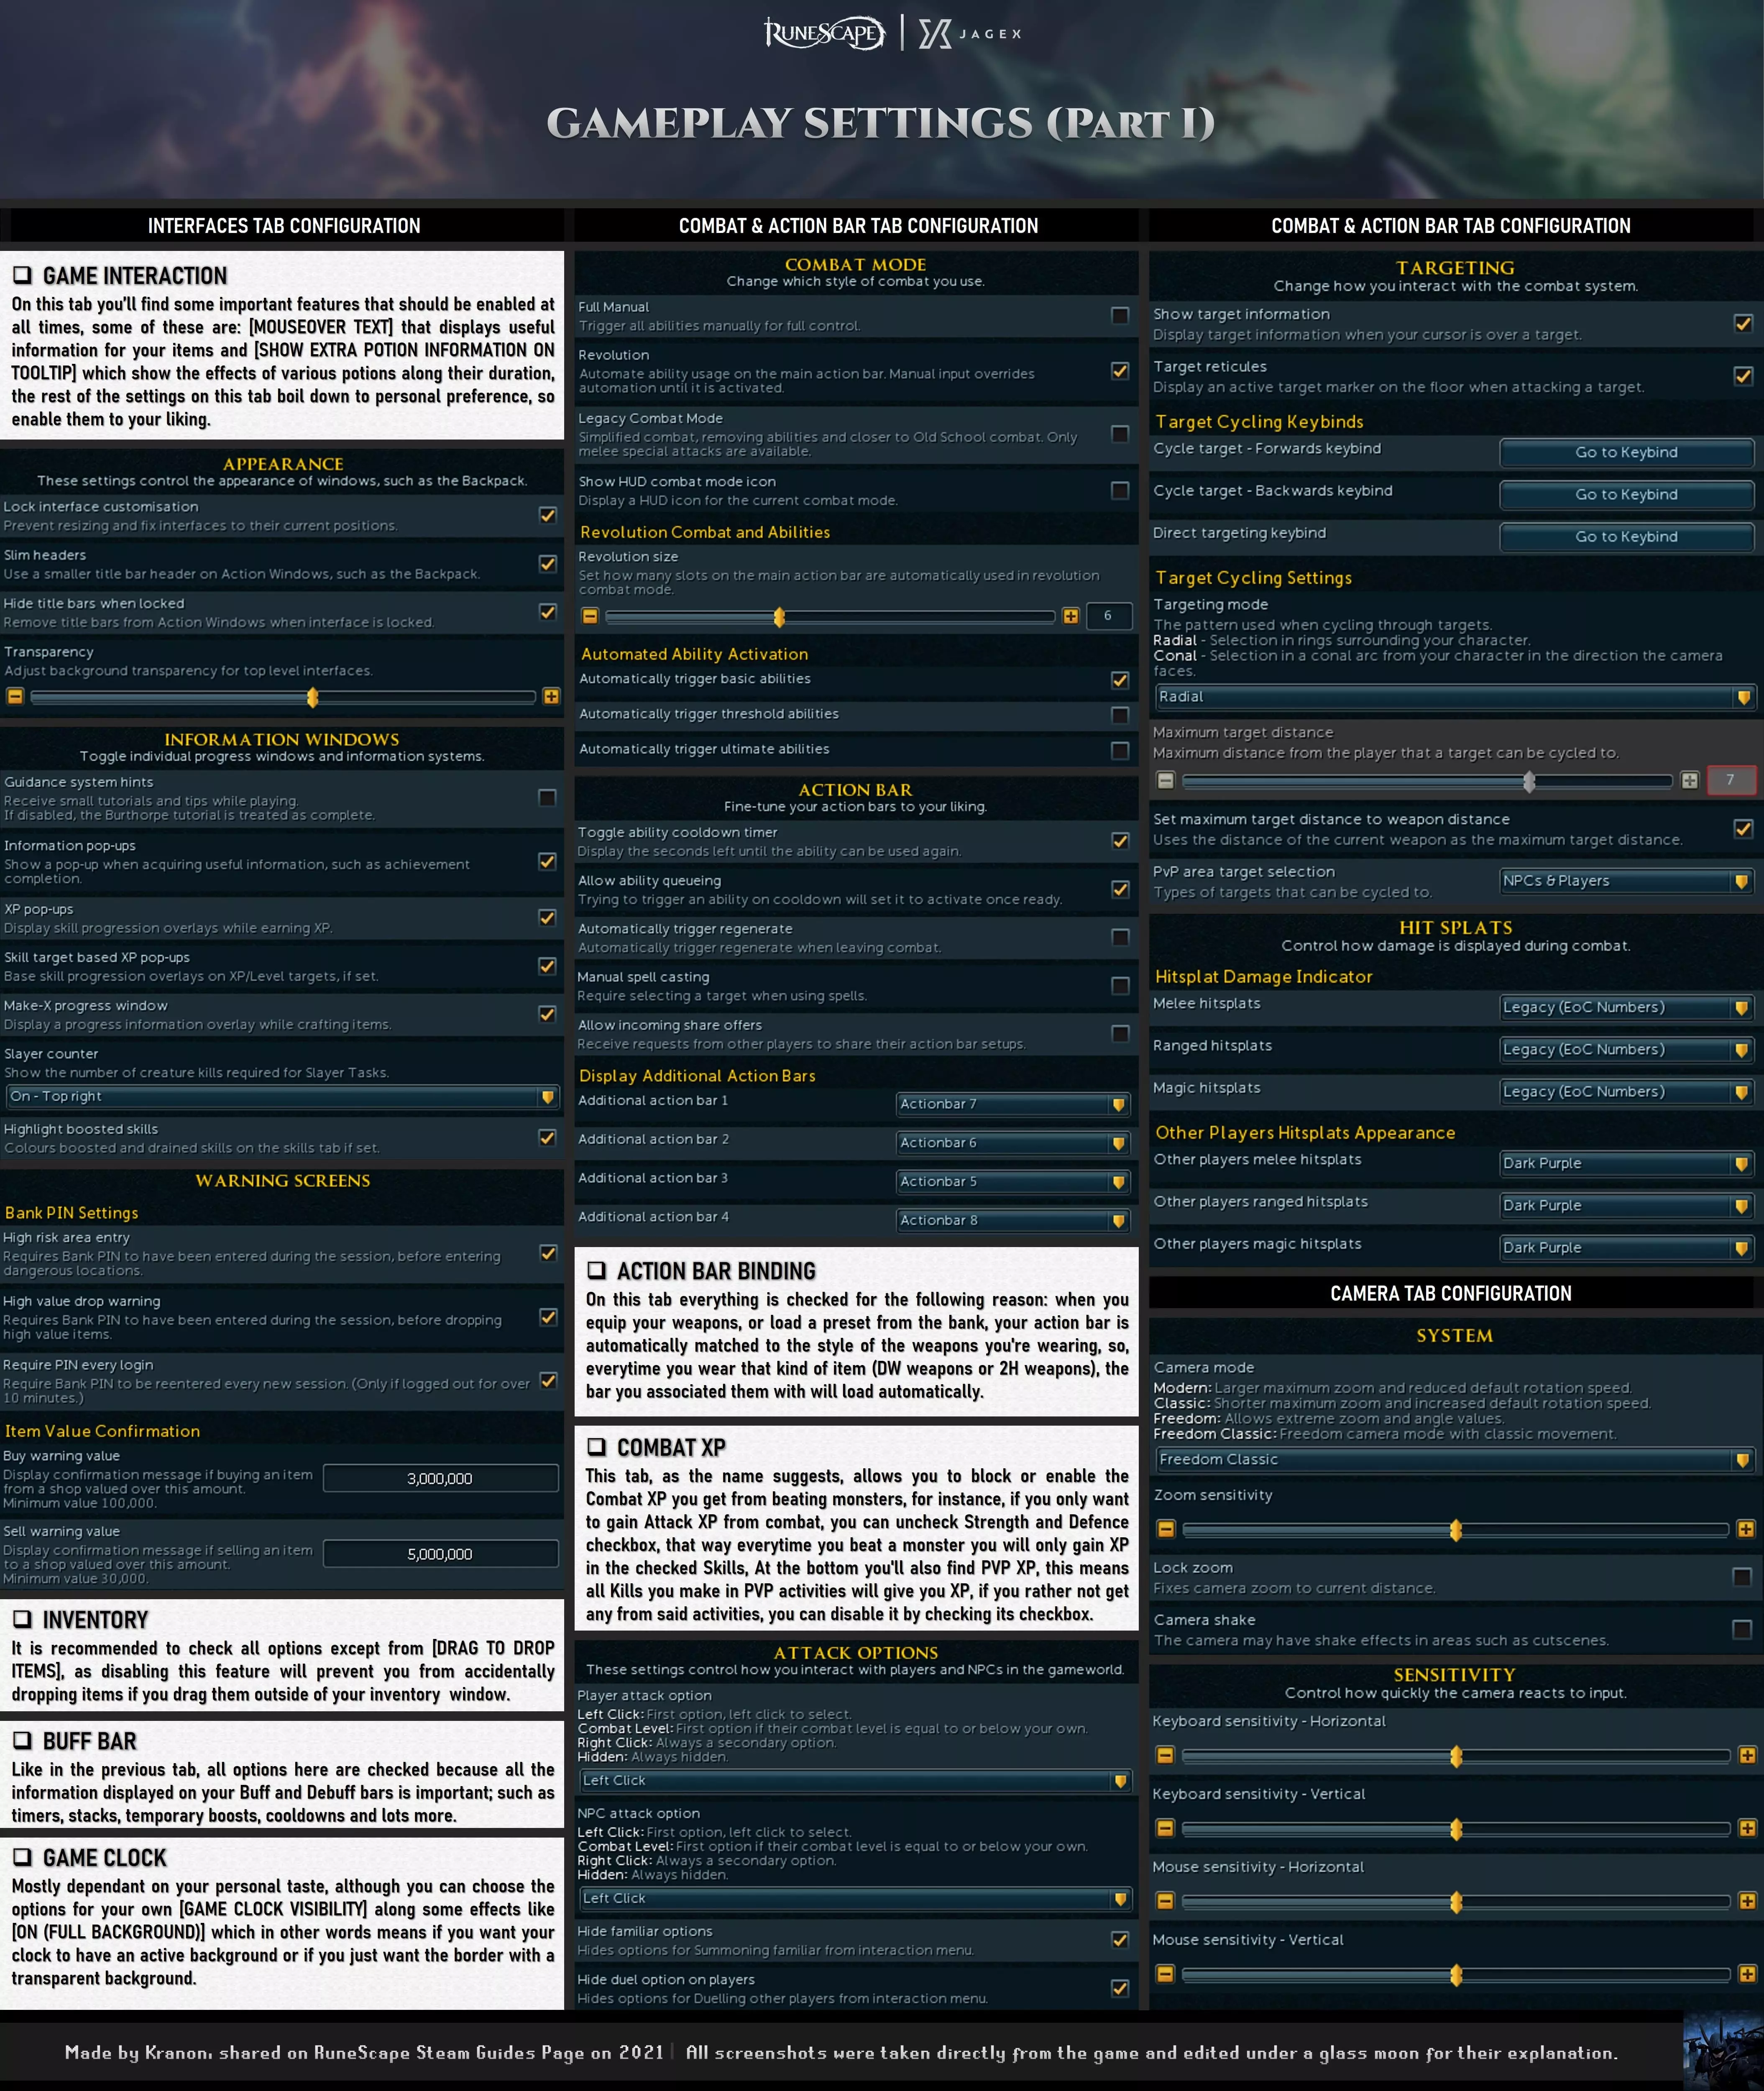
设置菜单分为5个不同的类别:【游戏玩法】、【图形】、【控制】、【音频】和【功能区】。在接下来的内容中,我将展示【游戏玩法】选项卡中的每个选项及其功能。其中一些选项会配有图片(这些图片直观易懂,能说明其作用),其他选项则会有简要说明,以便让所有这些选项更易于阅读和理解。 在【游戏玩法】选项卡下,你会找到8个不同的子类别(NXT客户端为7个,Steam客户端为8个),下面将详细说明每个子类别的作用:

“各种设置标签页”。 子组 描述 界面 从根本上来说,此设置允许你自定义界面窗口的外观,筛选游戏中应显示哪些界面和警告屏幕,某些物品在使用时的行为方式(例如在倾析药水后保留药水瓶,或在使用 farming 技能时清空水桶),你可以选择显示哪些 buff 栏图标,以及是否显示游戏时钟。战斗与动作栏 在这里你可以更改战斗模式(如自动战斗和手动战斗,或类似传统战斗模式的经典战斗模式),还能调整动作栏的可见性和技能排队功能,以及动作栏绑定(根据你使用的武器类型自动切换主动作栏)。此外,你可以设置战斗获得的经验类型、攻击其他NPC的方式、目标选择设置,以及命中数字的颜色(用于美化)。相机 另一项重要功能是相机模式,你可以在这里选择相机缩放模式,这在与大型怪物战斗时非常有用(能让你看得更清楚),还可以调整相机灵敏度。 技能与经验 许多技能都有其独特机制;从寻找鹤嘴锄的特定部件,到死神任务中分配给你的 bosses 数量,以及这些 bosses 是 solo 还是团队类型,所有这些设置都能帮助你自定义与这些技能的互动方式。 消息与社交 在该设置中,你可以自定义登录时、游戏会话期间收到的消息类型,包括来自好友、 clan、私人和群组聊天的消息。你还可以自定义每条消息、好友广播、 clan 聊天或同一世界中任何人的消息颜色,也可以自定义【Runemetrics】个人资料跟踪的事件。 物品掉落 此设置允许你自定义战利品系统界面(以及各种过滤选项),你还可以自定义战利品光束(当你获得贵重物品时出现的光柱;可手动定义,或用于稀有/独特掉落),此外,你还可以自定义是否接收 clue scrolls。我强烈建议勾选所有复选框,因为“Treasure Trails”是一项很棒的活动(而且利润丰厚),你也可以启用战利品光束,这样就不会错过任何一个。游戏玩法设置速查表 旧版风格:此选项允许你自定义界面颜色、小地图图标、技能斗篷模型和战斗模式,使其让人联想到旧版本游戏(你可能记得2011年的版本)。 第三方:这是Steam客户端的专属选项,其作用是在你的好友列表状态中显示你当前所在的世界(例如世界2或世界84)。
设置菜单窗口的第一部分
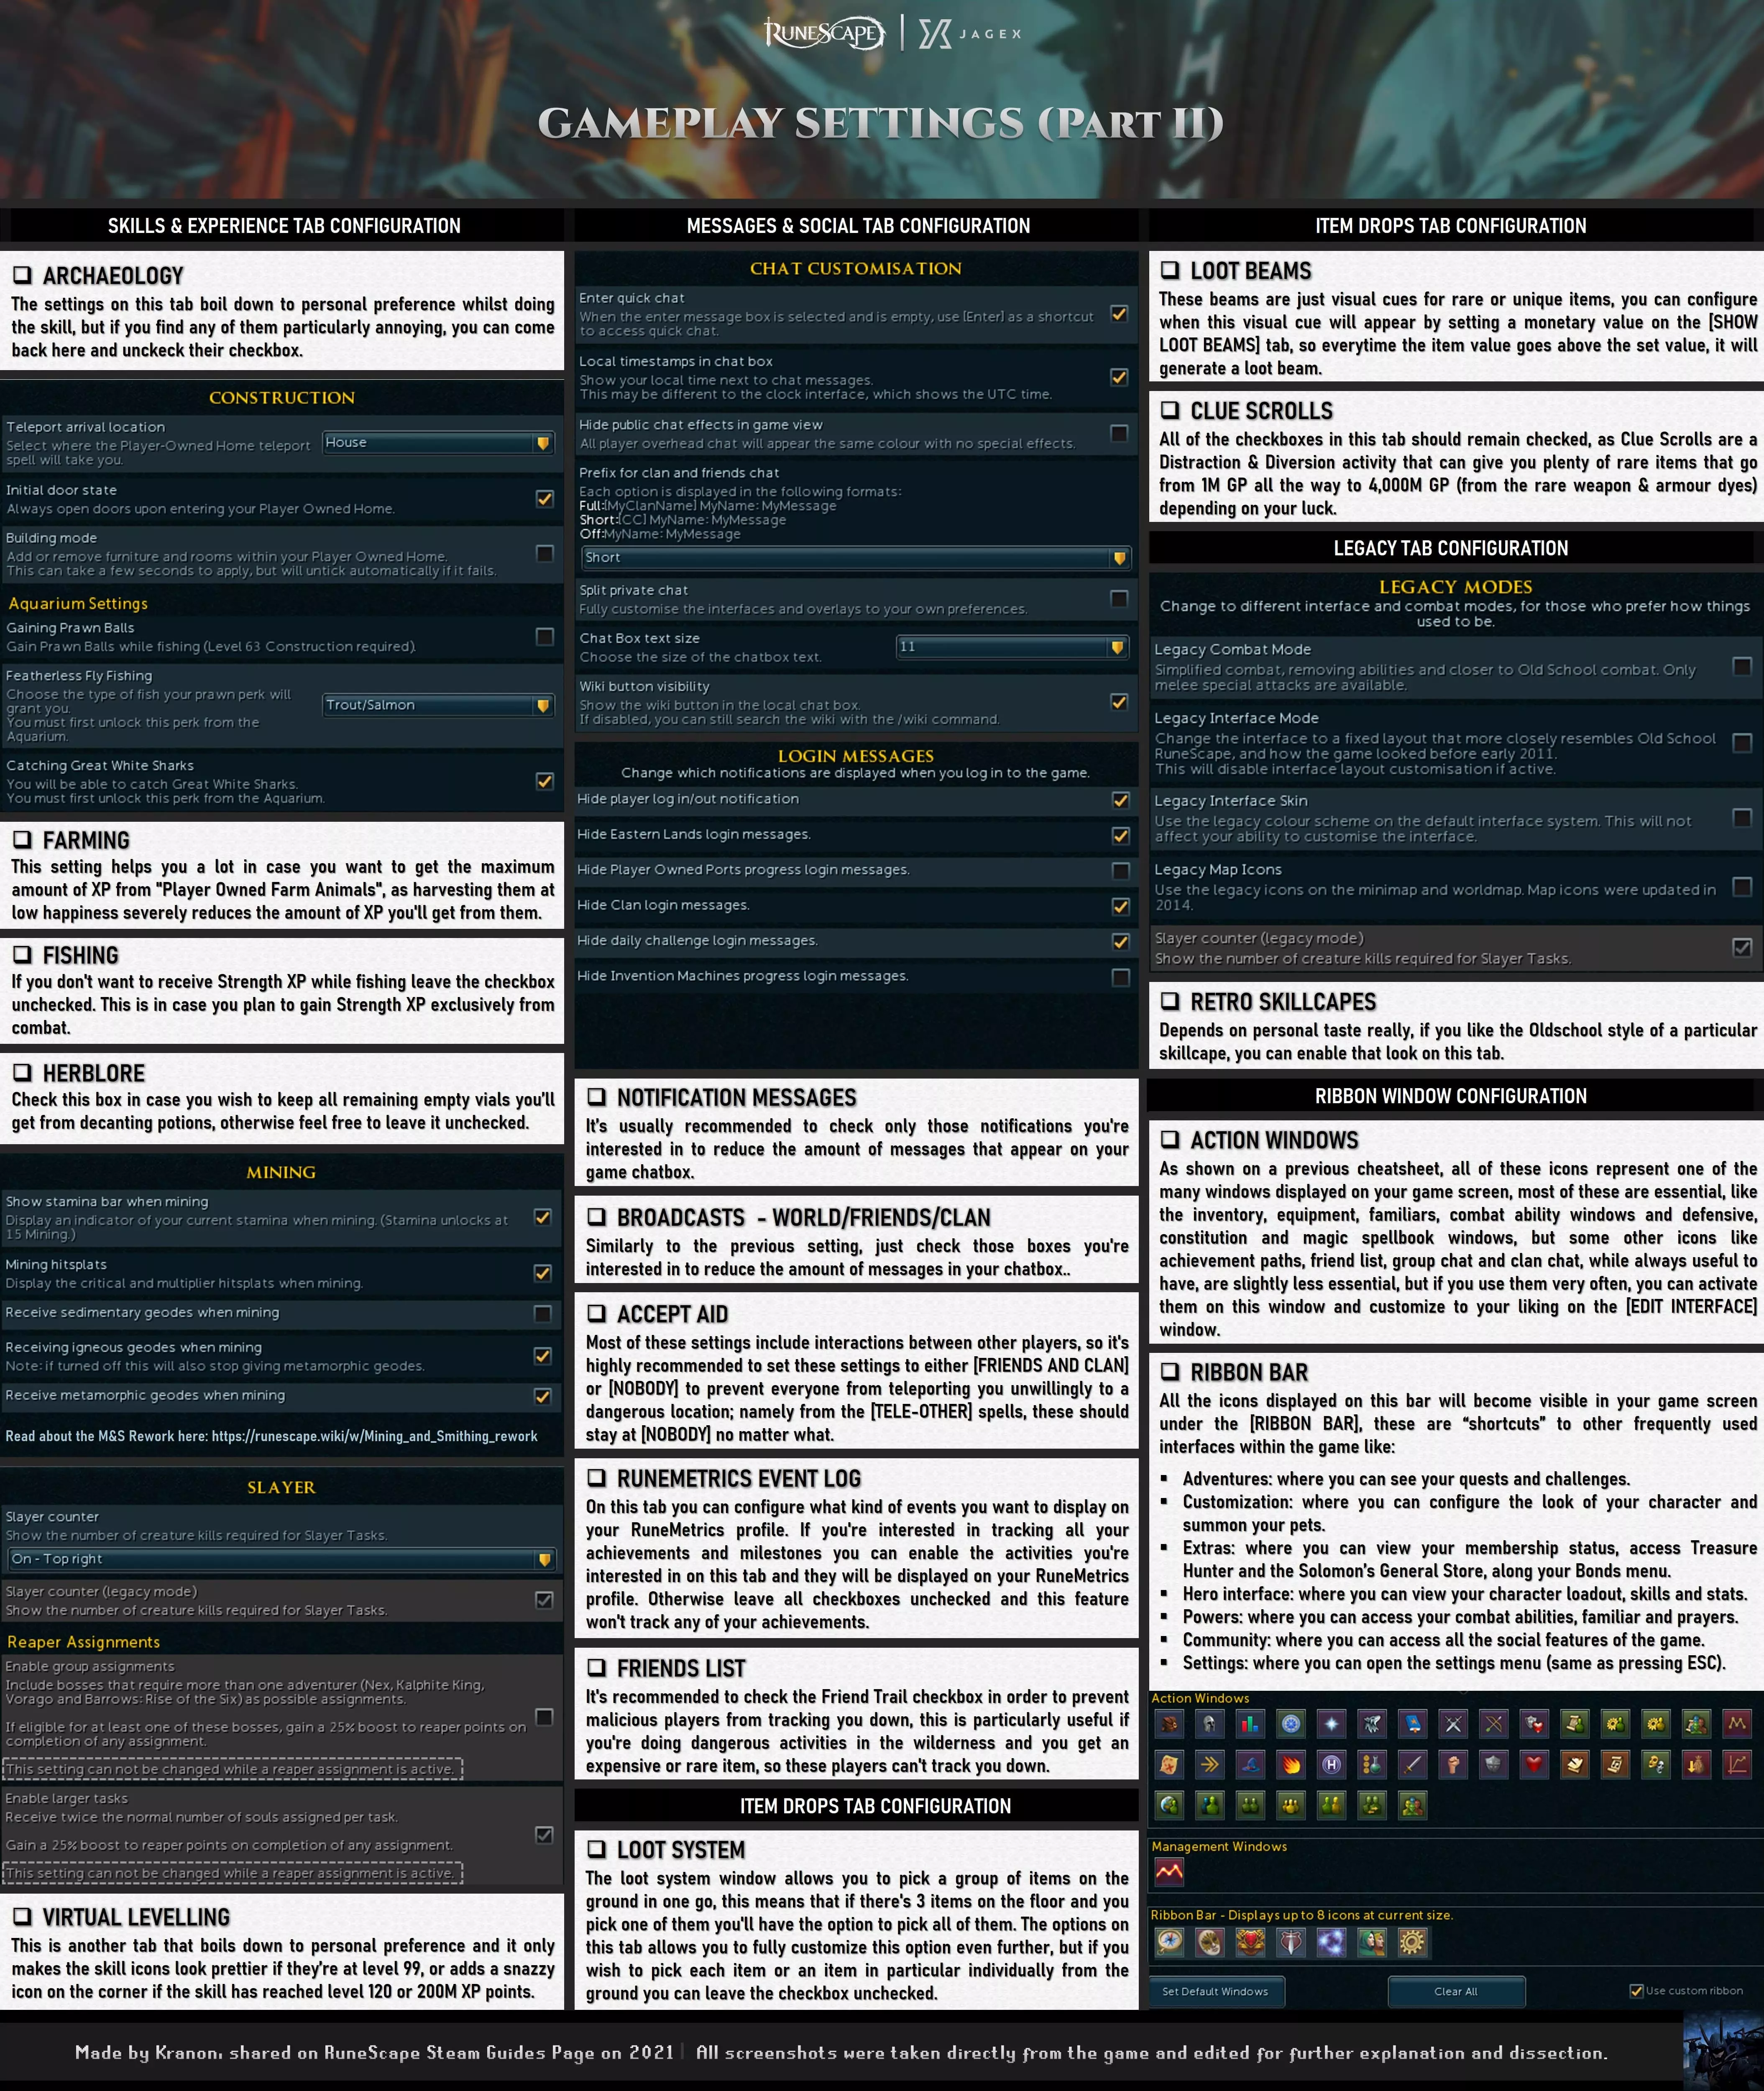
设置菜单窗口的第二部分。 更多相关信息可参考维基。 结语

《RuneScape》是一款围绕“自由”打造的游戏,所有这些界面、技能栏和设置都体现了这一点。虽然没有绝对最佳的配置、按键绑定或界面,但尝试所有选项并通过测试来学习,以找到最适合自己需求的方案,始终是个好习惯。 无论你是在免费城镇闲逛的新玩家,还是刚购买会员在会员专属区域探索的玩家,本指南中的内容都能对你有所帮助。 在Reddit和讨论论坛上,我常见到的问题包括:如何达到最高GP/小时?应该购买哪些装备,以及购买顺序是怎样的?在特定等级下应该挑战哪些BOSS?而且,尽管答案在不断变化(因为价格一直在变动,游戏环境也在不断演变),但最终总会得出相同的结论,那就是:“你能做什么以及你能做到多稳定。”以下是一些补充信息,包括装备与 Boss 进度以及大量实用技巧: 装备和战斗进度。 实用技巧列表。然而,在尝试这些方法并了解你能多稳定地运用它们之前,你必须从游戏的最基础开始,理解游戏的运作方式,以及如何在尽可能提升画面表现的同时确保游戏的稳定性。这就是本指南的目的:教你(玩家)每个设置的作用、它们如何影响你的游戏体验,并展示技能栏的基础知识。剩下的部分则需要你通过自身经验来在这些基础上进行拓展。