换一换
换一换 


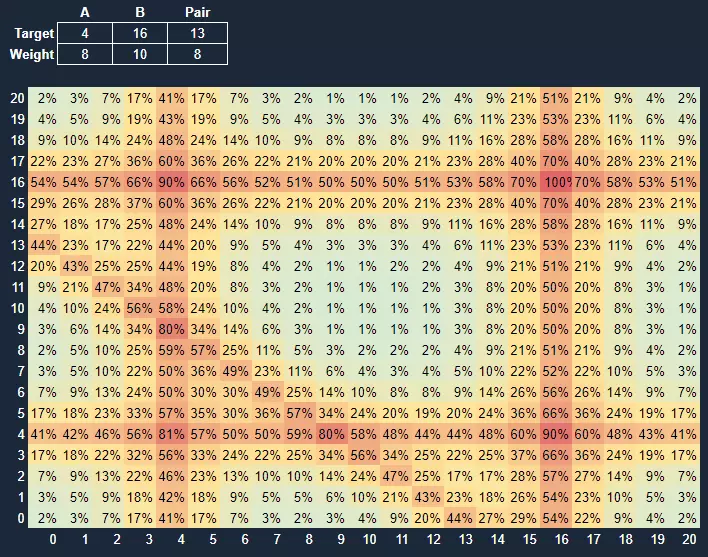
烹饪机制理解指南:如何烹饪出最美味高效的 meals 概述 首先,如果你是游戏新手,发现了一些带有烹饪加成的装备,想知道它有什么作用,简单来说,目前没什么用,大约一年后再来关注吧。 本文档包含几份不同的指南,介绍如何优化你的分数,其中涉及各种权衡取舍。 如果你不关心细节,想要一个快速简便的流程来最大化效率,可以使用侧边栏中的TL;DR指南。 本文档的主要内容涵盖了另一份指南,该指南在侧边栏的“我的指南”部分有总结。 烹饪是在达到SADISTIC难度后击败第十个泰坦所解锁的最终机制。每天你都有机会烹饪(并享用)一顿美味佳肴,这将为你提供永久的经验值获取加成。本指南旨在解释餐食效率的评分方式,以及如何让每顿饭都达到最佳的+100%加成。 当你首次解锁烹饪功能时,你可以使用6种食材,随着游戏进度的推进,还会解锁另外2种食材。每种食材都有自己的单位,通常有21种不同的数值,范围在0到20之间(包含0和20)。有些食材的数值以2或甚至50为增量递增,但同样有21种独特数值。为简单起见,本指南将所有食材数值统称为0到20之间的数字。 改变食材数值会影响你的当前餐食效率,这正是你需要最大化的分数。最高效率为100%,每道菜都有能达到100%效率的数值配置。 食用该菜肴时,菜肴效率和其他烹饪加成会影响永久经验值增益的幅度。之后你会获得下一道需要准备的菜肴,它将使用不同的食材,需要调整不同的数值才能达到最优。你大约每天可以食用一次新菜肴。 术语表 本指南尽量使用统一的术语,但在烹饪相关概念上,人们可能会使用不同的词汇。以下是本文档中使用的术语: 数值:食材当前的设置值,范围在0到20之间。(记得从以50为增量的单位转换)分数:特定食材数值组合下的当前餐食效率。峰值:峰值是指食材的某个数值,该数值比其相邻两个数值的分数都高。注意,0或20也可能是峰值。未配对:没有真正未配对的食材。未配对意味着它与一个锁定的食材配对。(x,y):将一对食材的数值设置为x和y。记住,配对的顺序无关紧要。烹饪评分方式:再次说明,如果你不关心评分方式,只想知道如何优化效率,可以直接跳至侧边栏的简明指南。每道餐食的食材都要进行配对。请记住,如果你解锁的食材少于8种,你的一种(或两种)食材可能会与一种未解锁的食材配对。 每种食材都有一个隐藏目标值[0-20]和一个隐藏权重[4-14]。此外,每对食材还有一个隐藏目标值[5-34]和一个隐藏权重[8-30]。 对于每对食材(我们称之为A和B),该对的得分基于以下几点: (若A已解锁):A与A的目标值的接近程度 (若A已解锁):A与B的目标值的接近程度 (若B已解锁):B与B的目标值的接近程度 (若B已解锁):B与A的目标值的接近程度 (若两者均已解锁):A+B与该对目标值的接近程度 对于以上每一项,非常接近目标值会获得高额奖励(即呈指数级下降),并且每条线都乘以目标的权重,然后相加得到总配对分数。你的分数就是配对分数的总和,而你的膳食效率则是你的分数占完美可能分数的百分比。 从中得出的结论是: 如果配对中的一种食材被锁定,那么未锁定(即未配对)的食材将有两个目标值,且权重不同,找到最佳分数应该很容易。 如果两种食材都未锁定,A和B是可互换的。(A,B)的分数与(B,A)相同。 通常,当每种食材的数值接近各自目标值,且它们的总和接近配对目标值时,会获得最高分数。 配对分数通常比单独分数的权重更高。 每个配对可以独立于其他配对进行优化。 我发现通过可视化最容易理解评分机制,因此制作了这个图表来展示配对评分的原理。该图表模拟了仅包含两种配对食材的餐品。请注意,图表是对称的,A轴和B轴可以互换,这与我们预期的一致。
在这里你可以看到,两根垂直条表示当A接近任一目标时的情况,水平条表示B接近任一目标时的情况,而对角条则显示当总和接近目标对时的情况。在这个示例中,最优解是A、B、4和9。 请注意,线条的强度是权重的函数,并且即使保持目标不变,改变权重也可能导致不同的结果和不同的最优解。
识别配对 已知对于每对材料A和B,(A,B)与(B,A)会产生相同的分数。我们可以利用这一特性来找出哪些材料是相互配对的。 首先,将所有材料设为相同的值,通常设为0。 增加其中一种材料的值,并记录分数的变化,然后将其改回原值。 如果单次增加未导致分数变化,则继续增加该材料的值,直到分数发生变化,并记录此时的分数以及所需的增加量。 如果超过两种材料导致相同的分数变化,则返回上一步,继续增加这些材料的值,直到它们的分数变化出现差异。导致分数变化相同的原料会被配对在一起。例如,你可能会有这样的体验(记得在每一步之间将数值重置为0):从将所有原料设为0开始,此时分数为1%。增加蛇油会使分数变为1.04%。当番茄增加到8时,分数变为1.4%。当鸡蛋增加到8时,分数变为1.4%。当咖啡粉增加到8(400汤匙)时,分数变为1.46%。增加椰奶会使分数变为1.04%。当柠檬汁增加到2(100毫升)时,分数变为1.01%。你可以得出结论:蛇油与椰奶配对,番茄与鸡蛋配对,而咖啡粉和柠檬汁各自未配对。优化未配对食材 当一种食材未配对时,优化起来会容易得多。从技术上讲,它仍然与一种隐藏食材配对,因此会有两个目标值能提供良好分数,但基于总和的配对分数会被舍弃。 使用之前的可视化方式,我们可以想象成移除代表配对分数的对角线,然后只查看单行数据。

当数值与权重较高的目标值匹配时,即可获得最佳分数。只需从0到20进行扫描,并保留能产生最高分数的数值,就能找到这个最佳分数。 优化组合 为了找到组合的最佳数值,我们有更多可供搜索的选项。对于未组合的材料,有20种选项,而对于组合材料,则有441种配置;如果排除所有重复项,则为231种。当然,你也可以尝试通过穷举搜索来找到最高分数,但我们将尝试提出一种更好的方法。 以上述相同的例子来说,我们可以将其视为一种二维搜索问题,目标是找到最高值。当然,我们在游戏中无法看到整个图表,每次只能查看一个单元格。
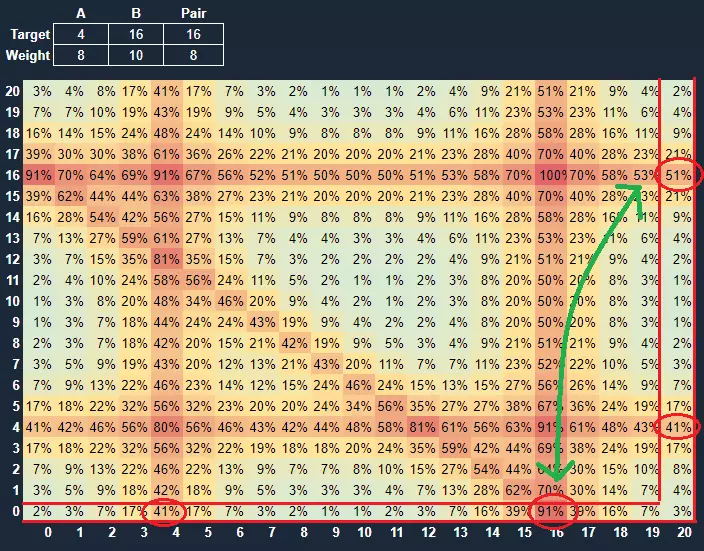
我建议的方法是研究较少数量的单元格,以尝试确定图表上的线条位置。我们知道对角线对应配对目标,水平线和垂直线对应单个目标。最优值几乎总是出现在其中两条线的交点处。如果我们能弄清楚目标值是什么,那么我们只需要检查少数几对数值。 确定目标值 我们要寻找三个目标值:每种原料各一个,以及一个配对目标值。我寻找它们的方法如下: 随意将一种材料设为A,另一种设为B 将A和B的值都设为0 将A从0逐步增加到20,记录出现峰值的位置 保持A为20,将B从0逐步增加到20,记录出现峰值的位置 大多数情况下,你应该会得到5个峰值。如果找到的峰值少于5个,说明部分目标位置非常接近。我会在下文深入讲解这些情况,现在我们先回到示例。
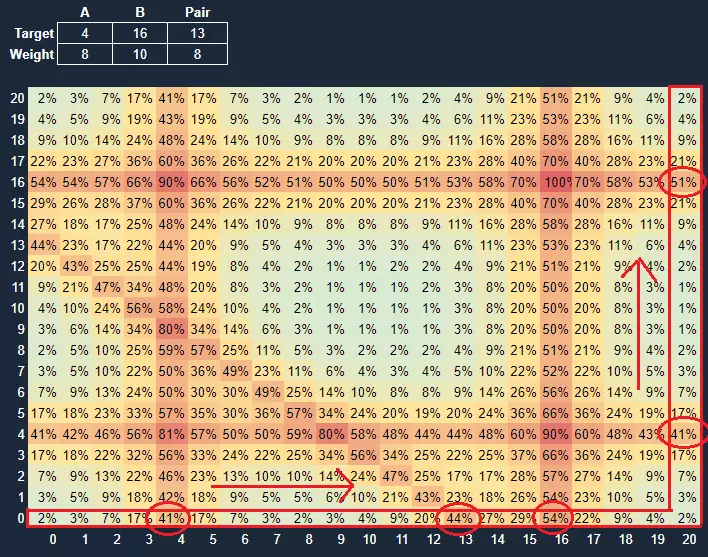
以下是我所检查的数值以及我们本应找到的峰值。我们发现A在4、13和16处出现峰值,B在4和16处出现峰值。当存在5个峰值时,总会有一个单独的峰值,这个峰值就是配对目标。因此我们可以得出结论,单独目标是4和16(注意顺序无关紧要),配对目标是13。 需要注意的是,如果单独的峰值出现在材料B上,那么配对目标将是20加上该峰值(因为我们在将A设为20的同时递增B)。 还要注意,如果你看到A在20处出现峰值,而B在0处出现峰值,那么配对目标就是20。 特殊情况 如果你按照此流程操作后发现峰值少于5个,那么至少有两个目标非常接近。我喜欢通过寻找宽峰或高峰来解决这个问题。 宽峰:对于普通峰值,分数会飙升约6%或更多,然后立即下降相似的幅度。但如果看到分数显著上升后,接着是较小的变化(上升或下降均可),然后再显著下降,这就是宽峰。这种情况发生在两个目标相邻时。此时,只需将两个得分较高的值都视为峰值,这样就能找到所需的5个峰值。 下方是宽峰的示例,绿色标记为宽峰,红色标记为全部5个真实峰值。
也有可能单个目标形成多个宽峰。
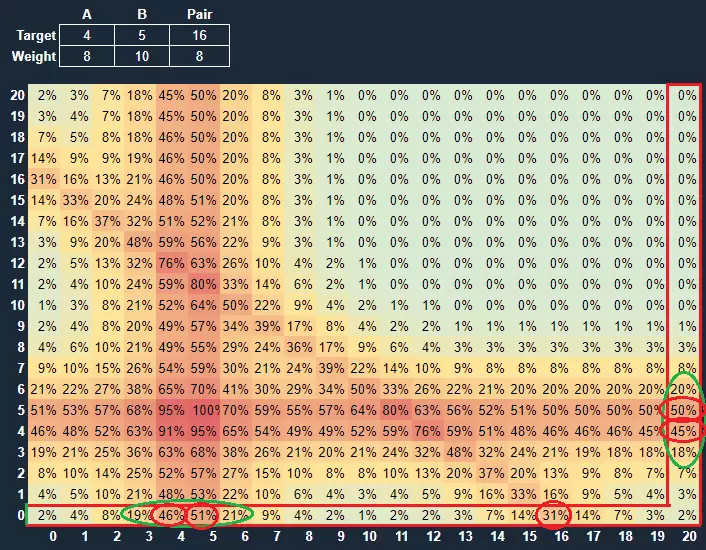
如果你只找到了4个峰值,且其中一个峰值的分数明显高于其他峰值(尤其是另一种材料上的对应峰值),那么该峰值既是材料目标,也是配对目标。 以下是一个高峰值的示例。注意不同材料上同一峰值的分数存在显著差异。
堆叠的单独目标:如果你只找到3个峰值,并且确定这些峰值不宽,那么很可能A和B目标的值相同,而那个不同的就是成对目标。 非常特殊的情况 虽然极为罕见,但上述方法可能无法识别出三个目标值。不过,希望你现在已经足够了解机制,可以进行一些创造性的问题解决。这些值很可能非常接近,所以试着进行试验。 优化分数 一旦你确定了三个目标值,我们将它们分别称为A、B(两个单独目标)和P(成对目标)。能够产生最佳分数的组合只有少数几种。这些组合通常出现在图表上两条线的交点处,或者对角线与图表边缘的交点处。 这些候选组合(按可能性从高到低排列)如下: - 个人得分线与配对线的交点:(A, P-A)、(B, P-B) - 个人得分线彼此之间的交点:(A, A)、(A, B)、(B, B) - 配对线的端点,即使没有与任何线相交:(0, P)、(P-20, 20) 请注意,部分候选组合可能包含无效值,可以直接舍弃。例如:
Here the candidates are in red, with the duplicates in blue. (0, P) is missing because it would be invalid. Simply check the scores for all the candidates, and use the one that gives the best score. My Guide This is the process I use for cooking. I use this over the TL;DR Guide because it involves less clicking, and less menial note taking or memorization. It does require a better understanding of how scoring works, but if you've read this far, you probably have that understanding. Process: Set all ingredients to 0 Identify which ingredients are paired (read Identifying Pairs) For each unpaired ingredient, cycle 0-20 to find the best score, and keep it there. For each pair: Choose one ingredient to be A, and one to be B. The order doesn't matter. Increment A from 0-20, and keep track of where the peaks were. Leaving A at 20, increment B from 0-20, and keep track of where the peaks were. Based on the peaks you found, identify the three target values A, B, and P If you found 5 peaks, A and B are the matching ones, and P is the odd one out. If P was a peak of ingredient B, remember to add 20 to it. If you found fewer than 5 peaks, read the Optimizing Pairs chapter for tips on how to resolve it. Check potential candidates to find the highest score: (A, P-A) and (B, P-B) if they are valid (0, P) if P <= 20 or (P-20, 20) if P > 20 (A, A), (A, B), and (B, B) Help, I can't get to 100%! It's possible that you've followed this guide or any other, and you still can't quite get your efficiency score up to 100%. Here are some tips to help. First off, if you followed a different guide, consider reading this one to gain a better understanding of how cooking is scored, and maybe learn a different technique for optimizing score. As far as quick fixes go, here are a few things you can try: Search other candidates For each pair (X, Y), try these candidates to see if it improves: (X, X) (Y, Y) (X+Y+1, X+Y+1) Search nearby values For each pair, follow these steps to try nearby values, and end up back where you started. It should be obvious, but this won't work if one of the values is either 0 or 20. Pick one ingredient to be A and one to be B, order doesn't matter. A up B up A down A down B down B down A up A up A down and B up Brute force When all else fails, it is possible to try every possible configuration of values to find the optimal solution. Remember that the pairs can be done independently, and that order doesn't matter, which leaves around 700 different configurations to try with only 6 ingredients. However, just don't do this, it's probably not worth it. Give up This is a perfectly viable option! Increasing Meal Efficiency from 90 to 100 gives about a 0.05% permanent exp gain boost, which has diminishing returns from every meal you've cooked so far. It might just be worth your time to give up and just eat your dinner. TL;DR Guide If you didn't read this document, and you don't really care how the mechanic works, and just want a low effort process to maximize score, here are a couple options. Slower but more efficient Set all ingredients to 0 Identify which ingredients are paired (read Identifying Pairs) For each unpaired ingredient, cycle 0-20 to find the best score, and keep it there. For each pair: Choose one ingredient to be A, and one to be B. The order doesn't matter. Increment A until you reach a peak Leaving A at the peak, cycle B 0-20, note the highest score and the associated values, then reset B Return to step 2 until A reaches 20 or you found 3 different peaks. (Optionally - Read note below) Set A to 0, B to 20, then repeat steps 2-4. You might find different peaks for A this way. Set A and B to the pair of values that recorded the highest score Note: This step can always be skipped if you already found 3 different peaks for A, as it will never find new ones. If you always skip this step, you may rarely end up with a score in the high 90s. Performing this step will not guarantee 100%, but improves your odds of getting there from ~90% to over 99%. To save time, you might consider always skipping this step, and then only when you end up with <100%, starting the process over including it. Super quick, but less efficientIf you really don't care about getting a particularly high score, and just want a quick and easy solution, this is the approach for you. In my testing this approach averages 90% efficiency. Set all ingredients to 0 Identify which ingredients are paired (read Identifying Pairs) For each unpaired ingredient, cycle 0-20 to find the best score, and keep it there. For each pair: Choose one ingredient to be A, and one to be B. The order doesn't matter. Increment A from 0 to 20, then B from 0 to 20 (while keeping A at 20), noting what the maximum score was. Reverse the previous step until you get back to the maximum score you noted. Search 'diagonally' by both incrementing B and decrementing A, noting what the maximum score is. You can stop once B <= A. Reverse the previous step until you get back to the maximum score you noted. External Resources and Sources The spreadsheet I used to make the graphs[docs.google.com] The Wiki page on Cooking[ngu-idle.fandom.com] Miyagi's Cooking Sheet[docs.google.com] sourced from Discord The NGU Idle Discord[ngu-idle.fandom.com]