换一换
换一换 


这是我为《幽浮:未知敌人》/《幽浮:内部敌人》制作的指南,内容涵盖外星人、EXALT组织、多人游戏以及通用信息和数据。 简介 我在浏览指南区时,看到了许多不同主题的指南,从职业到科技树、战术再到如何保住所有国家。深夜里我突然想到:“为什么不把这些内容整合起来,制作一份终极指南呢?” 几天后的现在,我开始着手这项工作。我想感谢那些已经整理了一些指南的人,他们帮助我避免了花费一周时间收集信息并整合的麻烦:Ssenkrad_II撰写了关于如何在普通/铁人模式下拯救所有国家的内容,greentiger节省了我写出所有路径和可用选项的时间,并提供了一些通用策略和技巧,Rensje详细描述了《幽浮:未知敌人》中的职业,Hellbilly为《幽浮:内部敌人》的玩家列出了各职业推荐的基因改造,最后是Archmage MC,他为《幽浮:未知敌人》的长 war 模组制作了详尽的指南,没有Archmage MC我可能会手忙脚乱,因为我个人从未玩过长 war,而本指南本应是终极指南。我还要特别感谢XCOM维基,它提供了详尽的统计数据、描述和注释,帮我节省了不少时间。同时,感谢XCOM社区分享的战术和技巧。特别感谢SilverBullet、Robin、Kant019、MowingSawblade(抱歉可能拼写有误,毕竟过了挺久了)、EluMoon6(抱歉可能拼写有误,毕竟过了挺久了)、Elbrus,以及其他许多我记不清用户名的玩家,他们在对战中教会了我如何进行多人游戏,还有一些可以在战役中使用的巧妙战术!注意:对于那些正在寻找特定信息的人,本指南的顺序如下:界面说明、武器/物品/护甲、外星人、EXALT、士兵职业/推荐基因改造、灵能、SHIV、基地管理、研究树、第二波选项、Long War mod、(即将推出)战术与技巧、多人游戏战术与技巧。 另一个注意事项:这是一个半成品,因为幽浮系列的信息量实在太大(我也比较懒),所以如果您没有找到想要的内容,请耐心等待。我真的担心自己可能会达到章节数量的上限。 各项内容的含义 好的,指南的这部分是为那些从未玩过游戏,但正在观看幽浮游戏视频,并在心里想“这都是什么意思?Overwatch?哈?”的玩家准备的。以下是我对所有基础内容的最佳解释。以下是我标记了基本信息的截图。
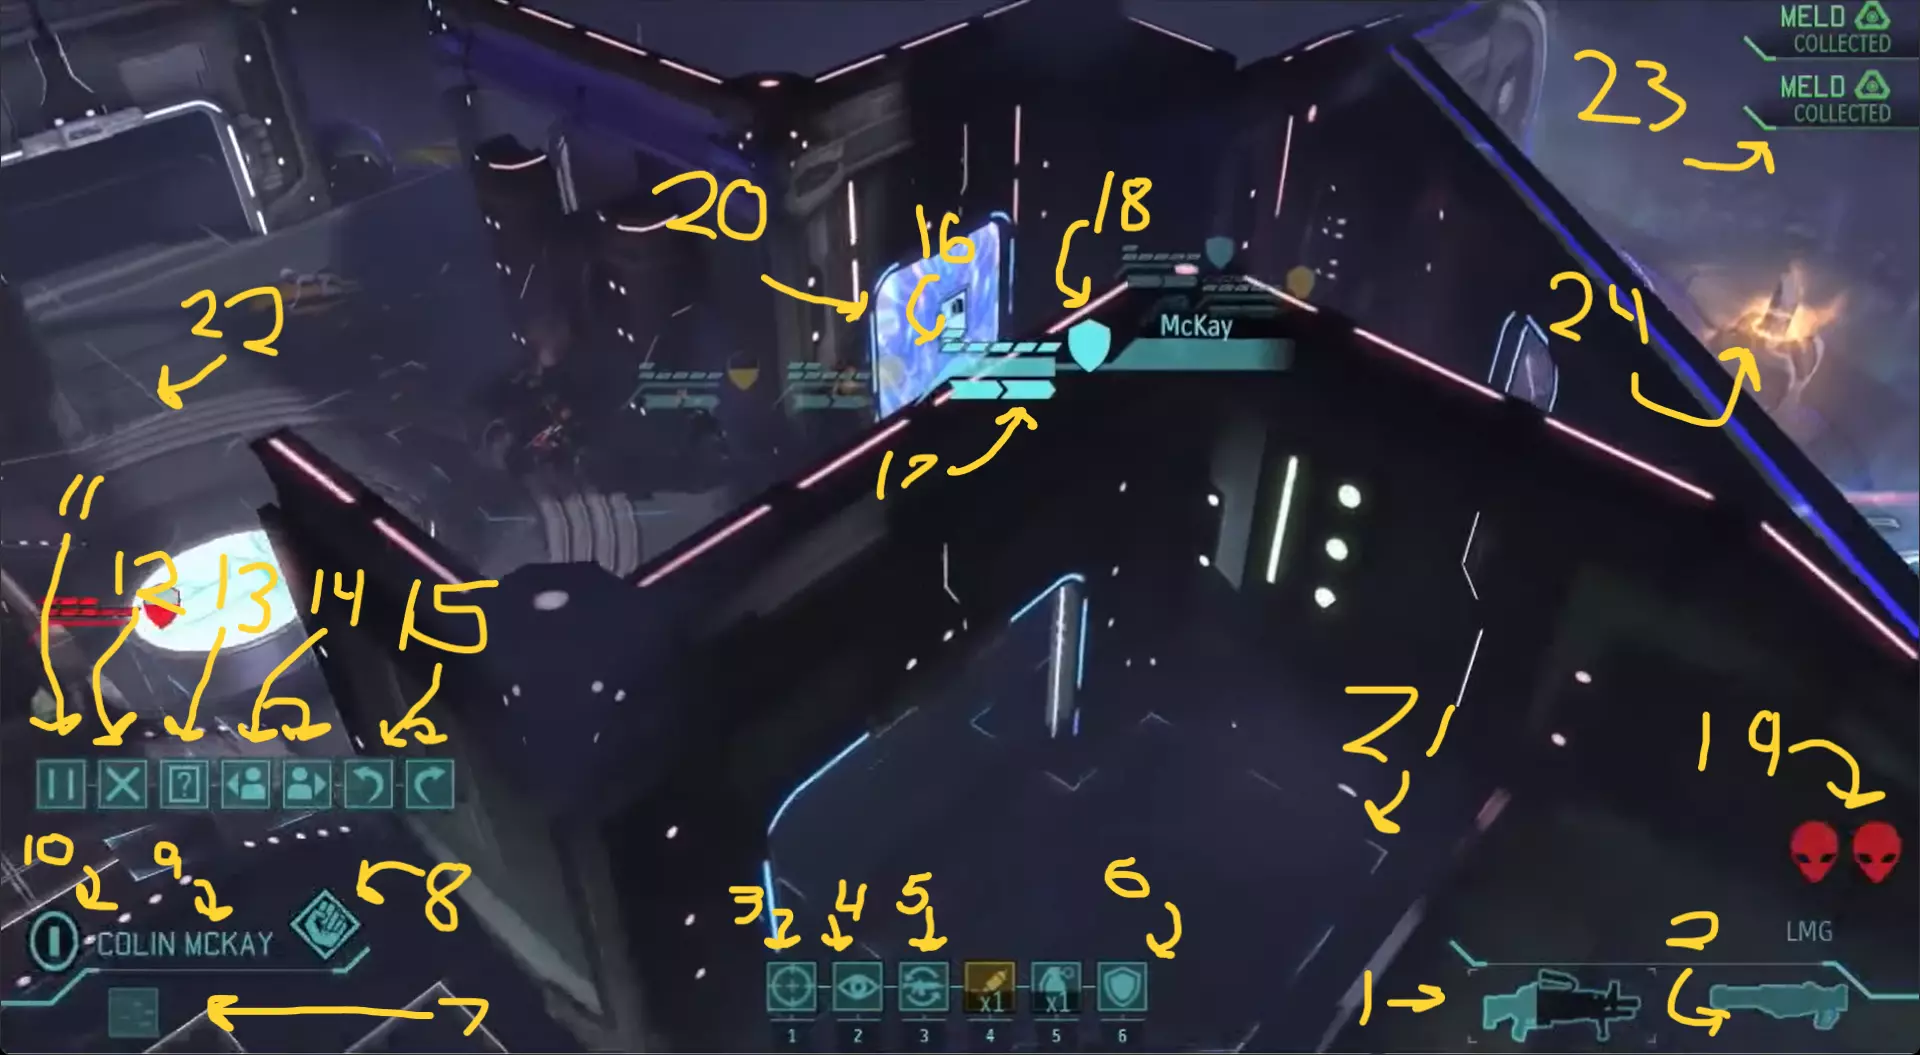
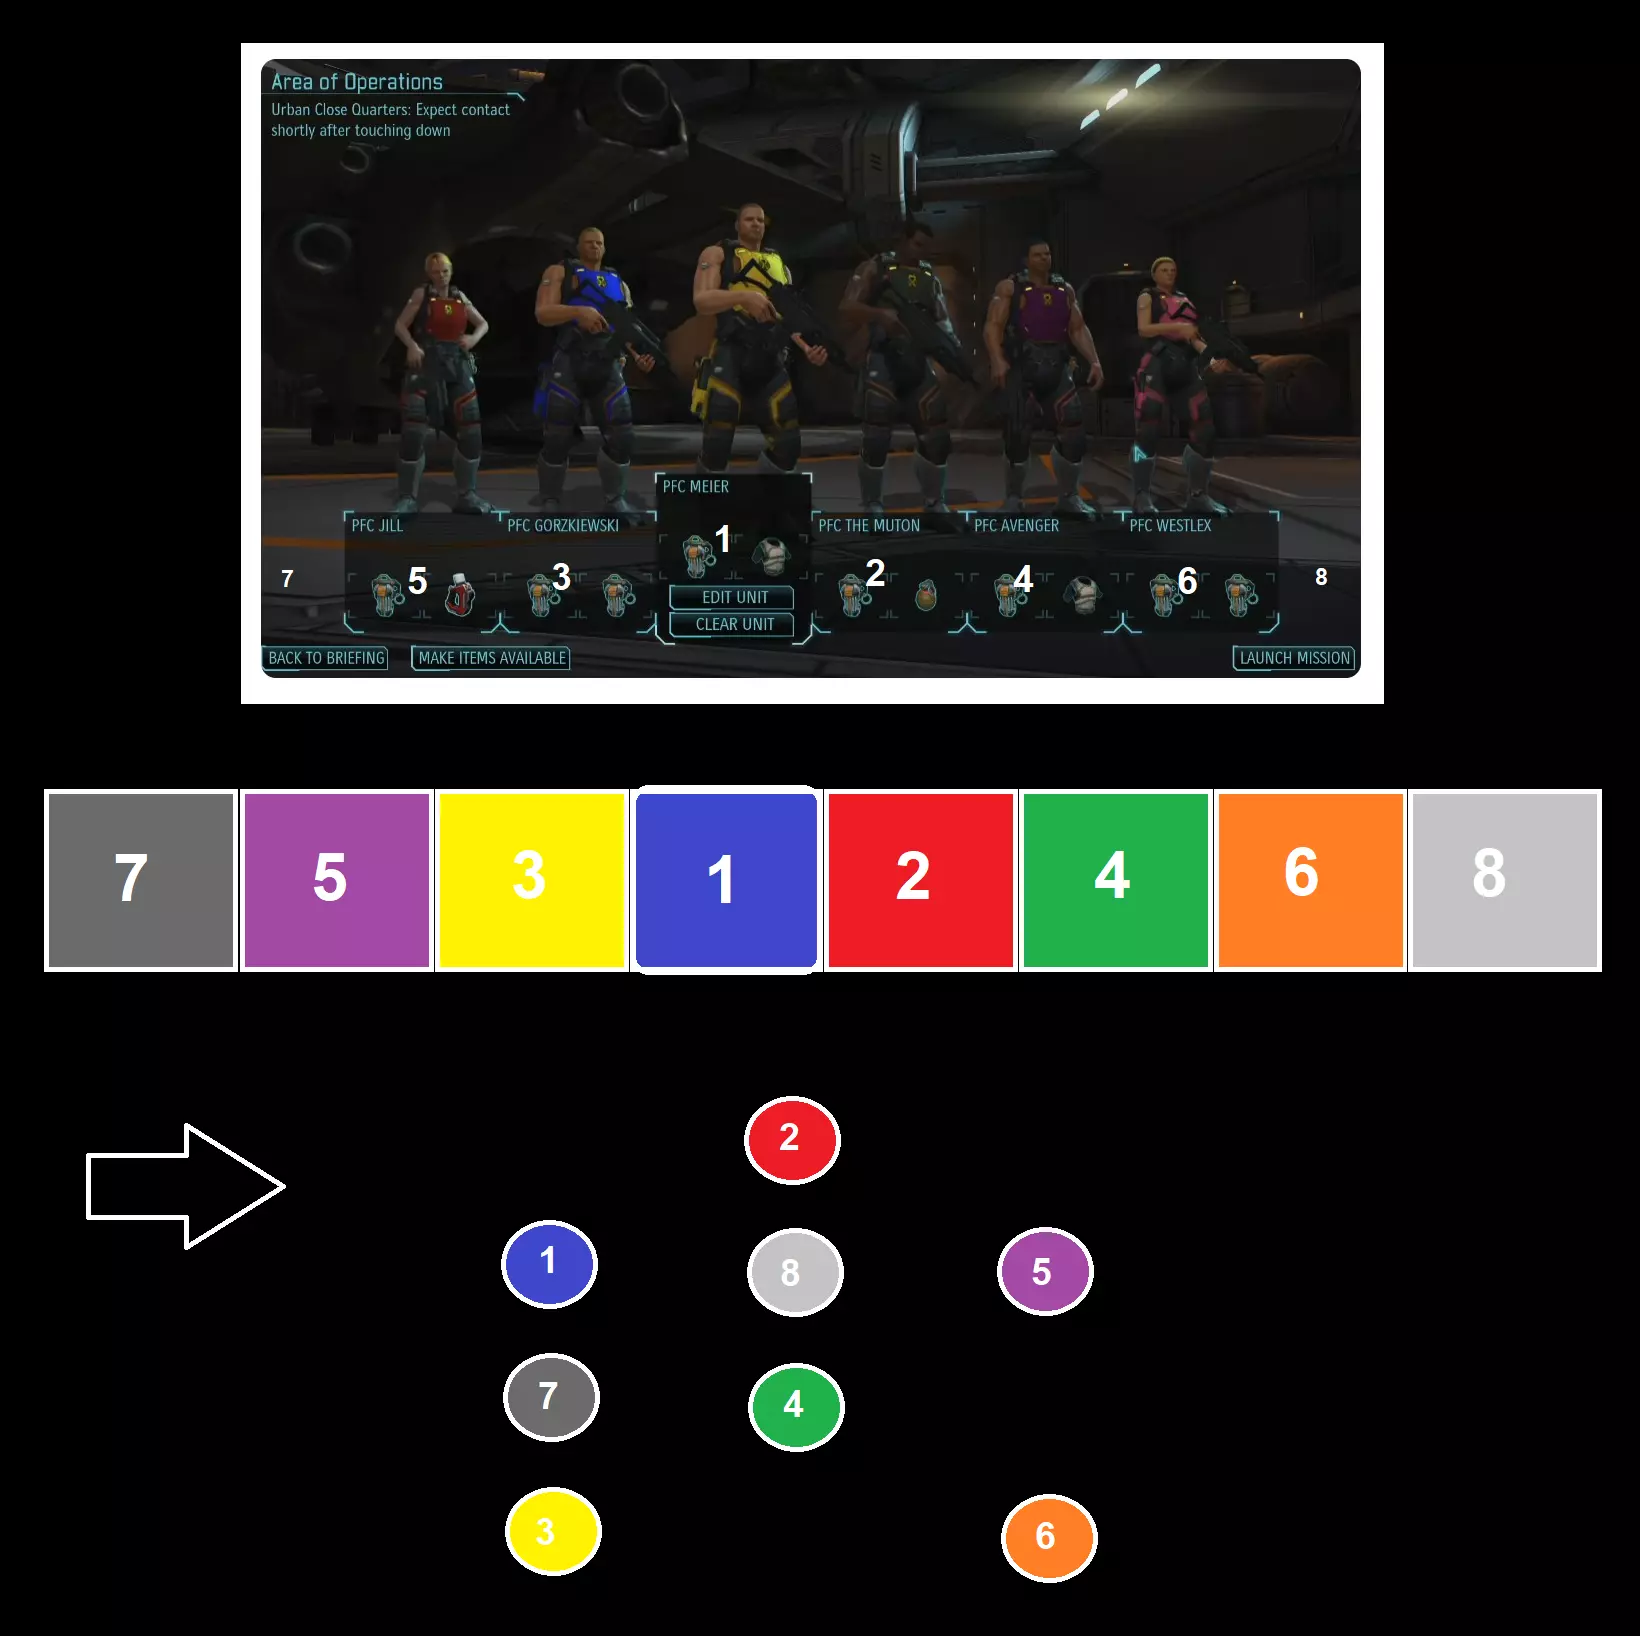
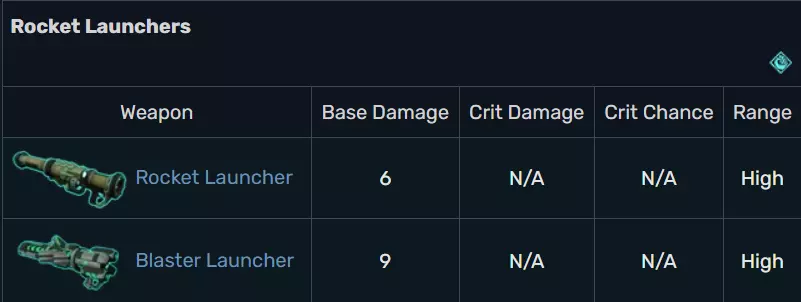
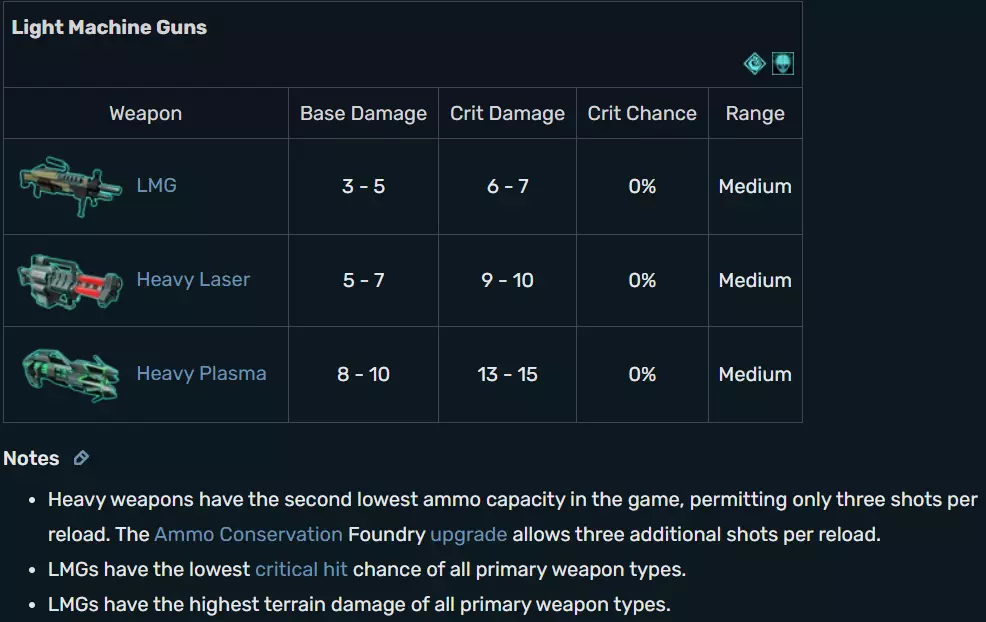
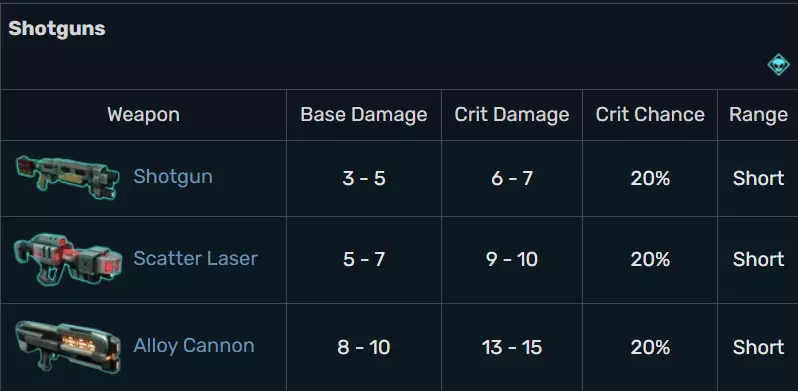
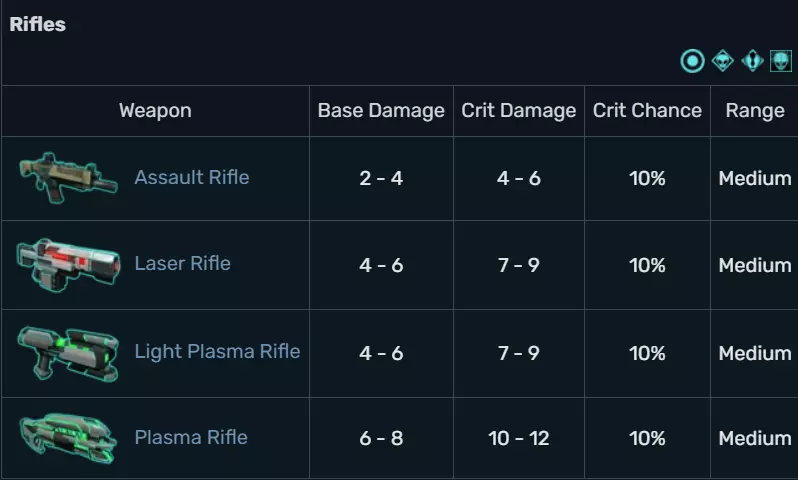
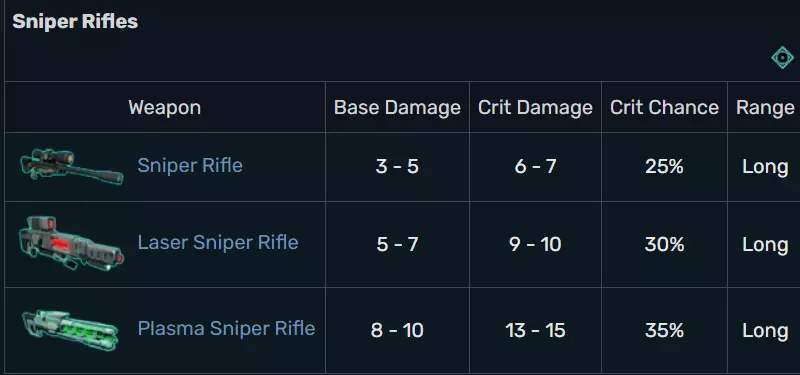
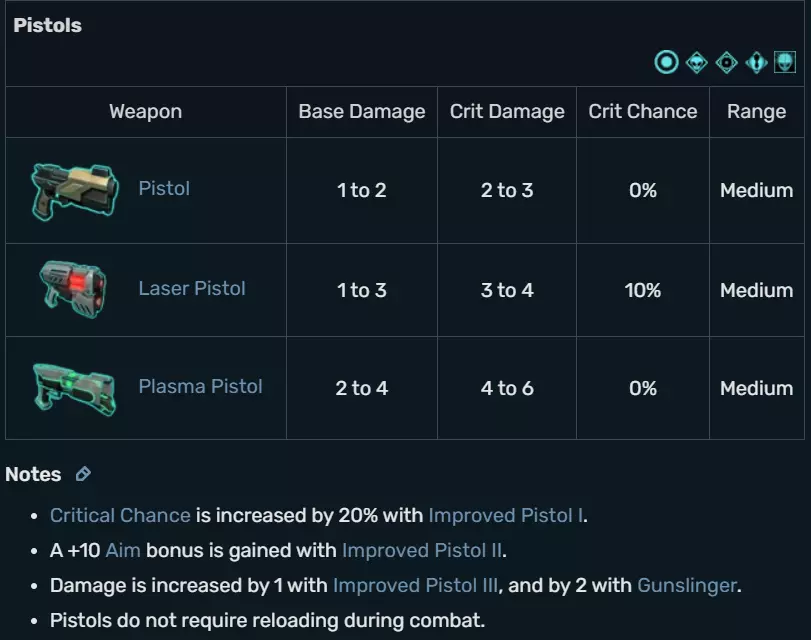
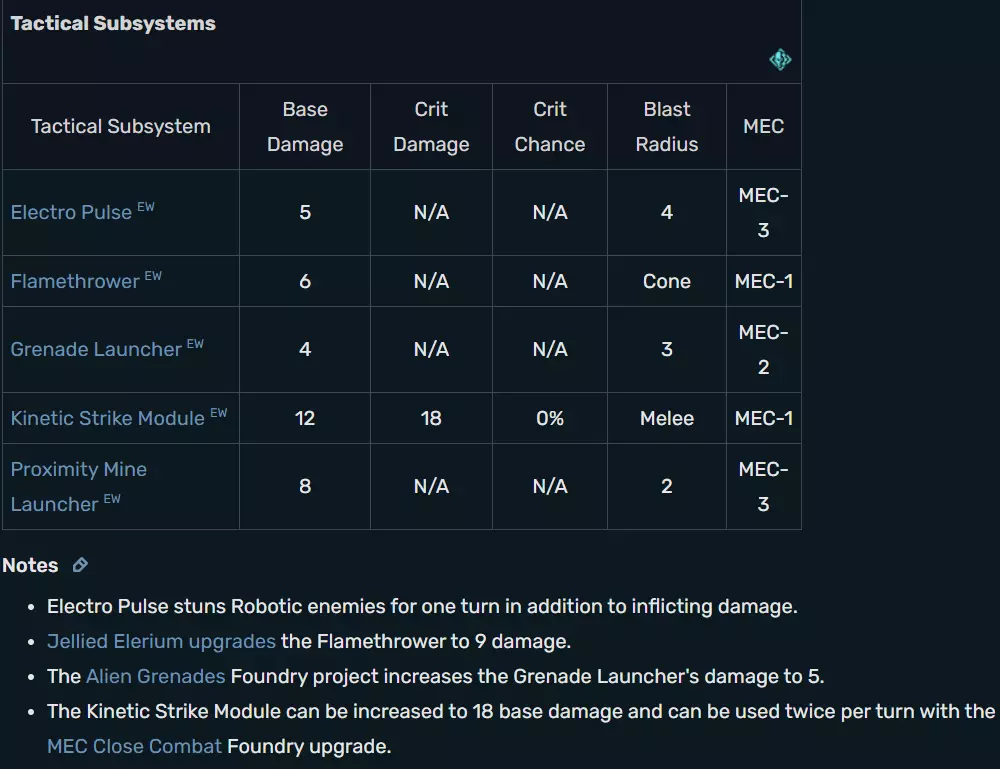
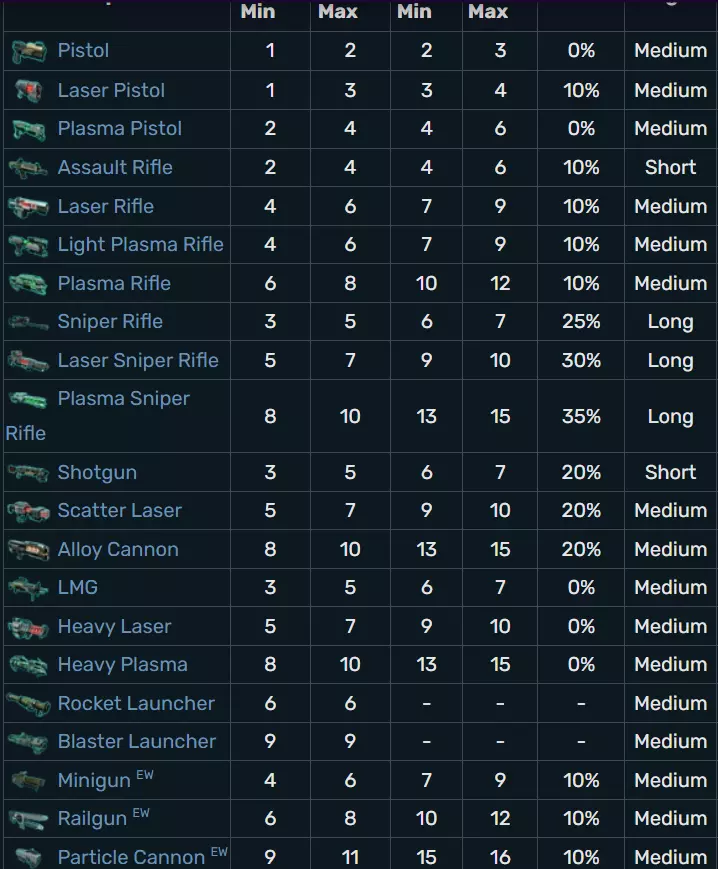
1. This is the main weapon of the solider. It shows how much ammo is spent and remaining. The specific weapon you are looking at is the LMG. 2. This is the secondary weapon of the soldier. For every other class except heavy it is a pistol instead of a rocket launcher. The Rocket launcher can only be used once unless the heavy has the ability to use it twice. Pistols also never have to be reloaded. 3. The icon to shoot, click it to bring up the hit chances and choose which enemy to shoot. 4. The icon for overwatch. This enables the soldier to take a shot at an enemy if they move in their line of sight for a small aim penalty. Certain soldier abilities can remove this aim penalty. 5. Reload icon, the only thing to note is that if you reload it will use both moves, but you can move and then reload to maximize moves. 6. Hunker down icon, any soldier can use hunker down except for MEC class. Hunker down doubles cover bonus and provides immunity to critical hits, but reduces sight radius. Only available while in cover (which should be all time because if your soldier is not cover....You clearly named that one after your ex or least favorite person). Disables the Close Combat Specialist ability of Assault class troopers. 7. Ability and traits icons, You will see penalties, bonuses, skills, and gene mods there. For this picture you only see the shredder skill icon. You can click on the icons to get a menu that explains what every current icon means and what the soldier current stats are (aim, will, etc.) 8. Class symbol, it is there to remind the people with short term memory loss that you brought (whatever class you brought). The symbol will change slightly if you genetically modified that soldier or if they have the psionic subclass. The example class symbol is for a heavy. 9. Really? No guesses as to what that is???? Wow...It is your soldier's name. 10. The soldiers current rank, the example is the corporal rank. 11. Pause menu button (Escape key also works) 12. End turn, its in the name you click you forfeit your turn simple. 13. Bring up a menu that explains what every current icon means and what the soldier current stats are (aim, will, etc.) 14. Switch between your soldiers (Yes I know mind blowing; you can also use the tab key). 15. Switch your camera angle (or use E and Q keys) 16. How much health points your soldiers have left (Major hint if you run out of point your soldier dies or could start bleeding out) 17. How much moves/actions you have left (you only get two). Some abilities can allow for you to shoot more than once or have your actions refunded. 18. How much cover your soldier is in. Full cover= full shield, Half cover= half shield, Flanked= shield turns yellow, No cover= blank shield with yellow outline. FYI, Blue is better chance at life, yellow is a crap I got outwitted by an alien, and empty is you either lost your cover due to a grenade or etc. or misclick (at least that better be the reason). 19. How many aliens your soldier sees (note just because you cannot see them does not mean they cannot see you) 20. Open the door, by acting more civilized, aliens will not be alerted and start running to your position. 21. That blue outline says your soldier can move there and will only lose one action point. 22. That yellow outline says your soldier can move there but you will use both action points (so be careful not to misclick) 23. This is an enemy within part, It shows whether or you got the meld, lost it, or that it is still out there. In this example they were able to collect both meld canisters. 24. That is just a opened meld canister so you can get an idea of what to look for. All weapons Soldiers carry a primary weapon, secondary weapon, and an item (two with Tactical Rigging in XCOM: Enemy Within). Primary weapons are a soldier's main source of firepower in combat; they include rifles, sniper rifles, shotguns, and LMGs. Secondary weapons vary; they include pistols, rocket launchers, and a wide range of tactical subsystems available to MEC Troopers that are installed directly to a MEC. On occasion a class ability (such as the Sniper's Headshot or a Heavy's Mayhem) is related to the weapon's technology level. These are, in order: Level 1: Conventional weapons (excluding the Rocket Launcher) Level 2: Beam weapons, Railgun EW, and Rocket Launcher Level 3: Plasma weapons, Alloy Cannon, and Particle Cannon EW Alright here we go here are the weapon stats.

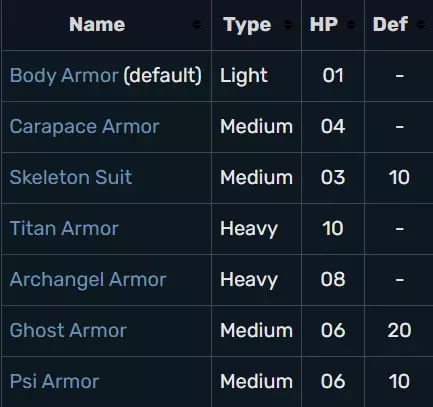
所有护甲 身体护甲供士兵在战斗任务中抵御外星武器和环境危害。所有士兵均可装备身体护甲,但机械化外骨骼士兵(MEC Troopers)除外,他们装备的是机械化外骨骼(MEC suits)。所有身体护甲都会为士兵提供额外生命值。针对这种【护甲生命值】造成的伤害不会导致士兵受伤;只有当士兵在任务中损失部分基础生命值(状态面板中显示的绿色数字)时,才需要恢复时间。此外,士兵可以在物品栏中装备纳米纤维背心、几丁质镀层或呼吸植入体来补充【护甲生命值】。 幽浮:未知敌人 身体护甲 轻型护甲。这是所有XCOM部队的默认身体护甲。增加+1生命值。甲壳甲 中型护甲。增加4点生命值,但无特殊加成。 骷髅服 中型护甲。增加3点生命值和10点防御力,允许穿戴者使用抓钩到达更高的有利位置,并提升3点移动速度。 泰坦甲 重型护甲。提供10点生命值以及火焰和毒素免疫。在《幽浮:内部敌人》中还会获得窒息免疫。 大天使甲 重型护甲。提供8点生命值,允许6次飞行移动。可升级为每次任务12点燃料。《幽浮:内部敌人》中增加了火焰、毒素和窒息免疫。 幽灵甲 中型护甲。允许穿戴者在每次任务中隐形4次,每次持续一整回合(包括幽浮方和敌方回合)。还包含抓钩,提升3点移动速度,增加20点防御力和6点生命值。《幽浮:未知敌人》新增了对火焰、毒素和窒息的免疫效果。 灵能甲 中型护甲。灵能甲是游戏中最后可用的护甲,仅能由拥有灵能能力的士兵装备。提供+6生命值。与游戏内描述相反,它提升20点意志而非30点。此外,该护甲还有隐藏的+10防御加成和+2移动力。
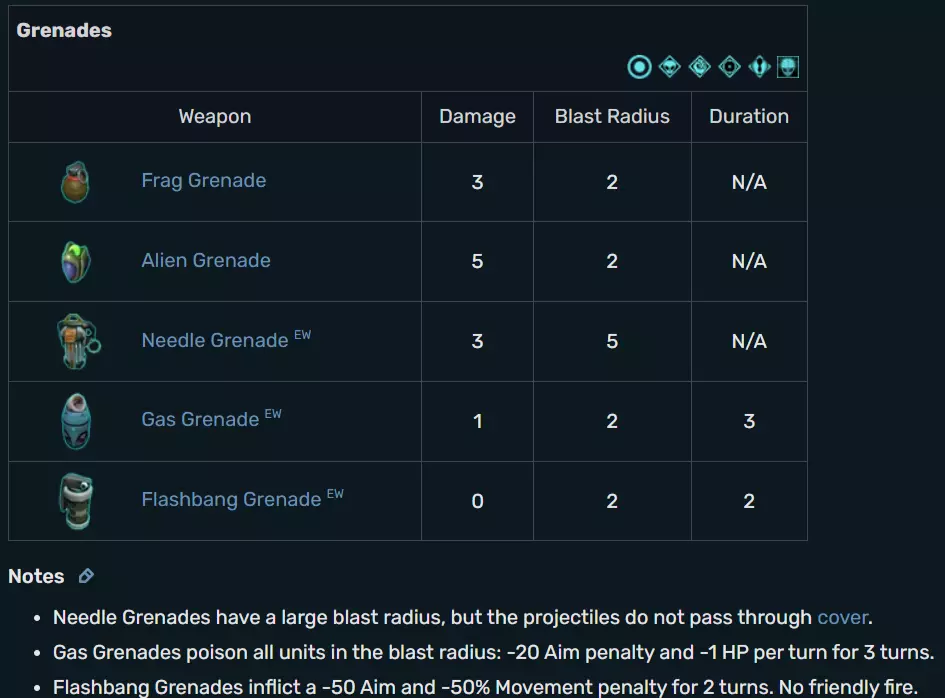
所有物品 在《幽浮:未知敌人》中,士兵可通过额外的装备栏位来装备物品,该栏位是对武器和身体护甲栏位的补充。物品具有多种功能,从提升护甲生命值到治疗等特殊作用。大多数物品在完成特定研究项目后可在工程部门进行生产,许多物品还能通过相关的铸造厂项目获得升级。所有士兵都能装备一件物品。 拥有中士军衔【战场医疗兵】技能的支援兵可以使用医疗包三次;但物品栏仍只需携带一个医疗包。 拥有上尉军衔【掷弹兵】技能的重装机兵在物品栏装备一个手榴弹时,可以使用两个手榴弹。达到少校军衔的支援兵将获得【深口袋】技能,该技能可提供第二个物品栏位,但他们不能装备相同物品的复制品,除了破片手榴弹和外星手榴弹。 在《幽浮:内部敌人》中,玩家可以研究【战术装备】铸造厂项目,为所有士兵提供两个物品栏位,而【深口袋】技能则改为为有限使用物品增加额外使用次数。 在《幽浮:未知敌人》中,士兵可通过额外的装备栏位获得物品,该栏位是对武器和身体护甲栏位的补充。物品具有多种功能,从提升护甲生命值到治疗等特殊作用。大多数物品在完成特定研究项目后可在工程部门进行生产,许多物品还能通过相关铸造厂项目获得升级。 以下是相关物品: 外星 grenade:外星设计的爆炸性武器。对爆炸范围内的所有目标造成5点伤害。 电弧投掷器:用于捕获外星标本进行审讯的专用装置。 甲壳 plating:可与身体护甲结合的防护 plating。增加4点护甲生命值,并减少50%受到的近战伤害。 战斗兴奋剂:能提升士兵表现的强效药物合剂。战斗兴奋剂可在有限时间内提高意志力和移动属性,并减少受到的伤害。 破片 grenade:人类设计的爆炸性武器。对爆炸范围内的所有目标造成3点伤害。医疗包 用于治疗和稳定受伤士兵的医疗设备。每次使用恢复4点生命值。 心灵护盾 专门设计用于抵御敌方灵能攻击的装置。意志力+30。 纳米纤维背心 可与防弹衣结合的防护插件。护甲生命值+2。 瞄准镜(S.C.O.P.E.) 先进的瞄准模块。命中率+10。 幽浮:未知敌人 物品 该扩展包新增了多种可生产物品。 闪光手榴弹 战术武器。使敌人命中率和移动力降低50%,持续2回合。 毒气手榴弹 战术手榴弹。产生持续1-3回合的毒云,每回合造成伤害。 幽灵手榴弹 战术手榴弹。使爆炸范围内所有友方目标获得1回合潜行效果。若进行射击,暴击率额外提升30%。 拟态信标 一种战术手雷,能在2回合内吸引其范围内的外星人。已进入战斗的敌人较难被迷惑。 针形手雷 一种战术手雷,对大型爆炸范围内的所有目标造成3点伤害,但不会破坏掩护。 收割者子弹 特殊子弹,可作用于常规武器,使其暴击率提升20%,但武器的射程惩罚翻倍。 呼吸植入体 一种特殊装置,可提供+2点护甲生命值,并赋予对中毒和窒息的免疫能力。 手雷列表如下:
List of Bonuses and Penalties NOTE: THE CREDIT FOR THIS PART OF THE GUIDE GOES TO THE XCOM WIKI FOR PUTTING THIS LIST TOGETHER. There are various bonuses and penalties that can affect soldiers and enemies in XCOM: Enemy Unknown. Bonuses and Traits ModifierDescription XComEW- Adrenaline Surge:This unit is wounded, triggering an adrenaline surge. (+10 Aim, +10 critical chance) XComEW- Aggression: Units with Aggression receive a +10 bonus to critical hit chance for each enemy in sight (maximum +30). XComEU- Airborne: Flying units can bypass ground obstacles. They can remain in flight if they have sufficient fuel. XComEW- Blood Frenzied: Units frenzied by Blood Call have +10 bonuses to Aim and Will, and a bonus +4 to mobility. XComEW- Bring 'Em On: Enemies in sight! +1 damage on critical hits for each such enemy. XComEW- Combat Drugs: Units in smoke that has been infused with Combat Drugs receive +20 Will and +10 critical chance. XComEW- Combat Pheromones: Receiving bonuses: +10 Aim, +5 critical chance, and +1 movement. XComEW- Combat Stimmed: Units under the influence of Combat Stims are less likely to panic, move faster, and take 50% less damage from all sources. (+40 Will against Panic, +3 movement) XComEW- Council Medal of Honor: +10 Aim and Critical Chance if not within 7 tiles of an allied unit. XComEW- Damn Good Ground: This unit gains +10 Aim and +10 Defense against enemies at lower elevation, in addition to the usual elevation bonuses. XComEW- Dense Smoke: Units in dense smoke receive an additional +20 Defense. XComEW- Distortion Field: Inside an ally's Distortion Field, receiving +10 Defense. XComEU- Elevated Ground: All units receive offensive bonuses against enemies on lower ground. +20 Aim Bonus. XComEU- Evasion:Enemies targeting this unit when it is airborne suffer a -20 Aim penalty. XComEW- Ghost Mode: Stealthed units are much harder for enemies to see, and receive a bonus to their critical chance (requires Ghost Armor/Grenade). XComEW- Greater Mind Merge: Psionically assisting any nearby Sectoids, granting them +25% critical chance and +1 health. XComEW- Hardened: Hardened units receive extra protection against critical hits. Reduces the chance of suffering a critical hit by 60%. XComEW- Hyper-Reactive Pupils: +10 Aim due to previous miss. XComEW- International Service Cross: +2 Aim per continent bonus XCOM has earned. XComEW- International Service Cross: +2 Will per different nationality in the squad. XComEW- Inside Telekinetic Field: Units protected by a Telekinetic Field receive +40 Defense. XComEW- Inspired: Will increased by the inspiration of a psionic ally (+30 for 2 turns). XComEW- Iron Skin: All damage taken is reduced by 25%. XComEW- Low Profile: Units with Low Profile treat partial cover as full. XComEW- Mimetic Skin: Currently concealed from enemy view. Moving in front of enemies again or firing will reveal the unit. XComEW- Mind Control:Using Mind Control allows control of an enemy unit. XComEW- Mind Merge: Psionically assisting an ally, granting the ally an array of stat bonuses. XComEW- Mind Merged-Sectoid: Receiving psionic assistance from an ally, gaining +25 critical chance and +1 health. Mechtoid: Receiving psionic assistance from an ally, gaining a psionic force shield and 50% damage reduction while the shield is up. XComEW- Nearby Leader: The squad leader is nearby, improving this unit's Will. XComEU- Poison Immune: This unit cannot be poisoned. XComEW- Reinforced Armor: All damage taken is reduced by 50%. (Sectopods) XComEU- Resilience: This unit is immune to critical hits. XComEU- Robotic: This unit cannot be affected by fire, poison and most Psionic abilities. XComEW- Running & Gunning: Units under the effect of Run & Gun may fire after Dashing. XComEW- Smoke Coverage: Units in smoke receive +20 Defense. XComEW- Star of Terra: Entire squad receives +5 Will and +5 Defense in battle. Robotic units receive only the Defense bonus. XComEU- Stun Immune: This unit cannot be stunned. XComEW- Tactical Sense: Units with Tactical Sense receive a +5 defensive bonus for each enemy in sight (maximum +20). XComEW- Urban Combat Badge: +5 Aim against enemies in full cover. XComEW- Urban Combat Badge: +5 Defense when in cover. XComEW- Will to Survive: In cover and not flanked; incoming damage is reduced by 2. Penalties ModifierDescription XComEW- Battle Fatigue: This unit has suffered combat wounds, weakening its Will (if the loss is less than 50% of the unit's total health: -5 Will; if more than 50%: -10 Will). XComEW- Catching Breath: This unit is recovering from strangulation, and has -75% mobility and -50 Aim. XComEW- Critically Wounded: Critically wounded units will bleed out after a short time unless Stabilized or Revived by a Medikit. XComEW- Disoriented: This unit was in a Flashbang explosion, suffering -50 Aim and -50% Movement penalties. XComEW- Electropulsed: This unit has been disabled by electropulse. XComEU: Elevated Ground (Penalty): An enemy unit has elevated position and can see this unit. Enemies can see you. XComEW- Fallen Comrades: An ally has fallen, weakening this unit's Will (-5 per death). XComEW- Hallucinating: Units subject to Mindfray suffer penalties to Aim, Will, and mobility. XComEW- Holo-Targeting: Active Marked with Holo-Targeting: easier for all enemies to hit. XComEW- Mind Controlled: Mind Controlled units are under the enemy side's control. XComEW- Panicked: Panicked units have a chance to move or act unpredictably. Possible actions include Hunker Down, shooting at an enemy, or shooting at an ally. They also skip the next turn. (Sometimes though it can work out for you, example below)
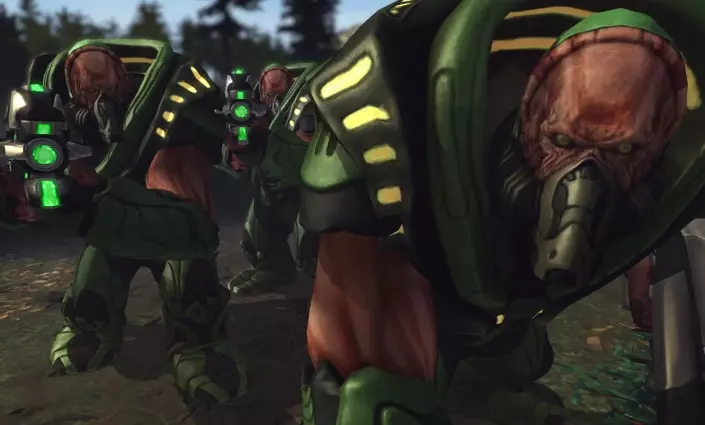
幽浮:未知敌人-裂隙:处于裂隙中的单位在第一回合会受到中等伤害,如果下一回合仍停留在受影响区域则会受到更严重的伤害。高意志力可以减少伤害;低意志力则会使伤害加剧。 幽浮:未知敌人-哨兵模块失效:暴击已损坏哨兵模块的电路。受影响的SHIV将失去由哨兵无人机铸造厂升级带来的生命值再生和近距离反击能力。 幽浮:未知敌人-撕裂:被撕裂火箭击中的单位在4回合内受到所有来源的伤害增加33%。 幽浮:未知敌人-快速射击惩罚:拥有快速射击技能的单位在移动后开火时,狙击步枪射击的命中率会降低20点。(在幽浮:内部敌人中降低10点命中率。)XComEW- 压制:被压制的单位会受到-30的瞄准惩罚,并且在移动时会受到压制者的反应射击。 你将面对的敌人 《幽浮:未知敌人》中有许多敌人,而《幽浮:内部敌人》中则更多。这里我将描述游戏中让你头疼的敌人。我们将先从外星人开始,然后是《内部敌人》玩家会遇到的EXALT。 Sectoid 首先是你的第一个敌人—— Sectoid( Sectoid)

它们在打击士兵的威胁等级中相对较低,但仍是你需要留意的威胁,尤其是在游戏初期。它们装备有等离子手枪。在前三个难度下,它们的命中率为65,在不可能难度下为75。简单和普通难度下的暴击率为0,而经典和不可能难度下的暴击率为10。简单、普通和经典难度下的生命值为3,不可能难度下为4。它们的机动性为12,意志力为10。它们拥有心灵融合和压制这两种能力。心灵融合是指一个 sectoid 可以对视野内的另一个 sectoid(在多人游戏中则是任何单位)使用此能力。该能力能为目标单位在一回合内提供+25暴击率、+25意志力和额外1点生命值。传送单位不会获得加成。若传送单位被击杀,接收单位也会随之消亡(在多人游戏中,若接收单位拥有足够高的生命值,则不会消亡,而是会受到伤害,这点同样适用于机械 Sectoid)。Sectoid 可以与机械 Sectoid 进行心灵融合,为其提供一个灵能护盾,而非通常的加成效果。该能力会在一回合内为接收单位增加5点生命值。若传送的 Sectoid 被击杀,反馈会导致护盾内爆,机械 Sectoid 不会死亡,而是会受到3点伤害。 Sectoid 是游戏中最早出现的敌人。它们的部署概率从4月到7月逐渐降低(如果启用“马拉松”第二波选项,则为4月到10月),不过从6月开始(马拉松模式:8月),会有补充的 sectoid 伴随 mechtoid 出现,这在一定程度上抵消了上述概率降低的影响。sectoid 可部署于大多数任务类型,但不会在恐怖袭击地点任务中出现。 注意:心灵融合往往弊大于利;这意味着会少一个 sectoid 向玩家射击,还可能通过击杀心灵融合的发送者实现双杀,最糟糕的是,这会在战争迷雾中暴露两个 sectoid 的位置,使玩家能轻松瞄准并使用火箭筒等远程爆炸性武器进行攻击。不要急于追求双杀——过度延伸你的单位可能会导致位置薄弱,敌人下回合就会利用这一点。在多人游戏中尤其如此,因为敌人可能会用【心灵融合】两个可牺牲单位来引诱你落入陷阱。 压制是指用子弹(在本作中是等离子)进行弹幕射击以牵制目标,对被压制的单位会触发反击火力,并使其瞄准值降低30点。 瘦人 第二个是瘦人

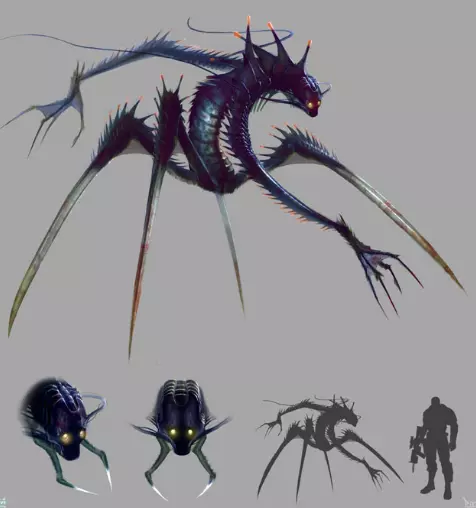
这个又高又瘦的家伙即便是在游戏后期也极度烦人。它们在游戏初期就会出现,并且是议会任务中的常见外星人,即便到了游戏后期也会出现在每个议会任务中。它们装备有轻型等离子步枪。在简单和普通难度下,它们的命中率为65;而在经典和不可能难度下,命中率则为75。简单和普通难度下的暴击率为0,经典和不可能难度下的暴击率为10。生命值方面,简单和普通难度为3,经典难度为4,不可能难度为6。所有难度下的机动性和意志力均为15。它们的技能包括压制、跳跃和毒 spit。对于记忆力不好的玩家,【压制】指的是用大量子弹或本游戏中的等离子体压制目标,使其被压制时会遭受反击火力,并受到30点瞄准惩罚。【飞跃】技能可以无视攀爬限制,让单位能直接跳上任何地方,无需借助管道或梯子等物体。【毒液喷吐】在命中时不会造成基础伤害,而是使目标中毒,中毒单位在接下来的3回合(在《幽浮:未知敌人》资料片《幽浮:内部敌人》中为3-5回合)内每回合减少1点生命值。此外,中毒单位还会受到-20瞄准和-3移动力的惩罚。毒液喷吐会留下一个3x3(目标格及相邻格子)的毒云,持续3回合,任何穿过该区域的士兵和大多数外星单位都会受到影响。对毒素免疫的单位包括:外星单位中的瘦人、 Chrysalid、僵尸,以及所有机械单位(包括赛博碟、无人机、机甲oid、 Sectopod 和搜索者)。人类单位方面,携带医疗包的士兵可获得毒素免疫,且医疗包能治愈其他中毒士兵。泰坦动力甲也能提供免疫,所有型号的S.H.I.V.同样免疫。在《幽浮:内部敌人》中,若士兵装备了天使动力甲、幽灵动力甲、MEC外骨骼或呼吸过滤器植入体,毒素喷吐的效果也会被抵消。当XCOM士兵聚集时,瘦人更有可能使用毒素喷吐以最大化中毒单位数量,但根据个人经验,即使附近没有其他士兵,它们也会对单个士兵使用喷吐。瘦人是整个战役中议会任务的常见敌人。从第二个月(4月)开始,它们可以替代 Sectoid 出现在其他任务类型中,无论游戏是否启用“马拉松”第二波选项。它们在非议会任务中出现的几率在6月和7月期间下降(马拉松模式:8月至10月),到游戏后期几率极低,与 Floaters 和 Seekers 相当。在恐怖任务中不会遇到它们。
第三名是悬浮者。这本质上是狙击手在中后期的目标练习对象。和任何与幽浮相关的事物一样,在游戏前期就应该对它们保持警惕,并且要小心应对。就我个人而言,我会将它们标记为比 Sectoid( sectoid )更高优先级的击杀目标。在简单和普通难度下,悬浮者的命中率为50,而在经典和不可能难度下则为60。它们的暴击率与 Sectoid 和 Thin Man( thin man )相同。它们的意志力和机动性与 Sectoid 相同,并且携带轻型等离子步枪。悬浮者的技能是飞行和投掷,它们还拥有闪避特性。飞行嘛,就是飞行,还需要我多解释吗?现在你需要这些数据了吗?好吧……飞行单位可以越过障碍物,拥有高度优势,这意味着它们对处于较低海拔的目标有+20的命中率加成。其闪避特性使那些瞄准空中漂浮者的单位命中率-20,同时漂浮者获得+20的防御力。【发射】技能允许单位在一回合内移动到战场上的任何位置(注:这会消耗漂浮者的所有行动点,本质上它们可以去任何地方,但直到下一回合才能进行其他行动)。不过,该技能无法在室内使用。漂浮者通常会使用【发射】技能从侧翼包抄你的士兵。 搜索者 在《幽浮:未知敌人》中,我们名单上的第四个敌人是你可能遇到的最令人头疼的敌人之一。
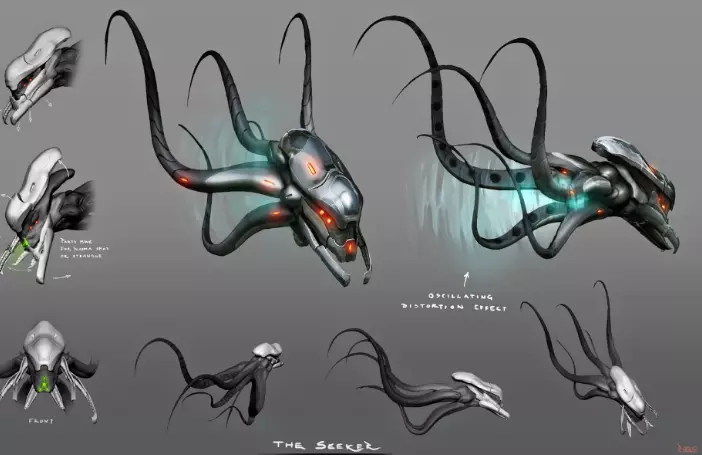
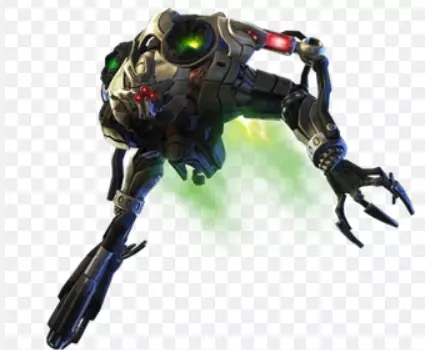
搜索者是一种类似飞行鱿鱼的机器人单位。能够进行【隐形】(持续有限回合数)。搜索者会成对出现,初次被发现时更倾向于逃跑和躲藏,待你的小队与其他敌方单位交战后才会重新出现。尽管是成对触发,但搜索者在很大程度上独立行动(即可以在不同回合发动攻击),并且偏好攻击孤立单位(如拥有【狙击视野】的狙击手)。 搜索者首次出现在第二个月(4月),无论游戏是否启用“马拉松”第二波选项。在接下来的三个月内(马拉松模式:从6月到10月的五个月内),它们的部署概率会逐渐下降,最终维持在与【 Sectoid 】和【 Floater 】相当的低概率水平。搜寻者可部署于大多数任务类型,但不会在恐怖袭击任务中出现。 搜寻者在所有难度下的瞄准值均为65,暴击率与 sectoid 相同。其防御力在简单和普通难度下为10,在经典和传奇难度下为20。生命值方面,简单难度为4,普通和经典难度为5,传奇难度为6。移动力在简单难度下为14,其他难度下为16;武器为等离子手枪。 搜寻者拥有飞行、潜行和绞杀能力。绞杀可对相邻且未被防绞杀护甲、物品或能力保护的人类单位使用。被攻击的士兵将无法执行任何操作,并在被释放前每回合受到伤害;释放后,该士兵会陷入一回合的喘不过气状态。潜行能力会使搜寻者对敌人隐形。它可以在潜行模式下使用触手进行攻击,但必须解除潜行模式才能使用远程攻击或绞杀。搜寻者还具有闪避、机械特性,并且对眩晕免疫。 外来者 敌人5号是外来者
这种敌人仅在UFO任务中出现,通常位于飞船的控制室/指挥室。在游戏后期,它们会逐渐被更具挑战性的敌人取代。它们的瞄准率相当高,简单和普通难度为70,经典难度为80,不可能难度为90。它们的暴击率与之前的外星人相同,生命值在简单/普通难度下为3,经典/不可能难度下为5。所有难度下的移动力均为12,但不可能难度下为17,意志力在所有难度中均为20。【外来者】配备轻型等离子步枪,唯一的技能是压制。 【 Chrysailds 】 这个小东西简直是纯粹的麻烦,在游戏早期/中期极其危险,即使在后期也需要留意。这种会给你和你的士兵带来纯粹创伤后应激障碍(PSTD)的生物是抱脸虫(chryssaild)
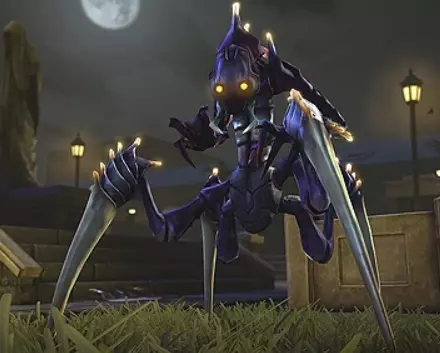
我不是在开玩笑,问问任何资深指挥官就知道,这些东西简直可怕,看看它们的样子就知道了。
太可怕了…… 这些“小”虫子会出现在你的首次恐怖任务中,也会在一些其他任务中出现,比如外星飞船突袭补给舰,但除了恐怖任务外,你不会经常遇到它们。它们的暴击率和之前的其他外星人相同,所有难度下的防御力均为10。它们的机动性最高,为20,意志力120,经典/不可能难度下的伤害修正为+2(简单/普通难度下为0)。生命值为8。 现在,那些刚接触《幽浮》系列的玩家可能想知道为什么这些东西这么可怕,我甚至敢打赌你现在的想法是“是啊,这些看起来有点吓人,但应该没那么糟”,不,它们就是很糟。它们的技能包括跳跃、毒爪和植入。它们的特性包括仅近战、免疫眩晕、硬化和免疫中毒。植入体是我想让你注意的能力,我会通过下方视频向你展示…… 僵尸 如果有留意上一章内容,你就会知道僵尸是如何产生的。对于那些说“我才不会去看那个”的人,我说明一下:当尸骸兽杀死一个人后,1回合后就会形成僵尸。僵尸会在3回合内转化为另一只尸骸兽,因此我建议优先击杀僵尸,因为尸骸兽出现时会获得完整回合。僵尸在简单/普通/经典难度下有10点生命值,在不可能难度下则为14点。暴击率与之前提到的相同(我开始发现规律了……),机动性为8。它们的意志力是120,在经典难度下有+2修正,在不可能难度下有+4修正。值得庆幸的是,僵尸仅能进行近战攻击。最后需要注意的是,它们对眩晕免疫。 穆顿
这个看起来壮实的家伙在游戏后期能快速骚扰玩家,在早/中期也颇具威胁。其瞄准值在简单/普通难度下为70,经典/不可能难度下为80,暴击率与其他单位相同(除非暴击率不同,否则我不会再特别提及),防御力10,生命值在简单/普通难度下为8,经典/不可能难度下为10,机动性12,意志值……10?原以为它们的意志值会更高。它们在游戏早期装备轻型等离子步枪,到中/后期则会配备等离子步枪。此外,它们还携带外星 grenades(手雷),并能进行压制。其技能包括【血腥号召】和【恐吓】。【血腥号召】能激励附近同种族盟友,在2回合内提升其速度、专注力和决心,该技能冷却时间为4回合。【威吓】效果:受伤时,有几率使敌人陷入恐慌。 穆顿首次出现在第三个月(5月),装备轻型等离子步枪;若启用“马拉松”第二波选项,则在6月出现。在经典和不可能难度下,它们会在下个月升级为标准等离子步枪;在简单和普通难度下,则在两个月后升级。它们的部署几率在8月(马拉松模式:12月)开始下降。某些任务,如“弹弓”DLC中的“狐朋狗友”,可能会在其常规部署前暂时引入该敌人。 机甲 Sectoid(Mechtoids)
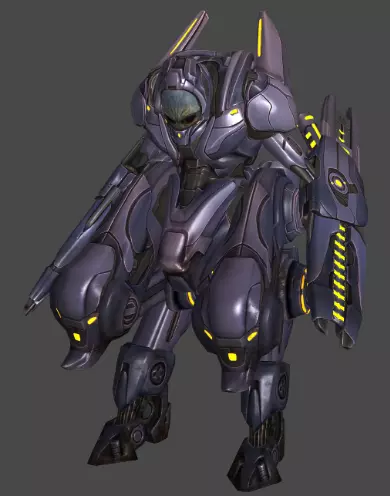
这种外星单位是《幽浮:未知敌人》的资料片【内部敌人】中的敌人,所以只玩《幽浮:未知敌人》的玩家无需担心会遇到它们。 机甲 Sectoid(Mechtoid)的属性如下: - 瞄准率:简单难度60,普通难度70,经典/不可能难度80 - 暴击率:简单和普通难度0,经典/不可能难度15 - 防御力:10 - 生命值:简单难度16,普通难度20,经典难度22,不可能难度24 - 意志力:高达0 - 伤害修正:简单难度-1,普通难度0,经典难度+2,不可能难度+4 机甲 Sectoid 是穿着机甲的 Sectoid。它是一个机器人单位,装备有双等离子迷你炮,如果不移动,一回合可以攻击两次。机甲 Sectoid 不会利用掩护,但拥有较高的生命值(普通难度下20 HP)。sectoid可以与mechtoid进行心灵融合,并为其提供一个拥有6点生命值的灵能护盾。只要护盾存在,mechtoid受到的伤害就会减半;足够的伤害可以打破灵能护盾。杀死进行融合的sectoid会取消护盾,并对被链接的mechtoid造成3点伤害。mechtoid在战斗中使用新型等离子迷你加农炮。这些武器在普通难度下基础伤害为6-8点,简单难度下伤害-1,经典难度下伤害+2,不可能难度下伤害+4。与赛博碟和 Sectopod类似,这些集成武器无法被缴获,并且在mechtoid被摧毁时一同被破坏。机械oid的特性包括硬化、眩晕免疫、机器人,拥有等离子弹幕(未移动时可射击两次)和灵能护盾(当 Sectoid 建立灵能链接时获得减伤护盾)的能力。 机械oid首次出现在第四个月(六月),若启用“马拉松”第二波选项则为八月。首月任务中限制出现一只(不适用于不可能难度),其在七月至九月最为常见(马拉松模式:2015年十月至2016年三月)。十月(马拉松模式:2016年四月)后生成概率下降。机械oid可部署于多种任务类型,但不会在恐怖任务中出现。 赛博碟
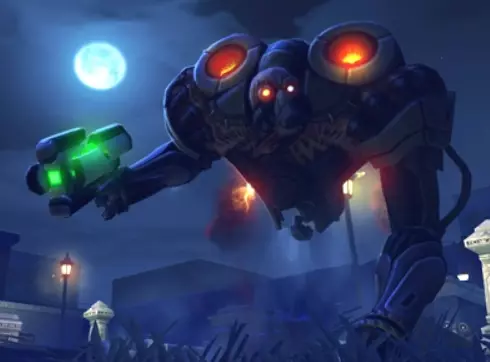
赛博碟机在简单/普通难度下的瞄准值为70,经典/不可能难度下为80;防御力10;生命值在简单/普通难度下为16,经典/不可能难度下为20;机动性18;意志力0。有个小知识想插一句,你知道这些东西有小型汽车那么大吗?好了回到指南…… 对于毫无准备的玩家来说,赛博碟机的外观可能会让人感到非常不安。当小队缺乏像光束武器这样的火力时,要击落赛博碟机是很困难的,这不仅是因为它的高生命值,还因为无人机在修复赛博碟机。此外,赛博碟机使用一种非常强大的光束武器,能一击消灭没有良好护甲的士兵。赛博碟的能力包括飞行、轰炸(可投掷手榴弹至远距离)和死亡绽放(从闭合状态释放强烈能量场,对所有附近敌人造成伤害,冷却时间3回合)。其特性为闪避、硬化、眩晕免疫和机械。 赛博碟首次出现在第四个月(6月),若启用“马拉松”第二波选项则为8月。仅首月任务中限制每次出现1个(不适用于不可能难度或恐怖袭击任务,在这些任务中根据月份,所有敌方集群都可能是赛博碟)。随着新敌方单位的引入,其部署概率在接下来的两个月内(马拉松模式:10月至12月)逐渐下降。如果启用了【弹弓】DLC,在【跳板】任务中会有一个或多个【赛博碟】向玩家部署。假设DLC尽早启动,那么在相当长的一段时间内将不会再出现赛博碟。

无人机
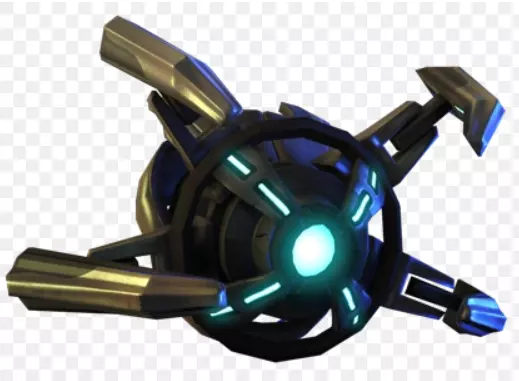
无人机在简单/普通难度下瞄准值为60,经典/不可能难度下为70;防御力为10;生命值在简单/普通难度下为3,经典难度下为5,不可能难度下为7;机动性为12。无人机是小型悬浮球形机器人,常被看到护送赛博碟和 Sectopods。由于生命值低且远程攻击较弱(基础伤害2点),无人机通常不会构成太大直接威胁;但它们能够为所护送的机械单位修复3点生命值,这可能会延长这些重型单位造成的威胁。此外,无人机因其基础+10防御力而具有一定的骚扰能力,它们通常还会利用飞行能力进一步提升生存,这使得它们比地面单位更难被瞄准,同时能够获得对软目标的视野,例如在恐怖事件任务中的受伤单位或平民。无人机总会出现在外星基地突袭中,但如果在第二个月进行突袭,它们将不会伴随任何外星机器人单位。无人机的能力包括:空中移动、过载(使自身动力源过载,摧毁自身但造成类似手榴弹的爆炸伤害,大致就像光环播报员的声音:自毁),以及修复(为机器人单位恢复3点生命值,可多次使用)。无人机的特性包括闪避、硬化、眩晕免疫和机械。无人机无法像有机单位那样被完整捕获并送回XCOM总部。不过,完成“无人机捕获”铸造厂项目后,可以使用电弧投掷器对其进行黑客入侵,并在任务期间控制它。被捕获的无人机可用于修理SHIV和MEC,或攻击外星人,若能在成功的任务结束时存活,它将自毁。狂战士
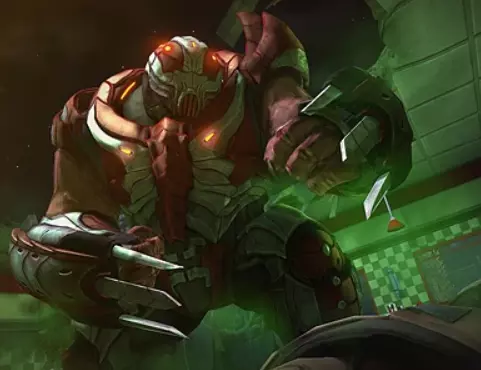
狂战士是一种纯近战敌人,其属性如下:简单/普通/经典难度下,命中率60、防御力20、生命值20;不可能难度下生命值为25。它的机动性为17,意志力80,经典难度下伤害修正+1,不可能难度下+3。狂战士体型比普通穆顿更大,装甲也更厚重。作为纯近战攻击者,狂战士依靠其较高的生命值、防御力和移动速度来拉近与敌人的距离,其意志力也高于基础穆顿。狂战士拥有【公牛冲锋】能力,可向目标冲锋并摧毁路径上的一切。狂战士通常与一到两名普通穆顿一同出现。这种组合能让穆顿在狂战士推进时提供掩护或压制火力,并利用其【血之呼唤】能力进一步提升狂战士的移动范围。狂战士的能力包括【威吓】(能把意志低下的士兵吓得屁滚尿流)、【嗜血】(每当有人击中狂战士,它就会向该目标移动)以及【公牛冲撞】(直线冲破掩体,发动毁灭性的近战攻击)。这种外星人的特性为【仅近战】和【硬化皮肤】。 狂战士首次出现在第五个月(7月),若启用“马拉松”第二波选项则为10月。仅在首个月的任务中限制每次出现1名狂战士(不适用于 Impossible 难度和外星基地突袭任务)。随着新敌方单位的引入,它们在接下来三个月内被部署的几率会下降(马拉松模式:五个月,从2015年12月至2016年4月)。穆顿精英
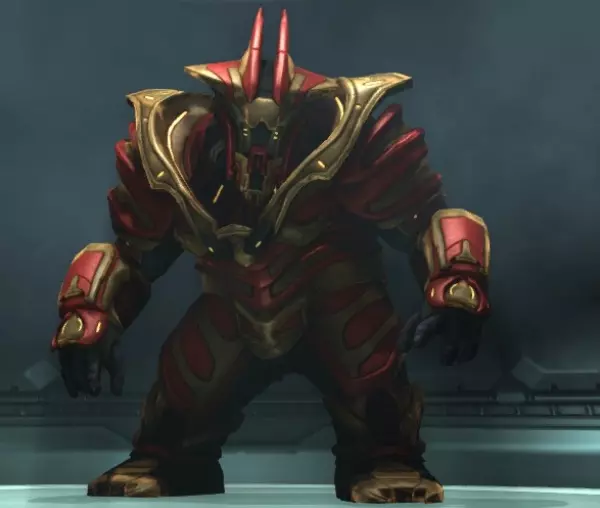
穆顿精英的命中率在简单/普通难度为80,经典难度为90,不可能难度为100;防御力在简单/普通难度为20,经典/不可能难度为30;生命值在除不可能难度外的所有难度均为14(不可能难度为18),【幽浮:未知敌人】中的数据为简单/普通难度14,经典难度18,不可能难度20;意志力为20。穆顿精英在外观和生理结构上与标准穆顿相似,但相似之处仅此而已。穆顿精英身体更强壮,配备更厚重且更具威严的装甲和重型等离子炮;与普通穆顿相比,精英通常表现出更高的智能和协作能力。穆顿精英是聪明且强大的小队战士,不太可能被轻易击败。穆顿精英主要承担护卫职责,通常会保护外星部队中任何在场的以太族。凭借其出色的身心能力,穆顿精英是一股不容小觑的力量,面对这种敌人时应采取极端措施。它们拥有压制和轰炸能力。 穆顿精英首次出现在第七个月(9月),如果启用了“马拉松”第二波选项,则会在2016年2月出现。在它们登场后,在外星绑架事件和两种UFO任务中都很常见,但不会出现在恐怖站点任务中。 重型悬浮怪
重型悬浮兵的瞄准值在简单/普通难度下为70,经典/不可能难度下为80;防御力10;生命值在简单/普通难度下为12,经典难度下为14,不可能难度下为16;意志力25。重型悬浮兵是悬浮兵的高级版本,拥有升级的武器和更厚重的装甲。它比标准悬浮兵单位更精准,生命值是后者的三倍。额外的装甲和武器并未降低重型悬浮兵的机动性,其跳跃喷射器现在呈绿色发光,似乎更加强大。它的上臂有支架,似乎有助于其使用等离子步枪,尤其是它似乎总是单手发射该等离子步枪。不过,重型悬浮兵的精准度有净提升,这显然是由于它戴着类似夜视镜的头盔。重型悬浮体拥有发射、闪避、空中和轰炸能力。 重型悬浮体首次出现在第六个月(八月),若启用“马拉松”第二波选项则为十二月。其部署概率在接下来的两个月内下降(马拉松模式:2016年2月至4月的三个月内),降至与狂战士相当的水平。 指挥官 Sectoid

指挥官 Sectoid 是一种电子战外星人。其属性如下:简单/普通难度下瞄准值为85,经典/不可能难度下为95;防御力20;简单/普通难度生命值10,经典/不可能难度14;机动性12;意志值在简单/普通难度为90,经典难度115,不可能难度125。尽管它们看起来与较弱的同类相似,但 Sectoid 指挥官拥有更大的头部,上面布满粗大的血管,还有发光的红色眼睛。和 Sectoid 一样,它们都是基因相同的克隆体,但经过改造后拥有更强的耐力和惊人的灵能。虽然这些天赋使它们比自己指挥的低阶部队致命得多,但它们最终仍然不过是 Ethereals 的顺从爪牙。其主要攻击方式包括以下技能:心灵冲击(对目标造成5点伤害,并施加瞄准、意志和机动性惩罚。机械敌人免疫此效果。持续2回合,冷却1回合)、高级心灵融合(与附近所有同种族的低级友军进行心灵融合,为他们提供25%暴击率、+25意志和+1生命值)、心灵控制(难度极高的灵能技能,若成功,可控制目标3回合。机械敌人免疫此效果),以及灵能恐慌(若目标意志被压制,将使其在下一回合陷入恐慌状态。机械敌人免疫此效果,冷却2回合)。 Sectoid Commander首次出现在德国的教程任务中,它会使用心灵控制迫使一名德国士兵攻击XCOM突击小队。在【外星基地突袭】任务前,战斗中不会遇到它们。在此之后,【 Sectoid 指挥官】会出现在外星 UFO 的舰桥上,取代【 Outsider 】。它们可能单独出现,也可能以小群体形式出现。【 Overseer 坠机点】任务完成后,它们会被【 Ethereal 】取代。在【幽浮:未知敌人】的资料片【内部敌人】中,它们再次变得更为常见,因为现在可以在【绑架任务】中发现它们,为多个【 Mechtoid 】提供【心灵护盾】——不过这同样只有在【外星基地突袭】任务之后才有可能发生。 【 Sectopod 】
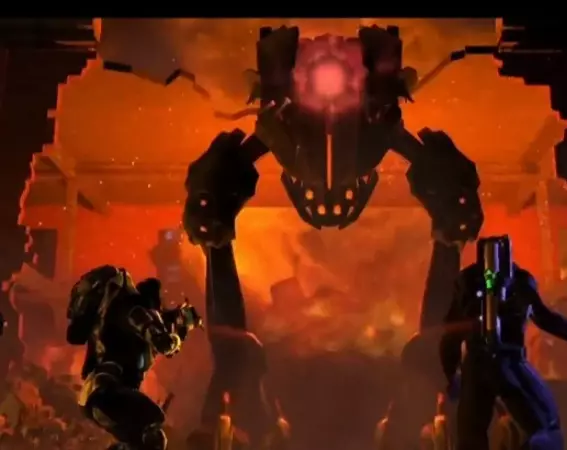
对于任何《幽浮》系列老手来说,有一种类似创伤后应激障碍的情况—— Sectopod( Sectopod)拥有简单/普通难度下80、经典/不可能难度下90的命中率,30点防御力,30点生命值以及12点移动力。Sectopod是一种极其危险的机械敌人。它通常在战役进行约六个月后(一般在研发出重型等离子武器之后)出现,并且通常伴有两到三个无人机。它常见于较大型的外星飞船上以及游戏后期的恐怖袭击地点任务中。Sectopod的主要威胁来自其极高的生命值以及它的加农炮射击能力,该能力允许它在一回合内发动多次毁灭性攻击。虽然需要极其强大的武器才能可靠地消灭Sectopod,但这些致命的机器绝对不是不可战胜的。在《幽浮:内部敌人》中, Sectopod( Sectopod)受到所有来源的伤害减少50%,这实际上使其生命值翻倍,同时也使任何护航无人机的修复量翻倍。再加上HEAT弹药对机械单位的加成从100%降低到50%,这使得它们成为游戏中最重大的威胁之一。本文中列出的许多策略是在《幽浮:内部敌人》发布之前制定的,因此不会按指定方式生效,必须进行修改才能有效对抗具有新特性的Sectopod。在多人游戏中,无法选择Sectopod加入你的小队。Sectopod拥有集束炸弹能力(标记一个大面积区域,一回合后,用一连串爆炸性小型炸弹饱和轰炸该区域)。以及加农炮射击(光束攻击,造成高额伤害并获得免费的【守望】状态。如果 Sectopod 不移动,加农炮射击可以使用两次(针对不同敌人)。它们的特性包括:硬化、眩晕免疫、机械、强化装甲(所有受到的伤害减少50%,受到的伤害向上取整为最接近的整数)。 Sectopod 首次出现在第七个月(9月),如果启用“马拉松”第二波选项,则出现在2016年2月。在其首次出现的月份,每个任务限制出现1个,之后每个任务限制出现2个;但有玩家报告在普通模式下单个任务中出现过多达4个 Sectopod。这些部署限制似乎不适用于不可能难度。在不可能难度的恐怖事件遗址任务后期月份,所有五个敌方 pods 都可能是 Sectopod( Sectopod)。Sectopod( Sectopod)可部署于多种任务类型,包括恐怖事件遗址、大型 UFO 着陆点和坠毁点,但不会在绑架任务中出现。监察者坠毁点任务至少会出现一个 Sectopod( Sectopod),即使你尚未到达 9 月份。 Ethereal( Ethereal)
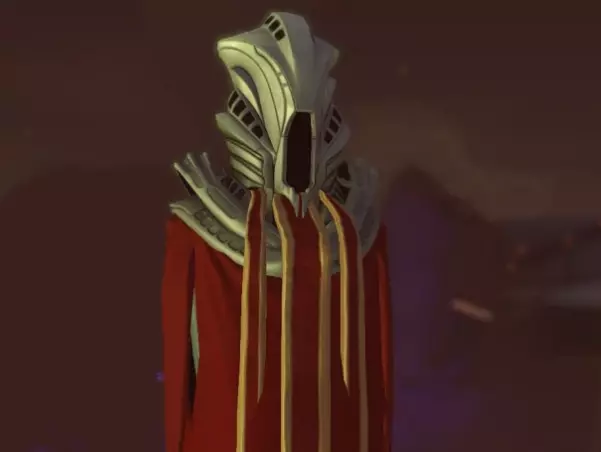
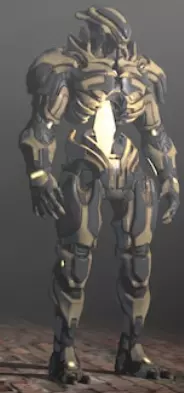
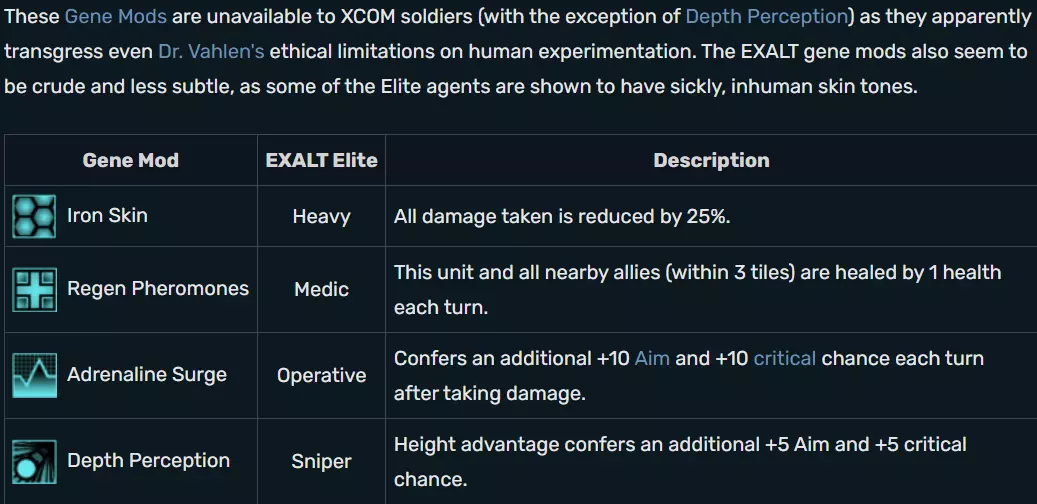
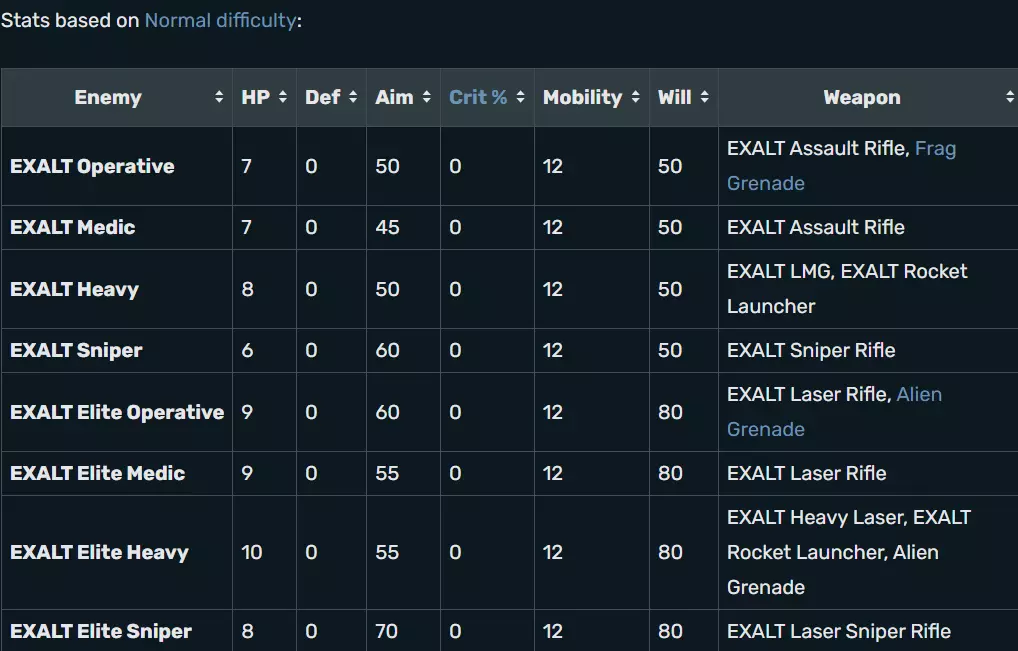
Ethereals have 100 aim for easy/normal and 110 aim for classic/impossible; 40 defense; 20 health for all difficulties except for impossible where they have 25; 12 mobility; and 120 will for easy/normal, 145 will for classic, and 155 will for impossible. he Ethereals are the psionically gifted, yet physically frail leaders of the alien invasion. Possibly due to extreme age or the energy requirements of their overdeveloped brains, their bodies have atrophied to an alarming degree. Some of their organs are underdeveloped and some sensory organs are not working at all. Despite being physically infirm, they are extremely resilient in combat and their devastating mental abilities can wipe out an entire XCOM squad in short order. The Ethereals used a combination of mind control and forced evolution to subjugate and mold the numerous races that comprise the alien invasion. Many of the races that XCOM faces were uplifted by the Ethereals and experimented on in order to create superior beings. Ultimately, they were all deemed failures and now serve as shock troops for subsequent invasions. The only way Ethereals fight is with their abilities which are mindfray (Causes the target to lose grip on reality, inflicting penalties to Aim, Will, and mobility, and doing 5 base damage. Robotic units are immune. Lasts 2 turns, 1 turn cooldown.), rift (Devastate an area with a storm of psi energy. The rift does more damage against targets with low Will, and reduced damage against target with high Will. 4 turn cooldown.), psi lance (Project a bolt of pure psi force at an enemy.), mind control (Very difficult psi technique that, if successful, grants control of the target for 3 turns. Does not work on robotic enemies. 5 turn cooldown.), and psi drain (Drain health from an ally.) They also have the hardened trait. The first Ethereal is encountered during the Overseer Crash Site mission; if playing XCOM: Enemy Within, it is possible to encounter an Ethereal first during the XCOM Base Defense mission instead. Ethereals replace Sectoid Commanders on any UFO Crash Site or UFO Landing Site mission thereafter. Ethereals are typically accompanied by one or more Muton Elite. Exalt: Who the heck are these guys EXALT is a secret human paramilitary society determined to seize power while the governments of Earth are distracted with resisting the alien invasion in 2015.They are the new enemy faction introduced in XCOM: Enemy Within. They conduct operations targeting XCOM starting in May (the 3rd month of the invasion). While not allied with the aliens, EXALT harbor transhumanist ideals and sympathize with the aliens' effort to evolve the human species; where others fear or resist the alien invasion, EXALT see it as their opportunity to acquire the resources they need to seize power. So, like XCOM, EXALT is operating in the shadows and endeavoring to recover alien technology and develop sophisticated human genetic modification protocols, but unlike XCOM, their ultimate goal is to establish a world government under their control. EXALT works to disrupt XCOM's activities as they see XCOM as a rival in the acquisition of alien technology and an impediment to the aliens' human experimentation. To this end, EXALT sets up sleeper cells in Council nations around the world; the cell's hidden presence magnifies the effects of any panic the country may receive. Furthermore a cell can go active, performing one of three different EXALT Operations against XCOM: Sabotage, steals funding from XCOM; Propaganda, increases panic in the country where the cell is located; or a Research Hack, reverses progress on the project currently being researched. In addition to the strategic threat posed by EXALT, the organization's paramilitary agents present a very real tactical threat during Covert Operations. The following EXALT soldiers may be encountered in the field: EXALT Operative, EXALT Medic, EXALT Heavy, and EXALT Sniper.When first encountered, EXALT forces utilize conventional weapons that equal those of XCOM. In fact, EXALT weapons retain the same stats as their XCOM equivalents despite their visual differences; EXALT small arms are dark-colored, sleek or angular, and have elements reminiscent of modern real world (mixed western-european) firearms. As the game progresses, XCOM will encounter Elite soldiers who wear armor and utilize laser weapons and equipment that is also on par with XCOM's technology. Although EXALT weapons have completely the same stats in game mechanics as the XCOM counterparts, they tend to fire in a visually different way like performing a different burst of fire in numbers of shots. This is purely cosmetic. EXALT weapons can be recovered after a mission to be used by XCOM soldiers or can be sold via the Gray Market. Council members may request a stock of EXALT weapons in return for a larger cash bonus than would be received from a normal sale, similar to requests for pieces of alien technology. Exalt soldiers
关于这些家伙没什么好说的,它们不过是《幽浮》的廉价仿制品。
隐秘行动 开发中 新兵 注:由于本人较懒且已花费大量时间整理,本指南的这部分内容均为Rensje的作品,其创作功劳归Rensje所有。 每个加入XCOM计划的士兵最初都只是一名新兵。他们仅配备基础突击步枪和一枚破片手榴弹,这些缺乏经验的新兵若想存活,就必须机智且谨慎。新手属性 难度:简单/普通/经典/不可能 生命值:6/5/4/3 瞄准:65/65/65/65 意志力:40/40/40/40 防御力:0/0/0/0 【意志力】每提升一级增加1-6+2,若拥有钢铁意志 perk,则额外增加1-4+2 【注】若在新游戏开始时选择第二波 modifier“众生平等”,则本表格信息不适用 推荐背包物品 纳米纤维背心【生命值+2】/甲壳 plating【生命值+4,受到的近战伤害降低50%】 S.C.O.P.E.【瞄准+10】 破片手榴弹 医疗包【若小队缺乏专职支援单位】 确保新手存活应始终是你的首要任务。即使他们在任务过程中一枪未发,只要参与成功的任务,仍会获得经验值并最终提升等级。为此,给新兵配备纳米纤维背心或许是最佳选择。它可能无法让新兵免于致命一击,但初期+2的生命值加成很容易就能决定受伤和死亡的区别。 如果你更喜欢进攻型玩法,给新兵配备瞄准镜来提升他们的命中率是个不错的主意。你早期遇到的 sectoid 在处于高掩护或距离较远时很难被击中。 或者,给新兵配备破片手榴弹能让早期任务的生存难度大幅降低。新兵的瞄准能力可能较差,但投掷手榴弹却很在行。用手榴弹摧毁外星人的掩护或直接消灭他们,这是个可靠的战术,但别指望博士瓦伦对此表示欣慰:“你或许应该指示你的士兵在使用爆炸物时保持克制。虽然爆炸物在消灭外星人方面确实有效,但它们也会破坏我们希望从外星人尸体上回收的 artifacts(物品)。这只是一点需要考虑的事情。” 只有当你的小队没有支援士兵时,才给新兵配备医疗包。把医疗包给其他任何士兵都会浪费他们宝贵的物品栏位,降低他们的作战效率。 突击职业 注:由于我比较懒,而且已经花了足够多的时间整理这些内容,所以这部分的大部分内容都是 Rensje 的成果,感谢他们撰写了这部分内容。
The aggressive Assault class is great for recon, flanking, blitz tactics and capturing aliens alive with the Arc Thrower. They are not as durable as the Heavy, but their nimbleness paired with their defensive abilities keeps them alive even if they get caught in alien crossfire. Though they prefer the shotgun, an Assault soldier can also carry assault rifles into battle. ASSAULT STATS RankHealthAim Squaddie+1+5 Corporal+0+3 Sergeant+1+3 Lieutenant+0+3 Captain+1+3 Major+0+3 Colonel+1+4 * The information in this table does not apply if the Second Wave modifier Hidden Potential is selected upon starting a new game ASSAULT ABILITIES RankAbility Squaddie: Run & Gun Allows firing or Overwatch after dashing on the turn Run & Gun is activated. 2 turn cooldown. Corporal:Tactical Sense Confers +5 defense per enemy in sight (max +20). Aggression Confers +10% critical chance per enemy in sight (max +30%). Sergeant:Lightning Reflexes Forces the first reaction shot against this unit each turn to miss. Close & Personal first standard shot made within 4 tiles costs no action, however it doesn't stack with Run & Gun. Lieutenant:Flush Fire a shot that causes enemies to run out of cover. The shot is easy to hit with, but does reduced damage. Rapid Fire Take two shots against a single target in quick succession. Each shot carries a -15 penalty to Aim. Captain:Close Combat Specialist Confers a reaction shot against any enemy who closes to within 4 tiles. Does not require Overwatch. Bring ‘Em On Adds 1 damage on critical hits for each enemy the squad can see (up to 5). Major:Extra Conditioning Confers bonus health based on which type of armor is equipped. Heavier armor increases the bonus. Colonel:Resilience Confers immunity to critical hits. Killer Instinct Activating Run & Gun now also grants +50% critical damage for the rest of the turn. Squaddie: Run & Gun - every Assault promoted from rookie status acquires the Run & Gun ability, and it is awesome. Being able to fire (even Rapid Fire!) after dashing really helps when trying to flank an enemy, and it's also great for closing the distance on enemies that are hard to reach otherwise. Corporal: Tactical Sense - Although Aggression is nice, Assaults generally have plenty of crit chance as it is, especially when flanking or attacking from stealth with Ghost Armor. Also, to reach Aggression's full potential the Assault has to be within line of sight of three aliens, which can be very dangerous indeed. Being front-line fighters, Assaults need all the extra defense they can get, especially on higher difficulties where aliens receive bonuses to Aim. This makes Tactical Sense a much better choice. Be advised that Tactical Sense has no effect against melee enemies such as Chryssalids. Sergeant: Lightning Reflexes - Lightning Reflexes is one of the best abilities here. With it you can force an enemy in Overwatch to waste its reaction shot on you without taking any damage. This in turn allows cornered squadmates to retreat to safety. The importance of Lightning Reflexes' many possible applications cannot be overstated. Close & Personal is a one of my personal favorites and has helped out in situations when you can land a double kill and help open up the field more. Lieutenant: Rapid Fire - Rapid Fire is great in tandem with Run & Gun; run straight up to the enemy and blast them in the face twice at point-blank range. The damage potential is huge, and at short distances the -15 penalty to Aim is negligible. By itself, Flush does terrible damage compared to Rapid Fire. It has some situational uses, such as forcing a well-fortified enemy out of cover while the rest of your squad is on Overwatch, but chances are good said alien will just take cover somewhere else straight away. Captain: Close Combat Specialist - Close Combat Specialist will save your hide on terror missions, when you are surrounded by Chryssalids and Muton Berserkers. You can even trick Berserkers into charging you by shooting them from a distance; if they close to within 4 tiles you get a shot at them for free. This ability is must personally it has saved my squad so many times even when it is mixed with mimetic skin which can be annoying at times but the benefits of both tend to outweigh the consequences. Bring 'Em On is a solid choice for the more offensive Assault, especially if you went with Close & Personal at sergeant rank. The enemies don't even have to be in the Assault's direct line of sight for the damage bonus to work, making this a potentially powerful offensive ability. Major: Extra Conditioning - all Assaults that attain major rank gain Extra Conditioning. Have your Assault wear either Archangel or Titan Armor for the full +4 bonus to Health. Ghost Armor will give you +2 Health with this ability. Colonel: Resilience - no matter how careful you are, at some point your Assault is going to get shot. At higher difficulties, chances an alien will score a crit against you increase dramatically. Resilience makes the Assault immune to critical hits, even when flanked. Take this ability and never look back. However, if you went with Close & Personal and Bring 'Em On before, you have to take Killer Instinct here. If you use Run & Gun to dash right up to the enemy and then Rapid Fire at point-blank range, this deadly combination of abilities pretty much guarantees two critical hits at 150% damage, plus 1 damage for each enemy your squad can see. That's about 15-25 damage per shot with an Alloy Cannon. Boom. RECOMMENDED BACKPACK ITEMS Nano-Fiber Vest [Health +2] / Chitin Plating [Health +4, melee damage taken reduced by 50%] Arc Thrower Combat Stims [Will +40, Mobility +3, 50% damage reduction and crit immunity for 2 turns] Assault troops usually fight in the vanguard, exposing them to enemy fire. Good defense is a necessity and because of this, equipping your Assault with either a Nano-Fiber Vest or Chitin Plating is a must. Chitin Plating is an absolute no-brainer on terror missions and will help you deal with those pesky Chryssalids. Of course, you will have to kill one before you can make any. The Assault's close proximity to the enemy makes them ideal candidates for carrying the Arc Thrower into battle. Be advised that the Arc Thrower isn't considered a weapon and therefore cannot be used with the Run & Gun ability. Soften enemies up from a distance and rush in with the Assault to take them in for 'questioning'. Combat Stims are another great choice for Assaults to carry, especially for those that prefer offensive abilities. Note that using it ends the Assault's turn. For those with EW the recommended gene mods will be in the next chapter... Recommended Assault gene modifications NOTE: BECAUSE I AM LAZY AND HAVE A LOT TIME WRITING THIS, ALL OF THE CREDIT FOR WRITING THIS PART OF THE SECTION GOES TO Hellbilly. The skill builds may vary but the Assault has two distinct specialities. First, they are the very best at close-quarters combat with the Shotgun, Close Quarters Specialist and Close and Personal. Secondly, they are excellent frontline troopers; the best at scouting ahead and flanking the enemy with Run and Gun. The Assault excels at fighting; whether offensive or defensive. They have several skills you can take to improve their survivability such as Tactical Sense, Lightning Reflexes, Extra Conditioning and Resilience. This means they are more difficult to kill and thus, mods won't be wasted. The Assault enjoys the highest priority since he benefits the most from gene mods. - Suggested Mods - Neural Damping The Assault is one of the most lethal soldiers in your squad, especially when armed with a shotgun. For this reason, Neural Damping is the best since you do not want your Assault, under any circumstance, to be mind-controlled and be made to wreak havoc on the rest of your squad. The immunity to panic and the additional will also greatly helps Assaults with low will. Hyper Reactive Pupils + Rapid Fire + Close and Personal + Close Combat Specialist The best choice in almost all cases. The Assault's Rapid Fire immediately benefits from this mod if the first shot misses. Free shots like Close and Personal and Close Combat Specialist can turn a miss into an added benefit. Mimetic Skin This gene mod really fits the Assault's playstyle. Since the Assault is the first to scout ahead, this mod allows him to do so safely. The Assault is one of the best classes to modify with Mimetic Skin since Run and Gun opens up a lot of options. The Assault can, for example, move to Heavy Cover, spot the enemy, take Combat Drugs while the rest of the squad engages the enemy. Then, in the next turn, storm the "safe" enemy positions with a devastating flanking attack with Run and Gun. Warning: This mod conflicts with Close Combat Specialist. If an alien moves too close to the Assault, he will fire and come out of the invisibility from Mimetic Skin. This will make him vulnerable to follow-up attacks from aliens who haven't moved yet. Secondary Heart These mods synergize well with the Assault's skills and give a boost to his innate survivability. The Assault can make great use of the Adaptive Bone Marrow with the high base health he can acquire from Armor and Extra Conditioning. The Resilience skill prevents sudden spikes in damage from critical hits. All these combine to make damage much more manageable and allows the Assault to soak up a bit of damage (if necessary) and always be in a state or combat readiness - if given some time to heal. The Secondary Heart goes well with this set-up. It eliminates the will penalty from the critical wounds Assaults tend to receive regularly. Having your Assault live on only his base health is also very risky. Worst case scenario? At least the Secondary Heart allows you to stabilize your Assault instead of death. The Adaptive Bone Marrow (with Rapid Recovery) will help your Assault recover in time for the next mission should that happen. If your Support has Revive then that's a great combo too, since the Assault can heal up to full base health by himself. Muscle Fiber Density The Assault excels in making bold, aggressive movements in the battlefield thanks to Run and Gun. Run and Gun allows the Assault to quickly take advantage of terrain to get flanking shots on the enemy. Muscle Fiber Density greatly improves his range of movement making flanking easier or, if flanking is not possible, take advantage of high ground for the added aim bonus. This is great on Riflemen Assaults. - Situational Mods - Neural Feedback - Preventing your Assault from being mind-controlled is top priority so Neural Damping is the safer bet. However, there are instances when Neural Feedback is an acceptable choice. If your Assault has exceptionally high will, whether from the Iron Will upgrade, medals or items like Mind Shield, Neural Feedback makes sense because your Assault may resist the psi attack and deal a lot of damage in return. Depth Perception - This mod makes sense only if you took Muscle Fiber Density or armor with a grappling hook. Even then, the situations when the high ground really matters are few and far between. This mod is useless on Shotgun Specialists who need to be right next to the enemy anyway. Adrenal Neurosympathy - If you don't care for the Secondary Heart, this mod is best on Assaults since they have the killing power to trigger Combat Rush for their squadmates. However, here are some things to consider. Shotgun Specialists may not be the best for this mod for two reasons; first, they tend to fight deep into the enemy positions and their squadmates may not have line of sight on the Assault to receive the Combat Rush buff. Secondly, the added aim from Combat Rush is moot in close quarters and the critical chance isn't that powerful since the shotgun already has a high critical chance, not to mention flanking bonuses. Riflemen Assaults perform spectacularly with Combat Rush. The added aim, critical chance and movement from Combat Rush fit their aggressive playstyle perfectly. The real question is whether the Assault should give up the Secondary Heart to carry this mod or just have another squadmate carry this mod since it's really only Combat Rush that matters. You decide. Bioelectric Skin - Look, we all know Mimetic Skin is awesome but sometimes, Mimetic Skin is too costly or, for one reason or another, not an option. In which case, Bioelectric Skin also works best on the Assault since the Assault often does the scouting anyway. Shotgun Specialists benefit from this mod since it's usually them who stack up behind a doorway before breaching a room. Bioelectric Skin can detect the threats and their positions before storming them. The immunity from strangulation is also a bonus since Shotgun Specialists are good at Seeker-peeling duties. Sniper class NOTE: BECAUSE I AM LAZY AND ALREADY SPENT ENOUGH TIME PUTTING THIS TOGETHER THIS PART OF THE GUIDE IS ALL Rensje's WORK AND THE CREDIT GOES TO THEM FOR WRITING THIS.
Snipers are the most terrifying addition to any XCOM squad. They can kill without being seen, or disable enemy weapons from a distance. Scaling buildings or taking to the skies in Archangel Armor to find that perfect vantage point, they oversee the entire mission area. Your whole squad will rest easy knowing that their Sniper is up there somewhere, looking out for them. SNIPER STATS RankHealthAim Squaddie+0+10 Corporal+1+3 Sergeant+0+3 Lieutenant+1+3 Captain+0+4 Major+1+7 Colonel+0+10 * The information in this table does not apply if the Second Wave modifier Hidden Potential is selected upon starting a new game SNIPER ABILITIES RankAbility SquaddieHeadshot Fire a shot with +30% critical chance and extra damage on critical hits based on the tech level of the sniper rifle. 2 turn cooldown. CorporalSnap Shot Removes the sniper rifle’s restriction on firing and Overwatch after moving. Any shots taken suffer a -20 Aim penalty. Squad Sight Allows firing at targets in any ally’s sight radius. SergeantGunslinger Confers 2 bonus damage with pistols. Damn Good Ground +10 Aim and +10 Defense against enemies at lower elevation in addition to the usual elevation bonuses. LieutenantDisabling Shot Allows the Sniper to fire a shot that causes the target’s main weapon to malfunction. The target may use Reload to fix the weapon. The shot cannot inflict a critical hit. 2 turn cooldown. -10 Aim penalty. Battle Scanner Scanning device, when thrown creates a new source of vision for 2 turns. Can only be used 2 times per battle. CaptainExecutioner +10% Aim against targets with less than 50% Health. Opportunist Eliminates the Aim penalty on reaction shots, and allows reaction shots to cause critical hits. MajorLow Profile Makes partial cover count as full. ColonelIn The Zone Killing a flanked or uncovered target with the sniper rifle does not cost an action. Double Tap Allows both actions to be used for Standard Shot, Headshot, or Disable Shot, provided no moves were made. 1 turn cooldown. Squaddie: Headshot - The Sniper's signature ability is also one of its best. Once every three turns you can fire a shot with a 30% increased crit chance and extra damage based on weapon tech. It's pretty much a guaranteed crit if you flank an alien or catch one out in the open with it. It pairs really well with Double Tap and Ghost Armor for landing two massive crits in a row. Corporal: Squad Sight - Squad Sight defines the Sniper class. With it your Sniper can fire on any alien your squad can see, provided there are no obstacles in the line of fire. Without it, you have to waste valuable time setting your Sniper up on a good vantage point. Squad Sight means your Sniper spends less time running and more time killing aliens. Essential. Paired with Archangel Armor this ability is godlike. Snap Shot, although not without its uses, really is more trouble than it's worth. Using it properly means flanking aliens with your Sniper and that means getting in dangerously close, exposing yourself. Being able to fire the Sniper rifle after moving is nice, but Snap Shot does hurt the Sniper's impeccable accuracy. Sergeant: Gunslinger - This ability is a godsend in confined spaces, and early on when the Sniper is still lacking some of his best abilities. With Gunslinger your Sniper will do surprisingly decent damage using a Laser or Plasma Pistol, and it works just fine with Double Tap for those times when one shot just isn't enough. Damn Good Ground is a nice ability in its own right, but Snipers have great Aim to begin with, especially on higher ground. The Defense bonus is nothing to write home about, either, and if you play your Sniper right he should not be exposed to enemy fire to begin with. Lieutenant: Disabling Shot - On higher difficulties, sometimes you just know you won't be able to kill that last alien on this turn. Disabling its weapon is a pretty good alternative at that point. Disabling Shot allows you to waste the alien's turn by making it reload to fix its gun. It's also great for 'prepping' targets you want to stun with the Arc Thrower, minimising the risk of getting your soldiers killed should the stun fail. If your Sniper took Snap Shot earlier, you might like Battle Scanner. It's great for peaking around corners without exposing yourself, but it has limited uses and does not work as well for Snipers that like to keep their distance. It will work with Squad Sight, which is nice. Captain: Opportunist - Taking reaction shots that can crit without suffering an Aim penalty? If that sounds overpowered to you it's because it is overpowered. Opportunity turns your squad's line of sight into a murder zone. Any alien careless enough to step within range is going to get its head blown off. It works beautifully with pistols too, even over long distances. The Executioner ability does not even begin to compare to this. Major: Low Profile - This ability means you can set your Sniper up anywhere you like. It lets you save obstacles that provide full cover for squad members who really need it, and makes ledges, balconies, rooftops and lorry trailers that much more attractive as vantage points. Colonel: Double Tap - This is it; the hardest choice your Sniper will ever have to make: In The Zone or Double Tap? In The Zone is excellent for those whide open spaces where you are going up against Cyberdiscs, Floaters, Drones, Chryssalids, Zombies or Berserkers, pretty much any enemy that does not take cover. As long as you can kill them with one shot and the shot connects, you can keep firing until you've emptied your rifle. It's hugely powerful, but very situational. On the other hand, Double Tap lets you fire twice every other turn. There's a little less potential damage here, but it is much more reliable and less dependent on the situation. Double Tap works just fine with all special shots and if you use it with Ghost Armor and Headshot, you can score two huge crits in a row. More than enough to kill a Sectopod, or even the Uber Ethereal, in one turn. If you went with Snap Shot earlier, pick In The Zone here. If not, I would strongly recommend taking Double Tap. Actually, I would always recommend it. It's both powerful and reliable and that makes it really hard to beat. RECOMMENDED BACKPACK ITEMS S.C.O.P.E. [Aim +10] The S.C.O.P.E. is probably the only item your Sniper will ever need. Early on, it's vital to compensate for the Aim penalty on reaction fire, and it negates the Aim penalty on Disabling Shot completely. It will also help you make the most of In The Zone and Double Tap, making the S.C.O.P.E. the obvious choice. Afternote: Sniper's snapshot got buffed with a reduced aim penalty but is still absurdly outclassed, even with the nerf that squadsight shots can't crit without headshot. Battle Scanners are much more worthwhile due to new additions that are otherwise a pain to deal with early on. Late game not so much. Battle scanners can be pretty janky. Recommended Sniper gene modifications The Sniper has two radically different styles. The first are the Squadsight Snipers who excel at dealing tremendous amounts of damage from a distance to high-value targets without exposing themselves to counterattack. The second is the Scout Sniper who uses his superior mobility to bring the power of the Sniper Rifle to bear without the drawbacks of having to set-up or being blocked by line-of-sight. Snipers are glass cannons. They deal most of your damage but have little in the way of survivabilty. They rely on long range and high ground more than the other classes. Snipers don't really need a lot of mods to be effective. They tend to stay far away from the battles. A few key mods will do and even then, there may be ways around their weaknesses such as S.C.O.P.E.S. or Skeleton/Ghost/Archangel Armor. As such, there's no hurry to modify them. - Suggested Mods - Depth Perception and/or Muscle Fiber Density These mods works best with both kinds of Snipers since they ought to and should be using high ground as much as possible. Muscle Fiber Density helps Scout Snipers since they move around a lot more and it frees them to use the heavier armors to compensate for their lack of survivability. It may not even be necessary for Squadsight Snipers since, being away from danger, they can take their time getting to high ground, could use the lighter armors with grappling hooks or use the Archangel Armor for instant high ground (overkill!). Mimetic Skin Talk about synergy. Mimetic Skin goes so well with Snipers, it's ridiculous. Mimetic Skin allows near total freedom of movement for the Sniper by allowing him to be invisible in any type of cover. This allows the Sniper to take the best firing position easily and in complete safety without worrying about being shot. Scout Snipers make great use of this since there's usually only low cover at the top of buildings. Squadsight Snipers however, have no use for this at all since they don't need invisibility staying way behind the frontlines. Those three mods are the important ones. The rest are situational or are only really relevant to the uncommon Scout Sniper. - Situational Mods - Neural Damping or Neural Feedback Brain mods shouldn't be necessary since your Sniper should be far away from the threats leaving the other classes more at risk of psi attacks. Those classes should receive the brain mods first. Still, if you feel the need for a brain mod, follow the general rule: If the Sniper has low will, get Neural Damping. If the Sniper has a high will score and a high chance to resist psi attacks, get Neural Feedback. Hyper Reactive Pupils They synergize sure, but the usefulness of the mod is dubious. This mod can be useful in the earlier months though, when Snipers still tend to miss often. However, if you're at the point when you have Double Tap, chances are your Sniper will have impressive aim already and won't miss often enough to justify this mod. Bioelectric Skin - Mimetic Skin works better for Snipers but this is entirely up to the player. Scout Snipers have good use for it. Squadsight Snipers could, theoretically, benefit from the immunity from being singled out and strangled by a Seeker but you could just equip a Respirator Implant if that's a problem. Also, note that the Sniper's Battle Scanner ability may take the place of this mod. Secondary Heart and Adaptive Bone Marrow Squadsight Snipers have no use for these mods. They should be far away from the dangers of death and critical injury in the first place. The Secondary Heart is useful only for insurance purposes so that your "MVP" Sniper does not die a sudden death. Scout Snipers could take these mods to improve their survivability but then again, if resources are scarce, you may have to decide if it's better on either Assaults or Heavies as they do a better job at managing damage. It depends how important you value your Scout Sniper's life. This sad choice is up to you. Adrenal Neurosympathy Snipers are the best at killing things. Snipers with Executioner are excellent at delivering the coup de grace and can trigger Combat Rush easily enough for your team. Scout Snipers will make better use of this mod than Squadsight snipers because Squadsight Snipers tend to be out of sight of your other soldiers such that they cannot receive Combat Rush. The reason this is in the Situational Mod section is that the Sniper does not necessarily need to be the one to carry this mod. If you don't want to take out an insurance policy on your Sniper with the Secondary Heart, this mod is great. Support class NOTE: BECAUSE I AM LAZY AND ALREADY SPENT ENOUGH TIME PUTTING THIS TOGETHER THIS PART OF THE GUIDE IS ALL Rensje's WORK AND THE CREDIT GOES TO THEM FOR WRITING THIS.
Sometimes things can get ugly; soldiers start taking hits and go down, or panic in the face of overwhelming odds. The Support is there to patch them up, strengthen their resolve and help them get back into the fight. These strong-willed warriors have good aim and run like the wind, providing covering fire for their squad or going the distance to flank enemies. SUPPORT STATS RankHealthAim Squaddie+1+5 Corporal+0+3 Sergeant+1+3 Lieutenant+0+3 Captain+1+3 Major+0+3 Colonel+1+5 * The information in this table does not apply if the Second Wave modifier Hidden Potential is selected upon starting a new game SUPPORT ABILITIES RankAbility SquaddieSmoke Grenade Deploy a smoke grenade once per mission. The smoke confers +20 defense to all units, not just allies, and lasts during the enemy turn. CorporalSprinter Allows the support to move 3 additional tiles. Covering Fire Allows reaction shot to trigger on enemy attacks, not just movement. SergeantField Medic Allows medikits to be used 3 times per battle instead of once. Smoke and Mirrors Allows 1 additional use of Smoke Grenade each mission. LieutenantRevive Allows Medikits to revive critically wounded Soldiers at 33% of maximum health instead of just stabilizing them. Rifle Suppression Fires a barrage that pins down a target, granting reaction fire against it and imposing a 30 penalty to aim. CaptainDense Smoke Smoke Grenades have increased area of effect and further increase units’ Defense by 20. Combat Drugs Smoke Grenades now contain powerful stimulants that grant +20 Will and +10% Critical Chance for all units in the cloud. MajorDeep Pockets Confers an additional item slot in inventory. ColonelSavior Medikits restore 4 more health per use. Sentinel Allows two reaction shots during Overwatch, instead of only one. Squaddie: Smoke Grenade - Smoke Grenades are essential for those times when you need a soldier to get in position where there is no full cover to benefit from. It's a great ability, but you only have one per mission, so make it count. Corporal: Sprinter - +3 to Mobility may not sound like much on paper, but it makes a huge difference. You could use it to flank an enemy that is pinned down, close in on an enemy to stun him with the Arc Thrower or leg it to stabilise a friendly that was shot down across the battlefield. Sprinter is a subtle, but powerful ability. Covering Fire is not bad, especially on higher difficulties, but it has one major flaw: your Support will only take a reaction shot after the enemy has fired, meaning it could well be too late already. It pairs well with Sentinel later on, but it's not nearly as versatile as Sprinter. Sergeant: Field Medic - Getting 3 uses out of your Medikit per mission instead of just 1 makes this an absolutely essential ability. Watching a wounded soldier bleed out because you used your one Medikit on a paper cut is rough; don't put yourself in that position. You could argue that having 2 Smoke Grenades per mission would allow you to prevent those wounds in the first place, but relying that heavily on Smoke Grenades is risky, especially on higher difficulty levels where the aliens receive bonuses to Aim. Lieutenant: Revive - No medic can do without Revive. It's essential, especially in those Ironman games where every veteran soldier is worth his weight in gold. Not only can you prevent them from dying, you can actually put them straight back into the fight. Awesome. Rifle Suppression uses up a lot of ammo and unless you took Covering Fire earlier, you are probably not going to get much use out of it. A suppressed alien knows better than to move when under fire, and at higher difficulty levels chances are good they will still hit you, even at a -30 penalty to Aim. Captain: Dense Smoke - This is a pretty tough choice, but Dense Smoke is the slightly better choice here because the area of effect on it is bigger than that of Combat Drugs, and because +20 Defense is generally better than +20 Will and a +10% crit chance, which is negligible. Defense works against all enemies, whereas Will only really helps you against psionic abilities. That said, Combat Drugs is not without its uses and having a second Support with this ability could be a great idea. You could use it to empower your gifted soldiers or keep soldiers with a low base Will stat from panicking in the face of terrible danger. Major: Deep Pockets - It may be a passive ability, but Deep Pockets is a-ma-zing. You could carry both a Medikit and an Arc Thrower, or Chitin Plating and a Mind Shield, or any other combination of offensive, defensive and utlity items. Deep Pockets is a defining ability for the Support and it makes them the most versatile class by far. Colonel: Savior - Again, this is a very tough choice because both abilities are pretty great. Savior is fantastic because it doubles the effectiveness of your Medikits. If you completed the Improved Medikit project in the Foundy, this bumps your Medikits up to +10 Health per use. Awesome. Sentinel is great too, as it allows you to fire from Overwatch twice. Unlike the Heavy's Rapid Reaction ability, the first shot does not even have to be a hit for it to work. Sentinel is great when you're trying to lure enemies into a murder zone, but it has one major flaw: the second shot will never trigger on enemies that you run into for the first time. RECOMMENDED BACKPACK ITEMS Medikit Arc Thrower Every Support should carry a Medikit. Supports are the best at healing squad members and their Deep Pockets ability allows them to carry another, more directly beneficial item as well. Also, the Medikit grants immunity to poison, which is excellent when fighting Thin Men. The Arc Thrower is another great item choice for Supports, especially if you took the Sprinter ability. Supports can run long distances, making it easy for them to get into stun range. Should the stun fail, you could use your Assault to run in and clean up so nobody gets hurt. Later, when capturing aliens alive is no longer a priority or even completely unnecessary, you could replace the Arc Thrower with any item you want. Chitin Plating is great for defense, especially on terror missions. Mind Shield will help your Support overcome psionic attacks. Combat Stims could improve their own psionic powers, etc. Take your pick, they are all solid choices. Afternote: Supports Deep Pockets gives +1 use to most utility items and the old effect is now a foundry upgrade for ALL soldiers. Recommended Support gene modifications NOTE: BECAUSE I AM LAZY AND HAVE A LOT TIME WRITING THIS, ALL OF THE CREDIT FOR WRITING THIS PART OF THE SECTION GOES TO Hellbilly. The Support Class excels at keeping the rest of your squad alive and fighting at peak condition. The Support could be a Medic, who greatly extends the lives of your troops by healing a lot of damage and making the most out of Medkits and Smoke Grenades. The Support could also act as Fire Support, preventing damage by Supressing enemies and using Covering Fire and Overwatch to shoot enemies first before they can even attack. The Support Class is the lowest priority for mods. Why? It's because their skills are powerful enough on their own and don't synergize as much with mods. It's mostly about the Medkits, Smoke Grenades and Overwatch. Furthermore, other classes (especially Assaults), do way better with mods than the Support could. - Suggested Mods - Hyper Reactive Pupils Like the Heavy, the Support has skills that revolve around Overwatch and potentially firing multiple shots in one turn. Overwatch shots aren't reliable so the mod should help turn any misses you get into useful bonuses. Bioelectric Skin - This mod is suggested only because Mimetic Skin really works better on any other class. Bioelectric Skin naturally makes sense on a Support since the Support is typically in the middle of the group. this mod prevents Seekers from getting close as well as free up the Support to help squadmates being strangled. Muscle Fiber Density This mod allows the Support to get flanks where other classes can't. This allows you to play more aggressively like an Assault although, an Assault would probably do a better job as a flanker. Still, if you have a Fire Support, a height advantage should help make those Overwatch shots more accurate. Other Soldiers with Adaptive Bone Marrow and Secondary Heart + Revive Revive used to be terrible in Enemy Unknown since it was very risky having your soldier fight on with low health. You needed to be really lucky to be able to Revive him in the first place. Then, you'd have to waste Medkits healing him up, suffer through the will penalty from the critical wounds and if the revived soldier drops down to zero again, it's over. The ABM and Secondary Heart combo fixes all those problems (except for dying a second time). The soldier is easier to Revive, doesn't waste as much Medkits if you use them after all the base health heals, and there's no will penalties from critical wounds. Revive is now a very powerful ability. - Situational Mods - Neural Damping and Neural Feedback Supports with Sprinter are often in charge of the Arc Thrower for alien capturing duties. In that case, it may be helpful to use Neural Damping to prevent being mind-controlled. Otherwise, follow the general rule; if your Support has low will, get Neural Damping to prevent panic during combat. If your Support has high will, Neural Feedback could be more useful with the added damage. Depth Perception - In the same vein as a Gunner Heavy, it's better to take the Hyper Reactive Pupils, especially on the Fire Support who uses all those reaction shots. It's better to have a mod that benefits you most of the time than a mod that helps only some of the time. Mimetic Skin - This mod is always good. The Support could use this defensively to help squadmates since using the Medkit or Smoke Grenade doesn't remove the invisibility. The issue is whether this belongs to the Support class. Again, assuming resources are limited and you had to choose which class to mod with Mimetic Skin, it may be worthwhile to mod another class. Secondary Heart or Adrenal Neurosympathy Either one works really, so it's up to you. If you want more survivability, the Secondary Heart and Adaptive Bone Marrow works though keep in mind the Support has no skills to mitigate damage actually received. The Support is better at healing or preventing damage rather than taking it. Though not as good at killing as the other classes, getting Combat Rush for your squadmates is still a great bonus if you can arrange to get it. At least one of the soldiers on your team should be carrying the Adrenal Neurosympathy mod anyway. Adaptive Bone Marrow - If you took the Secondary Heart, you might as well take this. If not, then this mod may be better when given to either the Assault or Heavy since they're a bit sturdier and won't die as easily before this mod can be useful. Still, it's not wrong to put it on the Support per se. Heavy class NOTE: BECAUSE I AM LAZY AND ALREADY SPENT ENOUGH TIME PUTTING THIS TOGETHER THIS PART OF THE GUIDE IS ALL Rensje's WORK AND THE CREDIT GOES TO THEM FOR WRITING THIS.
The Heavy is a hulking powerhouse, capable of dealing massive amounts of damage to synthetic enemies.. and pretty much everything else around them. Armed with a light machine gun and a rocket launcher, these bad boys carve a path through obstacles like no other. HEAVY STATS RankHealthAim Squaddie+1+2 Corporal+0+1 Sergeant+1+1 Lieutenant+0+1 Captain+1+1 Major+0+2 Colonel+1+2 * The information in this table does not apply if the Second Wave modifier Hidden Potential is selected upon starting a new game HEAVY ABILITIES RankAbility SquaddieFire Rocket Fire a rocket using an equipped launcher. This ability can not be used after moving, nor more than once per mission. CorporalBullet Swarm Firing the primary weapon as the first action no longer ends the turn. Holo-Targeting Shooting at or suppressing enemies also confers a +10 Aim to any allies’ attacks on those enemies. SergeantShredder Rocket Fire a rocket that causes all enemies hit to take +33% damage from all sources for the next 4 turns. The rocket’s blast is weaker than a standard rocket’s. Suppression Can fire a special shot that grants reaction fire at a single target. The target also suffers a -30 Aim penalty. LieutenantHEAT Ammo +100% to damage against robotic enemies. Rapid Reaction Confers a second reaction shot, if on Overwatch and the first reaction shot is a hit. CaptainGrenadier Allows to carry 2 grenades in a single inventory slot. Danger Zone Increases hit area of rockets and suppression by 2 tiles. MajorWill to Survive Reduces all normal damage taken by 2 if in cover and not flanked. ColonelRocketeer Allows 1 additional standard rocket to be fired per battle. Mayhem Confers additional damage based on weapon tech level to Suppression and all area-effect abilities. Squaddie: Fire Rocket - The Heavy's signature weapon is the rocket launcher. Use it to dispose of cover, exposing the enemy, or to blow up explosive objects such as cars. Everything caught in the blast will die, including your squadmates. Make sure you have a medic standing by. Corporal: Bullet Swarm - This ability allows you to fire your weapon and then move, shoot again, go into Overwatch or reload. Needless to say, Bullet Swarm is a versatile ability that's easily more useful than its counterpart Holo-Targeting. Sergeant: Shredder Rocket - Every once in a while, especially on terror missions, you are going to get swarmed. Whether facing a zerg rush of Chryssalids or a small army of Mutons, Shredder Rocket is your ticket out of a sticky situation. Use it to soften up the masses and then clean up with a grenade. The Shredder Rocket also doubles nicely as a terraforming tool. Suppression is not a terrible ability, but it consumes ammo both when you activate it and if the Heavy takes a reaction shot. This could mean you start your next turn with an empty gun, and that's a pretty afwul situation to find yourself in. Lieutenant: HEAT Ammo - This ability DOUBLES all damage you deal to synthetic enemies; that includes Cyberdiscs and Sectopods. With HEAT Ammo your Heavy will one-shot Cyberdiscs every time, and if you took Bullet Swarm your Heavy can single-handedly topple a Sectopod in one turn as well. HEAT Ammo isn't just good, it's vital. Rapid Reaction is terrible because it relies on the first reaction shot to hit. Heavies have terrible Aim and on top of that, there's an Aim penalty on reaction shots. Even if by some miracle the first shot connects, your special second shot can and very likely will miss, making this a godawful ability. Captain: Danger Zone - This ability is pretty great, but it's also a double-edged sword. Being able to catch more enemies in one rocket's blast radius is awesome, but the increased damage radius also means it's easier to hit your own guys with it. It also makes it a bit trickier to blow up cover without killing the aliens cowering behind it; the raw damage potential more than makes up for these little drawbacks, however. Don't take Grenadier. You will need a S.C.O.P.E. on your Heavy to compensate for his terrible Aim and on top of that, if you take Shredder Rocket and Rocketeer you will have a total of 3 rockets available on every mission. Use any more explosives than that and you will find yourself wanting for salvage before long. Major: Will to Survive - If you position your Heavy with care, this ability will really help him survive. With this, chances are good the Heavy won't get hit for more than his armor can shrug off, meaning no more visits to the infirmary! Colonel: Rocketeer - This is a tricky one. The extra damage on rockets from Mayhem is nice if you don't use more than one or two of them per mission, but if you didn't take Suppression (and I recommend that you don't) the usefulness of this ability is seriously hampered. Rocketeer gives you one extra standard rocket per mission. Point for point, that is more bang for your buck than the damage bonus from Mayhem, making Rocketeer a solid choice, especially in combination with HEAT Ammo (yes, it applies to rockets too!) and Danger Zone. RECOMMENDED BACKPACK ITEMS S.C.O.P.E. [Aim +10] Combat Stims [Will +40, Mobility +3, 50% damage reduction and crit immunity for 2 turns] Heavies are terrible shots. Early on, when you have to make do with one rocket and your LMG, you will want to make every shot count. The +10 Aim bonus of a S.C.O.P.E. is a godsend for inexperienced Heavies. Later on, when your Heavy has attained colonel rank, trading that S.C.O.P.E. for a Stim Pack allows for some interesting tactics. Your Heavy, already a pretty durable unit, can soak up damage like a sponge with the Stim Pack's 50% damage reduction and crit immunity. On top of that, the +3 Mobility bonus allows the Heavy to run farther, enabling him to get in close and shoot the enemy from point-blank range, negating the need for that S.C.O.P.E. altogether. And the best part? With Bullet Swarm you can fire AND use the Stim Pack all in one turn! Afternote: Heavies got a nerf to HEAT, +50% as opposed to x2 damage, and grenadier now also offers a +1 damage to all explosives on top of the prior effect. Recommended Heavy gene modifications NOTE: BECAUSE I AM LAZY AND HAVE A LOT TIME WRITING THIS, ALL OF THE CREDIT FOR WRITING THIS PART OF THE SECTION GOES TO Hellbilly. The Heavy is XCOM's Demolitions Expert. The Heavy is the best in dealing massive area-of-effect damage using the Rocket Launcher and grenades. The Heavy can also be a Gunner; using the LMG to supress the enemy or tear them to pieces with a hail of Overwatch fire. Like the Assault, the Heavy needs to be at the frontlines to do his job. The Heavy has mobility issues since he needs to "set-up" before using the Rocket Launcher. Survivability is also a concern since the Heavy is often in the firing line. The Heavy is second to the Assault in Gene Mod priority. - Suggested Mods - Neural Damping or Neural Feedback You will always want some kind of brain mod for your Heavy since he will be in the frontlines and will be susceptible to psi attacks. The same rules as in the case of an Assault applies. Neural Damping is highly recommended. You do not want your Heavy to be mind-controlled and have all that weaponry turned against you. The immunity to panic helps Heavies with low will. Otherwise, if your Heavy has very high will or you dont mind the slight chance of your own explosives used against you, get the Neural Feedback mod. Hyper Reactive Pupils The best choice for the Heavy especially for a Gunner. It synergizes very well the skills that allow you to fire twice: Bullet Storm and Rapid Reaction. If the first shot misses, you get a bonus on the second. The Heavy fires his gun a lot but has the lowest aim of all the classes so this mod mitigates that weakness by turning misses into bonuses. Secondary Heart + Adaptive Bone Marrow The Heavy is a frontline soldier and boosting his survivability is never a bad idea. The Secondary Heart and Adaptive Bone Marrow combo synergizes with Will to Survive in making damage manageable allowing you to heal up. It doesn't work as well as the Assault but it works nontheless. Be warned though, that Will to Survive is useless when flanked and the Heavy is still vulnerable to the occassional critical shot unlike an Assault with Resilience. Since the Heavy tends to get damaged a lot, the Secondary Heart should be handy in removing the will penalty from critical wounds. In higher difficulties, you will be reliant on Heavies and their rockets to even the odds. The Adaptive Bone Marrow is crucial in making sure Heavies are always available for the next mission. Mimetic Skin Heavies suffer from the need to be in position first before they can launch their rockets. Gunners don't suffer as much, but the bottom line is that Heavies need to be in a good position at all times to find the range for their rockets or to cover the area in Overwatch fire. Mimetic Skin removes that weakness and gives the Heavy the luxury of getting into position in safety without being seen. Here's a nifty trick; Provided the Heavy hasn't been seen, you can move him far and way up to heavy cover deep in enemy territory and leave him cloaked there. You can then move your squad up to engage the enemy. When the aliens take cover, the Heavy can ambush them and launch a rocket to destroy them and their cover. Whether Mimetic Skin works better on a Heavy or an Assault depends on the player and who his "MVP" is. Still, Heavies can get a lot of benefits from this mod. - Situational Mods - Depth Perception - The Heavy isn't a very mobile class; other classes are more adept at exploiting high ground. Without Run and Gun, Sprinter or Damn Good Ground, you need the Muscle Fiber Density mod or armor with a grappling hook. Remember that the Heavy has poor aim. You will probably miss more often than get a chance to use high ground. Better to have Hyper Reactive Pupils, which will benefit you all the time, than Depth Perception, which will benefit you some of the time. Adrenal Neurosympathy - It's a mixed bag. On the one hand, Demolitions Heavies can trigger Combat Rush easily, but firing rockets don't benefit from the aim and critical chance bonuses of Combat Rush and if you had to use a rocket, chances are that it won't take much to finish the job anyway. On the other hand, Gunner Heavies may not have the killing power since they're usually supressing or going into Overwatch in the hopes of getting a double shot from Rapid Reaction. They certainly benefit from Combat Rush though; two Bullet Storm shots while under Combat Rush is pretty fun. Survivability is often more important but if you don't care for the Secondary Heart, get Adrenal Neurosympathy for the Heavy and watch him kill things. Bioelectric Skin - A Heavy could, theoretically, detect aliens behind a wall or on the roof and fire a rocket at them. The immunity to strangulation is nice. The question though, is whether the Heavy should be the one to carry this mod? You decide. Muscle Fiber Density - It's situational. It helps the Heavy's mobility but the Heavy is not meant to be a class that zips through the battlefield getting crazy flank shots like a Run and Gun Assault or have any skills which provide high ground bonuses like the Sniper's Damn Good Ground. It's good to have but perhaps the other classes can get more out of this mod. Mec class

The Mechanized Exoskeletal Cybersuit Trooper is a new soldier class introduced in XCOM: Enemy Within. MEC Troopers are not generated at random during Rookie promotion like other class assignments, but are created by augmenting soldiers in the Cybernetics Lab. Rookies and Psionic soldiers are ineligible for augmentation.Converting a soldier to a MEC Trooper is a permanent class change. They lose their abilities and Gene Mods, but retain their stats, rank and experience. MEC Troopers do not use the same weapons or equipment available to the other classes but instead utilize Mechanized Exoskeletal Cybersuits in combat. MECs grant MEC Troopers significant health and Will bonuses, access to heavy weaponry and advanced Tactical Subsystems, as well as immunities to fire and poison; they also gain the Hardened trait. MEC Troopers wear their Base Augments when outside of a MEC Suit. In comparison to the standard rifles used by Rookies, Supports and Assaults, MEC Trooper weapons provide a +2 base damage bonus and a +4 Crit damage bonus. This effectively raises the MEC Trooper's weapon by one tech level (i.e. the damage output of the Minigun matches that of the Laser Rifle); their damage within a given tech level is surpassed only by the Sniper's Headshot ability, which is able to inflict comparable critical damage to targets, but with much greater frequency. Upon undergoing augmentation, MEC Troopers gain a special inherent ability based on their previous class: Assault Class, damage received from enemies within 4 tiles is reduced by 33%; Heavy Class, The nearest visible enemy suffers -20 Aim and cannot critically hit this unit; Sniper Class, Any shots taken without moving have +10 Aim and +10% critical chance; Support Class, Nearby allies in cover receive +10 Defense. Additionally, MEC Troopers gain experience and ranks conventionally and have their own unique training tree: Rank1-Squaddie Collateral Damage: An area of effect attack that destroys most cover and hits all eligible targets for 34% damage. This attack cannot cause critical hits. Rank2-Corporal Advanced Fire Control: Shots from Overwatch no longer suffer any Aim penalty. Automated Threat Assessment: Confers +15 Defense when in Overwatch. Rank3-Sergeant Vital-Point Targeting: Confers +2 Damage against all humans and autopsied aliens. Damage Control: When a MEC takes damage, all further damage will be reduced by 2 for the next 2 turns. Rank4-Lieutenant Jetboot Module: When activated, confers the ability to jump to normally inaccessible heights for the rest of the turn. One For All: When activated, the MEC becomes a high cover element. Moving or using an arm-based weapon will return the MEC to standard posture. Rank5-Captain Repair Servos: Confers 2 health recovery at the start of each turn. A total of 6 health can be regenerated per battle. Expanded Storage:Allows additional use of Restorative Mist, Grenade Launcher and Proximity Mine Launcher in each mission. Increases primary weapon base ammo by 50%. Rank6-Major Overdrive: Firing the MEC's primary weapon as the first action no longer ends the turn. Rank7-Colonel Absorption Fields: Any hit that does more damage than 33% of the MEC's maximum health is reduced to that number. Reactive Targeting Sensors: The MEC gets a free shot back at the first enemy who attacks the MEC each turn, provided there's enough ammo to do so. When equipped with a MEC Suit, MEC Troopers gain the hardened trait. Mec class continued MEC Troopers have the most complex skills and customize builds of any soldier class. Players who have completed the game on Classic or Impossible difficulty levels, recommend choosing Vital-Point Targeting, Jetboot Module and Expanded Storage. Inherent Ability MEC Trooper skills should complement their inherent ability for a common purpose. Shock-Absorbent Armor for flanking and close-quarter rushes. Body Shield for tanking and mid-range firefights. Platform Stability for ambushes and long-range sniping. Distortion Field for supporting rigid squad formations. Advanced Fire Control vs. Automated Threat Assessment Advanced Fire Control is preferred for most cases, and Automated Threat Assessment only in conjunction with Body Shield. Advanced Fire Control is functionally identical to Opportunist (without the critical damage). Advanced Fire Control's reaction fire often kills weaker foes attempting to outflank or run away in one hit. Automated Threat Assessment increases Defense by 15 (for a total of 25) while on Overwatch. Body Shield reduces the nearest enemy's Aim by 20, granting a total defense of 45 in regard to that unit only Automated Threat Assessment ends if the MEC Trooper takes an Overwatch shot, further reducing its utility. Automated Threat Assessment works best with Kinetic Strike Module when MEC Trooper falls short a few tiles of an alien in full cover; or in situations where a normal shot would most likely miss. Vital-Point Targeting vs. Damage Control Damage Control is preferred for most cases, due to AIs preference for targets with a high hit probability leading resulting in MEC Troopers often drawing enemy fire. Vital-Point Targeting increases the Miniguns' 6-8 damage range, generating a reliable source of 10-damage hits. Vital-Point Targeting applies to standard shots only; not Flamethrower, Proximity Mines, or Grenade Launcher. Damage Control effectively grants MEC Troopers 4-6 health per turn in Firefights. Damage Controls mitigation comparatively prolongs a MEC Trooper's lifespan. On higher difficulties this is a marginal amount; two consecutive hits from a Thin Man's 6-9 damage range kills a Level 1 MEC. Damage Control can be very powerful when combined with Absorption Fields. A 15 hit point Warden will take a maximum of 4 damage per hit due to Absorption Fields, subsequently reduced to a maximum of 2 damage per hit with Damage Control. A Warden starting with 15 hit points will therefore require a minimum of 7 hits to kill (at least until Damage Control wears off), making them very rugged. Jetboot Module vs. One For All Jetboots is preferred for most cases, as clustered units will trigger AI's grenades and Area of Effects. Jetboots can be used to reach high ground and grant good fields of fire over the map. Jetboots and Kinetic Strike can quickly close distances with the enemy by moving straight over normally impassable terrain. One for All is functionally identical to Alloy S.H.I.V.'s Armored Shell ability. One For All ends if the MEC Trooper takes an Overwatch shot, moves, or uses any other low-tier abilities, further reducing its utility. High-tier abilities do not cancel the effect. Repair Servos vs. Expanded Storage Expanded Storage is preferred for most cases, due to superior utility and healing options. An exception is for Kinetic Strike MECs on Impossible, where Repair Servos allow an aggressive MEC to repair on the move, reserving turns for useful action. Restorative Mist will still be taken for healing potential and total hp as Grenade Launcher is much less effective on Impossible. There is no difference in the amount of self-healing compared to 2x Restorative Mist if the MEC has not been awarded the Defender's Medal. If the MEC has been awarded the Defender's Medal, the difference is 2 hp. An aggressive Kinetic Strike MEC makes many kills with Kinetic Strike throughout the game from beginning to end and makes much more use of Electro-Pulse than Proximity Mine Launcher, and thereby the other needs for Expanded Storage are negated. Repair Servos effectively grants MEC Troopers 4-6 health per mission. Repair Servos, by itself, is inferior to Damage Control, Restorative Mist and Savior Support. Expanded Storage + Restorative Mist heals 4 per use for two uses, for a total of 8 points of healing. This rises to 6 per use, for 12 total, after researching Improved Medikit. Restorative Mist heals in a small AoE instead of just healing the MEC. Restorative Mist requires an action to use, as opposed to Repair Servos, which is passive. Repair Servos should only be taken if no other viable healing options are available, and only in conjunction with MEC Troopers defensive skills. Expanded Storage Increases MEC Troopers' primary weapon base ammo by 50%, and allows 1 additional use of Restorative Mist, Grenade Launcher and Proximity Mine Launcher in each mission. Repair Servos might be preferable for Grenade Launcher MEC Troopers for a balance of healing and offense. Absorption Fields vs. Reactive Targeting Sensors Reactive Targeting Sensors is preferred for most cases, due to MECs having very high health pools and the Hardened trait; Absorption Fields only if in conjunction with Body Shield. That being said, this changes on Impossible, where Absorption Fields are the way to go unless you like relegating your star MEC to a secondary role. Absorption Fields effectively reduces incoming damage to 33% of MEC Trooper's maximum Health. Absorption Field is comparable to the Assault's Resilience ability Absorption Fields' threshold damage reduction, prevent all damage above a certain threshold, while having no effect on damage below that threshold. Absorption Field scales backwards; its usefulness gradually decreases as the MEC Troopers' HP bar increases. Absorption Field is vital to the survival of a brand-new MEC-1. Absorption Field is useless to the survival of a fully upgraded MEC-3. Absorption Field contributes weird occurrences such as a Sectopod hitting a baseline MEC for 4 damage with a cannon that can normally deal 15 damage. Absorption Field almost never applies itself on difficulties below Impossible, as on average, only Sectopods deal more than 33% of a MEC Trooper's health (without critical damage). Reactive Targeting Sensor effectively provides a free shot during the MEC Troopers' turn, provided there's enough ammo to do so. Reactive Targeting Sensor depletes ammo fast, often against insignificant targets with a very low probability of connecting return fire. Reactive Targeting Sensor shot has normal reaction shot penalty (confirmed by missing on shot that has 100% accuracy after enemy's turn), therefore it has no synergy with Advanced Fire Control. Reactive Targeting Sensor's synergy with the Aim bonuses Platform Stability are currently unknown. Ultimately, a MEC Trooper should be built to suit the player's play style and complement the abilities of the squad. A MEC Trooper built in the early game can still be trained in a way so that it can be effective late game. An understanding of the capabilities of the player's squad and the various builds and abilities of MEC Troopers is required before choosing any build. Engaging Psionic Enemies Players should be careful with their MEC(s) when fighting psionic foes (Sectoid Commanders, Ethereals) who possess the Mind Control ability. MEC Troopers have no pistol option to switch to, and pack a lot of firepower. Thus, having a Mind Controlled MEC is a highly dangerous proposition, and is made all the more possible by the fact that they cannot equip Mind Shields or be gene modded with Neural Damping. Thus, it may be advisable to augment soldiers with high Will to make Mind Control more difficult. When a MEC Trooper is at high risk of being Mind Controlled, there are the options of emptying the MEC's primary weapon using Collateral Damage or simply firing at the psionic enemy in question, to deprive the MEC Trooper of some offensive options should it be mind controlled. Psionic subclass NOTE: BECAUSE I AM LAZY AND ALREADY SPENT ENOUGH TIME PUTTING THIS TOGETHER THIS IS PART OF THE GUIDE IS ALL Rensje's WORK AND THE CREDIT GOES TO THEM FOR WRITING THIS. After building the Psionic Labs, you can test your soldiers for 'the Gift'. All classes can become Psionics and they will get a special purple class icon to convey that they are gifted. Psionics can get inside the minds of their enemies, causing them to panic and fire on their allies. The most powerful Psionics can even deflect bullets with their mind, or make an alien do their bidding. Note that Psionic soldiers can only gain ranks and access new abilities by actively using their powers. Use psi powers often and well to unlock new, even stronger powers more quickly. PSIONIC ABILITIES RankAbility AdeptMindfray Causes the target to lose grip on reality, inflicting penalties to Aim, Will and mobility, and doing 5 base damage. Robotic unit are immune. Lasts 2 turns. 1 turn cooldown. SpecialistPsi Inspiration Removes Mindfray and panic from all allies within 3 tiles, and strenghens their Will by +30 for 2 turns. 4 turn cooldown. Psi Panic Cause target to panic on its following turn, if the target's Will is overcome. Robotic enemies are immune. 2 turn cooldown. OperativeTelekinetic Field Create an immobile telekinetic field that lasts through the enemy turn. The field distorts and deflects incoming attacks, granting +40 Defence to both allies and enemies within the field. 4 turn cooldown. Mind Control Very difficult psi technique that, if successful, grants control of the target for 3 turns. Robotic enemies are immune. 5 turn cooldown. Adept: Mindfray - Every gifted soldier starts out with this ability. Mindfray is an excellent power because it does not factor in distance or cover, making it a good choice against enemies that are in full cover. The penalties to Aim and Mobility make it a very good substitute for Suppression and the Will penalty makes the enemy more susceptible to panic or mind control. Specialist: Psi Inspiration - This ability comes into its own against enemies like the Sectoid Commander and Ethereal. Being able to bolster your squad's defense against mental attacks is vital, and strengthening their Will to prevent panic is also important. You could even use it to improve another Psionic soldier's powers, improving their chances of nailing a Mind Control. Psi Panic is a decent ability, but panic in itself is too unreliable to count on as a combat strategy. There's simply no telling what a panicked enemy might do: he could run away in fear, attack his own allies, or he could go berserk and fire on you again instead. Using Psi Panic is like rolling the dice and I would recommend against using it. Operative: Telekinetic Field - It may be the safe, boring option, but make no mistake; Telekinetic Field is powerful. It adds +40 Defense to whatever Defense bonuses were already in place, and the area of effect is massive. This ability will save your squad from Sectopods and Muton Elites more than a few times before the alien invasion is over. Just keep in mind that enemies can benefit from it as well, so use it wisely. Mind Control is an amazingly powerful ability that can really turn the tide in battle. With the right combination of gear, items and abilities, you could even use it to mind control an Ethereal, which will grant you an achievement if you succeed. It's also just really, really cool, but it has drawbacks. Unlike Telekinetic Field, it can fail, and if it does you won't be able to use it again for five turns. In the thick of a firefight, five turns is an eternity. If you have more than one gifted soldier on your team, have one take Telekinetic Field and the other take Mind Control. Two Psionic soldiers working together spell disaster for the aliens. RECOMMENDED BACKPACK ITEMS Mind Shield [Will +30] Combat Stims [Will +40, Mobility +3, 50% damage reduction and crit immunity for 2 turns] Chitin Plating [Health +4, melee damage taken reduced by 50%] The Mind Shield's description can be deceptive. It's intended purpose is to shield the wearer from offensive psi attacks, but it can also be used to power the user's own Psionic abilities. Use it together with Psi Armor to have a real shot at mind controlling those darn Ethereals. You will have to kill one before you can build it, though. Going with Combat Stims is good if you can't build the Mind Shield yet. The +40 bonus to Will is excellent and the damage reduction certainly does not hurt either. You can use this to empower your Mind Control ability, but remember that it takes up a turn to use it. Don't leave your soldier exposed while the stimulants take effect. Of course, you could argue that a Psionic has plenty of mental defenses as it is, especially if wearing Psi Armor. You could therefore decide to bolster his physical defense, and that's where Chitin Plating comes in handy. +4 to Health is nice, especially considering Psi Armor is medium-class and only provides +6 to Health, rather than Titan Armor's +10 Health bonus. A NOTE ON PSI ARMOR After clearing the Overseer Crash Site, XCOM's second essential story mission, you will have the opportunity to research Psi Armor. I strongly recommend developing it at the earliest possible convenience. Psi Armor grants a +20 bonus to Will, making it that much more likely your Psionic powers will work succesfully. S.H.I.V The S.H.I.V. (Super Heavy Infantry Vehicle) is a weapons platform in XCOM: Enemy Unknown that can be manufactured in the Engineering Lab. S.H.I.V.s can be deployed as substitutes for human soldiers on missions and require a space in the XCOM HQ barracks. Tactical Info: Autonomous mini-tank. Poison immunity may be useful on the Council Missions that exclusively involve Thin Men. S.H.I.V.s are incapable of taking cover. Cannot act as cover for troops. While stronger than the average Rookie or Squaddie, S.H.I.V.s still end up quite weak in comparison to higher-level soldiers. They are useful when faced with a shortage of able-bodied competent troops, although a few low-level soldiers should be taken in the squad to get promotions. S.H.I.V.s are very powerful against Chryssalids because of their immunity to poison and zombification. If you have the S.H.I.V. Suppression upgrade from the Foundry, they can also be helpful in stopping ranged units from supporting the Chryssalids. Contrary to what one might expect, a S.H.I.V. can rescue civilians on a Terror Site mission, though they do not emit a soundbite when reaching the civilian. In the same vein, a S.H.I.V. can activate objectives and collect Meld from canisters.
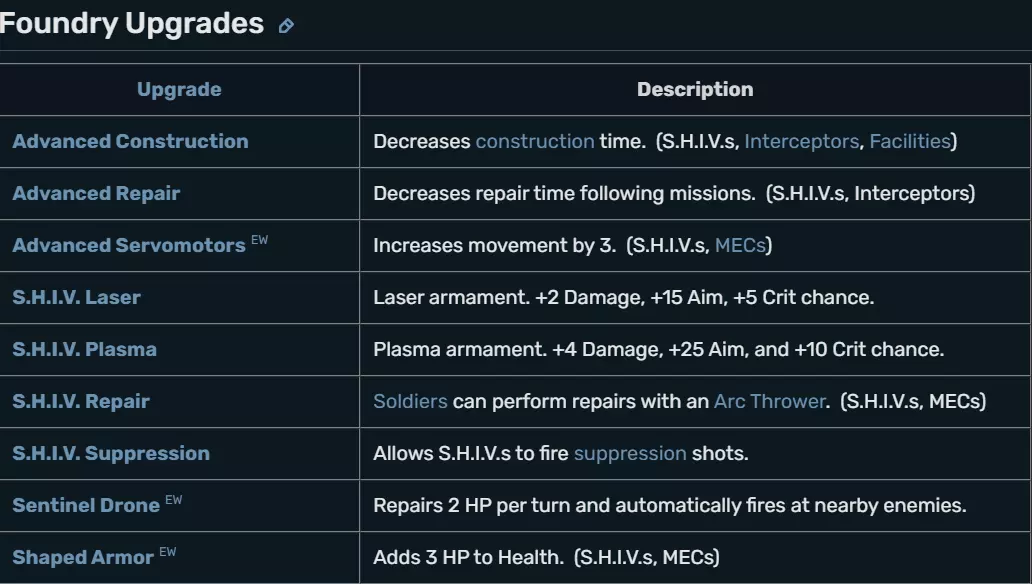
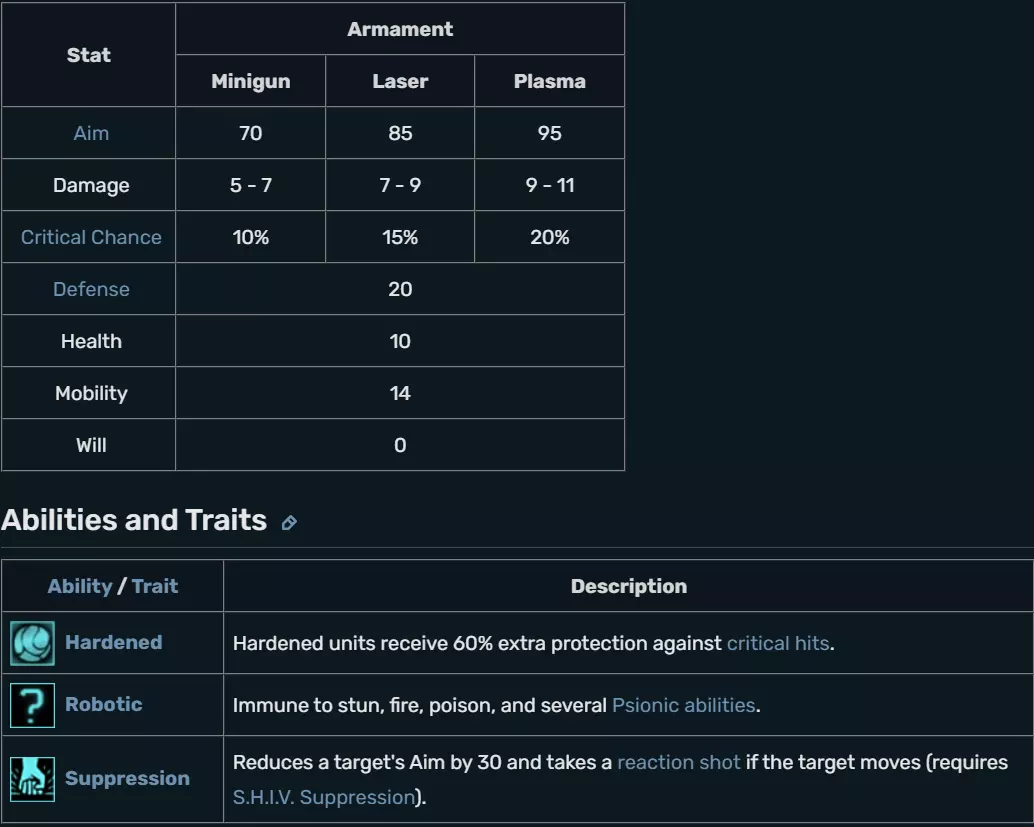
Medals WIP Outside ground to ground combat What?! Did you really expect me to write out all of that? No I am not. Deal with it. Research priorities This is generally the order I research various items (this doesn't include autopsies or interrogations, I generally wait until I can get full coverage over South America to make them become instant--except for the Outsider interrogation since that advances the story). Xenobiology -> unlocks Alien Containment Weapon Fragments -> unlocks SCOPE Alien Materials -> unlocks nanofiber vests Arc Thrower -> to capture aliens Beam Weapons -> allows to build laser rifles Carapace Armor -> allows you to build better armor (YOU WILL NEED this for Chryssalids) Experimental Warfare -> unlocks Foundry UFO Power Source -> unlocks Elerium Generator Heavy Lasers -> lasers cannons for Heavies Laser Pistols -> laser pistols for sidearms Alien Grenades (Foundry, if available) Improved Medikits (Foundry, if available) Tactical Rigging (Foundry, if available) Alien Nav Computer -> unlocks Satellite Nexus Elerium -> unlocks Titan Armor Stealth Satellites -> UFOs that aren't shot down can't find sateliites Plasma Rifles -> allows to build plasma rifles Titan Armor -> allows you to build titan armor Ammo Conservation (Foundry, if available) Improved Arc Thrower (Foundry, if available) New Fighter Craft -> unlocks the Firestorm fighter, the best in game Heavy Weapons Platform (Foundry, if available) SCOPE Upgrade (Foundry, if available) Outsider Shard -> unlocks alien base assault mission * Fusion Lance -> best fighter weapon in the game Sentinel Drone (Foundry, if available) -> SHIVs can repair themselves SHIV Suppression (Foundry, if available) -> SHIVs can do suppressing fire SHIV Laser -> SHIV weapons upgraded to lasers Meld Recombination -> unlocks MECs and Gene Mods for soldiers Skeleton Suit -> armor that I don't use but to count towards research Archangel Armor -> armor that I don't use but to count towards research Heavy Plasma (2 needed) -> build Heavy Plasma for Heavies Advanced Repair -> shorter repair times Advanced Flight (Foundry, if available) -> more flight time Shaped Armor (Foundry, if available) Blaster Launcher (2 needed) FOCUS SHOULD NOW BE ABOUT DESTROYING EXALT'S HEADQUARTERS Alloy Cannon -> unlocks alloy cannons for assaults ASSAULT THE ALIEN BASE DEFEND HEADQUARTERS OVERSEER SHIP MISSION WORK ON BEATING THE GAME How to maximize saving countries https://steamcommunity.com/sharedfiles/filedetails/?id=809053440 I am not copy and pasting all of that in here just no. Besides go give the man some credit. Second Wave Options The following Second Wave options are available by default: Damage Roulette: Weapons inflict a wider range of damage (minimum 1 damage, and maximum 150% of the weapon's base damage). Does not apply to explosives. Random damage range varies between 1 and the weapons' base damage + 50% (rounded down), a critical hit adds the base damage value to the previously calculated random damage. Example: an Assault Rifle with a 3 damage stat can deal up to 1-4 damage or 4-7 critical damage. New Economy: Randomizes funding provided by Council members from 10% to 400% of regular funding. Not Created Equally: Rookies have random initial stats. Range of Will: 25~59 (normal 40), values will vary by increments of 2 to the lower 25 limit. Range of Aim: 50~80 (normal 65), varies in increments of +5. Note that this is one way to make the Heavy class more useful in the endgame, at the expense of having to hire, screen and fire a lot of soldiers after getting the OTS New Guy perk. Range of Movement: 11~14 (normally 12), 1/3 chance of getting 11, 1/3 chance for 12, 1/6 chance for 13, 1/6 chance for 14 movement. All soldiers will have the same Health Points, value is defined by the difficulty level. Hidden Potential: As a soldier is promoted, their stats increase randomly. Normal Difficulty If the player completes the game on Normal difficulty, additional Second Wave options are unlocked: Red Fog: Combat wounds degrade the soldier's Aim and Movement attributes for the remainder of mission. Does not impact Aliens (reference). Absolutely Critical: A flanking shot guarantees a critical hit. The Greater Good: Psionics can only be learned from interrogating a psionic alien. Marathon: The game takes considerably longer to complete. Causes a delay in the initial deployment of most alien species, triples research time, doubles facility construction time, doubles infirmary recovery time, and doubles the cost of Engineering projects (i.e. constructing facilities and items). This increases the difficulty of the early game. Classic Difficulty XCOM-EU 2nd wave If the player completes the game on Classic difficulty, additional Second Wave options are unlocked: Results Driven: The funding provided by each nation is determined by its panic level. +25% funding at level 1 panic, ±0% funding at level 2 panic, -25% at level 3 panic, -50% at level 4, -75% at level 5. High Stakes: Random rewards for stopping alien abductions. Diminishing Returns: Increased cost of satellite construction. More Than Human: The psionic gift is extremely rare. Impossible Difficulty If the player completes the game on Impossible difficulty, additional Second Wave options are unlocked: War Weariness: Council funding decreases over time. E-115: Elerium degrades over time. Total Loss: Lose all soldier gear upon death. Alternate Sources: Doubles the power requirements to build facilities. EW adds more choices to second wave options The following Second Wave options are available by default: Aiming Angles: Units receive Aim bonuses the closer to flanking an enemy they are. Save Scum: Loading a saved game will reset the random number seed, so taking an identical action may yield different results. Training Roulette: Each soldier's training tree is mostly randomly generated. Does not apply to MEC Troopers.If the player completes the game on Normal difficulty, additional Second Wave options are unlocked: Mind Hates Matter: Psionic soldiers can't become gene modded or vice-versa. Classic Difficulty If the player completes the game on Classic difficulty, additional Second Wave options are unlocked: Itchy Trigger Tentacle: Non-cover aliens have a 50% chance of firing at soldiers upon being spotted. If triggered these Robotic units (Mechtoids, Cyberdiscs, and Sectopods) will fire in place of entering Overwatch as normal. A spotted soldier will finish their move before the alien(s) fire, meaning any cover bonuses will be in effect (notably, Low Profile, Will to Survive, Damn Good Ground, and the effect of Distortion Field). The Long War mod https://steamcommunity.com/sharedfiles/filedetails/?id=573645447&searchtext=tech Multiplayer tips Listen to what you hear. MEC trooper have a very distinct sound as well as chryssailds and ethereals. Camera zoom ins are not randomn that can tell you that the enemy sees you or something else important. Change your strategies very often remember you are fighting another person if you give them patterns the will beat you senseless. Try to have a lot of counters on hand example bio electric to counter mimetic skin. If you are in an unlimited be careful of aliens you choose ethereals have low movement and cannot keep up with other units well. Think outside the box, if you know the enemy armed the door and is waiting for you make your own door. Try to have a medic on hand at all times, I cannot express how many times most of squad started bleeding out and if I had a medic with revive could have put them right back in again. PUT A MEDKIT ON THE MEDIC. Ask me how I know.... Listening can also tell you if (being the brutes they are) if your opponent broke a window or kicked open a door. The fog of war is not super effective, let me explain. If you hear a breaching noise (broke window/kicked open door) and move your camera you can see which window or door was broken/opened. If you hear no noises and notice all doors are closed and no windows are broken, you can safely assume they are no enemies waiting/moving inside. Ethereals are much better on enemy unknown than they are on enemy within. Pay attention to the point limits above when building your squad. Also pay attention to your opponents point count as they can tell you what units they have. All aliens squads tend have numbers like 19,000 or 14,200. When the numbers are more like 32,549 that will tell you they have soldiers. I was once able to deduce on a match that my opponent had 5 ethereals and 1 soldier due to the points. Multiplayer strategies There are a lot I am only going to put down a couple for now and add in more later. The bouncer method (EW/EU unlimited): Okay everyone in a way has done this one before on a smaller scale. Essentially have 4 sniper, 1 medic, and 1 assault. Have the snipers get set up on the high ground and give them squadsight (it is a requirement). Have the assault have the mimetic skin and a mind shield send them out to "paint" the enemy and have the snipers rain down heck. The support is there to help when things go wrong. The spartan method (EW unlimited): Have one support and five mec troopers. Have three of the mec troopers wear the Ifrit mec suit and the other two the typhoon suit. Make the support mimetic skin and/or the bioelectric skin but have them wear ghost armor. The goal here is to keep the support alive and hidden to prevent targeting and bring any mec troopers who are bleeding out to revive them. The reason why you have three ifrits is for the mines. See an enemy or enemies toss a mine or two and if you do not want to wait for them to move have one of the typhoon toss a grenade over to activate them but only do it after you put down all your mines for the turn. Flamethrowers are something you are not going to use much but can work if close enough to an enemy and want a guaranteed hit. A note about this deck is that if they have a weakness to psionics and you can end up finding some or most of your squad mindcontrolled. Also never group them ever. I learned this lesson the hard way so do not repeat my mistake. The Flood strategy (EW 20,000): This build is all about killing and converting enemies to your side. Consists generally of a scout (try doing a rookie with mimeitc skin it is cheaper than a seeker but still allows the ability to scout and unlimited charges!), a sectoid commander, mechtoid, two chryssalids, and a mec trooper typhoon. I personally like to name them as (flood watcher, gollum, flood artillery, flood infector, and the gravemind respectively) If no one caught the references I am disappointed in you. This deck requires you to quickly get sight of the enemy and plan to accordingly. Try to move everyone close to the enemy but not in sight. The chryssailds should move behind a wall or on a roof nearby the opponent and then reveal and strike. Weaken soldiers to a low enough health that when the chyrssalids strike you will receive another unit. Do not have the chryssailds use both moves on moving right in front of the opponent as they will target them as high priority and kill them. You have to be sneaky with them. Downside to this deck is if the entire squad for your opponent are aliens it will ruin the entire purpose of the build. Ethreal Slayer This technique is special enough that I have decided to give it's own chapter. This for me is one of my biggest secrets I figured out after doing the a lot of multiplayer matches. This build is most effective against, well ethreals as the title suggests. It is also only possible on unlimited matches (if doing multiplayer) and it works better with Enemy Within than Enemy Unknown. You need six soldiers that are either sniper or assault (your preference though I would highly recommend assault as it does better), give them psi armor, mind shield, maximum rank, alloy cannon or plasma sniper, and the gene mod of neural feedback, and the bone marrow one ('bastion' gene mod for multiplayer). By doing all of this correctly ethreals the strongest psi unit finds their strength turned into their weakness as ethreals will receive a lot of damage just for attacking the soldier even if the attack fails, the chances of are very low. The soldiers have chances to mind control the ethreal with a 70% chance success without psi inspiration or mindfray on the enemy while the ethreal has a measly 20% chance success rate of mind control on the soldier! Another thing to note is that soldiers receive less damage because they have such high will (ex. psi rift does 12 some damage on a normal soldier the special one receives only 4 damage!) and what damage they do get they will heal at a certain point thanks to the bone marrow mod! So make sure to remember this and if anyone tries to run six ethreals....Obliterate them. Conclusion Guess what? You made it is the end for now. I know there is no way I managed to get everything, but I believe I got the majority. I will be coming back and editing more info later. I know you just read a lot of info so congratulations! I wish you the best of luck on battlefield commander!