换一换
换一换 


这是一份详尽的100%成就指南,包含从0到100%的逐步流程。如果您正在寻找特定的成就或收集品,可以使用Ctrl+F并在搜索栏中输入相关内容以获取更直接的帮助。 我会为我的所有指南提供支持和调试帮助。如果您有任何问题、遇到困难或发现指南中的错误,请随时留言,我会尽快回复您。祝您游戏愉快! 简介:
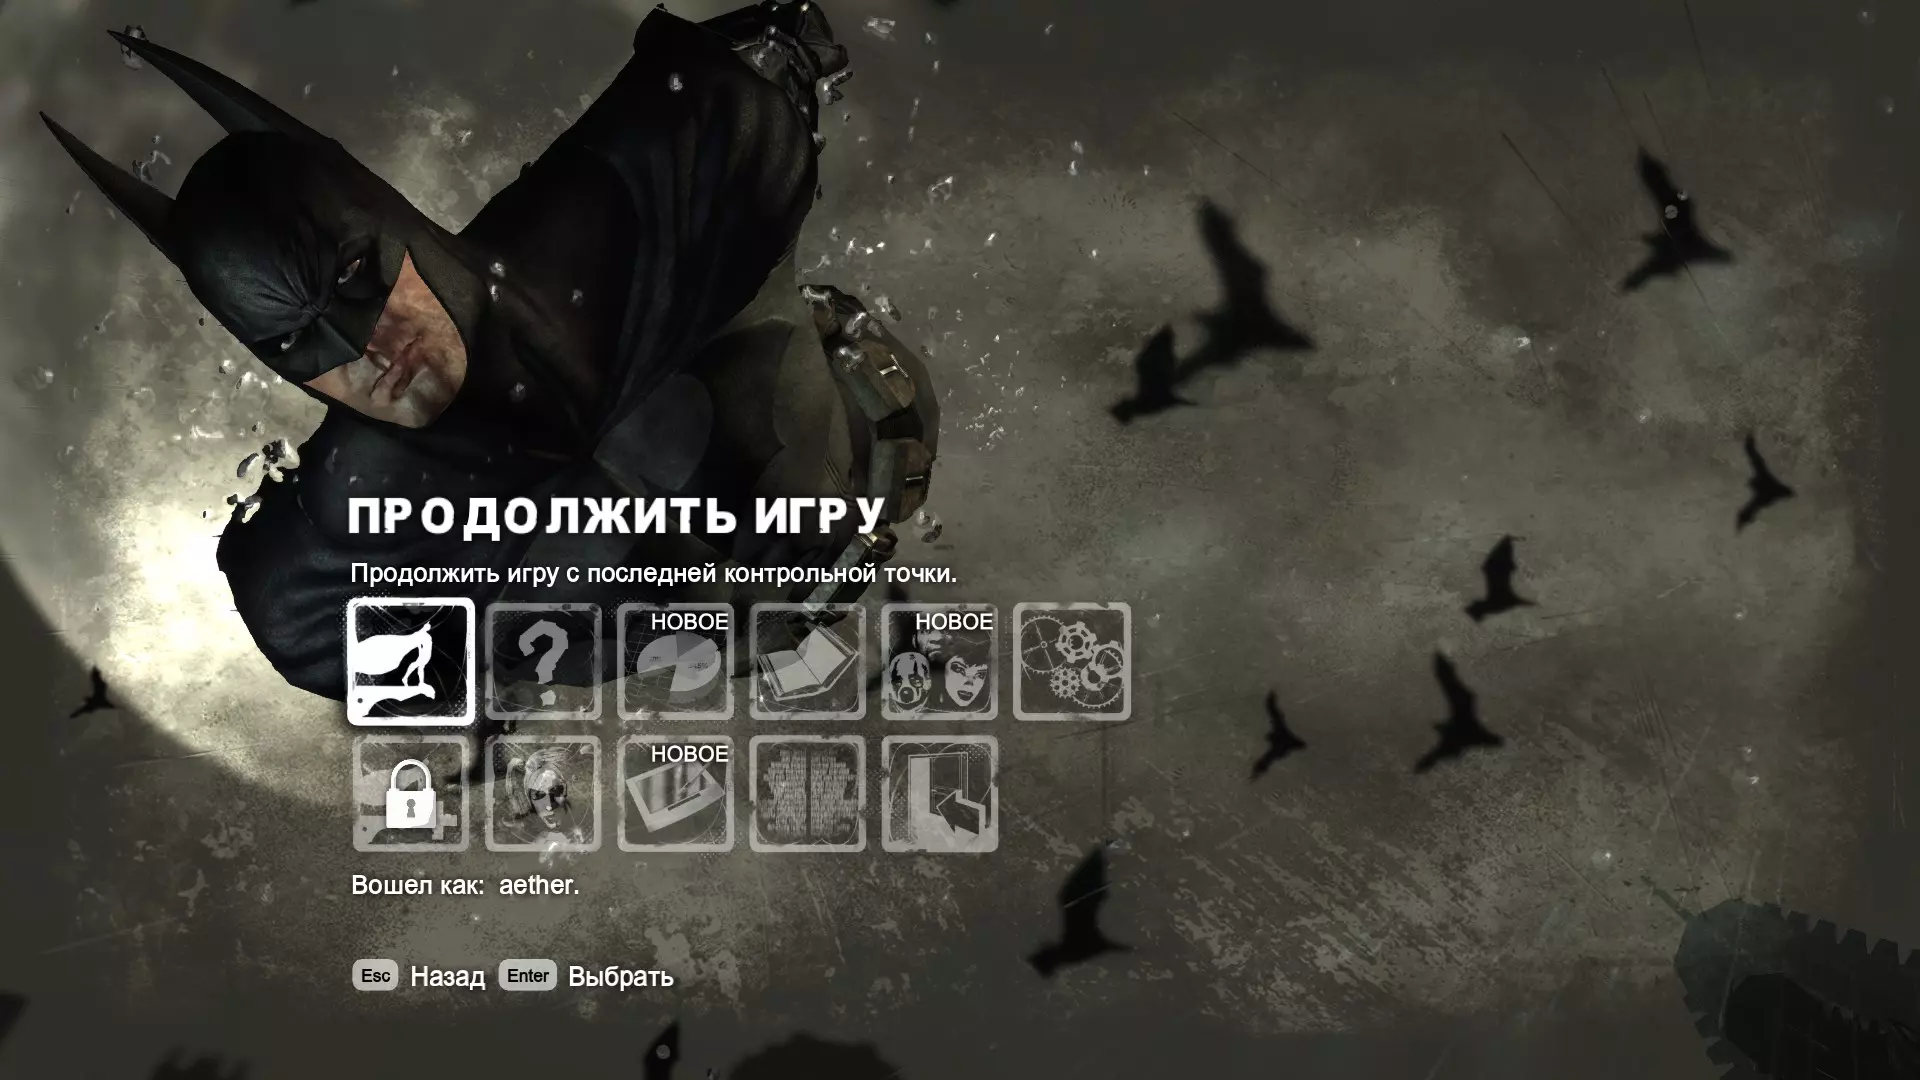
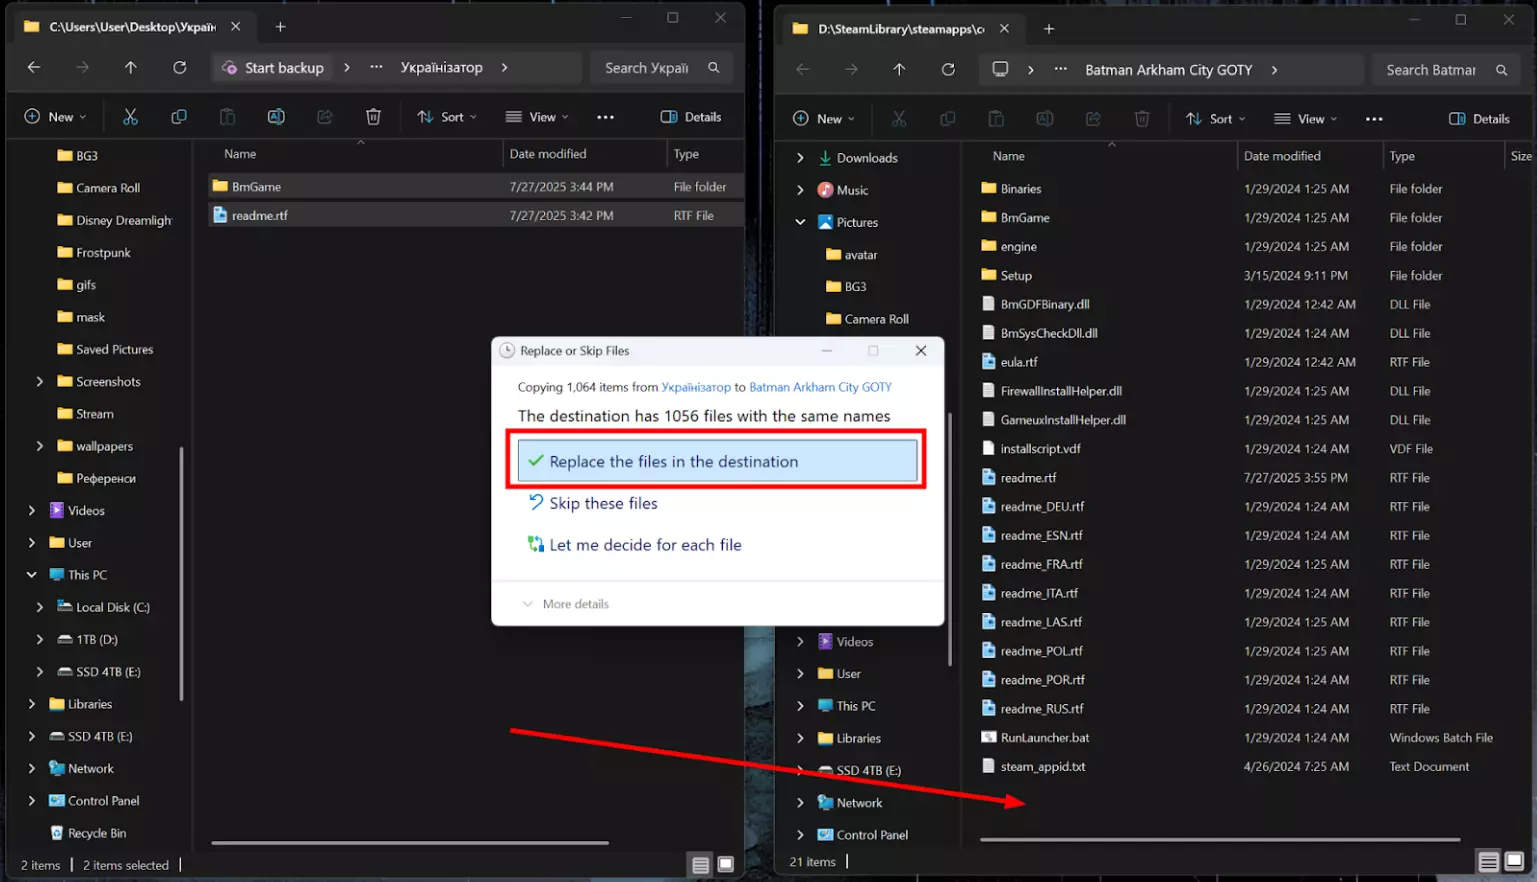
Achievement Breakdown: (44) Story Related: (16) Side Missions: (10) Collectibles: (7) Slay: (2) Miscellaneous: (2) Challenges: (7) DLC – Catwoman Bundle Pack: (6) Story Related: (2) Collectibles: (2) Challenges: (2) This is Part 1 of 2 for the 100% Achievement Guide: Batman Arkham City. Part 1 only covers our first playthrough & the locations of all 360 Riddler Collectibles as well as Catwoman’s DLC & Collectibles/Challenges. Part 2, linked in the Conclusion of the guide, covers: NG+, Batman’s Physical Challenges, Harley Quinn’s Revenge DLC, & all levels of Riddler’s Revenge for the four playable Characters. Batman – Arkham City is going to be a true test of your discipline & combat prowess; it is an extremely challenging 100%. For the Perfect Knight – Day Two Achievement, we will have to beat the game once on any Difficulty (Normal or Hard), beat NG+, beat all 12 Side Missions on BOTH the Base Game & NG+, as well as purchasing all Upgrades/Gadgets, finding all 360 of Riddler’s Collectibles, complete all 40 Physical Challenges, & beating all 72 Ranked Challenge Medals & 108 Campaign Challenge Medals of Batman’s difficult Riddler’s Revenge Challenges. Only the Side Missions need to be completed on both playthroughs; the Gadgets/Upgrades & Riddler Collectibles/Challenges, will remain completed & carry over into NG+ fortunately. As shown above, there is a ludicrous amount of Collectibles to find in the Base Game. Some will only be accessible after beating further into the Main Story & acquiring new Gadgets. To not overload us all at once, I will include the Collectibles locations as they appear & become relevant. While the indoor locations are straightforward to explain, the outdoor locations in Arkham City proper, are not. I will include progress maps of the Collectibles locations to help us out where possible. For those that want a more independent approach at finding the 360 Collectibles in the Base Game, here is an incredibly useful guide by gamepressure. Its maps follow along with your own in game Collectibles as they are listed. If you are missing Collectible #5 in the Museum, simply scroll through the guide to see the description for Collectible #5. No Collectible is missable, feel free to beat the Main Story & Side Missions first, saving the tedious Collectible hunting until the very end. https://guides.gamepressure.com/batmanarkhamcity/guide.asp?ID=12887 For those interested, here is an organized list of all the Achievements/Secret Achievements. This is how I derive my Achievement Breakdowns & the first reference I create before I begin my 100% journeys. https://steamcommunity.com/sharedfiles/filedetails/?id=2773373426 Normally, Batman’s Skins (if you have the Game of the Year Edition) are only accessible on NG+. We can however use the button inputs: Left, Left, Down, Down, Left, Left, Right, Up, Up, Down to unlock them early for our first playthrough. You will know you did it right because an audio cue will play; the inputs need to be done quickly. You need to complete the Main Story Mission – Bruce Wayne Held Hostage before we can do this when we locate our Bat Suit. With the Bat Suit, quit to the Main Menu & input the code; when you go to resume your game a new set of options will appear where we can pick a Skin. Before You Play! – Game Stutter Fix!: Arkham City has an awful port to PC. No matter how good your PC is, when you are outside in Arkham City proper you will notice severe lag & drop in FPS; it is not as bad in doors. To fix this without mods you will need to go into your Save File settings & change some code around; this is not as hard as it sounds. First, go into the Computer Folder – Documents – WB Games – Batman Arkham City GOTY – BmGame – & Config. In the Config Folder, look for the Configuration Setting File called BmEngine; this will directly affect your Save File so be careful & only change what I list. In the BmEngine File, press Ctrl+H to bring up the Find Bar; this will allow us to search for things within the BmEngine File. Type poolsize into the “Find what” bar & select “Find Next” to where the Pool Size is located. Set the Pool Size to 4096 (this translates to 4gb & is safest if you are unsure what your VRAM is). Feel free to set it higher if you have more than 4gb of VRAM. The next step is to type sizeofpermanentobjectpool into the Find bar (if it says it could not find it, change the direction of the search to up instead of down so it searches above where we are located right now). Double the current value from 1160000000000 to 232000000000. Just change the first three numbers, leave all of the 0s. Lastly, we need to adjust the hysteresislimit & set it to 0. That is the last adjustment we need to do, but do not close out of BmEngine File just yet. Minimize the File, & right click it & bring up the File’s Properties. In Properties, set the Attributes to “Read-only”. If we close the File without doing this, all of our adjustments will not save; set it to read-only to hard save our changes so it will not reset when we close down the File. With that set, close the File & we can begin playing Arkham City as it was intended… don’t ask me why Rock Steady couldn’t Patch this themselves though… *Guide contains major spoilers. Sequence 1: A City In Distress 1. Main Story: Catwoman Episode 1 DLC, Bruce Wayne Held Hostage, Rescue Catwoman 2. Side Missions: 1/12 3. Achievements: 5/64 ----------------------------------------------------------------------------------------------------- To unlock NG+ at the end of our first playthrough you must be playing on either Normal or Hard Difficulty. Playing on Easy Difficulty will not unlock NG+ & will waste your playthrough. I strongly suggest playing on Normal. Unless you are a Batman veteran & want a lot of pain & suffering, I would not recommend playing on Hard. You cannot change the Difficulty once you start a game & it will carry over into NG+ which can be very challenging. Park Row:

成就#1 - I’m Batman:化身蝙蝠侠。 剧情相关。完成序章主线任务【布鲁斯·韦恩被劫持】,并在艾斯化学工厂顶部获取蝙蝠战衣和装备即可解锁该成就。

成就#2 - 酸液陷阱:拯救那位女子,但她真的陷入困境了吗? 剧情相关。完成主线任务 - 营救猫女并将她从双面人手中解救于所罗门·韦恩法院。 支线任务#1 - 冷血杀手1:在我们完成主线任务 - 营救猫女后,这个支线任务将有随机几率激活。当我们探索阿卡姆城并前往寻找小丑的途中,请留意是否有电话铃声。如果听到铃声,迅速追踪并接听,电话另一端会是维克多·萨斯……铃铃铃。 我在公园街找到了第一部电话,但它可能在任何时间出现在任何地点。

成就3 - Saviour:拯救医疗志愿者。 剧情相关。在主线任务“追踪小丑”中,进入教堂/医疗中心并击败劫持亚伦·卡什和其他人质的四名暴徒。 跟随小丑的信号穿过工业区前往钢铁厂推进主线任务,但暂时不要进入;我们可以先完成一些支线任务…… 工业区: 支线任务2 - A.R.训练基础1-4:在工业区的最开始会出现任务标记,并通知此支线任务已激活。前往导航点并完成所有四个滑翔挑战,以解锁非常快捷的钩爪推进器。60%完成 支线任务2 - A.R.高级训练5-8:基础AR训练任务完成后,我们现在可以进入高级训练任务。前往导航点,完成四个任务。其中有些任务可能相当棘手,尤其是高级AR训练任务1。100%完成

成就#4 - AR骑士:完成全部8个增强现实训练。完成最后的高级AR训练任务后即可解锁该成就。 支线任务#1 - 冷血杀手2:在探索过程中,有机会听到另一部电话铃声。开启侦探模式可帮助定位电话,电话会显示橙色半圆以标识声音来源。接听电话即可正式开始该支线任务。后续会有大量时间在阿卡姆城主区域探索,因此不必担心电话不会立即出现,可能在1分钟或15分钟内发现响铃的电话。当接听电话后萨斯挂断时,会进入限时寻找下一部电话的阶段。跟随城市中的导航点前往随机电话位置,并在计时器结束前接听电话。如果未能及时接听,将会出现游戏结束画面并返回上一个检查点。当你到达电话处,需要在扎斯说话时追踪他的信号。我们只能追踪到特定位置,之后进度会停止,需要寻找新的电话。完成度19% 公园街: 支线任务#3 - 暴力行径:前往公园街西角的外围墙处,世界地图上会显示一个蓝色六边形标记。到达导航点后,会发现杰克·莱德正遭到暴徒袭击;击败暴徒以解救他。在瑞恩获救后与其交谈,将解锁需要从施暴暴徒手中解救政治犯的事件。完成这个支线任务需要完成16个此类事件,这些事件会在游戏过程中随机出现。这是另一个进度因玩家而异的支线任务,其遭遇会随机出现。如果可能,请尝试记录你已经遇到过暴力事件的地点,以避免在游戏后期回溯;请在第34序列结束时查看此支线任务的事件地图。当前进度6% 支线任务#2 - 冷血杀手3:继续探索,有可能会有另一部电话开始响起。在下一步找到电话后,对萨斯的位置进行更多三角定位,以推进支线任务。32% 完成 欢乐大道: 支线任务 #4 – 脆弱联盟 1:一直以来,在欢乐大道的世界地图上有一个显示为【求救信号弹】的支线任务。前往该地点,我们会在克兰克玩具公司大楼外找到信号弹。解决大楼外的暴徒后进入内部,即可找到贝恩。 与他对话以推进支线任务,之后我们需要定位并摧毁6个泰坦容器。 工业区: 支线任务 #4 – 脆弱联盟 2:第一个泰坦容器可在工业区找到。在世界地图上为标记点设置导航点并前往;使用我们的爆炸凝胶将其摧毁。15% 完成 鲍厄里: 支线任务 #4 - 脆弱联盟 3:我们可以在鲍厄里找到第二个泰坦容器。在世界地图上为标记点设置导航点并找到它;使用我们的爆炸凝胶摧毁它。这是我们目前可以立即摧毁的仅有的两个,其余四个将在我们推进主线剧情时解锁。 30% 完成 公园街: 支线任务 #5 - 幕后观察者 1:在推进主线剧情之前,我们可以开始另一个支线任务。到达截图中所示的神秘观察者所在地,他们会在地面上画一个符号,我们必须在侦探模式下扫描该符号。
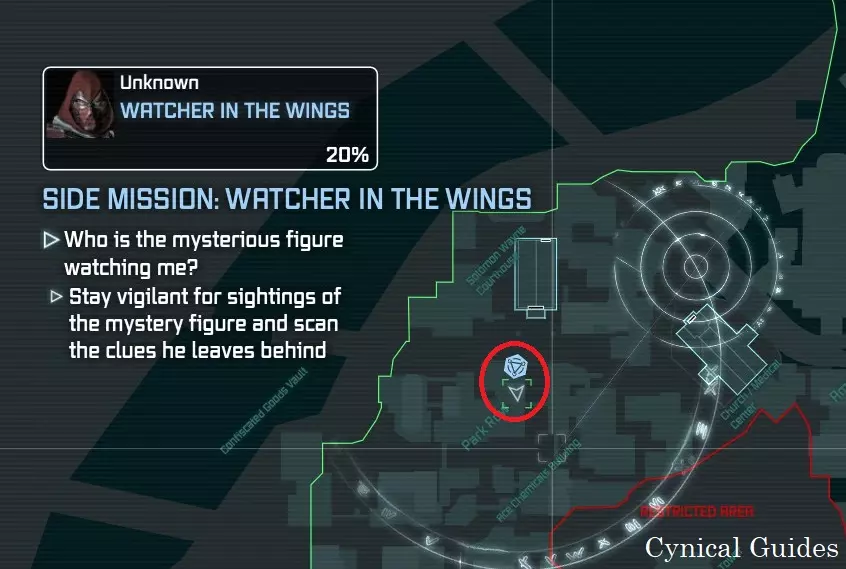
我们需要在另外三个地点找到这个观察者才能完成支线任务;随着主线剧情的推进,他的新位置将会显示。完成度20%

成就#5 - Pay Your Respects:一段缅怀的时刻。 在进行主线故事之前,打开世界地图,在艾斯化学工厂名称中的“Building”一词中间位置设置一个传送点。前往该传送点,我们会来到帝王剧院外。剧院入口右侧有一道可以翻越的铁丝网,翻过去后就能进入名副其实的犯罪巷。沿着小巷往前走,然后左转,就能看到布鲁斯·韦恩父母遇害处的粉笔轮廓。 靠近轮廓并“表达敬意”,蝙蝠侠会蹲下身,神情沮丧。聆听这段充满情感的配乐,让镜头缓慢环绕蝙蝠侠两次,即可解锁该成就。完成此过程大约需要5分钟。序列2:朋友的重逢 1. 主线剧情:追查小丑,钢铁厂,猫女第二章DLC 2. 支线任务:1/12 3. 谜语人奖杯:3/247 4. 猫女奖杯:12/35 5. 成就:8/64 ----------------------------------------------------------------------------------------------------- 钢铁厂:

成就#6 - Chimney Sweep:只有一条路可进。 剧情相关。通过烟囱进入钢铁厂,并从熔炉室离开。当通过爬行空间进入满是暴徒的装卸区时,该成就将解锁。

成就#7 - One-Armed Bandit:完成相关剧情即可解锁。剧情相关。收集到远程电力充能装置后,返回装载区并击败 Mister Hammer 迷你 Boss 即可解锁该成就。 【哥谭市公园 row - 猫女】:完成主线任务【钢铁厂】后,将解锁猫女的下一个 DLC 任务。完成该 DLC 任务的第一个目标,并从猫女的公寓中取回她的物品。之后,你可以快速收集散布在阿卡姆市各处的猫女奖杯,以完成相关收集。
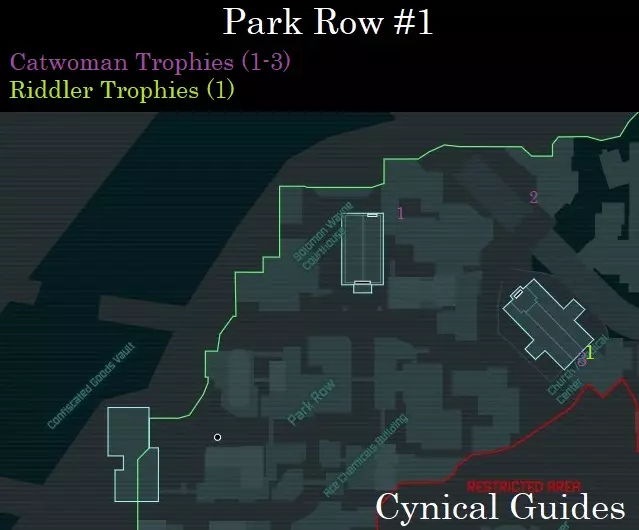
猫女奖杯#1:爬出覆盖猫女公寓的笼子,向下看向公寓正下方/南侧的方形小巷。跳入方形小巷,我们可以发现第一个奖杯被锁在小巷出口上方悬挂的一个小笼子里。走到笼子下方,向天花板猛扑,我们就能爬进笼子并拾取奖杯。 猫女奖杯#2:从猫女公寓出发,爬上她住处右侧的建筑,然后跳上靠近外围墙的破损天桥。沿着这段短天桥向东走,我们可以看到墙边有一栋建筑,上面有水塔和一个写着“所有外围墙均受监控”的广告牌。爬上这栋建筑,就能在广告牌正下方找到这个奖杯。猫女奖杯#3:将导航点设置到教堂/医疗中心最深处,位于“Medical”中的“e”字顶部。在教堂后方的小巷里,可以找到一个大型笼子,里面有四个压力板;猫女奖杯就在笼子顶层的天花板上。要获取它,站在第一个压力板上,它会解锁猫女和蝙蝠侠奖杯的笼子。跳向天花板并爬到下一层;从这里再次跳向天花板即可收集奖杯。 谜语人奖杯#1:既然我们在这里,可以顺便收集这个谜语人奖杯,省去之后作为蝙蝠侠回来的麻烦。 Bowery - 猫女:
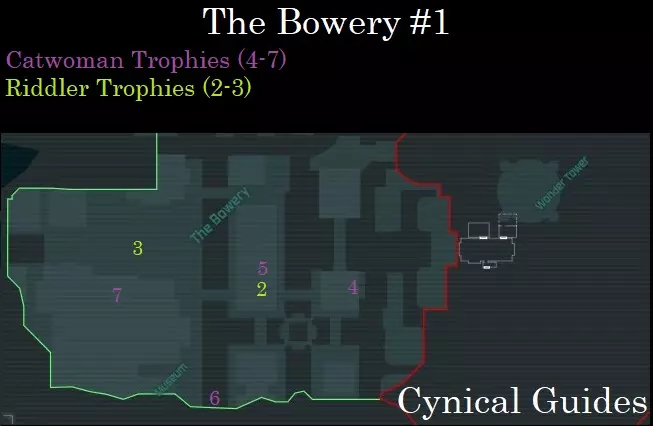
猫女奖杯#4:现在前往地图最东角的鲍厄里区。爬上一栋高楼,楼顶挂着倾斜的橙色“哥谭”霓虹灯招牌。奖杯位于两个半圆形花盆之间的墙壁上,与一个谜语人奖杯相对。 谜语人奖杯#2:查看世界地图,将导航点设置在地图上“鲍厄里”字样东南方向的大型矩形建筑。登上屋顶,解决持枪暴徒,然后站在屋顶中央的圆形直升机停机坪上。转身朝南看向屋顶,就能看到这个谜语人奖杯在一个小拱门上。要以猫女身份到达那里,需爬上附近顶部有红灯的无线电塔,然后从塔上跳到拱门上。(从技术上讲,以蝙蝠侠身份收集更容易,因为他有蝙蝠抓钩)。 猫女奖杯#5:从我们找到谜语人奖杯的屋顶出发,直接前往我们正下方的位置,可以看到一个地下通道,通道两侧墙壁上各有3个发光的绿色问号。爬到地下通道的天花板上,沿着天花板移动,就能在其中一组问号的正上方找到猫女奖杯。 猫女奖杯#6:前往Bowery区名为Jezebel Center的长长的玻璃隧道的最南端。在尽头,爬上墙壁到达一个孤立的阳台,即可获得该奖杯。猫女奖杯#7:在Bowery区域可收集的最后一个奖杯,登上博物馆屋顶并前往中央位置,那里会有一个大型发光玻璃穹顶。沿着穹顶走,我们可以在这个穹顶和其北侧较小的方形穹顶之间找到这个奖杯。 谜语人奖杯#3:从博物馆屋顶向北眺望单轨轨道,我们可以看到这个谜语人奖杯位于一个小铁柱顶端,我们可以跳过去。 工业区 - 猫女:
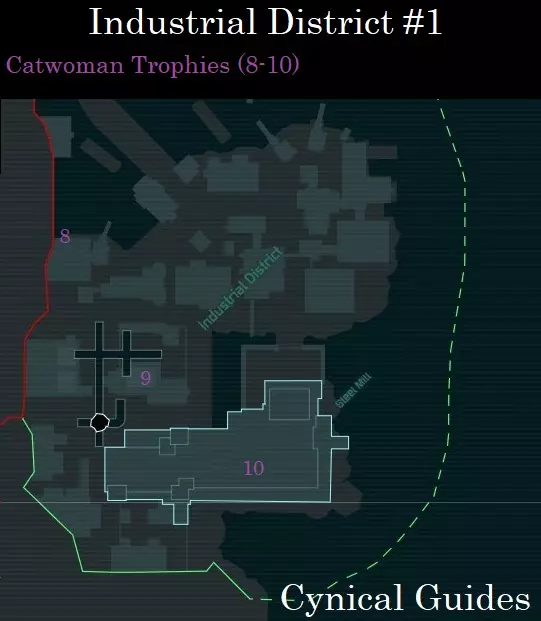
猫女奖杯#8:进入工业区,沿着街道前往该区域的西北角落,那里有一台孤零零的起重机靠近 waterfront。跳过围栏,走上一些金属楼梯,来到水上的走道,经过起重机,走到 perimeter wall 旁的死胡同。站在走道的栏杆上,蹲下身子,向下进入天花板攀爬状态,即可在走道下方拿到这个奖杯。 猫女奖杯#9:爬上“超级碰碰车”建筑——就是有很多破损碰碰车的那栋,在铁丝网屋顶下方可以找到这个奖杯。只需跳向天花板即可收集。 猫女奖杯#10:爬上钢铁厂的屋顶,到达之前作为蝙蝠侠进入过的大烟囱底部。在屋顶的烟囱和方形金属无线电塔之间,会有一个长长的铁丝网笼,笼子两侧有带有沙滩球的海豹木质剪影。从北侧进入这个铁丝网笼,我们可以向上扑到天花板,收集里面的奖杯。 欢乐码头 - 猫女:
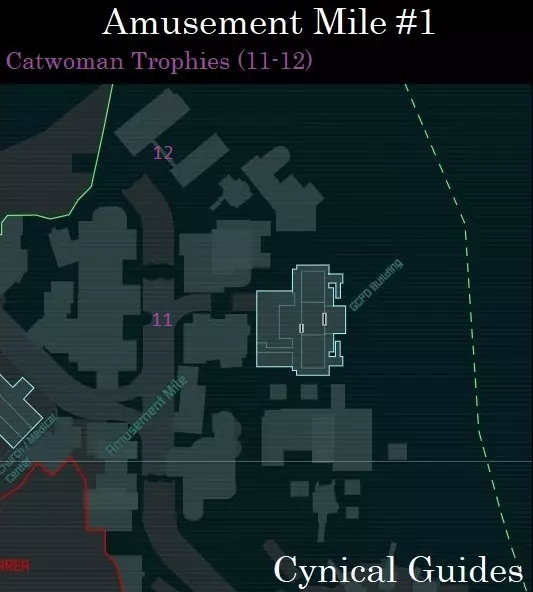
猫女奖杯#11:前往断裂的天桥部分,然后从其右侧跳下,落到下方的 ledge 上。从这里,使用【天花板扑击】,沿着天桥的下方攀爬即可拿到奖杯。 猫女奖杯#12:最后,前往地图东北角的毒藤女巢穴。走到通往她巢穴的走道下方,使用【天花板扑击】沿着其下方攀爬即可拿到奖杯。在我们推进DLC【猫女第二章】的流程时,几乎不可能错过这个奖杯。

成就#8 - 阿卡姆城塞壬:拜访老朋友 剧情相关。进入毒藤女的巢穴并击败她的数波被控制暴徒,以完成猫女第二章,解锁该成就。 序列3:收集品快速收集1 1. 主线剧情:寻找解药 2. 支线任务:1/12 3. 小丑气球:3/24 4. 泰格摄像头:3/48 5. 谜语人奖杯:13/247 6. 猫女奖杯:12/35 7. 成就:8/64 ----------------------------------------------------------------------------------------------------- 工业区:在我们继续主线剧情之前,让我们利用这段时间快速收集阿卡姆城周围的可用收集品。这样可以立刻完成大部分收集品,剩下的就只有那些被主线剧情进度和我们尚未获得的装备锁定的收集品了。在探索时,注意留意任何响铃的电话或正在进行的袭击事件。事先声明一下……这对我们所有人来说都会非常繁琐,对你而言也不会有太多乐趣;Rock Steady这次在收集品的设计上确实有些过头了……
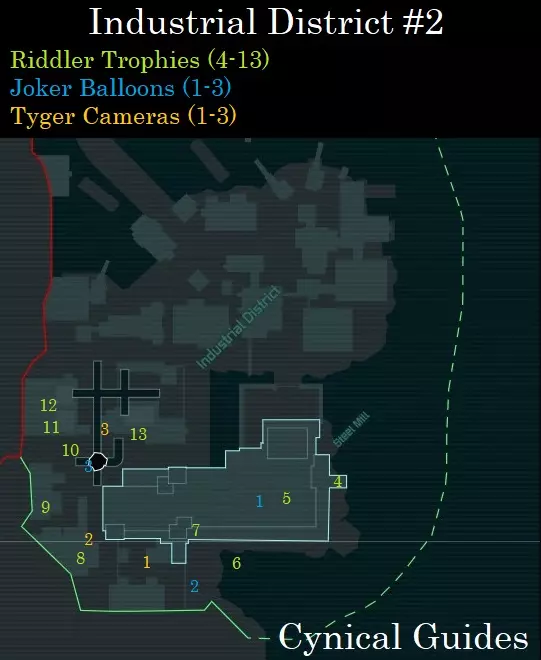
Riddler Trophy #4: After we are thrown out of the window by Joker, make your way along the waterfront South of The Steel Mill & we can find this Trophy on a small extended overhang a little ways above the water. The moment we do, if you have not already grabbed one of these before as Batman, we will be interrupted by the Riddler & unlock his thoughtful Riddles tab in our PDA. We can now keep track of things as we go along. Pay attention to the Physical Challenges at the very end of the Riddles tab to chip away at as we play. Riddler Trophy #5: Make your way to the Steel Mill roof directly in front of the chimney at the South end. Here we can see a Structural Weakness we can blow up with Explosive Gel. Blow up the wall & walk through & you will see a glowing Question Mark. Look behind it, & we will see a Trophy Cage that has our Riddler Trophy in it. Joker Balloons #1: Walk around to the entrance of the room where the Question Mark is & face inside it once again. From the outside, look up above you to the left & we can see a set of Balloons being held by a nutcracker statue up to the left of the chimney. Take them out with a Batarang. Riddler Trophy #6: From the Steel Mill roof, look off the edge down into the bay in the South corner of the map. Down below we can see a large submerged cage; inside will be a Riddler Trophy. To get in there, we need to leap off the roof & Dive Bomb to gain speed. When you are ready, pull up & Glide yourself carefully above the water, inside the cage to land on the Pressure Plate at the bottom. Grab the Trophy & Grapple out of the cage. Joker Balloons #2: Grapple out of the cage in the bay, then grapple up onto the balcony above us to the West. After climbing off the railing, look up & we can see a set of Balloons on the hat of a nutcracker standing in the middle of the road. Riddler Trophy #7: Across from the nutcracker that had the Balloons on it, we can see a small train engine a little ways down the road. Walk up to it & equip your Remote Electrical Charge; fire a charge into the Industrial Motor to activate the train. The train will only travel a short distance, but when it stops, we can climb onto its roof & use Explosive Gel to blow up a Structural Weakness in the ceiling above it to find the Trophy; you will need to use the Batclaw to grab it. Tyger Camera #1: Walk back over to where the nutcracker is & enter the compound to the West of it. Grapple or walk up to the second floor of the walkway in its center, & we can spot a Tyger Camera just above a set of stairs leading back down to the ground floor. Take it out with a Batarang. Tyger Camera #2: Carry on to the far South West end of the Industrial District & we can find a building that has strange conveyor ride that leads inside a flaming clown mouth inside it. Look up to the right of the iron gates barring it to find a Camera. Riddler Trophy #8: Slide underneath the iron gate barring access to the building ahead of us & we can use our Batclaw to grab a Riddler Trophy attached to the ceiling of the conveyor system. Riddler Trophy #9: Leave this building & walk down the street North & take a left under an archway reading “Death Ride”. There is a Riddler Trophy in the building that will be ahead of us, but we do not have the required Gadget to collect it. Instead, grapple up to the roof of this building & we can find a Pressure Plate & a Trophy Cage. Stand on the Pressure Plate & one out of 8 Question Marks will light up ahead of us. Keep your eye on this Question Mark because after a second, they all will light up & begin turning. When they stop turning you will have to throw a Batarang at the initial Question Mark to open the Trophy Cage. Joker Balloons #3: From the top of this building, walk to the roof edge & face out to the North East. Below us, we can see a crane close to a large hole in the pavement that has a set of Balloons attached to the top of its boom. Riddler Trophy #10: Drop off the building now & approach the crane; crouch underneath it to locate this Trophy. Riddler Trophy #11: Directly North of the crane, we can see a long concrete wall that has a chain link top close to a building with piping coming off its walls. Climb over the concrete wall & walk under the chain link top to see three Pressure Plates & a Trophy Cage. We now have to activate all three Plates without touching the floor. To do this stand on the first Plate & press the dodge button to jump Batman over to the second Plate; he jumps way further than you think. Activate all three this way & the Cage will unlock. Riddler Trophy #12: Grapple onto the roof of the piped wall building beside where we are & we can find another Trophy Cage with five Pressure Plates beside it. They light up in sequence leading towards the Cage before resetting. Start at the far end & wait for it to reset; time it out, & sprint down the Pressure Plates as they light up until you get to the Cage. If done quickly, it will unlock. Tyger Camera #3: Drop back down into the area with the crane & the large hole & walk across the street from where the concrete wall we found Riddler Trophy #11. Look over to the right of the large square armored vehicle blocking the nearby archway & we can see a Camera beside some flashing coloured lights. Riddler Trophy #13: Hop over the small concrete wall to the right of the Camera we just destroyed & we can find a Structural Weakness close to a barrel fire. Blow up the wall with Explosive Gel & we can walk in to collect a Riddler Trophy. Sequence 4: Collectibles Blitz 2 1. Main Story: Finding the Cure 2. Side Missions: 1/12 3. Joker Balloons: 7/24 4. Tyger Cameras: 9/48 5. Riddler Trophies: 20/247 6. Catwoman Trophies: 12/35 7. Achievements: 8/64 ----------------------------------------------------------------------------------------------------- Industrial District:

Riddler Trophy #14: Climb back over the small wall & head across the street to the South from the last Trophy. Grapple onto a girder attached to a lower level of the Steel Mill building. Walk up the small roof & turn on Detective Mode to see some Soft Wood Paneling. Kick it apart & grab the Trophy behind it. Joker Balloons #4: Look across to the next building to the North, beside the Super Dodgems building, & we can see a set of Balloons on top of a speaker system. Tyger Camera #4: Drop down into the street directly East of the Balloons & we can see an iron gate in an archway dividing access to the road. We can find this Camera on the North side of this gate on the on pillar closest to the waterway. Riddler Trophy #15: Walk down the street a little ways North & turn on Detective Mode looking left to find some Soft Wood Paneling in the wall of a Tyger CCTV Relay Tower. To get inside, we will need to launch into the air & Glide through the Panels. Inside the tower, we can find a Trophy Cage, six Pressure Plates on the ground & one Pressure Plate set into the wall. We need to activate the Pressure Plate on the wall without touching any of the six Pressure Plates on the ground or the Trophy Cage will close. To do this, launch yourself back up into the air & Glide inside the tower to fly into the Pressure Plate on the wall. As soon as you land on the wall, you need to quickly tap A (or Space Bar) to push yourself off the wall back into a Glide to get past the Pressure Plates on the ground. If done successfully, we can walk over to grab the Riddler Trophy. Joker Balloons #5: Grapple up to the very top of the Tyger CCTV Relay Tower & we can find a Balloon set on top of the neon orange Tricorner Naval sign. Tyger Camera #5: Drop down off of the Relay Tower just South into the small compound behind us, close to the Super Dodgems building. We can find the Camera on top of the archway leading back onto the street close to a speaker system. Riddler Trophy #16: Walk through the archway we found the Camera on & walk across the street North over to the next building. Grapple up a concrete wall & drop over to the other side to find three Pressure Plates & a Trophy Cage. The Pressure Plates will light up in sequence moving away from the Trophy Cage. Simply run along the three Plates as they light up & the Trophy Cage will open for us. Riddler Trophy #17: From the last Trophy, Grapple onto the building right beside us & if you look up to your right, you can see two large chimneys with a small bridge in between them. Grapple up to the bridge & we can find a Trophy Cage; opening it is a little complicated. Located on these two chimneys, facing out towards the East, will be two Pressure Plates; while facing East we can also see another chimney with a Pressure Plate on it slightly off our left. What we must do to open the Trophy Cage is fly up & Glide into all three of the Pressure Plates without touching the ground or breaking our Glide. With the Grapnel Boost, this is easier than it sounds. Grapnel Boost off one of the chimneys, Glide into one Pressure Plate, push off the wall back into Glide, & Grapnel Boost up another chimney. Rinse & repeat until all three Pressure Plates have been Glided into. Tyger Camera #6: Glide down to the waterfront & turn around to look at a building with a few bay doors & a neon green beer sign; we can find the Camera on the wall directly in the middle of the bay doors. Riddler Trophy #18: From where we found the last Camera, climb over the fence near the green beer sign & turn on Detective Mode to find a Structural Weakness in a wall below the Gotham Hardware sign. Destroy it with Explosive Gel, & we can find a strange mini-game involving a rolling Trophy Cage & two Industrial Motors. Use the Remote Electrical Charge & charge the different Motors to figure out which does what; one Motor pushes & pulls the Trophy Cage while the other changes the Motors position. Move the push/pull Motor to the left side of the mini-game, then move it back to the right side, as soon as you do this quickly charge the push/pull Motor to pull in the Trophy Cage over to the right side of the mini-game as it passes. Release the Cage & it will fall into the lit square box at the bottom where we can break the Cage open. Riddler Trophy #19: Exit the Gotham Hardware store & Grapple up on top of the nearby crane close to the waterfront. On top of the crane will be an Industrial Motor; use the Remote Electrical Charge to lower the crane hook down into the water. After the hook has fully entered the water & the machine has stopped moving, charge the Motor again & bring the crane hook back up. The hook will now be holding a Riddler Trophy; use the Batclaw to collect it. Joker Balloons #6: While still on top of the crane, look up above our heads & we can find a set of Balloons on top of the small balcony where the cranes luffing wires are attached to. Tyger Camera #7: Return down to the streets & begin following the road by the waterfront towards the East. Approach the main entrance to the Industrial District, blocked by an armored vehicle, & look to the entrances right to see a Camera close by building. Tyger Camera #8: Keep following the road along to the East & we can find another Camera on a building to the right of a blocked archway in the road. Tyger Camera #9: Climb over the armored vehicle blocking the archway near Tyger Camera #8, & take a left down the road North; we can find this next Camera on the building wall directly off our left. Joker Balloons #7: Grapple onto this building's roof now & we can find a set of Balloons attached to one of the smalls metal chimneys. Riddler Trophy #20: Drop back down into the street where we previously were & walk across the road over to the small tower with a long pipe snaking off it. Turn on Detective Mode & walk around to the tower’s North face, & we can find a Soft Wood Panel wall. Glide up & fly through the wall to destroy it & we can find this Trophy on the floor. Incidentally, we also just opened up this tower to Catwoman so she can come through to collect one of her Catwoman Trophies later on... Sequence 5: Collectibles Blitz 3 1. Main Story: Finding the Cure 2. Side Missions: 1/12 3. Joker Balloons: 12/24 4. Tyger Cameras: 12/48 5. Riddler Trophies: 28/247 6. Catwoman Trophies: 12/35 7. Achievements: 8/64 ----------------------------------------------------------------------------------------------------- Industrial District:
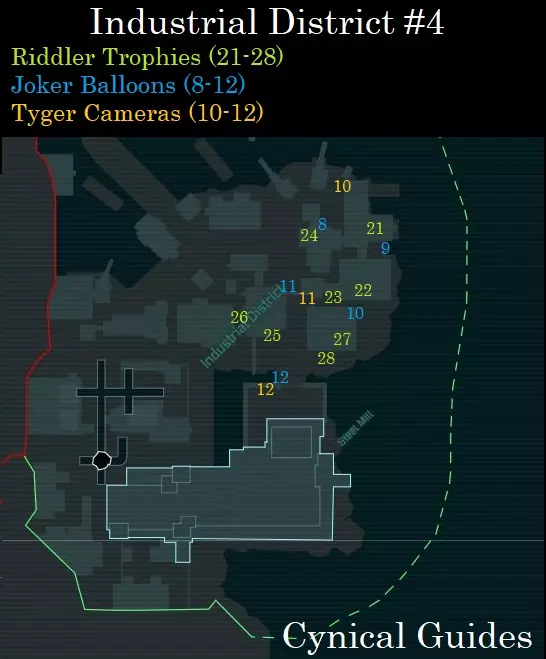
Tyger Camera #10: Drop out of the tower & carry on East past the crane & we can find another Camera on the last building near the water. Joker Balloons #8: From the Camera, look to your right & we can see a set of Balloons on top of a nutcrackers head to the right of the neon green Joker’s Funland sign. Riddler Trophy #21: Grapple onto this building now & begin walking along the roof South. After passing the second small chimney, drop off the roof onto a lower level facing the water. On this lower roof we can find a Structural Weakness in a small square structure; blow it up with Explosive Gel to find the Trophy inside. Joker Balloons #9: From the last Trophy, facing the water, walk to the edge of the roof to your right & look down to see a set of Balloons on top of a fence near two dumpsters. Riddler Trophy #22: Grapple up to the next building to the South & on its roof will be a small open-square structure that has a Trophy Cage on its ceiling. On top of this structure will be a Pressure Plate that will open the Cage. Stand on the Pressure Plate & a 6 second timer will start; quickly drop off & use the Batclaw to snag the Trophy. Joker Balloons #10: While on the same rooftop, walk over to the South side & look at the Ferris Wheel on the next building; we can see a set of Balloons hanging off of a large pipe sticking off the roof near it. Riddler Trophy #23: Before we climb onto the building with the Ferris Wheel, drop down into the streets instead. On the ground here we can see a Trophy Cage & a Pressure Plate. Standing on the Pressure Plate will open the iron doors ahead of us but only for around 8 seconds. As soon as you step on the Pressure Plate, quickly throw Remote Controlled Batarang & guide it into the Question Mark to your right first. Then immediately throw your second Remote Controlled Batarang & launch it at the Question Mark straight ahead of us (you might also be able just use a regular Batarang if you are quick enough). Lastly, throw one final Remote Controlled Batarang & guide it into the left Question Mark. This will take a few attempts, try Boosting your Batarangs as often as possible. Time fortunately seems to slow down slightly while you are controlling a Batarang. When all three Question Marks are struck after they have been activated at the same time, the Trophy Cage will open for us. Riddler Trophy #24: Quickly jog down the street to the North West from the last Trophy to the building behind us. Follow the building around to the left towards an iron bar fence & we can find a series of three Soft Wood Panels that we can just punch through to get to another Trophy. Joker Balloons #11: Exit the room we found the last Trophy & look through the iron bar fence off our right. Immediately to the South West of us we can find another entrance to Joker’s Funland; we can find another set of Balloons on a nutcrackers head to the right of the entrance. Tyger Camera #11: Approach where the Balloons were & climb over the armored vehicle blocking the entrance to the Funland. On the other side, turn around & we can find a Camera on the right pillar of the Funland entrance. Joker Balloons #12: Follow the road South further into Joker’s Funland towards the gates to Sionis Industries; we can find our final Balloons in the Industrial District in the hands of a nutcracker. Tyger Camera #12: We can also find our last Tyger Camera in the Industrial District directly to the right of the nutcracker that holds our Balloons. Riddler Trophy #25: Turn around from the gates to Sionis Industries & climb over the small concrete wall off our left. Over the wall will be a strange mini-game maze we will have to crawl through to collect the Trophy. It is rigged with Mines, but they are not an instant kill. The maze is actually simple… just follow the path that does not have Mines in the way, there is only one possible path we can take. Riddler Trophy #26: Facing away from the maze mini-games entrance, we can drop off this level to a lower down alley off of our right. Down here we can find a Trophy Cage & two Pressure Plates. This is a strange math mini-game. When you stand on the left Pressure Plate, 3 green lights will get lit; standing on the right Pressure Plate will light 5. The goal is to light all 7 green lights; going over the amount will reset the counter but maintain how many lights you went over by. So, if you stand on the right Pressure Plate twice, you will hit 10. You will be over by 5, so 5 green lights will still be lit when it resets. There are so many ways to beat this, you may even do it accidentally just by walking around on the Plates testing them out. The fastest way from 0 lights is to walk on the left Pressure Plate 3 times (3 lights + 3 lights + 3 lights = 9 lights, 2 lights carry over) then walking on the right Pressure Plate once to reach 7. Side Mission #5 – Watcher In the Wings 2: Since we completed the Main Story Mission – The Steel Mill, Grapple to the very top of the Ferris Wheel to find the Mysterious Watcher standing there. Scan the Symbol he carves to progress the Side Mission. 40% Complete Riddler Trophy #27: From the highest car on the Ferris Wheel, drop down two cars on the waterside & turn around to face the second highest car on this side. We can find a Trophy stuck to the cars ceiling; snag it with the Batclaw. Riddler Trophy #28: Drop off the Ferris Wheel South & land on a lower down landing just to the left of the bridge to Sionis Industries. We have another Remote Electrical Charge mini-game with a rolling Trophy Cage to play. This one is really simple, just charge the corresponding Industrial Motors to guide the Cage to the opposite end to break it open. By this point you may have progress Side Mission #2 – Cold Call Killer to 45% Complete & Side Mission #3 – Acts of Violence to 12% Complete. Sequence 6: Collectibles Blitz 4 1. Main Story: Finding the Cure 2. Side Missions: 1/12 3. Joker Balloons: 12/24 4. Tyger Cameras: 13/48 5. Riddler Trophies: 40/247 6. Catwoman Trophies: 12/35 7. Achievements: 8/64 ----------------------------------------------------------------------------------------------------- Amusement Mile:As we grab more Collectibles, we should be Leveling up more than a few times; make a point of purchasing the Shockwave Upgrade in the Combat Tree. We will need it for grabbing a few Collectibles.
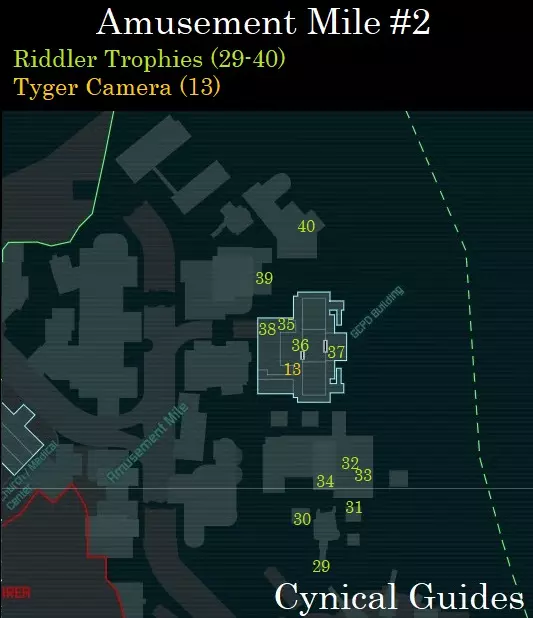
Side Mission #6 – A Shot In the Dark 1: If you look on your World Map, we can see a Side Mission Marker reading “S.O.S. Broadcast Source” where a Political Prisoner is trapped on the rooftop of the Gotham FM building. If you have not already done so, get to the Marker & speak with the man who will shortly be shot. Set up a crime scene & follow the bullet trajectory back into the Industrial District. Find the shell casing from Dead Shot & we will end the first section of the Mission. Two other murders will appear later on as we progress through the Main Story. 15% Complete Riddler Trophy #29: Leave the Industrial District & Grapple on top of a crane near the South Eastern end of Amusement Mile in the middle of the water. At the top of the crane, we can find an Industrial Motor that we can activate with our Remote Electrical Charge. Activate it, & pull the crane hook out of the water; the crane hook will have a Riddler Trophy at its end we can collect with the Batclaw. Riddler Trophy #30: From the last Trophy, look off the side of the crane to the West & we can spot a strange fenced box below us with a Trophy Cage & three Pressure Plates. To open the Trophy Cage, we need to land on each of the Pressure Plates without touching the ground or the fences at all. To do this, we have to Grapnel Boost out of area, Glide around & land perfectly on each Pressure Plate. This can be a little tricky & take multiple tries as your aim has to be perfect. If done correctly, the Trophy Cage will open up for us. It is easier just letting go of Glide & dropping onto the Pressure Plate then aiming a Dive Bomb onto them I found. Riddler Trophy #31: Grapple back onto the nearby crane & this time walk over & drop off its East side to find another Trophy Cage. For this challenge, stand on the Pressure Plate underneath the small roof behind the Cage & five Question Marks will light up on the wall ahead of us. We must strike each Question Mark in sequence as they light up on the wall with a Batarang. We need to do this three times. From left to right: First Time: 1, 3, 5, 2, 4 Second Time: 4, 3, 1, 5, 2 Third Time: 3, 5, 2, 1, 4 After completing the three sequences correctly, the Trophy Cage will open for us. Riddler Trophy #32: Grapple on top of the roof of the Krank Co. Toys building & we can find a Trophy Cage as well as a larger cage with two Question Marks inside it. To the right of the Trophy Cage is a horizontal vent that has four shutters opening & closing rapidly. Equip a Remote Controlled Batarang & carefully guide it through the vent to strike the first Question Mark straight ahead. For the second Question Mark, we now have to guide a Batarang left through the vent down a newly opened tunnel. The shutters have fortunately stopped so be sure to use Brake to slow the Batarang down. With both Questions Marks struck, the Trophy Cage will open. Riddler Trophy #33: Walk to the East end of the Krank Co. Toys rooftop & we can see a large cage with six Pressure Plates & an already opened Trophy Cage. If we stand on the Pressure Plates, the Cage will close. To get back there, Grapnel Boost off a building & Dive Bomb/Glide your way into the cage & over the Pressure Plates. Riddler Trophy #34: Enter inside the Krank Co. Toys building now & walk into the center room we originally found Bane in. To the right of where we enter this room, we can see a Riddler Trophy in a chair behind the reception desk; grab it with the Batclaw. Tyger Camera #13: Exit Krank Co, & Grapple over to the GCPD building now & on the outer first floor, we can find a Camera on the wall near an Industrial Motor controlled door. Riddler Trophy #35: Use the Remote Electrical Charge on the Industrial Motor to open the door; we will need to slide under it. Here we can find the doors into the GCPD Building (where our next Main Mission will take place). Walk down the ramp where we entered & we can find a Structural Weakness. Blow it up with Explosive Gel & we can find a Riddler Trophy. Ignore entering the GCPD Building for now & exit this area. Riddler Trophy #36: Grapple up to the second floor of the outer GCPD Building & we can find two Structural Weaknesses. Blow one, or both, up with your Explosive Gel & we can crawl into a small space. Follow it along & we can find a Riddler Trophy underneath a set of stairs. Riddler Trophy #37: Grapple around to the backside of the GCPD Building & drop down onto a platform in the water. From here, walk back towards the building & we can see a Riddler Trophy upside down in a weird doorway shaped alcove. Use the Batclaw to collect it. Riddler Trophy #38: We must now find a way into the underground parking lot of the GCPD Building. The entrance can be found on the lower North side of the building, but it is blocked by a Soft Wood Panel (this is easiest seen from the buildings North of the GCPD Building). Glide into the air & go through the Panel to enter the parking lot; we can find the Riddler Trophy inside to the right. We have also simultaneously cleared the way now for Catwoman to come collect another Catwoman Trophy. Riddler Trophy #39: Leave the outer GCPD Building now & carry on North to the next building over with a neon orange “Gotham” sign. Look below the “TH” in Gotham, & we can see a platform lower down with a Trophy Cage. Below the fencing, the Cage rests upon is a Pressure Plate inset into the wall of the building. We will need to Grapple off a building into the air & Glide/Dive Bomb over to land on the Pressure Plate. As soon as we touch it, quickly push off the wall & Grapple threw the doors we just opened back up to where the Trophy Cage is. Riddler Trophy #40: Just to the North East of the last Trophy we can find another Trophy Cage & Pressure Plate on the next building’s rooftop. Simply stand on the nearby Pressure Plate & use the Batclaw to collect the Trophy. Sequence 7: Collectibles Blitz 5 1. Main Story: Finding the Cure 2. Side Missions: 1/12 3. Joker Balloons: 16/24 4. Tyger Cameras: 23/48 5. Riddler Trophies: 49/247 6. Catwoman Trophies: 12/35 7. Achievements: 8/64 ----------------------------------------------------------------------------------------------------- Amusement Mile:
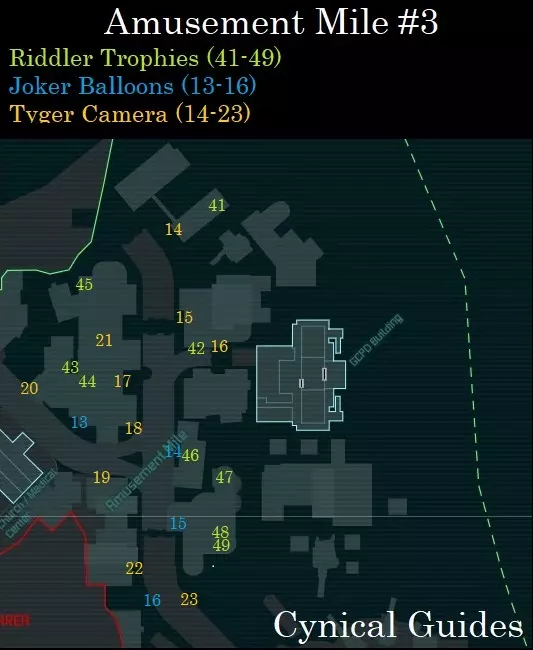
Riddler Trophy #41: Get onto the building across from Poison Ivy’s lair & we can find a Structural Weakness in a small room behind a billboard. Blow it up with Explosive Gel to find the Riddler Trophy. Tyger Camera #14: Glide over onto the broken overpass across from Poison Ivy’s lair & look back towards the building we came from; we can find a Camera on the side of the wall just underneath the first level. Tyger Camera #15: Follow this broken overpass down South; we can see another Camera off our left on a building near the end of this bridge piece. Riddler Trophy #42: Jump across to the next piece of the overpass & walk over to where the junction in the road is. Drop off the road to your left to land on a L-shaped platform with a Trophy Cage & a Pressure Plate. Stand on the Pressure Plate & look West across the water to see three Question Marks. Use Remote Controlled Batarangs to systematically strike each Question Mark to open the Trophy Cage. As soon as we hit one of the Question Marks, a 7 second timer will begin. Time slows down while Controlling a Batarang; abuse the Boost as often as possible. Tyger Camera #16: Grapple back onto the overpass & walk a little ways down the road towards the GCPD Building; we can see the Camera on the wall of the building to our left before GCPD. Tyger Camera #17: Return to the road junction on the overpass & hop over the meridian to the far side towards the building with the “Gotham Casino” sign on it. We can find another Tyger Camera to the left of the casino’s sign. Tyger Camera #18: Keep following the overpass down South while sticking to the right-hand side of the road & we can find another Tyger Camera on the wall at the end of the Gotham Casino. Tyger Camera #19: Take the roadway West at the junction & we can find a Tyger Camera off the building across from us to the right of a billboard reading “You Are Under Close Surveillance”. Joker Balloons #13: Carry on down the road West & we can find a Balloon off our right very close to the last Tyger Camera. Only a few of the 12 Joker Balloons are available for us in the Amusement Mile (the ones on the overpass from Park Row leading to the Industrial District), the rest will get unlocked as we progress in the Main Story. Tyger Camera #20: At the end of the overpass piece to the West before entering Park Row, near some Thugs, we can find a Camera off the building to our right. Riddler Trophy #43: Leave the overpass now & Grapple onto the building just in front of the Gotham Casino. Here we can find a Trophy Cage, & on the surrounding buildings, three Pressure Plates. To open the Cage, we need to systematically land on all three Pressure Plates without touching the ground or other parts of the environment. Riddler Trophy #44: Grapple up on the part of the Gotham Casino directly to the East/above where we collected the last Trophy to find an elongated fenced box & a Riddler Trophy. The Trophy flips on rotation & can only be collected when it is upside down inside the fenced box. What’s worse, is that we need to run & slide into the box so we must time it right so we slide past the Trophy at the same time as it is flipped into the box. It takes around 5 seconds for the Trophy to flip into the box after it resets… Tyger Camera #21: Drop down onto the first floor of the Gotham Casino & there will be a host of Thugs we will need to dispatch. Standing on the frozen over pool, we can find a Camera below the second-floor balcony. Riddler Trophy #45: Turn around from the frozen pool & walk to the far North side of the Gotham Casino to find a small shack with a Soft Wood Panel wall. Give it the ol’ Batman beatdown, & we can find a Trophy behind it. Joker Balloons #14: Make your way back to the large road junction on the overpass. From the junction, look up at the Gotham City Olympus building & we can find a set of Balloons just above the “Gotham” in the sign. Riddler Trophy #46: Turn on Detective Mode now & look at the front entrance of Gotham City Olympus to see some Soft Wood Paneling. Climb up to it & punch through it to find a Trophy. Wait if this is the building’s front entrance… where is the door in here? Gotham architecture is way too advanced for me … Joker Balloons #15: Look to the right of the Gotham City Olympus building & we can see another set of Balloons at the end of an elevated broken girder. Assisting Catwoman: From where the Balloons were, drop off the overpass below them, & we can see some Soft Wood Paneling. Break it down, & Catwoman can come back here later to collect a Catwoman Trophy. Riddler Trophy #47: Grapple onto the building behind Gotham City Olympus now & at its Northern end, we can find a Trophy Cage & a cycling Pressure Plate. Simply wait for the Plate to turn green, & stand on it to open the Cage. Even Robin could do that one. Riddler Trophy #48: Grapple over to the South side of this building now & we can find our next puzzle close to the GCR building. Here we can find a Pressure Plate, an Industrial Motor, & a Rolling Cage. Stand on the Pressure Plate & use the Remote Electrical Charge to pull the Rolling Cage past the first grate. Step off the Pressure Plate & re-engage the Industrial Motor to pull the Rolling Cage to the end where we can break it open & collect the Trophy. Riddler Trophy #49: Grapple up to the Gotham FM building where that Political Prisoner was killed by Deadshot. Look up at the radio tower & there will be two levels we can Grapple to. Grapple to the bottom one & we can walk around to the side of the “C” to find a Riddler Trophy. Joker Balloons #16: Return to the overpass & carry on South; we can find these Balloons on top of a light post just outside the highway closure to the Industrial District. Tyger Camera #22: Turn around from the last Balloon & we can find a Camera off the building wall to our left. Tyger Camera #23: Turn back around again & walk up to the highway closure & we can find a Camera on the metal beam at the far left. Sequence 8: Collectibles Blitz 6 1. Main Story: Finding the Cure 2. Side Missions: 1/12 3. Joker Balloons: 17/24 4. Tyger Cameras: 31/48 5. Riddler Trophies: 58/247 6. Catwoman Trophies: 12/35 7. Achievements: 8/64 ----------------------------------------------------------------------------------------------------- Amusement Mile:
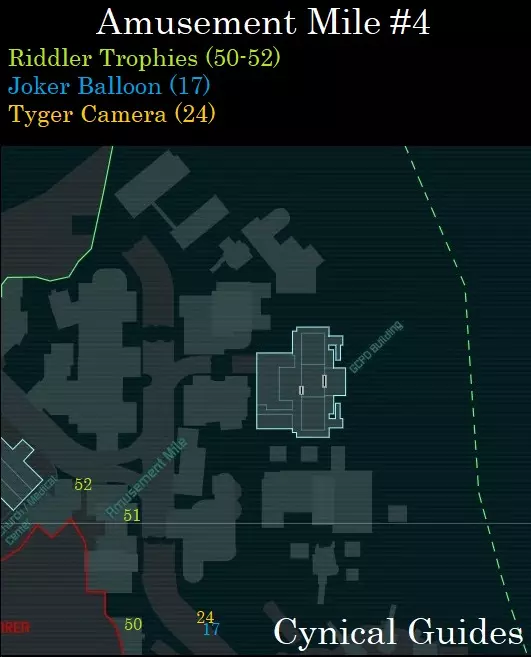
小丑气球#17:在高速公路封闭处爬上高架道路,我们可以在左端远处看到一些气球。 泰格摄像头#24:跑到高架道路的尽头,下到下方的天桥。转身回望高速公路封闭处,我们可以在最右侧的金属横梁上看到一个摄像头(与上一个摄像头平行)。 谜语人奖杯#50:从高速公路封闭处面向北方,用抓钩荡到左侧的建筑物上,找到一个奖杯笼。围绕奖杯笼的是三个未激活的灯,它们分别对应我们需要找到的三个压力板。第一个需要找到的压力板位于奖杯笼北侧的建筑物顶部(不要与谜语人奖杯#51中使用的三个压力板混淆)。我们需要的压力板在一个钢箱顶部;与之相对的钢箱上有一个水塔。 当我们站在压力板上时,转身看向奖杯笼的方向,就能看到第二个压力板在其下方墙壁侧面的广告牌上。滑行过去并落在上面,注意不要接触地面,然后立即蹬墙,这样就能落在我们身后墙壁上的第三个压力板上。一旦我们按下第三个压力板,就会启动7秒的计时器,我们必须迅速用抓钩爬上去收集谜语人奖杯,否则就得从头再来。 谜语人奖杯#51:向北走,经过上一个奖杯使用的压力板,我们会发现一组新的三个压力板和一个奖杯笼。只需走过去激活压力板就能拿到奖杯。很简单。 谜语人奖杯#52:沿着这些屋顶向北回到前方的天桥。从这里转身,看向我们刚才穿过的那些建筑物的右侧,可以看到建筑物侧面有三个问号,其下方靠近地面的位置还有另外三个问号。下到地面,靠近墙边的问号;在这里我们还能找到对应的奖杯笼。靠近这些问号,在每个上面放置爆炸凝胶,但先不要引爆。 用抓钩爬上问号正上方或对面顶层的屋顶。确保所有问号都在视野范围内,因为接下来我们需要快速行动。准备好后,引爆下方的爆炸凝胶;引爆的同时,立即切换到蝙蝠镖并快速投掷(装备后按住左扳机连续投掷),瞄准上方的问号。如果操作正确,奖杯笼就会打开。 公园街:
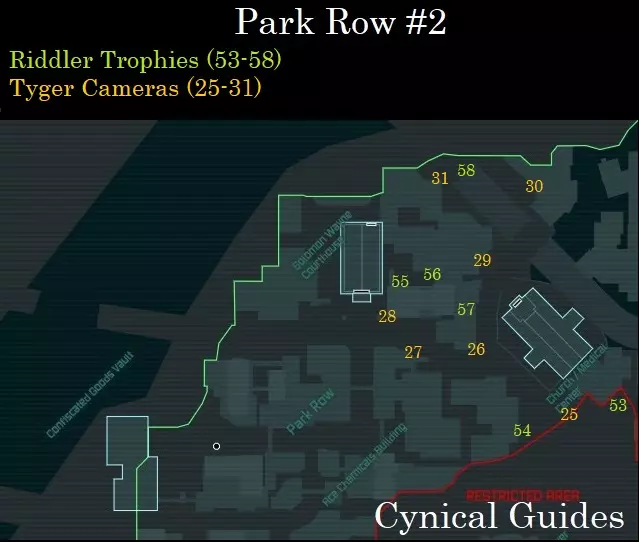
谜语人奖杯#53:从教堂屋顶向南走,我们可以找到一个泰格发电站。那里会有一个让地面带电的保险丝盒,旁边的墙上有一个结构弱点。用远程电力 charge 射击保险丝盒,然后用我们的爆炸凝胶炸开墙壁,即可收集谜语人奖杯。 泰格摄像头#25:从我们找到奖杯的屋顶西端下到下面的街道。我们可以在 perimeter wall 的一根柱子上找到一个摄像头。 谜语人奖杯#54:跳过铁栅栏,朝着下面带有霓虹绿色“黑金丝雀”标志的方向前进,我们可以找到一个奖杯笼子。在笼子处开启侦探模式,我们可以看到一条电线从笼子延伸出来,沿着“黑金丝雀”的墙壁向上,通向一个问号。用蝙蝠镖击中问号,我们将有9秒时间返回牢笼领取奖杯。 泰格摄像头26:用抓钩返回铁栅栏上方,沿着向北的路走,教堂在我们右侧;在道路的T字路口,我们可以在右侧的建筑拐角处找到一个摄像头。 泰格摄像头27:现在沿着路向西走,路会被一个破旧的路障挡住,上面有“我们需要你!”的标语。用抓钩越过路障,我们可以在左侧的建筑上找到一个摄像头,就在蓝色霓虹“休息室”招牌旁边。 泰格摄像头28:继续沿着路走,我们可以在所罗门·韦恩法院右侧的建筑墙上找到另一个摄像头。谜语人奖杯#55:走到法院右侧的小巷,跳过铁丝网围栏,在右侧可以找到一个压力板和奖杯笼。在压力板的正对面,我们能看到奖杯笼两侧的建筑墙壁上嵌有压力板。要打开笼子,需要在不接触地面或物体的情况下按下所有压力板。 使用钩爪助推升空并滑翔至南墙的压力板,蹬墙后滑翔至北墙的压力板,再蹬墙一次,着陆在地面压力板上即可打开奖杯笼。俯冲轰炸到地面压力板上可能是最简单的方法。谜语人奖杯#56:从上个奖杯处向东走,沿着小巷前行,会发现另一个谜语人奖杯被一个铁丝网围栏挡住,围栏上方有三个绿色箭头。钩爪到绿色箭头上方的屋顶,能看到一扇需要踩下压力板才能打开的钢门;压力板位于钢门东侧的建筑屋顶上。 站在压力板上,钢门会打开约5秒钟。踩下压力板后,迅速滑翔并俯冲穿过钢门。进入后会落在一些软木板上,用冲击波或爆炸凝胶摧毁软木板即可拿到奖杯。 谜语人奖杯#57:钩爪到上个奖杯南侧的屋顶,能找到一个奖杯笼子。开启侦探模式,从牢笼向北看,能看到一个问号;用蝙蝠镖击中它即可打开牢笼。 泰格摄像头29:从最后一个奖杯处向东下到街道,看向左侧的建筑墙壁,就能找到一个摄像头。 泰格摄像头30:沿着道路向北走,会走到一些路障处,这些路障通向一个政治犯营地。在这里,我们可以在右侧的建筑墙壁上找到一个摄像头。 泰格摄像头31:翻过路障进入政治犯营地,在营地的后左角附近可以找到一个摄像头。 谜语人奖杯58:在政治犯营地中,有两座棚屋带有软木板墙;位置更靠北的那座棚屋后面有一个奖杯。 序列9:收集品快速攻略7 1. 主线剧情:寻找解药 2.支线任务:1/12 3. 小丑气球:17/24 4. 虎爪摄像头:36/48 5. 谜语人奖杯:73/247 6. 猫女奖杯:12/35 7. 成就:8/64 ----------------------------------------------------------------------------------------------------- 公园街:
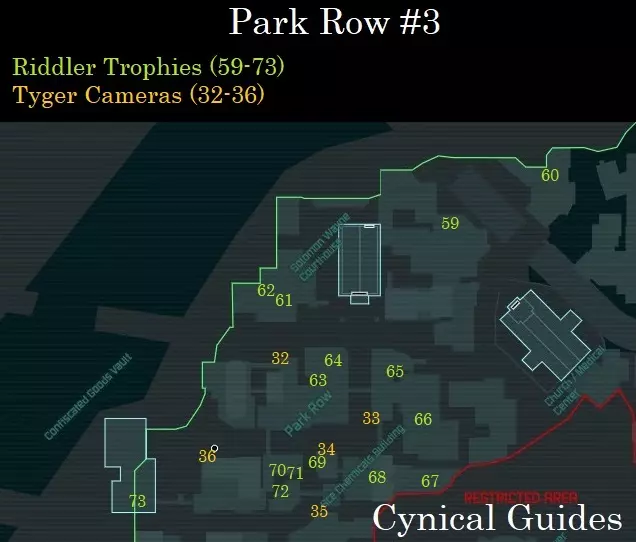
Riddler Trophy #59: Grapple up onto the building above where we found the last Tyger Camera in the Political Prisoner camp, & we can see a Trophy Cage with 3 Question Marks nearby. Walk up to each Question Mark & spray Explosive Gel on them; walk over to the Trophy Cage, detonate the Gel, & collect the Trophy. Riddler Trophy #60: Make your way over East across some buildings & drop down to a Trophy Cage with 5 Question Marks along the wall beside it. The Question Marks will light up; when they do, we need to strike them with a Batarang. Either time out when to strike them… or just spam Batarang Quick Throw on each Question Mark until they are activated; missing won’t reset the ones you have activated. Assisting Catwoman: Return to the entrance of the Solomon Wayne Courthouse & look to the left of the building where we can see an iron bar enclosure with a Catwoman Trophy inside it. At the back of the enclosure, we can find a Structural Weakness; destroy it with Explosive Gel. We will return here later as Catwoman to collect the Trophy. Riddler Trophy #61: Enter into the iron bar enclosure we just gained access to, & we can find an Industrial Motor to the right of the Catwoman Trophy inside. Use the Remote Electrical Charge to open the door it’s connected to find a Riddler Trophy inside a small room. Riddler Trophy #62: Exit the iron bar enclosure & Grapple onto the building beside us to the West. At the top, near the Perimeter Wall, we can find a Trophy Cage with a Question Mark ahead of it. Turn on Detective Mode to see electrical wires leading off the Question Mark to the left & right. These wires connect to two Question Marks off our left & one Question Mark off our right. When you strike a Question Mark, it will activate a 4 second timer. To complete this relatively easily, place Explosive Gel on the two Question Marks on the left & one off the right. Stand in front of the middle Question Mark, closest to the Trophy Cage & detonate the Gel. After you detonate the Gel quickly throw a Batarang at the middle Question Mark to open the Cage. Tyger Camera #32: Drop down into the streets near the far West end of Park Row & we can find a Camera across from the Harvey Dent campaign office. Riddler Trophy #63: From the Camera, face East down the road & head down the alley to the left of where the Camera was. Hop over a chain link fence towards a barrel fire & slide underneath a fence to our left to find a Trophy. Riddler Trophy #64: Grapple onto the roof above where we found the Trophy & we can find a Trophy Cage & a Pressure Plate. Simply stand on the Pressure Plate to open the Cage & use the Batclaw to collect the Trophy. Riddler Trophy #65: Head East from the last Trophy over to the next rooftop where we can find a Trophy Cage & a green Question Mark locked inside a chain link enclosure. To strike the Question Mark, we must guide a Remote Controlled Batarang through the vents beside the Trophy Cage. Riddler Trophy #66: Make your way along the rooftops South towards the Perimeter Wall & we can find a small isolated room on top of a building. Turn on Detective Mode to find Soft Wood Paneling in its entrance; break it down to collect the Trophy behind it. Riddler Trophy #67: Carry on South & we should be able to see a Trophy Cage with five Question Marks cycling on & off. Approach the Cage & time a Batarang to strike one of the Question Marks as they become active; the ones at either end are the easiest to strike. Once any of the Question Marks has been successfully struck, the Trophy Cage will open. Riddler Trophy #68: To the right of the last Trophy, walk down some metal stairs & look over the ledge to see some steel doors we will need to open. Look above us & we can see a Gargoyle that has been painted by the Riddler. Grapple up to it, & the steel doors will open for us. Quickly drop off the Gargoyle through the steel doors to collect the Trophy. Tyger Camera #33: Drop down into the streets where we can see Finnigan’s Restaurant & the Monarch Theater; we can find a Camera on the building just East of Finnigan’s. Tyger Camera #34: Look South of Finnigan’s now to find yet another Camera. Riddler Trophy #69: Immediately to the right of the last Camera, we can find a Riddler Trophy underneath a lifted car in the middle of the road; slide underneath it to collect it. Riddler Trophy #70: Get back over to the other side of the car, & head down to the end of the street West, where a barricade blocks the road. Turn on Detective Mode & look up to your left to see some Soft Wood Paneling inset into the wall. Grapnel Boost up & Glide through the Paneling to find a Trophy on the ground below. Destroying the Soft Wood Paneling here will also give Catwoman access to one of her Trophies here in Park Row. Riddler Trophy #71: Walk around the enclosure we found the last Trophy in to get to the other side & we can find an Industrial Motor operated door. Open the door using the Remote Electrical Charge & collect the Trophy behind it. Riddler Trophy #72: Grapple onto the building directly above us & we can find a Rolling Cage puzzle with three Industrial Motors. Use the Remote Electrical Charge to guide the Cage up to the top of the puzzle where we can bust it open. Tyger Camera #35: Drop down into the street now & we can find a Camera next to a flashing Ace Chemicals sign. Tyger Camera #36: Grapple over some buildings to get over onto the other side of the street where we can find our final Camera in Park Row on the walls of a Liquor store. Riddler Trophy #73: Get on top of the Tyger Confiscated Goods Vault & we can find a Pressure Plate & a Trophy Cage. This will require the Shock Wave Upgrade. Grapnel Boost up into the air & Dive Bomb onto the Pressure Plate. As soon as you land on the Plate, activate Shock Wave to charge the Question Mark at the top. You need to generate a lot of force from a great height to charge the Question Mark; Grapnel Boosting off of the top of the Bank of Gotham is a good option. As soon as the Question Mark is activated, quickly strike it with a Batarang to open the Trophy Cage. Sequence 10: Collectibles Blitz 8 1. Main Story: Finding the Cure 2. Side Missions: 1/12 3. Joker Balloons: 17/24 4. Tyger Cameras: 43/48 5. Riddler Trophies: 85/247 6. Catwoman Trophies: 12/35 7. Achievements: 8/64 ----------------------------------------------------------------------------------------------------- The Bowery:
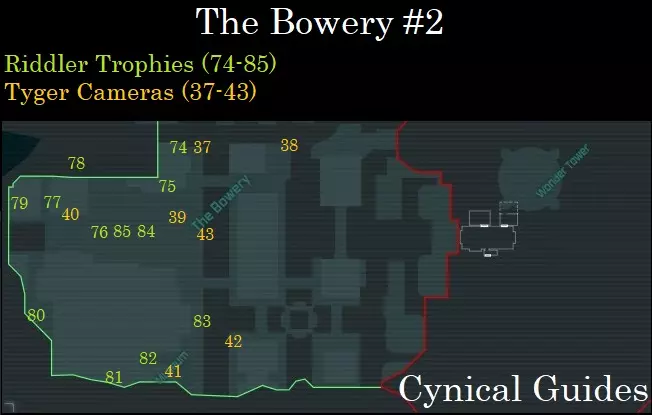
Tyger Camera #37: Drop down into the street South & we can find a Tyger Camera near the barred entrance to the Jezebel Center. Tyger Camera #38: Carry on down the street to the East & we can find another Camera on the corner of the Bank of Gotham. Riddler Trophy #74: Grapple onto the building roof close to our first Tyger Camera here & we can find a Trophy Cage. The Cage will shut if we get too close to it; walk about a meter away from the Cage & use the Batclaw to collect the Trophy. Riddler Trophy #75: Grapple higher up on the building South, & we can find a Pressure Plate connected to a vent system that has a Trophy at the end. Stand on the Pressure Plate & the vent system will open; quickly run & slide through the vent to get to the Trophy. You will only have 2 seconds after stepping on the Pressure Plate to get into the vent. Tyger Camera #39: Drop off the building South, & walk up the metal stairs to the Monorail; we can find a Camera attached to the Monorail sign just before the landing above. Riddler Trophy #76: Drop down off the Monorail platform & head West along the concourse where we can find a large horse statue with some barricades built around it. There will be a Riddler Trophy on the back of the horse statue; use the Batclaw to grab it. Tyger Camera #40: On the other side of the barricades with the horse statue, we can find a Camera across from an entrance to the Iceberg Lounge. Riddler Trophy #77: Hop over the chain link fence down the alley to the left of the Camera & we can find an Industrial Motor operated door. Use the Remote Electrical Charge to open the door & crouch underneath it to collect the Trophy on the other side. Riddler Trophy #78: Grapple onto the building roof where we found the last Trophy & we can find a Tyger security checkpoint built into the Perimeter Wall with a Riddler Trophy behind it. Turn around from the Tyger Sentry Turret & turn on Detective Mode to locate a Structural Weakness in a small room behind us. Detonate the wall with Explosive Gel & enter the Floor Grate behind it. Follow the crawlspace along in behind the security checkpoint & exit the crawlspace to collect the Trophy. Riddler Trophy #79: Hop over to the next rooftop just West of our position to find a Trophy Cage, Pressure Plate, & three Question Marks. Standing on the Pressure Plate will activate a Question Mark, but close a fence barring our access. Walk over to all three Question Marks & place Explosive Gel on each of them. Now go & stand on the Pressure Plate. When you do, the middle Question Mark will activate. Press the Zoom button (right stick) & look at the Question Mark in the middle. Hold the trigger down to detonate our Explosive Gel & you will notice that only the center Gel should be highlighted. Detonate it, then look at the left Question Mark next to detonate, with the right Question Mark being last. If done right (center, left, right) the Trophy Cage will open to us. Riddler Trophy #80: Make your way over South down the alley beside the Museum to find a Pressure Plate linked to two Question Marks & a Trophy Cage. Stand on the Pressure Plate to activate the first Question Mark which we will strike with a Batarang. When you do, the second Question Mark will activate but iron bars will close blocking us from hitting it. There will be one iron bar missing on the far right side; throw a Remote Controlled Batarang & guide it through the gap to hit the Question Mark. When both Question Marks have been struck, the Trophy Cage will open for us. Riddler Trophy #81: Now head to the far end of the Museum rooftops to the South; we can find a Ridder Trophy in between one of the glass domes & the Perimeter Wall. Riddler Trophy #82: Drop down onto the East side of the Museum & we can find this Trophy in an alley; run & slide underneath the barricade to collect it. Tyger Camera #41: Exit the alley & hop over the chain link fence out onto the concourse. Turn around to look back at the alley to see a Camera to the left of the entrance. Tyger Camera #42: From the last Camera, look out across the balcony to the East to find another Camera on the opposite side as us. Riddler Trophy #83: Drop down into the Jezebel Center below & walk North towards the area beneath the Museum entrance to find some Soft Wood Paneling. Bust through it to find a Riddler Trophy in a small room. There is more Soft Wood Paneling above the first that leads to a different Riddler Trophy; we cannot get it until we have the Line Launcher. Tyger Camera #43: Follow the Jezebel Center hallway down North & hop over the barring chain link fence to get over to the next side. Shortly after hopping the fence, we can see a Camera off our left. Riddler Trophy #84: Hop over the chain link fence to the left of the Camera in the Jezebel Center & make your way down the hall; we can find a Trophy right behind the first second pillar holding up the glass ceiling. Riddler Trophy #85: Across from the last Trophy, we can see another through a chain link barricade obstructing the hall towards the West. To get to it, Grapple up to the concourse above & run along to drop over to the other side. Ignore the Pressure Plates & Trophy Cage on the other side (that is for a different Ridder Trophy requiring the Line Launcher) & look instead at the electrified fence at the back. To get over this fence, we have to Grapnel Boost off the floor above us to get ourselves into the air & Dive Bomb/Glide over the fence. Sequence 11: Collectibles Blitz 9 1. Main Story: Finding the Cure 2. Side Missions: 1/12 3. Joker Balloons: 17/24 4. Tyger Cameras: 47/48 5. Riddler Trophies: 95/247 6. Catwoman Trophies: 12/35 7. Achievements: 8/64 ----------------------------------------------------------------------------------------------------- The Bowery:
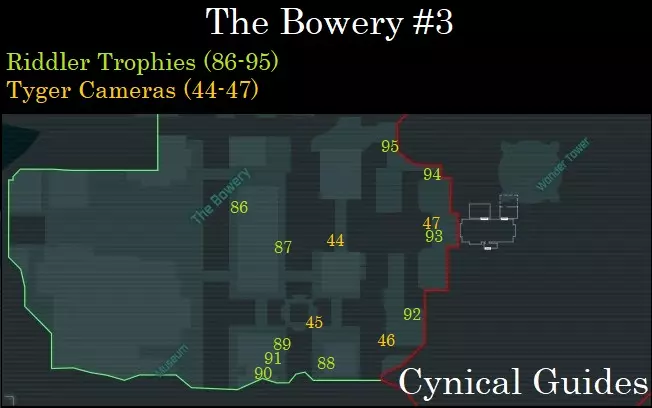
Riddler Trophy #86: Return back into the Jezebel Center where we found the last Tyger Camera in the main hall & we can see an Industrial Motor-powered door in an Italian Cuisine restaurant. Use the Remote Electrical Charge to open the door & quickly run & slide underneath it to get into the room with the Trophy. Riddler Trophy #87: Begin heading East through the Jezebel Center down the next hall & we will be obstructed by an iron gate with Proximity Mines behind it. Turn on Detective Mode, & we can see a Structural Weakness in the wall the right of the Mines. If you have at least one Ability Point put into Ballistic Armor, hop over the gate closest to the wall & only one Mine will explode. Use Explosive Gel to destroy the Structural Weakness & we can find a Trophy in the room beyond. Tyger Camera #44: Exit the Jezebel Center to the East & we will be outside its second entrance. Across from where we exit, past a monorail column, we can spot a Camera on a horse statue pillar. Tyger Camera #45: Hop over the gates South into the next area of the Jezebel Center, past the Proximity Mines. Enter the junction area with the Gun Thugs & we can find a Camera on one of the corners. Tyger Camera #46: Carry on East out of the Jezebel Center & we can spot a Camera to the left of a neon red Hotel sign off our right. Riddler Trophy #88: Grapple out of the Jezebel Center up to the building above to the West. Here we can find a Trophy Cage with a vent system that leads to a Question Mark. To open the Cage, we must guide a Remote Controlled Batarang through the vents to strike that Question Mark. Guide the Batarang through the first vent & it will exit into a small chain link enclosure; make the Batarang do a U-Turn & guide it into a different vent paralleling the first to get to the Question Mark. Riddler Trophy #89: Hop off the building towards the West now & drop down to the concourse where we can spot a Trophy Cage & three Pressure Plates; one on the floor beside the Cage, above the Cage on the wall, then across the opposite side of the concourse on the building wall we were just on. To open the cage, we must activate all three Pressure Plates without touching the ground or any object. Glide off of the building we found the last Trophy on to the Pressure Plate on the wall above the Cage; push off the wall & Glide towards the Pressure Plate on the opposite wall; push off THAT wall & Glide to the Plate on the floor to open the Cage. Riddler Trophy #90: From the last Trophy, walk down the concourse South & look to your right to see a Structural Weakness in the wall; destroy it with Explosive Gel to get at a Trophy. Riddler Trophy #91: Grapple onto the building’s roof above us to the West now. At the top, we can see a Rolling Cage puzzle with a Pressure Plate & two Industrial Motors. Use the Remote Electrical Charge to guide the Cage through the puzzle to the end; standing on & off the Pressure Plate to open Grates to let the Cage pass by. Riddler Trophy #92: Make your way to the bottom South East end of The Bowery & we can locate a Trophy Cage with two Pressure Plates near it; a third can be found on top of the roof South of the Cage. We need to activate all three Pressure Plates without touching the ground or any object. Stand on the isolated Pressure Plate on the roof first, then Glide down to one of the lower down ones. Next, Grapnel Boost up into the air & Glide down onto the final Pressure Plate to open the Cage. Tyger Camera #47: Make your way over to the front entrance of the Arkham City Processing Center & we can find a Camera up above the sealed doors. Riddler Trophy #93: Now Grapple up above the Arkham City Processing Center entrance to an upper balcony where a Tyger Security Console is. Look above the Console, & we can find a Trophy stuck to the wall a ways up; grab it with the Batclaw. Riddler Trophy #94: Head North down an alley close to the Arkham City Processing Center & take a right to see a Trophy stuck in a chain link enclosure barred by a burst pipe jetting steam. There is a very small space in between the chain link walls; pull out the Batclaw & slowly walk back & forth near the space until you see a prompt to use the Batclaw. This is not how we are supposed to get this Riddler Trophy, but it does work (you would normally need to come here with the Freeze Blast to seal the steaming vent). Riddler Trophy #95: Grapple over the building West of us & drop down into the next alley where a small Thug fortification is. Turn on Detective Mode, & Grapple onto the large vent system above us where we can see some Soft Wood Paneling on a nearby wall. Grapnel Boost up into the air & Glide down through the Wood Panels to access the Trophy behind them. Smashing these Soft Wood Panels also lets Catwoman access one of her Trophies up above us here. Sequence 12: Where Were We? 1. Main Story: Finding the Cure 2. Side Missions: 1/12 3. Joker Balloons: 17/24 4. Tyger Cameras: 48/48 5. Riddles: 1/69 6. Riddler Trophies: 104/247 7. Catwoman Trophies: 12/35 8. Achievements: 9/64 ----------------------------------------------------------------------------------------------------- The Bowery:
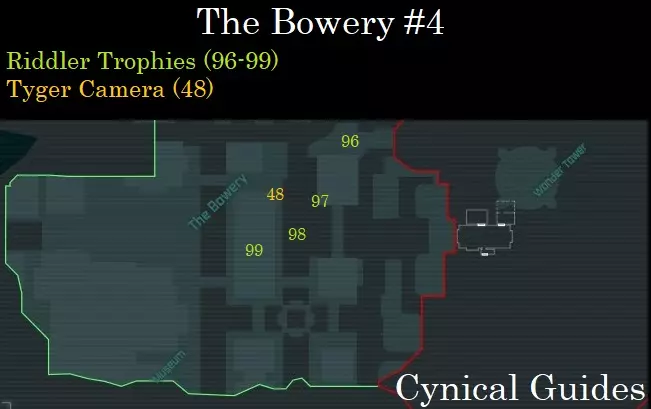
谜语人奖杯#96:钩爪抓住我们位置西北方向的建筑,在该建筑的屋顶上有一个房间,里面有结构弱点。用爆炸凝胶摧毁它即可获得奖杯。 谜语人奖杯#97:现在向南走,下到下面的街道。跳过一个小混凝土墙,可以看到一个奖杯笼;开启侦探模式,可以看到两条电缆分别向左和向右通向两个问号。首先,靠近左边的问号,在上面喷洒一些爆炸凝胶。然后走到右边的问号处,绕过拐角。引爆凝胶炸药后会启动3秒倒计时,迅速投掷蝙蝠镖激活第二个问号,即可解锁奖杯笼。 泰格摄像头48:跳上我们附近的混凝土墙,向西抬头看。在哥谭银行左侧的建筑墙上,可以找到最后一个泰格摄像头。 谜语人奖杯98:从上个奖杯处,开启侦探模式,向南望向高处的单轨铁路系统。在断裂轨道的尽头,能看到一节孤零零的单轨车厢,其车门被一些软木板挡住。使用钩爪助推向上,小心滑翔穿过木板即可找到奖杯。谜语人奖杯#99:作为本次快速收集的最后一个收藏品,使用钩爪登上单轨系统顶部,向西跟随单轨,来到一座大桥下方,我们会看到两侧各有三个问号,天花板上还有一个奖杯笼。面向其中一组三个问号,使用快速投掷蝙蝠镖,迅速扔出三个蝙蝠镖。当第一组三个问号被激活后,我们只有2秒时间转身,对另一组问号使用快速投掷蝙蝠镖。如果成功,奖杯笼就会打开,我们可以用蝙蝠抓钩获取奖杯。 至此,我们终于完成了大部分收藏品的收集。还有几栋建筑可以进入以获取其他收藏品,但我们会留到之后它们出现时再处理。截至目前,【冷血杀手】的完成度应已达到约60%,【暴力行径】的完成度约为18%。具体百分比可能会有小幅波动。 欢乐码头 - GCPD大楼:
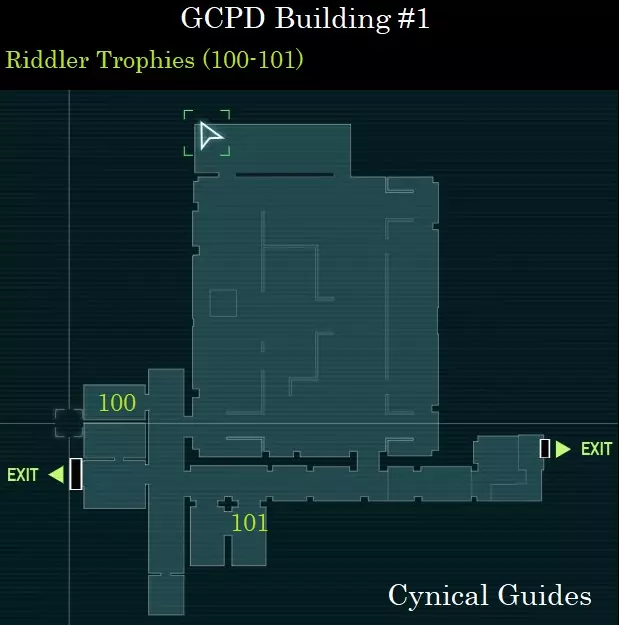
密码序列器 - 市政代码:我们终于可以推进主线任务【寻找解药】了。进入哥谭市警察局大楼,解决里面的持枪暴徒。当我们准备离开时,企鹅人会将我们困在大楼内,我们需要将市政代码下载到密码序列器中。 谜语人奖杯#100:在离开大楼前,我们可以在哥谭市警察局获取两个收集品。在我们进入哥谭市警察局大楼的位置附近,向左沿着走廊走,会发现一个被关在隔离牢房里的谜语人奖杯。抬头看向隔离牢房 door 的右上角,可以看到玻璃上方有一个足够容纳蝙蝠镖的小开口。要进入牢房,需向东前往停尸房方向,途中会被一些蒸汽管道挡住。这部分操作有点 tricky。将遥控蝙蝠镖扔过蒸汽,向上投向天花板,那里有电线正在放电。让蝙蝠镖带电,然后引导它穿过蒸汽。现在将蝙蝠镖一路带回奖杯收容室,从门旁边的空隙穿进去。收容室后面有一个保险丝盒,将带电的蝙蝠镖猛击到保险丝盒上,即可打开收容室的门。 谜语人奖杯 #101:现在我们拿到了市政代码,从哥谭市警察局入口向东走,沿着走廊可以在墙上找到一个市政安全控制台。使用密码破解器破解密码,打开附近的收容室。在牢房内,我们可以发现一面墙上有结构弱点;使用爆炸凝胶炸开墙壁,就能在后面找到一个奖杯。 公园街 - 教堂/医疗中心:
支线任务7 - 谜语难题1:当我们离开哥谭市警察局大楼前往鲍厄里区时,会接到一个新的支线任务,要求我们寻找失踪的医疗团队。前往公园街的教堂并进入内部,在那里我们会遭遇谜语人。 我们需要解开谜语:“我是一种乐器,其音乐总是源自心灵。我是什么?” 前往教堂的尽头,进入侦探模式;扫描后方的管风琴以完成该谜语。

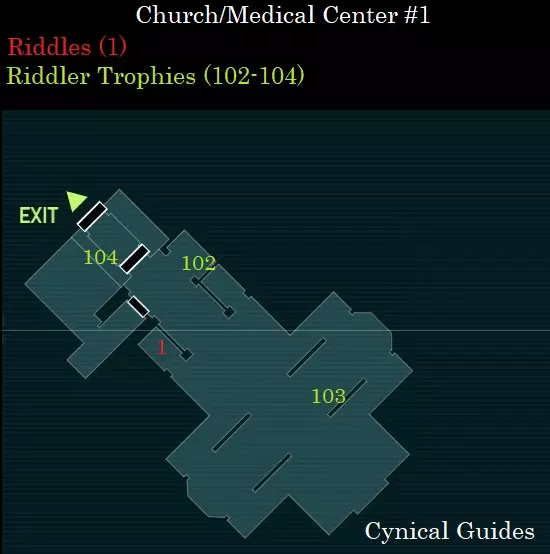
成就#9 - IQ测试:解开第一个谜题。 完成支线任务#8 - 谜之难题期间,解开教堂/医疗中心的谜题即可解锁该成就。 谜题#1:“若你找到名字,现金是否会随之而来?” 仍在教堂内时,前往西端靠近钟楼入口的一个小壁龛。在壁龛尽头,我们可以找到一张桌子,桌上有一盏亮着的灯,灯上有艾伦·卡什的身份牌以及一张他和家人的照片;扫描他家人的相框即可完成谜题。 谜语人奖杯#102:钩爪抓住教堂正门上方的石像鬼,开启侦探模式。面朝教堂内部,我们可以看到左侧墙上有一些软木板。从石像鬼上滑行并调整角度穿过镶板,在后面找到一个奖杯。 谜语人奖杯103:前往教堂的东南端,经过红色医疗中心横幅后前往治疗区。在此处开启侦探模式,我们可以看到旧忏悔室侧面有一些软木镶板;击破它就能找到奖杯。 谜语人奖杯104:现在从钟楼门进入,用抓钩爬上钟楼原来挂钟位置下方的第一层。转身看向我们来时的方向,可以在钟楼二楼下方的天花板上发现一个谜语人奖杯。我们可以用蝙蝠爪收集它。 以上就是教堂内所有可收集物品。 序列13:日历人 1. 主线剧情:寻找解药 2.支线任务:1/12 3. 小丑气球:17/24 4. 谜语:3/69 5. 谜语人奖杯:106/247 6. 猫女奖杯:12/35 7. 成就:12/64 ----------------------------------------------------------------------------------------------------- 公园街 - 所罗门·韦恩法院:随着等级提升,记得尝试获取【密码范围放大器】和【密码功率放大器】升级,以备后续收集品使用。
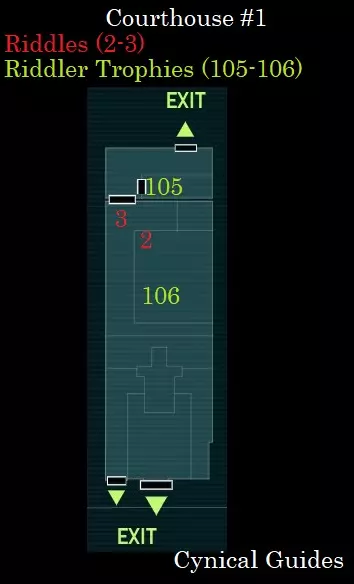
支线任务7 - 谜语人难题2:在解开谜语人难题的第一个谜题后,谜语人会告诉我们在法院里可以找到一名人质。当我们离开教堂时,会遭到一些谜语人手下的袭击;审问线人会在世界地图上添加一些收集品的位置。这些线人现在会在阿卡姆城中随机出现…… 进入法院,我们可以发现人质被一群暴徒挟持。击败暴徒,解开M.P.T.埃迪·伯洛的束缚。他会交给我们谜语机;打开PDA的谜语机选项卡,解开谜题:“如果你了解我,你会想要分享我,但如果你分享了我,我就会消失。我是什么?”谜题的答案是“秘密”。解开谜题后,我们就能找到下一名人质。完成度5% 谜题#2:“砰!砰!法庭秩序。” 在法院主厅,前往双面人在第三章主线任务中所在的玻璃保安室。放大查看桌上两把枪旁边的法官木槌并扫描,即可完成谜题。 谜语人奖杯#105:前往建筑北端并进入地下室。开始下楼梯后,立即转身,会看到一个奖杯卡在我们穿过的门框上方;使用蝙蝠爪收集它。 谜题#3:“谁疯到会和这家伙约会?” 进入地下室第二个房间,那里有关押犯人的单独监禁牢房。在第二个牢房里,我们可以看到日历人坐在他的床上;扫描他即可完成谜题。 谜语人奖杯#106:在日历人旁边的牢房里,我们能发现一个谜语人奖杯。开启侦探模式,我们可以沿着一根电线找到为牢房门锁供电的保险丝盒。现在迅速跑上楼,在法院里向右转到北出口,在那里我们可以看到两根钢梁之间有电流弧光。 投掷一枚遥控蝙蝠镖,引导它穿过电流使其带电。小心地引导带电的蝙蝠镖下到地下室,一直向前,射向保险丝盒,以打开奖杯所在的牢房门。 所罗门·韦恩法院内没有更多可收集物品了。

成就#10 - Storyteller:与日历人进行12次充满杀意的约会。 要解锁此成就,我们必须在12个特定节日与日历人对话。游戏会追踪你电脑的时钟,所以若想正常解锁,你必须等到对应的节日。不过,由于游戏追踪的是电脑时钟,我们可以通过手动将时钟调整到每个节日当天来利用这一点。此外,部分节日的具体日期每年会有所变化;如果你手动调整时钟,请确保日期所在年份正确。日期会变化的节日只有母亲节、父亲节、劳动节和感恩节。 当日期正确时,前往法院地下室并与日历人对话,即可触发该节日的独特对话。等待日历人坐回床上,然后退出法院进入公园街保存游戏,接着按Shift+Tab调出Steam界面(或你设置的其他快捷键)并最小化到桌面。将电脑日期更改为下一个节日,重新进入游戏,再次进入法院以让游戏识别日期变更……重复此操作。注意,如果你在主机上游玩,需要退出法院保存并完全退出游戏,才能更改主机日期。 2022年节日: 1. 元旦——1月1日 2. 情人节——2月14日 3. 圣帕特里克节——3月17日 4. 愚人节——4月1日 5. 母亲节——5月8日 6. 父亲节——6月19日 7. 独立日——7月4日 8. 圣罗克日 - 8月16日 9. 劳动节 - 9月5日 10. 万圣节 - 10月31日 11. 感恩节 - 11月24日 12. 圣诞节 - 12月25日 此成就可累积解锁,无需一次性完成,可在游戏流程中的任意时间进行。日历人牢房旁的日历会记录你已完成的节日。 公园街: 支线任务#7 - 谜语难题3:如果你已解开我们解锁的谜语机谜题,现在可以定位第一个正式人质了。前往教堂以西的任务点,与墙上画有绿色问号的黑金丝雀标志互动。进入黑金丝雀酒吧,向我们进来时经过的门上方的问号投掷蝙蝠镖,以解锁前方道路。 进入下一个房间,会发现里面布满带电地砖,人质被绑在我们上方。正对面有一个问号,激活后会关闭地砖上的一条通路,持续20秒;房间入口右侧还有另一个问号。从安全区域移动到另一个安全区域,直到到达房间另一侧的电梯。击打我们左侧墙上的问号以启动电梯,乘坐电梯到达顶部。从电梯顶部滑翔到人质身边并解救他们。

成就#11 - 谜题:从谜语人手中解救第一名人质。 该成就将在我们收到人质亚当·滨崎医生发出的谜语人下一条加密无线电广播6-2-5、9-2-5后解锁。 支线任务#7 - 谜之谜题4:使用密码序列器,且如果你已完成80/400个谜语人收藏品/挑战,我们就能解码谜语人的下一条广播,获得谜语:“它越多,你看到的就越少。我可能是什么?” 答案是“黑暗”。解开谜语后,我们就能去解救另一名人质。 欢乐大道: 支线任务#7 - 谜之谜题5:如果你已解开我们解锁的上一个谜机谜语,请前往欢乐大道的下一个人质任务点。与画有绿色问号的墙壁互动,进入藏身处。在藏身处的第一个房间里,站在下层的压力板上,会激活拯救人质的小游戏。人质会藏在三个容器中的一个后面,容器会被打乱位置。不过这个谜题是被操纵的,如果你开启侦探模式就会发现,人质实际上被藏在容器下方。向人质所在位置下方的问号投掷蝙蝠镖,然后跳过去营救他们。失败会导致人质死亡,并出现游戏结束画面,此时可以重试小游戏。30%完成度

成就#12 - 策划者:从谜语人手中解救第二名人质。 该成就将在我们收到人质M.P.T.威廉·诺斯发出的谜语人下一条加密无线电广播8-6-0,1-2-0后解锁。 我们需要收集160/400个谜语人收藏品才能解码下一条广播。 序列14:深入地下 1. 主线剧情:寻找解药,禁用干扰器 2. 支线任务:1/12 3. 小丑气球:17/24 4. 谜语:7/69 5. 谜语人奖杯:118/247 6. 猫女奖杯:12/35 7. 成就:13/64 博物馆:继续主线剧情并前往鲍厄里区的博物馆。使用密码序列器解码门锁后进入。当我们尝试入侵下一个控制台以继续推进时,会被企鹅人直接干扰。要继续在博物馆内行动,我们需要先关闭企鹅人的干扰器。关闭前两个干扰器后,前往杰泽贝尔中心下方的地铁,在那里找到第三个干扰器。 地铁站:
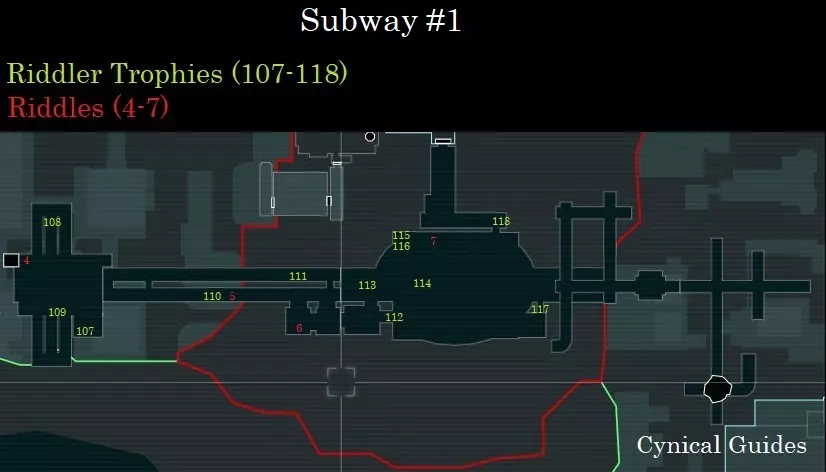
地铁站: 谜语人奖杯#107:首次进入地铁站后,进入西端有猫女奖杯的房间。在这个房间里,可以找到一个通风口盖,将其撕下后进入一个石质房间,地板上有结构弱点。用爆炸凝胶破坏地板,即可落下拿到奖杯。 谜语人奖杯#108:走下楼梯到地铁站下层,在底部右侧可以看到一个通风口盖。撕下盖子,爬过狭窄空间即可找到奖杯。 谜语人奖杯#109:在地铁站下层的另一端有一排地板格栅。穿过格栅落下,在格栅中间可以找到奖杯。 谜题#4:“BOARD at drive-time?”“我不会再透露任何线索了!” 在地铁下层的东南角,可以看到一块维基·维尔的广告牌;扫描它即可完成谜题。 地铁隧道: 谜语人奖杯#110:开始向东穿过地铁隧道,打破挡住去路的墙上的一些软木板。在墙的另一边,向西返回我们进入下层隧道的入口方向,从火车车厢上跳下去,就能看到地面正下方有一个奖杯。 谜题#5:“这个问题只能从一个不寻常的视角来回答。你能到达那里吗?” 用抓钩回到我们跳下来的火车车厢,这次从车厢东侧下到地面。进入火车车厢并走到后部。开启侦探模式,我们可以看到右侧墙上画着一个问号,左侧火车窗户上则画着一个圆点。看向窗户上的圆点,实际上能看到窗户倒影里的问号;将这两个部分对齐并扫描,即可完成谜题。 支线任务4——脆弱联盟4:穿过地铁隧道,我们会遇到由几名暴徒看守的第三个泰坦容器。解决他们,然后使用我们的爆炸凝胶摧毁容器。45%完成 谜题6:“死而复生在一周中的任何一天都是作弊行为。” 从泰坦容器处,看向画着所罗门·格兰迪的巨大墙壁,扫描它即可完成谜题。谜语人奖杯#111:在通过工业电机操作门继续前进之前,向北看并跳过一些碎石。使用我们的爆炸凝胶,炸开附近墙壁上的结构弱点,我们将进入北火车隧道的下层。忽略里面有三个奖杯笼的半开着的门,而是向西走,会看到轨道中间有一个不同的笼子,前面有一个压力板。 站在压力板上,我们可以隐约看到前方火车车厢里有一个问号被激活(实际上里面有三个)。首先,投掷一个遥控蝙蝠镖,并引导它到火车里最远的那个问号。当击中它时,会开始8秒倒计时,我们必须迅速击中另外两个问号。将另一枚遥控蝙蝠镖扔到中间的问号处,然后快速投掷最后一枚蝙蝠镖到最近的问号处,以打开笼子。 地铁终点站:

成就#13 - Communication Break:清理电波。 剧情相关。进入地铁终点站,击败企鹅人的手下并处理掉通讯干扰器即可解锁该成就。 谜语人奖杯#112:处理完干扰器后,前往地铁终点站的上层,开启侦探模式。在终点站的西角,上层墙壁上有一些软木板。从附近的石像鬼处滑翔穿过木板即可收集奖杯。 谜语人奖杯#113:从上个奖杯处,钩爪到最西侧的石像鬼顶部,然后下落到上层的一个独立平台上。走进一个房间,会发现一个连接着奖杯笼子的谜语人安全控制台。使用密码序列器来禁用奖杯笼。 谜语人奖杯114:现在下到一楼,进入我们正下方的火车车厢。查看火车天花板,会看到一个附着在上面的奖杯;用蝙蝠爪收集它。 谜题7:“假期时间到了。我该去哪里?某个有毒的地方?” 现在离开火车车厢,走到下层的西北角;扫描写着“造访圣普利斯卡”的布告板以完成谜题。 谜语人奖杯115:看向布告板左侧,我们能看到一个可以进入的开放式爬行空间,在里面能找到一个奖杯。谜语人奖杯#116:从我们进入的爬行空间出来,在侦探模式下直接看向我们之前所在位置的正上方,透过上方栅栏的孔洞可以隐约看到一个保险丝盒。拿出远程电力 charge,穿过孔洞射击保险丝盒。现在向左走上楼梯,在刚才那个奖杯上方的楼层地板上就能收集到一个奖杯。 谜语人奖杯#117:现在前往上层航站楼的东南角,可以看到墙上嵌着一排软木板。打破软木板进入一个侧室,下楼后就能在空旷处找到一个奖杯。你也可以通过附近的地板格栅进入来获取该奖杯。谜语人奖杯#118:穿过地铁终点站下层北端的一扇门,进入隧道的侧区。向右看,会看到一扇由工业电机操作的门;使用遥控电击打开它,门后即可找到奖杯。 序列15:哥谭市警察局救援 1. 主线剧情:博物馆 2. 支线任务:1/12 3. 小丑气球:17/24 4. 企鹅人:5/12 5. 谜语:9/69 6. 谜语人奖杯:127/247 7. 猫女奖杯:12/35成就:14/64 【Bowery(鲍厄里区)】 支线任务#8 - 身份盗窃1:在摧毁通讯干扰器后离开地铁时,查看世界地图,会发现阿卡姆城处理中心以南有一个新的任务点,显示为犯罪现场。前往该任务点,在篝火桶附近可以找到一具尸体,由此开始新的支线任务。靠近尸体会激活支线任务;开启侦探模式并进入证据扫描器,这样就能追踪地面上受害者的血迹。 跟随血迹会找到一名政治犯,推进支线任务进度。完成度35% 【Museum(博物馆)】
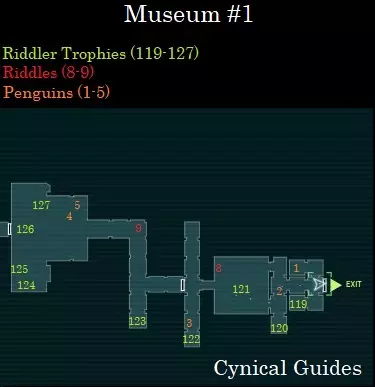
奖杯室: 谜语人奖杯#119:进入博物馆后,你会注意到左侧墙上嵌有一些软木板。击破木板并穿过洞口,会发现一个奖杯笼和墙上的三个问号。只需快速投掷三枚蝙蝠镖击中问号即可解锁笼子。 企鹅雕像#1:进入与找到谜语人奖杯的房间相对的房间,通过市政安全控制台所在的玻璃窗进入,在后面的角落里可以找到一个陶瓷企鹅雕像。投掷蝙蝠镖将其摧毁。 谜语人奖杯#120:现在关闭安全系统,进入奖杯室的大房间,在被霸王龙惊吓后向左看,会发现附近墙上有一处结构弱点。使用爆炸凝胶摧毁墙壁,在后面可以找到一个奖杯。 谜题大师奖杯121:解决劫持琼斯警官的暴徒后,钩爪到房间中央天花板附近的大型链环升降机上,即可找到奖杯。 谜题8:“这里谁说了算?是木偶还是操纵者?” 下到一楼,走到房间的西北角。在这里可以找到一个玻璃展柜,里面有木偶疤面煞星;扫描它即可完成谜题。 企鹅人2:现在前往下层最东端,在即将开放的蝙蝠侠展览旁可以找到一个企鹅人。 谜题大师奖杯122:获取这个收集品需要【密码序列器范围放大器】。在 trophy room 的出口门附近,下楼后可以看到一个大型安全门下方有个小空间。奔跑并滑到下方,在穿过另一扇门之前及时停下。开启侦探模式,可以看到前方有一些安全激光挡住了去路。拿出密码破解器,破解奖杯附近的市政安全控制台以关闭激光。 企鹅人 #3:从最后一个奖杯处转身,向左看可以发现玻璃展示柜顶部有一个企鹅人。 无名走廊: 谜语人奖杯 #123:在使用遥控蝙蝠镖前进之前,先向左走,使用远程电力 charge 打开走廊深处的一扇门,门后有一个奖杯。打开这扇门后,我们也可以以猫女的身份回到这里,收集她的一个【奖杯】。 谜题9:“他是被陷害的?还是家族遗传?” 使用【遥控蝙蝠镖】打开大门,以便我们继续前进。在大厅的尽头,我们可以找到一幅企鹅人和他家人的画像;扫描它即可解开这个谜题。 角斗士斗技场:

成就#14 – Gladiator:最后站立者。 剧情相关。进入角斗士坑房间并击退企鹅人的一波波手下;击败所有敌人和泰坦暴徒即可解锁该成就。 谜语人奖杯#124:要继续在角斗士坑中前进,查看房间的南角并开启侦探模式,以看到带电围栏后面的安全门覆盖面板。引导遥控蝙蝠镖进入该面板,以打开最左侧的安全门。 进入我们刚刚解锁的新区域,我们可以在左侧看到一个市政安全控制台、一个工业电机以及安全门后的结构弱点。首先,使用密码序列器入侵控制台并打开安全门。接下来,使用远程电力充能器将电梯提前向上发送。现在靠近结构弱点,并用爆炸凝胶摧毁它,即可找到一个奖杯。 谜语人奖杯125:现在使用远程电力充能器将电梯送回楼下,爬进电梯后再次将其向上发送。在电梯内抬头寻找另一个结构弱点,同样用爆炸凝胶摧毁它,之后我们就能爬到角斗士坑的二楼。从电梯处转过拐角,可以看到一个阀门盖,用蝙蝠爪将其撕开,并用爪子收集盖子后面的奖杯。 企鹅人4:沿着二楼继续前进,用爆炸凝胶摧毁挡路的结构弱点。走到我们之前看到科波特站着的阳台,向左看,可以看到一个企鹅玩偶在悬挂的笼子里;用遥控蝙蝠镖把它取出来。 企鹅玩偶#5:从二楼的阳台出发,沿着左侧带电围栏后面的楼梯下去,就能找到另一个企鹅玩偶。 谜语人奖杯#126:现在到了棘手的部分。作为参考,跑回由远程电力充能操作的电梯,继续沿着大厅往前走,经过充满水的展品,大厅尽头有一些铁栏杆。透过栏杆,开启侦探模式,可以看到墙壁右角落里藏着一个保险丝盒。看向我们前方铁栏杆的右侧,能看到栏杆之间有一个小空隙……刚好够引导蝙蝠镖通过。返回角斗士坑的中央房间,查看其中一个带有电弧的围栏。明白接下来该怎么做了吗?投掷一枚遥控蝙蝠镖,引导它穿过电流使其带电。现在引导这枚带电的蝙蝠镖穿过走廊,通过铁栏杆的空隙,进入保险丝盒以过载电路,部分升起中央安全门。 滑跑到安全门下方,我们可以收集前方半浸在水中的一个奖杯。 谜语人奖杯127:看向我们刚收集的上一个奖杯的右侧,可以看到一扇可破坏的玻璃窗。跳进去进入下一条走廊,沿着走廊走到底,在最后的安全门后面找到一个奖杯;我们可以直接走过去收集它。如果你确实想这么做,可以引导带电的蝙蝠镖并让其过载这个保险丝盒,以打开这里的安全门,但既然我们已经拿到了门后的谜语人奖杯,现在就没必要这么做了。 序列16:光与玻璃 1. 主线剧情:博物馆 2. 支线任务:1/12 3. 小丑气球:17/24 4. 企鹅人:9/12 5. 谜语:13/69 6. 谜语人奖杯:134/247 7. 猫女奖杯:12/35 8. 成就:15/64 ----------------------------------------------------------------------------------------------------- 博物馆:
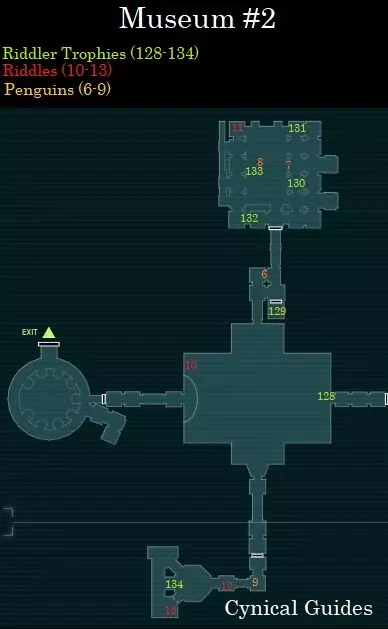
Torture Chamber: Riddler Trophy #128: After you save Officer Forrester, drop down onto the fragile ice, & very carefully turn around to face the lower East wall of the room where we can find a Valve Cover. Use the Batclaw to open the Cover & use it again to collect the Trophy hidden behind it. If you wait until after completing the Main Story Mission – Museum, all the fragile ice will have melted & we will have to tediously travel around the room using the Batclaw & a Raft until we get the Freeze Blast later on... Riddle #10: “This question can only be answered from an unusual perspective. Can you get yourself there?” After collecting the last Trophy, very carefully begin walking West along the fragile ice. When we reach a narrow piece of the ice, a short event will trigger where Tiny the Shark will bite out the ice beside us. From this position, turn on Detective Mode & look across to the West where we can see a Question Mark painted on the far wall at the back of the room. We can see the Dot on a pillar in the middle of the water surrounded by Anchor Points. We basically need to walk to the far East end of the fragile ice to be able to align the two pieces; when you do, Scan them to complete the Riddle. Penguin #6: Cut down the Raft in the North corner of the Torture Chamber & rescue Officers Whitman & Strickland encased in ice here. After they are freed, carry on North down the halls of the Torture Chamber & we can find a Penguin sitting on top of a wooden rowboat exhibit. Riddler Trophy #129: Turn around from the Penguin & we can see an Industrial Motor operated door. Open it using the Remote Electrical Charge & crouch underneath it to find a Trophy Cage & Question Mark puzzle. Watch the circular Question Mark wheel rotate in its activations & time a Batarang to hit it an activated one to open the Cage. You can basically just spam Quick Throw until you hit it… Armory: Riddler Trophy #130: Carry on North through the Museum & enter the Armory where we can save Officers Miller, Sanchez, & Michaels. With the room secured, return to where we entered the Armory on the second floor & begin making your way around counterclockwise. Rounding the corner from the entrance, we can see some Soft Wooden Paneling in our way; punch through it to find a Trophy near a hole in the floor. Penguin #7: From the Trophy, drop down through the hole in the floor to the lower level of the Armory & punch through another wall of Soft Wood Paneling. We can find a Penguin in a broken open exhibit off our left. Riddler Trophy #131: Carry on North on the lower level of the Armory to the far North East corner where we can spot a Trophy locked behind a security gate. Use our Cryptographic Sequencer to hack the Municipal Security Console to the gates left to open it. Riddle #11: “See no evil, hear no evil, speak no evil, or there will be explosives consequences.” Continue around the lower level counterclockwise over to the North West end of the Armory. In the far corner, we can see a glass exhibit with three skeletons inside it all holding frag grenades in front of their faces; Scan the skeletons to complete the Riddle. Riddler Trophy #132: Go to the far South end of the Armory’s lower floor & we can see a line of Floor Grates. Hop inside them & we can find a Trophy in the middle of one of the crawlspaces; it helps being in First Person View to see it, though it is hard to miss. Penguin #8: Head to the center of the lower floor where the disturbingly rendered mammoth display is & we can find a Penguin underneath it between its feet. Riddler Trophy #133: This Riddler Trophy requires the Cryptographic Sequencer Range Amplifier Upgrade. From the Penguin underneath the mammoth, look up above us to the underside of the bridge in the West corner & we can see a Riddler Security Console connected to a Trophy Cage. Hack it with our Cryptographic Sequencer & use our Batclaw to collect the Trophy. War Room: Penguin #9: Leave the Armory back into the Torture Chamber & head South across the fragile ice & down the hall past the Thugs into the War Room. Walk down the hall to the corner & we can find a Penguin on a table immediately to our right. Riddle #12: “Have Joker's pets laughed themselves to death, or just eaten too much?” From the Penguin, continue down the hall & up some stairs where our way will be barred by a half-closed security gate. Before sliding under it, look to its left to see an exhibit with two hyenas that have hats on in it; Scan the Hyenas to complete the Riddle. Side Mission #4 – Fragile Alliance 5: Slide under the gate & make your way to the right of where Mr. Freeze is being kept to find a Structural Weakness in a wall down the hall. Dispatch the second Abramovici Brother & continue down the hall, past the Municipal Security Console, & we can find the fourth Titan Container. Riddle #13: “Brothers in arms. Brother at war. Who's right? Who's... Left?” Look to the left of the Titan Container to see a poster of the two one-armed Abramovici Brothers; Scan in it complete the Riddle. Riddler Trophy #134: Free Mr. Freeze from the Hawaii exhibit, & after basically almost killing him, walk inside the exhibit & we can find a Trophy inside a treasure chest prop. Batman didn’t have his coffee this morning it seems… Iceberg Lounge:

成就#15 - Wrecking Ball:阻止不可阻挡之物。 剧情相关。在军械库中从急冻先生的战衣获取干扰器 - 冻结覆盖升级后,前往冰山俱乐部并与企鹅人对峙,之后需要与所罗门·格兰迪进行 boss 战。禁用他的电荷攻击并将其击败两次即可解锁该成就。 完成主线任务 - 博物馆后,将解锁干扰器 - 枪械干扰器升级供购买。解锁密码序列器的两个升级后,获取该升级将成为解锁部分收集品的新优先事项。 公园街:
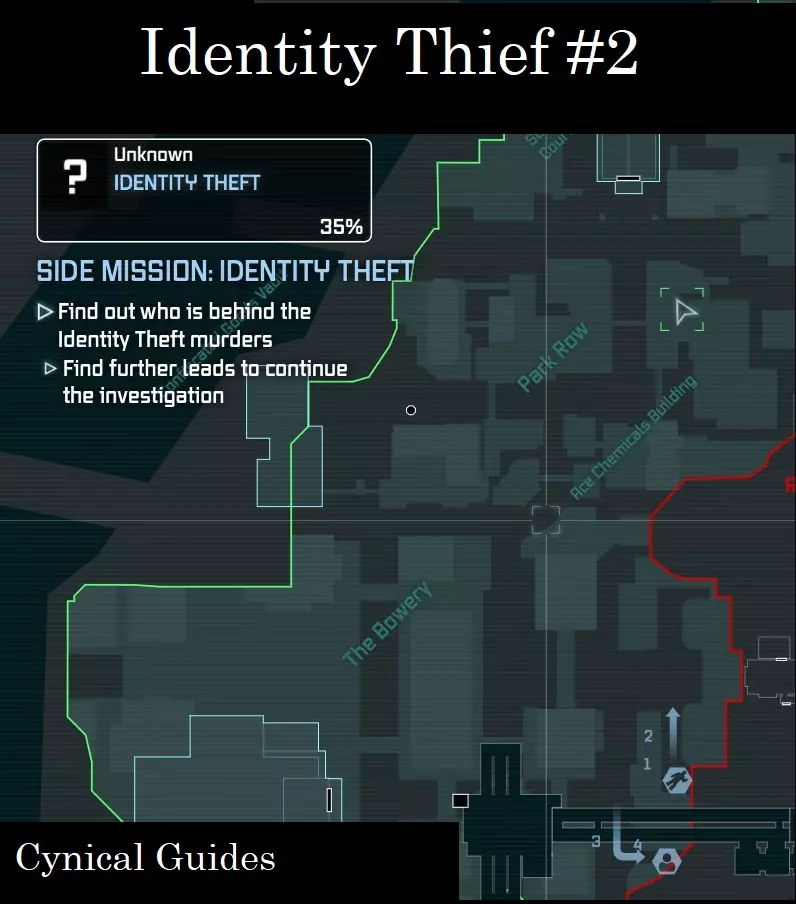
支线任务#8 - 身份盗窃2:追踪刺客并获得钩爪发射器后,前往公园街上图所示的导航点,在一条偏僻小巷中可以找到下一名受害者。使用证据扫描仪收集更多关于凶手的信息。完成度50% 序列17:刺客联盟 1. 主线剧情:奇迹之城 2. 支线任务:1/12 3. 小丑气球:17/24 4. 小丑牙齿:7/12 5. 企鹅玩偶:9/12 6. 谜语:14/69 7. 谜语人奖杯:143/247 8. 猫女奖杯:12/35 9. 成就:15/64 ----------------------------------------------------------------------------------------------------- 地铁:
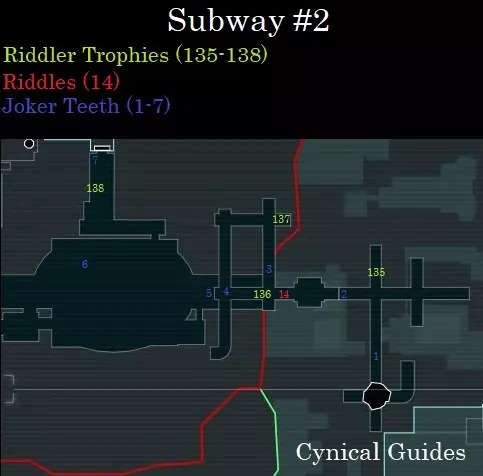
地铁维修通道: 谜题人奖杯135:跟随刺客的信号进入工业区,从旧地铁的东侧入口进入。着陆后,我们可以看到左侧的铁栏杆之间有电流弧光。在前方隧道更深处,我们能看到一个保险丝盒,隧道尽头的另一些铁栏杆后面有一个奖杯。使用遥控蝙蝠镖,让其接触附近的电流带电,然后引导它进入保险丝盒,即可获取奖杯。 小丑牙齿1:沿着隧道走向最后一个谜题人奖杯时,在需要跳过的缺口前,可以看到一组小丑牙齿在四处移动。用蝙蝠镖将其摧毁。小丑牙齿#2:沿着地铁隧道向西走,我们可以在前方需要跳过的缺口前看到另一组小丑牙齿。 谜语人奖杯#136:处理完小丑牙齿后,看向缺口对面,会发现前方孤立的平台上有一个谜语人奖杯。使用新获得的【线发射器】到达那里。 谜题#14:从奖杯处转身,开启【侦探模式】,会看到前方地板有结构弱点。用【爆炸凝胶】摧毁它,然后跳入一个秘密藏身处。扫描床以及床上的项圈,即可完成该谜题。支线任务7 - 谜语难题6:如果你一直按照指南进行,在地铁区域收集了一些谜语人奖杯后,可能会收到使用谜语机的提示。这原本应该在完成160个谜语人挑战后触发,但目前我们已经完成了大约185个(不包括你已完成的物理挑战)。我很确定它会在我们获得钩爪发射器道具并完成160个谜语人挑战后解锁。 无论提示何时出现,打开谜语机并解决谜题。谜语是:“我有头,有尾,但从来没有腿。你知道我是什么吗?”答案是【硬币】。我们将解锁第三名人质的位置,但需完成当前主线任务【奇迹之城】后才能解救他们。 小丑牙齿#3:蹲下穿过一道降下的铁门继续前进,我们会看到一组牙齿在前方快速移动。 谜语人奖杯#137:使用钩爪发射器在隧道中前进,会看到提示让我们在悬挂途中再次发射以改变方向。当到达上方的猫女奖杯时,按住扳机减缓时间,向右发射钩爪发射器即可获得谜语人奖杯。 小丑牙齿#4:继续穿过维修通道,蹲下钻过另一道铁门,在冲破地板上的软木板攻击小丑的暴徒之前,就能找到一组小丑牙齿。地铁终端: 小丑牙齿#5:解决掉下方的那群暴徒后,我们可以在这个房间里找到另一组四处移动的牙齿。 当我们黑入市政安全控制台以打开通往主终端室的门后,将解锁“抓钩发射器 - 钢丝升级”供购买;这应该是我们接下来的优先购买项。 小丑牙齿#6:在我们跟随刺客的信号向北穿过主房间的门之前,快速跑过损坏的通讯干扰器所在位置,我们可以在通往二楼的楼梯前看到一组小丑牙齿。 谜语人奖杯#138:当我们到达需要使用抓钩发射器跨越水面的缺口时,抬头向左看水面上方,可以看到一个奖杯笼和一个谜语人安全控制台。装备射程放大器后,使用密码破解器打开奖杯笼;用蝙蝠爪收集奖杯。 小丑牙齿#7:现在使用索道发射器越过水面,然后用抓钩爬上带有出口门的 ledge,在门前可以找到一组四处移动的牙齿。 奇迹之城:
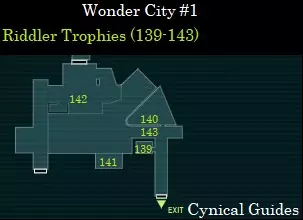
倒塌街道1: 谜题人奖杯139:首次进入倒塌街道后,沿着走廊往前走一小段路,抬头看向左侧,可以看到一个可以用钩爪爬上去的房间。爬上去后,就能在地板上找到一个奖杯。 谜题人奖杯140:继续沿着走廊前进,我们可以直接穿过前方的窗户进入一个小房间。房间内有一个奖杯笼,当我们进入房间时它会立即关闭,离开房间时则会打开,这意味着我们必须用蝙蝠爪从远处收集它。在奖杯笼所在的同一个房间里,我们可以在附近的一扇窗户上找到结构弱点,可用爆炸凝胶将其摧毁。摧毁它后,离开房间,使用钩爪发射器向右侧发射第二条绳索,借此移动到房间的另一侧。从这里,我们可以透过刚才打开的窗户,用蝙蝠爪收集奖杯。 谜语人奖杯141:在我们收集上一个奖杯的位置,向南眺望 gap,能看到另一个奖杯放在一个孤立的 ledge 上,同样可以用蝙蝠爪直接抓取。 谜语人奖杯142:仍然站在这个 ledge 上,抬头看向有小丑手下的房间墙壁右侧,会看到一个可以用钩爪爬上去的洞口。走进手下们上方的房间,能发现天花板上有一个奖杯,也可以用蝙蝠爪收集。谜语人奖杯143:如果站在我们跳进来的窗户另一侧,也就是进入有笼子的谜语人奖杯141所在房间的那扇窗户,使用侦探模式向上看,可以看到上方有一些软木板。要打破它,使用勾爪滑翔器骑到房间的最西端,那里有阿卡迪亚博士的生命 elixir 画在一组大型钢门上。转身回到我们来的地方,然后从边缘滑翔到东侧,朝着水面倾斜下降。如果离另一侧足够近/朝着水面下降得足够远,我们就能从顶部边缘使用钩爪助推,头朝下穿过软木板。打破木板后,我们现在可以用蝙蝠爪收集奖杯。 序列18:师徒 1.主线故事:奇迹之城 2. 支线任务:1/12 3. 小丑气球:17/24 4. 小丑牙齿:7/12 5. 企鹅人:9/12 6. 恶魔印记:9/12 7. 谜语:18/69 8. 谜语人奖杯:151/247 9. 猫女奖杯:12/35 10. 成就:17/64 ----------------------------------------------------------------------------------------------------- 奇迹之城:
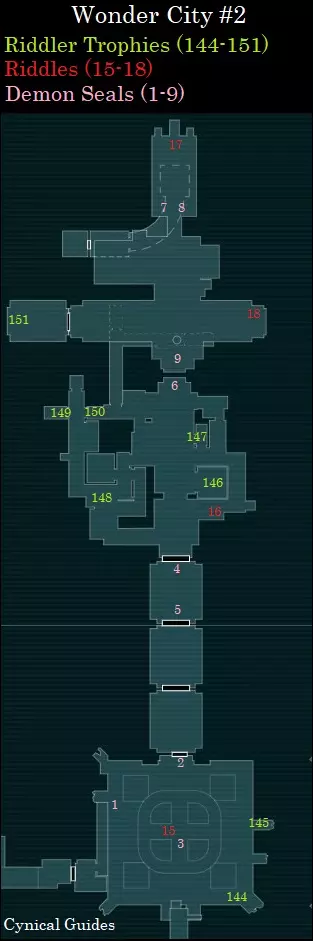
奇迹之塔地基: 支线任务#4 – 脆弱联盟6:穿过门进入奇迹之塔的下一个房间,营救菲奥娜·威尔逊。确保她安全后,下落到奇迹之塔地基的二楼,找到我们要摧毁的第五个泰坦容器。只剩最后一个了。 谜语人奖杯#144:现在下落到一楼,前往房间的东南角;奖杯就在一些地板格栅附近的空地上。 谜语人奖杯#145:再次用抓钩爬上二楼,前往房间的东角。开启侦探模式,我们可以看到茶屋和冰淇淋糖果店之间有一处结构弱点。用爆炸凝胶摧毁它,即可找到奖杯。 谜语#15:“犯罪是一个全球性问题。”“你永远阻止不了的,蝙蝠侠。” 在楼下房间中央,我们能看到一个旋转的地球仪;扫描它即可解开谜题。 【恶魔封印1】:在奇迹之城有一种我们需要摧毁的新型收集品,名为恶魔封印。恶魔封印看起来像蝙蝠/狼的雕像头部,上面有一个圆形门环;可以用蝙蝠爪将其拉下以摧毁。第一个恶魔封印位于楼下西北角的楼梯下方。 【恶魔封印2】:向北走上楼梯,来到二楼,我们可以在一座天使雕像和一个石像鬼之间看到另一个恶魔封印。恶魔印记3:现在用钩爪爬上三楼,前往奇迹塔南侧,在当前停用的电梯室入口上方可以找到一个恶魔印记。 奇迹大道: 恶魔印记4:沿着刺客追踪信号向北穿过奇迹城,使用远程电力充能打开前两扇门。穿过挂满暴徒的房间并击退三名刺客后,正前方下一扇门的上方就是一个恶魔印记。 恶魔印记5:拉下最后一个恶魔印记后,转身看向我们刚穿过的门上方,这里有第二个恶魔印记。

成就#16 - Lost & Found:揭开阿卡姆城的秘密。 剧情相关。在奇迹城大道最后一个房间使用爆炸凝胶找到工业马达,打开第三扇门进入奇迹大道主街即可解锁该成就。 谜题#16:进入奇迹大道主街后,沿着第一条街右转,向右看会看到一个立式招牌,上面写着“哥谭市时报奇迹城:已关闭”。扫描该招牌即可完成谜题。 谜语人奖杯#146:从刚才扫描的招牌处,用钩爪爬上前方街道的 ledge,跳到下一个铁丝网 ledge,看向左侧的建筑墙壁。在这座建筑内,可以看到一个奖杯笼和一个压力板。要打开牢笼,我们需要站在所有三个压力板上,期间完全不能接触地面。 首先,站在奖杯牢笼所在房间的第一个压力板上。现在看向我们进入这个房间的对面,会看到另一个压力板;使用钩爪发射器(Line Launcher)到达那里。从第二个压力板上,向西望向奇迹大道对面,找到第三个也是最后一个可以用钩爪发射器到达的压力板。如果你成功踩到所有三个压力板,牢笼就会为我们打开。 谜语人奖杯147:回到奇迹大道的主街,继续向北走,会看到一段蝙蝠侠试图推断如何继续前进的小过场动画。扫描机械守护者前,查看 Billingham Butchers 右侧的建筑,会看到砖墙下有个可滑入的狭小空间。滑入墙下即可找到一个奖杯。 恶魔印记 #6:靠近奇迹之城神庙的门,查看门的上方即可找到恶魔印记。 谜语人奖杯 #148:从奇迹之城神庙的门转身面向南方。沿着右侧小巷前行,经过家具店后小巷会开阔起来,在路灯旁的婴儿车里可找到一个奖杯。 谜语人奖杯 #149:从婴儿车处出发,沿着小巷走向奇迹大道的西北角。在一个问号标志对面,能看到一些软木板;击破木板即可收集奖杯。谜语人奖杯#150:现在来处理那个问号。首先,如果你还没有扫描过机械守卫,需要先扫描它们,然后打开刺客的秘密通道。进入通道后,我们会看到前方有一个结构弱点,用爆炸凝胶摧毁它就能找到奖杯笼。 还记得奇迹大道西北角的那个问号吗?有两种方法可以处理它:一种是操控遥控蝙蝠镖飞过去击中问号,另一种是走到问号处,在上面喷洒爆炸凝胶,然后回到奖杯笼处引爆它。 恶魔之室:

成就#17 - Sandstorm: We are legion。 剧情相关。完成恶魔试炼并击败拉尔斯·艾尔·古尔即可解锁该成就。 恶魔印记#7:击败拉尔斯后,我们将从拉撒路之池出来回到恶魔密室。然后我们可以在前方通往下一区域的门上找到两个恶魔印记。 恶魔印记#8:位于拉撒路之池外,上一个恶魔印记的旁边。 谜题#17:“这对恶魔双子是否构成威胁?” 转身面对拉撒路之池的门,尝试让两座拉尔斯·艾尔·古尔雕像同时出现在屏幕上;扫描它们以完成谜题。 恶魔印记#9:穿过门进入恶魔密室的主房间,进入时我们可以立即看到正对面有一个恶魔印记。谜题18:“通缉:已死……还是活着?” 从恶魔印记出发,向左走,沿街而下,在被封锁的门左侧可以找到所罗门·格兰迪的“通缉”布告栏;扫描它即可完成谜题。 谜语人奖杯151:现在前往街道的另一端,靠近死胡同的门。使用远程电力充能打开门,在房间中央可以找到一个奖杯。 序列19:揭露真相 1. 主线剧情:急冻人,营救维姬·维尔 2. 支线任务:2/12 3. 小丑气球:17/24 4. 小丑牙齿:12/12 5. 企鹅人:9/12 6. 恶魔印记:9/12 7. 谜题:18/69 8. 谜语人奖杯:154/247 9. 猫女奖杯:12/35 10.成就:19/64 ----------------------------------------------------------------------------------------------------- 地铁:
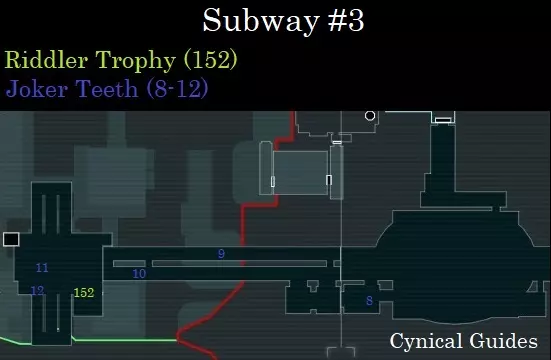
地铁终点站: 小丑牙齿#8:从奇迹之城返回地铁。通往工业区的道路将被封锁(不过我们可以在那边与杀手鳄碰面),所以我们必须改从包厘街出去。 无论你是否在终点站解决了小丑的手下,都前往房间西侧出口,我们可以找到一组小丑牙齿。 地铁隧道: 小丑牙齿#9:进入地铁隧道,用抓钩抓住火车车厢,穿过墙上的洞口进入隧道,在前方的火车车厢顶部可以看到一组小丑牙齿。 小丑牙齿#10:继续穿过地铁隧道,向下跳到进入地铁站的位置,在我们下方的地面上可以找到更多小丑牙齿。地铁站: 小丑牙齿#11:进入地铁站下层,击败新招募的小丑帮暴徒;在房间最西端附近可以找到一组小丑牙齿。 小丑牙齿#12:使用密码破解器入侵下层的任意一个市政安保控制台,这样就能通过楼梯前往上层。在一个小办公室房间内,坐在椅子上的企鹅人暴徒尸体旁可以找到最后一组小丑牙齿。 谜语人奖杯#152:看向我们找到小丑牙齿的房间对面,有一个被铁栅栏锁住的房间。使用密码破解器入侵附近的市政安保控制台来解锁该房间。 Bowery:
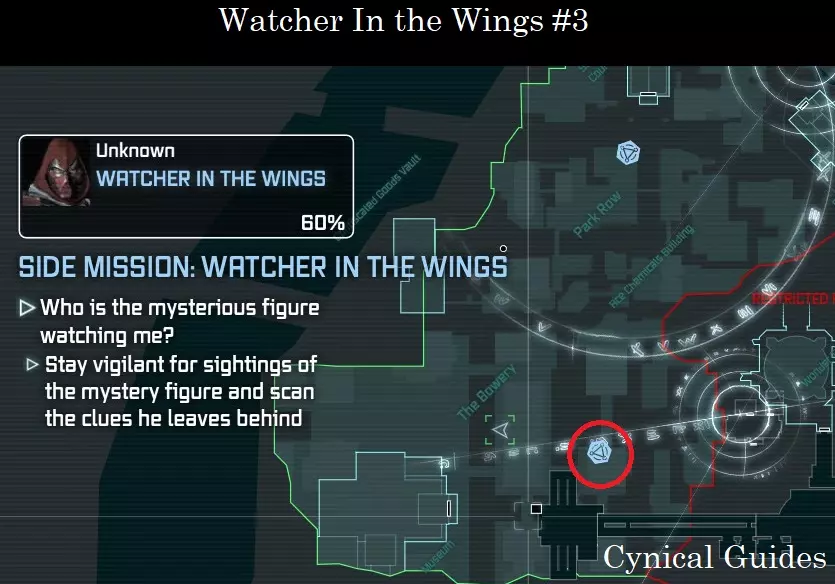
支线任务5 - 幕后观察者3:离开地铁后,去审问昆西·夏普以获取下一个主线任务的信息。当我们把他甩开时,实际上可以看到对面屋顶上的神秘观察者。用钩爪过去并扫描下一个符号以推进支线任务。60%完成 博物馆: 支线任务9 - 远程藏身处:完成主线任务“奇迹之城”后,我们可以在世界地图上博物馆附近看到一个新的任务点,显示“带有装备升级的便衣警察”。解决博物馆北入口外的暴徒后进入内部。与琼斯警官交谈,我们将获得干扰器的地雷引爆器升级。就是这么简单。100%完成 工业区: 支线任务#7 - 谜语难题7:前往工业区第三名人质的导航点,然后前往小巷中一些垃圾桶附近的喷漆问号处。使用斯巴达踢踹墙壁进入巢穴。 要解决这个谜题,使用钩爪发射器到达水面对面的走道。从走道向上看,会发现流过两个问号的水流可以通过对工业电机使用远程电荷来控制。右侧的问号可以用普通蝙蝠镖击中,而左侧的问号需要用遥控蝙蝠镖击中。安全门关闭后,使用钩爪发射器穿过第一组圆形锯陷阱。通过后,向右发射另一道绳索,然后穿过下一组障碍物,你就会进入下一个谜题房间。 在这个谜题中,只需使用远程电力电荷将一个西奥尼钢铁托盘引导至附近有三个工业电机的压力板上。随着下一道安全门被禁用,我们现在可以解救一位无名医生。她给我们的密码是6-0-6 1-2-0。

成就#18 – Puzzler:从谜语人手中救出第三名人质。完成第三个谜题后救出无名医生即可解锁该成就。此内容在完成160/400个谜语人挑战并获得钩爪发射器后解锁。哥谭市警察局大楼:
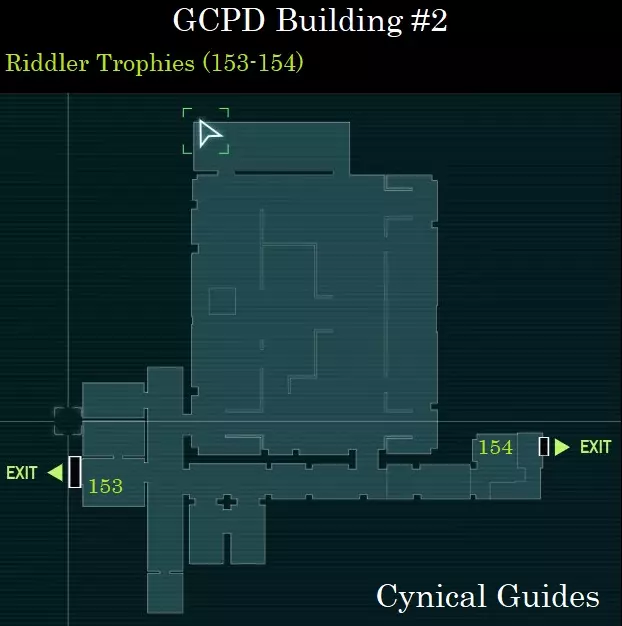
支线任务10 - 冰之心1:继续进行主线任务 - 急冻人,并前往欢乐港的GCPD大楼。最后的小丑气球在这里可以收集,但我们需要先获取最后一个道具,然后再进行阿卡姆城最后的收集品快速收集。可以忽略这些气球,或者直接打爆它们,我会在最后几张欢乐港地图中标出所有气球的位置,所以不用担心…… 注意,如果你还没有开始,在游戏过程中要留意你的体能挑战。寻找机会完成一些挑战,比如有暴徒试图闯入GCPD的时候。到这个阶段,我已经完成了蝙蝠侠40个挑战中的30个。剧情触发的机会最容易把握,但所有挑战仍可在通关后解锁,这样能减少你在游戏后期的回溯操作。我将在完成二周目后,在【蝙蝠侠:阿卡姆之城】100%成就指南的第二部分中包含所有40个挑战的攻略。 击败急冻人后,我们将获得急冻枪道具,这是收集品所需的最后一个道具。同时,这也将开启“冰之心”支线任务。当前完成度0%

成就#19 - Hide & Seek:一场致命的捉迷藏游戏。 剧情相关。在哥谭市警察局大楼击败急冻人即可解锁该成就。 谜语人奖杯#153:前往哥谭市警察局正门出口,在出口前的走廊里可以用钩爪爬上更高的楼层。在这里可以看到一个奖杯笼和三个压力板;需要在不触碰其他任何东西的情况下触碰所有三个压力板。要做到这一点,使用勾爪发射器在压力板之间移动。这可能有点棘手,因为需要发射第二条绳索才能到达或离开奖杯笼前的压力板;最好把这个压力板留到最后。 谜语人奖杯#154:现在我们有了冰冻冲击,前往哥谭市警察局停尸房外,可以看到它被蒸汽挡住了。使用冰冻冲击封锁蒸汽,然后穿过蒸汽进入左侧房间,在清洁台上可以找到一个奖杯。这里也靠近我们能够进入哥谭市警察局新出入口的位置。 序列20:收集品快速收集10 1. 主线剧情:钢铁厂2-电子布吉舞 2. 支线任务:3/12 3. 小丑气球:17/24 4. 企鹅人:9/12 5. 恶魔印记:9/12 6. 谜语:27/69 7. 谜语人奖杯:160/247 8. 猫女奖杯:12/35 9. 成就:20/64 公园街: 支线任务#11 - 茶话会:在我们从狙击手暴徒手中救出维基·维尔后不久,我们将在公园街接到一个新的支线任务。前往标记为【解药投放点】的航点并去收集解药……或者尝试去收集。结果蝙蝠侠反而得到了一剂好东西……

成就#20 - Stop the Clock:时间所剩无几。 与疯帽匠一同踏上这场特别的蘑菇之旅并击败他,即可解锁该成就;这是一个非常简单的支线任务……100%完成 支线任务#6 - A Shot In the Dark 2:在我们离开疯帽匠的藏身处后,很快会听到一声枪响,并且可以在公园街北部找到死亡射手的新受害者。前往任务标记点,我们可以在公园街北端政治犯营地上方的断裂天桥顶部找到尸体。使用证据扫描仪来寻找关于死亡射手下落的另一条线索。还剩一具尸体……40%完成 现在我们拥有了冰冻炸弹道具,遗憾的是,我们将返回阿卡姆城进行最后的收集品收集不过这次的闪电战会比我们第一次快得多,因为大部分工作已经完成了。当我们在城市中探索时,也要记住支线任务【冷血杀手】和【暴力行径】…… 鲍厄里区:

Riddle #19: “You don't have to be crazy to shop here, do you?” Head to the location on the map & look at the Jezebel Center sign above the gates; Scan it to complete the Riddle. Riddler Trophy #155: Make your way to the North entrance to the Museum & head to the Perimeter Wall North of the horse statue to find a Municipal Security Console connected to some iron bars. Use the Cryptographic Sequencer to hack the console & let us collect the Trophy behind the bars. Riddler Trophy #156: Return to the Northern entrance of the Museum & drop off the walkway down into the lower level of the Jezebel Center to the West of it. Down here we can see a Trophy Cage along with three Pressure Plates; it's another Line Launcher puzzle. Make your way between the Pressure Plates without touching anything else to unlock the Cage. Riddler Trophy #157: Make your way up to Platform #2 at the monorail station & we can see a Municipal Security Console connected to the doors of a monorail car. Hack it with our Cryptographic Sequencer to open the doors where we can find a Trophy inside. Riddle #20: “Arkham city is not a place for the rich or famous, Bruce Wayne never felt so wanted.” From the monorail station, drop down back to the North entrance of the Museum again & begin following outside the Museum walls to the East, around the Museum. Around the first corner, before we start running South, we can see a wall of the Museum lined with Wanted posters of Bruce Wayne; Scan them to complete the Riddle. Riddle #21: “Cowboy, trilby or bowler? Hats off to anyone brave enough to try one on.” From the Wanted posters, run across the bridge behind us to the East & we can find the Hat Shop (you’ll probably notice the neon “Live Nudes” sign first... the Hat Shop is to the signs right). Scan the sign to the Hat Shop to complete the Riddle. Riddler Trophy #158: From the Hat Shop, drop down into the Jezebel Center below & look at the wall underneath where the Museum is located to see some Soft Wood Paneling up above us. To get in there, climb on top of the Subway entrance to the East & use the Line Launcher to ride through the Paneling & collect the Trophy. Riddle #22: “Studies have shown that if you're not on your best behavior, you'll come out crazy. How Strange?” Make your way, East, through the Jezebel Center & approach the Tyger Inmate Analysis Unit gateway; Scan it to complete the Riddle. Riddler Trophy #159: Turn around from the Tyger Gate & Grapple onto the large building North of our position with the neon orange Gotham sign on it (the same one we previous found the Mysterious Watcher on). On the West face of the building’s roof, we can see a Riddler Security Console connected to a Trophy Cage. Simply hack it with our Cryptographic Sequencer to open it. Riddler Trophy #160: Drop down onto the next rooftop East of our location with the “Lethal Force Is Authorized” billboard & we can find another Riddler Security Console connected to some iron bars on a small room. Hack the Console with our Cryptographic Sequencer to remove the bars & let us collect the Trophy behind them. Riddle #23: “My intellect towers above yours, Batman. I wonder if you'll ever solve this Riddle?” While this Riddle is in fact located in the Bowery’s Riddle tab of our PDA, it can actually be unlocked anywhere in Arkham City; it is easiest done from this location though marked on the Map above. Simply zoom up at the Wonder Tower & get the entire upper portion of the tower into frame. Scan it to complete the Riddle; you may have to move around to get it all into frame correctly. Riddle #24: “Was the writing on the wall from the moment you entered?” Grapple onto the balcony above the front entrance to the Arkham City Processing Center & head over to the far-right side where we can see a commemoration plaque from Quincy Sharp; Scan it to complete the Riddle. Riddle #25: “Do you need to look SHARP to campaign for change?” Grapple onto the building close to where the monorail ends in the East & we can find a billboard for Quincy Sharp’s political campaign; Scan it to complete the Riddle. Riddle #26: “You're a dummy if you don't try & buy one.” Make your way over to the street side entrance to The Bowery, adjacent to where we entered through the Jezebel Center & we can see the Magic & Props shop; Scan the sign to complete the Riddle. Riddle #27: “The feuding families always sit down to a good meal. Will there be a massacre?” From the magic shop, Grapple up to the walkway where the Bank of Gotham is to the West of our location & follow the walkway down South. Past a neon green Beer sign, we can find Sal Maroni’s Italian Restaurant; Scan the restaurant building to complete the Riddle. Sequence 21: Collectibles Blitz 11 1. Main Story: Steel Mill 2-Electric Boogaloo 2. Side Missions: 4/12 3. Joker Balloons: 17/24 4. Penguins: 9/12 5. Demon Seals: 9/12 6.Riddles: 38/69 7. Riddler Trophies: 168/247 8. Catwoman Trophies: 12/35 9. Achievements: 21/64 ----------------------------------------------------------------------------------------------------- Park Row:
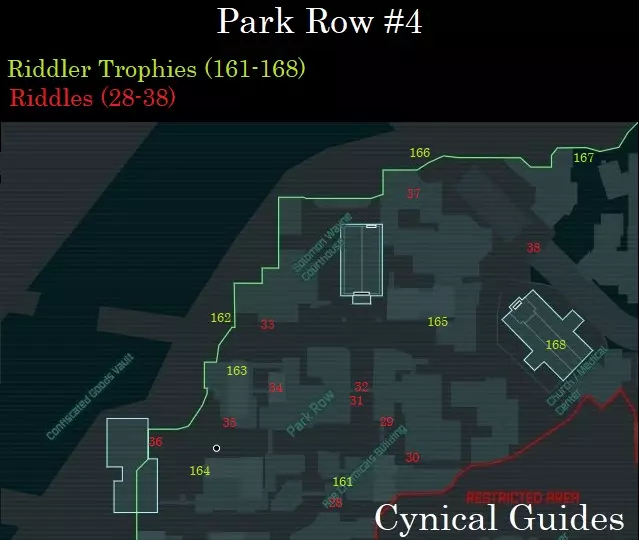
Riddle #28: “Acing the chemistry test will illuminate you.” Grapple onto a nearby roof across from the Ace Chemicals building & zoom in on the large sign on its roof; Scan it to complete the Riddle. Riddler Trophy #161: Head around to the North side of the Ace Chemical building & enter the alley across from Finnigan’s to see a chain link cage around a Trophy blocked by a steam vent. Use our Freeze Blast to seal the vent & slide underneath the cage to access the Trophy. Riddle #29: “I am an actor who can transform a film with the final cut. Who am I?” Approach the Monarch Theater & look up at the building wall to the left out it see a large movie poster for The Terror. Scan the poster to complete the Riddle. Riddle #30: “Six legs went in & only two came out. Where am I?” Go past the Monarch Theater now to the right & hop over the chain link fence to find the sign to Crime Alley; Scan the sign to complete the Riddle. Riddle #31: “Do you have Strange thoughts? Maybe you should seek help?” From the Monarch Theater, head down the road North towards the Solomon Wayne Courthouse. When you get to the barricades in the middle of the road, look to your left to see a store with a sign reading Strange Minds hanging off it; Scan the sign to complete the Riddle. Riddle #32: “This question can only be answered from an unusual perspective. Can you get yourself there?” Approach the Solomon Wayne Courthouse & Grapple onto the horizontal flagpole directly above the entrance at the top of the building. From here, turn on Detective Mode & look South down the street to see the Top of a Question Mark spray painted on a steel arch with the Bottom painted on the road past it. From this angle, we can easily align both pieces; Scan them once aligned to complete the Riddle. Riddle #33: “DA campaign special: Get two votes for the price of one.” From the Courthouse, head down the road to the West & off your right you will see a campaign office for Harvey Dent; Scan the building to complete the Riddle. Riddler Trophy #162: We need the Disrupter – Jam Firearm Upgrade for this Trophy. Carry on West from the campaign office, & we can find the entrance to a Tyger checkpoint entrance in the Perimeter Wall. Use the Disrupter to disable the Tyger Sentry Turret & waltz on past it to collect the Trophy behind it. Riddle #34: “I wonder how you can land an appointment with this milliner? Perhaps it would be best to book?” Return to the building we found Mad Hatter inside for the Side Mission – The Tea Party. Quickly pop inside the building & we will actually see Mad Hatter himself, crying over his stomped-on hat. Walk over to the table & zoom in to the book of Alice In Wonderland near his feet; Scan the book to complete the Riddle. Riddler Trophy #163: Exit the Mad Hatter’s hideout & Grapple on top of The Stacked Dice Casino ahead of us. On the roof, to the right, we can see a Riddler Security Console connected to some iron bars on a small room. Hack the console with our Cryptographic Sequencer to get at the Trophy. Riddle #35: “Has this flower turned a new leaf?” Head South across the roof top & drop down into the street below. Turn around & we can see the Baudelaire shop that Poison Ivy’s owns; Scan it to complete the Riddle. Riddle #36: “This den is where the vicious animals take your treasure. Is it theft, if it's already stolen?” From the flower shop, head down the street to the West & Scan the gate to the Tyger Confiscated Goods entrance to complete the Riddle. Riddler Trophy #164: We will need the Mine Detonator Upgrade for the Disrupter for this Trophy. Hop over the small stone wall to the left of the barricades to the South of our location down the road. Here, we can see a chain link enclosure with two Riddler Proximity Mines in the way of our path to a Trophy. Use the Disrupter to detonate the Mines & collect the Trophy. Riddler Trophy #165: Return to the Solomon Wayne Courthouse & head down the road to the East towards the Church. As we approach a barricade, we can see a neon orange sign reading “The Stacked”…(Dice). To the left of the sign, in an alley, we can see a chain link enclosure blocked by a steam vent. Use our Freeze Blast to seal the vent & collect the Trophy. Riddle #37: “It's far from PURRFECT, but she calls it home.” Grapple over the buildings towards Catwoman’s Apartment; Scan the cute kitties on her windowsill to complete the Riddle. Riddler Trophy #166: Enter the Political Prisoner Camp & head to the far end to the North where the Tyger checkpoint is. We need to use the Disrupter – Firearm Jam to disable the Tyger Sentry Turret inside. If this is too soon after Riddler Trophy #164, carry on to the next Riddler Trophy & come back here to give Disrupter time to reset its uses. Disable the Sentry Turret, & use our Explosive Gel to blow up the Structural Weakness to its right to access the Trophy. Riddler Trophy #167: Grapple over the buildings to the East of the Political Prisoner Camp & head to the waterfront dividing Park Row from the Amusement Mile. Along the Perimeter Wall here, we can see a Frozen Riddler Trophy in the water in between two Anchor Points. Use our Freeze Blast to create a platform directly over the Trophy & simply Glide onto the ice to collect it. Riddle #38: “You've been warned. People aren't the only unstable part of this city.” Grapple over to the front entrance of the Political Prisoner Camp & approach the gated iron blockade barring entrance to the road leading into Amusement Mile. Zoom into the Catastrophic Subsidence sign on the fence & Scan it to complete the Riddle. Riddler Trophy #168: Grapple onto the lower rooftop of the Church & we can find a Riddler Security Console connected to a Trophy Cage. Hack the Console with our Cryptographic Sequencer to open the Cage. Side Mission #8 – Identity Theft 3: Make your way back to the South face of the Ace Chemical building in an alley way & we can find the final body. Use the Evidence Scanner to case the area & follow the bleach trail the killer left behind… past Jack Ryder… & to the Inmate who will tip us off to the killer’s hideout. Make your way over to the hideout, in the same complex as Catwoman’s apparently, & head inside. Escape the trap to complete the Side Mission. 100% Complete

成就#21 - 连环杀手:追踪连环杀手。 完成支线任务【身份窃贼】以解锁该成就。 序列22:收集品冲刺12 1. 主线剧情:钢铁厂2-电子布吉舞 2. 支线任务:4/12 3. 小丑气球:22/24 4. 企鹅人:9/12 5. 恶魔印记:9/12 6. 谜语:44/69 7. 谜语人奖杯:173/247 8. 猫女奖杯:12/35 9. 成就:21/64 ----------------------------------------------------------------------------------------------------- 欢乐英里:
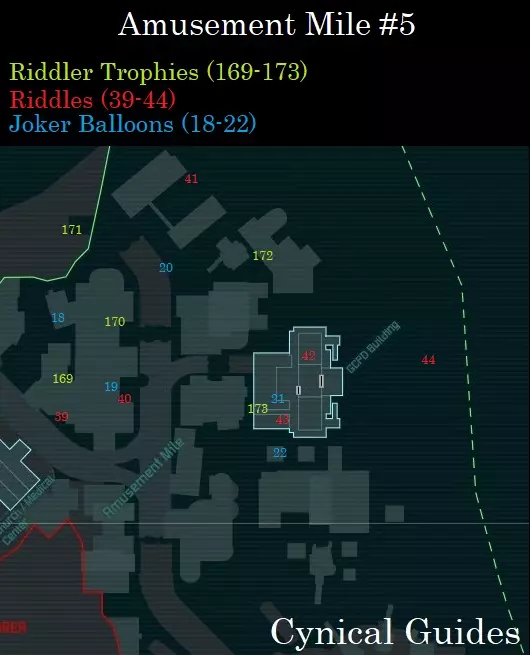
Riddle #39: “This question can only be answered from an unusual perspective. Can you get yourself there?” First, make your way over to the spot marked on the map where the Tyger billboard is located on top of the building near the Gotham Casino. Walk around to the backside of the billboard & turn on Detective Mode to see the Top of a small Question Mark painted there. Look out across the water past the billboard & we can see a lone Industrial Motor on a building with a water tower on it. Use our Remote Electrical Charge on the Motor, & a steel door will drop down. If you are still in Detective Mode, you will see the Bottom of the Question Mark is painted on this door. Return back over to the billboard with the Top to align the pieces. Aligning the pieces is a little tricky; walk backwards from the Top of the Question Mark & tilt the camera angle downwards when you Scan to get the pieces together. Riddler Trophy #169: Head North from the Tyger billboard & drop down onto the next roof where we can see an Industrial Motor puzzle with a Rolling Cage. To access the Motor however, we need to get beneath it. Drop off the chain link platform below & use the Line Launcher to travel over the water. Before getting to the end, use Tight Rope to stand on our line. While standing on the line, use our Remote Electrical Charge & charge the Industrial Motor. Guide the Rolling Cage to the top & make your way back up to break it open. Joker Balloons #18: Keep heading North along the rooftops & we can find a set of Balloons on top of a smokestack on the final building in this line, just before the Perimeter Wall. Riddler Trophy #170: Return to where Vicki Vale is in front of the Gotham Casino & head down the passage behind her to the left to see a Pressure Plate. Stand on it, & the iron bars down the other end of the passage will disappear. Use the Line Launcher now to ride down the passage, through two sets of Soft Wood Paneling, over to a Trophy. Riddle #40: “Which acrobat family gambled with their lives, & has now been left to fly solo?” Return to where Vicki Vale is standing & look up at the building wall to the South to see a poster of the cancelled Big Gotham Circus performance featuring Nightwing; Scan the poster to complete the Riddle. Joker Balloons #19: Look up at the very top of Gotham Casino now & we can find a set of Balloons attached to one of the hanging dice on the Casino’s sign. Joker Balloons #20: Head North from the Casino now onto the Northmost broken overpass piece & we can find a set of Balloons attached to a broken girder off the overpass’s East side. Riddler Trophy #171: Carry on North along the overpass & look down into the water to see a flooded Tyger checkpoint in the Perimeter Wall. Use the Freeze Blast to create a platform to Glide onto but do not make it too far into the checkpoint as there is a Tyger Sentry Turret inside. Disable the Sentry with the Disrupter Jam Firearm, & pull your frozen platform inside the checkpoint using our Batclaw & the Anchor Points to get at the Trophy. Riddle #41: “If she is the ROOT of evil, how could anyone be expected to contain her?” Grapple your way over to the building across from Poison Ivy’s hideout & climb on top of the Tyger billboard near the buildings edge. From here, look down at the bottom of her building’s right corner & you should be able to see a biohazard containment tank in the water; Scan the tank to complete the Riddle. Riddler Trophy #172: Start making your way South towards the GCPD Building from Ivy’s hideout & we can see a building with a neon pink dolphin off our left before we get there. On this building we can see a Trophy Cage & a Pressure Plate. When you stand on the Pressure Plate, three Question Marks down above the water below us will activate but become blocked by a chain link fence. Throw a Freeze Blast down near them & Glide onto the platform. Approach each of the Question Marks & spray down some Explosive Gel on each of them; you can use the Anchor Points at either end to pull ourselves closer with the Batclaw. After they have been sprayed, Grapple back up to the Pressure Plate & activate the Question Marks. Detonate our Explosive Gel & collect the Trophy. Riddle #42: “Always a shining example of justice? Not if you ask me.” Grapple over to the GCPD Building now & get up to the roof where we can find the Bat Signal; Scan the spotlight to complete the Riddle. Joker Balloons #21: From the GCPD rooftop, we can spot a set of Balloons attached to a loudspeaker system at the South end of the complex. Riddler Trophy #173: Head over to the area below the Balloons we just destroyed & we can find a Trophy locked in a room by a Municipal Security Console. To be able to hack it, we need to Grapple over to the lower building roof to the West of GCPD & use the Range Amplifier Upgrade for the Cryptographic Sequencer to reach it through the chain link fence wall. Head back over to the room to collect the Trophy. Joker Balloons #22: From outside the room of the last Trophy, look up at the building South of GCPD to see a set of Balloons attached to a steel pipe near a balcony. Riddle #43: “Park in his spot & you may just get a ticket.” Drop down below the GCPD Building near the water at the North end & get inside the underground parking lot. Use the Line Launcher to get across the water to the other side of it & Scan the parking lot reserved for “Conditioner” Gordon to complete the Riddle. Riddle #44: “Look out! Can you see where the madness began?” Grapple onto the East side of the GCPD rooftop now & look out across the water to the North East where we can actually see Arkham Island, where Arkham Asylum is. Scan the island to complete the Trophy. Sequence 23: Collectibles Blitz 13 1. Main Story: Steel Mill 2-Electric Boogaloo 2. Side Missions: 5/12 3. Joker Balloons: 24/24 4. Penguins: 9/12 5. Demon Seals: 9/12 6. Riddles: 47/69 7. Riddler Trophies: 177/247 8. Catwoman Trophies: 12/35 9. Achievements: 23/64 ----------------------------------------------------------------------------------------------------- Amusement Mile:
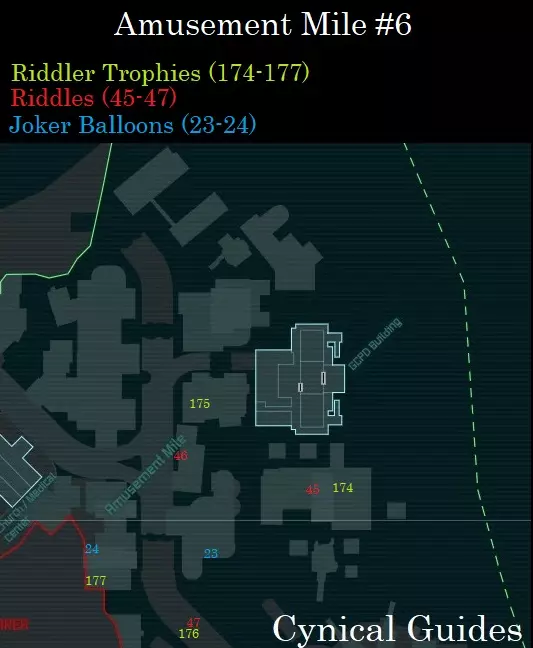
谜题#45:“这个地方已经急转直下,情况变得糟糕起来。这对你的口味来说是不是有点难以承受?” 抓住绳索荡到克兰克玩具公司大楼;抬头看向主标志并扫描它以完成谜题。 谜语人奖杯#174:前往克兰克玩具公司大楼的北侧,从边缘跳下到靠近水边的一个长长的屋顶上。走到这个屋顶的边缘,向水中投掷一个冰冻冲击来制造一个平台。滑翔到平台上,使用锚点用蝙蝠爪将自己拉到屋顶下方,朝着水中的一些铁栏杆移动。在栏杆处,我们可以看到水中有一个冰冻的谜语人奖杯,栏杆右侧不远处有一个谜语人安全控制台。使用我们密码序列器的范围放大器来破解控制台并为我们打开栏杆。栏杆消失后,将我们的平台拉入房间并收集冰冻奖杯。 谜语人奖杯175:钩爪到哥谭市警察局西边的建筑,上到有水塔的屋顶,我们可以看到一个连接着一些铁栏杆的谜语人安全控制台。用我们的密码序列器破解控制台,收集栏杆后面的奖杯。 谜语46:“像众神一样参加派对的邀请会是晴天霹雳吗?” 现在滑翔到哥谭市奥林匹斯大楼前,放大到手持霓虹蓝色雷电的宙斯雕像;扫描雕像以完成谜语。小丑气球 #23:用钩爪爬上GRC广播大楼,我们可以看到广播塔第二层悬挂着一组气球。 谜语 #47:“如果你感到害怕,别害怕大声说出来。” 用钩爪爬上吊桥顶部,在狙击手暴徒上方,扫描一只乌鸦正在啄食的稻草人面具残骸,即可解开这个谜语。 谜语人奖杯 #176:现在我们需要到吊桥下面,从吊桥西侧跳下到下方的驳船上,向桥底投掷冰冻炸弹。滑翔过去并抬头,会看到桥底附着着一个奖杯,用蝙蝠抓钩抓住它。谜语人奖杯#177:用钩爪移动到吊桥西侧的建筑,前往靠近外围墙的背面,那里有一个装满谜语人 proximity mine( proximity mine)的铁丝网围栏。围栏内的地雷不止两个,为了避免长时间等待干扰器充能,需要谨慎选择引爆的地雷。 假设围栏是一个5x5的网格,需要摧毁的地雷位于坐标2x2和3x5处。为了更清晰地说明,这里有一个简易示意图展示谜题概况。参考:“M”代表地雷,“T”代表奖杯。

随着地雷被引爆,沿着小路进入奖杯所在地,然后再返回。 小丑气球#24:在我们找到最后一个奖杯的围栏外面,向北抬头看,我们可以看到最后一组小丑气球设置在附属于围墙的扬声器系统上。 工业区: 支线任务#7 - 谜语人谜题8:如果你还没有这样做,请在密码破解器中输入6-0-6 1-2-0,并且如果我们已经完成了240/400个谜语人挑战,我们将为谜语机解锁下一个谜语。谜语是:“正午阳光下,我就在你脚下;无论你怎么跑,都无法摆脱我。我是什么?”答案很明显,是你的影子。完成谜语将解锁工业区第四名人质的位置。前往导航点,闯入下一个藏身处。使用我们的【密码序列器】来关闭带电安全地砖的路径,到达安全区域。从那里,向房间对面的问号投掷【蝙蝠镖】,以关闭通往房间另一侧的另一条路径。爬上二楼,迅速到达另一端,在那里我们可以使用【钩爪发射器】进入人质左侧的房间。 在此处开启【侦探模式】,我们可以看到安全门由一个位于结构弱点后面的问号控制。使用爆炸凝胶摧毁墙壁,并用远程电力 charge(Remote Electrical Charge)启动工业电磁铁,将钢箱从围栏的开口处移开;现在我们可以用遥控蝙蝠镖(Remote Controlled Batarang)来消除问号。站在下一个房间的压力板上以关闭最后的安全门,然后使用两次钩爪发射器(Line Launcher)在半空中抓住人质,并安全地带着他穿过玻璃窗逃脱。 他会告诉我们密码的下几位数字:1-1-5 7-8-0。目前我们还无法使用该密码,因为需要完成320/400个谜语人挑战(Riddler Challenges)后它才会生效。

成就#22 - Intellectual:从谜语人手中解救第四名人质。完成240个谜语人挑战后解救第四名人质。完成度60% 支线任务#3 - 冷血杀手4:目前,我们可以访问所有萨斯的电话迷你游戏来定位他。你需要将支线任务进度推进到80%才能发现他的位置。这至少需要完成6个电话迷你游戏(前提是每次都能最大化三角定位);如果不能,则最多需要8个电话迷你游戏。 要知道去哪里搜索,请从支线任务选项卡中访问【冷血杀手】,你可以看到所有可能的公用电话位置。已完成的位置会显示对勾,而非电话符号。在每个仍可使用的公用电话旁滑翔,最终会有一个电话开始响起。如果没有电话响起,尝试进出建筑物或退出到主菜单并重新加载游戏以重置阿卡姆城。 扎斯的藏身处位于工业区的 waterfront 附近。 在他藏身处的房间里潜行,绕到扎斯身后,通过玻璃窗对他执行击倒。

成就#23 – Dial Z For Murder:阻止电话亭杀手。 完成支线任务“冷血杀手”并完成所有萨斯的电话迷你游戏,追踪他到藏身处并击败他。100%完成 序列24:收集品突击14 1. 主线故事:钢铁厂2-电子布吉舞 2. 支线任务:5/12 3. 企鹅人:9/12 4. 恶魔印记:9/12 5. 谜语:53/69 6. 谜语人奖杯:185/247 7. 猫女奖杯:12/35 8. 成就:23/64 ----------------------------------------------------------------------------------------------------- 工业区 – 萨斯的藏身处: 谜语#48:“如果你打算在阿卡姆城留下自己的印记,你需要一种特殊的房地产经纪人。”在扎斯被关在笼子里的同一个房间内,查看附近的桌子,可以看到一些散落的“中间人”名片;扫描它们以完成谜题。 谜语人奖杯#178:在我们上一个谜题中使用的名片上方,可以看到一个西奥尼斯工业的控制面板。激活按钮后,水面上方会开始出现电弧。在我们爬进这个房间的通风管道内,有一个保险丝盒。使用遥控蝙蝠镖,引导它穿过电弧,然后返回,通过通风管道进入左侧的竖井,到达保险丝盒。这将打开我们当前所在房间通风管道外部的奖杯笼子。你需要等待水位下降,才能让蝙蝠镖穿过电流。 谜语人奖杯#179:从最后一个谜语人奖杯的奖杯笼处,向下跳到前方由水位控制升降的破旧桥梁上。向桥的右侧投掷一枚冰冻炸弹,然后跳上平台。从我们所在的位置环顾角落,就能看到左侧墙壁上附着着一个谜语人奖杯;用蝙蝠爪收集它。 工业区:
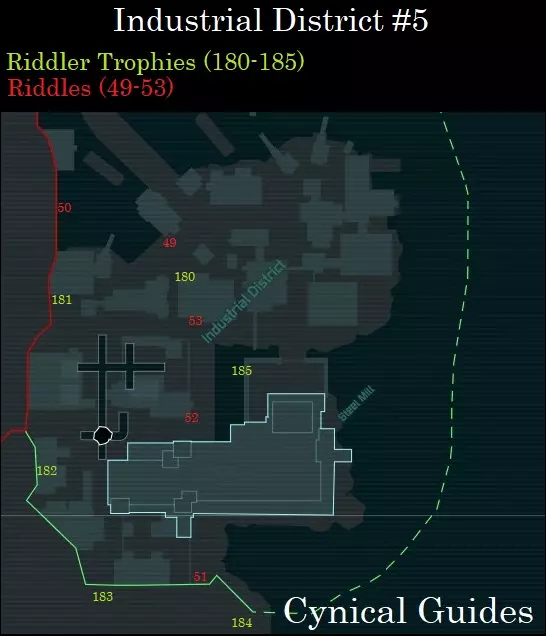
Riddler Trophy #180: Exit Zsasz’s Hideout, & head right, across the street & hop over a small brick wall. On the other side, attached to the wall, will be a Riddler Security Console connected to a Trophy Cage. Hack the Console with our Cryptographic Sequencer to open the Cage. Riddle #49: “Breaking news! Get out while you still can.” Hop back over the brick wall & we can see a Bill’s Hotdogs stand across the street; Scan it to complete the Riddle. Riddle #50: “This question can only be answered from an unusual perspective. Can you get yourself there?” If you turn on Detective Mode & look to the West on the waterfront, you can see the massive Top of a Question Mark painted on the Perimeter Wall. We can locate the Dot on top of a large smokestack tower, East along the waterfront; it is just East of the building being connected by piping. Get on top of the smokestack & align the two Question Mark pieces; Scan them to complete the Riddle. Riddler Trophy #181: From that spray-painted Question Mark, begin making your way South West along the Perimeter Wall. On the other side of the first building past the crane, down in the alley below, we can see a Pressure Plate connected to a Trophy Cage. For this Plate, we need to gain a lot of velocity & Dive Bomb onto the Pressure Plate & activate Shockwave to activate the Question Mark above. It is best if you place a Waypoint over the Pressure Plate as accurately as you can because it is extremely difficult trying to align yourself in the air without knowing ahead of time where it is. Use the Grapnel Boost off of one of the large smokestacks to the East of the Pressure Plate & maintain as much height as you can. As soon as you pass over the Waypoint (or just before) begin Dive Bombing & land onto the Pressure Plate, activating Shock Wave right afterwards. If you had enough time spent in Dive Bomb, your Shock Wave should activate the Question Mark above. Strike the Question Mark with a Batarang to open the Cage; do not step off the Pressure Plate before striking the Question mark or you will have to restart! This will definitely take you a few tries to get the time in Dive Bomb right. Riddler Trophy #182: Continue South along the Perimeter Wall & drop down into the compound we found previously the Titan Container in for the Industrial District. Here, turn on Detective Mode to see a Structural Weakness in a nearby building’s wall. Destroy it with Explosive Gel & we can see a Riddler Security Console connected to a Trophy Cage. Problem is, the Console is not active. Exit the room & use the Remote Electrical Charge on the Industrial Motor to open the garage door to our left. Head inside this new room & stand on the Pressure Plate here to activate the Console. Use the Range Amplifier on our Cryptographic Sequencer to hack the Console & unlock the Cage. Riddler Trophy #183: Get to the very South West end of the Industrial District now to see a Tyger checkpoint in the Perimeter Wall guarded by electrified floor tiles. Use the Line Launcher to get past the tiles & over to the Trophy. Riddle #51: “Did you hear the HOLE story of how Black Mask escaped?” Head to the far South East end of the area now over to the waterfront near the Steel Mill. Past a nutcracker statue, along a small brick wall, we can see some wanted posters of Black Mask; Scan them to complete the Riddle. Riddler Trophy #184: Grapple onto the Steel Mill roof & walk to the very East most end of it above the water. If you look to the far South West back over at the Perimeter Wall, we can see an entrance in the wall with a “You Are Under Close Surveillance” billboard right below it. To get inside, we need to Grapnel Boost off a high point of the Steel Mill roof & Glide/Dive Bomb our way over to the entrance; the Trophy will be just inside. Riddle #52: “Does Zsasz still pose a threat? This guy called to find out.” Get back over to the Steel Mill & follow the railway tracks under the building North to the other side. Immediately on the other side, we can see a Thug’s corpse slumped over a pay phone; Scan it to complete the Riddle. Riddle #53: “Was this parasite ratted out, or does he continue to plague Gotham?” Carry on North over the archway & onto the other side of the street. Dead ahead of us at the intersection we can see a billboard for Otis Flannegan Pest Control on the wall; Scan it to complete the Riddle. Riddler Trophy #185: From the billboard used in the last Riddle, look off to the East over the waterway across to the Steel Mill’s lower walls. Turn on Detective Mode, & we can see a Valve Cover above an Anchor Point. Use the Batclaw to tear open the Valve Cover & a Frozen Riddler Trophy will fall out into the water. Use the Freeze Blast to create a platform & collect the Trophy using the Anchor Point if needed. Sequence 25: Collectibles Blitz 15 1. Main Story: Steel Mill 2-Electric Boogaloo 2. Side Missions: 7/12 3. Penguins: 9/12 4. Demon Seals: 9/12 5. Riddles: 55/69 6. Riddler Trophies: 193/247 7. Catwoman Trophies: 12/35 8. Achievements: 25/64 ----------------------------------------------------------------------------------------------------- Industrial District:
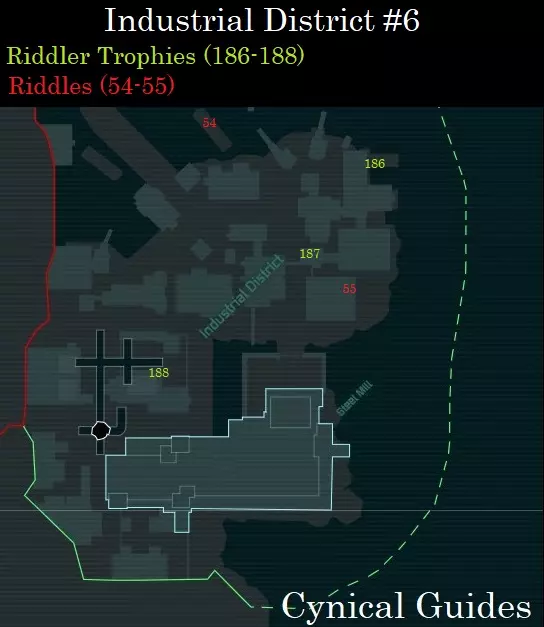
谜题#54:“哪个臭名昭著的家族总在说垃圾话?” 现在一路向北回到 waterfront,滑行到水中的驳船上。走到驳船上的“船长室”,扫描船舱外的法尔科内航运标志即可完成谜题。 谜语人奖杯#186:现在开始沿着工业区 waterfront 向东南方向前进。到达仓库建筑的背面,下到较低的码头,那里有一个霓虹绿色箭头指引我们进入仓库。使用两次勾索发射器穿过建筑;第二次发射时,激活钢丝行走并转身,这样我们就能钩爪到上层,那里有一个奖杯。使用奖杯旁的压力板可以轻松离开仓库。 谜语人奖杯#187:前往地图上标记的位置,就在摩天轮以北的街道上。在这里,我们可以看到一栋建筑内有一些蒸汽喷口;用冰冻冲击关闭第一个喷口,前方会有一个谜语人 proximity mine(感应地雷)。使用干扰器地雷引爆器关闭地雷,再用冰冻冲击关闭下一个蒸汽喷口,然后再次用干扰器关闭另一个地雷;奖杯就在这一系列操作的尽头。 如果你比较懒,并且拥有全套弹道装甲,你可以直接冲过地雷去拿奖杯,因为只有两个地雷…… 谜题#55:“空中、海上或陆地。不利用这些聪明人可就太不应该了,不是吗?”仍在街上,前往顶部有摩天轮的建筑东侧。在该建筑的东墙上,可以看到法尔科内仓储航运公司的广告牌;扫描它以完成谜题。 谜语人奖杯#188:前往地图上标记的位置,跳过一堵小砖墙,进入围栏区域后方。在后面,能找到一个连接着奖杯笼的谜语人安全控制台;使用我们的密码序列器破解控制台以打开笼子。 支线任务#10 - 冰之心2:既然工业区的收藏品已收集完毕(除了最后三个),前往该区域的东北端至 waterfront。在有两台起重机的位置,开启侦探模式,我们能看到左侧建筑里有一扇门。敲门时,会被小丑的一名手下赶走。要进入内部,滑翔到水中的法尔科内货运驳船上,然后在侦探模式下回头看向那栋建筑,会发现水面上方的墙壁有一处结构弱点。 使用冰冻冲击制造一个平台,再用钩爪枪抓住锚点把自己拉到墙边。用爆炸凝胶破坏弱点,继续通过锚点把自己拉进建筑内。进入建筑后,在主楼层可以找到诺拉;解决里面的手下以推进支线任务。GCPD大楼: 支线任务#10 - 冰之心3:返回GCPD大楼中的急冻人处,并告诉他我们现已找到诺拉;记住现在我们只能从水面上方的东侧进入GCPD……

成就#24 - 谈判筹码:让分离的夫妇重聚。 完成支线任务【冰之心】并为急冻先生找到诺拉即可解锁该成就。100%完成 欢乐码头: 支线任务#5 幕后观察者4:当我们离开哥谭市警察局大楼后,前往建筑群的正门入口,然后向西走到对面的建筑。前进时开启侦探模式,我们应该能看到一个身影站在水塔下方,靠近一个谜语人安全控制台;那就是神秘观察者。 扫描他留下的符号,然后我们需要完成一个谜题,将圆形徽章与我们扫描过的所有四个符号对齐。当符号正确对齐后,它们会指引我们找到神秘守望者的最终位置,就在公园街教堂/医疗中心外。前往该地点,教堂墙上会有一个巨大的符号;扫描它,神秘守望者会以夸张的方式登场与我们见面。他会揭示自己是死亡天使阿兹瑞尔,并给我们留下一个预兆。这或许是对《蝙蝠侠:阿卡姆3》的预示?

成就 #25 - 神秘追踪者:揭露神秘观察者。 在全部五个地点找到神秘观察者,以完成支线任务【幕后观察者】。100%完成 地铁:
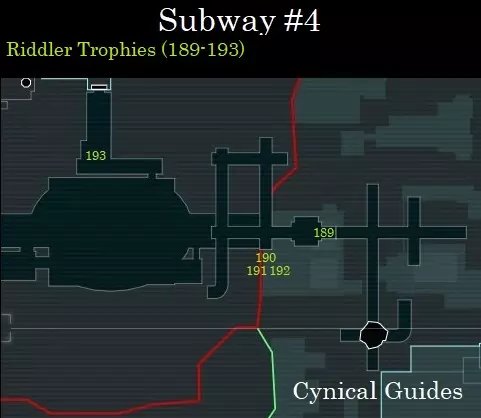
地铁维修通道: 谜题奖杯#189:从工业区入口进入地铁,沿着隧道向下走,直到你落到下方的一座桥上。在此处,站在桥的轨道上,向水中投掷冰冻炸弹制造一个平台。落到平台上,你会看到桥下方的水面上方墙壁上粘着一个奖杯;用蝙蝠抓钩收集它。 谜题奖杯#190:用抓钩回到桥上,走进下一条隧道。一进入隧道,向左看,会发现墙壁上有一处结构弱点;用爆炸凝胶摧毁它。结构弱点后面有一扇半开的钢门,你可以从门下爬进去,进入一个陷阱房间,里面有三个奖杯笼和一个压力板。站在压力板上,向门上激活的问号投掷蝙蝠镖。房间很快会开始充满蒸汽,要快速连续投掷冰冻冲击并关闭所有通风口,避免死亡。在关闭前两组通风口后,一定要离开后方的压力板,因为最后一组通风口会在压力板所在位置喷射蒸汽。 关闭通风口后,就可以自由收集这里的三个谜语人奖杯了。收集奖杯后,出口就会打开。 谜语人奖杯191:与谜语人奖杯190和192一同收集。 谜语人奖杯192:与谜语人奖杯190和191一同收集。地铁终点站: 谜语人奖杯#193:进入地铁终点站,前往通往奇迹之城入口的大厅。当你靠近房间内被水淹没的区域时,查看我们所站的木质平台下方,可以看到水下有一个被冰冻的谜语人奖杯。投掷一枚冰冻炸弹制造平台,然后跳下去收集奖杯。 序列26:收集品冲刺16 1. 主线剧情:钢铁厂2-电子布吉舞 2. 支线任务:7/12 3. 企鹅人:12/12 4. 恶魔印记:9/12 5. 谜语:58/69 6. 谜语人奖杯:203/247 7. 猫女奖杯:12/35 8. 成就:25/64 ----------------------------------------------------------------------------------------------------- 地铁:
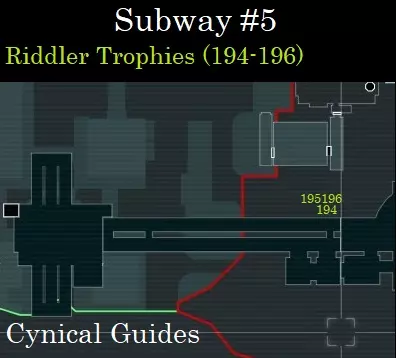
地铁隧道: 谜语人奖杯#194:快速进入地铁隧道,立即右转并跳过一些掉落的钢梁。前方会有另一扇半开的钢门,通向一个设有三个奖杯笼的陷阱房。要开始谜题,使用密码 sequencer 入侵附近的谜语人安全控制台。 谜题开始后,立即发射勾爪枪并使用走钢丝技能站在绳索上,以避开即将带电的地砖。这是唯一安全的地方,因为房间里的每一块地砖都会带电。只需待在绳索上,直到地砖的电力耗尽。届时,跳下绳索并收集所有三个奖杯。 谜语人奖杯#195:与谜语人奖杯#194和#196一同收集。谜语人奖杯#196:与谜语人奖杯#194和#195一同收集。 博物馆:
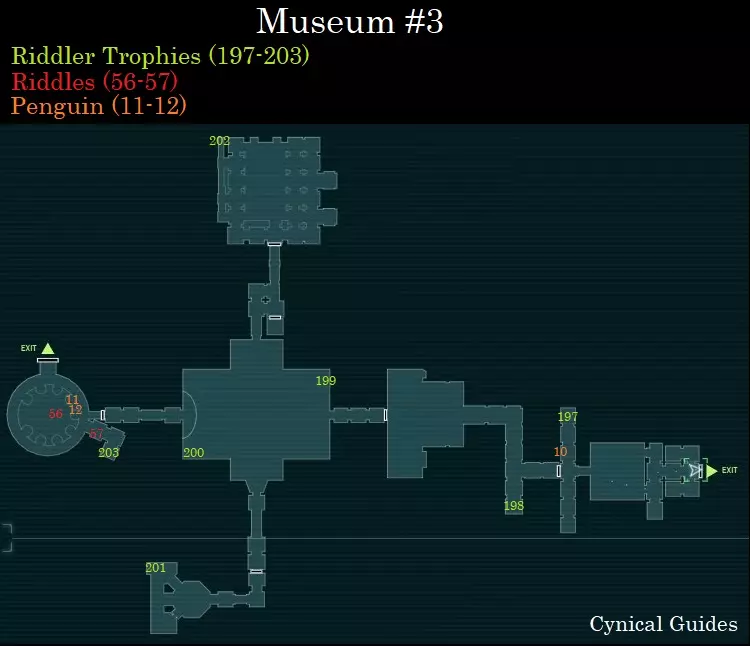
奖杯室: 谜语人奖杯#197:从地铁出口进入鲍厄里区,从博物馆东侧入口进入。在奖杯室,前往主房间,我们可以在疤面煞星展品上方找到一个通风口盖。穿过通风口进入前方大厅,尽头有一台虎式哨兵炮塔守卫。使用干扰器的枪械干扰功能将其禁用,即可收集它守卫的奖杯。 企鹅人#10:从最后一个奖杯所在位置返回通风口时,我们可以看到通风口正对面右侧的展示柜顶部有一个企鹅人。 无名走廊: 谜语人奖杯#198:进入无名走廊,在十字路口右转。经过第一个拱门后,我们可以钩爪爬上前方的第二个拱门。从这里转身,朝我们来时的方向望去,透过玻璃窗可以看到一个奖杯和一个猫女奖杯。使用钩爪发射器到达那里并打破窗户。 torture chamber: 谜语人奖杯#199:穿过角斗士坑进入 torture chamber。使用钩爪发射器快速绕到房间的最北侧。从这里爬上附近的脚手架塔。现在向南方发射钩爪发射器;在穿过房间中央之前,迅速向入口所在的东方发射另一条绳索,这样我们就能到达一个更高的平台,那里有一个奖杯。 谜语人奖杯#200:现在使用钩爪发射器到达房间西侧,那里是冰山休息室的入口。看向你左侧的栏杆外,望向水中,可以看到一个冰冻的谜语人奖杯。向它投掷冰冻炸弹制造平台,然后跳过去收集奖杯。你可能需要使用锚点和蝙蝠抓钩来导航过去…… 作战室: 谜语人奖杯#201:向南离开酷刑室,进入作战室。击退主房间里的暴徒,然后向右走,进入后室。一走进后室就能看到一个冒着蒸汽的通风口,用冰冻炸弹关闭它,然后爬过去拿到奖杯。 军械库: 谜语人奖杯#202:现在前往军械库,走到房间的西北端。突破结构弱点,穿过通风口,或者直接走到尽头有蒸汽通风口的走廊。使用冰冻冲击关闭通风口,我们就能收集到后面的战利品。 冰山休息室: 博物馆内最后的收藏品位于冰山休息室。我们需要离开博物馆,绕到北侧入口进入,因为之前救援的警察已经将正门封锁。 企鹅#11:进入冰山休息室后,在警察左侧的桌子上可以看到两个企鹅。 企鹅#12:与上一个企鹅在同一张桌子上。 谜题#56:“枪林弹雨中如何保护自己?”看向房间中央附近那个随机出现的警察,他正拿着企鹅人的伞枪;扫描他即可完成谜题。 谜题#57:“在享受全套VIP待遇方面,有谁能超越企鹅人吗?” 进入下层的侧室,一进门就立刻向右看,会看到一张桌子上放着一堆高顶礼帽;扫描这些帽子以完成谜题。 谜语人奖杯#203:前往这个侧室的后部,会有一个可以滑过去的闸门,闸门被两个谜语人 proximity 地雷挡住。使用干扰器地雷引爆器摧毁地雷;滑过闸门,然后收集奖杯。 工业区: 谜题#58:“你能在浪漫消融前找到这对酷情侣吗?”回到我们在支线任务【冰之心】中找到诺拉的5B号仓库,现在我们终于可以看到急冻先生和诺拉在一起了。扫描他们即可完成这个谜题。 你必须100%完成【冰之心】,否则他不会出现。 顺便提一下,此时我在支线任务#3【暴力行径】中大约只完成了46%。并非所有该支线任务的事件都会立即解锁,而是会在主线剧情推进到特定节点后才出现。大部分事件会在完全通关主线剧情并进入游戏后期后解锁。请保持留意并经常查看世界地图,它们有时会以可追踪的六边形图标显示。 序列27:再次进入钢铁厂... 1.主线故事:钢铁厂2-电子布加洛 2. 支线任务:7/12 3. 恶魔封印:9/12 4. 哈莉头像:4/12 5. 谜语:61/69 6. 谜语人奖杯:211/247 7. 猫女奖杯:12/35 8. 成就:25/64 ----------------------------------------------------------------------------------------------------- 钢铁厂:现在终于到了重新进入钢铁厂的时候了。不幸的是,我们要在这里完成所有的谜语人挑战,但至少我们已经进入最后阶段,只剩下少数挑战了!
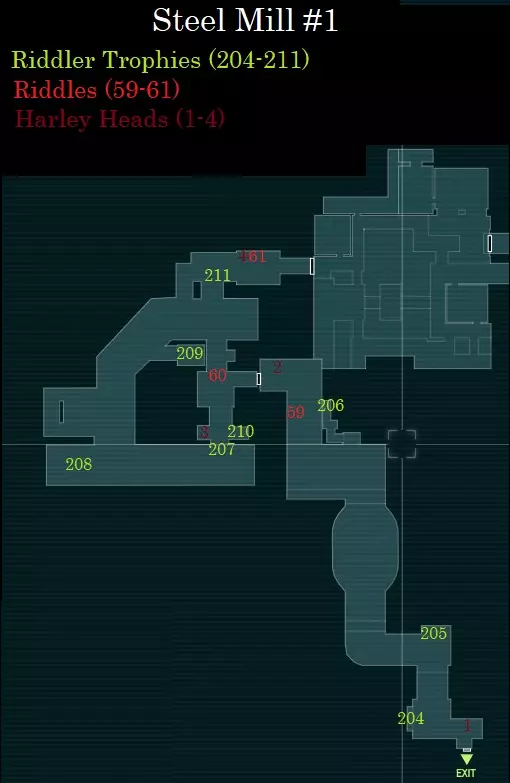
Cooling Tunnel – B: Harley Head #1: As soon as we enter the Steel Mill from its Southern entrance, we can see a Harley Quin animatron straight ahead of us. We can interact with it to have her sass us. To fulfil the Collectible, take out your Remote Electric Charge & shoot her to destroy it. We will need to find & destroy 11 more of these… Side Mission #4 – Fragile Alliance 7: From the first Harley Head in Cooling Tunnel – B, turn left & we can spot our final Titan Container to destroy for Bane. Do so, & we will finally be able to turn in this Mission when we are finished with the Steel Mill. Riddler Trophy #204: From the Titan Container, Grapple up to the ledge to our right & turn on Detective Mode to see a Structural Weakness in the wall nearby. Destroy it with Explosive Gel & we can collect the Trophy. Riddler Trophy #205: Drop down from the railing ahead to the watercourse & we can see a Trophy Cage & a Riddler Security Console across the other side. Either Line Launch across & use the Cryptographic Sequencer to hack the Console or simply hack it from where we stand & use the Batclaw to collect the Trophy. Riddler Trophy #206: Navigate through the watercourse using our Freeze Blast platforms & the Batclaw until we have to enter through a vent. On the other side of the vent, look North East from where we stand to see a Question Mark above the water. Strike it with a Batarang, & some iron bars above it will open up. Equip the Line Launcher & ride over to where it guarded to see another Vent Cover we can tear down & enter. Follow this new vent through & there will be a Trophy we can collect at the end. Riddle #59: “Who can BOYLE & Freeze at the same time?” Leave the vent & Glide through the window to dispatch the Thugs ahead. Look to our left & we can see a Boyle Cytogenetics advertisement on the wall; Scan it to complete the Riddle. Harley Head #2: We can find another Harley animatron to the right of the entrance doors to Cooling Tunnel – D. Cooling Tunnel – D: Harley Head #3: Dispatch the Thugs we find at the beginning of the room & we can find a Harley Head in the corner to the left of a pit of boiling water (where the Two-Face Thug is or was strung up). Riddle #60: “This question can only be answered from an unusual perspective. Can you get yourself there?” Across from the Harley Head, having turned on Detective Mode, we can see the Top of a Question Mark on the wall under a balcony. Use our Explosive Gel to destroy a Structural Weakness; crouch & carefully drop to hang off the ledge we opened above the water. As we hang from the ledge, looking back at the Question Mark Top, we can also see the Bottom close to where our hands are on the ledge. Align the two pieces & Scan them to complete the Riddle. Riddler Trophy #207: Look down into the watercourse below & throw a Freeze Blast across to the far side ahead of us to create a platform. Leap onto the platform & immediately look up above us to our left to see a ledge we can Grapple up to where we can find a Trophy. Riddler Trophy #208: Create a new ice platform & begin following the watercourse flow down to the East. After ducking under the first wall, look up ahead of us & we can see a Trophy through some fencing on the ceiling. Carefully let the platform get past the fencing & quickly grab the Trophy with the Batclaw before our platform flows into the drills at the end of the channel! Riddler Trophy #209: Carry on through the watercourse & use an electrified Remote Controlled Batarang to gain access to the second half of the area. Remember where this arcing electricity is as we will need it for a Riddler Trophy later on… After the way is opened, create an ice platform down below the bridge & begin flowing down the watercourse. Shortly after passing under the arcing electricity, look up to our right to see a Vent Grate in the wall. Tear it down with the Batclaw & Grapple up inside the vent where we can find a Trophy. Riddler Trophy #210: Hack the Municipal Security Console using the Cryptographic Sequencer at the end of the watercourse; not only will we lower a bridge to carry on, but we will also unlock a door back into the first room of Cooling Tunnel – D. Head back into this first room & we can tear open a Valve Cover with the Batclaw. With the pipe open, we now need to electrify a Remote Controlled Batarang. Throw one & guide it back down the watercourse tunnel we just came from to where the electricity was arcing. With the Batarang electrified, quickly guide it back to us & through the pipe, take a right, & into a Fuse Box to lower some iron bars letting us grab a Trophy. This can be a bit tricky; Boost through the watercourse & back to give yourself more time to Brake & take it slow through the pipe. Riddler Trophy #211: Head across the bridge we lowered now & we can see a Trophy stuck underneath a mine cart shortly off our right. Look left down the track, & we can see an Industrial Electromagnet. Activate it with the Remote Electrical Charge to pull the mine cart so we can collect the Trophy. Harley Head #4: Look to the right of the blast furnace & we can see a Harley Head against the wall. Riddle #61: “Do you really need to hammer it home? Everyone knows Harley is stupid.” To the right of the Harley Head we just destroyed will be Harley’s wooden sledgehammer, covered in blood; Scan it to complete the Riddle. Sequence 28: Oh Boy, More Collectibles 1. Main Story: Steel Mill 2-Electric Boogaloo 2. Side Missions: 7/12 3. Demon Seals: 9/12 4. Harley Heads: 10/12 5. Riddles: 62/69 6. Riddler Trophies: 225/247 7. Catwoman Trophies: 12/35 8. Achievements: 25/64 ----------------------------------------------------------------------------------------------------- Steel Mill:
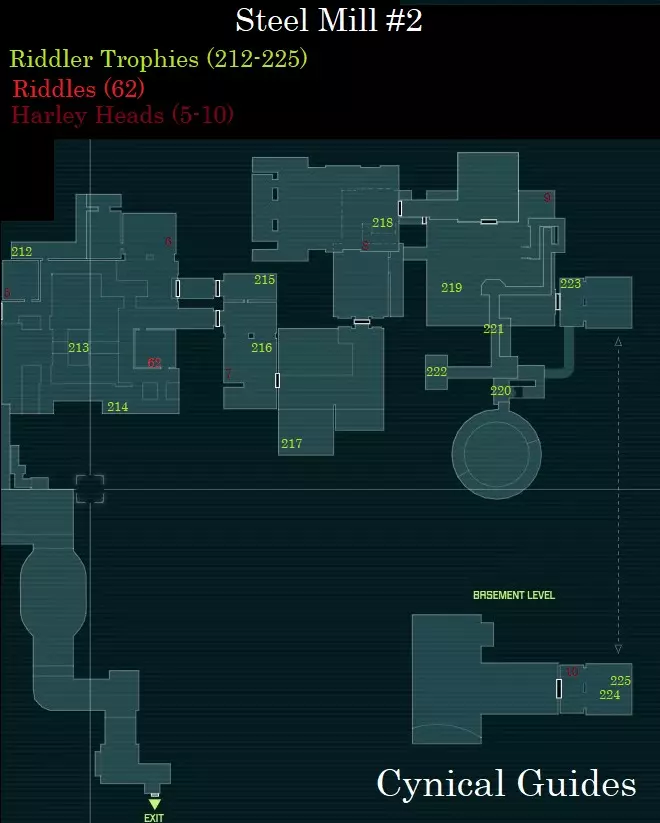
Smelting Chamber: Harley Head #5: Dispatch the Gun Thugs inside the room & return to where we entered this area. Head left from the doors into a side office where we can find a Harley Head in a corner. Riddler Trophy #212: While in the same office we can see a Vent Cover at the far end. Tear it down & crawl through onto a conveyor belt. While on the belt here, look up & we can see a ledge we can Grapple to where a Trophy will be. Harley Head #6: Drop down to the bottom floor of the Smelting Chamber & head to the far North East corner where we can find a Harley Head next to a burning barrel. Riddler Trophy #213: In the center of the Smelting Chamber, we can see a lava tunnel flowing under a metal structure. In the middle of this structure, we can see a Trophy; take a run & slide underneath the girders over the lava tunnel to collect the Trophy. Riddler Trophy #214: Head to the South end of the Smelting Chamber’s second floor & we can find a Valve Cover inset into the wall up above us. Tear it open with the Batclaw & we can find a Trophy behind it. Riddle #62: “Surely someone was clowning around when they qualified this person?” Head up to the office at the top floor to the South East. Inside, we can see a wall with a bunch of Joker photos along with Harley Quinn’s University of Gotham diploma; Scan the diploma to complete the Riddle. Assembly Line: Harley Head #7: Enter the Assembly Line through from the main doors (not the Industrial Motor controlled door) & we can see a Harley Head in the corner of the office we enter. Riddler Trophy #215: From where we walked into this office, look way up to the North & we can see a ledge we can Grapple up to. Turn on Detective Mode & we can see a Structural Weakness in the wall past a Service Hatch. Destroy it with Explosive Gel to find a Trophy. Riddler Trophy #216: Dispatch the Sniper Thug, & return to the lower main floor. Look underneath the office we entered & there will be a vent blasting out steam. Block it with a Freeze Blast & crawl under the office to find a Trophy. Riddler Trophy #217: Across from the Industrial Electromagnet on the lower level, in between the two sets of stairs leading up to the small walkway, we can find a Vent Cover. Tear it down & crawl under the walkway & follow the tunnel down to the end where we can jump up through a Floor Grate to find a Trophy. Side Mission #12 – Hot & Cold 1: Near the back end of the Assembly Line, we can find Harley Quinn bound & gagged. Take the tape off her & she will tell us of some gear that Joker looted from Mr. Freeze & locked in the Boiler Room. We will have to go there anyways for some Collectibles… Harley Head #8: Leave Harley as you found her, & crawl through the conveyor belt over to the other side of a barred room. When we exit into the room, we can see a Harley Head off our right while still standing on the conveyor. Loading Bay: Riddler Trophy #218: Enter the Loading Bay & we can shortly find a disabled elevator off our right when we round the corner. Hack the Municipal Security Console with the Cryptographic Sequencer & we can open up the elevator doors letting us collect a Trophy. Opening these doors will also let Catwoman come through here later on to collect her Trophy as well… Harley Head #9: Dispatch the Thugs & Sniper Thugs inside the main Loading Bay room. When finished, head to the far North East corner, up a small set of stairs, & we can find a Harley Head near some burning windows. Riddler Trophy #219: Drop through the Floor Grates in the center of the Loading Bay & crawl into the tunnels under the floor (going into First-Person View can be helpful to find the exit). Follow the tunnel down but do not enter the next crawl space. Instead, look to the spaces right to see some steaming vent. Block the vent with a Freeze Blast & jump up to collect the Trophy it was protecting. Riddler Trophy #220: Follow the tunnels below the Loading Bay, South, all the way through to the blocked off entrance to Waste Exchange. At the now dead end, look off our right & we can spot a Valve Cover. Tear it open with the Batclaw & we can collect a Trophy. You may have already collected this Riddler Trophy during our very first visit to the Steel Mill in Sequence 2. To double check if this is the case (& save yourself the tedium of backtracking through the tunnels) look in your Steel Mill Collectibles Tab; Riddler Trophy #220 is recorded in the very top left square. Riddler Trophy #221: Return to the main room of the Loading Bay & head over to the large Industrial Electromagnet near the center. Use the Remote Electrical Charge to guide the freight hook above us, backwards from the Managers Office & through a fan in the South wall of the Loading Bay. Grapple in through where the fan blocked & we can immediately collect a Trophy. Ventilation System: Riddler Trophy #222: Carry on down the tunnel in through the Ventilation System & drop down into the lower level. From here, we can see a Trophy Cage & a Pressure Plate across a lava pit. Use the Line Launcher to ride over the lava to get to the Plate to open the Cage. Freight Elevator: Riddler Trophy #223: Once again return to the Loading Bay & this time head to the far South East corner of the room where we can find an Industrial Motor locked door. Use the Remote Electrical Charge to unblock the door & head inside the room beyond. When we enter, we can spot a Valve Cover off our left. Tear it open with the Batclaw to find a Trophy. Riddler Trophy #224: Use the Cryptographic Sequencer to hack the nearby Municipal Security Console to open up the elevator shaft to us. Drop down the shaft & lift up the elevator using our Remote Electrical Charge to be able to slip past it & get to the bottom of the shaft. From down here, look up at the elevator we were not moving, & we will be able to Grapple up inside it to find a Trophy. Riddler Trophy #225: Drop back down to the ground & turn on Detective Mode to see a Structural Weakness in the floor nearby. Destroy it with Explosive Gel & drop through the hole we made to find a Trophy. Harley Head #10: Grapple up to where the final two Thugs are in the room & we can find a Harley Head near the room’s exit doors. Sequence 29: Protocol Ten 1. Main Story: Steel Mill 2-Electric Boogaloo, Catwoman Episode 3, Protocol Ten, Wonder Tower 2. Side Missions: 9/12 3. Demon Seals: 9/12 4. Harley Heads: 12/12 5. Riddles: 64/69 6. Riddler Trophies: 227/247 7. Catwoman Trophies: 12/35 8. Achievements: 30/64 ----------------------------------------------------------------------------------------------------- Steel Mill:
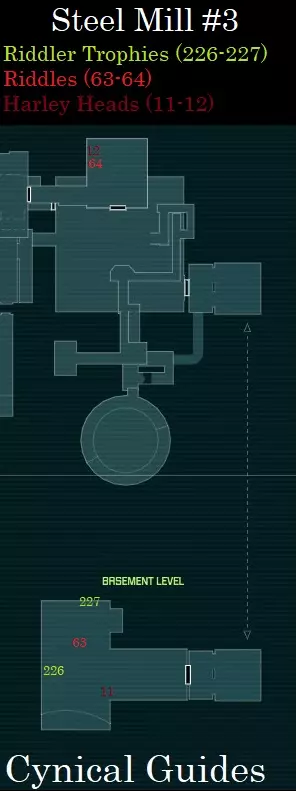
锅炉房: 哈莉头像 #11:进入锅炉房并解决里面的一大群小丑手下。完成后,回头看向我们进入主房间的走廊,在走廊出口的一些箱子后面可以找到一个哈莉头像。 谜语人奖杯 #226:在锅炉房里,我们可以看到一个可爱的小企鹅靶场游戏。用蝙蝠镖击倒所有移动的企鹅,奖杯就会作为奖励出现;你可以连续快速投掷来摧毁它们。奖杯出现后,我们需要用蝙蝠抓钩收集它。 谜语 #63:“没有他的魔术箱,滑稽的人算什么?” 从企鹅靶场游戏处,向右看,可以看到一个侧室,上面有一个写着“死亡之旅”的标志。当我们走到拱门下方时,向左看,可以看到一个装有小丑随机物品的箱子;扫描它们即可完成这个谜语。 谜语人奖杯#227:从小丑的战利品箱处,开启侦探模式,直视前方,会看到我们面前的墙壁有一处结构弱点。用爆炸凝胶摧毁它,就能找到奖杯。 支线任务#12 - 冰与火2:继续进入“死亡之旅”区域,向左转,会看到一个冒着雾气的箱子,里面装有急冻先生的一些技术。获取它,我们将解锁急冻集束手雷。100%完成 经理办公室: 谜语#64:“人们说事物变化越多,就越是保持不变。哪个傻瓜说的这话?” 返回装载区,最后用钩爪爬上经理办公室。在最左侧角落,我们可以看到哈莉的阿卡姆疯人院服装正在展出,旁边地板上放着一个阳性验孕棒;扫描它们即可完成谜题。天啊……这个系列正好需要一个小丑宝宝…… 哈莉头像#12:我们可以在哈莉服装右侧房间的角落里找到最后一个哈莉头像。

成就#26 – Ghost Train:为生存而战。 剧情相关。进入小丑的巢穴并击败他及其手下即可解锁该成就。 注意,这是完成一些体能挑战的绝佳机会…… 公园 row – 猫女:

成就#27 – Pick Pocket:窃取改变命运的赃物。 剧情相关。随着钢铁厂任务完成,我们将在第三章回到猫女的剧情;暂时先忽略她的猫女奖杯,留到最后再收集。先从收集品中喘口气。闯入泰格没收物品保险库,拿起保险库内的两个公文包即可解锁该成就。 在第三章结尾,我们将面临选择:从钢铁厂营救蝙蝠侠,或是离开阿卡姆城并带着钱逃走。选择离开阿卡姆城会触发游戏的【邪恶结局】,随后会播放制作人员名单。之后游戏会重新加载到这个选择点。营救蝙蝠侠是我们的唯一选择;不过为了体验完整剧情,建议查看一下【邪恶结局】。不明白她为什么不能多花几分钟把公文包藏在外面某个地方,等以后再来拿……我猜她只是不擅长同时处理多项任务吧。 欢乐码头: 当我们化身蝙蝠侠逃离钢铁厂时,情况变得一团糟,而斯特兰奇也开始采取行动。 支线任务#4——脆弱联盟8:前往克兰克玩具公司大楼,扫描泰格直升机后进入,去见老熟人贝恩。摧毁所有6个泰坦容器,我们就能完成这个支线任务。 贝恩会在里面等着我们。击退一些泰格守卫,再与贝恩战斗,然后炸毁剩余的泰坦,即可完成支线任务。100%完成。 完成这个支线任务还会解锁一个房间,猫女稍后可以进入获取一个奖杯。

成就#28 - Broken Toys:摧毁一切。 完成支线任务【脆弱联盟】并摧毁阿卡姆市所有的泰坦容器即可解锁该成就。 支线任务#7 - 谜语人难题9:到目前为止,我们肯定已经完成了320个谜语人挑战。如果还没有完成,请打开谜语机,接下来要解决的谜语是:“用力打我,我会裂开,但你永远无法阻止我回瞪你。我是什么?” 答案是镜子。第五名人质可以在欢乐码头找到。 进入下一个藏身处并营救M.P.T.安妮·毕肖普。这里的谜题并不难,我们基本上需要逐个使用我们的每个 gadgets(道具)来解决迷你谜题以找到她。75%完成

成就#29 – 智力谜题:从谜语人手中解救第五名人质。完成320/440个谜语人挑战后,在支线任务【谜题为题】中解救第五名人质即可解锁该成就。

成就#30 - Fully Loaded:收集蝙蝠侠的全部28个装备及升级。 虎大师程序是解锁此成就所需的最后一项升级。此时所有剧情锁定的装备或升级均已收集,若成就未解锁,则意味着你需要从个人数字助理的韦恩科技标签页购买最后几项升级;完成最后的收集品和支线任务后,我们仍有相当多的经验值可以获取。首次通关达成100%进度将为我们提供足够的经验值,使蝙蝠侠和猫女完全升级。 猫女的升级对此成就无影响,仅蝙蝠侠的升级计入。 序列30:杀不死你的 1. 主线剧情:奇迹塔 2. 支线任务:9/12 3. 恶魔印记:9/12 4. 虎式中继站:1/4 5.谜题:66/69 6. 谜语人奖杯:239/247 7. 猫女奖杯:12/35 8. 成就:30/64 ----------------------------------------------------------------------------------------------------- Bowery区
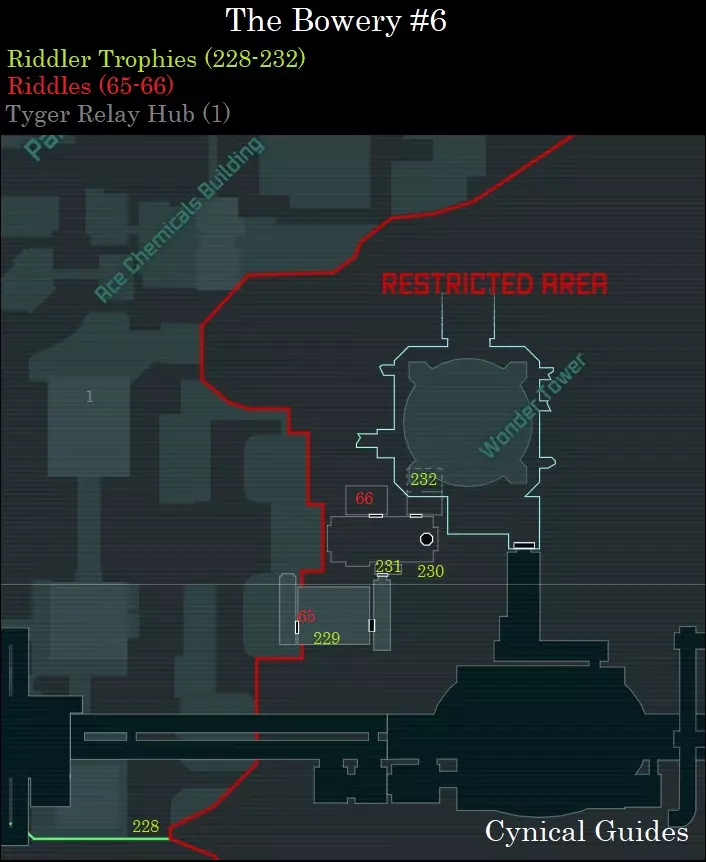
泰格监控中继站1:前往艾斯化学大楼正南方向的建筑屋顶,我们就能找到第一个中继站。 拥有泰格主程序后,我们现在可以用密码序列器破解所有泰格控制台。 谜语人奖杯228:前往鲍厄里区南端的外围围墙。在这里我们能找到一个泰格检查站,左侧墙上有一个泰格安全控制台。破解控制台,从半开的大门下爬过去;在里面用蝙蝠爪可以收集天花板上的奖杯。 阿卡姆城处理中心: 谜题65:“这个问题只能从一个不寻常的视角来回答。你能到达那里吗?”到达阿卡姆城处理中心的阳台入口,使用密码序列器破解泰格安保控制台以进入内部。使用远程电力充能打开通往下一个房间的门,在此处开启侦探模式,可看到附近窗户上喷涂的问号顶部。 要找到圆点,沿着内部阳台继续前行,通过铁栅栏门使用密码序列器破解泰格安保控制台,以在该楼层继续前进。进入下一个房间,开启侦探模式,可看到带栅栏窗户下方的混凝土窗台上喷涂的圆点;将两部分对齐并扫描,即可完成谜题。谜语人奖杯#229:下到下一层,降落到下方不远处一片水域上方的走道上。使用冰冻冲击在下方水域中央制造一个平台,然后落到平台上。从这里,可以找到一个阀门盖,用蝙蝠抓钩将其撕开,后面就有一个奖杯。 谜题#66:“在这个地方,你可不想措手不及,对吧?” 使用远程电力充能装置进入处理中心,从一些虎爪守卫手中救出政治犯;这里也是完成一些体能挑战的绝佳地点。 解决掉守卫后,进入囚犯们靠墙聚集位置左侧的侧室。在室内,我们可以发现一名死亡的泰格守卫被绑在手术台上;扫描他们即可完成谜题。 谜语人奖杯#230:回到关押政治犯的房间,抬头看向东南方向的墙壁,会看到一个侧室上方有结构弱点。用钩爪爬上去,使用爆炸凝胶将其破坏,即可找到奖杯。 谜语人奖杯#231:在政治犯所在位置的正对面,有一个连接着电梯的泰格安保控制台。用我们的密码 sequencer 破解它,电梯内部的天花板上有一个奖杯;用蝙蝠爪抓住它。 谜语人奖杯#232:要获取在Bowery区的最后一个蝙蝠侠收藏品,进入该区域最里面的侧室,它位于政治犯所在位置的右侧。在这个房间里,我们可以找到一面能照出自己影像的镜子;像蝙蝠侠在家时经常做的那样,打破这面镜子,就能在隔壁房间的天花板上发现一个战利品。用蝙蝠抓钩抓住它。 奇迹之城:
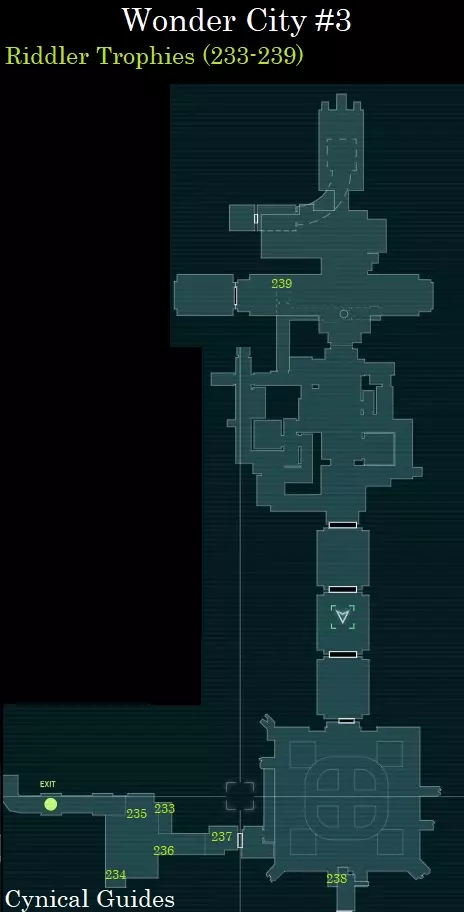
倒塌街道2: 谜语人奖杯#233:通过阿卡姆城处理中心的下水道格栅落下,我们将进入奇迹之城。通过地板上的洞落下,进入一座被摧毁的建筑。走到朝东的墙洞处,我们可以看到对面一个孤立的壁架上有一个奖杯;使用蝙蝠爪从这里抓住它。 你必须站在特定的角度才能锁定它……实际上我们必须用绳索发射器荡到那个平台上才能继续前进,所以如果你没有用蝙蝠爪抓住奖杯也没关系……我们可以直接用手捡起来。 谜语人奖杯#234:从我们所在的房间望向水面,我们可以看到一个可以用绳索发射器到达的壁架。在那个 ledge 下方,有一个金属悬挑结构,其下方卡着一个奖杯。要拿到它,我们需要向水中投掷一个冰冻冲击,然后用蝙蝠抓钩抓住奖杯。 谜语人奖杯 #235:用绳索发射器荡到之前拿到谜语人奖杯 #233 的 ledge 上,回头望向我们用蝙蝠抓钩射出的墙洞对面的水域。在洞的左侧,我们可以看到一个被电缆吊在空中的冰冻谜语人奖杯。用蝙蝠镖切断电缆,奖杯会落入水中;在水中用冰冻冲击制造一个平台来收集奖杯。 谜语人奖杯 #236:用抓钩回到我们之前所在的平台,向南望向水域对面,会看到一个附在墙上的奖杯笼子。在囚笼上方,透过铁丝网我们能看到一个谜语人安保控制台。用我们的密码序列器黑入控制台,再用蝙蝠爪收集奖杯。 谜语人奖杯#237:沿着墙壁移动或用索道发射器前往坍塌街道2的出口。在这个最终房间里,我们能看到天花板上有一个问号;用蝙蝠镖击中它,下方会打开一个奖杯囚笼。要到达囚笼,使用爆炸凝胶摧毁脚下的结构弱点。 奇迹塔地基: 谜语人奖杯#238:进入奇迹塔地基并解决所有泰格守卫。从奇迹塔的电梯入口向南看,会看到一个泰格安保控制台;用密码序列器黑入它以获取奖杯。秘密通道: 谜语人奖杯#239:在乘电梯前往奇迹塔之前,快速穿过奇迹城大道并进入秘密通道。沿着通道向下走,我们可以透过一些铁栏杆看到一个奖杯,前方有一个谜语人感应地雷阻挡去路。使用干扰器地雷引爆器摧毁地雷,然后奔跑并滑过栏杆下方即可收集奖杯。 序列31:让你变得陌生 1. 主线剧情:奇迹塔、帝王剧院、猫女第4章 2. 支线任务:9/12 3. 恶魔印记:12/12 4. 泰格中继站:1/4 5. 谜语:68/69 6. 谜语人奖杯:244/247 7. 猫女奖杯:17/35 8. 成就:32/64 ----------------------------------------------------------------------------------------------------- 奇迹城:
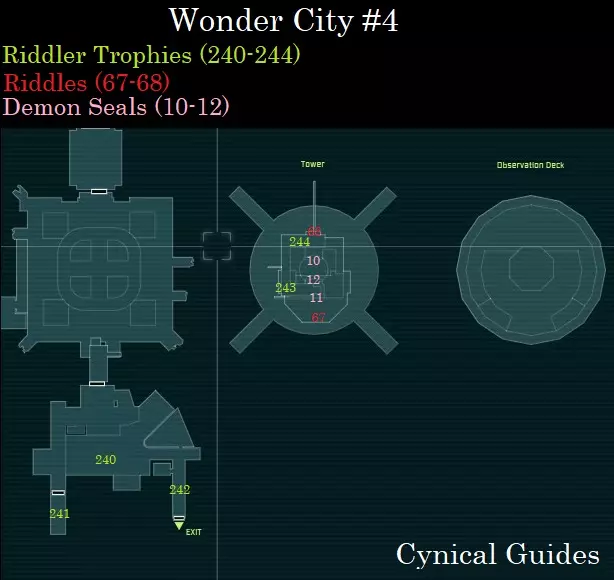
倒塌街道1: 谜题人奖杯#240:暂时忽略奇迹塔,从奇迹塔地基快速钩爪爬上倒塌街道1区域。进入房间后,走到所在建筑的边缘,向下看向水中,可以看到一个被冰冻的谜题人奖杯;使用冰冻冲击在其上方制造平台,然后跳下收集。 谜题人奖杯#241:从这里钩爪爬上西侧的 ledge(边缘),可以看到一个连接着密封钢门的泰格安保控制台。用密码破解器黑入控制台,进入通往另一扇钢门的楼梯间。在楼梯中途,抬头可以看到天花板上的奖杯;用蝙蝠爪收集。谜语人奖杯#242:现在使用勾爪发射器前往区域最南端的奇迹城主入口。当我们靠近出入口大门时,抬头可以看到上方楼层的两根管道正在冒出蒸汽。用冰冻冲击封住管道,然后勾爪爬上上一层,在这里可以找到一个谜语人奖杯。 奇迹塔: 破解奇迹塔地基处电梯上连接的泰格安保控制台,以获得进入最终区域的权限。 恶魔印记#10:当我们乘坐电梯前往奇迹塔时,电梯最终会停下,门的另一侧会有泰格守卫等待。通过电梯的检修口勾爪爬上电梯顶部,在电梯井的北墙上可以找到一个恶魔印记。恶魔印记11:消灭电梯外的虎爪守卫,然后抬头查看电梯入口上方,即可找到另一个恶魔印记。 谜题67:“何处能将过去的景象尽收眼底?” 在我们与虎爪守卫战斗的区域外,沿着栏杆向南看,会发现一块描绘哥谭市画面的牌匾;扫描该牌匾即可解开谜题。 谜语人奖杯243:入侵虎爪安保控制台,然后绕到塔楼右侧,抓住边缘。沿着这个边缘一直绕着塔楼移动,回到我们之前所在的对面位置,在一道铁门后可找到奖杯。 恶魔印记12:继续攀爬奇迹塔,直到找到暂时通往塔内的梯子。跳到对面有笼子的一侧,然后转身回头看我们跳下来的上方,就能看到最后一个恶魔印记。 谜语人奖杯244:从最后一个恶魔印记处,我们实际上可以看到下一个奖杯就在我们需要穿过的笼子区域上方。要拿到它,只需走出笼子区域,用钩爪抓住笼子顶部即可获得奖杯。 谜题68:“这个问题只能从一个不寻常的视角来回答。你能到达那里吗?” 这是目前为止最麻烦的一个需要扫描的谜题。从最后一个奖杯处,跳到塔楼北侧伸出到开阔空中的水平钢梁上。走到钢梁尽头,打开侦探模式并转身,就能看到下方塔楼上喷涂的问号顶部。那个点就在它下方不远处。 要扫描这两个碎片,我们实际上需要从光束上滑翔下来,并在半空中对准它们,然后再进行扫描。从光束上朝着问号中心的方向跳下,几乎立刻就能扫描到碎片。这可能需要尝试几次。幸运的是,如果你动作够快,当你知道自己操作失误时,实际上可以用抓钩重新回到光束上再试一次;如果动作不够快,你就不得不重新攀爬一部分塔才能回到原来的位置。

成就#31 - Freefall:别往下看。 剧情相关。爬上奇迹塔顶端并击败雨果·斯特兰奇即可解锁该成就。 鲍厄里:

成就#32 - Exit Stage Right:世界就是一个舞台。 剧情相关。在 Monarch 剧院彻底阻止小丑,并完成《阿卡姆之城》的主线故事。 博物馆 - 猫女:开始游玩猫女的最终章节,最终我们将不得不进入博物馆对抗双面人。进入时,我们不妨寻找她藏在这里的奖杯……
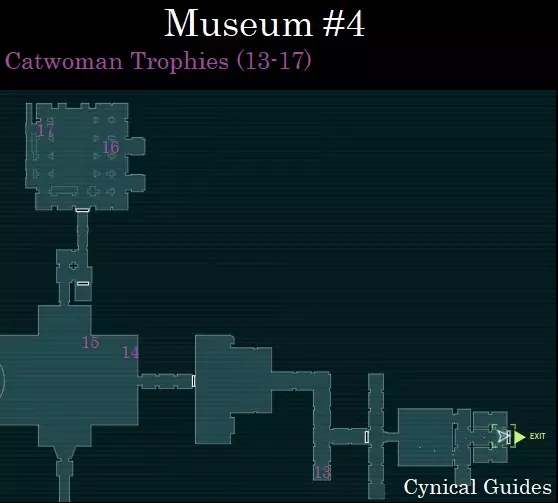
无名走廊: 猫女奖杯#13:进入奖杯室后方的无名走廊,在走廊的第一个岔路口左转。进入一个之前锁着工业电机的房间,使用“扑向天花板”技能,通过维修舱口到达上方的奖杯处。 torture chamber: 猫女奖杯#14:进入torture chamber后,从水面上方的边缘跳下,沿着边缘底部向房间的东北端爬行。仍在边缘下方时,通过维修舱口爬上去,在这里可以找到另一个奖杯。 猫女奖杯#15:从上个猫女奖杯的位置,使用“扑向天花板”技能,沿着上方走道的下侧向西穿过房间;奖杯会出现在走道下侧的路径上。军械库: 在解决双面人之前,先收集接下来的猫女奖杯!如果我们完成猫女章节,就会结束该章节并离开博物馆,以蝙蝠侠的身份返回;而在游戏后期,我们需要专门以猫女的身份回到这里…… 猫女奖杯16:现在进入军械库,在顶层房间右侧移动,避开双面人的手下。当我们转过拐角时,可以扑向天花板上的悬垂物,它会带我们绕到上层东侧。沿着它走,就能找到一个奖杯。 猫女奖杯17:最后一个猫女奖杯位于博物馆军械库上层西侧,曾存放急冻人战衣的玻璃展示柜顶部。 序列32:最后的狂欢!1. 主线故事:通关后 2. 支线任务:9/12 3. 泰格中继站:4/4 4. 谜语:68/69 5. 谜语人奖杯:246/247 6. 猫女奖杯:25/35 7. 成就:33/64 【鲍厄里 - 猫女】:当我们在猫女第4章结束后重新操控蝙蝠侠时,会在我们所站建筑的边缘附近看到两只可爱的小猫。这些猫标记着猫女和蝙蝠侠之间的角色切换点;在鲍厄里、公园街和工业区各有一个这样的切换点。
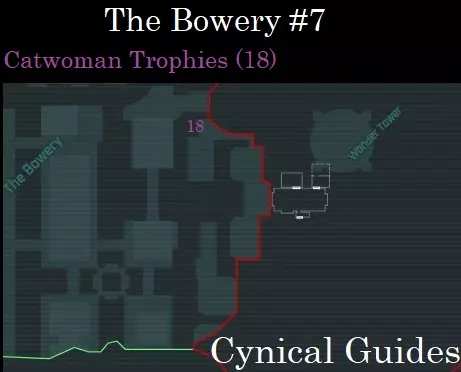
猫女奖杯#18:切换至猫女,前往艾斯化学工厂与阿卡姆城处理中心之间的建筑屋顶。在我们第一次以蝙蝠侠身份快速收集物品时,应该已经摧毁了挡住猫女进入铁丝网围栏内奖杯的软木板。穿过木板所在的位置,然后向天花板猛扑,通过维修通道爬上去即可获得奖杯。 猫女的珠宝:当我们在游戏后期第一次切换回猫女时,会收到一个新的最终DLC任务,让她找回所有16件被盗的战利品。要收集她的战利品,切换至盗贼视觉并开始寻找暴徒。携带她赃物的暴徒会闪烁橙色光芒,头顶还会悬浮一个钻石符号。你可以用任何方式将他们击倒,即可收集+1赃物。在我们四处收集她最后的猫女奖杯时,请留意这些暴徒…… 另外,当我们扮演蝙蝠侠时,要留意任何正在遭受攻击的政治犯,这是“暴力行径”支线任务的内容。目前,我只完成了大约46%;我们会在游戏流程的最后阶段刷完所需的最后几场遭遇战。 公园街:
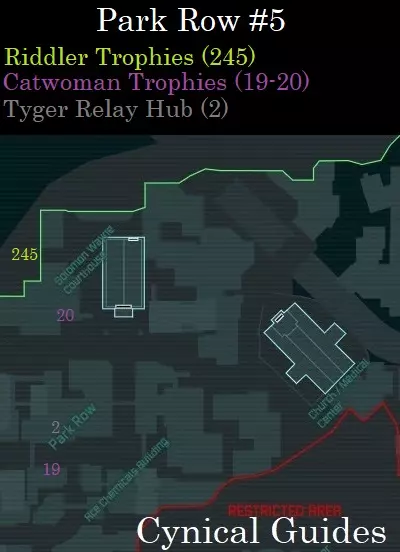
猫女奖杯#19:现在以猫女身份前往公园街,从帝王剧院向西沿着街道前进。沿街走一小段路,就在世界地图上“公园街”标记的正下方,我们可以在街道中间找到一个路障。路障左侧会有一个铁栅栏围起来的区域,上方有哥谭五金店的招牌。 这个招牌下方有软木板,我们之前以蝙蝠侠身份应该已经摧毁过。爬过木板,然后跳向天花板即可收集奖杯。 猫女奖杯#20:面对所罗门·韦恩法院的入口,前往法院西侧另一个铁栅栏围起来的区域。翻越附近的围栏,沿着围栏走到其背面,我们之前作为蝙蝠侠已在结构薄弱处炸开了一个洞。进入围栏,跳至天花板收集奖杯。

成就#33 - Family Jewels:找回被盗物品。 需要从双面人的手下那里收集16颗宝石。虽然数量是固定的,但这些宝石会随机出现在哪些手下身上;当你使用盗贼视觉时,带有宝石的手下头顶会有钻石图标,由此可以辨认。双面人的手下只会在鲍厄里和公园街出现;欢乐码头和工业区由小丑控制。 如果找不到更多带有钻石的手下,保存进度后退出到主菜单,然后重新加载游戏以重置阿卡姆城并让手下重新刷新。在鲍厄里和公园街仔细搜寻,收集齐16颗宝石即可解锁该成就。谜语人奖杯#245:现在切换到蝙蝠侠,回到我们刚才在法院附近的最后一个铁栏围场。继续走过围场,向左绕过它下方的建筑,会看到外围墙上有一个泰格 checkpoint,其入口带电。靠近入口,使用我们的密码序列器入侵里面的泰格安全控制台,以关闭电力并打开大门;奖杯就在后面。 泰格闭路电视中继 hub #2:前往世界地图上“Park Row”中“A”字母的正上方。在这栋建筑的顶部,就在蓝色霓虹灯“Bar & Lounge”招牌前面,我们可以找到一个泰格中继 hub 进行入侵。 欢乐大道:
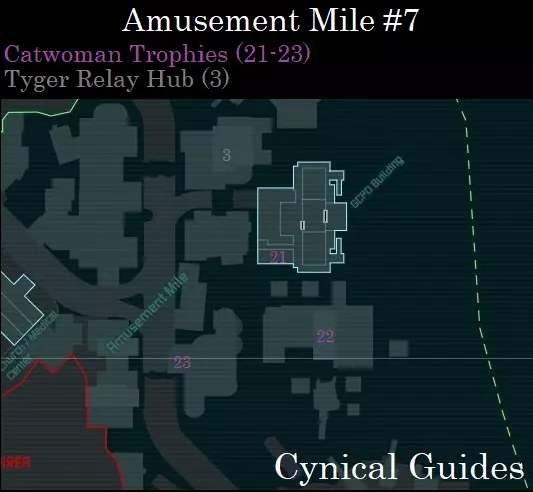
Tyger监控中继站3:化身蝙蝠侠,爬上GCPD大楼西北方向带有龙虾标志的屋顶,即可找到一个可入侵的Tyger中继站。 为了减少麻烦,建议向下滚动指南,以蝙蝠侠的身份收集工业区、钢铁厂和地铁地图中所有剩余的收集品,这样就无需在蝙蝠侠和猫女之间频繁切换。 猫女奖杯21:化身猫女,前往GCPD大楼,进入一楼下方的地下停车场。跳至天花板,沿着天花板爬到停车场的另一端,即可找到一个奖杯。 猫女奖杯22:前往克兰克玩具公司大楼并进入内部。如果你已完成支线任务【脆弱联盟】,我们就能进入贝恩的泰坦容器储藏室;在此处跳至天花板可收集一个奖杯。 猫女奖杯#23:在哥谭市奥林匹斯大厦右侧,我们可以在附近一栋建筑的屋顶找到一个靠近水边的小房间。如果你之前已和蝙蝠侠一起破坏了挡住房间的结构弱点,就能收集这个奖杯。 工业区:
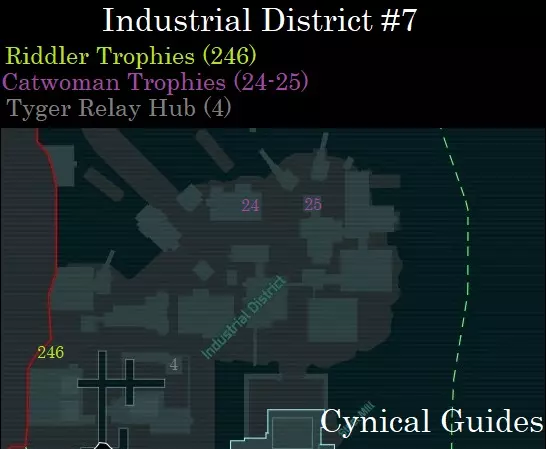
虎爪监控中继站4:作为蝙蝠侠,前往一栋大型建筑的顶部,该建筑有一个霓虹灯橙色招牌,上面写着“三角海军”,在两个招牌之间可以找到一个虎爪中继站。 谜语人奖杯246:从三角区出发,向西北方向前往外围墙,找到一个带有通电大门的虎爪检查站。使用密码序列器入侵虎爪安全控制台,在检查站后方可以找到一个奖杯。 猫女奖杯24:如果你已完成“冰之心”支线任务,作为猫女进入 waterfront 附近的5B号仓储仓库,在有急冻先生和诺拉的主房间内,从地板格栅下方跳下。沿着通风管道前往下层,然后跳至天花板即可收集奖杯。猫女奖杯#25:从5B号仓库的前门出去,向东穿过街道,前往一座有管道通向其上层的塔楼。在塔楼底部,如果我们之前以蝙蝠侠的身份破坏了软木板,就可以跳进塔楼。在这里,我们可以看到三个压力板连接着天花板上的奖杯笼。只需跳向天花板并落到每个压力板上即可打开笼子;触地会重置压力板。 序列33:别再玩猫的双关语了! 1. 主线故事:游戏后期 2. 支线任务:9/12 3. 谜语:69/69 4. 谜语人奖杯:247/247 5. 猫女奖杯:35/35 6.成就:34/64 钢铁厂:注意现在我们可以从屋顶通过在最近几个主线任务中炸开的洞口进入钢铁厂。这样我们就不用穿过B和D号冷却隧道的水道,节省了很多时间。
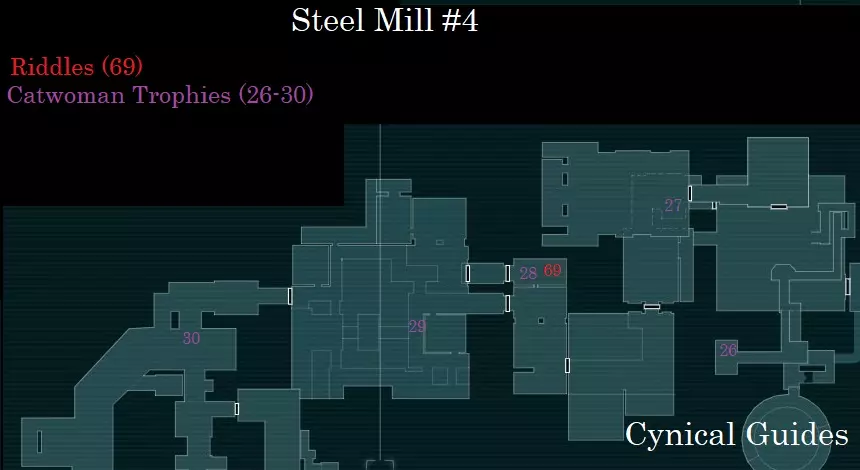
装配线: 谜题#69:“一旦组装完成,这两者会再次合二为一吗?” 扮演蝙蝠侠,前往钢铁厂的装配线,进入上方有“西奥尼工业”标志的办公室。在通往熔炼室的门口对面,有一个可以用抓钩进入的开放式通风口;如果你绕了远路,当你从熔炼室出来进入装配线时,你会正对着这个通风口。 沿着通风口前进,然后下到下层。转过身,我们不仅能看到安布拉莫维奇兄弟俩……还能听到他们的声音。他们还活着,而且状态很好。扫描它们以完成我们最后的谜题;至少有人能得到一个圆满的结局……不过,我们必须在游戏后期专程回到这里才能拿到最后的谜题,这实在是太令人恼火了……再次感谢Rock Steady…… 通风系统: 猫女奖杯#26:从屋顶入口以猫女身份重新进入钢铁厂,然后跳入主装载 bay 房间。从这里,通过我们以蝙蝠侠身份在墙上创造的圆形洞口向上跳跃,进入通风系统。跳下竖井,然后扑向天花板以避开下方的岩浆;我们可以在与一个未激活的压力板相同的房间里,通过铁丝网的一个洞口找到这个奖杯。 装载 bay: 猫女奖杯#27:重新进入装载 bay,然后开始向装配线移动。在两个区域之间的房间里,我们可以在之前作为蝙蝠侠骇开的电梯内找到一个收集品。 装配线: 猫女收集品28:进入装配线并前往西奥尼士工业办公室。在通往熔炼室的门附近,向北抬头看,可以看到一个可以跳上去的壁架。在这里,会有一个维修舱口,我们可以滑进去获取被铁栅栏挡住的收集品。 熔炼室: 猫女收集品29:进入熔炼室并解决里面的持枪暴徒。从最低层向上看,靠近顶层办公室的阳台下方有一个收集品粘在那里;使用【跳向天花板】动作来收集它。冷却隧道 - D 猫女奖杯#30:进入冷却隧道 - D,走到钢桥横跨水道的位置。靠近桥边,蹲下爬下去并悬挂在桥下方,即可找到奖杯。 地铁:
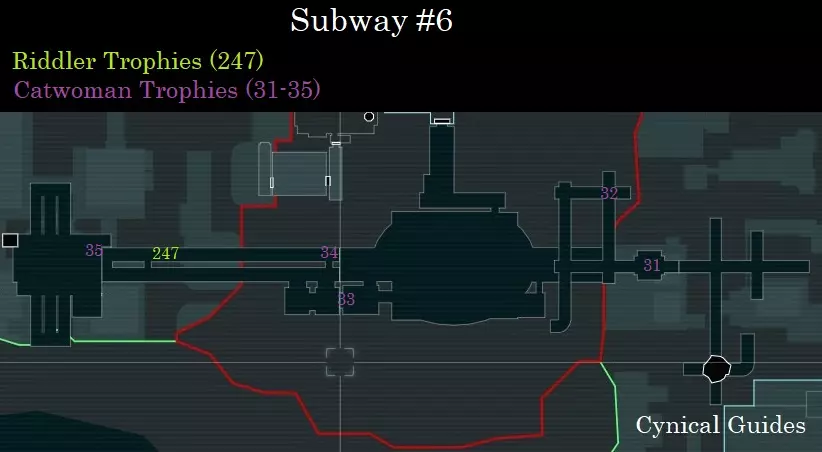
地铁隧道: 谜语人奖杯247:扮演蝙蝠侠,前往地铁站房间,在其下层可以找到一个泰格安保控制台。使用密码序列器入侵控制台,即可打开通往地铁隧道的大门。进入左侧隧道,走进敞开的火车车厢,在地板上可以找到蝙蝠侠的最后一件收藏品。终于结束了…… 地铁维修通道: 猫女奖杯31:扮演猫女,从工业区进入地铁维修通道,下落到隧道下方的桥上。爬上桥栏杆,然后向下爬(需要按住蹲伏键,否则会直接跳下桥),在桥的下方可以找到一个奖杯。猫女奖杯#32:沿着地铁维修通道前进,直到需要【跳向天花板】才能继续前进,奖杯会出现在途中,不可能错过。 地铁隧道: 猫女奖杯#33:快速穿过地铁终点站的主房间,经过所有持枪暴徒,到达地铁隧道入口。要进入,需要【跳向天花板】越过一扇工业电机锁着的门,奖杯就在我们正上方,不可能错过。 猫女奖杯#34:从上个奖杯处跳下,向北跳过倒下的钢梁,进入最上方的地铁隧道。沿着隧道向左走一小段路,在到达一节敞开的火车车厢前,我们可以【跳向天花板】。从这里爬上维修通道,我们就能进入上方的秘密房间,在那里可以找到一个奖杯。 地铁站: 猫女奖杯#35:我们的最后一个猫女奖杯位于地铁站上层的主接待办公室内,在一张桌子上。 阿卡姆城:收集完所有35个猫女奖杯后,我们现在只需要完成猫女的5个体能挑战。这些挑战都非常简单,可以在阿卡姆城的任何地方完成;如果需要,可以保存并退出游戏,然后重新加载来重置暴徒的刷新。 猫女挑战#1:使用绊雷眩晕敌人3次。 可累积。只需在战斗中扔下绊雷,让暴徒接触到时摔倒在地即可。猫女挑战2:在一个连击流程中施展特殊连击【鞭击】和特殊连击【鞭绊】。 需要为猫女购买这两个技能升级。在战斗中聚集一大群暴徒,两次积累连击数以激活这两个技能,同时不中断连击倍数。 查看PDA的韦恩科技标签,了解如何施展这两个招式。 猫女挑战3:完成一次爪爬,至少使用8次独立跳跃,且没有一次跳跃时机失误。 爪爬是猫女版的蝙蝠侠钩爪。在Bowery区找到高楼,比如哥谭银行,或在工业区找到烟囱,然后使用猫爪。跳跃时机判定为“完美”或“良好”均可,但不能出现“太晚”。猫女挑战#4:执行3次突袭攻击。 累计计算。只需爬到敌人上方,就会出现执行突袭攻击的提示。如果离敌人太近或正上方,提示会显示“下落攻击”;要进行突袭攻击,你需要离得稍远一些,这样她就必须突袭而不是落到敌人身上。执行3次突袭攻击即可完成挑战。 猫女挑战#5:在战斗中使用3次快速鞭击。 累计计算。战斗中,只需激活3次快速鞭击,无需连击;甚至可以对同一个敌人完成。

成就#34 - 斯芬克斯之谜:完成全部40个猫女谜语人网格项目。 该成就将在我们收集全部35个猫女奖杯并完成她的5个体能挑战后解锁。 序列34:黑暗骑士 1. 主线剧情:通关后 2. 支线任务:12/12 3. 成就:37/64 ----------------------------------------------------------------------------------------------------- 鲍厄里: 支线任务#7 - 谜语人难题10:在我们完成400个谜语人挑战后,我们可以完成谜语人支线任务的最后部分。请注意,猫女的体能挑战和奖杯确实计入这个数量。如果你还没有完成蝙蝠侠的所有体能挑战,不用担心,我们可以通过猫女的任务额外获得40个,以达成400个的目标。 甲骨文会告诉你她已经定位出谜语人的藏身处。前往冰山休息室入口正下方的导航点,我们需要像之前收集这里的谜语人奖杯那样,滑翔越过带电围栏。朝着导航点俯冲,然后迅速拉起并滑翔过带电围栏。在围栏的另一边,我们可以找到一扇通往藏身处的门。 小心绕过谜语人让被绑架的警察和医生行走的轨道,到达谜语人位置的下方进行击倒。这实际上是一个相当简单的结局,对应着一个原本令人恼火的支线任务。100%完成

成就#35 - Genius:从谜语人手中解救所有人质。 完成400/440个谜语人收集品/挑战(猫女DLC收集品作为奖励计入总数)后,在谜语人的藏身处击败他,完成“谜天大圣”支线任务即可解锁该成就。 公园街: 支线任务#6 - 黑暗中的一枪3:阻止谜语人后,前往公园街,会听到一声枪响,标志着死亡射手的最终犯罪现场。触发最终犯罪现场的条件尚不明确。必须处于游戏后期,但除此之外,它可能在任何时候触发。对我来说,它是在完成“谜天大圣”支线任务后触发的。我们可以在公园街西端靠近提格安保检查点的外围墙附近找到犯罪现场,那里聚集了一群暴徒。调查犯罪现场后,我们会将死亡射手的位置缩小到三栋可能的建筑:12A、12B或12C。为了节省你的猜测时间……他在12A。 前往欢乐港的12A号楼,开启侦探模式寻找变电站维修舱口;这里有三个需要拆除的舱口。登上建筑物的楼梯,拆除小房间后面的舱口,即可找到死亡射手的武器和个人数字助理。使用密码序列器破解个人数字助理,了解死亡射手的下一个目标:杰克·莱德。 现在我们有3分钟时间前往上鲍厄里区的莱德所在地。完成“Cold Call Killer”成就后,你会发现3分钟其实是相当充裕的时间;如果你愿意,甚至可以步行前往并且仍然能及时赶到……(不过别真这么做)。在不得不与死亡射手本人交手前,先找到莱德并救下他;只需到达死亡射手站立位置的下方,然后执行击倒。用蝙蝠侠的大腿夹碎死亡射手的头!达成100%完成度。

成就#36 - Contact Terminated:阻止契约特工。 评估完死亡射手的所有三个犯罪现场后,在他杀死下一个目标前赶到,亲自击倒这名刺客,以完成支线任务【暗夜之击】并解锁该成就。 支线任务#3 - 暴力行径2:在完成本指南前面提到的所有内容(不包括蝙蝠侠的所有体能挑战)后,我们现在可以去完成剩余的政治犯解救任务,以完成这个支线任务。

这些袭击事件会在固定地点发生,但并非每次都会出现。在阿卡姆城中前往所有地点进行循环搜索,如果某些地点没有出现袭击事件(你可能已经完成过这些事件),请退出到主菜单以重置区域,然后再次循环搜索。如果两个袭击事件的位置过于接近,只会生成其中一个,此时你需要重置区域才能生成第二个。由于我们处于游戏后期,所有可能的袭击地点都将开放。100%完成

成就#37 - Aggravated Assault:阻止阿卡姆市的袭击事件。 阿卡姆市周围共发生16起袭击事件,解救全部16名政治犯即可完成支线任务“暴力行径”并解锁该成就。 这是我们在《蝙蝠侠:阿卡姆之城》一周目游玩中需要完成的最后一件事,现在我们可以开始二周目了。开始二周目不会覆盖当前存档,所以如果有遗漏的内容,你随时可以回到一周目完成。这个功能非常实用,因为要解锁“完美骑士 - 第二天”成就,我们需要在一周目和二周目中都完成全部12个支线任务。因此,如果你不小心遗漏了某些内容,随时可以回到一周目去完成。 总结:由于需要收集440个收藏品,一周目游玩确实非常折磨人。幸运的是,《蝙蝠侠:阿卡姆之城》拥有极其出色的剧情,这让我们的流程体验变得可以接受。对我们来说幸运的是,所有谜语人收集品、物理挑战、升级和 gadgets 都会继承到二周目。我们不需要再次收集全部 400 个谜语人收集品/挑战!一周目、二周目和谜语人复仇模式都在同一个存档文件中进行,并且都会计入我们的完美骑士进度。 特别感谢 Caelan1963,他精心帮助我进行指南和收集品地图的质量控制! 请注意,这是 100% 成就指南的第 1 部分(共 2 部分)。第二部分将涵盖:二周目、哈莉·奎茵的复仇DLC,以及蝙蝠侠、猫女、罗宾和夜翼的谜语人复仇挑战。如果你已完成第一部分的所有内容,那么在完成二周目并获得谜语人复仇中蝙蝠侠的所有奖章后,将解锁【Perfect Knight – Day 2】成就。请确保所有内容都在同一个存档文件中进行。
57% 完成