换一换
换一换 


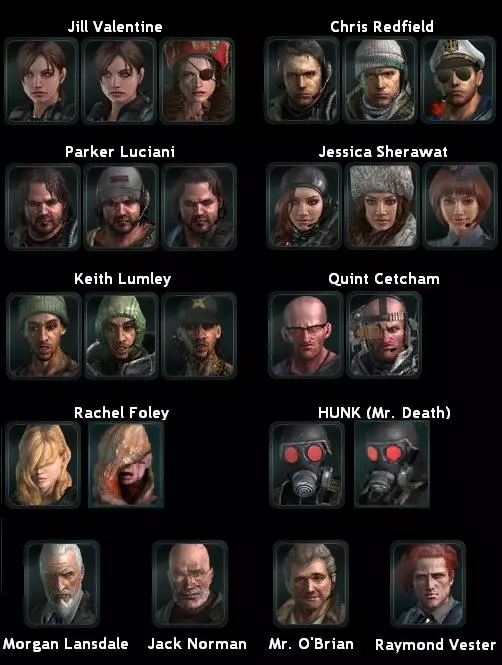
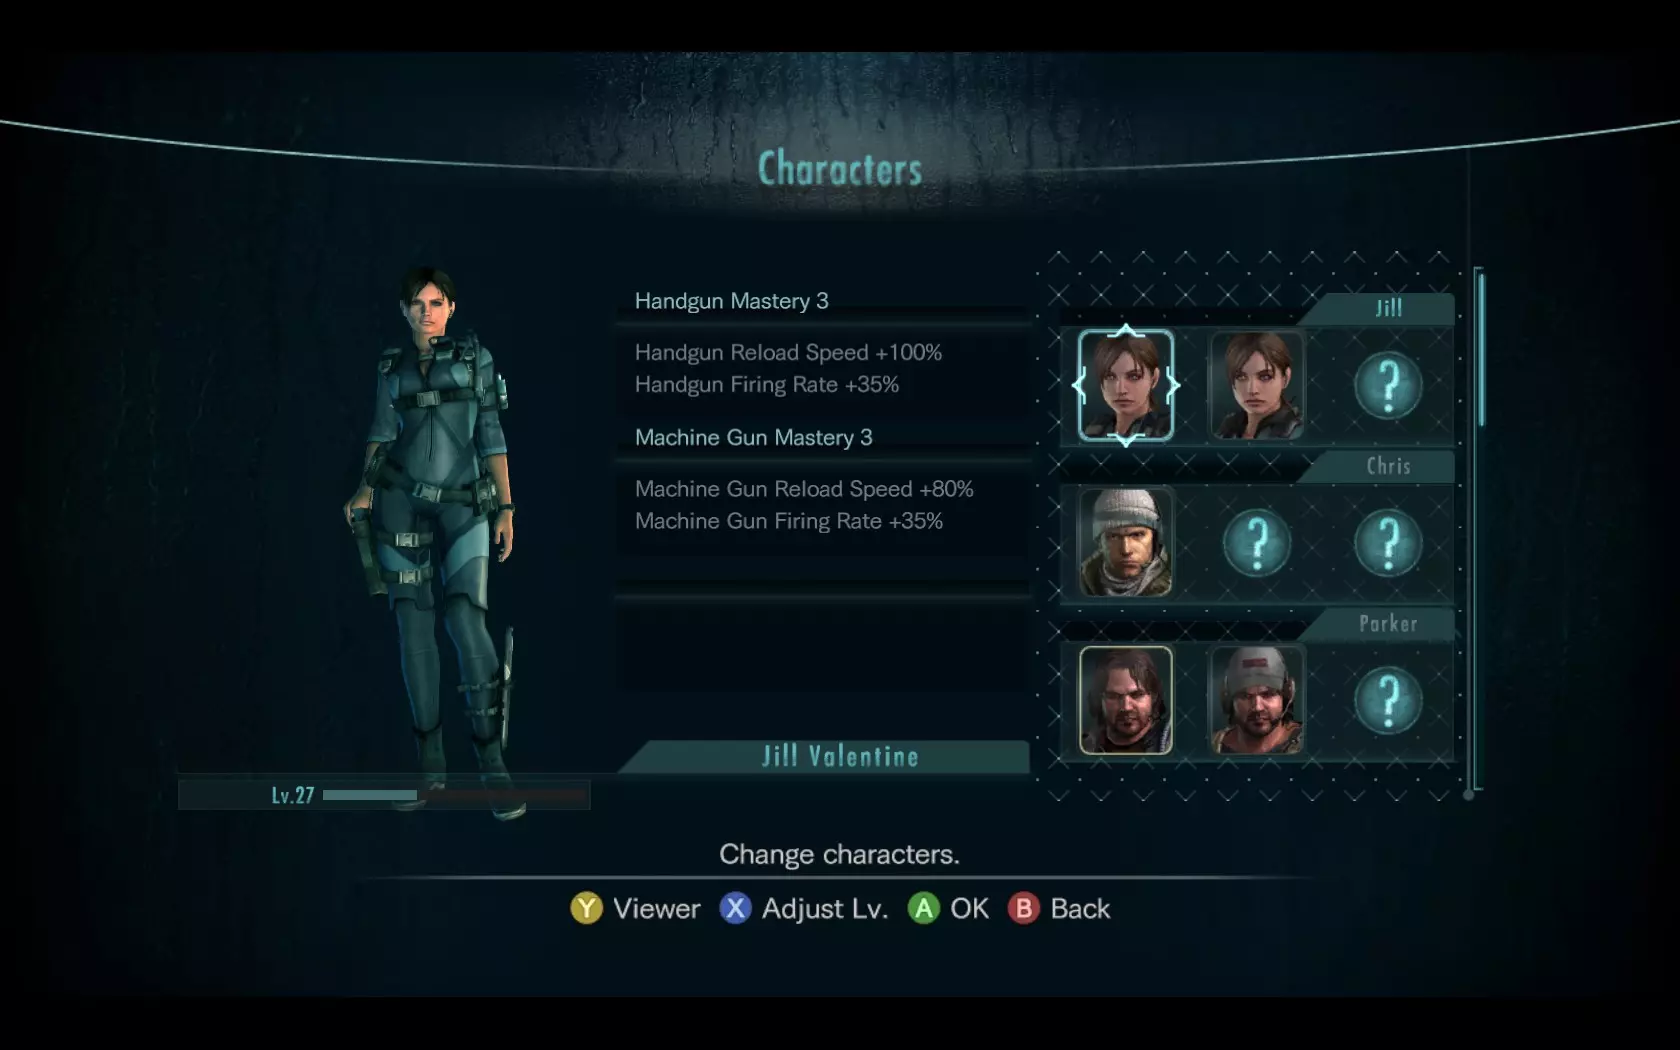
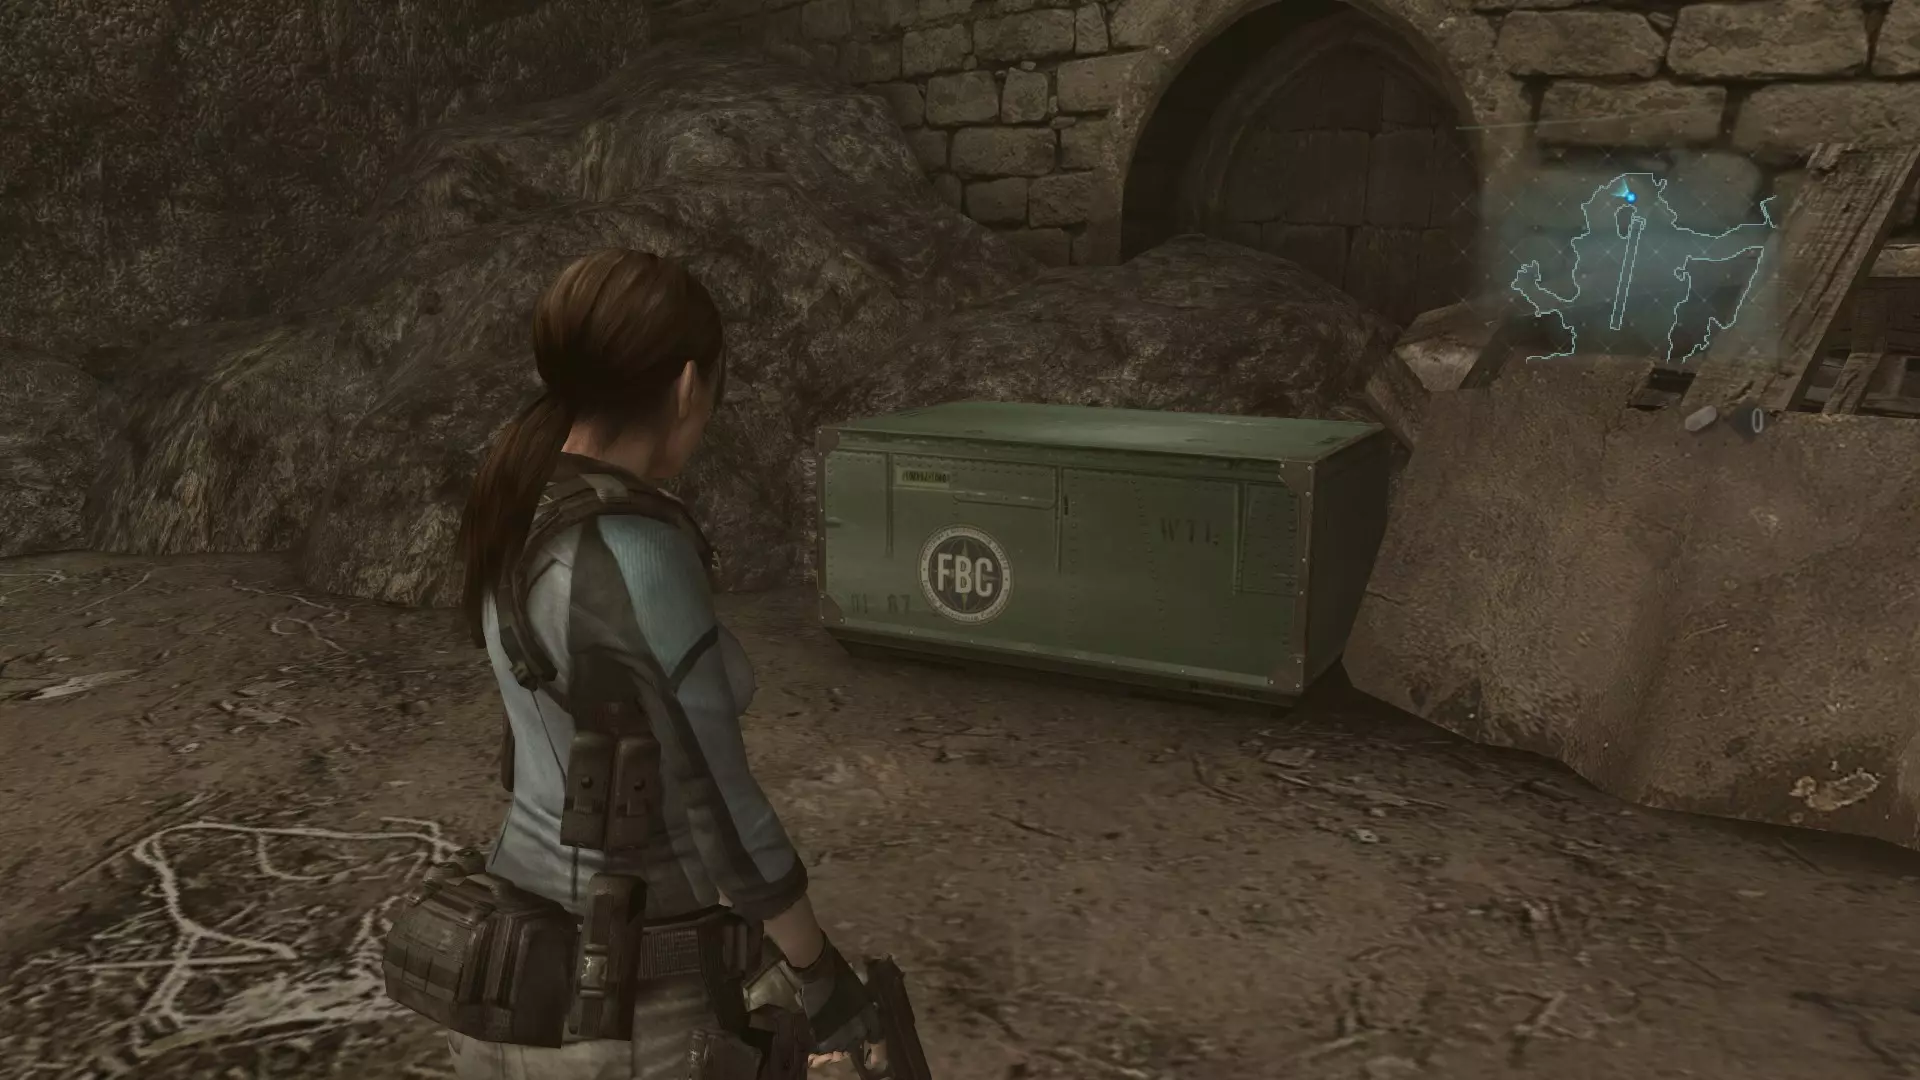
[WIP] probably all information you need for Raid mode in one place: weapon and character stats, location of weapon parts, Genocide counts, enemies weakness, etc credits a very huge thank to the site - http://kouryakutsushin.com . on that site you can find lots of useful (and detailed) information for various games, including Resident Evil: Revelations, Resident Evil: Revelations 2, Resident Evil 6, Resident Evil 5, Operation Racoon City, Final Fantasy XIII, Shining Resonance, Persona, Xenoblade, Kingdom Hearts 358/2 Days, and many others. check that site out and pass the link to other forums link to information on Resident Evil: Revelations : http://kouryakutsushin.com/biorev-wiki/ thank you, @drae_perin for numerous additions and corrections thank you, @CAMOBAP for numerous additions and corrections hints, tricks, advice overall this is grindfest-type of game - be ready to replay stages for the extra exp and better loot in your first play try to be a few levels above than a stage's minimum level require - it will let you to deal more damage to enemies and receive less damage from them due to level differences (see table below) every enemy in the Raid has weakness and resistance against certain weapons. for example, some enemies receive more damage from handgun, while others may have an extra protection against sniper rifles every character in the Raid mode has hidden (secret) stats, for example Parker has extra defense that helps to sustain more damage. stats can be positive or negative leveling the maximum character's level is 50; level is shared between all characters (unlike in Revelations 2 Raid mode) - no need to raise them individually four factors determine what amount of experience player gets for beating the stage: the number and quality of killed enemies (Scagdead gives more experience than a Ooze Pincer, for example) the difference between killed enemy's level and player's level (30 level player gets more experience for killing level 32 Scagdead than level 35 player) killed enemy's buffs (rogue, tank, berserker, boss) obtained rank (S rank gives more experience than A or B) you can equip only the weapons with lever below (or the same) as your current maximum level. weapons' stats automatically scaled down to accustom your current character's level on the character select screen, you can lower down/up your level. it is needed for "MinLevel" bonus and also you get more exp if you beat the stage with lower level management you get a free healing herb if you land a fully charged melee attack on the end-level coin in first half of the Raid try to not use SMG/Assault rifles and Magnum. ammo for them will cost you a fortune. wait until you will get more BP from stages SMG/Assault rifles are, overly, terrible for the novice players, don't use them until you reach level 40 and will have more weapon parts to maximize their potential Muramasa sniper rifle has a 100% critical chance (guaranteed) if you hit enemy's weak spot and will inflict triple critical damage (more than any weapon in the game). its firepower is overly low, however it is a total killer if you have a good aim and can shoot at enemies weak spots Shock Grenades has higher damage blast if they are thrown in water when upgrading a gun it may appear that firing speed is not changing (staying the same). however the actual firing speed varies. in other words, if game tells you that with a certain weapon part firing speed stays the same - it is not true; equip that part and check for yourself 255 shoots per second is the in-game limit for how fast a weapon may shoot, however the actual limit is set my your CPU/FPS power and might be around 25-35 shoots per second wanted enemies an exclamation mark near stage name means that there is a Wanted enemy in that stage. they have a custom name, more health and better stats than regular enemies and award you a custom part/weapon upon death Wanted enemies appear randomly when you get a certain ratio of obtained experience versus killed enemies (on level 50 it seems that a single wanted enemy appears every 5,000 obtained experience and if at least 60 enemies killed) Wanted enemies appear only on the last ten stages of the current maximum difficulty. in other words, if you are finished raid mode, then Wanted enemies will appear in level Abyss 10-20 only Wanted enemies never appear on the Ghost Ship Wanted enemies may appear on levels that you have not unlocked yet - usually if you are half-way through a current difficulty once appeared, Wanted enemies will not disappear until you kill them there is might be more than one Wanted enemy per stage (it seems there could not be more than 5 Wanted enemies per stage) weapons stats firepower, firing speed and capacity are for level 1 gun and for level 50 weapon in parentheses nametypefirepowerfiring speedcapacitypiercedaze powercritical ratecritical powerin shopM92Fhandgun278 (3300)1.50 (2.73)14 (30)019514%160%oftenPC356handgun245 (2908)1.25 (2.50)12 (27)014518%160%oftenGovernmenthandgun385 (4543)1.00 (1.50)8 (12)028018%160%uncommonG18handgun188 (2219)5.00 (7.50)26 (40)010010%160%rareWindhamshotgun165 x6 (1859 x6)0.51 (0.79)10 (17)090 x620%150%oftenM3shotgun120 x6 (1355 x6)1.00 (1.58)8 (13)080 x68%150%oftenHydrashotgun108 x9 (1203 x9)0.91 (1.37)4 (7)072 x916%150%rareDrakeshotgun128 x9 (1407 x9)1.37 (1.77)3 (4)092 x96%150%neverM40A1rifle1150 (12754)0.60 (1.00) (bolt-action)9 (18)+275075%200%uncommonPSG-1rifle880 (9785)1.43 (2.31) (semi-auto)6 (11)+240055%200%uncommonMuramasarifle1020 (10696)0.45 (0.54) (bolt-action)3 (4)+3900100%300%neverMP5SMG118 (1344)7.50 (10.00)44 (100)0466%150%oftenP-90SMG97 (1105)10.00 (15.00)60 (125)0402%150%uncommonAUGassault rifle125 (1387)5.00 (7.50)29 (41)+15222%200%oftenG36assault rifle150 (1664)4.29 (6.00)22 (35)+15730%200%oftenHigh Rollerassault rifle175 (1941)3.34 (3.75)19 (32)+28024%200%rarePythonMagnum1900 (21071)0.55 (0.86)7 (8)0100016%150%uncommonL. HawkMagnum1600 (17744)0.94 (1.50)5 (6)070018%150%uncommonPale RiderMagnum2250 (24315)0.40 (0.47)2 (4)012008%150%rare weapons tags the probability to get a weapon with any tag is 50%; the chance to get a specific tag is: Light Weight - 12% Short Range - 10% Long Range - 10% Sonic Assist - 10% Speed Load - 10% Speed Shot - 10% Steady Hand - 10% Easy Grip - 10% Short Range+ - 5% Long Range+ - 5% Sonic Assist+ - 5% Named Weapon (Rare) - 3% nameprosconsnameprosconsShort Range+14% short-ranged firepower +40% daze power-14% long-ranged firepower Short Range++22% short-ranged firepower +20% firing speed -18% long-ranged firepower -25% capacity -25% critical rateLong Range+16% long-ranged firepower +10% movement speed-10% short-ranged firepowerLong Range++26% long-ranged firepower +35% critical rate -15% short-ranged firepower -10% firing speed +25% recoil Sonic Assist+150% hit radius +80% daze power +100% stopping power -100% dodge Sonic Assist++200% hit radius +10% firing speed +15% reload speed +2 pierce 5 slot maximum Speed Load+30% capacity +35% reload speed -10% firing speed Speed Shot+15% capacity +35% firing speed -20% reload speed Steady Hand+15% firing speed -60% recoil +60% critical rate -70% hit radius Easy Grip+30% knife damage +20% melee damage+9% defense -15% firing speed -50% capacityLight Weight+25% movement speed +150% dodge -16% firepower Named Weapon (Rare)+35% firepower +20% firing speed +2 pierce +60% recoil -20% movement speed "short-ranged" is distance less than 4 meters "long-ranged" is distance more than 6 meters PS, NO, Easy Grip tag does not increase your health by +20% (it is not possible from game's engine perspective, you always have 1,000 HP regardless), instead it increases your melee damage by 20%. have no clue where that mistake/assumption came from, maybe wrong translation of Japanese 体術威力 word? weapons rare names M92FRevelatorWindhamSledgehammerGovernmentDictatorM3Raider PC356ChimaeraHydraCerberusG18SlaughterDrakeLindwurmPythonSerpentMP5MarauderL. HawkThunder RaptorAUGStingerPale RiderGrim ReaperP-90Lead StormM40A1ZaytsevG36AggressorPSG1ProwlerHigh RollerHigh Roller IIMuramasaZeroth weapons level drop on each stage for all stages there is an equal chance to obtain the weapon of specific level; for example in Abyss 16 there is a 25% chance of getting a 42 level weapon, 25% of 43 level, 25% of level 44 and 25% of level 45; for Trench 10 there is a 33% of 23 level, 33% of 24 level, 33% of 25 level, etc the weapon drop from Wanted enemies has +1 level, so it is possible to get a 42 level weapon from Abyss 9 stage in case of Ghost Ship level the chances are 80%, 12%, 6% and 2% for 47, 48, 49 and 50 level weapon respectively (yes, you have just a 2% chance to get a 50 level weapon here) stageChasmTrenchAbysslevelChasmTrenchAbysslevelChasmTrenchAbyss011-316-1932-35087-921-2338-401513-1527-3042-4502 1-417-2033-36098-1022-2439-411613-1528-3042-45032-417-2034-37109-1123-2540-421713-1529-3142-45043-518-2135-38119-1124-2740-431814-1630-3243-45054-619-2235-381210-1225-2840-431914-1630-3343-45065-820-2336-391311-1226-2941-442015-1730-3344-4607 6-920-2337-401412-1426-2941-44Ghost Ship47-50-- weapon parts: where to obtain (1) two DLCs are available for that game that give few weapon parts earlier. they don't grant any exclusive weapon parts - all content from those DLCs you can obtain in a regular game. those DLCs are so sort of "booster packs" or "pay-for-win packs" https://store.steampowered.com/app/229621/Resident_Evil_Revelations_Resistance_Set/ https://store.steampowered.com/app/229622/Resident_Evil_Revelations_Enhancement_Set/ "TB" stands for "Trinity Bonus" - you obtain that weapon part if you managed to get a Trinity Bonus on a specific stage weapon partin storeloot fromat residentevil.netResistance Set DLCEnhancement Set DLCDamage Ifrom the startChasm 1-201000 REpoints--Damage IIclear Chasm 19Trench 1-20; Ghost Ship2000 REpoints--Damage IIIclear Abyss 1Trench 17-20; Abyss 1-205000 REpoints--Damage IVclear Abyss 16Abyss 10-17; Abyss 20-yesyesDamage V-Abyss 18-20--yesDamage VI-Ghost Ship---Critical Ifrom the startChasm 1-201000 REpoints--Critical IIclear Trench 5Trench 1-20; Abyss 1-20; Ghost Ship2000 REpoints-yesCritical IIIclear Abyss 1Abyss 1-95000 REpoints--Critical IV-Abyss 16-20-yes-Critical V-Ghost Ship-yes-Fire Rate Ifrom the startChasm 1-20; Trench 1-41000 REpointsyes-Fire Rate IIclear Abyss 1Trench 1-20; Abyss 1-20; Ghost Ship2000 REpoints-yesFire Rate IIIclear Abyss 16Abyss 13-205000 REpoints--Fire Rate IV-Ghost Ship--yesCapacity Ifrom the startChasm 1-151000 REpoints--Capacity IIclear Chasm 7Chasm 10-202000 REpoints--Capacity IIIclear Chasm 13Chasm 16-20; Trench 1-75000 REpoints--Capacity IVclear Chasm 19Trench 1-16---Capacity Vclear Trench 5Trench 11-20; Abyss 1-6---Capacity VIclear Abyss 1Abyss 1-15---Capacity VIIclear Abyss 6Abyss 10-20--yesCapacity VIII-Abyss 18-20; Ghost Ship--yesCapacity IX-Ghost Ship-yes-Capacity X-Ghost Ship--yesReloader Iclear Chasm 7Chasm 7-9; Trench 1-205000 REpointsyes-Reloader IIclear Chasm 7Chasm 10-12; Trench 1-20---Reloader IIIclear Chasm 13Chasm 13-15; Trench 1-20---Reloader IVclear Chasm 13Chasm 16-17; Trench 1-20--yesReloader Vclear Chasm 19Chasm 18-20; Trench 1-20---Reloader VI-Abyss 1-6; Ghost Ship---Reloader VII-Abyss 7-12; Ghost Ship---Reloader VIII-Abyss 13-15; Ghost Ship--yesReloader IX-Abyss 16-19; Ghost Ship---Reloader X-Abyss 18-20; Ghost Ship---Bind Ifrom the startChasm 1-201000 REpoints--Bind IIclear Chasm 7Chasm 1-202000 REpoints--Bind IIIclear Chasm 19Trench 1-10; Ghost Ship5000 REpoints-yesBind IVclear Trench 5Trench 1-20; Ghost Ship--yesBind V-Abyss 1-12-yes-Daze Ifrom the startChasm 1-201000 REpoints--Daze IIclear Chasm 7Chasm 1-202000 REpoints--Daze IIIclear Trench 5Trench 8-16; Trench 20; Ghost Ship5000 REpointsyesyesDaze IVclear Trench 9Trench 1-20; Ghost Ship--yesDaze V-Abyss 7-17; Abyss 20---Infighter Iclear Chasm 19Chasm 10-17; Trench 1-205000 REpoints--Infighter IIclear Trench 9Trench 8-10; Abyss 1-20-yes-Infighter III-Ghost Ship---Outrage Iclear Chasm 19Chasm 13-20; Trench 1-20---Outrage IIclear Trench 15Trench 11-13; Abyss 1-20---Outrage III-Ghost Ship-yes-Piercing Iclear Abyss 6Trench 14-16; Abyss 1-20--yesPiercing II-Abyss 16-19; Ghost Ship--yesEasy Hit Iclear Chasm 13Chasm 13-20; Trench 1-71000 REpointsyes-Easy Hit IIclear Trench 15Trench 14-20; Abyss 1-20; Ghost Ship2000 REpoints-yesEasy Hit III-Abyss 13-20---Burst II-Abyss 1-3 (TB)---Burst III-Abyss 13-14 (TB)---Full burstspend 1,000,000 BP in store to get one freeGhost Ship---Charge Shot Iclear Abyss 6Abyss 4-6 (TB)---Charge Shot IIclear Abyss 6Abyss 4-6 (TB)---Charge Shot III-Abyss 16-17 (TB)---Charge Shot IV-Abyss 16-17 (TB)---Brass Knuckle Iclear Chasm 7Chasm 18-20; Trench 1-75000 REpoints--Brass Knuckle IIclear Abyss 6Abyss 4-128000 REpoints-- weapon parts: where to obtain (2) weapon partin storeloot fromat residentevil.netResistance Set DLCEnhancement Set DLCEdge Runner Iclear Trench 5Chasm 1-201000 REpoints--Edge Runner IIclear Trench 15Trench 5-13; Ghost Ship2000 REpointsyes-Edge Runner IIIclear Abyss 11Abyss 7-15---Narrow Iclear Chasm 13Chasm 18-20; Trench 1-78000 REpoints--Narrow IIclear Trench 15Trench 17-20; Abyss 1-6; Ghost Ship-yes-Wide Iclear Chasm 13Chasm 16-20; Trench 1-4---Wide IIclear Trench 15Trench 14-20; Abyss 1-3; Ghost Ship--yesDehumanizer Iclear Trench 9Trench 5-7; Abyss 1-20; Ghost Ship5000 REpointsyes-Dehumanizer IIclear Abyss 11Abyss 1-6; Ghost Ship---Dehumanizer III-Ghost Ship-yes-Poisonous Lure Iclear Trench 9Trench 8-10; Abyss 1-20; Ghost Ship5000 REpoints--Poisonous Lure IIclear Abyss 11Abyss 7-12; Ghost Ship8000 REpoints--Poisonous Lure III-Ghost Ship-yes-Hunting Gear Iclear Trench 9Trench 11-13; Abyss 1-20; Ghost Ship---Hunting Gear IIclear Abyss 11Abyss 13-15; Ghost Ship---Hunting Gear III-Ghost Ship-yes-Giant Rabbit's Foot Iclear Trench 9Trench 14-16; Abyss 1-20; Ghost Ship5000 REpoints--Giant Rabbit's Foot IIclear Abyss 11Abyss 16-19; Ghost Ship ---Giant Rabbit's Foot III-Ghost Ship-yes-Green Belt Iclear Trench 9Trench 17-19; Abyss 1-20; Ghost Ship5000 REpoints--Green Belt IIclear Abyss 11Abyss 18-20; Ghost Ship---Green Belt III-Ghost Ship-yes-Fertilizer Ifrom the startChasm 7-20---Fertilizer IIclear Trench 9Trench 8-20; Ghost Ship-yes-Fertilizer IIIclear Abyss 1Abyss 1-12--yesAmmo Magnet Iclear Trench 9Trench 1-75000 REpoints--Ammo Magnet IIclear Trench 9Trench 8-13; Abyss 1-208000 REpoints--Ammo Magnet IIIclear Abyss 1Trench 14-20; Abyss 1-20---Ammo Magnet IV-Abyss 1-12; Ghost Ship---Ammo Magnet V-Abyss 13-19; Ghost Ship---Ammo Magnet VI-Abyss 18-20; Ghost Ship---Ammo Magnet VII-Ghost Ship-yes-Ammo Magnet VIII-Ghost Ship---Ammo Magnet IX-Ghost Ship--yesFangs Iclear Abyss 6Trench 17-20; Abyss 1-205000 REpoints--Fangs II-Abyss 18-20; Ghost Ship---Fangs III-Ghost Ship---Metal Detector Iclear Chasm 13Chasm 1-9---Metal Detector IIclear Trench 5Trench 1-7; Abyss 1-20; Ghost Ship-yes-Metal Detector IIIclear Abyss 6Abyss 1-15; Ghost Ship--yesMedical Kit Ifrom the startChasm 1-12-yes-Medical Kit IIIclear Chasm 19Trench 1-13; Ghost Ship---Medical Kit IIIclear Abyss 1Abyss 7-20---Aura of Strength Iclear Chasm 19Chasm 16-20; Trench 1-75000 REpointsyes-Aura of Strength IIclear Trench 15Trench 14-20; Abyss 1-20; Ghost Ship8000 REpoints--Aura of Strength IIIclear Abyss 1Abyss 16-20--yesEnrage Iclear Chasm 7Chasm 7-151000 REpoints--Enrage IIclear Trench 5Trench 8-202000 REpointsyesyesCloak Iclear Chasm 7Chasm 4-12---Cloak IIclear Trench 5Trench 1-13---Autoloader I-Ghost Ship---Autoloader II-Ghost Ship---Autoloader III-Ghost Ship---Autoloader IV-Ghost Ship---Autoloader V-Ghost Ship---Gluttony I-Ghost Ship---Gluttony II-Ghost Ship---Gluttony III-Ghost Ship---Gluttony IV-Ghost Ship---Gluttony V-Ghost Ship (TB)---Cornucopia I-Abyss 10-12 (TB)---Cornucopia II-Abyss 10-12 (TB)---Cornucopia III-Abyss 18-19 (TB)---Cornucopia IV-Abyss 18-19 (TB)---Cornucopia V-Ghost Ship--- weapon parts: where to obtain (3) weapon partin storeloot fromat residentevil.netResistance Set DLCEnhancement Set DLCBottomless Pouch Iclear Abyss 11Abyss 1-3 (TB); Ghost Ship---Bottomless Pouch IIclear Abyss 11Abyss 4-6 (TB); Ghost Ship---Bottomless Pouch IIIclear Abyss 16Abyss 7-9 (TB); Ghost Ship---Bottomless Pouch IVclear Abyss 16Abyss 10-12 (TB); Ghost Ship---Bottomless Pouch V-Abyss 13-14; Abyss 20 (TB); Ghost Ship---Bottomless Pouch VI-Abyss 20 (TB); Ghost Ship---Bottomless Pouch VII-Abyss 16-17; Abyss 20 (TB); Ghost Ship---Bottomless Pouch VIII-Abyss 18-20 (TB); Ghost Ship---Grenade Launcher-Abyss 15 (TB)---Medal of Courage-Abyss 7-9 (TB)---Auto-Shot-Chasm 10-20; Ghost Ship5000 REpointsyesyes weapon parts: extra info Critical parteach weapon has a certain critical power that you cannot change in any way (see table on weapon stats). those parts increase that chance of critical rate (the chance that weaopn will deal a critical damage upon hitting enemy's weak spot) the critical chance will NEVER go higher than 100% you can use Critical part to mitigate Short Range+'s -25% critical rate penalty. so if you have, say Muramasa sniper rifle (that has 100% critical rate) but with Short Range+ weapon tag (so it now has 75% critical rate), then you can use Critical IV weapon part to restore weapon critical rate back to 100% game uses geometric stack for calculating critical rate. for example if you equip Critical V to Windham shotgun, then math behind will look like this: 20% + (20 * 50%) = 30% equipping Critical I to G18 has the following effect: 10% + (10 * 10%) = 11% equipping Critical IV to PSG-1 has the following effect: 55% + (55 * 40%) = 77% equipping Critical III to M40A1has the following effect: 75% + (75 * 30%) = 97.5% Fire Rate partit was already said in the beginning. but it is worth to mention once more - attaching a Fire Rate part to a weapon WILL change gun's firespeed even if the number isn't changed in weapon's description all changes from Fire Rate weapon parts will properly calculated and have effects regardless what game says in description the max possible firespeed for any given gun is 255, however the actual number will be in about 25-30 depending on your FPS and CPU Daze, Bind partsDaze increases the chance that enemy will be stunned (increases weapon's stun power) Bind prolongs the effect of stun, making enemies exposed to melee attack longer Charge Shot partweaopn partfire powerstun powercharge timeCharge Shot Ix1.3x1.30.8sCharge Shot IIx2x1.72sCharge Shot IIIx1.6x1.51.2sCharge Shot IVx2.24x22.8s Dehumaizer, Poisonous Lure, Hunting Gear, Great Rabbit's Gear partsDehumaizer, Poisonous Lure, Hunting Gear, Great Rabbit's Gear weapons parts increases the damage you deal to certain enemies. check the table below to learn more weapon partdeals more damage to:DehumaizerOoze Regular, Ooze Pincer, Ooze Tricorne, Ooze Chunk, Ooze Rachel, Globster, Scagdead, Norman, Ghost NormanPoisonous LureGhiozzo, Aculeozzo, Sea Creeper, Draghignazzo, Baby Draghignazzo, ScarmiglioneHunting GearFenrir, Black Fenrir, Hunter, Farfarello, Wall BlisterGreat Rabbit's Gearany enemy with any type of icon (berserker, tank, rogue, boss)yes, Wall Blister counts as wild enemy not as sea-creature (which is odd); and, yes, Globster counts as humanoid enemy despite looking as a blob, don't ask me why... Bottomless Pouch, Cornucopia partsyou don't need to carry weapon (have it in arms) to make timer goes on - parts will restore your sub weapon/ammo even if you use a different gun right now the effect of multiple Bottomless Pouch/Cornucopia does overlap. if you have Bottomless Pouch 1 equipped in three guns, then you will get three grenade in 210 seconds; same for Cornucopia Fertilizer, Metal Detector, Ammo Magnet partsyou do need to carry weapon (have it in arms) to make them work. you can trigger their effect if you use melee attacks, knife weapon, sub weapons (or even if you get close to a Ooze Chunk), as long as the weapon with those parts is in the "ready" state effect of those parts DOES stack (you may get healing herb, BP and ammo from a single enemy), however you will see notification for only one obtained item Medical Kit, Aura of Strength, Enrage, Cloak partsMedical Kit, Aura of Strength, Enrage and Cloak parts work ONLY in cooperative mode. don't waste your time to make them work in solo game when you attack enemy with the weapon equipped with Cloak weapon part - there is a chance that enemy will attack not you, but your teammate; opposite for Enrage weapon part Medal of Courage partMedal of Courage is a special weapon part that adjust the giving damage according to your current level to understand its mechanics better, first check the "player's level vs enemy's level" table in that guide as you can see from that table - if you a player has, say, 43 level and enemy has 50 level -then player will deal only 55% of damage (because of difference in 7 levels); with Medal of Courage equipped you will deal a nominal (100%) damage to that enemy without any negative side effects important notes: the damage modification will be removed from the weapon that has a equipped Medal of Courage - all other weapons, melee attacks, knife attacks, side weapons will still suffer from damage modification as you can see - that weapon part has no effect if your character has higher level than enemy's weapon's level doesn't matter either it has no effect on taken damage - you still will suffer a full difference in levels when enemy hit you (and if difference is too high then enemy may one-hit kill you) characters stats Jill 1Jill 2Jill 3Chris 1Chris 2Chris 3Parker 1Parker 2Parker 3knife damage-15%-+5% +20%-10%-10% +100%--knife speed+50%+50%+60% -+20%- -20%--melee damage-10%-+5% ---10% -10%--grenade splash--20%+5% --- ---20%dodge--+60% --- -25%--defense-12%-6%-15% +6%--6% +6%+12%+18%handgun reload+100%+140%+70% -10%-10%- -+100%+70%handgun rate+35%+45%+25% -10%-10%- -+35%+25%magnum reload--+5% --- --10%-magnum rate--+5% --- --10%-SMG/assault rifle reload+80%+50%+50% --10%- --10%-10%SMG/assault rifle rate+35%+25%+25% --10%- --10%-10%shotgun reload-5%--10% +80%+50%+50% +50%+80%+100%shotgun rate-5%--10% +25%+18%+18% +18%+25%+35%rifle reload--10%+5% +30%+80%+50% -10%--10%rifle rate--10%+5% +10%+25%+18% -10%--10%Keith 1Keith 2Keith 3 Jessica 1Jessica 2Jessica 3 Quent 1Quent 2Raymondknife damage+45%+60%+100% --10%- +30%-10%-knife speed--+20% +40%+30%+40% --+20%melee damage+45%+60%-10% --10%- +30%-10%-grenade splash--20%- --- +130%+80%-dodge--+120% --+60% ---defense+12%--24% --6%-12% -18%--9%handgun reload-10%-10%- --- -10%-+40%handgun rate-10%-10%- --- -10%-+15%magnum reload---10% ---10% --+80%magnum rate---10% ---10% --+40%SMG/assault rifle reload+50%+30%+30% +30%+80%+50% ---10%SMG/assault rifle rate+25%+15%+15% +15%+35%+25% ---10%shotgun reload---10% -10%-- +30%+80%-shotgun rate---10% -10%-- +10%+25%-rifle reload-10%-- +100%+80%+50% -10%--rifle rate-10%-- +35%+25%+18% -10%--O'BrienMorganNorman RachelRachel OozeHunkLady Hunk knife damage--+30%-+60%--10%knife speed--+20%+30%-30%+20%+40%melee damage--+30%-+90%-10%-25%grenade splash+80%-20%+80%--20%-+5%dodge-25%-25%--25%-60%+120%-defense-18%+3%--12%-21%-18%-6%handgun reload+140%--10%-10%-30%-+5%handgun rate+75%--10%-10%-25%-+5%magnum reload-10%+50%-+50%-20%+35%+100%magnum rate-10%+25%-+25%-20%+15%+70%SMG/assault rifle reload-10%-+5%--20%+100%-10%SMG/assault rifle rate-10%-+5%--25%+45%-10%shotgun reload-10%--+30%-20%-10%-10%shotgun rate-10%--+10%-25%-10%-10%rifle reload-+80%+50% -10%-15%-10%+5%rifle rate-+25%+18% -10%-25%-10%+5% characters knife weapons characterweaponfirepowercharacterweaponfirepowercharacterweaponfirepowerJill 1diver knife150Chris 1survival knife165Parker 1axe165Jill 2survival knife150Chris 2diver knife165Parker 2survival knife165Jill 3cutlass150Chris 3survival knife165Parker 3survival knife165Jessica 1survival knife150Keith 1kukuri knife190Quent 1survival knife165Jessica 2diver knife150Keith 2kukuri knife190Quent 2survival knife165Jessica 3survival knife150Keith 3ninja knife190Raymondsurvival knife165Racheldiver knife150Hunksurvival knife165O'Briensurvival knife165Rachel OozeRachel's arm195Lady Hunksurvival knife150Morgansurvival knife165------Normansurvival knife165 player's level vs enemy's level how to use that table: for example, if player is level 50 and enemy is level 35, it makes a difference of 15 between them and player will deal x2.0 damage and receive x0.20 damage; if player is level 32 and enemy is level 35, it makes a difference of 3 levels and so enemy will deal x1.21 damage, while will take only x0.81 damage from a player levels differencehighest level deals damagehighest level receives damage21+x3.00x0.1016-20x2.50x0.1511-15x2.00x0.2010x1.70x0.3509x1.63x0.4208x1.56x0.4807x1.49x0.5506x1.42x0.6105x1.35x0.6804x1.28x0.7403x1.21x0.8102x1.14x0.8701x1.07x0.9400x1.00x1.00 player's level and attack power multiplier sub weapons are all kind of grenades: regular grenades, BOW decoys, pulse grenades, and shock grenades knives are all kind of self-defense weapons: diver knife, survival knife, kukuri knife, ninja knife, axe, cutlass, Rachel's arm levelrocket launchersub weaponknifemeleelevelrocket launchersub weaponknifemelee01x1.0x1.0x1.0x1.226x5.5x5.5x6.7x6.702x1.1x1.1x1.15x1.3527x5.8x5.8x7.0x7.003x1.2x1.2x1.3x1.528x6.1x6.1x7.4x7.304x1.3x1.3x1.45x1.6529x6.4x6.4x7.8x7.705x1.4x1.4x1.6x1.830x6.7x6.7x8.2x8.106x1.5x1.5x1.75x1.9531x7.0x7.0x8.6x8.507x1.6x1.6x1.9x2.132x7.3x7.3x9.0x8.908x1.7x1.7x2.1x2.2533x7.6x7.6x9.4x9.309x1.8x1.8x2.3x2.434x7.9x7.9x9.8x9.710x1.9x1.9x2.5x2.635x8.2x8.2x10.2x10.111x2.0x2.0x2.7x2.836x8.5x8.5x10.6x10.512x2.2x2.2x2.9x3.037x8.8x8.8x11.0x10.913x2.4x2.4x3.15x3.2538x9.1x9.1x11.5x11.314x2.6x2.6x3.4x3.539x9.4x9.4x12.0x11.815x2.8x2.8x3.65x3.7540x9.7x9.7x12.5x12.316x3.0x3.0x3.9x4.041x10.0x10.0x13.0x12.817x3.2x3.2x4.15x4.2542x10.4x10.4x13.5x13.318x3.4x3.4x4.4x4.543x10.8x10.8x14.0x13.819x3.6x3.6x4.65x4.7544x11.2x11.2x14.5x14.320x3.8x3.8x4.9x5.045x11.6x11.6x15.0x14.821x4.0x4.0x5.2x5.2546x12.0x12.0x15.5x15.322x4.3x4.3x5.5x5.547x12.4x12.4x16.0x15.823x4.6x4.6x5.8x5.848x12.8x12.8x16.6x16.424x4.9x4.9x6.1x6.149x13.2x13.2x17.2x17.025x5.2x5.2x6.4x6.450x15.0x15.0x19.5x19.0 EXP required to level up 01-11248021558031958041235800250012270022598032998042283800372013292023638033103804333980049401431402467803410780444038005116015336025718035111804547580061380163580267580361158046555800716001739802779803712380476438008182018438028838038139804888730092040194780298780391638049126580102260205180309180401958050191180 number of enemies for Genocide bonus in the parentheses is an average time one need to kill all enemies on the level (to get a Genocide bonus) by a level 50 character with the most optimized guns/build (read: gluttony + full-burst magnum for the bosses), YMMV tho level Chasm Trench Abyss 0110 (1:15)21 (2:00)29 (2:30) 0214 (1:30)19 (1:40)29 (2:15) 0330 (3:15)32 (3:40)46 (4:20) 0423 (2:45)33 (3:00)46 (3:40) 0521 (3:00)30 (3:40)65 (4:45) 0632 (4:15)36 (4:30)56 (5:45) 0748 (5:45)83 (6:00)86 (7:00) 0841 (7:00)52 (7:30)72 (8:00) 0935 (4:40)50 (5:20)88 (7:00) 1025 (1:30)30 (1:45)40 (2:30) 1133 (4:30)42 (5:10)46 (4:45) 1219 (1:30)30 (1:50)39 (3:00) 1321 (3:00)37 (3:30)50 (4:00) 1421 (3:45)34 (4:00)55 (6:15) 1593 (15:00)120 (16:30)147 (20:00) 1648 (4:45)70 (4:45)84 (6:30) 1726 (2:10)52 (3:40)56 (3:45) 1831 (4:15)36 (4:30)88 (6:30) 1935 (4:30)49 (4:30)86 (9:30) 207 (0:30)9 (0:45)23 (2:00) enemies per stage Chasm Trench Abyss 01Ooze Regular, Ooze Pincer, Ooze TricorneOoze Regular, Ooze Pincer, Ooze Tricorne, Wall Blister, AculeozzoOoze Pincer, Ooze Chunk, Baby Draghignazzo, Aculeozzo 02Globster, AculeozzoGlobster, Ghiozzo, AculeozzoScagdead, Hunter, Scarmiglione, Aculeozzo 03Ooze Regular, Ooze Pincer, Ooze Chunk, AculeozzoOoze Regular, Ooze Pincer, Ooze Chunk, AculeozzoOoze Regular, Ooze Pincer, Ooze Tricorne, Ooze Chunk, Aculeozzo 04Fenrir, Black Fenrir, AculeozzoFenrir, Black Fenrir, AculeozzoBlack Fenrir, Hunter, Wall Blister, Aculeozzo 05Ooze Regular, Ooze Pincer, AculeozzoOoze Regular, Ooze Pincer, Wall Blister, AculeozzoFarfarello, Scarmiglione, Ghiozzo 06Ooze Regular, Ooze Pincer, Ooze Tricorne, Ooze Chunk, ScagdeadOoze Regular, Ooze Pincer, Ooze Tricorne, Ooze Chunk, ScagdeadOoze Regular, Ooze Pincer, Ooze Chunk, Scagdead, Scarmiglione, Baby Draghignazzo 07Hunter, AculeozzoHunter, Wall Blister, AculeozzoHunter, Farfarello, Scarmiglione, Aculeozzo 08Ooze Pincer, Ooze Tricorne, Ghiozzo, Ooze RachelOoze Pincer, Ooze Tricorne, Ghiozzo, Ooze Rachel, AculeozzoOoze Regular, Ooze Pincer, Ooze Tricorne, Ghiozzo, Ooze Rachel, Scarmiglione, Scagdead 09Ooze Regular, Ooze Pincer, Sea Creeper, GhiozzoOoze Regular, Ooze Pincer, Sea Creeper, GhiozzoHunter, Ooze Tricorne, Sea Creeper, Ghiozzo 10Fenrir, Black Fenrir, Farfarello, AculeozzoFenrir, Black Fenrir, Farfarello, Scarmiglione, AculeozzoFenrir, Black Fenrir, Hunter, Draghignazzo, Aculeozzo 11Ooze Regular, Ooze Pincer, Ooze Tricorne, Ooze Chunk, Hunter, Scagdead, AculeozzoOoze Regular, Ooze Pincer, Ooze Tricorne, Hunter, Scagdead, AculeozzoOoze Regular, Hunter, Scagdead, Ghiozzo, Baby Draghignazzo, Aculeozzo 12Ooze Tricorne, Ooze Pincer, DraghignazzoOoze Tricorne, Farfarello, DraghignazzoOoze Tricorne, Scarmiglione, Draghignazzo 13Ooze Tricorne, Ooze Rachel, Scagdead, Hunter, AculeozzoOoze Tricorne, Ooze Rachel, Scagdead, Draghignazzo, Hunter, Wall Blister, AculeozzoOoze Pincer, Ooze Tricorne, Ooze Chunk, Ooze Rachel, Scagdead, Hunter, Wall Blister, Scarmiglione, Aculeozzo 14Ooze Pincer, Ooze Tricorne, Scarmiglione, Sea Creeper, AculeozzoOoze Pincer, Ooze Tricorne, Scarmiglione, Sea Creeper, AculeozzoOoze Tricorne, Scarmiglione, Sea Creeper, Baby Draghignazzo 15Ooze Regular, Ooze Pincer, Ooze Tricorne, Ooze Chunk, Scagdead, Hunter, GhiozzoOoze Regular, Ooze Pincer, Ooze Tricorne, Ooze Chunk, Scagdead, Hunter, Farfarello, Ghiozzo, AculeozzoOoze Pincer, Ooze Tricorne, Ooze Rachel, Scagdead, Hunter, Farfarello, Fenrir, Scarmiglione, Wall Blister, Baby Draghignazzo, Sea Creeper 16Hunter, Farfarello, Fenrir, AculeozzoOoze Regular, Hunter, Farfarello, Wall Blister, AculeozzoOoze Tricorne, Ooze Chunk, Hunter, Farfarello, Fenrir, Aculeozzo 17Ooze Regular, Ooze Tricorne, Scarmiglione, AculeozzoOoze Regular, Ooze Tricorne, Scarmiglione, Ghiozzo, AculeozzoOoze Tricorne, Scarmiglione, Wall Blister, Aculeozzo 18Ooze Regular, Ooze Pincer, Ooze Tricorne, Ghiozzo, Sea Creeper, Hunter, Scarmiglione, Baby DraghignazzoOoze Regular, Ooze Pincer, Ooze Tricorne, Ghiozzo, Sea Creeper, Hunter, Scarmiglione, Baby DraghignazzoOoze Regular, Ooze Pincer, Ooze Tricorne, Ooze Chunk, Ghiozzo, Hunter, Farfarello, Scarmiglione, Wall Blister 19Hunter, Farfarello, ScagdeadHunter, Farfarello, ScagdeadHunter, Farfarello, Wall Blister, Ooze Pincer, Baby Draghignazzo 20Scagdead, Draghignazzo, Ooze Pincer, NormanScagdead, Draghignazzo, Ooze Tricorne, Wall Blister, NormanScagdead, Draghignazzo, Ooze Regular, Ooze Pincer, Ooze Tricorne, Ooze Rachel, Wall Blister, Scarmiglione, Norman enemies weakness and resistance every enemy in the Raid has resistance and weaknesses to certain type of weapons. enemies with "crown" icon near their names are called "bosses" and have different set of buffs/debuffs compare to regular enemies HandgunShotgunSMGAssault RifleSniper RifleMagnumMeleeKnifeExplosiveShockOoze Regular1.001.301.001.001.051.001.351.001.001.00Ooze Regular (Boss)0.250.390.350.350.840.350.440.400.402.50Ooze Pincer1.001.001.001.001.351.301.001.001.001.00Ooze Pincer (Boss)0.900.350.350.350.410.260.900.400.400.40Ooze Tricorne1.301.001.001.001.051.001.002.201.001.00Ooze Tricorne (Boss)0.420.800.800.350.270.350.400.710.400.40Ooze Chunk1.300.301.481.480.901.001.001.001.301.00Ooze Chunk (Boss)0.260.140.220.220.230.800.400.401.300.40Ooze Rachel1.000.401.170.900.630.701.400.950.700.67Ooze Rachel (Boss)0.400.160.360.810.260.280.451.710.280.27Globster1.000.901.301.001.050.701.001.000.484.80Globster (Boss)0.250.320.260.350.370.840.401.800.430.24Fenrir1.001.001.000.901.000.901.002.201.401.00Fenrir (Boss)0.900.350.350.230.350.320.400.440.282.50Black Fenrir1.000.901.001.301.350.901.001.000.501.00Black Fenrir (Boss)0.400.720.350.390.410.230.401.800.400.40Hunter1.000.751.001.251.001.251.001.001.001.00Hunter (Boss)0.400.260.250.380.800.380.900.400.400.40Farfarello1.001.001.300.900.770.701.351.001.001.00Farfarello (Boss)0.400.250.390.230.350.350.481.800.900.40Ghiozzo1.000.901.001.301.350.901.001.000.501.00Ghiozzo (Boss)0.400.720.350.390.410.230.401.800.400.40Aculeozzo0.010.010.010.010.010.010.010.030.010.10Sea Creeper1.000.901.001.001.301.001.001.000.503.00Sea Creeper (Boss)0.400.770.250.250.330.350.400.401.000.30Scarmiglione1.300.770.770.771.051.001.001.001.000.00Scarmiglione (Boss)0.260.850.350.850.370.250.400.400.400.04Wall Blister1.001.000.600.600.841.301.001.001.004.80Wall Blister (Boss)0.400.250.210.210.930.260.400.400.900.72Scagdead-Big1.000.760.761.200.840.701.002.200.761.00Scagdead-Big (Boss)0.900.290.840.290.320.350.400.440.310.40Scagdead-Baby1.001.200.760.760.760.951.351.000.761.00Scagdead-Baby (Boss)0.400.270.290.290.840.370.540.450.312.50Draghignazzo-Big1.300.700.720.720.720.951.001.000.673.50Draghignazzo-Big (Boss)0.390.250.820.820.260.240.400.400.470.53Draghignazzo-Baby0.701.251.001.001.100.701.001.001.400.70Draghignazzo-Baby (Boss)0.910.380.350.350.220.810.400.400.490.42Norman0.900.690.730.730.660.561.350.901.230.73Norman (Boss)0.450.290.300.300.270.230.531.800.282.83Ghost Norman (1st Phase)0.410.320.600.600.030.030.410.410.410.41Ghost Norman (2nd Phase)0.040.030.060.060.300.300.040.040.040.04 if you want to thank me......then check my guide about fixing various game issues: launching, crashing, optimization, stuttering, gamepads, etc. the guide is huge, but the topic is broad to begin with https://steamcommunity.com/sharedfiles/filedetails/?id=1935376439
突袭模式入门

2026-02-19 01:00:19

导读
这是《生化危机:启示录》突袭模式的入门指南,涵盖角色隐藏属性、全武器数据与获取、敌人弱点、刷级刷装备技巧、武器部件获取等内容,还分享了关卡敌人配置、等级伤害机制等实用信息,助力玩家快速上手该刷本玩法。

评论
共0条评论

生化危机:启示录 - 突袭模式全关卡三位一体奖励(深渊)
希望这个教程(其实我不觉得这能算“教程”,更像是“带解说的示例”)能对部分玩家有所帮助。我想展示在深渊难度下各个阶段该做什么以及怎么做。获取三位一体加成其实很简…
2026-02-20 13:000赞 · 0评论

《生化危机:启示录》成就与技巧指南
《生化危机:启示录》高清版有一系列预设目标需要完成。每个目标达成后,玩家将获得对应奖杯(PS3版)或成就(Xbox360和Steam版),以此体现玩家在游戏过程…
2026-02-19 04:000赞 · 0评论
《生化危机:启示录》成就猎人攻略指南
This guide is intended for achievement hunters, but the first sections will like…
2026-02-19 16:000赞 · 0评论
《生化危机:启示录》全成就指南
《生化危机:启示录》100%完成度指南 简介
2026-02-19 04:000赞 · 0评论
STEAM 【战锤星际战士2】地图“方尖碑”守护圣物 基因种子 武器数据 刷新位置攻略
2025-10-31 02:320赞 · 0评论
七匣子 逃离鸭科夫全武器伤害数据
> 逃离鸭科夫全武器配件数据
2025-08-16 03:430赞 · 0评论
良秀 良秀打经验本的最佳姿势
-
2026-05-19 17:360赞 · 0评论
手游 【FGO】距离冠位战仅剩2个月,准备好这些轻松刷本!
2026-05-15 21:340赞 · 0评论
雷电王座 魔兽世界雷电王座怎么去 刷雷电王座不用跑本好方法
摘要:刷雷电王座不用跑本好方法:找周游一键进入,从锦 绣谷飞往雷电王座真的需要飞好久,为了刷郝利东和季鹍也是不容易,现在有了新方法再也不需要跑本了,来看看黑科技…
2025-11-30 18:380赞 · 0评论
策略游戏 全境封锁:曙光(突袭模式)
-
2026-05-04 18:360赞 · 0评论

暂无更多
最新更新
- 《生化危机:启示录》全隐藏手印位置 — 以下是帮助你找到所有手印的指南
- 成就 命中目标 — 大家好。本指南将介绍获取成就“На прицеле”的流程。 前言 本指南中自然会包含游戏剧透。 成就本身——【目标锁定】【战役】在瑞秋抵达咖啡厅前将其击败。 …
- Resident Evil Revelations-视频介绍
- Resident Evil Revelations-视频介绍
- 生化危机:启示录 - 突袭模式全关卡三位一体奖励(深渊) — 希望这个教程(其实我不觉得这能算“教程”,更像是“带解说的示例”)能对部分玩家有所帮助。我想展示在深渊难度下各个阶段该做什么以及怎么做。获取三位一体加成其实很简…
- 《生化危机 启示录》HD全成就指南 — 《生化危机:启示录》全成就攻略 - 简体中文版本。 指南后续会增加一些图片、基本游戏说明,敬请期待。 综述 本指南中部分内容引用自互联网,并已明确标注引用来源。…
- 《生化危机:启示录》高清材质包 — 介绍 对游戏内所有纹理进行了小幅更新。通过人工智能对纹理进行了放大处理,纹理分辨率提升至原来的4倍,并进行了少量手动优化。未对原始纹理做出大幅改动,本次更新的目…
- 《生化危机:启示录》| 地狱难度/无伤/S级评价/100%完成度 — 第一集:深入深渊 第一集-1
- 如果你想达成白金成就,这会对你有帮助 — 只有2个成就可能真的很麻烦,因为如果没有帮助或以较慢的方式完成,会花费大量时间。 - EXTERMINADOR【突袭模式】击败10000名敌人。 - MAEST…
- 按章节顺序排列的武器与部件 — Gotten tired off the weird order most guides are done in so i've ordered them af…