换一换
换一换 


This guide will help you get Hammer++ set up for Team Fortress 2 Classified, and provide a walkthrough of the differences and new features you may find compared to Team Fortress 2. So, You Want to Make TF2C Maps? Of course you do! TF2C is a joy to create levels for; whether it's designing around the subtle but game-changing Jump Pad, experimenting with the brand new gamemodes such as VIP and 4-Team, or simply making a more standard map during a brand new era of Team Fortress 2. What is This Guide? Here I will show you how to properly set up Hammer for TF2C so you can jump in and experience all of this! In fact, some people reading this may have already been creating maps for TF2C, using the previous version. The setup steps have changed since then, and a few things will be different in the new build, which I will outline later on in the guide. What is This Guide Not? This guide is not a comprehensive tutorial on how to create a map for tf2, nor a walkthrough of how to use any of the new gamemodes and features. This is just to get new and experienced mappers alike started on the new Steam version, and a few pointers on where to look next for the more exciting stuff. The truth is that much of the basic concepts of mapping for TF2C will be nearly identical to mapping for regular TF2 itself, so much of the fundamental concepts and the tutorial content already published will still be relevant. If you have never mapped before, welcome! After you follow along and get Hammer set up, I will provide some links to resources that can get you started on mapping for TF2C. 1. Find Your TF2C Installation Throughout this guide, this location will be referenced often, so keep it handy. TF2C is found in: (YOUR STEAM FOLDER)/steamapps/common/Team Fortress 2 Classified/ To find this folder quickly, you can right click Team Fortress 2 Classified in your steam library and go to "Properties" > "Local Files" > "Browse". From here on, I will refer to this folder as .../Team Fortress 2 Classified/ 2. Download Hammer++ First of all, you'll need to install Hammer. The default Hammer Editor shipped by valve is incompatible with TF2C, so you will need Hammer++. TF2C uses the Team Fortress 2 version of Hammer++.Download the latest release from the download page.[ficool2.github.io] Make sure that you download the version for Team Fortress 2 Once the zip file is downloaded, extract it, and copy the bin folder into your .../Team Fortress 2 Classified/ directory. Accept any file/folder overwrites. 3. Configure Hammer for TF2C Now you have Hammer++ installed, you'll need to configure it for TF2C. The game provides a script which will set up this config automatically, or you can do it yourself. Option A: Configure Automatically (Recommended)Navigate to .../steamapps/common/Team Fortress 2 Classified/bin/x64 again, where hammer++ is installed. Locate hammer_tf2c_setup.bat and double click it to run. Your configs should automatically be generated, and a message "Team Fortress 2 Classified Hammer setup completed successfully." should appear. NOTE: Steam MUST be running when you open hammer with this config, else it will fail! You may now open hammer with the new "Team Fortress 2 Classified" configuration at .../Team Fortress 2 Classified/bin/x64/hammerplusplus.exe Option B: Configure ManuallyOpen hammer++ at .../Team Fortress 2 Classified/bin/x64/hammerplusplus.exe You will be greeted with a blank "Configure Hammer" window. Press "Edit" > "Add" and name the config "TF2C". Return to the configuration window and the "Configuration" drop down should now read "TF2C". Here are the essential config fields to get hammer working: Game Configurations Game Data files: click "Add" next to the game data box, and add $SteamDir/steamapps/common/Team Fortress 2 Classified/bin/tf2c.fgd Game Executable Directory: $SteamDir/steamapps/common/Team Fortress 2 Classified Game Directory: $SteamDir/steamapps/common/Team Fortress 2 Classified/tf2classified Build Programs Game: $SteamDir/steamapps/common/Team Fortress 2 Classified/tf2classified_win64.exe BSP executable: $SteamDir/steamapps/common/Team Fortress 2 Classified/bin/x64/vbsp.exe VIS executable: $SteamDir/steamapps/common/Team Fortress 2 Classified/bin/x64/vvis.exe RAD executable: $SteamDir/steamapps/common/Team Fortress 2 Classified/bin/x64/vrad.exe Place compiled maps in this directory: $SteamDir/steamapps/common/Team Fortress 2 Classified/tf2classified/maps MDL executable: $SteamDir/steamapps/common/Team Fortress 2 Classified/bin/x64/studiomdl.exe Click okay, hammer will tell you it needs to restart. Close and reopen hammer++ and your new config will be available! NOTE: Steam MUST be running when you open hammer with this config, else it will fail! 4. Set Up Your Compile Parameters Compile parameters are what you set when you are ready to turn your working map document into a playable map. When you compile your map, several different programs are executed. If you are a beginner, you don't need to know much specifically about these programs. You will learn more about them as you continue on your mapping journey. It's enough to describe them as such: * VBSP - Does the bulk of turning your map document (.vmf) into a map file that is playable by you and others (.bsp) * VVIS - Partitions the level into distinct areas called visleaves which tell your computer what parts of the map to draw depending on what you can see * VRAD - Applies lighting to the level The auto-setup script from the previous section pre-configures a lot of things but it cannot pre-configure the compile parameters. To do so, open up any map document and click on the "Run map" button (Shortcut: F9):
如果菜单处于【基础】模式,请点击左下角的【专家...】。
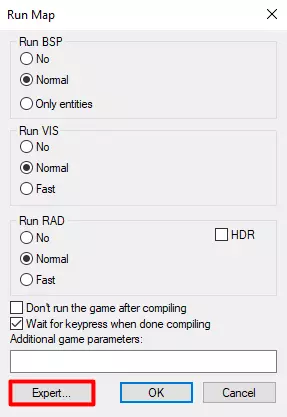
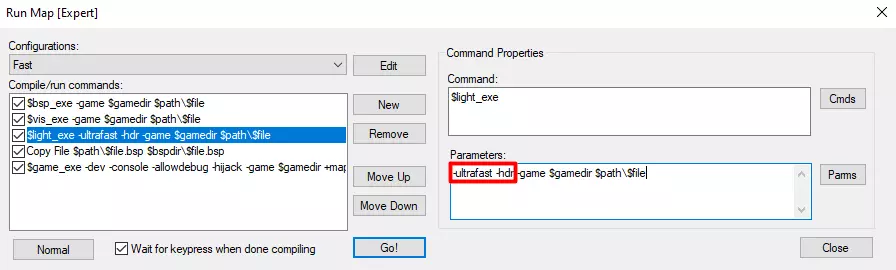
执行此操作后,你会在左上角看到一个名为【配置】的选择框。其中包含一些预设配置,但建议你按以下方式设置三个配置,因为它们是Eminoma使用的官方编译设置: 快速 在参数中添加 -ultrafast -hdr
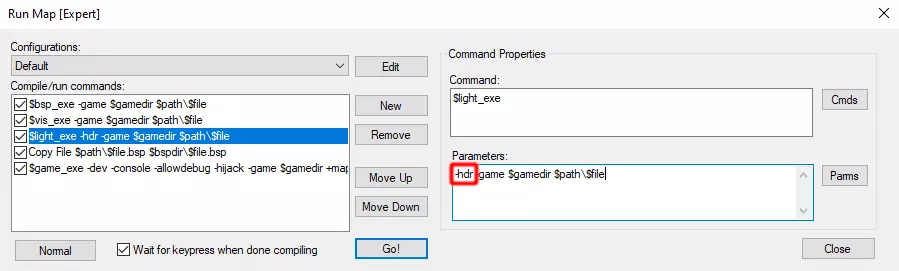
默认设置 在参数中添加 -hdr
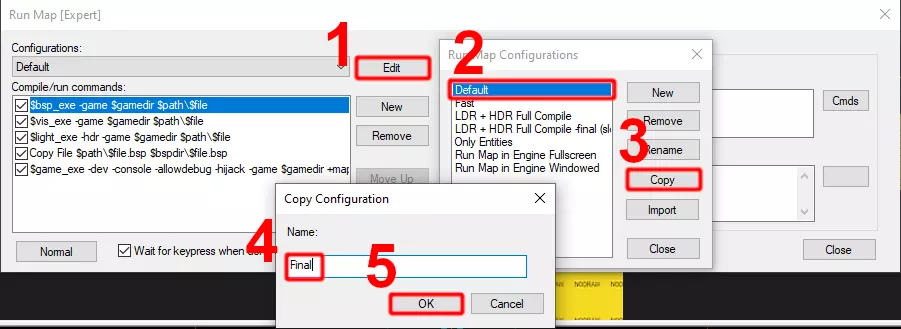
需要创建此项目。首先,点击编辑,然后选择默认,接着点击复制,再将配置名称设置为Final,最后点击确定。
现在,请按以下参数进行设置: RADAdd -final -hdr -softencosine -ao -aoradius 2 -LargeDispSampleRadius -worldtextureshadows -StaticPropIndirectMode 2 -choptexlights

You're Set Up! Now What? Go! Make Maps! Be Free! For new mappers (or at least new to Team Fortress 2)There is already a wealth of TF2-specific tutorials that are still totally relevant for TF2C mapping, including: UEAKCrash TF2 mapping tutorial series Tophatwaffle's source mapping tutorial series (not specifically related to TF2 but covers a lot of core mapping fundamentals) 3kilksphilip's Source SDK series (again not specifically TF2-related, but related to Hammer mapping in general) Valve Developer Community (VDC) Wiki - the authoritative source on all Source engine modding For experienced mappersIf you are already an experienced mapper, then you can generally just go about making maps the same way as you would for regular TF2. There are some new features that are native to TF2C, such as the 4team and VIP modes which have their own new HUD parameters. We have yet to thoroughly explore those, so unfortunately there is no clear guide for them yet. But, feel free to experiment and discuss in the TF2C Mapping Community Discord server[discord.gg]. Setting up on Linux For Linux users, a few more steps are required. If these don't work for you, feel free to reach out on Discord[discord.gg] Get the Windows binariesUnless you run the game via Proton, you will have the linux64 folder instead of x64 in your ../Team Fortress 2 Classified/bin/ folder. To solve this, right click TF2C in Steam and head to Properties -> Compatibility -> Force the use of a specific.. -> Proton (any) After a quick update, x64 will be visible. You could continue from here and run the game via Proton, but if you wish to continue running the game natively you can move your x64 folder elsewhere temporarily, remove Proton, and replace the folder such that you have both x64 and linux64 Now you can install Hammer++ as normal! Running Hammer++To actually launch hammer, you'll need to run it with a compatibility layer. A few methods have been tested with varying results: Option A: Using Proton via SteamSimply add hammerplusplus.exe to steam with Games -> Add A Non-Steam Game -> hammerplusplus.exe Now right click and head to Properties -> Compatibility and enable Proton on it. Different versions have different results but I personally found Proton 10 to work decently enough. Launch hammer via steam! If you encounter graphical glitches such as flickering, try adding the following to the program's launch options under Properties -> General PROTON_USE_WINED3D=1 %command% Option B: Using wineThis method is a bit more hands on, but can have cleaner results on some systems than just applying proton. Furthermore it doesn't require Steam to be open and running a game. Install wine and winetricks. I use wine11 without wow64. Open up winetricks and create a new prefix for hammer. It must be a 64 bit architecture. Head into it, go to "Install a Windows DLL or component", and install the following: dotnet30 dotnet 35 dotnet40 vcrun2003 vcrun2005 vcrun2008 vcrun2010 vcrun2012 vcrun2013 vcrun2015 Now create a shell script to boot hammer like #!/bin/bash export WINEPREFIX=PATH/TO/YOUR/WINEPREFIX wine "PATH/TO/steamapps/common/Team Fortress 2 Classified/bin/x64/hammerplusplus.exe" Fixing AppID mountingBut we're not out of the woods yet! While running in a compatibility layer, Hammer can't reach Steam mount the TF2 assets! Find and open ../Team Fortress 2 Classified/tf2classified/gameinfo.txt. Use a find/replace tool to replace all instances of |appid_440| with |all_source_engine_paths|../Team Fortress 2/, Then surround the file path on that line with double quotes. For example, game_lv |appid_440|tf/tf2_lv.vpk becomes game_lv "|all_source_engine_paths|../Team Fortress 2/tf/tf2_lv.vpk" As of writing there are 14 of these lines. Don't worry if it goes wrong, the process is entirely reversible by deleting gameinfo.txt and validating files. Differences From TF2 This section is currently under construction. The TF2C Steam release is quite new and we are still discovering and documenting all the differences! If you come across something that is quite different, feel free to discuss it in the TF2C Mapping Community Discord server[discord.gg] so that it can be added to this guide. Differences From TF2C (2025 Sourcemod Version) This section is currently under construction. The TF2C Steam release is quite new and we are still discovering and documenting all the differences! If you come across something that is quite different, feel free to discuss it in the TF2C Mapping Community Discord server[discord.gg] so that it can be added to this guide.