换一换
换一换 


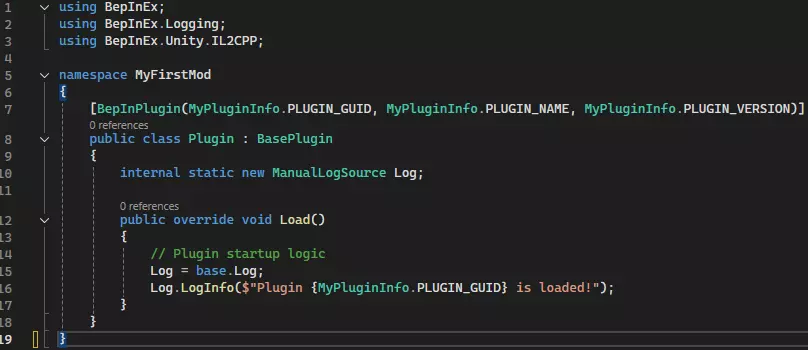
Gameplay mods change or expand on core gameplay, not just adding additional vehicles or factions. Yes, it's possible! NOTE: Due to a previous game update, use the nightly or bleeding edge builds of BepinEx 6. DISCLAIMER WARNINGGameplay mods can often be in a legal gray area, and this is of concern due to there being no precedence for them in Easy Red II, even though they are common in hundreds of games. Additionally, gameplay mods can be dangerous, with unintended consequences, or even malicious code, especially when gameplay modding is new to a game. Tread carefully. Do not distribute any decompiled source code. Do not distribute game files. Only distribute you own mods. Only download mods from trusted sources (investigate source code if on GitHub). Publish your MOD'S source code on Github for the security of others. ALL MODDING TOOLS USED ARE AVAILABLE ON GITHUB.Visual Studio isn't, but that is safe, and there are open-source alternatives if desired. Gameplay Modding Gameplay mods change, remove, or even add core aspects of the gameplay of Easy Red II. These are mods made via (in the case of this game) C#, a programming language. These mods can do almost anything. You can change how much damage you receive, you can change how vehicles work. You can add new kinds of weapons that were not previously possible. You could potentially even make a whole dynamic campaign if you wanted (given enough experience and work)! Basically anything is possible, and in a game like Easy Red II, this gives us unprecedented power, and can make this game live long after updates cease. The next section covers installation of BepInEx 6 (the required mod loader) and my example gameplay mod. Installing the Loader and Mods What is BepInEx 6?BepInEx is a really common mod loader for Unity games. However, you are probably only familiar with BepInEx 5. Due to technical details (use of Il2CPP instead of mono, don't worry if you don't know what that means) in how ER2 was made (since it wasn't developed with gameplay mods in mind), BepInEx 5 will not work. BepInEx 6 is the latest version, but is still in development. However, it does work with ER2, and gives us the features we need both to develop gameplay mods and create cool features. Installing BepInEx 6You MUST use BepInEx 6.0 (nightly or bleeding edge build), NOT 5.4 (or any other 5.x version) Installation is rather simple. If you would prefer, an official installation guide for BepInEx 6 is available with platform specific details.[docs.bepinex.dev] DOWNLOAD THE IL2CPP x64 VERSION - Go to the Latest BepInEx 6 pre-release[github.com] - Scroll down until you see "Assets", and click on the triangle. - Download the ZIP according to your platform. Should also contain "IL2CPP" and "x64". - Extract the contents of the ZIP into your game folder (ie. where "steamapps common Easy Red 2" is located on your computer) - If you are on Windows, you are done! Run the game once before adding mods, and let BepInEx load completely. It will load much faster after this first time. - If you are on MacOS or Linux, additional steps are required. I recommend reading the Official Guide[docs.bepinex.dev] for these extra details. Simply select the button for your platform. Using BepInEx 6Mod installation is much simpler. Before we begin, download a mod, [https://github.com/Silverado-Legion/ER2_Fire_Coaxial_Spacebar/releases/tag/v1.0.0]such as my sample mod[/url], which lets you fire the coaxial without switching to it, by firing while holding the spacebar. - Download the mod - Extract the mod into BepinEx's plugin folder (Easy Red 2 BepInEx plugins) - Done! Simply launch the game. List of All Mods This section is a work in progress, and short because there are not yet many mods. Spacebar Fire CoaxialThis mod allows you to fire the Coaxial gun on vehicles by pressing fire while holding the spacebar. GitHub[github.com] Last Updated: May 16th, 2025 Disable DamageThis mod turns damage off for all NPCs. Does not apply to vehicles, emplacements, buildings, etc. Does not disable bleeding (though you won't take damage), or some damage effects (grayscale, damage indicators). GitHub[github.com] Last Updated: May 15th, 2025 Developing Gameplay Mods This is the legally gray area, due to there being no precedence for gameplay mods in this game. However, this section will cover how to develop gameplay mods. Do note that a more advanced, official BepInEx plugin development[docs.bepinex.dev] guide is also available. Developing mods for a game like Easy Red II is more difficult than some other Unity games. It has no Mono version, so only IL2CPP is available (that is, the C# is turned into C++), which makes it harder. Previously, on BepInEx 5, there was some IL2CPP support, but it was limited, and didn't even work for this game. However, with BepInEx 6 and HarmonyX's new support for IL2CPP, NOTICE: KNOWLEDGE OF C# PROGRAMMING IS ASSUMED. SOME ADVANCED CONCEPTS MAY BE USED. If you do not know how to program in C#, there are countless courses for it, from the free courses found at W3 Schools and Microsoft's website for .NET, to YouTube, and many other free sources. Though it seems like a scary programming language, it is much easier to learn than you would expect. If you are new to programming, start with JavaScript, as that will help get the basic syntax down, then move onto C#. I will also give a general rundown on how to write a Harmony patch in a later section. Getting StartedThere are several tools we will be using. Of course, BepInEx 6 must be installed, but there are other tools just as important: - Visual Studio (or alternatives, such as VS Code, Rider, and open-source IDEs) - DnSpyEx[github.com] (basically required for writing Harmony patches) - .NET Standard 2.1 (used by the project template, compatible with Standard 2.0) - Unity Explorer[github.com] (optional, useful for testing and debugging. Note that an unofficial continuation is linked, the original is discontinued.)NOTICE: If you use Unity Explorer, you MUST use the IL2CPP.CoreCLR version! Note: Unity is not required. The Unity-Mono plugin for DnSpyEx is not required (or even useful) for making mods for this game. Creating a ModBefore we begin, you should download the BepInEx templates. They are not required, but will make things easier: - Open PowerShell, Bash, or other preferred terminal. - Paste this command: dotnet new install BepInEx.Templates::2.0.0-be.4 --nuget-source https://nuget.bepinex.dev/v3/index.json - Finished! Templates will be available in Visual Studio and Jetbrains Rider, or you can create a project from the terminal. Now, with that out of the way, let's begin: - There are two options for creating a project: Create a BepInEx 6 IL2CPP project in VS or Rider, or: Run these commands in your terminal: dotnet new bep6plugin_unity_il2cpp -n MyFirstMod dotnet restore MyFirstMod - Now with your project created, double click on Plugin.cs in the editor, and you should see something as in the image.
初始设置 - 接下来,我们需要一些必要组件。由于BepInEx本身未为此游戏创建NuGet包,我们需要手动引用游戏。从现在开始,假设你使用的是Visual Studio,不过在Rider中的操作也非常类似(我可能会在近期添加一个关于在Rider中完成所有这些操作的部分,敬请期待)。在此之前,你应该至少使用BepInEx 6运行过一次游戏。 - 在解决方案资源管理器中右键点击【依赖项】。 - 点击【添加项目引用】。 - 点击右下角的【浏览...】。 - 导航至游戏文件夹。 - 导航至BepinEx > interop文件夹。 - 选择【Assembly-CSharp.dll】,然后点击确定。现在你已成功引用游戏! - 完成上述步骤后,现在我们可以添加HarmonyX。 - 点击右上角的【项目】。- 点击“管理 NuGet 程序包...” - 点击“浏览” - 搜索“HarmonyX” - 选择由 BepInEx 提供的名为“HarmonyX”的程序包 - 点击安装。现在已添加完成! 编写代码 - 现在我们可以添加代码了! - 在“Log = base.Log;”上方添加一些空白 - 按照图片所示添加代码。这会告诉 Harmony 我们有补丁,并且希望它们在加载时全部应用。你可能会注意到一条红色波浪线(图片中也有显示)。这是下一步要处理的内容。
- 将光标悬停在带有红线的文本上。 - 错误出现后按Alt+Enter,自动添加“Using”语句。 - 现在可以开始工作了! 使用Harmony为游戏打补丁 使用dnSpyEx 注意:强烈建议阅读Harmony 2的维基,其中更详细地涵盖了您需要了解的所有内容。您还应该了解反射。 - 现在这一步也完成了!让我们制作一个Harmony补丁。 - 补丁有多种类型。大多数时候,您最需要关注的是前缀和后缀。还有其他类型,例如转译器,它们更复杂但功能非常强大。 - 现在,打开dnSpy。如果您想修补某些内容,必须了解您要修补的内容! - 点击“文件”,然后点击“打开”。- 导航至之前的同一DLL,即CSharp-Assembly.dll,选中它并按下“打开”。 - 向下滚动左侧面板,直到看到“CSharp-Assembly”,点击其旁边的三角形,以及“CSharp-Assembly.dll”旁边的三角形。 - 现在可以看到一堆黄色行,这些是DLL中的命名空间。大多数可以忽略,但以“CorvoStudio”开头的命名空间等除外。此外,“-”包含其他你需要查看的类,你可能要修补的大部分内容都在其中。 - 现在我们来到这里,可以打开例如“Corvostudio.EasyRed2.Characters”,然后打开“SoldierIdentityManager”,查看其构造函数、方法、字段等。- 注意:我们看到的不仅是反编译的IL代码,这些代码是从C++代码反编译而来的。尽管命名空间、类、方法和字段的名称是正确的,但其中的实际代码和变量与实际编写的内容并不完全匹配,不过它们会被编译成相同的IL代码。这使得代码阅读难度增加,但并非无法阅读。 - 或许可以先大致浏览一下这些内容。如果你目前不打算对这些代码进行任何操作,现在就不需要深入研究,但要熟悉dnSpy。 制作Harmony补丁——现在让我们真正了解Harmony。看看我模组中这个补丁的图片。
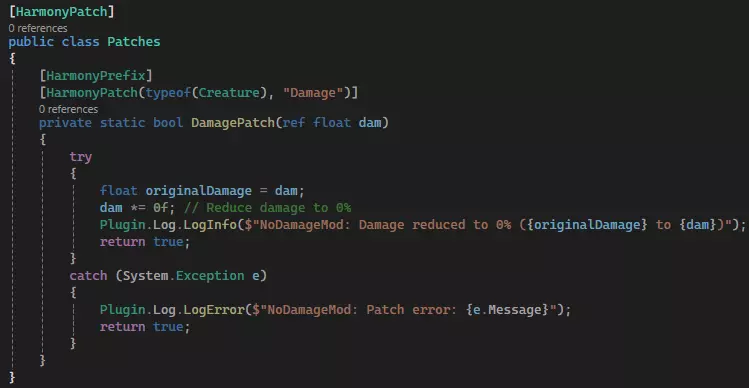
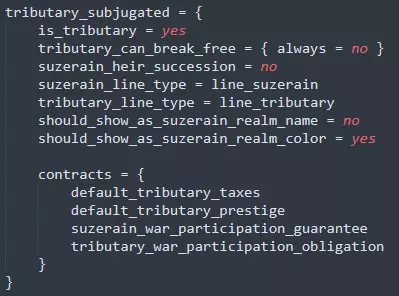
让我们来逐步分析。首先,我们创建了一个名为“Patches”的类(之所以这么命名,是因为在这个示例中我只有一个类。如果你打算创建很多补丁,为了便于组织,你应该将不同类或命名空间的补丁分别放在不同文件的几个类中)。这个类具有“[HarmonyPatch]”属性,这是Harmony能够识别它所必需的。 接下来,我们有一个名为“DamagePatch”的私有静态方法,其返回类型为bool。它还接受一个参数:一个float变量的引用,这个引用名为dam。这是Harmony会从我们正在修补的方法中填充的参数,并且会按照原始方法中的顺序进行填充。现在,对于此补丁,我们返回的类型(前缀)通常是bool(推荐)或void(某些使用场景)。 - 该方法有两个特性。第一个是"[PreFix]",它向Harmony表明我们希望在方法本身运行之前执行此操作,甚至可能覆盖它(返回false表示覆盖,返回true表示允许方法运行)。第二个更为复杂:"[HarmonyPatch(typeof(Creature), "Damage")]"。这告诉Harmony我们要修补"Damage"方法——我们使用引号是因为(通常)它是私有的——位于"typeof(Creature)"中(这是诸如士兵等事物的父类)。 - 以上就是基本概述!现在你不必使用try-catch语句,但(几乎)总是应该有一个备用条件,以防出现问题。在这种情况下,除非必要,否则不要直接修改参数。如果出现问题,返回true,以便回退到原版实现。 额外的Harmony信息 你还需要了解一些关于补丁的其他事项。 常用标签 - 如果你需要知道实例所属的确切实例,“this”无法正常工作。可以添加这样的参数:“ref <类型> __instance”。将<类型>替换为实例的类型。Harmony会识别这个变量名,并有效地将“this”放入其中,以便你访问它。 - 类似地,对于后置补丁,如果你需要方法的结果(在任何地方使用它之前),可以这样做:“ref <类型> __result”。还有其他类似的标签,建议阅读相关指南以获取更多信息。 后缀:与前缀类似,但在目标方法之后运行。它们的返回类型始终为void。通常用于修改其他方法的结果,且无法覆盖原方法。需要注意的是,如果使用场景不当,它们的运行速度可能会慢于前缀。 transpilers:这是最强大的补丁类型之一,因为它允许你在运行时实际修改其他方法的中间语言代码。不过这也使得它们较为复杂,但通过一些帮助以及将示例分解为易于理解的部分,你是可以掌握的。目前我没有《红色行动2》的相关示例,但我曾在《骑马与砍杀2》的模组“Burning Empires”中多次进行过类似操作。 感谢您阅读本指南。这是我第一次撰写此类指南(尽管我以前写过程序设计指南,但从未在Steam上发布过)。据我所知,这也是该游戏的首个此类指南,我希望它能引发该游戏模组创作的变革,让这款游戏永葆活力,就像《我的世界》和《骑马与砍杀2:霸主》的玩法模组一样,不仅让游戏长盛不衰,更使其成为许多人认为必须拥有的优秀游戏,即便只是为了模组。 【注意】由于该游戏的玩法模组尚属新兴事物,目前处于【蛮荒阶段】!无论是优质模组的出现,还是活跃且安全的模组社区的建立,都需要时间。 更新:游戏模组制作现状 由于这一切都还非常新颖,目前对于游戏的运作方式以及如何实现某些功能,人们知之甚少。我之前曾提到BepInEx对游戏进行了反编译,但这一说法并不准确。实际上,它巧妙地将游戏转换为与原始代码匹配的C#方法,这些方法仅通过调用指向实际方法的指针来让HarmonyX正常工作。这意味着我们并没有真正了解游戏各部分的工作原理,因此很难进行深入研究。在掌握足够信息之前,任何复杂的模组都难以实现,而且目前只有我一人在从事这项工作。需要完成的工作 - 创建一个包含实用工具和应用程序接口(API)的模组,以简化模组开发。 - 更好地理解游戏的运行机制。