换一换
换一换 


Some hints for Idle Champions of the Forgotten Realms. The game changes fast, so this guide may be outdated in some or more points. Artemis formation General List of possible supporters Blooshi Artemis Kent, Antrius, Commodore Krux Dhadius, Valentine Evelyn Jim, Catti-brie Nrakk, Duke Ravengard, Jang Sao Birdsong Torogar Nova, Strix, Rust Zorbu, Bobby A Grand Tour of the Sword Coast Torogar Birdsong Valentine Zorbu Jim Blooshi Kent Nova Artemis Specialisations: Blooshi - Sliced Soul + Resilient Spirit / Alternatives: NERDS, Evelyn Artemis - Kent - Potent Poison / Alternatives: Antrius, Commodore Krux Valentine - All Hail the God Brain / Alternatives: Nrakk, Jang Sao Jim - Fan Club / Alternatives: Catti Brie Birdsong - Theme of Deception (right, evil) + Soptrano (middle, female) Torogar - Tiamat's Rage (right) Nova - Tight Knit Zorbu - Lead the pack Unlock Wren To unlock Wren you have to beat the variant "Twice Through the Grat Wheel" of the adventure "Titan on the Town" in the town "Sylvania" on the "Sigil" map of the campaign "Turn the Fortune's Wheel". If you have a lot of power, this variant might be very easy for you. This guide is for people, that have some power, but struggle a little with this variant. Power depends on the item levels and legendary levels of your champions, so this guide may not work for you. Variant text "You may only use Neutral Champions and Champions of the alignment(s) specified below. For the first 100 areas, you may use Lowful Good champions. Every 100 areas, this restriction changes: Neutral Good for area 101-200. Chaotic Good for area 201-300, and so forth. This restirction is linked to your highest area completed, not your current area. Every 100 areas, all Champions in the formation are removed and can't be used for the rest of the adventure. Champions can't otherwise be removed from the formation once they've been added. ..." Hints You will need to own nearly every champion in the game (this will be outdated some day) Be careful, where you use your Neutral Neutral champions. You may need them for later areas. They are marked bold below. Be careful to not add a wrong champion to the formation, you cannot remove them Be careful with familiars on leveling, they may place unwanted champions You can test and prepare your teams in the adventure "Titan on the Town" If need just a little more power on areas, upgrade legendary level to 1 for some of the used champions (see below). Some champions will not be very valuable, but at least they can carry legendaries. Level 1 is not so expensive. Use your ultimates on the bosses, e.g. the Gargantuan Owl Use event and/or weekend buffs for further power Over the time, when there will be more champions, this variant will become easier Area 1-100 (Lawful Good 1) Be careful to not use the champions needed for level 801-900 use - Celeste Nayeli Sentry - Dungeon Master (no extra champ!) - - Drizzt - - - This should be easy Area 101-200 (Neutral Good 1) Be careful to not use the champions needed for level 901-950 use only Bruenor Solaak - - - Sgt. Knox Farideh Vlahnya - Ulkoria Orisha Vi This should be easy Area 201-400 (Chaotic Good + Chaotic Neutral These areas should not be a big problem. There are plenty of champions you can use and the boss HP is not that high. But be careful to not use any Neutral Neutral Champions. You will need them later. You can use all your other alignment champions without care. Area 401-500 (Chaotic Evil) These are hard areas, since there are not many chaotic evil champions. Boss HP: 4E154 Voronika - - Baeloth (Over Excited) Prudence (She Hungers) Fen (Shadows of the Underdark) Xerophon (Neutral) Warduke (Chaos Reigns)(DPS, Tank) - - Warden (The Dark Hunger) - Vo Fe -- Pr -- -- Ba Wk Xe Wn Area 501-600 (Neutral Evil) These are hard areas, since there are not many neutral evil champions. Boss HP: 2E185 Sisaspia (Spreading Spores) Blooshi (Sliced Souls, Resilient Spirits)(Tank) - Jarlaxle (Leader of the Bregan D'aerthe) Viconia (Holy Power) Alyndra (Expansive Vision) - Jang Sao (Speed of Shooting Stars, Star Caller)(Neutral) Lazaapz (The Zapper) Astarion (Outflank: Bottom, Arcane Trickster) - Arkhan (Bulk Up) (DPS, Tank) As Vi -- Al Bl JS Si Ar Lz Ja Area 601-700 (Lawful Evil) These are hard areas, since there are not many lawful evil champions. Boss HP: 1E216 Deekin (Doom Doom Doom)(Neutral) Lae'zel (Battle Master) Artemis (Observance: Friend)(DPS) - - Krull (Traitor) Vin Ursa (Rear Deck, Friends in Low Places) Hew Maan (Law Maan) Jaheira (Class Act - Bruisers, Hunter - Soulless) (Neutral) Torogar (Tiamat's Word) - Miria (Methodical) Kr Jh -- Lz Mi Ar De To HM VU Area 701-800 (Lawful Neutral) These are hard areas, since there are not many lawful neutral champions. Boss HP: 8E246 Thellora (Callessa's Blessed) Merilewen (Stink Like Skunk)(Neutral) Omin (Form Ranks) Stoki (Ki Overflow) - Shadowheart (Find Yourself) Lucius (Elemental Master) Duke Ravengard (Strength of Baldur's Gate) Birdsong (Theme of Consideration, Unison) - Jamilah (Bruiser)(Neutral) Selise (Relentless Avenger, Tyr's Eyes) Lu DR St Bs Th Me Om Se Sh Ja Area 801 - 900 (Lawful Good 2) These are hard areas, because the boss HP is very high. Boss HP: 1E277 Turiel - Dynaheir Commodore Krux (DPS) Qillek Reya Umberto - Brother Uriah Barrowin (Tank) Dragonbait (Tank) Nerys Dy Ny Qi Um Ba Ry BU Db Kx Tu Spec for Lawful Good, Constitution and Favoured Foes. You can load up Commodore Krux in lower areas raise your BUD. You can load up Umberto's clue stacks with a lot of time (do never use the first investigation). Area 901-950 (Neutral Good 2) These are hard areas, because the boss HP is very high. Boss HP: 1E293 Gale (Tank) (Neutral) - Mehen Kent (DPS) Valentine (Neutral) Evelyn (Tank) Gazrick - Shaka Virgil Rust (Neutral) Wyll Formation depends a lot on Shaka's "Celestial Puzzle". You may have luck or not If "Celestial Puzzle" is bad, you can switch tanks positions temporary to raise your BUD You can stack up Rust's "One Gold Piece" with his ultimate This is just an idea: Ru? Gz? Me? Va? Ev? Wy? Vi? Ga? Sh? Ke? Patron: Elminster Restrictions Only Champions released or reworked in an event in the past 3 years can be used. Because of the restrictions, the useable champions will change over time. Therefore the suggested formations will be outdated soon. Variants have additional restrictions, that may make the suggested formations not useable. You may try to adapt, but that isn't possible always. Formations April 2024 Wylly Wonka The idea is, to have Wyll buff NERDS with Folk Hero. To get the max of four stacks, you must have one additional champion each for at least four of NERDS classes (Fighter / Ranger / Bard / Cleric / Rogue / Wizard). No other class has to have more than two champions. A Grand Tour of the Sword Coast Gazrick Astarion Lae'zel NERDS BBEG Karlach Wyll Valentine Shadowheart Specialisations: 1. NERDS: Pink Leader, Standing By (5th, pink) 2. Lae'zel: Battle Master (center, face) 3. BBEG: Min-Maxing (center, red square face) 4. Karlach: Wild Magic (right, blue) 5. Valentine: All Hail the God Brain (left, brain) 6. Shadowheart: Guidance (left, yellow) 7. Gazrick: Finesse with Frost (right, snowflake) 10. Astarion: Outflank (Bottom); Arcane Trickster (center, blue eye) 12. Wyll: Pact of the Chain (center, blue chain) Tomb of Annihilation Gazrick BBEG Wyll Tatjana Valentine Karlach Lae'zel Astarion Shadowheart NERDS Ceremorphosis Ceremorphosis is an ability that champions with the affiliation "Absolute Adversaries" use to get stronger. To get more Ceremorphosis stacks, you have to add special champions to your formation: Absolute Adversaries 1. Gale 2. Lae'zel 3. Minthara (1 + 2 additional with spec) 4. Karlach 6. Shadowheart 10. Astarion 11. The Dark Urge 12. Wyll Ceremorphosis Feat Some other champions have a feat, that, when used, adds a ceremorphosis stack. Most of them are "Heroes of Baldur's Gate". 3. Dynaheir 5. Viconia 7. Minsc 8. Nrakk, Duke Ravengard 9. Jaheira, Volo 11. Imoen Other Halsin: has a spec to raise Ceremorphosis stacks. Farming kills Some champions have a buff that scales with the certain kills they get over the time. You can farm kills in vartants that have resurrecting Enemies, like Variant AdventureMap No. / Waypoint No. CampaignRemarkMarch of the Undead Terror in the Dark1/1A Grand Tour of the Sword CoastEnemies have 5 Hit boxesKas the Bloody Handed The Sanctum of the Sword1/?A Grand Tour of the Sword Coastone NPC takes a slot in the formation Spirit of the Trickster GodsThe Lost Love 2/1The Tomb of Annihilationonly in stages with a certain debuff "Wongo", e.g. 41-45 Twilight Twist Fugitives 1/4 Waterdeep Dragon Heist Relentless Peril Wrecked Flying Fortress 2/8 Baldur's Gate Descent into Avernus An Unexpected Geist Tall Tales1/1The Wild Beyond the Witchlight Formations As example, we want to farm murder stacks for the Dark Urge. Farm in low levels of the variants. Dhadius* Widdle Selise Dhani Dark Urge Rorogar Jang Sao Widdle - Level 440 - Familiar on Ulitmate - copys attack cooldown to Dark Urge Dhadius or Imoen or Xander- Level 10 - for the 3.5s attack cooldown Dark Urge - max Level - Divine Soul + Resist the Urge Selise - Level 20 - Attack stance - Reduce attack cooldown in the two rows behind her optional: Torogar - Level 25 Jang Sao - Level 170 - Speed of Shooting Stars, Moon collector Brother Uriah - Level 40 - To heal Dhani - Level 70 - For leveling up the paint stacks, it would be better to remove Dark Urge and get her to max level Attack speed buff Sometimes you want to speed up the attack of one of your champions. Here are some champions that buff the attack speed: Selise - Level 20 - Divine Sense: Attach Stance -1s to the two rows behind her, if in attack stance Widdle - Level 160 - Hurry Up Now - 25% chance to reset attack cooldown for adjacent champs Widdle - Level 350 - Only As Slow as the Fastest Link - All adjacent champs get base attack cooldown of the quickest of them Hew Maan Ulkoria Desmond - Howl at the Moon - Embrace the Beast Korth Merilwen - Wildshape - -0.5s to adjacent, while in cat other champs to speed up attacks Alyndra - Heroes of the Planes - Combo with Widdle Ishi - Speeds up herself Duke Ravengard Champs with low attack cooldown Dhadius - 3.5s Imoen - 3.5s Xander -3.5s Caliope -3.7 Donaar -3.8 Regis -3.8 Arkhan -3.9 Nova -3.9 Trial Champion Benefits What champions should be chosen for Trials (not formation)? The team must max only the scales. Every other is neglectable. Must have Increase received Scales of Tiamat 100% That's why we do Trials.This should be maxed to 100% if possible. Limited use Increase Assault Party Damage May reduce the number of days, you have to participate. Rather useless, but better than nothing Increase Enemy spawn Speed Speeds the game up a little bit. Do not even bother about All others Durable Dragon - Korth Variant 3 Build the following team additionally to your pushing team. Replace used characters in your pushing team. Special team Orkira - Healer Grimm - Armor Breaker Antrius - Healer Krull - Armor Breaker Gazrick - Armor Breaker Duke Ravenguard - Support Strongheart Aila - Stun Wulfgar - Stun Strongheart - Stun (Feat Stunning Riposte) Selise - Armor Breaker Formation (Gri) (Sel) (Str) (Wul) (Duk) (Ail) (Ork) (Ant) (Gaz) (Kru) Fight Set BUD with your pushing team Swap to special team Set Selise to Aggressive stance (sword icon) Use fire breath potion Use health potion(s) Enter boss area Use Krull ultimate (key 4) Use Orkira, Grimm, Antrius, Gazrick and Duke Ravenguard ultimates (key 1,2,3,5,6) Use Aila ultimate (key 7) wait until stun ends Use Wulfgar ultimate (key 8) wait until stun ends Use Strongheart ultimate (key 9) Use Krull ultimate, when cooldown ready Swap to pushing team, if most are dead If it doesn't work out, try to kill the first resurrected dragons without ultimates, e.g. start to use ultimates on the fifth dragon. The House Always Wins - Strategy idea Strategy idea for "The House Always Wins" in Vecna campaign Because of the randomness of this variant, we cannot create a strategy that will always work. All we can do, is raise the odds. This is an idea for an strategy that raise you chances to be able to use certain champions in the areas 1101 to 1150. It is not fully developed yet. Maybe it isn't good at all. I have already found out, that the chances, this strategy works out isn't that great. It's estimated 1/3 (with lots of approximations). That isn't great, Preparation You need a lot of power to be able to use this strategy. Create two formations with 8 champions that can beat area 1150. You can test that in the free play of that variant "The Rod of Seven Parts". We call them formation 1 and formation 2. Spit both of them into two parts of 4 champions. We call them quads. We name the squads red 1 (1R) and black 1 (1B) for formation 1 and 2R, 2B for formation 2. Make sure that the red squads do not share any seat with the black squads, e.g. it 1R uses slot 5, then 2B must not use slot 5. Each part should contain a tank. Be careful with the formation layout. Make sure the formations work without the green slots. Play Try to get to area 901 using only champions that aren't in formation 1 or 2. Same for the green places. In Area 901, if the ball lands on red, put three champs of 1R into the free red slots of the formation. If the ball wasn't on red before, you can put the fourth champ of R1 into the slot, where the ball was before. if the ball lands on black, do the same with 1B. In the following tree, going left means red has to be replaced and going right means black has to be replaced. "1R" means, put in the red 1 part (1R) of formation 1. "XX" means, this strategy did not work out, sorry. All other branches would end in either formation 1 or formation 2, if there wasn't one slot blocked by the ball. In reality you will end up with "mostly" formation 1 or formation 2. The strategy idea is not yet fully developed. Area any 901 / 1R 1B 1001 / / 2R 2B 2R 2B 1101 / / / / XX 2B 2R 1B 1R 2B 2R XX Because of the green slots, the chances are about 1/3, that the strategy works out. Issues The ball slot The slot the ball lands on cannot be used. Therefore you can only swap in 3 of a squad into slots of the color. You may be able to put the fourth champ on another color, or you may not, if the ball was already on that color before. On the next ball area you may lose that fourth champion. Or you may never have the chance to swap in the fourth champion. The blocked slot can change your positional formation abilities, especially if it is the DPS slot. What if green needs to be replaced? If green needs to be replaced two or three times (from area 901), this strategy does not work out. You will end up with champions from the "any" team. If green needs to be replaced once, you have a 50% chance that the other two are black and red and a 50% that both are red or black. In the first case, the strategy still works out, in the second you will end up with champions from the "any" team. Before area 901 The rest of your available champions may not make it to area 901. Between 901 and 1101 You have a mixed formation, that may not be strong enough. You know, that formation 1 and formation 2 can beat 1150, but you can't that a mix will make it to 1101. Tanking This strategy may work for DPS, but you may still lose, because you cannot tank an area, if you do not take care of your tanking situation. Ramping Champions that ramp of with the number of areas will not have the opportunity to do so. Make sure you test your formations in free play without ramping buffs. Go to soft cap with another team. Then put in your formation 1 or 2, without beating any areas with them. Check, if the BUD is high enough for area 1150. It has to be 1e418 or higher. Improvements If you have two more formations (3 and 4) that can beat area 1150, you can use the same strategy to try to form the "any" team. Just start the tree from area 701 instead. If the strategy works out (also ~1/3 chance), formation 3 or formation 4 is your "any" team. Ideally, all of your prepared formations can beat 1150, even if you swap their red part with any red part of all the other prepared formations. Therefore I recommend to put your DPS for all prepared information on the same color, e.g. red. For the tanks, this works out automatically, since one tank slot is red and one is black. Prepare different "green" teams, having one tank and strong support. Depending on how many you can create, try to make sure they are used in the later areas. Other strategies Green team strategy Maybe, you have two strong champions, that you want to use in the lasts areas, e.g. your best DPS and your best Tank. You can put them into the green slots, in area X or later and then hope that the ball does never land on green again. It is best to swap in your green team on the next opportunity after area 700 (see Math chapter). Combine both Since the first strategy can win with just 8 champions, it doesn't matter, who is on green. Use the green team strategy additionally, for the case the first strategy doesn't work out. But maybe you do not want to use your best DPS and Tank in this case. Building squads Build squads: Red squads: 4 champions: 1 DPS + 1 Tank + 2 Support Black squads: 4 champions: 1 Tank + 3 Support Green squads: 2 champions: 1 Tank + 1 Support For the start you need one red, one black and one green squad. There are 11 "ball areas". That means you need the 3 starting squads and at least 11 additional squads. Total 14 squads. Ideally you have 33 additional squads, 11 red, 11 black and 11 green. But probably you do not need as much. 6 red, 6 black and 6 green should be fine. Sort them by strength (on their own). Start with the weakest. Try to swap in the next weakest squads in the "ball areas". If you see, that it gets tough, skip the next weakest squad and use a stronger one instead. Near the end, use your strongest squads. The House Always Wins - Math Odd calculation for the Idea Because of green, the odds are not as good as it looks on the first glimpse. In every "ball area", there is a chance of 4/10 for red, 4/10 for black and 2/10 for green. In 901 the chance for getting red or black is 8/10. In 1001 the chance for getting red or black is 8/10. Multiplied with the chance of 901, it is 64/100. In 1101 the chance for not XX and not green is 6/10. Multiplied with 64/100 is 384/1000. So there is roughly a 1/3 chance for this strategy to work out. That means in average, you will have to try this strategy three times. Odd calculation for Green team strategy Our event is, that the ball lands on green. The probability is 20%. We want to wait for the area, after that probability that the event occurs exactly once is the highest. In area 1101 (before the check) there is only one roll left, therefore the chance the event occors exactly once is 20%. Areaneverexactly oncemore than once 110180%20%0%100164%32%4%90151%38%10%80141%41%18%70133%41%26%60126%39%34%50121%37%42%40117%33%50% So it is best to wait for area 700 or 800 and swap in your "green team" the next time the the ball lands on green. You then have a ~41% chance, that you finish the variant with your "green team". The House Always Wins - Example Planning Planning my teams to test the idea. I do not know if it will work. Choose the teams To make it easier, I use the same seats, because seat conficts can hard to be resolved. Team 1: - Krydle (Tank) Minthara (Tank) Desmond - Kas (DPS) Jim - Volo Torogar Rust - Team 2: - Blooshi (Tank) Artemis (Dps) Antrius - Evelyn (Tank) Catti-Brie - Birdsong Virgil Nova (Tank) - Green Team: Miria Valentine Green Team Backup: Duke Ravenguard Briv Build squads Team 1: Squad Red: 3. Minthara (Tank) 7. Jim 6. Kas (DPS) 9. Volo Squad Black: 2. Krydle (Tank) 4. Desmond 10. Torogar 11. Rust Team 2: Squad Red: 3. Artemis (Dps) 7. Catti-Brie 6. Evelyn (Tank) 9. Birdsong Squad Black: 2. Blooshi (Tank) 4. Kent 10. Virgil 11. Nova Build Formations ♡: red ♣: black ♠: green (♣ Vol) (♠ ? ) (♡ Rus) (♡ Tor) (♣ Kas) (♣ Min) (♠ ? ) (♡ Des) (♡ Kry) (♣ Jim) (♣ Bir) (♠ ? ) (♡ Vir) (♡ Nov) (♣ Cat) (♣ Eve) (♠ ? ) (♡ Ken) (♡ Blo) (♣ Art) Test teams I run the free play "The Rod of Seven Parts" with the formations. I cannot rely on stacking abilities, like those of Kas or Blooshi. I do not clear any area with the formations. I go to soft cap with another team. I had to make sure, that for the Kas team all champs were turned into vampires an Voronika gets her crown. And I had to play Nrakks mini game to get 60 Ki points. To beat area 1150 we need a BUD of ~1e418. My Kas team does only BUD 1e320. That's far from enough. There are lot of bad choices for the formation: Kas is a ramping champ. Volo has the wrong position. Too few evil champs. Vecna campaign has fewer gold, not good for Rust, but Rust is still one of my strongest buffers. Better version of Kas formation: (♣ Des) (♠ ? ) (♡ Vor) (♡ Kas) (♣ Jim) (♣ Blo) (♠ ? ) (♡ Rus) (♡ Min) (♣ Tor) 1 Voronika 2 Blooshi 3 Minthara 4 Desmond - 6 Kas 7 Jim - - 10 Torogar 11 Rust Red squad: 1 Voronika 3 Minthara 6 Kas 11 Rust Black squad: 2 Blooshi 4 Desmond 7 Jim 10 Torogar My Artemis team does only BUD 1e335. Also far from enough. Better version (♣ Kru) (♠ ? ) (♡ Dha) (♡ Nov) (♣ Bir) (♣ Kry) (♠ ? ) (♡ Nra) (♡ Eve) (♣ Art) 2 Krydle 3 Artemis 4 Krix 5 Dhadius 6 Evelyn 8 Nrakk 9 Birdsong 11 Nova Black squad: 5 Dhadius 6 Evelyn 8 Nrakk 11 Nova Red squad: 2 Krydle 3 Artemis 4 Krux 9 Birdsong Seats do not fit, so I have to move something around. Kas cannot be moved without loosing to much. Therefore I swap Artemis with Nrakk. Now my Kas team does 1e396. and my Artemis team does 1e384. Still not enough. If I will be able to get Miria on the green tank slot at the end, it is nearly enough for both formations. So I have these squads: Formation 1 Black Squad (1B): 2 Blooshi 4 Desmond 7 Jim 10 Torogar Formation 1 Red Squad (1R): 1 Voronika 3 Minthara 6 Kas 11 Rust Formation 2 Black Squad (2B): 2 Krydle 4 Krux 8 Nrakk 9 Birdsong Formation 2 Red Squad (2R): 3 Artemis 5 Dhadius 6 Evelyn 11 Nova All slots are used but 12: So we have Miria in the Green Team. I need to find the weakest links of each squad, Because these are the champs I may not be able put in because of the ball slot or have to put into another color and risk to lose it. For the Artemis team this is Krydle and then Nova. For the Kas team this is Minthara and then Voronika. I now test 1R with 2B: 1e357 and 2R with 1B: 1e355 With Miria: 1R with 2B: and 2R with 1B: 1e388 That's not enough to get to area 1101, I need 1e401. Conclusion: My account power isn't enough. And the strategy has so many approximations. I also need more room for errors. I absolutely need lots of more power. Later I have worked on my legendary levels and now: Kas Team: without Mira: 1e413 with Miria: 1e446 Artemis Team without Miria: 1e403 with Miria: 1e424 The House Always Wins - Refined strategy idea Take green slots and the slot that is blocked by the ball into account. Disclaimer Everything is subjective I am not an expert I do not care about optimization I do not want to spend too much time into this game Everything depends on too many different factors Every account is different The game changes, it is hard to stay up to date It is fun to fiddle around and see what happens
《被遗忘的国度:闲置冠军》指南

2026-02-19 22:00:16

导读
这是《被遗忘的国度:闲置冠军》的游戏指南,包含Artemis等阵容搭配、各角色专长推荐,还详细讲解了Wren解锁方法、不同区域通关阵容,以及Ceremorphosis机制、击杀刷取、试炼队伍搭配和《The House Always Wins》关卡的策略思路。

评论
共0条评论

冬霜群岛
许多玩家已经尝试过这个关卡,但普遍认为其难度较高,与其他关卡相比更具挑战性。然而,只要玩家能够成功通过该关卡,就能获得相当丰厚的奖励,这无疑对许多玩家来说是一个…
2026-04-30 04:400赞 · 0评论
明日方舟ls5 明日方舟LS5怎么过 LS5三星过关技巧
LS-5是明日方舟游戏中的一个副本,但是有很多玩家表示该副本有一些难度,所以会问到明日方舟LS5怎么过?关于这个问题,小编今日带来了LS5三星过关技巧的相关介绍…
2026-01-17 07:210赞 · 0评论
三国 代号鸢13-15酆公兄妹无董奉诸葛亮吕布
-
2026-01-10 08:410赞 · 0评论

惊无命10 混乱武林苍山负雪攻略 混乱武林3苍山负雪惊无命攻略
很多朋友对于混乱武林苍山负雪攻略和混乱武林3苍山负雪惊无命攻略不太懂,今天就由小编来为大家分享,希望可以帮助到大家,下面一起来看看吧! 要成功通关混乱武林3的苍…
2025-12-12 17:590赞 · 0评论

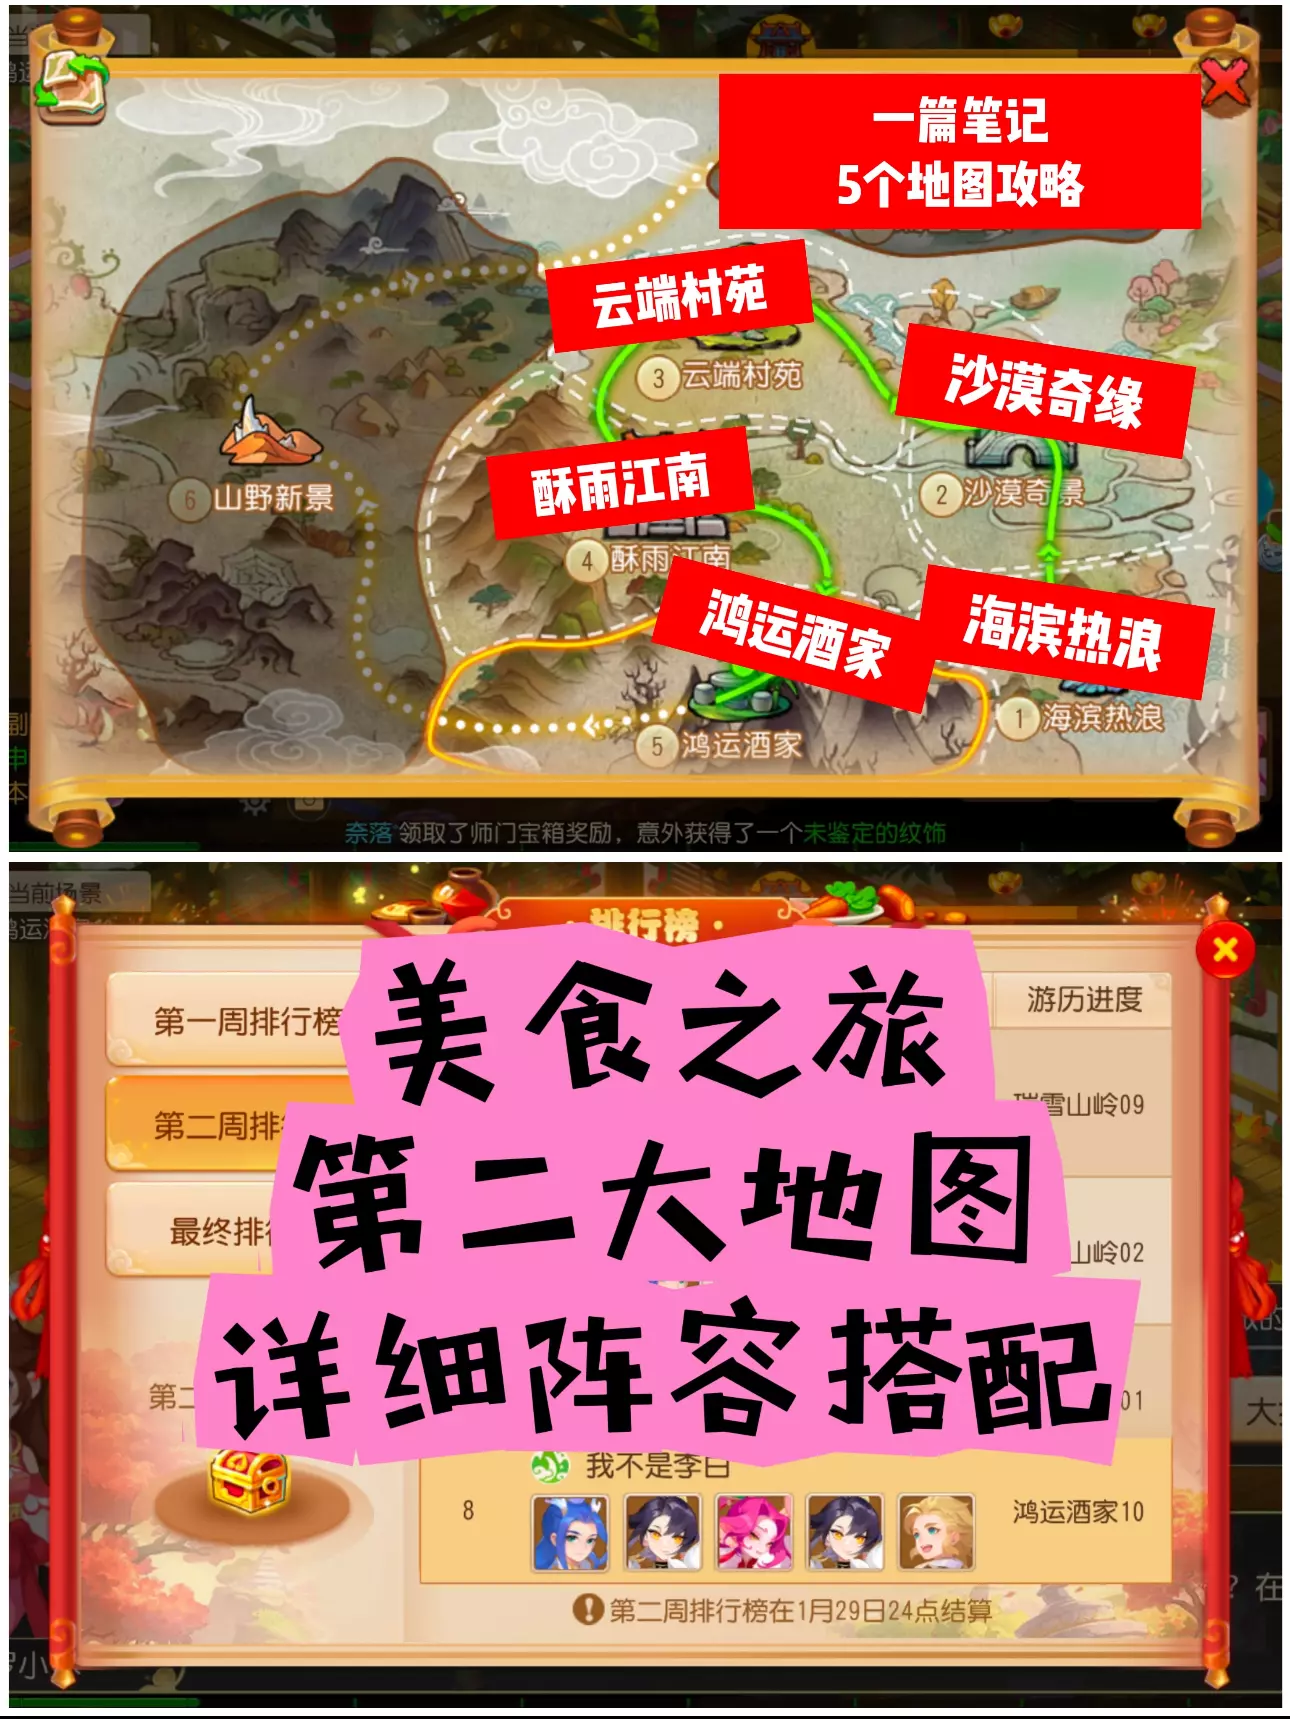
美食之旅第二大地图阵容搭配
宝子们,美食之旅更新地图了,第二个大关卡来了,大姨的攻略也来啦!目前大姨打到鸿运10,打了几次没过宝子们也是一样,打不过不要急,养养再打,第二关重点如下: 进去…
2025-11-26 08:390赞 · 0评论

活动 【新斗罗大陆】全新多活动整合赛季玩法及简要攻略
-
2025-11-26 00:220赞 · 0评论

无期迷途 《无期迷途》暗域第27期三图炼金兽打法攻略
2025-09-16 16:490赞 · 0评论
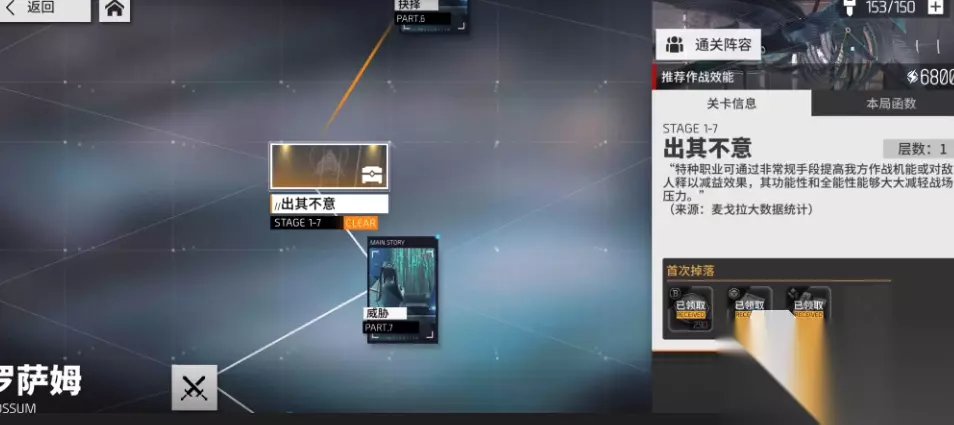
出其不意任务 少女前线云图计划出其不意关卡怎么过 出其不意关卡攻略
关卡的战斗是游戏中的核心玩法,随着推图进度的提升,战斗的难度也会增加的。有很多玩家不知道少女前线云图计划出其不意关卡怎么过,这个关卡还是有一些设定的, 下面就请…
2025-12-30 17:590赞 · 0评论
美食之旅第二大地图阵容搭配
宝子们,美食之旅更新地图了,第二个大关卡来了,大姨的攻略也来啦!目前大姨打到鸿运10,打了几次没过,还加上今天小年也有点忙,就养养再打。宝子们也是一样,打不过不…
2025-11-26 08:360赞 · 0评论
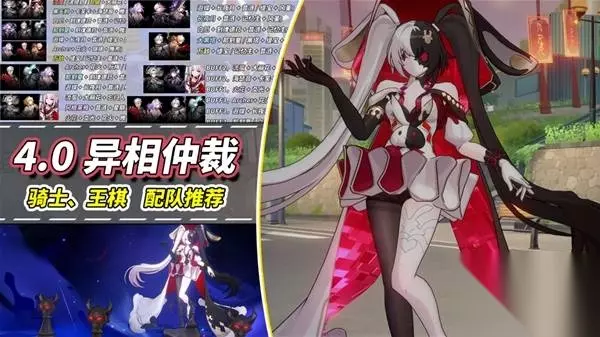
崩坏星铁 《崩坏星穹铁道》4.0异相仲裁配队推荐
《崩坏星穹铁道》4.0的异相仲裁包含骑士关和王棋关两个大关卡,下面请看由“冻梨游研社”带来的《崩坏星穹铁道》4.0异相仲裁配队推荐,一起来看看吧。
2025-11-26 02:050赞 · 0评论
暂无更多
最新更新
- 冠军传说,第八部分 — 幸会! 我们带着下一期《冠军传说》回来了! 接下来的两个传说冒险中,卡利克斯将踏上猎杀传奇生物塔拉斯克的征程,而巴罗温回到家乡后,在冰风谷的雪地中发现了诸多潜藏…
- 《被遗忘的国度:闲置冠军》冠军更新:卢修斯·埃莱纳斯托 — 卢修斯·维里翁-埃卢因·埃莱纳斯托出身于高等贵族。当他加入艾罗伊斯英雄团时,本以为自己清楚将要面对的一切,然而在遇到人生中第一头牛后,他的想法改变了——那些可怕…
- 《被遗忘的国度:闲置冠军》漫游指南 v1.2.5 — 并没有找到其他的中文攻略,所以就由我来当第一个吧。 2020/2/25更新至v1.2 (Q&A施工中鸽了) ——————————————————————…
- 愚者节庆典9 — 在漫长而寒冷的冬天过后,匕首滩的市民们热切地期盼着愚人庆典的到来:这是一个尽情宴饮、开怀畅饮、享受欢乐愚行的日子。人们身着色彩鲜艳、略显夸张的服饰,像宫廷弄臣般…
- 塔索·伯尔福特登场 — 塔索·布尔弗特是一位声名远扬的坎德人,他热情洋溢、待人友善,并且拥有永不满足的好奇心。作为长枪英雄们的核心人物,塔索“借”东西的本事总能帮他解决更多麻烦,而非制…
- 冠军传说,第七部分 — 我们带来了《冠军传说》的下一期内容! 接下来的两个传说冒险中,贝洛斯·巴里提尔很高兴新扎瑞西斯的女总督需要他的专业知识,而影心则被卷入一场围绕圣物的阴谋,这让她…
- Idle Champions of the Forgotten Realms-视频介绍
- 【冠军更新:迪金】 — 迪金曾是滴水之牙氏族的一员,担任过白龙泰莫法拉尔的诗人。从泰莫法拉尔的侍奉中解脱后,他立志成为费伦大陆最出色的故事讲述者。他渴望吟唱和讲述英雄事迹,但他的歌谣常…
- 舰队苏醒9 — 一队冒险者受雇于深水城的某个商人公会,调查过去一年中多起神秘的船只失踪事件。迷信的人们将其归咎于乌mberlee,但商人公会对此并不确定。随着“公平之海节”的举…
- 介绍雷斯林·马哲理 — 雷斯林·马哲理天生体弱,却拥有非凡的魔法天赋,他与双胞胎哥哥卡拉蒙·马哲理形成了“魔法对利剑”的鲜明对比。作为史上最年轻尝试高阶魔法试炼的巫师,雷斯林在试炼后彻…