换一换
换一换 


本指南旨在提供一份易于理解(尽管可能不够全面)的《战地模拟器》机甲及其他可动载具制作指南,涵盖相关的各种细节。 本指南主要面向已有一定游戏模组制作经验的玩家,因为其中涉及某些必要的概念和技巧,不在本指南的解释范围内。 简介 对许多人来说,在《战地模拟器》中制作机甲似乎是一项艰巨的任务。说实话,实际情况比你想象的还要复杂。尽管如此,本指南仍将尽可能清晰地(即使不够全面)介绍《战地模拟器》机甲制作的各种细节。在本指南中,仅会解释您在制作其他模组时可能未曾接触过的概念,其他内容我会视为基础知识。如果您在毫无相关知识的情况下看到本指南,仍可以尝试甚至成功,但我建议初学者从一些更稳定的内容开始。 为配合本指南,文末提供了一个Unity资源包,其中包含在本指南制作过程中创建的机甲。这应作为您制作机甲时的参考资料,尤其是当【原版】步行机甲不可用或导入Unity时出现问题的情况。 1.Blender: 本指南将使用当前最新版本的Blender,不过内容在旧版或新版中应该不会有变化(除非使用2.8之前的版本……)。需要注意的是,在旧版本中打开Blender 3.0及以上版本的文件,会导致骨骼与顶点关系出现目前无法修复的问题。因此,我也建议使用3.0及以上版本的Blender。 1.1 建模 由于腿部的特性,机甲建模往往比大多数其他载具建模更复杂一些。

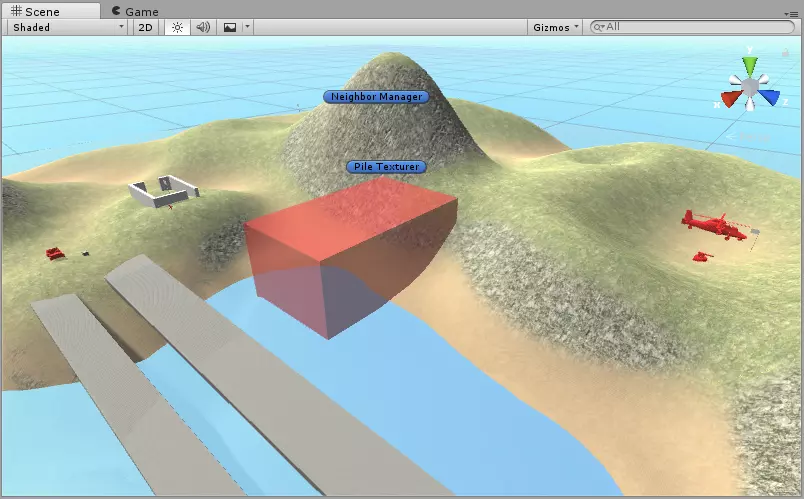
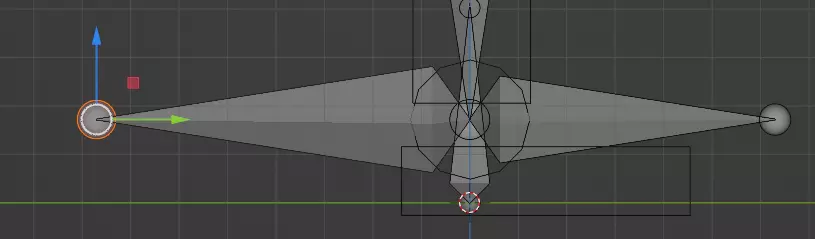
手臂等部件。不过,对于那些已经在Blender中花费了相当多时间进行建模的人来说,这应该不会构成太大挑战。制作模型时,最好将你之后想要进行动画处理的关节制作成略微弯曲的状态,而不是完全伸展挺直的。这样可以让后续设置反向运动学(IK)更加容易。弯曲的具体程度由你决定。通常,我建议将腿部以及机甲的其他组成部分在Blender中制作成单独的对象,以便于后续操作。你完成的模型可能会看起来像这样。1.2 骨骼。为你的机甲制作骨骼时,形状主要由你决定。不过,有一些关键元素需要到位。1.2.1 反向运动学 任何尝试过制作简单线性或角运动之外动画的人都能证明反向运动学的实用性。 这些功能允许动画师(你)只需调整骨骼链中的最后一根骨骼,Blender 会自动处理该骨骼链中所有父骨骼的旋转。 IK 修改器应放置在足部骨骼上方的骨骼上,并将足部骨骼本身设为目标。链长应设置为使虚线指示线连接到腿部最后一根骨骼的上端。 还需要一个 IK 极向量目标,它是根骨骼的同级骨骼(1.2.2 层级结构)。这根骨骼帮助 Blender 确定 IK 链应朝向哪个方向。一旦极点目标放置到位,你可以在IK修改器上设置极点角度,直到移动IK目标上下时获得理想的弯曲效果。总体而言,你的骨骼应该看起来像这样。
1.2.2. 层级结构
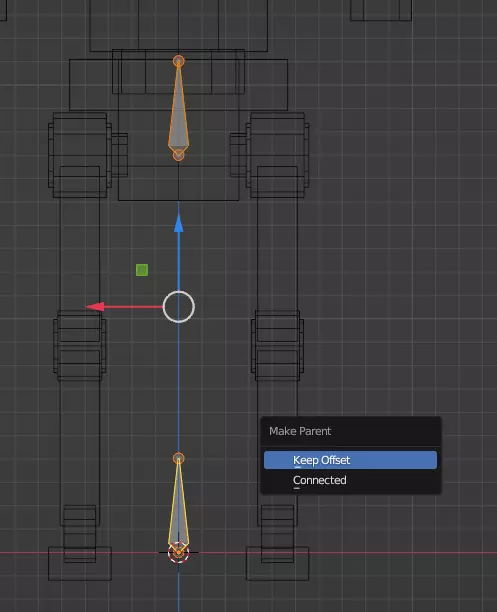
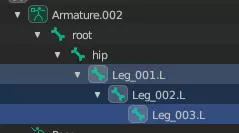
为了让动画在Unity中正常工作,骨骼的层级结构需要从根骨骼开始。该根骨骼应位于坐标原点(0,0,0),且不进行任何缩放或旋转操作。 根骨骼上方应设置一个髋骨,身体的其余部分从髋骨开始构建。这两根骨骼不直接相连,而是通过“保留偏移”(ctrl+p)的方式进行父子关系设置。你可以通过复制根骨骼来创建髋骨。 从髋骨开始,腿部及其他肢体骨骼可以作为连接子骨骼,或者通过复制并设置为带偏移的子骨骼来创建。 与反向运动学相关的骨骼(目标骨骼、极向量目标骨骼)应作为根骨骼的同级骨骼,并通过相应的修改器继承根骨骼的位置和旋转。(详见1.3)牢记这些通用规则,我们就可以开始制作实际的骨架了。确保将模型和骨架对齐,使其朝向负Y轴方向。假设你已经放置好了根骨和髋骨,接下来可以开始挤出一条腿的骨骼,并移动骨骼末端以适配模型的关节位置。
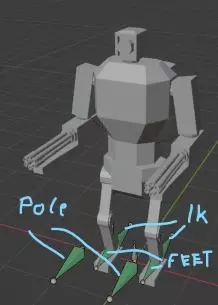
这会让我们进行权重绘制时变得容易很多。对于脚部,你需要使用普通骨骼,并从其根部额外挤出一根骨骼。
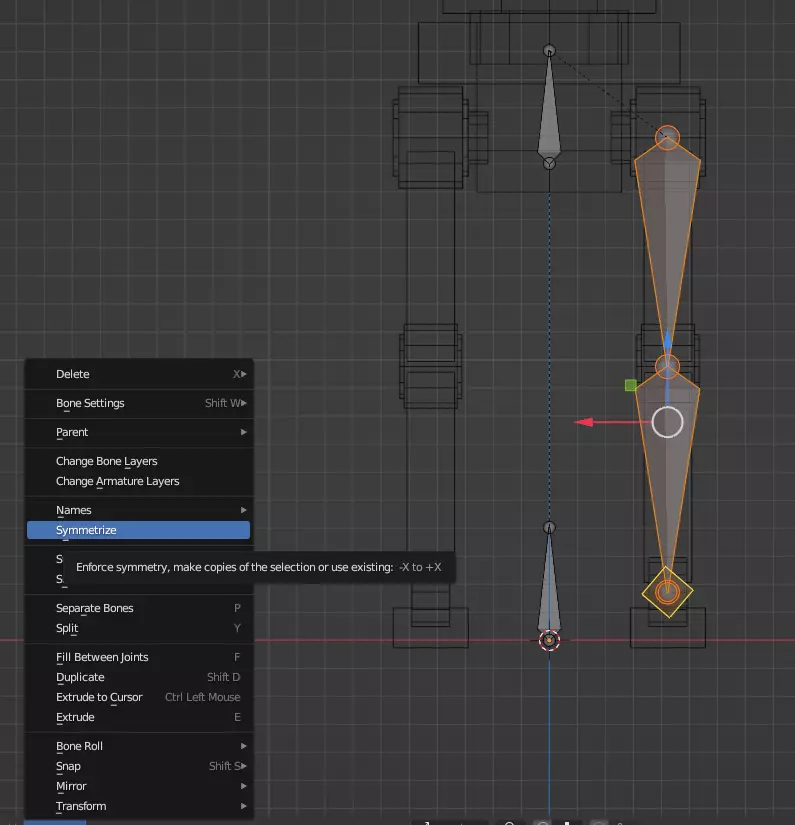
这块骨骼将作为那条腿的IK目标,必须通过alt+p->清除父级操作从骨骼层级中移除。此骨骼应朝向与常规足部骨骼相反的方向。 再次复制该骨骼,将其翻转180度,并移动到膝盖高度左右,以创建IK设置的极向量目标。现在你应该按自己的意愿命名所有骨骼,那些你希望镜像的骨骼必须根据其所在侧在名称末尾加上“.R”或“.L”。完成后,选择所有要镜像的骨骼,然后通过选择“骨架->对称”来对称化骨架。
1.3 权重绘制
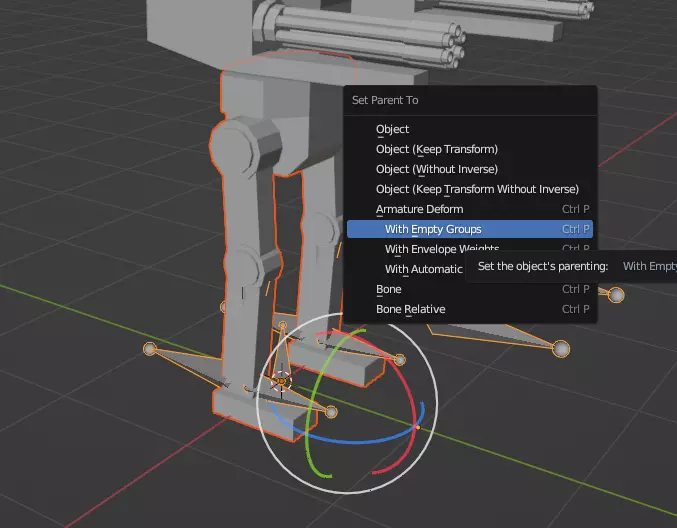
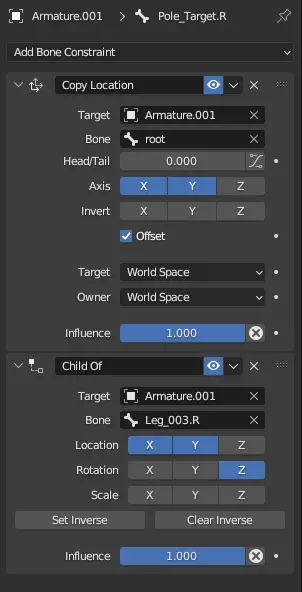
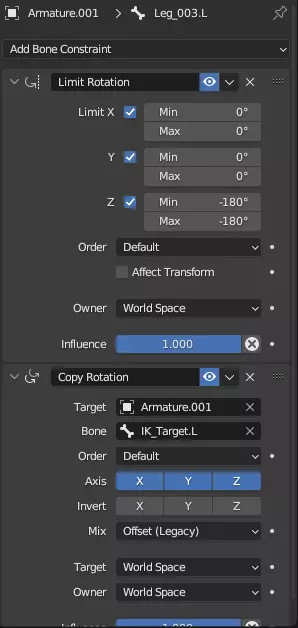
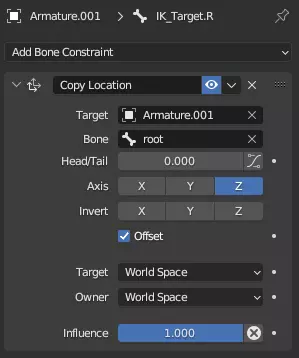
现在模型和骨架已经完成,我们可以先选择模型,然后选择骨架,按下Ctrl+P,将骨架设置为模型的父级,并使用空顶点组(自动权重也可以使用,但不推荐)。 对于不了解的人来说,权重决定了单个顶点受一个或多个骨骼运动的影响程度。为完成此任务,Blender提供了权重绘制模式,你可以在该模式下为骨骼“绘制”顶点权重。 我建议仅对非常简单的模型或需要权重渐变的弯曲部分使用此方法。对于模型的大部分(特别是腿部),建议使用对象的“顶点组”选项卡,以便一次性为大量顶点分配权重。在视口中选择所需顶点,选择对应正确骨骼的顶点组,将权重设为1并按下分配权重。 假设所有操作都正确完成,移动骨骼现在也应该能移动网格。某些顶点出现异常行为可能是由于未分配到骨骼,或分配了一个或多个错误的骨骼。 这可以通过上述讨论的方法修复。 其他仅受一个骨骼影响的网格组件,例如上半身受髋骨影响,可通过以下步骤设置为该骨骼的子物体:选择相应物体,将骨架添加到选择中,进入姿态模式并仅选择要作为父物体的特定骨骼。1 额外骨架设置 在开始为机甲制作动画之前,应为部分骨骼添加一些额外修改器。这一步是可选的,但根据我的经验,它能让动画制作过程更轻松。 IK目标应继承根骨骼的Z轴位置并带有偏移,足部骨骼应继承IK目标的旋转,混合模式设为偏移(旧版)。由于这会使骨骼翻转180度,还需添加一个限制旋转修改器,在所有轴上激活,将X轴和Y轴约束为0 0,Z轴约束为-180 -180。最后,极向量目标应添加一个“子级分离”修改器,继承对应足部骨骼的X、Y位置和Z轴旋转。
1.4 动画制作 我假设你至少具备一些Blender动画制作经验(如果没有,网上有很多教程可供学习)。机甲行走动画可以像示例中那样简单,也可以根据你的需求制作得复杂精美。要制作一个可用的动画,有两点是绝对必要的:机甲的任何移动都必须基于根骨骼,无论是直线移动还是原地转向。 所有用于普通机器人机甲的动画都需要是可循环的,且所有骨骼相对于根骨骼的位置在动画的开始和结束时必须完全相同。制作动画时,建议为骨骼使用恒定的偏移值,这样可以让重复性操作更简单,并且不会弄乱相对位置,因为骨骼位置是在局部空间中显示的。 仅供玩家使用的移动动画也可以设为非循环(例如起始动画,以便更平滑地过渡到行走循环)。 2. Unity 当你从Blender正确导出所有内容后,就可以开始在Unity中工作了 2.1 导入

在开始实际车辆的制作工作前,你需要按照一些特定设置导入模型。首先,在导入设置的“骨骼”选项卡中,将“角色定义”设为“从此模型创建”,并将“根节点”设为你的根骨骼。在“动画”选项卡中,你可以像处理其他任何模组一样设置动画。
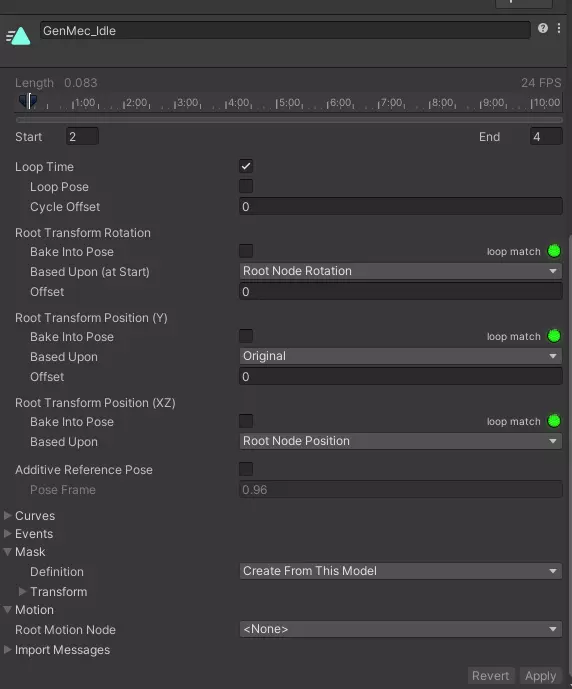
如果不确定,可以查看武器模组教程,其中应该会涉及相关内容。如果动画需要循环播放,请勾选“循环时间”框。重要的是,源片段必须是骨架动作片段,否则动画将无法正确循环,而是在每次动画结束时将你重置到起始位置。 将遮罩设置为“从此模型创建”。最后,如果你希望使用声音库(稍后介绍)来处理脚步声和其他与移动相关的音效,请在事件选项卡下添加事件,使用“PlaySoundBank”或“PlayRandom”。对于前者,整数值决定播放声音库中的哪个音效。 2.2 动画控制器
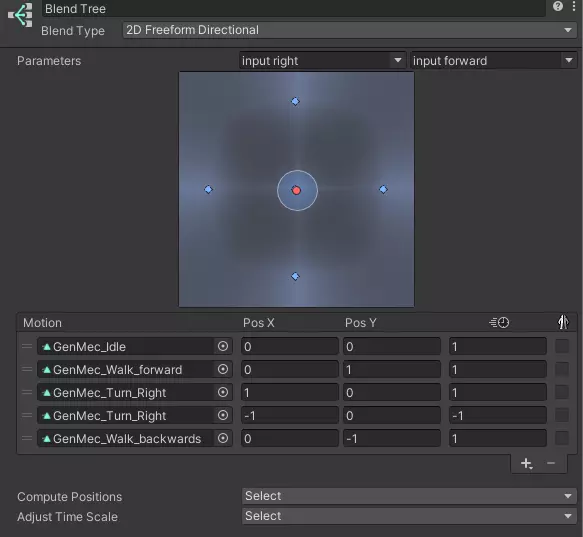
机甲的基础动画控制器只需“input right”和“input forward”这两个浮点参数,不过也可以使用其他与输入相关的参数。 对于动画状态,只需创建一个新的混合树。 将混合类型更改为“2D自由方向”,并按顺序选择“input right”和“input forward”作为参数。然后你可以导入动画,并将它们与这两个输入方向的比例相关联。 虽然也可以不使用混合树来制作动画器以实现自定义或更好的动画过渡,但只有使用混合树时,机器人才能正确导航。示例包中包含一个仅添加玩家的脚本。
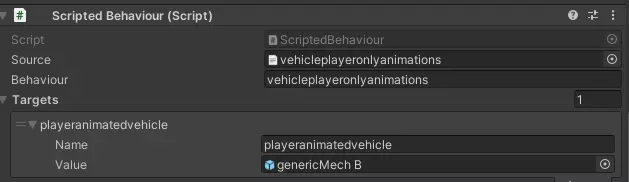
参数功能,如果你希望将两者分开。你可以将过渡效果与玩家动画绑定到“player”布尔参数上。为此,你需要为载具添加一个“脚本行为”组件,并按如下方式进行设置。
2.3 载具设置
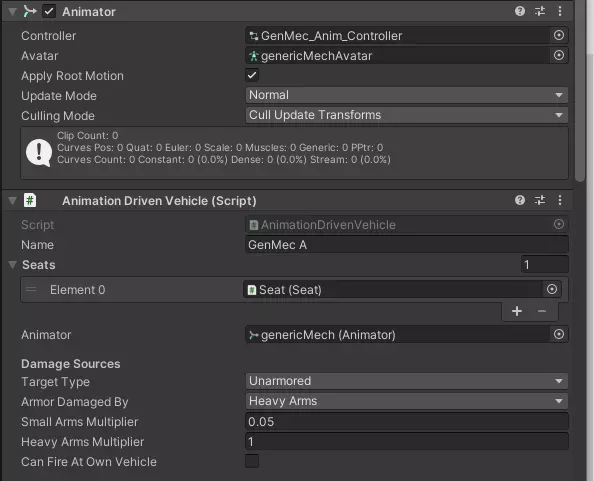
将FBX文件拖入Unity场景时,可能需要对上身进行一些清理,以修复异常的旋转和位置。这可以直接在网格对象上进行,且不应导致问题。 你的预制件上应该已经有一个动画器组件,在“控制器”槽中添加你之前创建的动画控制器。此外,在顶层预制件上添加“动画驱动载具”和“角色控制器”组件。 就设置而言,“动画驱动载具”组件与其他载具脚本没有太大区别,但有两点需要注意:1. 在顶部附近的动画器选项卡中,输入载具本身。
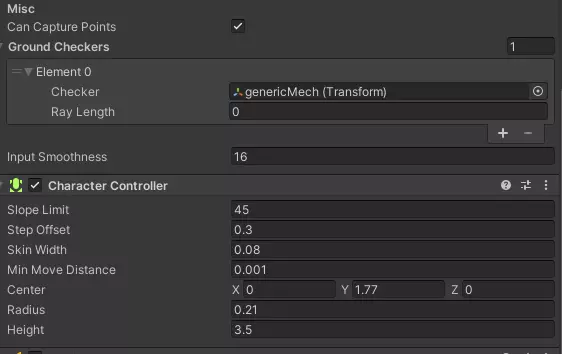
(the animator you have edited just previously) and 2. add a ground checker near the bottom of the script, which is again the vehicle itself. Other than that, everything can be set like with any other vehicle script. On the Charcter controller, edit the height and radius values to get the capsule collider it adds to fit between the legs, but the height of the whole mech. The other values of the component can be left unchanged for the most part, in part because i can't quite tell what impact most of them have on the vehicles handling. When you now just add a seat with a camera you can already test out your mech for the first time. I'd reccomend adding the colliders aswell, upper body colliders directly on the mesh components, and leg colliders on the bones. For the latter I'd use box colliders adjusted by hand to fit the leg mesh first on one side and copied component by component to the bones on the other side. When making mechs, there's two ways to go about how to handle weapons and vehicle turning, first being the "normal" method showcased on the default walker and the GenMec A, where there's specific animations for turning left and right, tied to the A/D inputs. Weapons are completely seperate from the turning, though the camera can be turned with the weapons for orientation. The Second Version, originally used on the Seraphim Mech, then by Lordaloa and myself uses the weapons input to directly turn the whole vehicle, which can be advantageous for less cumbersome mechs. In the following sections, the setup for each variant will be outlined and explained. 2.3.1 Setup A Setup A is the simpler of the two setups, in that the number of interdependent components is kept to a minimum. Movement and Direction is handled soley by animations on the Armature, while the Upper body with all its weapons can be treated essentially as a seperate object. It follows, that for the weapons setup nothing is necessarily different from your usual vehicle/weapon setup. However. since the form of mechs and their wide variety of weapons, often mounted on different arms may still cause issues or confusion, I will describe some ways how I'd go about making certain weapon setups, although only one is provided as a reference. 2.3.1.1 Turret placed on upper body Probably the simplest weapon to set up is just to make a turret as a child of the upper body. This Turret can be setup like normal. 2.3.1.2 Turret as part of the upper body Another relatively easy setup is to use your upper body itself as the Bearing/Pitch of your weapon. In this case you can have your arms or wherever your barrels and muzzles are mounted static. You may have to create the appropriate setup for the weapon movement in the hierarchy though, but as long as it is a child of the hip bone, everything is fine 2.3.1.3 Upper Body Bearing and seperate Pitch You may decide to have the Turrets bearing be based on the upper body, with the pitch seperate. Itself not very complicated, unless you want to aplly this to two seperate arms with barrels on them. Two ways to do this are to either make an empty pitch object, that the two arm pivot points are children off (assuming they are all on a straight line along the x axis) Or use an empty object with a far out target as pitch, using lookatcamera scripts to facilitate the movement of the arms itself, this method also works on non-symmetrica arm arrangements. It should be noted however, that this causes the shots to converge in the distance of your target object. The Ins and outs of the lookatcamera script will be elaborated on later 2.3.1.4 Bearing and Pitch in two seperate arms There is two ways to make only the weapon arms move for weapon movement. first method: Using the general setup of lookat targets and lookat cameras described in 2.3.1.3 we can also make bearing and pitch movement simultaneously, by just making the parent of the Target as the Bearing aswell. This again causes convergence of the shots in the distance, although this may be seen as beneficial aswell. Another downside is the inablity to set different values for weapons, i.e. to prevent clipping Second Method: We can also make this Weapon Style, by just making two seperate weapons, by just making two seperate weapon setups, one on each arm. As long, as they are both controlled by one seat, they will follow the same mouse inputs. This method uses the Bearing and Pitch Values of each weapon seperately, however you as the player now necessarily have two weapons. Obviously good when you have different weapons on your arms, however if you have "twin" weapons shooting simultaneously (just add weapon2 muzzle to weapon 1), this can be annoying as, you are either stuck with two weapons on the seat doing exactly the same, one of the weapons being the same but with only one barrel or having to include a seperate firing mode using other ammo/firing rate/whatever. If this was planned from the beginning, good on you When the weapons are set up, you might also want to figure out what to do about cameras in each of these setups. For 2.3.1.1 and 2.3.1.2 the camera can just be placed wherever you want as a child of the pitch you have chosen. For 2.3.1.3 and 2.3.1.4 it makes a difference, if you wish to have your camera as a child of the weapon or in a head-like position. For the Former the previous advice still applies, for the latter the setup is a bit more complicated. If your camera already is child of the bearing upper body you can use an inherit delta rotation script on the pitch of your weapons, to look where the gun looks. Same applies, if you have a seperate bearing or bearings, inheritingthe bearings delta rotation aswell on a parent object with the same origin. The Axis multipliers can be left as 1 by default, since only one delta rotation can ever come from bearing or pitch respectively. You will however have to set the correct axis multiplier to -1 should either movements be inverted. Should movement be translated on the wrong axis, you will have to make additional parent objects with rotation as compensation. Since this is highly dependent on your specific mech, you will have to figure that part out, when you get to it. Alternatively, if you use a lookat target at some point of your weapon setup, you can creat a parent to your camera with yet another lookatcamera setup, pointing at the target provided. The Methods for head like cameras can also be used for actual head meshes (ideally with the camera in the head) 2.3.2 Setup B Setup B has a peculiar weapon arrangement, in that it needs atleast one turreted weapon (This has to use the old unstabilized turret script) using the vehicle itself as the bearing. The Pitch can be done as described under 2.3.1.4 though I prefer always prefer the look at camera approach (see 2.3). It is imperative, that the muzzle is rotated such that its local axis align with the axis indicator (z forward, x left, y up (assuming you are in front of the mech)) Additional Weapons besides the "main"/first one can be made as additional mounted turrets with the same bearing and either the same or a different pitch. Alternatively, you can also make them as static mounted weapons, as long as their muzzles are children of look at camera objects. The exact position in terms of hierarchy does not make a difference, as long as all muzzles are set up correctly Since turning is handled by the camera, you can use the A/D inputs for Walking left or right. Should the muzzle setup be incorrect, bots will use this to walk weird circles, looking every which way, without considering their actual goal. 2.3.3 Look at cameras
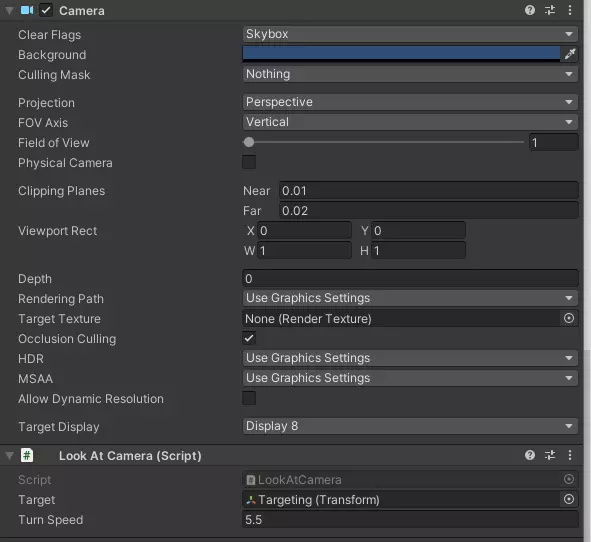
在Unity中,有一个名为【看向摄像机】的脚本,它能让物体始终朝向某个独立的对象。为此,你的 pivot 对象需要同时包含一个摄像机对象和该脚本。 与常规的《战地模拟器》摄像机不同,这里的摄像机脚本需要启用。视野可以设置为1,目标显示器需要设置为除1以外的任何值。当摄像机转向【看向摄像机】脚本指定的目标时,所有子对象也会随之转向。通过【旋转速度】设置,你可以调整摄像机跟随目标所需的时间,这可用于实现巧妙的效果。 2.3.4 一般说明 除了前面描述的制作机甲时的挑战外,没有太多其他需要考虑的事项。粒子效果、音效和对抗措施等内容可以像设置其他载具一样进行配置。 不过需要注意的是,机甲被摧毁后有时可能会出现动画继续播放的情况,导致机甲在空中行走等类似问题。解决此问题最简单的方法是在机甲被摧毁时禁用所有动画网格组件,并启用静态网格组件作为替代。为这些静态网格组件添加刚体组件和碰撞体,可确保它们在载具被禁用后不会随其他部分一起移动。最后,要确保机甲内的士兵位于碰撞体外部,否则无论是否需要,都会产生火箭特效。 3. 需避免的错误 不要制作零帧长度的待机动画。当机器人停止与机甲一起移动时,这会导致游戏崩溃。 首次测试机甲时,可能会出现以下情况: A. 机甲执行一次行走动画后便停在原地 -> 检查动画导入设置中是否启用了循环。 B. 机甲持续执行行走循环,并总是错误地回到起始位置 -> 确保机甲的动画器组件上启用了应用根运动。 至少在机器人动画中使用Unity的混合树。在动画器中使用普通动画过渡可能会导致机器人朝奇怪的方向移动。 确保Unity中的缩放比例为1x1x1(实际值可自由设置)。否则可能会产生不良效果。 总结