换一换
换一换 


《环世界》 RedistHeat 模组简易入门指南 这是一份帮助你上手《环世界》中略显复杂的模组“RedistHeat”的简易指南。需要说明的是,本指南尚未针对新版本更新,目前内容基于 A14 版本。由于我暂时没有时间重新深入《环世界》进行更新,且已知模组作者已做了一些改动和修复,因此请谨慎参考本指南。 概述 RedistHeat 是《环世界》的一款模组,旨在为玩家提供更多供暖和制冷选项,包括多种尺寸的加热器、空调以及完整的管道系统!根据创意工坊页面介绍: - 平衡每个房间的温度 - 建造(可锁定的)通风口来平衡相邻房间的温度。打造属于你自己的庞大管道网络,构建中央供暖/制冷系统。更好的图形效果 通风口和管道只能建造在墙壁上方,而非自身作为墙壁。不再用单格通风口杂乱地堆砌堡垒墙壁。本模组还包含同样为壁挂式的小型冷却器和中型加热器。 更多工具 大型基地可使用工业级加热器和冷却器来有效维持温度。 安装说明 通过Steam创意工坊安装非常简单,但请确保同时获取CCL,因为它是必需的! 使用指南 安装好模组后,您可能想知道从何处开始使用?首先提醒一下,如果你在已有的存档中使用这个模组,可能会遇到一些问题,比如普通通风口/加热器等物品消失,甚至无法加载存档。强烈建议在新殖民地使用! 新建的殖民地已经加载好了吗?很好!我们先来看一下物品。其中一些物品的用途相当明显,但为了以防万一,我还是会列出所有物品,并在下面详细说明它们的使用方法。 温度标签

以下物品位于温度选项卡中: 小型加热器 - 与原版【加热器】基本相同 中型冷却器 - 与原版【冷却器】基本相同 小型冷却器 - 冷却器的小型版本,可壁挂! 中型加热器 - 中等尺寸的加热器 工业级加热器 - 超大尺寸的加热器 工业级冷却器 - 超大尺寸的冷却器 排气口 - 工业级冷却器用于排出热废气 通风口 - 与原版通风口相同,但外观更美观 主动式通风口 - 类似通风口,但可以设定目标房间的期望温度 通风口 - 与原版通风口相同,但外观更美观 管道系统选项卡

以下物品位于管道系统选项卡中: - 管道上段 - 用于构建管道网络 - 管道下段 - 用于构建管道网络 - 管道出风口 - 将空气从管道释放到目标房间 - 智能管道出风口 - 将空气从管道释放到目标房间,但可以为房间设置期望温度,管道会尝试自动开关以维持该温度 - 管道进风口 - 让空气进入管道系统 - 管道冷却器 - 管道内的冷却装置,用于降低管道系统中的温度 基本用法 在介绍管道系统之前,先说说本模组中的基本物品以及它们如何改善您的游戏体验! 基本温度控制 在《环世界》原版中,您为殖民者保持环境温暖/凉爽的选项仅限于加热器、冷却器、营火和基本通风口。它能用吗?当然可以,但如果效果很好,你就不会对RedistHeat感兴趣,也不会看这个指南了! 在最基础的层面上,你可以用几乎和使用原版加热器/冷却器/通风口完全相同的方式来使用这个模组中的核心物品。 小型/中型加热器:放置在你想要加热的房间里,然后设定所需温度。你可以通过点击设备并调整刻度盘来设定温度,操作方式与原版完全相同。假设你有足够的加热功率来加热房间,它最终会达到设定的温度并保持在那里。房间不够暖和?那就再添加一个加热器!加热器没有排气要求。小型加热器可以放在任何地方,但中型加热器必须安装在墙上。旋转中型加热器时,你会看到它将要加热的房间会亮起【红色】轮廓,表示这是目标区域。 小型/中型冷却器:其工作原理与加热器相同,但需要处理它们的排气输出,因为它们会释放热量以产生冷空气。放置这些物品时,与原版冷却器一样,需要将蓝色方框朝向你想要冷却的房间,红色方框则朝向其他任何地方。蓝色区域会获得冷空气,红色区域会排出热量。请注意,小型和中型冷却器都像原版冷却器一样安装在墙上,并且设置温度的方式完全相同。 通风口:这是一个通风口。其工作原理与原版通风口相同,允许空气在两个房间之间流动。两个房间的温度会自动尝试达到平衡。这是一种将热量/冷气从一个房间分配到多个房间的基本方法,这样就不必在每个房间都放置加热器/冷却器。需要注意的是,通过通风口连接的房间越多,加热器/冷却器的整体负载就越大,它可能无法维持所需的温度。此外,由于通风口只是墙上的孔,共享空气的房间温度与装有加热器/冷却器的源房间相比会有一些差异。通风口运行不需要电力。 主动通风口:与上述功能相同,但你可以为接收房间设置所需温度。放置主动通风口时,将橙色一侧对准你想要“控制”的房间,并确保设置好所需温度。就像通风口不过是墙上一个华而不实的洞一样,这个带“脑子”的洞也是墙上的一个洞!主动式通风口会根据需要自动开启或关闭,以尝试维持房间内的设定温度。主动式通风口运行时需要电力。工业暖通空调!
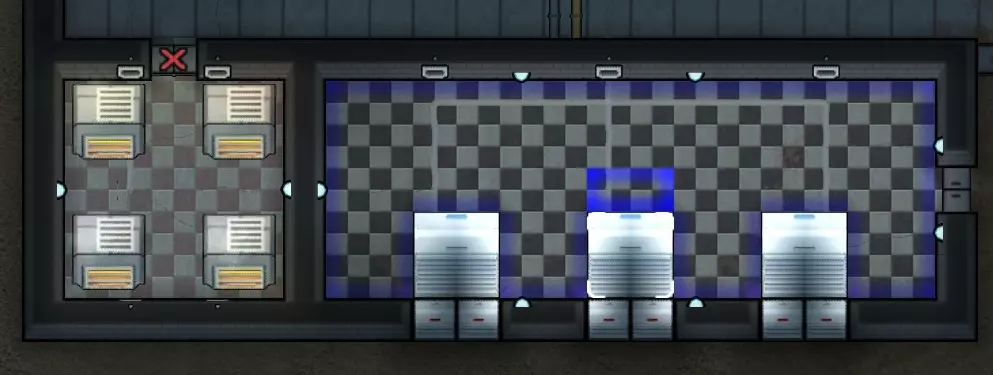
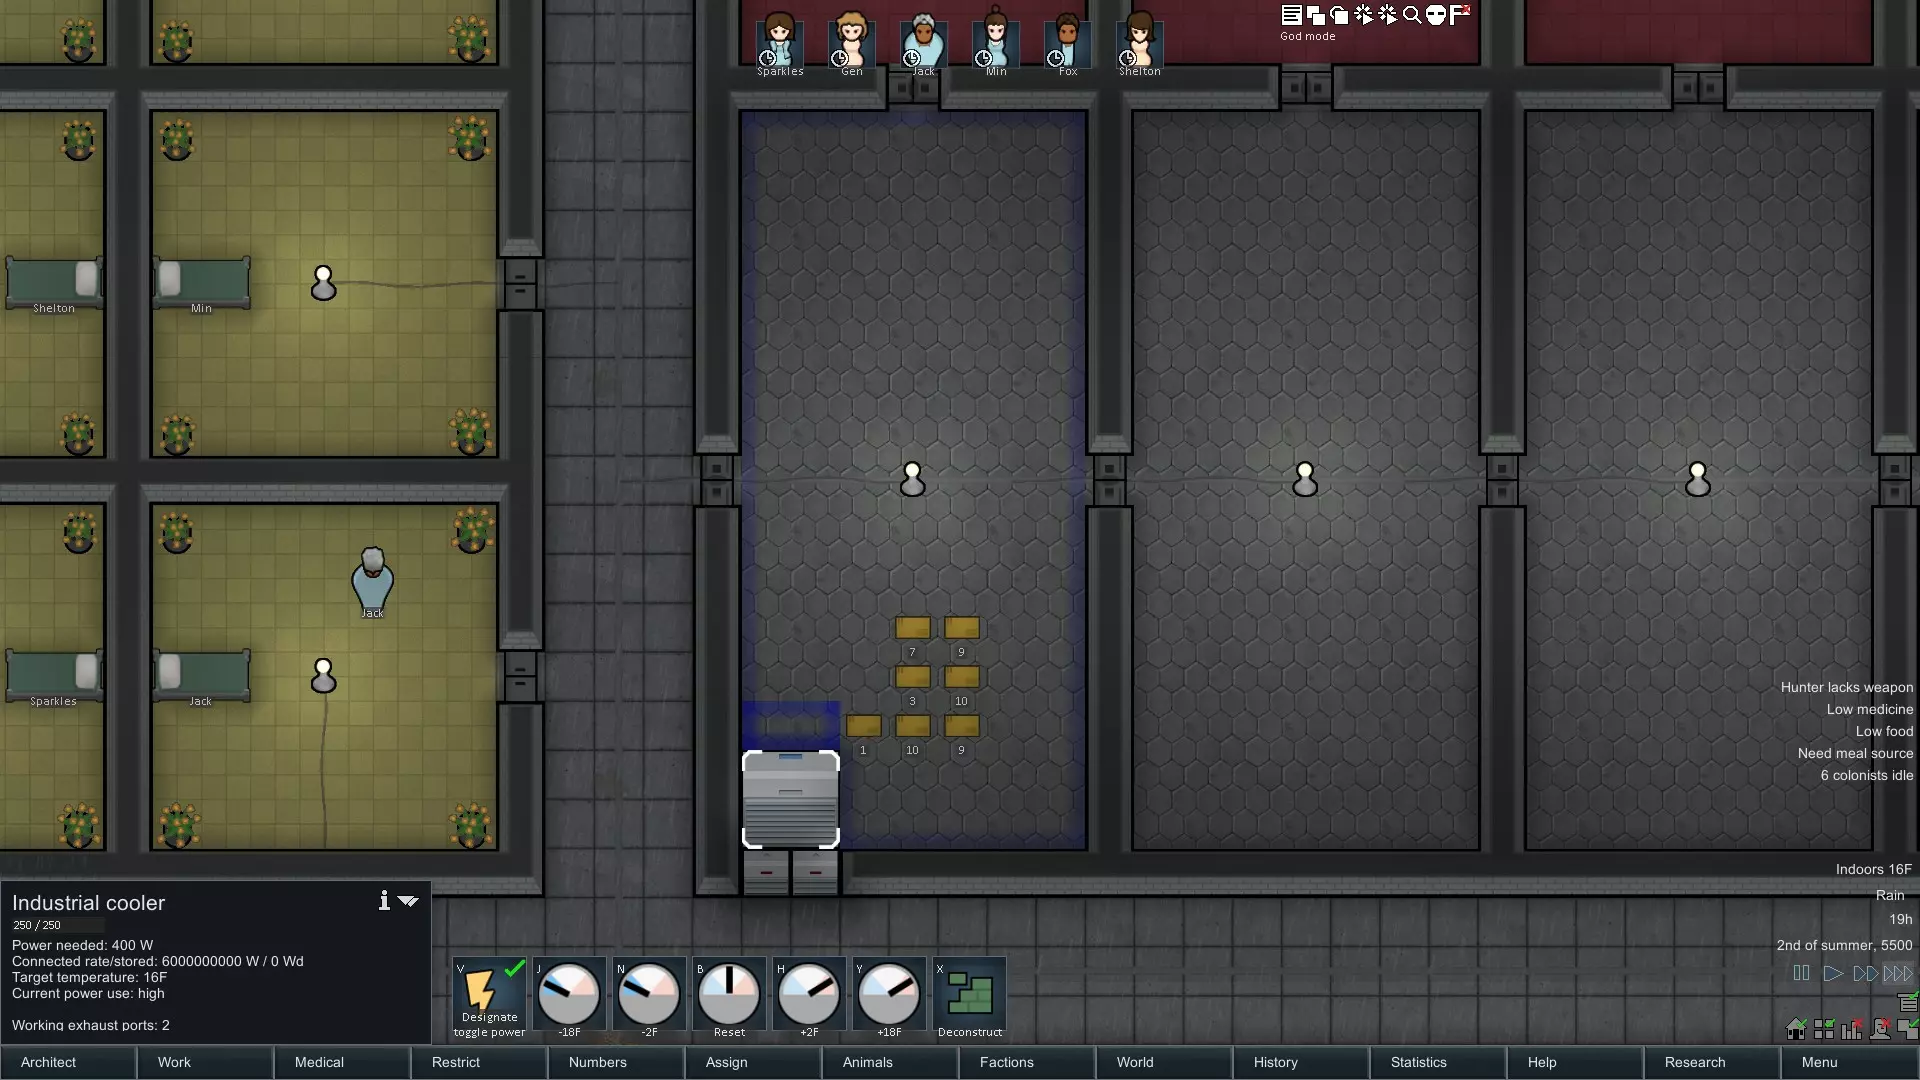
Industrial Heater: This item really operates identical to a standard heater but is able to put out more heater. How much more? Want to cook a pawn? There are no special placement rules so you can place one of these really anywhere you want much like the small heater [or the vanilla heater] and set the desired temperature. If the room isn't too big, the heater will raise the temperature of the room to match. We'll discuss more advanced uses for this in the duct section. You can see four of these portable infernos in the picture above on the left side. Note I have the door forbidden as it is ~250F that room. Industrial Cooler: This is the King Frigid Zero Cool Deluxe cooling unit for your base! This baby will get you sub-zero temperatures super fast but has some oddities about it that most people trip up on. You can place the industrial cooler anywhere you like tho do note it has a couple blue boxes in front of it, that's where the cold air comes out. The coolers are the large white units on the top-right side of the screenshot. Note that the industrial cooler needs exhaust ports attached to function! Exhaust Ports: The industrial cooler puts out a lot of heat and you need to deal with that somehow. The solution is exhaust ports! You can attach these to any side of the device and they will output the heat and improve the performance of the industrial cooler. I said above they are required and while that isn't entirely true, they help improve the performance enough that you should consider them required. As you can see in the screenshot above they are the small white boxes attached to the industrial coolers. You need to rotate them until they light up to attach to the cooler. If you look closely you'll see a small gray arrow that points at the industrial cooler when connected.Since these things pull all the heat off the industrial cooler, you'll want to DO something with that heat which means venting it outside in most cases. In my example I have them on an external wall blowing the exhaust straight outside. While the industrial cooler placed on an outside wall will not "seal" properly as it leaves gaps between it and the walls, the exhaust ports will which makes setup a breeze if you have outside facing walls. Built in a mountain? No problem! You can still exhaust into a hallway, another room or really wherever you want identical to how you handle exhaust with standard coolers. Note that you can't place an exhaust port until you have placed an Industrial Cooler as it has to line up based on that object. I Heard You Like Ducts? If you downloaded RedistHeat, ductwork is most likely the number one thing you want to use and I'll admit it's pretty cool! Ductwork also is one of the most common confusion points for folks new to the mod so I'll try to help you hit the ground running with your ductwork empire. Basic Ductwork: Think of a duct-pipe as a transit for air. You run ductwork between rooms you want to heat/chill so your pawns won't complain about sleeping in the heat/cold or wose, suffer from hot/cold related conditions such as hypothermia. I'm looking at you "guy who only places arctic!" Ductwork can be placed the same as power wiring and can even be in the same square as power wires making it very easy to snake around your base. I generally place my ductwork in my walls but that is entirely optional. Note that the more ductwork you have, and the more rooms connected to your system via duct outlets and smart outlets, the more heating and cooling "power" you will need to hit those desired temperatures. It is currently recommended by the mod author to break from "one duct network to rule them all" to having multiple networks in the case of large bases. This has the added benefit of being slightly easier to troubleshoot when things go wrong as well as gives you some redundancy in case one of your HVAC rooms is blow up by say... a stray mortar. Not that that ever happens... Lower / Upper Ducts: Throughout the mod you will see references to upper and lower ductwork and upper and lower connections. What the heck is this? Basically, the author has put in lower and upper versions of ducts so that you can run two ducts in the same space. Lower ducts connect to lower ducts and upper ducts connect to upper ducts but they will not connect to eachother. In the current build of RedistHeat you'll generally run say... lower duct for heat and upper duct for cool if you want to have a fancy automatic system for hot/cold that you never need to touch. We'll discuss more later but the gist is it is two separate duct networks and your intakes/outlets will connect to either lower or upper but not both. Duct Intake: This lets air into the system. While standard HVAC in real life would simply connect the duct directly to your furnace/AC, that's not entirely the case in RedistHeat so you need to use duct intakes to suck in cold or hot air into the ducts and feed it into your rooms using duct outlets. Note that multiple intakes increase the amount of air brought into the system so in the case of furnace/AC rooms you may need more than one intake to fully take the air from those rooms into the duct system. Note that you have to tell the intake to bind itself to either the upper or lower duct network using the "cycle channel" button, default keybind R. You can also click the "toggle airflow" button to open/close the intake manually. Duct Outlet: You guessed it, duct outlets are the other half of duct intakes. Intakes bring air INTO the duct network and duct outlets let the air OUT. At the most basic you should have an intake in your furnace [or AC] room and an outlet in the room you want to heat/cool. Much as you sometimes need multiple intakes to pull air into the system from a room, you will need multiple outlets to get enough air out of the system into larger rooms so keep that in mind when you place a single outlet in a 20x20 room and can't figure out why it won't reach the target temperature! Keep in mind that a duct outlet is NOT temperature controlled and it will simply dump air from the duct network at whatever temperature it happens to be. Like the intake, you have to pick an upper or lower duct network and you can manually open or close an outlet using the "toggle airflow" button. Smart Duct Outlet: These are functionally the same as duct outlets except you can set the temperature on them. For example, if you have a basic set up with industrial furnaces feeding your duct network and want your pawns to hang out in a lovely 70F room even though your duct temperature is 120F, the smart duct will automatically open to get temperature in the room up to 70F and close once it hits that. You don't have to do anything as it is all automatic! These things are sweet! Do note that like everything else, if there is not enough "power" in the ducts to accomodate the load needed to say get a room to 70F... it will still fail to do so. In the case above however, it will try to keep the temp at 70F or lower. Duct-tastic Systems Advanced Duct Systems Gotchas: There are a number of gotchas in the current mod that catch people. Here's a few common ones: Not enough air in the ducts. I refer to this as "power" in other parts of the guide but basically it is the amount of hot or cold air being produced by your heaters or coolers. How to fix this? You guessed it, more heaters or coolers of any type. Just make sure the air from the added heaters/coolers is being piped into the duct system via intakes. Room not getting cold/hot enough. If it is a large room, make sure you have enough duct outlets or smart duct outlets and verify the temperature set on the later. If that all seems fine, refer to first bullet. You can always click on a duct to see the duct's actual temperature which is useful as the duct needs to generally be as hot/cold as you are hoping to have the connected room. You can overcharge your ducts such that they are much colder or hotter than you actually need and use the smart outlets to control output into rooms. Duct lines look broken around intakes/outlets. Make sure you have your intakes and outlets set to the right channel, that is, upper or lower to match your upper or lower ducts. Cooler not cooling. Coolers [of all sizes] need to be able to exhaust their heat to operate. If they are exhausting into a room that is 100F, they won't work very well so keep that in mind when placing both small/medium coolers as well as the industrial coolers and their exhaust ports which put out quite a bit of heat. Things aren't working as expected. Double check your placement of your heaters and coolers paying attention to the hot and cold zones as applicable. They will highlight the room the air will go into as you rotate them around so make sure your cooler is pushing cold air into the room you want or that your duct outlet is feeding air into the pawn's rooms and not the hallway by accident. Not working at all? Make sure the room you are trying to heat or cool has a ROOF on it as the air will escape. I believe having actual walls [not the raw stone but actually walls] also helps with sealing the rooms. See the other tips as well but a missing roof is the fast track to failboat city with RedistHeat. One system to rule them all. While it is possible to make one giant system to do your entire base including special areas like freezers, it's not recommended based on my experience and guidance from the mod dev. At minimum you'll want to put your freezers on a separate system from the rest of your base and you may need a few systems if you have a very large base. Common Usage Scenarios So you've made it this far or just scrolled through to look at the pictures but either way, you've arrived at the pinnacle of RedistHeat, actually using the damn thing! Here are a couple basic set ups to help you get started: Hot and Cold Due to how smart outlets currently work, the easiest way to make a system that you can simply "set and forget" for your pawns that will both heat AND cool requires running two duct networks. Two but why?? You need one for hot and one for cold and luckily we have an upper and lower network to use for just such a purpose. Each room in this configuration will have two smart outlets both set to the same temperature so they will automatically let in heating or cooling as-needed to keep the rooms at the set temperature. You can scale this any way you like and the set up here is for demonstration only. In cooking terms, salt to taste.
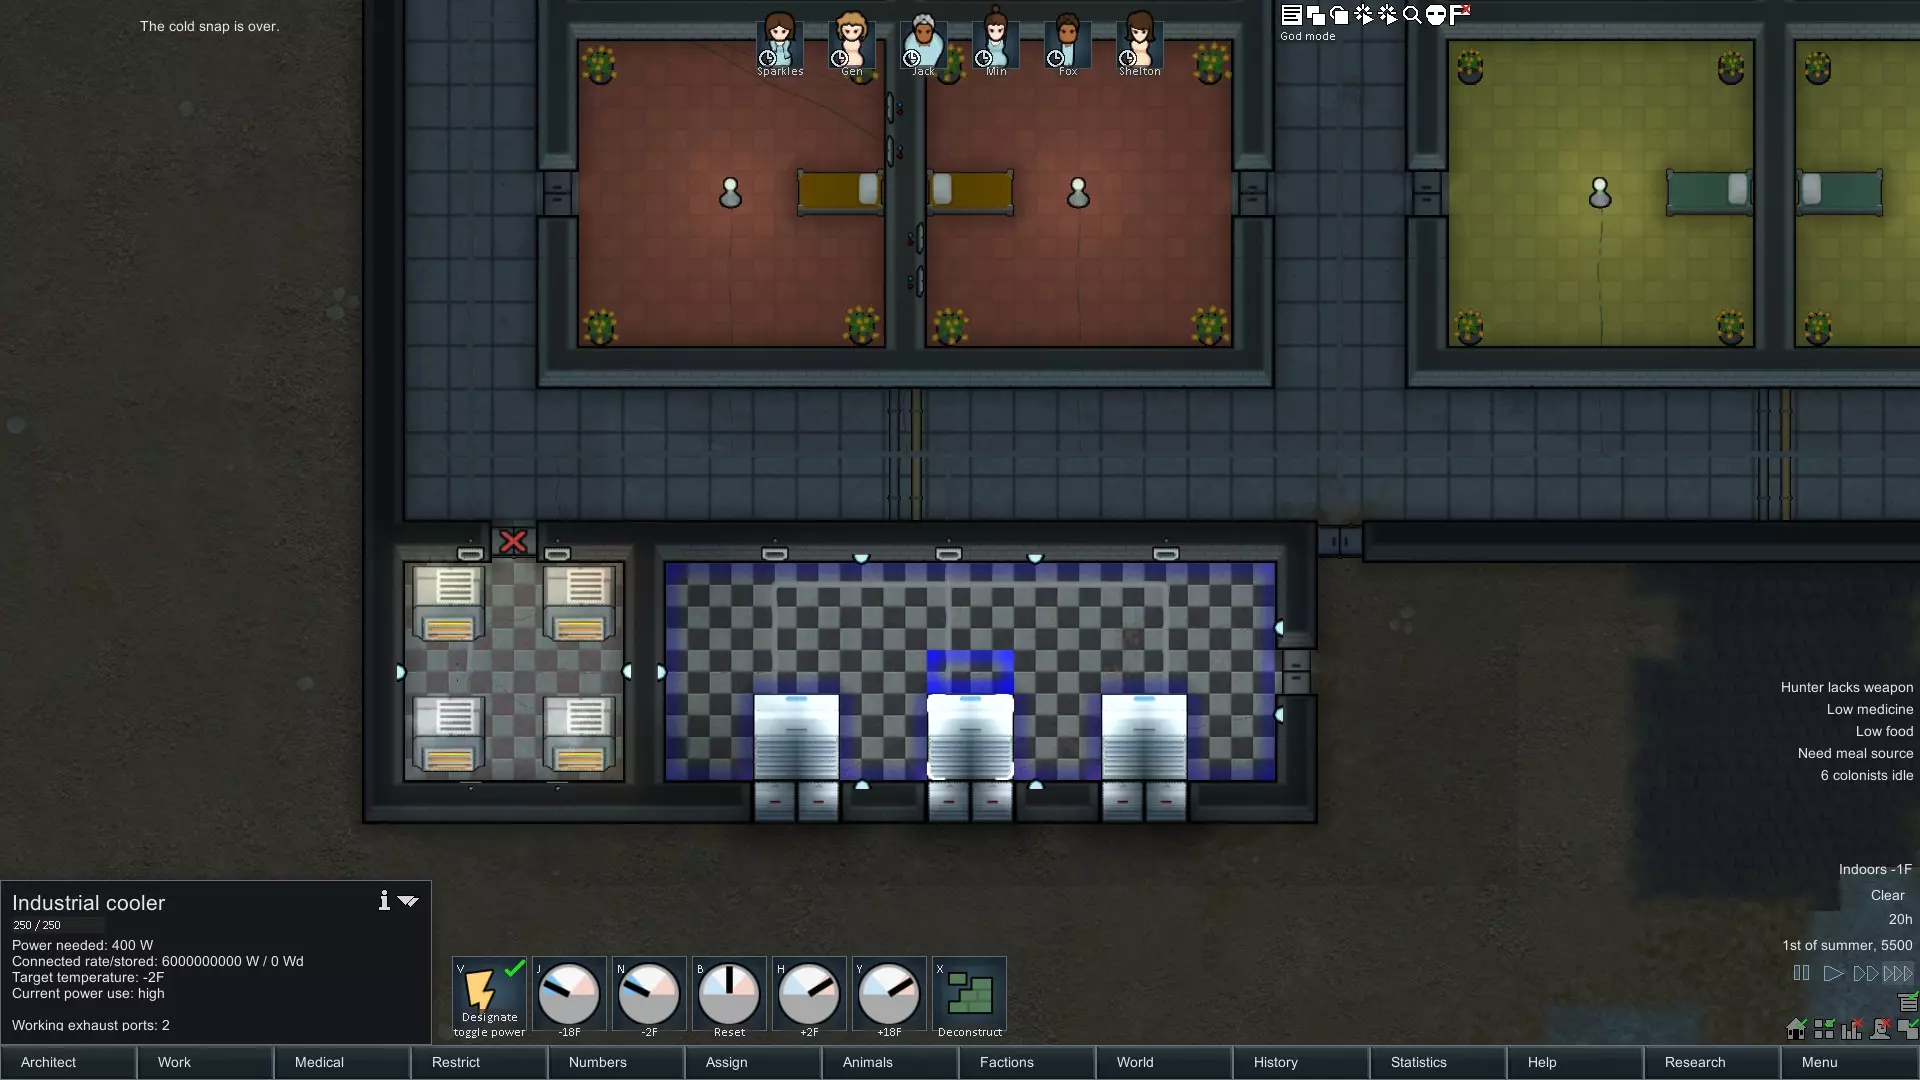
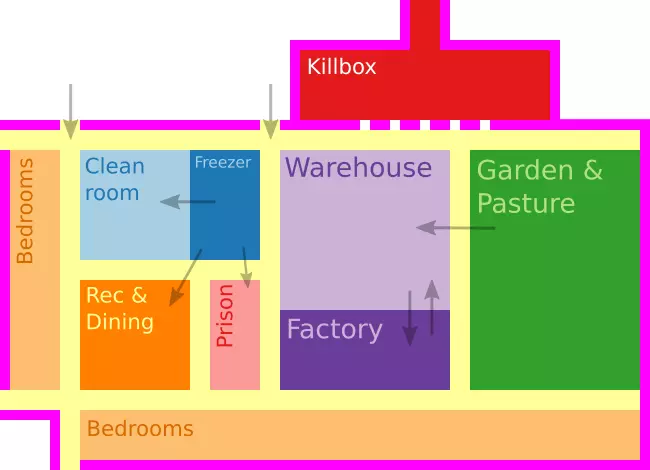
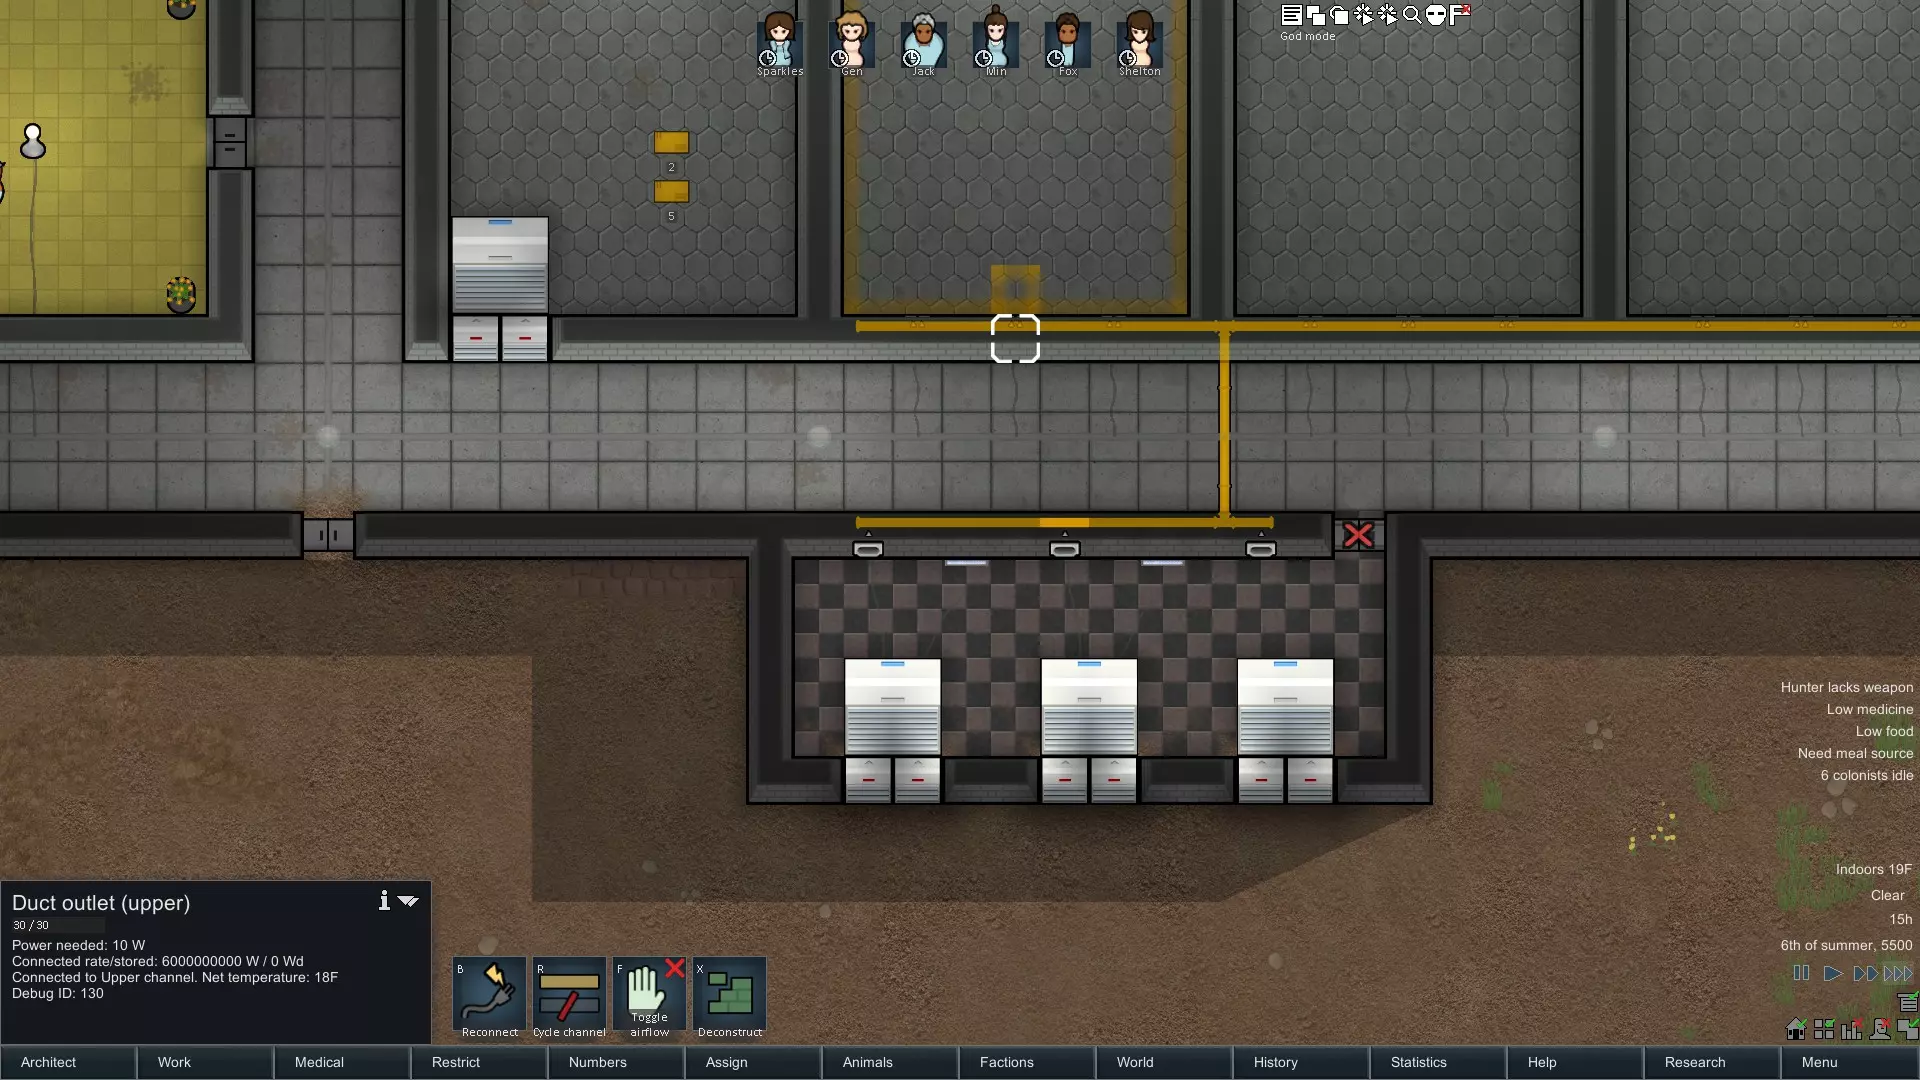
这到底是怎么回事? 你有一个密封的房间,里面有4个工业熔炉,温度设置得非常高(房间内约250华氏度,因此将门标记为禁止进入,我可不想把殖民者烤熟)。我们称这个房间为热室。 热室旁边是一个冷却室,里面有3个工业冷却器,温度设置得非常低(实际上是0华氏度),每个冷却器有2个排气口,将热量排到室外。我们称这个房间为冷室。 热室有4个管道进气口连接到下方的管道系统,用于将热室内的热量吸入下方的管道网络。冷室有3个管道进气口连接到上方的管道系统,以保持上方管道网络的凉爽。 好了,你已经了解了管道之类的东西,接下来该怎么办呢?下层管道是热的,上层管道是冷的,所以我们需要将这些空气输送到殖民者的房间里。上下层管道都铺设在墙壁内,它们可以占用相同的空间,你可以通过颜色来区分它们,一个是橙色,另一个是黄色。如果你点击同一个位置,会循环显示该方格内的物品。
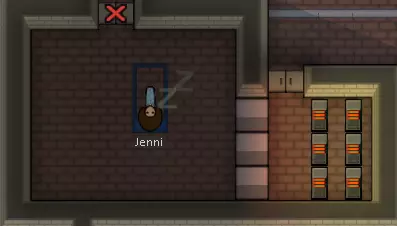
与上图相同的视角,但略微向上滚动,可见管道系统。你能看到橙色【下方】管道来自热室,黄色【上方】管道来自冷室。每个房间我都安装了两个智能通风口,均设置为70华氏度。其中一个根据需要引入热气,另一个则根据需要引入冷气。Morgloz曾提到,他希望在未来某个时候制作一个统一的智能通风口,使其能够连接到上下两个管道网络,这样每个房间就无需两个智能通风口就能实现这种“冷热双控”设置,但在撰写本文时,这种通风口尚未存在。 这个系统相当基础,但实现了冬季供暖、夏季制冷的目标,并且无需人工干预。你可以根据需求拆除下方的网络(如果你不需要热量)或上方的网络(如果你不需要冷却)。 冰柜 在殖民地中,你最先快速搭建的设施是什么?如果是我,或者不是在北极地区游玩,我会立刻建造一个冰柜来存放食物,防止食物变质!使用 RedistHeat(热量再分配)系统搭建冰柜非常简单,有几种不同的方法。和原版冰柜一样,你需要限制冰柜的进出流量,并使用自动门来减少门开启的时间,以避免温度流失。 方法一: 像原版一样在房间内放置冷却器。确保将热量排到房间外面。你可以使用小型、中型甚至工业级冷却器,无需管道系统!只需将冷却器放置在房间内即可开始使用。务必为工业冷却器安装排气口。通常这样就足以满足基础冷冻室的需求。示例:使用工业冷却器的冷冻室。注意排气口的位置,确保冷冻室四周处于【密封】状态。
方法二: 想要更有趣的设置,或者对冷藏库有特殊需求?没问题!这种方法与“冷热双控”设置几乎相同,只是由于只需要关注制冷侧,因此只需单条管道网络即可。详细步骤不再赘述,可参考“冷热双控”部分,关键要点是确保有足够的制冷能力将冷藏库维持在目标温度【通常为32华氏度或更低】。使用上层或下层管道网络,将工业冷却器房间的所有进风口连接到冷藏库。由于冷藏库通常是较大的房间,需确保安装足够的管道出风口以充分覆盖整个空间。在这种情况下,使用智能管道出风口并没有什么意义,因为你只是将所有冷空气排入冷冻室,而且并不真的在意冷冻室的实际温度有多低。如果出于某种原因你确实在意温度,那就考虑使用智能管道出风口。这是一个使用管道系统为两个独立冷冻室制冷的基本设置示意图。请注意,每个冷冻室都有多个管道出风口,因为单个出风口不足以将室内温度降至我期望的16华氏度冷冻温度。
总结 希望本指南能对那些正在努力了解这个优秀模组的玩家有所帮助。起初可能会觉得有些复杂,因为部分内容不够清晰,而且它并非完全遵循现实世界的暖通空调系统,但随着你不断摸索,就会逐渐明白其中的道理。 最后提醒一下,官方Ludeon论坛上有更多关于该模组的信息,模组作者Morgloz也经常会在那里活跃。论坛允许发布比创意工坊评论更长的帖子,这样你可以更详细地描述遇到的问题。