


Increlution
 Steam Deck
 抢先体验
抢先体验 家庭共享
家庭共享 云存档
云存档

Survive the ever increasing pressure of time for as long as you can!Increlution is a minimalistic incremental game about time management that takes inspiration from roguelite games. It's up to you to survive as long as you can with the tools that you unlock throughout life, such as food or constructions. As time goes on, your health will decline increasingly faster until you'll eventually die. However, death merely marks a new beginning. With every generation, your chances at survival will increase, because progress in previous lives increases your
游戏圈
共8条帖子

末
2026-02-19 04:00:10 · 发布在 「Increlution」
Updated with a big spoiler waltrough for chapters 10 and 11
Chapter 10
Chapter 10 global considerations
Like chapter 9, this chapter provides an opportunity/incentive for funneling. The higher your hourglass/shield/tooth are, the more generation xp you can get when reaching the vault "wall". As always do not funnel before reaching the gate. Only funnel when you're dying on something else than natural decay.
You are actually playing 2 games there.
Pre chapter 10 consideration(skipping or not chapters, skipping or not funnels, trying to get more hps for volcano buildings, trying to save time to delay death or not), trying to get new doublers or not. And depending your doublers unlock or funnel possibilties you don't run chapters in the same order.
Chapter 10 consideration: depending on what you're trying to do you may not run it in the same order.
Chapter 10 guidelines The vault door(hourglass decay check) is a place you do not want to actually reach early on, do everything in you power to delay getting there, including turning on funnels
before the mushroom check is completed and beatable naturally, if you have already boomed mining, you always go middle floor before lower floor and buy as much food as possible and go for it next.
Always go for the hut and the belt, it is better to train combat than going into the door and dying there early
Always take whatever you can from the waterfall
Always overgather vegetables and lianas in chapter 6
Always overgather every wood source in the game
Very Early chapter 10
Early chapter 10 Top floor(hut and bracer) > Lower floor > Middle floorFrom koi fish to first lap(reach vault door)
Doublers to look for: lava shrine 1, jaguar, chimera
1) got to top level and try making hut then bracer(bracer first if you come from river). move away from it and go to low level as soon as decay + damage from steel would end your run prematurely
2) if you can do the middle floor(takes some generations as there is no food gathering option there), go there and buy food
2 bis) if ch6 is skipped, 1 or 2 gens after doing the middle floor is a good time to re enable it as you'll still be able to build the hut there and you want doublers
3) go to low floor. Try gathering mushrooms if not high on decay, go to waterfall and take from it if not very high on decay
4) when reaching the vault for the first time you're no more early in chapter 10 but lots of things are still to do there ^^.
Mid chapter 10 - Middle(buy food) > Low(Use the food on Mushrooms) > Top floor(hut and stretch)from first lap to mushroom gathering without trading food
Focus on funnels there if not harming doublers
Doublers to look for: missing previous ones + bronze dragon, fight poachers (require ch11 prog)
1) be wary about new doublers oportunities(chimera should be done or close right now)
2) do not be afraid to shuffle 6 7 8 chapters depending on funnels availability and doublers, never skip a doubler for funnels
3) prioritize getting food on mushrooms as long as you still need to
4) play around as long as you can on the top floor prioritizing combat over mining after hut is finished
5) you'll eventually go through vault door and enter chapter 11 in the meantime
Late chapter 10after getting mushrooms without trading food
Doublers to eventually consider adding: missing previous ones + volcano shrine 2, waterfall statue
1) there is a trick where you can still get some food to unlock the statue early but if slingshot is useable, it is your priority
2) run low > mid > top floors. Do not forget to buy statue as soon as you can afford it. Once every encounter is completed in C10, you really want to minimize time spent in it, be sure to take the pendant before entering top floor for now on. Double check your C10 automations after your run, once you've made sure that you passed on everything, bought the extra tools, the slingshot and the pendant you'll never have to think about this chapter ever again
3) At this points funnels are likely turned off, but due to hp growth you still have the option to add funnels if you feel like you'd need them. Just turn on the 3 every few generation, due to hp growth they are very likely to pass, especially if done in the correct order
Chapter 11
Overview/Spoiler disclaimer
If you've never run the chapter, having guidelines will negate the frustration but also some potential fun. I had a blast doing it blind because of the complexity.
I will include transition screenshots from my next playtrough.
Breakdown of things that matters during chapter 11
Combat instinct is absolutely king there, most of your damage will come from regular attacks on the titan. Each increase of combat instinct is a big milestone
Hunting is a swiss knife in chapter 11, at first it is used to stall to get combat xp, then afterward it is meant to be boomed
3-4 gens after reaching the 80% phase start bringing ch10 slingshot at all time
Block is time inneficient but can be a way to stall the fight a bit between 80% and 40%
Maximizing "safe" damage options(using them at the right time) can greatly impact the quality of a generation and be a difference maker on your first kill
Agility plays a huge role in the fight, giving you access to a naturally increasing amount of free damage on the titan over your run while not hurting you in the encounter (it's kind of a soft enrage but for you)
Woodcutting / Mining / Construction play a huge role and the booming of woodcutting is gen gated(you can only train it for a same amount of time each gen)
Impactfull things before chapter 11 in your current generation always bringing slingshot after building catapult
optionnal combat actions(mostly doublers) are huge because the gen xp multiplier bonus goes a very long way there
overtraining beforehand construction related skills, hunting and gathering is also good
chapter 10 pendant is not necessary to make progress on the encounter but is definitely a massive asset once you can get it
in chapter 6 and 8 be certain to perform the agility actions that give the most agility exp(do the decay one is chapter 6 then build liana rope before using the action that doesn't require it; in chapter 8, take the rail agility shortcut after fixing the cart; those adjustments are very minor but they adds up). You can also keep sabotaging camp with right clic but it's micro intensive.
Actions Breakdown
Attack: It is the bnb action on the titan, most of your progression in the fight is tied to your ability to throw more and more attacks at him to scale your combat instinct level wich in turns makes you able getting missing hp doublers in chapter 8 and accelerate your hp growth. The more combat multiplier you have at the start of the fight, the less dmg you'll take hitting the titan and the more you'll be able to push damage.
dodge and backshot: In the early stages of the fight, it is only usefull to unlock the first food source in ch11 and to stall heal between attacks. Later on it acts as a soft enrage for yourself, giving you increasingly more backshots per generation wich is basically free damage on the titan while recovering some hps.
Block: Blocking is safe and can be right clicked to get 10B combat xp for free, it is recommended doing so. After performing 3 successfull blocks, you enable a one time special counter attack moves that does decent damage. It can be preloaded to perform a small damage burst. When blocking shines the most is between 80% and 40% when you're on 2 food sources. At this point it can be used to extend the fight or safely drop a bit hp of the titan, it is however a last resort option for latest parts of the fight as it is very time inneficient(deletes food). Obviously the more hp you have and the more food are at your disposal, the more you can block in a generation.
Catapult Shots: the action takes increasingly longer to perform but gives increasingly more hunting xp. The more shots you can fire, the easier it will be to end the fight.
Food considerations: Make sure to be maxed on food at 81% titan health and just before finishing a block action.
First phase(100 - 80% titan health)
You just got there, inevitably passing vault door by mistake while ricing chapter 10.
1) unlock the first food source by dodging 3 times
2) focus on attacking titan, dodging then hunting(you won't make the treshold at all) to stall for hp sustain. Do not worry about getting a bit of hunting instinct as you'll need it, you can disable the hunter bow in chapter 5 to increase your sustain(I admit I did it)
3) Blocking is pretty meh on that phase, but if you can perform few sucessfull blocks out of your food, it is better doing so than dying from attack decay or hunting self damage at the end of your generation.
Second phase(the great outdoors)
note: Depending on your current progression, it can be ok to stay for an extended period of time on the building tasks as long as you do not die prematurely. Depending on your current stats, block sheanigans can be used to recoup some hp bars just after the "outdoors" part.
1) before moving on, maximize food so you shrink time spent on food sources
2) right click the "leave area option"
3) focus on the catapult task with all your heart every time, leave at point where you know you'll be able to recoup the health loss(it's safe up to 10-13s attacks cd). It is an actual grind completing it
4) for few generations catapult will be far from completed, you can keep attacking/hunting then trying to stall on block
5) at a point where you're confortable bruteforcing attacks to get to 80%, actively train hunting instinct but never finish the shot(right clic the action when hunting multiplier > 10K)
6) once the catapult is made, load it and do the longer option to unlock a new food source. you can stand "safely" up to 5s attack on titan at this point
Third Phase(Honey to 40%)
1) At this point you want to always put the titan at 81%, 10B+ hunting multipler(no shot fired) and finish it with a regular attack
2) try to increasingly add catapult shots before leaving(I ended my run at 6 shots fired, but it can be doable at 4 or 5 probably)
3) Do some counter attacks to stall, you can count how many you can do, the purpose is not going below 40% and have a counterattack available at this point
4) Keep attacking so you get combat instinct
5) unload your dodge actions before dying so you get the agi and hunting xp
Fourth phase(40% to 20%) - Burst Phase
View it as a mmorpg burst phase. At 40% you're gifted with an inivetable death mechanic that deals you increasingly more damage, your goal is to absolutely crush the titan with everything you have to make it reach 20% asap. A counter attack is very good there. Obviously the more catapult shot have been fired, the best shape you're in because the easiest it is to still attack. From this point and onward blocking really sux.
1) try having counter attack enabled when Titan hp reach 40%
2) try having having still all your backshots at disposal
Final phase - Everything you have left phase
You're on 3 foods now, the better you handle fourth phase, the more time to boom gathering and do stuff to the titan. Throw everything in the book at him, the hp growth seems daunting the first time but it really slows down to nothing at a point and you can't really outdps the initial healing burst. Things that will make you pass the finish line:
Having more catapult shots fired means that you used less attacks to get there. Each shot makes the fight actually significantly easier
Combat instinct is still king there as it means less dmg per attack and faster attacks
Naturally more agility instinct leads to more shots fired wich are 2.5% each
Maximum hps helps as well but not that much hence the healing from food is very high and the damage taken grows exponentially
Post Titan phase
Sadly, the end of the chapter is a bit underwhelming, just max out food inventory before moving on and do not bother funneling.
Pre chapter 10 an chapter transition walktrough
How to work around chapter 9 content
Reaching Tooth, lots of options opens to you. The first thing to do is to reach path around lava decay encounter while making sure that each hourglass automation is unlocked, preferably equalized. Depending on your current ng+ perks, you'll be stuck on the lava decay encouter or on the 750K agility check just after for a certain amount of generations, xp perks are very good there but if your build is very glass canon you may pass the decay encounter before reaching the treshold encounter .
As decay growth and food scarcity in chapter 9 leads to incredibly short runs, it is advised to turn on all 3 funnels until the point when you think you can skip a chapter and still get into the volcano(76 river or 78 mine are the "viable" options). At this point you should effectively stop funnelings all together and transition to chapter 10.
If you're not able to fully funnel the hourglass before clearing a path in chapter 9, swap chapter 6 and 8(run 7 8 6 9) and transition to jaguar and gorilla combat. You may also stop funneling, don't loose 2 gens on getting a combat shield level for example, it's not worth it.
How to transition to Chapter 10
There are currently 3 possible/ no clear nonsense ways of doing this and the community hasn't settled totally on them
Way 1 (the one I choose): Skip chapter 6(even the doubler) and go in ch10 stabilizing on Koi faster and building the hut faster. It is actually a little bit worst on hp growth.
Way 2 (the one the famous Baldain and the almost-as-famous Hepivelle took): Keep running all chapters to keep doublers. Hp prog will be slightly better but instinct gains worse. Do that if you're not sure about your max hps
Way 3 (I've seen people do that, made sense but won't try): Skipping C8. I'm not sure about this, basically you trade a doubler with a hut. If you decide it's the way for you, do not keep this pathing for too much generations because it ruins instinct gains and ch10 is particulary sloggish.
As you can see there are tradeoffs every time and at the end of the day, it probably depends on your actual run and playstyle. I tend to switch often my pathing for early chapter 10 runs.
Rough early game progression guidelines
- chapter 3, start with river route, gather banana and don't even try to fight bear, flee, complete systematically tiger training and stop when you can fully complete a goat teaching and stop doing goat, skip parrot for now. Optimisation is possible by trying to get a bit of agility before decay kills you by leaving temple and climbing. Swap to mine, kill bear asap and keep killing it, always do bear and tiger training(forever), do a full parrot teaching only once. You can optimise your run by dying from decay while chipping agility exp moving in the mountain. Goat and Parrot teaching can be turned on again during CH4 but you want to at least build the hut there first and be sure to be able to do the hut after doing the teachings.
- Respect decays bursts and don't try to pass trough decay gates too early, you want to really respect your time spent in C5, not only you get really big instincts gains there but more importantly it is where the bulk of your hps come from, do enough combat in C3 and C4 to kill dragon ideally before you build C5 cabin(if not ok it's life but it should not happen), and try doing huts before gathering all 3 foods in CH4 and 5(ideally just one)
- Most players utilise a no fish strategy to boom hp (don't fish anything, do Emerald>Ruby>Saphire in C4 and start fishing eels there for few gens after building the hut and getting the hp doubler)
- Do your first 2-3 runs of chapters 7 by passing through river and going straight there and gather as much wood and cart upgrades as possible while trying to get back to food to stay alive a bit longer, keep forever wood on high priority there(you want to overgather C7 wood forever). In early C7 prog use shovel over bow
- Pass C7 combat encounters by bringing uncooked food from ch4 and ch5, always claim shield for confort, rejecting it can be more value from a gen to another but it's marginal. Honestly if you can funnel shield without using bull meat, do it. If you are feeling like you are hitting a brick wall do ch6(temporary food cd buff)>ch7 instead of just dying in C7 at 25mn.
- Start C8 like you started C7, with the shovel and always use the shovel when you can kill bull without a bow. Stop doing just C8 when you have gathered enough digging instinct
- Pass C8 by doing Ch7 > CH8
- Very early in chapter 9 try to reach path around lava encounter while doing 6(food cdr)>7(claim shield)>8>9 or ideally 7>6>8>9(with belt and pickaxe) with saved food. The idea is to maximize instincts gains and scale slightly with funnels for your final stride while trying to not overgrind either, it's my strat there may be better
- funnel every hourglass buff each run until you can jump into volcano, kill jaguar and gorilla if you can't funnel anymore
- At the point where you can reach volcano and feel confident about skipping C6, go and beat the game. Food CD from ch6 is equivalent to +- 20 agility instinct for the path around lava encounter and you get lots of instincts pretty quickly by passing it, especially if you do all 3 chapters in the meantime. You'll also suffer slightly less decay reaching it after skipping c6 wich reduces damage taken during the encounter.
Late game doublers order unlock
1th or 2nd) Jaguar (depending if you value decay tripler over hp doubler or not)
1th or 2nd) Volcano's shrine 1: note that I was able to build it 3-4 gens earlier by switching to river at a point
3rd) Chimera (it doesn't fully prevents you from funneling shield and even when it's the case, you can even tryhard scum a bit of funnel so you know when you can claim one safely)
4) Both c8 doublers, wich are enabled by Chapter 11 combat training
5 and 6) Volcano shrine 2 and Statue
Problem solving and self evaluation
Self Evaluation example(outdated, was with chapter 9)
Let's consider my last run:My perks were:
Instinct xp = 4
Generation xp = 4
Auto Job = 3
Base decay reduction = 1
Hp growth = 2
Note that I did not apply what was in the guide nor the tierlist because I'm a nihilist.
It took me 112 gens to beat ch6, I got stuck 31 gens into C7 wich was just a bit less than the amount of gens it took me to beat ch1 to ch5. Then it took me 16 gens to beat c8 again and only 23 to beat ch9(while not being able to skip any chapter for final push but was not that bad anyway). I was positively surprised on the amount of gens that took me beating ch9 considering that I did lots of funneling there
At this moment it is absolutely clear that reducing my time in ch7 (while keeping things equal otherwise) would be beneficial on my next run. There are actually 2 ways of beating C7:
- getting pelicans earlier on the late ch7 encounters, wich would with great certainties save me at least few gens in C7 and would probably help a tiny bit in C9 as well but would probably not help much elsewhere and would be minor if I keep things equal eo
- investing into more ehp so I would be stronger on the encounters and beat them naturally earlier hard to quantify in C7 but would help there and probably elsewhere as well
It gets extremly complicated there because C7 was "only" 36 generation out of 180 and overall, however I knew that the prior save(wich was not auto job, I was trying "no farm", I beat ch7 in 13 generations. Then you also have hp scalling and instinct levels gain diminishing returns into the mix. Is it worth to tocus on C7 when my decision would definitely not fix all of C7 issues in a row?Should I take a more versatile approach and try to shrink my run as whole without making C7 worse? Should I get xp perks at lvl5 to increase final compression even more now or keep delaying it?
The main thing to take from this example is that the more your run is compressed, the easier it is to pinpoint issues and answer them properly. I'm far enough into ng+ so I can see clearly things to improve but it is pretty difficult establishing certainties on best strategy to adopt against them. Later on with more experience and increasing perk costs, there will be less decision making. To make things even more complicated I won't tell wich decision I took for my ng8 ^^.
Just experiment as you go and build yourself personnal breakpoints, there are lots of way to engage with your runs, game is more complex than it looks.
Proposed perk choosing "algorithm"
This is not meant to be the most optimal perk points distribution but it can be used as a framework to help you pick things in order to optimize perk point spending in order to shrink your runs. Also I encourage people to explore themselves and get a better understanding on their pathing and options during perk selection and during the run than following blindly a guide.
if you feel like something is the solution to your issue: pick it but then reflect on it at the end of your run
if gen xp or instinct xp are below 3: invest in them
if hp growth or base decay are 2 level below xp perks level: invest in them priorizing hp
if you don't have autojob perk: level it to 3
if your autojob level is two level below xp perks: invest in it
if you "need" to level hp growth and decay and hourglass perks cost less the half of the price of both: invest in them until these cost more than half that price
tl;dr; force xp perks, get autojob when you already have a minimum of "juice" then prioritize versatile perks over more situationnal ones while still putting points in them when better perks get too expensive.
Auto Job Strategy
Auto Job
For the record I base all that of personnal data gathered during a ng4 and ng5 runs with auto job.
NG5 build was gen xp=3; instinct xp=4; auto job=3. Ended in 4d9h at gen 200 and something like 2.3M belt hps. However I died a lot dumbly in ch8 and did not apply some common sense advices I gave in this guide, so you can easily beat this number by quite a bit. I valued instinct xp over gen xp more because I intended a lot of repetitition.
Bare Minimum strategy: Instinct xp = Gen xp = Auto Job = 3. Allows you to compress your runs enough so you can clear the game in sub 4d if playing perfectly but realistically you'll probably get a bit more ^^'. It is very clutch, you'll need a pretty good understanding on early chapters to scum as much hp as possible while zooming.
Comfy Baseline: Instinct xp = Gen xp = 4; Autjob = 3; food value = 1. Food value really improves the areas where the build struggles the most by ensuring you can pass the monkeys easily without sharks, progressively bringing you food in the worst areas of C7(pelicans in combat chain) and C8(few bull meats during seals allowing you more capture)
afterward: try hitting instinct xp = gen xp = 5 at some point, then put point gen after gen in either food value to reduce ch7 grind, max hp if you feel like you need more "steroids", decay perks are pretty strong as well. You can also increase auto job over 3 obviously. Then when decay perks start beeing expensive or if you start killing dragon after building the cabin in C5, get points asap in hourglass perks so you don't fail hp booming(don't remove from xp perks for that, and keep auto job at 3 or more).
Strategy for auto job:
- Run is straightforward up to C7, you can try a pseudo no fish there but it will be less powerfull as you'll passively get xp. You'll go way faster and won't be able to stall dragon so you'll have less hp than regularily, you need to maximise what you can have. I finished my ng5 run with less than 2.4M hp belted ok.
- Try to maximise the amount of jobs available on your screen, for example in C4 you want to do saphire last as saphire temple is longer than the 2 others, in C3 don't cook crabs instantly move to coconuts first, etc
- chapter 7 with autojob:
As a rule of thumb, always reject shield as long as you have no pelicans in your inventory
Boom woodcutting xp normally but switch fast to ch6>ch7 taking hourglass temporary buff but you can skip funnels for now
Keep attacking bull as it is more optimal in terms of instincts gains
Progressively turn on max priority on vegetables and lianas hence you can reach reject shield
Turn off farming high priority as you get your first pelican for bull and start claiming shield
Hunt bull, kill lion, then funnel right of the bat and do 2 double funnels runs, 3 if you can and Hydra isn't done yet (you'll have to tightly micro bull meat on hydra). Skip funnels for now - chapter 8 with autojob:
first run as usual rushing limestone with cart and pickaxe and overfarming it
do ch6(temporary food cd)>ch7(claim or reject if you feel like it) shield>ch8
you can die to walrus if you game is configurated properly, be certain to have the magic checkbox checked in the options, you want catch/cook seals and walrus and the exploration prior to it on high priority
if you don't mind microing, rightclicking the follow poachers encounters allows you to top seals and manually fishing seals if full hp ensure that you are getting as much seals as possible
f+ perk allows you to trickle bulls in there allowing you getting more seals, funnels, max hp help a lot as well there- chapter 9 with autojob
after c8 completion, try to reach path around lava with chapters order 6>7>8>9
start doing triple funnels(hourglass, shield, tooth) while ending at path around lava
if you can't triple funnel anymore but still can't path around lava, consider running 7>8>6>9 and doing jaguar/gorilla(if you still can't do a bit more funnels and chip away at them to get combat xp). As you're squishy never stop running chapter 6, even if it will slow down early C10 prog, you'll recoup hp and be better in the long run. Otherwise it's up to you.
-chapter 10 with autojob
even if it's heartbreaking, consistently buy as much food as you can from the middle floor to pass the gathering treshold encounter eventually (overgather lianas and vegetables as well, it helps)
the perk is also pretty bad in the top floor but it's not as bad as it can look
-chapter 11 with autojob
laugh at the guys without autojob, this perk owns there
Perks Analysis
Perks with Ch 10/11 update
Hourglass perks have gained an implicit buff of value(enabling earlier doublers and more funnels), notably f+ baseline effect is noticeable.
XP perks are extremly solid there
Autojob is very detrimental during C10 progression and very beneficial in the second half of C11
Decay is less of a factor in the later stages of this content segment, but base decay perk will still help
Generalities about perks
What is interesting about the perk system is that on one side perks costs increase exponentially, wich makes you want to spread an spend your point in different ones, but very often perks can be synergistic with each others giving you over time more than their base value.
Lots of perks seem to have decreasing returns, their effect is actually linear, beeing 5% better for example than the previous rank. if you have both xp instinct at 1 in a run and put them to two, it will feel proportionnally as strong in the next for example, same for things like combat shield, food cooldown etc.
Xp perks
Generation exp: Extremly beneficial no matter what your strategy is currently. It provides a small but very meaningfull fixed acceleration to your job multipliers over your current generation. It has the side benefit of greatly improving the rate at wich you pass breakpoint encounter(like catch tief in chapter 5) as well.
Instinct exp: On par with generation xp. It improves the way you scale skills instinct multiplier but this time over a run.
Note on Xp perks: Those perks effect are multiplicative with each other and are the main tool at your disposal to compress your runs overall. Every other perk should ideally be lower or equal level to those as their value per point is clearly superior.
Decay perks
Investing on decay has a meaningfull impact on total run lengh oposite to popular beliefs, base decay also tends to save more raw generations per point per run than other perks.
Base decay: 1 point of this perk gives you roughly 13.79 seconds advance on your previous decay. It may look bad at first but it is at the end of the generation that xp gains are the biggest, those seconds of progress gained per generation per point add up really fast over time. It is not a perk that you'd take over xp perks(wich increase your gains no matter what) but it can be a filler if you don't feel like you need extra utility perks and it will have a positive impact on your run. Also maybe you were just needing extra seconds to just stabilise food in a run and actually gain a ton of extra value. This perk is the only perk that reliably provides a bit of everything, makes you take less generations in your run, saves a bit of time(not much), while giving you relatively more hps than before as you progress. It's never a bad choice and it's confortable on your micro as it saves generations.
Decay Growth: This perk is absolutely trash until EXTREMLY late into ng+(like when all the other perks are very high). The effects of it are explonentially increasing the further you stand in a generation but due to the way decay naturally growth, it starts having a minor impact only after 45-50mn in your generation, it will make a difference in your early runs. Its value increases slightly per investment in perks that do increase your run length(food cooldown reduction, base decay, max hp) so at a point that almost no player will probably ever reach(NG300+ or something) it will gradually starts becoming more and more attractive and eventually becoming the best perk to invest in once you'll reliably do 60mn+ generations.
Here below is the exact formula to calculate the benefit of those perks:
ln(1/(0,95^base_decay_perks))/ln(growth)*60 (credit: Paseux)
"Hourglass" perks
I have a very personnal opinion on those, wich differs from others, please don't hesitate to discuss it in comments if you feel like you have something productive to say on those. I'm still pretty convinced of what I'm saying
The big advantage of those perks is that they are heavily synergistic to each other. F+ compensate F- issues(at least on paper) and shielding and increases to healing have a direct quadratic synergie meaning that these get better the further you increase their value in conjonction.
Those perks are all pseudo farmable in game through funneling later on. The main critic I can do to those perks is that they are very situationnally usefull compared to some other perks and such may prove to have very limited impact on your run progression speed. You want to pick them for good reasons. Early on in NG+, if you fear just for survivability 1 or 2 ranks of max hp perk over any of those is enough.
Combat shield: If you had to intellectualise the real value of this perk, 5% damage reduction is +- equivalent of 5 instincts level of your skill against a decay encounter in terms of total damage dealt to you with the extra benefit of giving you the chance of maybe eating a bit more during it and loosing less hps overall. There is no drawback combining it with ch7 claim shield. It is overall a very mediocre perk in a vaccuum but it can be used to enable certain strategies and it help solve issues in later ng run, it has also the merit of saving a bit of food along the way and synergizing with f- and hp perks pretty well. Lots of things that do damage to you other than natural decay are solved by having more hp and benefit from f+ perk. I'd recommend staying away from it your first 5-6 generations as it's very weak at compressing your runs.
Food Cooldown(f-): It increases your heal per second from food at the cost of making you consume more food wich in turn makes you use your jobs more. Some people love it, I find it lackluster but compared to combat shield it is more versatile as long as you have food. This is a very popular perk around the community. Despite it's invasive impact on your run(gathering more food), it is more versatile than combat shield as it is actually effective against decay and health losses. Heal per second helps on gathering more of the dreaded seals.
Food Value(f+): It slightly increase heal per second and greatly increases food value at the cost of increased food cooldown. In a vaccuum it makes you naturally do less food related jobs by generating "virtual food" but it also allows you to bring more food with you in certain situations. It is extremly synergistic with the auto job perk as each points in it have very meaningfull impacts in the areas of the game where auto job struggles the most.
Auto Job
This perk dramatically decreases the lengh of your runs, however i has a massive amount of downsides. I don't recommend this perk before NG4 or NG5 as its issues are solved by massive run compression and a skillfull enough run to get hps properly in a very compressed run of ch4 and ch5 atm . I'll discuss what I consider a decent enough base template for Auto Job builds down the lime. It is objectively the most powerfull perk to work around.
drawbacks of auto job
it removes one gameplay element: cannot stockpile uncooked food for difficult encounters
increasingly degrades your ability to block progression in some segments by skipping a job for a while wich can be horrible for hp growth
shortens runs while not providing anything on combat encounters, making you even squishier
Health Gain
This is the ultimate confort perk.
Most of the time it also makes you less reliant on food sheaniningans(confort and idleability), and it also naturally stretches your run a bit(so it also shrinks your playtrough a smidge) even if you don't particulary need it. At higher perks count, it also negates the compression effect of xp perks and autojob.
Perks Tierlist
It's left there for now because it is mostly accurate however it really doesn't reflect the way you should approach choosing perks, and I fear it can get missleading or even toxic. (may be removed, a bit ashamed of this section)
Disclaimer
The main criteria is the effect of the perk on your overall run lengh in a vaccuum. I remove or add 1 tier based on the eventual drawbacks a perk can have. For example, if food cooldown reduction was not arbitrarily taxing from the time you spend on non job tasks, wich I consider a drawback, I would put it top tier.
A tier
Both of those perks have direct impact on you run lengh. They are also effective at beating treshold encounters faster(naturally bigger skills multipliers), due to accelerated compression these are also stellar against decay effects in/and decay encounters. On top of all that, these are very synergistic with each others and have very positive synergies with most of the other perks. Despite being universally effective, overly compressing your run can reduce your hp growth when hitting wall wich can reduce their effectiveness if you don't invest on other perks at some point.
Generation xp
Instinct xp
A- Tier (or Autojob Tier)
Autojob: This perk is extremly strong at compressing the duration of your runs but the milleage varies too much depending on your other perks, it is very unoptimal in early ng+ runs(tryed it, doable but not optimal and more tedious than it should be). It also supress gameplay elements (saving food) wich is unfun. I recommend toying with it but the more you delay incorparting it, the smoother the transition will be. (bare minimum from my testing is having gen xp = instinct xp = autojob = 3 and a bit of f+ to beat ch7 a bit earlier)
B Tier
Those perks are less good at compressing your run than A tier ones, however these make your runs smoothers/longers no matter what happens and still have positive impact on your instinct xp gains.
Max health gain: This perk has amazing scalling per rank and its effect is easy to evaluate against walls, it also makes your last a tiny bit longer per gen(so it also naturally accelerates your run a bit).
Base decay: It is probably the most balanced perk in terms of overall returns. Decay is often an overlooked effect when failing an encounter, the game lengh decay is actually often what makes the difference between passing something. Staying longer at the end of your gen also dramatically increase the total experience gained this gen wich in turn accelerate your whole run while increasing your hp gains slightly. Even if the gain per rank on this perk is low, it gets some noticeable job done at every rank. However if you get stuck low decay on an encounter is doesn't help.
Food cooldown reduction: very versatile perk as it helps a bit with natural decay and decay encounters but it makes you use food job more. I do prefer equalizing it with the food value perk. This one is a community favorite and is pretty good at dealing with most of what the game throws at you. Don't make the mistake of overinvesting in it, mix it with base decay(the perks synergize very well) and food value.
C Tier (Reactive perks)
Those perks are more situationnal or less relevant than the previous ones, but may situationnally prove to be very effective as solving an expected issue during your run or be more point efficient down the line.
Increased food value: the perk scales amazingly well and is pretty strong in some later portions of the game. Even if it doesn't directly increase the speed at wich you gather things, it makes the action actually more effective. This perks is amazing as squeezing generations of ch7 and ch9, pairs extremly well with food cooldown.
Combat shield: It's usefull at getting decay doublers earlier and getting through some bottlenecks earlier. However its scope is very limited during a run, there are better perks but it's worth investing in it when better perks start getting expensive. I don't particulary fancy putting point in this but it doesn't disapoint either. As long as it is very low priority it's fine.
D tier
The perks that you use as filler when everything else is too expensive and can't really be refactored
Decay growth: When reaching higher dna pool, you can temporary dump points you can't put anywhere else there, it's value grows a your ability to stretch runs but its initial value is abyssally low. It's a clear non factor until very late into ng+.
Early NG+ advices and builds尽快勾选那个选项,它本应是默认行为但目前并非如此。勾选后,你无需完全收集或烹饪一整堆食物,就能执行与食物优先级相同的操作。这不仅能提升你对自动化的控制,还能防止你在C8中因海豹和海象而死亡,无需进行微操。
当前“休闲”第11章的配置:
基础经验值=本能经验值=4
基础衰减=3
衰减增长=1
F- / 战斗护盾 / F+ =3
最大生命值=3
自动工作=3
下一轮我可能会将基础衰减+1、生命值增长+1,或者增加1代际经验值、1本能经验值,具体取决于本轮中是否发现明显的不合理瓶颈。
配置方案:
第一轮:代际经验值=本能经验值=1。灵活点可选基础衰减、食物冷却时间或最大生命值。如果你对自己最大化生命值的能力没有信心,可以选择减少食物冷却时间;如果你不确定但想要一个缓冲,可以选择最大生命值。基地衰减压缩运行略有提升
第二阶段:生成经验值=本能经验值=2。灵活位置作为生成1
第三阶段:生成经验值=2,本能经验值=3。你会知道如何用剩余点数进行选择,但随着压缩的增加,最大生命值变得相关
第四阶段及以后:你可以继续使用基准策略,逐步投资衰减和增益类技能,因为经验值技能会逐渐变得更贵;或者使用定制策略更快跳过c6(存在权衡);或者添加自动任务作为另一个加速运行的乘法层。你引入自动任务的阶段越晚,体验会越舒适,但如果操作得当,从新游戏4/5阶段开始,自动任务就是净收益放松型与“阈值型”策略
保守/放松型策略
其核心思路是专注于你游戏过程中的棘手环节,从而让游戏逐渐变得更适合“放置”(idle)。就有效游戏时长而言,这种策略本质上并非最优分配,因为它会导致一些“过度击杀”(overkills)的情况,但对玩家来说更为轻松。例如,如果你发现自己需要手动操作5个生成点(gens)或某个遭遇战,那么在这些遭遇战上分配点数,从机制层面会减少你下一轮游戏中需要手动微操的时间。
阈值型策略
这类策略在表面上看似保守型策略,但实际上玩家会量身定制自己的build,通过跳过游戏的某些部分来节省时间。这是一种有得有失的策略,通常能带来不错的游戏时长。根据可用DNA的数量(即已进行的游戏次数),你可以采用不同的游戏策略。
举个简单的例子,比如投入点数到f-、f+和战斗护盾,以弥补你在前一轮游戏中为了跳过沙漏相关操作而集中投入的属性。
游戏Discord中的Baldain分享了一个相当不错的C6早期跳过策略,在早期新游戏(NG)阶段表现很好。
简单来说,Baldain的阈值策略如下:
战斗护盾=2
食物冷却时间减少=2或更高
最大生命值成长=2或更高
剩余点数投入经验值、衰减或f+相关技能
在C4阶段跳过钓鱼,甚至通过跳过一些工具来提升生命值,直到击败巨龙,然后在C4和C5阶段实现生命值的大幅增长。仅完成一次C6阶段,期间不制作汤(仅依靠C5阶段的食鲨和鹈鹕来通过猴子关卡)。不要再打第六章了,通过按顺序完成第七章>第八章>第九章来通关游戏。这种策略能在第六章到第八章之间提供非常快的经验值获取加速,但在游戏前期效果并不特别好,而且如果投资速度属性的话,这种策略就会失效(因为第六章的压缩机制会降低生命值)。


两全
2026-02-20 01:00:14 · 发布在 「Increlution」
这是一份简单的视觉指南,旨在帮助你在任何分岔路情况下选择最佳路线。
说明:
嗨,这份指南并非追求极致的精致。
这只是我为自己制作的东西,既然已经完成了,就想着不妨分享出来。
本指南主要涵盖【分岔路线】以及每条路线上能找到的东西,尤其适合你想专门训练某项内容或获取特定物品时(有时你必须在一些选项中做出选择)。
本指南【不包含可选内容】。我们默认你无论如何都想获取所有可能得到的东西。
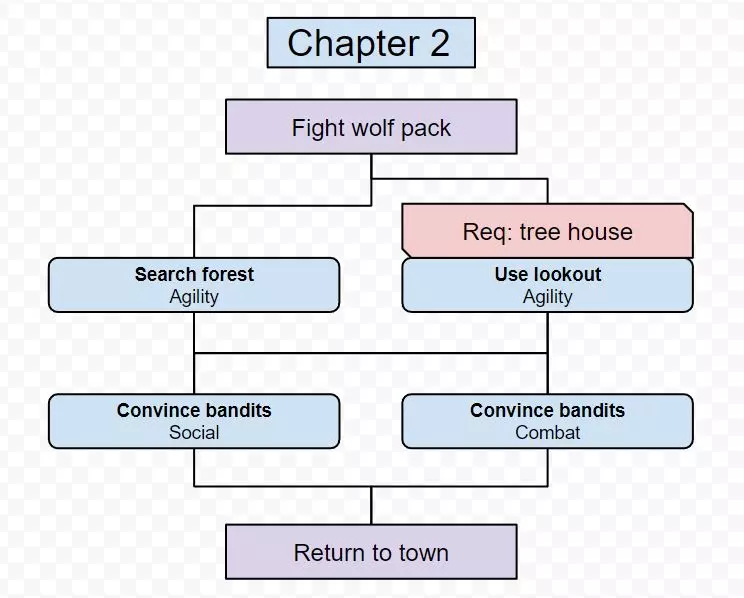
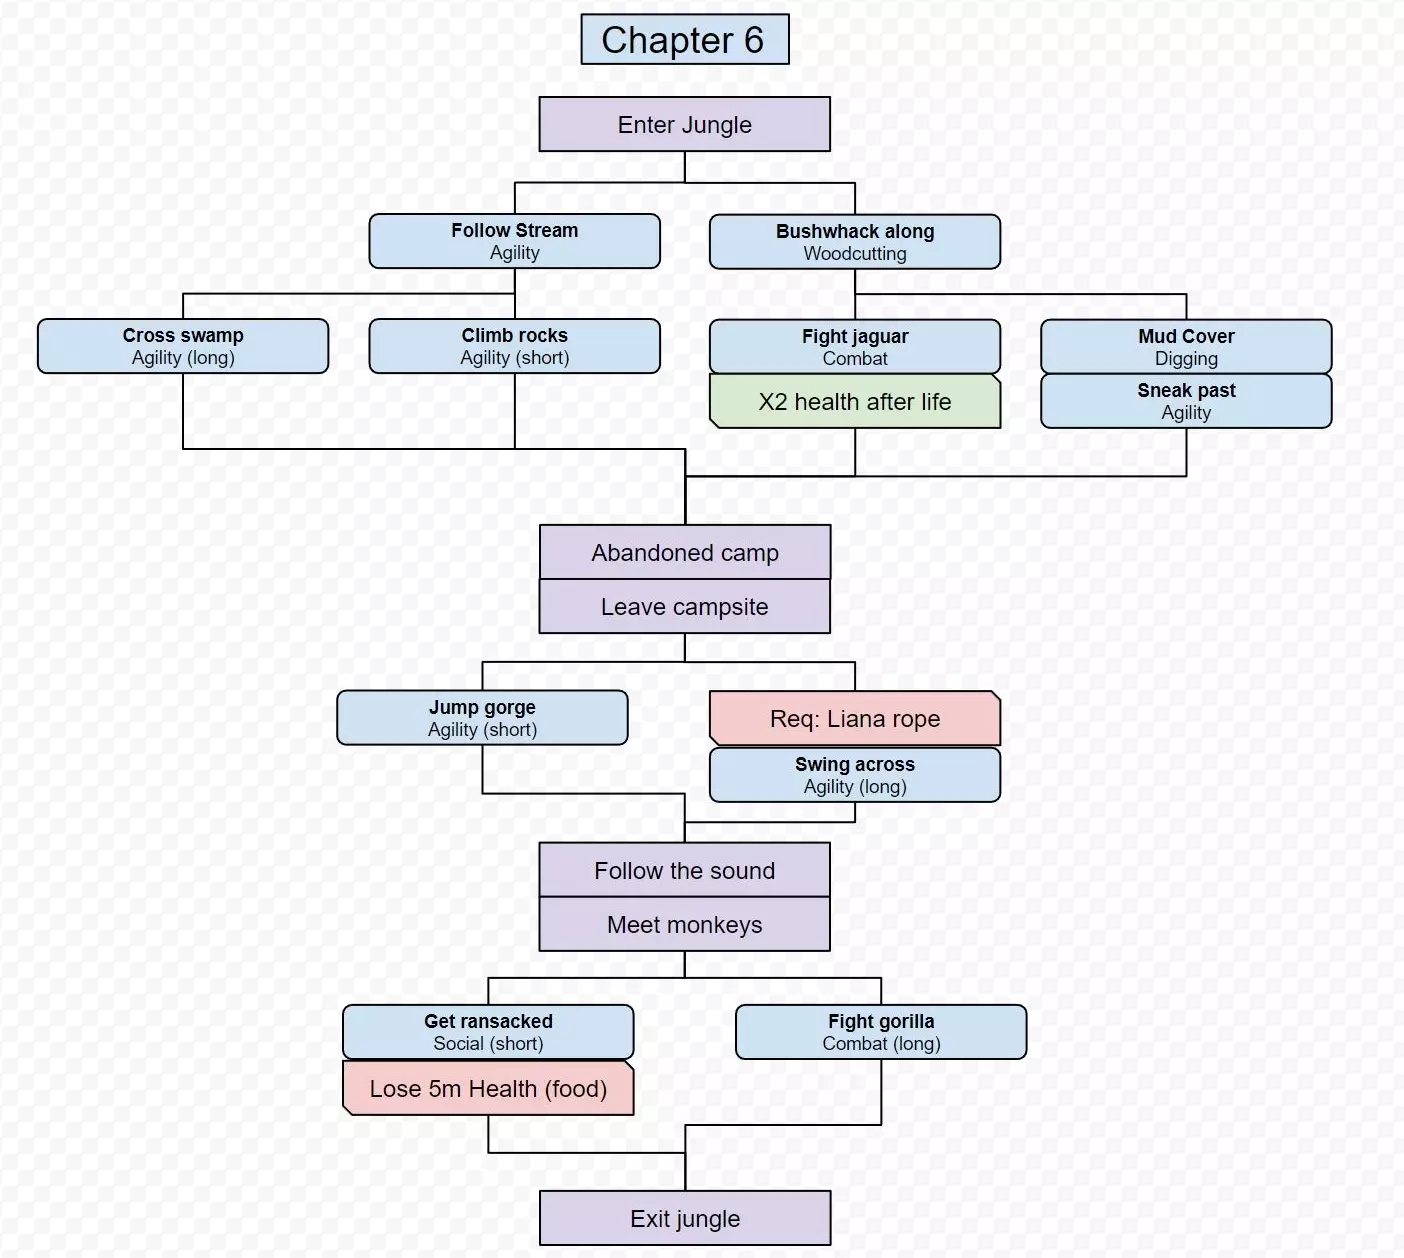
第2章第三章第六章
提示:
如果有人在最大化路线并顺利完成整个流程时遇到困难,可以尝试按照第七章、第六章、第八章的顺序进行。这样可能会有更好的刷取效率,至少对我来说很有帮助。
将【向北航行】设为最高,【向西航行】设为高,【向东航行】设为常规。
另外,我注意到如果基础生命值不足,【捕捉海豹】很容易导致角色死亡。如果这是第八章的瓶颈,将【捕捉海豹】设为关闭,【探索泥滩】设为关闭,【烹饪海豹】设为最高。到达那里后,先开启一次【捕捉海豹】,然后立即进行【探索泥滩】。这样可以获得足够的备用食物来通过海象关卡,同时不会让生命值过低而被海象直接杀死。当基础生命值达到约600万时,会感觉轻松一些。当然,这只是一个大致估算,因为有很多因素会影响这一点,比如永久沙漏增益。第七章第八章

作者信息
下载233乐园APP
专心推荐好游戏
纠纷处理及不良内容举报电话:
4006600910 (工作时间: 9:00-12:30,14:00-18:00)
北京市朝阳区启阳路4号院2号楼15层1803室
本公司产品适合10周岁以上玩家使用 未成年人家长监护