


BATTLETECH
 Steam Deck
 家庭共享
家庭共享 云存档
云存档

BATTLETECH/MechWarrior 原创者 Jordan Weisman 和获奖的 Shadowrun Returns 系列的开发人员共同创作了下一代回合制 'Mech 战术战斗。 故事发生在 3025 年,银河系陷入了无休止的战争轮回,皇室贵族们使用大量名为 BattleMech 机械化战车进行作战。当您发现自己卷入一场残酷的星际内战时,指挥自己的雇佣兵 'Mech 和 MechWarrior,努力维持生存。升级您的星际作战基地,与封建领主协商雇佣兵合同,修复和维护老化的 BattleMech 队伍,执行毁灭性的战斗战术,在战场上击败敌人。在回合制战斗中指挥一小队 ‘MECH以各种各样的组合部署 30 多个 BattleMech。利用地形、定位、武器选择和特殊能力智取和打败对手。管理雇佣兵公司招募、定制和发展独特的 MechWarrior。改进和定制运输机。作为一名雇佣兵,穿越广阔的太空,投靠各种皇室贵族和地方派系,接受任务和管理您的声誉。参加绝望的内战沉浸在一位被暴力废黜的统治者的故事中,发动残酷的战争,在杂牌雇佣兵公司的支持下帮她夺回王位。定制您的 'MECH用 MechLab 来维护和升级您的部队,用战场上从战败敌人那里夺来的装备替换毁坏的武器系统。玩家对战 (PVP) 多人游戏和小规模战斗模式为 ‘Mech 和 MechWarrior 定制长矛以与好友们正面交锋,在网络上与对手抗争,或进入单人小规模战斗模式,与人工智能 (AI) 对战,检验您的战略。
游戏圈
共21条帖子

冰豆鲨
2026-02-14 13:00:22 · 发布在 「BATTLETECH」
There are quite a lot of mechs, but there are some far better than others, and there are some far worse than others. This guide will tell you which ones to get, and which ones to sell.
1. Current Weapon Balance In This Game (as of 2020 1.9.1 Patch).
It is impossible to talk about the mech's performance without weapon balance in HBS Battletech game.
Forget about the table top balance, since HBS pretty much changed a lot of values here and there, and they added a thing called stability damage, which is loosely related from roll when a mech is taken more than 100 damage (20 from tabletop). Here are quick summary.
1) Normal PPCs are way too hot and limited thanks to nerfs on numbers and the nature of the game where long-range combat is rarely effective.
2) HBS buffed ballistic weapons, with ammo explosion far less common since all empty critical spaces are now acting as pads.
3) HBS kind of nerfed missile weapons' raw damage but gave them immense stability damage.
4) With all of visibility changes and maps themselves, range advantage is shockingly small.
5) This game uses hardpoint system, which was invented in MW4 era and used by MWO and now this game. Thus there are hard limit on customization on mechs' weaponry unlike MW3 and older games.
Consider the fact that the fastest and the most reliable way to kill a mech in a game is...
1) Knock the mech down with weapons with high stability damage.
2) Use free precision fire to destroy center torso.
3) Keep doing this since a player is always outnumbered by 1:2 or even 1:3 if you got a bad roll on a mission difficulty.
These three requirements mean that you need a heat efficient weapon that does a lot of damage to quickly destroy knocked down mech's center torso.
Energy:
The biggest issue for all energy weapons with exception of PPC is that they have ZERO stability damage. They do not contribute knocking down a mech, which makes them highly undesirable when you want to knock down enemy mechs. However, unlike missiles which now have complicated mechanics, energy weapon can reliably focus-fire well with precision-strike, very well-suited for a finisher job mechs which are supposed to have very high alpha damage to kill downed mechs. Try grab ER Medium lasers and pulse lasers as many as possible.
PPC can be still somewhat usable on light mechs and lighter medium mechs which do not have enough tonnage for anything other than energy weapons, and can utilize internal heat dissipation values (-30). Good example of mechs that can be used with PPC are Panther and Vindicator.
It's a bit different for Snub PPC, which is essentially en energy version of LBX cannons, which is better than LBX cannons themselves. While standard ones is about as sub-par as normal PPC, enhanced versions such as +10 damage or stability damage is exceptionally strong because the damage applies to each shot. It means +10 damage Snub PPC actually does total of 50 additional damage to the target. +10 stability damage alone gives total of 75 stability damage, which is just 5 damage shy from normal LRM20, with 4 tons less and no need for ammo. It is highly recommend to look for those enhanced Snub PPCs for your light and medium mechs.
Ballistic:
With introduction of UAC, Ballistic is the best weapon as of 1.9.1. They are very good weapons against vehicles, and can instantly kill some of lighter mechs and/or cripple mechs if luck is involved.
LBX versions usually have far better values than standard ACs, but the catch is LBXs are shotguns, which acts more like LRMs rather than pinpoint ballistic. LBX-2 suffers least from this huge drawback, but the problem of heavier LBXs is that they have to compete with LRMs for their job. With LRMs can do indirect fire and have more range, LBXs are unfortunately not really good choices for your mechs. LBX-2 is exception and it acts like a better version of AC-2.
But the real deal is UACs. They fire twice, and the enhance versions usually have negative tonnage advantage, which makes them lighter than normal ACs. Only issue is rather massive refire penalty for heavier UACs. After firing UAC for couple of times, the accuracy decreases so much that you have no choice but not fire every 3rd or 4th shot. But lighter UAC does not suffer much from refire penalty, thus making UAC-2 and UAC-5 exceptionally strong weapons. Even with refire penalty UAC-10 and UAC-20 are generally much better than normal AC-10 and AC-20 regardless.
Missiles:
They were the best weapons in this game before the intorduction of UACs. SRMs give you both very high raw damage AND very high stability damage. However, now SRMs don't do well for precision strike because for each shot they lose precision strike hit chance bonus, cutting down overall alpha damage about 10~25%, which is actually significant. For tonnage, heat and damage involved, UACs match SRMs, with better range.
LRMs' damage is rather deceiving, due to its forced spread damage nature that does not bring pinpoint damage, but the LRMs' role is not for damage dealer; they are for dealing stability damage to knock down mechs and remove evasion charges by making target into 'unsteady' status. LRM's rules are so crucial against heavier mechs which have huge stability health. It is always wise to grab any +stability damage variants as many as you can. Even with the introduction of LBX, with indirect fire, LRMs are still better choice for stability damage.
Support:
The hardpoints for small lasers, machineguns, and flamers. They were actually quite powerful, but then they got a huge nerf bat on 1.1. Small Laser is a bit hot now, and flamers just do not have enough ammo for single player missions, Machineguns got the least nerf because precision strike penalty does not matter much at close distance, but it is still nerf regardless.
They really need to be boated to be useful, thus look for mechs with a lot of support hardpoints are very valuable.
Conclusion.
1) Lasers : Good for finisher and maybe generalist, but with lack of stability damage hurt.
2) ACs : Most powerful with UACs. Can do both raw and stability damage, but all of them are direct fire.
3) SRMs : Second vest for generalist with high damage, still effective for finisher.
4) LRMs : All about stability damage. Dedicated role.
With all of balance situations, your typical lance composition would be...
1) 2 LRM boats. Primary weapons : LRMs + some side weapons.
2) One high-alpha finisher. Primary weapons : UACs, Lasers, SRMs + some LRMs.
3) One generalist. Primary weapons : UACs, (Snub-PPC), SRMs, Lasers, LRMs.
(weapon choices are ranged from best to worst).
LRM boats are... LRMs. High alpha finisher should have a lot of lasers and maybe some SRMs to reliably focus fire knock down mechs, and one generalist mechs that should have some stability damage in case two LRM boats failed to knock down the target completely.
Additional Info
https://docs.google.com/spreadsheets/d/1lbJj-yOgFc1sXgW7Cjcn_gzE1-VPiIOV-bV4tlUgOdU/edit#gid=1245211847
You can quickly look at the spreadsheet and realize what's going on the weapon balance. It is good to remember that numbers from this spreadsheet does not account stability damage.
2. Mech's Speed, Available Tonnage, Initiative, And Hardpoints.
Well, faster a mech can move, it has less tonnage available. Really simple.
The problem is this issue is far more severe than everyone would think.
Quickdraw is a 60 ton mech, and Vindicator is a 45 ton mech. However, there is only 0.5 availabe tonnage difference between two despite the fact that Quickdraw weights 15 tons more! It gets far worse after you use additional tonnage on armor.
Yes, Quickdraw actually moves more distance than Vindicator does. And yes, because since it is a 60 ton mech, Quickdraw can put more armors than Vindicator (but also make available tonnage problem worse), but you really have to consider whether fast movement and a bit more armor are really worth for losing so much tonnage.
The truth is, unless we are talking about light mechs and melee mechs, speed hardly matters (yes, you can ignore Escort missions if you want) in many situations, while additional armor is still worth it.
And then the initiative issue destroys these fast-moving heavy mechs. While they can move fast, they STILL have lower initiative compared to lighter mechs, which limits tactical choices available to them.
That being said, it does not mean speed is completely worthless. Higher speed mechs can position far better than slower mechs, allowing those mechs to flank the targets.
Finally, unlike traditional TT, this game follows hardpoint system which was invented during MW4 era. Basically, there are some limits on what weapons could be placed on which part of the mech. This creates a lot of interesting choices, strengths and weaknesses on each individual mech.
For instance, a mech that has all the weapons on arm really can't shield (that is, showing only side of the mech so the enemy cannot hit center torso directly) because it will lose weapons on the arm.
Some have weird hardpoint locations, such as Shadowhawk's missile port on head. It means you cannot put bigger missile weapons such as SRM6, while other mechs such as Griffin, while having same 3 missile hardpoints, does not suffer this issue.
More interesting is probably ballistic locations for Atlas and King Crab. For Atlas, both B locations are on a single side torso, this restricts the size of weapons you can put if you are going to use both hardpoints. Also very vulnerable against a human player, since he/she will try to get rid of that ballistic side torso asap.
But then, unlike King Crab, Atlas can shield, while King Crab, with each AC20 on each arms, will lose a lot of firepower if it tries to shield and loses an arm in process.
Finally, all mechs have basic 10 heatsinks which are embedded and not shown on the mech lab. The lostech versions of the mechs are configured with double heatsinks. It means instead of normal -30 heat generation, those lostech versions have initial -60 heat generation, making those mechs incredibly valuable.
In conclusion, you want to find some balance between available tonnage and speed with initiative issue in mind, as well as hardpoint locations.
https://docs.google.com/spreadsheets/d/1fnaqQv8nnYpy9gtQm75-D6fmYfNJ5u3OALSIe8ckOuo
This is a comprehensive spreadsheet for mechs, and so much more. But for now, we are focusing on mechs. The spreadsheet has information for all mechs for its available tonnage and other information.
3. Too Light To Assault.
In this game, light mechs are rather lackluster compared to heavier mechs. This game is NOT Mechwarrior Online.
It would be so much better if evasion mechanic is stronger. At least now there are missions with limited tonnage and stuffs, but the majority of missions still have no limit on tonnage and no negative consequence for bringing heaviest mechs possible.
With no missions elements favoring low tonnage loadouts, light mechs hugely underperform most of the time, with exception of some certain main missions which have some sort of time limit on certain objectives.
Of course, there are exceptions, such as Firestarter. But the mech's strength is mostly from having a lot of support hardpoints, not the strength as an light mech.
Even worse in 1.1, light mechs have the smallest stability health compared to heavier mechs. Assault mechs have twice more stability health compared to light mechs. Most of the case, light mechs are simply not competitive against heavier mechs.
You really want to ditch lighter mechs and deploy heavier mechs as much as possible. It is very highly recommend to ditch THAT Spider and Locust at the start of the game. The best way is keep playing main campaign until Argo mission where you get a free Centurion (without weapons though), which is one of the best medium mechs thanks to its immense available tonnage and excellent weapon hardpoints.
Speaking of ditching mechs.....
4. DO NOT SCRAP. DO SELL.
Yes you get MORE money if you don't scrap unneeded mechs.
1) Store the mech first.
2) Go to Store, go to sell.
3) Sell that stored mech.
You will get more money from selling the mech to the market than using scrap. There is absolutely no reason to not use selling over scraping.
5. Light Mechs.
1) Locust.
They are all fillers. You do not want to use them, even in the worst situation. This mech literally has only about 2.5 tons of available tonnage left if you decide to max out frontal armor. Just not worth it. All of them are not worth it at all.
Maybe 1V, which you can do 1ML + 3SL and do some backstabbing, but there are far better mechs with enough tonnage to get better weapons.
Verdict : Sell it.
2) Commando.
Still no. Well, definitely better than Locust, with 1B variant you can do 2 X SRM4 + 1 X SRM2, which is respectable firepower, but still these light mechs have almost no armor and will die quickly once enemy mechs focus fire on them.
Verdict : Sell it.
3) Spider.
NO. JUST. NO.
Verdict : Sell it.
4) Panther.
So finally a mech with some good tonnage. Of course it sacrifices speed, making the mech not-so-good choice for scouting, but at least it can pace with medium mechs no problem.
Stock setup is not so good because PPC and SRM has some serious range conflict. Either...
PPC + LRM10 for long range.
4 X ML + SRM6 for short range.
would be better than stock setting. You can completely remove armor from the left arm to do some tonnage saving. With frontal armor maxed out, you will get 14.5 ton of available tonnage.
Panther is indeed a usable mech, but you still want to go for a bigger tonnage mech if possible.
Verdict : Keep it til you get medium mechs.
5) Jenner.
Ah Jenner, it is a powerful mech, if you make it into paper. But with frontal armor maxed out, you can only get about 6 tons of available tonnage. Quite not enough.
The trick is either going for full lasers (4 X ML) or full missiles. You can put 2 X SRM6 and two tons of ammo by striping all arm armors and additional striping on other places. Or you can go 2 X SRM4 and get some more armor and jumpjets.
I have to say 2 X SRM6 is very powerful, for an light mech.
Verdict : Keep it til you get medium mechs.
6) Firestarter.
A very extremely useful mech with 6 support hardpoints. It also has 6 energy hardpoints and 2 ballistic hardpoints, but they are not really important factors. It is not like you can utilize those two ballistic hardpoints on a 35ton mech with 3025 IS tech weapons.
Right now the best setup would be the mix of machineguns and small lasers. Unless you are making this for multiplayer, you will find flamers' fuel is too short.
This is really a good mech, and for some main campagin objectives, you really want to have at least one.
Verdict : Get it.
7) Urbanmech.
UUUURRRRBBBIIIIEEE!
The urbie!
....
It is good. The movement is indeed that of assaults, but it has the armor of medium. It is an usable mech. It is really a stop-gap in case you fail to find a proper medium mechs.... but you get that Centurion for free if you progress main missions.
Verdict : It's the Urbie. The Urbie. You should have at least one, regardless how bad/good this mech is.
8) Flea.
So the DLC mechs in general have 'quirks' and for Flea it has defensive one. It has +2 Hit Defense, making it a bit more tankier than other light mechs. But still it is just a 20 ton mech so it will die very quick as soon as it loses evasion charges.
FLE-15 variant looks good with 5 support hardpoints, but the problem is it simply does not have enough tonnage to actually utilize them unlike Firestarter.
Verdict : Sell it.
9) Javelin.
It is a better version of Jenner. It loses some speed but for that it obtains more armor and more usable tonnage while 5 tons lighter than Jenner. It means you can pull off 2 X SRM6 build with a bit more possible tweaking. But yeah, that energy-only version should be avoided.
Verdict : Keep it til you get medium mechs except 10F which you should just sell it right away.
10) Raven.
The problem is that ECM is rather meh with current implementation, and sensor lock simply cripples an ECM mech way too easily. Area Sensor Lock is just.... well, not very good with such low range. Still 3X can do some heavy damage with its two missile hardpoints.
You will get one for free if you do a specific mission. I'd say just give one of major powers for favor points.
Verdict : Sell it for 1X, keep it for 3X
6. Medium Mechs 1/2.
1) Cicada.
So, just how bad is Cicada? This is what you need to know:
You cannot max out frontal armor on 2A variant. It is not possible. Even if you put zero armor on backside.
3C is a bit better and almost as fast as 2A, still it has only 5 tons of available tonnage after maxing out frontal armor.
Just. NO.
Verdict : Sell it. I mean you should try to NOT get a fragment on this mech. Seriously.
2) Vindicator.
A straight upgrade from Panther, with similar setup. By being slower, this mech can have similar available tonnage compared to heavier medium mechs.
Once again recommended setups are basically enlarged versions of Panther's. Either PPC + LRMs as a stability damage dealer, or medium lasers with SRMs as a finisher. Both choices are strong, but with a bit slower speed Vindicator would be a bit more useful as a stability damage dealer rather than shorter range setup.
Verdict : Keep it.
3) Blackjack.
Oh yes, very first mech you will ever control, as this is your main character's mech.
Fortunately, this mech is quite powerful thanks to large available tonnage, as same as Vindicator's.
Stock setup is already powerful and surprisingly balanced. While AC2 is lackluster, it still works well with medium lasers. Only problem is their minimum range issue. In shorter range, AC2's accuracy goes down, in longer range, medium lasers' accuracy goes down. But this can be overcome by spending some experience points on pilot customization.
Of course, the stock setup is not fully optimized though. You can get rid of AC2s and put a single AC5 or two large lasers instead. With just three jumpjects, four heatsinks and maxed out frontal armor, you get a very powerful finisher. I recommend 2 X LL + 2 X ML build.
Verdict : Keep it.
4) Trebuchet.
Once again big engine problem hurts this mech. In order to have high speed, this mech is left with less available tonnage than both Vindicator and Blackjack.
LRMs are therefore bad for this mech due to lack of tonnage, but you can use it as an LRM boat if you truly do not have any medium mechs that have more than 1 missile hardpoint. But with such movement speed, you should use it as SRM + Lasers.
....but I still think you should just sell it.
Verdict : Sell it.
5) Hunchback.
So, among with Centurion and Enforcer, Hunchbacks have the largest available tonnage for all medium mechs, a.k.a "trooper" mechs. Pretty much all other 55 ton mechs to 60 ton heavy mechs have lesser availabe tonnage compared to these three. Which makes them really, really strong.
4P is pure energy variant, and 4G has that iconic AC20 on its right side torso. Considering heat issues, both of them actually end up having similar alpha strike damage (8 X ML vs UAC20 + 2 X ML) The problem is that medium lasers do zero stability damage, while (U)AC20 does.
4G is extremely powerful and you should get it if possible. 4P is ok... since large available tonnage allows you to put a lot of heatsinks, but once again without stability damage, the mech is relatively weak, but you can still use it as a decent finisher.... only because it has so much available tonnage to put many heatsinks.
Verdict for both variants : Get it.
6) Centurion.
If you finish the Argo mission, you will get an A variant without any weapons equipped.
And this particular variant is the best medium mech you can ever get. This mech pretty much has everything; lasers, missiles, and one ballistic. Perfect hardpoints for this game. And with being one of the three mechs with the largest available tonnage, you really, really want this particular variant.
You can do 3 X SRM6 + 2 X ML which does incredible raw damage AND stability damage, or (U)AC20 + ML/missiles for huge pinpoint raw damage AND stability damage, or you can use it as LRM boat with extremely powerful LRM 20 + LRM 15 + LRM 5 setup, with four tons of ammo if you do some armor stripping. It's total of LRM 40, 2/3 of LRM power from an 85 ton assault mech Stalker. With + and ++ variant, you can pretty much put any mech from zero stability damage to unsteady state with one full alpha salvo.
Seriously, you want CN9-A. And it is highly probable you will use this mech until some good Assault mechs appear.
Unlike A variant, AL has no ballistic hardpoints, instead four laser hardpoints and two missiles, which makes the mech relatively weak, but still better than others. The best use of AL would be 2 X LRM20, which is heavier than LRM 20 + LRM 15 + LRM 5 setup. This makes AL not as strong as A unfortunately. 2 X Large Lasers + 2 X Medium lasers are also very effective as a finisher with long range.
Verdict for both variants : Get it.
7) Enforcer.
Twisted version of Centurion CN9-AL, Enforcer has a ballistic hardpoint, but it has zero missile hardpoints.
However, good thing is there are big, big ballistic weapons called (U)AC10 and (U)AC20, which alleviates hardpoint number issue for ballistic hardpoints. Just like Hunchback, you'd really want to get UACs since there is no missile for additional stability damage needed unlike Centurion.
Of course, with generous amount of energy hardpoints, Enforcer can be also used as a finisher with multiple medium lasers, with enough tonnage for heatsinks.
Verdict: Get it.
8) Kintaro.
Well, you can guess with its whooping 5 missile hardpoints, but I have to say Kintaro is one of the best medium mechs available. Sadly, it does not have a lot of available tonnage like trooper mechs (Centurion, Hunchback, Enforcer), which limits choices.
Yes, it has 5 missile hardpoints, but you don't want to put too heavy ones there, it will be very hot, with very limited ammo and little armor if you go too big. Best bet is just using SRM4s, which are extremely heat-efficient among SRM family.
Verdict: Get it.
9) Griffin, Wolverine, Shadowhawk.
Why did I list all three here? Because they are essentially all interchangeable. If you look at the hardpoints, speed and available tonnage, they are literally same mechs, just with minor differences below:
-Both Griffin variants do not have ballistic hardpoints.
-Wolverine has ballistic hardpoints on its arm.
-Shadowhawk's infamous head missile hardpoint, and its strong melee (85 compared to 70 from other two), which CAN make some difference since it can easily kills vehicles with melee.
Those three are really skirmisher mechs, which can pretty much max out armor, put a lot of jumpjects with respectable firepower. They are not hard hitters like trooper mechs, but they can tank and distract enemies while your Hunchback tries to core them with its AC20.
That said, with proper pilot skills, they function better than lights as scouts.
I have to say, despite that head missile hardpoint, Shadowhawk is probably the best of three with its powerful melee attack, and both variants have all three missile hardpoints for 2 X SRM6 + 1 X SRM4 + ML. But Griffin comes really close with non-weird missile hardpoints that would allow reinforced cockpits to protect pilots from head damage.
Main campaign spoiler:
You will be able to play with Griffin 2N, which is a lostech version with ER PPC. Unfortunately, ER PPC is a worse version of normal PPC in this game. But, the mech is an Lostech version with massive initial -60 heat per turn, which allows you to use that ER PPC without any problems. With this it is probably the best skirmisher mech you can obtain. It will be obtainable from places like black markets.
Verdict for both Shadowhawks: Get it.
Verdict for Griffin 1N: Keep it.
Verdict for Wolverine 6R: Keep it.
Verdict for Griffin 2N: Protect it with your life.
Verdict for rest of them: Sell it.
7. Medium Mechs 2/2.
10) Assassin.
The quirks given to this mech is unfortunately a bit flawed. With ignoring some evasion it should be good for killing light mechs, and with enough speed that seems appropriate....
...But it simply does not have enough firepower. It is a 40 ton mech, with relatively large engine with just 14 usable tons. What actually kills an light mech is completely removing its evasion bonus, not trying to ignore some of it. If this bonus is applied to entire lance (well, that would be too OP I guess) then this mech is probably the ultimate light mech killer, but it only applies to itself.
21 is probably better version with four missile hardpoints. You can still use it as hard-hitting SRM boat and it works that way well.
Verdict for Assassin 21: Keep it.
Verdict for Assassin 101: Sell it.
11) Vulcan.
That 90m bonus range for support weapon makes Vulcan an logical upgrade from Firestarter.... except it has only four support hardpoints for 2T while Firestarter has 6. Not to mention you lose 1 initiative as a medium mech. But that 90m DOES make big difference. You can safely sell off 5T.
With +10 melee defense it is also durable against mechs that try to melee. The best usage for Vulcan would be equip it with flamers and make targets overheat. AI usually orders overheated mech to melee the target, and for that this quirks works well.
...Of course, except with limited ammo you really cannot use flamers well on singleplayer.
Verdict for Assassin 2T: Keep it.
Verdict for Assassin 5T: Sell it.
12) Hatchetman.
Just like some of melee-oriented mechs (Dragon, Shadowhawk, Banshee), except the mech is truly made for melee. You can put all melee mods so that it hits like a truck, or you can put some weapons and use it as a normal mech with strong melee damage just like Shadowhawk, either works to certain degree.
Obviously 3X is far better choice than 3F with additional hardpoints.
Verdict for Hatchetman 3X: Keep it.
Verdict for Hatchetman 3F: Sell it.
13) Phoenixhawk.
It is not as good as you'd think. So the playstyle is always jumping around and shoot, since it has 20% damage boost when the mech has jumped. It also has jump distance boost.
The problem is jumpjet does make a lot of heat, and Phoenixhawk, with just 20 tons of usable space, does not have enough tonnage to carry all the heatsinks and jumpjets cool the mech.
Fortunately, it has an lostech version (1B). It has additional 8 usable tons and tons of energy and support hardpoints, which makes it insanely powerful and have enough cooling power to continuously use jumpjets. Of course, you are not really going to salvage it from the battlefield though.
Verdict for Phoenixhawk 1B: Get it.
Verdict for oithers: Sell it.
14) Crab.
The mech is all about energy. ALL energy. Once again it has an lostech variant (27B) and of course it is super duper powerful. But it is still a boring, simple mech.
There is something NOT boring though. If you do "Steel Beast" Flashpoint mission, you will get a Crab with ballistic hardpoint (BSC-27). Of course the issue is with just 26.5 usable tons, it can't carry big guns well like trooper medium mechs.
Verdict for Crab 27B: Get it.
Verdict for Crab 20: Keep it.
Verdict for BSC-27: KEEP IT. It is an unique mech and you are not going to get it anywhere after the mission.
8. Heavy Mechs 1/2.
1) Dragon.
Do not trust Yang's words, it is terrible. There is a reason why you can easily get its fragments after a certain main campaign mission is completed.
Because it is truly terrible, because basically the mech is almost entirely consisted of a big engine to move faster.
Big engine = low available tonnage. And both Dragon and Quickdraw went extreme for this case.
...
Well, NOT that terrible because it has a very interesting aspect; super duper 90 points melee punch.
...
Well, Shadowhawk DOES can do 85 point melee punch, and as being a 55 ton mech it can have almost same armor as Dragon and higher initiative, and moves at the same speed.
...
Yeah, just sell it.
Verdict: Sell it.
2) Quickdraw.
Most likely very first heavy mech you will ever encounter (you will know why), and there is a reason why it is chosen as the first heavy mech.
Because they are even worse than Dragon I mentioned above.
I mean, at least Dragon has that super duper 90 points melee punch, but Quickdraw actually has the LOWEST melee damage (55). Both variants for Quickdraw are truly irredeemable.
Well, you CAN do something with 4G variant with two missile hardpoints, but very low available tonnage completely cripples this mech. You can try medium laser build, but there are better medium mechs for such build as well.
As enemies, they actually carry a lot of firepower ( 2x LRM15 and 4 Mediums), which hurt a lot. But they have paper armor, even at 100% condition thanks to low tonnage. Hit them and they will die very fast.
Verdict: Sell it.
3) Jagermech.
Finally, we are behind those terrible 60 ton mechs, and moving into usable mechs, and pretty much rest of heavy mechs are usable to amazing thanks to large available tonnage.
Now, one thing that you must realize is Jagermech has almost all of its firepower on its arms. You can't shield with this mech unless you are willing to lose half of the mech's firepower in no time.
However, it pretty much overcome that problem with really, really good hardpoints and arm-mount weapons' bonus (+5% to hit).
Both available variants are extremely powerful; you will feel missions will be much easier if you manage to get one of them relatively early.
For A variant, you can go either super hard punching 4 X SRM6 or go for same LRM build from Centurion (LRM20 + LRM15 + LRM5), or more LRMs if you are willing to sacrifice armor... but I don't recommend to do it.
For S variant, 3 X AC5 is probably the most dominant build. It's insanely powerful and insanely cool unlike PPC... you get the idea. Because AC2 is rather bad, 4 X AC2 are not recommended however.
Or you can go a boomstick with AC20 or dual AC10 with less armor. It has so many choices that are usable.
As enemies, Jagermech basically has no armor; only 480 total, even worse than Quickdraw. But they truly have immense firepower, so you really want to kill them asap.
Verdict for both variants: Get it.
4) Catapult.
So, Catapult is perhaps one of the most recognizable mechs from Battletech/Mechwarrior/Mechcommander games. And they are all famous for being a missile boat.
Unfortunately, this C1 variant does not do enough missile justice with just 1 missile hardpoint on each missile pods (arm). Really only use is 2 X LRM20, but LRM20 is heavier than LRM15 + LRM5 combo. Hence Catapult loses some tohnnage.
You will have a bit better luck with just going laser builds instead, with three large lasers and one medium lasers will give you very powerful focus fire damage. Good thing is that you can trim armors from arms to put 1 more heatsink or two.
Now, the interesting one is probably K2. It is actually a good variant if you build it right. So here is a interesting story. The reason why K2 is good is.... essentially combination of how PGI shaped the mech in MWO and how HBS implemented hardpoints and jumpjets.
Those two ballistic hardpoints on side torsos of K2 are, if we follow HBS implementations, should be just support hardpoints because in MWO machineguns use ballistic hardpoints, and those two hardpoints are really for machineguns. But, for some reason, K2's ballistic hardpoints are still there in this game, and instead HBS just put additional support hardpoints, not removing ballistic hardpoints.
In lore K2 variant does not have jumpjet thus K2 does not have jumpjets in MWO, but in HBS, by following TT more closely, you can put jumpjects on pretty much all mechs, thus allowing K2 to have jumpjets.
And these two ballistic hardpoints save K2 because in current Balance, PPCs are basically unusable. They are way too hot, even with just 2 and a lot of heatsinks.
Thus you have no choice but transform K2 into a ballistic mech with these two ballistic hardpoints. 2 X AC5 may seems a bit weak but still give respectable firepower. You can TRY put one PPC on that build, but then it just becomes really, really hot. What you can do is shave some more armors from its arms, and put 2 X AC10 instead, which brings a lot of firepower.
Or you can do same thing with C1 with lasers, except the problem is you can't trim arm armors (because each arm has that energy hardpoint) so ironically energy variant K2 cannot put more heatsinks than missile variant C1. All hail to PGI's hardpoint inflation!
As enemies K2 has a fatal weakness; it has machinegun ammo in its center torso. If you just keep focusing on center torso, that ammo will explode, instantly kill the mech. Make sure you remove the ammo when you field one for yourself.
Verdict for both variants: get it.
5) Thunderbolt.
Thunderbolts may appear a bit more compared to others.... because it has three variants compared to just two from others, and they are quite good.
5SS is probably one of the mechs that definitely got a lot of boost from large laser buff. Well, what you can do is 2 X LL + 2 X ML + SRM6, which give you very reliable focus fire damage as well as increased combat range from those two large lasers. Or you can do 3 X LL + 2 X ML, giving up stability damage for more focus fire damage. But this will run a bit hotter.
5SE has 2 missile hardpoints, and with three support hardpoints and 5 energy hardpoints. You can go either typical 2 x LRM20 or try use SRMs and small lasers + medium lasers for heat-efficient close-range mech, or can copy exact same builds from 5SS.
5S is obviously best with available ballistic hardpoints. Huge AC with SRMs/lasers will be the ideal build. Idealy AC20 but you can try AC10 if you want bigger SRMs and/or lasers.
Verdict for all three variants: Get it.
6) Cataphract.
This rare 70ton mech is a basically upscaled version of Enforcer; no missile hardpoints, one ballistic and bunch of energy hardpoints. You can do upscaled version of Enforcer with a big UAC and bunch of lasers, 3 X LL + 2 X ML, or very simple yet effective 4 X LL. It barely has enough tonnage to support 4 large lasers, heatsinks and just one jumpjets with some armor triming.
The ECM one (0X) is very interesting. Unlike Raven, ECM is somewhat workable on this mech since it has enough firepower. The usable tonnage does take massive hit (only 33.5 tons) But still enough to take a large UAC and some lasers. Unfortunately the sensor lock cripples the mech just like Raven's case.
Verdict for both variants: Get it.
-continued-
9. Heavy Mechs 2/2.
-continued-
7) Grasshopper.
Yet another one variant only chassis. This time it is upscaled Firestarter. Most interesting is that it has a lot of support hardpoints. Too bad they got nerfed. Because medium lasers were also nerfed, now Small Lasers + Medium Lasers will be incredibly hot. It is better to use Machineguns + Medium Lasers instead.
If you do not need upscaled Firestarter, you can always use its tonnage and energy hardpoints with bunch of large lasers and medium lasers.
Verdict: Get it.
8) Blackknight.
Among with Orion, Blackknight has the largest free tonnage available for Heavy mech class. It means it has enough tonnage for large lasers and heatsinks to cool the mech down. It also has tons of energy hardpoints. It has an lostech version with -60 heat per turn, which makes it as the most powerful energy-focused heavy mech available in this game.
2 X LL + 5 X ML will give you immense focused firepower. You could go 3 X LL + 2 X ML, but then you lose about 35 damage compared to the former build. With the range still hardly matters, I'd say go for 2 X LL + 5 X ML.
Blackknight also does have a lot of support hardpoints, but that's Grasshopper's job if you ask me.
Verdict: Get it.
9) Orion.
The final, and the best heavy mech is here. It's the best heavy mech, with the largest free tonnage, with the heaviest armor as a 75 ton heavy mech in the class, missile hardpoints and ballistic hardpoint; both variants have everything they need to be amazing mechs.
V variant will be the better one thanks to 3 missile hardpoints, and you really just want one big gun instead of two smaller guns on K variant anyway. But each missile hardpoints of V variant are located on each arms, which makes shielding quite tricky for this mech. Well, at worst, V still can be used as an excellent LRM boat thanks to three missile hardpoints.
K variant is all about AC20 and a bunch of SRMs.
Orions are very powerful mechs with a lot of tonnage available as well as good hardpoints, but it does not mean they have same protection as Assault mechs. But they are good enough, and as a heavy mech they can initiate earlier than Assault mechs, which helps knockdown-to-kill strategy easier.
Verdict for both variants: Get it.
10) Rifleman.
Basically an lighter version of Jagermech, You lose 2.5 usable tons but gain quirks (100m+ view distance and -2 recoil/range penalty). Well, Those are REALLY strong quirks thus making Rifleman better version of Jagermech....
....Which is quite absurd lore-wise, because Jagermech is supposed to be a replacement for Rifleman, which is an older design. But just like Mechwarrior Online, Rifleman is once again beating Jagermech no problem.
Exception would be a missile variant because it has no missile variant. 4D is a pure energy variant, and honestly it is not that great. While it has a lot of usable tonnage, it is still a 60 ton mech in the end. Try get Blackknight or Warhammer for a better laserboat.
Verdict for Rifleman 3C: Get it.
Verdict for Rifleman 3N: Get it.
Verdict for Rifleman 4D: Sell it.
11) Archer.
As a missile boat, it is a straight upgrade from Catapult with quirks and added tonnage. +75% SRM stability damage is not something you can laugh about with 2S variant. Just like Catapult's case, 2R is a weaker variant with just two missile hardpoints.
Verdict for Archer 2R: Get it.
Verdict for Archer 2S: Get it.
12) Warhammer.
Why?
WHHHYYYY????!?
WHHHHHHYYYY DOES 6R ONLY HAVE ONE BALLISTIC HARDPOINT?
It is just very disappointing decision, considering the fact that Catapult K2 was ok with two ballistic hardpoints but somehow 6R did not carry dual ballistic hardpoints from MWO. The result is that it has really weird combination. So.... one ballistic, one missile and four energy hardpoints. Warhammer does have +20% energy damage boost quirk, but for 6R it hardly makes sense with just four hardpoints anyway. Such a wasted oppounity here.
Either using UAC20 or Gauss rifle on one side and LRMs on other side, making it lighter lostech Highlander would be logical choice for the mech build.
6D is decent laserboat with the quirks, but 7A takes the cake as an lostech version with -60 heat advantage.
Verdict for Warhammer 6R: Keep it.
Verdict for Warhammer 6D: Get it.
Verdict for Warhammer 7A: Protect it with your life.
13) Marauder.
If you ask an experienced player "What is the best mech in this game?", about 80% of the answer will be Marauder. The reason is that Called Shot boost. With maxxed out tactics and gunnery, the chance for headshot using called shot is 35%. With sufficient firepower, it can somewhat reliably does heatshot every single turn, which makes the mech very powerful. Lance-wide 10% damage reduction is also great.
Though, I do have some reservations against Assaults. In unmodded game, An Atlas, Kingcrab, Annihilator and Bullshark also can pretty much one-shot most of mechs (including themselves) with called shot to the center torso because the firepower is just overwhelming. And unlike Marauder, the chance is so high that they do not rely on luck at all. Not to mention those mechs are also tankier than Marauder even with 10% damage reduction. If there is no tonnage limit or you do not need higher initiative, the reason to use Marauder instead of heavy assaults is a bit weak.
That said, it is safe to say Marauder is THE BEST HEAVY MECH CHASSIS in this game. Oh yeah, even further, there is an lostech variant (2R) on top of all of these quirks, which makes it the best mech in the game period.
Verdict for all Marauder variants: Just buy get it.
9. Assault Mechs 1/2.
1) Awesome.
Yes, it does have whooping 120 melee damage, only surpressed by Banshee and heavier mechs, but problem is it is too slow to be used as a melee mech, so forget about it.
This mech is a really only single assault mech that can do well as a pure laserboat, Only other mech that can come close is Stalker with 6 energy hardpoints with a bit more tonnage, but in reality it will do less dps and alpha damage because Stalker has to use 5 X LL + 1 X ML instead of Awesome's 4 X LL + 3 X ML. Stalker actually ends up with less damage and hotter with less heatsinks with additional weight from one more large laser. There is actually another mech which has immense tonnage with 6 energy hardpoints (see Atlas), but that one could have some other builds.
And, seriously, Stalker is best served with LRMs.
Other mechs such as Banshee and Battlemaster do not have enough tonnage to put heatsinks, so they are actually worse despite the fact that they are heavier mechs. Too big engine problems.
So yes, if you get rid of PPCs for good and embrace large lasers, Awesome is extremely powerful finisher, with 4 X LL + 3 X ML for 8Q variant. we are talking about 235 alpha damage, with 160 damage to distant targets. It is purely powered by newly buffed large lasers.
If you really need stability damage, then you can do like 1 PPC + 3 X LL + 2 X ML, but you will find it will be suddenly so much hotter. And there is 8T variant with missile hardpoints anyway.
With missiles, 8T variant can give you cooler setup with mix of SRMs and lasers. But then you are giving up focus fire damage for precision strike. With just 2 missile hardpoints, 8T are not an ideal LRM boat.
Verdict for both variants: get it.
2) Victor.
Basically tonnage-wise they are Orions, with a bit more armor, one less initiative as an Assault mech. Not sure that is good compromise. Victors suffer same problem as low tonnage heavy mechs... just a bit less extent.
9B has interesting three ballistic hardpoints, which you can use it as 3 X AC5... just like 65ton Jagermech.
Verdict for both variants: keep it.
3) Zeus.
Take a Victor, remove some missile pods and add 4 energy hardpoints, and you get Zeus. Basically slightly worse version of Victor depend on the setup. It would be better if medium lasers were not nerfed, but with the nerf, you would not see much tonnage savings from using lasers due to need of additional heatsinks.
Good thing is as a single variant, you won't be seeing this mech often.
Verdict: Sell it.
4) Battlemaster.
in MWO, Battlemaster is a very good mech because its hardpoints are quite high that you can peek and shoot very easily.
But in this game, physical locations do not matter. With energy weapons being really bad, Battlemeaster is sadly just a better version of Zeus with more energy hardpoints available.
It still moves quite fast, and medium laser spam can be powerful... but way too many heatsinks would be used to cool down the mech. With fast movement, however you can use it as an Assault scout mech... if you need one. Problem is medium lasers are further nerfed now this mech is too hot to be useful at this point.
At least as a 85ton mech, it can use ligher Jumpjet H instead of 2ton Jumpjet A, unlike Banshee.
OH I almost forgot. It DOES have ballistic hardpoints, if you really want to have a big gun on this mech. As well as just one missile hardpoint, but you can forget about it.
This certainly makes Battlemaster a bit more better than other 'fast' assault mechs... but the problem is, despite it is probably the fast assault mech with the most available tonnage, which means,
1) No ballistic hardpoint usage.
2) Can't use large lasers effectively due to tonnage restriction.
At this point only reason why this mech does not demoted to "sell it" is because there is no better alternative for a scout Assault mech.
Verdict: Keep it.
5) Stalker.
Finally, some assault mechs with actual assult mech free tonnages. Stalker is indeed slow (just like rest of mechs below except Banshee) Assault mech that carry huge weapons, with tons of space available.
As we talked at Awesome section, you can forget about 6 energy hardpoints; the gist is four missile hardpoints, absolutely ideal for LRM15 for each hardpoints. You can do LRM20 + LRM10 instead of just four LRM15 if you like, with a bit less available tonnage since LRM 20 + 10 weights more than two LRM15.
If you really want an energyboat and still does not have Awesome, you can use Stalker with 5 X LL + 1 X ML, but it will run rather hot. You can do 4 X LL + 2 X ML, but now that is quite low dps and alpha damage as an slow assault mech.
Or, you could mix SRMs and MLs. Problem is there are better brawling mechs and Stalker's high tonnage should be used more wisely. But if you do not have enough Assault mechs, 4 X SRM6 and bunch of MLs do give scary firepower.
Anyway, grab it as soon as possible. Among with Highlander 733, it is the best LRM assault mech available in the game.
Verdict: Get it.
6) Highlander.
Very stable assault mech, with a lot of free tonnage available.
Continuing from Stalker; 733, with four missile hardpoints, is the best LRM assault among with Stalker. Now, despite the fact that it weights 5 ton more, 733 actually does not have more tonnage than Stalker for several reasons.
1) The difference in free tonnage is only 3 tons (75.5 vs 60.5)
2) From 90 ton mech, you have to use A variant for jumpjet, which weights two tons instead of one.
3) Highlander can put more armor.
They are basically same performing mechs for LRM boating purpose, with Highlander may be a bit more durable if you decide to sacrifice jumpjets, which I really do not recommend even for the LRM boat.
If you already have an Assault LRM boat, 733 still can use its single Ballistic hardpoint for brawling close-range mech. Grab an AC20 and put some SRMs, it will be good substitution for Atlas or King Crab, with just a bit less armor.
733P has two builds;
1) You can use it as triple LRM20, but just like LRM 20 + 10 build, it is not as effective as 4 X LRM15. So it is not as good as 733 for using as an LRM boat.
2) 3 X LL + 1 X ML + 2 X SRM6. Very powerful, versatile with bunch of stability damage with focus fire damage. You can adjust number of energy weapons and missile weapons for your like.
Main campaign spoiler:
Annnnnd we have 732B, a lostech version. Unlike disappointing Blackknight and Griffin ones, this particular Highlander is actually amazing out of the gate, with very little adjustment with weapons, and it will be freely given after that particular mission is over. It is one of two lostech mechs you can obtain from completing the campaign.
Now, I understand some spreadsheets for this game lists this mech as having same free tonnage as non-lostech variants, but it is not true. 732B has 5 more tons than other variants thanks to lostech. Which means it has more free available tonnage than non-lostech Atlas and King Crab! Well, only 0.5 ton, but you get the idea.
It is an extremely powerful mech, and other than some armor distribution adjustment, stock setup is actually really good and you really do not need to modify it much.
Verdict for 733: Get it.
Verdict for 733P: Get it.
Verdict for 732B: Protect it with your life.
-continued-
10. Assault Mechs 2/2.
7) Banshee.
OH here we go. The biggest engine rating in Battletech universe, for mechs, is 400. This mech has 380.
...
REALLY BIG ENGINE that is. The ignorable side effect is it only has 37.5 tons of available tonnage. For comparison, 65 ton Catapult has 39 tons of available tonnage.
...
Just kidding, this is not definitely an ignorable side effect.
You can use it as a pure melee mech at least. This is only possible because as a 95ton mech, Banshee has enormous amount of armor. With all of arm mods and leg mods, Banshee can do some serious punch. Thing is, even after 380 rated engine, it can only go as fast as 65 ton heavy mech, not to mention it suffers initiative problem...... These problems are quite hard to overcome.
Added 5/25: People also comment that Banshee can be equipped with a lot of support weapons... but as an assault weapon with the lowest initiative, I am not sure how effective it would be (Grasshopper is already borderline slow). And a problem with melee interaction is that those support weapons hardly focus well. It is always better to have one big punch that leftover damage would go to CT, than small lasers and machineguns firing everywhere. I still recommend to put arm/leg mods as much as possible for bigger melee/DFA damage.
Unless you are interested in weird builds such as these, I suggest to sell it asap.
Verdict for both variants: Sell it.
8) Atlas.
Perhaps Atlas is the one of the most well-known mechs. Maybe not as well-known as Clan's Mad Cat (Timber Wolf), but that skull-looking head and overall mech shape is quite something to be remembered. Among with King Crab, Atlas boasts a bit more durability (a bit more structure point, and about 30 points more armor), and with such hardpoint placement location, Atlas can do shielding a bit better than King Crab, without the fear of losing heavy ballistic weapons on the arms.
It's really a simple mech compared to King Crab (which have some interesting problems and tricks). Super durable, super heavy, super slow, and... super powerful.
We DO have an interesting variant though. Well, actually, this Atlas II cannot be considered as a variant of Atlas, rather it is a different mech. It just uses same model as Atlas.
Just like lostech Highlander, this Atlas has far bigger available tonnage than non-lostech Atlas; 78 tons. With 13 tons more than normal Atlas, you will feel space restrictions rather than tonnage restriction when you configure this mech.
Fill it with the biggest and the heaviest weapons you can deploy is all I can say, and yeah, while it indeed has more energy hardpoints, but until HBS actually balances this game, please don't go for energy-heavy build. It is simply waste of a mech. I guess you can go ridiculous 6 X LL, but if you punch your calculator a bit you will realise you are losing a lot of damage for just increased range, where in this game range is not that important. Oh and yeah, Large lasers have ZERO stability damage as well.
Now, during the mission, you really do not want to fire those ER Large Lasers. They are hotter than normal large lasers and you will find the mech gets hot rather fast. Keep using cooler AC20, missiles and medium pulses but try not to use ERLL often.
Verdict: Get it.
Verdict for II: Protect it with your life.
9. King Crab.
Another 100 ton Assault mech, with more focused on firepower. It definitely has more missile hardpoints, for instance, but it does not make an excellent LRM boat because all of those missile hardpoints are located on a single side torso, making it unable to put large size missile weapons. However, you can still do 4 X SRM6 which they alone are quite powerful.
Popular builds are either using that dual AC20, or 4 X SRM6 + 4 X MLs which are actually more powerful than dual AC20 among with far better heat management and more alpha strike damage.
Compare to Atlas, having ballistic hardpoint on each arms is a bit troublesome; if you try to shield your mech, your arm will be first to be gone from damage, among with the gun installed with it. At the same token, King Crab would not instantly lose a lot of firepower if it loses a certain torso; for Atlas it means both AC20 are gone, while for King Crab, you can still fire other AC20.
Other than that, it has same availabe tonnage as Atlas, with a bit less structure and armor. Very valuable mech no matter what.
Yes, at the very last campaign mission, it seems Victoria's King Crab is a special one. It is not even canon variant since none of them have medium pulse lasers. Unfortunately, you cannot get this mech, ever. It does not give you fragments.
Sometimes the game gets bugged and gives you the fragment. However, you cannot combine it with other normal King Crab fragment, therefore completely useless.
Verdict: Get it.
11. Conclusion.
And... that's it. Just want to say this mech guide is strictly single-player only. Multiplayer is all about SRMs, flamers and AC20 so act accordingly is all I can say about it.
12. Update history.
2/24/2025 :
1) The update after 7 years! Mostly cleaned a lot of grammar issues til Medium mech section.
6/25/2018 :
1) Initially updated for 1.1 balance.
6/17/2018 :
1) Preparing for (hopefully) upcoming patch.
5/29/2018 :
1) Fixed moar typos.
2) Jaegermech => Jagermech. Thanks @C4rter for pointing this out.
5/25/2018 :
1) Fixed insane amount of typos and grammar errors.
2) Add a bit more description for Thunderbolt.
3) Add some more updates and thoughts for Banshee.
4) Awesome as well.
5) And Battlemaster.
6) Moved up Hunchback 4P from "Sell it" to "Keep it". For a finisher it is not really a bad mech.
7) URBIE.

牛角面包
2026-02-14 22:00:09 · 发布在 「BATTLETECH」
BATTLETECH is a complex turn-based strategy game.
This guide focuses on the tactics and strategy of the Combat game. The information within applies to both the single player campaign and multiplayer skirmish.
Credits
Special thanks to Laurie, Ryan, and Prussian Havoc for editing and strategic advice.
A very short BattleTech History
BattleTech has been around for over 30 years. It started out as a tabletop strategy game released in 1984 where players filled out record sheets and moved robotic miniatures on a hex-grid. Those miniatures represented ten meter tall humanoid war machines called BattleMechs, powered by fusion engines, and equipped with all manner of cool sci-fi weaponry. Since then, BattleTech has existed as multiple video games across multiple platforms, over 100 novels, multiple rpg's, a card game, different board games, MUX/MUSE's, and even a Saturday morning cartoon.
For more info about real-world BattleTech history, go here:
https://en.wikipedia.org/wiki/BattleTech
For comprehensive coverage of in-universe BattleTech lore, head to Sarna:
http://www.sarna.net/wiki/Main_Page
Terminology
Alpha Strike - When a mech fires ALL its weapons, this is called an Alpha Strike.
Beta Strike - When an Orion gets its head caved in by an AC/20. This is known as a Beta Strike. #neverforget
Battlemech - The huge humanoid, multi-ton war machines powered by fusion reactors. Also known simply as 'Mechs
Campaign - The single player campaign where you move around the map in your dropship, Not covered in this guide.
Dropship - Spaceships that carry mechs through space, traveling from Jumpships and capable of landing on planets.
Evasive Pips - The white chevrons ">>>" that appear beside a unit's nameplate. The more evasive pips a unit has, the harder it is to be shot.
Initiative Phase - A round is made up of five initiative phases. Units are designated to move on specific phases depending on several factors such as: size, type of unit, skills, and some status effects.
Initiative Track - The ui element in the top middle of the screen displays the current phase and which units have acted or need to act.
Interleaved Mode - When there are enemy units in sensor range, the combat game forces you to take turns moving a single unit at a time. See also Initiative Track.
Heat - When most weapons fire, they will generate heat. Generate too much and your mech can take damage or even shutdown.
Jumpship - Spaceships that carry dropships and jump (teleport) between star systems.
Lance - For this game a lance usually means just a group of units, usually around 4. Consider this like a squad in other games.
LOS/Line of Sight - Can a line be drawn from one mech to another without being blocked by obstacles.
Non-Interleaved Mode - When there are no enemies on radar, the combat game allows you to move all of your units at once.
Mech - See Battlemech
Mech Class/Size - Light 20-35 tons, Medium 40 - 55 tons, Heavy 60 - 75 tons, Assault 80-100 tons. This classification applies to vehicles as well.
Mechwarrior - The human pilots of Mechs.
Merc/Mercenary Unit - Soldiers for hire that accept contracts.
Round - The time it takes for everyone to activate their units. Five initiative phases long.
Combat 101 (the Basics)
One thing to note about BattleTech is that it's a very information dense game. The UI does a great job of communicating all the info, often in layers, allowing the player to drill down into more specific information. However, due to the sheer volume of information, there is a slight learning curve. Fortunately, there is almost always a tool tip that explains pretty much anything. So if you aren't familiar with a symbol or a button, simply hover the mouse over the item you're interested in and a short description should pop up.
The tutorial does a good job of covering the absolute basics, but for completeness sake I'll review them in a little more detail.
Camera ControlsTo move the camera around the map you can use the keys W,A,S,D keys to pan the camera or Q and E to rotate. Alternatively, you can use the mouse by holding the right mouse button to change which way the camera is facing.
Move ActionsThis is a turn-based game so opponents take turns activating units. When there are no visible enemy units on radar, teams move all their units at the same time. Once radar contact is made with the enemy, teams begin taking turns with individual units. I'll go into the Initiative System later, but for now just know that lighter units have the option of acting early in the turn order or reserving down to a later Initiative Phase.
To select a unit for activation, you can either click the Mech you wish to move, click on the pilot portraits in the bottom middle of the screen, or use the Tab key to cycle through the units you control. Personally, I much prefer the tab key because it's fast and only selects the units who can still act in this round.
A normal activation consists of a Move Action and a Fire Action. Here's the action hotbar in the bottom middle of the screen.基础移动动作及其快捷键:
2. 移动 - 移动单位。移动结束后,你可以选择执行攻击、防御姿态或其他主动技能等动作。
3. 冲刺 - 专注于移动和躲避攻击。移动距离更远,可获得更多闪避值,但会消耗你的射击动作。
4. 跳跃 - 部分机甲配备了跳跃喷射器,使其能够越过障碍物并移动一定距离。此动作过程中可能会获得大量闪避点数,但会产生一定热量。如果机甲无法跳跃,该按钮将被禁用。
- 防御姿态 - 消耗你的动作来专注于防御。获得守护状态(受到的伤害减少50%)和固守状态(受到的稳定性伤害减少50%)。在非回合制移动(自由移动)模式下,默认移动动作是冲刺。在回合制战斗模式下,默认移动动作仅为移动。处于非回合制模式时,建议将冲刺切换为移动,这样你的单位在战斗的第一回合开始时会处于戒备状态。跳跃也能达到此效果。
要移动选中的单位,将鼠标光标放在你希望移动到的区域,你会看到由目标点组成的六边形网格。纯白色的点表示没有特殊地形修正,而有颜色或特殊标记的点则表示存在某种地形效果,例如森林或崎岖地形。
点击你想要移动到的点,会出现一个射击范围指示。圆锥的中心是你的机甲移动结束时将要面对的方向,只要机甲拥有视野且武器能够打到目标单位,它就可以向该圆锥范围内的目标开火。如果你对选择满意,再次点击即可确认朝向。你可以按ESC键取消此操作流程。(1)红色实线表示有清晰的射击线,可以向目标开火。
(2)带小眼球的红色间断线表示射击线部分受阻,目标获得掩护加成。
(3)红色弧线表示没有直接射击线,但可以使用任何间接火力武器(LRMs)越过障碍物向目标开火。
(4)白色虚线表示虽然有清晰的射击线,但无法攻击该特定敌人(可能是因为敌人在你的射击弧线外、超出射程或你正在冲刺)。
如果你喜欢当前所在的位置,仍可以通过选择移动动作,然后点击你站立的位置来改变朝向。之后,你可以像往常一样通过第二次点击来确认朝向变化。或者你也可以选择完全不移动,直接点击开火按钮:1. 攻击——如果你尚未移动,那么你将从当前位置进行攻击。请记住,若没有【王牌飞行员】这一特殊技能,开火后你将无法移动。
近战:当选择移动位置时,如果你看到敌方单位周围有黄色边框,你可以选择与他们进行近战攻击。点击带有黄色边框的单位后,根据剩余移动点数和地形,你可以移动到最近的3个点位。这会将你的单位移动到该点位,面向敌人,并进行近战攻击。你还将使用所有【支援型】武器(火焰喷射器、机枪或小型激光)进行射击。如果你装备了支援武器,将移除两个闪避点。一个用于近战攻击,一个用于支援武器。近战不会产生任何热量,因此是造成伤害并在一回合内冷却的好方法。
如果你在跳跃时看到敌方单位周围出现黄色边框,这是使用名为【天降正义】(DFA)的特殊物理攻击的机会。这是指你的机甲跳跃并尝试着陆在敌人身上。【天降正义】攻击通常命中率较低,会对你的机甲腿部造成伤害,并对自身造成稳定性伤害。但如果成功,也会对目标造成大量伤害和稳定性伤害。这是一种高风险战术,通常在危急时刻使用,所以请谨慎使用。射击:完成上述移动动作之一(冲刺除外)后,该单位可以进行射击。点击带有红线指向的单位来选择目标,或使用Tab键在可能的目标之间切换。确定目标后,可在屏幕右下角的武器面板中选择要使用的武器。如果武器超出射程或无法命中目标,即使已启用也不会开火。武器选择会保留上一轮的设置,因此在射击前请花时间检查武器面板。开火会消耗弹药(如适用)并产生热量。热量过高可能会损坏机甲甚至导致停机。无论哪种情况,在你发起攻击前都会有警告闪烁。There is a circle around the feet of the target unit that indicates which side of the enemy your weapons will hit. This is also reflected in the target readout in the upper center of the HUD that highlights which locations could be randomly hit.
ReserveIf you have no units selected, you'll see the "Reserve" button. Clicking this will delay the units in this initiative phase to the next initiative phase. If you’ve selected a unit, you can hit Escape to clear the selection and back out to the Reserve button option.
DoneIf you try to reserve on the last Initiative Phase, instead you will just end your action and this will Brace all the units that haven't acted yet.
Game Mechanics
SensorsUntil a unit makes visual contact, you will have limited or no information about that contact. As it gets closer to visual range, you will receive more information. At first, you will see a sensor blip with no info. As it approaches, it will resolve into a type (mech, vehicle, turret). Once it is almost to visual range, you will see the tonnage of the unit, and then finally you will make visual contact.
Sensor range is represented by a large blue circle centered on your mech. You likely won't notice the sensor ring until you're seeing contacts at extreme sensor range. To make sure a unit remains hidden, be certain the enemy blips remain outside the circle. Ending a non-interleaved round with an enemy unit in sensor range will trigger the turn-based interleaved combat mode.
Firing Weapons & DamageFiring weapons follows tabletop rules (roughly), but there are some slight differences.
Roll to see if the weapon hits. You'll see the percentage chance to hit from the weapon's panel in the bottom right.
If you succeed, we roll a random location. The hit location chart differs depending on which direction you are attacking from. For instance, attacks made from the the right side can't hit any locations on the left. Rear shots can hit the weaker rear armor, etc.
Damage is applied to the hit location. Damage is first applied to the Armor of that location.
If any damage is left over, it is then applied to the Internal Structure of that location. Once a shot goes internal, it can begin damaging or destroying components.
If a location's internal structure is destroyed, it will destroy every component in that location. And then any extra damage is transferred towards the Center Torso. As before, this damage is first applied to armor, then to structure.
Once the firing sequence is done for ALL weapons, we roll for a critical hit on any location that took Internal Structure damage but was not destroyed.
If a crit is rolled successfully, we damage a random component in that location. One hit damages the component and makes it less effective, two hits destroys it completely.
If anything generates a pilot injury (side torso destruction, head hit, ammo explosion) then the pilot takes a single injury.
Finally we apply the Stability Damage to the target. If the unit falls down, it drops to a lower initiative phase and the pilot takes an injury, (which can result in a second injury).
One major difference from tabletop rules is the game rolls for each missile in the volley instead of once for each rack. Another difference is the single crit roll per penetrated location (instead of 1 per damage application). Same goes for pilot hits.
Note, whether or not an attack hits, simply attacking a unit will remove one pip of Evasion from the Target.
Called ShotsThere are a few cases when you get to choose which location you're aiming for: when a target is prone, when a target is shutdown, or when an attacker uses a Morale/Fury ability. This works exactly the same as Firing Weapons above, except for two differences.
First you choose the location to aim for. This will be limited by which side of the enemy is facing you. Your chance to hit is still displayed down in the bottom right weapons panel. If a weapon hits, the percentage shown in the location targeting window is the percentage that it will hit each location.
Aiming for the head is the toughest shot to make, but it can also be the most rewarding. Sometimes one more pilot hit is all you need to eliminate them and claim some sweet salvage.
In the Campaign mode, choosing whether to disable or destroy a Mech can be tough. Do you aim for the arm with the AC/20 to possibly remove it from the field early? Or do you try and disable the Mech a different way so you can possibly salvage the AC/20? I leave that decision to the reader.
Shot DifficultyShot difficulty is affected by a number of things. Evasive charges (white chevrons >>>) make it more difficult to hit, weapon range, intervening forest, cover, high ground, weapon location (arms get a bonus), weapon accuracy (lasers get a bonus), Autocannon refire penalty, certain terrain effects, indirect fire penalty, minimum range (on some weapons). A MechWarrior's Gunnery skill can offset any kind of penalty they might encounter - the higher the skill, the more penalties can be offset.
Weapon Types - There are 4 weapon slot types in the game: Ballistic, Energy, Missiles, and Support.
Ballistic Weapons - These weapons are giant Autocannons (AC's) that fire solid slug projectiles. Very heavy, take up a lot of space, inflict some Stability Damage, have decent to amazing damage (depending on the class), require ammo, but don't generate much heat. The bigger the number, the more damage but the shorter the range. AC/2's are the longest ranged weapons in the game, but don't do much damage. AC/20's do the most damage in the game, but have very short range.
Energy Weapons - These weapons shoot beams of energy. The Medium Laser, Large Laser, and Particle Projection Cannon (PPC) fall into this category. These weapons generate quite a bit of heat, but don't require any ammo. Laser weapons also receive an accuracy bonus, but don't generate any Stability Damage. The PPC deals decent Stability Damage and inflicts a penalty on the target's next round of shots from the system interference it deals. The more powerful the energy weapon, the longer it's Range, the higher it's Damage and the more heat it generates.
Missile Weapons - These weapons launch explosive projectiles with propulsion systems. Missile Weapons are a great source of consistent damage (since they roll a separate to hit roll for each missile), the damage is spread out over the target. This can be a good thing if you're "fishing" for a head hit or a chance to damage and Crit Seek an exposed location. Long Range Missiles (LRMs) are guided missiles that can cover long distances and, if you have a spotter, be fired indirectly - arcing over intervening terrain. However, they have a significant minimum range which makes them much less effective at close range. Short Range Missiles (SRMs) inflict greater damage as well as Stability Damage, but have a much shorter range and are incapable of indirect fire.
Support Weapons - This is a new class of weapon for BATTLETECH consisting of very short range weapons: Machine Guns (MGs), Small Lasers, and Flamers. Prior to this game, these weapons were lumped in with Ballistic and Energy weapons. The interesting thing about support weapons is not only do they ignore enemy Evasive pips they are also the only weapons that can fire during Melee Attacks. Small Lasers do decent damage for their weight. Flamers have a limited number of charges, but they do damage to the enemy AND add some heat to the target as well. In addition to a bonus to crit, Machine Guns roll five separate hit locations for each MG that hits, doing a small amount of damage. MGs are superb for trying to hit exposed locations and damage components.
Game Mechanics (Continued)
Apparently the steam guide "section" has a text limit. So here's the rest of the Game Mechanics.
Stability DamageStability Damage is a measure of how much an attack will knock the target off balance. Melee Attacks and most weapons are capable of inflicting Stability Damage. The larger the mech, the greater the damage. You have 5 pips on your stability bar and an indicator to show a threshold of how many pips you can sustain before your mech is Unsteady. While Unsteady, a Mech cannot sprint. Higher piloting skill will increase this threshold.
If the bar fills completely once your mech is Unsteady, it will fall over and your pilot will take an injury. Your mech can't go from steady to prone even if your bar fills up after a single massive Enemy attack. In this situation your now unstable Mech will get knocked down on the next attack that causes any Stability Damage.
Stability Damage is removed by the following:
Activating your unit will remove one pip
Standing still will remove one pip
Bracing will remove all Instability
If your pilot is a Master Tactician, reserving will remove 1 pip
If a mech loses a leg for any reason, it will automatically fall prone regardless of how steady it was before the attack. Additionally, one of its stability pips will turn “Red” and remain permanently filled for the remainder of the match.热量
当你开火时,武器会产生一定量的热量。能量武器在这方面是“罪魁祸首”。冲刺或跳跃时也会产生一些热量,其中跳跃产生的热量取决于跳跃的距离。
你散发的热量由机甲的散热器决定。所有机甲默认散热30点,但如果安装了额外的散热器,散热能力可以提升。
散热器的效率会受到当前地图生物群系的影响,因此在沙漠和月球等星球上要密切关注热量表。热量条上有一个指示器,超过该指示器就会达到临界热量水平。如果飞行员的勇气技能较高,这个临界值可以提高。当机甲的热量超过此阈值时,其内部结构将受到少量伤害。
若热量条完全充满,机甲将关闭,成为活靶子,敌人可通过【精准射击】瞄准特定部位。不仅如此,即便能撑到下一回合,机甲也只能进行启动操作,无法执行其他任何指令。通常情况下,应尽可能避免机甲关闭。但凡事皆有例外,有时关闭机甲可能是一个明智(尽管有风险)的选择。例如,对于即将被摧毁的机甲,使用【阿尔法打击】或许能消灭高优先级目标。initiative phase system
这是决定行动顺序以及各单位在哪个阶段行动的游戏机制。虽然乍看有些复杂,但实际上相当直观。每个单位会根据其重量等级和单位类型被分配到相应的行动阶段。对于机甲,轻型机甲在阶段4行动,中型机甲在阶段3,重型机甲在阶段2,突击型机甲在阶段1。载具的灵活性不如机甲,因此比同重量等级的机甲晚一个阶段行动。当一个回合开始时,我们从行动阶段5开始,然后依次向下倒数。
游戏会始终尝试让双方队伍交替行动。例如,如果当前阶段双方都有单位,且你是上一阶段最后行动的人,那么本阶段将由对手先移动或保留其单位。与AI对战时也是如此。
其他会影响 initiative phase【行动阶段】的因素:被击倒会使你落后一个行动阶段。士气/狂怒技能可以提升你的行动阶段或降低目标的行动阶段1级。【战术大师】是机甲战士的技能,能让你提前一个行动阶段行动。让中型机甲在轻型机甲阶段行动,或让重型机甲在中型机甲阶段行动,都能带来强大的优势。许多这类行动阶段修正效果可以叠加,无论是正面还是负面效果。保留指令会将本阶段尚未行动的所有单位延迟至下一阶段行动。乍看之下这似乎没什么用,但可以参考以下例子:你有一台轻型机甲在第4阶段行动,通过保留指令将其延迟至突击阶段最后行动。如果战场上没有其他轻型单位,你的轻型机甲实际上会连续行动两次——它会在本回合的第1阶段行动,而到了下一回合,其行动阶段会重置回第4阶段,从而再次获得行动机会。
利用行动阶段系统为自己创造优势是胜利的关键。通过正确的战术行动,你可以在本回合击倒已激活的单位,并在下一回合它们再次行动前将其彻底消灭。MoraleThe single player campaign uses a blue Morale Bar that begins each battle already filled to your company's morale level. During combat you'll gain additional morale by completing objectives, destroying enemy units, and even gain a small amount each round. Increased salary levels can slowly raise your morale over time and there are also Argo upgrades that can permanently increase morale.
This morale can then be spent on two special abilities, Precision Strike and Vigilance.
Precision Strike gives you a +4 “To Hit” bonus and lets you target a specific location. Additionally it will knock the target back into a later Initiative Phase for its next activation. Let's say you use this ability to target and blow the leg off of a medium mech. If it already acted this round, it won't get another activation until next round's Assault phase (having moved back two Phases, one for the Knock Down and a second for your use of Precision Strike.) Poor dead bastard.
Vigilance clears all Stability Damage, gives you Guarded and Entrenched, and lets this unit act in one sooner initiative phase next round. So if normally the unit acts in the Medium Phase, next round the unit will act in the Light Phase.
In the Solo-Campaign, the Morale Bar regenerates pretty quickly. I recommend spending it when it gets close to max unless you have specific plans for a particular ability. Using Morale abilities is a key to surviving more difficult missions.
FuryIn Multiplayer Mode, the Morale Bar is instead called the Fury Bar. However, while similar to Morale, you only get the Precision Strike ability. Vigilance is not available in Multiplayer Mode. Also instead of your bar filling up for accomplishing good things(like killing an enemy), it fills up because bad stuff happens to you (like losing an Arm, a Side Torso or even an entire Mech). It fills slower than a Morale Bar and also costs a full Fury Bar to get a single Precision Strike. Make it count!
Effects
Biome EffectsThere are several different biomes and many of them affect the performance of your mech's Heat Sinks. Don't feel like you have to memorize these details, simply mouse over the icons or the movement dot to get tooltip information.
Lunar - Heat Sinks are 65% effective.
Martian - Heat Sinks are 75% effective.
Badlands - Heat Sinks 85% effective.
Desert - Heat Sinks are 85% effective.
Verdant/Lowlands/Highlands - No effect.
Tundra - Heat Sinks are 110% effective.
Polar - Heat Sinks are 120% effective.
Terrain EffectsThese effects apply when standing in various types of terrain.
Clear - No effect
Destroyed Building - Movement reduced by 50%, Damage received reduced by 25%. Available on any biome with buildings. Note, this is only for larger, targetable buildings. If you smash your mech through a farm house, you won't be slowed down a bit or gain any cover. Although you can see through Destroyed Buildings, it does reduce your vision range.
Forest - 25% reduced movement, 50% visibility reduced, 25% damage reduction. Available in every biome but Lunar. Martian biomes have dust storms that effectively do the same thing. Although you can see through Forests, it does reduce your vision range.
Ice - Cooling increased by 50%, Movement reduced by 50%, Stability Damage received increased by 20%. Available in cold biomes or biomes without an atmosphere.
Marshland - Reduces Stability Damage received by 50% while standing in it. Available in Verdant/Highland/Lowland biomes.
Mineral Field - 10% movement reduction. You'll receive a 2 “To Hit” penalty when making attacks from crystals, but there's a 4 “To Hit” penalty when targeting someone inside a Mineral Field. Available in Badlands and Desert Biomes.
Radioactive Zone - 10% movement reduction, You'll receive a 4 “To Hit” penalty when targeting someone inside a Radioactive zone and you will receive +10 heat/round for 2 rounds. Available in Lunar and Martian biomes.
Road - Available on every biome. 5% movement increase.
Rough - 4 “To Hit” Melee defense bonus, 25% movement reduction, and received Stability Damage is increased by 50%. This effect persists until your next activation. The Rough debuff is also applied if you walk through Rough terrain. Rough Terrain exists in every biome.
Steam Vents/Geothermal - 10% movement reduction, cooling reduced by 50% for 1 activation. Available in Tundra and Polar biomes.
Water - Cooling increased by 50% (regardless if Heat Sinks are positioned in a Mech’s Legs or not), Movement reduced by 50%. Available on warm biomes with an atmosphere.
Unit Status EffectsThese effects can be gained/lost through combat actions.
Cover - 25% reduction in damage received. Attacks hitting the rear arc will ignore Cover and do full damage. Granted by Forests and Dust Storms.
Entrenched - Receive 50% less Stability Damage. Granted when Bracing (sacrificing your firing action).
Guarded - Receive 50% less damage. Attacks hitting the rear arc will ignore guarded and do full damage. Received by Bracing (sacrificing your firing action).
Prone - Your mech is lying down on the job. Stand up and look respectable! Falling prone knocks that unit down an Initiative Phase and injures the pilot. Also, when a mech is prone enemy units can target specific locations. After standing from prone, the unit also has a penalty to hit targets.
Sensors Impaired - When a Mech has been hit with a PPC it suffers a an increase to its shot difficulty until its next activation.
Shutdown - Your mech has overheated and automatic safeties have turned off your Mech’s fusion engine. Enemy units can target specific locations and receive a bonus to hit you. The only thing you'll be able to do next activation is restart your fusion reactor.
Unsteady - When a Mech takes enough Stability Damage, it will become Unsteady. When a Mech is Unsteady, it can't sprint and if the Stability Damage bar fills up from a subsequent Enemy Hit it will be knocked Prone.
Vehicle - Not really a status but vehicles do have some special rules. For one, they don't have a Stability bar because they can't be knocked over. They also don't generate any heat. However they do take double damage from Melee Attacks. And stepping on them is VERY satisfying. :)
Another thing to know about vehicles is they have a much smaller number of hit locations so they are much easier to take out than a mech. However, some vehicles pack a serious punch. The SRM Carrier has ten SRM6's. A demolisher is a tank that has two AC/20's... DO NOT GET CLOSE TO THESE! They will ruin your day.
Mechwarrior Skills and Abilities
Thanks to HonorKnight for his awesome post on this. Made my research easy peasy. :)
There are four skills you level up from rank 1-10. At rank 5 and rank 8 you receive a special ability, but you only have two rank 5 slots and one rank 8 slot so choose wisely. These Abilities will appear on the Action Bar in the 5, 6, and 7 slots.
Gunnery - all ranks: +2.5% base ranged weapon hit chance per point
Rank 5: Multi-Target - Action: Fire weapons at up to three targets.
Rank 8: Breaching Shot - Passive: Attacks with a single weapon ignore Cover and Guarded on the target.
Piloting - all ranks: +2.5% base melee hit chance per point
Rank 4: +1 Unsteady Threshold
Rank 5: Evasive Movement - Passive: The unit generates an extra Evasive charge from movement actions.
Rank 6: +1 max Evasion
Rank 7: +20% sprint distance
Rank 8: Ace Pilot - Passive: This unit can move after shooting if it has not moved yet.
Rank 9: +1 Unsteady Threshold (+2 total)
Rank 10: +1 max Evasion (+2 total)
Guts - all ranks: +5% bonus on survival rolls. Incapacitated Death Chance (90% - 5%*Guts), Lethal Death Chance (140% - 5% * Guts).
Rank 4: +1 Health
Rank 5: -1 Recoil Penalty, Bulwark - Passive: Gain Guarded when remaining stationary. (you can still shoot)
Rank 6: +15 Overheat Threshold (redesigned, used to be 5 for every guts skill point)
Rank 7: +1 more Health (+2 total)
Rank 8: -1 Recoil Penalty, for a total of -2, Juggernaut - Passive: Successful Melee attacks knock your target back one Initiative Phase
Rank 9: +15 Overheat Threshold, for a total of +30
Rank 10: +1 more Health (+3 total)
Tactics
Rank 4: -1 Indirect Fire Penalty
Rank 5: -45 Minimum Range, Sensor Lock - Action: Select a target within sensor range to reveal it until the end of the current round and remove two evasive charges. Consumes your firing action.
Rank 6: "Called Shot Bonus"
Rank 7: -1 more Indirect Fire Penalty (-2 total)
Rank 8: -45 Minimum Range, (-90 total), Master Tactician - Passive: Mechs piloted by this MechWarrior gain +1 Initiative, and remove one bar of Stability Damage when Reserving
Rank 9: "Called Shot Mastery"
Rank 10: Eliminates Indirect Fire Penalty
Strategic Advice
Kill Units - The fundamental goal of combat is to kill the Opposing Units. The fastest way to kill most enemy mechs (in general) is to destroy their Center Torso. Ergo, we can say that your fundamental goal in BattleTech is really to kill hostile CTs.
A mech can also be eliminated by destroying its head, destroying both of its legs, or incapacitating the MechWarrior. Destroying the head is heavily luck dependent so don't count on it. Destroying both legs is sometimes tough. Usually you have to wait for a couple of lucky side shots breaching one of the legs. Knocking out the MechWarrior is something you can do by inflicting Stability damage and firing at the mech's side arcs to destroy the side torsos.
Focus Fire - The more of your Mechs that can range and fire on a single enemy unit, the quicker you are likely to take it and its Weapon Systems out of the Match. The use of terrain is essential to both maximizing your ability to Focus your fire against enemy Mechs while at the same time limiting your opponents opportunities to Focus Fire against your most vulnerable/damaged Mechs.
Target enemies which have already activated this round to ensure maximum opportunity for Stability Damage (possibly even achieving a Knockdown) before the enemy has an opportunity to activate that Mech and lessen/eliminate its Stability Damage. The same principle applies to removing evasive pips.
Crit Seeking - The sequencing of attacks can pay high tactical dividends. High Damage Attacks can punch holes in Enemy Armor, permitting low damage, multiple hit location attacks from Support Weapons and Missiles to then “Crit Seek.” Crit Seeking is made possible by attacks that damage Internal Structure.The first successful Crit damages the component, while a second successful Crit destroys the component. Machine Guns are especially effective since they roll 5 separate locations and have a bonus to crit chance.
Line of Sight - Use Line of Sight to your advantage. If you use terrain and other obstacles to block LOS to your units, you restrict the enemy's options. If they don't have LRMs, they won't be able to shoot at you. If they do have LRMs, they will be able to use Indirect Fire to target you at a penalty. A popular tactic is to use Sensor Lock to reveal a unit, and then use your long range units to engage before the enemy can see you.
Defensive Positioning - Offer your front to the enemy until one side is more damaged than the other. Then turn the other cheek and show your undamaged side to him. Alternately a Mech can be built with no weapons or components in an Arm or an Arm/Torso-Side. From the very beginning of the match this side can be presented toward the Enemy, soaking Damage and serving effectively as a Shield. Whenever employing Defensive Positioning, care must be shown toward that side’s Leg or risk its loss. Also be mindful of quicker enemies that may be able to move fast enough to get a rear shot.
Wingman / Mutual Support - Try to position your Mechs so their Rear Armor can't be exploited. And if your opponent does maneuver to achieve Rear shots, try to make them pay for it as they have likely overextended their own lines and are themselves vulnerable to Melee or Ranged Attacks.
Lance Composition - Take advantage of useful Combat Roles when choosing Mechs for your Lance. A fast Light Scout Mech can permit you to make the most of Indirect Fires from any LRMs your remaining three Mechs may carry. A dedicated LRM Mech may permit you to sacrifice some Armor or other Weapon Systems from this Mech with the understanding it would need to be safeguarded while in combat. A Brawler Mech may max out its Armor and focus on short range weapons (AC20, SRMs, etc) in order to Tank and deal as much damage as possible.
A Scout, 2 Brawlers and a dedicated LRM Mech can make for a very well rounded Lance Composition. Alternately, risk can be assumed and all 4 Mechs may be of a single type, for example four Brawling Hunchback-4G’s (AC/20) with the player looking toward Sprint and Brace to best close the distance to Enemy Mechs before pummeling them to scrap. Of course, if the Enemy manages to keep out of AC/20 range, it is going to be a lost effort.
Location, Location, Location - While planning to move, you can see your hit chances before confirming your move’s facing by mousing over enemies. Sometimes even moving a single dot closer to or further away (and out of Minimum Range) from a target can bring a significant amount of firepower to bare. Taking the time to plan for the best Move/Fire combination can realize decisive tactical advantage.
References/Further Research
Campaign Mode - Talk to Yang in the Mechbay. He has much to offer those willing to take the time and discuss it with him.
PartyElite's Beginner Tips - https://www.youtube.com/watch?time_continue=1&v=TCBGZeiNAB0 - A video covering 10 great tips.
Skill Points:
https://forum.paradoxplaza.com/forum/index.php?threads/lesser-known-effects-of-skill-points-i-e-other-than-the-big-8-abilities.1086290/
Tips to think about:
https://forum.paradoxplaza.com/forum/index.php?threads/tips-to-think-about.1087389/
Weapon Stats:
https://forum.paradoxplaza.com/forum/index.php?threads/weapon-stats-overview.1083542/
Strategy Chat on the steam forums:
https://steamcommunity.com/app/637090/discussions/0/1696043806553694857/
Some questions and answers:
https://forum.paradoxplaza.com/forum/index.php?threads/teach-me-senpai.1088446/
HBS-Internal PVP Tournament Writeups:
https://forum.paradoxplaza.com/forum/index.php?threads/hbs-internal-pvp-tournament.1084491/
Paradox BattleTech Forums:
https://forum.paradoxplaza.com/forum/index.php?forums/battletech.994/
Some discords you can ask questions on:
https://forum.paradoxplaza.com/forum/index.php?threads/setting-up-comms-for-BattleTech.1088466/#post-24092492
Eck vs Carlos
https://www.youtube.com/watch?v=MDf0Nzn-5yc关于作者

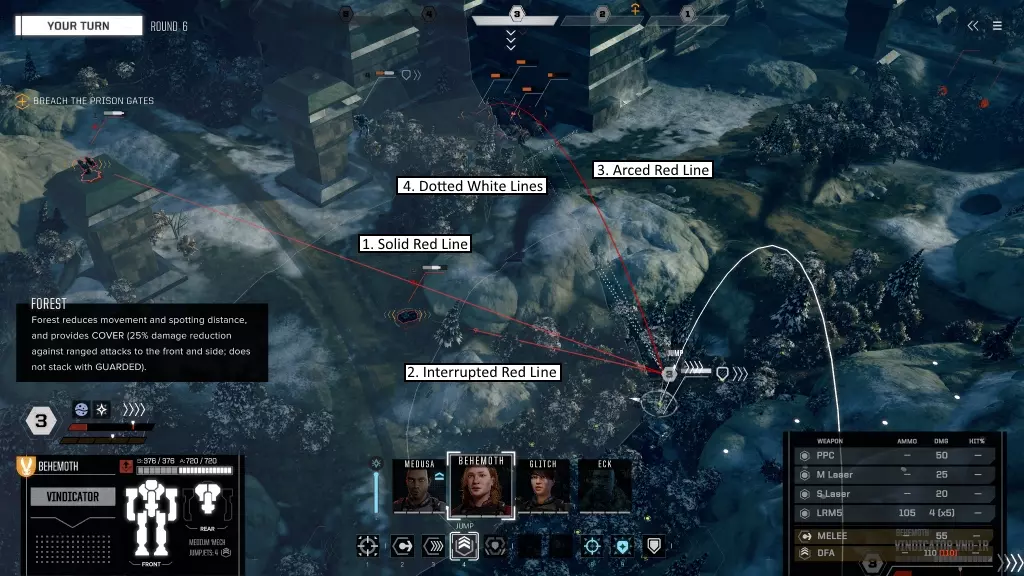

下载233乐园APP
专心推荐好游戏
纠纷处理及不良内容举报电话:
4006600910 (工作时间: 9:00-12:30,14:00-18:00)
北京市朝阳区启阳路4号院2号楼15层1803室
本公司产品适合10周岁以上玩家使用 未成年人家长监护
首页 / BATTLETECH