速刷超级信用点与战争债券勋章(v1.004.001+)
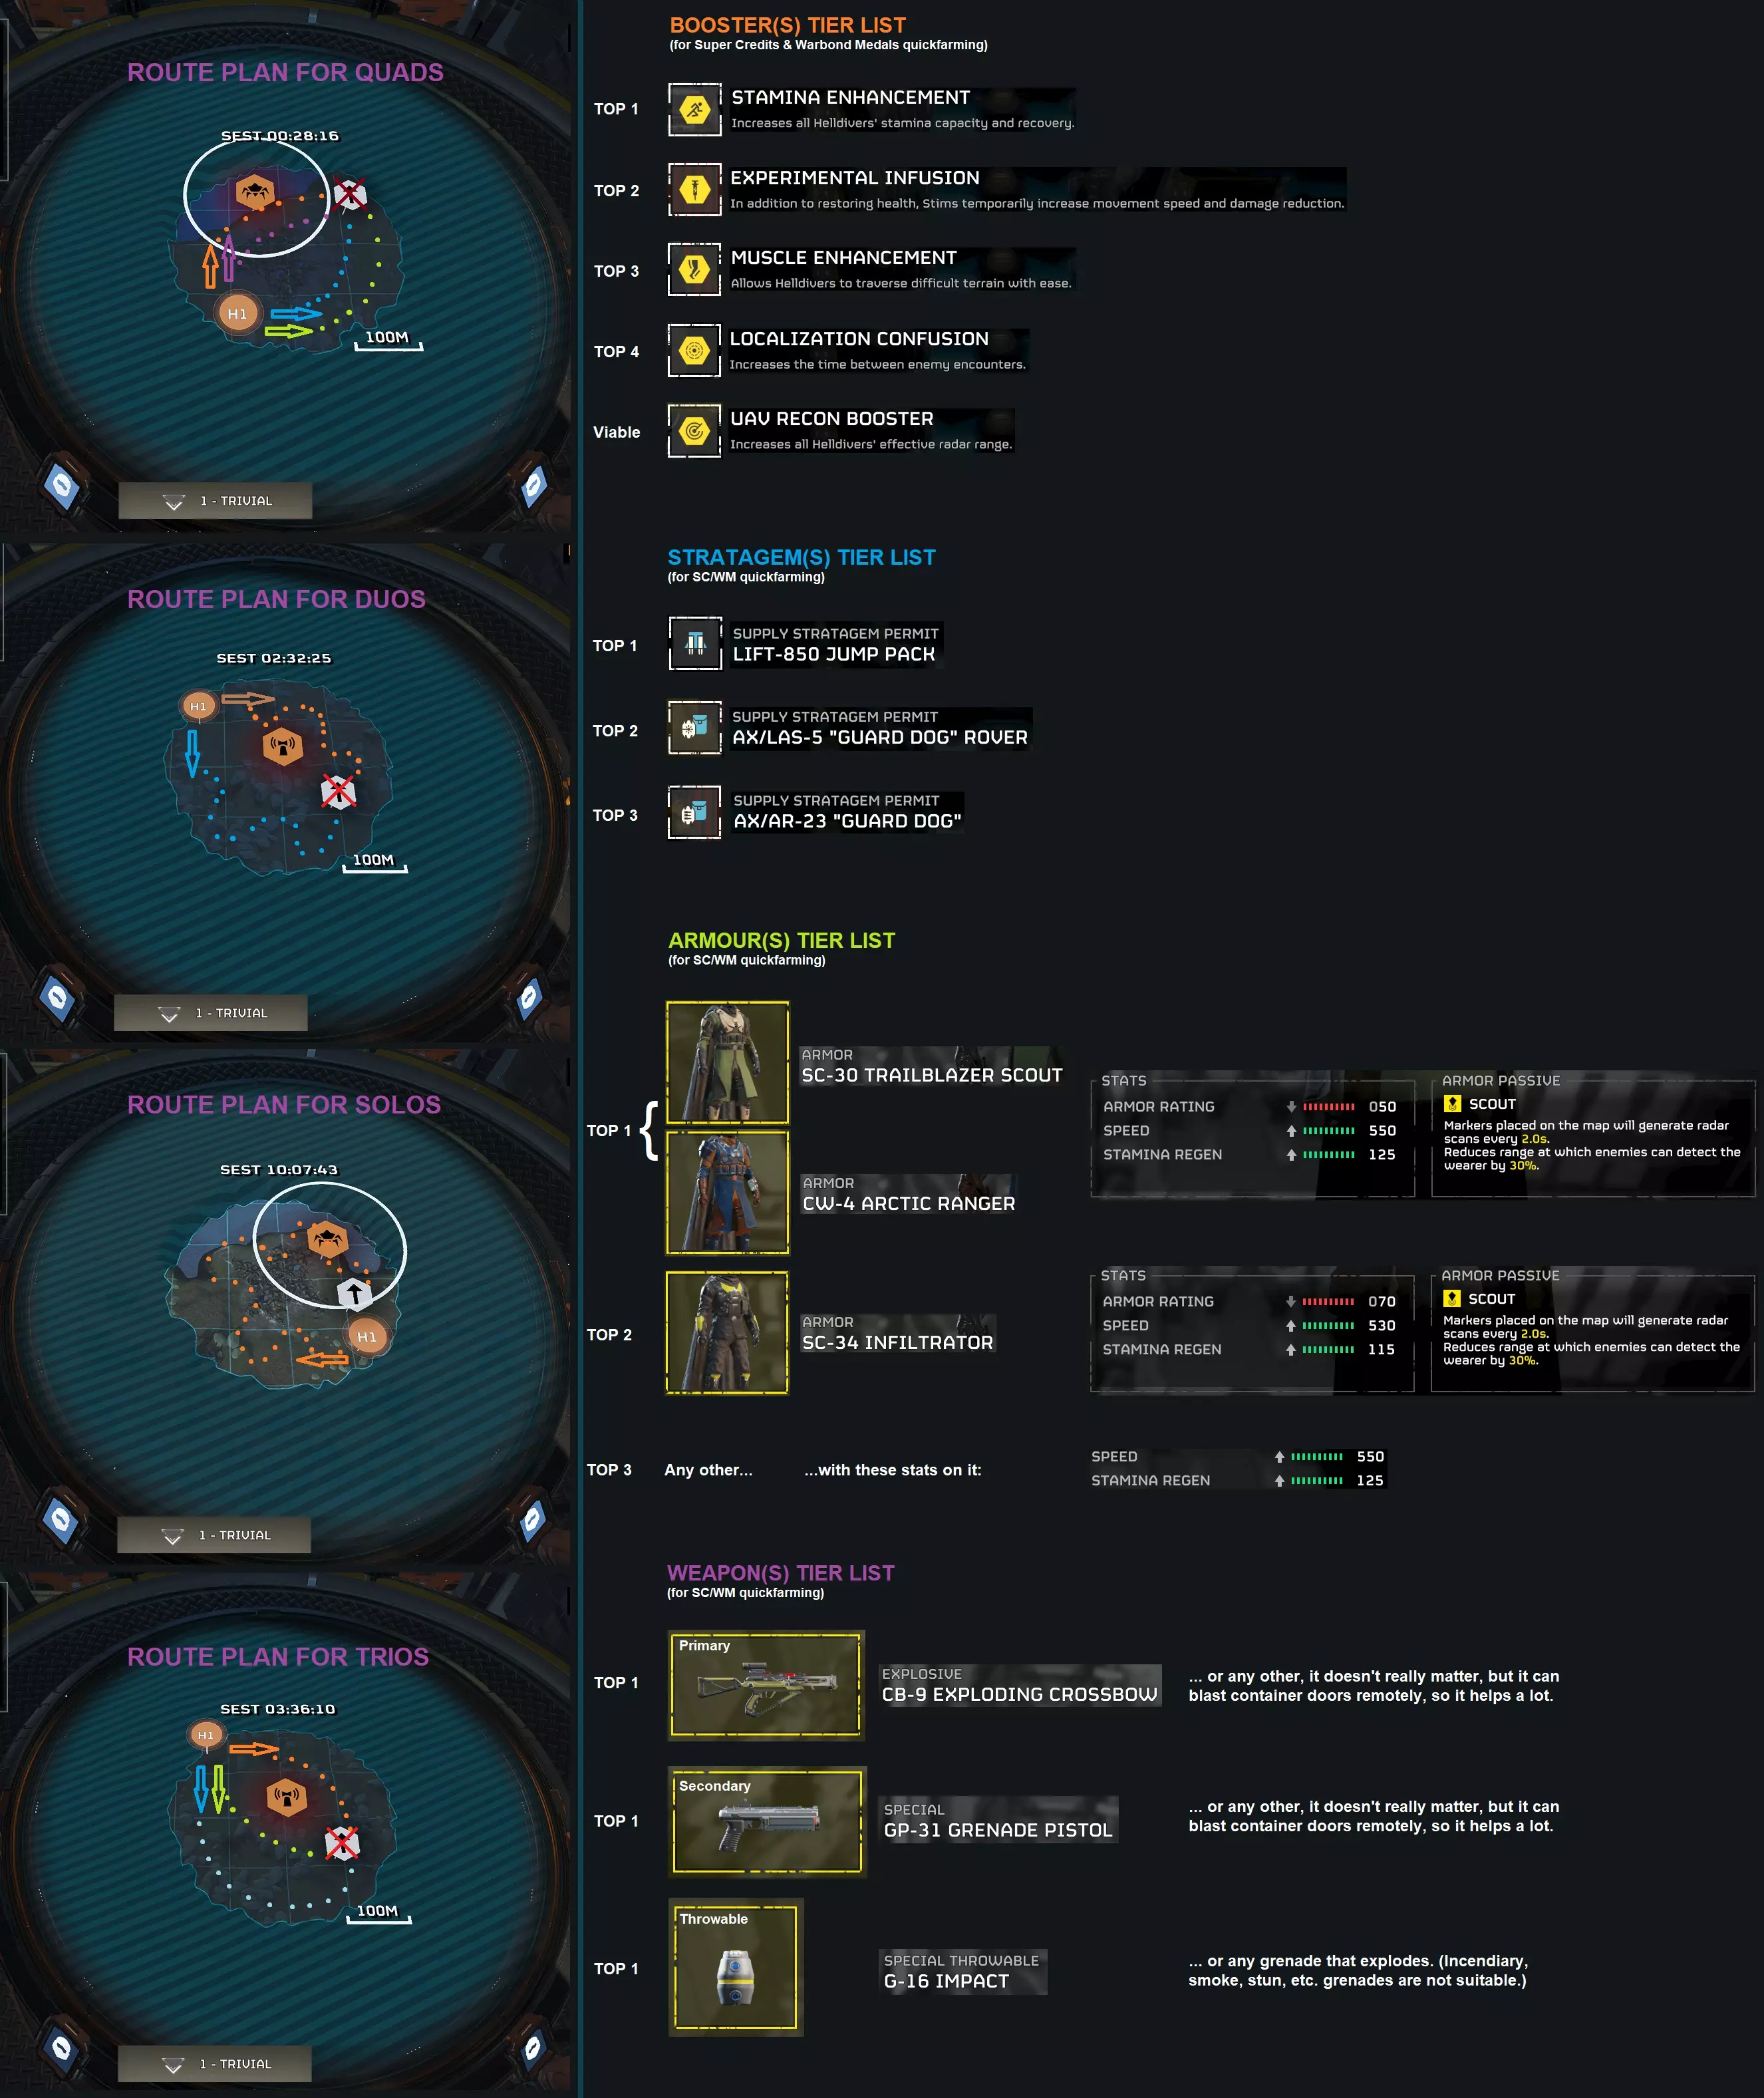
Fellow Helldivers! In this quick guide, I've tried to compile the most concise steps on how you can obtain the necessary currencies (Super Credits and Warbond Medals) as quickly as possible, so you can purchase all the 'Premium Warbonds' and their contents as soon as possible. I can't promise an enjoyable gaming experience, but in return, you'll be rewarded with the satisfaction of quickly acquiring the weapon, armour, or anything else you've been eyeing. :) And the "must have" numbers: You will need 16500 Super Credits actually to unlock all the Premium Warbonds (0 + 15 * 1000 + 1500 SC - the Standard Warbond called 'Helldivers Mobilize' is actually free, Premium Warbonds cost 1000 SC, Legendary Warbond costs 1500 SC) + You will need 13368 Warbond Medals to unlock all their contents (2015 + 686 + 672 + 699 + 669 + 734 + 569 + 814 + 686 + 836 + 598 + 663 + 641 + 873 + 713 + 637 + 863 WM) Superstore's "optional" numbers: In Superstore, you can find mainly skins (cosmetic items), and 2 forgettable weapons. This is why this section is optional. But, if you want EVERYTHING in the game, you will need more 8000+ Super Credits! Let's dive! Helldivers 2 --- release/01.004.001/16170 live.prod "from HOT FIX 01.004.001" 23.10.2025. Section 1 - Preparation (for absolute beginners) Basically, you don't need any special equipment. Really! You can start farming at level one. I actually recommend doing this because the sooner you can choose from weapons, armor, boosters, and other items, the easier it will be to progress later on, and then you won't have to focus on farming anymore, allowing you to deal with more important things. There is one thing you must have: some kind of explosive grenade to open up crate doors - so don't replace your basic grenade (yet)! Section 2 - Preparation Phase 2 (for 15+ level players) However, if you're not just starting the game, it's worth getting the following: Weapons: CB-9 Exploding Crossbow (Primary) (tested today, still blasts crate doors) GP-31 Grenade Pistol (Secondary) G-16 Impact (Throwable) Armors: All light armors with a speed of 550 and a stamina regen of 125 are good, but it's best if they also have the 'Scout' passive perk. This helps you avoid encounters with enemies more easily. In the long run, this is very important because you can save a lot of time by just running through the map without stopping. I recommend the following: SC-30 Trailblazer Scout (Armor with Scout passive trait) CW-4 Arctic Ranger (Armor with Scout passive trait) SC-34 Infiltrator (Armor with Scout passive trait) - Here, the speed and stamina bonus is a bit smaller, but it's still worth it because you gain more time by being noticed less often and thus fighting less frequently. Stratagems: M-102 Fast Recon Vehicle (Supply Stratagem) - Mandatory. Saves you a lot of time! EXO-45 (or EXO-49) Exosuit (Supply Stratagem) - Mandatory. You will be able to loot Bunkers alone! LIFT-850 Jump Pack (Supply Stratagem) - Useful. Saves you a lot of time! LIFT-182 Warp Pack (Supply Stratagem) - Useful. You will be able to loot Bunkers alone! Boosters: Basically, it doesn't matter at the start; take whatever you can, as you won't really need them until you acquire the following: If you have the M-102 Fast Recon Vehicle (solo play): - UAV Recon Booster (enhanced radar range) If you don't have the M-102 Fast Recon Vehicle (solo play): - Stamina Enhancement (enhanced stamina capacity) Other useful Boosters (for duo, trio or quad play): - Experimental Infusion (temporary enhanced movement speed) - Muscle Enhancement (easier movement on snowy terrain) - Localization Confusion (less enemy encounters) - Dead Sprint (you can use your HP as stamina) Section 3 - Planning loot-route The first and most important rule is to try not to enter the map alone (since there are bunker doors that you can't blow open and require two people to open), so it's best if there are at least two of you, and you can communicate with each other. Of course, the more of you there are, the faster you'll finish! If you're alone (Solo Helldiver): Land on one side of the extraction zone; this makes it easier to run around the map without accidentally covering the same area twice. When you reach the other side of the extraction zone, you're done. Try to make a loop about one-third of the way from the outer edge of the map, as this will likely take you past all the POIs (Points of Interest), which could be a building, bunker, shelter, crashed pod, or anything else. If your eye isn't yet trained and you don't recognize these spots on the minimap or the map itself (not all of them flash!), it's also worth paying attention to the compass at the top of the screen, as it will show nearby POIs with a question mark. When you think you've finished and made the full loop, don't call in Pelican-1, just abandon the mission using the "Abandon Mission with Squad" button. (In this case, you won't receive XP, money, or Samples, so don't waste time solving missions or picking up Samples. It's completely unnecessary! You're only there for Super Credit and Warbond Medal! And you’ll get both!) If there are two of you (Duo): In this case, it's worth landing directly opposite the extraction zone and heading out in a semi-circle in two directions. If you find a bunker (which requires 2 people to open), mark it on the minimap with a ping, go all the way to the edge of the extraction zone, then return together to the bunker, open it by simultaneously pressing the glowing yellow buttons, pick up all the loot, and then hit the "Abandon Mission with Squad" button in the Menus. If there are three of you (Trio): Two players should proceed as in the duo scenario, while the third moves through the center of the map toward the extraction zone, easily picking up the loot in the middle. If one of the two outer players finds a bunker, the third can quickly join and open it immediately. After that, move on to the extraction point and abandon the mission. (Again! Your best friend is the "Abandon Mission with Squad" button!) If there are four of you (Quad): Run through the map just as described in the duo scenario (keeping a distance of 10-20 meters between you so that you cover as much area as possible). You can open bunkers immediately, meet at the extraction zone, and abandon the mission. (Abandon Mission with Squad...)
第4节 - 所有人注意事项 补充信息: - 速刷仅在1级(简单)难度下效果最佳!基于时间考虑,提高难度等级并不值得!尽管地图可能看起来更大,但敌人数量的增加会大幅延长地图通关时间!如果你只需要超级 credits 和 warbond 勋章(这也是本指南的核心内容),那么最好选择简单难度进行游戏! - 非常重要!非必要情况下,不要战斗!尽可能避免战斗!射击看似花费不多时间,但实际上会占用大量时间。(显然,有时你无法避免战斗,但不要主动寻求冲突。例如,“侦察兵”护甲在这方面会有所帮助。) - 尽量寻找“全地形”地图!包含池塘、沼泽、丛林等地形的地图拥有更少的兴趣点(POIs),这意味着更少的战利品! - 如果你觉得自己落下了什么东西……不要返回,也不要再次搜索一张空的(或几乎空的)地图!而是开始一张新地图!不要为可能根本不存在的东西浪费时间。 :) - 避免“防御”任务和极小的地图!这些地图上没有战利品! - 寻找视野开阔、便于移动的星球!避开有地震(震动)和火焰龙卷风的星球!它们会极大地拖慢你的速度! - “ALT+F4”方法已经不再奏效,在之前的某次更新中已被修复。 - PLAS-15 忠诚者、JAR-5 统治者、SG-8P 惩罚者等离子炮、PLAS-101 净化者(或任何能量型爆炸武器)都属于“爆炸类”武器,但你无法用它们打开战利品箱!- 有了载具,一切都会快得多。:) - 不要完成地图上的主要目标!已加入全新游戏机制!如果你完成了目标,就必须撤离!别这么做,这是在浪费你的时间!潜入地图,搜刮物资,放弃任务。就这样!一次撤离大约需要3分钟!无论如何都要避免完成目标!(不要在目标附近召唤任何载具(汽车或机甲)!鹈鹕运输机可能会意外完成某些目标!) - 对于独狼地狱潜者:你可以独自驾驶机甲搜刮地堡!(将机甲的背部推到门前,然后下车。搜刮地堡后,跳回机甲,就可以带着战利品自由离开了。) ------------------- 感谢阅读,祝大家刷得开心!:) 抱歉我的语法不太好……:( 顺祝商祺: [HTPA]Gee Force,头颅埋葬者,等级131
速刷超级信用点与战争债券勋章(v1.004.001+)
2026-02-11 09:01:04 发布在  HELLDIVERS™ 2
说点好听的...
收藏
0
0


