


《鬼泣4》100%成就、攻略路线与收集要素
Everything you need to know to plan and get the platinum for DMC4, including Collectibles checklists. Introduction Ah! Check it out! It's got wings! The fourth entry in the series is generally not considered as the best one. It has its issues, namely half the game consists of backtracking through the areas and bosses of the first half of the game. Despite those issues and some annoying enemies, I thought the core of the gameplay was well done, with the different characters' abilities and the combat feeling well polished and satisfying. That said, going for 100% achievements in this game is not for the faint of heart or the impatient. You'll get them through sweat and tears. But I hope this guide will help a bit. And even if you don't care about the achievements, you may still find some use in the mission guides or character tips. Difficulty System - I know it's not my business, but this could get ugly. The game works with a single automatic save. You can't save manually in different slots, and you can't restart a new playthrough from scratch (i.e. collecting again all the Blue Orbs, etc) unless you manually delete the save data. There are 7 difficulty modes. The 4 basic ones are: Human. Easy/Normal. Available directly. Devil Hunter. Normal/Hard. Available directly. Son of Sparda. Similar to Very Hard in DMC3, with different enemy waves, etc. Unlocked by completing Devil Hunter with any character. Dante Must Die. The hardest of the main difficulty levels. Enemies can Devil Trigger. Unlocked by completing Son of Sparda with any character.In addition, there are 3 other difficulty modes that are a bit more gimmicky: Legendary Dark Knight. Like Son of Sparda but with a lot more enemies. Available directly. Heaven Or Hell Everything dies in one hit. Unlocked by completing Son of Sparda. Hell and Hell Your character dies in one hit but enemies are like in Son of Sparda. Unlocked by completing Dante Must Die. The Mission Select screen is always available, to replay any mission on any difficulty (provided you've already completed that mission on that specific difficulty, with that specific character). You can also switch costumes at any time between Missions. In the options menu, two additional settings that affect gameplay difficulty can be turned on or off at any time, and for any of the difficulty modes: Turbo mode, which makes everything go 20% faster. Automatic mode, which simplifies the controls (i.e. some combos are performed automatically, you can just keep pressing the trigger instead of mashing it to keep shooting, etc). It does make things easier, so it is an option that you might consider if you are having trouble at some point. But the downside is that it gives significantly less control over which combos to perform, etc. Playable Characters - Time to wake up, kid! You're missing out on all the fun! The default characters are Nero and Dante, who share the playthrough (some missions with Nero, some with Dante). The alternative characters are available from the start: Vergil (all missions with the same character), and Lady/Trish (who share the playthrough like Nero/Dante). The missions and location of items are identical for all characters. Each character has their own weapons and abilities, but they share the Proud Souls resource that allows to buy abilities and upgrades. So if you max out Nero and then start playing with Vergil, you'll already be able to purchase all his abilities right from the start. The characters also share the health and devil trigger bar upgrades (Blue/Purple orbs), and the Red Orbs account and inventory (Vital Stars, etc). Difficulty modes unlocked with one character (pair) are also unlocked for the others. The only thing that is not shared between characters is the mission progress within each difficulty. You will unlock costumes for the different characters. They have no effect on gameplay, except for the super costumes which provide unlimited Devil Trigger and some other goodies. These are obtained by completing DMD with Nero/Dante, and with Vergil. Lady and Trish do not have super costumes. The gameplay possibilities are very advanced, and you can easily spend hundreds of hours mastering all the subtleties of the game, improving your skills, and refining your combos. In the dedicated sections below (Character Tips), I'll point our some abilities that can be important at (let's say) beginner level: in combat, but also for reaching items and completing Secret Missions. The first thing you want to do for each character is to set your controls. The most important thing is to remap the ranged attack / shoot button (pistols, etc) to a trigger, so that you can use it (to charge, or to spam) mostly independently of your melee attacks. While we are in the game's option, also note that you can select different lock-on systems (priority to the enemy closest to you, or in the direction you push the stick, etc)... pick the one that works best for you, it can make a difference. Noteworthy Achievements - I fail to see the logic here. Is sanity the price to pay for power?
共有7种不同难度模式:人类、恶魔猎人、斯巴达之子、但丁必须死、传奇黑暗骑士、天堂或地狱以及地狱与地狱。完成高难度模式不会同时算作完成低难度模式,你必须分别完成每个难度。好消息是,每种模式都可以使用任意角色(组合)进行游玩。
“荣耀之座”这个成就其实不算太难,毕竟它要求在7个难度模式中的5个(除了“天国或地狱”和“地狱与地狱”)里,所有任务都达成S评价。不像《鬼泣1》和《鬼泣2》那样,只需要在任意难度下完成一个任务的S评价就完事了。至少,这个成就可以用任意角色(组合)来完成。总体来说不算太复杂,但确实需要花些时间。你得记住并找到场景中每一个隐藏红魔石的位置,不过我在任务指南里准备了一些小地图,能帮到你。
这是游戏中7位主要Boss对应的7个类似成就之一。每个成就都可以使用任意可玩角色完成。实际上,以相对正当的方式尝试获取这些成就并非坏事,这样可以非常熟悉Boss的招式,并为它们在“但丁必死”难度和“血宫”中的出现做好准备。不过,也有更取巧的方法来获取这些成就,所以这些成就都不应成为障碍。以熟练且令人满意的方式达成SSS评价的话,但丁或许是最难的一个,但他也和其他Boss一样可以被取巧击败。
This one is going to be painful indeed. 101 stages with various enemies of increasing difficulty. One run can take up to two hours, you can't use any items, and if you die you're welcome to start again from level 1. And that's to be done with each of the 5 characters. Thankfully Nero, Dante, and Vergil have super costumes, which can be used to get the achievement. Lady can mostly charged-shot her way through. Things can get more complicated with Trish. Roadmap - When your blood and this sword are combined, we will be able to proceed to the final stage of our ultimate goal. There are various achievements that can be obtained with any of the characters (e.g. S-rank all missions in DMD), and it may be up to personal preferences and which characters you are more comfortable with. Therefore, the Roadmap below should be seen more as a proposed guideline than an absolutely strict order. The idea here is to push through with Nero/Dante for most the achievements that they can get, but still leave some things to do for the others. It is organized character by character, since switching from one to another always means (re-)learning new controls etc. Start with the Nero/Dante preliminaries, but for the rest feel free to reorganize things to your liking, or start working on several things in parallel. Nero/Dante PreliminariesStart this long journey with two relaxed playthroughs with Nero/Dante. The main goal is to get cosy with the game. Learn to know the enemies and bosses, the mission layouts, Nero and Dante's abilities and playstyle, etc. The second goal is to get your characters (almost) fully upgraded by collecting Blue Orbs and other items, completing the Adjudicators and Secret Missions, and buying the Blue/Purple Orbs and abilities. If you like your first playthrough to be blind (or at least not follow a guide every step of the way), go ahead and have fun, it won't cost you at all in the long term, since a lot of things are not accessible the first time through, and all missions will have to be repeated multiple times anyway. Start on Devil Hunter if you want some challenge, but don't feel bad about switching to Human after a few missions if it is too difficult. Second playthrough will be on Devil Hunter or Son of Sparda. Use your Red Orbs mainly to buy Blue and Purple Orbs. Use your Proud Souls to buy abilities (don't forget that these can be refunded, so you can try things as you like). Follow the Mission Guides below while playing to catch all the Blue Orbs and other collectibles, and attempt the Secret Missions and Adjudicators. Note that some of the items, and many of the Secret Missions, are difficult or impossible to reach or complete on the first run through. So skip at will. Don't worry about getting all the Red Orbs either. Nero/Dante MasteryQuite a bit of work to do here, you'll need to get really comfortable with Nero's and Dante's playstyle. S-rank all Missions in Human / Devil Hunter / Son of Sparda. See the corresponding section below for some tips on the matter, and use the images in the Mission Guides to locate all Red Orbs. It's a bit grindy, but overall, S-ranking missions is not too difficult. And it is good practice, and it will fill up your Red Orbs account so you don't have to worry about buying items during DMD. Also take the opportunity to complete any remaining Secret Missions, and to learn and practice all the moves and abilities. Complete Dante Must Die mode, and you will unlock the Super Nero/Dante costumes. With your experience S-ranking the lower difficulties, it should not be too difficult. You may however need some Vital Stars, since some enemies deal A LOT of damage. Pick up all red orbs, use items if necessary, but make sure not to die... and you will most likely get a first try S-rank in many missions. (optional) S-rank all missions in Dante Must Die. Once the playthrough is finished, check out how many S-ranked missions are missing, and decide if you want to do this now, or leave it for later. Some people recommend to use Vergil to S-rank Dante Must Die, since he has a good damage output. You can still decide later after playing a bit with Vergil. Once you have unlocked Super Nero/Dante, start working on SSS-ranking bosses. See the corresponding section below for some tips on the matter. Complete the Bloody Palace with Nero. Use Super Nero, put on Turbo mode, and make sure to finish it in under 2 hours for the corresponding achievements. See the Bloody Palace section below for some tips on the matter. Complete the Bloody Palace with Dante. Use Super Dante, and make sure to dispatch your lesser self without taking any damage in the last level (see the Bloody Palace section below). If at any point you find yourself short on Red Orbs, the Bloody Palace with Super Dante in Turbo mode is a decent option for farming Red Orbs (about 170,000 in 30 minutes). You could also already Start Heaven Or Hell with Lady/Trish (see below), as the missions in this mode can be completed very quickly and without items, and still pay out well in Red Orbs (some missions better than others, up to 40,000 Red Orbs in 5 minutes iirc but the game doesn't keep track afterwards). Vergil Complete and S-rank all missions in Legendary Dark Knight. This may not be the easiest mode to learn how to use Vergil. But it's not extremely difficult either, and Vergil can generally deal well with the enemy masses (or very very well, if we think Judgment Cut End). As for the S-ranks, don't worry about the time or using items, just try not to die, and you should easily get enough Style points to S-rank most missions on the first attempt. Note that you can see your max rank for each mission on the Mission Start screen, since LDK is not in the Total Ranking table. You'll also get the achievement for killing 10 enemies within a second, without even trying. (optional) Complete and S-rank all missions in Dante Must Die. If you prefer to S-rank DMD with Nero/Dante, that's up to you. You could then skip DMD with Vergil altogether, except that DMD unlocks Super Vergil, which can make the Bloody Palace a lot more comfortable. Alternatively, the Super Vergil costume can be bought as DLC. Complete the Bloody Palace with (Super) Vergil. Lady/TrishIt is only required to complete one playthrough in any difficulty (Heaven or Hell being the fastest), and the Bloody Palace. However, Lady and Trish do not have super costumes, so it doesn't hurt to get some practice with those characters before tackling the Bloody Palace. This is why I propose here to play Hell and Hell with Lady/Trish, but you can do it with (Super) Nero/Dante or Vergil, if you prefer... and get some practice with Lady/Trish directly in the Bloody Palace. Complete Heaven or Hell, if you didn't do it already. Complete Hell and Hell. You die in one hit, but enemies don't (and are on Son of Sparda difficulty). So it can get tricky at times, especially with new characters. But on the other hand, you already have a lot of experience with the game, and you get 3 free Gold Orbs before each Continue, so it's not as bad as it sounds. Don't hesitate to skip enemies when you can (no red walls) and use Holy Water if needed. Hell and Hell is good practice for the Bloody Palace since both these modes are about dispatching the enemies while taking minimum damage, rather than Style. If you are still missing some boss SSS-rank achievements, Lady can cheese most of them with Charged Shots. See the section below. Complete the Bloody Palace with Lady. Since you're not using a super costume, this should almost certainly give you the achievement for completing Bloody Palace with an S-rank. Complete the Bloody Palace with Trish. Mission Guides - It's a customer with the password. They're nearby. What should we do? - Eh. You need to ask? In addition to the location of Secret Missions, Adjudicators and Collectibles, these Mission Guides contain some directions on where to go during the missions, but are not detailed walkthroughs as I wanted to keep it reasonably short and focused so as to not distract too much from just playing the game. To S-rank the missions, you need to grab all Red Orbs in the environment, so these are marked on the maps as well. The legend of the figures is:
秘密任务 共有12个秘密任务,每个任务奖励一个蓝色魔魂石碎片。这些任务只需完成一次,但你仍可以返回获取红色魔魂石。部分秘密任务需要特定能力,在首次通关时可能无法(或极难)完成。我添加了一些关于如何成功完成较复杂任务的提示。如果遇到太多困难,可以查看此指南[www.xboxachievements.com]以获取更详细或其他策略。由于 Nero 和 Dante 大多会经过相同的区域,部分秘密任务可以在不同关卡中由 Nero 或 Dante 尝试,但通常只有其中一人可以完成(或完成难度低很多)。我只会标注推荐角色(你仍可尝试用另一角色挑战)。 战斗裁决者:攻击它们并切换使用不同招式来提升你的风格等级,达到一定程度后即可获得蓝魂石碎片。我认为所有战斗裁决者都能在一周目完成,至少在你为绯红女皇/叛逆之刃购买了足够技能的情况下是如此。每个战斗裁决者只需摧毁一次即可获得蓝魂石碎片,不过之后仍可再次摧毁以获取红魂。部分裁决者仅可由 Nero 挑战,其他则仅可由 Dante 挑战。可收集物品:蓝魔石碎片、生命之星、恶魔之星和黄金魔石可在任务中找到。这些物品会在任务指南中标注,首次出现的任务会进行说明(不过部分物品用但丁更容易获取,因此我会将其列在但丁的任务中)。由于你会多次经过相同区域,部分物品可以稍后再收集。 蓝魔石碎片只能获取一次,但生命之星、恶魔之星和黄金魔石在每个难度(人类、恶魔猎人、斯巴达之子、但丁必死、传奇黑暗骑士)中均可获取一次。在特定难度下获取后,该物品不会被其他东西替代。由哪个角色获取物品并不重要,因为所有角色共享物品(例如,在斯巴达之子难度下,若你使用 Nero 或 Dante 未拾取金色魔魂石,那么在同一难度下切换为 Vergil 或 Lady/Trish 时,该金色魔魂石仍会存在。 红色魔魂石 要达成任务 S 评价,通常需要红色魔魂石收集获得 S 评价,即收集到超过 95%的可用红色魔魂石。环境中的红色魔魂石更为重要(可见的、隐藏的储藏点以及可破坏物体掉落的),因为一旦进入区域,这些魔魂石就会被算作可用。部分任务存在“可选”区域,你可以进入但并非完成任务所必需。若进入这些区域,则必须收集其中的红色魔魂石。击杀敌人获得的红色魔魂石会自动收集。来自审判者的物品(如果你已拥有蓝色宝珠碎片)和红色宝珠石只有在你收集它们时才会被计入可用数量,因此为了达成S级评价,你可以放心忽略这些。 任务指南(1-4) 任务1 - 物以类聚 这是一个教程关卡(可在选项中关闭),在【歌剧院】进行一场战斗。 红色宝珠:【歌剧院】(10个长椅,确保在战斗结束前全部摧毁)。

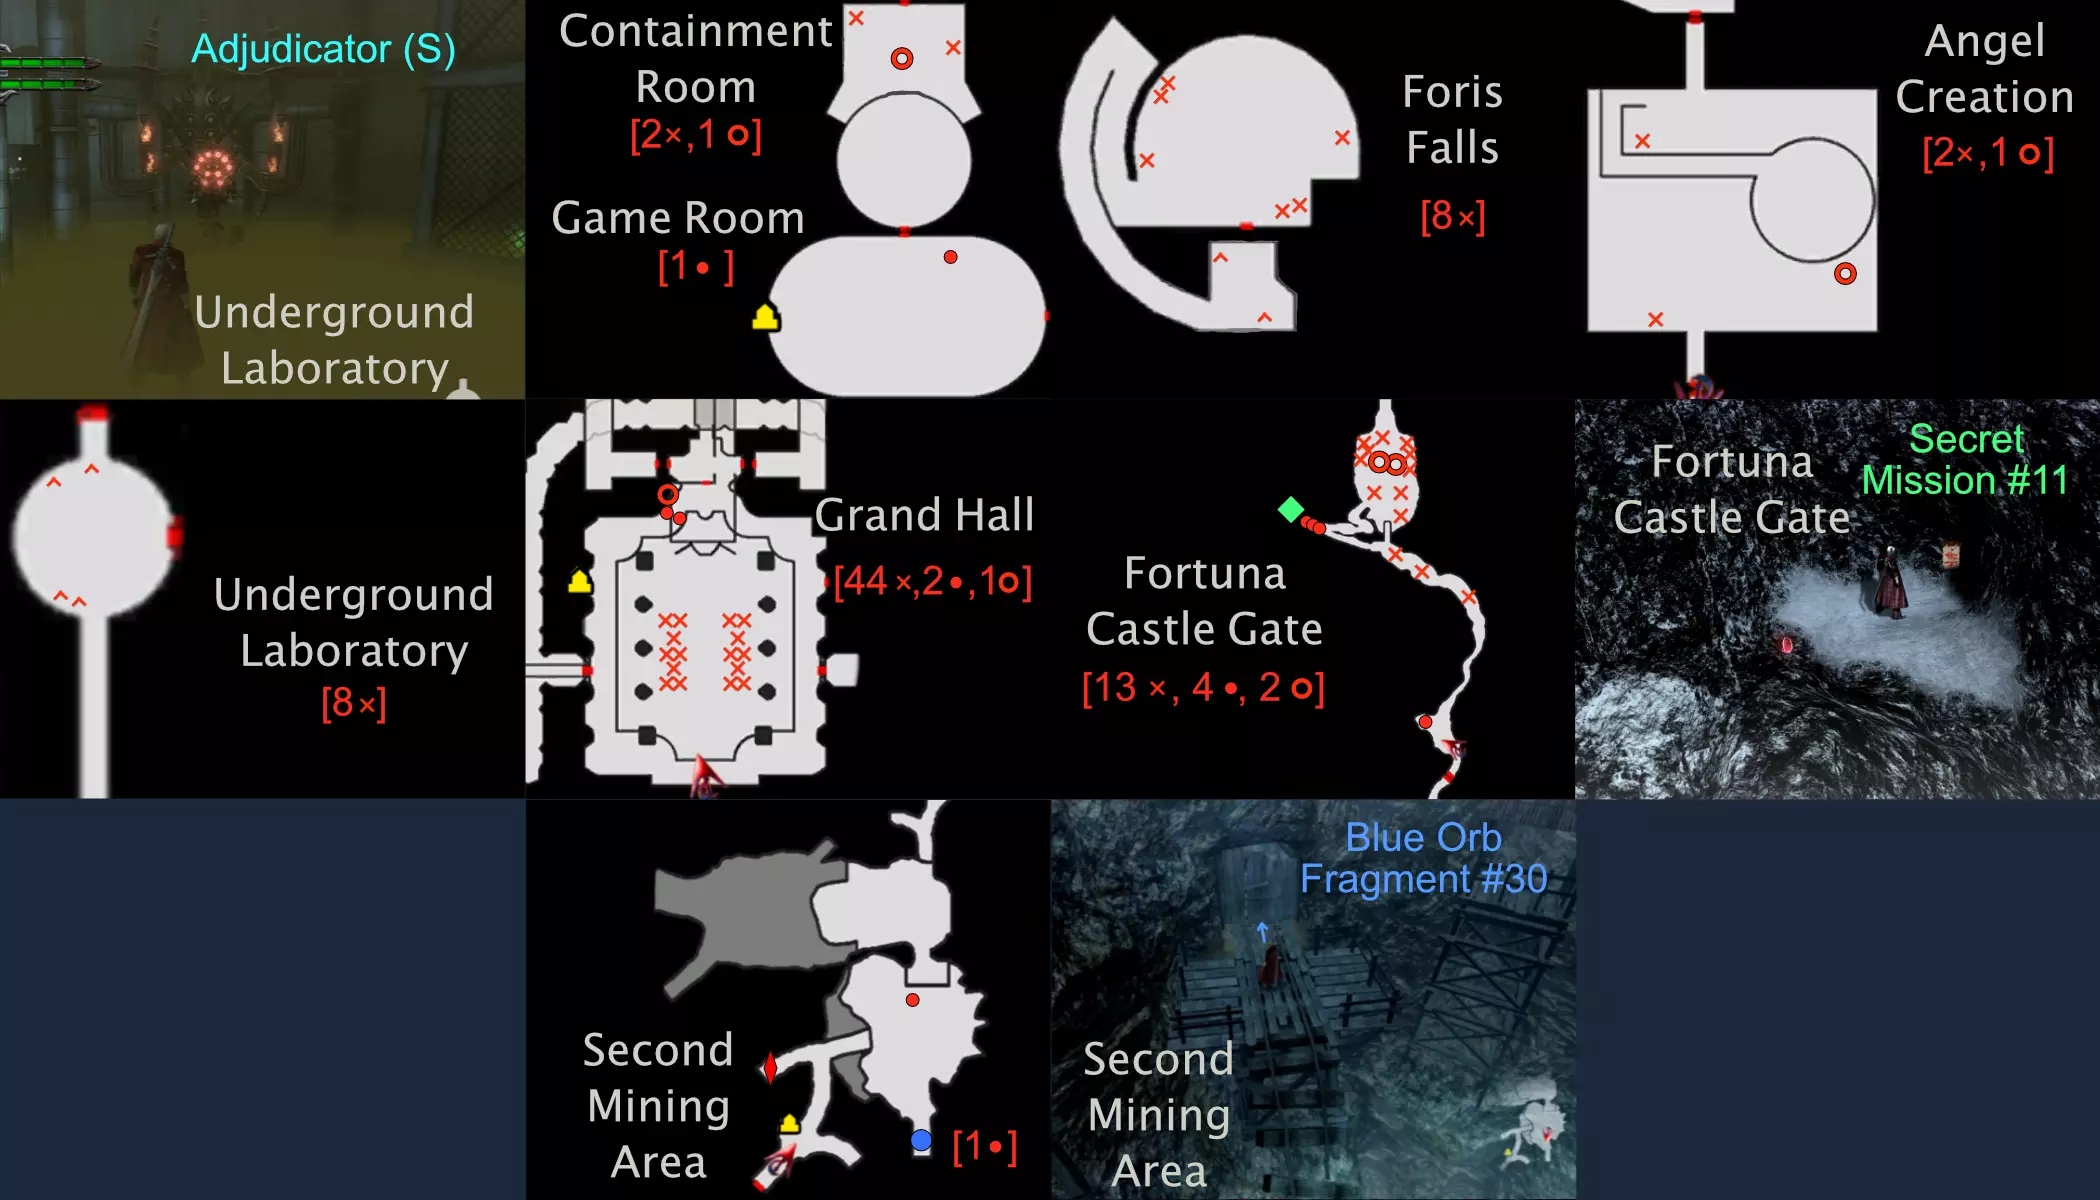
任务 2 - 地狱之门 金色魔魂石:你进入的第一座建筑是【仓库】。在下层,通过墙壁跳跃来获取楼梯几步上方壁龛中的魔魂石。 生命之星 S:当你落到【大教堂】的主楼层时,它在右侧的一间牢房里(使用抓取)。 秘密任务 #1(蓝色魔魂石碎片 #1):你将通过一系列抓取点穿越【露台/商业区】。在第一个抓取点之后,你会看到一根带有红色铭文的柱子正好挡在你的路径上。与它互动。首次游玩即可完成,但后期拥有更多能力后会变得更容易。使用你的恶魔之手(抓取/爆破)的次数至少要和你的剑一样多。蓝色宝珠碎片 #2:在市场区域,比红色宝珠石碑稍远的地方,沿着屋顶上3个小红宝珠的轨迹前进。 战斗裁决者 B(蓝色宝珠碎片 #3):攀爬到[第一矿区]的上层。很容易找到。 红色宝珠:[歌剧院广场](6张长椅、4个垃圾桶、1个可见);[仓库](下层:2个桶;上层:3个桶、5个板条箱、5个架子);[大教堂](下层:10把椅子;上层:4张长椅、2个可见);[住宅区](市场:5个罐子、5个板条箱、1个桶、3个可见;离开市场后:1个大型垃圾桶、2个隐藏在高大木塔顶部);[蓝港](入口:2个可见,出口:2个大型垃圾桶);[海关大楼](2个可见);[第一矿区](6个可见)。
任务3 - 白翼 蓝色魔珠碎片 #4:大致位于起始区域可见的红色魔珠上方。沿着竖井攀爬至顶部。 生命之星S:在离开该区域前,左侧的一个小死胡同通道内。当你进入城堡的【宏伟大厅】后,从右侧的门进入【大广间】。不要走遇到的第一道门,而是一直跑到另一边进入【拷问室】。最终你会回到【宏伟大厅】,下一道门将带你经由【中央庭院】和【福里斯瀑布】进行一段漫长的迂回,之后再次回到【宏伟大厅】。 生命之星S:在福里斯瀑布下楼梯后,桥旁一根柱子的上方。圣水:当你回到大厅时,在一个高处的壁龛里,就在圆形开关之前。可以通过墙壁跳跃+抓取(Snatch)来获取。 蓝色魔球碎片 #5:按下圆形开关后,向前移动并穿过门。再往前走一点,(镜头)右侧有一面可破坏的镜子。碎片就在镜子后面。红魔魂石:[第二矿区](1个可见);[弗图纳城堡大门](初始可见1个,13根细石柱,2个隐藏在大石柱顶部,3个在带破损楼梯的返回小径中可见);[大厅](下层:8条长凳,36把椅子);[大殿](5把椅子,12个烛台,部分位于 gated area,使用恶魔之手,2个在可破坏镜子后方可见);[大厅](上层:2个可见,1个隐藏需EX3 - High Roller);[画廊](3具盔甲,6把椅子,5张桌子,2个板条箱);[图书馆](外部:1个隐藏;下层:2个陶罐,1张书桌;上层:3张书桌)
任务4 - 冷血 返回【宏伟大厅】,从一楼的门进入【大型大厅】,然后从右侧第一道门进入【餐厅】。 秘密任务#2(蓝色魔球碎片#6):在通往餐厅的走廊中,用螺旋刃摧毁火球发射器。你需要在不接触地面的情况下完成5次空中爆破。跳跃或二段跳后抓取敌人,然后立即进行爆破,重复此操作。掌握好时机后会相当简单。红魔魂石:[图书馆](下层:2个罐子、1个书桌;上层:3个书桌;室外:1个隐藏);[画廊](3个盔甲、6把椅子、5张桌子、2个板条箱);[大厅](上层:2个可见、1个隐藏;下层:8条长凳、36把椅子);[餐厅](8把椅子、桌上4套餐具);[大广厅](5把椅子、12个烛台、2个在可破坏镜子后方可见)。
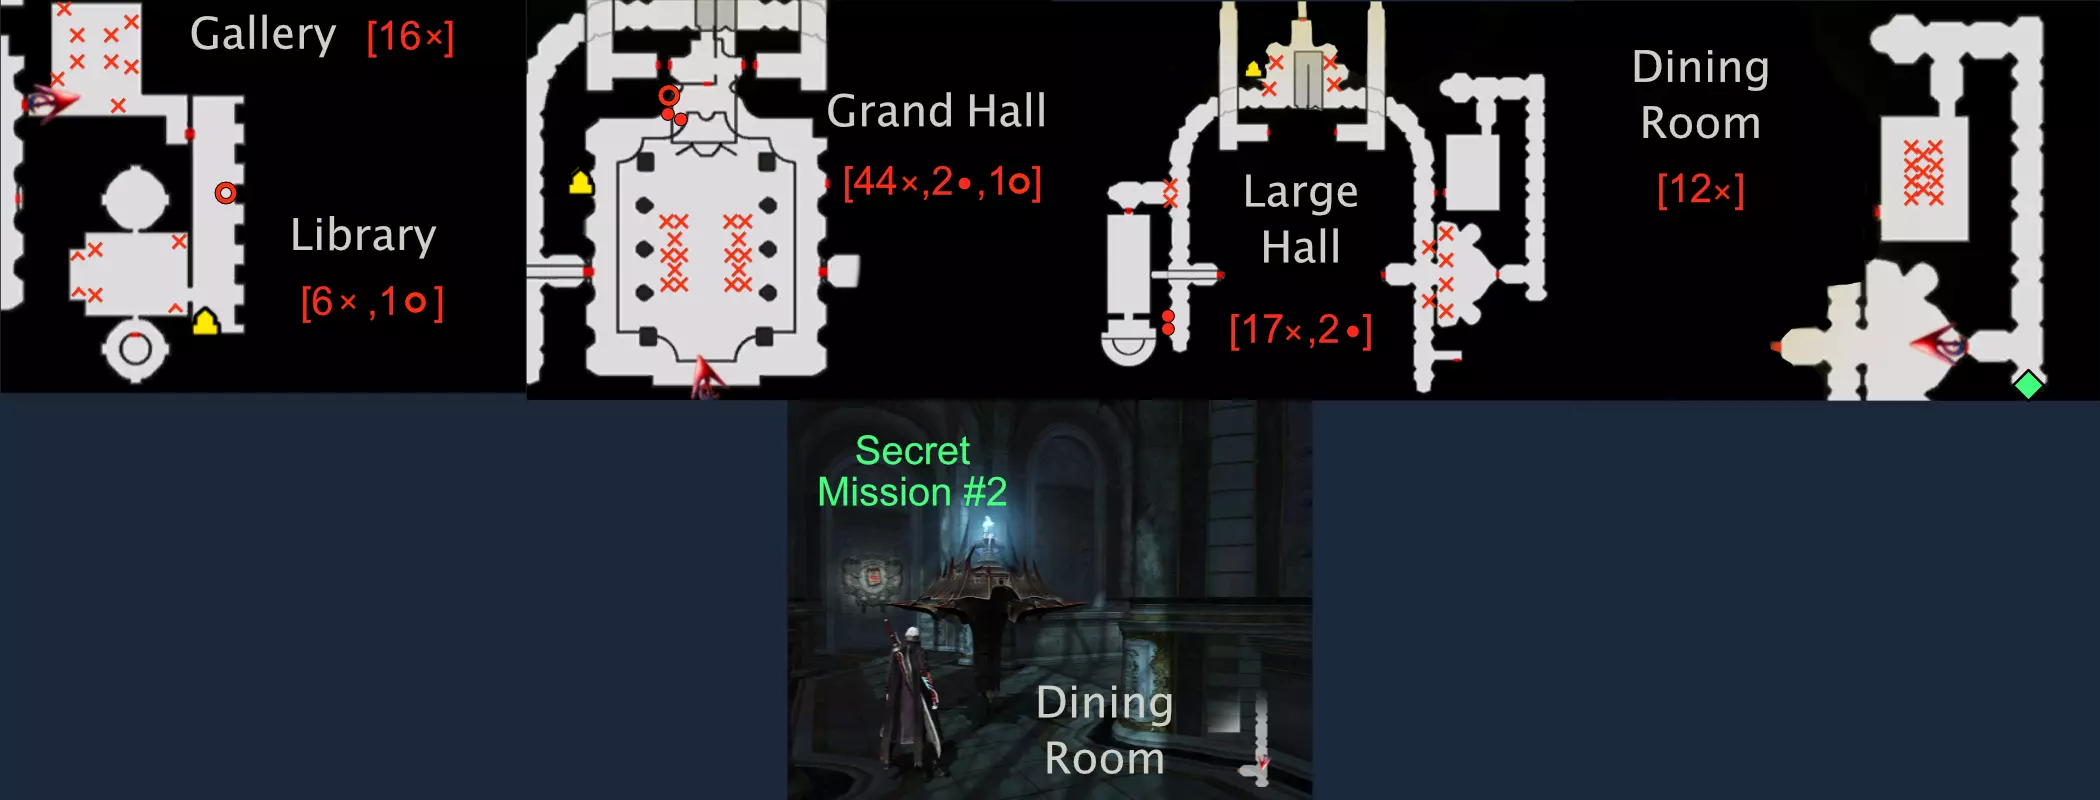
任务指南(5-8) 任务5 - 三一颂 秘密任务#3(蓝色魔珠碎片#7)。在起始区域,出口楼梯的周围和下方。不建议首次游玩时尝试,因为这实际上需要恶魔之手的“抓取”能力。抓住一个稻草人并“抓取”它来保护你免受冰元素的攻击,尽量调整好自己的位置(背后受到攻击会使你受伤并导致尝试失败)。可随意嘲讽。第一个稻草人被摧毁后,抓住另一个继续。希望你最终能达到C级风格评价。 秘密任务#10(蓝色魔珠碎片#8)。在下一个房间,摧毁壁炉上方的镜子。激活回旋镖并推动它四处移动,以“夷平一切!”(摧毁5座黑/蓝色塔)。别忘了用剑砍它一两下,让它移动得更快更远(除非你需要更好的控制)。不要走任何门。 圣水 在螺旋井中通过弹跳板向上移动时。它在第二个平台上,突出的头颅下方。尽量跳到靠近它的地方,然后使用抓取。 生命之星S 在第三个平台上,一个封闭的牢房里(使用抓取)。 生命之星S 穿过大厅里的画作后,下楼梯,你会在一个牢房里看到它(使用抓取)。红魔魂石:【士兵墓地】(18座墓碑、10座雕像、8座冰雕、1个高处可见:站在马雕像位置,使用空中冲刺和抓取;2个隐藏在靠墙的平台上);【大师房间】(3张桌子、4把椅子);【螺旋井】(10个可见,1个隐藏:在第一个平台的开放牢房内);【大厅】(12根蜡烛、5把椅子、2个在镜子后方可见);【宏伟大厅】(36把椅子、8条长凳、2个可见、1个隐藏)。
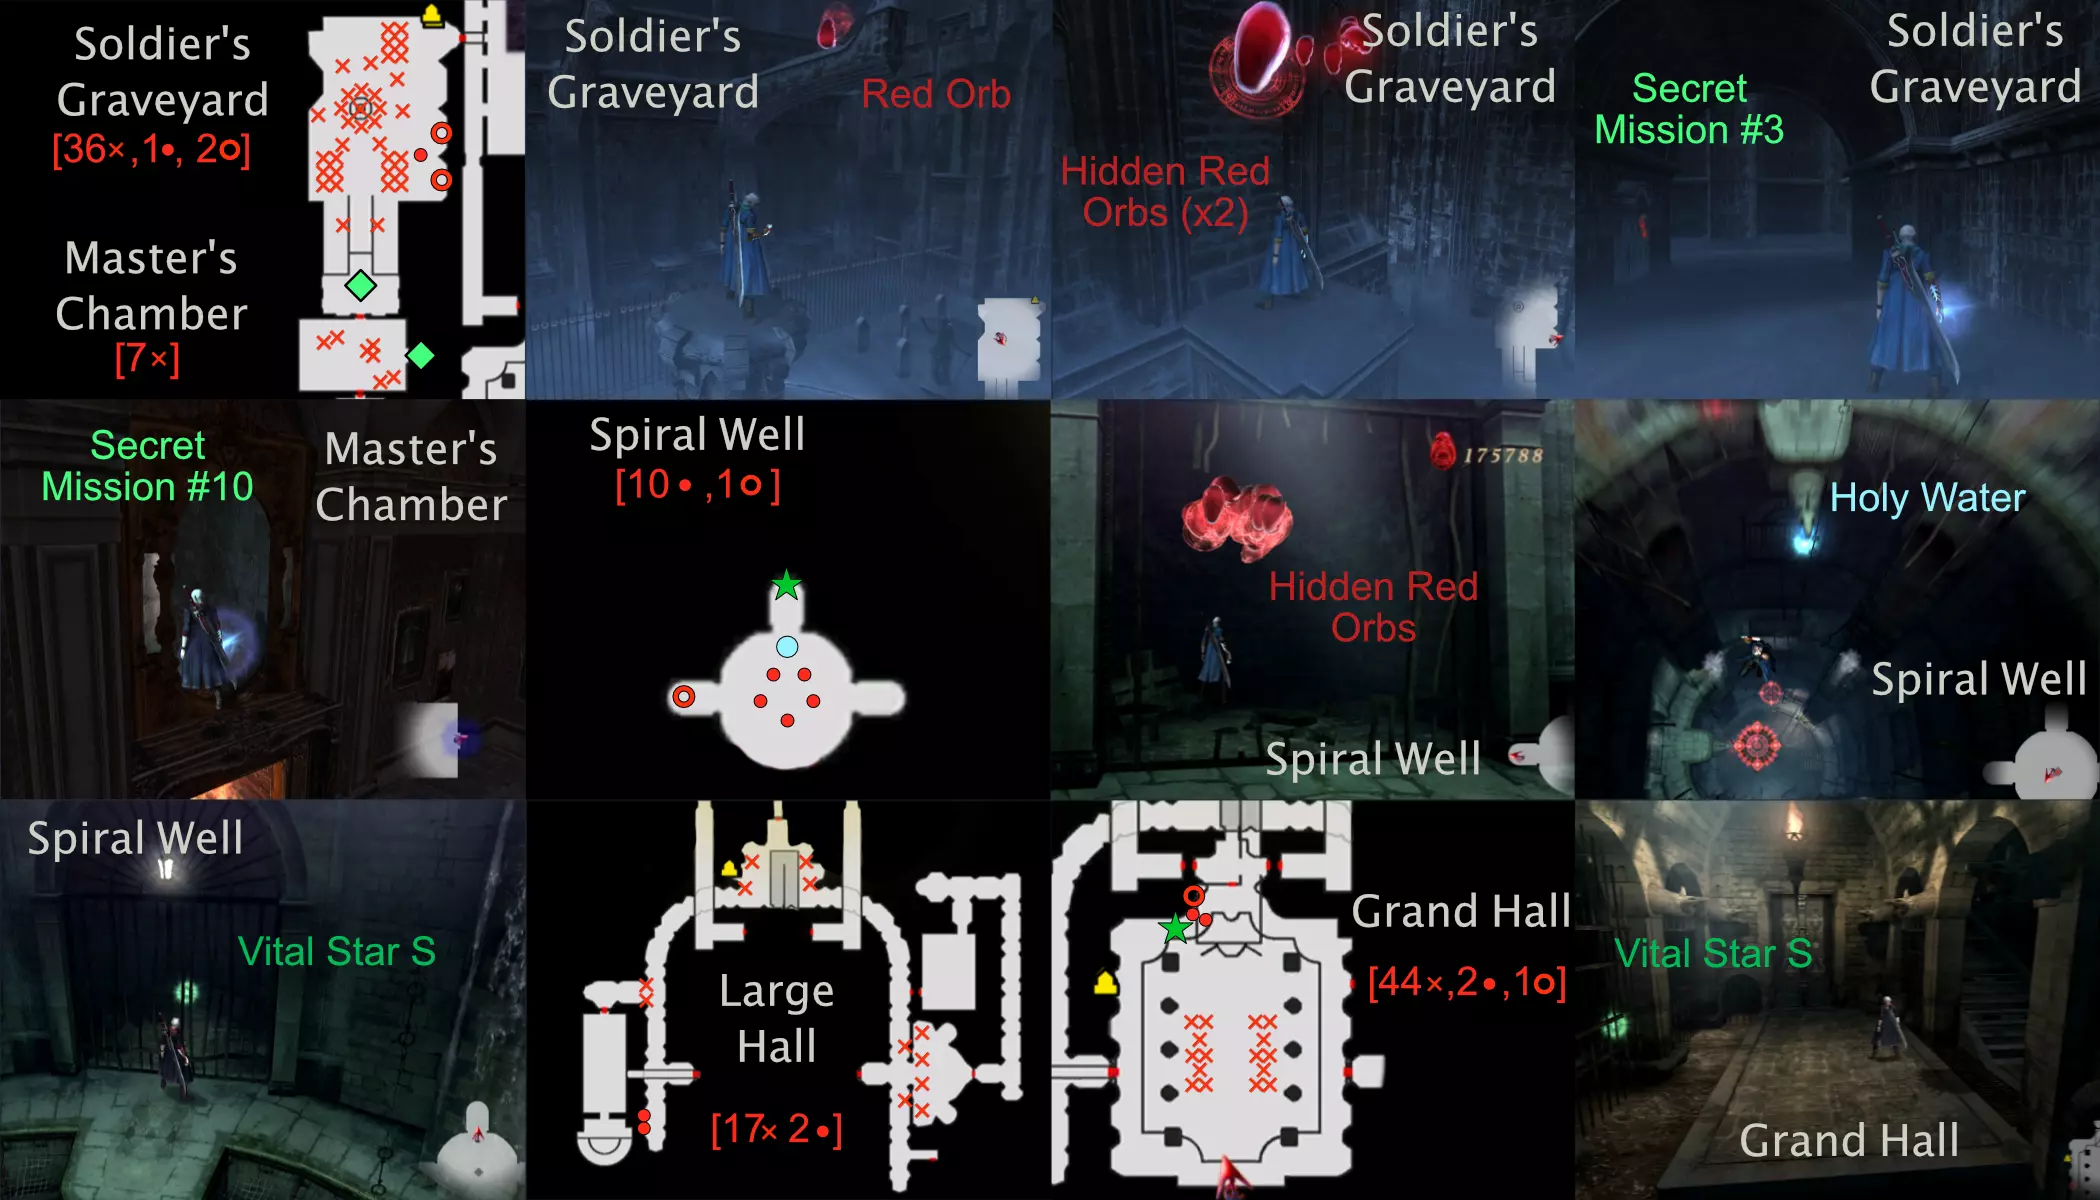
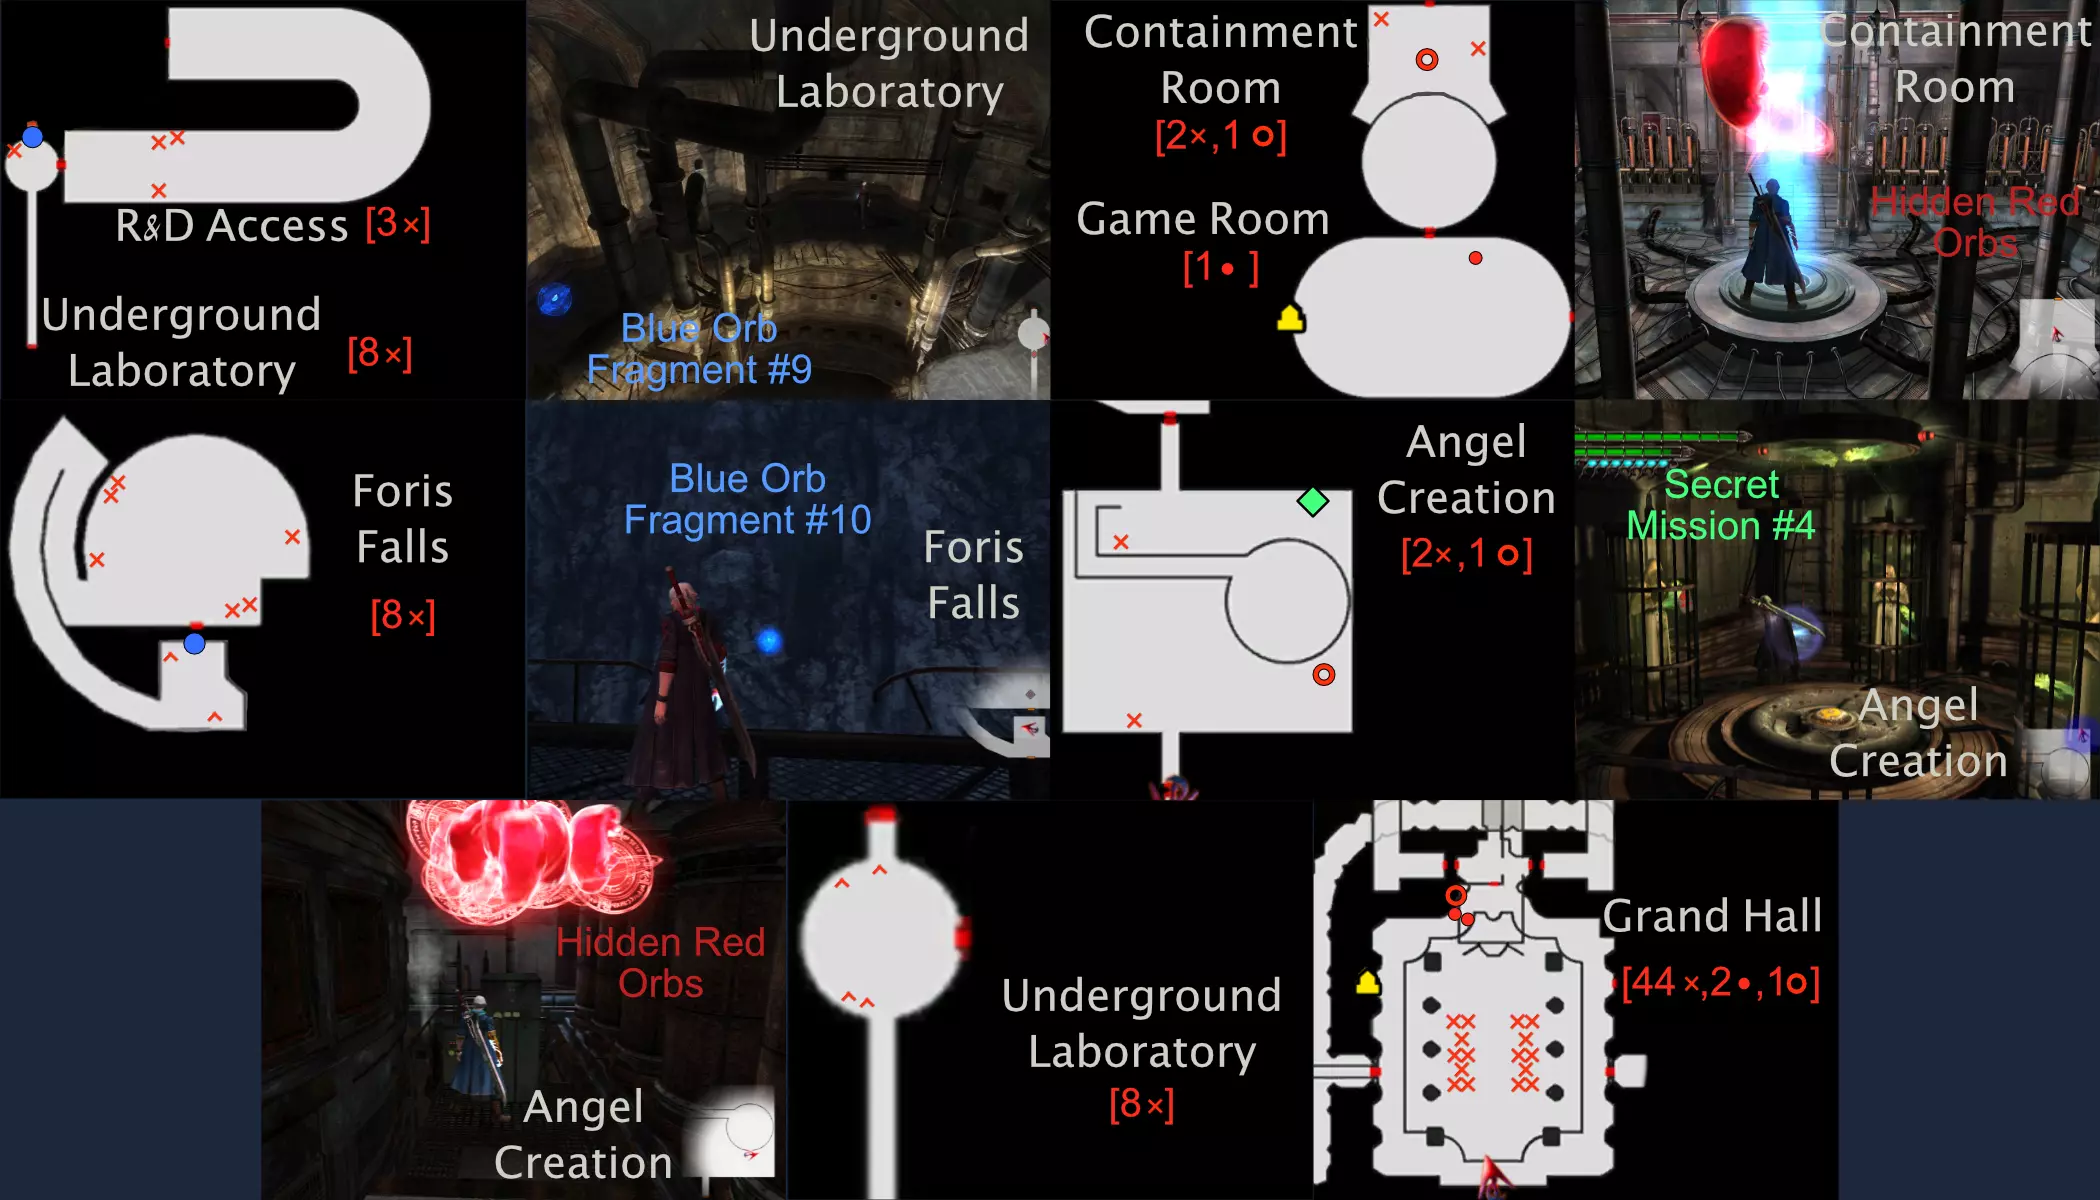
任务6 - 复活 蓝色魔珠碎片#9。你会从[地下实验室]一个开放竖井的顶部开始。绕着竖井跑,拿到碎片后再跳下去。游戏室提示:骰子可以控制,因为你击中它时,它朝上的数字总是会再次出现,而且它总是按固定顺序旋转:1-4-2-6-3-5。 蓝色魔珠碎片#10。获得新剑后,离开并走上福里斯瀑布的楼梯,你会看到碎片在阳台边缘不远处(使用冲刺跳跃过去)。 秘密任务#4(蓝色魔珠碎片#11)。在[天使创造室]的第一场战斗后,入口左侧其中一个绿色培养舱后面。你需要在限定时间内找到3个红色魔珠缓存。跟随你发光的手来定位它们。每次重启秘密任务时,会从8个可能的藏匿点中随机选择3个。因此可能需要尝试多次,但记住你已经找到的那些,最终一定能成功。当你返回[大厅]后,从上层圣像肖像侧面的其中一扇门进入,然后一路前往[福里斯瀑布]的桥梁处。红魔魂石:[地下实验室](顶层1桶,下行途中7桶);[研发通道](3块破损闸门碎片);[游戏室](1个可见);[收容室](2把椅子,1个隐藏);[福里斯瀑布](下层:6桶;上层:2桶);[天使创造室](2桶,离开培养舱时尼禄正左方有1个隐藏);[地下实验室](上行金属平台上7桶,顶层1桶);[大厅](你肯定喜欢那36把椅子和8条长凳吧?2个可见,1个隐藏)
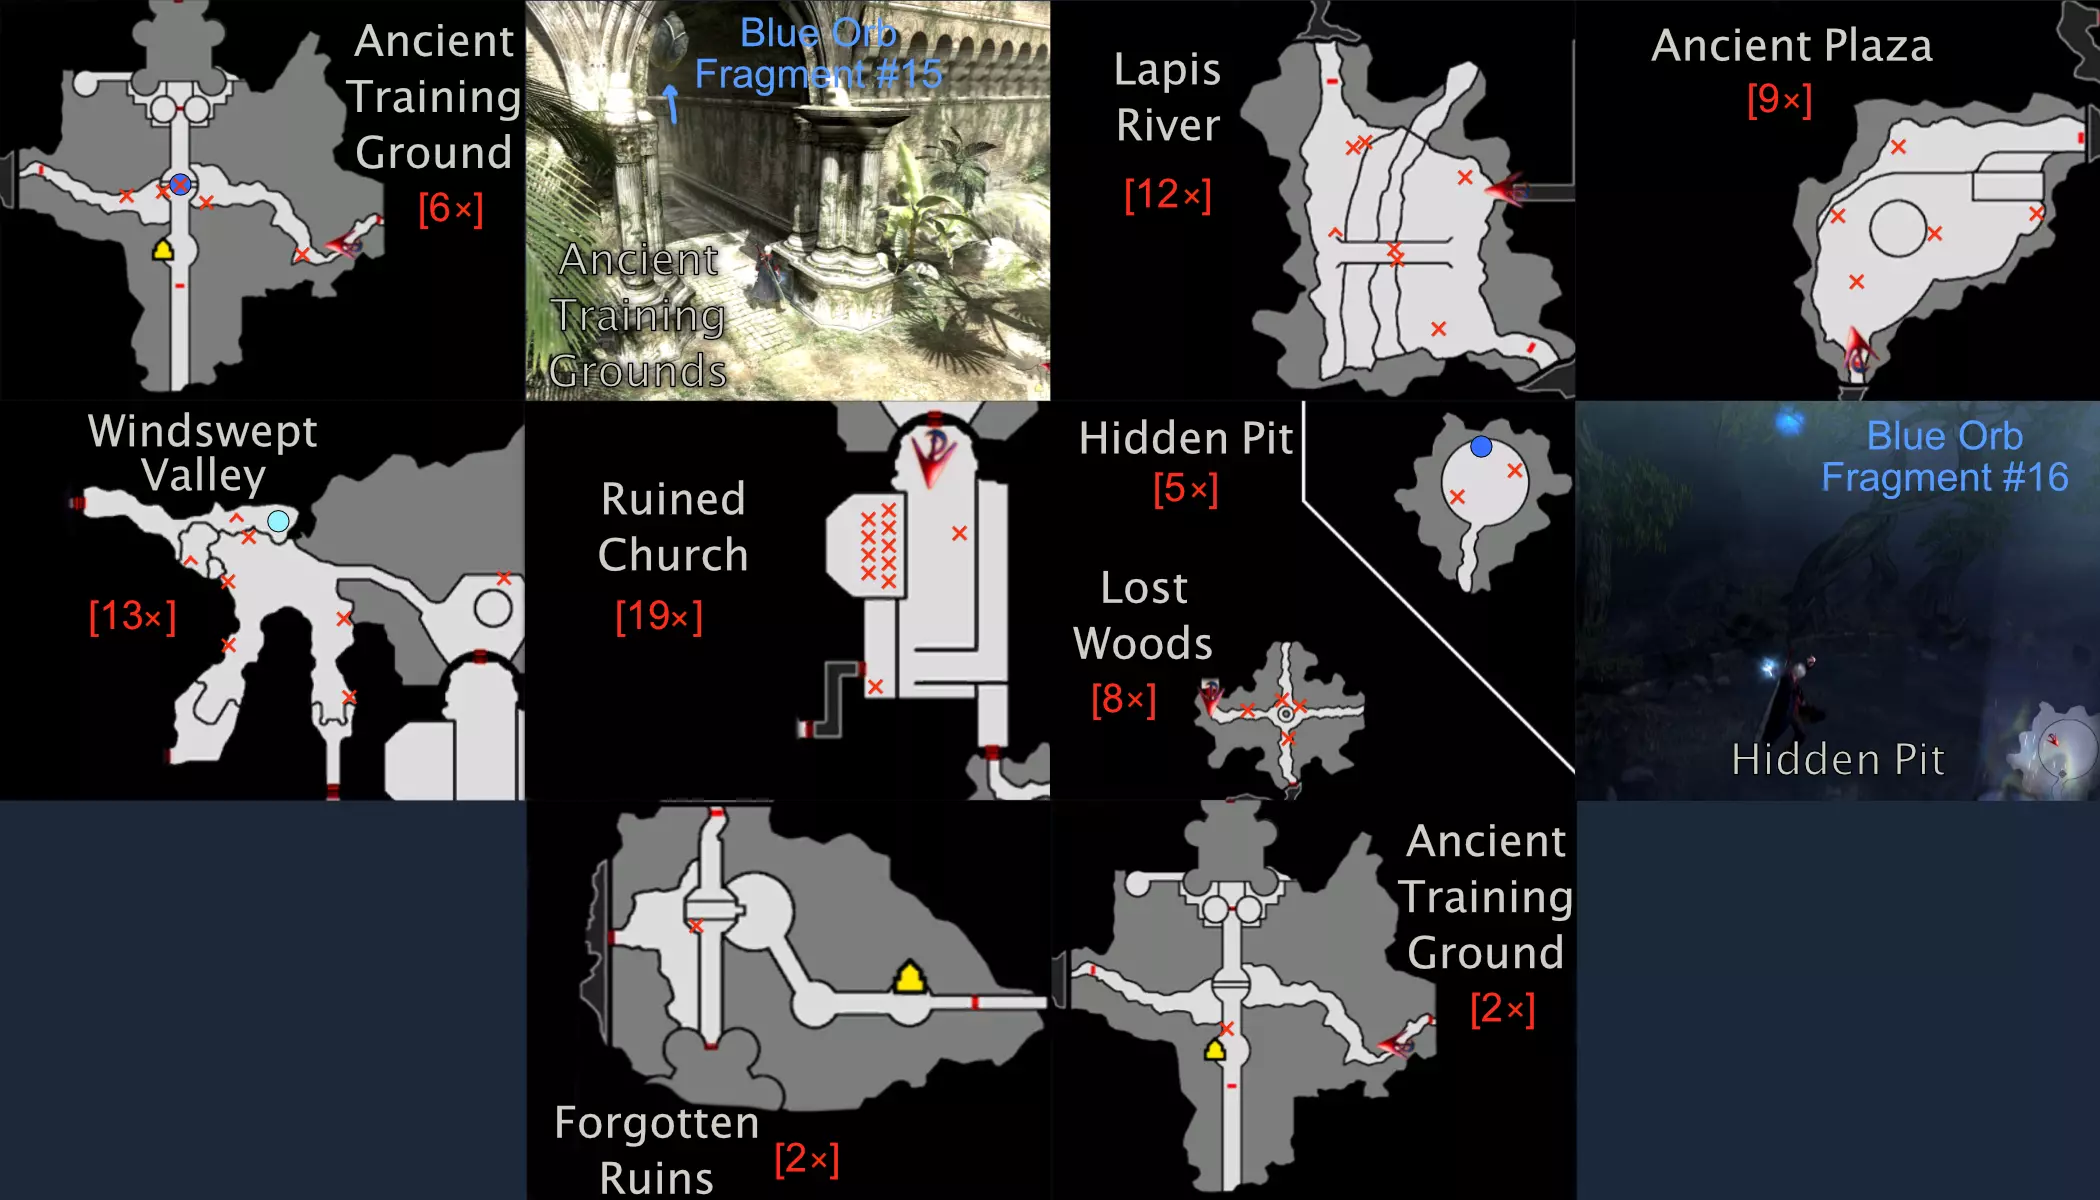
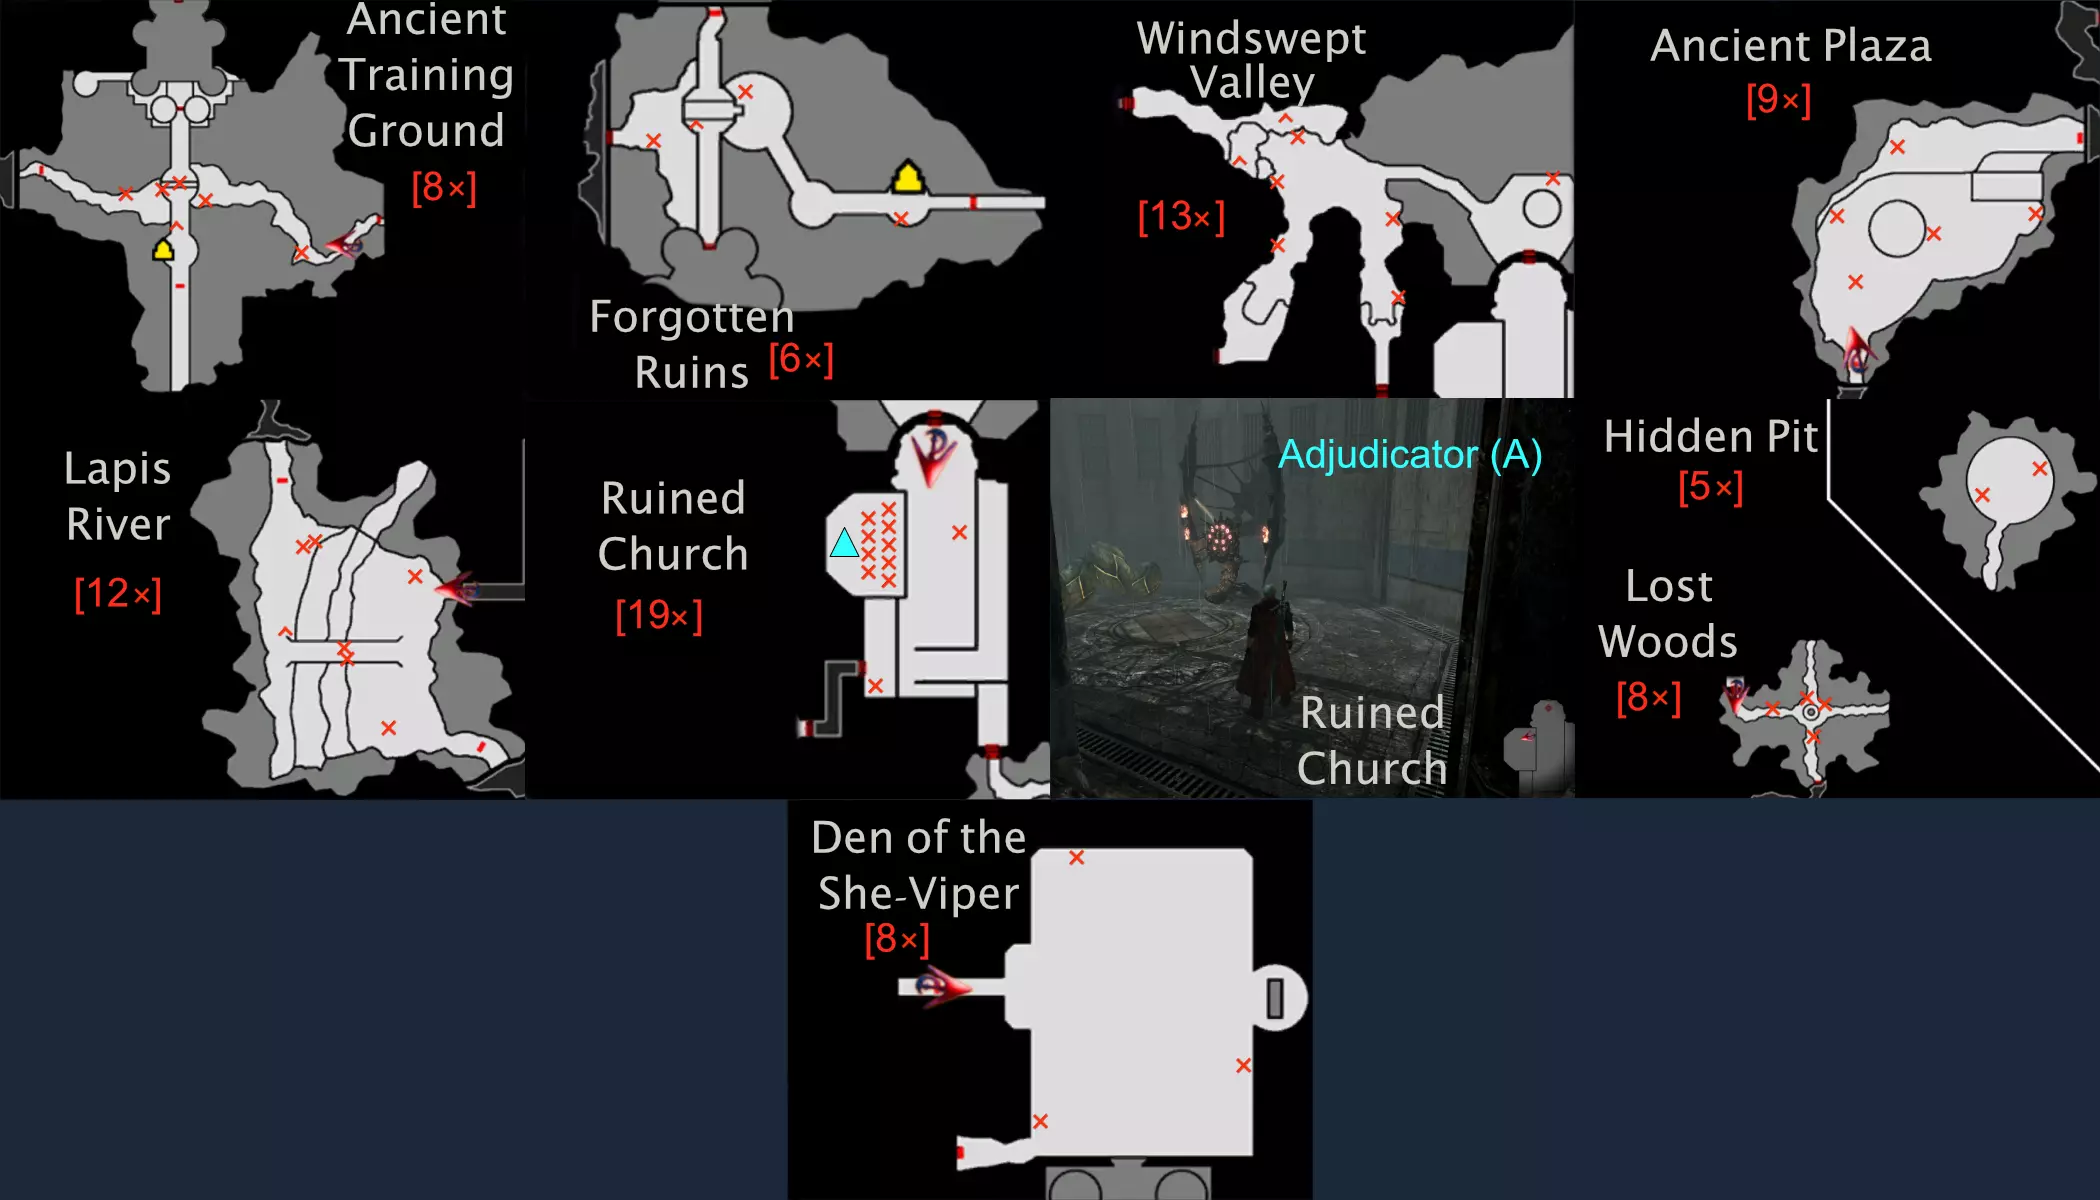
任务7 - 蛇蝎美人 生命之星M:在起始区域的大树干内,你可以通过一个洞口向上跳并获取它。 圣水:在下一个区域,跳下去之前,从入口处沿着边缘向左走。 蓝色魔魂碎片#12:在荒废山谷中,大约在消失的地板中途位置,悬浮在你上方的空中。使用空中冲刺来获取它。 秘密任务#5(蓝色魔魂碎片#13):在青金石河,穿过石桥后向左走,在一棵树后面可以找到秘密任务的入口。该任务涉及抓取动作,因此只有尼禄可以完成。 战斗裁决者A(蓝色魔魂碎片#14):在遗忘遗迹区域的开始部分,很容易找到。红魔魂石:[森林入口](12个蛋);[风蚀山谷](9个蛋);[废弃教堂](19个蛋);[可选区域:废弃低地](4个蛋,1个隐藏蛋——若完全未进入该区域,不会影响你的分数);[青金石河](12个蛋);[古老广场](9个蛋);[风蚀山谷](4个蛋,此前无法到达);[废弃山谷](18个蛋);[遗忘遗迹](4个蛋——桥上还有2个蛋,你可以尝试用EX3翻滚攻击+空中冲刺+抓取或朝正确方向射击来破坏。我已将其标注在图片中,但建议不要在这上面浪费时间。我很确定它们并非达成100%完成度所必需的)。[母蛇巢穴](8个蛋,战斗结束后仍可破坏)。
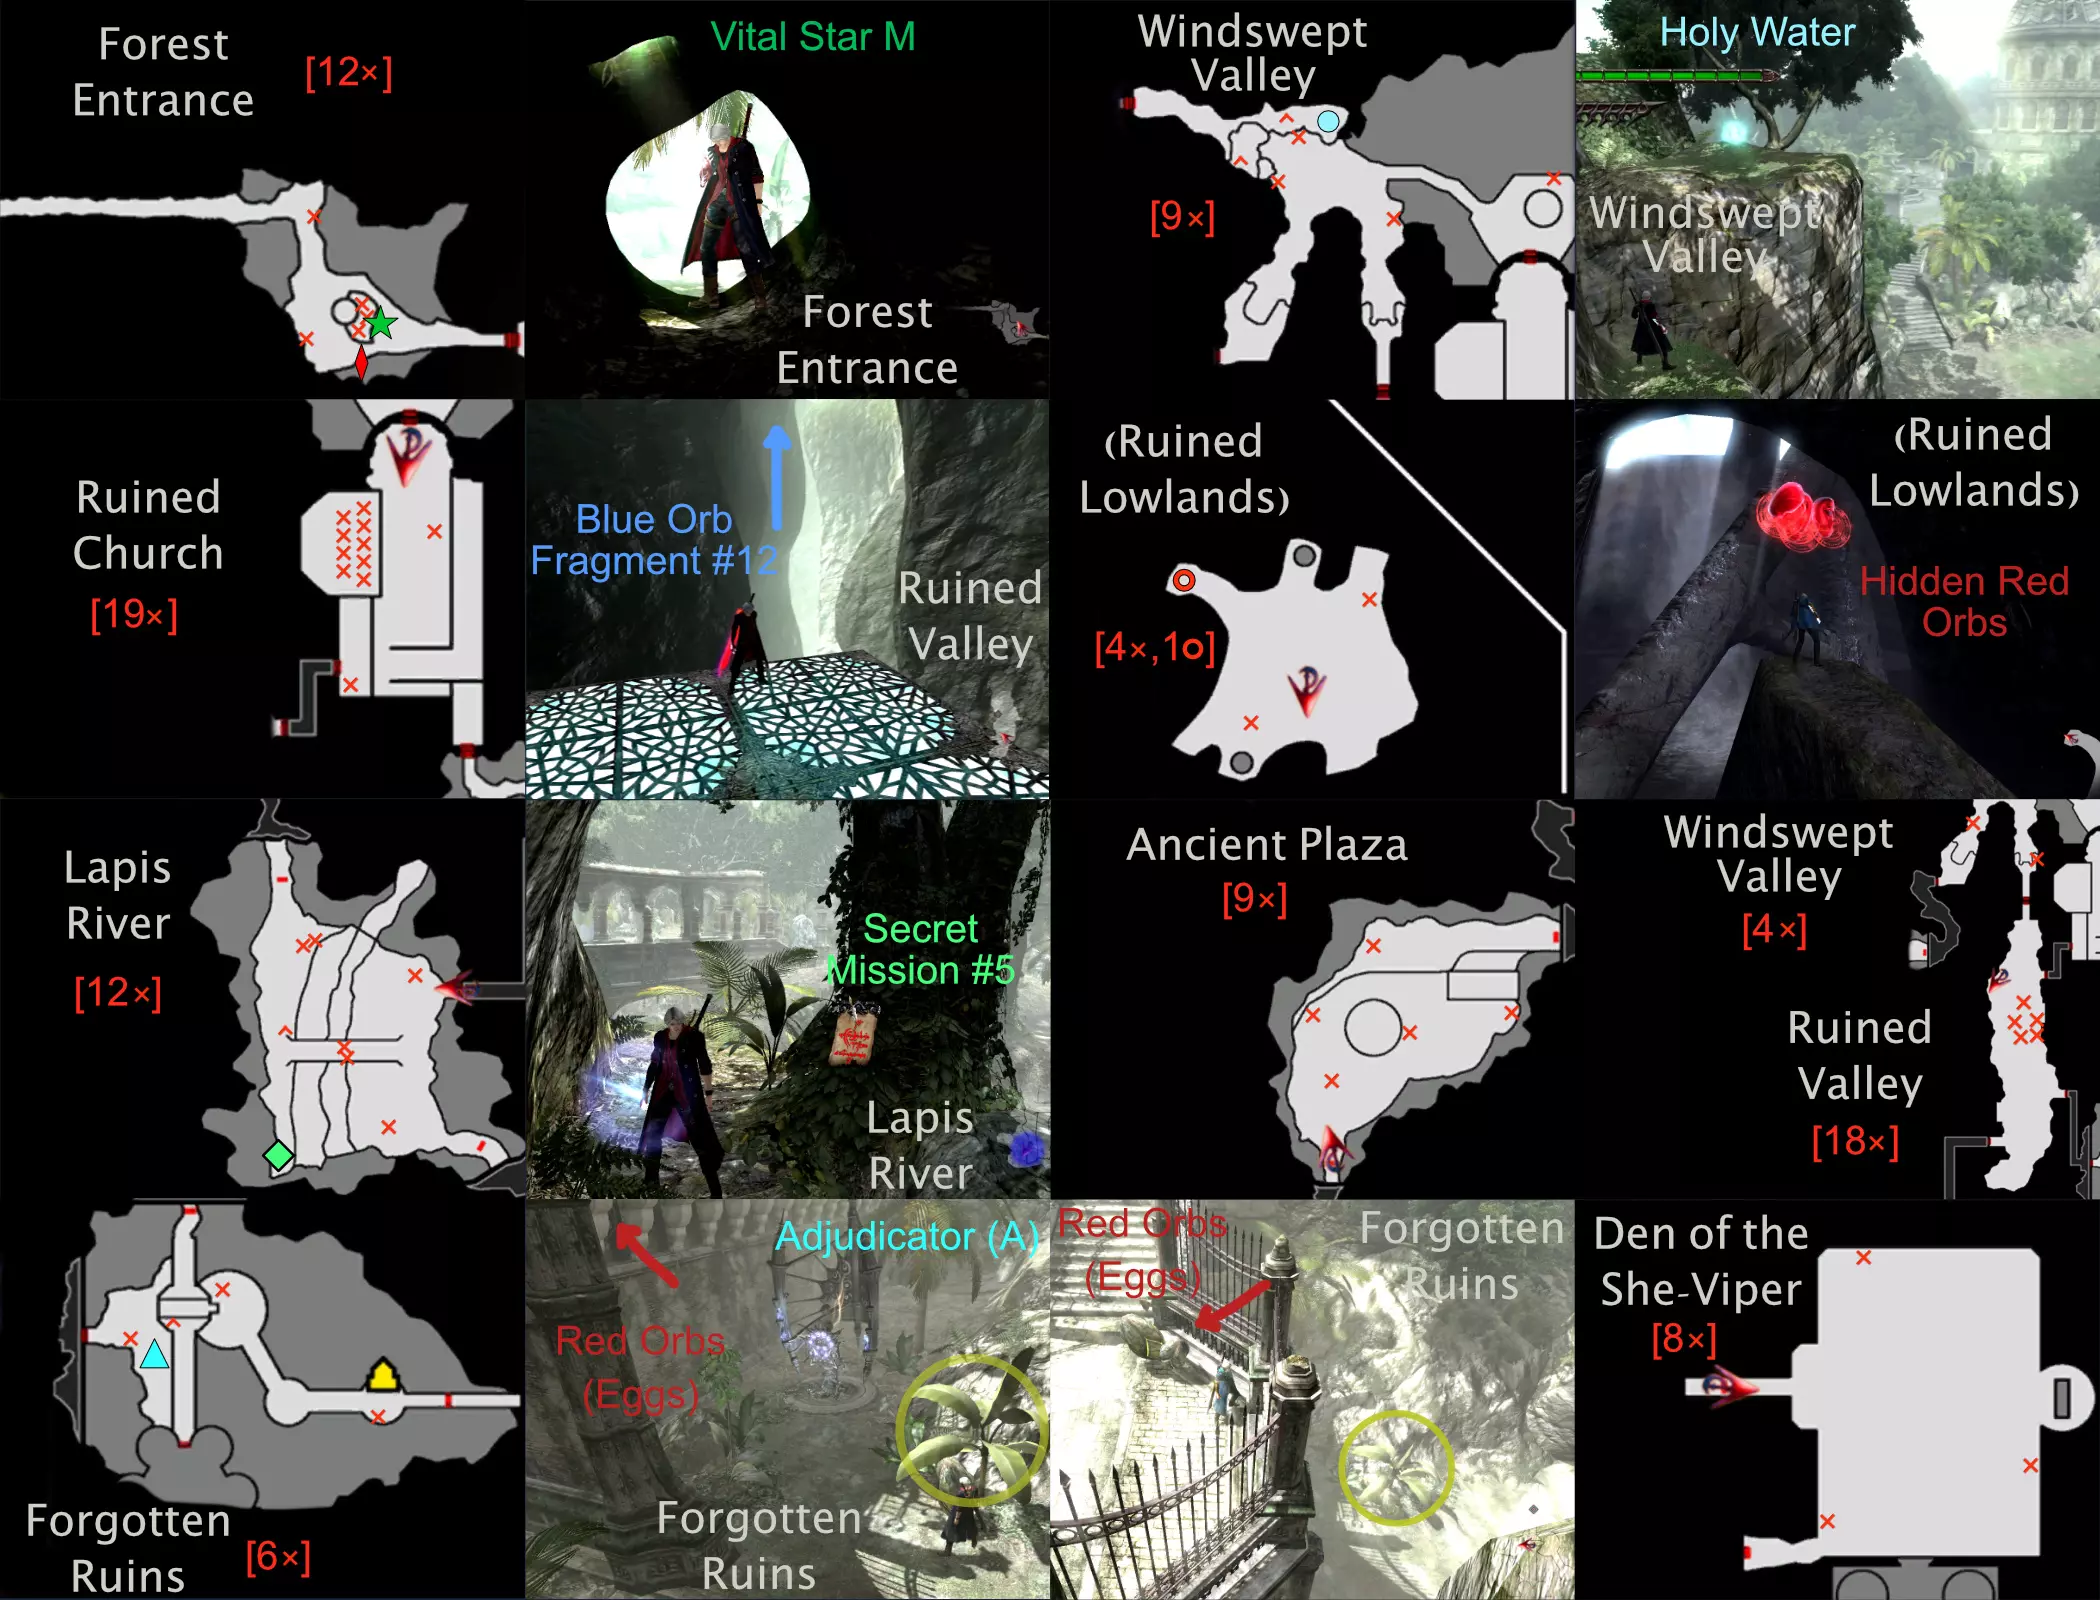
任务8 - 信仰告白 蓝色魔珠碎片#15:在第一个区域穿过桥下时,摧毁天花板上悬挂的蛋。 蓝色魔珠碎片#16:返回废弃教堂,然后进入迷失森林。在十字路口向左走,你会被传送到【隐藏深坑】。碎片悬浮在空中,使用空中冲刺(Air Hike)获取。离开迷失森林需要解开谜题:始终朝着光亮的方向走,即选择与地面阴影方向相反的路径。你需要连续这样做几次。红魂:如果你确实想100%收集红魂,可能需要在任务开始时转身,通过【母蛇巢穴】(8个魂蛋)回溯,以获取【遗忘遗迹】底层的4个魂蛋。这会花费时间,且对红魂获得S评价并非必要,因此不推荐这么做。【古老训练场】(6个魂蛋);【青金石河】(12个魂蛋);【古老广场】(9个魂蛋);【风蚀山谷】(13个魂蛋);【废弃教堂】(19个魂蛋);【迷失森林】(8个魂蛋);【可选区域:隐藏深坑】(4个魂蛋);【遗忘遗迹】(上层:2个魂蛋);【古老训练场】(上层:2个魂蛋)。
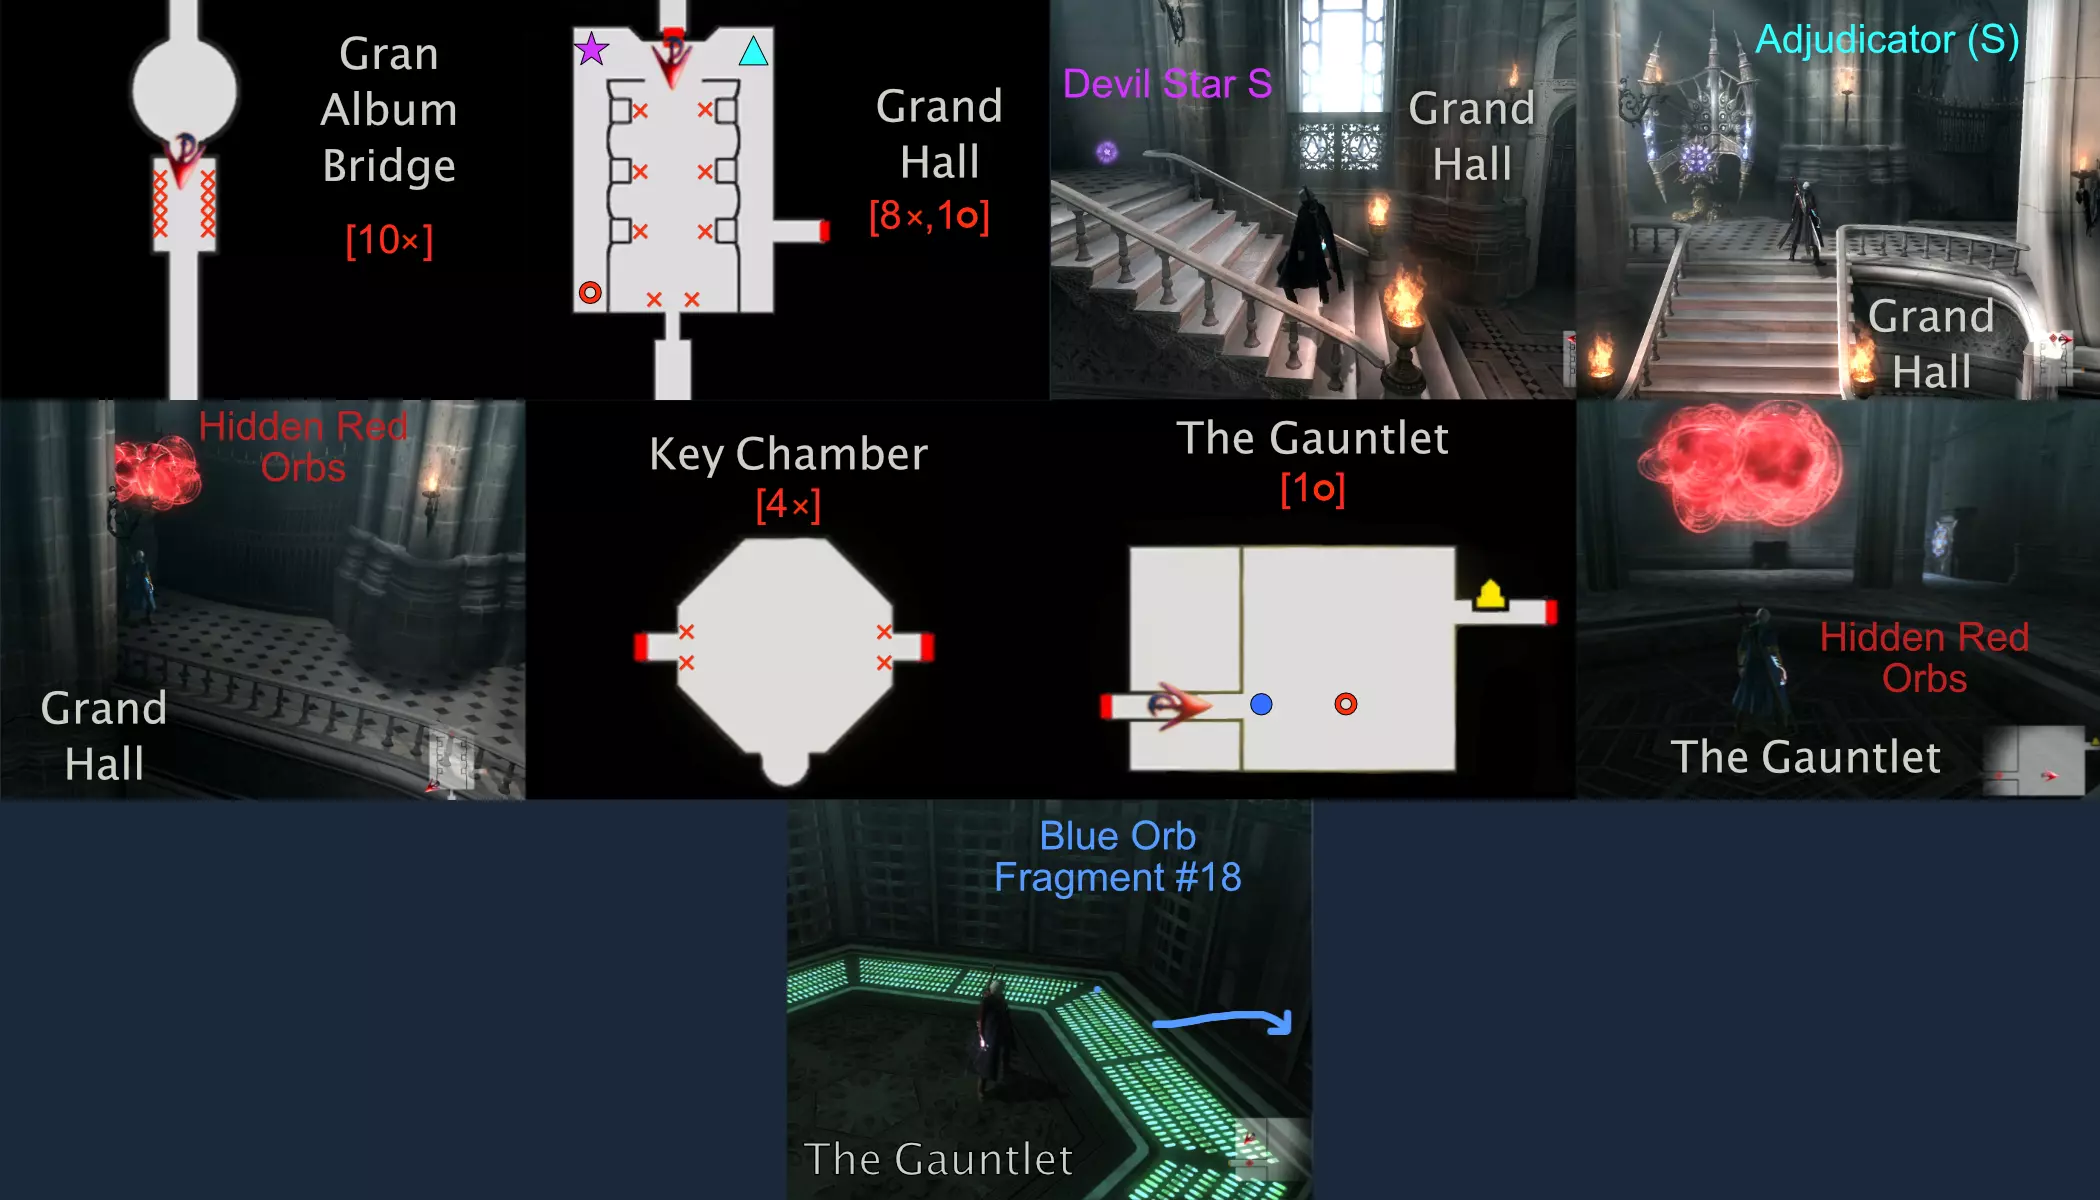
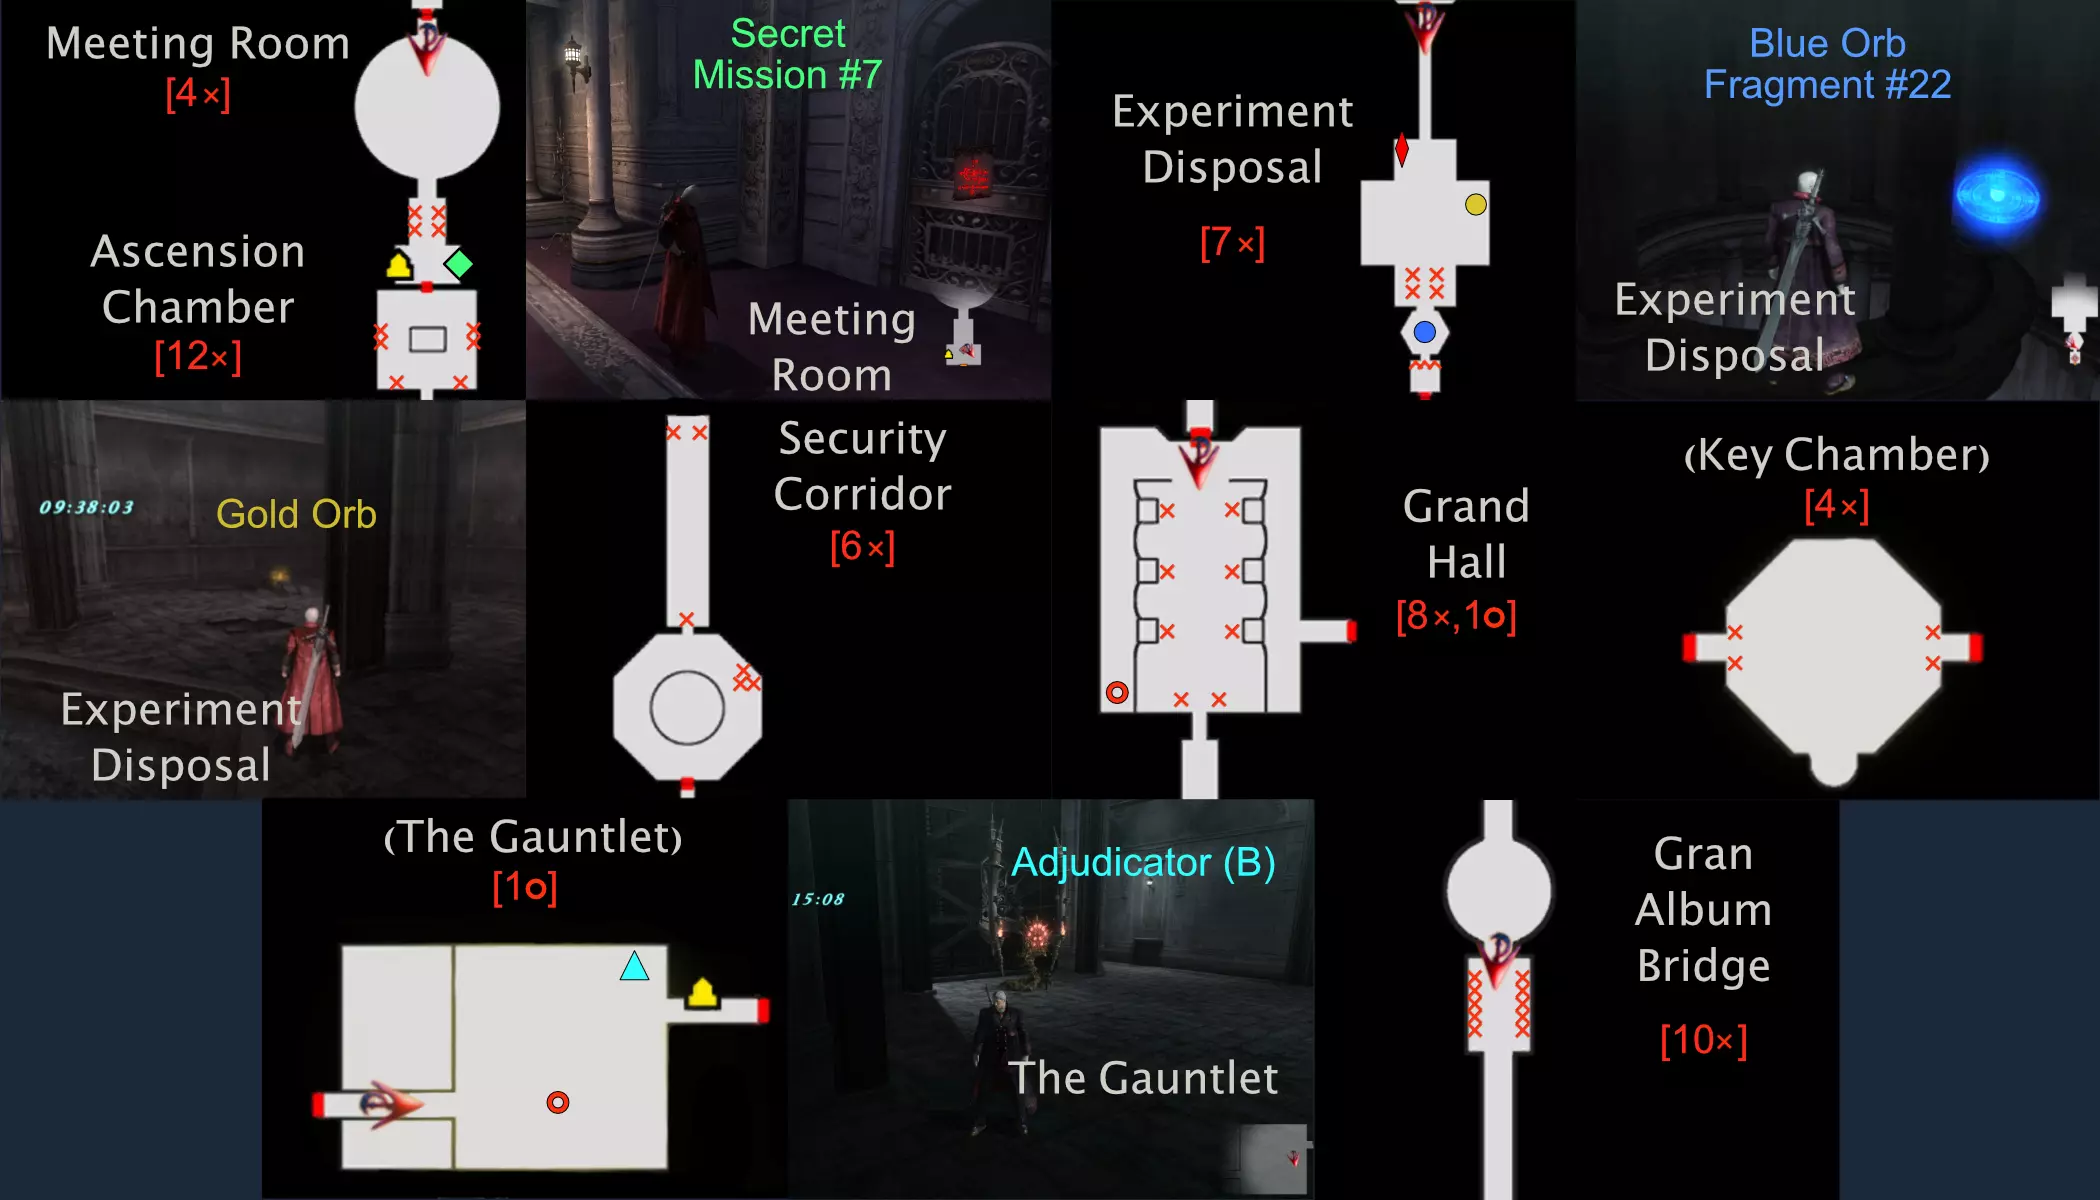
任务指南(9-12) 任务9 - 为了你 恶魔之星S。从大厅入口出发,上右侧楼梯后转过拐角。 战斗裁决者S(蓝色魔球碎片#17)。从大厅入口出发,上左侧楼梯。 蓝色魔球碎片#18。在试炼场电梯内的第二轮战斗结束后,通过不会通向时间切片器和激光房间的出口向下跳。 红色魔球:[格兰相册桥](4张桌子、6个隔板);[大厅](6张长椅、2个罐子、1个隐藏);[钥匙房](4个隔板);[试炼场](1个隐藏);[阿格纳斯的房间](入口附近有一些可破坏的椅子和桌子,主房间内有3个带有绿/白色魔球的可破坏笼子;但这些都不含红色魔球,因此不计入100%收集)。
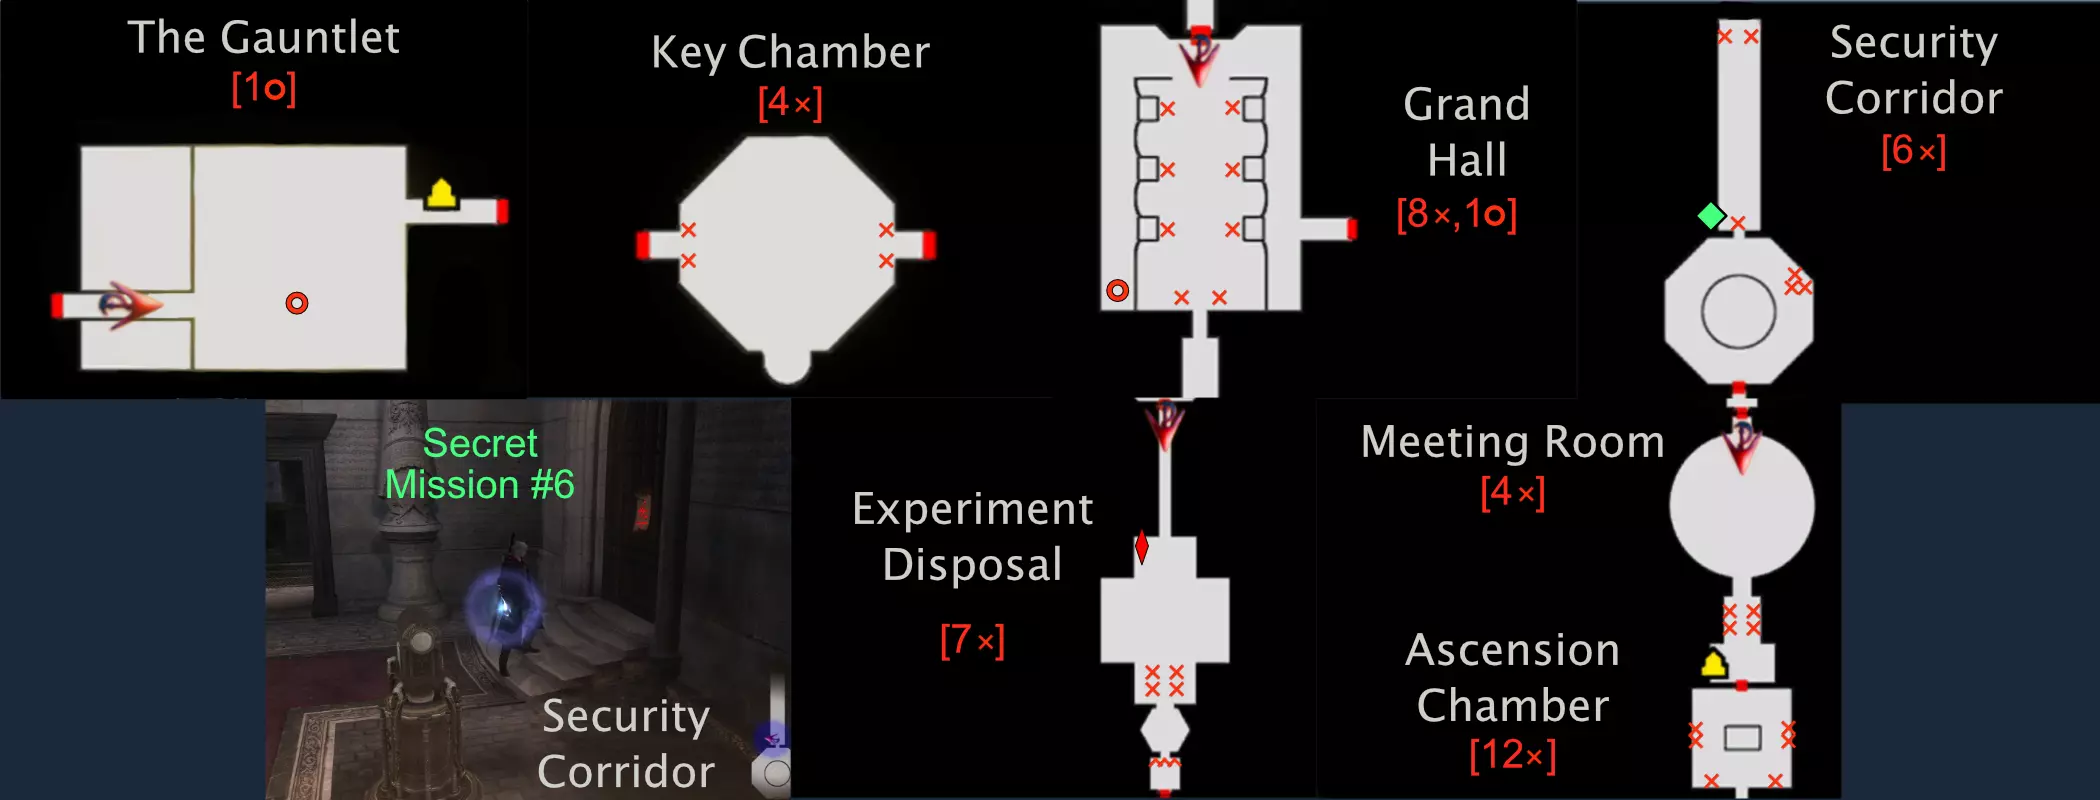
任务10 - 荣耀加身 返回【大厅】,过桥进入【安保走廊】。 秘密任务#6(蓝色魔珠碎片#19):穿过移动激光后,直接向右走。抓住并按住稻草人,二段跳登上楼梯,注意不要被击中。将稻草人放在喷泉附近,然后返回楼梯处防守并对付奇美拉(用buster可将其秒杀)。红魔魂石:【试炼场】(1个隐藏);【钥匙房】(4个分隔物);【大厅】(6个长椅、2个罐子、1个隐藏);【安保走廊】(走廊:2个长椅、1个栅栏;竖井:3个板条箱);【实验废弃物处理室】(下层:4个雕像;上层:2个雕像、1个栅栏);【会议室】(4个烛台,离开主房间后);【飞升室】(2张桌子、4个罐子、6个烛台;你必须在战斗结束前收集这些)。
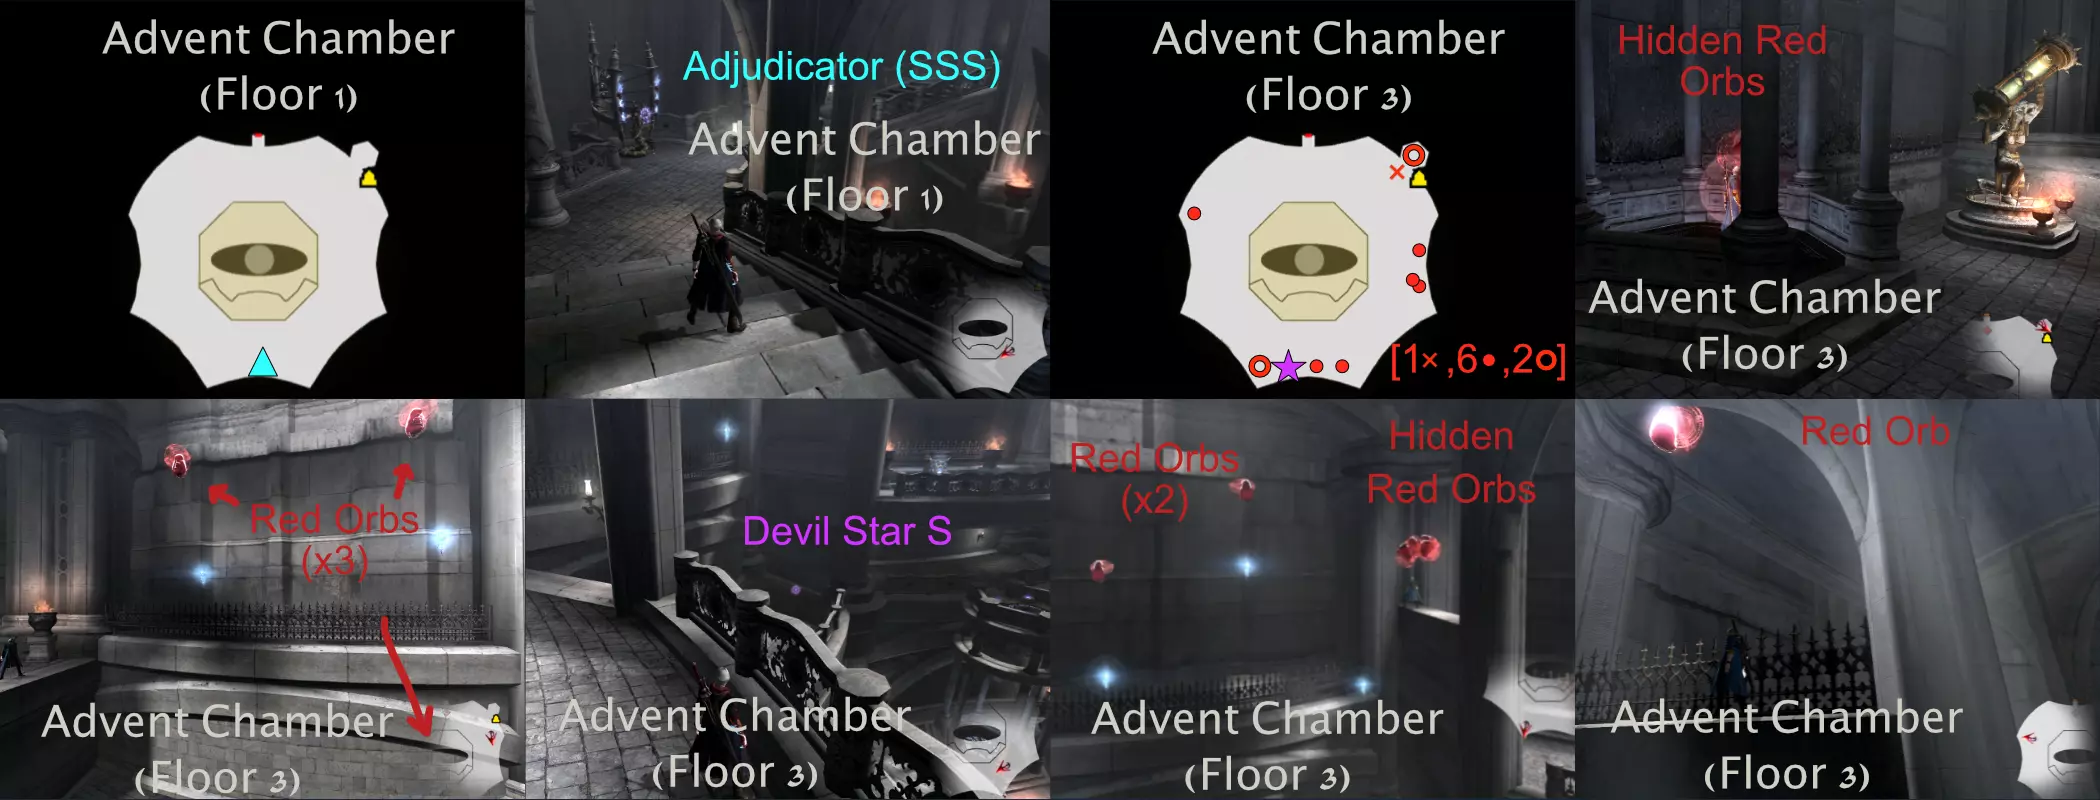
任务11 - 第九圆环战斗裁决者SSS(蓝色魔珠碎片#20)。在底层,入口的对面。 恶魔之星S。在3楼,经过神圣雕像后,你需要穿过两组带有可见红色魔珠的抓握装置。该星星位于第二组抓握装置下方的地板上。 红色魔珠:[降临之间](1个栅栏,6个可见,2个隐藏:查看图片……当你看到神圣雕像时,就可以开始留意这些了)。
第十二关 - 新的开始 隐藏任务 #7(蓝色魔珠碎片 #21)。离开飞升之间后直接向右走。你本可以在之前操控尼禄时完成这个任务,但最简单的方法可能是使用潘多拉的“魔盒变炮”(需装备枪神风格)飞过去。你需要填满灾厄计量条,不过如果在隐藏任务中触发敌人后跳回起始平台,也可以在任务中完成充能。 蓝色魔珠碎片 #22。位于“实验废弃物处理区”电梯井的第二环。使用空中冲刺和骗术师风格的冲刺来攀爬。 金色魔珠。在实验废弃物处理区中间跳下后的底层。 战斗裁决者 B(蓝色魔珠碎片 #23)。当你回到[宏伟大厅]后,从右侧的侧门绕道,穿过[钥匙房],进入[试炼场]。审判者在底层。之后返回宏伟大厅。 红魂:[晋升大厅](2张桌子、4个罐子、6个烛台);[会议室](4个烛台);[实验处理室](上层:2座雕像、1个栅栏;下层:4座雕像);[安全走廊](竖井:3个板条箱;走廊:2张长椅、1个栅栏);[宏伟大厅](6张长椅、2个罐子、1个隐藏);[可选区域:钥匙房](4个分隔物);[可选区域:试炼场](1个隐藏);[格兰相册桥](4张桌子、6个分隔物)。
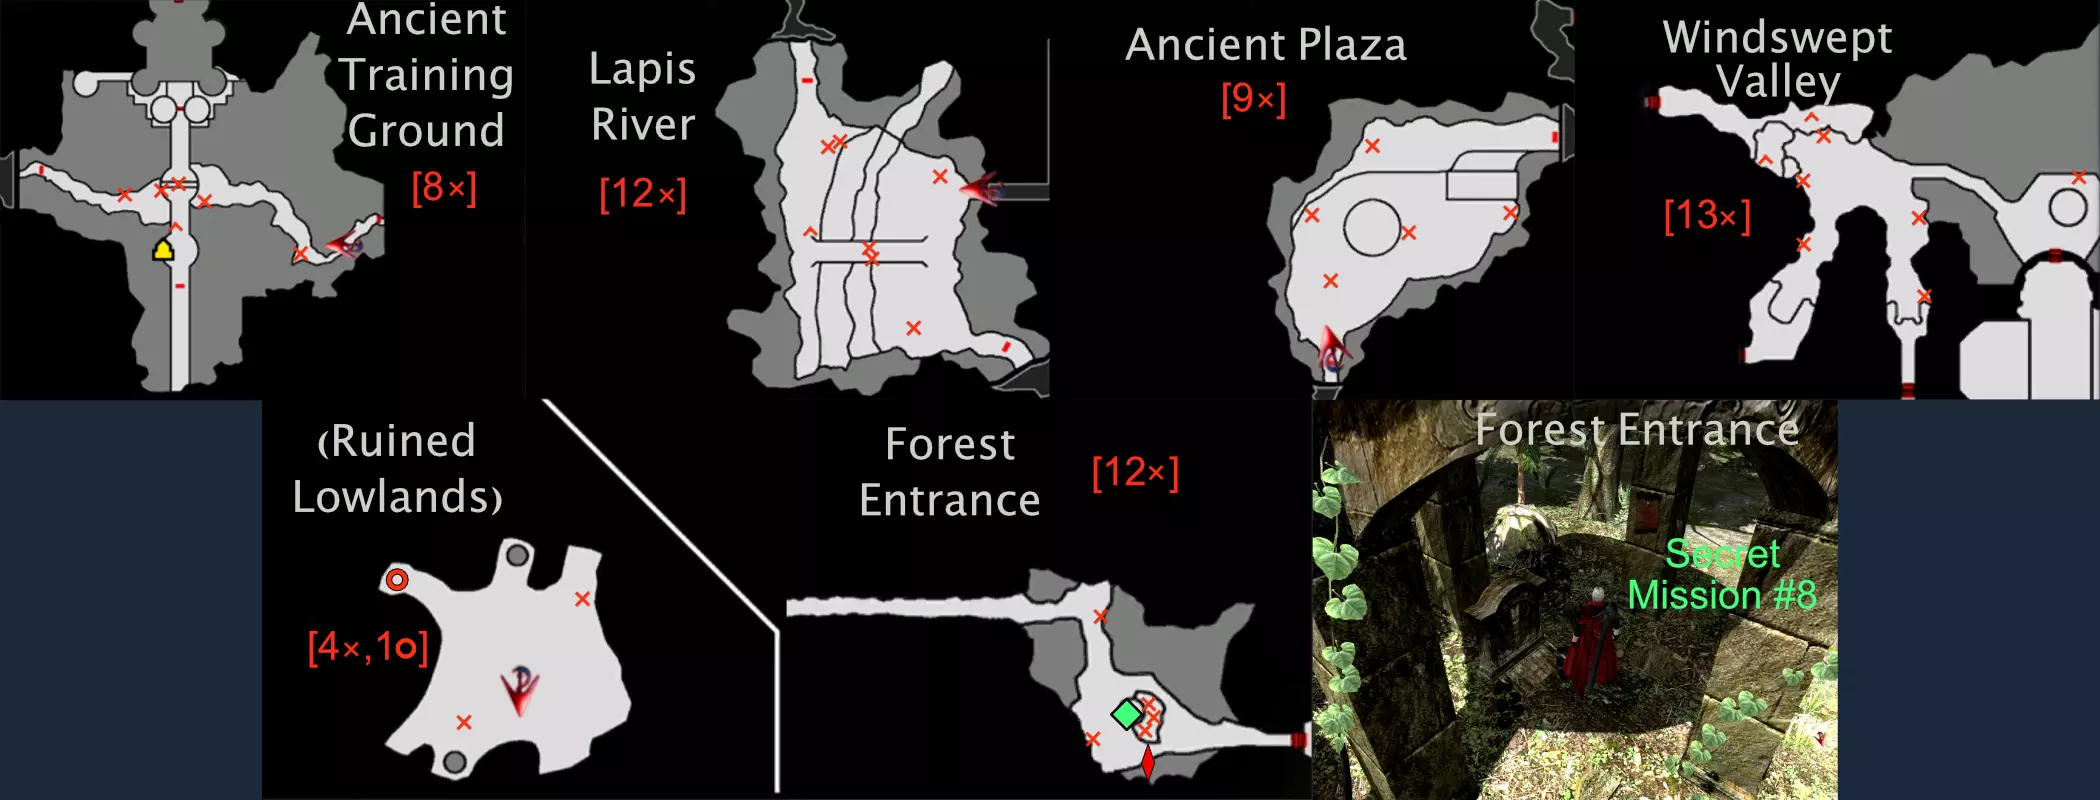
任务指南(13-16) 任务13 - 恶魔归来 本任务区域存在会将你传送的紫色雾气。若你迷路:起始点为古老训练场。从桥上跳下,选择东侧出口(离桥较远的那个),即可进入遗忘遗迹。再次跳下并穿过雾气,抵达风蚀山谷。通过楼梯上的雾气,会被传送到古老广场。从广场另一侧的出口离开,前往青金石河。穿过桥下的雾气,你会出现在风蚀山谷的楼梯处。从那里,你就能进入废弃教堂。 战斗裁决者A(蓝色宝珠碎片#24):位于废弃教堂内,入口右侧的可破坏玻璃后方。红色魂玉:[远古训练场](8个蛋);[遗忘废墟](4个蛋);[风蚀山谷](11个蛋);[远古广场](9个蛋);[青金石河](12个蛋);[风蚀山谷](2个蛋);[废弃教堂](19个蛋);[迷失森林](8个蛋);[遗忘废墟](2个蛋);[母蛇巢穴废墟](8个蛋)。
任务14 - 遗迹森林 秘密任务#8(蓝色魔珠碎片#25)。在森林入口处,空心树干旁的小亭子里。首先击杀一名敌人,选择皇家护卫风格,然后站在中间并在适当的时机格挡。敌人有3种不同的攻击方式,学习每种攻击的时机,再加上一点练习、一点运气和一点耐心,你就能成功。如果你死亡,使用金色魔珠,否则你会被送回2个区域。如果遇到太大困难,4级技能无畏战舰(皇家护卫能量条充满后)可以让事情变得更简单。红色宝珠:【远古训练场】(6个蛋 + 桥上2个);【可选 - 废弃低地】(4个蛋,1个隐藏);【青金石河】(12个蛋);【远古广场】(9个蛋);【风蚀山谷】(13个蛋);【森林入口】(12个蛋)。
任务15 - 芙尔图娜城堡战斗裁决者SS(蓝色魔珠碎片#26)。任务开始时,登上左侧的楼梯。 秘密任务#9(蓝色魔珠碎片#27)。位于图书馆螺旋楼梯的底部。 金色魔珠:在士兵墓地,站在马雕像的位置,你会看到左侧壁架上有金色魔珠,右侧壁架上有红色魔珠。使用空中冲刺+骗术师冲刺到达中央壁架,然后再次使用以到达两侧的壁架。红魔魂石:【大厅】(2个可见,1个隐藏:需在魔化状态下使用三段跳获取);【画廊】(3件盔甲、6把椅子、5张桌子、2个木箱);【图书馆】(1个隐藏在室外,4张书桌、2个陶罐);【大广间】(6个烛台、5把椅子);【餐厅】(8把椅子、4套餐具);【大广间】(6个烛台、2个可见于镜子后方);【螺旋井】(10个可见,1个隐藏:使用红色跳跃垫抓取所有红魔魂石后,返回并使用蓝色跳跃垫离开);【主人房间】(3张桌子、4把椅子);【士兵墓地】(18块墓碑、10座雕像、8座冰雕,1个可见:站在马雕像位置,使用空中漫步和骗术师冲刺,2个隐藏在靠墙的平台上)。
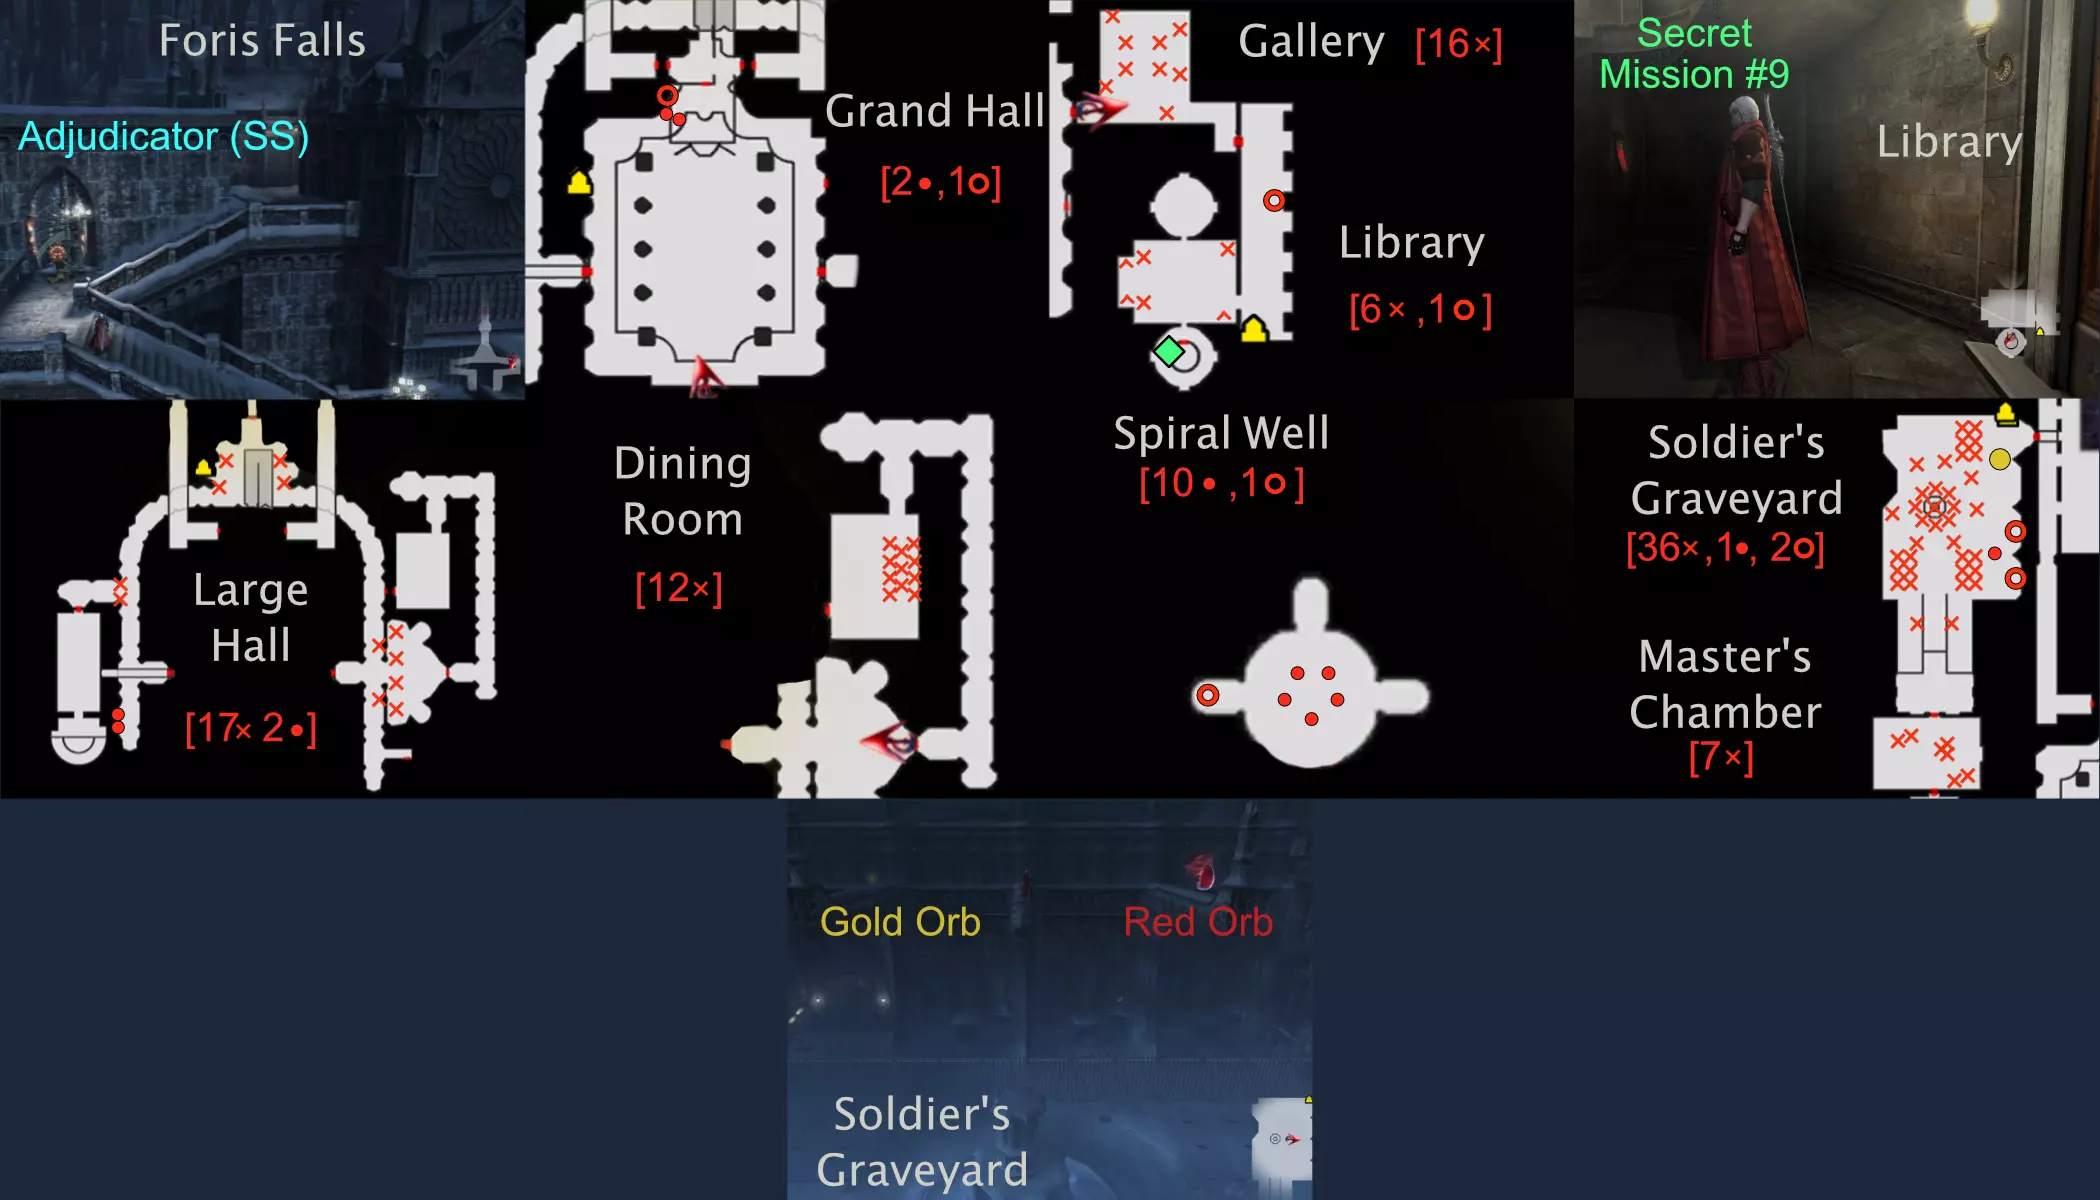
任务16 - 炼狱战斗裁决者S(蓝色魔珠碎片#28)。在任务刚开始时。 秘密任务#11(蓝色魔珠碎片#29)。当你在弗杜那城堡大门的雪地中沿着破损的楼梯向上走时,3个小型红色魔珠会指示秘密任务的位置。不过到达那里有些困难。当灾厄计量表积满时,走上下一段楼梯,二段跳并激活潘多拉的复仇(枪神风格),朝着有红色魔珠的 ledge 飞回去。 蓝色魔珠碎片#30。在第二矿区一路向下跳。那里会有两个红色弹跳垫,利用它们尽可能跳得高一些,到达可见红色魔珠的对面。那里有一个木制 ledge 可以着陆,还有一面可以打破的木墙,打破后就能拿到碎片。红魔魂石:【游戏室】(1个可见);【收容室】(2个椅子,1个隐藏);【福里斯瀑布】(8个木桶);【天使创造室】(2个木桶,1个隐藏);【地下实验室】(8个木桶:金属架上2+3+2个,顶部1个);【大厅】(36个椅子,8个长椅,2个可见,1个隐藏:需在恶魔触发模式下使用三段跳);【弗图纳城堡大门】(13根柱子,4个可见,2个隐藏在大柱子顶部);【第二矿区】(1个可见)。
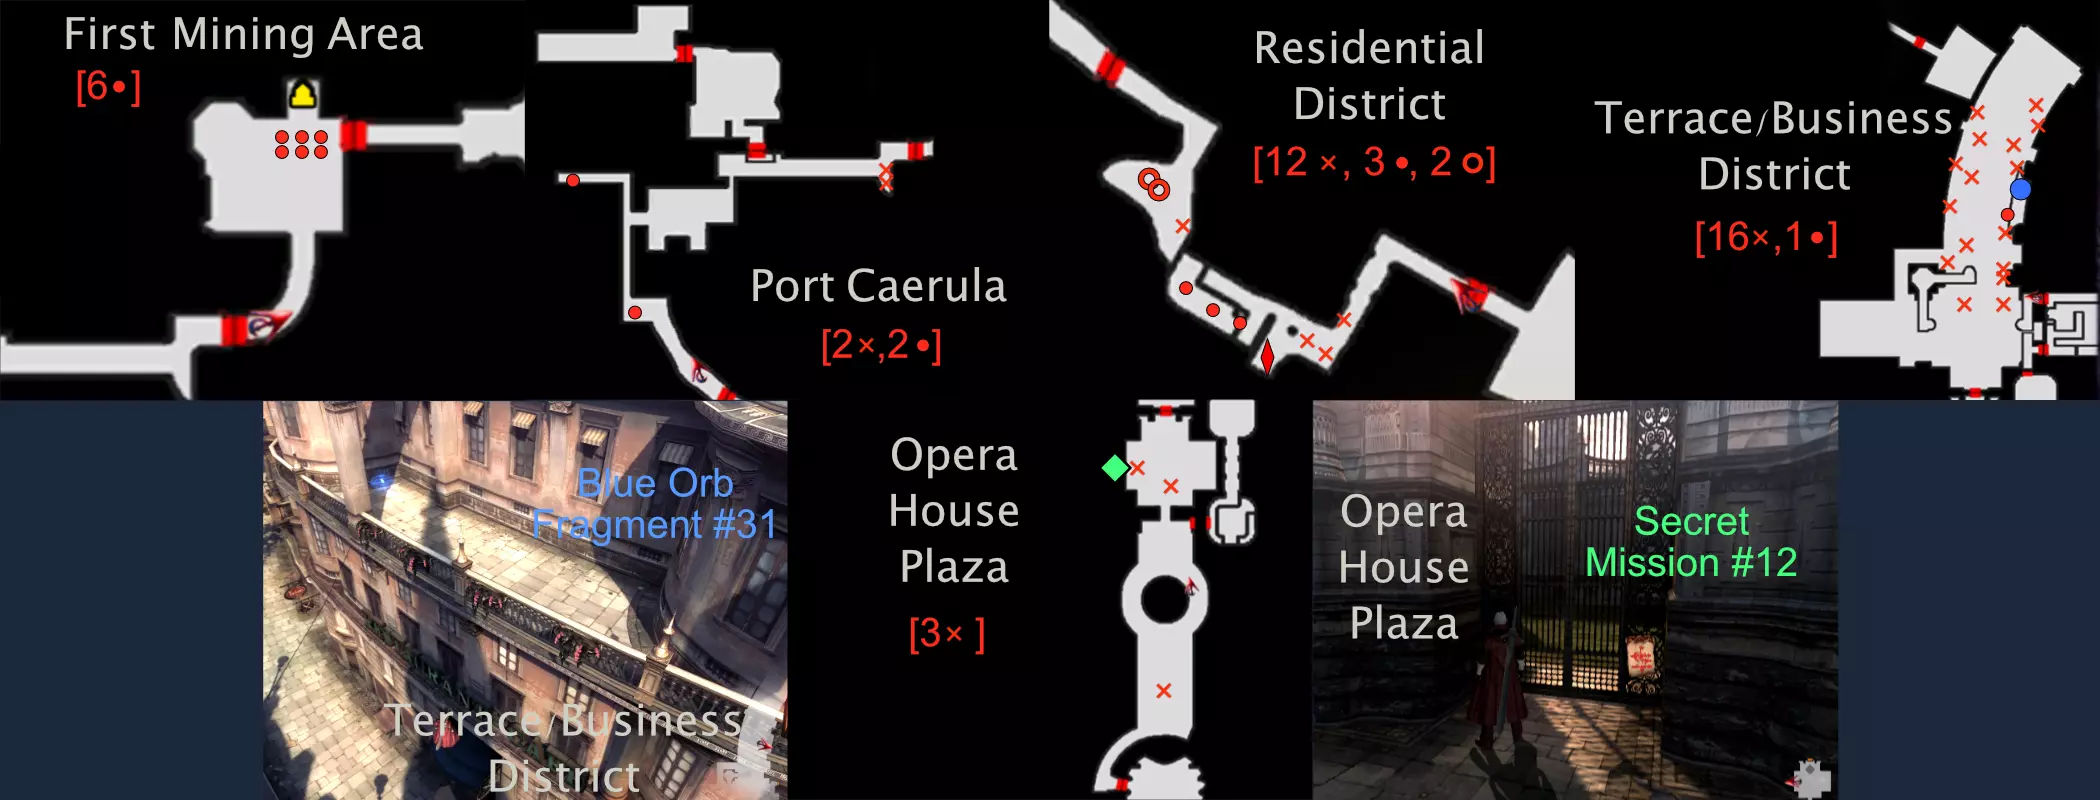
任务指南(17-20) 任务17 - 弦乐柔板 蓝色魔魂石碎片 #31。在露台/商业区大街的左侧,一家餐厅的门上方有一个显眼的红色魔魂石。跳起来获取它,你会看到碎片在上方的露台上。 秘密任务 #12(蓝色魔魂石碎片 #32)。进入下一个区域(歌剧院广场)后,在但丁右侧一个可破坏的垃圾桶后面。 红色魔魂石:[第一矿区](6个可见);[蓝港](2个垃圾桶,2个可见);[住宅区](塔上隐藏2个,1个垃圾箱,屋顶可见3个,5个罐子,5个板条箱);[露台/商业区](9个垃圾桶,7个长椅,1个可见);[歌剧院广场](3个垃圾桶)
任务 18 - 毁灭者 此处无内容,祝你玩得开心! 任务 19 - 继承者 红魔魂石:【天堂:天龙座】(8个蛋 - 击败艾奇德娜后别忘了收集);【天堂阶梯】(与阿格纳斯战斗后有4根柱子)。

Mission 20 - La Vita NuovaNothing here, have fun! Character Tips (Nero/Dante) - What's the point of packing a sword like that if you're not even gonna use it? These are not complete character guides, but rather beginner-level tips concerning some abilities that can make your life easier. Check out more in-depth tutorials online if you want to actually start playing well, jump canceling and Royalguard flying and all that. The tips below are a little bit spoiler-y in terms of gameplay (the joy in discovering that a certain ability works way better than expected, etc). So you may want skip these Character Tips at first, and start learning to know each character for yourself, experiment with their abilities, etc. And only come back here if you're having some trouble. In any case, don't use only the abilities I mention here. Style is about variety after all. Nero Snatch lets you pick items from a distance (including from behind bars). It can be upgraded twice for a larger range, which is very useful in combat, although I think the base version is sufficient to grab most items. Air Hike is obviously extremely useful, and required to reach certain items. High Roller + Exceed 3: A few items / hidden red orbs are too high to reach even with double/wall jumping. Using the Red Queen High Roller move boosted by Exceed level 3, followed by a jump, lets you reach those high places. (Devil) Buster Nero's signature move, and it is very good in terms of damage, Style points, and crowd control. Can be used against bosses as well, for great effect. Careful not to get hit when you do it within a crowd, as it can leave you somewhat vulnerable. Learn to not mix it up with Snatch: target lock on for Snatch, and off for Buster. Space it out with other attacks to optimize your Style points. Charged Shot 3 This is rather OP as it is very easy to use, does a lot of damage, yields a lot of Style points, and it incapacitates most enemies. You basically want to be constantly charging shots. MAX-Act Hit the trigger right after any attack to instantly fully charge your Exceed gauge, for increased damage and coolness. Try to get used to doing this all the time. It's pretty difficult to consistently get the timing right, but even if you spam the trigger in the least stylish way possible, you'll still benefit from it. Dante Air Hike is obviously extremely useful, and required to reach certain items. Note that while in Devil Trigger, Dante can Triple Jump, which allows to reach higher places. Trickster level 3 is necessary to reach some items as well. Argument This is a Gunslinger ability for Pandora that puts you in a flying Rocket Launcher. It lets you reach some difficult places, and is almost indispensable for some Secret Missions. It can be devastating in combat as well, but (except with Super Dante) it will be very situational since you need to fill up the Disaster gauge to use it. Styles Dante is hard to master since you have to juggle between 3 melee weapons, 3 ranged weapons, and 5 Styles. It is easy to get confused, and this may create a tendency to stick to a single style. Start by trying to systematically switch between at least two styles in every encounter. I'd say Swordmaster and Trickster for starters, then progressively add the others. Real Impact A very OP Swordmaster ability for Gilgamesh. The animation takes a bit to get started, so you usually want the enemy knocked out. Send the enemy in the air with Prop (Rebellion Swordmaster), then prepare your Real Impact. That basic combo can carry you through most encounters. Note that if you activate Devil Trigger at the right time (or just spam the Devil Trigger button when Real Impact starts), you get the Distorted Real Impact, which deals even more damage. Highly recommended against bosses. Drive/Overdrive (Rebellion Swordmaster). There are many situations where you don't want to stay too close to the enemies (notably with Chimeras), and Dante doesn't have much in terms of crowd control, nor anything like Nero's Charged Shots. So you need to be aware of your ranged options with melee weapons. Slash Dimension (Dark Slayer), Round Trip (Rebellion) and Bondage (Lucifer Swordmaster) can be useful as well in that context. Character Tips (Vergil/Lady/Trish) - Can I come along? - Do what you want, but don't expect to get paid. Vergil Aerial Rave B. The key to reaching higher places: jump, then Aerial Rave B (which will move you upwards), then use the Style button to teleport upwards. Air Trick / Trick Up. Vergil's cool way of moving around. Learn to use appropriately and not mix up these two abilities. Air Trick (target lock on) teleports you close to your marked target. Trick Up (target lock off) teleports you upwards and can cancel most of your animations and keep you safe. Concentration. Vergil's main gimmick is the Concentration gauge, which you can fill by staying still or walking with an enemy locked on. But you lose concentration if you get hit, run/jump around, or miss an attack. High concentration gives your attacks significantly more range and damage, and access to a few special moves. You need to play Vergil accordingly or you'll make your life harder than it needs to be. Rapid Slash. Vergil's version of Stinger, which cuts through enemies instead of pushing them away. It effects a decent area, and you can chain them back and forth. Very useful in many circumstances, especially in Legendary Dark Knight mode. Judgement Cut Hold the melee button after any melee attack (incl. Rapid Slash, etc), the sword will glow, and then release for a slash dimension area damage at range. If you time it perfectly (hold just the right amount of time before releasing), you get the Just/Perfect version, which is faster and stronger. This is worth practicing a bit. Judgement Cut End. For this move, you need to be in Devil Form and with high Concentration. But it essentially clears the room. If you want Style points, don't use this at the beginning of a fight but raise your Style meter first. Dragon Breaker. Vergil's version of Real Impact, and it can be distorted as well. It takes more time to charge, but is a must when the situation allows it. Summoned Swords. You can spam those independently of your melee attacks. Spiral Swords / Blistering Swords / Heavy Rain all consume some of your Devil Trigger gauge, but have very good utility. Lady Bayonet Sweep. While Lady's melee options are limited. This move is always satisfying to use, and very good for giving you some breathing space. Explosion Shot. Or level 3 charged pistol shots. Like with Nero, those are very efficient, and you want to be using them a lot. Trigger Happy. Nothing out of this world, but it's nice to know that you can use this while charging your pistols. Same goes for many of the Style button abilities, so remember that you don't necessarily have to stay idle while charging shots. Maximum Burst. Or level 3 charged Kalina Ann shots. Your biggest damage dealer. It takes a long time to charge, and if the enemy moves it will have been for nothing. So you'll often prefer uncharged or level 1 charged shots. But when you can pull a level 2 or 3, it pays off. Shredder Shot. Or level 3 charged shotgun shots. Unlike the pistols and Kalina Ann, charged shotgun shots are not concentrated when you release, but give you a certain time during which your shots are more powerful. At very close range, these can do a lot of damage, and knock back most enemies. Wire Shot. Very good for crowd control. A routine that is reasonably safe and thus particularly useful to learn for Hell and Hell, and for Bloody Palace: charge your pistols, double jump, Wire Shot twice to slam the enemy on the ground (or once if it was already in the air), release your charged pistol shot (just after the Wire Shot animation ends), then switch to Kalina Ann and make a quick shot (or level 1 charged shot), then switch back to pistols and repeat. Burst Attack. Lady does not have a Devil form, but instead a Burst gauge that fills up similarly to the Devil Trigger of other characters, and gets depleted when you perform the Burst Attack. It gives you some invincibility frames, and does a lot of damage at a pretty decent range. But it should be used responsibly, since you may find yourself in situations where you really need it (e.g. if a Blitz grabs you). Trish High Voltage. This move, followed by a jump, is the key to reaching higher places for some items. Round Trip. Arguably Trish's primary move. It is easier and faster to execute than Dante's and Vergil's version and has a better range. Great for crowd control, but it also gives access to some powerful moves while Round Trip is active. The main basic combo that can carry you through most of the game is Round Trip + (charged) Thunder Blow. But do not neglect Collider, and Bare Knuckle combos C (+Electrical Dance) and D (finishing with a Real Impact type uppercut). V-Divider. Not a critical move, but occasionally very useful, notably to group up enemies before a Round Trip. Revenge. Your big damage dealer. Particularly useful against bosses and Blitzes. It consumes your DT gauge (you need at least 2-3 bars to perform it). Practice pulling out the laser without messing up the controls. If you have trouble like I had at first: lock on, quick back to forward on the stick and then, only after that, press and hold the shoot trigger. Luce & Ombra. A bit underwhelming in comparison with Nero's or Lady's charged shots. However, while in Devil Form, the rapid fire from these pistols is nothing to laugh at. Very good for dropping the Mephistos and Fausts. S-rank Missions - You got a jacked up notion of fair play pal, and it's beginning to piss me off. To get an S-rank for a mission, you need to reach a total score above a certain threshold. You get a Base score value just for completing the mission (between 500 and 3500, depending on the mission). Then, the total score is computed this way: (Base + Style points) x Multipliers Multipliers Difficulty: Human x0.85, Devil Hunter x1, Son of Sparda x1.8, Dante Must Die x3 Clear Time: S x3, A x2.5, B x2, C x1.5 Orbs: S (95-100%) x2, A (75-94%) x1.75, B (60-74%) x1.5, C (45-59%) x1.25 Bonus and Penalties: No items x1.2, No damage x1.5, Continues x0.8, Gold Orb x0.7, Enemy Handicap x0.8, Super costume x0.2.This means that the final rank is not simply an average of the ranks in the 3 categories. The total score thresholds are defined so as to compensate for the Difficulty multipliers, so that the Style points requirement are always the same in Human / Devil Hunter, and in Son of Sparda / Dante Must Die. In certain missions, the Style points requirements are even identical across all difficulties. Ideally, you want to aim for an S in both Time and Orbs, and get the No Items bonus. In that case, getting sufficient Style points is generally not too difficult. If you get an A in either Time or Orbs, or if you use items, it's often still possible to S-rank the mission, but you need significantly more Style points. If you accumulate the imperfections (using items, getting A in both Time and Orbs), it quickly becomes next to impossible to get enough Style points, unless maybe if you farm them e.g. during the Dice game. The no damage multiplier obviously greatly increases the likeliness of S-ranking the mission, but if you are able to do the mission without taking damage, chances are you'd get an S-rank anyway. The super costume penalty is huge, so it makes it practically impossible to S-rank a mission with it. Although other penalties are smaller, having to use a Gold Orb, Continue, or triggering the enemy handicap (if you die enough times), generally means you won't S-rank. Actually, if you die and Continue instead of using a Gold Orb, not only will you get a penalty, but you also lose all Style points acquired so far in the mission. So make sure not to die, because a Gold Orb will be difficult to compensate, and a Continue essentially impossible. But remember that if you've used one item, you can use as many as you like without further penalty (particularly interesting in DMD, since you can easily get more Style points to compensate). In Legendary Dark Knight mode, the scores and thresholds are calculated as in Son of Sparda. But since there are so many enemies, you will get a whole lot more Style points, so getting an S-rank should generally not be a problem. Don't worry about getting an S-rank in Time. Don't worry about using items. Try not to die (since Continues and Gold Orbs cost more than simply using Vital Stars, and they can in some cases cost you the overall Mission S-rank). Some missions are practically impossible not to S-rank, as you can without too much trouble get more than 5 times the required Style points (and thus you could even get it using a Super Costume, but it's riskier obviously). Requirements per missionYou can find all the details and thresholds in this guide[gamefaqs.gamespot.com] (except that the difficulty multipliers are not mentioned, for some reason). But it's not necessary to know all that, so I'll focus on the essential. The table below gives the maximum time to get an S-rank in Clear Time, for each mission on each difficulty. It also gives the Style points required to S-rank the mission, with 2 different values. The first (e.g. 334 in Mission 1) assumes an S-rank in Time and Orbs, and the No items bonus. The second assumes getting an A-rank instead of S-rank in Time OR failing to get the No items bonus. MissionTime (H)Time (DH)Time (SoS)Time (DMD)Style (H/DH)Style (SoS/DMD)10:451:001:151:25334 - 500334 - 500211:0015:0021:0026:005445 - 68346834 - 8500313:3018:0020:0025:007028 - 88347028 - 8834413:3018:0021:0033:004945 - 63347028 - 8834509:0012:0018:0021:304056 - 51675445 - 6834616:3022:0025:0030:008612 - 108348612 - 10834715:0020:0023:0028:004445 - 58344445 - 5834811:0015:0017:0021:004945 - 63344945 - 633499:3013:0023:0028:006834 - 850010306 - 126671015:0020:0025:0030:007223 - 91677917 - 10000 MissionTime (H)Time (DH)Time (SoS)Time (DMD)Style (H/DH)Style (SoS/DMD)1111:0015:0017:0021:008612 - 108348612 - 10834127:3010:0011:3014:005250 - 65005250 - 65001313:3018:0023:0029:004945 - 63345639 - 71671413:3018:0024:0029:004403 - 55845445 - 68341521:0028:0034:0041:006723 - 86678806 - 111671618:3025:0030:0037:006723 - 86677417 - 95001713:3018:0021:0025:0011389 - 1416711389 - 14167187:3010:0011:3014:003778 - 48343778 - 48341922:3030:0050:0060:009000 - 1150013862 - 17334202:303:153:454:303584 - 45003584 - 4500 SSS-rank Bosses - I'll do it. I wouldn't want to deny anyone their dying request. Some general considerations: It must be performed on difficulty Son of Sparda or above, so Son of Sparda would be the primary choice. All are doable in Son of Sparda... but for some specific strategies, Dante Must Die or Legendary Dark Knight may be preferable (as bosses have more health and thus you can raise your Style higher). The achievement for Echidna, Credo, Agnus (and maybe Dante?) can be obtained in the Bloody Palace as well. If you get close to killing the boss without being on SSS-rank, let yourself be killed and Continue, to avoid restarting the mission. There is an enemy handicap that may trigger after doing a few "Continues". It makes the enemies less aggressive (though I'm not sure it affects the bosses, it's not very noticeable), and reduces your mission score, but doesn't prevent getting these achievements. You can use Super Costumes. When you gain a rank (from D to S), you don't lose it over time, but only if you get hit. So up to that point, there's no need to rush the fight and take too many risks. The last two ranks (SS and SSS) do however fall back down to S rather quickly, if you don't do any damage. One thing that makes these achievements a lot easier is Holy Water. If you raise your Style rank to SSS, but the boss still has some health left, you can spam Holy Water to finish it with less risk of getting hit or losing the SSS-rank over time. EchidnaMissions 7 or 19 with Nero/Vergil/Lady, or Mission 13 with Dante/Vergil/Trish. She is by far the easiest to SSS-rank. Style points go up really fast on her, so there is a lot of room for mistakes. With Nero, just landing a couple charged shots and a few sword strikes without getting hit, may be enough to reach SSS. Otherwise, when she is sitting on the ground like a flower, you can grab her with Devil Bringer after stunning her, for a lot of Style points. You can also grab her sack when she is in spider position. BerialMissions 2 or 19 with Nero/Vergil/Lady, or Mission 16 with Dante/Vergil/Trish. In Mission 2 with Super Nero in Son of Sparda. Prepare a Charged Shot before entering the arena. Start with that, then Maximum Bet, Streak and a couple hits to the head. It should remove his fire and stun it before it has the chance to do anything. Jump and Devil Bringer grab his head, then Streak and Devil Bringer grab his head on the ground. You should be at A-style already. Now you have to be careful not to get hit. Stay at a distance, and spam Charged Shots whenever available. Run for the fire columns, and when he does his big charge move, use the DT activation invincibility frames then land a couple hits and back off. Once your style rank is at least at S, and when he loses his fire again, a double Devil Bringer grab should be enough to bring you to SSS, and probably kill it. Bael or DagonMissions 4 or 19 with Nero/Vergil/Lady, or Mission 15 with Dante/Vergil/Trish. I got this one on my first attempt with Super Nero. So I don't really have a specific strategy. For the mermaids, just Streak into them, and grab them with Bringer whenever they are stunned or starting an attack. For Beal, hit the crystals. With the max EX from the Super Costume, you should stun it relatively easily and then Devil Bringer grab his face for lots of damage and Style. Don't forget the Devil Trigger activation invincibility frames that are very useful to avoid taking damage from certain attacks. Angelo CredoMission 8 with Nero/Vergil/Lady. It might take a few attempts, but he's not too difficult to SSS-rank with Nero (or Super Nero). During his first phase (more than 50% HP), he basically has only two attacks. The first is a sword combo that ends with a downwards slash. Just walk away to avoid the hits and then back in front of him before he gets up, to grab his shield with Buster. The other attack is when he throws his spear from afar. He usually throws 3 of them, dodge the first two, then grab the third (without target lock, press and hold the Bringer button at the moment he throws it), and throw it back at him (press the target lock and release the Bringer). Just with this, and some Charged Shots when available, you can easily get through the first phase without getting hit and bring your rank to A or S. He gets more aggressive later on, but ideally you have worn him down sufficiently and at some point he will be weakened and his shield will stop glowing. When you grab him, you'll throw some extra punches and have then a decent time (12 seconds according to wiki) to go wild attacking him. If you start from S-rank you should be able to reach SSS easily, and significantly lower his health. Then finish him with Holy Water if you don't want to take any chances. Angelo AgnusMission 9 or 19 with Nero/Vergil/Lady. Mission 17 with Dante/Vergil/Trish. This one can be more complicated, but is very doable with (Super) Nero as well. I don't really have a specific technique to propose. You have to learn a bit his different attacks and be able to avoid them. What worked for me is to mostly rush him with Super Nero, grab him with Bringer when he gets stunned / loses his yellow glow. Some errors are permitted since it's not too hard to drive up the Style meter... just need enough skill or luck to not get hit during a sufficiently long period of time. Finish with Holy Water if necessary. The SaviorMission 20 with Nero/Vergil/Lady. He's not difficult to SSS-rank, since his last stage gives Nero the opportunity to make a lot of Style points. So you absolutely don't have to make a perfect fight, you just have to nail the ending. I did it without really trying during my S-rank mission attempts in Son of Sparda. Bring him down to 2 bars of health (hold your strikes so as to not go much below that). At that point, after you break his bubble he will make a Stinger-type attack that you can grab with Bringer (position yourself at a decent distance, release the target lock, and around the beginning of his movement towards you, press and hold the Devil Bringer button). This should bring you to A-style and leave him with a sliver of health. Break his bubble again without taking any damage. If you successfully repeat the Stinger grab, it should raise your rank to SSS and finish him. DanteMission 1 or 10 with Nero/Vergil/Lady. Dante is typically reported as the hardest one to SSS-rank. It's also the only one that I did not bother to try with Nero. An easy way to do it is in Mission 1 with Lady on Dante Must Die. Charge your pistols, then jump and Wire Shot Dante (2 or 3 times in a row until you catch him and send him in the air), and release your charged shot while he is in the air. Rinse and repeat until he dies, and you should kill him the moment you reach SSS. You might need a couple attempts, but it's rather easy. Cheesier approachesLady can get a lot of Style points with Charged Shots. So many of these achievement can be obtained simply by staying afar, spamming (pistol and/or Kalina Ann) Charged Shots, and dodging attacks. I only used Lady against Dante, and haven't tried for the others since I got them without too much trouble using Nero, but reportedly she can easily SSS-rank most of them. With Super Dante, you can pick the Gunslinger Style and equip Pandora, activate Devil Trigger, (triple) jump and push the Style button. Then launch the rockets until the boss dies. If something goes wrong at some point let yourself die and restart. This reportedly works with Echidna, Berial, Angelo Agnus, and possibly with Dagon. But do it in Dante Must Die, because they don't have enough health to let you reach SSS in Son of Sparda. Bloody Palace - Oh that's fair! Now I've got to fight a whole herd of these things. The Bloody Palace must be completed separately with each of the 5 characters. Nero, Dante, and Vergil have super costumes, which makes things easier (or almost trivial). Lady and Trish do not, so it can get a bit more tricky. There are a few additional achievements related to the Bloody Palace: Complete it under 2 hours. This is easy and can be done with any of the characters. Super Dante can do it in 30-40 minutes without any challenge. Complete it in Turbo mode. Can be done with any character too, preferably one you're comfortable with, and using a super costume. Complete it with a global S rank. This is practially automatic if you don't use a super costume. So it will come naturally with Lady or Trish. Kill Dante without taking any damage, on level 101. This is best achieved with Super Dante, see below. I am giving below a few tips for each character. If you are having trouble, I recommend this guide[psnprofiles.com], which is very detailed and includes tips and strategies for each level of the Palace, with each character. Nero It is rather easy to complete with Super Nero. In Devil form and with constant max Exceed, you deal a lot of damage. So not much to worry about, but try not to get hit too much, because your health does not regenerate, and that could turn out to be a problem in some of the higher levels. Abuse Charged Shots against Dante on level 101. Dante Using Super Dante, activate Devil Trigger, select Pandora and the Gunslinger Style, and voila, Bloody Palace is done. Well not exactly, but it is going to be trivial. Triple jump and press the style button to activate Argument, then shoot rockets with the style button until everyone is dead. Some of the levels can be cleared a bit faster using Grief (typically in case of many smaller ground-based enemies). Note that there are a couple levels where some enemies are laying on the ground and you need to drop down and get close to activate them. You can also use Argument (or Grief) to kill Dante without taking any damage. Start by running (or trickstering) away to take some distance, or you might get hit by a shot before you can do anything, and that would ruin the whole thing. Vergil Using Super Vergil, the Bloody Palace is rather easy as well. You can use Judgement Cut End to dispose of mostly anything. Be careful not to get hit, since you have a few instants of vulnerability when you engage in that maneuver. Other important moves are the Rapid Slash followed by Judgment Cut (the "Just" or instant version ideally), and the Spiral and Blistering Swords. Beowulf to deal more damage to a single bigger target (unshielded Blitzes for example). Lady The Bloody Palace with Lady is going to be more complicated as she does not have a super costume. It might take a few attempts, but it is very doable. Camera manipulation is very important to keep enemies off screen where they can't attack you. Thankfully most of her attacks do not require locking on, so you can run around the arena releasing charged pistol shots and be generally safe. Wire Shots are paramount for crowd control. Notably, the routine [charge pistol shot - double jump - ground slam enemy - release pistol shot - quick uncharged Kalina Shot - switch back to pistols and repeat] is very efficient and can be done mostly without locking on, unless you want to focus on a specific enemy to take it out quickly. When it's safe enough, use level 2 or 3 charged Kalina Ann Shots (after a level 3 charged pistol shot) to dispatch bigger or grouped enemies. Charged shotgun shots are an efficient way to take out smaller enemies. At least in the early levels, many of those get one-shot. Bigger enemies may take a couple shots, but they also get knocked down. However, you have to go at very close range, so it's not always the safest approach. Highly recommended against the Gladius flying swords. Note that you can charge the shotgun before going through the portal, to start the next stage with an advantage. Use your Burst attack wisely: against bosses, when in trouble, when surrounded by many enemies. But be sure to have it available when facing Blitzes, because if they catch you it's the only way to avoid A LOT of damage. Trish This was by far the most difficult achievement for me. It will probably take several attempts, and failing at the higher levels is likely to get frustrating so be prepared for that. But keep at it, you'll first be able to reach level 85 reliably, then you'll eventually pass through, then you're almost there. To get some sense of progression and stay motivated, keep note of the higher level you reach and what's left on your timer after each set of 10 levels (as you get better, you'll clear stages faster and without taking damage). Now for the combat tips: Actively manage your health and Devil Trigger bar. Make sure to have Devil Trigger full for Blitzes (check the list of enemies on each level in the guide linked above). But if you won't need it soon, use it to regenerate health instead of leaving it maxed. Camera manipulation is very important to keep enemies off screen where they can't attack you. A bit more complicated than with Lady. But an essential part of a successful run. You generally want to stay close to the edge of the arena. The main strategy against most enemies is Round Trip + Thunder Blow. Collider is an alternative to Thunder Blow depending on the enemies and situation. Collider sends the enemies in the air, so you can't attack them as fast and they might get out of Round Trip. But it can drop enemies that are in the air (e.g. Angelos) and leave enemies knocked out at the end of Round Trip to more easily catch them in the next. For Infested enemies, I found Collider to be preferable (at the minimum safe distance from their flailing). Charging into them with Thunder Blow is gonna get you hurt. For Mephistos and Fausts: activate DT and shoot them, which will make them drop quickly, then Round Trip + Thunder Blow. Pandora's Revenge is your main damage dealer. Practice a bit if necessary, because you should be able to reliably pull it at any time, and in any direction. You can also do it in the air, which is sometimes useful. For all bosses, you want to spam Round Trip and use Revenge at any opportunity. Activate DT in cases where you might get knocked out. Blitzes suck. That's how it is. Ideally you want to use Pandora's Revenge to take out its shield immediately when it spawns, or when you have an opportunity (if it uses its laser or disappears and re-spawns). Not always easy when there are other enemies, make sure to pick the lock-on system that works best for you in the game's option. Activating DT and shooting with the pistols is a possible alternative but it's less efficient. Once the shield is down, Round Trip + Thunder Blows (but it still moves around, ideally you want to be in front of it to block it). Level 85 and the double Blitzes is infamous for good reason. Use Revenge at the start if you can, then whenever you get an opportunity (including on unshielded one to take it out as fast as possible). Possibly activate DT to not get knocked by the other one. Try to take as little damage as possible and don't rush, sometimes one can drop the other's shield with its laser. Try to have a bit of luck too, as it can help a lot. Careful of level 89 as well. A good option to regain DT when you can't melee safely, is to jump and use the forward Pandora attack, then immediately the backward Pandora attack. This should keep you in the air if you time it right, and it regenerates DT efficiently. Conclusions - Baby! Yeah! Ahahahah! Alright! Nice! Sweet! Alright, that was a tough 100%. But I enjoyed the challenge. Sure, playing through the same missions and bosses so many times started to feel a bit too grindy at some point, but all playable characters felt sufficiently unique and fun to use. I had about 180 hours playtime on Steam when I got done with this, but this includes A LOT of idle time, in part writing bits for this guide. So maybe about 120h or something, and probably faster if you got the skills. I hope you liked the guide, let me know if it helped! And you know, if it did... favorite and like and award and all that, to give it more visibility. If you're interested, I made similar guides for DMC1, DMC2, and DMC3: https://steamcommunity.com/sharedfiles/filedetails/?id=2934304748 https://steamcommunity.com/sharedfiles/filedetails/?id=2940707560 https://steamcommunity.com/sharedfiles/filedetails/?id=2949541899
2026-02-13 09:03:44 发布在  Devil May Cry 4 Special Edition
说点好听的...
收藏
0
0