换一换
换一换 


你已经知道掠夺者是爆头之王。但为什么会这样,以及如何在游戏中充分发挥它的优势呢?本指南超越了常见的“给掠夺者配备失落科技武器”的建议,深入详细地介绍了如何设置精准射击、如何计算相关数据、最值得追求的武器以及最适合组建爆头 lance 的机甲。 入门指南 你可能已经从论坛或其他指南中听说过爆头和传奇的掠夺者。但作为一名忙碌的佣兵指挥官,你可能希望在阅读本指南时,让你的机甲技师们也有事情可做。在深入过多细节之前,这里有一些你可以委派给下属军官的任务,这样你就能在吸收其余信息的同时,获得一些爆头实战经验。穆拉德的先锋训练舱:你需要【精准射击精通】才能有效使用爆头。优先获取【战术-9】。过热阈值提升对于处理高热量负荷非常有帮助。【勇气-6】和【勇气-9】很重要。你的第一个爆头专家几乎肯定是先锋。目标最低属性为: Gunnery 4, Piloting 2, Guts 6, Tactics 9。 杨的掠夺者配置:使用从 salvage 或从不结盟世界购买的零件获取掠夺者-3R。 库存掠夺者有58%的几率爆头(后续会有计算),但它的热量非常高。将 PPC 换成大型激光,并根据你的喜好平衡散热片和装甲。 有更好的爆头Build——包括掠夺者和非掠夺者的——但这个Build仅使用标准武器和装备就能让你入门。大流士的精准射击战术:你的掠夺者优先使用专注值进行精准打击,这能让你选择攻击位置。 瞄准头部。如果能击杀目标,那很好。如果没能击杀,可以继续尝试或正常摧毁机甲。爆头的随机性很强,所以要制定备用计划。 注意目标的掩护、护卫和壁垒状态,以及敌方掠夺者和独眼巨人指挥部的存在。这些会增加敌人的伤害减免,使爆头变得更加困难。 记住,掠夺者擅长各种精准射击,即使是针对侧躯干或腿部的攻击。如果没能爆头,你仍然可以帮助小队达成断腿击杀或驾驶员击杀。《苏美儿》旅行指南 若游玩战役模式或跳过生涯模式声望刷取: 最大化与海盗阵营的声望。开启并访问黑市。 若游玩生涯模式或在战役模式中已破坏与海盗的声望: 与卡诺皮亚人结盟。从其阵营商店购买麦格纳激光炮++(+10伤害)。 与联邦太阳同盟结盟。从其阵营商店购买帝王UAC2++。 从每个阵营获取所需物品后解除盟约,以便开始积累与海盗的声望。开启并访问黑市。发现更高级物品时进行购买。 请注意,爆头有更多优化方法,机甲战士训练、武器选择和 lance 组成也存在诸多细节。本文仅作为新手入门参考。我们很快就会深入探讨。什么是爆头?
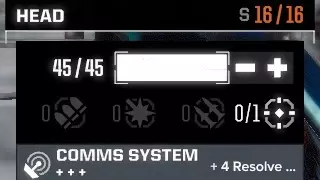
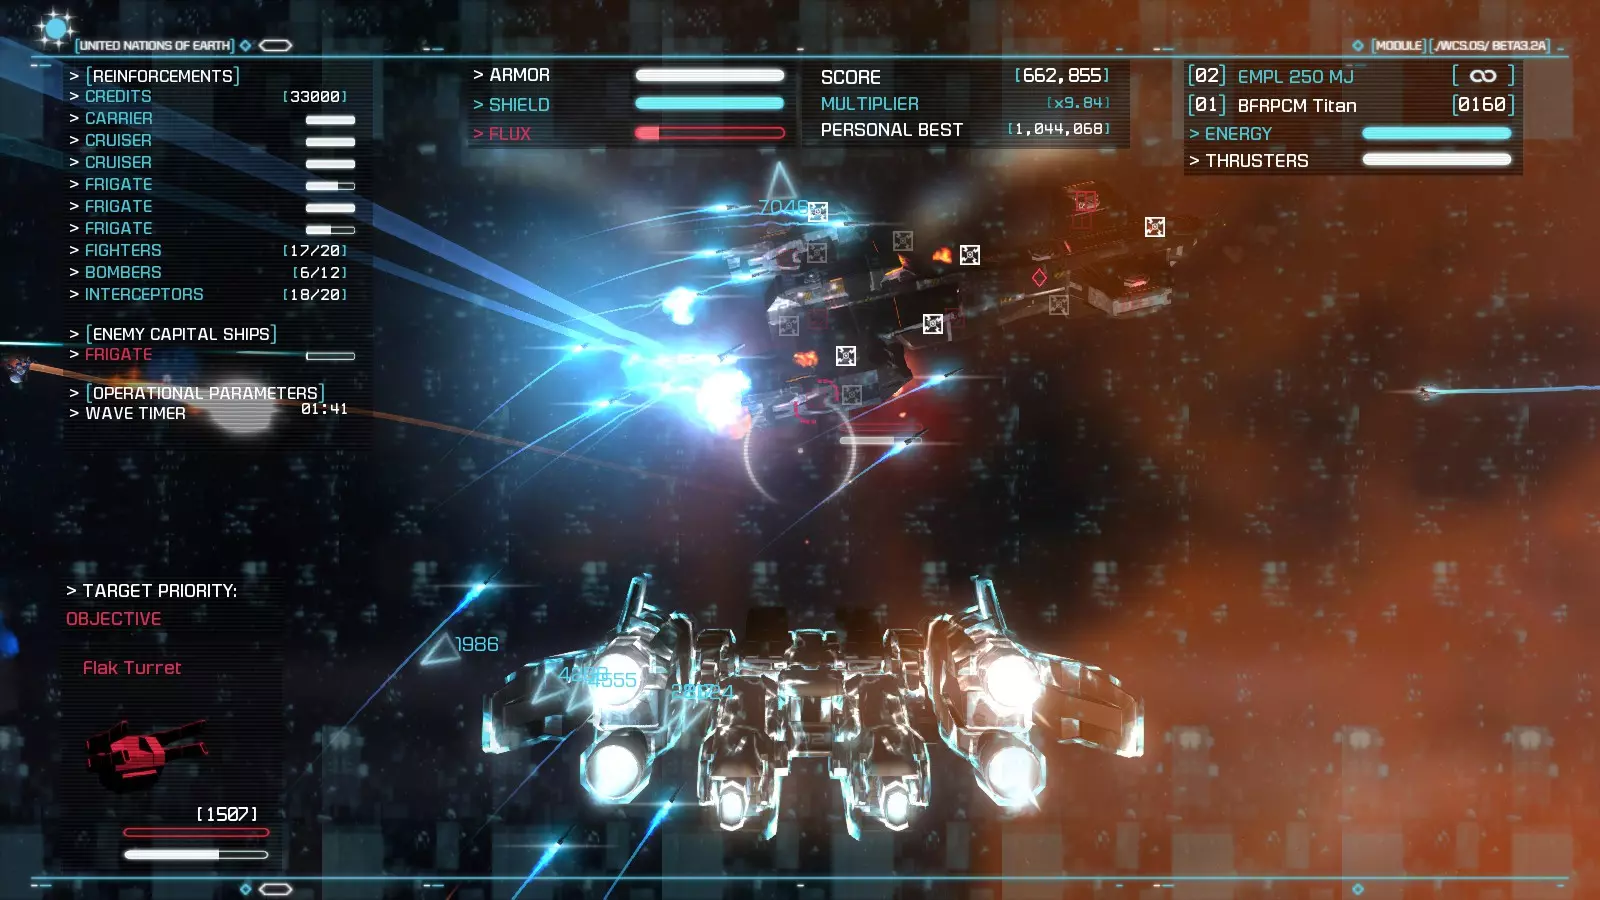
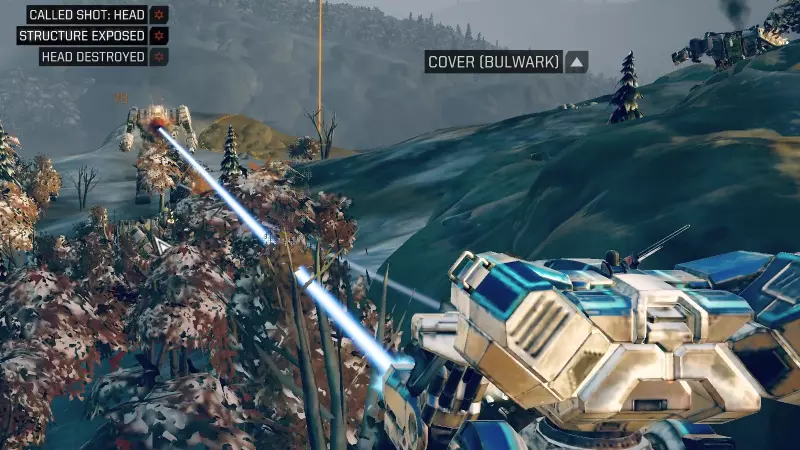
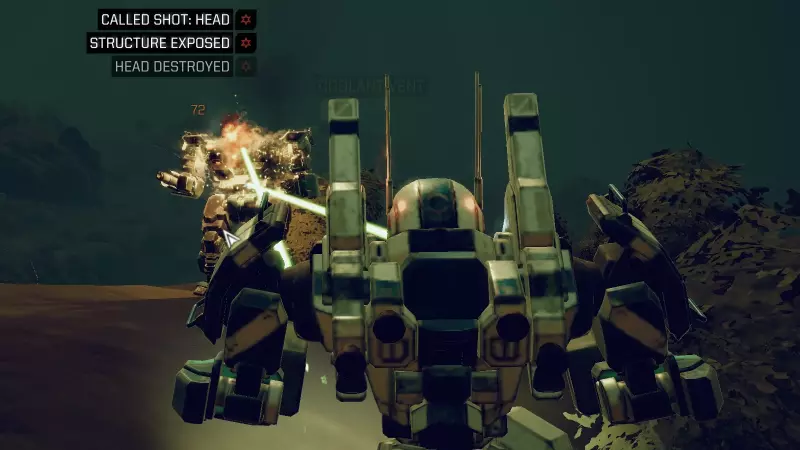
在大多数《机甲战士》任务中,成功的关键在于击败敌方机甲。有几种方法可以实现这一点:摧毁中央躯干、摧毁双腿、击晕机师或摧毁头部。单纯增加火力以缩短摧毁中央躯干所需的时间,是对时间和资源最不高效的利用。侧翼包抄和精准射击等战术能有效提高效率,但面对拥有更厚装甲和更强结构的重型机甲时,这些战术的效果会大打折扣。爆头尤为有效,因为它能完全无视装甲和结构,让你轻松击败即使是最重、最危险的敌方机甲。机甲头部最多拥有45点装甲和16点内部结构,这意味着需要造成61点伤害才能摧毁它。通过这种方式摧毁机甲可获得3个 salvage parts,因此利润也很高。在我的铁人模式克伦斯基生涯中,专注于爆头的小队能够依靠简单的战场战术,可靠地连续完成数百个5 skull任务,并获取大量突击机甲的 salvage,且失败风险极低。由于爆头本质上是一种随机现象,与原始伤害输出关系不大,而更多地与特定武器特性相关,因此需要一些背景知识来组建一支为此优化的小队。 指定射击
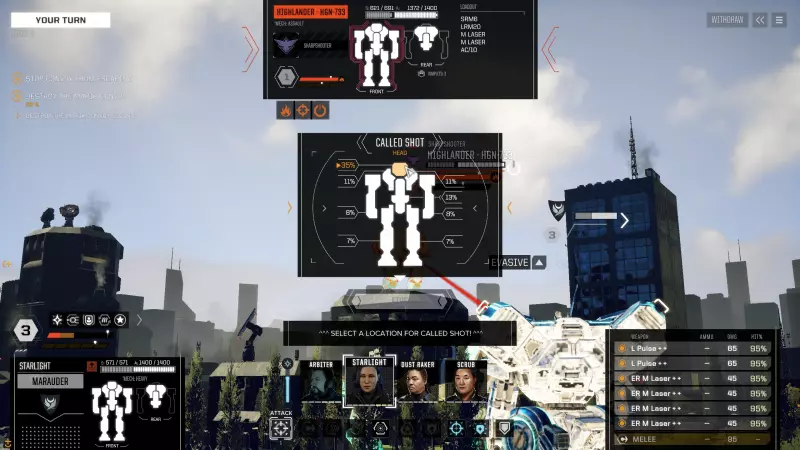
The first part of any headshot method is to generate called shots that let you select a target location. The game provides four ways to do this. 1/ Precision Strike (PS). You can spend 30 resolve in combat to make a Precision Strike. This grants a 20% bonus chance to hit and allows you to select the target location. You should have enough resolve to take 1 PS on the first round of combat and at least 2 PS on every subsequent round. PS is good, use it whenever you can. 2/ Knockdown. If you deal enough stability damage to a mech that is already unstable, you will knock it down, allowing you to select the target location. Note that knockdown targets present a different called shot profile than other called shot methods. It takes a minimum of two turns to knock down one enemy so this is one of the weaker methods for generating called shots. 3/ Break a Leg. If you destroy a mech’s leg, you will knock it down, allowing you to select the target location. This is better than knockdown from stability damage because you can do this in 1 turn if you hit the leg with enough damage. However, it generally takes one PS to target the leg. 4/ Shutdown. If you force a mech to overheat (e.g. with Infernos and Flamers), you’ll cause it to shut down, enabling a 20% bonus chance to hit and removing all mechwarrior effects (including Guarded, Entrenched, and Bulwark) in addition to allowing you to select the target location. It takes only one turn from a suitably-equipped mech to shut down an enemy and you can also combine this with TAG to increase the threat level of your weapons. The best way to generate called shots is with a combination of PS and shutdown. This gives the ability to kill or disable up to 3 mechs in one round. No mech is safe from shutdowns. Even special mechs that are immune to headshots can be shut down by infernos and killed with a CT called shot. Headshot Math Headshots are fundamentally a function of probability and using it effectively requires you to trust the game's RNG. A full treatise on headshot math is out of scope for this guide. However, I can provide a brief foundation and some few useful tools for predicting the effectiveness of your headshot builds. The default chance of a single-shot weapon hitting the head on a called shot is 2%. With Called Shot Expert from Tactics-6, the chance increases to 6%. With Called Shot Master from Tactics-9, the chance increases to 18%. The Marauder’s Lance Command Module further increases this chance to 35% for a Tactics-9 mechwarrior. The actual chance to hit the head also varies based on the attack facing. Flank and prone facings have a slightly reduced chance to hit the head while it’s not possible to target the head from a rear facing. For the purposes of this guide, we’ll assume front facing and tactics-9. Multiple shot weapons such as MGs, SRMs, UACs, SPPCs, and LBXs have a reduced chance to hit the head for each successive attack. Multiple shot weapons # of shots123456Tactics-9 Marauder35%22%13%7.3%4.4%2.8%Tactics-9 Other mechs18%11%6.2%3.8%2.5%1.9% Clustering weapons such as LRMs set the targeted part on the initial attack and every other attack has an improved chance to hit the same region. However, hits on the head are only possible if the head was the target of the initial hit. Subsequent hits on the head only have a 0.5% chance no matter the initial called shot bonus. This effectively renders LRMs useless as a headshot weapon. Weapon damage is important to consider. It takes 61 damage to destroy the head. This can be dealt by a single big weapon or by multiple hits from smaller weapons. It is also important to consider damage reduction. A guarded unit or a unit in cover has 20% damage reduction. When both guarded and in cover, the unit has 40% damage reduction. Mechwarriors with Bulwark add 20% to any cover bonus. Furthermore, if there is a Marauder in the enemy force, all units gain an additional 10% damage reduction. There are also ways to increase the amount of damage dealt to the enemy. One way is by hitting the enemy with TAG / TAG+ / TAG++ that provides a +10%, +15%, or +20% damage bonus. Another is by using a mech with a built-in damage bonus such as the Phoenix Hawk, Warhammer, or Annihilator. Weapon Damage vs Damage Multiplier % Damage120%100%90%80%60%40%1-hit kill516168771021532-hit kill2631353952783-hit kill182124273553 Most mechs including the Marauder mount multiple weapons and the chance that you will score a headshot kill is equal to the chance that you will deal enough damage to destroy the head in a single alpha strike. In general, we can simplify the problem by classifying weapons by how many hits it takes to destroy the head. The 1-hit and 2-hit probabilities are easy to compute so here are some tables to help get a sense of how the probabilities work. Headshot Table (Marauder) # of attacks123456No hits65%42%27%18%12%7.5%At least 1 hit35%58%73%82%88%92.5%At least 2 hits0%12%28%43%57%68% Headshot Table (Other Mechs) # of attacks123456No hits82%67%55%45%37%30%At least 1 hit18%33%45%55%63%70%At least 2 hits0%3%9%15%22%30% As an example, we'll use a MAD-2R shooting 2x LPulse++ (1-hit) and 4x ERMLaser++ (2-hit). Against an undamaged target with 0 damage reduction, the chance for one of the two LPulse to hit the head and kill the target is 58%. The chance of two ERMLasers hitting the target is (100% - 58%) * 43% = 18%. Therefore this mech has a 76% chance to kill its target with an alpha strike. Against a target that has already taken one hit to the head, any of the 6 weapons hitting the head would result in a kill or 92.5%. Headshot Weapons
Headshot efficiency is my primary criteria for determining how good a weapon is at generating headshots. I calculate this value based on the number of hits required, the number of shots fired, accuracy modifiers, weapon weight, 8 shots of ammo, and the number of double heatsinks to manage the heat. For example, the ERMLaser++ serves as the benchmark against which I will compare other weapons. It is a 2-hit weapon that weighs 1-ton and generates 20 heat which requires 3.33 double heat sinks to neutralize. Therefore its efficiency comes out to 100 / (1 + 3.33) / 2 = 11.54. The LPulse++ is a 1-hit weapon that weighs 6 tons and generates 30 heat. Its efficiency comes out to 100 / (6 + 5) = 9.09 which is 79% of the ERMLaser++. Despite being less efficient, its increased range and the extra value of being a 1-hit weapon puts it on the same level as the ERMLaser++. While efficiency is important, so are other factors. Range is very important since headshot fights are fast and it is important to be able to engage an enemy from further away. Also, some weapons work better in specific situations or with specific mech quirks. Finally, it's important to note that early game players will not have access to top-of-the-line gear and will have to work with the choices that are available. Early Game Weapons This is the early game tier consisting of weapons that do not perform as well but get a pass because they are easy to obtain and use without endgame heat management like double heatsinks or exchangers. AC2++ (+10 dmg)35 damage | 6 tons | 4 heat | 720 / 480 / 120 range | 60% A 2-hit kill autocannon with very long range. It’s not as good as a UAC2++ but it is easy to find and works without double heatsinks. This is a great choice to put in the ballistic slots on your first Marauder. There are multiple ++ variants so make sure to get the +10 dmg one (Kali Yama). Look for these on Advanced Mining worlds. AC10++ (+10 dmg)70 damage | 12 tons | 12 heat | 450 / 300 / 0 range | 52% The first one-hit kill weapon a new player is likely to come across. The AC10++ is pretty inefficient but it does the job. I’d recommend passing this one up in favor of AC2++ since early Marauder 3Rs have plenty of ballistic hardpoints. There are multiple ++ variants so make sure to get the +10 dmg one (Kali Yama). The +5 dmg version (Kali Yama) only deals 65 damage but that's still enough for a 1-hit headshot. Look for these on Advanced Mining worlds. Gauss Rifle80 damage | 15 tons | 5 heat | 660 / 360 / 180 range | 51% The regular Gauss Rifle is a competitive replacement for the Kali Yama AC2++ or AC10++ if you are unable to find one of those on an Advanced Mining world. You can obtain one of these from the campaign after the mission sequence on Artru. In career mode, you can obtain up to four of these from the Head Hunting flashpoint by pursuing Whistler (headshot his custom Jagermech and salvage all 3 pieces). You can find ammo on SLDF worlds. PPC++ (+10 dmg)60 damage | 7 tons | 35 heat | 540 / 360 / 90 range | 34% The best non-LosTech energy weapon can do 1-hit headshots if equipped on a Phoenix Hawk or Warhammer or if used against an enemy debuffed by TAG. There are multiple ++ variants so make sure to get the +10 dmg one (Donal). Look for these on Advanced Research worlds. Large Laser40 damage | 5 tons | 18 heat | 450 / 300 / 0 range | 54% Large Lasers are 2-hit kill weapons with good range that are available immediately. This makes it a good choice for those who obtain a Marauder early in their campaign or career. You’ll replace this with better weapons as you get them. There are +10dmg variants that does not help raw headshot efficiency much but are still worth it for the extra damage and ability to negate a few pips of evasion. Medium Laser25 damage | 1 tons | 12 heat | 270 / 180 / 0 range | 96% This ubiquitous weapon can score a headshot kill in 3 hits and has short range. The only thing that recommends it is its relative efficiency and usefulness compared to other early game weapons. Load these up on your mechs and replace them with better weapons as you get them. Late Game Weapons These are the best headshot weapons for the late game, bringing the best combination of efficiency and range on advanced mechs kitted out with double heat sinks and/or exchangers. UAC2++2x35 damage | 5 tons | 8 heat | 720 / 480 / 120 range | 93% The UAC2++ is totally overpowered as a headshot weapon. It has a ridiculous 720 range and works well even without double heat sinks. Even factoring in the multishot penalty, UAC2++ still posts a benchmark that far outclasses all other ballistic weapons. Ammunition tends to be a non-issue since headshot battles end quickly. You can buy unlimited quantities of this weapon in the Davion faction store. A Marauder 3R can mount 3 of these making it a deadly long-range sniper. LPulse++65 damage | 6 tons | 30 heat | 450 / 300 / 0 range | 79% The LPulse++ is the best 1-hit kill weapon boasting good efficiency and range as well as an accuracy bonus. Its weaknesses are that it is expensive, difficult to find, and requires double heatsinks and/or exchangers. Needless to say, you’ll need to visit a lot of SLDF and black market worlds to find a pair of these for your Marauder 2R. ERMLaser++45 damage | 1 ton | 20 heat | 360 / 270 / 0 range | 100% The ERMLaser++ strikes the best overall balance for a late-game headshot weapon. It has decent range, low weight, and fits on common energy hardpoints. The high heat generation can be offset with double heat sinks and exchangers. 45 damage allows it to remain a 2-hit-kill weapon against enemies with 20% damage reduction and to become a 1-hit-kill weapon when shot by a Phoenix Hawk or Warhammer against a target debuffed by TAG. It can be hard to find enough of these since they are only rarely available on SLDF worlds and the Black Market. Fortunately, you can also obtain 4 of these from one of the mechs you get as a reward in the Heavy Metal flashpoints. SPPC++ (+10 dmg)5x25 damage | 6 tons | 35 heat | 360 / 270 / 0 range | 56% The SPPC++ is an unusual weapon. It looks like a 3-hit weapon but it has a special synergy where one hit will complete a kill on something that has already been hit by an ERMLaser++. There are multiple ++ variants so make sure to get the +dmg version (Donal). This weapon is good on anything that runs ERMLasers but especially the Warhammer 7A. Situational Weapons These weapons are situationally useful, whether it is at close range, with specific mech quirks, or as a replacement for something harder to get. MLaser++ (+10 dmg)35 damage | 1 ton | 12 heat | 270 / 180 / 0 range | 144% The MLaser++ is a very efficient 2-hit headshot weapon hampered only by its short range. This is a solid choice on any mech. Its advantages are that it’s lightweight and energy hardpoints are common. You can buy unlimited quantities of this weapon in the Canopian faction store. There are multiple ++ variants so make sure to get the +dmg version (Magna). There is a +++ version out there but it does not have +dmg and is therefore only as effective as a regular medium laser. ERSLaser++40 damage | 0.5 tons | 10 heat | 150 / 150 / 0 range | 208% The ERSLaser is the most efficient headshot weapon in the game but suffers from a very short range. If you have extra support hardpoints and can get the mech into range, it will improve your chances of scoring a kill. Since it is a support weapon, its accuracy is not affected by evasion making it an ideal weapon against light mechs. You can only find these in SLDF and Black Market shops and they are very useful for many applications so hoard them when they show up. This is an especially good weapon for fast mechs like the Phoenix Hawk. ERPPC++70 damage | 6 tons | 45 heat | 690 / 510 / 0 range | 64% Though less efficient than the LPulse++, the ERPPC++ holds its own as a 1-hit headshot weapon. Its range is comparable to the UAC2++ and the extra damage lets it remain a 1-hit kill weapon against a Marauder’s 10% damage reduction. Even the sensor impairment can be useful by disrupting return attacks if you get unlucky and fail to secure the kill. The main weakness is the enormous amounts of heat it generates and the huge price tag. It can work well on a Marauder 2R if you're having trouble getting LPulse++. UAC5++2x45 damage | 7 tons | 16 heat | 540 / 360 / 90 range | 61% The UAC5++ is usually worse in every way than the UAC2++. The only exception is when it’s equipped on an Annihilator due to its ballistics damage bonus. Against an enemy debuffed by TAG, an Annihilator with 5x UAC5++ has 10 chances to destroy the head - 5 at full accuracy and 5 at reduced accuracy. Even if the enemy were to somehow survive, it would have taken a huge amount of damage and lighter mechs are likely to be outright destroyed. MPulse++50 damage | 2 tons | 16 heat | 270 / 180 / 0 range | 93% The MPulse++ is inferior to the ERMLaser++ in both efficiency and range. However, it is a suitable replacement for when you don’t have enough ERMLasers to go around. This works well on mechs like the Phoenix Hawk that are not impacted by its shorter range and can make use of the improved accuracy and damage for called shots against other parts. Note that MPulse on a Phoenix Hawk will 1-shot a target debuffed by TAG. SRM2+++2x12 damage | 1 tons | 4 heat | 270 / 180 / 0 range | 100% It may take 6-hits on its own to score a kill but the SRM2+++ has a niche use as a finisher when it delivers just enough damage to finish off what other weapons started. It is also the only headshot weapon for missile hardpoints and therefore good on mechs like the Warhammer 7A that carry a mix of weapons. Gauss Rifle++80 damage | 13 tons | 5 heat | 660 / 360 / 180 range | 58% Big, expensive, and hard to find, the upgraded Gauss Rifle has poor efficiency but it is good for sniper builds that use Breaching Shot and also as a weapon for hardpoint-limited mechs like the Atlas II. UAC20++2x120 damage | 12 tons | 48 heat | 270 / 180 / 0 range | 39% The UAC20 is big, heavy, and inefficient. However, it has the best headshot rating for a single breaching shot weapon so finds its place on builds that focus on using close-range breaching shots to bypass enemy damage reduction. Headshot Mechs When comparing the effectiveness of different mechs, one typically considers their damage output. However, when it comes to headshots, the key property we want to consider is the chance of making a headshot kill. While I could have done some fancy math or spreadsheet magic to come up with this score, I just wrote a script to do 10000 alpha strikes for each weapon attack using 95% accuracy, the computed headshot chance for the weapon, and the weapon damage adjusted by the target's damage reduction. Two scores are presented, the first for 0% damage reduction and the second for 20% damage reduction which is commonly seen. Other key considerations include range, heat, armor, and the ability to jump. In general, I'll present sample builds that you can adjust to your own play style. For example, I won't be adding jump jets unless I think it is critical for the mech to jump in order to make its concept work such as for long range snipers that need to control elevation or close-range brawlers that need to control distance and facing. If you need jump jets to make a mech work in your lance, you can typically drop some armor, heat sinks, or weapons to make it happen. Marauder 3R This will likely be the first Marauder you obtain. Parts for this mech can be found at the shop in systems controlled by Local Government or Taurian Concordat. It is the gold standard for headshots and makes the best use of UAC2++, the most overpowered weapon in the game. However, it is limited by its poor heat management and will struggle to mount longer range energy weapons. Basic Marauder 3RConfiguration Heat Armor Headshot NotesAC5, 2x LLaser, 2x MLaser 68 / 42 (-16) 1400 53% / 33% When you get your first Marauder, exchange the PPCs for LLasers, remove 2 heat sinks, and max out the armor. It has a good headshot score given that it uses only standard weapons and should be considered the baseline for what a competent headshot mech should be able to do. Feel free to trade armor for heat sinks if you're worried about running hot. It might be possible to trade out enough armor for jump jets but I'm not about to recommend kiting at this level. Early Marauder 3RConfiguration Heat Armor Headshot Notes2x AC2++, 4x MLaser++ 56 / 54 (-2) 1400 67% / 34% 1x Gauss, 4x MLaser++53 / 45 (-8)1400 63% / 42%Breaching Shot1x AC10++, 4x MLaser++60 / 54 (-6)1400 63% / 37%Breaching Shot2x AC2++, 2x LLaser+++44 / 36 (-8)1400 43% / 37%1x Gauss, 2x LLaser+++41 / 30 (-11)1320 42% / 42%Breaching Shot1x AC10++, 2x LLaser+++48 / 36 (-12)1400 42% / 27%Breaching Shot4x LLaser+++48 / 36 (-12)1400 43% / 43% Early game weapons are obtainable from a typical campaign or career without using faction stores or the black market. With these weapons, several options open up to customize your Marauder. Marauders based on MLaser will have greater headshot chance while those based on LLaser will lose some headshot chance in exchange for the ability to engage from further away. Of the ballistic weapon options, the AC2++ is the most efficient choice. However, the Gauss Rifle and AC10++ open up a new tactical option to have a mechwarrior with breaching shot take flat 35% headshots against any amount of damage reduction. The AC10++ is slightly more efficient but has less range than the Gauss. This is a good time to start experimenting with Jump Jets to fire at range or to kite the enemy. Standard Marauder 3RConfiguration Heat Armor Headshot Notes3x UAC2++, 4x MLaser++, Jump Jets72 / 42 (-30)116086% / 64%3x UAC2++24 / 42 (+18)116056% / 23% This is the standard build that most people refer to when discussing Marauders. It has an amazing headshot rate, remains effective against enemies with damage reduction, and can shoot halfway across the map. Despite its effectiveness, the standard Marauder suffers from some disadvantages. It needs to get close to use its MLasers and it has poor armor and heat management. This is not too big of a disadvantage though if you primarily use it for kiting and reserve the MLaser++ for emergencies or to finish off a disabled enemy. Alternately, trade out the MLasers and heat sinks for more ammo and use it as a dedicated sniper. Breaching Marauder 3RConfiguration Heat Armor Headshot NotesUAC20++, 2x TTS+++ (ballistic), Jump Jets72 / 48 (+30)140047% / 47% This is the Marauder build for those who like to use Breaching Shot to negate extremely high DR (60%). Since the UAC20++ hits twice, it has a better headshot chance than Breaching Shot weapons that only fire one shot. Use TTS+++ (ballistic) to counter the effect of recoil. It's possible to mount an additional pair of medium lasers but they're not likely to contribute much. Marauder 3D The Marauder 3D variant can be found at shops in the Federated Suns or as salvage on the battlefield. It cannot use the overpowered UAC2++ and it also gets outclassed by the 2R so it's not very popular for the late game. However, it is still a reasonable effective in the early game where it can take advantage its extra energy hardpoints. Basic Marauder 3DConfiguration Heat Armor Headshot Notes3x LLaser, 2x MLaser 78 / 54 (-24) 1400 53% / 33% Basic setup for a Marauder 3D is similar to the 3R. Exchange the PPCs for LLasers, remove 2 heat sinks, and max out the armor. This variant runs hotter than the 3R. Brawler Marauder 3DConfiguration Heat Armor Headshot Notes5x MLaser++, 2x SLaser++, Jump Jets 72 / 75( +3) 1400 75% / 46% This variant of the Marauder 3D takes a different approach to the early game. It completely abandons any semblance of staying at a distance in favor of maximum headshot efficiency at close range. Jump Jets and max armor are required but it also has enough heat sinks to sustain round after round of jumping and alpha strikes. Marauder 2R
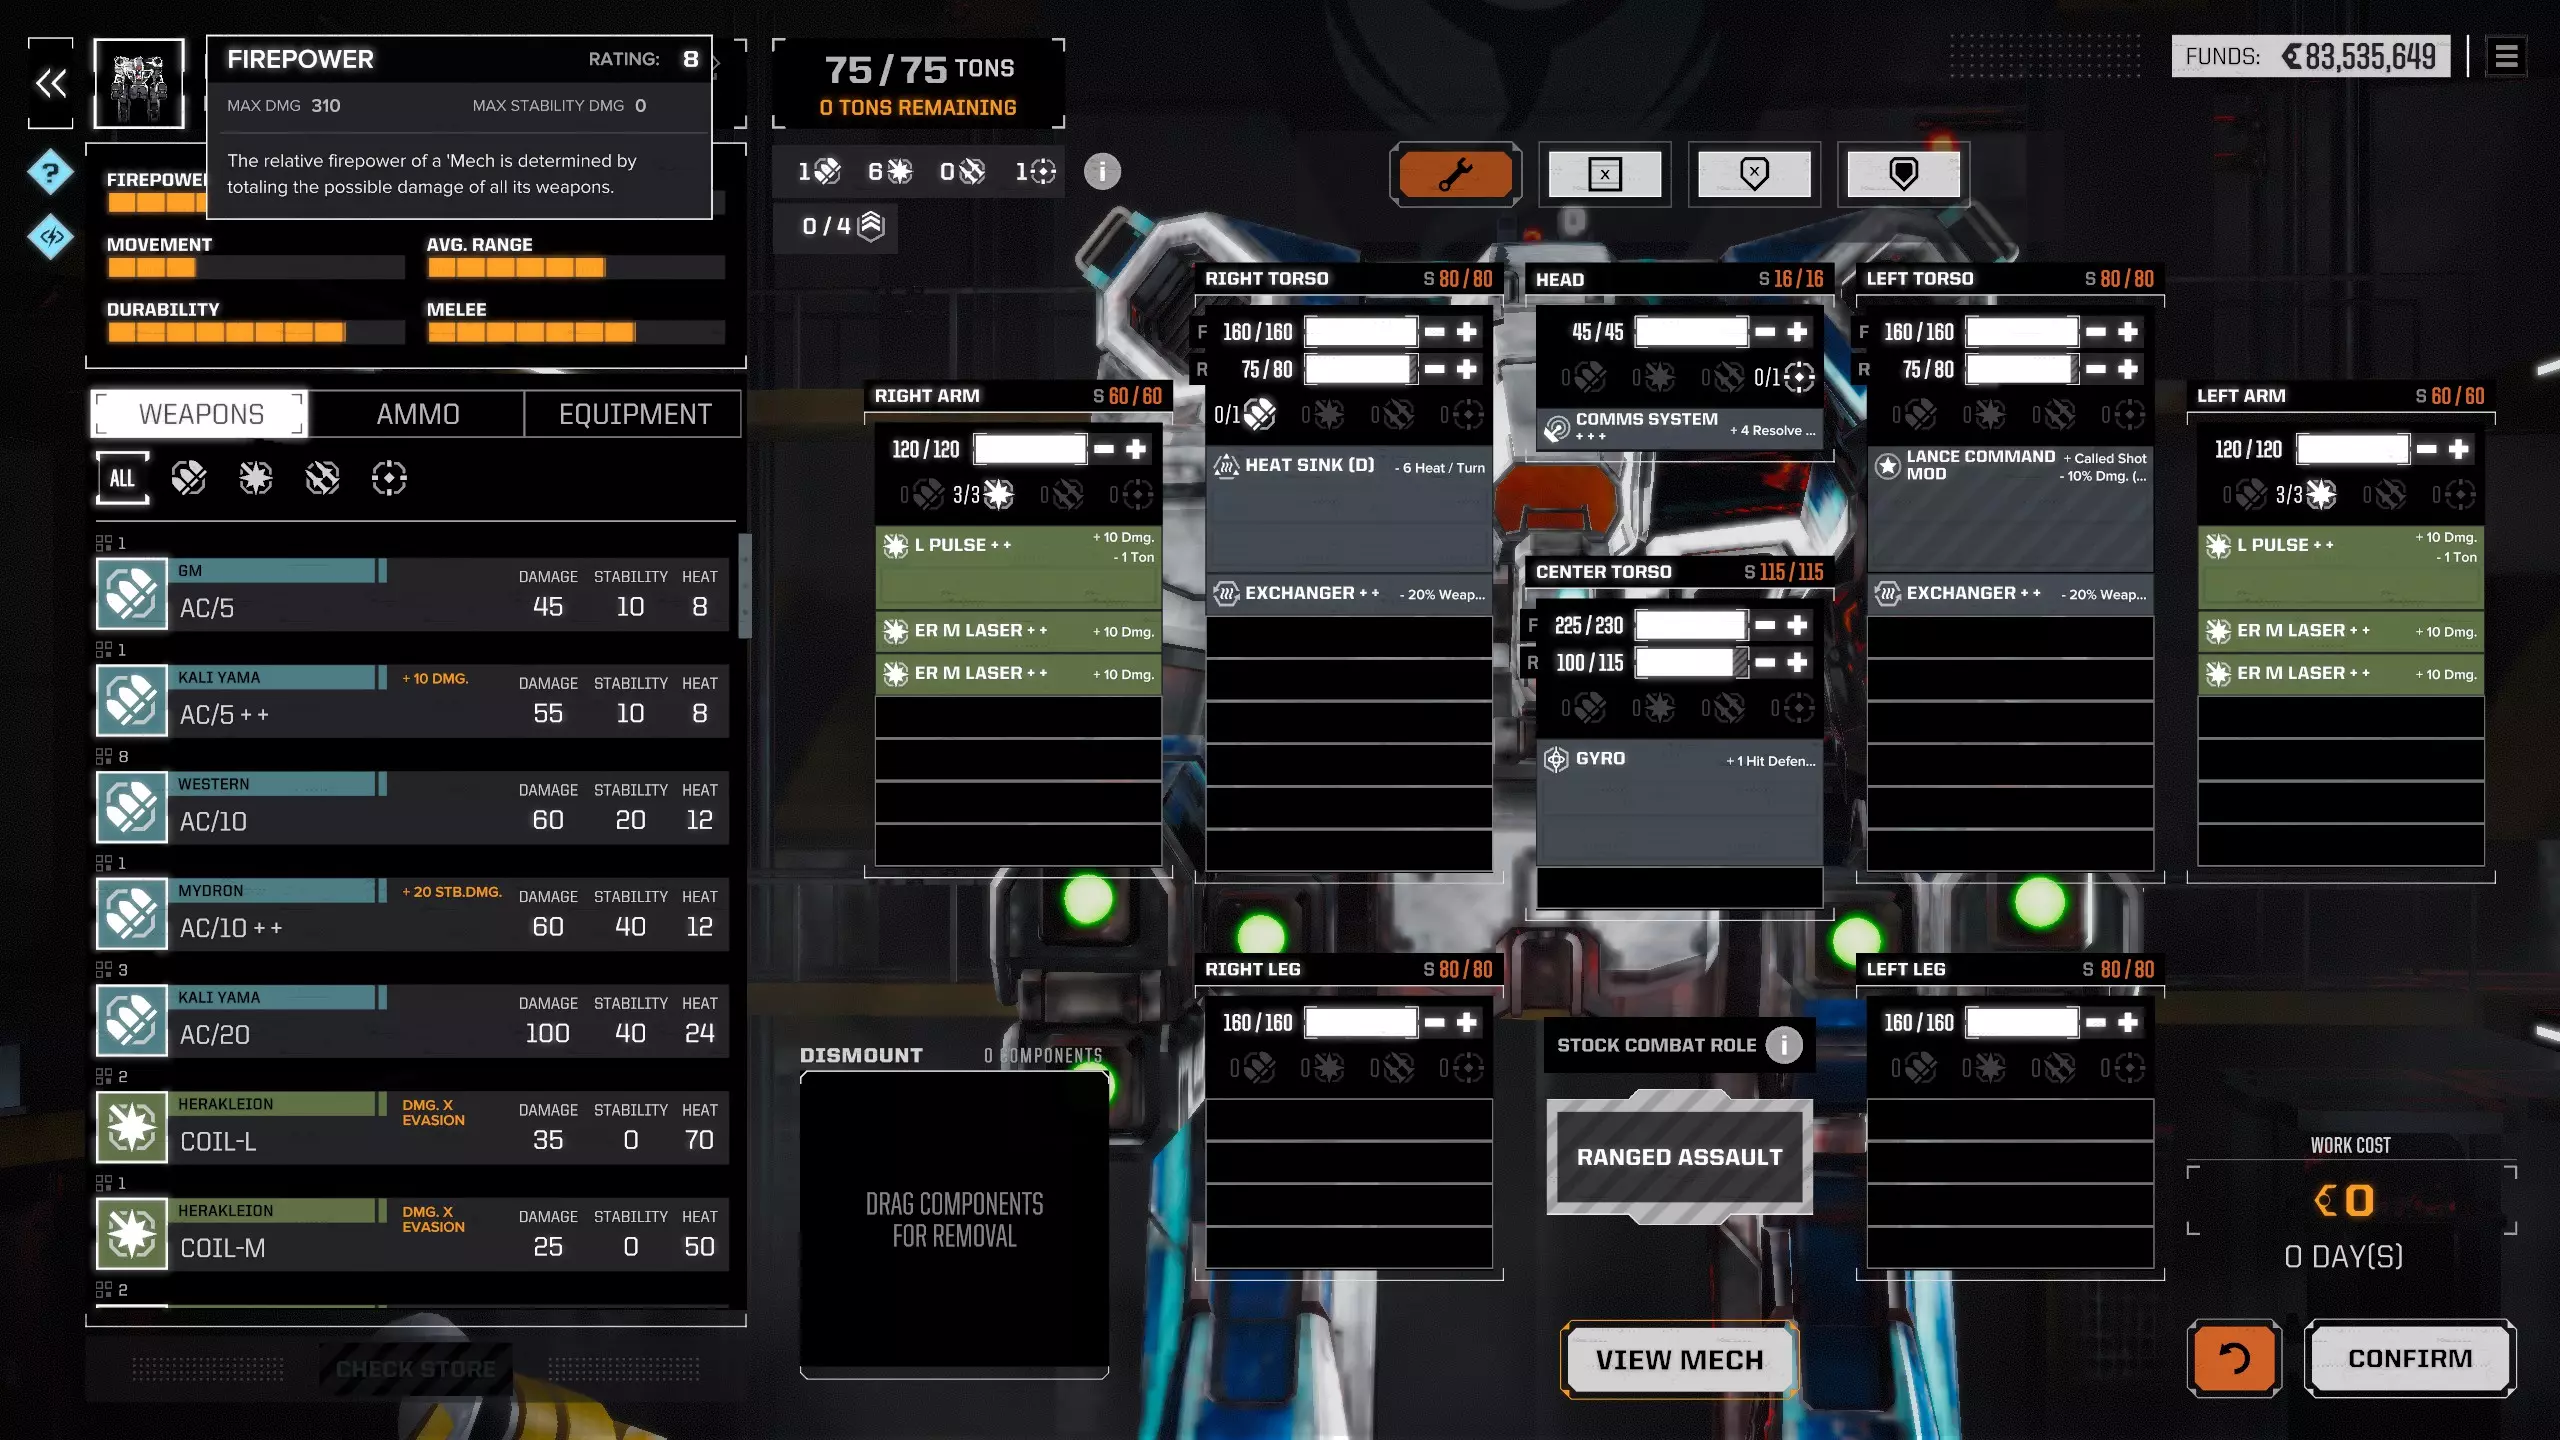
掠夺者2R放弃了3R型号的三联UAC2“奶酪制造机”配置,转而成为一个更适合能量武器的平台——尤其是ER激光。因此,它通常拥有更远的集火射程,并且对抗带有伤害减免(DR)的敌人时效果更佳。该机型获取难度相对较高,最简单的获取途径是黑市。 进阶掠夺者2R配置 热量 装甲 爆头率 备注 UAC2++,6x ER激光++,跳跃 jets 102/90(-12)1400 79%/78% 这台机甲是进阶掠夺者战术的入门机型。尽管与标准掠夺者3R相比,它的射程和爆头率有所降低,但两者仍足以保证其作战效能,并且还具备更出色的热量管理和装甲。需要特别指出的是,这种配置对抗拥有20%伤害减免的敌人时非常有效。SPPC劫掠者2R配置 热量 装甲 爆头率 备注2x SPPC++,4x ERMLaser++96/66(-30)140080%/64%UAC2++,SPPC++,5x ERMLaser++114/84(-30)140082%/72% 这种先进劫掠者的变体使用SPPC来补充ERMLaser。这将使爆头率提高几个百分点,但代价是热量增加且失去跳跃喷射。值得注意的是,SPPC会降低敌人的命中率并造成大量扩散伤害,这两者在尝试机甲外科手术(精准打击)时都有帮助。 LPulse劫掠者2R配置 热量 装甲 爆头率 备注2x LPulse++,4x ERMLaser++89/66(-23)140076%/67%450射程时为57%3x LPulse++,跳跃喷射90/78(-12)140072%/28%4x LPulse++96/60(-36)116082%/43% 这种先进劫掠者的变体使用LPulse从MLaser射程之外攻击敌人。它针对中距离效率进行了优化,在360至450距离范围内表现优于高级型2R,在270至360距离范围内表现优于标准型3R。 这种方案的一个更谨慎变体增加了跳跃喷射器,改进了热量管理,同时将ER激光炮替换为多一门的脉冲激光炮。 这种方案的一个更极端变体牺牲了装甲和热量管理,将剩余的ER激光炮替换为多两门的脉冲激光炮,以在450距离范围内获得极致火力。狙击型劫掠者2R配置 热量 装甲 爆头率 备注 高斯++,6x ERMLaser++,跳跃喷射器 100/60(-40) 1160 79%/79% 突破射击 ERPPC++,SPPC++,4x ERMLaser++,跳跃喷射器 102/60(-42) 1160 79%/65% 突破射击 ERPPC++,5x ERMLaser++,跳跃喷射器 92/90(-2) 1160 72%/68% 突破射击 这些劫掠者变体搭载了一门大型远程武器,以实现突破射击的远程优化。用高斯炮替换UAC2后,在保持近距离相同爆头能力的同时,仍能使用突破射击。但这需要以大幅降低装甲和热量管理为代价。 ERPPC变体比高斯炮的射程略长,并且可以全天候狙击而无需担心弹药问题。通过用一门SPPC替换第二门ERMLaser,它可以保持相同的爆头能力,或者将节省下来的吨位分配给热量管理或装甲。需要注意的是,良好的热量管理非常重要,因为拥有【突破射击】技能的机甲战士无法同时拥有【冷却液排放】技能。其他射击游戏
Marauders are not the only mechs that can generate headshots. Fire enough weapons and RNG eventually works in your favor. Some mechs also have quirks that can convert a 2-hit weapon to a 1-hit weapon, further improving the chance of scoring a headshot. Many of these mechs have advantages over a Marauder in areas such as speed, firepower, or unusual lance bonuses that make them worth bringing. Phoenix Hawk 1BConfiguration Heat Armor Headshot Notes2x MPulse++, 3x MLaser++, 3x ERSLaser++, Jump Jets78 / 72 (-6)92045% / 45%53% with TAG, 390 damage The Phoenix Hawk 1B brings the best headshots for the tonnage. Its vectored thrust kit turns MPulse++ and ERMLaser++ into 1-hit headshot weapons against a tagged enemy. Its mobility allows it to make good use of short range weapons and is great at backstabbing enemies when you don’t feel like taking a chance on the headshot. Even though it’s not a Marauder, its mobility, versatility, and firepower makes the Phoenix Hawk a great wildcard to fill the fourth spot in a headshot lance. Warhammer 7AConfiguration Heat Armor Headshot Notes7x ERMLaser++, 2x SRM2+++, 2x ERSLaser, Jump Jets107 / 90 (-17)132063% / 53%80% with TAG, 506 damage Optimized capacitors turn the ERMLaser++ on a Warhammer 7A into a 1-hit headshot weapon against a tagged enemy. Armed with a mix of 7 ERMLaser, 2 ERSLaser, and 2 SRM2, this mech is a beast at close range and its poor headshot accuracy ensures that arms and torsos will take plenty of damage on a flanking headshot. If things aren’t working out so well, it also has great damage output and it has enough damage output to kill an Atlas with a CT called shot. Cyclops 1ZConfiguration Heat Armor Headshot Notes2x ERMLaser++, 4x MLaser++, 2x SRM2+++96 / 81 (-15)168031% / 26%2x ERMLaser++, 4x MLaser++UAC2++96 / 72 (-24)168042% / 28%5x MLaser++, 1x SPPC++86 / 72 (-14)160026% / 26% The Cyclops Z is mainly brought for the initiative bonus but it sometimes finds itself contributing to headshots. Armed mainly with 2-hit kill weapons like MLasers, SRM2s, and a UAC2, it is unlikely to kill an undamaged opponent. However, if the enemy has already been hit, the Cyclops can bring enough shots to finish the job. It’s also fairly messy and pairs well with assault mechs making it a good choice for the aspiring mech surgeon. SPPC++ is another interesting choice for this role since it will complete a kill if it follows up a hit by an ERMLaser++ - for example, if you use it in a lance with Advanced Marauders. AnnihilatorConfiguration Heat Armor Headshot Notes5x UAC5++64 / 66 (+2)188043% / 43%79% with TAG, 520 damage5x UAC2++, 2x ERPPC++83 / 78 (-5)188059% / 52%560 damage Ballistic siege compensators turn the 5 UAC5s on an Annihilator into 1-hit weapons against a tagged enemy generating an incredible 10 chances to get a 1-shot kill. This mech is extraordinarily messy and will splash damage across the entire target facing. It is slow so the best way to set up a flank is by using a scout to provoke the enemy into turning away from the Annihilator. A less radical build relying on UAC2++ and ERPPC++ has longer range and is better in lances without TAG or shutdown. Atlas IIConfiguration Heat Armor Headshot Notes4x ERPPC++, Gauss++94 / 84 (-20)184063% / 30%3x ERPPC++, 2x Gauss++116 / 90 (-26)184063% / 38%4x ERPPC++, 2x UAC2++96 / 81 (-15)184060% / 35%4x LPulse++, 2x Gauss++130 / 78 (-52)184070% / 43% An Atlas II can be anything it wants to be. If it can be a scout, it can also be a Marauder doing headshots while masquerading as an Awesome. These builds serve as proof that if you throw enough tonnage at a problem, you’ll get something out of it. Support Mechs
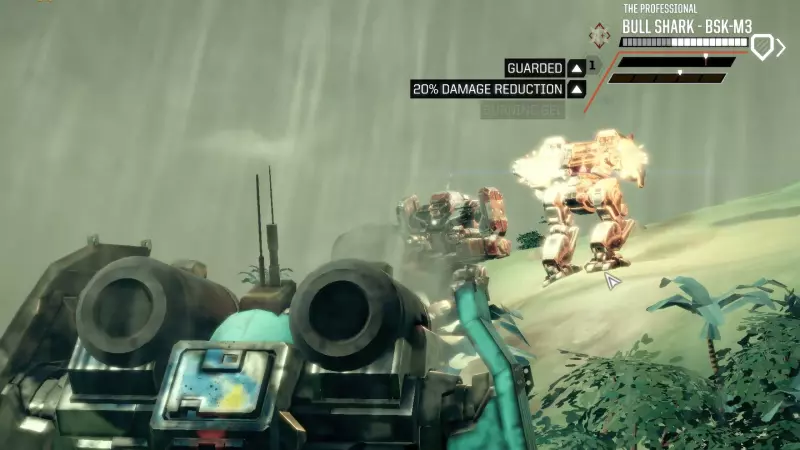
Support mechs help the rest of the lance by providing abilities that do not substantially contribute to damage. Since headshots are powerful but usually restricted by PS, there is room in the lance for 1 or 2 support mechs that increase the effectiveness of the shooters. Inferno SupportsConfiguration Heat Armor Shutdown NotesGriffin 2N, 4x Inferno++, 2x Flamer++, 2x TAG++, 1x TTS+++ (missile), Jump Jets22 / 60 (-38)108095% vs 3EC95% vs 3EC w/o flamersJagermech 6A, 4x Inferno++, 2x Flamer++, 2x TAG++, 3x TTS+++ (missile), Jump Jets22 / 30 (-8)128095% vs 6EC95% vs 5EC w/o FlamersCatapult 4C, 4x Inferno++, 2x Flamer++, 1x TAG++, 3x TTS+++ (missile), 1x TTS+++ (energy), Jump Jets17 / 30 (-13)128095% vs 6EC95% vs 4EC w/o FlamersBattlemaster 1S, 5x, Inferno++, 2x TAG++, 2x TTS+++ (missile), Jump Jets25 / 30 (-5)156095% vs 4EC Inferno supports cause the shutdown condition by inflicting heat damage on enemy mechs. They do this by using the inferno weapon which is a special SRM launcher that fits in a missile hardpoint and fires 2 shots each of which deals heat damage. Normal infernos deal 5 heat damage per hit but what we really want are Inferno++ which deal 15 heat damage per hit. Another weapon that helps with heat damage is the flamer - in this case a Flamer++ which also deals 15 heat damage but fits in a support hardpoint and has a shorter range. In order to cause a shutdown, an inferno support needs to deal at least 100 heat damage in a single alpha strike. Any less and the opponent will stay active. It is critically important for an inferno support mech to hit with its weapons - at least 7 hits from either Inferno++ or Flamer++. In order to successfully shutdown even with random misses, redundant weapons and TTS are very much worth it. Any inferno mech worth the name with a 10-gunnery mechwarrior will shut down a 0-evasion enemy over 99% of the time, therefore the metric I use is how much evasion an enemy can have and still get shut down 95% of the time. In addition, an inferno mech is a good carrier for TAG since that will also debuff the enemy, allowing the shooters to get better shots. Finally, infernos are close-range weapons and inferno mechs benefit greatly from jump jets to get around the melee and to rapidly change facing. The Jagermech 6A is the standard for inferno mechs. It has plenty of space and can carry up to 3 TTS in a standard configuration giving it the best shutdown performance against evasive enemies. The Catapult 4C is similar to the Jagermech but has a slight disadvantage because it can only carry a single TAG in the CT which also prevents it from equipping a Gyro. The Griffin 2N is notable for its increased initiative and speed. This inferno mech can quickly zip around the battlefield and makes up for its single TTS by being able to employ its Flamers more often. The Battlemaster 1S is a difficult mech to find but it is a beast of an inferno mech with its massive armor and ability to stay further away with its 5 infernos. Its main disadvantage is low initiative which is limiting because you typically want your inferno support to act before the shooters and on a count where the enemy cannot immediately restart. LRM Knockdown SupportsConfiguration Heat Armor Stability Dmg NotesBull Shark, 80x LRM+++57 / 48 (-9)1240320Cyclops HQ, 40x LRM+++40 / 30 (-10)960160+1 Initiative, +1 acc (all), -10 dmg (lance) I am not an expert on stability damage so instead, I'll link to a post by someone who is: Stability and You: A Handy Guide to Using Stability for Winning Battles and getting Salvage by darkfireslide from r/Battletechgame The key takeaway is that knockdown is a 2-step process and generally requires two mechs (or one mech acting consecutively). First, one mech has to destabilize the target by dealing enough damage to overcome its unsteady threshold. Once the target is unsteady, it can be knocked down if another mech deals enough damage to exceed the knockdown threshold. Here is a table of the thresholds from the post I linked above: Weight1-3 Unsteady4-8 Unsteady9-10 UnsteadyKnockdownLight416191100Medium5379105130Heavy6597129160Assault82123162200 The Bull Shark M3 is one of the best missile boats in the game capable of carrying 80 tubes of LRMs. That is enough to destabilize anything except for entrenched assault mechs with elite pilots. Like most missile boats, it sacrifices armor for firepower and should be kept away from the front lines. The Cyclops HQ can also be configured to bring a decent amount of missiles and also brings the usual initiative bonus as well as the accuracy and defensive bonuses from the Adv Command Module. This variant has very low armor and should be kept away from the front lines. TAG SupportsConfiguration Heat Armor Pilot Hit NotesMarauder 3D, 5x TAG, 2x MG++, Mortar, ECM, Jump Jets25 / 36 (+11)1400 88%Marauder 3R, 4x TAG, 2x MG++, LB2X++, Mortar, Jump Jets22 / 39 (+11)1400 82%Cyclops HQ, 4x TAG, 2x NARC20 / 30 (+10)160070%+1 Initiative, +1 acc (all), -10 dmg (lance) Mech surgery is the concept of maximizing salvage by destroying as many components as possible before destroying the head or killing the mechwarrior. The purpose of a TAG support mech is to score pilot hits with a 1-damage weapon (TAG or NARC) while dealing the least amount of collateral damage to the rest of the target. The Marauder 3D has the best chance to score a pilot hit with its 5 TAGs. It also carries MGs to help destroy components, a Mortar to soften up enemies, and an ECM because it has nothing better to do with the leftover tonnage. The Marauder 3R has slightly less chance to score a pilot hit but exchanges the ECM for an LB2X for additional component damage. The Cyclops HQ is less efficient than either Marauder but brings the usual initiative bonus as well as the accuracy and defensive bonuses from the Adv Command Module. There are other possibilities out there. For example, the Rifleman 4D can bring 8 TAGs for an impressive 80% pilot hit rate. Acknowledgements @revenantsknight for the excellent Kerensky Career Guide. @traedog93 for gathering all the game data into One Spreadsheet to Rule Them All @danko9696 for helping to correct the multi-hit table, providing a lot of build suggestions, and a different perspective on playing headshots. darkfireslide from r/Battletechgame for Stability and You: A Handy Guide to Using Stability for Winning Battles and getting Salvage HBS for making game with far more depth than I could have expected.