换一换
换一换 


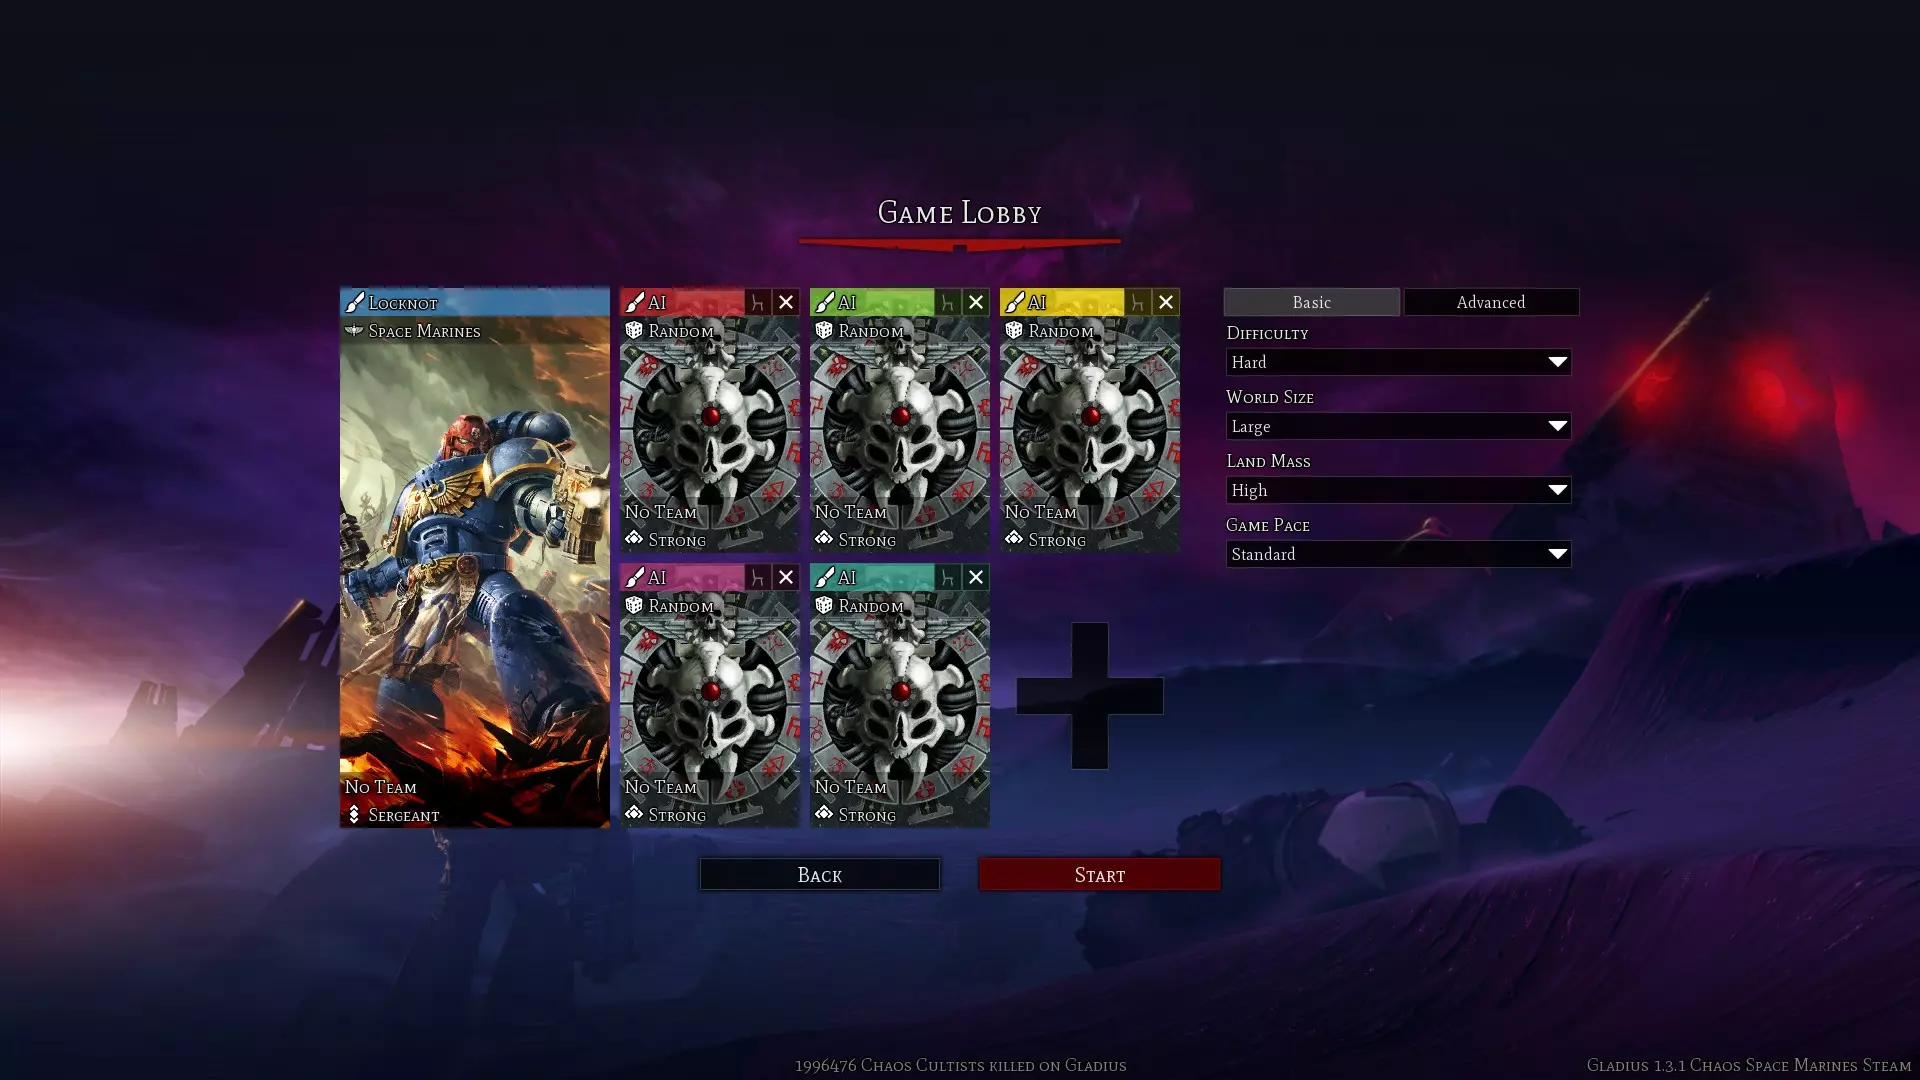
This is a guide for playing the T'au faction in Warhammer 40,000 Gladius - Relics of War. It will discuss how to grow the T'au economy efficiently at any stages of the game, some army compositions you can go for at different stages of the game, what technologies to prioritize and, lastly, some strategies on how to use various units and how to equip your heroes. ***Updated version*** After playing and watching more PvP games and messing around with some build orders, I have come up with a more optimized build that I am sharing here. I am pleased to mention that this new build still relies heavily on rushing heroes ! so it fits right in with the original idea behind this guide. Note that this time it includes vehicles since Hammerhead tanks are basically mandatory to survive some PvP matchups. It is the first T'au unit you can have with a range of 3 and the first one with good armor penetration and damage (Piranha don't count, because they have great armor penetration, but very weak damage). I am also going to add sections discussing other strategies like going into Food shortage, capping cities at 7-8 population in PvP, how to accelerate population growth in the late game and the importance of leveraging overproduction. Introduction This is a guide for playing the T'au faction in Warhammer 40,000 Gladius - Relics of War. It will discuss how to grow the T'au economy efficiently at any stages of the game, some army compositions you can go for at different stages of the game, what technologies to prioritize and, lastly, some strategies on how to use various units and how to equip your heroes. I have played mostly against AI, but I have also given a try to PvP recently. The build order presented in this guide will be focusing on developing a strong economy as quickly as possible while maintaining an army strong enough to allow you to survive. I encourage you to try the advice in here and tweak them to match your own playstyle. Faction Overview The T'au is a young faction in the Warhammer 40K universe. Technologically, they are reasonably advanced and progressing quickly. Their empire is small, but expanding. They have a strong preference for ranged combat and use drones and battlesuits for warfare. This is well represented in Warhammer 40,000 Gladius - Relics of War. In the game, the faction overview for T'au describes the following traits for them: Utopia: Each new type of building (with a population assigned) in a city increases loyalty (by 1, 2 with the tier 10 “In Diversity, Unity” technology), each duplicate building (with a population assigned) decreases loyalty (by 1). This is perhaps the most unique feature of the T'au faction and dramatically affects how T'au grow their economy. I will cover this topic in great detail later in the guide. I have added clarifications to the Utopia rule in ( ) since it is such an important mechanic. Convert Auxiliary: Convert T’au auxiliaries to your side. This is a powerful mechanic that allows you to convert Kroot Hounds and Vespid Stingwings to your side. It can be very useful in the early game, speeding up exploration and potentially saving your starting infantry if it runs into too many enemies during exploration. The Influence cost is very reasonable making it a great ability. For The Greater Good: Use your diplomatic influence to crush enemy unit morale. I find the Influence cost of this ability to be high for what it does. I rarely use it, but it can be situationally useful. The Influence cost is much lower when used on damaged units. So it can be used on a unit at low life to provide you that little bit of damage to finish off a target that is just out of reach of an attack. Subvert City: Undermine the power and authority of enemy cities to reduce their loyalty. I find the Influence cost of this ability to be too high for what it does. I almost never use it. Tidewall Shieldline: Cities and outposts reflect incoming ranged damage. Great for defense ! Just having troops standing in your city will grant them this buff ! Supporting Fire: Increased overwatch damage against enemy units next to other friendly units. Consider not firing with some units to have higher overwatch damage ? This can help against melee units since they have to move next to friendly units. A good PvP opponent will be able to really mitigate overwatch damage taken though. Markerlight: Mark enemy units for a more damaging attack. Negates Ranged Damage Reduction and grants +1 accuracy, but consumes an action. Its main use is to make units in cover, like forest or ruins, vulnerable. It can also be useful when a weak unit buffs the damage of a stronger unit. Bonding Knife Ritual: Sacrifice individual gain to restore unit morale for the betterment of the Empire as a whole. A fallback ability that can be used on infantry to restore morale before attacking. The cooldown is long, so it can't be abused, but it can get you out of a dicey situation. Losing morale is the first step to losing your army and this ability can really help to secure a kill that will help restore overall morale without needing to trigger this ability on all your infantry at once. Drones: Miracles of T’au technology that provide offensive, defensive and tactical support. There are a lot of them, with lots of abilities, but Builder Drones and Gun Drones are certainly the most important. Trade Goods: Purchase resources and even proselytise population. Trade Goods technologies are useful at specific times in the game. It costs twice the amount of Influence of what you trade for, so you should try to straight up make the correct resource buildings to produce what you need rather than pay this premium cost for it. Wisdom Shared can speed up your early game by 2-3 turns. Many Mouths also has its use later in the midgame to overextend production of Broadside Battlesuits to seal the game in your favor. A Shield For All can help if your spawn location has poor Ore. Proselytise Population can help you grow your cities abnormally fast in combination with an extra Foundry building, or catch up if your population did not keep up with building construction. Support Systems: Install support systems on battlesuits. Each battlesuit only has a limited number of support system slots. These are more late game upgrades to customize your battlesuits army to adapt to different situations. These upgrades cost Influence, but are worth it if the unit survives with them for a while. Map Settings & Game Overview There are many map settings that you can play with to alter the pace of the game, but also how early in your technological development you will encounter enemy factions. This will affect how early you will need troops to stand your ground against an enemy faction, which will affect how early you should introduce troop production in your build order. About Gladius economy growth in general Before diving into the T'au faction economy, let's cover the basics of Gladius economy first. In the early game, all factions, except Space Marines, desperately need to found additional cities to grow their economy faster. Seizing more territory is also crucial to grow your economy by capturing encampments and for map control. Each extra city applies a -6 Loyalty penalty to all cities in your faction empire. At the same time, your cities are growing and each additional population applies -1 Loyalty. In Gladius, the early game is a struggle to develop your empire and economy while maintaining enough Loyalty in your cities. Every negative Loyalty point reduces yields and production in a city by 2% (caped at 50% penalty at -25 Loyalty). Cities with low Loyalty have laughable yields when accounting for their buildings' upkeeps and construct buildings slower, which means that it will take them more time just to construct the necessary buildings to restore their Loyalty to 0 before they can start developing at a normal pace again. Ideally, you should prepare established cities in advance in your empire to take the Loyalty hit coming with the foundation of a new city. Note that every positive point of Loyalty increases yields and production in a city by 1% (there is no cap !). I won't delve into the maths behind this, but as a rule of thumb, once a city reaches a raw production of 50 (about 5 resources production building + city center), you should try to maintain its Loyalty between -5 and 0 at all times before adding more resource production buildings. Once a city reaches a raw production of 100 (15 resources production building + city center), you should start to increase Loyalty above 0 proportionally to the raw production in excess of 100. To keep it very simple, this means that, once a city reaches that point, every time you add a production or population building, you also add a Loyalty building in that large city. This makes it easier to keep track of. Aside from city economy growth, capturing and holding outposts as quickly and as long as possible is another crucial aspect of building a strong economy in this game. For this reason, it can be better to prioritize getting troops to capture outposts than to actually make more resource production buildings (plus, you need an army to survive and win anyway). Lastly, building heroes and equipping them with Tantalising Icon and Scrolls of Magnus should also be considered a way to grow your overall economy. It really should be considered as additional income outside of your cities. It takes no population and gets online the turn after you buy the item. It is limited by the number of heroes you trained and you can't stack identical items on the same hero, but the first Tantalising Icon you get on your first hero will assist you in getting the next one earlier at least. This can provide an appreciable amount of extra Influence and Research in the midgame without stressing or compromising your cities growth and unit production. Once you grasp how to leverage this concept, you can “be” a Necron with any faction and buy some economy growth with your Influence ! I will discuss this subject further in the build order. Leveraging overproduction All resources generated in excess are stored in your bank at the start of each turn. Upkeeps and costs are paid from there as well. You'll notice that Production does not show up in your resource bank. Each building group in each of your cities has its own “hidden” Production bank. These Production banks stay partially full if you queue another element on the turn you finish something in your city, but if you skip a turn using a certain type of building with production, it resets its associated bank to 0. For example, when you found your first city in a game at Fast speed, your Foundry makes a little over 6 Production due to high Loyalty. Claiming a tile costs 9 Production and making a Research building costs 18 Production. If you continuously cue up action to build in that city, claiming your first tile will take you 2 turns and leave you with 3 Production in “hidden” bank. Making the Research building will take 3 turns and still leave you with 3 Production in the “hidden” bank. Finally, claiming a second tile will take you only 1 turn because of the 3 Production you already have in “hidden” bank. If your city sleeps a turn between finishing the Research building and claiming the second tile, its bank resets to 0 and on the turn after sleeping, your city would need 2 turns to claim the second city tile. The message to take away here is that you should try to produce stuff continuously in your cities. +10% Production tiles and operating at positive or negative Loyalty will also have an impact and either can shave or add a turn to producing buildings or units in your cities every now and then. (Avoiding) crashing your economy As I said, Gladius offers a struggle between developing a strong economy and maintaining a large army and cities with growing demands. The mechanics that can push your economy into a crashing death spiral are simple and brilliantly designed. So let's go over them to actually avoid this kind of scenario. The three problems that your city can encounter are: population shortage, resource shortage and low loyalty. These problems stack their penalty multiplicatively, so whenever one of them begins to manifest itself, it should be a priority to address it before things completely degenerate as shown in the following screenshot.
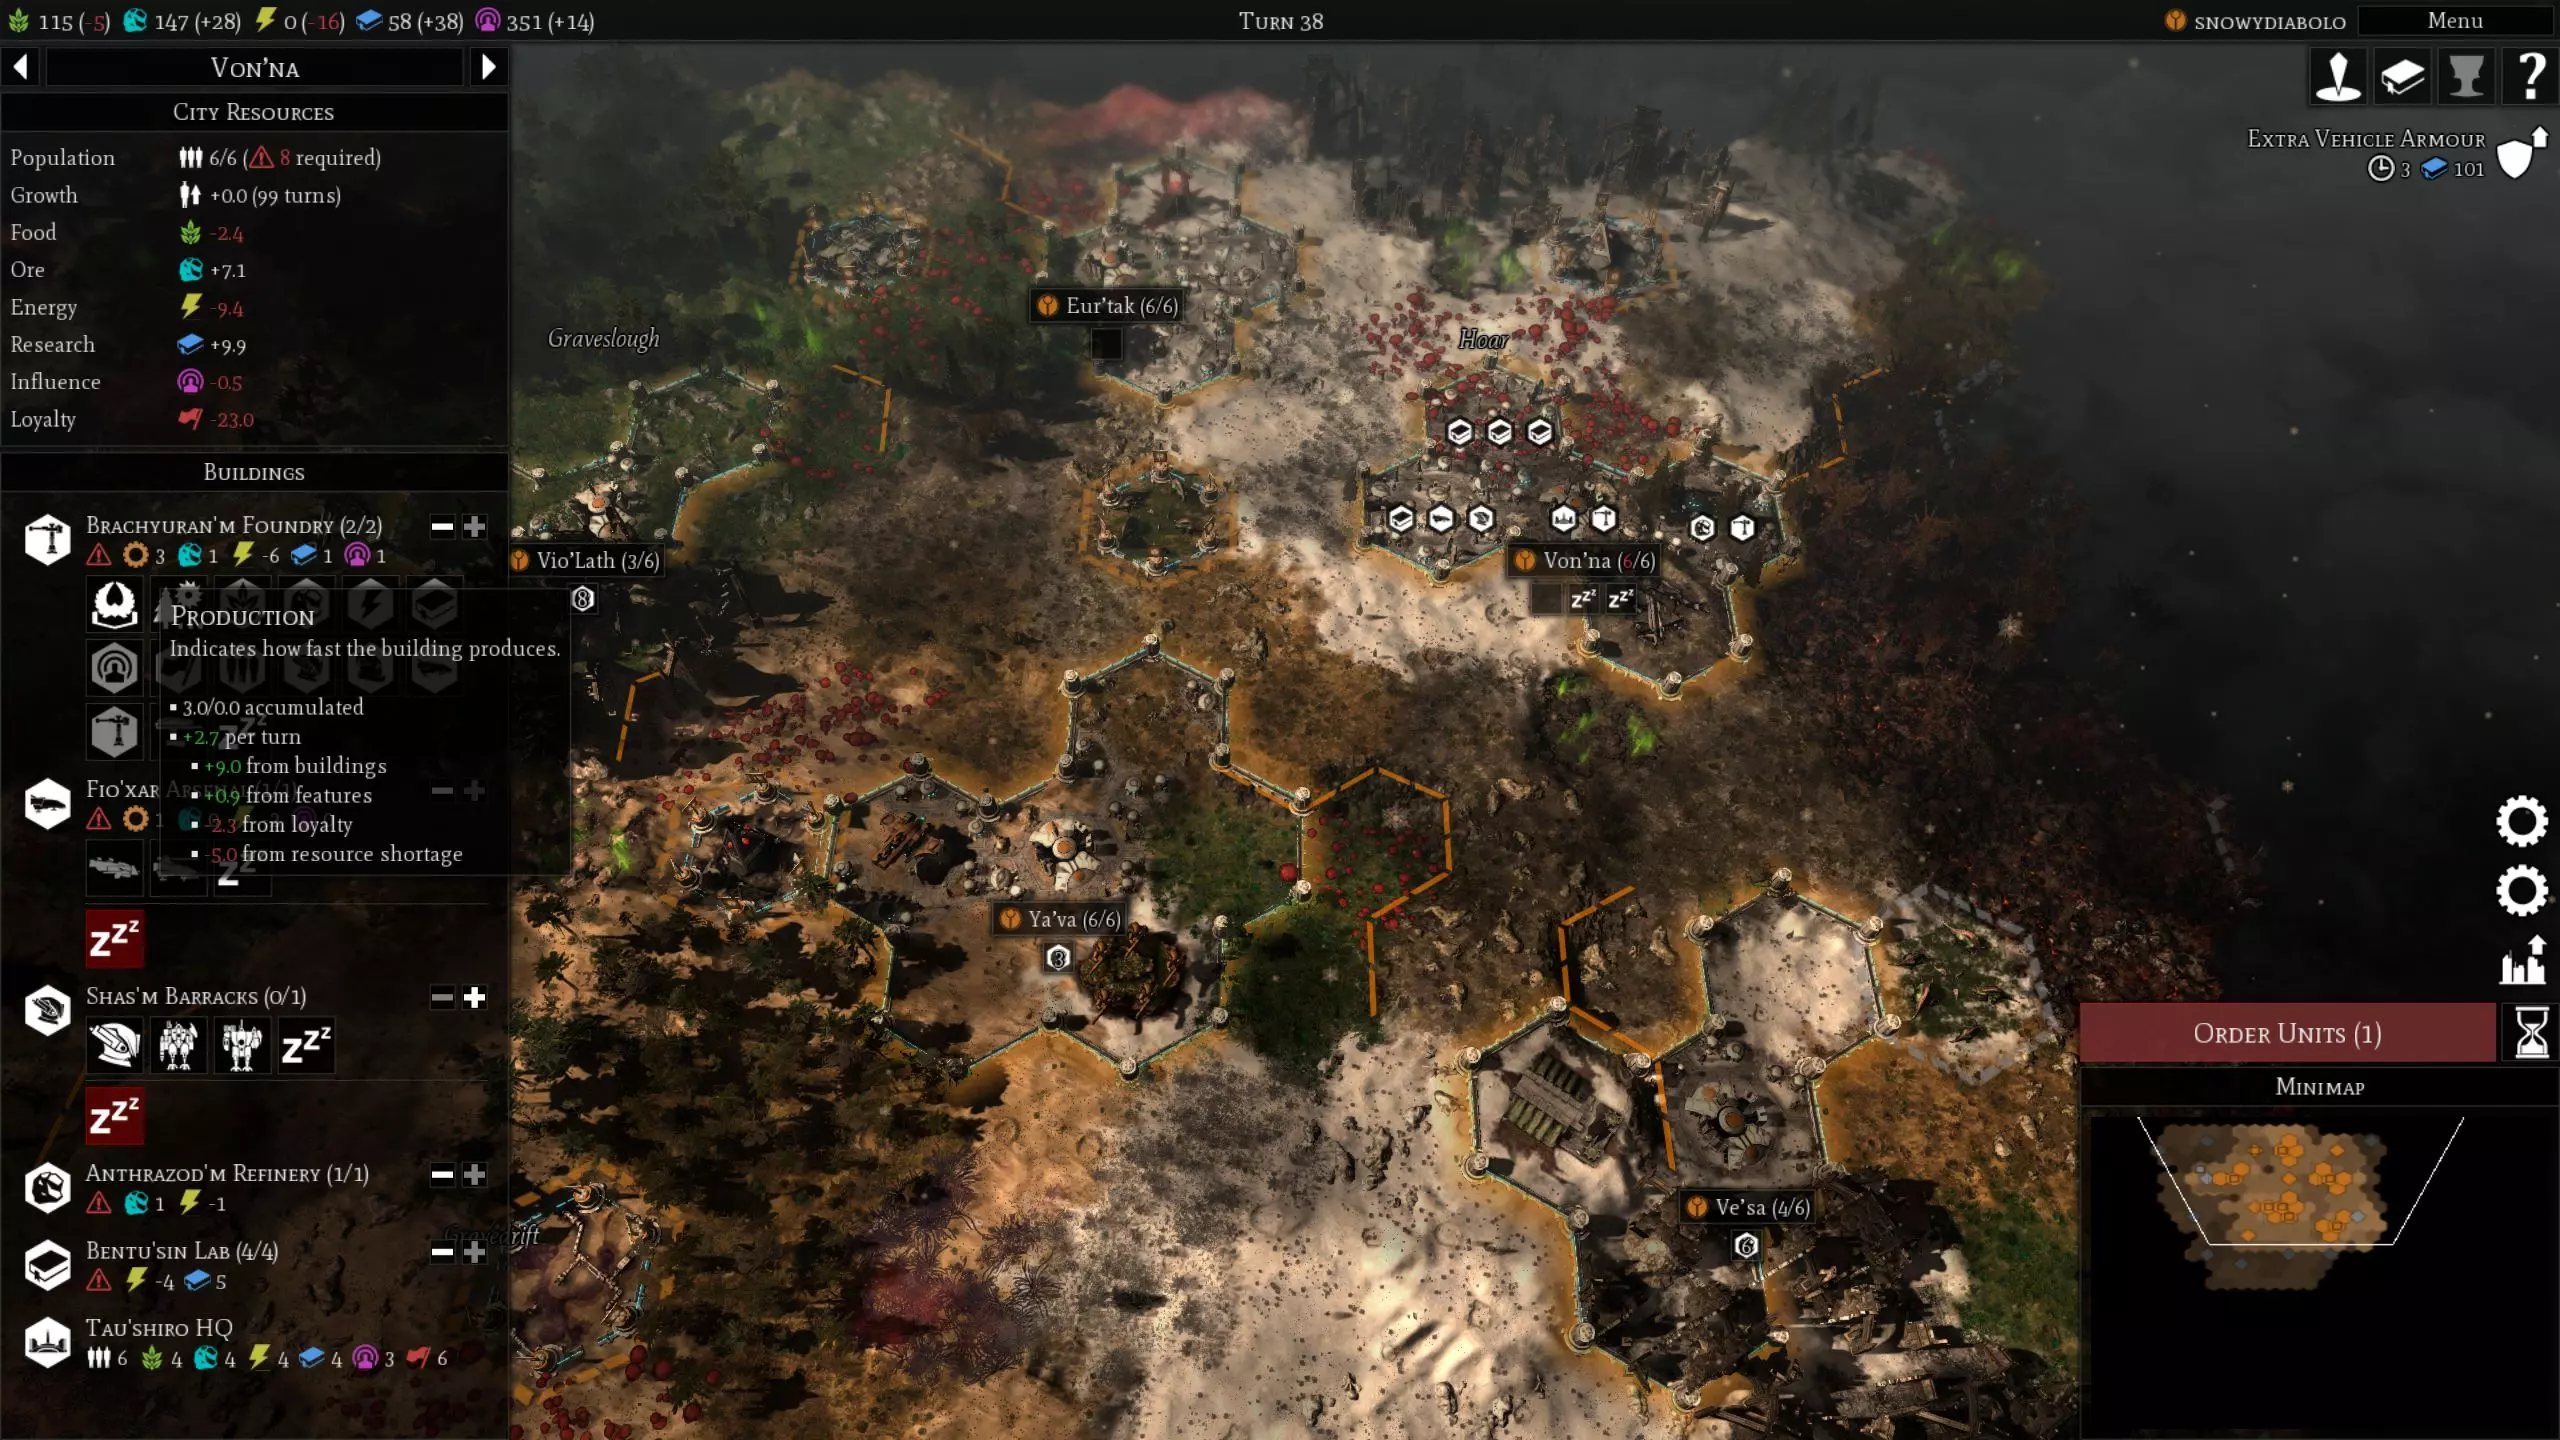
Try to avoid the Economic Death Spiral in Gladius. The first problem is population shortage. It is simple, if you have 8 buildings that require a population in a city, but you only have 6 population, then the 8 buildings in your city will consume their maximum upkeep and produce only 6/8 = 75% of what they should be producing under normal circumstances. In the screenshot, the two Brachyuran'm Foundry on +10% tiles should be producing +12 production from building and +1.2 production from the +10%, but they make only +9 production and +0.9 production due to the population shortage that lowers my production to 75% of what it should because I have 6 population available in that city that requires 8 population. Matching or exceeding the required population in the city removes the population shortage penalty and lets your buildings produce at 100% capacity, but having too much idle population costs you loyalty, so you should try to always keep your population close to the amount required in your cities. Note that your city headquarter and Habitat module do not require a population assigned to them. The second problem is resource shortage (Food, Ore or Energy). Whenever one of your resource banks hits 0 and you have negative upkeep, you start entering a resource shortage. On the turn after this happens, every element in the city that consumes the resource in shortage will suffer a -10% penalty. If the shortage is not resolved on the next turn, the penalty becomes -20% on the next turn. Then -30%, -40% and finally -50%. If your bank is at 0 and you have one turn with a positive upkeep, the penalty will be completely lifted on the next turn. In the screenshot, the two Brachyuran'm Foundry on +10% tiles have +9.9 production after applying the population shortage penalty. Since this T'au army suffers from an Energy shortage, a further 50% penalty is applied on that 9.9 production, causing that city to lose another -5 production due to the Energy shortage, leaving only 4.9 production. That is very bad, especially since the penalty applies to everything the Brachyuran'm Foundry produces and they still require a full upkeep of Energy to remain active. This T'au army also has a negative upkeep of Food, but its Food bank is not at 0, so it is not suffering from a Food shortage, yet. Energy shortage affects almost every building in a city except the headquarter and Energy buildings (those consume Ore). It is a nasty shortage because it slows down all production. It also affects the output of Habitat and Loyalty buildings which can really feed the death spiral in large cities. Ore shortage only affects Energy buildings, but if you are in an Ore shortage, you can't build anything, everything costs Ore. Notice how an unchecked shortage in Ore or Energy can eventually lead to a shortage in both resources... The Food shortage is perhaps the least problematic of the three. It will apply up to a 50% penalty on population growth in your cities and will prevent you from building new units that require Food, but that is it. Note that Necrons use Ore as Food and Space Marines use Requisition as Food/Ore. This can make resource shortage particularly violent for these factions compared to Food based factions. But we are not done yet, things can still get worse! Like I already said, every negative Loyalty point reduces yields and production in a city by 2% (capped at 50% penalty at -25 Loyalty). In the screenshot, the two Brachyuran'm Foundry on +10% tiles have +4.9 production after applying the population shortage penalty and the Energy resource shortage penalty. But this T'au army made so many cities without keeping their Loyalty under check that the city containing these two buildings is at -23 Loyalty. A 46% penalty is applied on top of other penalties on every Food, Ore, Energy, Research, Influence and Production that this city makes. This time, this penalty also affects the city headquarter that had been spared so far from the two other kinds of penalties. Fortunately, the Loyalty penalty does not apply to buildings that increase population limit or loyalty itself. In the example, the two Brachyuran'm Foundry production is cut by 46% from +4.9 production down to +2.7 production when you finally apply the Loyalty penalty on those two buildings. And that's how two main production buildings on +10% tiles can reach a state in which they produce only half of what a single production building would do on a vanilla tile. So, what should you do to avoid this to happen? Monitor the state of your economy every turn and react fast when it shows signs that something is going wrong. You must control (slow or speed up) population growth in your cities to match their construction pace. You must temporarily turn off buildings or even disband some units to avoid resource shortage. You must monitor your cities' loyalty to try to keep them close to 0, or at the very least, above -10 so that they produce at least 80% of what they should. With a good understanding of all these penalties and how they stack multiplicatively, you can better understand what building to prioritize at different stages of the game to keep your economy afloat and avoid the death spiral ! Controlling city population growth It is necessary to manage population growth in your cities for two reasons. First, you want to avoid population shortage at all costs. Second, you also want to avoid too much overpopulation since it will cost you extra Loyalty in your cities. The main parameter you can control to tune the population growth of your cities is to set how much free space they have in them. You receive +8/32 population if you have 5 or more free shelter space in your city, this growth rate becomes +7/32 if you have 4 free shelter space, +6/32 if you have 3 free shelter space, +5/32 if you have 2 free shelter space, +4/32 if you have 1 free shelter space, 0 if you are out of free shelter space. That is already a great tool you can use to speed up, slow down or stop population growth in your cities. On top of that, a Food shortage can also slow down population growth by up to 50%. So if you plan to play with a Food shortage by building units that do not consume Food or by using Many Mouths with T'au and you still want to grow your cities, make sure to always have 5 or more free shelter space in them to max out their population growth at +4/32 despite being in a Food shortage. The growth rate provided here is for normal speed. They get adjusted with game speed: x4 for Extremely Fast, x2 for Very Fast, x4/3 for Fast, x2/3 for Slow, x1/2 for Very Slow and x1/3 for Extremely Slow. T'au economy growth Now that the basics are covered, let’s dive into the subject of T'au economy. While browsing, I have seen many comments stating that T'au have a great early game with Utopia, but that they have trouble maintaining good Loyalty when cities become too large because of Utopia. It is time to break this myth and share how to avoid Loyalty problems at different stages of the game with T'au. T'au economy growth: The Good (early game) Utopia grants T'au a phenomenal Loyalty boost at a time at which you desperately need to settle additional cities. T'au can have up to 14 different buildings in their city. So as long as a city makes different buildings, its population Loyalty penalty is mostly canceled by Utopia in the early game. For this reason, T'au should aim for making one building of every kind in their cities during their early development. The City Center and Loyalty building provide T'au cities with an extra +12 spare Loyalty during the early game that can be put to good use by constructing two new cities as soon as possible. T'au has the unique ability compared to other factions to maintain three cities at 0 Loyalty early game with the construction of a single Loyalty building in each of these cities. Note that making Builder Drones slows down the development of the city making them. This can make T'au more vulnerable in the early game. Your first city should be the one making the two first Builder Drones you will require to build your second and third cities and support your army. By slowing down the development of your first city, you let your second and third city catch up to it and stall the development of your first city, which extends the period of time during which Utopia acts as a benefit for that city. T'au economy growth: The Bad (mid game) Once you built your three cities and they reached a population above 10, you will be confronted with the penalizing side of Utopia. As you add new copies of buildings already present in cities, the advantage provided by Utopia will rapidly fade away and eventually become a penalty to your economy’s growth in the late game. This will happen approximately during the mid game, but earlier in your first city. Note that once you built every relevant different buildings in a city, Utopia applies the same -1 penalty for any new building, no matter what it is or how many copies are present in your city, which means it is totally fine to start specializing your city at that stage (like you would do with any other faction). Stopping construction of new buildings and capping population in your cities or letting your Loyalty go down are not solutions I would advise employing to address the Utopia Loyalty problem, unless you are expecting to win the game soon. You have three other available options to maintain or increase Loyalty in your city. The first one is to keep constructing Loyalty buildings in all of your cities. This is usually what other factions have to do for long term growth. Every time a city grows by 6 population, it will require roughly one habitation module, one Loyalty building, one Food building and one Power building, just to sustain its growth, which leaves three population free (habitation modules do not require a population) for actually growing the city and your economy. Because of Utopia, T'au gets a worse deal using this approach since they will need two Loyalty buildings instead of one, to compensate for Utopia, which leaves only two population free for actually growing your city for every block of 6 population. This is really bad and should only be used to maintain Loyalty close to 0 in your cities during the mid game, while the other better options are not yet available. The second option to boost your Loyalty at the end of the mid game is to research the Tier 10 technology “In Diversity, Unity”. It is an absolute must if you get there and is usually the first technology I research when reaching Tier 10. This technology gives a very sudden boost to your economy and allows you to build one or two extra cities if you expect the game to keep going for a while. This second option is only a one shot boost to your cities’ Loyalty though, it is not a sustainable solution to the problem caused by Utopia in the late game. The third and best option is to train Cadre Fireblade heroes in the late game. T'au economy growth: The Ugly (late game) How many Cadre Fireblade heroes do you need to make ? Yes
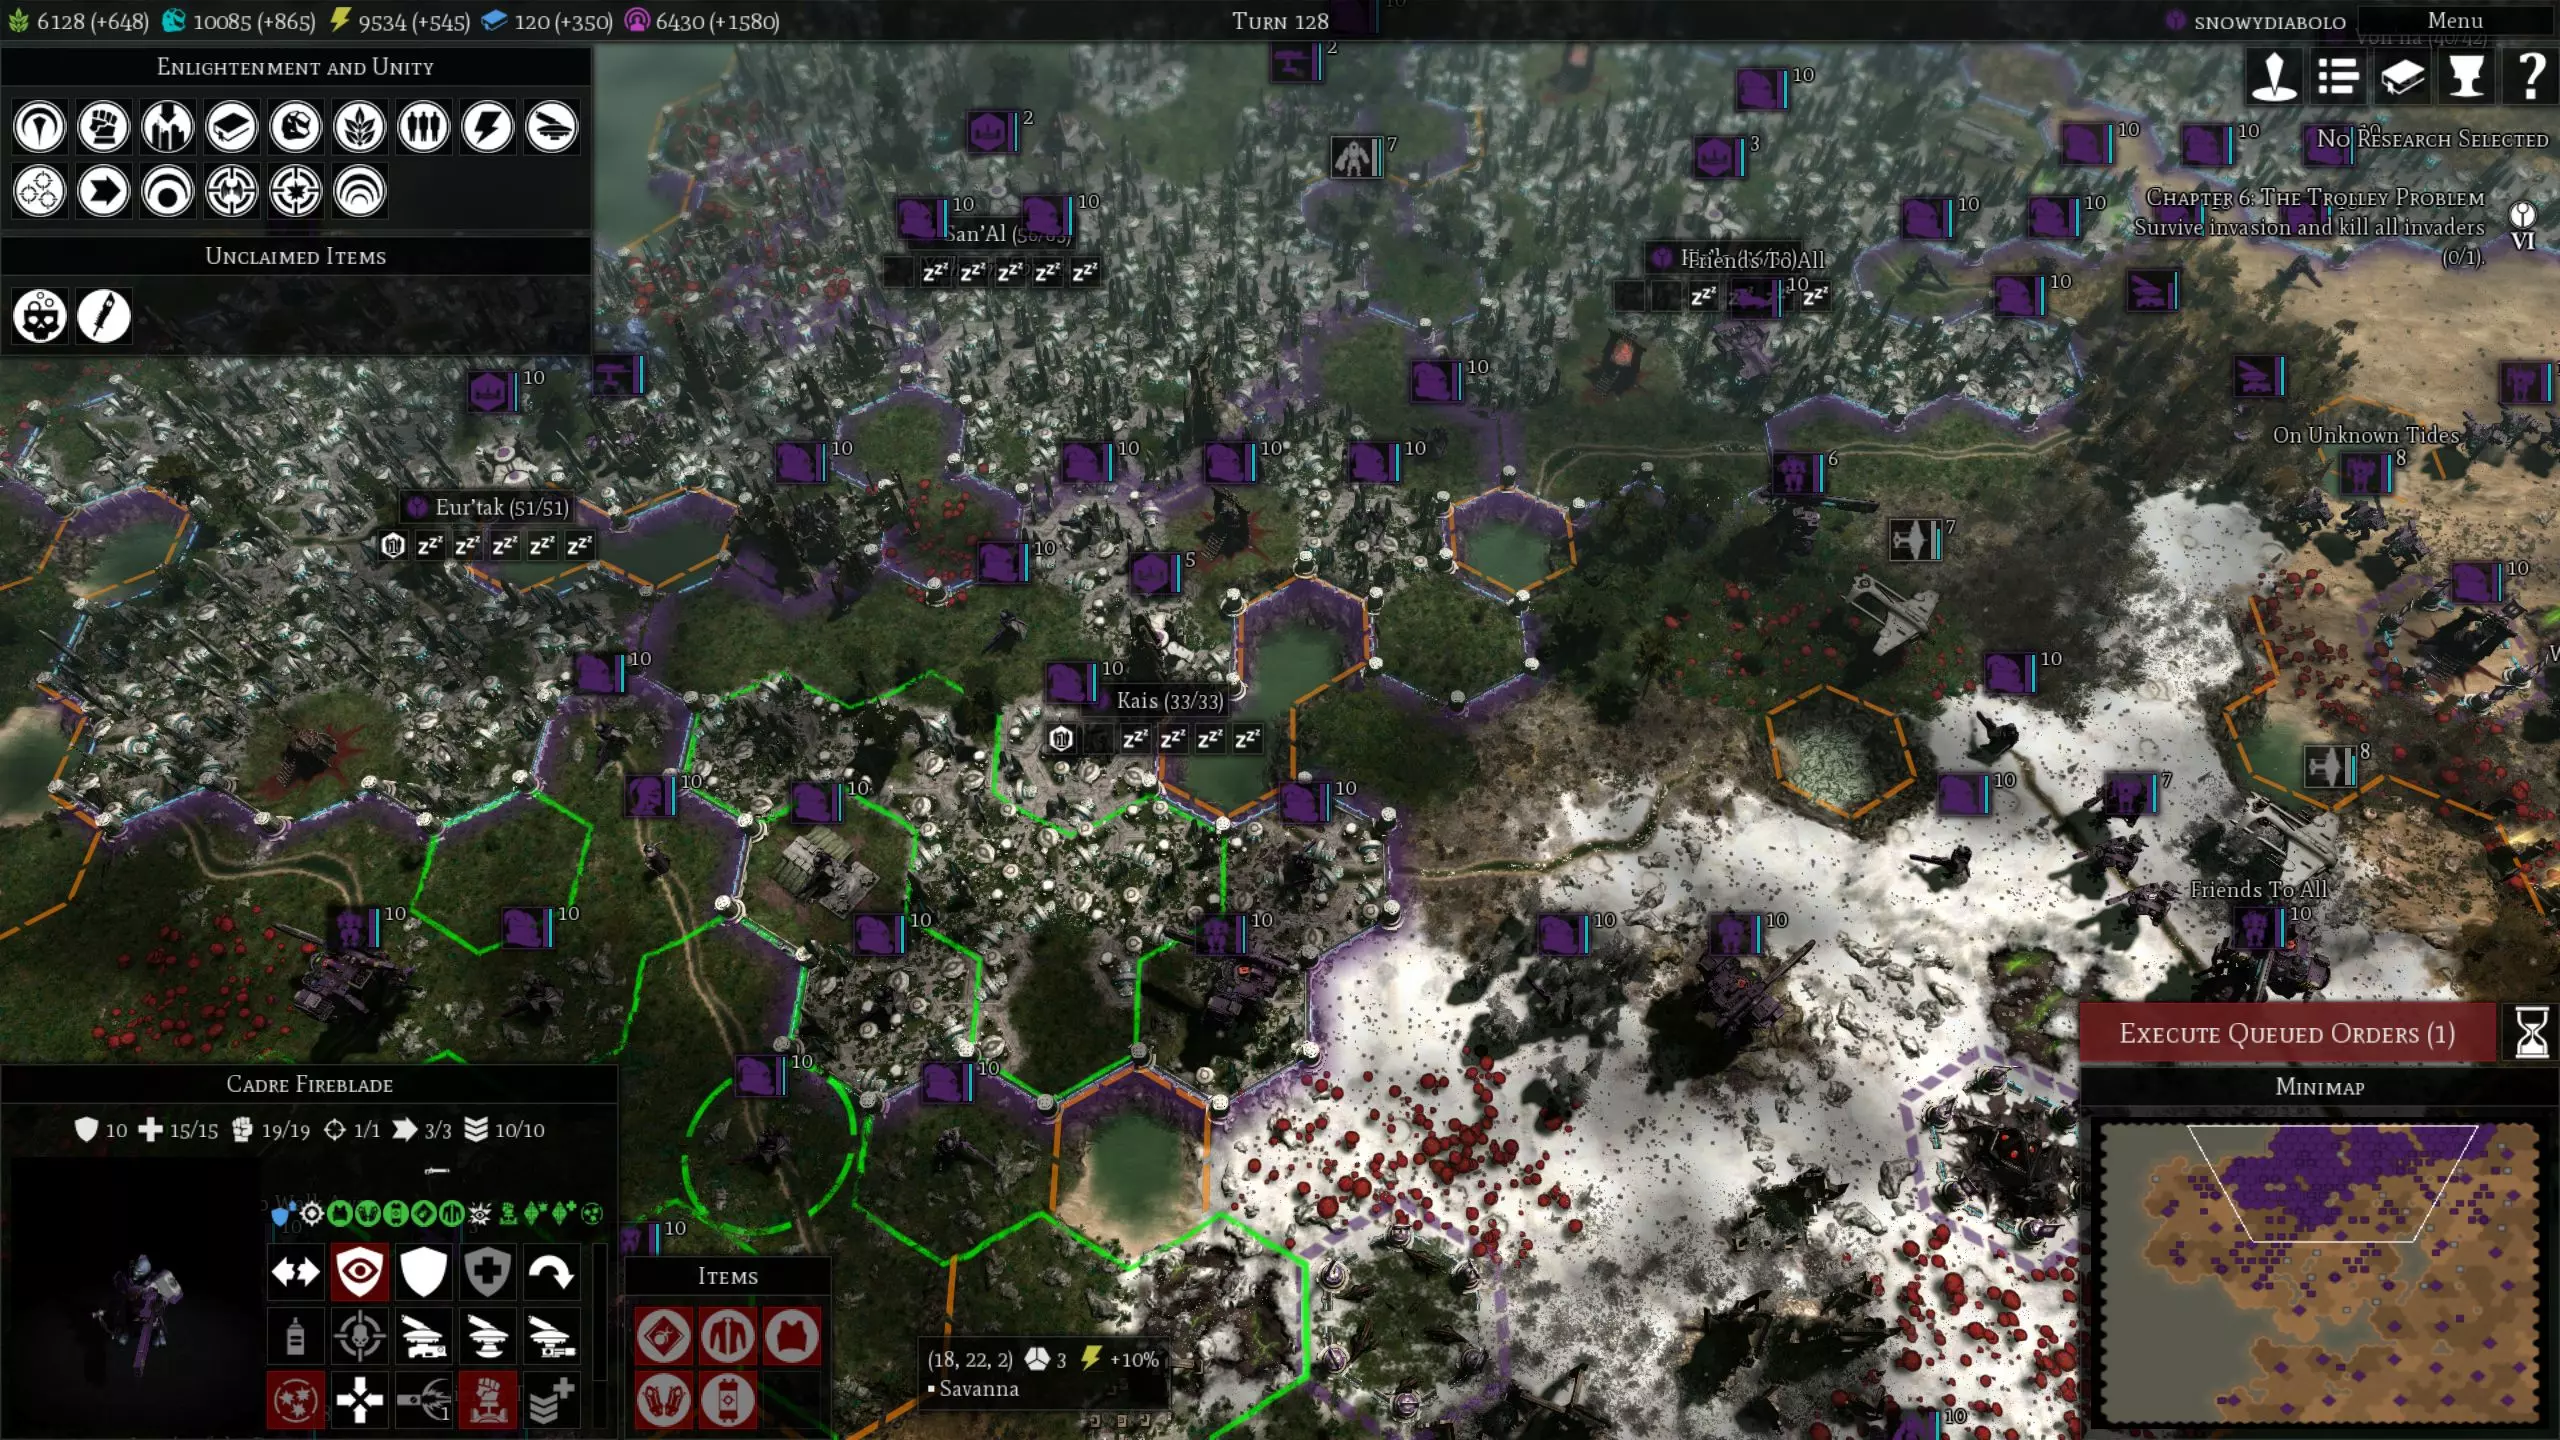
一直培养干部火焰之刃英雄直到游戏结束!你能在这张截图中找到多少个? 干部火焰之刃的6级联合技能是游戏中最出色的英雄技能之一。为帝国所有城市+6忠诚度是非常显著的增益效果。而且这个效果可以叠加,你也一定会去叠加它。你的城市总是需要更多的忠诚度,因为它能提升所有产出以及建筑带来的生产力。这个被动 buff 叠加的次数越多,你能维持的军队规模就越大,城市自我建设的速度就越快,并且无需建造大量单位生产建筑就能更快地训练新部队。一旦你能够开始招募6级英雄(如果你有额外影响力可投资于【禁忌知识】物品将他们升至6级,甚至可以在此之前),就应该开始训练一群【 cadre fireblade 】,他们能多次为你提供忠诚被动 buff。这一行动将改变你帝国的经济增长模式。在【极快】速度下,你最早可在第30回合招募6级英雄;【很快】速度为第60回合;【快速】速度为第90回合;【正常】速度为第120回合;【慢速】速度为第180回合;【很慢】速度为第240回合;【极慢】速度为第360回合。为每个【 cadre fireblade 】装备【诱人图标】,将他们的维护费用从-1.5食物和-3影响力转变为-1.5食物和+5影响力。这一点非常重要,因为你需要不断获取更多影响力来招募更多的【 cadre fireblade 】。如果你查看装备了【 tantalising icon 】的【 cadre fireblade 】的维护费用,会发现它有点类似一个较弱的影响力建筑,需要消耗食物,但不需要人口,这非常棒!每个新英雄的招募成本是英雄基础成本的N倍,其中N是你已训练或正在训练的该英雄数量。不过,他们的维护费用保持固定。因此,如果你在游戏中损失了两名【 cadre fireblade 】,战场上有10名【 cadre fireblade 】,并且已经在训练1名【 cadre fireblade 】,那么训练游戏中的第14名【 cadre fireblade 】时,成本将是该单位基础成本的12倍,因为其中有两名已经阵亡。训练大量同类型英雄的成本会变得非常高昂,但这完全没问题,因为每一位新的 cadre fireblade 都能持续改善你的经济。如果你的城市每回合能产出足够的食物、矿石和影响力,并且在所有先前 cadre fireblade 的忠诚加成下,你将能快速积累资源来训练下一位 cadre fireblade。 这解决了钛族在游戏后期的乌托邦难题,也是本指南中最重要的建议。拥有多个城市,以最大化能从叠加的团结忠诚被动加成中受益的城市数量。在这些城市中建造一个忠诚建筑,并集中精力让它们生产更多资源,尤其是在游戏后期要产出更多影响力。钛族城市通常不会花费时间建造多个忠诚建筑,这也是其经济增长速度快于其他派系的原因之一。尽可能多地训练6级及以上、装备有诱惑圣像的 cadre fireblade 英雄,直到游戏结束。这就是秘诀。如果在游戏后期采用大规模生产 cadre fireblade 的策略,你将拥有忠诚度超过100的城市,并体验到对对手形成压倒性优势的感觉。
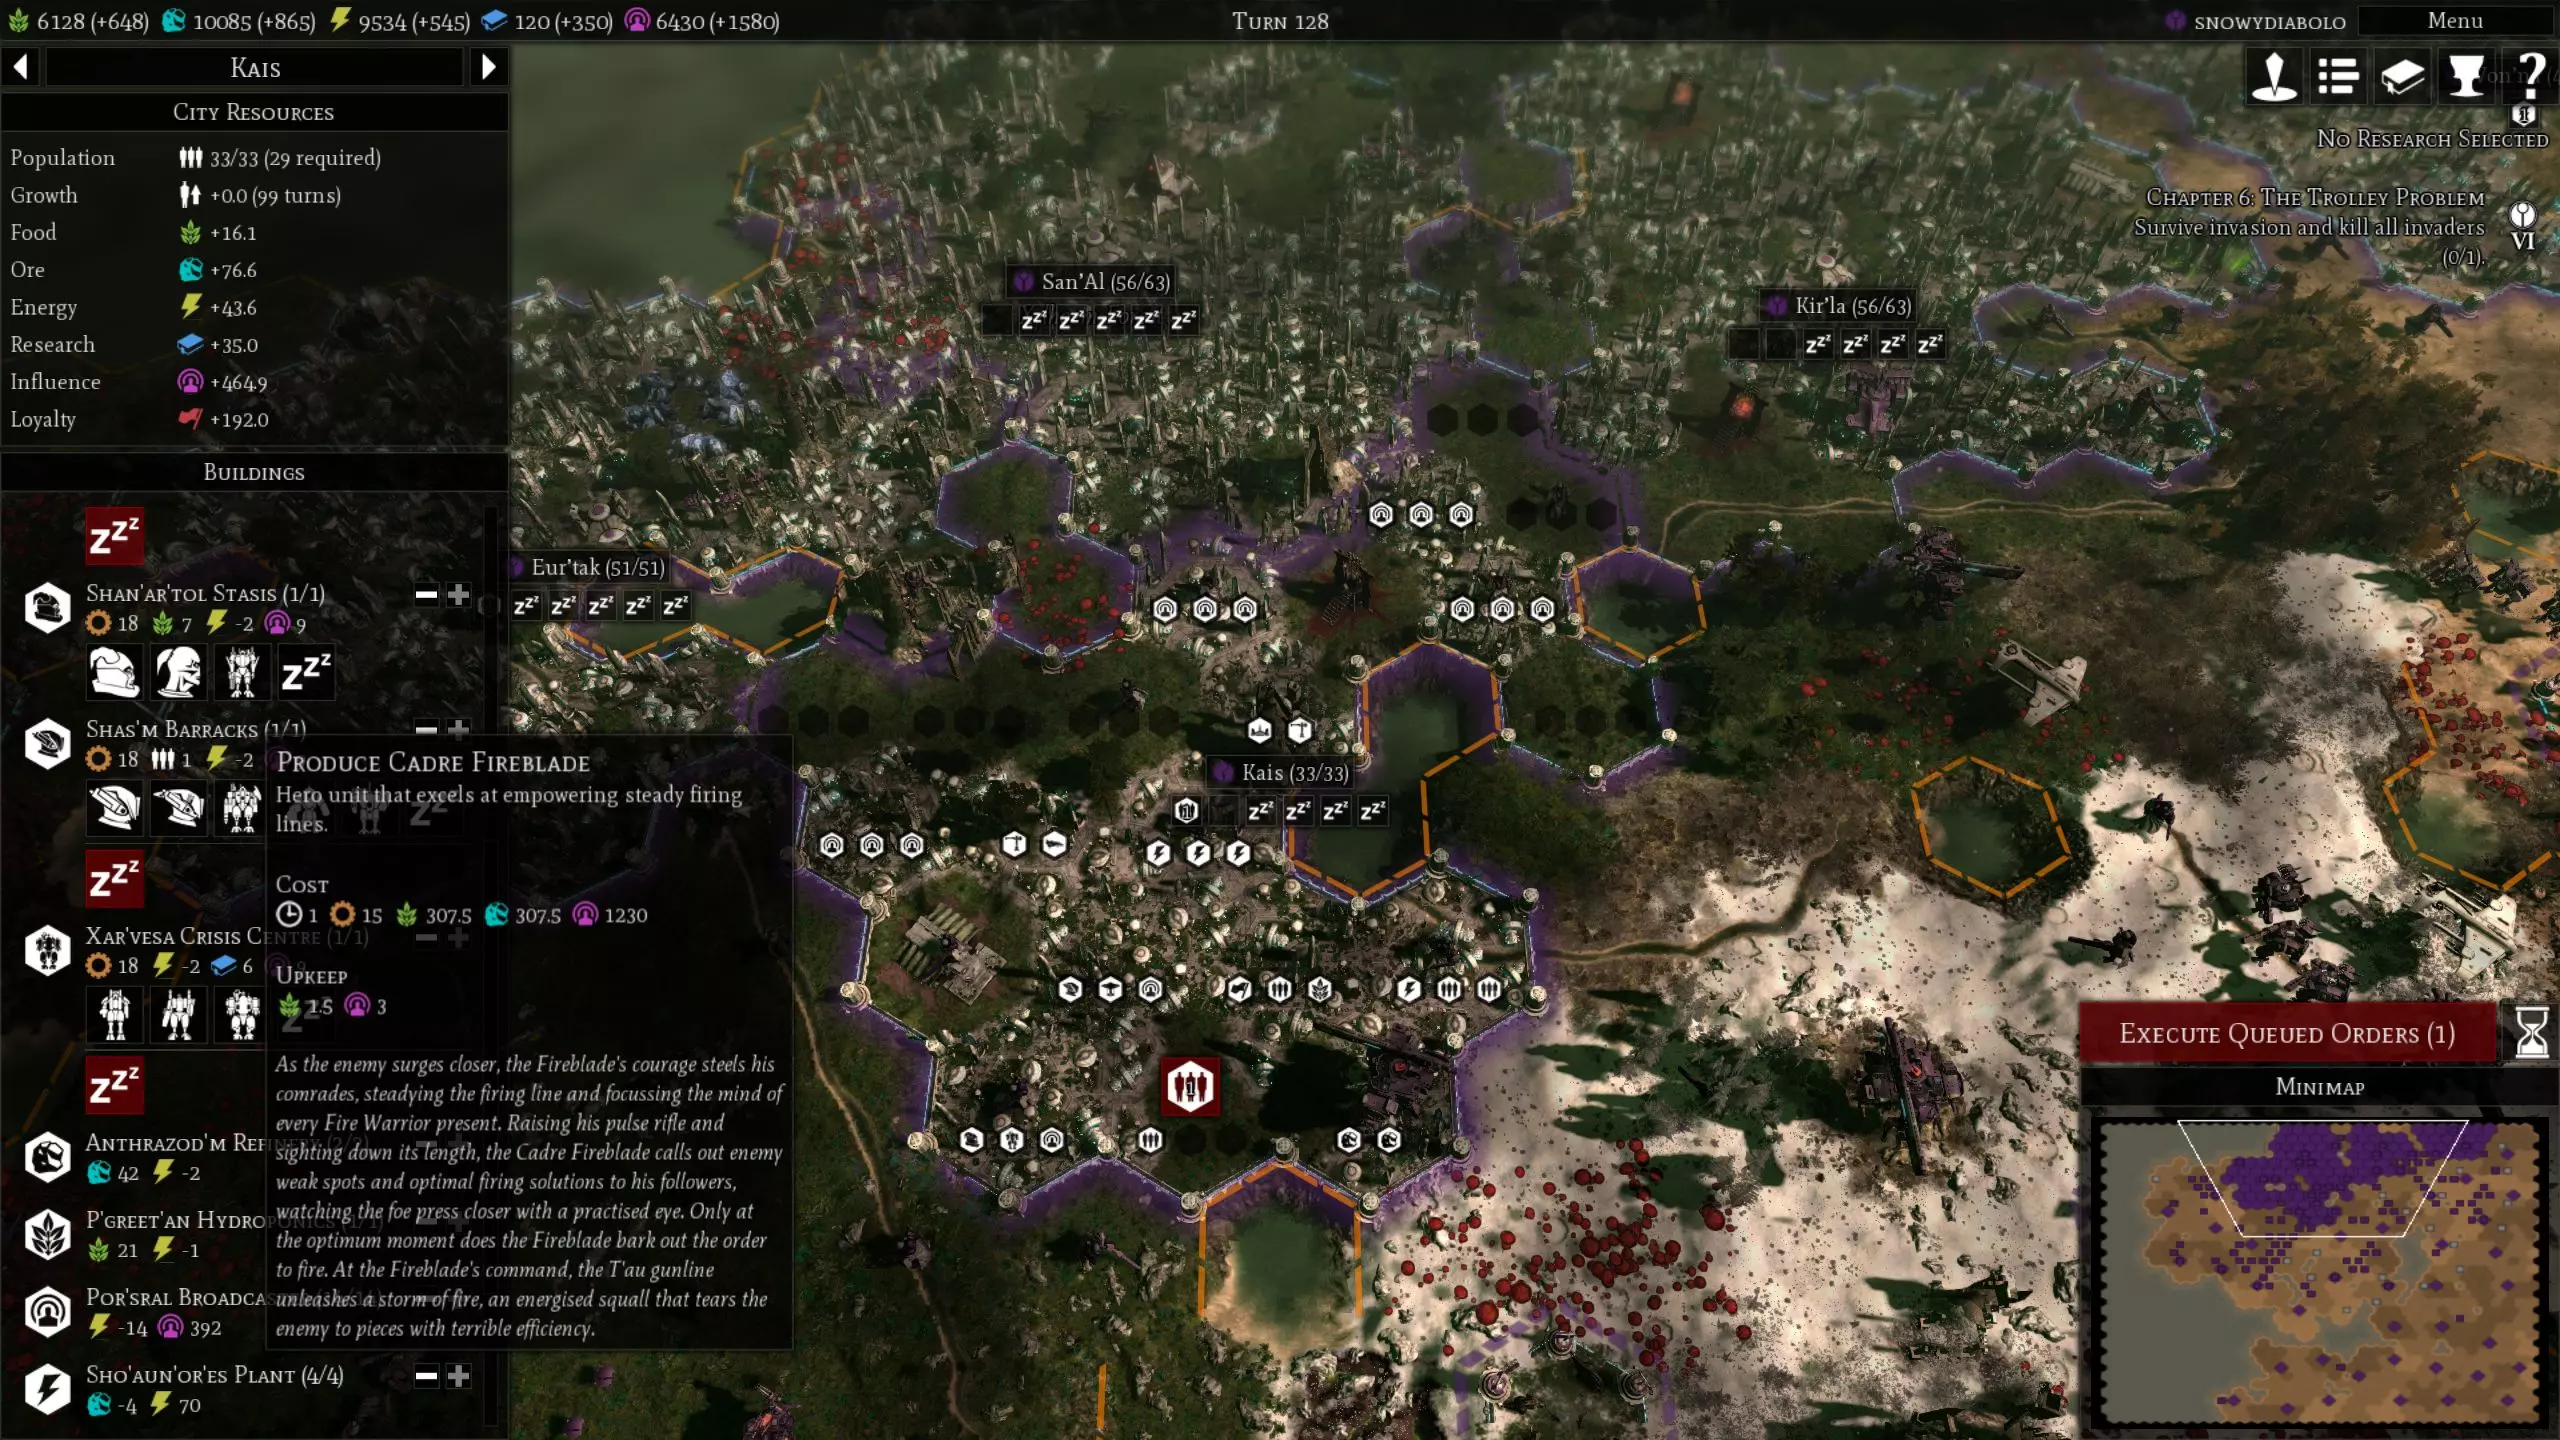
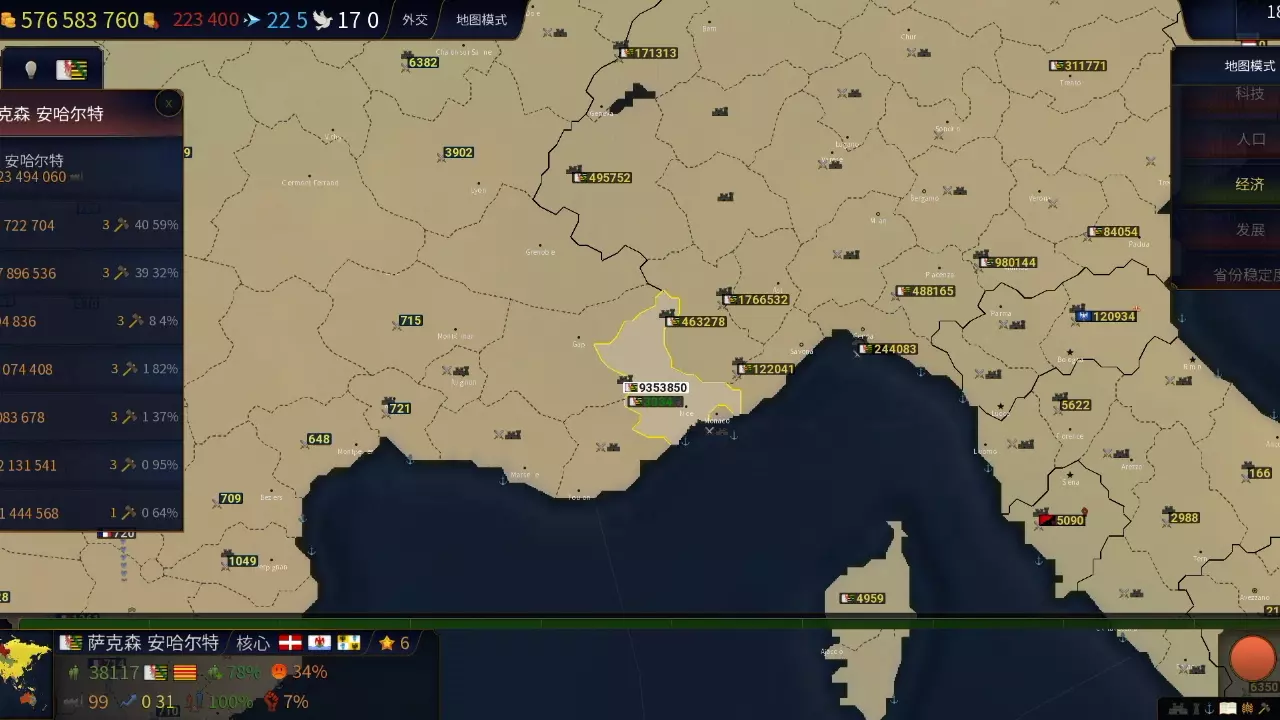
以极快速度和近乎作弊的优势进行游戏是什么体验?看看这些资源产出,看看这座城市的忠诚度,再看看第41 cadre fireblade的训练成本! 现在该如何处理这些cadre fireblade单位呢?它们代表着大量的资源投入,也是维持你经济的核心部分。其中少数应进行适当(防御性)装备,派往前线附近为你的军队提供增益。大多数可以留在城市附近。如果需要,它们可以通过守望、无人机和狙击能力进行防御,或者如果你担心它们的生存,可以在每个城市中隐藏6个。除非你想让它们在军队后方5距离处进行狙击!始终让几台侧舷战斗服处于守望状态以保护他们,这或许是一个值得探索的可行选择。 最后,在游戏初期不妨建造一到两名 cadre fireblade,为他们配备装备并尝试通过在军队中参与战斗来提升等级。他们将为你的部队提供极大帮助,而且如果能在默认可招募6级英雄之前将他们升到6级,还能促进经济发展。另外,一旦你开始每回合产生大量影响力,也可以毫不犹豫地在军队中额外编入以太族和指挥官。这两者在战斗中都能为你的军队提供巨大帮助!
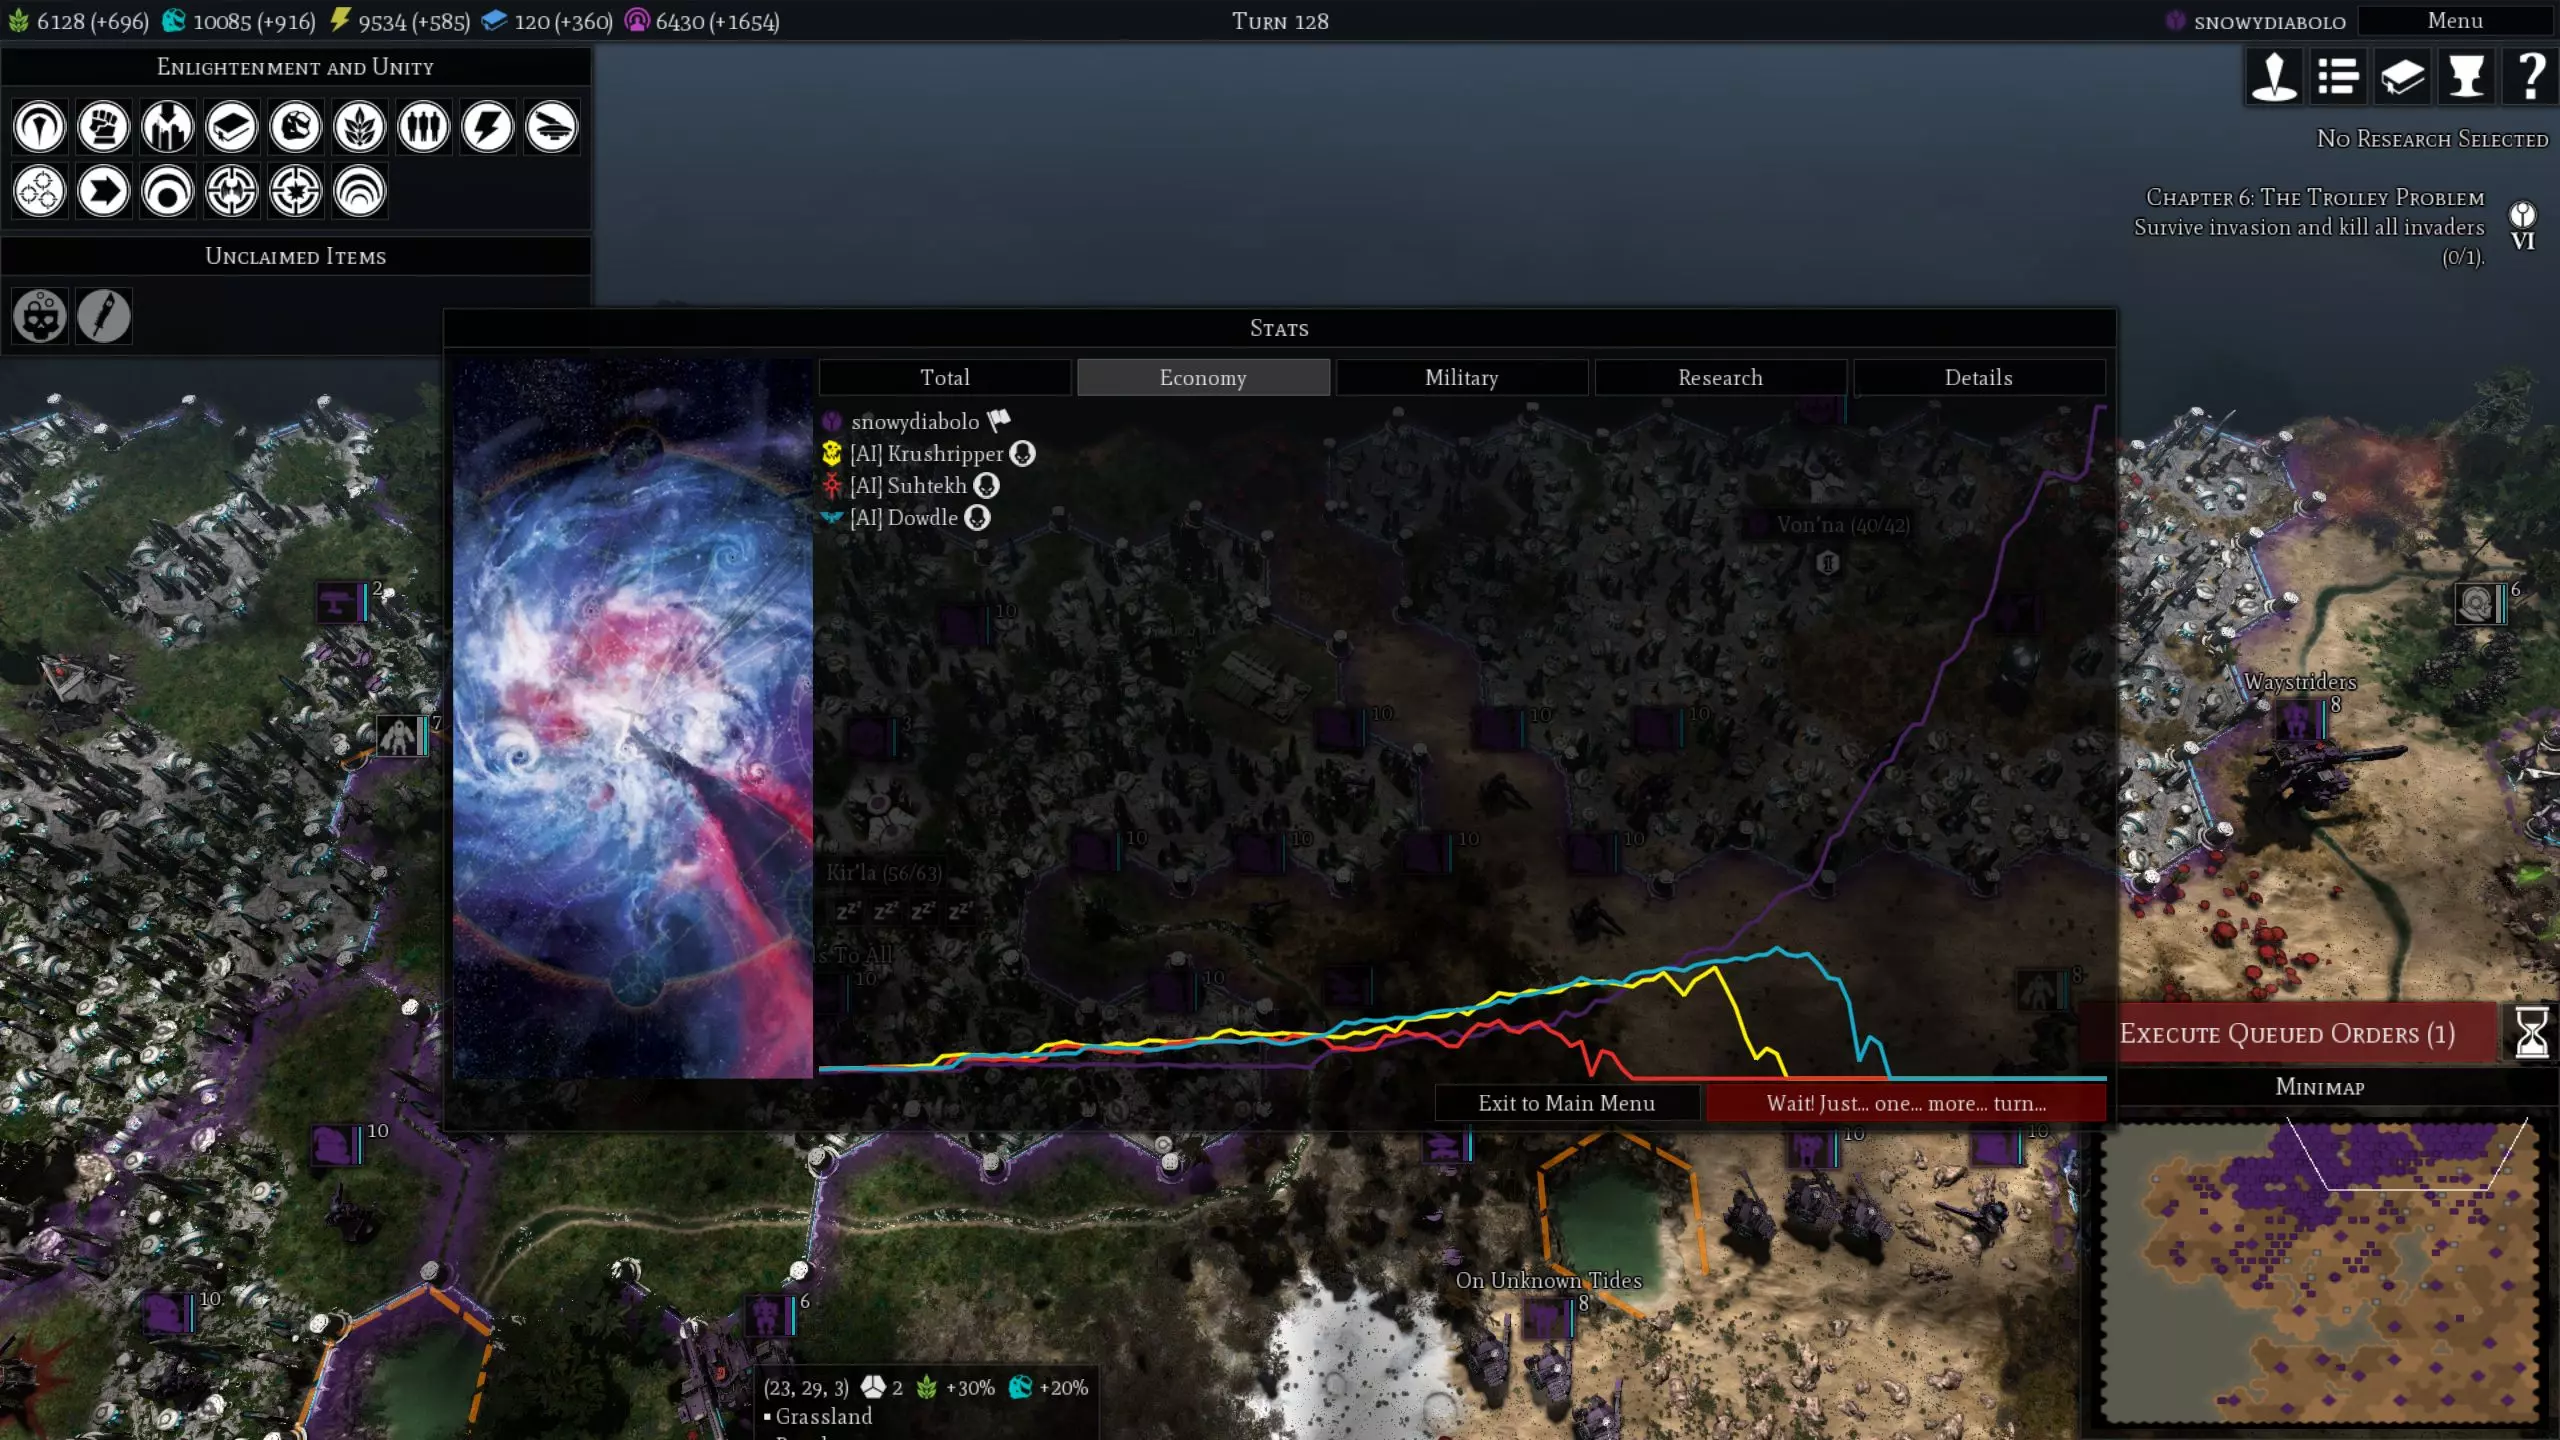
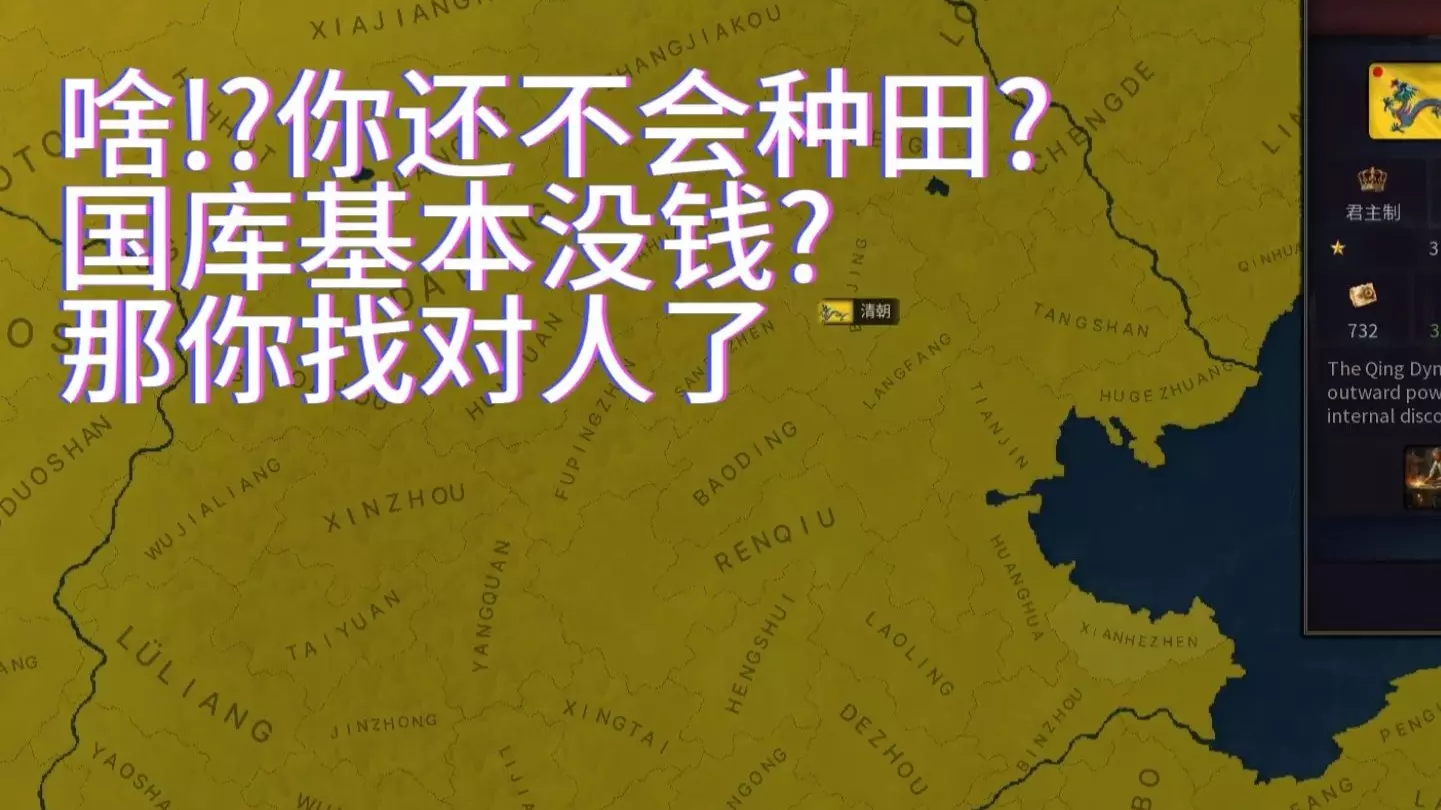
Ultra Hard AI economy growth (red, yellow and blue) looks like a joke compared to Normal T'au economy growth (purple) once T'au reaches late game and applies this strategy. Notice how a Normal economy growth struggles in the first half of the game compared to Ultra Hard AI economy growth though. Technologies research order (part 1) A disclaimer before I start. The build I decided to showcase here does not relly heavily on vehicles and air units. Now, I do not think vehicles are useless or bad. Devilfish transports can be a great addition to transport, support and protect your heroes and infantry and Hammerhead tanks can also be very powerful in numbers during the mid game. T'au strategy can even revolve around closing the game early with Hammerhead Gunship tanks. The reason why I put less emphasis on vehicles and air units is that they require a separate track of upgrades, which either slows down your progression towards end game technologies or force you to skip other important upgrades for your infantry, heroes and monstrous battlesuits. Additionally, vehicles do not synergize very much with T'au heroes compared to infantry and monstrous battlesuits. Legend: **** Game changing milestone *** Essential technology ** Important technology * Nice addition If the technology is not mentioned in a tier, it is not a priority to research for this guide. Tier 1 Hero Building *** (T'au heroes have really powerful support abilities once you understand them and you must construct additional Cadre Fireblades. This building also has decent yields and a low upkeep.) Vehicle Building *** (There is a window during the midgame during which getting Hammerhead Gunships is a necessity to survive in PvP or against strong AI.) Bonding Knife Ritual ** (Restore a unit’s morale before attacking with it, which is very useful if you need a morale boost at the start of your turn.) Wisdom Shared * (Trade 80 Influence for 40 Research. You can spend your first Influence point here to get Builder Drones 2 or 3 turns earlier and build your new cities faster, but this choice excludes recruiting early heroes or converting early auxiliaries.)Go for Hero Building first to train your first Cadre Fireblade ASAP or take Wisdom Shared for faster Builder Drones production. You will only have enough Influence for one of those two options, so skip Wisdom Shared research if you do not use it for faster Builder Drones. Usually I get Vehicle Building next. When war is imminent with your opponent, go back in the tech tree to grab Bonding Knife Ritual, it can make a huge difference. Tier 2 Gun Drones *** (An absolute must, you will find so many uses for these expendable units.) Ethereal *** (Great support hero that mostly mass buff and mass heal. I use this hero early for the infantry healing instead of making another Builder Drone to reduce the stress on my cities’ growth.) Habitation modules *** (You must construct larger cities. I usually delay this research until after unlocking Hammerhead Gunship.) Many Mouths ** (It took me a while, but I learned to really appreciate this one. Research it in the midgame, immediately after researching Broadside Battlesuits to leverage your Influence output into getting Food to build a bunch of those units. You can even overextend your economy and go in Food shortage and pay Broadside Battlesuits with Influence instead of Food with this research.) EMP Grenades * (I have not tested those enough, there are a lot of things I want in this research tier and usually, my Fire Warriors are not numerous enough to justify this research by the time I have Research to spare on this one. But if your opponent makes many armored vehicles, these can be worth it.)Pathfinders are skipped mostly because they cost as much as a Crisis Battlesuit and I am not convinced yet they are worth as much. Tier 3 Builder Drones **** (You must construct additional cities ASAP, can heal any T'au unit or city by 8 each turn, and can terraform.) Commander *** (Strong hero unit that provides army wide buffs on a short cooldown and can tank and deal a lot of damage, when geared and supported properly.) Loyalty Building *** (You must support additional cities, you must maintain city Loyalty. I usually research this after getting habitation modules or when I expect the game to be a long one.) Shield Drones ** (Improves your army's survivability.) A Shield For All * (Try to just have enough raw Ore production on your own, but later in the game, if you really need that extra Ore, this is an option.)The TY7 Devilfish is nice if you decided to include vehicles to your build, but like I said, this slows down your progress to endgame technologies. Tier 4 XV8 Crisis Battlesuits *** (A stronger infantry to replace Fire Warriors.) Better Weapons *** (More damage to Gun drones, Piranha, Fire Warriors, Pathfinders, Stealth Battlesuits, Cadre Fireblade, Ghostkeel, Riptide, Stormsurge, City.) Dissemination (tier 2 cities) *** (You must construct larger cities. I usually research this one after getting Broadside Battlesuits.) (PvP community mod) Crisis Center *** (The PvP mod moved this research here. Necessary to train endgame units like XV104 Riptide Battlesuits and KV128 Stormsurge. Get this research later if the game lasts for a long time.)The Foundry building is situational. Building it generally slows you too much to survive a PvP game. Additionally, if you build a second Foundry in your city, population growth will not keep up with Foundry building production. Either you will have to disable one Foundry occasionally in your city or you will need to frequently spend Influence to artificially grow your city population with Proselytise. In theory, this is great ! But note that if you grow your city too fast, you also run into the Utopia Loyalty problem earlier during the game which is a problem before you can reliably train level 6 Cadre Fireblade. For this reason and because it slows your progression to endgame techs, the Foundry technology is not recommended in early cities in this guide. Tier 5 TX7 Hammerhead Gunship **** (First T'au unit with a range of 3, good damage and decent resistance. You usually need some just to survive early engagement in PvP.) Extra Infantry Armor *** (Affects All Infantries, Drones, Heroes and Monstrous Battlesuits.) Crisis Center *** (Necessary to train endgame units like XV104 Riptide Battlesuits and KV128 Stormsurge. Get this research later if the game lasts for a long time.) Proselytise * (Allows you to buy one population per turn in a city at the cost of Influence. Research this technology later if you run into city population growth issues. If you decide to build an extra Foundry in your cities, this technology will be mandatory.) Technologies research order (part 2) Tier 6 Better Weapons *** (More damage to Pathfinders, Broadside Battlesuits, Devilfish, Hammerhead Gunship, Commander.) Seeker Missile *** (This technology is worth researching after unlocking XV88 Broadside Battlesuits or most vehicles.) XV25 Stealth Battlesuits ** (Do not be fooled by the 6 hitpoints of this infantry unit, it can take a lot of ranged hits in a city or encampment and can be healed fully on every turn by a Builder Drone. It can also deal significant damage with its melta weapon and has Infiltrate. Keep in mind that it is very fragile to melee attacks though ! I do not really advise making those in PvP though because this weakness will most likely be exploited.) TX78 Sky Ray Gunship ** (The last T'au land vehicle offers a huge burst of damage with two stronger Seeker Missiles that have a 5 round cooldown. I do not usually make those, but they are tougher than Hammerhead Gunship, so you can use them as tanks in front after they unleashed their volley of seeker missiles.) Tier 7 (PvP community mod) XV88 Broadside Battlesuits **** (The endgame T'au infantry. It is tough enough and deals good damage after moving, deals devastating damage when standing still and deals absolutely devastating damage when standing still next to a Cadre Fireblade. Add some seeker missiles on them for even more firepower.) XV104 Riptide Battlesuits *** (This unit has versatile abilities to adapt to many situations and it can deal and take a lot of damage. Try to bring an Ethereal hero and Builder Drones to heal and support them.) Blacksun Filter *** (Increased vision to Pathfinders, Stealth Battlesuits, Broadside Battlesuits, Ethereal, Commander, All monstrous suits, All vehicles, All air units. Vision of the battlefield means smarter decisions !) Extra Vehicle Armour ** (Necessary if you intend to keep making Hammerhead and Sky Ray instead of transitioning to monstrous battlesuits.) Vectored Retro Thruster * (Increased movement upgrade to battlesuits. Research this one later to speed up your Stormsurge.)I have not included the aircraft building in this guide because it arrives really late and T'au aircraft are not that impressive. The AX39 Sun Shark Bomber can help with clearing infantries, but it is a Tier 9 aircraft and you prefer saving Energy for more Stormsurge at that late stage of the game. Tier 8 XV88 Broadside Battlesuits **** (The endgame T'au infantry. It is tough enough and deals good damage after moving, deals devastating damage when standing still and deals absolutely devastating damage when standing still next to a Cadre Fireblade. Add some seeker missiles on them for even more firepower.) Better Weapons *** (More damage to All seeker missiles, Crisis Battlesuits, Broadside Battlesuits, Sky Ray Gunship, Sun Shark, Commander, Ghostkeel, Riptide, Stormsurge, City.) Automated Repair System ** (Necessary if you intend to keep making Hammerhead and Sky Ray instead of transitioning to monstrous battlesuits.) Stimulant Injector ** (Even more resistance is great for battlesuit survivability! But it will also cost you Influence to apply. Research this technology after finishing your two Tier 10 technologies.) Hammer of Wrath ** (Periodically buff monstrous battlesuits damage. Research this technology after finishing your two Tier 10 technologies.) Tier 9 Foundations (tier 3 cities) *** (You must construct larger cities.) Advanced Targeting System ** (Even more accuracy is great for battlesuits ! But it will also cost you Influence to apply.) AX39 Sun Shark Bomber * (Decent aircraft against infantry. But it is not that powerful this late in the game.) Tier 10 In Diversity, Unity **** (Provides up to an additional +14 Loyalty to your cities depending how many different buildings you made in them. This technology will provide a significant boost to your economy.) KV128 Stormsurge **** (The strongest T'au unit. Extremely tough and hits extremely hard with a long range, especially when standing still. Try to bring an Ethereal hero and Builder Drones to heal and support them.)If your economy is doing great, research Stormsurge first to start producing them faster. Otherwise, research In Diversity, Unity first. And that is it. This is a strong and fairly quick path to reach the endgame. Some tier have more than two technologies to research, but I have included information on what to delay after other research to help you navigate in what order you should perform these researches. Cheap technologies from early tier, do not delay you by much later in the game and can offer you a significant advantage. Higher tier technologies that were skipped can be researched after finishing the two technologies in tier 10. Remember, tier 3 Builder Drones, tier 5 Hammerhead Gunship, tier 7 or 8 Broadside Battlesuits and the two tier 10 technologies are your biggest game changing milestones that you are trying to reach and that are worth delaying other technologies for. Build order In the early game, you can either spend your Influence on heroes and Tantalising Icons, on early recruit auxiliaries or on Wisdom Shared to speed up Builder Drones by 2 or 3 turns. Unfortunately, you can't do all of the above, so you have to pick one of these three options, which will affect the build you play and how early you start training heroes. Remember that you need some Influence to build your two cities as well. The build order I prefer is the one that spends all Influence on recruiting early heroes, but it requires a lot of Influence early on, so you need to settle next to an Influence encampment to execute it smoothly. It needs a Jokaero Encampment near your first city to allow you to quickly purchase a Tantalising Icon as soon as you finish training your first Cadre Fireblade. First city Research (To get to builder Drone faster.) Hero Building (To recruit your first Cadre Fireblade, Ethereal and Commander, in that order. Start the Cadre Fireblade immediately after the building finishes. Purchase a Tantalising Icon when the Cadre Fireblade comes out. Time your city constructions and wait for purchasing a Tantalising Icon before paying the training cost of the next hero.) Infantry Building (Start infantry production to support your heroes.) Builder Drone (To build your second city. The timing should be just right to have enough Influence a few turns after purchasing your first Tantalising Icon.) Builder Drone (To build your third city.) Ore (To accumulate enough Ore to sustain unit and building production. You might need to complete this before your second builder drone to afford your second city if your spawn is poor in Ore.) Vehicle Building (To prepare Hammerhead Gunship production.) Energy (The need for Energy will be felt to train Hammerhead Gunships and after constructing the Population and Loyalty buildings.) Food (Get some Food to sustain infantry production. You can turn this building off later if you enter a planned Food shortage and use another building instead. This can spare a lot of Influence you would spend in Many Mouths while your Food deficit is low.) Population (To allow your city to grow past 7 population. Aggressive PvP builds may stop their city growth to fully invest all their resources into only making units to win the game ASAP. That can work if the game finishes soon, but it will become harder to win if your opponent keeps developing his cities and manages to hold your attack.) Influence (Do not neglect producing Influence, you can always use Influence on faction abilities or more heroes. You may need this building just after Infantry if you want to do this Hero Build without an Influence outpost. To do that without delaying Builder Drones too much, you will need two tiles with 3 free spaces though.) Loyalty (To maintain Loyalty near 0 which also increases city production.) Crisis Center (To get endgame monstrous battlesuits.)At this point, you have your 13 first main buildings in your first city. You can start duplicating resource or unit production buildings in your city once it reaches this stage or before that if you urgently need more resources. Also take note that the construction of Builder Drones slows the development of your cities compared to other factions which makes those drones extremely precious units. The optimal build order for your first city will change depending on the terrain and outposts it has access to, so don't hesitate to adjust the build order suggested here to your situation. Watch your upkeep and adapt ! Second and third city They should be focusing first on stabilizing your Ore production, then Vehicle production to make Hammerhead Gunship and Energy production to support the continuous production of Hammerhead Gunship. Just before researching Broadside Battlesuits, you should add Infantry production to these cities and Food production to help with purchasing these units. Then they should focus on balancing and improving your economy. It is important to build a large army fast to prepare for the first encounter with your opponent, but also to clear neutral and capture as many outposts as possible as quickly as possible. Securing and holding 3 new outposts is basically equivalent to gaining a “free” production building at no cost. This helps you snowball in the early game and is another key element to developing a strong economy in this game. It is very important that one of your three first cities is next to a Jokaero Encampment. That city should make the building to train hero units rather soon. This is very important because you need to equip your hero units to reduce their Influence upkeep, to improve their strength, to improve their resistance and sometimes to improve their mobility. Having them spawn on or next to the Jokaero Encampment ensures you can equip and send a hero to battle quickly after training it. Additionally, once that city has built its different districts, it can start specializing in mass-constructing Influence buildings on +20% tiles to sustain the training of your herd of Cadre Fireblades in addition to covering all of your other Influence costs. Units overview: Heroes (part 1) Cadre Fireblade Cadre Fireblade is a hero unit with mediocre damage on its own, but amazing utility for adjacent infantries, heroes and drones. It has a low health and a base armor of 6 that can be brought up to 10 with upgrades and items. I have already covered extensively the Cadre Fireblade level 6 passive Unity ability. Take it ASAP when leveling up your hero. The Volley Fire passive ability is perhaps the next best ability on this hero. Any infantry, drone, or hero unit that has not moved and stands next to the Cadre Fireblade gets a +25% up to +75% buff to its number of attacks. This means the Cadre Fireblade can almost double the damage of units that are standing still just by standing there next to them. The buff also applies to the hero itself if you do not move it before shooting or sniping. Or you could instead decide to move him next to other infantry that have not moved in order to buff two different groups of units that have not moved during a single turn. This can make it quite painful to attack into a T'au defensive position with overwatch that includes a well positioned Cadre Fireblade. Also note that a drone unit that just spawned counts as not having moved when it is summoned which means it can immediately benefit from Volley Fire. The Break Composure ability is a 1 turn buff applied to the Cadre Fireblade and all infantry units, drones and heroes surrounding it, that adds 2 up to 6 morale damage to their attacks. This can rapidly break enemy morale without requiring to secure a kill and gives a lot of added value to weak attacks like those of the Cadre Fireblade and of drones. Once a target is demoralized, you can finish it more easily with units that punch harder to keep spreading morale losses in the armies opposing you. This skill works on structures and cities as well. This active buff is a free action and has a 3 turns cooldown. Lastly, but not least, Cadre Fireblade has a Precise Shot ability that basically turns him into a sniper. +50% up to +150% to accuracy, damage and range turns the mosquito bite attack of the Cadre Fireblade into a long range punch in the face. To really maximize the damage, resist the urge of shooting on a turn you moved and use this ability while standing still to benefit from Volley Fire. The range can be up to 5 when the ability is maxed out which means you can really hit targets from afar. Cadre Fireblade also doubles his attacks at half range, which synergizes well with this high range. You might even consider equipping Sightless Helm, Concealed Weapon System, Omni-Scope and Entropic Locum to crank the damage of your snipe, the +% accuracy stacks on the items bonus. This attack has a 3 turns cooldown, so you could even make a squad of three Cadre Fireblade that reposition and swap this set of items with each other to snipe on every turn and prepare the next turn's snipe in advance without investing too much Influence in these items. As if this hero did not offer enough already, it has Markerlight (every turn) and Deploy Drones (10 turns cooldown) abilities. Markerlight can be a particularly good alternative to the Cadre Fireblade's weak attack to mark targets with ranged damage reduction from cover. Equip this hero with Tantalizing Icon to have it contribute to your Influence output. Equip it with Scrolls of Magnus if you are still researching relevant technologies. Equip it with Zoat Hide Jerkin, Adamantium Weave Vest and Armaplas Bracers if you intend to protect your investment in this hero. The Forbidden Knowledge item can also be worth it to unlock level 6 Unity faster. Faolchu's Wing can also be fun on him, but it costs a lot. Ethereal Ethereal is a hero unit with mediocre damage, but great utility for adjacent infantries, heroes, drones and monstrous battlesuits. It has a low health and a base armor of 0 making him super fragile. All of its abilities apply an effect to itself and all surrounding units. Ethereals can also Deploy Drones (10 turns cooldown). The first early Ethereal you train can fulfill the important role of healing your initial infantry army instead of stalling one of your cities with the construction of another Builder Drone. Sense of Stone and Storm of Fire apply a +17% damage reduction and a +17% attacks to all surrounding units for 1 to 3 turns. These skills are free actions that you can use every turn, but once you use one, you can't use the other on the same turn. Calm of Tides is an AoE heal that can heal 4 up to 12 health to the Ethereal and all surrounding units. This is fantastic to maintain your army alive and in top shape without. This ability consumes the unit action and has a 3 turns cooldown. Zephyr's Grace is the Ethereal's level 6 ultimate ability. It grants an additional action to the Ethereal and all surrounding units. If the unit has already moved and used their action, they get an additional action, but if they have not moved and used any action, they can move once and use their two actions afterwards. This means you can grant your units a round of double attacks, which is usually devastating. This ability “consumes” the Ethereal's action, but gives one back, allowing the Ethereal to use Calm Tides or activate an item after using it. It has a 10 turns cooldown. Equip this hero with Tantalizing Icon to have it contribute to your Influence output. Equip it with Scrolls of Magnus if you are still researching relevant technologies . Equip it with Zoat Hide Jerkin for a bit of survivability if you have the Influence to spare, but do not bother with Adamantium Weave Vest and Armaplas Bracers since this hero starts with no armor. Faolchu's Wing is actually a must on this hero because of how fragile it is. During your turn, move in the middle of your units to renew their buff as a free action and then activate the wing item to move to safety in the backline. Try to use Calm of Tides AoE not too close to the front line since you won't be able to move back afterwards. Units overview: Heroes (part 2) Commander Commander is a hero unit with respectable base damage on its own and amazing utility for your army. It has a decent health and a base armor of 8 that can be brought up to 11 or 12 with upgrades and items. The Commander's abilities are called Metastrategies and all three of them are free actions that share a common cooldown, so each Commander can only use one at a time, but three commanders could apply all three to your army on the same turn. Metastrategies apply to all units within 3 tiles of the Commander (including itself) and initially have a 3 turns cooldown. This hero unit costs a lot, but it is your only unit that can really tank damage early in the game if geared adequately which should be relevant when you get rushed in PvP and need something other than a city to hold the frontline. Killing Blow grants +25% up to +75% damage when attacking an enemy unit with less than 50% health remaining. So it is of no use to one shot a healthy target, but it can really help out to finish off very resistant targets that require multiple hits to take down. Cities and tanky units are good examples of targets against which you want to use this ability. Patient Hunter grants +10% up to +30% ranged damage reduction to all friendly units. It is a very straightforward buff, but be careful of melee attacks (as always). Circle of Blades grants +10% up to +30% bonus accuracy to a friendly unit targeting an enemy unit that is next to another of your friendly units. So you must move a friendly unit next to the target you want to take down in order to benefit from the buff. That can be a good job for drone units or Stealth battlesuits. This also means that, if you want to benefit from the buff with the unit you moved next to the enemy unit, you will need to move another friendly unit next to that enemy unit. Don't forget to keep bringing friendly units next to your next target as you start killing enemy units while this Metastrategy is active ! Thousand Daggers is the Commander's level 6 passive ability that lowers the cooldown on Metastrategies from 3 turns down to 2 turns. This means that, in theory, a squad of 6 level 6 Commanders can trigger all three maxed out Metastrategies on every turn for your army ! Equip this hero with Tantalizing Icon to have it contribute to your Influence output. Equip it with Adamantium Weave Vest, Armaplas Bracers, Zoat Hide Jerkin and perhaps even Temporary Shields to protect your investment in this hero. Equip it with Sightless Helm, Concealed Weapon System, Entropic Locum, Omni-Scope and Combat Stimulant to significantly crank up its damage. As you noticed, some choices will have to be made to get more defense or more offense here. Install Stimulant Injector and Advanced Targeting System when available to finalize upgrading your Commander. A fully geared Commander is tanky and can deal a lot of damage on its own. On top of that, it can benefit from its own Metastrategies, from the Cadre Fireblade Volley Fire, from the Cadre Fireblade Break Composure and from all Ethereal abilities to stack up impactful buffs for truly devastating attacks. “The city busting hero squad” T'au can assemble a squad of heroes to take out a poorly defended city in roughly 3 turns. If you are really clever, bait the enemy army away from the city you intend to attack to maximize your chances of success ! In order to achieve this, you will need to have vision near the city you intend to strike down. You achieve that by sneaking a Kroot Hound or a Vespid Stingwings close to the city you intend to attack. You can also use battlesuits with Jet Packs or vehicles or air units to travel on water to reach the city you intend to attack. Assemble a team of five heroes: Three level 5+ Commanders with Dimensional Key, Entropic Locum, Omni-Scope, Combat Stimulant, Concealed Weapon System, Sightless Helm (if you can afford), Adamantium Weave Vest (if you need to tank damage). Two of them with maxed Circle of Blades and one of them with maxed Killing Blow. One level 5+ Cadre Fireblade with Dimensional Key, Zoat Hide Jerkin, Adamantium Weave Vest and Armaplas Bracers. Volley Fire must be maxed out and Break Composure should have two or three points in it. One level 6+ Ethereal with Dimensional Key, Zoat Hide Jerkin and Faolchu's Wing. Sense of Stone and Storm of Fire should have two points each and Zephyr's Grace must be unlocked. Then proceed as follow: Turn 1: Jump and control. Teleport your squad of five heroes near the unsuspecting city. The Ethereal can activate its defense buff before or after teleporting. Spam Gun Drones everywhere with your heroes to immediately take control of the perimeter within the city since your heroes can't move after a jump. Enemy turn... Turn 2: Move in and demoralize. Activate the Cadre Fireblade Break Composure ability on Commanders, Cadre Fireblade and some gun drones. Activate your Ethereal's attack buff. Then move Commanders inside the city at 1 or 2 range from the city center. Leave a room in the middle of them for the other heroes to step in on the next turn (hold that spot with a Gun Drone). Activate your Accuracy buff from one Commander or Patient Hunter if you fear for your safety. Use your Combat Stimulants on your Commanders since the buff will last two turns. Fire on the city with units buffed with Break Composure to break the city's morale, attack with Commanders last since they can hit harder after the morale loss. Enemy turn... Turn 3: Go for the kill. Depending how large and experienced the city under attack is, you might be able to finish off the city this turn. Move Ethereal in the middle of the Commanders. Activate your Ethereal's attack buff, then Zephyr's Grace (ultimate ability) to grant +1 action to all units, then activate Faolchu's Wing to remove the Ethereal from the middle (if you don't have this item, move the gear to the Cadre Fireblade and disband the Ethereal with the extra action). Move the Cadre Fireblade in the middle to grant +75% Ranged Attacks to all 3 Commanders that remained immobile. Activate Accuracy and Damage buffs from the two remaining Commanders. Blast the city with 6 Commander multiplicatively buffed up attack actions that will deal obscene damage to the city, especially after passing the 50% life cap. If you survive long enough with this hero squad, you can keep wreaking havoc in enemy lines or teleport back to another location once the keys are active again, but keep in mind that drones and Zephyr's Grace will be on cooldown. While this is a very utopic scenario, using very specific items, it provides a lot of great tips explaining how to use your heroes and combine their different abilities to get the most out of them. Fun fact: this is how I completed the “There Is No War” achievement in a normal game. Considering the damage you can deal with such a small squad, imagine what you can achieve with these heroes when they are fully supported by a real army. Infantry T'au infantry plays an important role in this faction and can be relevant at all stages of the game. It is the unit type that synergizes the most with T'au heroes, especially with Cadre Fireblade. All these units require Food and Ore to build and have an upkeep in Food. Fire Warriors are basic infantry units that can deal a decent amount of ranged damage on their own. They are tough enough to withstand a few hits in the early game. They can use their Markerlight (every turn), Deploy Drones (10 turns cooldown) and Bonding Knife Ritual (10 turns cooldown) abilities and some grenades if you research them. Note that they double their attacks when they stand right next to their target, so do not hesitate to move up close when you intend to go for a kill. Pathfinders are like tactical Fire Warriors. They can deal a burst of damage at the cost of some health, but they are more fragile than Fire Warriors. They can use their Markerlight (every turn), Scout (3 turns cooldown), Deploy Drones (10 turns cooldown) and Bonding Knife Ritual (10 turns cooldown) abilities and some grenades if you research them. They come with 3 different unique speciality drones that only they can deploy. It is relevant to note that their MB3 Recon Drones have twice the range and the attacks of standard MV1 Gun Drones. The problem with this unit is that it is fragile, has a high cost and upkeep and the technology to unlock them is already in a tier containing other mandatory technologies to research. All of this makes it hard to justify researching and making them when XV8 Crisis Battlesuits are not too far away in tier 4. XV8 Crisis Battlesuits are much tankier and deal more damage than Fire Warriors. They only have the Deploy Drones (10 turns cooldown) and Bonding Knife Ritual (10 turns cooldown) abilities, but they are equipped with Jet Packs allowing them to move quickly and stand on water or Wire Weed. They can host one support system upgrade once you unlock them. One of their attacks has a range of 2 tiles and the other has a range of 1 tile so move up close when you intend to go for a kill. They are generally great against infantry with their flame weapon. You can intentionally block their line of sight in forest to make sure their overwatch attack includes the flame weapon at range 1 that ignores forest cover anyway. XV25 Stealth Battlesuits have no health, but they have a high armor and 50% ranged damage reduction from Stealth and Shrouded. This makes them extremely squishy to melee attacks, decently resistant to ranged attacks and extremely resistant to ranged attacks when standing on an outpost or defending your city tiles. Their melta Fusion Blaster can deal a devastating amount of damage to high armor targets and structures, especially with the help of Volley Fire from Cadre Fireblade. They are also equipped with Jet Packs and do not trigger overwatch attacks when moving. They also have access to Markerlight (every turn), Deploy Drones (10 turns cooldown) and Bonding Knife Ritual (10 turns cooldown) abilities. They can host one support system upgrade once you unlock them. You must have a good knowledge of the game's units to know what this unit can go up against and what it should avoid. The fact that Stealth Battlesuits have so few health offers the benefit that you can fully heal them in a single turn with an Ethereal or a Builder Drone, which makes them a frustrating target to take out if your opponent only has ranged units available. Lastly, but not least, the XV88 Broadside Battlesuits are the final heavy hitting infantry of the T'au faction. They have a lot of armor and decent health. They also have access to Seeker Missile (5 turns cooldown), Deploy Drones (10 turns cooldown) and Bonding Knife Ritual (10 turns cooldown) abilities. They can host one support system upgrade once you unlock them. They have a three tiles ranged attack with high damage, armor penetration and accuracy. They also have a two tiles ranged attack that requires no line of sight with decent damage, high number of attacks, low armor penetration and high accuracy. Their accuracy drops by half after moving for all attacks, including Seeker Missiles. Because of all of that, Broadside Battlesuits will do okay damage if they move, but they will deal twice more damage if they do not have to move to attack and they will deal 3.5 times more damage if a Cadre Fireblade with maxed Volley Fire stands next to them. Broadside Battlesuits can easily one shot a lot of targets when they gather those conditions, making it a very powerful unit to defend positions on the map or to slowly push back the opposing army by alternating between standing + shooting and moving + shooting. If you manage to bring these within a range of two next to a city with a Cadre Fireblade, they will melt down the city center on the next turn if they are not dealt with immediately, especially if you pull off the Zephyr's Grace trick I described in the city busting hero squad section. Auxiliaries You can use the action Convert Auxiliary to convert Kroot Hounds and Vespid Stingwings to your cause. So it is worth understanding how to use these troops at their best. They will be very useful in the early game, but will eventually be replaced by better troops. Note that converted auxiliaries units can be healed by a Builder Drone and have an upkeep in Food (about one Food per auxiliary per turn). Kroot Hounds have a lot of mobility, even through forests and imperial ruins. They have Infiltrate so they do not trigger overwatch attacks. Their morale is easy to break however. Hide them in forest to protect them since it grants them increased ranged damage reduction. They only have a melee attack. Vespid Stingwings have a lot of mobility as well, even through forests and imperial ruins. They have Jump and ignore the enemy’s zone of control which is great to surround an enemy unit. Their attack is ranged, but its range is only one tile. They also get a bonus when standing in ruins. Monstrous Battlesuits These three oversized battlesuit units are endgame units made in the Crisis Center building. They do not benefit from Cadre Fireblade abilities, but Ethereals and Commanders can heal and buff them. Have them stand next to each other or next to a vehicle to gain +1 accuracy from Fire Team passive ability (except for Stormsurge). All these units require Ore and Energy to build and have an upkeep in Ore. The XV95 Ghostkeel Battlesuit shares some similarities with the infantry Stealth Battlesuits. It has more health, but relies a lot on ranged damage reduction to survive, which makes it rather fragile to melee attack, especially compared to a Hammerhead Gunship that would be unlocked at the same research tier and have the same cost and upkeep in resources. This unit has a Jet Pack and can move faster through cover. It has an aura of fear to demoralize, a Hammer of Wrath (3 turns cooldown), an Accuracy debuff (5 turns cooldown), a Deploy Stealth Drone (10 turns cooldown) and a Bonding Knife Ritual (10 turns cooldown) ability. Stealth Drone can grant a unit +33% ranged damage reduction. It can host two support system upgrades once you unlock them. Cycle its weapon depending if you are facing a squad or a single target. Build a few of those units if you really need them and switch to Riptide Battlesuits when they become available. XV104 Riptide Battlesuit is much more resistant than the previous Ghostkeel Battlesuit. It also has more range and deals more damage. This unit has a Jet Pack and can move faster through cover. It has an aura of fear to demoralize, a Hammer of Wrath (3 turns cooldown), a Deploy Shielded Missile Drones (10 turns cooldown) and Bonding Knife Ritual (10 turns cooldown) ability. It also has three Nova abilities that share a 2 turns cooldown and cost an additional 10% max health to activate. Nova shield provides a strong 50% invulnerable damage reduction for a turn, Nova Boost grants +2 movement for a turn and lastly, Nova Fire grants +67% attacks for a turn. Having an Ethereal around is useful to perform maintenance after using Nova abilities. All these abilities allow a Riptide battlesuit to adapt to various situations depending if it needs to tank damage, reposition quickly or deal more damage. It can host two support system upgrades once you unlock them. Cycle its weapon depending if you are facing a squad or a single target. Build these units until Stormsurges are available. Lastly, the KV128 Stormsurge is by far the strongest T'au unit. It has high health, high armor and a Feel no Pain ability that can be further improved by the Stimulant Injector support system. It has an aura of fear to demoralize, a Hammer of Wrath (3 turns cooldown) ability, a Destroyer Missile (5 turns cooldown) and a Stomp (1 turn cooldown) attack. It can host three support system upgrades once you unlock them. I recommend Stimulant Injector, Advanced Targeting System and Vectored Retro-Thruster. This unit has no Jet Pack, but can move faster through cover. It is Fearless, so very hard to demoralize. It is packed with weaponry that can attack at a range of two or three tiles. If it attacks and has not moved during the turn, all its ranged attacks (so everything except Stomp attacks) are doubled. Be careful, using Stomp counts as moving for some reason, so if you do not intend to move your Stormsurge, always use the Destroyer missile and normal attack before Stomping nearby units. Just on its own, a Stormsurge deals an absurd amount of damage, especially when it has not moved. It is an ideal target for an Ethereal's Zephyr's Grace. Drones T'au have access to many Drone units that are usually deployed with a 5 or 10 turns cooldown, except for the Builder Drone that is a bit more special. All drones are considered as summoned units and will disband automatically after three turns, except for the Builder Drone. They can be used as utility or sacrificial troops for a great variety of tasks, but keep in mind that they do have a minor effect on nearby troops’ morale when they die (since most Drone unit are worth 1 XP at lvl 1, their death would affect nearby allied troops morale by -1 and nearby enemy troops’ morale by +1). Drones can benefit from all T'au heroes abilities. Most units generally have the choice to deploy either Gun Drones, Shield Drones or Marker Drones. But a few specialized units have different unique drones in their arsenal. I will not list them all because this guide is already long and there are many to cover. Here is some information on the most important ones. The Gun Drones are the first that can be researched and are very important to scout ahead, allowing you to take better strategic decisions, and to improve the damage and survivability of your units. Its attacks can pin enemies, but keep in mind that it only has a range of 1. Pinned enemies will have a hard time fleeing or reinforcing their position. The Shield Drones has no attack, but can grant a +17% invulnerable damage reduction to a nearby target. If you have trouble keeping key units or heroes alive, using this drone might be worth considering. In general, use them to be “in the way”, flanking your army or even blocking the frontline. If they die tanking one strong attack, that is what drones are for. The Marker Drones has no attack, but it has the Markerlight ability to mark targets. This can be useful to remove the ranged damage reduction of units hiding in cover. Like I said, the Builder Drones is a special one since it is not summoned by a unit and it does not expire. It needs to be built in a city and is a permanent unit. Its most important role is to found new cities for your empire. Its second most important role is to heal your units. Repair works on any T'au unit or city and can be used every turn to restore 8 health, which is a lot since most T'au units have low health, especially infantry. This can greatly improve the speed at which your army progresses since you won't have to constantly wait multiple turns for your units to heal back up before moving onward again. Lastly, the builder drone can clear features on tiles. Make enough of them to build your new city and support your army, but be careful, this unit is extremely precious and should remain in the backline, away from danger, since making a new one slows down the development of your cities which has a direct impact on the growth of your economy. Those were the four main and most important drones available with T'au. The others are found in specialized units as Deploy “specialized” Drones abilities. Vehicles Like I already said, I am not as overwhelmed by T'au vehicles since they lack synergy with T'au heroes other than the Commander. All T'au vehicles are skimmers that can hover over water, but most of their upgrades are locked behind technologies that need to be researched. I will still describe these units here even if they are not the focus of this guide. The Tx4 Piranha is a fast scout unit with low health and low damage. It can have Seeker Missiles, Gun Drones and has access to Jink abilities. It can be useful for early exploration or capturing unguarded encampments in the back line once fighting begins. Otherwise, use this unit as a cheap caster that quickly makes drones and shoots seeker missiles once you are past the early game. The TY7 Devilfish is a transport unit with decent health and armor. It can have Seeker Missiles, Gun Drones and has access to Jink abilities. It only has 4 movements and 4 cargo space which is not a lot for an army with battlesuits that usually take up 3 spots in a transport. The TX7 hammerhead Gunship is a good tank unit with decent health and armor. It can have Seeker Missiles and has access to Jink abilities. Have it stand next to another vehicle to gain +1 accuracy from Fire Team passive ability. It has a powerful 3 tiles ranged attack and a 2 tiles ranged attack. It is usually the unit you require to survive in the midgame. I usually start a vehicle building in each of my 3 cities just before researching Hammerhead Gunship technology. Try to escort your tanks with a Commander hero to at least benefit from Metastrategies buffs. Note that these tank units have a high health which makes them difficult to repair quickly with Builder Drones compared to other infantry units. Lastly, the TX78 Sky Ray Gunship is another tank with more health than the Hammerhead Gunship, but that deals less damage with its standard attack. It can launch very powerful Seeker Missiles twice and has access to Jink abilities. All enemy units targeted by this tank are considered as marked during the attack, which might be relevant on a map that offers a lot of cover to ranged attacks in the terrain. The philosophy behind using those is to apply lots of burst damage when joining the frontline with the Seeker Missiles and then to tank damage for your other units. Air units T'au air units are unimpressive at best compared to the rest of their arsenal. They lack health, armor and damage to justify getting and building them. They have similar issues as the ground vehicles since they also don't synergize well with T'au heroes. The AX3 Razorshark Strike Fighter is the worst of the two T'au air units. So let's just move on to the other one... The AX39 Sun Shark Bomber costs and looks almost the same as the Razorshark, but it offers a few interesting advantages. It has a movement of 6, like the Razorshark. It has Seeker Missiles (5 turns cooldown), specialized Interceptor Drones (5 turns cooldown), a Pulse Bomb attack (3 turns cooldown) and Jink (3 turns cooldown) abilities. The Pulse Bomb attack deals massive damage to infantry units in general while the Interceptor Drones have a special attack that is very similar to the one of Pathfinders. Having this kind of glass cannon attack on an expendable and renewable drone with no upkeep is much more impactful than on a Pathfinder though. These two abilities present on the Sun Shark Bomber and absent from the Razorshark Strike Fighter makes the bomber much more useful in practice. All enemy units targeted by this bomber are considered as marked during the attack, which might be relevant on a map that offers a lot of cover to ranged attacks in the terrain. Strategy The build order in this guide gives you some pointers on what to build in your first city, but what objectives should you pursue at different stages of the game to win ? Exploration phaseFocus on taking control of outposts to help your economy and gain vision and map control. If you have a Jokaero Encampment, found your first city next to it to go for a hero build and save your Influence for heroes, otherwise, go for Wisdom Shared and save Influence to activate it once or use your Influence on Convert Auxiliaries to remove enemies of your path and increase your army size, which allows you to explore faster and snowball. Start training more infantry units to accelerate your exploration. Identify nearby locations that would be best candidates for two new cities. You need at least one city with access to a Jokaero Encampment. A city placed on a choke point for units caused by the terrain features (water, cliffs, rivers, forest and imperial ruins) can provide you a really strong defensive position that will buy you enough time to eventually win the game if you are attacked early. First contact with enemy factionIdeally, your three first cities should be built by then. Try to wrap up the exploration phase. You could try killing the enemy unit that triggered first contact, but it might be safer to start regrouping your forces at a location that you can defend like terrain tiles with cover, outposts or inside your city. Expand the city where you might have to defend to create safer tiles for your units. T'au is quite vulnerable before getting some Hammerhead Gunship or a geared up Commander and eventually Broadside Battlesuits. On top of that, since production is divided between your cities because of Utopia, your production of new units will happen in bursts (your three cities will start and finish your three first Hammerhead Gunships almost all at once, creating a burst in your army strength). If necessary, fall back and wait for those timing rather than trying to fight at all cost an early push that you simply can't defeat. Defending & AttackingAs a frontline of combat draws itself on the map, it will be up to you to decide when is the correct time to attack and secure kills and outposts or fall back to a position that should be easier to defend. There is too much to cover on this topic and it is out of the scope of this guide. Use the information and tips I scattered in my unit descriptions. Be wary of overwatch attacks when advancing (send drones or tanky units first at locations where you would take less damage). Melee units should be a prime target to eliminate because some of your troops rely heavily on ranged damage reduction to survive. Go on water with hovering battlesuits when possible if it lets you avoid melee attacks and to exploit positions that are inaccessible to standard ground units. Reaching the endgameIf you reach the stages of the game at which you managed to train a few Broadside and Riptide Battlesuits, one or two Cadre Fireblade and one or two Commander, things are looking very good. You should have an easy time defending a position with these units. Train an Ethereal if it is not already done to mass heal your army when necessary. If your units traded well, you might already be on your way towards taking down an enemy city and securing victory at this stage ! Otherwise, the final stage will be to start training Stormsurge and train more Cadre Fireblade to grow your economy faster. If you expect this to be a long game, or if your cities are too far away from the frontline (in very large maps), consider founding some more cities to increase the growth rate of your economy or to train units closer to the frontline or to secure new defensive positions. The longer you can keep this up, the more troops you will be able to sustain, until your victory becomes inevitable due to an overwhelming economical advantage over any other faction, as I have shown in the last screenshot I included. Going in Food shortage As I mentioned in the sections about shortage and population growth, you can go into Food shortage with T'au and use Many Mouths to get Food for infantry production. The advantage of doing this is that you can deactivate all Food building and use the population in your cities elsewhere and most importantly that your population and infantry Food upkeep will not really matter anymore. The cost of doing that is that population growth will slow down in your cities and it will cost you pretty much all the Influence you can spare. Extra Food that can't be spent immediately making units will also be lost, which can be very wasteful depending on the game speed. As an example, a Broadside Battlesuit costs 30 Food at Fast speed and 40 at Normal speed. At both speeds, Many Mouths costs 80 Influence and gives you 40 Food, so you can afford one Broadside Battlesuit at both of those speeds, but you will then lose the 10 extra Food in a Fast speed game (unfortunately a Fire Warrior costs 11.25 Food in that context). Usually, if you go for this strategy, you can completely skip Food building construction. Personally, I don't favor this strategy because I prefer to spend more Influence elsewhere. You really need to have a lot of infantries and a large Food upkeep to justify paying Food with Influence at a 1:2 ratio to justify using this strategy in my opinion. Note that even if I try to avoid Food shortage, I still research Many Mouths after unlocking Broadside Battlesuits to help kickstart their early production. Capping city population With only one or two Infantry Building, you can cap cities at 7-8 population. This is usually seen in PvP games. The philosophy behind this idea is that, since the game is likely to end soon at this stage in PvP, you spend much less resources on city and economy growth and spend almost all of it on army production to tip the scale in your favor. Additionally, as discussed, growing large cities before you can train level 6 Cadre Fireblade is problematic with T'au, because of Utopia. Capping cities that low in population is an “All In” that the game will be ending relatively soon, because you will most certainly eventually lose to opponents that keep growing their economy if they manage to defend against you. You could also consider doing this at 13-14 population since this requires only one habitation module and there is still room for relevant unique buildings in your cities past 7-8 population. I think both of those are worth considering for PvP, although I find capping at 7-8 population is really low. For PvE games, go for endless growth supported by Cadre Fireblade, it is more fun ! Summary I tip my hat to you if you read the whole thing. I hope you can find some of the tips I gave useful to your games playing T'au or playing with T'au allies or even playing against them ! As you noticed, T'au units (heroes in particular) have a lot of abilities that must be taken into consideration to fully take advantage of the toolkit they offer. Deciding when and what to move and how to most harmoniously mix your heroes within your army has a huge impact on the amount of damage your army will be able to deal during a turn. “The city busting hero squad” I described and explained is certainly an extreme example of this. I also hope that this guide highlights how unique the T'au economy is. That Utopia is an amazing advantage in the early game over other factions and that, even if it becomes a drawback in the mid game and late game, T'au has the tool already not only to mitigate this drawback, but to develop a truly unstoppable economy with many cities with ever increasing production and Loyalty. All that is required is not to neglect Influence production and aggressively train level 6+ Cadre Fireblades in the very late game, until the end of the game. Thank you for taking the time to read this guide. Your constructive comments and feedback are more than welcome if you want to share them.