换一换
换一换 


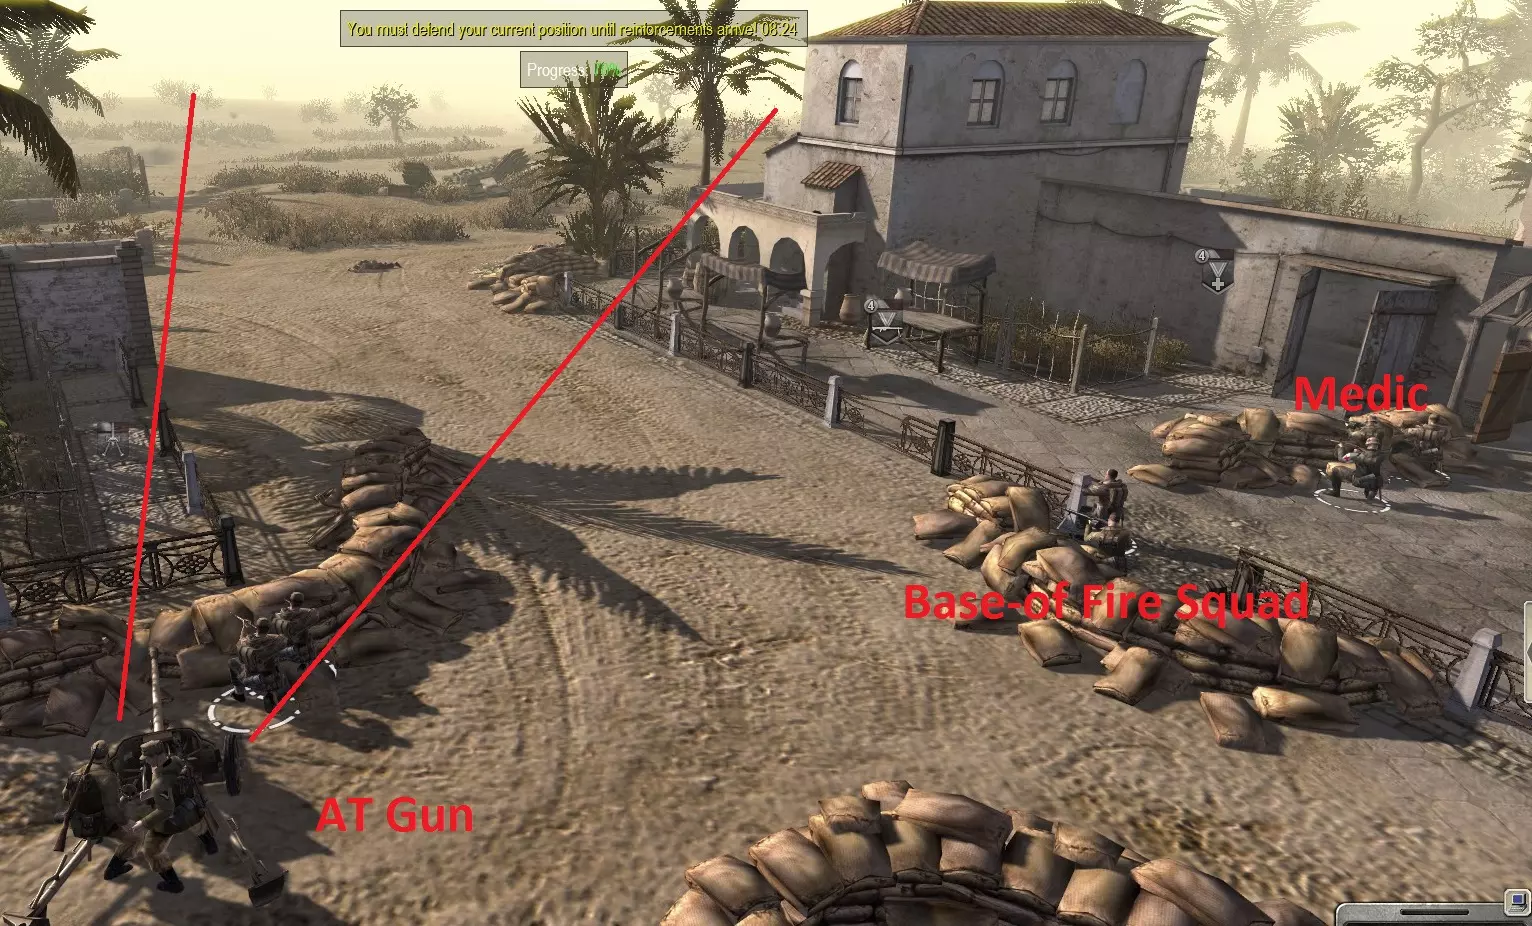
Men of War: Assault Squad 2 is not for the faint of heart. It is no Comany of Heroes--you cant just bludgeon your way through with explosions and cannons blaring. Victory will require methodical planning, sound intelligence, diverse unit selection, careful deployment, and above all, patience. If you get the hang of it, theres no other realistic WWII simulator like it on the market. This guide will focus mainly on the single player game (Skirmish mode), but there is likely something here for everyone. There's not a ton of comprehensive information out on this complex game, so the guide aims to be a one-stop shop to get newcomers' feets' wet with discussions on basic controls, game types, battle group composition, tactics, and overall battle strategies without having to watch dozens of videos. Being a noob guide, specific suggestions may not be applicable on higher difficulty levels--this was written for something like a "normal" difficulty playthrough. Hard+ difficulty is HARD. The enemy will throw everything they have at you, and fast (while you're fielding some infantry, they're fielding 20mm cannon. If you're fielding a medium tank, they're fielding a heavy tank [you'll never see a King Tiger on normal!]). If you can survive this on your own, then you don't belong reading this guide (non-superhumans must bring a friend). Also note that this is not a traditional walkthrough--I will not delve into the basic principles of WWII warfare or how to beat each mission (each map is like a sadistic little puzzle, why spoil the fun?), rather it emphasizes strategies that may be applied in most situations. If you don't know about these things, then you best whip out a few programs on the History Channel before you causal gamers stop in here. If you are looking for the skinny, you've come to the right place--read on! Please give a "thumbs up" if you learned something, or at least got a few chuckles. "We're going to hold on to him by the nose, and kick him in the ass. We are going to kick the hell out of him all the time, and we're going to go through him like crap through a goose!" - General George S. Patton Key Controls You may want to make your first stop the game's set of tutorial missions to really get acclimated. If you want the crash course, though, here as some basics that aren't so intuitive but oh-so helpful to know. Master the following in order to keep up with the fast pace of the game as the enemy will be constantly hounding you sooner if not later: Action Grouping - select the units you want and press shift + number. Repair - it seems that most (if not all) vehicle crews carry a repair kit. Park your thing in a safe place, hit the repair icon on the UI, and out pops your repair guy. You could also grab a spare tank crew and send them out for a combal repair. Oh, and keep your vehicles fully crewed with drivers and gunners (anyone can do it although tank crews are more effective). Resupply - Move your troops within the resupply radius of a supply truck. You can also do this manually if you like to micro (press I). Revive - Click on a squad with a medic (or the medic), then right click on the downed soldier (only works if they have a bloody orb over their corpse). Keep your medics alive at all cost and out of harm's way wherever possible, they will be as good of a friend to you as the guy with the machinegun. Run(!) - Your troops can walk or run into battle, depending on whether you single or double right-click. One click, your troops will take their sweet time to follow your orders and may get hung up shooting the enemy gung-ho while standing around with their parts in their hands. On the other hand, this will not expend their stamina. Two, and your troops will up the action, making a beeline for relative safety (or certain doom). Basic Tips for Getting Started Hit the pause button and take a pause. look around. Think about your next steps. It may save the game for you. Also, it is possible to slow the game down when things are getting really hairy, so play around with this. It's not cheating, I promise (come on, you can't even issue orders while paused!). Save early and often, especially right before and after battle milestones. Any time find that you set yourself up with a nice defense, or you are ready to make your big push, save the game. It will probably go wrong. In the words of Patton, "attack, attack, attack!" Don't dally once you get into combat. Prolonged firefights are not ideal as the enemy's available reinforcements are unlimited. Your units will run out of ammo quickly so plan your attack, pin the enemy, and promptly flank them to deliver the finishing blow. Look ahead on the map. Make a habit of watching the minimap for armor blips coming your way and see what's there. You should know what's coming down the pike so you can redeploy (or deploy) as necessary by the time they arrive, but be warned, enemy reinforcements will often move erratically. Most armor engagements are at range. Don't call in a shiny Tiger thinking you can just roll in and blitzkrieg--you are liable to get a tread blown off best-case, but more likely to get obliterated by a well-camoflaged heavy gun. In fact, blitzkrieg tactics are seldom (if ever) applicable the way the makers have lined up meticulously overlapping defenses for you to... explore, unless they have been properly neutered by infantry, mortars, artillery, and special attacks. Direct Control. You can use first person mode on anything. This is fun. I find this useful particularly when my guys aren't doing what I want them to do (they're usually pretty good shots). Select a unit and press "E." For example: your AT gun is careless plunking away at enemies at range and some armor rolls up on your flank posied to ruin your day. Go into first person, point at a weak point on their armor (more on this later), and put a swift end to the shennanigannery. You can even mill around in this mode with the ASDW keys! If you want to get geared up for "Hard" difficulty, you should definitely be well-practiced with direct control as this is an indispensible skill. You may need a repair box in your inventory to do a repair (derp). It is better to have and not need, than to need and not have. Don't misinterpret this--I'm saying don't spend your points needlessly. A great tip that I attribute to AfricanRhino. Think if you can accomplish more with less. Brute force is rarely the answer here--consider all options at your disposal. Always be on your guard. expect the unexpected. Even when assaulting, the enemy will perform routine counter attacks, especially when you capture a command point it seems. Be ready to hold on to what you take (unless you're going for a momentary unit tree boost to deploy some heavy vehicles). Murphy's law is true. You may plan as I describe, but be flexible and mix it up if conditions call for it. With that said, refer to "save early and often." Infantry Warfare Basic Infantry Tactics Don't let anyone fool you. Infantry are the cornerstone to any effective fighting force, whether it be screening armor, defending entrenched positions, or flushing out hairy AT positions. Try to keep your infantry platoons around 4-6 in number (guerilla forces excepted) and use action groups to keep them straight (although you can merge and subdivide at any moment when called for). Scout the approach, send in a base-of-fire unit to get the party started, then swing around the side with your flankers to bring the hurt with some enfilade fire. Never try to cover significant open ground under fire as stamina will quickly deplete, and your poor guys will be left holding the bag. For a quick advance, use leapfrog tactics, where you execute the above maneuver, and follow up to the next position using your base of fire squad. This is risky. Don't get ahead of yourself, cowboy. Infantry are fragile. Always move from cover to cover. Pick sturdy looking things like stone walls and boulders as you advance. Trenches are always the best choice. Wait for your machine gun crew to set up and suppress the enemy before your next steps. Be sure to spread your troops out when holding a position against nasties i.e. howitzers (small groups of 1 or 2), as one stray shell will spoil your whole little brigade. Later down the road, upgrade to elite mechanized infantry for an extra punch (although stock infantry will still perform admirably). These guys are great for rolling in in a blaze of glory, unsually mounting several machine guns to chew through enemy infantry. Count on them to get some serious dangerous work done, including bolstering your AT squads--they always carry bazookas and so can replace AT rifles. Don't forget theyre still mushy infantry so they'll also go out in said blaze of glory if you put them into sticky situations (all dozen-or-so of them). Platoon Composition 1. Base-of-fire squads. These guys will fight at range and keep your enemy's head down while you figure out how to squash them, and can adequately defend a location against soft targets. They will be a potent mid-to long-range force and will support your advance. They should be primarily comprised of a machinegunner to provide a base of fire, a bunch of rifemen, and a medic. Most importantly, add an AT squad. There is little worse than slogging up the road early-game to find an armored car or the like come rolling up, catching you with your pants down because you dont have armor yet. Also, they are good with base-of-fire groups because they are just behind the main line, so while your flankers are creating a distraction (getting obliterated), they're ready to pick off any cocky tanks as they go zipping by willy-nilly. On the other hand, if all you've got are a couple of anti-tank rifles... well, you better bring along a small gun. 2. Flanking squads. If the base-of-fire squads are the anvil, these guys are the hammer. Combine a few submachinegunners and assault rifle guys with a flamethrower for some good close-range punch. 3. Supply truck(s). You will need the ammo. trust me. Start by simply moving all your troops into the resupply radius before you initate the engagement (first truck's free!). Keep these guys in safe places as you move along. 4a. Mortar(s). as soon as you got some dineros left over. Mortars are interesting and universally indispensible, particularly in groups for softening up a command point or defending against massed infantry. Especially useful when you don't have line-of-sight on your target, and when the enemy has an elevation advantage. 4b. Sniper(s). Sneak snipers in (either solo or under cover of your infantry) to poke the enemy from range, spearheading or supporting the advance, hiding them under a bush or something. Very useful for picking off machinegunners. These guys can really excel when you have an elevation advantage (even when you don't). In fact, there was this one time when I used a sniper to singlehandedly clear out an entire rail yard garrison of about two dozen entrenched and well-armed germans (AT guns, assault rifles, etc.) on hard. Very cool (try it for yourself, the Iskra Soviet mission). 5. A Reserve Squad. Cobble together whatever else you got hanging around and keep them coming up behind (sounded wrong) to plug any gaps, like when you didn't add that AT squad like I told you and one of your flanking squads got blasted out of the water by a marauding armored car. Always be sure to use them to man HMGs as you claim control points. Flanking Maneuvers How does base-of-fire and flanking work in practice, when the enemy is well-entrenched with good defensive lines? Consider the following scenario:
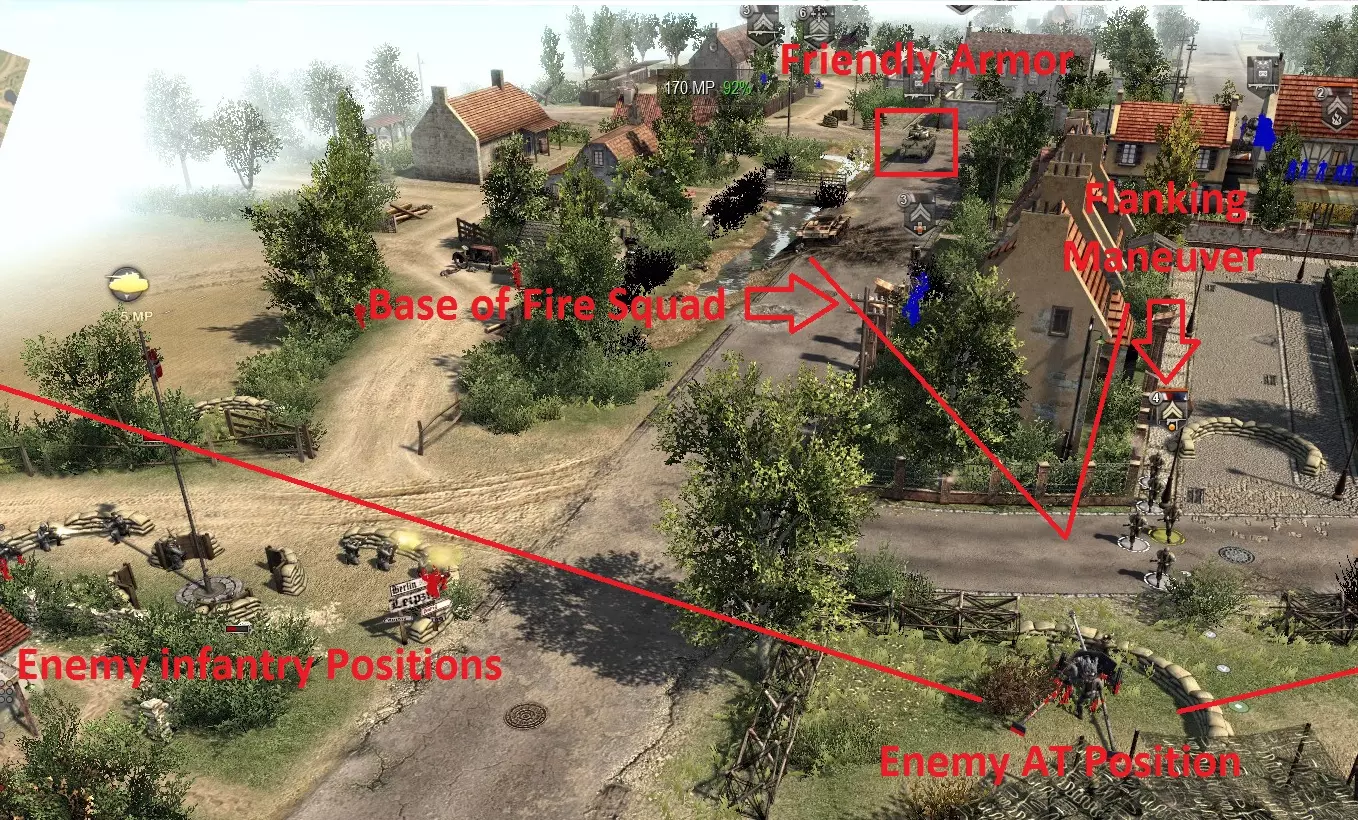
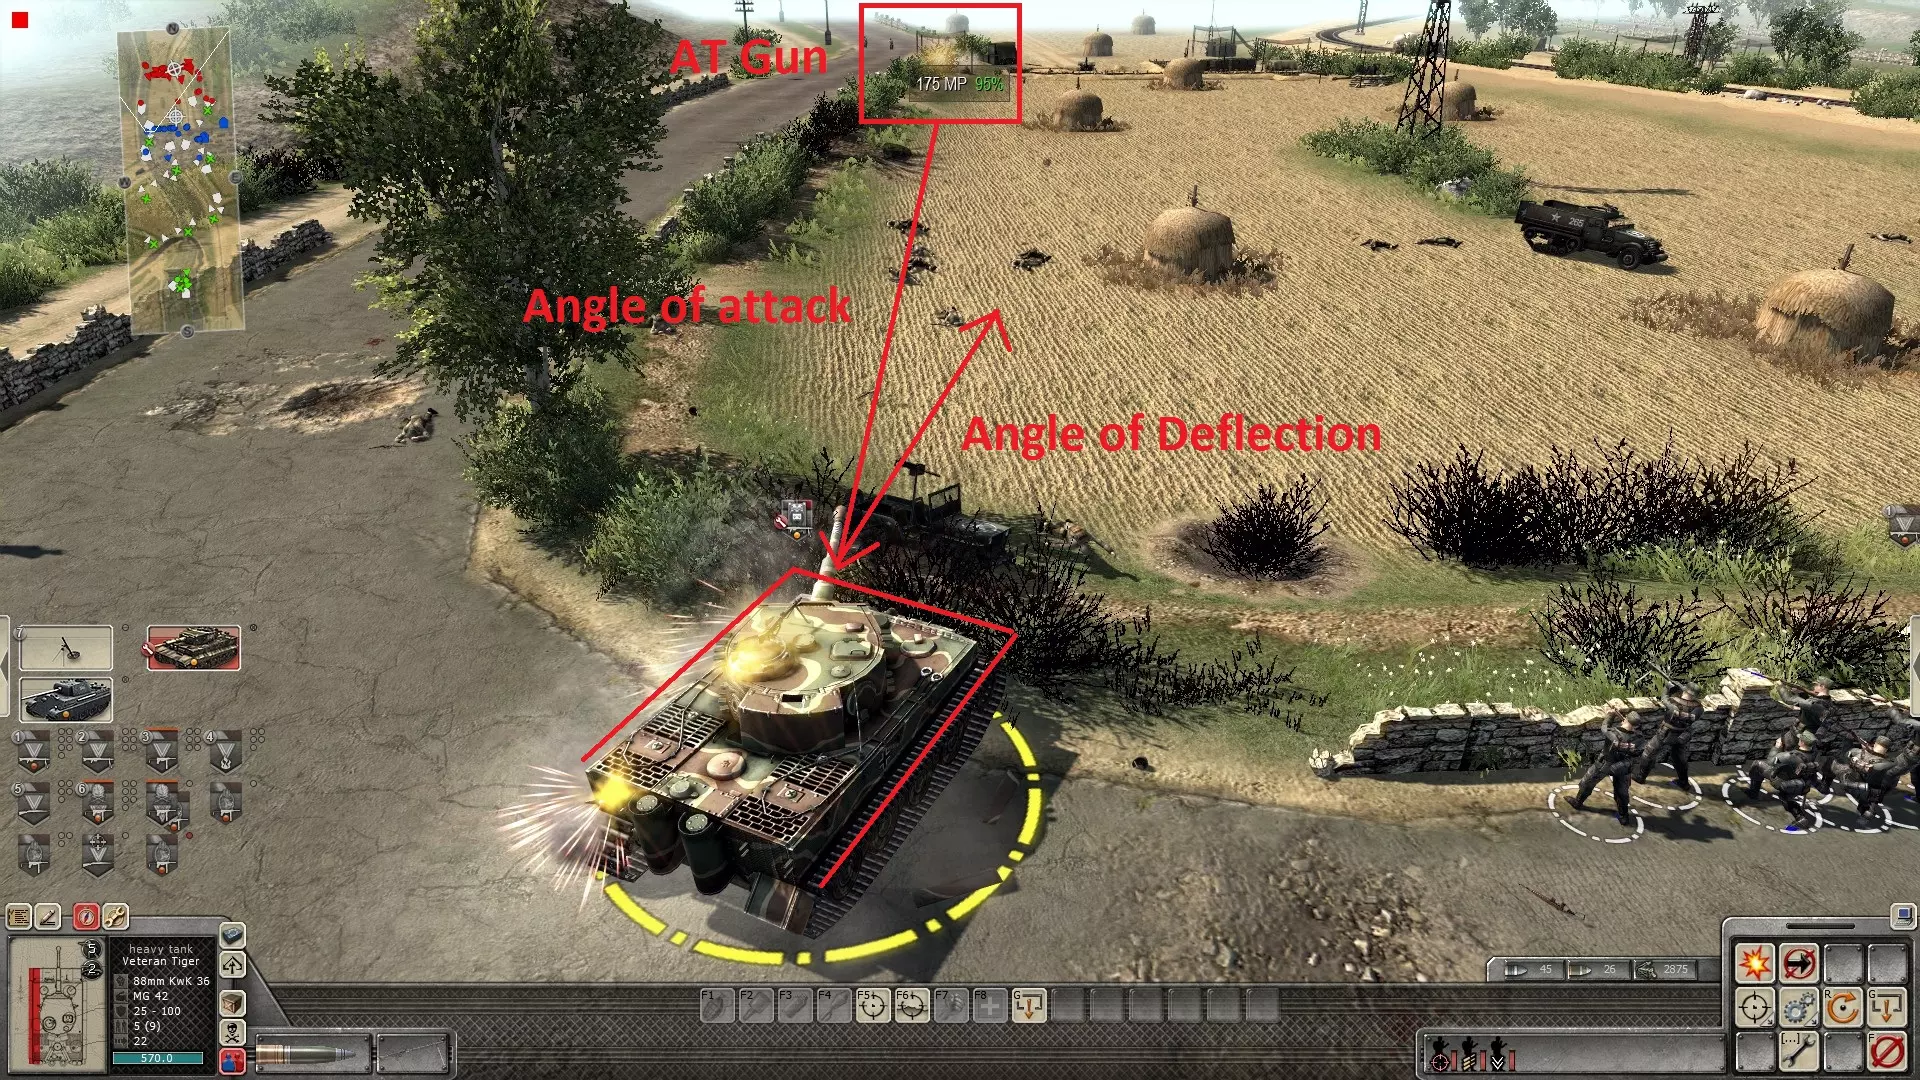
The placement of the enemy AT gun makes for a very dangerous approach, especially for that Sherman hanging around at the top of the image. Although he might give those entrenched troopers a headache, if we were to conduct a frontal assault, he would be subject to close-range enfilade fire from the AT gun facing his left armor (mercy!). If the infantry were to just buzz in, they would be in a world of hurt from all parties involved, especially as there is no decent cover from the AT. This position appears to have no suitable approach. Instead, the base-of-fire squad has carefully taken up a position between houses and a stone wall to get the attention of the enemy, but notice that the AT field of fire does not permit retaliation. This has caused a distraction sufficient to permit flankers to slip through the urban area on the right away from most of the trouble, getting the drop on the unsuspecting AT crew. A few frames later, the flanking squad has shredded the AT gunners with grenades and SMGs, and the tank is rolling up unchallenged down the main road to support their subsequent flanking of the soldiers in the sandbag positon. "Battlefield Thievery" On lower difficulties, this is not very useful at all. Tanks coming up against you are typically on par with what you have, or at least manageable to deal with. if you decide to give hard difficulties a go, you will need to beg, borrow, and steal to get ahead. When you are plunking around with T-34/57's and a Pather rolls into town, you bet your bottom dollar you want to grab that puppy for yourself when it goes down. Establish a perimeter, select a group of infantry and click the repair button, and take the thing for your own so you have a fighting chance. Guerilla Warfare Sneaking units around and placing infantry into brush cover is more effective than you might think, especially in multiplayer games where the fog of war mechanic is in effect. This type of cover actually can be decent as your guys will typically go prone (always use prone). Think of them as a force recon group. Wooded areas and light brush (I think you can even garrison trees?!) are great spots to put snipers and elite infantry like marksmen and AT squads, especially in harassment positions on the farthest flanks. Makeshift foxholes (i.e. impact craters) also work well for this. In small, well dispersed groups (one to two per position), these forces make impeccable flankers and can accomplish great feats. Dispersion is useful in keeping cohesion of this force type when encountering artillery fire (and always for that matter). In multiplayer, use them to get eyes on the enemy and encircle them, taking up positons where they least expect. Consider your rules of engagement, holding fire or switching to return only when appropriate to maintain stealth. Where possible, quitely tuck them away along roads and reinforcement routes. AT weapons are a bit OP in this game, so if the enemy is armor-heavy and light on infantry, this is a surprisingly resourceful way of defeating a top-heavy opponent. Armored Warfare Basic Armor Tactics Tanks are balanced based on real life, mostly, so your use of them (quantity) may need to vary with respect to quality (you've got your Germans, then, well... everyone else I suppose). First, look for weaknesses in the enemy lines before approaching. Target areas that are not under the overwatch of an AT gun and avoid them like the plague. Even losing a tank tread stinks--repairs take forever (allow for 5 minutes of work even on a tread). Advance your infantry first in these areas to clear the threat. ATs are deadly against infantry as well especially with HE rounds, so try to pin their guys from a safe place, pick the safest approach you can find, and sprint over there with you pew-pews (and hand grenades if you don't want to steal it) so your tanks can roll in and mop up. Armor is precious. I prefer to babysit them one at a time rather than lumping them into action groups to maximize effectiveness and flanking fire. Tanks are powerful when used properly yet expensive when squandered needlessly. Armor should therefore be used offensively only in wide open spaces where they can attack with impunity (e.g. fields), otherwise employ defensive tactics and screen with infantry. Avoid close contact with the enemy unless safe (they will chuck AT grenades and the ilk). If you are going to plow the road, don't pick urban areas unless they have first been secured by your infantry. Also make sure your tanks are fully crewed so they are operating at maximum efficiency (scrolling over the tank shows the crew requirement and any additional transport capacity). Getting that second machinegun up and operational again can mean a big difference when the zerg swarms approacheth. Ammunition Selection Use the right ammo for the right situation. Vehicles have a few options. Select a vehicle and look to the bottom left of your UI. Use HE (high explosive) against infantry and APCR (armor-piercing composite rigid) against scaries at close range (good penetration). Do I need to explain what to do with regular rounds too (if you are already confused about all this jargon, just go with standard AP)? Armor Selection Armor compositon is greatly continent upon the disposition of the enemy (think rock-paper-scissors approach). Certain tanks are useful in certain situations: Armored Cars. Use these in the early game to compliment flanking infantry as a fast-attack force to turn your foes into a bloody little pulp. How better to flank your foe than accomanied by a mobile 20mm cannon? More useful late-game as a cheap and speedy way to defend control points that may be subject to incursions by slithering enemy infantry. Light Armor. Versatile especially in the early game in combating enemy armor, light vehicles, and supressing/overwhelming unsupported infantry (think HE rounds). Keep them far, far away from enemy AT and (heavier) enemy armor. Medium Armor. These typically form the backbone of your force. Effective at performing all the roles of light armor (albeit a bit more slowly) and spooking heavier ones from the flanks, while soaking up more punishment. Also a very useful addition to your reserve force. When in doubt, grab a medium tank (or just save up). Heavy Armor. Will annihilate most all enemy vehicles with powerful, long range, large-calibur shells like a knife slices through warm bread. Weaknesses include poor mobility and turn speed. These guys are by no means invincible, either--a Tiger tank tread can be damaged quite readily just as with smaller vehicles, leaving you with a big, immobilized (but still boomy) tin can. Support with infantry. Tank Hunters. These guys are interesting but can be more difficult to deploy. Note that many hunters are often plagued by lack of a rotating turret, so you need to gain a good position before engaging large targets in particular. On the upside, their weapon is usually more comparable to that of a heavier vehicle. Advanced Armor Tactics I tend to deploy armor defensively except when supporting or leading an advance. Always present the enemy with your front when possible. If in a defensive posture, point your vehicle at a (preferably) 45 degree angle towards the enemy to maximize deflection of shells even on tanks with relatively flat armor (e.g. a Tiger). Point the thing the right way and the enemy can plunk away at your armor all day (at least the big ones) with little effect.
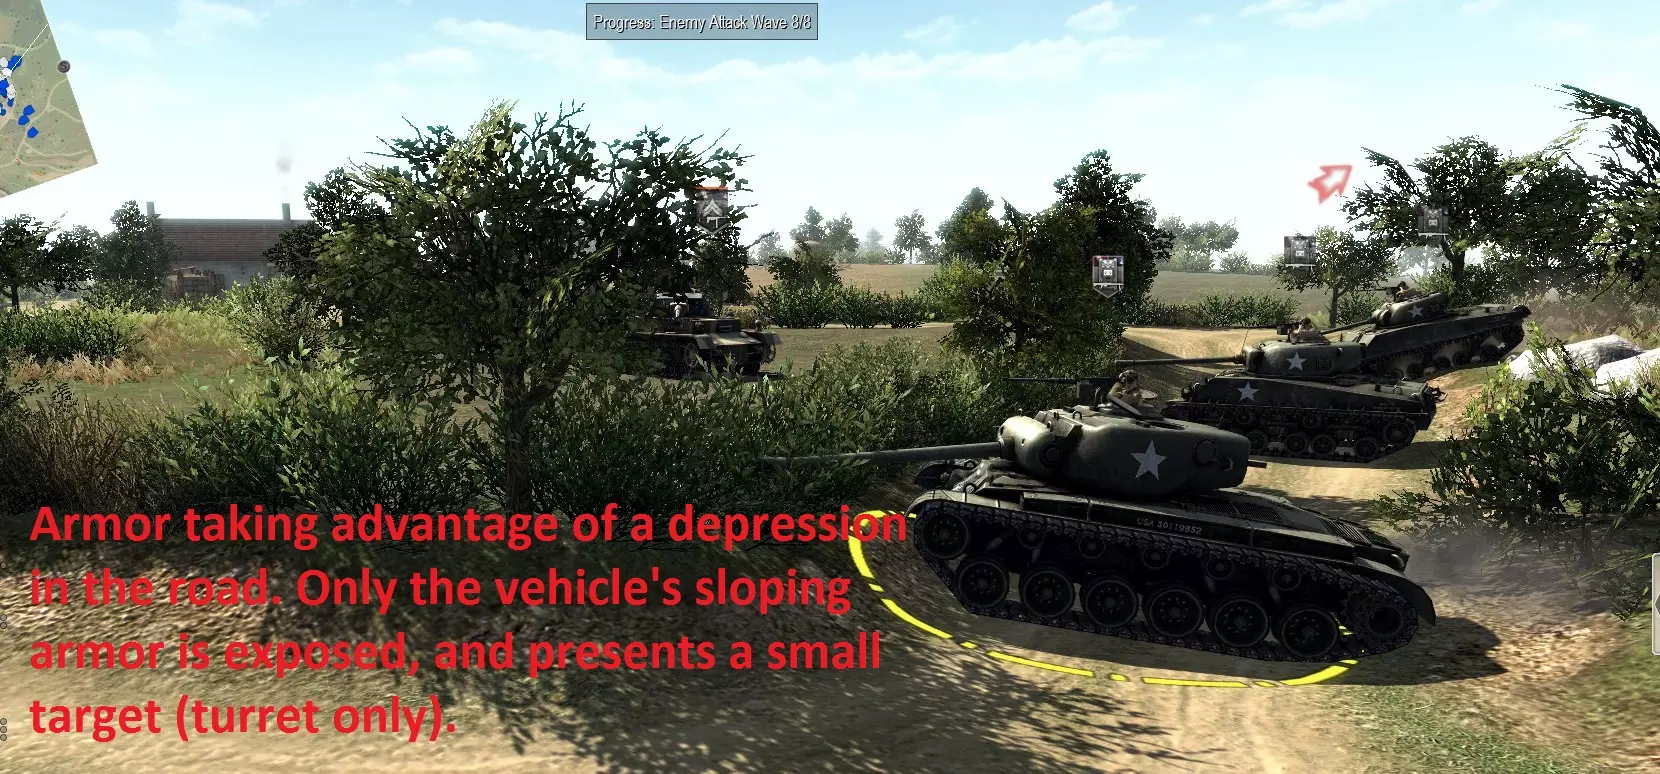
注意你的载具相对于敌人的位置。通常来说,装甲的正面(炮塔、前装甲板)最为坚固,越靠近后方(下首上装甲、顶部、侧面等)防护能力越弱。倾斜或有角度的装甲(例如德国黑豹坦克)比垂直装甲更有效。 进攻时,尽可能用步兵掩护你的装甲部队。坦克始终容易受到反坦克步兵和敌方装甲部队的侧翼攻击。 高度和位置至关重要。将你的载具部署在敌人无法攻击到你的地方(但要确保你能攻击到他们)。当你没有主动操作载具时(即使在操作时也应如此),始终利用建筑物和自然地形来掩护你的载具。如果道路上有沟壑,把坦克停在里面,看着敌人束手无策。
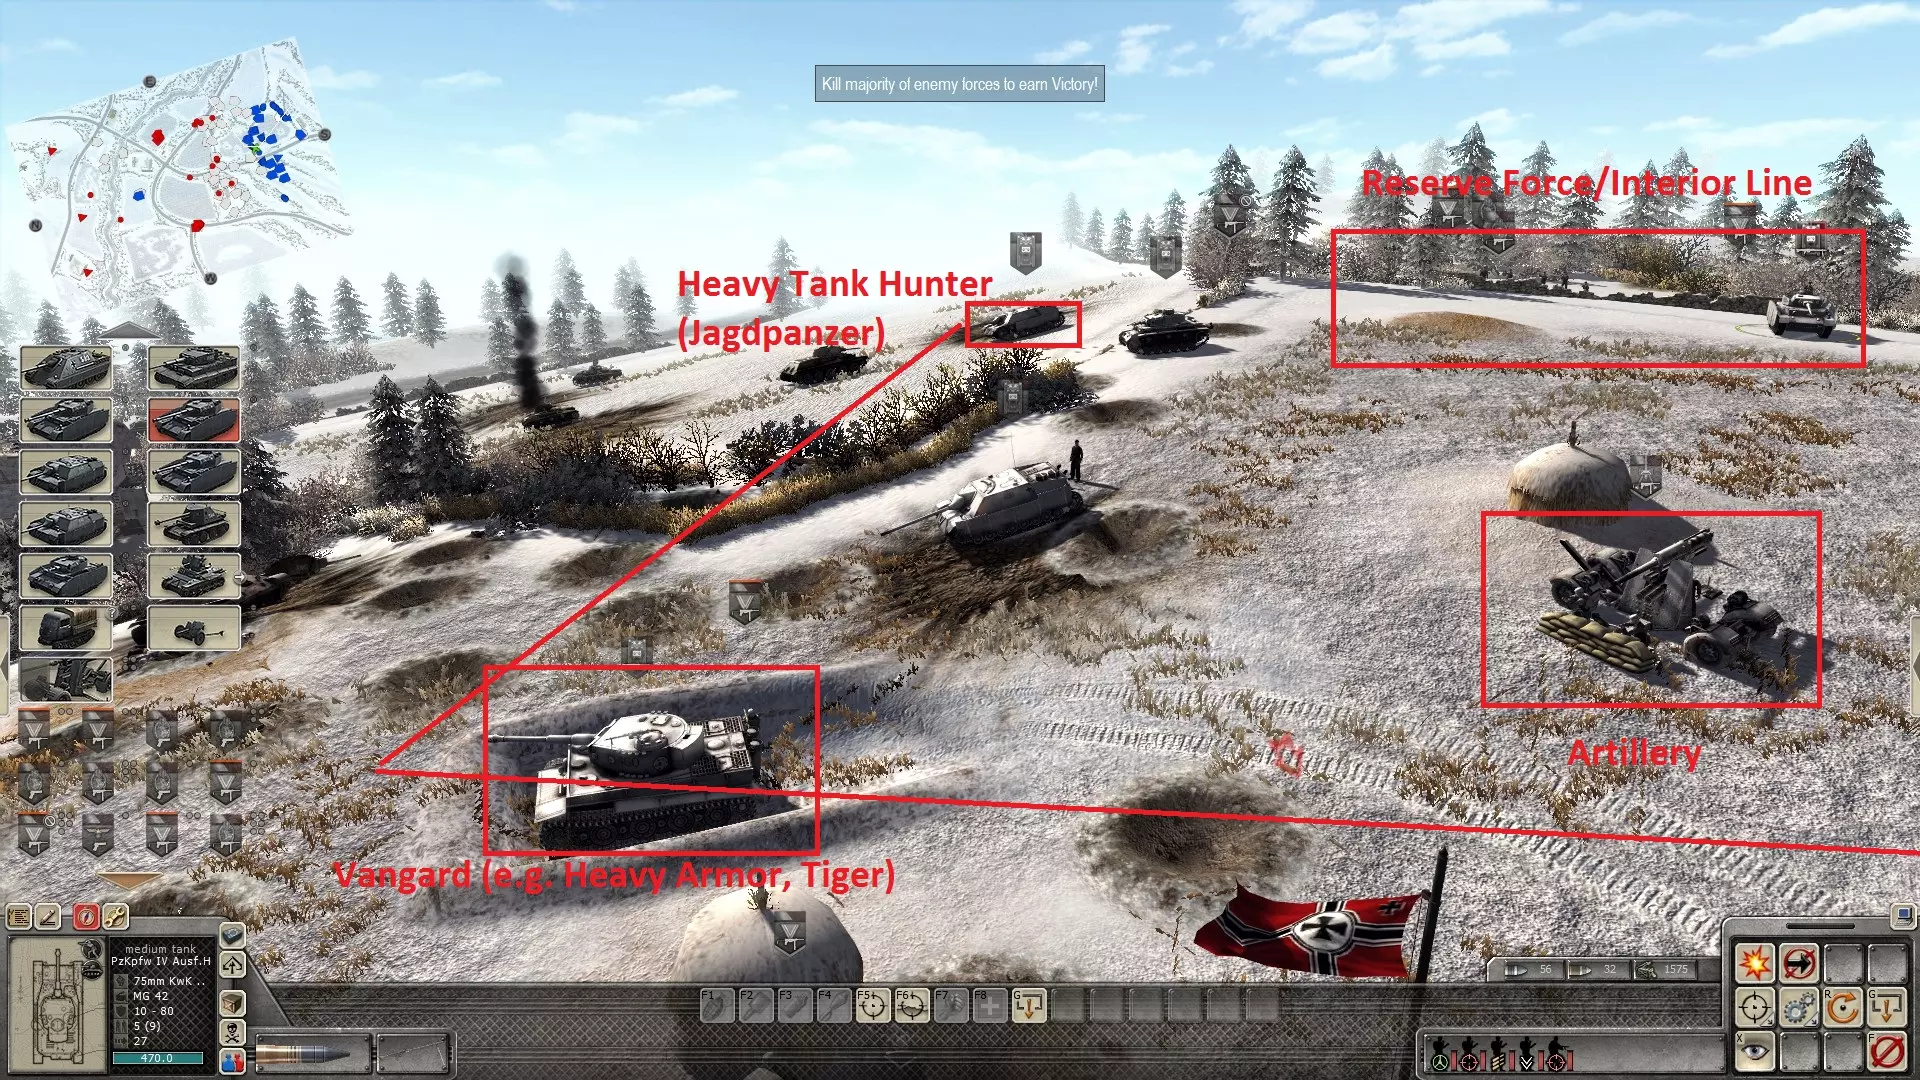
In multiplayer, stay mobile. Once the enemy spots you, they are liable to counter from range or flank your position, so permanent defensive positions are less viable. Hide your guys in buildings and stuff when you are not using them. If your enemy has howitzers or rocket artillery, run like hell when they spot you, and relocate to another spot on the battlefield. Faction Special Abilities Here is a list of the special abilities granted to each faction and a few words on how they may be used. They are often a cheap and effective way of dealing with the enemy without getting touchy with your precious units, albeit they are often somewhat fragile. Don't forget these--they can prove incredibly useful especially when the enemy has you pinned on all fronts. On the whole, use these to break the enemy's most impenetrable defenses. Commonwealth Artillery Strike - Not always the most accurate, but when on target, devastating to clustered enemy positions and static defenses like 88's and howitzers. When the advance gets bogged down, use this abusively to clear the way for your armored battlegroup. Commandos - A cute ability which calls in a mechanized infantry platoon (trio of scout cars). Call these guys in when regulars are not getting the job done or just need a bit of extra punch, or if your flank squad is knocked out and needs a quick replacement. You get a potent (but fragile) anti-infantry vehicle and a large group of elite troops armed with submachineguns and light machineguns. I find a limited use for this ability... I tend to favor SAS (the special infantry choice) as they tote AT weapons, however if you feel enemy armor is not a risk for the particular approach, feel free to go for these. USA Paratroopers - Call in a single carbine-armed trooper anywhere on the battlefield. May seem impotent prima facie, however cooldown is fast and the troops are very effective at what they do. Spam them behind enemy lines of course to knock out targets of interest (AT guns) before your big push. Airstrikes - Combine paratroopers with this for a decisive one-two punch (see infantry tactics). Call in paratroopers to a safe location and keep them quiet-like, call in an airstrike on the more potent targets, and mop up with the infantry. Useful for capping irascible command points. Not recommended if enemy armor is floating around. See the infantry tactics above for recommendations on use. Germany Veteran Tiger - Deploy a... veteran Tiger tank to the battlefield! Pretty straightforward one here. This guy will shred all enemy armor that you encounter quite seamlessly, and make defending control points a breeze, as he can pick of most tanks from outside their effective range. As always, don't forget this thing has weaknesses too (can be flanked, vulnerable to infantry, and disabled by heavier AT). Goliath - Difficult to use but quite boomy. A remotely controlled explosive on wheels (tracks). Sounds wonderful? Try getting it close to your target. This is no small feat... better used in multiplayer (fog of war is great) when your opponent is distracted as the AI rarely falls for this trick. Japan 200mm Rockets - These handy little babies can pummel enemy fortifications from afar. Great for knocking out enemy howitzers, or the occasional piece of armor. Conserve ammo for the big targets. Banzai! - This might be my favorite ability. For a handful of MP, you get a sizeable fast-attack force delivered anywhere on the battlefield in a matter of moments. The force is comprised of several infantry platoons and a few light tanks. True to their nature, these guys will attack relentlessly and quite effectively (although will favor rapid advance over self-preservation). I find them useful for either pressing an enemy's weaker defenses, or as a distraction to their stronger ones while I slip in with special forces to deliver the killing blow to pesky howitzers. Alternatively, use them to screen your heavy armor as you press the frontal attack. This bargain can be called upon repeatedly every few minutes! Soviet Union 203mm Howitzer - Another large-scary-thing smasher. Spot the enemy, then use this to plow the road of unwanted howizters and anti-tank weaponry. It has a cute nickname by the way, "Stalin's Sledgehammer." Well earned. This thing is a BFG. You might want to try strapping it to something to get it around because it's slow as heck (why it doesn't come with a tow, I have no idea). For the Motherland! - An ability very similar to the Banzai charge, but slightly less potent as this lacks an armored element. You get a horde of conscripts that come flying in, battering themselves incessantly on... anything you like. It's a massive zerg meat shield! Nearly replaces the need to field your own infantry in the late game (you get a million more for only twice the price). Game Modes: Assault Assault In this mission type, you typically begin with a handful of infantry and have to build up a force capable of blasting through increasingly hazardous positions. Spend your early MP to deploy a versatile platoon of infantry and mortars (see the Infantry Warfare section). Draw an imaginary, roughly horizontal line across your minimap along the axis (no pun intended) of capture points. This is the front. Consider your position in relation to the enemy's disposition. Think about what you need to do to claim this line, find the weaknesses, and go from there. Before you "attack, attack, attack," Recon, recon, recon. Know your enemy and all that jazz. Good intelligence is the cornerstone of any well-planned (although sometimes ill-fated) assault. Scout ahead and look for hidden AT guns (also look for the triangular unit on the minimap), they will ruin your day and I mean it. They are sneaky (hint: always check the bushes). Oh, and don't forget their baby AT infantry, they can be rather tough to spot (surprise!!). Another word on mortars. Mortars are exceptionally useful in assault missions. The ability to field potent indirect-fire at good range in the early game cannot be understated. Deploy one, and watch him surgically toast enemy machinegun positions around the enemy control points as you poke in with your infantry squads. Deploy two or three, and enjoy some withering firepower capable of smashing through most all early and mid-game defenses. You can get them in quite close and safely which will allow them to clear the way much more effectively than tanks. Always use them to take out enemy AT guns so your boomier guys have a clear shot at supporting the advance. Move up the line carefully along the width of the battlefield. Lookout for flanking maneuvers by the enemy. Establish good defenses as you advance. Static machinegun emplacements are great at mowing down the infantry that the AI will throw at you incessantly without wasting your ammo, so keep them fully manned and try to situate your infantry a bit to the rear of them. Place some AT or armor in a good defensive position especially along roads. Leave a few guards in areas where you don't expect action, just in case. Just a couple of these guys sneaking through your lines and capping your territories after you have pushed 3/4 up the combat zone will make you cry, especially if you are totally committed and ready to cap the last control point. Moving on to the mid-game: here is an example of a mixed force well-suited to deal with a number of challenges:
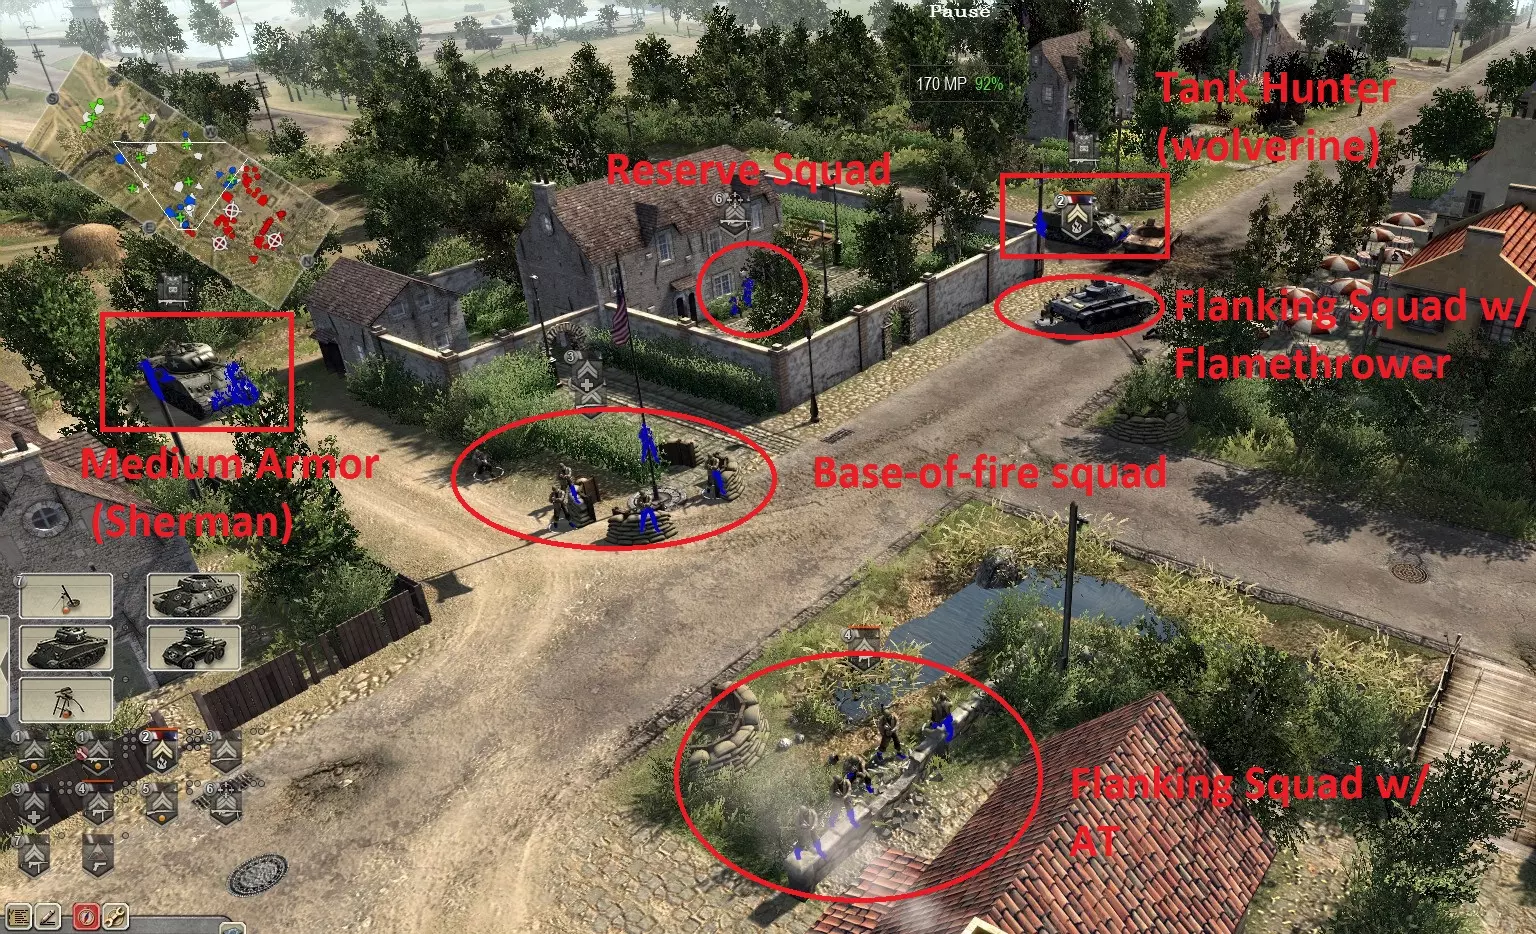
一个火力基地小队位于中央,附近有中型装甲单位,随时准备防御控制点以对抗轻装部队并支援进攻。该小队包含一名医疗兵,当左右两翼的侧翼小队陷入困境时,医疗兵可以跑过去提供援助。侧翼小队配备了反坦克武器和火焰喷射器,以便在掩体间灵活移动时对付步兵和装甲单位(不过如前所述,将反坦克武器配备给火力基地小队可能更为明智)。最后,注意预备队(步兵和坦克猎手)部署在后方稍远处,位于此处与右上角另一支部队(未显示但在小地图上可见)之间,随时准备在你进攻的某一方向受挫或有敌方坦克突破防线时填补缺口。 打破僵局 你已取得不错进展,部队在前线占据了稳固阵地,但遇到了一些阻碍。敌方防御变得相当坚固,榴弹炮和重型反坦克武器正瞄准通往最终目标的所有有利进攻路线。该怎么办?以牙还牙,这就是答案。 考虑以下美军场景。我们的前线已经推进到相当靠前的位置,但由于以下因素无法继续前进:88毫米火炮能摧毁我们的装甲单位,讨厌的【 Nebelwerfer 】(火箭炮)会对任何接近的步兵造成大面积杀伤,还有像撒在各处的【 Spoiled Jimmies 】(此处指零星分布的)伪装德军步兵和机枪手(未显示),他们足以在重炮发挥威力时牵制并削弱我们的部队。仔细观察整条防线,发现类似的密集交叉防御随处可见。正面进攻无异于自杀,但我们发现了这个看似坚不可摧的防御的一个关键弱点——后方一个防御薄弱的火车站场。
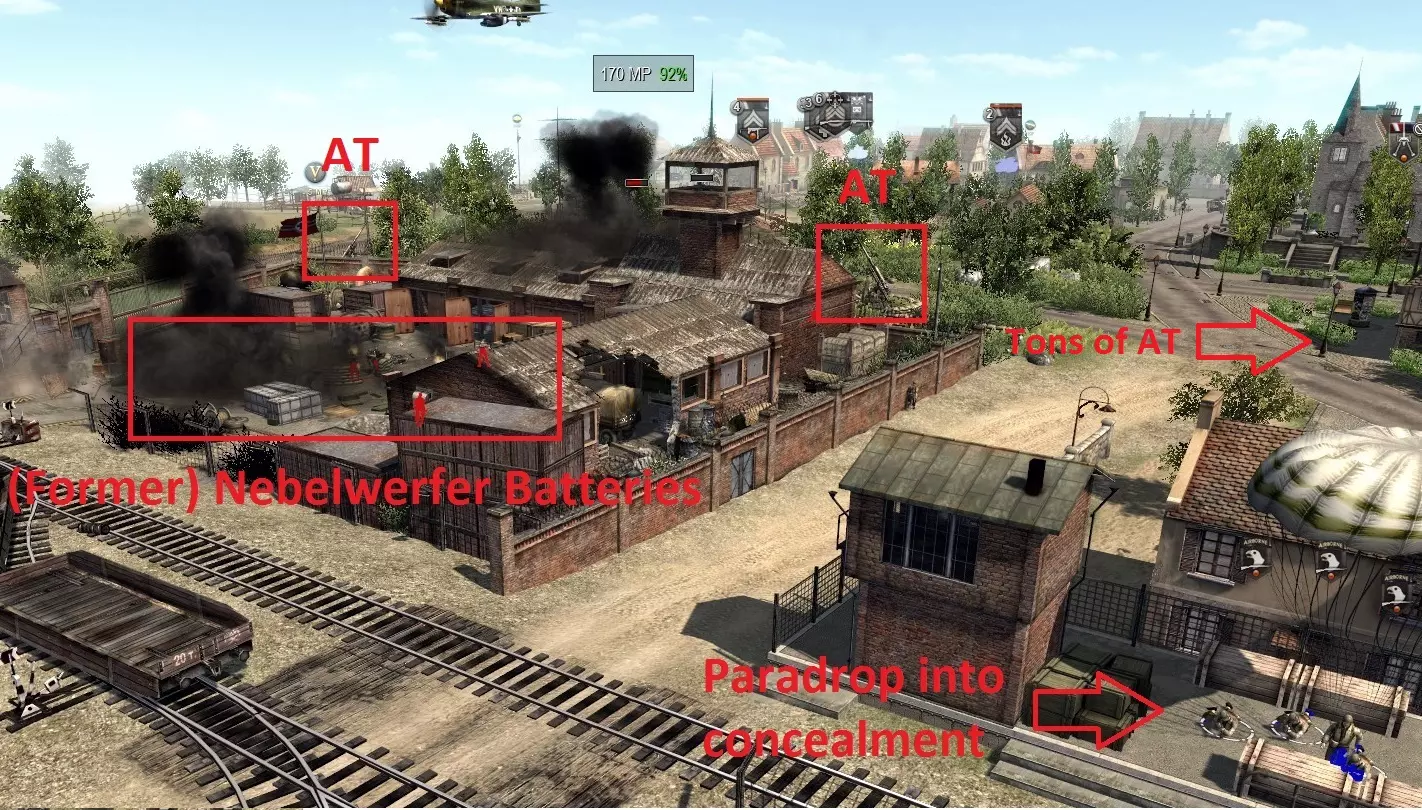
朋友们,这正是空降兵的任务。这些精锐步兵可以精准、隐蔽且低成本地投送,虽然缺乏反坦克能力,但作为精锐部队,他们能够渗透该区域并轻松击溃敌方步兵。空降兵已悄然降落在敌后(右下角),准备在空袭后突入并肃清残敌。这次惩罚性打击为进攻提供了无风险的序幕,在空降兵从容现身完成任务前,先让控制点周围的主要敌方阵地陷入混乱。此任务在短时间内以极小伤亡获胜。不要忽视你阵营的特殊能力!反击战 有时你需要负责防守已占领的区域。用步兵和装甲部队精心构建交叉防御阵线,将其部署在建筑物之间、城墙沿线等地。尽可能利用狭窄通道,将敌人引入杀戮区。
注意,反坦克炮拥有良好的道路视野,同时左右两侧的建筑物等天然屏障能提供不错的掩护(但别忘了坦克仍能直接碾过这些建筑,破坏一切部署)。它被部署在拐角处,是为了充分利用侧射火力位置,压制接近的步兵并阻止任何前进的装甲单位……使其动弹不得(开个小玩笑!)。看着一辆横冲直撞的敌方坦克从街角猛冲出来,却发现一门88毫米火炮正正对准它的(侧面装甲),这种感觉相当令人满足!附近还部署了一支本地火力支援小队,负责对付任何散兵游勇,保护反坦克炮。 游戏模式:防御 防御模式与进攻模式是完全不同的体验。你的增援选项通常以重装甲为主,其中包括坦克乘员,他们是在8波攻击中保持你的装甲部队机动和良好状态的关键。当然,你的防御应该充分利用地形和周围环境,但有些情况下几乎没有掩护,因此我将阐述一个最坏的场景:一支德国装甲战斗群受命防守一座无遮蔽的山丘。
一方面,射击范围通常不成问题,许多火炮能够攻击远距离目标,但如果敌人逼近,你可能就麻烦了。为应对这种情况,队伍已在山脊上摆出先锋阵型。中路和侧翼由配备【硬芯穿甲弹】的最重装甲部队加强,以巩固阵地,并在可行时向敌人推进路线的侧面提供强大的反坦克火力。防线中间则由中型坦克以交错阵型部署在两个据点之间。 另外需要注意,一支由步兵和坦克组成的预备队正隐蔽在战线后方的石墙之后。该部队包括一门反坦克炮(确实在那里)、一个反坦克小队、一个维修组和一辆坦克。这支预备部队在突击模式中同样十分有用。他们将承担多种角色,包括: 1. 填补防线缺口——在战斗中,敌人能够且会摧毁你部署最完善的载具,此时预备部队已准备好填补空缺,并且他们斗志高昂。 2. 阻止敌人向被突破的侧翼推进。任何突破重型载具防线的敌人都将面对这些预备部队(他们斗志高昂)。 3. 修理受损载具。履带经常会脱落,炮塔有时会失灵,预备部队能让这些载具重新投入战斗,且不会使车组人员陷入危险。突入战场深处,去回收常见的被摧毁重型载具残骸,或者应对任何远程威胁(火箭弹、机动火炮),这些威胁会在你精心布置的防线后方肆虐,而它们自身却像无助的大型金属鸭子一样暴露着。与此同时,你的主力部队保持不受干扰。提示:让你的乘员跳上坦克侧面搭个便车。 当掩护有限时,请仔细考虑你的反坦克炮部署位置:
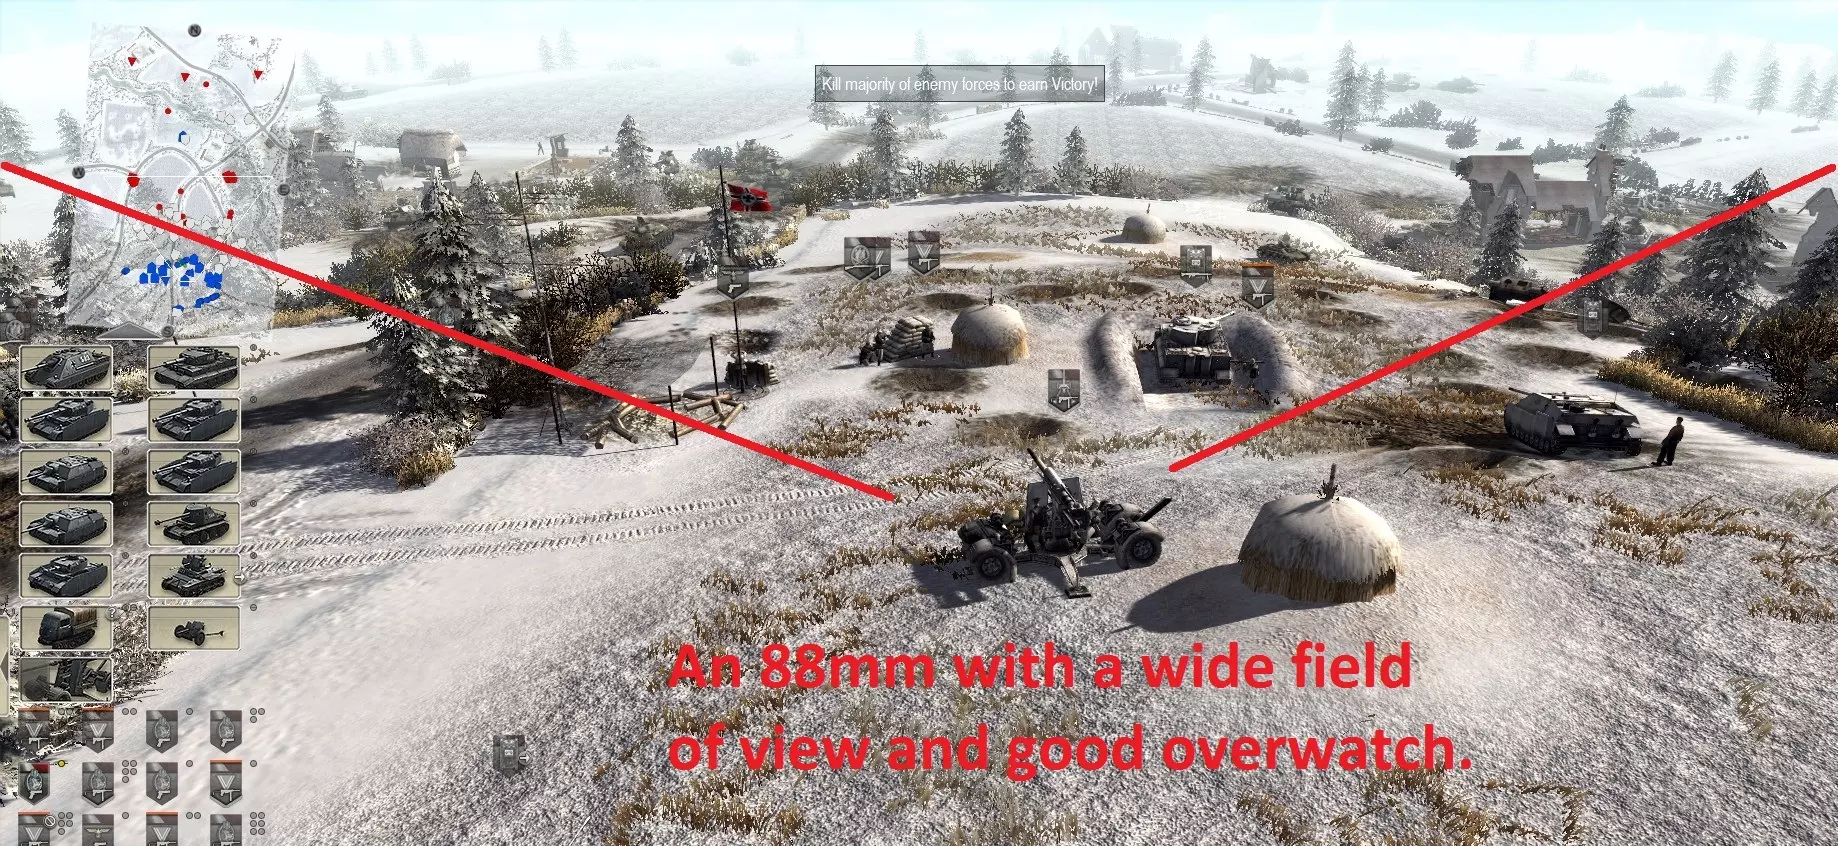
你的剩余坦克和步兵主力已部署在敌军预计会出现的山顶。敌军大部分兵力因你方处于其火力范围之下而无法攻击,但当他们靠近时,你方装甲部队可以开始逐个消灭他们,炮口瞄准他们脆弱的装甲薄弱部位。 在此情况下,强大的炮兵部队部署在 hill 中央的制高点。这挺枪的放置旨在提供最佳射界以支援整个编队,但不会位于阵线的最前沿,因为那样会使其容易受到来自侧面的机枪和火炮攻击。 到第8波时要格外小心。此时,敌人通常会召唤他们的超重型装甲部队,并会尽可能猛烈地攻击你的侧翼,所以要确保所有人都已就位、装备已修复、补给已补充,并准备好迎接最后的进攻。 信不信由你, hills其实可以从相反的角度用于防御。有时你可能会有机会进行反斜面防御。当你面对压倒性的装甲敌人时,这是理想的选择。想象一下,你正面临最后的进攻浪潮,而敌人对侧翼的攻击比预期的更加猛烈,这都是因为你之前说“嘿,我才不需要什么该死的预备队”。现在敌人已经准备好包抄你主力侧翼的侧后方。你剩余的兵力有限,所以你迅速占据了以下阵地(你最好确保他们先完成手头的任务):
你剩余的坦克和步兵已全员部署在山丘顶部,这里是预计敌军将要翻越的地方。敌军主力因你方处于其火力范围之下而无法发起攻击,但当他们靠近时,你的装甲部队就能开始逐个摧毁他们,炮口瞄准他们脆弱的腹部,同时你的步兵负责清除敌军的骚扰。 找回丢失的特殊坦克 这是一个在战斗开始时出现的趣味小游戏。一小队愚蠢的坦克纵队在路边遭到一群暴徒的伏击,地点距离你的基地不远不近,十分尴尬。他们携带着一个有用的装备——一辆“特殊坦克”。这在完成任务时非常有用,所以即便你还没来得及部署所有防御工事,也要先组建一支小队外出找回该物品。这会花费不少时间,但一辆中型坦克和一支部队的反坦克单位通常足以完成这项任务(注意,当你靠近时,那里的步兵会加入你,并且具备维修能力)。 迅速肃清敌人,然后用你的部队在坦克周围建立防御 perimeter。中型坦克在击退前来完成任务的敌方坦克时不可或缺——轻型坦克或其他轻型车辆不足以应对它们,除非是在最简单的难度下。注意不要让它被摧毁,否则一切可能都完了。完成后,向你的基地方向倒车,以免被麻烦的二号坦克打断履带或造成其他损坏。当特殊单位撤离到基地的相对安全区域时,缓慢撤出你的部队(先让脆弱的步兵暂时留下,直到确认安全为止)。 游戏模式:据点防御 此游戏模式包括初始30分钟的敌人进攻,随后是对三个敌方重要阵地的大规模反攻。 初始防御 你会发现这种防御方式与你习惯的大不相同。你开始时有相当数量的指挥点(CP)和一些时间来布置防御。你会获得一个主基地,并由三个卫星阵地提供支援。如果你失去了这些阵地,恢复起来会既困难又耗时,所以我建议不惜一切代价守住它们。中心位置通常非常易守难攻,因此是停放预备部队和补给卡车的绝佳地点,以确保所有人都能得到充足的补给。 首先,我建议将步兵分成三个小队,并将他们松散地部署在前沿战壕中。安排你的三辆坦克分别支援每个卫星基地。敌人的进攻通常是轻到中型的攻击集群,他们会像被高爆炮弹赶出巢穴的一群愤怒的持枪黄蜂一样蜂拥而至,冲击你的外围防御。不幸的是,从地形上看,这些阵地都不是特别易守难攻。你可能会变得傲慢,倾向于部署大量坦克之类的装备。别这样。即便是面对密集的蜂群般的敌人,那些黄蜂(wasps)也会用它们无数讨厌的螫针不断攻击你的反坦克炮和精良的装甲。你的堑壕步兵救不了你。你闪亮的坦克、反坦克炮或其他装备也不行。不,先生:我有两个词要告诉你:20毫米机炮。如果你想在几秒钟内以最少的微操作撕碎脆弱的步兵和车辆,它们就是你的不二之选。你会发现20毫米机炮在战斗初期会是所有人最好的朋友。而且,它们非常便宜。在你的每个卫星基地找个好位置部署一门,就像这样:
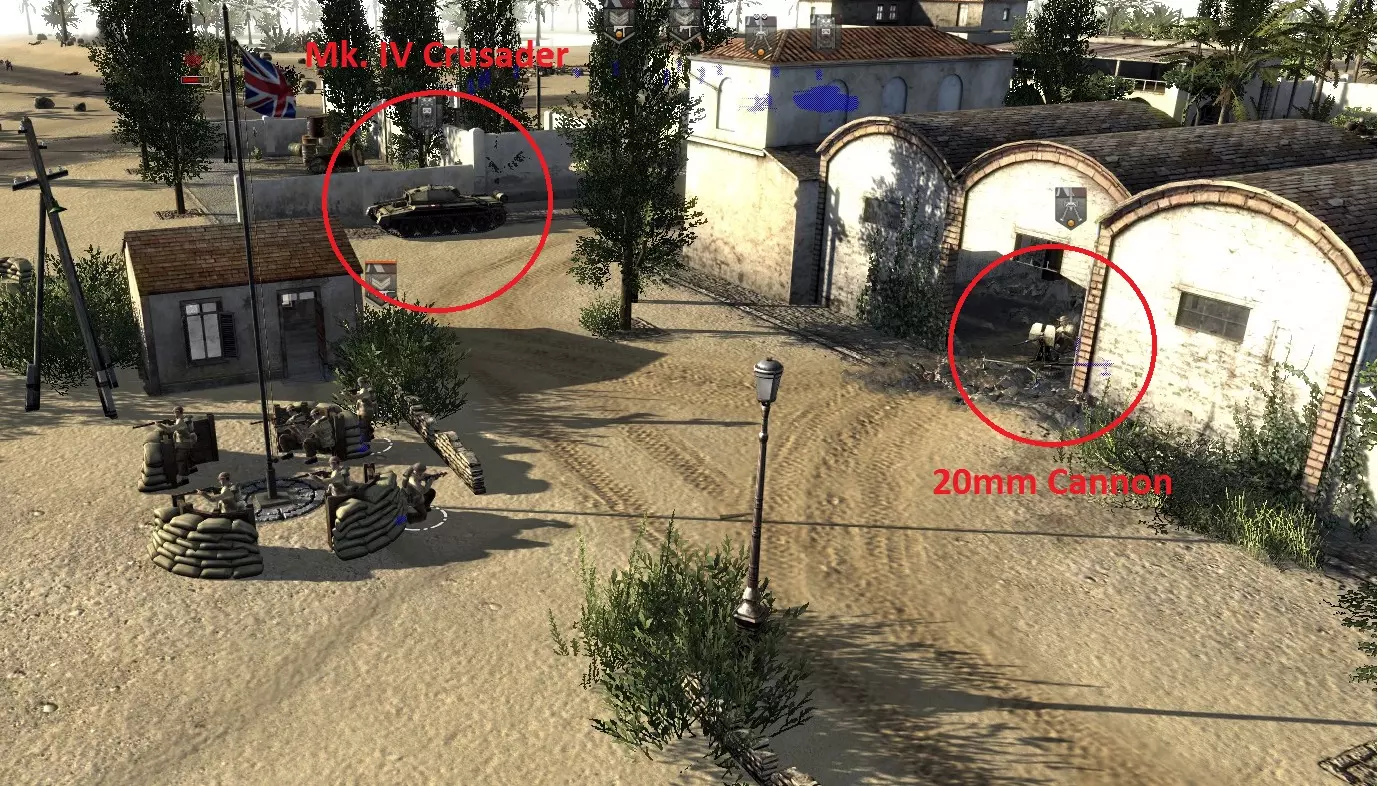
这是部署20毫米炮的绝佳位置:离战斗区域不会太近(你的战壕[未显示]将作为缓冲区),但又足够近,以便在敌人逼近时让所有人都能从容应对。20毫米炮还有助于保护你的重型火炮,使其能够持续攻击更重型的目标,因为重型火炮通常会因少数过于靠近的神风坦克而迅速损失。注意,坦克也处于防御位置,仅左侧暴露,以保护它至少免受一个极端侧翼的 incoming fire。这种防御成本较低的阵地能出色地抵御AI的疯狂进攻(但要注意弹药消耗)! 多余的点数该怎么处理?存起来。敌人偶尔会给你带来惊喜(例如一次精准的伞降会直接落在你的中心区域。之后在你为最终反击做准备时,你也会用到它们。如果你还是设法丢失了外围防御,需要退守主基地,这也可能派上用场。说到主基地,那里有几门不错的小型榴弹炮,所以一定要让它们保持自由开火状态(理想情况下你根本用不到它们)。 确保中心区域有少量步兵,以应对那些诡异的随机偷袭。你也可以考虑部署一门自己的榴弹炮来进一步支援外围防御,或者配备一辆坦克,以便在某个防御点受损时填补缺口。 反击阶段 情况开始变得真正有趣起来。一支由坦克和步兵组成的大规模增援部队涌入你的基地,将敌人击退。但不要掉以轻心——敌人会以牙还牙,他们对你消灭了数百万他们的小兵感到非常愤怒——所以不要像巴顿那样莽撞行事。 首先,部署你(剩余的)装甲部队来支援将承受猛烈攻击的前线,但让友军承受大部分伤害(让他们待在你的基地范围内)。我通常喜欢派几个人出去清理左右两侧,但这不是特别重要。 一旦局势得到控制,观察一下敌人的阵地。看起来很棘手?确实如此。没有合适的正面进攻路线,否则会被敌人的装甲、重型反坦克武器、迫击炮等撕成碎片。(别告诉你的AI伙伴)。另外要注意,在这种游戏模式下你无法使用特殊阵营能力。那么现在该怎么办?让你的手下做最脏的活。像这样支援他的推进:
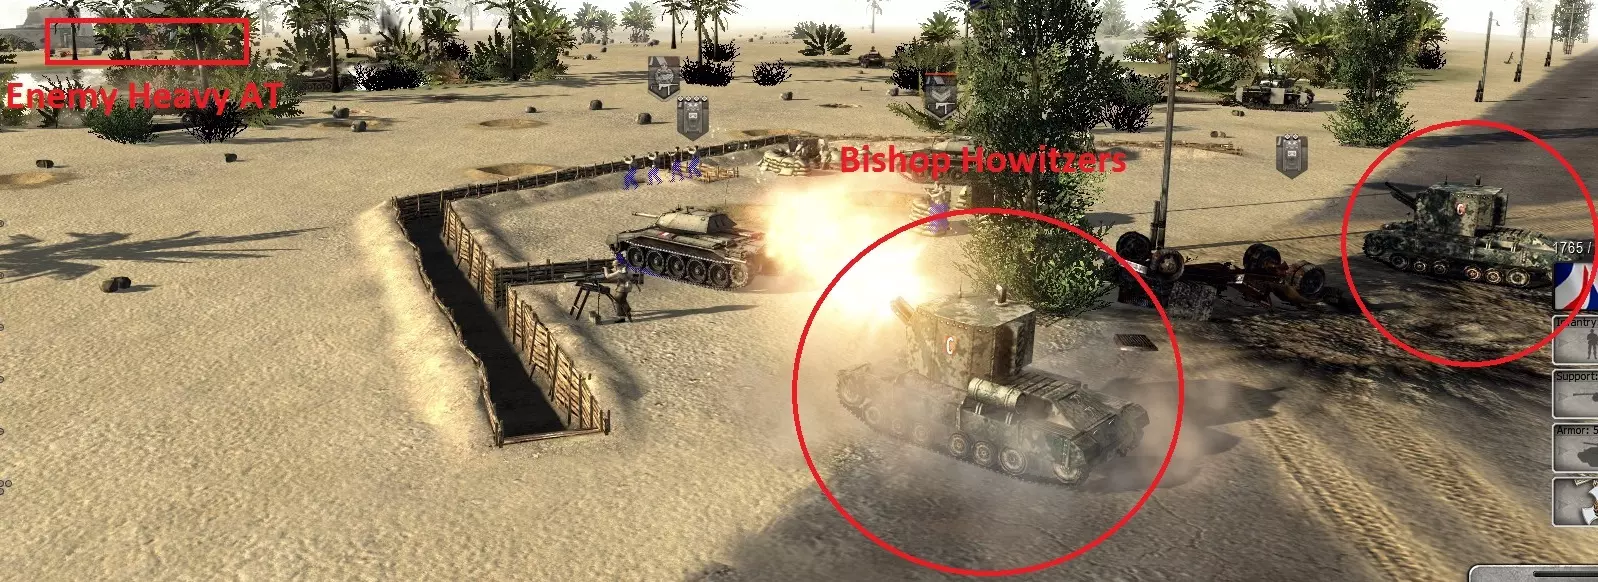
如果20毫米机关炮是初期防御的核心,那么几门榴弹炮或火箭发射器将是成功反击的关键。使用这些武器削弱那些反坦克炮,你会发现己方源源不断的支援部队正逐渐逼近核心目标。夺取该目标至关重要,因为这将阻断敌人的增援路线。 如果你已完成这项任务或对等待感到厌烦,可以用榴弹炮攻击敌人的卫星阵地。如果弹药耗尽,另一个战术是让无线电操作员悄悄靠近(约60米),向敌人的反坦克炮发射几发信号弹,以便你能趁机占领阵地。 选择一名无线电操作员和几名掩护步兵(你能舍得派出的),将他们移至侧翼并卧倒。散开并向目标位置推进,直到进入敌方火炮的射程范围。将无线电操作员切换为直接控制模式,拿出信号枪(副武器)。发射信号枪,然后就等着看好戏吧。现在你可以让几辆坦克和步兵一起推进,像你一直等待的那样,用一次明智的正面攻击来完成任务。 游戏模式:破坏 说实话,我不是特别喜欢破坏任务。我只玩过一次,而且几乎是敷衍着通关的。这类任务通常是“攻击目标”或“夺取控制点”的类型。我觉得自己目前不太适合给出这方面的建议,所以暂时先不细说了,但以后可能会再补充。有一点我想分享,那就是潜行是你的朋友,尤其是在较高难度下。在战场上活动时,尝试通过将交战规则切换为“还击”(如果你想特别隐蔽,也可以选择“停火”)来避免让敌人察觉到你的存在。 如何正确使用作弊 如果你在简单难度下几次失利后气得直砸键盘,或者只是想从大量微操中解脱出来,专注于大局,别担心。可以看看WhiteSnoop制作的CheatMod。这个模组能让你获得无限弹药和燃料。毕竟,不是每个人都想在第三帝国的强大力量——88毫米火炮猛烈开火——冲向你最后一道防线时,还到处跑去分发步枪弹药。我得说,新的补给系统让这个选项不再是必选。 结语