换一换
换一换 


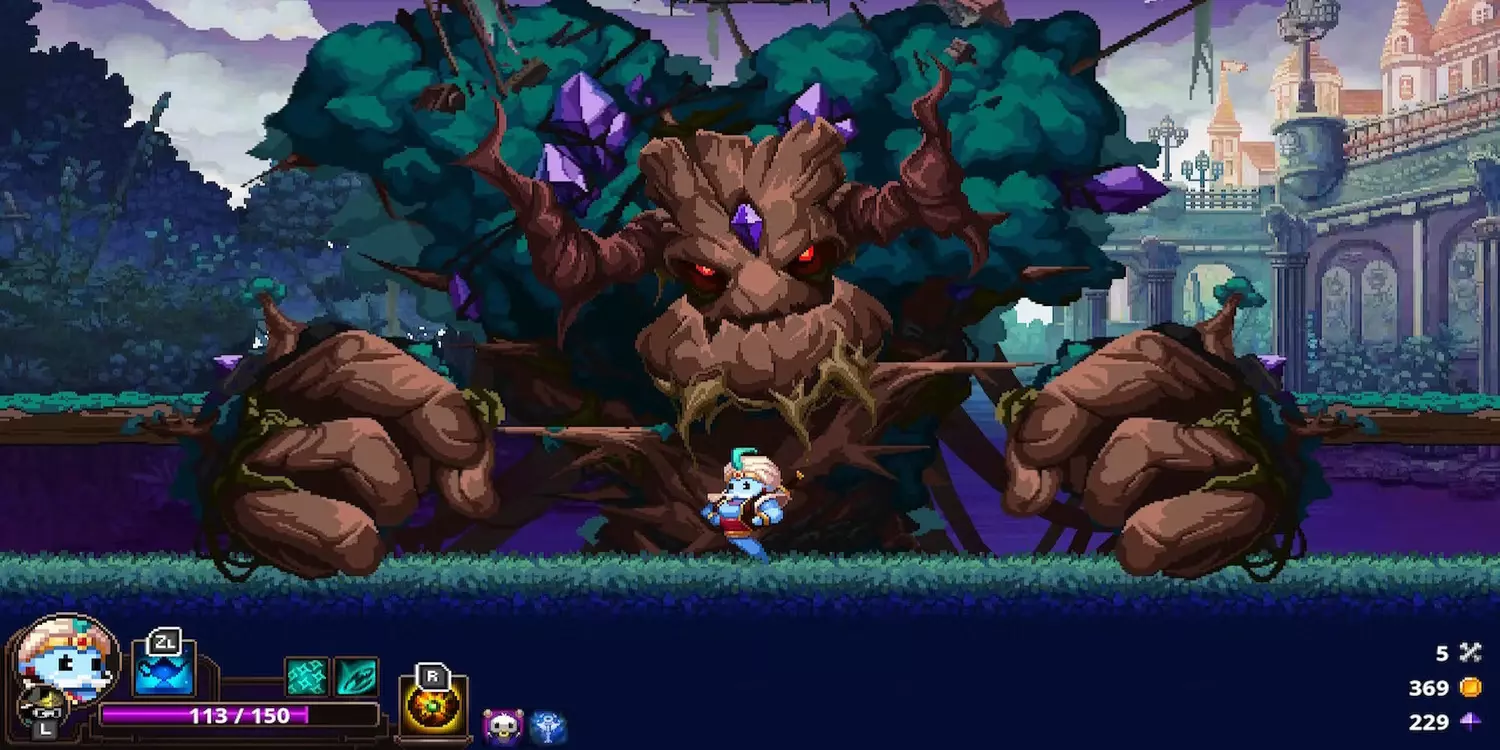
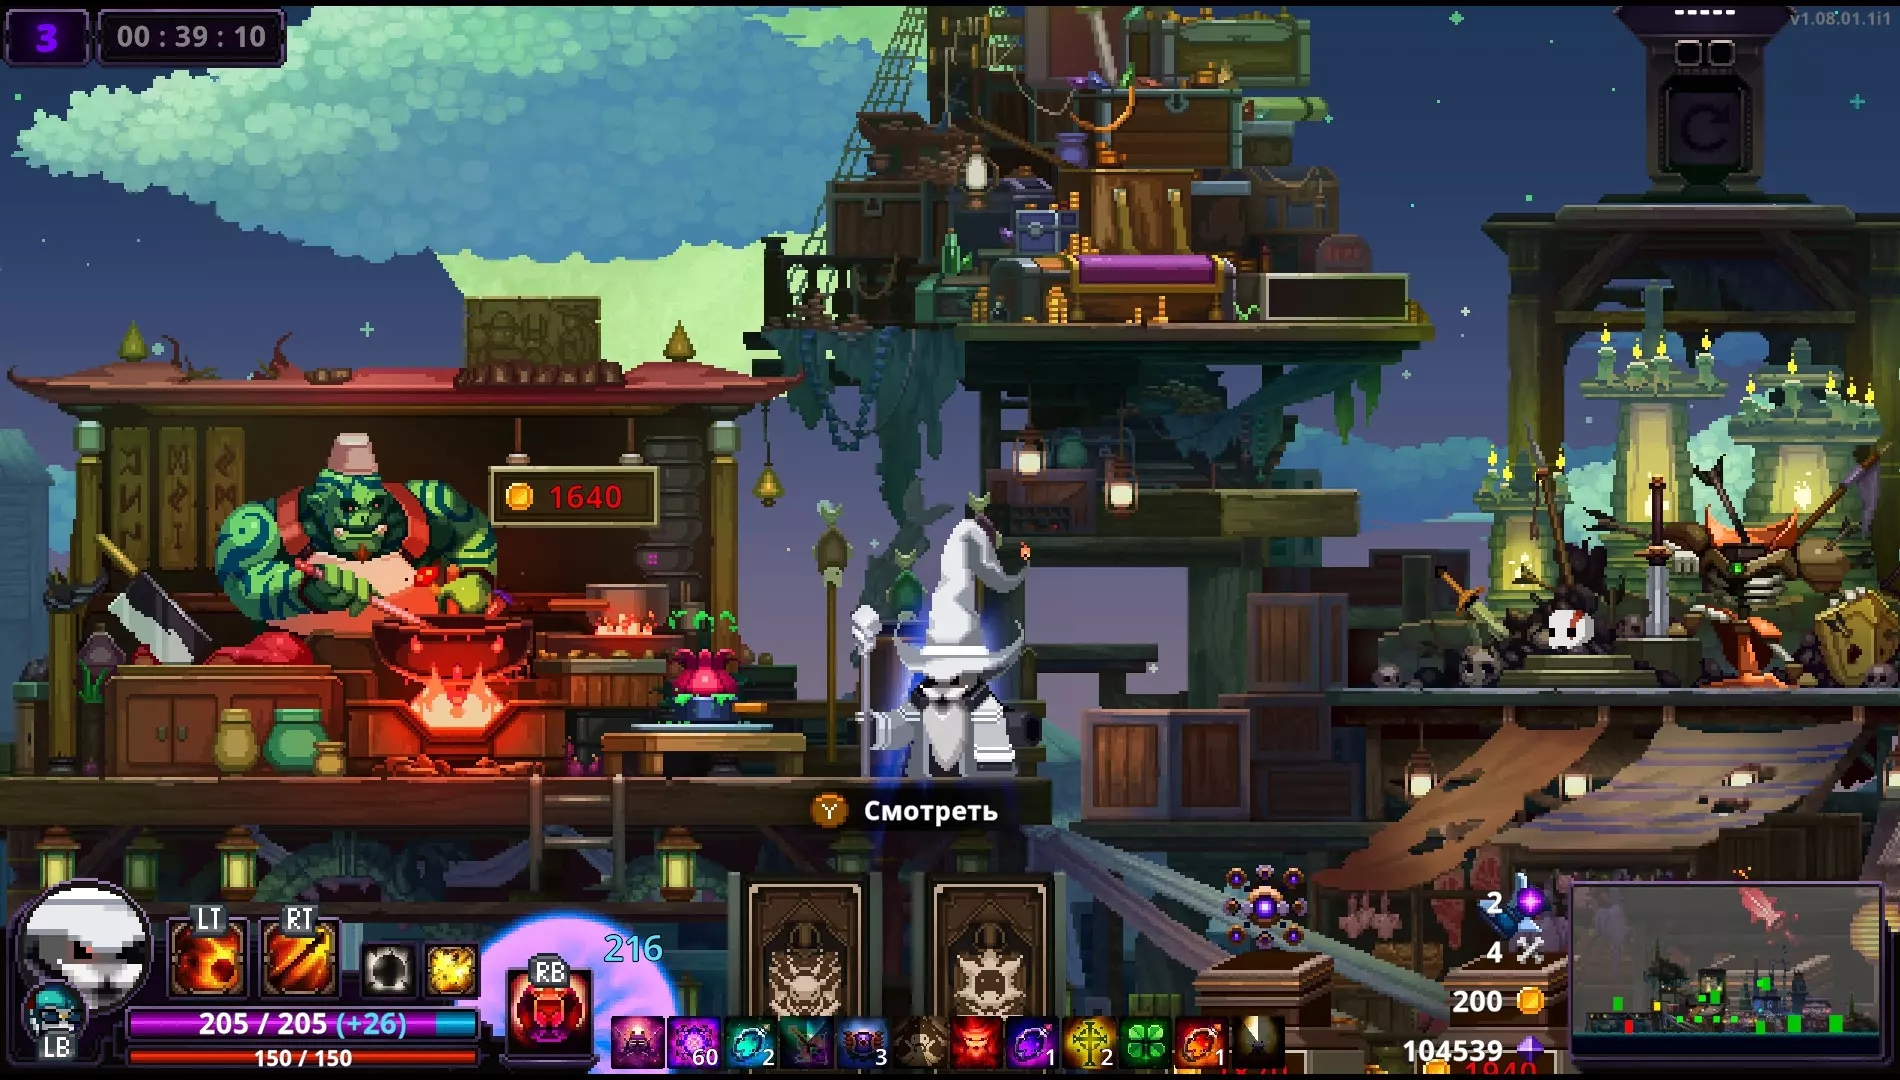
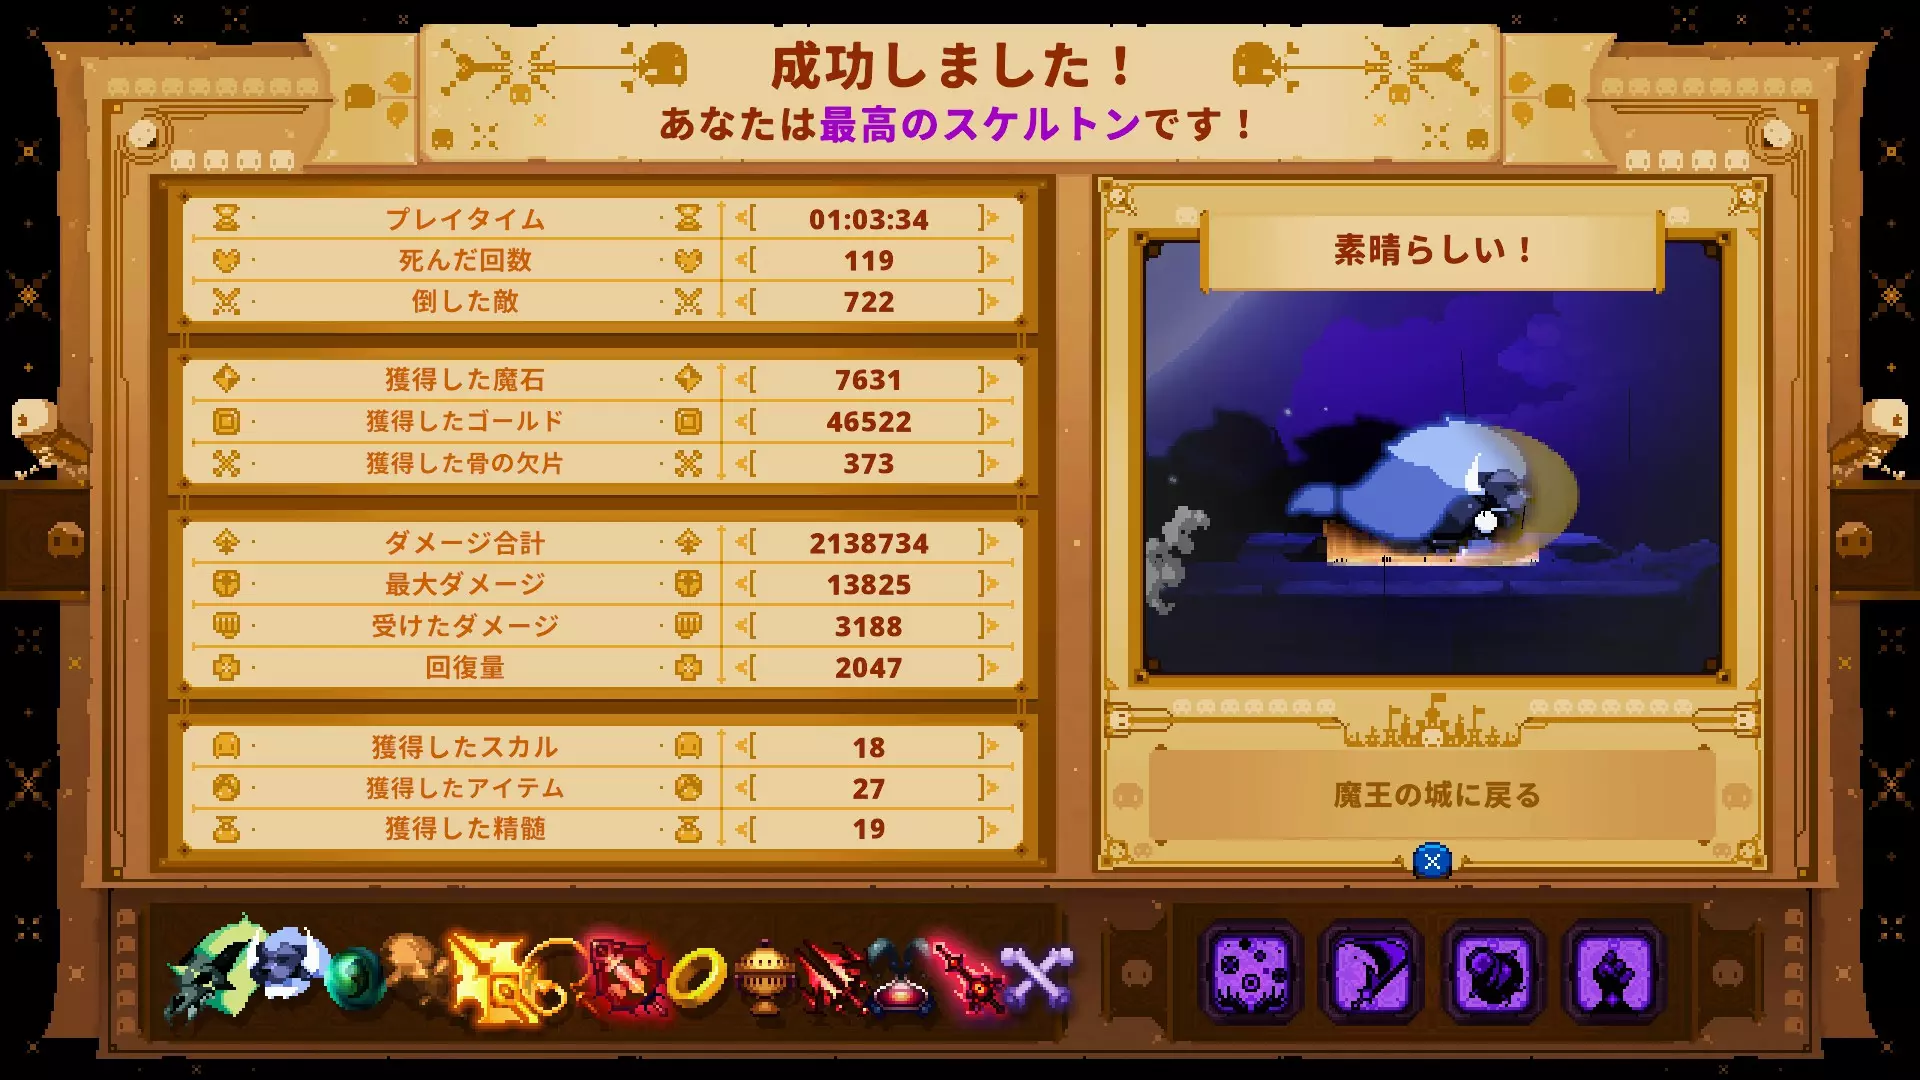
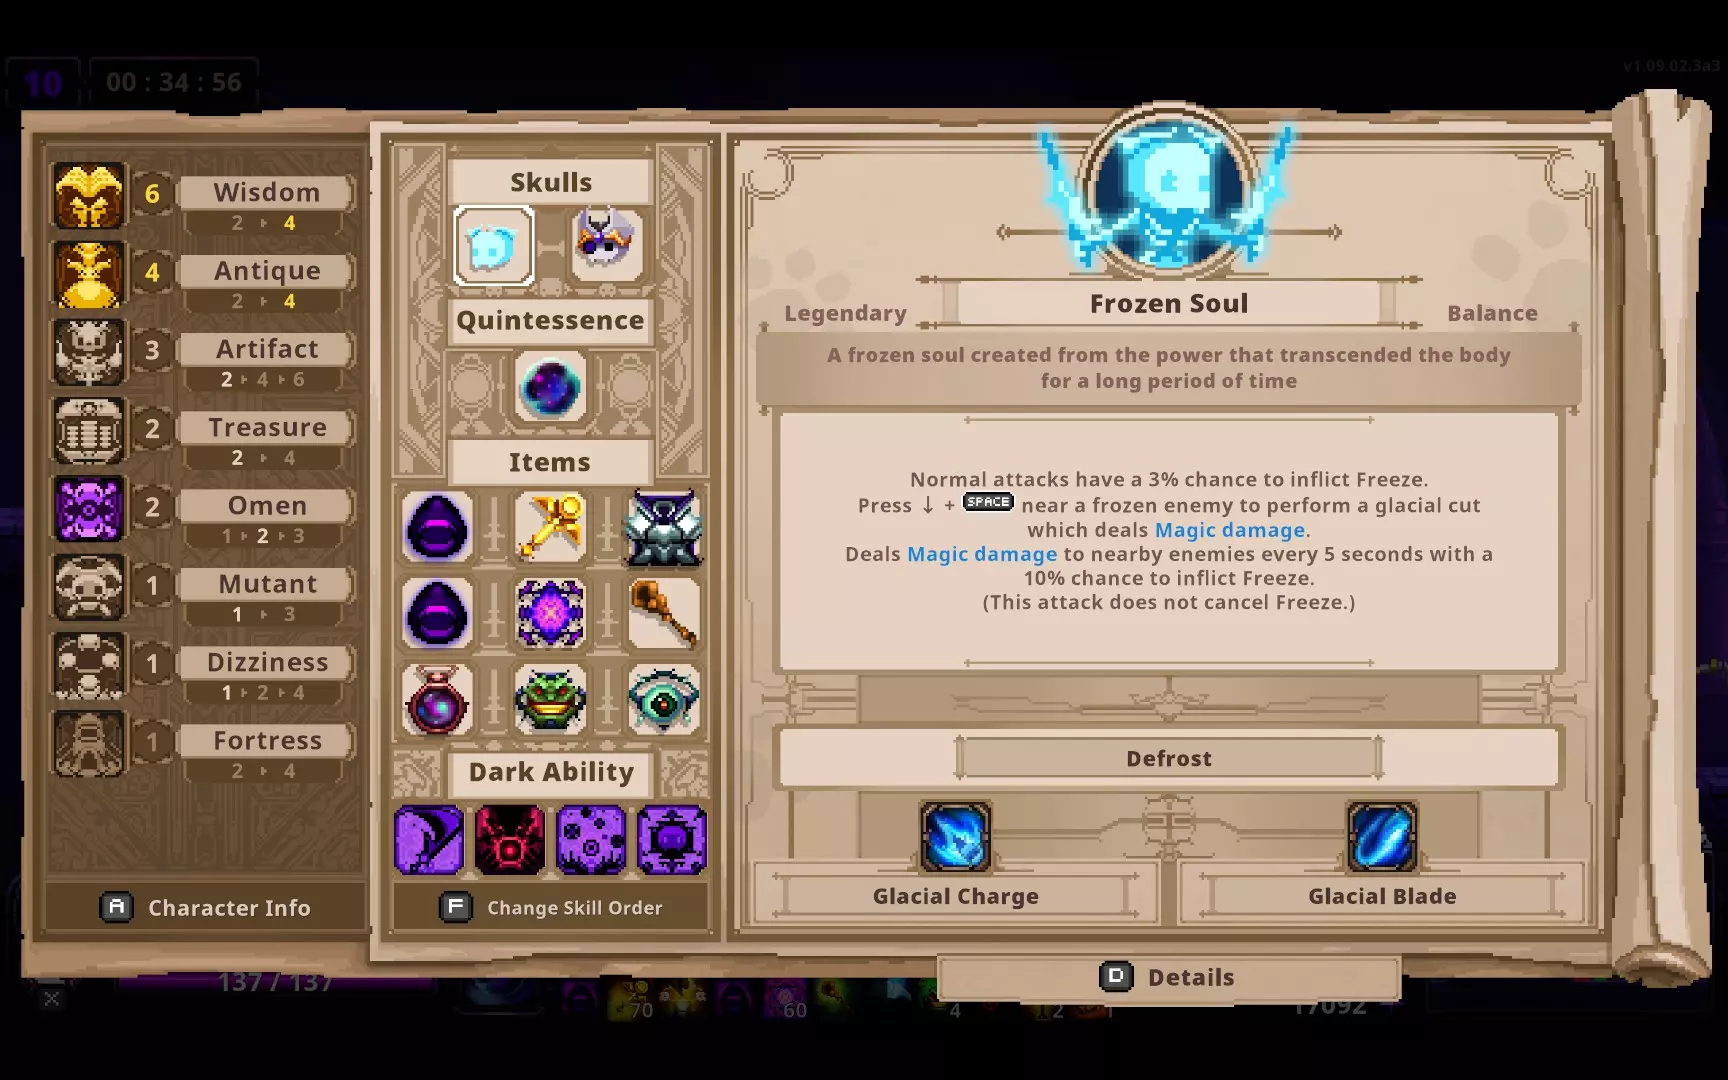
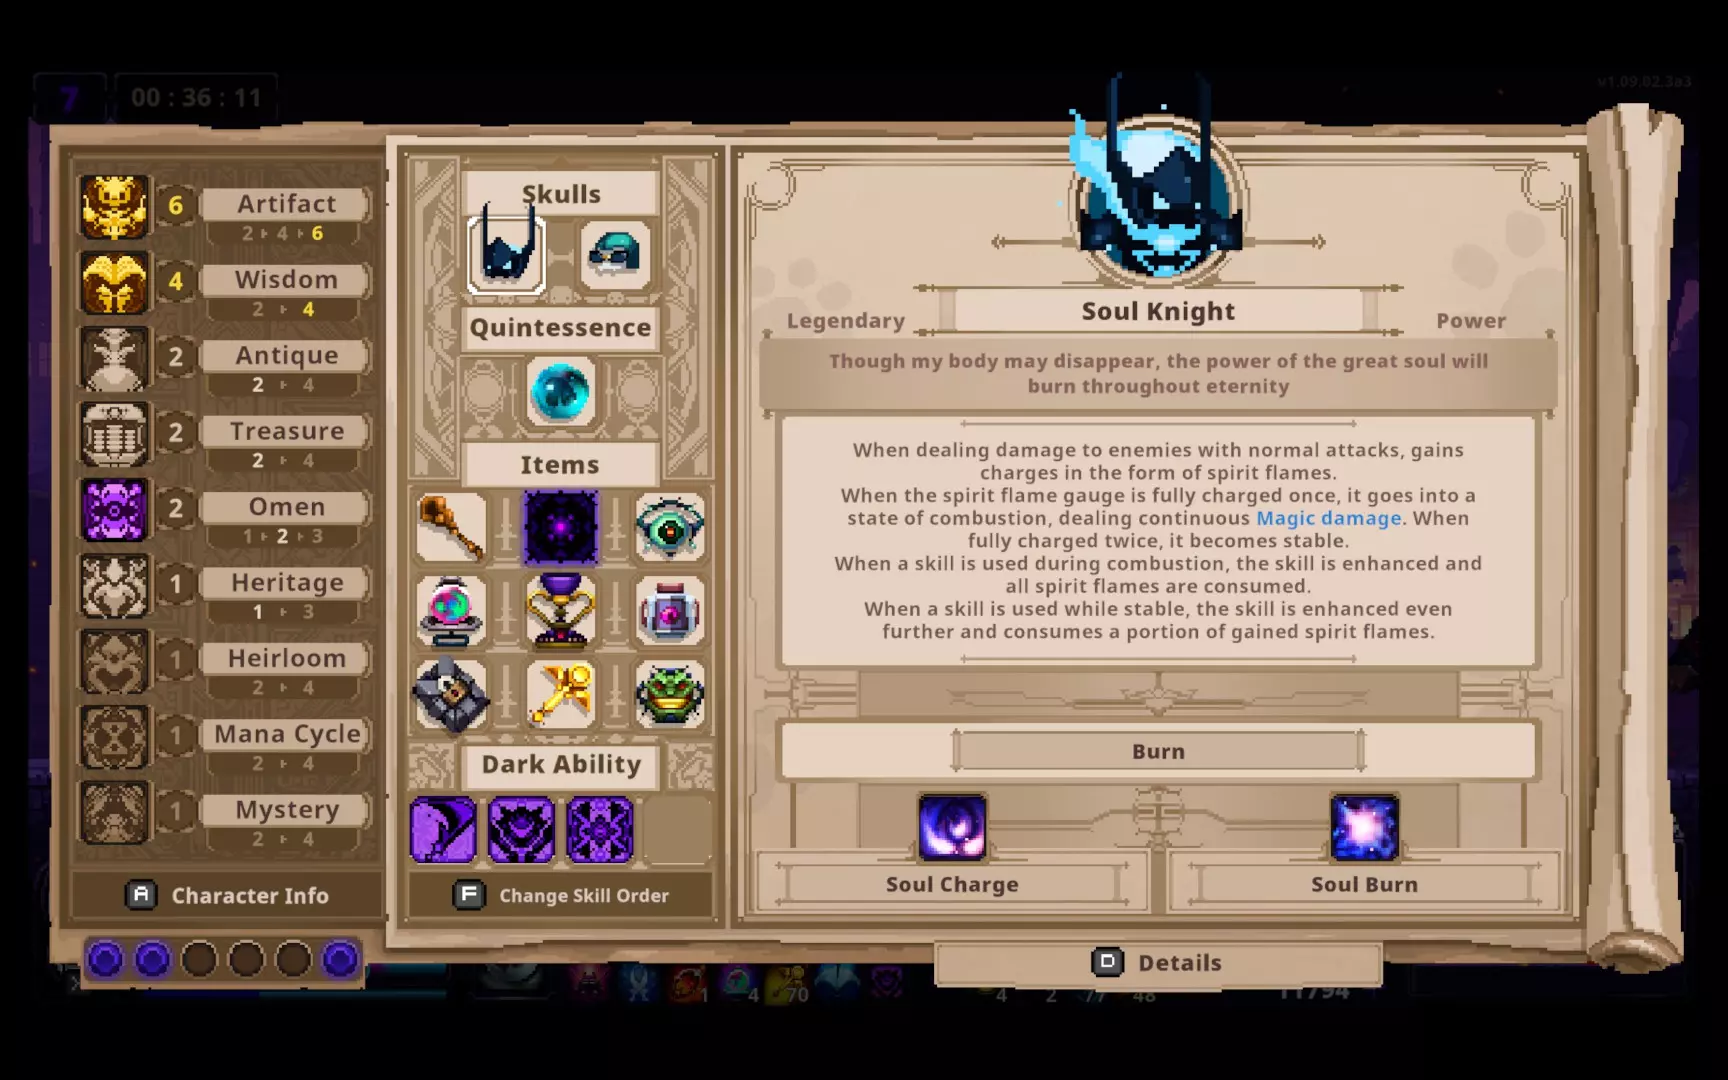
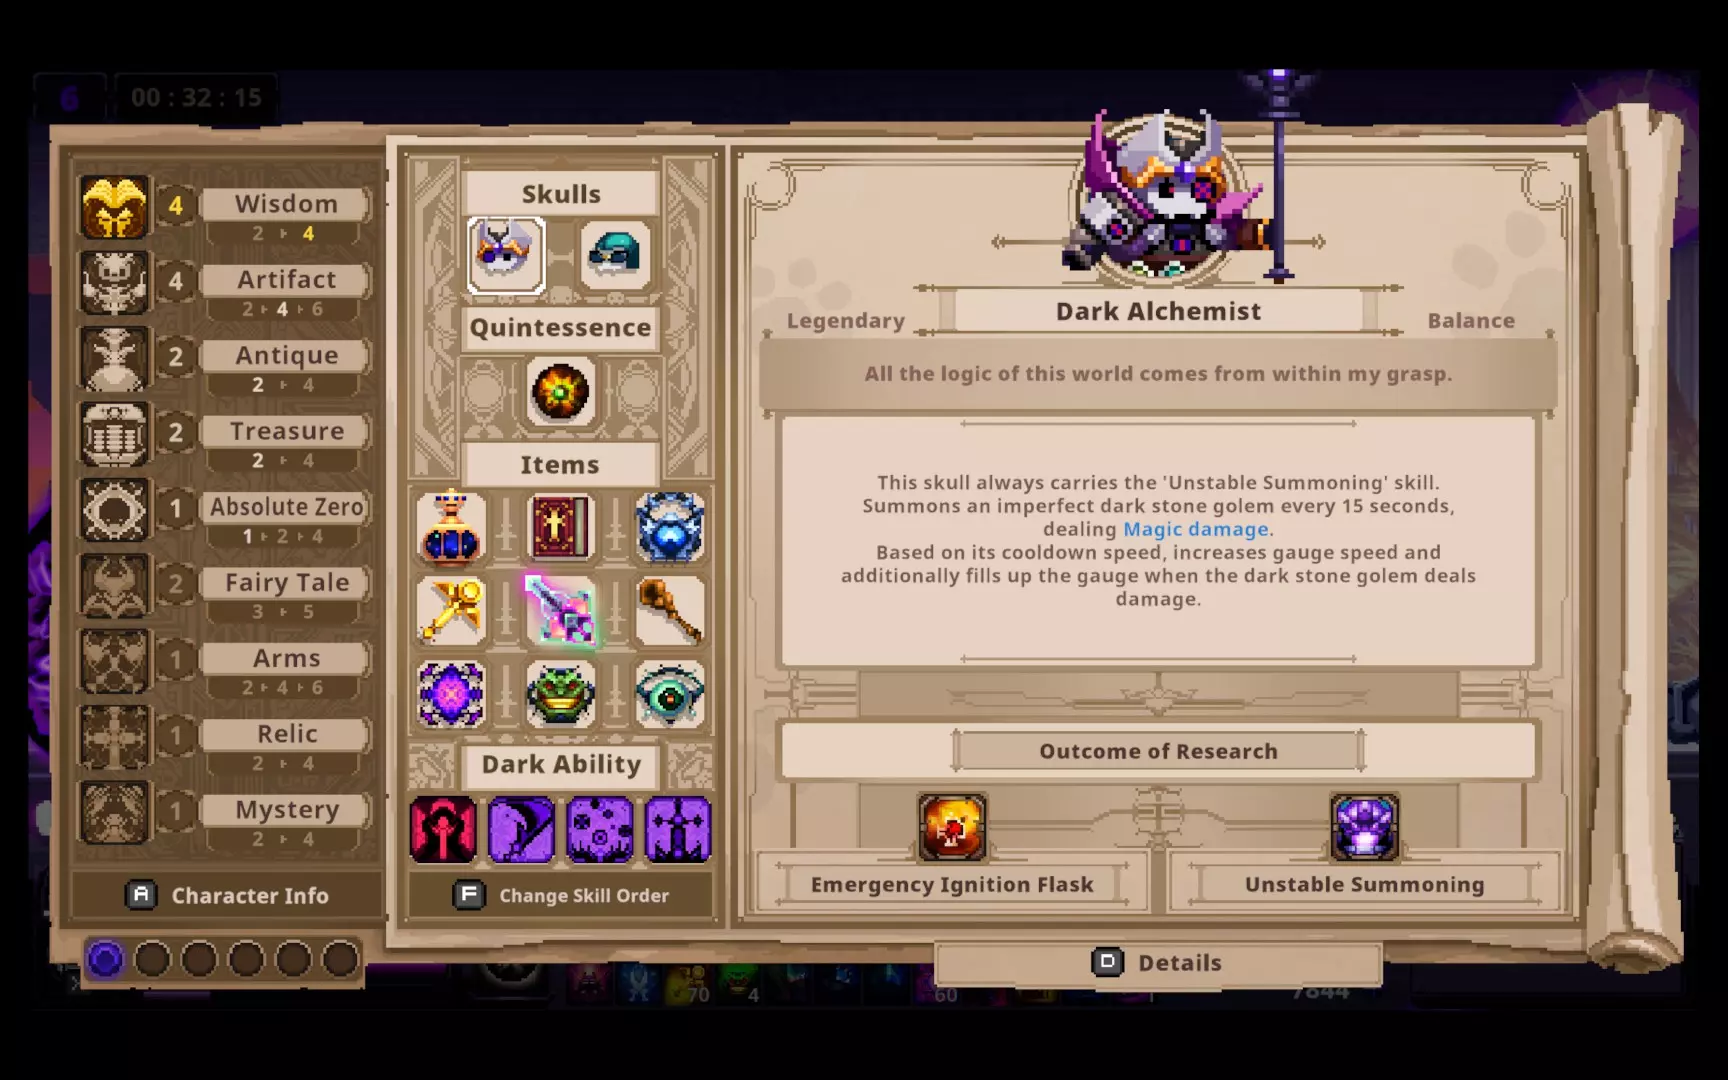
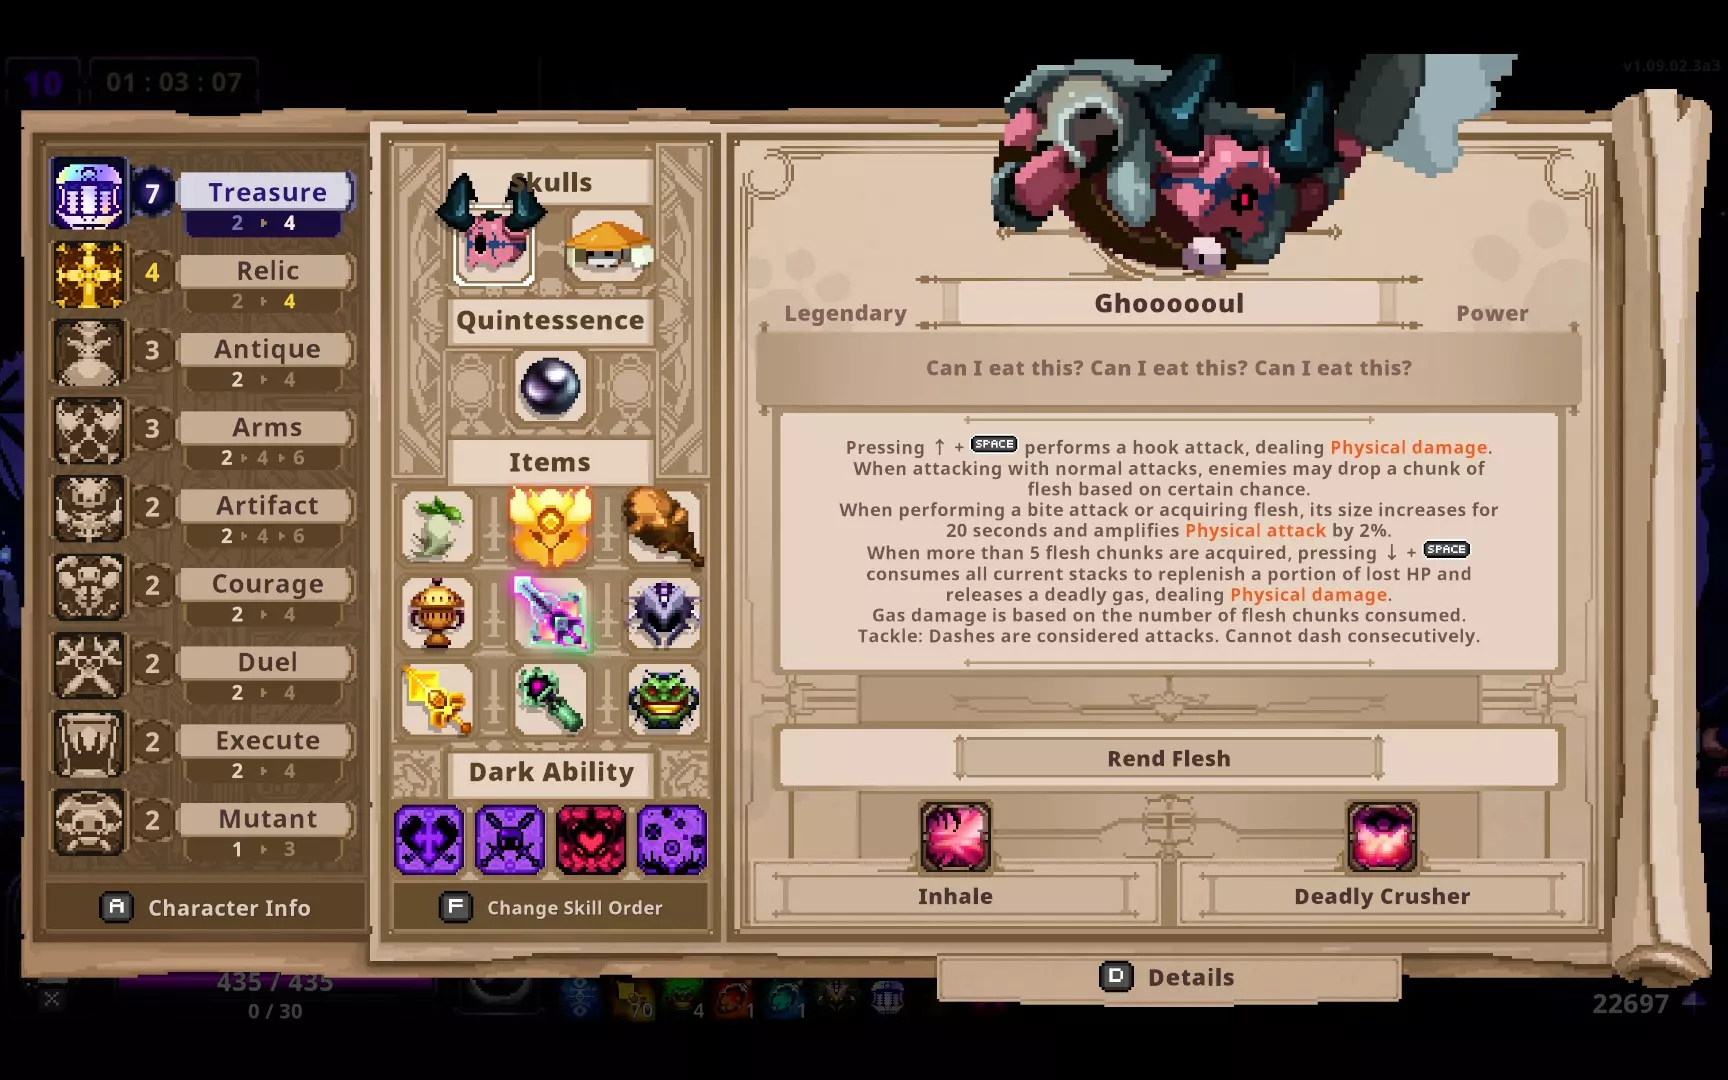
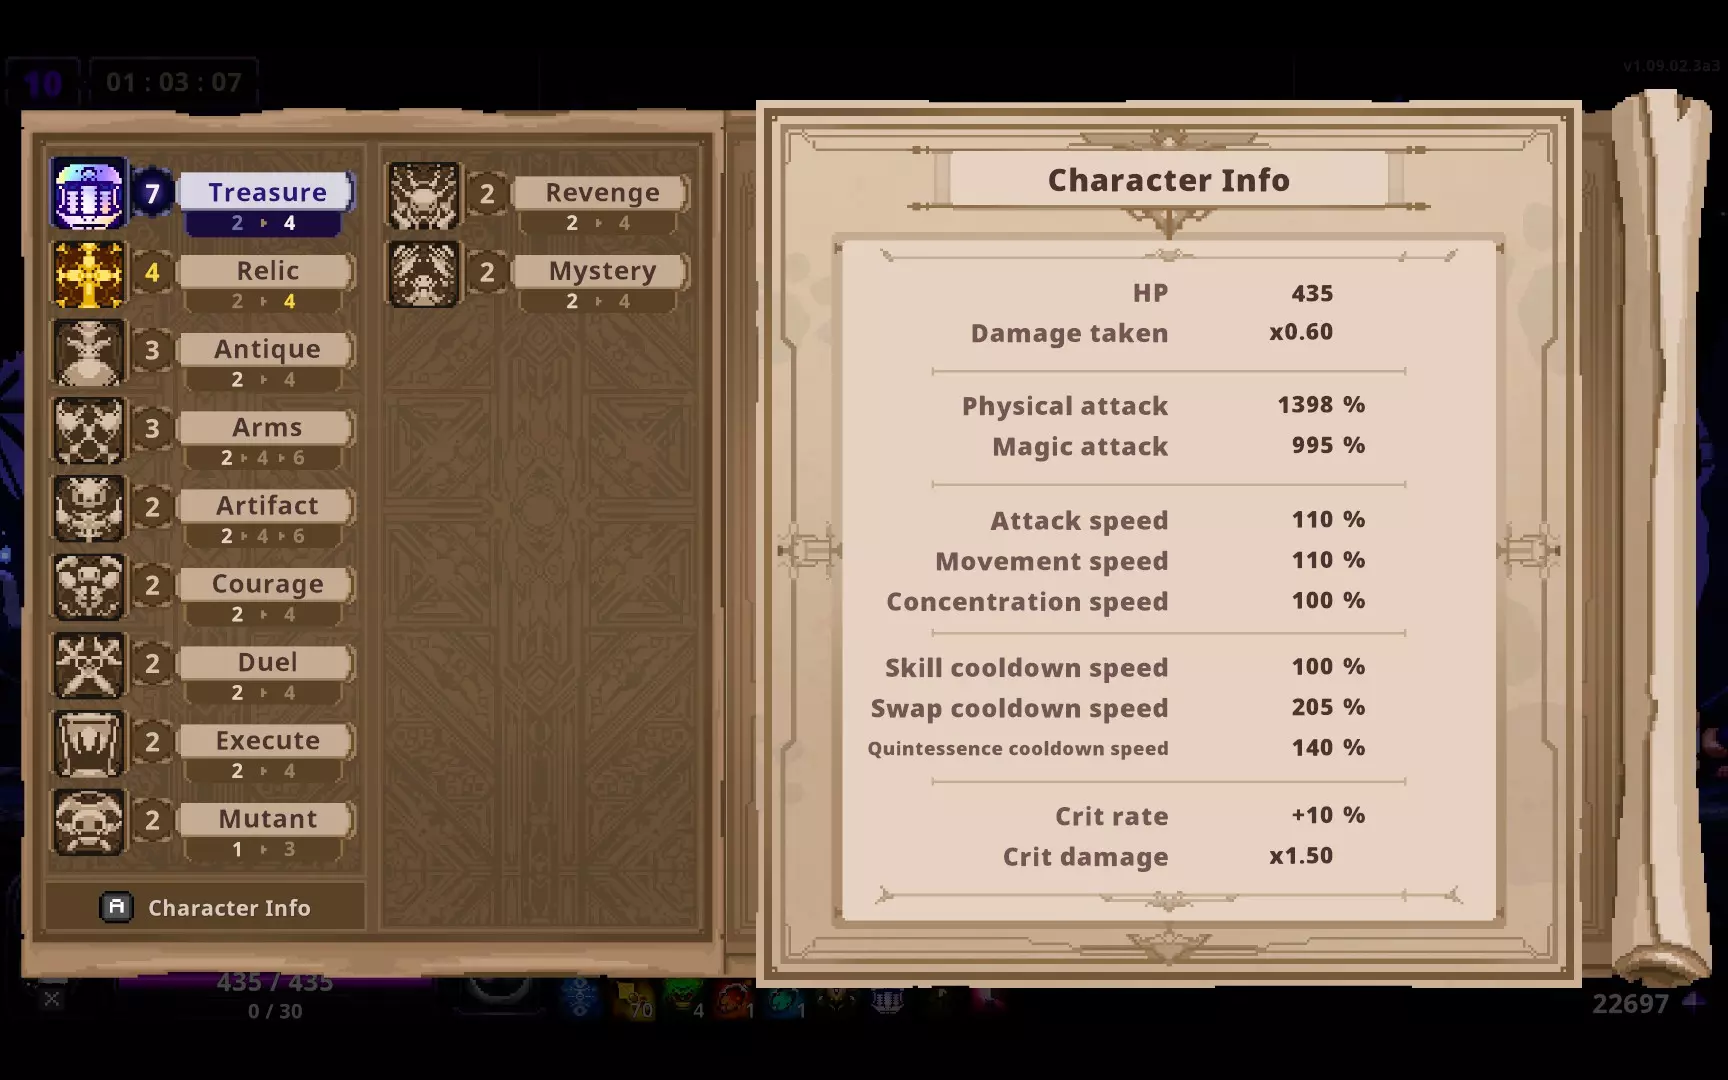
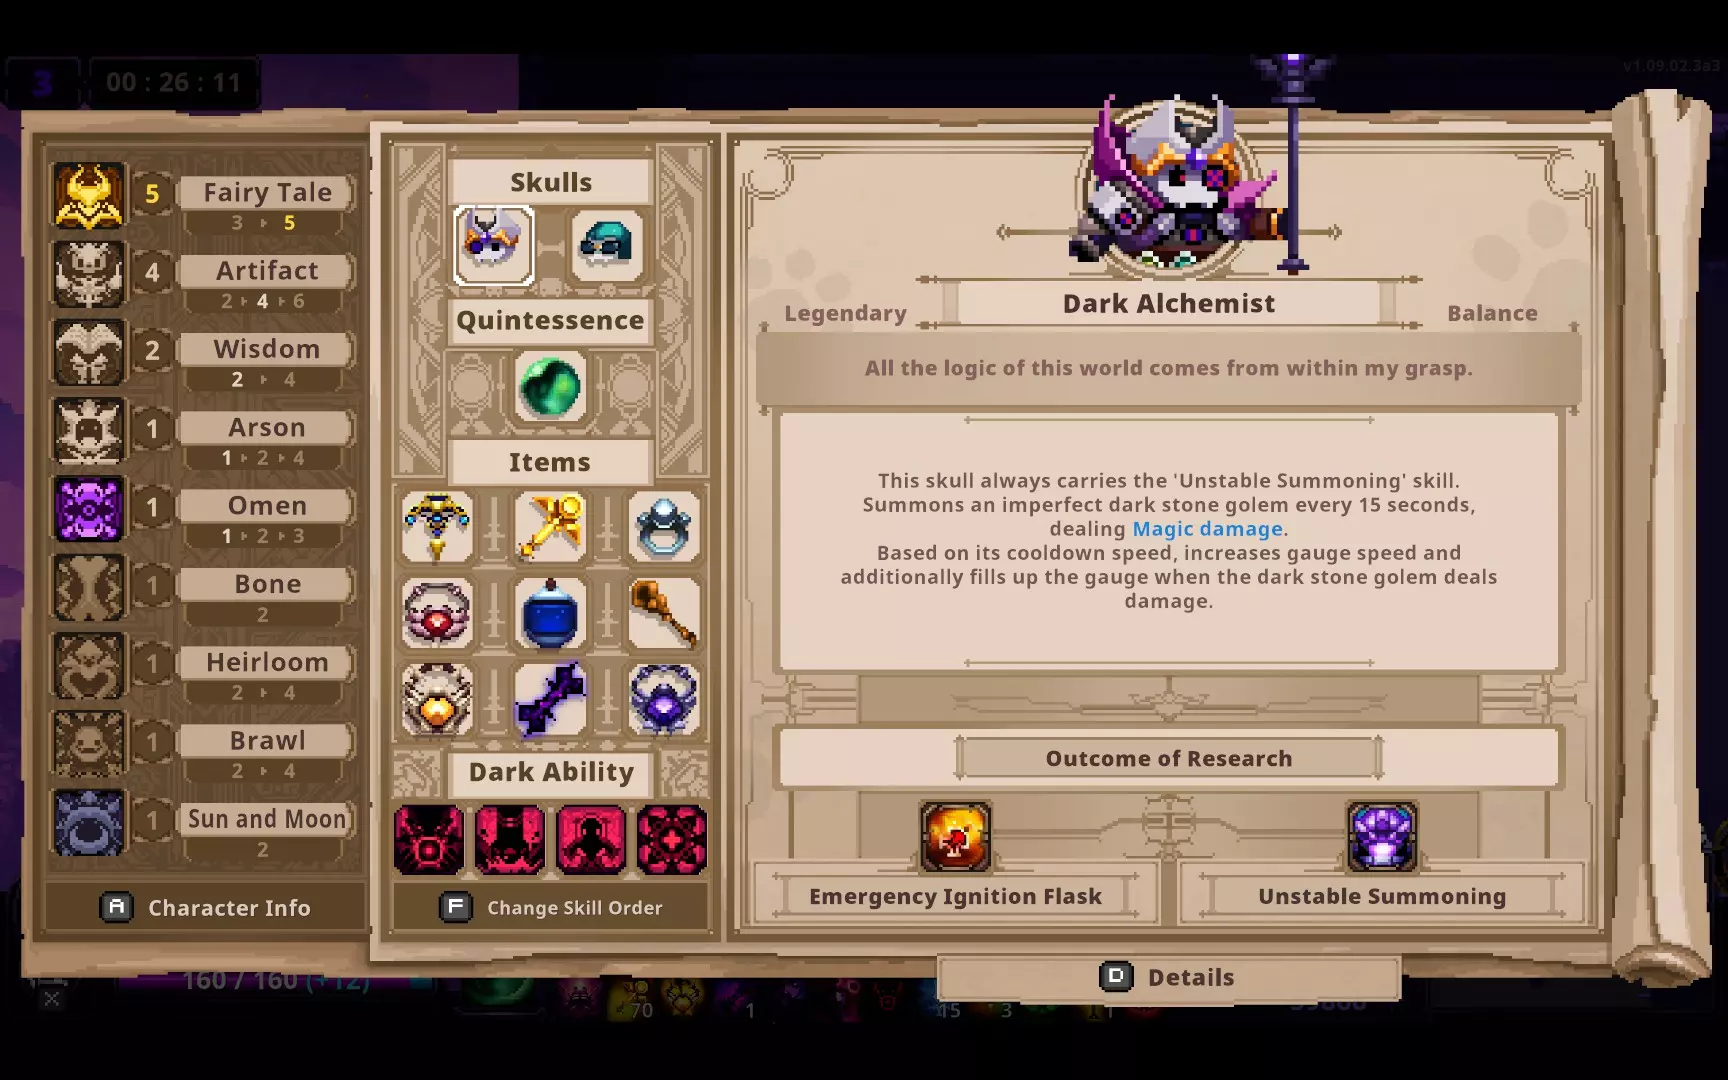
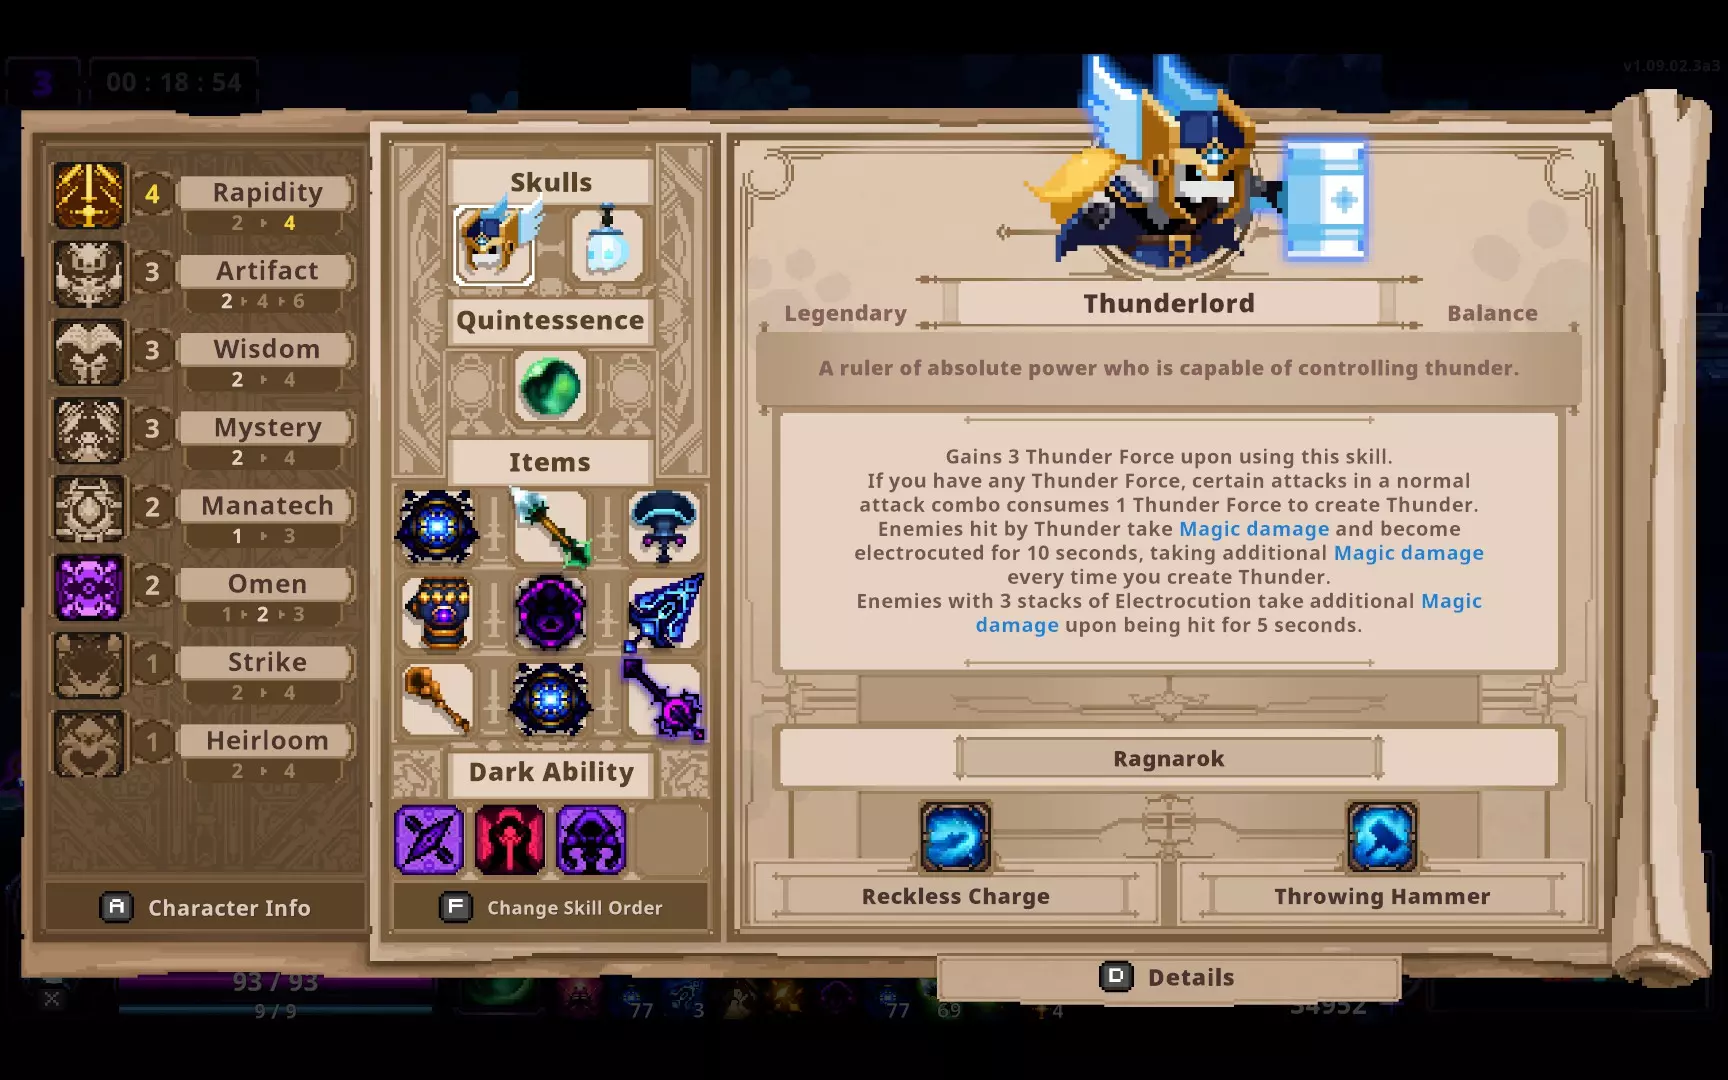
Hi! Welcome to my comprehensive dark mirror guide for Skul! While the original chapters of Skul aren't really that difficult, the "hard" mode, Dark Mirror, provide quite an interesting (and tough) challenge. It can be quite difficult and frustrating for less experienced players, so I decided to make a guide about all the things I've learned about the dark mirrors through countless deaths. I really enjoy dark mirror runs as they're built in the mold of the original levels but have some really fun and crazy additions/features! This guide will cover stuff like recommended skulls/items/quintessences as well as useful builds. Take notes, but most importantly, have fun! (lol) For information about specific skulls/tools/abilities etc, check out the fandom: https://skul.fandom.com/wiki/Skul:_The_Hero_Slayer_Wiki. Introduction [Warning: Spoilers Ahead for Skul: The Hero Slayer] The dark mirror is a mode that's unlocked after you finish the original game. There are ten levels in total (not counting your initial run); you unlock the next level as well as an equipment reward after you beat the final boss of your current level (the emperor and dark skul not required). The most prominent change in the dark mirror are the enemies; there are new enemies every two levels and all bosses have additional/modified attacks (the final boss, the first hero, has a modified second phase and doesn't have a third phase). You also unlock a variety of features as you progress, such as the Bone Offerings from Arachne, the dark abilities, the additional item in the black market, etc. It can be quite challenging for a new player to encounter such new additions for the first time, and even for experienced players, it can be difficult to beat higher levels as enemies' health and damage increase drastically (the first boss in dark mirror level 10 has nearly five times the health he does in the original). Thus, it can be useful to learn some tips before you venture in. But then again, it's always encouraged to try out things yourself and see what works for you. These are just some tips and guides gathered from countless runs. In this guide, I will recommend skulls, note useful items, as well as list out some key points/synergies. Enjoy and have fun! Yours, Will Skulls While you can experiment with many different builds, it can be quite challenging to pass high dark mirror levels without some solid damage or synergy. Here are some of the best skulls you can try out: Alchemist: Really strong magical skull; solid for dealing damage as well as being very versatile. The fire flask does decent damage and the freeze/stun flask is great for control. The "unstable summoning" skill, which you get after upgrading to Unique/Legendary, deals really good damage and covers basically the whole screen. After you beat Dark Mirror 7, you will be able to get the skull from the beginning. Safe and strong choice. Frost Skull: The swap skill, hibernation, gives you two seconds of invincibility, which is incredibly useful in dark mirror runs. The final few bosses have some very wide-ranging and high-damaging attacks, and those two seconds can be a life saver. Plus, the skull dishes out decent damage and has strong control abilities, so a great pick overall. For skills I would prefer Glacial Sword and Charge over the other two. Skeleton - Bomber: Quick and explosive. It's crucial to get the "Kaboom" skill (especially early on) for manual explosion, and for the other skill I would choose Ignite to boost damage. I prefer to use the skull as quickly as possible, and cycle explosions fast by swapping as soon as the cooldown's gone and hitting Ignite a few times before Kaboom. The huge explosion damage is really helpful for clearing up tough enemies and it's also very versatile for damage dealing. Solid Pick. Ghoul: Healing is life-saving as most enemy attacks deal a lot of damage in the dark mirror. Once upgraded to at least Unique, Ghoul's meat chunk mechanics allows him to not only deal more physical damage but also heal portion of received damage. This can be paired with the dark ability "Piety" (see "Dark Abilities" in table of contents) and the revenge/relic inscription to form a very strong and easy healing build (see “Ghoul Healing Build” in "Builds" in the table of contents). Werewolf: Really fast, has some invincibility, and deals good damage. The fact that you can chain skills makes it super versatile (although less when fighting a boss), and the Hunt skill gives you some crazy damage bonus. Beast Leap gives good mobility and invincibility, while the other two skills either chain or heal. Increase the movement and attack speed and you'll get a vicious killing machine. Keep in mind that two of the skills deal physical while the other two deal magical, so you're going to want to focus on one or make sure it's the skill you want for your build. Skeleton - Shield: The shield mechanic acts as temporary hitpoints, and a little bonus hitpoints can never go amiss. The shield skull deals pretty good physical damage, and it can rack up shields quickly, which allows you to take more damage (or deal more damage; see "Shield Backlash Build" in "Builds"). Slave: This skull might not be for everybody, but for those who know how ot parry, this is the one for you. It has the ability to parry, which nullifies the damage (and when upgraded allows you to deal extra damage). Incredibly versatile, you can block out pretty much any attack if you can react in time, and the skull itself does pretty good damage on its own. If you've got the skills, then try Slave. Also ideal for hitless runs/achievements. Alchemist + Frost Skull is almost always a solid pick; use "Unstable Summoning" from Alchemist to deal damage, and Frost Skull for control and invincibility. You can also switch out Frost for Bomber. Other good skulls include Great Warlock (the abyss meteor skill deals insane damage and covers an extreme range; good for one-shotting through normal rooms as well as bosses) and Living Armor (you can cycle skills quickly with the Flame Spirits gauge, and the skills themselves are strong as well). You can either aim to have your skulls as the main damage source and focus items based on boosting damage, or make your play more items oriented (see "Items"). As long as you have high enough attack (and decent amount of hit points), most skulls should work (unless it's really bad). It's really up to you as to what you choose. However, if you've chosen a skull to invest in, make sure you don't switch halfway as you might not have enough resources to throw together a good build. Here are some screenshots from some of my previous runs:
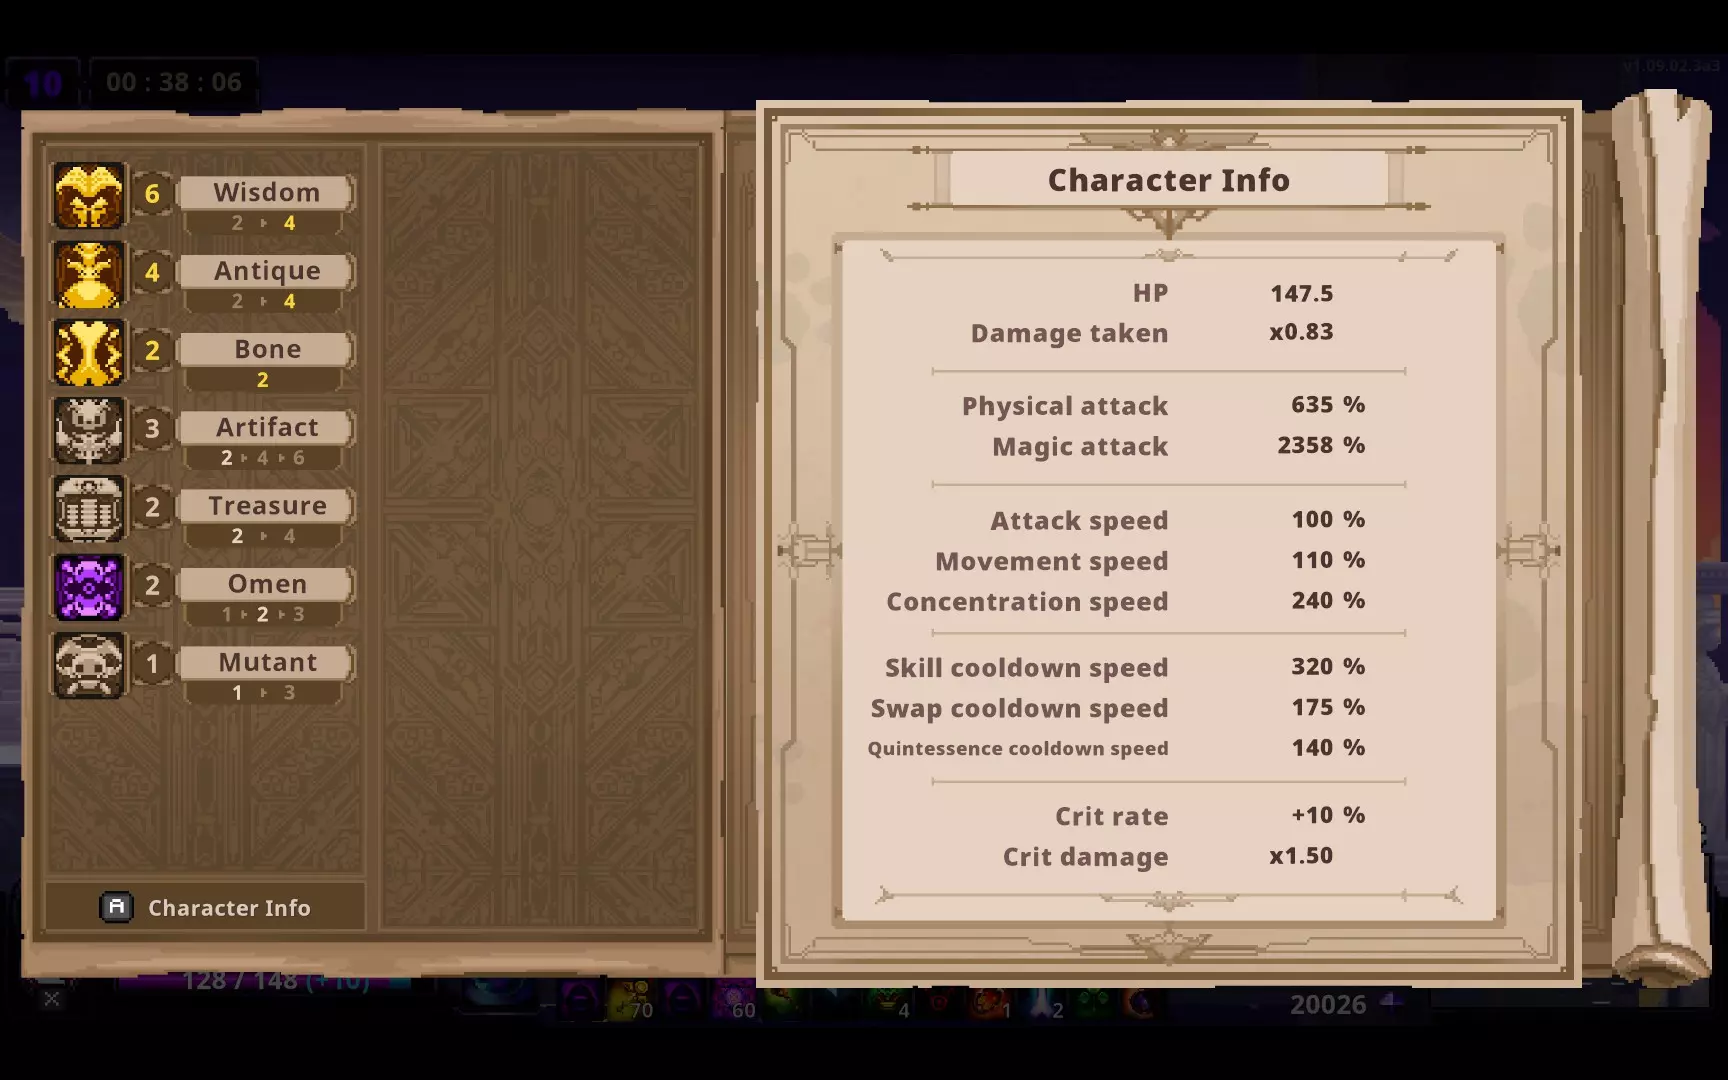
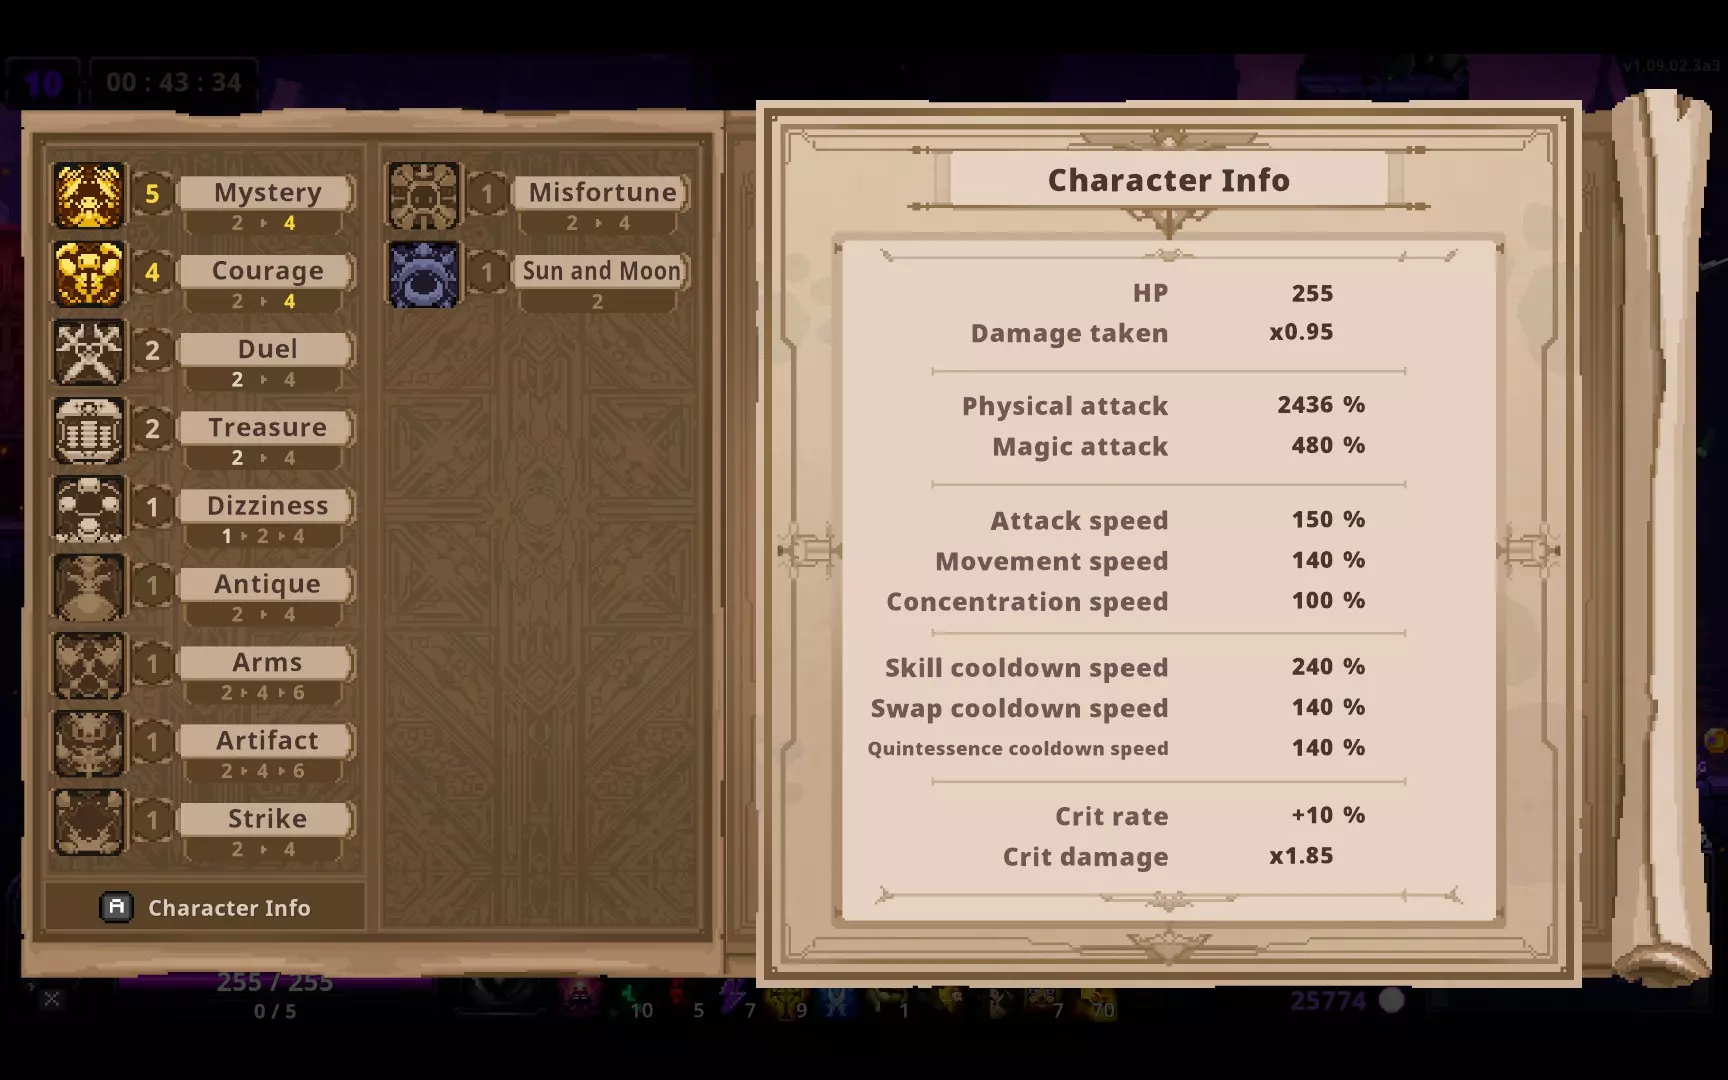
Items With the countless items in the game, it can be quite hard to choose what items to use. While some items are universally useful, most are really up to your specific build, so it’s important to keep that in mind when choosing items. Here, I’ll recommend some universal items that are consistently helpful/strong. Specific build items (like the spirit rings) will be included in the next part (“Builds”). Solar Sword: Grants 40% physical damage increase. If you get Lunar Ring, the two items will combine to make Fulgent Dawn, which gives 80% increase to both physical and magical as well as a burst of damage every 50 seconds. If you’re able to duplicate it (with the slime npc), you will get Dawn of the Crimson Sun, which gives you a whopping 100% increase in physical damage. The same goes for Lunar Ring, but for magical damage. The stats is good and the burst of light has decent range and damage as well. Golden Sword: You’re probably going to spend at least 7000 coins in one run, so the golden sword grants a guaranteed 70% increase in physical damage. For a rare item, the stat increase is pretty nice. Ritual Staff: Gives 50% magical damage increase as well as 40% skill cooldown speed increase for balance skulls. If you’re using Frost & Alchemist (both are magical balance skulls), you have a constant skill cooldown increase. Plus, it works well with Nether Mana Suppressor, which boosts magical damage based on skill cooldown speed; you can reach 100% cooldown speed increase with the ritual staff’s 40% and the witch’s 60% upgrade (for balance skulls). Nether Mana Suppressor: mentioned above. Maximum increases 120% magical damage; impressive stats increase and inscriptions. Hope Slasher: Maximum grants 120% increase in physical damage. Works similarly to nether mana suppressor, but you need to consistently deal damage to get that 60%. Stone Mask: Based on your skull’s rarity, the stone mask grants you extra gold. You can’t hurt with a little more gold; remember to switch it out at the end though. Prohibited Book & Forbidden Sword: Both require you to deal damage to enemies (the book requires you to deal skill damage while the sword requires you to kill the enemy). Once you’re reached their quota, the items transform into more powerful ones with respective stats increase and effects (the sword gives extra attacks when you dash and attack, while the book summons tentacles/shockwaves/orbs after you use your skills a few times). Both give decent boosts to damage and their effects can be pretty useful. However, if you don’t think you can reach the quota before the final fight, then don’t get it (you have to deal skill damage 500 times or kill 300 enemies). If you get the item on the first/second/third map, you still have a chance. Water Spirit Undine & Lake In A Bottle: If you’re able to get the both of them in one run, they will transform and grant you 110% increase in magical damage as well as a 45% increase in attack speed and a spirit. Pretty good stat boosts; also really useful for getting fairy tale inscriptions. Olive Tree Cudgel: grants a variety of buffs; you’re pretty likely to get all of them through one run. Increase max HP by 80, summon earthquakes when using skills, increase physical damage by 100%, decrease damage received by 20% and boost damage dealt by 20%…not much to say here. Just look at the effects yourself. Pot of Greed: Grants you 120% increase in both physical and magical damage if you’ve got 4 legendary skulls/items/quintessences. As you progress, 4 should be easy to reach, and when you reach it, the item grants you an extra random legendary. Essentially two legendary items in one with a massive damage increase. What’s not to love about it? Voodoo Doll: grants you an extra life with a moderately small amount of hit points. An extra chance never hurts, right? After the one time it saves you, it grants you 60% increase in magical damage. The Chosen Hero’s Circlet: A really strong item in general. Works similar to voodoo doll but better; when your hit points reach 15% or below, you are invincible for 7 seconds and have 50% amplified physical damage & 100% faster move speed. After the seven seconds, you recover hit points equal to the damage dealt to enemies during the time (up to 30%). The best thing is that it doesn’t break after that; after 60 seconds, the effect will be ready again. It only falls from adventurer fights (from the sword dude), however, and so it’s very rare. Omen: Shard of Darkness with either Lunar Ring or Solar Sword: if you have Omen: Shard of Darkness and have Lunar Ring or Solar Sword, the items will combine and become either Omen: Solar Eclipse or Omen: Lunar Eclipse. The two items increase (respectively) physical or magical damage by 150% and grants you invincibility for 3 seconds with 1 hit point when you receive fatal damage (recharges after you defeat 50 enemies). The stats increase and fatal damage save is quite useful, but it does have the omen inscription, so use at your own risk (the omen inscription grants you negative effects based on the number of it; increase received damage, decrease max hit points, or one-hit death). And now, for those equipments that are useful for specific scenarios and doesn’t really fit into large/popular builds: Glacier Breaker: specifically boosts damage dealt to frozen enemies (use Frost Skull or Alchemist with Ice Flask). While the damage boost is decent, most freeze-dealing skulls aren’t that good at dealing damage themselves, and this renders the use of freeze as a main damage source to be niche. It really doesn’t feel that different when you use it, unfortunately, but a 30% damage increase is still no joke. The Ring: does everything, but none of them are spectacular. Grants you stat boosts in almost everything from hit points to damage to skill cooldown, but none of the numbers are very impressive and is usually outshined by more specific items. However, if you’re starting early one or have an empty spot, then a little overall boost should do well. Veiled Mask: decreases critical chance hugely but compensate with a 70% increase in critical damage. The 30% decrease means that if you want to have a critical hit, you have to bring it up with other items/buffs. Unless you are using a critical damage/rate build, use skulls that have automatically critical hits (e.g. samurai’s Single Slash) or use the Troll quintessence, which turns all attacks into critical hits for 5 seconds (that combo is actually quite deadly). Dark Abilities Dark abilities are a big part of the dark mirror levels; you can access them in between big chapters and you get the currency for them by defeating dark enemies, who are buffed normal enemies with an extra attack/mechanic. Some of the abilities are stronger than others, while others are less impressive. Here's a rundown of basically every ability: Regular Dark Abilities: Innate Power: boosts basic attack damage. Useful if you're doing a normal attack build, or your basic attack is your main power source. Super Baby: boosts your max hit points. A little extra health can't hurt, right? Not super useful if you're aiming for absolute power and damage, but it fits in well with tanky builds, and if you've got an extra space, it can be a good choice. Lethal Speed: when you land a critical hit, you have boosted attack and move speed. Probably specially designed for werewolf. Not very useful. Coziness: grants cooldown speed and crit rate boost when you have a shield. Useful if you're doing a shield build, but otherwise somewhat useless. Reckless Posture: boosts physical/magical damage and decreases incoming damage; effect multiplies five times for a few seconds when you're hit. Useful for ghoul healing build, otherwise not very practical. Counterattack: when you dodge an attack, you gain boosted physical/magical damage. The boost it offers is quite practical, but it's not as flexible as some of the other boosts. I'd rather not choose it. Lightweight: dash cooldown decreases when you defeat an enemy. Not sure which body part the developers used to think up this. Shorthand/Hawkeye: boosts damage dealt to either close enemies (marked by a circle around you) or far away enemies (outside the circle). Shorthand is quite practical as you're very likely to be in close range with the enemy when you're fighting, but then again if you're using ranged skulls, Hawkeye might be a good option. Personally, neither shine out as very strong abilities, but you choose whether you need it or not. Soul Strike: boosts skill damage dealt to enemies. Plain, simple and powerful. The damage boost won't affect the same enemy for two seconds, but it's only two seconds. C'mon. The max 75% damage boost is undeniable. Plus, it's pretty cheap. What are you waiting for? Weakness Exposure: attacking enemies for a number of times will deal extra damage, Not very powerful or useful unless perhaps you're doing fast attack build. Hard Shell: gain shields when entering a map. Useful for shield build. Beast Blood: enhances damage for a while when you enter a map; if you defeat an enemy the time is reset. Can be used in normal rooms, but useless in boss fights. I would rather use something else. King Slayer: instantly kill mini-bosses and bosses when they're at 10% hitpoints. Not immediately viable, but not useless. Achievement: heal after you finish a map. If you're bad at the game, a little heal here and there won't hurt. Electric field: create an electric field every time you deal 7 normal attacks. Useful for perhaps rapidity normal attack build. Not universally powerful. Collection Desire: boosts physical/magical damage for every inscriptions with 2 or more. Inscrpitions with 2 or more shouldn't be hard to find, so this is a very solid and significant boost. Avoid if you don't have that much inscriptions though. Last Resistance: an extra life with 25% hit points. Why not? Piety: increases hit points recovery and boosts damage upon healing. Essential for ghoul healing build, but I can't see it incorporated into many other builds. Rift Blade: creates a rift that deals damage when you attack them. Can be used, not super strong. Not advised. Put Pocket: plant a bomb when attacking enemies. All bombs explode after a little while, dealing damage. If you wanna have fun, go for it. Not strnog though. Mercury Heart: negates two damage instances after you defeat a dark enemy. If you're able to avoid damage in normal rooms, you can go into boss fights with a bunch of hearts and fight like you're invincible. Otherwise not very strong; you might get hit right after the hearts. Big Mountain Pressure: boosts physical/magical damage every second. The boost is signifiant, but all effects are reversed after you attack an enemy. It's too slow for my liking, and the fact that you have to wait before you attack again to maximize damage is just...not my style. Predicted Pain: dealing skill damage to the same enemy increases your damage. Can be quite useful for boss fights. Go-getter: damage from items are boosted. If you're doing an item-oriented build, go for it. Silent Cries: decreases skill cooldown for the other skill when you use one. Pretty practical, but doesn't boost damage directly. If your skills cooldown fast, then there's no need to choose. Relapse: has a chance to re-inflict a status after it's canceled. If you're doing freeze/stun oriented runs, you can potentially control the boss forever. It's still a chance though, so it's really up to you if you want to take it or not. Cursed Dark Abilities:Cursed dark abiltiies appear as red/black icons and two are offered in between the chapters. All of them have a positive effect along with a negative effect, so it's up to you to see if it's worth it. Given the sheer amount of them, I will pick out some of the good ones and recommend them here. Shyness: if you're getting this right before the final boss fight, lucky you. Boosts damage if you're facing only one enemy, but with two or more, their attack power increases. Ideal for single boss fights; do not pick for normal rooms. Aging: increases skill cooldown drastically in return for 15% less skill damage. If you have some other way to reverse that (e.g. soul strike), then a 120% in cooldown speed should be more than worth it. Bone Shield: spend bone fragments to megate received damage. If you have a bunch of unspent boens and got this skill right before the final boss fights, you can probably win any level. After all, 50 bone fragments means 150 points of damage negated (at a 1:3 rate). You might not want to choose it early on, though. Ambition: gain effects for the amount of core quartz (the currency for dark abilities) you have. This means that you will have to stash up. If you're doing high mirror levels, this can be quite useful as much more dark enemies appear than in lower levels. Spirit of Negotiator: your first few rerolls are free at the black market, but each time you do it prices will increase. Can be qutie useful for buying items and being able to reroll for free. Remember to switch it out for something else later on though. Life Change: at max, grants 300% increase in physical/nagical damage. All the healing orbs and potions you get from enemies and chests will not heal you (only the meal at black market and the Achievement ability). If you're confident in your skills, go for it. Glass Body: you're invincible for a second after getting hit, which can be quite useful to avoid boss combos or numerous damage sources at once. Also amplifies your outgoing damage by 35% (at the cost of receiving 35% more damage). I don't really see much that's bad about it unless you're that bad at the game; amplified 35% damage and invincibility for 1 second every time you're hit is quite strong. Other ones like Reversed Fate (which reverses physical and magical damage) and afflicition-based-ones (affecting freeze, bleed, stun, etc.) afre all situational. Based on your build/run/situation, decide for yourself what might be the best for your build. Quintessences Quintessence choices can vary quite from what you would choose in a normal run. In the Dark Mirror, you should either focus on dealing damage or avoiding damage. Thus, quintessences that straight up deal damage (Suonisio, Shadow Knights) aren't as strong as they are in normal gameplay due to the high hit points enemies have. Rather, focus on boosting your damage and avoiding them. Recommended: Succubus: Summon succubus, who swings a scythe over quite a wide area. Enemies who are hit by it are "charmed" for a few seconds, and in that state, they cannot deal damage to you. This can be very useful for boss fights if they are about to use a wide-area/high-damaging attack. It basically gives you three seconds of invincibility. Slime: One of the strongest quintessences for this mode. Quite useless for normal runs, but here, three seconds of invincibility...that's no joke. That can get you out of a lot of sticky situations, and given its much faster cooldown than Succubus (15 seconds as opposed to 42), it's a certified life-saver. Orc: If you're doing physical damage, Orc can help you reach ridiculous numbers: it doubles your physical damage (the number you see on your character information sheet) for a few seconds, but during that time, you take double damage. Use at your own risk. Yes, you can one shot bosses, but if you take damage, especially if you have a few omen inscriptions...well, no one can save you then. Troll: turns all your attacks into critical hits for a while. Extremely strong for boosting damage, especially if you have something like Veiled Mask. Also strong if you have lots of bits of damage (e.g. Alchemist's "Unstable Summoning" skill, Ninja's "Shadow Clone", Joker's "Highlight", etc.). Pair with items and skills that boost critical damage. Wisp: resets all your skill cooldowns and rotations. Being able to use your rotation and skills immediately again is certainly helpful, but the power of it depends. If you rely heavily on skills and/or have long skill cooldowns, it's worth considering. If you already have fast rotation and/or skill cooldowns or doesn't rely on skills very much, it might not be worth it. Personally, I rarely use it. It's lackluster compared to Orc or Troll in terms of boosting damage. Any quintessence with a very short cooldown (less than 10 seconds) with the dark ability "Supernatural": The ability "Supernatural" boosts all of your damage sources by 40% when you use a quintessence, but for compensation you can't damage your enemies with quintessence. This menas that if you have something that has a very short cooldown, you can have an almost constant 40% damage boost. So, if you choose this ability, avoid quintessences that mainly deal damage and/or have long cooldowns. Cyclops: it can be a decent pick since it gives 20 shields, which helps a little with survivability. It works well with the shield build (see "Builds"). Face Bug: The "common" rarity is certainly a mystery here. You throw a bug onto an enemy, which then allows you to deal extra 30% damage to them. A solid damage boost, quite strong for boss fights. Imagine you're fighting a skeleton and they throw a bug onto your face. I'm surprised it doesn't have stun + weakenedl; should be a legendary quintessence (lol). Avoid: Balrog: turns you into a demon of hellfire for a duration. Yes, it sounds cool and looks flashy, but its lackluster damage combined its forced, altered movements (extremely long dash, skills) makes it rather dangerous to use. You are going to want to position yourself carefully to avoid damage here, and Balrog forces you to move around if you want to maximize its damage. While you can use it to some fruition, it's overall too dangerous and just not as effective or flexible as something else. Imp: A weak quintessence in general. Not much to say. The imps run around freely, which is partly the problem. You can't really control them, which means that they are going to miss out a lot of damage and do some unnecessary damage. They don't exactly deal high damage either. It's just overall bad. Don't understand why anyone would pick it, Harpy: Delete this quintessence, please. Most other quintessences other than the mentioned "recommended ones". Ones that do direct damage (e.g. Ifrit, Flame Dragon, Raven Lord) are hardly significant in harder fights, while ones with special effects (e.g. Banshee, Naias) are weak in comparison to some of the others. Actually, a few can be used here: Lyweasel boosts your dash distance which can be useful; Ogre reduces damage taken by half when you stand near it, and Spectre gives you a very brief invincibility. Still, they fade in comparison to three seconds of invincibility from the slime or doubled physical damage. Builds As mentioned above, through the countless items and inscriptions you can pair with, there are some natural builds and synergies that are strong, especially in the dark mirror levels. Here's a rundown of some of the main/strong builds: Simple Damage Stacking Build Sack up your attack power and deal damage through your skulls. Aim for items mentioned above in "items", many of which provide direct damage boosts. A successful damage-stacking run can usually get physical/magical damage to about 1000% and more. For example:
选择强大且稳定的输出角色,例如炼金术士、炸弹人、狂战士、食尸鬼、武士、活体铠甲等。对于黑暗技能,选择能够提升伤害的技能:预测痛苦(对同一敌人的技能伤害增幅)、收集欲望(若拥有大量铭文)、灵魂打击(技能伤害增幅)等。选择此流派,要么对自己的运气极有信心,要么对自己的技术充满自信。如果运气足够好,叠加到极高的伤害,你可以一击秒杀所有敌人。或者,如果你技术娴熟,可以闪避所有敌人的攻击,同时造成高额伤害。游玩时,建议熟悉所有敌人和 boss 的攻击方式(参见“敌人”和“Boss”)。食尸鬼治疗流 选择食尸鬼作为你的主要头骨。你其实并不需要其他头骨;在游戏初期,摧毁你看到的头骨并尽快升级食尸鬼。该流派主要围绕【复仇】和【遗物】这两个铭文构建;【复仇】能让你通过攻击敌人来治疗所受伤害,而【遗物】则提供额外治疗以及成比例的真实伤害。建议将【遗物】升到4级,【复仇】升到2级就足够了。【回春之根】(被击中时为你提供少量治疗)、【传世剑鞘】(治疗时召唤额外攻击)、【神选牧师之典】(提升你的魔法/物理攻击,并每两秒对附近敌人造成伤害)等物品对该流派都至关重要。黑暗技能【虔诚】(提升生命值恢复量)和【鲁莽姿态】(被击中时获得伤害减免和攻击力提升)同样至关重要。思路是,凭借【虔诚】提供的30%生命值恢复加成,复仇技能恢复的生命值即便不能超过所受伤害,也几乎能弥补。这意味着你虽然需要闪避,但如果真的被击中,只需攻击敌人就能恢复失去的生命值。不过,由于复仇技能有冷却时间和延迟,食尸鬼头骨(升级后)的肉块机制可提供次要的生命值恢复。当你拥有5个或更多肉块时,失去肉块会恢复一部分生命值,再配合【虔诚】,能恢复大量生命值。请注意,当你切换角色时,所有肉块都会丢失,因此在整个游戏过程中一直使用食尸鬼是个不错的主意。
童话流派 没有什么比看着你的小精灵军队向敌人开火更令人满意的了,对吧?童话铭文需要五个才能发挥全部力量,但如果你成功做到了,就会获得奖励(一个名为奥伯龙的巨大增益灵王,它能做各种很酷的事情,比如发射法球和激光)。 从一开始就带着暗影精灵是个好主意,因为如果你遇到光明精灵,它会把你的暗影精灵转化为影魔。【瓶中湖】和【水精灵温蒂妮】(来自DLC)搭配在一起时也会发生转化,并为你提供110%的魔法攻击加成,所以它们搭配起来非常强大。如果你能获得【元素师的祝福】(每拥有一个精灵就会提升魔法伤害),一定要选择它。你也可以选择【灾厄预兆:绝望】,这是暗镜的特殊灵体,其功能与【暗影之魂】类似,但还会改变奥伯龙国王的外观和部分攻击方式。 基本上,堆叠几个灵体并召唤奥伯龙国王,同时确保你有不错的魔法伤害属性。方法很简单:专注于闪避,把脏活累活留给你的灵体。这可能不是最强的build,但肯定很有趣。此外,当铭文被女巫修改后(在你击败最终必要boss后),奥伯龙国王会变身为他的“真实”形态,此时他体型变小,但更显洁白且更加强大(他有一个向全屏发射激光的攻击,看起来非常酷)。你可以选择后续解锁的【实干家】暗影能力。它能提升你的道具造成的伤害,这将直接增强你的灵体的伤害。

流派(续) 流血/中毒流派 该流派专注于流血/中毒物理伤害。选择【骷髅-剑】以及任意其他头骨。【骷髅-剑】的技能和攻击均有造成伤口的能力,再次造成伤口时会转化为流血效果。流血会造成单次高额物理伤害,升级至传说品质后,再次施加流血会使敌人进入“破伤风”状态,造成每秒3次、持续3秒的中毒伤害。 装备方面,应专注于最大化该伤害。关于流血效果:饮血剑(造成流血时提升物理伤害和暴击率)、恐怖之刃碎片(造成流血时可召唤额外攻击)、奇迹圣杯(每隔一段时间大幅放大流血伤害)等。关于中毒效果:死亡逼近(放大中毒伤害)、奇美拉毒牙(加速中毒敌人死亡)、瘟疫之石(造成中毒伤害时提升物理伤害)等。你也可以搭配一次性注射器(暴击时施加中毒)和精华【 troll 】(短时间内所有攻击变为暴击)使用。这取决于你想造成哪种类型的伤害;就我个人而言,我更喜欢流血而非中毒,因为流血效果更快且伤害更高。无论你想走哪种路线,都要确保将相应的铭文【过度流血】或【过度中毒】升到满级,它们的帮助很大。至于暗影技能,有两个诅咒技能是专门为毒/流血设计的:【绝症】(增加中毒持续时间,降低伤害)和【血宴】(对敌人造成伤害时立即施加流血效果,但伤害较低)。是否需要它们由你决定(【血宴】搭配【骷髅-剑】的切换技能非常致命)。你也可以考虑技能【复发】,它有几率在状态异常效果结束后再次施加该效果。基本上,使用技能和攻击来造成伤害。骷髅-剑的攻击有几率自动造成创伤,创伤随后可转化为流血效果,其技能也能造成创伤。交替使用技能和攻击,并依靠流血/中毒伤害来消灭敌人。 盾牌反冲流 头骨选择骷髅-盾牌和另一个任意头骨。该流派围绕核心道具【坚韧印记】构建,当你拥有生命值护盾并受到伤害时,会触发反击冲击波。最好拥有两个【坚韧印记】(通过史莱姆NPC获得)。基本上,你要尽可能堆叠护盾,并通过冲击波造成伤害。建筑师胸甲(提供短暂护盾)、黑暗祭司长袍(当生命值低于阈值时提供生命屏障)、天选战士铠甲(进入地图时提供护盾)等装备。黑暗技能如舒适(拥有护盾时提升冷却速度和暴击率)、坚硬外壳(进入地图时提供护盾)和实干家(提升物品伤害)都至关重要。选择独眼巨人精华,使用时可获得20点护盾。将所有这些组合起来,你应该能获得相当可观的护盾量,进而甚至可以凭借反击伤害一击秒杀 bosses。这是一种非常容易上手的流派,生存能力强且充满乐趣。 基础攻击流派 现在,基础攻击流派有很多种玩法。基本上,你需要提升攻击速度,然后快速点击攻击按钮。通过装备如【金毛 rapier】(每第三次攻击会召唤一道剑裂)、【邪剑:Kirion】(额外攻击)、【残影】(额外魔法攻击)、【魔力护手】(提升基础攻击的魔法伤害并产生额外冲击波)、【痛苦与绝望】(提升攻击速度)、【预兆:噬魂者】(额外攻击)等物品,为你的基础攻击添加其他效果或连招。【迅捷】和【潜刃】等铭文也都适用。 许多头骨都拥有强力攻击,你可以自由选择任何效果好的头骨。【维京】头骨在攻击时会产生雷电,与【风暴云】(召唤闪电的物品)搭配使用效果相当强大。小丑的攻击每几次命中就会爆发额外伤害,而当吉恩升级为传说品质时,每第三次攻击会召唤三个影子进行攻击。水骷髅可以通过更快的攻击速度更快地获得溅射效果,支配者拥有第二形态,其攻击会得到强化并造成连击伤害等等。 许多黑暗系技能都适合这个流派。【先天之力】(提升普通攻击伤害)、【致命速度】(造成暴击时提升攻击速度)、【弱点暴露】(每第三次攻击造成额外伤害)、【电场】(7次基础攻击后生成电场)、【裂隙之刃】(攻击敌人时造成额外伤害)、【死亡契约】(提升普通攻击伤害)、【破碎之舌】(提升基础攻击并降低技能伤害)等等。
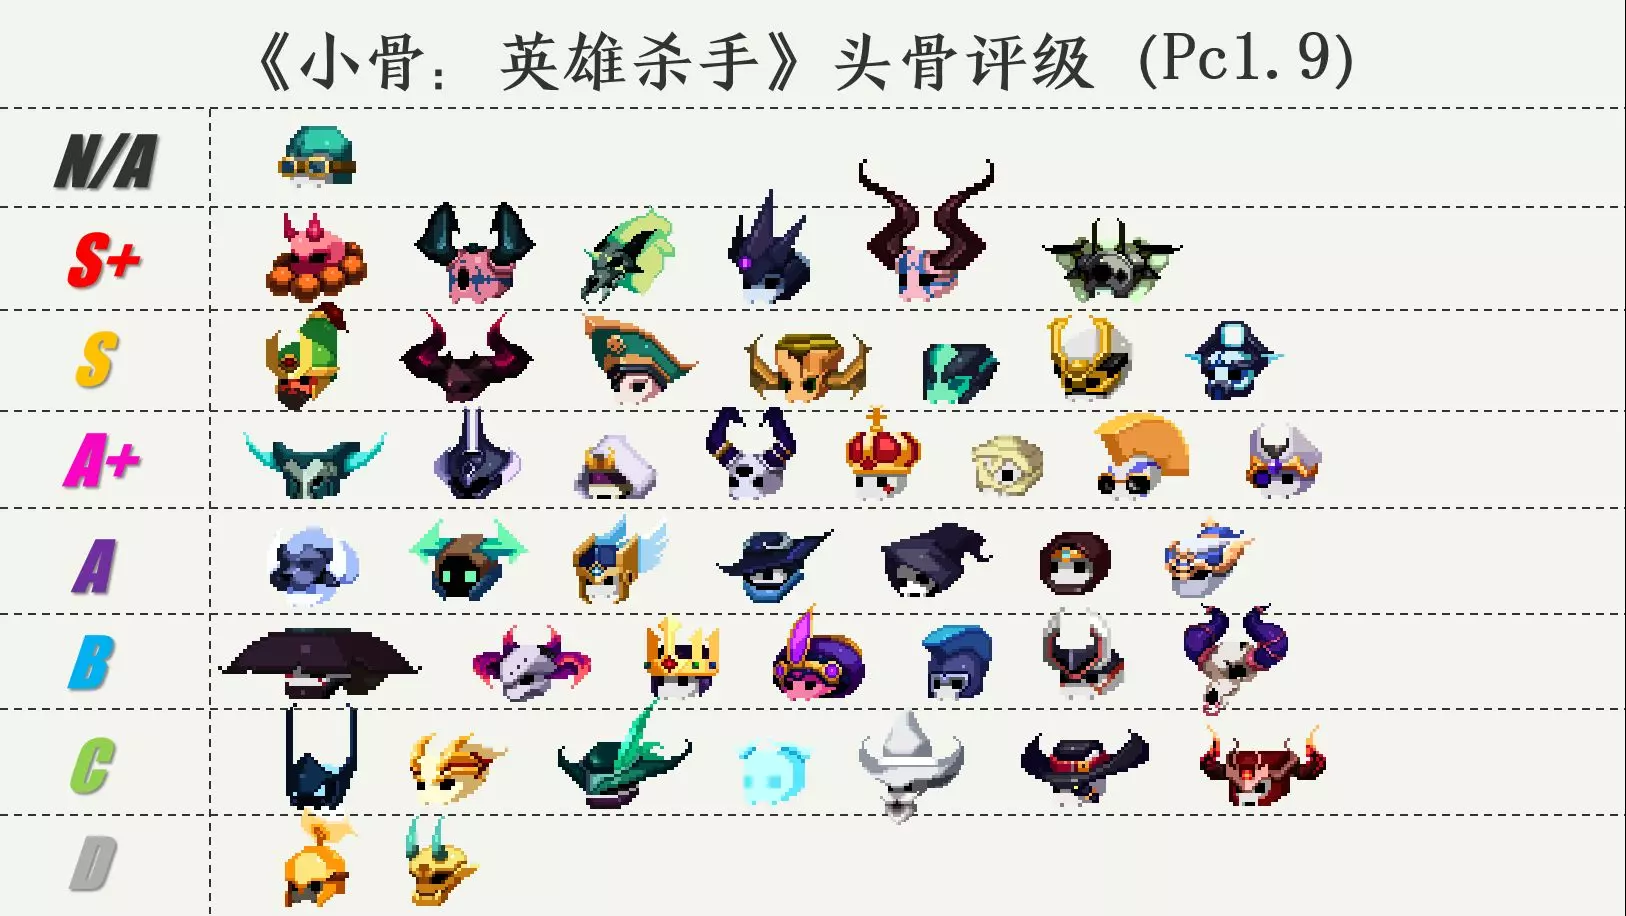
免责声明:本指南完全基于个人经验编写。我在多个账号上累计游玩超过400小时,自信对游戏的各种机制和暗镜模式有了一定的理解。因此,本指南是我在无数次游玩和长时间体验中收集的建议和技巧。当然,不同的人会有不同的看法和偏好。你可以亲自尝试所有建议,形成自己的见解(毕竟这才是游戏的乐趣所在)。本指南旨在帮助那些可能在暗镜关卡中遇到困难的玩家更快地取得进展,或获得不同的游戏体验。对于缺乏经验的玩家,它也有助于加深对游戏的理解。不过,对所有内容都要持保留态度(除了关于头骨的推荐;相信我,我推荐的那些都是好的)。尽管如此,还是尽情享受吧!《小骨:英雄杀手》是一段探索、学习并最终掌握游戏中数百种不同物品和头骨的终极旅程。这段旅程非常难忘,值得你全身心投入去享受。