换一换
换一换 


Do you want the Gaseous Assets achievement? Are you new to the stock market? Either way, this is the guide for you. This guide is a complete breakdown of the stock market, useful for players of ALL skill levels. It will teach you everything there is to know about the stock market and more... So much more... Introduction Thanks a lot for using this guide. These take many hours of work to put together, so I hope you can spare 3 seconds to give it a rating, because it really helps. If you find this guide extra helpful, please also consider giving it an award! Having a Cookie Clicker save from many years ago, I already had almost everything done when the game came to steam, but I had never bothered with some of the shadow achievements until now. So as I work my way towards the Gaseous Assets achievement, I've found myself learning way more about the stock market than ever before, as most of the tech required to get Liquid Assets and Gaseous Assets (legitimately) is not even required to get all the other stock market achievements. But for those of you who also want Gaseous Assets legitimately, or perhaps those of you just looking to expand your game knowledge, I've decided to document everything right here, in one place. It also just gives me something to do while I wait. For cookies. With that out of the way, enjoy the guide! ~ KarmicChaos ---------- Update Note: Seeing how I haven't updated this guide in nearly a year, I figured I should remove the WIP sections and do my best to tidy up the guide with the information I had for v2.048. This is still an invaluable guide for many people, so it felt wrong to leave it in a state of perpetual WIP for those that use it. I never did get around to updating it to include the new "You" buildings, as I lost interest after already having the Gaseous Assets achievement for myself. However I believe there is more than enough information in the guide to let those that use it figure out the changes in future updates. I may return to this guide if the stock market has another massive change like v2.048, but as of right now I will be leaving this guide in its current state indefinitely. Good luck trading! ~ KarmicChaos ---------- Major Update (v2.048): As of Cookie Clicker v2.048, which added the Cortex Baker building (among other things), the stock market may act differently from what is described in this guide. There have been major changes to the stock market, most notably those of the global spike and Supreme Intellect, which drastically upset the existing meta. Changes to Stock Market in Patch Notes: The bank minigame now tells you the value you previously bought a stock at The bank minigame flow is a little more exciting (oh gee how vague!)Unlisted Changes to Stock Market: Added dragon aura "Supreme Intellect". Added new stock type "PBL" to match the new "Cortex Baker" building Honestly, the ability to see your previous investment is a huge positive change for the stock market. I hope this change renews some interest in the minigame for players that were hesitant to try it before. The vague mention of changes to the "bank minigame flow" actually refer to several changes to the stock RNG, which I have already updated in that section of the guide. If you would like a short list of the changes, here is what I found: Added several new, smaller RNG checks to add extra minor fluctuations to both values and deltas. Modes 3 and 4 now cause the stock value to change by 5 times as much (delta fluctuations remain unchanged) The pull of the resting value is now 1% instead of 2%, leaving stocks free to rise and fall much more than they used to. The random duration of a mode was reduced by 300 ticks; modes used to last from 10-1000 ticks, and now they last from 10-700. Added a new random event to stock RNG called a "global spike", which has the ability to drastically change the delta and value of many stocks in the same tick, while also forcibly ending the modes those stocks were in. This makes mode recognition much harder, since modes now last much less time than they used to. Basic Info Feel free to skip this section of the guide if you're familiar with the basics of the stock market. OverviewThe stock market is a minigame that one can access by spending a sugar lump to upgrade their banks to lv. 1, after which it can be accessed on any future run so long as the player owns at least 1 bank. It may look overwhelming at first, but once you learn to read it you'll appreciate its compactness. The objective of the stock market is to buy and sell shares for different stocks in order to turn a profit. In essence, you buy shares when a stock is cheap, and sell those shares when that same stock is much more expensive. All stock market prices are in "$econds", where $1 = 1 second of your highest raw CpS StocksIn the stock market, there are 17 different types of stocks (listed below), each one corresponding to a different building you already own. The amount of shares you can own for a given stock is calculated using the following formula: N = F + H + 10*L where N = number of shares you can own F = bonus storage space from your offices H = highest amount of the associated building owned this ascension L = level of the associated building So for example, if you just bought your 200th Time Machine, your time machines were level 3, and you have level 2 offices, you could calculate the amount of CRM shares you can own like so: N = 25 + 200 + 10*3 = 255 ID*IconSymbolStock NameAssociated Building**0
无法识别
无法识别或无法翻译,已删除。
无法识别或无法翻译,已删除。
无法识别内容,已删除。
无法识别内容,已删除。
无法识别或无法翻译,已删除。
无法识别或无法翻译,已删除。
无法识别或无法翻译,已删除。
无法识别,已删除。
无法识别或无法翻译,已删除。
反物质冷凝器
无法识别内容,已删除。
无法识别,已删除。
无法识别,已删除。
无法识别内容,已删除。
无法识别或无法翻译,已删除。
PBL宣传人员皮质贝克 所有使用这些ID进行的计算都会加1,因此你可以将它们的ID视为按出现顺序排列的数字标签。(例如,CRL为1,PBL为17) 请注意,祖母和光标没有任何相关股票。如下所述,它们分别与经纪人及办公室存在松散关联。 经纪人
通常情况下,购买股票需额外支付20%的交易手续费,这会削减潜在利润。你可以通过雇佣经纪人来降低这笔手续费,每位经纪人能将当前手续费降低5%(非叠加)。每个经纪人的固定成本为1200美元,可雇佣的最大数量上限为: 最大经纪人数量=(本次飞升期间拥有的最高奶奶数量÷10)+奶奶等级 由于收益递减,除非追求【Gaseous Assets】成就,否则建议最多雇佣约80名经纪人。 办公室是一种股市升级建筑,可为所有类型的股票提供额外存储空间,并解锁特定贷款的获取权限。每次飞升后,你将从1级办公室开始,可通过牺牲一定数量的光标来升级办公室,但只有当你的光标达到所需等级时才能进行升级。 等级图标名称收益升级成本1
信用车库无100光标(需要2级及以上光标)
小型银行+25所有货物仓库空间200光标(需要4级以上光标)3
贷款公司 首次贷款权限 +75所有货物仓库空间 350个光标 (需要8级以上光标)
财政总部 一级贷款权限 +150所有货物仓库空间 500个光标 (需要10级以上光标)
国际交流一级/二级贷款权限 所有货物仓库空间+250 700个光标 (需要12级以上光标)6
贪婪宫殿1级/2级/3级贷款权限 +250所有商品仓库空间 +50%所有商品基础仓库空间*无 *贪婪宫殿提供的+50%仓库空间在固定+250之前生效 贷款 贷款是通过股票市场解锁的额外能力,可用于提供临时的每秒饼干产量(CpS)增益(贷款结束后会有CpS减益),代价是支付当前饼干数量的很大一部分。贷款在配合魔法书小游戏设置增益组合方面具有巨大的战略潜力,但由于贷款的应用实际上与股票市场无关,本指南将不涵盖其战略用途。

第一笔贷款:通过拥有3级办公室解锁。

第二笔贷款 通过拥有5级办公室解锁

第三笔贷款 通过拥有6级办公室解锁。 进阶信息 我建议所有技能水平的玩家都阅读本节及后续的所有内容。 银行上限 银行上限(或市值上限)是一个固定值,会对所有超过该值的股票价格产生影响。当股票价格高于银行上限时,只要股票的变动值为正,其变动值就会每周期减少10%,这基本上意味着它每周期会失去10%的上涨动力,并最终回落。银行上限的作用是限制股票的自由波动范围,直到玩家升级银行。 银行上限可以通过使用糖块升级银行来提高,银行每升1级,上限永久增加3美元。默认情况下,你的银行上限初始为97美元(因此在1级时,你的银行上限正好是100美元),并且每提升1级银行等级,银行上限就会增加3美元。 【基准价值】每种股票都有一个你需要熟悉的基准价值,这是股票会主动尝试回归的价值,对于战略性买卖极为重要(稍后会详细说明)。它并非该股票的平均值,而是游戏会在每个时间刻度将股票价值更新为向其基准价值靠近1%,之后再进行大部分随机数生成调用(指南中“股票随机数生成”部分的步骤3)。这也意味着,股票价格偏离基准价值越远,其回归基准价值的幅度就越大。需要注意的是,由于基准值会在每个时间间隔导致数值的固定变化,而银行上限只会减弱上涨势头(并非提供下跌势头),因此在某些情况下,基准值实际上可能会压制银行上限。股票的基准值也是每次飞升后首次解锁股票市场小游戏时的初始值。 以下是每种股票的默认基准值表格。这很容易记住,因为每种股票类型的基准值依次递增10美元。 图标 股票 基准值
无法识别,已删除。
无法识别,已删除。
无法识别,已删除。
无法识别内容,已删除。
无法识别内容,已删除。
无法识别,已删除。
无法识别内容,已删除。
无法识别内容,已删除。
无法翻译的内容已删除
无法识别内容,已删除。
无法识别内容,已删除。
无法识别内容,已删除。
无法识别内容,已删除。
无法识别内容,已删除。
无法识别
无法识别,已删除。
PBL$169 所有股票的基准价值只能通过使用糖块升级银行来提升。银行每提升1级,所有股票的基准价值就会永久增加1美元。因此,当银行达到10级时,上表中列出的所有价值都将增加10美元。 全球波动 全球波动是一种影响股市的新随机事件,每次结算时有10%的基础概率发生。由于这些事件会打乱股票当前的模式,因此需要重点关注。 当全球波动发生时,每只股票都有独立的概率受到波动影响。所有受波动影响的股票,其价值和变动率(delta)都会出现向上或向下的波动,并且它们的模式会立即结束。留意同一时刻多只股票出现的此类峰值,当这种情况发生时,意味着所有受影响的股票刚刚切换了模式! 模式 除了常规的股票随机数生成机制外,每只股票始终处于六种“模式”中的一种。这些模式会对股票的随机数生成施加额外规则,使其更有可能表现出特定的行为。 每当股票被分配一种模式时,它会被赋予一个随机选择的持续时间,介于10到700之间,该持续时间会在股票市场每次跳动时递减。由于股票市场每1分钟跳动一次,这意味着在没有全局峰值出现的情况下,模式有时可以持续长达700分钟(11小时40分钟)。一旦持续时间计数器归0,股票将被随机分配一个新的模式。进入新模式时,股票的delta值会延续。 股市的主要挑战在于准确识别股票处于哪种模式;如果能做到这一点,你就能更稳定地获得更多利润(稍后详述)。 模式0:【稳定】12.5%概率
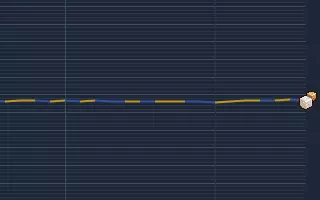
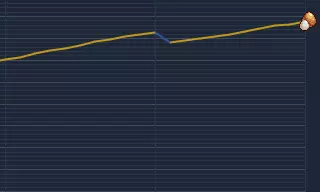
每刻度模式效果: - 变化值降低5% - 变化值在-0.025至0.025范围内波动 在模式0中,股票价值每刻度不会有太大变动,变化值保持在0附近,且向两个方向变动的可能性相同。理论上,这应该会形成一条稳定的折线图,类似于右侧图片所示,但实际情况并非总是如此。股票价值倾向于向基准值回归的趋势,往往会盖过低活跃度的影响,导致股票在某个方向上获得动量,因此有时它看起来更像模式1或模式2。 模式1:【缓慢攀升】25%概率
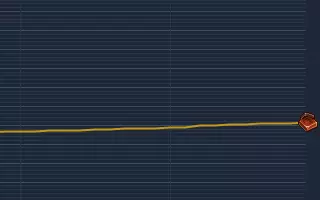
每刻度模式效果: Delta降低1% Delta变化范围为(-0.005至0.045) 在模式1中,股票的Delta变化保持在较低水平,价值变化也极小,但Delta和价值变化的权重都倾向于使股票价值上涨的频率高于下跌。这通常会形成如右侧所示的折线图,但如果随机数生成不佳且股票价值已接近或超过其基准价值,股价可能会频繁上下波动,看起来更像模式0。有时,由于随机数生成不佳,Delta可能会积累足够的负向动量,使模式1看起来像模式2,进一步增加混淆。 模式2:【缓慢下跌】25%概率

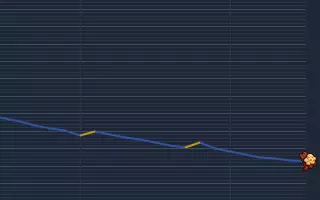
每刻度模式效果: - 德尔塔(Delta)降低1% - 德尔塔(Delta)变化范围为-0.045至0.005 - 模式2中,股票的德尔塔变化保持在较低水平,价值变化也极小,但德尔塔和价值变化的权重都倾向于使股票价值下跌的频率高于上涨。这通常会形成如右侧所示的折线图,尽管其出现频率比模式1略低,但可能会因一些不良随机数生成(RNG)在正方向获得势头而被压制,导致模式2有时看起来更像模式0甚至模式1。 - 模式3:【快速攀升】,概率12.5%
每刻度模式效果: - 增量变化范围:-0.015 至 0.135 - 数值变化范围:0 至 5 - (30%概率)数值变化范围:-7 至 3 且 增量变化范围:-0.05 至 0.05 - (3%概率)切换至模式4 在模式3中,每个刻度都倾向于大幅提升股票的数值和增量,因此是股票价值增长最快的模式。尽管其出现概率与模式4并无差异,但由于存在额外规则——每个刻度该股票有3%的概率立即切换至模式4(无论原本还能在模式3停留多久),所以该模式实际遇到的频率最低。当这种情况发生时,它不会被视为正常的模式切换,这意味着没有70%的几率进入模式5,并且模式3的持续时间会延续到模式4,而不是生成新的持续时间。这几乎总是导致模式3的储备被更快地切断,因此持续时间大大缩短,也更难见到。我认为这是六种模式中第二容易识别的模式(仅次于模式4),尤其是因为它非常罕见。 模式4:【快速下落】12.5%几率
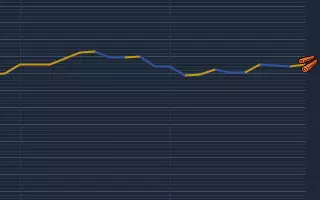
每刻度模式效果: Delta(增量)变化范围:-0.135 至 0.015 数值变化范围:-5 至 0 (30%概率)数值变化范围:-3 至 7 且 Delta(增量)变化范围:-0.05 至 0.05 在模式4中,每个刻度都极大倾向于降低股票的数值和Delta(增量),因此该模式下股票价值往往下跌最快。它通常是六种模式中最容易识别的,不过大幅向上波动可能会增加识别难度。通常,判断模式4何时结束才是较具挑战性的部分。 模式5:【混乱】12.5%概率
每刻度模式效果: - 增量变化范围为(-0.15 至 0.15) - (50% 概率)数值变化范围为(-5 至 5) - (20% 概率)增量变为(-1 至 1) 在模式 5 中,每个刻度都会随机且可能大幅改变增量和数值,正负变化的可能性相同。此外,模式 5 还有 2 条额外规则: - 当股票从模式 4 或模式 3 切换模式时,有 70% 的概率会覆盖该模式切换,转而使股票切换到模式 5。 - 在模式 5 中,每个刻度有 20% 的概率用 -1 至 1 之间的随机增量值完全覆盖当前增量值,这实际上会使任何方向的动量停止并被替换。模式识别(3-5) 模式识别是在股市取得成功的最重要技能,因此本指南的这部分内容极为重要。在此,我将介绍弱势/强势模式的示例,解释它们可能出现的原因,以及如何识别和区分它们。 当一个模式很好地完成其应有的功能时(例如,模式3能快速提升股票价值),通常更容易识别。我将此称为强势模式。当一个模式执行其功能的效果很差,甚至与预期功能相反时(例如,模式1反而降低了股票价值),就很难准确判断股票处于何种模式。我将此称为弱势模式。在模式0和模式5中,我也会使用【中性模式】这一术语来指代股票相对稳定、没有明显涨跌趋势的情况。 本指南上述“模式”部分中使用的示例图片是经过精心挑选的;每张图片都展示了一种强模式(在模式0和模式5的情况下则为中性模式),因为这些模式最容易让读者识别。大多数时候,模式并非如此清晰明确,而是介于强模式和弱模式之间。模式0、1、2(我之后会称之为低活跃度模式)在很多时候看起来彼此相似,模式3、4、5(也称为高活跃度模式)同样也彼此相似。让我们先分析高活跃度模式,因为它们之间的区别可能比低活跃度模式更容易区分。 模式3 幸运的是,我记录了一个场景,其中EGG处于强模式3,而CKI同时处于弱模式3,如下截图所示。这使得两者之间的差异更容易识别。
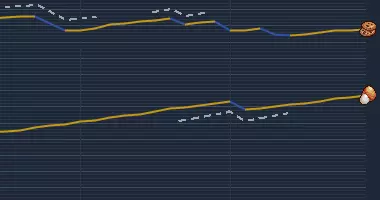
如你所见,EGG正处于强势的模式3,上升毫不费力,而CKI则处于弱势的模式3,其价值似乎出现更频繁的下跌,使其无法进一步上涨。 首先需要注意的是,模式3的一个显著特征是它对斜率的处理方式。很明显,在大多数价值上升期间,它会保持相对相同的斜率,直到出现下一次下跌。然后,当它下跌时,通常也会保持相同的下跌斜率,直到再次上涨,而且下跌速度通常比上涨速度陡峭得多。一旦在下跌后开始上涨,它会回到与下跌前非常相似的上升斜率。综合来看,这使得模式3具有一个非常容易识别的特征:如果股票以相对稳定的速率上涨,偶尔被大幅直线下跌打断,之后又回到相同的上涨速率,那么它就处于模式3。这最终看起来像锯齿形或闪电状图案,上图中已用虚线突出显示了相关示例。 即使在看似最混乱的情况下,你仍然可以应用此逻辑来判断股票当前是否处于或曾经处于模式3。你能否在其历史走势中至少发现一些这样的“锯齿形”和“恒定斜率”,即使它们之间的走势很混乱? 那么,为什么EGG处于强模式3而CKI处于弱模式3呢?主要是因为随机数生成不佳导致CKI的向下峰值出现得更频繁,不过还有其他原因:
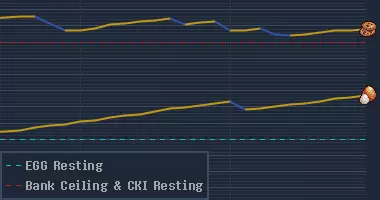
如你所见,红色虚线既是银行上限也是CKI的基准值。通常情况下,模式3能够轻松克服基准值的下拉作用(就像EGG的情况一样),但由于CKI同时也高于银行上限,所以它每周期会损失10%的上升动能。还要注意,如果EGG低于其基准值,它将进入比现在更强的模式3。 模式4

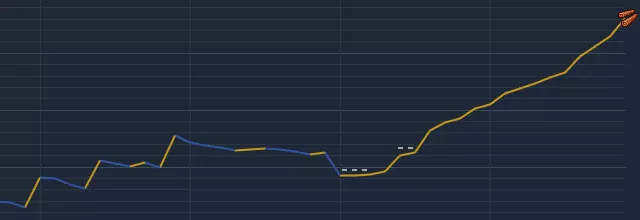
就像模式3呈现向上的锯齿状趋势和恒定斜率一样,模式4则在相反方向呈现完全相同的特征。不过,这并非区分模式4与其他模式的唯一技巧。还记得模式3的附加规则吗? “每一刻,该股票都有3%的几率立即切换到模式4……” 当股票处于模式3时,它极难在整个持续时间内保持模式3,而是更有可能最终切换到模式4。这意味着,如果你成功识别出一只处于模式3的股票,它的下一个模式几乎肯定是模式4。 因此,如果你不确定当前查看的股票是否处于模式4,一定要问问自己它之前处于什么模式。
与所有其他弱势模式一样,弱势模式4有时可能弱到足以反向运行,右侧就有一个这样的例子。请注意,尽管股票价值快速上涨,但你仍能判断该股票处于模式4,因为存在锯齿状波动,且向上峰值的斜率远陡于向下斜率(就像模式3下跌速度比上涨快一样)。 这个例子可能是由于一连串糟糕的随机数生成(RNG),再加上WCH当时比其基准价值低约90美元,这种情况下,由于持续的向上拉力,向上峰值会更陡峭,而向下回落则较平缓。在这种情况下,无论这只股票看起来多么诱人,你都应该避免购买其股份,因为它仍处于模式4,并且会回落。模式5
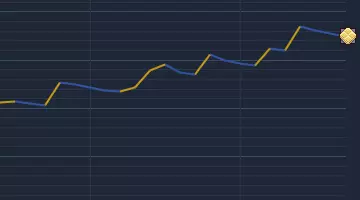
考虑上面的图像。缺乏经验的股票交易者看到这个可能会认为这是处于模式3(我确实见过其他指南用类似这样的图像来表示模式3)。但事实并非如此,这实际上只是处于模式5的上升趋势中,我会告诉你我是如何判断的。 识别模式5的第一个技巧通常是明显的线索,这也是我如此确定这只股票处于模式5的原因。就像模式4一样,问问自己在当前模式之前是什么模式。从截图中可以看到,在这个大幅上涨的峰值之前,有一个向下趋势的锯齿形走势,这可以确定为模式4。现在回想一下,当股票从模式3或模式4转换出来时,模式5有70%的概率成为下一个模式。还要记住,模式3几乎从未完成过其持续时间,因为它有额外规则——每一个时间单位都有机会切换到模式4。综合来看,这意味着模式5可以很容易被识别,因为可能出现在它之前的其他3种模式(0、1或2)与模式4完全不同,而模式5有70%的概率跟随模式4出现。 识别模式5还有另一个技巧,涉及到它覆盖当前增量值的能力(平均每5个时间单位发生一次)。在大约一半的覆盖情况中,折线图会短暂趋于平稳,即使在最规律的上升和下降过程中也会导致不规则现象。您可以在上方图片中看到用虚线突出显示的此类示例,以及在下方的【中性模式5】图片中看到一些更常见且明显的示例。
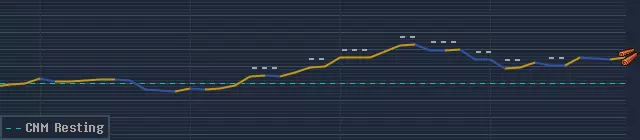
这些高原是模式5的良好识别标志,所以要习惯留意它们。 至于我们第一个例子中为什么会出现上升趋势,答案很简单。模式5有同等的上涨或下跌机会,这意味着平均来说它应该保持平衡。不过,它也会被其基准值所牵引,因此只要时间足够,无论方向如何,模式5总会使股票回到其基准值。 利用这一点来为你谋利。 哦,在我们的上升趋势例子中,CNM比其基准值低90美元。 模式识别(0-2) 低活跃度模式(0、1和2)彼此之间更难区分,在很多情况下它们看起来实际上是一样的。幸运的是,它们的行为有一个方面能让你分辨出它们的不同:它们所处的位置(以及它们的行为方式)与它们的基准值之间的关系。 模式0:模式0与模式5类似,向上或向下变动的可能性相同。然而,与模式5不同的是,模式0仅会增加/减少股票的delta值(而不是直接改变股票价值)。模式0每周期对delta的改变幅度不大,实际上每周期会使delta减少5%(使其更接近0,因此负delta不会变得更负)。因此,模式0无法直接改变股票价值,加上它对delta的影响较小,这意味着处于模式0的股票应该几乎不会有太大的涨跌(除了常规的股票随机数生成影响),呈现出我们所认为的“稳定”状态。但我们忘记了一些事情。还记得在模式5中,尽管股票的平均值处于平衡状态,但由于存在微小的拉力干扰平衡,它们最终总会收敛到其基准值吗?同样的逻辑和推理也适用于模式0;它的平均值处于平衡状态,因此基准值的拉力会对该平衡造成微小的干扰,这意味着随着时间的推移,模式0中的股票无论方向如何,都会逐渐接近其基准值。在模式0的情况下,一旦股票足够接近其基准值(约5美元),基准值的拉力就会弱得多,以至于模式0的低活跃度可以将其平衡,从而使股票呈现出“稳定”的状态。你可以在下方图片中看到这种行为的一些很好的例子,其中所有3个股票都处于模式0。
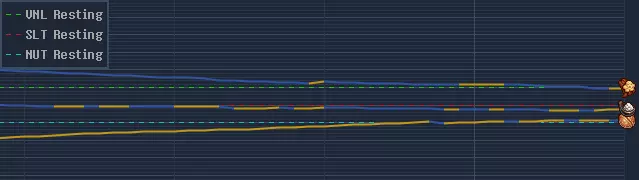
简单来说,如果在模式0下,股票价格与基准价值相差超过约5美元,它就会开始明显地向基准价值倾斜,直到足够接近后稳定下来。 模式1
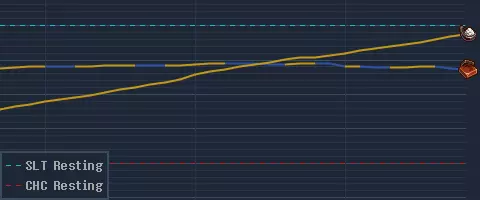
这里有另一张幸运的截图,显示两支股票处于相同模式却表现出不同行为。SLT处于强劲的模式1,正按预期上涨,而CHC则几乎难以攀升,反而趋于稳定,看起来更像是模式0而非模式1。 事实上,我如何确定CHC确实处于模式1,而不是模式0或模式2呢? 这就是低活跃度模式的大问题……它们的低活跃度使其容易受到基准值的影响而被操控,最终导致它们看起来都很相似。因此,我们不能像寻找模式3-5那样的“特征”(如锯齿状波动和平台期),而必须依靠逻辑推理来区分它们。以CHC为例,我们可以立即判断它处于低活动模式,排除模式3、4和5。然后我们可以继续通过排除法,思考如果CHC处于特定模式下会有什么表现,之后排除那些可能性最小的模式。 如果在这种情况下CHC处于模式0,我们会期望它有什么表现?通常,模式0会尝试保持稳定(就像现在的CHC一样),但如前所述,实际上模式0应该会明显朝着其静息值的方向倾斜。在这种情况下,CHC远高于其静息值,所以我们应该会看到某种下降趋势,但图像中显然没有这种趋势。因此,CHC不太可能处于模式0。如果CHC处于模式1,我们会期望看到它在其静止值的拉力作用下向上倾斜,对吧?模式1是低活动模式,这意味着与高活动模式相比,它将更早开始难以维持其对抗静止值的方向(股票偏离静止值越远,静止值的拉力就越强)。因此,尽管CHC仅比其静止值高出30美元,但这仍然至少是合理的,因为对于模式1而言,这个距离可能足以让静止值的拉力强到使其看起来“稳定”。所以CHC处于模式1是合理的。 如果CHC处于模式2,那它将处于强模式2,因为它既会向下倾斜,其静止值也会将其向下拉。图像中CHC的运动远非强模式2的表现,因此CHC处于模式2的可能性极低。在这三种可能性中,模式1的可能性明显最高。像这样使用排除法是识别所有三种低活动模式的好方法,而不仅仅是模式1。下次遇到低活动模式时可以自己尝试一下,效果出奇地好。 模式2
Like with mode 1, you can logic your way through the process of elimination to identify mode 2. It's basically the same gimmick in the other direction. Stock RNG As of right now, the info on the wiki is outdated, so all of this information was taken directly from the source code.This is by far the most technical part of the stock market. Although most of this information used to be quite unnecessary to know, as of v2.048, the stock market RNG has gone through several changes. Not only that, but it is now much more important to understand the details of stock RNG due to the addition of the Supreme Intellect aura, which tweaks very specific steps in the RNG. If you hate math and this section is difficult to wrap your head around, you aren't the first, but unfortunately, you may be unable to fully comprehend certain effects of Supreme Intellect as a result. Nonetheless, I have done my best to break this down into more digestible chunks to help as many people understand it as possible. Every 1 minute in real time, the stock market "ticks". On each tick, every stock is updated with a new value. The function that generates this new value does so through a series of steps that depend on RNG, the stock's resting value, current value, mode, and delta value. The delta value (represented by the Greek letter Δ) of a stock is literally a "rate of change in value" for the stock, or more simply a number assigned to how "fast" it is moving in a given direction. The delta of a stock is added to the stock's value at the end of every tick, with RNG calls and changes to the delta happening before this step. To be more specific, the list of steps taken each tick by the function that updates stock values is described in detail below: To help highlight the differences, all parts of stock RNG that are new or different in v2.048 will be bold and italicized, with the old version being crossed out. (New) Before any stock RNG happens, there is a 10% chance to create a "global spike". If this occurs, two numbers are generated: a "global delta" (a number between -1 and 1) and a "global probability" (a probability between 0% and 100%), both of which are used by all stocks during step 4 that tick. Decrease size of delta by 3% (brings it closer to 0) Do the following steps (depends on mode) Mode 0:Decrease size of delta by 5% Change delta by a random number (between -0.025 and 0.025)Mode 1:Decrease size of delta by 1% Change delta by a random number (between -0.005 and 0.045)Mode 2:Decrease size of delta by 1% Change delta by a random number (between -0.045 and 0.005)Mode 3:Change delta by a random number (between -0.015 and 0.135) Change value by a random number (between 0 and 1) (between 0 and 5)Mode 4:Change delta by a random number (between -0.135 and 0.015) Change value by a random number (between -1 and 0) (between -5 and 0)Mode 5: Change delta by a random number (between -0.15 and 0.15)Update value to be 2% closer 1% closer to resting value (New) If a global spike was generated this tick, have a % chance to do the following (this % is the global probability) Decrease value by: (global delta) * (1 + 7 * (random number between 0 and 1)^3 * delta) Decrease value by: (global delta) * (1 + 7 * (random number between 0 and 1)^3) Increase delta by: (global delta) * (random number between 1 and 5) Set this stock's mode duration to 0.(New) Change value by: (random number between -1 and 1)^11 * 3 (New) Change delta by a random number (between -0.05 and 0.05) 10% chance 15% chance to change value by a random number (between -1.5 and 1.5) (New) 3% chance to change value by a random number between -5 and 5 10% chance to change delta by a random number (between -0.15 and 0.15) Apply the following chances (depends on mode) Mode 0, 1, or 2:Do NothingMode 3:30% chance to change value by a random number (between -7 and 3) AND change delta by a random number (between -0.05 and 0.05)Mode 4:30% chance to change value by a random number (between -3 and 7) AND change delta by a random number (between -0.05 and 0.05)Mode 5: 50% chance to change value by a random number (between -5 and 5) 20% chance to override delta value with a random number (between -1 and 1)If value is above Bank Ceiling and delta is positive, decrease size of delta by 10% Change value by delta. (i.e. if value is 10 and delta is -2, the new value is 8) After all of this, the game checks to see if the value is below $5, at which point it will reduce any negative delta (downward momentum) by 5%. If the value is below $1, the game will simply set the stock value to be $1. Supreme Intellect & The New Meta TL;DR: Supreme Intellect makes the stock market move a lot faster due to more drastic RNG, so once you get a good grip on how the regular stock market works (without Supreme Intellect), I highly recommend you frequently equip/unequip Supreme Intellect and Reality Bending when using an active strategy and going for Gaseous Assets. Use supreme Intellect & Reality Bending to drop all stocks drastically, then unequip them and wait for them to rise back to their resting values. This is the new meta. ---------- As of Cookie Clicker v2.048, Krumblor the Cookie Dragon has a new dragon aura that directly impacts gameplay for all minigames:
至高智慧 "激活时为你的小游戏赋予多种能力。 详见各小游戏底部的更多说明。" 装备此光环后,将鼠标悬停在
每个迷你游戏底部的图标会显示该光环对该迷你游戏的具体影响。在股市迷你游戏中,描述为【股市更加混乱】。 这个描述不够具体,以下是【超凡智慧】光环的实际效果: 装备【超凡智慧】光环会修改股市多个计算公式中的一个变量,目的是让市场“更加混乱”。装备【现实扭曲】光环会应用【超凡智慧】10%的效果,同时装备两个光环则可叠加效果,达到110%的影响。【混乱】效果会影响股市的7个方面,按从左到右的顺序整理如下表并进行说明。光环模式 持续模式 5 绕过 概率变化 覆盖 范围变化 减少值 峰值 范围变化 峰值 全局范围 峰值 无概率10-700 刻度0%-1 至 13% 每刻度-5 至 5-0.15 至 0.1510%
10-500 刻度 50%-4 至 42% 每刻度 -10 至 10 -0.25 至 0.25 20%
10-680 刻度 5%-1.3 至 1.3 2.9%每刻度 -5.5 至 5.5 -0.16 至 0.16 11%
10-480 ticks50%-4.3 to 4.31.9% per tick-10.5 to 10.5-0.26 to 0.2621% Reduced Mode Duration As covered previously in the guide, when a stock switches to a new mode, it is given a random duration between 10-700 ticks. Supreme Intellect reduces the maximum by 200 ticks, so any random durations chosen with it equipped will be between 10-500 ticks, leading to more frequent mode changes in the stock market. In practice, the effect this has is extremely minimal, as on average (without Supreme Intellect), global spikes cause any given stock to change modes every 20 ticks. Mode 5 Bypass Chance (Increased Chance of Mode 5) When either Supreme Intellect or Reality Bending is equipped, a new RNG call is made every time a stock switches modes, with up to a 50% chance to bypass mode RNG entirely and just put the stock into mode 5. This operates similarly to the previously mentioned 70% chance to override and switch to mode 5 whenever a stock is exiting mode 3 or 4. These two override chances run separately, thus their probabilities stack. To be specific, if a stock is switching from mode 3 or 4 while Supreme Intellect is active, there is an 85% chance that the override will succeed. If it fails, there is still a 12.5% chance for the randomly chosen mode to be mode 5, cumulatively meaning there is an 86.875% chance for said stock to enter mode 5. Note that this is the only aspect that does not offer additional benefit for equipping both auras; it caps out at 50%. Delta Override Range (Steeper Plateaus in Mode 5) Recall that, when a stock is in mode 5, every tick has a 20% chance to completely override the current delta value with a random delta value between -1 and 1, effectively causing all momentum in either direction to stop and be replaced. By equipping Supreme Intellect, the random value of the replacement delta can instead be anywhere between -4 and 4, effectively making the "plateaus" that are so useful for identifying mode 5 so steep that they become un-traceable. Delta Reduction (Decreased Delta Stability) In order to prevent RNG from stacking too much delta in a given direction, a 3% reduction is applied to all delta values at the very start of each tick (Step #1 in the "Stock RNG" section of the guide). By equipping Supreme Intellect, this constant delta reduction is lowered from 3% per tick to 2% per tick, letting stocks gather much more momentum before this reduction becomes a hindrance. Value Spike Range (Steeper Value Spikes) For every tick, each stock has a 3% chance to experience an additional value change of a random number between -5 and 5 (Step #8 in the "Stock RNG" section of the guide). By equipping Supreme Intellect, these random value spikes instead pick from a range of -10 to 10, making the random value spikes much steeper in the process. Delta Spike Range (Steeper Delta Spikes) Similar to the value spikes described above, on every tick, each stock has a 10% chance to change its delta by a random number between -0.15 and 0.15 (Step #9 in the "Stock RNG" section of the guide). By equipping Supreme Intellect, these random delta spikes instead pick from a range of -0.25 to 0.25, making these delta spikes much steeper as well. Global Spike Chance (Increased Chance of Global Spikes) Global spikes are a tricky topic to explain in basic terms, but they can have drastic effects on a large portion of the stock market when they occur. Before any of the stocks are put through the RNG formula, there is a single roll to see if a "global spike" will be created for that tick. By default, this has a 10% chance to occur, but by equipping Supreme Intellect, this gets raised to a 20% chance. If this global spike occurs, there is a second roll for each separate stock to see if it will be impacted by this global spike (step #4 in the "Stock RNG" section of the guide). Factoring this into our probabilities tells us that there is a 5% chance of a global spike affecting any given stock on every tick (10% chance with Supreme Intellect), meaning on average every stock is affected by a global spike every 20 ticks (every 10 ticks with Supreme Intellect). Strategies DISCLAIMER: Please understand first and foremost that the stock market is a long-con game. Something like the small pull of the resting values only affects the stocks a little bit at a time. Only by giving it enough time will you begin to notice that even a 1% difference from equilibrium actually makes a big difference in the long run, even with the worst RNG luck. Have patience. ---------- So you're now a master at recognizing modes, but you've also now seen how complex the modes can get. This leaves us with just two huge questions left to answer: "When should I buy?" & "When should I sell?" The truly correct answer is "Whenever you think it's a good idea to", since even if your judgement sucks right now, you'll only improve over time. While this answer isn't satisfying, I'd say it trumps everything else I write in this section of the guide, since situations will vary, and what works for me may not work for you. To begin, all strategies a player can use in the stock market can be broken down into two categories: Active and Passive. Passive strategies get profits much slower than active strategies, but only require minimal interaction on part of the player. The simplest form of passive strategy, which requires you to know almost none of the information from this guide, is to simply check in on the stock market a few times a day, buying all stocks that are some amount or percentage below their average, while selling all stocks that are some amount above their average (top/bottom ~20-30th percentile is reasonable for this). Note that this is in relation to the stock's average, which is usually different from their resting value. If you struggle to calculate stock averages on your own, there are plenty of completely legitimate external calculators made by the community that do all of the math for you. I personally use this one. This now links to the outdated version, however it has a redirect to the new sheet for v2.048. Steam does not like direct links to google sheets, thinking they are malicious links, so I will leave this link as is. If you were using one of these sheets before the v2.048 update you will need to start a new one from scratch from the updated template. So for those of you who want to get Gaseous/Liquid Assets legitimately, the best course of action is to combine the two types of strategies. When you are away from the game for longer periods of time, use the passive strategy (buy stocks that are significantly lower than their average and sell the ones you have that are significantly above their average). Then, when you get back, your stocks are likely to be in a more beneficial place than when you left, and you can decide what to do from there. When you are actively playing the game, or only away for shorter periods of time, you should ditch the passive playstyle and use active strategies instead. By combining both of these strategy types, you can make the most out of your time in-game while still making some progress while away from the game. As a side note, if you are the type of person who would prefer to fully automate the stock market, this guide wasn't exactly written with you in mind, as it focuses on game knowledge that's only really useful to those trying to get Gaseous/Liquid Assets legitimately. With that being said, I would still like to provide some insight. As far as I know, all "legitimate" (non-cheating) stock market mods, scripts, or other forms of automation use the passive type of strategy I described above, where they automatically buy and sell when stock values reach certain thresholds. This is because writing a script to attempt any decent active strat is impossibly complicated to do without straight up cheating by extracting hidden data such as modes, durations, and deltas. Believe it or not, if you are using a mod to automate the stock market nowadays, it most likely does this. If you are against cheating but still insist on automating, try to avoid these types of mods/scripts, but also just know that you would still make profit even faster if you also learned the stock market and played actively whenever you could. Active strategies are any type of strategy that makes use of the information (especially the mode recognition) provided in this guide in such a way that the player can predict and exploit where the stock is likely to go in the near(-ish) future due to factors such as mode, current value, and resting value. ---------- As stated previously, I'd highly recommend forming your own active or hybrid strategy using both your own experience and the information given in this guide. However if you are too lazy to do this, or perhaps are looking for a strategy to use as a starting point for yours before deviating into your own techniques, look no further. Below is my own personal active strategy that I use, simplified down into a digestible list of simple actions that I always take while I play actively: NOTE: After the v2.048 update, this strategy WILL NOT work as well as before. This unfortunately means that any strategy you formulate now will likely need to babysit the stock market a lot more than before. ALWAYS BUY if the stock is below $5 BUY if the stock is within $20-30 of its floor value BUY if the stock is in strong mode 3 or 1 SELL if the stock is within $20-30 of its ceiling value SELL the moment a stock passes the bank ceiling (unless it has a resting value above the bank ceiling AND it is in mode 3, 5, 0, or 1, then sell when it gets close to it's resting value or switches modes) SELL IMMEDIATELY if the stock is in mode 2 or 4.ALSO: If the stock is noticeably below its resting value: BUY if in any mode 1 or 3 BUY if in upward-trending or neutral mode 0 or 5 SELL if in downward trending mode 0 or 5If the stock is anywhere above its resting value: BUY if in strong mode 1 or 3 SELL if in downward-trending or neutral mode 0 or 5