换一换
换一换 


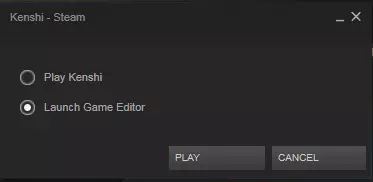
使用FCS编辑存档指南:修改属性、名称、关系等!如果本指南未涵盖你想了解的内容,只需提问,若可行我会添加到指南中。 简介 本指南将帮助你进行任何《剑士》所需的存档编辑。如果你不理解其中某部分,我很乐意解答任何问题。想做本指南未涵盖的操作?也欢迎提问,若可行我会添加到指南中。 开始使用 本节将介绍存档编辑所需了解的基本事项。 备份 编辑存档前务必备份,以防操作失误时能恢复到编辑前的状态。最简单的方法是在游戏中创建一个新的存档,而不是覆盖你常用的存档。我个人的习惯是先创建一个新存档,然后再进行快速保存。之后当你要编辑游戏时,编辑快速保存的存档。通过只编辑快速保存的存档,可以防止你意外编辑错误的存档。 使用FCS打开存档文件:首先启动FCS,最简单的方法是通过Steam运行《剑士》时,在初始弹出窗口中选择【启动游戏编辑器】选项。
进入后,你会看到一个可编辑或关闭的模组列表。只需点击窗口右上角的X关闭它,保存编辑不需要用到这个列表。然后点击顶部按钮中的“打开任意文件”。
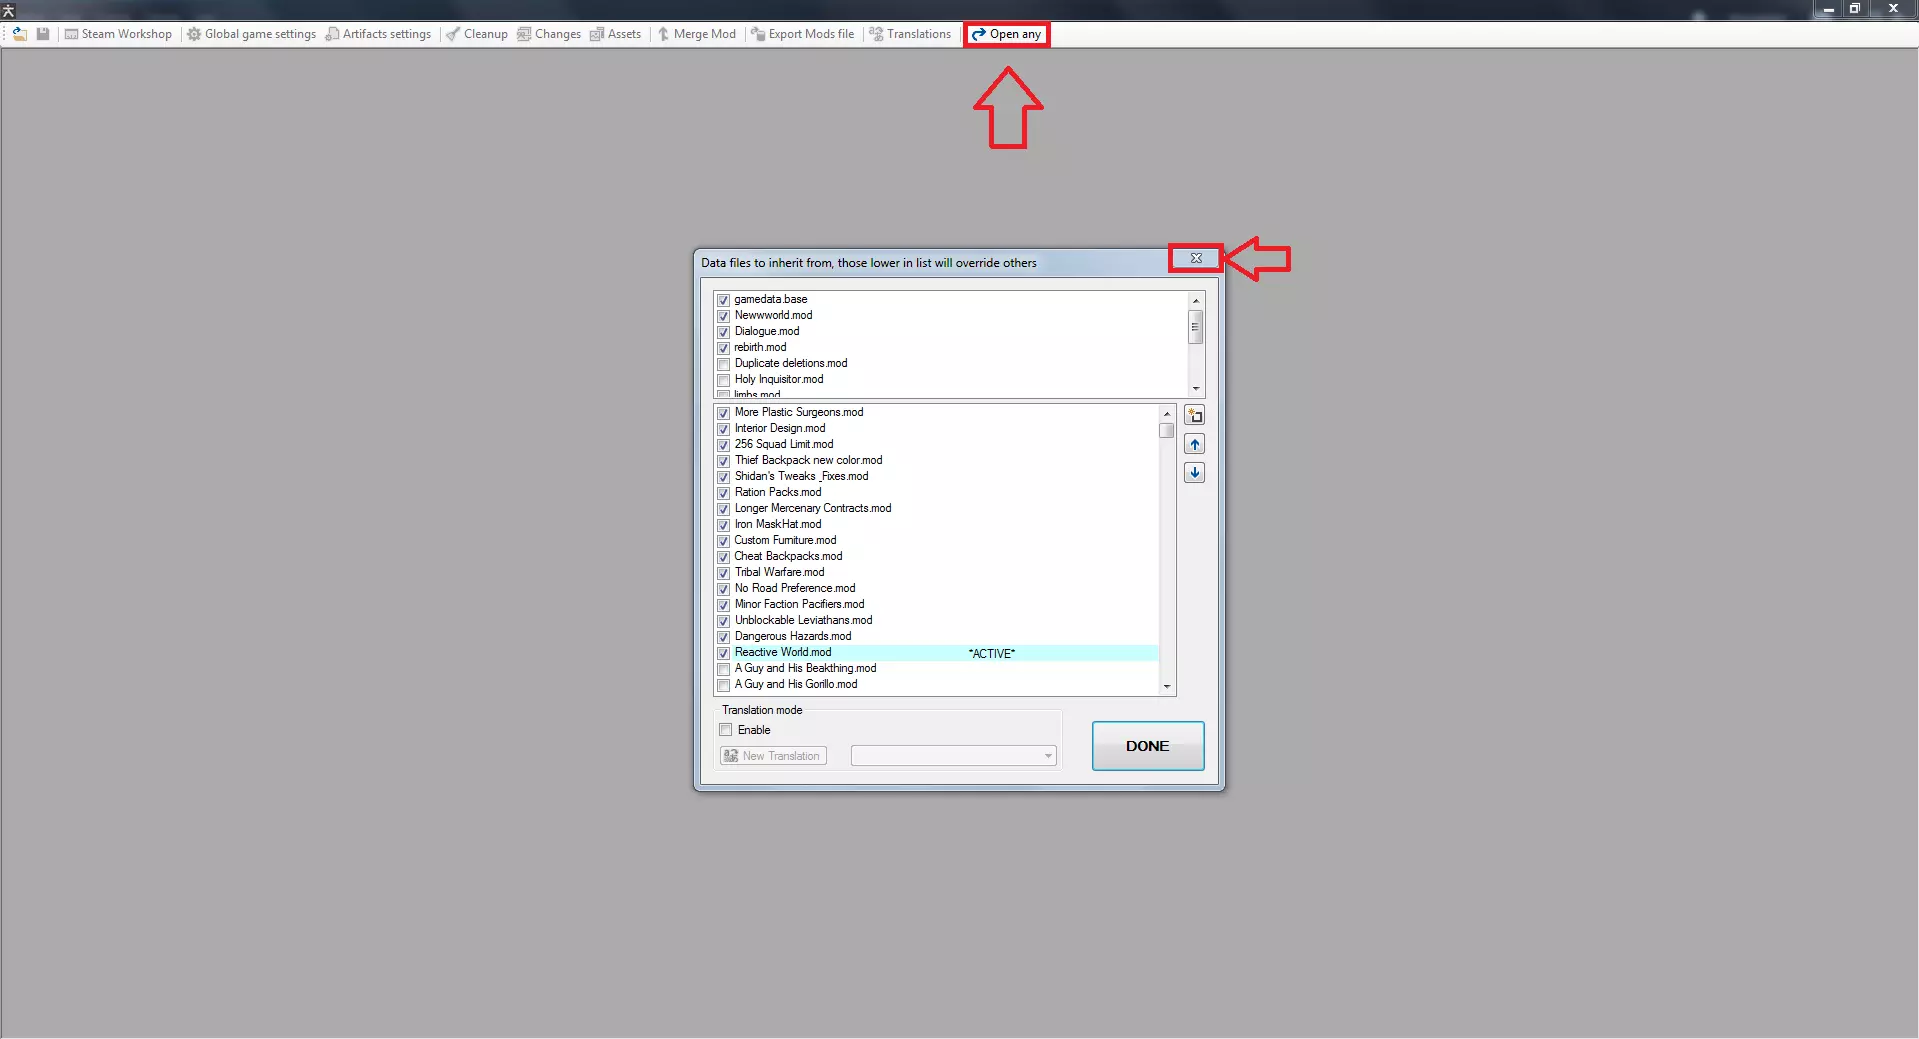
之后你会看到游戏的安装文件夹。(注意:从1.0.50版本开始,默认存档位置已移至C: Users %USERNAME% AppData Local kenshi save。如果你看不到appdata文件夹,请确保在Windows中启用了隐藏文件的查看功能。)导航到【save】文件夹,然后找到你要编辑的存档文件夹(如果你使用我的方法,就是快速存档文件夹)。打开存档文件夹后,你会看到构成存档的文件夹和文件。
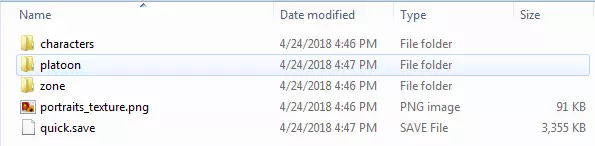
一般来说,你几乎总是需要打开quick.save文件或位于platoon文件夹中的小队.platoon文件。platoon文件将以你在游戏中的派系命名。如果你从未重命名过它,文件名会类似Nameless_0.platoon。 打开文件时,你会看到一个包含条目的窗口,其中几乎所有条目都命名为0。
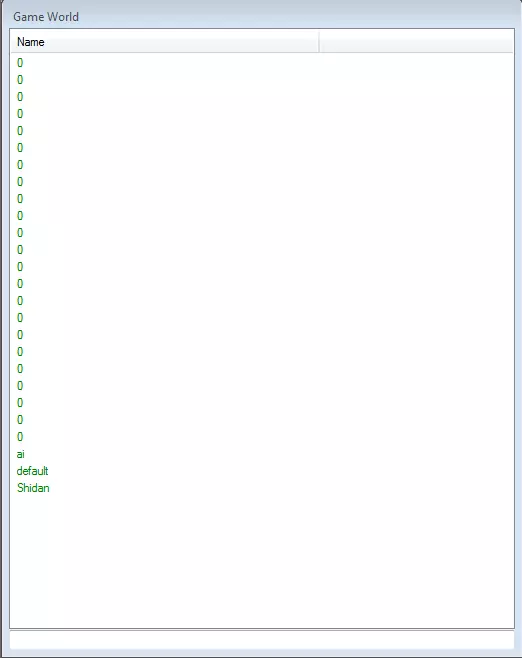
这对于了解每个条目的具体内容并没有什么帮助。不过,有一种方法可以帮助你理解这些条目。点击顶部的“Changes”按钮,会弹出另一个窗口,其中列出了所有条目,并且每个条目旁边都会显示其类型。在本指南中,我会经常通过类型来提及这些条目,因此你需要经常使用这个功能。
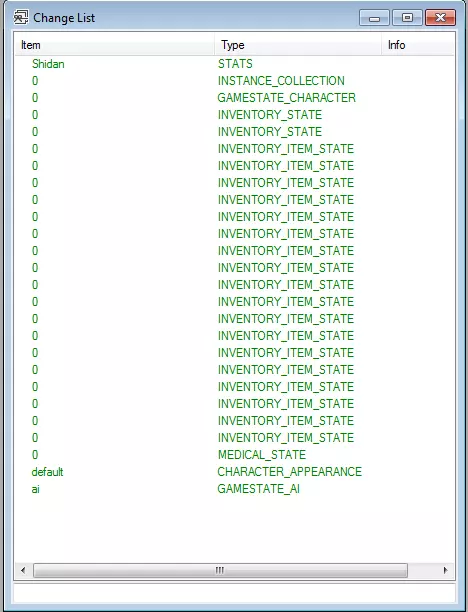
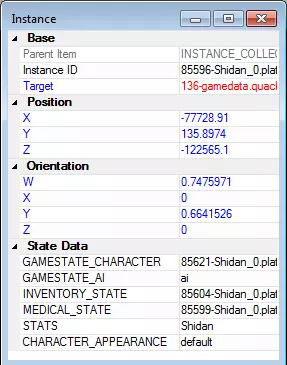
另一件你需要知道的事情是如何区分同一类型的多个条目,尤其是在编辑角色数据时,因为小队中的每个角色都会有医疗状态、游戏数据状态、 inventory state(物品栏状态)等条目,它们的名称和类型基本相同。 在这种情况下,你需要打开【INSTANCE_COLLECTION】类型的条目。此时,你需要通过双击右侧显示的实例来打开它。此实例中显示的所有条目都属于同一个角色,只需在此处双击即可打开,因此当你想要编辑特定角色时,可以使用这种方法找到你想要编辑的相应条目。如下面截图所示,属性条目以角色名字命名,这样你就能分辨出哪个实例对应哪个角色。
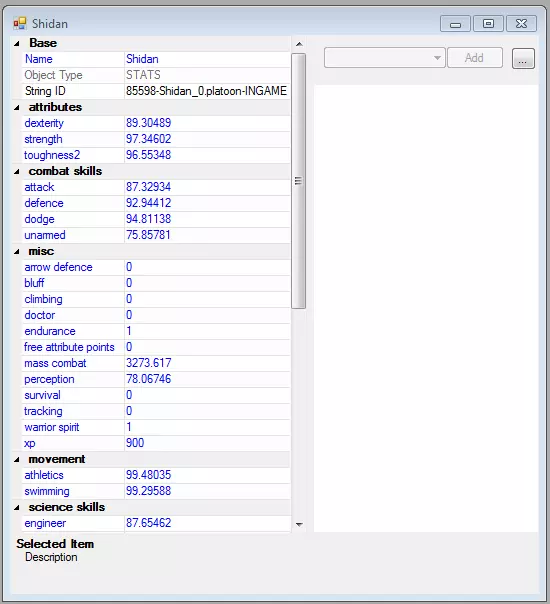
Advanced Settings (Hunger Rate, Research Speed, etc.) This section is for editing the advanced option you are given when starting a new game or import. It can be useful for if you want to change one, but do not want to import your save for some reason. Or if you want to set one to a value outside the normal limits. For starters, you'll want to open the quick.save file, and find the camera type entry. All of the settings are in there, so we'll go by each one in order. Hunger TimeThis one will be the value named "ht", along the left side. Remember, lower number means a faster hunger rate, and a higher number means a slower one. Don't accidentally kill yourself when trying to make it easier. ;) Chance of DeathThis one is named "cod", over on the left side. Lower numbers mean a slower wound deterioration rate, higher numbers mean a faster one. Global Damage MultiplierThis one is named "gdm", over on the left. Lower numbers mean less damage and exp per hit, higher numbers mean more damage and exp per hit. Production SpeedThis one is named "ps", over on the left. Lower number means slower crafting and item production, higher numbers mean faster crafting and item production. Research SpeedThis one is named "rs", over on the left. Lower numbers mean slower research, higher numbers mean faster research. Building SpeedThis one is named "bs", over on the left. Lower numbers mean slower construction, higher numbers faster construction. Number of Nests MultiplierThis one is named "nnm", over on the left. Lower numbers mean fewer nests, higher numbers mean more nests. Bandits Loot the PlayerThis one is named "bl", over on the left. If true, bandits can steal items from you when you're down. If false, they cannot. (Note: Honestly not sure if this does anything anymore) Easy ProspectingThis one is named "ep", over on the left. If true, the map has good resources all over. If false, it has normal resources. Though this doesn't work anymore, and the setting does nothing. Armour Colour So for starters, like many things this is simplest if you remove anything you don't want coloured the same colour. Remove weapons, backpacks, armour, and other items. Anything you don't want a colour scheme applied to (yes all items can have it applied, though 99% of the time the won't render the colours unless they're an armour that is set up for it). Multiple characters can be used, though you can't super easily identify which characters are holding which items (though you can track it with IDs if you want, it's an unnecessary pain when you could just do one colour at a time and apply it to all of them). So the first step is to open the platoon file, and locate the "INVENTORY_ITEM_STATE" type entry (or entries if you're editing multiple items), open it and near the top on the left you should see a "color sid" value. By default it will be blank in most cases, though you will sometimes find items with a colour applied, and its ID will be shown here (erasing the ID and leaving the field blank also functions as a way to clear colours). You'll likely need another instance of the FCS open (you can launch multiple directly through the exe file found in your kenshi folder), as you will need to acquire the SID of the colour scheme you want to apply. For this one, make sure to load gamedata.base, Newwworld.mod, Dialogue.mod, and rebirth.mod when booting up the FCS. You can load any custom mods you have as well too, but those ones are essential. If you only load the base game files, make sure NOT to save any changes you make while in here. Along the left side of the main window in the FCS you'll see various sections, select the Colour Scheme section to view all the colour shemes currently available. You can open each of these up and see exactly which primary and secondary colours are inside. Alternatively, if you're making your own mod, you can create a new entry and select the colours yourself. Once you've decided on a colour, go up to the top of the entry for that colour scheme, right click where it says "String ID", and select "Copy Value" from the list. Now go over to the platoon file again, and paste that value into the "color sid" field. Repeat for all your items you wish to colour, and then save the platoon file. Armour Uniform and Stolen tags Uniform - Courtesy of Cent0rea88 First, you should clear your inventory of any items you are not trying to edit, and move the character to their own squad. This is not strictly required, but it makes it much easier to locate the items you are editing. Open the platoon file for the squad your character is in, then using the changes screen or adding the type column, locate the entry with the type "INVENTORY_ITEM_STATE". If you emptied your inventory except for the one item, there should be only the one. You'll find the uniform value along the left side, near the bottom. Erase anything in this value to remove the uniform tag. Alternatively, you can also add or change which faction the item is a uniform for, by adding the StringID for the faction. I'll list some major faction's IDs here, but you can find the ID yourself by opening the faction when editing a mod using the FCS, it will be at the top of the faction's entry. Anti-Slavers: 58229-Dialogue.mod Flotsam Ninjas: 49377-rebirth.mod Holy Nation: 1083-gamedata.base Shek Kingdom: 11624-Dialogue (10).mod Slave Traders: 1084-gamedata.base Traders Guild: 1088-gamedata.base United Cities: defaultEmpireFactionSID StolenFirst, you should clear your inventory of any items you are not trying to edit, and move the character to their own squad. This is not strictly required, but it makes it much easier to locate the items you are editing. Open the platoon file for the squad your character is in, then using the changes screen or adding the type column, locate the entry with the type "INVENTORY_ITEM_STATE". If you emptied your inventory except for the one item, there should be only the one. You'll find the stolen tags on the left side, near the bottom. All named something about "ownedby..." Set the following values to 0, ownedbyC, ownedbyCS, ownedbyI, and ownedbyS. Then set the ownedbyTYPE value to 11. This will clear the stolen flags from the item. Attributes and Skills This is one of the simpler changes, as the entry you need to edit is simply named after the character. Don't even need to use the changes screen to assist you, just scroll through the list until you find the character's name, and then open it by double clicking. You'll be met with the window below, showing each of the character's stats. Simply change the numbers next to each stat to change what level it is. It is however HIGHLY recommended you never set them above 100, as sometimes they bug out when higher than that, often having negative effects on your character.
Bounties For this one you'll need to open the GAMESTATE_CHARACTER entry, inside you'll find a number of values related to bounties. "amount#, bountyexp#, bountyfac#, claim#, and crimes#. First you need to identify which number corresponds to which number. For this you need to check the bountyfac value, this will show the faction's unique SID. I will list the most common bounty factions below, otherwise you'll need to open up a mod in the FCS, then go to the faction list and search the SID using the search bar. United Cities - defaultEmpireFactionSID Holy Nation - 1083-gamedata.base Shek Kingdom - 11624-Dialogue (10).mod To remove a specific bounty, the safest method is to change the size of the bounty using the amount# value. Setting it to a low number (but higher than 0), will allow the bounty to expire naturally and quickly. Or you could set it to whatever else you want if you're not after removal. Character Coordinates (Teleporting) First thing you want to do is locate the coordinates you want to teleport to. There are two main methods I use for this. 1. Teleport to another character's location. If you have another character, it's rather easy to simply copy their location in the save data. Make sure they're in the same squad to make it easier to access. 2. Place a campfire at the location you want to teleport to, select the campfire, then open the in-game editor with Shift+F12. It should show you the coordinates of the campfire. Once you have either your character positioned, or the coordinates, open the platoon file for the squad, and open the instance collection. Each instance inside corresponds to a character, open them up to identify which, their name will appear towards the bottom of the instance. At the top of the instance, there will be some x y z coordinates, these are what you need to edit to teleport a character. If you used the campfire method, simply put in the coordinates of the campfire here. If you were using the squad mate method, locate their instance and copy their coordinates over. Once you're done, simply save the file and load the save. Character Personality All characters in Kenshi have a personality, sometimes preset, sometimes random, but all have one. They govern how a character responds to dialog, and the lines they say. While this is mostly a factor for NPCs, since their dialog tends to be the ones with real effects in the world, some players may be interested in identifying or changing their own character's dialog. It's a rather simple change. First, open the platoon file for the character, and locate the "GAMESTATE_CHARACTER" type entry. Towards the bottom half of the lis tof values, there will be one named "personality" with a number listed beside it. The number is which personality the character has, and it corresponds to the numbers shown below. 1 - Honorable 2 - Traitorous 5 - Smart 6 - Dumb 9 - Brave 10 - Fearful 14 - Maniacal There are also a few more, though I advise against using them, and they will never spawn naturally in vanilla. They were never fully implemented, though they do function. There are just almost no lines for them. 11 - Warm/Kind 12 - Cold/Cruel 13 - Normal If you wish to change the personality, simply change the number to the one that corresponds to the personality you'd like. Character Race For this one you'll need a bit of in-game preparation. The first thing you'll need to do is get another character, one of the race you want to switch your character to. Feel free to customize them before hand, or you can do it later. Make sure both the character you want to change, as well as the character of the race you want to switch to are in the same squad. And preferably nobody else in the squad. Then go open their platoon file. Find and open the INSTANCE_COLLECTION and open each character's CHARACTER_APPEARANCE entry and temporarily rename it something you can remember, I personally prefer to use the character's name. In the CHARACTER_APPEARANCE entry for the character whose race you want to swap, delete the reference in the race section on the right. Then once that is done, click the little box in the top right of the entry and select "Copy data form Item" from the list of options, then select the other CHARACTER_APPEARANCE you renamed. This will overrite the appearance of your character with the other character's, including their race. Now, you're not quite done yet. You'll need to copy over the character's part hit chances, or you may run into some unusual bugs with them not matching correctly. Open both character's MEDICAL_STATE entries, and perhaps rename them to be sure and remember which is which. Once inside look for the hit0, hit1, hit2, etc. values on both entries. On your main character, you'll want to change any numbers on these values that do not match to the same ones from your stand in. (e.g. If your main has an 80 on hit4, but the stand in has a 40 on it, you'll manually change the 80 to a 40.) Once the hit values match, you're done now. Rename any entries you renamed back to 0, then save the changes. Once back in-game you can simply dismiss the stand in, or keep them, whatever you wish. Hope you enjoy your new race. :) Death and KO Status Another MEDICAL_STATE edit. There are a few different values related to this. coma (whether the character is in a recovery coma, and needs to get above 0 HP to wake up) dead (whether the character is dead or not) KO (the KO timer on the character in seconds, assuming they're not dead or in a coma) unconcious (if the character is awake or not) Most edits to this are fairly simply. If you've got a KO'd character, you can simply set the KO timer to 0 you'll wake up as soon as you load up the save. Keep in mind HP data WILL override these flags though. If you don't fix the HP of your killed character for instance, they'll just die again once you reload. DeathDeath is little more complicated. Dead characters are moved to a separate squad upon death. You can edit that platoon file to revive them, but they will not appear in the UI or be able to be moved to a normal squad. The best method to deal with this is, is to create a new empty squad in-game, then save the game. Find the new squad in your platoon files, and find the one with the dead character in it. Now switch the file names. So if the files were: Nameless_1.platoon Nameless_2.platoon You would change the 1 to something else for a moment (to free up the file name), change the 2 to a 1, then change what used to be a 1 to a 2. This can be done before or after reviving the characters. If you are making this squad change before revival, just make sure not to go in-game until reviving the character and undoing their HQ damage. Otherwise they will be put in the dead squad again. Equipping items in locked slots This section will give a rundown of how to manipulate inventory items. Most of the time this is fairly pointless, as you can just do it in-game, but in some cases inventory slots can be locked due to race/prosthetics, and this method can be used to equip items to those slots. First off, open the platoon file of the squad. It is advised to empty your character's inventory of everything prior to this edit, except the item you wish to equip. That means no clothes, backpack, weapons, or equipped limbs even. And put them in their own squad if possible. Once you have the file opened, look for an "INVENTORY_ITEM_STATE" type entry, if you emptied your inventory and separated to a different squad there should only be one. If there is more than one, you may need to do a bit of detective work to identify the item. (If you've only got one item you can skip this) Namely its "inventory x" and "inventory y" values will be useful, as that will tell you the position of the item (X starts at 0 in the far left of the section, and counts up as it goes to the right. Y starts at 0 at the top and counts up as goes down.). Also note the "section" value, as that will tell you what area of the inventory it is in. Another method to identify it would be to check its "base data sid" value, and compare it to the value shown at the top when viewing items while modding. Now that you have opened the item, take note of the value named "section" on the left. This will tell you what part of the inventory the item is in. The possible positions are: 1. main (This is the main inventory window) 2. head (Helmet slot) 3. shirt (Shirt slot) 4. armour (Body armour slot) 5. legs (Pants slot) 6. boots (Boots slot) 7. back (Primary weapon slot) 8. hip (Secondary weapon slot) 9. belt (Belt slot) 10. backpack_attach (Backpack slot) 11. backpack_content (Backpack inventory window) The vast majority of the time you will just be moving between these 4: main, head, shirt, boots. Assuming your item you wish to equip is in your main inventory, and the slot you wish to equip it is empty, all you need to do is change the value that says "main" to say the name of the slot you wish to equip the item to. For example, to equip boots on someone who has lost their legs, you would change the "main" value to "boots". If the slot already has something equipped (such as you wanting to swap the gear equipped), then all you have to do is replace the section value for the equipped item as well, changing it back to "main". Save the file when you're done, and you should be good to go. Do note that with the exception of on prosthetics, items equipped in this method will not show up on the character. Equipping a shirt or a helmet on a skeleton will not be visible, though it will function statistically. Prosthetics and boots seem to be the exception to this, as they will render on the prosthetics. Also, while this method will allow you to equip items into locked slots, it does not allow you to equip items not allowed by a certain race. For example, you could equip a shirt to a skeleton, but not to a hiver. Because hivers have a shirt slot, and just cannot equip normal shirts. Similarly, you cannot equip items into slots they cannot normally go in (i.e. a shirt in the armour slot), nor can you equip multiple items in the same slot using it. Faction Relations For this one you'll be editing the "quick.save" file instead. And won't need to mess with all that changes screen or instance collection stuff, everything is pretty straighforward. 1. Locate the faction in the list you want to change your relation with. This will just have the faction name as its name, with no numbers. And the only one that is a "GAMESTATE_FACTION" type entry. Open it by double clicking. 2. Scroll down until you get to the "relationSID" numbers, look through them until you find one that says "204-gamedata.base" next to it. Make a note of the number associated with this entry. (E.G. If it's "relationSID26" then make note of the 26. That's you, for this faction.) 3. Now scroll back up to the "relation" numbers, look through them until you find the one with the same number as the "relationSID" entry from before. (E.G. relation26) 4. Change the value to the right to whatever you want your new relation level to be with this faction. Try to stick to -100 to 100, going any further can result in bugs under certain circumstances. Close the faction's window when you're done. 5. Repeat for any other factions you want to edit. 6. Now Save using the button in the top left. You're done! Load your save and enjoy. :) NPC Faction RelationsIf you wish to edit relations between NPC factions, the process is mostly the same. The key difference being in step 2, you need to locate an SID entry that is not "204-gamedata.base", which is the player's SID. And then you also to edit the relations in reverse (i.e. Edit faction A's relation with faction B, then edit faction B's relation with faction A as well). Keep in mind that this is a temporary edit. If you ever import the save, their relations will be reset (regardless of the import faction relations setting). If you want to lock in the faction relations changes between NPC factions, you need to make a mod and edit their starting relations with each other. Below is a list of all vanilla NPC faction SID numbers. Ancient Ruins - 48671-rebirth.mod Anti-Slavers - 58229-Dialogue.mod Band of Bones - 56595-Dialogue.mod Bar Thugs - 1534558-rebirth.mod Berserkers - 42257-rebirth.mod Black Desert Ninjas - 66292-rebirth.mod Black Dog - 56644-Dialogue.mod Black Dragon Ninjas - 18007-rebirth.mod Blackshifters - 48743-Dialogue.mod Bloodraiders - 16860-gamedata.base Bounty Hunters - 14508-gamedata.base Broken Ones - 64918-rebirth.mod Cannibal Hunters - 16855-gamedata.base Cannibals - 518-gamedata.base Crab Raiders - 62806-rebirth.mod Crabs - 56108-rebirth.mod Deadcat - 513-gamedata.base Drifters - 51707-rebirth.mod Dust Bandits - 200-gamedata.base Empire Peasants - 51646-Dialogue.mod Fishmen - 96359-rebirth.mod Flotsam Ninjas - 49377-rebirth.mod Fogmen - 18893-rebirth.mod Free Traders - 1229-gamedata.base Gorillos - 51813-rebirth.mod Grass Pirates - 96175-rebirth.mod Grayflayers - 48791-Dialogue.mod Gutters - 51812-rebirth.mod Herbivore - 40544-rebirth.mod Holy Nation Outlaws - 42022-rebirth.mod Hounds - 48814-Dialogue.mod Kral's Chosen - 51357-rebirth.mod Land Bat - 97574-Newwworld.mod Machinists - 50358-rebirth.mod Manhunters - 54587-rebirth.mod Mercenary Guild - 1214-gamedata.base Mongrel - 18891-rebirth.mod No Faction - nofac Nomads - 42097-rebirth.mod Old Machines - 42085-rebirth.mod Outlaw - 5442-gamedata.base Preacher Cult - 97072-Dialogue.mod Raptors - 58701-rebirth.mod Reavers - 62805-rebirth.mod Rebel Farmers - 54297-rebirth.mod Rebel Swordsmen - 1532900-__world reactions NE.mod Rebirth Slaves - 49392-rebirth.mod Red Sabres - 51652-rebirth.mod Sand ninjas - 1085-gamedata.base Scavengers - 95512-rebirth.mod Second Empire - 49356-rebirth.mod Second Empire Exile - 1533874-rebirth.mod Shek Kingdom - 11624-Dialogue (10).mod Shinobi Thieves - 14491-rebirth.mod Shrieking Bandits - 42235-rebirth.mod Skeleton Bandits - 62792-rebirth.mod Skeleton Legion - 57737-rebirth.mod Skeletons - 42088-rebirth.mod Skimmers - 56098-rebirth.mod Skin Bandits - 63028-Dialogue.mod Slave Hunters - 55101-rebirth.mod Slave Traders - 1084-gamedata.base Slaves - 57740-rebirth.mod Southern Hive - 56777-Dialogue.mod Spiders - 51331-rebirth.mod Starving Bandits - 1305-gamedata.base Stone Rats - 48753-Dialogue.mod Swamp Creatures - 51811-rebirth.mod Swamp Ninjas - 51638-rebirth.mod Swampers - 41162-Dialogue.mod Tech Hunters - 1233-gamedata.base The Gorrillo Bandits - 96261-rebirth.mod The Holy Nation - 1083-gamedata.base Thrall Masters - 97613-rebirth.mod Trade Ninjas - 40551-rebirth.mod Traders Guild - 1088-gamedata.base Twinblades - 48760-Dialogue.mod United Cities - defaultEmpireFactionSID United Heroes League - 42264-gamedata.base Vagrants - 96156-rebirth.mod Western Hive - 18000-gamedata.base Wildlife - 3943-gamedata.base Wolves - 56128-rebirth.mod Yabuta Outlaws - 1532482-__May 18 2.mod Health For this you'll want to open the MEDICAL_STATE entry for your character, either through the changes screeen, or the INSTANCE_COLLECTION if you have multiple characters in the squad. Inside you'll see multiple values corrsponding to each body part, sorted in order of the parts in-game. bandage (the amount of cut damage bandaged on the part) flesh (your "real" health on the part) rig (how much of the HP has been splinted) stun (the amount of blunt damage on the part) wear (the wear and tear damage on a robotic part)Any discrepancy between the values will be treated as unbandaged cut damage. (e.g. Setting a human's fesh value to 50 and the bandage to 20 will leave 30 unbandaged cut damage on the part.) The simplest thing to do is heal a character. By simply setting all the values but flesh to 0 and then changing your flesh values to the character's maximum will put your character back to full health. Alternatively you could damage a character by changing their flesh value to a lower value than their maximum. Handy for losing specific limbs easily, as you can just set the limb's health to -100% of their maximum health, and it will pop off the next time you load up the game if your limb loss setting is set to frequent in-game. You'll also see the blood level in here, which as you might expect, is the character's blood level. It's 1 to 1, so this is your exact blood level shown in-game. Hunger Inside the MEDICAL_STATE entry for the character this is shown on the "hung" value, as a number from 0-3 using decimals for the full values (e.g. 2.5 would be 250 hunger vlaue in-game.) There is also the "fed" value, which is how many NU the character has currently consumed and is causing hunger regen. It uses the same decimal system, so 0.5 = 50 NU points in-game. Limb Status (Getting your normal limbs back) This is more about how to regain limbs lost, as it is far simpler to lose limbs via HP editing as mentioned above. In the MEDICAL_STATE entry, you'll see a "limbs" value on the left side if they are a character who has lost and limbs (if they haven't, then the value won't even be there), with a number next to it. The number determines which limbs are lost and such, however it can be confusing to understand what number to use. Regaining all limbs is very simple though, as you can simply right click on the limbs value and then click delete value. Next time you load up the game your limbs will be back to normal. Warning: I'm unsure what will happen to prosthetics worn at this time, so I suggest only doing this with none equipped. Note: Let me clarify, it's the limbs value on the left side with all the other values that you need to delete. I've seen many people try to delete the ones on the right side, and then get confused why it doesn't work. Limbs detailsThe numbers are handled in an 8-bit binary format, separated into four sections (one for each limb). (e.g. 00 00 00 00) The pairs represent the right leg, left leg, right arm, and left arm respectively. Each pair has 3 possible states that it can recognize, 00 means that the limb is still attached, 01 means the limb has been severed, while 10 means there is a prosthetic attached. You then use the resulting binary number and convert it to decimal (there are converters online if you don't know how). For example, 01010101 is all limbs are lost, and converts to 85. So 85 is the number you'd put in the limbs value if you wanted to remove all limbs. 00000101 would be both arms are missing, and converts to 5. 01010000 would be both legs are missing, and converts to 80. Note: You cannot add a prosthetic this way, as the item data doesn't exist. 10101010 (170) would not give you prosthetics on all limbs, even though that's what it means. It will simply remove the limbs, and change the data to 01010101 (85) automatically. Player Money This is a rather simple change, though located in an unusual location. Open the quick.save file and search the changes list until you find the entry named "0" that has the type "camera" on the list. Alternatively, if you're having trouble with that, go down to the search bar in the main window, and type this exactly "Type = camera" like shown below.
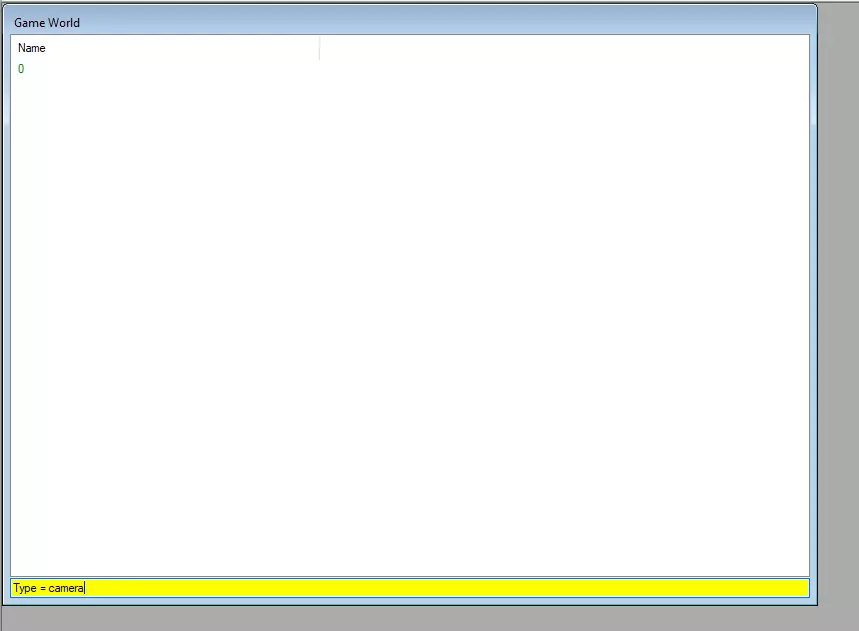
找到条目后,只需编辑其左侧的【玩家金钱】数值。目前不确定该数值的上限,因此在增加数值时需谨慎。为避免出现问题,建议不要超过20亿左右。 感谢Neorro指出了该数值的位置。 重命名角色: 首先,打开队伍文件。然后找到【GAMESTATE_CHARACTER】条目,在该条目列表的大约中间位置会有【name】数值。替换显示的名称即可更改游戏中角色的显示名称。 个人建议同时修改该角色【STATS】条目中的名称。这并非必需操作,但如果计划在未来进行更多编辑,保持名称一致会更方便。角色阵营转移 本部分介绍如何在队伍间转移角色。这能让你招募原本无法招募的角色,转换NPC的阵营,甚至可将你的角色加入其他阵营以满足各种需求(例如作为训练假人)。 武器与护甲品质 和许多修改操作一样,队伍中只有一名角色时操作最简单,且其 inventory 中最好只有一件物品。盔甲 首先,你需要打开角色的小队文件,然后找到【INVENTORY_ITEM_STATE】条目。(小队中每个角色的每件物品都会有一个这样的条目,因此理想情况下,最好只处理一个物品和一个角色。如果要对所有物品执行相同的编辑,处理多个物品也相当容易。) 在该条目内,左侧会有一个【Level】值,它决定了盔甲的品质。以下是游戏原版的品质等级列表,但你不必局限于这些范围。属性会持续提升,但最终会达到上限,无论等级多高。 5 - 原型 20 - 劣质 40 - 标准 60 - 高级 80 - 专家 95 - 杰作 武器 武器的修改稍微复杂一些,但也不会复杂太多。你将和处理护甲一样开始,先为相关角色打开队伍界面,然后导航至“INVENTORY_ITEM_STATE”条目。 在这里你需要查找两个值:“company sid”和“material sid”。 它们分别控制武器的制造商和型号。如果为不兼容的配置错误匹配这些值(例如,使用远古梅图),加载存档时武器将自动重置为卡屯废料大师卡屯1号。 以下是所有制造商及其型号的列表。你必须填写右侧显示的SID。“company sid”是制造商名称旁边的SID,“material sid”是型号名称旁边的SID。 未知 - 912-gamedata.base 生锈垃圾 - 913-gamedata.base 生锈刀刃 - 914-gamedata.base 远古 - 917-gamedata.base基础级 salvage - 918-gamedata.base 旧式改装刀刃 - 925-gamedata.base 改装刀刃 - 926-gamedata.base 卡顿废料大师 - 1057-gamedata.base 卡顿1号 - 1058-gamedata.base 卡顿2号 - 1061-gamedata.base 卡顿3号 - 1060-gamedata.base 骷髅铁匠 - 927-gamedata.base Mk I - 1059-gamedata.base Mk II - 1067-gamedata.base Mk III - 930-gamedata.base 边缘行者 - 1070-gamedata.base 边缘1型 - 1068-gamedata.base 边缘2型 - 1071-gamedata.base 边缘3型 - 1069-gamedata.base 十字 - 52288-rebirth.mod 名刀 - 52293-rebirth.mod 自制 - PLAYER_WEAPONS 自制武器可以使用任何原版制造商的模型,但名刀除外。