换一换
换一换 


这是由我(开发者)编写的iRacing摄像机工具官方使用指南。本指南涵盖了自定义视角以及准备直播或制作自定义视频时可能需要了解的所有内容。 简介 这是对iRacing模拟器内置新摄像机工具的简要介绍。在回放模式下,您可以随时按Ctrl-F12进入摄像机工具,按Esc键可退出该工具。以下是该工具运行时的截图。
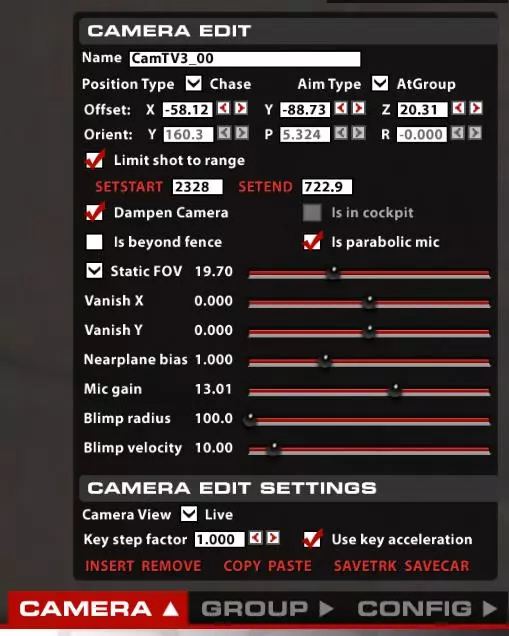
The camera system is broken down into four basic parts: Positioning the camera, aiming the camera, setting the lens up and selecting the active camera for a given moment in time. Let’s break them down one by one. Positioning the camera with Position Type There are four ways in which the cameras can be positioned. Statically placed in a fixed spot along the track, positioned relative to the center of the focus car, positioned relative to the car but not fixed to the chassis of the car (the chase and chopper cameras fit this description), or fixed on an independent motion like with the blimp camera. Let’s break each one down in turn. Fixed – fixed cameras are statically placed in the world, they do not move from frame to frame. Offset sets the position and height of the camera in meters, relative to some arbitrary point near the center of the track. Blimp – A blimp camera does a circle around the track, by default it centers itself over the track and sets its radius to be just smaller than the widest part of the track. Offset sets the center of the radius and the height of the blimp from the ground. The Blimp radius sets the size of the circle the blimp will travel. And finally Blimp velocity sets the speed of the blimp in meters/second. The blimps position is a function of radius/speed/ and the current time since the simulator started. Chopper – The chopper camera is dragged behind the car, using a spring/damper mechanism to allow it to wander a bit off course. Position sets the target height and distance from the car, but the Y axis is completely ignored, and the X axis is fixed to always be a negative offset. The chopper will try to maintain the requested distance and height but will drift from the target as the speed and direction of the target car changes. Chase – A chase camera orients itself a fixed distance (using the offset vector) from the focus car. But it is oriented relative to the direction of travel of the focus car (not the direction the chassis is aiming), and it is locked to a fixed height above the track surface. The chase camera can be set to any angle relative to the focus car, and any height above the track surface. In addition this camera forces the lens to always aim at a fixed point above the track, close to the center of the focus car. This allows the camera to visualize the vertical motion of the car since the track will remain stationary as the car bounces up and down. OnCar – The on car cameras are fixed to the frame of the car, in the same way the static cameras are fixed to the track. As the car moves, the on car cameras move in perfect step with the car. Position is relative to the center of the car, so a position of {0,0,0} is the center of the car. Oncar cameras force the aiming to be static relative to the chassis. This has to be the case since the camera is attached to the focus car and all other aiming styles require a focus car to aim at. Aiming the camera with Aim Type There are three aiming modes for the camera. Aim statically in a fixed direction, aim at a focus car, and aim at a group of cars. In addition dampening can be turned on to add in some error to the positioning and make things appear more natural, like a human operator is controlling the camera. Let’s break each type down in detail. Static – Static aiming aims the camera in a fixed direction using the orient vector. This vector is made up of Yaw (side to side), pitch (up and down) and Role (rotation). On car cameras set this orientation relative to the car frame. Chase, chopper, and blimp cameras are all relative to the platform that the camera is mounted to. And static cameras set the orientation relative to the world coordinates. Static aiming does not change, and therefore ignores the dampening request. At Car – This mode aims the camera directly at the focus car, so the car is always in the center of the display. This mode ignores the orientation vector. Dampening can be used to add a bit of variability to the shot. At Group – This piece of code uses a complicated formula of weights to try and focus not just on the focus car but makes sure that neighboring cars, and track surface are represented by the shot as well. In general this should allow for a more interesting shot over aiming at the car. Again dampening can be used to smooth out the shot and add in some randomness. Note that this shot in particular is very sensitive to cars disappearing from the world, and will jerk around in an unsettling way if cars disappear and reappear and dampening is not enabled to smooth out the motion. Setting the lens with Static FOV or Zoom The lens can either be set to a fixed field of view (width) or can dynamically set its view to try and make the focus car take up a fixed amount of space on the display. When you select Static FOV the camera fixes the lens to a given angle using the FOV slider. With Zoom mode the slider represents the percentage of the car that will be visible on the display. At 100% the car will fill the display and at 25% the car will be one forth the width of the monitor. The automatic zoom is limited in range, if the car is too far away or to close the zoom will hit a lock and stop zooming until the car comes closer into view. This is usually an undesirable effect, it is a good idea to zoom the camera in more in order to stop it from occurring. Shot selection There are a large number of cameras set up by default in the simulator, in order to better organize the cameras they have been combined into groups, like the TV1 camera set. Each camera in a group has the potential to be used at any time. Some cameras have a limited shot range, they can only see the focus car at certain points on the track. In order to filter these cameras out so they only become active when they have a nice shot, we have the concept of Limit Shot to Range. This sets up a start and end position along the track, starting at the starting line, that when the focus car is between, the camera has a possibility of becoming the active camera. For every frame we check if the current camera has a good shot, if it does not we look at all the other available cameras and randomly pick one with a good shot to display. At any one time there may be several cameras that have a shot, you can hit ‘b’ or ‘shift-b’ to manually select the next camera that has a good shot. To limit a camera to only be active for a given section of track perform the following steps. Load a replay with a car that travels at least one full lap around the track. This car will be our marker, used to set the start/end points of our shot. Set the replay to a point where the camera you are interested in becomes active, or select your camera directly from the group tab, by double clicking on it. Select limit shot to range, and hit the setstart button. The setstart button will flash and the camera will be locked in place. Now fast forward or rewind the tape until the focus car is at the start of the shot and hit the stestart button again. You have now set the start of the shot. Repeat for the end of the shot using the setend button.
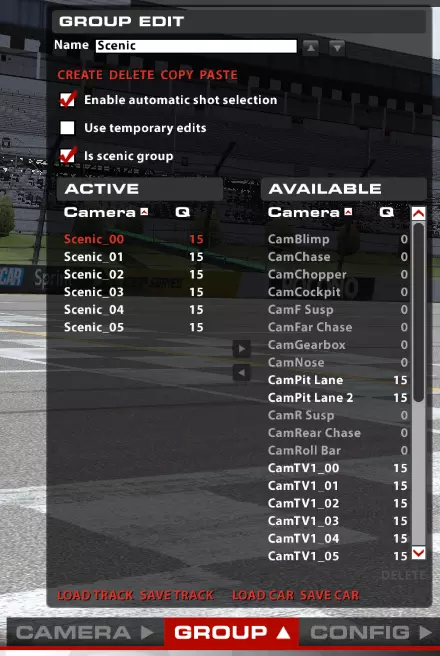
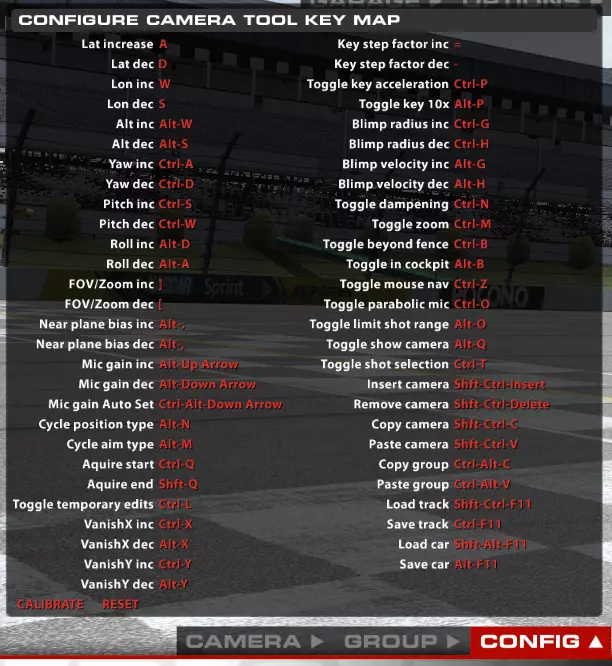
以下是群组选项卡的截图,有助于更轻松地理解相机选择系统。您会注意到,左侧方框代表活动群组中的所有相机,右侧方框代表不在活动群组中的所有相机。白色相机表示有有效镜头,灰色相机则没有。红色相机是当前活动相机。“Q”下方的数字代表每个相机的镜头质量,该数字会被输入到随机镜头选择代码中,以便在特定时间选择下一个活动镜头。 其他设置 除上述功能外,相机工具中还有几项其他值得关注的设置。驾驶舱细节增强:此设置会提升驾驶舱内的细节显示,同时移除车辆模型中不必要的部分。仅在车载视角下可用。 围栏显示优先级:设置车辆上的透明物体与围栏透明部分之间的渲染顺序。如果发现围栏显示在车辆挡风玻璃后方,可切换此选项。 抛物线麦克风:将摄像机上的麦克风设为指向性,使焦点车辆的声音比相邻车辆更响亮。 视角偏移X/视角偏移Y:可分别在左右或上下方向轻微偏移视角。若希望车辆在屏幕上显示得稍低一些,使用此设置会很方便。 近裁剪面偏移:为3D渲染引擎设置近裁剪平面。如果你发现靠近相机的物体(例如一段围栏)消失了,可以调整此参数使其重新显示。但要注意,将该参数设置得过小会导致远处物体出现因【Z轴冲突】效应产生的奇怪瑕疵。通常,移动相机比调整近平面偏移更好。 麦克风增益:此参数用于设置麦克风的音量(以分贝为单位)。麦克风增益滑块旁有一个小按钮,可根据当前与焦点车辆的距离来标准化相机音量。当车辆经过时按住此按钮,会将相机的峰值音量设置到合理水平。 相机视角:可设置为实时、广角、前视、侧视、顶视中的一种。这是一种用于可视化相机在世界中位置的特殊模式。当设置为实时视图以外的任何视图时,所有静态相机会通过彩色支架上的简单相机模型绘制到世界中。前视图/侧视图/顶视图会强制相机看向自身,以便将相机准确放置在固定轨迹位置。 使用按键加速——当使用键盘编辑相机时,控制会应用加速曲线,按住按钮的时间越长,相机在世界中的移动速度就越快。这在放置相机时很有用,但在尝试“实时”编辑相机时则不然。你可以禁用按键加速,以获得更平滑的平移/缩放体验。使用10倍加速键:你可以通过热键【alt-p】开启10倍加速。这有助于在不放弃精细控制的前提下,让镜头在世界中快速移动。 按键步长系数:此选项用于调整使用键盘控制镜头时的默认移动速度。增大数值会加快移动速度,减小数值则减慢速度。默认设置已优化,通常无需修改,但可用于镜头微调或实时编辑。 启用自动镜头选择:关闭此选项后,当车辆移出视野时,镜头系统将不会自动切换镜头,从而让操作者获得镜头选择的控制权。使用临时编辑:选中此选项后,对摄像机的所有编辑将在摄像机失去焦点时被遗忘。这在直播活动中非常有用,你可以临时调整摄像机,但不希望更改被永久保存。 是否为场景组:当我们聚焦的车辆从世界中消失时,摄像机系统将切换到场景摄像机组,为摄像机增添一些活力。将此设置为“是”会将当前组标记为场景摄像机组。 按键映射:在配置选项卡中,你可以找到摄像机控制的所有键盘映射。几乎所有控制都可以通过键盘快捷键进行编辑。位置(纬度、经度、高度)、瞄准(偏航、俯仰、横滚)和缩放控制也可以映射到模拟摇杆,以便在实时编辑时进行更精细的控制。如果想要重新映射某个控制,只需点击该控制旁边的红色按钮,然后输入按键或按下摇杆上的按钮。如果要取消按键重映射,按Esc键即可。若要恢复默认映射,只需点击重置按钮,这不会影响驾驶控制的校准。为了正确支持模拟设备,有一个校准按钮可用于校准摇杆。在将摇杆正确分配给控制之前,必须至少校准一次。
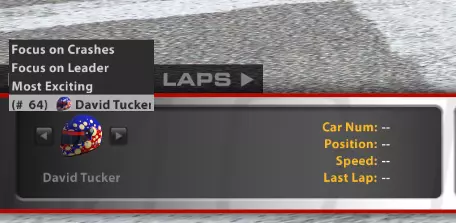
鼠标瞄准模式 有一种特殊的导航模式,允许你使用鼠标瞄准并围绕赛道飞行相机。你可以(在相机工具启动后)通过按【Ctrl-Z】启用它。激活后,移动鼠标即可瞄准相机,点击鼠标按钮可前后移动。你可以随时按【Esc】将相机重置回默认位置。或者,如果你再次按【Ctrl-Z】,相机工具将尝试更新相机的位置和方向(如果所选相机类型支持)。在鼠标瞄准模式下,你仍然可以使用键盘控制相机。这可以让操作者毫不费力地实现非常复杂的运动。导演模式 在会话屏幕的左下角,有一个头盔图标和当前摄像机系统正在跟随的车手姓名。点击这个头盔图标会弹出所有车手的列表,你可以选择要跟随的车手。此外,列表顶部有三个选项,可启用自动导演模式。此模式让摄像机系统决定聚焦对象。选项包括【聚焦碰撞】、【聚焦领先者】和【最激烈区域】。【最激烈区域】会尝试找到比赛中竞争最激烈的车辆并聚焦它们;【聚焦碰撞】与【最激烈区域】类似,但如果发生碰撞事故,会优先跳转到该区域;【聚焦领先者】会跟随领先车辆,或领先者附近值得关注的其他车辆。
赛道保存与加载 随时可以按下savetrak或savecar将编辑好的视角保存到磁盘。赛道视角文件位于【我的文档】iRacing cameras tracks【赛道名称】,车辆视角文件位于【我的文档】iRacing cameras cars【车辆名称】。这些文件是视角文件的本地副本,不会影响已随赛道和车辆存储的内部视角文件。可以保存多个视角设置,并通过加载赛道和加载车辆按钮重新加载。也可以从此处加载默认视角设置。 视角系统存在一些限制: 座舱视角 - 座舱视角不可编辑,无法进行更改,也不会保存到磁盘。-编辑-现在你可以编辑并保存驾驶视角,但有范围限制,以确保视角保持在驾驶员头部应在的位置附近。 车辆视角:车头、变速箱、防滚架、前悬挂和后悬挂均为车辆视角,会保存到模拟器中加载的每辆车的车辆视角文件中。其他所有视角均为赛道视角,保存到赛道视角文件中。每个车载视角组中只能有一个车辆视角。 其他按键绑定 除了视角工具使用的按键外,以下热键在编辑视角设置时可能会有所帮助。以kp_开头的按键为小键盘按键(键盘右侧的数字小键盘)。 ctrl-f12:切换视角工具开启/关闭。 esc:退出视角工具。 kp_7:跳转到回放开始处。ctrl-kp_4 – 跳转到会话开始处 shift-kp_4 – 倒放回放 kp_4 – 回放中后退一帧 kp_5 – 暂停回放播放 kp_del – 停止回放播放 kp_8 – 回放切换慢动作 kp_6 – 回放中前进一帧 shift-kp_6 – 快进回放 ctrl-kp_6 – 跳转到下一会话开始处 shift-kp_3 – 跳转到焦点车辆的下一圈通过点 shift-kp_1 – 跳转到焦点车辆的上一圈通过点 ctrl-kp_3 – 跳转到回放录像中的下一事件(可能会更改焦点车辆) ctrl-kp_1 – 跳转到回放录像中的上一事件 kp_1 – 跳转到回放结束处 b – 选择当前相机组中的下一个相机 shift-b – 选择当前相机组中的上一个相机 c – 选择下一个相机组shift-c – 选择上一个相机组。 v – 聚焦下一辆车。 shift-v – 聚焦上一辆车。 ctrl-v – 聚焦玩家的车(你的车)。 ctrl-c – 从活动编辑框复制文本。 ctrl-x – 从活动编辑框剪切文本。 ctrl-v – 粘贴文本到活动编辑框。 space – 切换会话界面显示/隐藏。 ctrl-pgup – 放大界面。 ctrl-pgdn – 缩小界面。 ctrl-alt-shift-home – 开启分屏界面模式。 ctrl-alt-shift-pgup – 在分屏界面模式下调整分屏位置。 ctrl-alt-shift-pgdn – 在分屏界面模式下调整分屏位置。 p – 切换速度和档位显示。 f – 切换系统仪表显示。 l – 报告延迟。 此外,你可以输入一系列按键来同时选择聚焦车辆和相机组。这在进行视频制作时特别有用。若要根据车号选择车辆,请使用以下序列:*<车号>*<摄像机编号><回车>。若要根据车辆位置选择焦点车辆,请使用:/<车辆位置>*<摄像机编号><回车>。在这两种情况下,您可以通过直接按*或回车来省略摄像机编号或车号。这样在更改其中一项时,焦点车辆或摄像机将保持不变。*和/键均位于数字小键盘的顶部。