换一换
换一换 


A guide to ship-mounted weapons and equipment. Damage Types For the uninformed we'll reiterate damage types and what they're good for here. ThermalThermal damage is typically most effective against shields. Most shields take about +20% damage from thermal sources, so weapons dealing thermal damage tend to be more effective at evaporating shields. Most hulls at their base take 100% thermal damage, but thermal weapons tend to lack sustainable up-front damage. Weapons that deal thermal damage are typically all types of lasers. Thermal weapons don't typically have as high damage-per-second as other weapons and have higher demands on your ship's power, but typically have unlimited ammo and are easy to use due to near-instant travel time. KineticKinetic damage is typically most effective against a ship's hull. Most hull takes about +20% damage from kinetic sources, so weapons that deal kinetic damage tend to be more effective against hull. This, combined with the fact that most shields a their base take -40% kinetic damage, generally makes it a waste to use kinetic weapons against a shielded opponent unless your damage output can simply overwhelm the shield generator. Kinetic weapons typically need ammunition in order to function but have very low demands on your ship's power in exchange. Kinetic weapons also have a significant travel time before they impact the target which necessitates accurate leading of a ship's movement, making these weapons more difficult to use at a distance and on smaller ships. ExplosiveExplosive damage is typically most effective against a ship's hull and external modules. Most hull takes around +40% damage from explosive sources. Most explosive weapons also tend to deal damage to nearby external modules (like weapon and utility mounts) when detonating, so this can be useful to neuter the capabilities of a particularly tough ship. Explosive weapons have almost zero distributor demand and a fairly high powerplant requirement, but also a very low ammo pool, so they are not typically useful to employ against every attacker if you plan to go a long time without rearming. Most shields have a baseline 50% resistance to explosive damage, so this makes explosive weapons a waste to use against shielded enemies. AbsoluteAbsolute damage is damage which ignores any resistances offered by its target. Essentially, absolute damage always deals 100% of its damage value to whatever it hits, irregardless of thermal, kinetic, or explosive resistances. This makes this damage equally effective against both shields and hull. Currently, only Plasma Accelerators and similar weapons deal absolute damage. This makes them useful in most circumstances, even against ships with particularly high resistance to certain damage types. This same bonus also applies in reverse, where absolute damage does not benefit from damage increases due to negative resistances. Thermal-Kinetic and Mixed DamageCertain weapon systems or engineering may have multiple damage type components. This generally makes them deal about the same amount of damage to those types of armor before resistances are calculated. Plasma Accelerators, for example, deal 60% of their damage as absolute, 20% as thermal, and 20% as kinetic. Hardpoints A ship's hardpoints determine the size, location, and number of weapons systems that can be installed on a ship. Hardpoints are specific from ship to ship but they cannot be changed by any means without flying a different model of ship. Hardpoints come in four sizes: Small, Medium, Large, and Huge, which are numbered 1-4 respectively. A hardpoint can mount any weapon of equal or lower size to itself. Generally speaking, larger weapons deal both more damage and have higher demands on your ship compared to smaller mounts. The placement and orientation of hardpoints is almost as important as their size and intended function. Certain ships are more suited to direct, forward combat by virtue of their hardpoint spacing and layout, while others are suited to using gimballed or turreted weapons to provide a wider field of fire. The Imperial Eagle, for example, is a combat focused ship that is fast and manuverable. It has one size two weapon mount above the cockpit and two size one hardpoints are located just underneath the cockpit right next to one another. This gives all of the weapons a very narrow field of fire, making them suited for fixed mounts. The Type-10 Defender on the other hand has its mounts spread very far from the center of the ship, making it more suited to a turret-based loadout. Hardpoints have to be deployed by the pilot to become function (default binding 'U'). Larger hardpoints take a longer time to fully deploy and become ready to fire. Deployed hardpoints will prevent a ship from engaging a Frame Shift Drive. Deploying your hardpoints also causes the hardpoints to begin consuming power from your power plant, which can disable other modules on your ship if the amount of power needed exceeds what your plant is able to provide. Weapon Mounts You may have noticed the same weapon being offered at a different price or as a different grade. Most normal weapons can come either as a fixed, gimballed, or turreted weapon. The distinction of these is very important and will need to be considered when you decide what weapons you want to buy. Fixed WeaponsThe fixed variation of a weapon will always be the cheapest variation (in the same size class) and the variation with the most raw damage. Fixed weapons, as the name implies, have their barrels pointed at a fixed point in front of the ship that is incapable of moving more than a few tenths of a degree at most. If very close to a target, the weapon's point of impact will snap to the target ever so slightly to avoid making fixed weapons frustrating to aim at a distance. Fixed mounts are most suited to faster or more manuverable ships that can rely on quickly orienting the entire craft to stay on target. They require higher pilot skill to employ effectively since the weapons will not lead shots on moving targets for you, that has to be handled by the pilot. Despite these drawbacks, fixed mounts enjoy the massive benefit of being unaffected by chaff or lack of adequate sensor profile on the enemy ship, as well as the most possible damage for that weapon size and type. Most weapons without other mounting solutions will come in a fixed mount. This includes explosives, railguns and plasma accelerators. Gimballed WeaponsGimballed variations of weapons are slightly more expensive and deal slightly less damage than a fixed counterpart, but have the massive benefit of semi-automated targeting. Gimballed weapons will try to follow your locked target and will appropriately aim ahead of a moving target, meaning all you have to do is hold the trigger to shoot. Gimballed weapons can aim within their mounting about 10-15 degrees from their center, so they can be quite flexible to help medium or large ships stay on target without needing the accuracy and attention of a fixed mount. Unfortunately, gimballed weapons are easily confused by Chaff, which causes them to track randomly and become nearly useless for the chaff's duration. This can severely neuter a ship relying mostly on gimballed weapons to track targets. A ship using heat sinks or otherwise outside of sensor profile range also will not be able to be tracked by a gimballed weapon, and the weapons will default to forward fire. Turreted WeaponsTurreted variations of weapons are usually prohibitively expensive compared to their fixed counterparts (they usually run a few million) and deal much less damage then the same fixed counterpart. They come with a marked advantage of being able to fully rotate within their mounting and engage any targets that are within their field of view. Depending on your ship setting, they can also be set to automatically engage hostile targets within range without input from the pilot so long as their firegroup is active. Turreted weapons can also be controlled by a gunner in multicrew, though this is a rare need unless you plan to build your ship around multicrew. Mileage varies on turreted weapons heavily depending on how a ship's hardpoints are oriented. Some ships have terrible hardpoint spacing or mounting locations for turreted weapons, and some weapons wouldn't make sense to have on an autonomous turret mount. Fragment cannons, for example, require you to be extremely close and precise with your volleys, so having turrets automatically spam your limited fragment canisters would be counter-intuitive. Common applications of turreted weapons are laser weapons with a low distributor draw, like pulse and burst lasers. These have unlimited ammo and require little power to keep up, so having them firing at whatever moves to keep pressure on a target can be useful, especially on a slow ship like the Type-10 Defender. The Type-10's four size 3 weapon mounts are two on the top, two on the bottom, but each mount has an excellent view all around it. The ship itself is slow and is practically incapable of turning, so it suits the Type-10 to a turret-oriented loadout where possible. Power Plant and Distributor Draw Your ship has two components of power consumption: your Power Plant (which provides power for all systems to operate) and your Power Distributor (which charges the systems needed to fire weapons, recharge shields, and use engine boosts). Some weapons will demand a lot of power from your distributor which makes them hard to continuously fire, even if your power plant is fine. You should carefully balance your weapons to make sure that your distributor can sustain firing your weapons how you plant to use them. Power PlantYour power plant powers everything on the ship and has a maximum amount of Mega-watts (MW) that it can supply. Certain weapon systems or equipment will demand a higher power draw from the power plant to remain operational. The power plant has two graphs for its draw: Deployed and Retracted. This refers to the state of your hardpoints. If your hardpoints are deployed, they begin consuming power from your power plant, and stop once your retract them. You can configure your modules to shut down non-essential systems when deploying hardpoints with the #4 panel and by changing the priority of non-essential modules like the Cargo Hatch, supercruise assists, or Field Maintenance Units to shut them down and free up power for your weapons when deployed. This can give you some more room to install additional power-consuming equipment on the ship. DistributorThe distributor has a capacity for each "bar" (systems, engines, and weapons) as well as a maximum charge rate for each. The charge rate stated is the rate it could be charged when 4 pips are distributed to that system. This means the rate is proportionally reduced when less pips are assigned to that system. Take note of how much a weapon draws from the distributor when firing and determine if you are comfortable with all of your weapons drawing that much power at a time. Certain weapons (like Beam Lasers, Plasma Accelerators, and Railguns) are notable for having very high distributor draw which makes them hard to sustain fire with. For example, a Size 4 Fixed Cannon has 2.17 MW draw on a distributor, but a Size 4 Gimballed Beam Laser has 8.99 MW draw per second. Even still a Size 4 Plasma Acclerator has a 21.04 MW distributor draw. If you adjust your loadout appropriately and reduce your distributor draw, that frees up pips that you may need in weapons for other systems like your shields and engines. Stretching your distributor to its limit on 4 pips is not always the best strategy for survivability. In a pinch, heat sinks can be used to supplement your weapon capacitor when needed. Hull Hardness and Internal Damage Attacking a ship's shields is fairly straightforward, however more goes into attacking a ship's hull directly. Hull HardnessHull Hardness is a ship's general resistance to damage from weapons fire, which is separate and distinct from normal damage resistances. Hull hardness cannot be raised or lowered and is an inherent property of the ship. Generally speaking, larger and more combat-focused ships have a higher hull hardness, with the Type-10 Defender having the highest at 75. A weapon's piercing factor determines how capable that weapon is of dealing full damage to the hull of a given target. If a weapon's piercing factor is greater than or equal to the hull hardness, that weapon will deal 100% of its normal damage to the target (before factoring in damage-specific resistances). If a weapon's piercing factor is lower than the target's hull hardness, that weapon's damage is reduced against the target proportionally (weapon's piercing/hull hardness). If a weapon has 30 piercing, and the target has 60 hull hardness, the weapon only deals 50% of its damage before accounting for resistances for specific damage types. In practice, Hull Hardness helps level the playing field so larger ships are harder to bring down using most smaller-sized weapon mounts. Certain weapons specialize in penetrating the hull and have a very high piercing factor for their mount size. Cannons have more piercing then most other weapons in the same class, so they are more effective at dealing damage against larger ships even if on a medium size or small mount. Railguns and Torpedos have 100 or more piercing, meaning they always deal full damage to any ship before calculating resistances. This makes them capable of dealing consistent damage against both small and large hulls. Some weapons are more suited to attacking smaller ships, like Fragmentation Cannons, which have a very low piercing factor. This makes their otherwise impressive damage output much more tame against larger hulls. Breach Chance and Internal DamageEvery weapon has a minimum and maximum "breach chance" when attacking the hull of a ship. A weapon uses its minimum breach chance when the enemy's hull is at 100%, and a weapon uses its maximum when the enemy's hull is at 0%. Weapons with a high average breach chance are more capable of consistently penetrating the hull and directly damaging the internal parts of the enemy's ship. "Breach damage" determines how much damage a module inside a ship takes when hit by this weapon after it has successfully breached the hull. Modules each have an integrity which essentially functions as its health. Most modules tend to malfunction as their integrity degrades, though some will continue to function until completely broken at which point the module will shut down and become non-functional until repaired. Every ship's core internal components are in different locations. Simply attacking the hull is not enough to damage specific core internal components, you have to attack a specific point on the enemy's hull. Targeting a subsystem on a targeted enemy can help you in identifying the approximate location of a subsystem you want to attack, such as the Power Plant or Frame Shift Drive. Modules must be repaired with an Auto-Field Maintenance Unit (AFMU). All modules can be repaired barring the Power Plant, which can never be repaired except at a station. Lacking an AFMU, ships with critical damage can "Reboot" their systems which completely shuts the ship offline for about 30 seconds. During this state, you are defenseless and adrift, but the ship's subroutines will cannibalize any remaining healthy modules to restore basic functionality (thrusters, FSD) to your ship. Most modules have an increasing chance to malfunction once below 80% integrity. Each time a module malfunctions, it slightly damages itself until broken. Disabling different core components has different effects on your opponent: Drives/Thrusters - Ship begins drifting at whatever velocity and angular rotation it had before its drives were cut. The target is stuck slowly rotating, flying in a straight line, making semi-easy pickings unless you happened to be traveling very fast before your thrusters were cut. Sensors - Can't be directly targeted but can still take damage. Disables the ship's radar and targeting capabilities. Cockpit Canopy - No effect on AI. Can't be directly targeted. Canopy breaches switch the ship to emergency life support which ranges from 5-25 minutes in duration (life support can be refilled with cheap engineering materials though). If emergency life support runs out, the ship is destroyed. Frame Shift Drive (FSD) - Disables supercruise and hyperspace jumps, trapping the ship in normal space until repaired. Power Plant - A malfunctioning power plant will have reduced power output at random which usually causes parts of your ship to shut down as less power is available. A power plant at 0% integrity will only output 40% of its maximum power. Additional strikes to a power plant at 0% integrity has a great chance of instantly causing the ship to go critical and explode, regardless of remaining hull health. This is typically the go-to target for any pilot trying to take down an armored, larger ship. Cargo Hatch - Destroying the cargo hatch causes the ship to randomly vomit whatever cargo it has in its hold at random intervals until the hold is empty. This is a very "haircut-with-a-halbred" method of piracy when you forget to bring hatchbreaker limpets. Kinetic Weapons These weapons are generally used as a dedicated source of Kinetic damage. Certain engineering effects can turn the damage partially thermal, which can make them somewhat of a middle ground. Fragmentation CannonsMounting: Sizes 1-3 and as a fixed, gimballed, or turreted mount. Strengths: Very high theoretical DPS if everything connects, easy to at least graze a target Weaknesses: Terrible piercing factor usually cuts damage in half or worse against larger ships, very little penetrative ability, range required for full damage is usually under 100m, limited ammo and bad ammo economy Notable Engineering: Overcharge or Short-Range plays to this weapon's strengths and can turn them into a fearsome burst damage dealer. Screening Shell experimental greatly reduces reload time and makes in-flight missiles and other munitions easier to hit. Corrosive Shell reduces the target's hull hardness temporarily on strikes to the hull and temporarily increases the damage of all other attacks against the target. Incendiary Rounds experimental can bolster this weapon's effectiveness at overwhelming shields by converting some damage to thermal. Fragmentation cannons fire a wide spread of pellets per shot which individually do quite low damage. When fired at close range they can deal appreciable damage if you can get the entire canister to hit and have the highest theoretical DPS of any weapon, but they are very difficult to consistently get on target at close range and have terrible spread and piercing. This often means that against anything but the lightest of ships you will be dealing reduced damage to begin with. In general, these weapons are not usually sustainable unless engineered and deployed en-masse. If fitted with Incendiary Rounds, these can be useful burst damage against even tough shield generators, but they are ammo reliant and must be used at close range, preferably on a manuverable ship. Power-Specific: The Pacifier Frag-Cannon is an alternative fixed size 3 cannon for Zachary Hudson supporters. It has a +50% increase in range and projectile speed and much less random deviation (jitter, from 5.0 to 1.7 degrees), but reduces its DPS by -13%. This makes it slightly more suited to long range but... why would you use a fixed size 3 frag cannon at all unless on a meme ship. The practical uses for frag cannons are already extremely slim. Multi-CannonsMounting: Sizes 1-4 as a fixed, gimballed, or turreted mount (size 4 is fixed or gimballed only). Strengths: Consistent damage, decent range, high magazine and ammo capacity, low demand to distributor Weaknesses: Limited ammo, needs to reload periodically, limited hull breach ability and damage against modules Notable Engineering: Autoloader experimental continually reloads the weapon even when firing, making your ammo pool near bottomless until you run out of ammo. Corrosive Shell experimental reduces ammo capacity, but causes strikes to the hull to temporarily reduce the target's hull hardness and increase damage taken from all other sources. Incendiary Rounds makes the weapon's damage mostly thermal, making the weapon a viable shield melter but reducing its effectiveness against hull. Small-caliber (comparatively) gatling cannons which are great for sustained fire alongside other weapons due to their low demand on your distributor. Limited ammo can make these not last as long while doing long bounty hunts, but they are still a very dependable weapon system. Unfortunately, compared to some other weapons, a multi-cannon's overall damage per second can be lacking against heavier hulls. The size 4 Multi-Cannon acts differently then the smaller counterparts, as it is treated more like an auto-cannon instead of a gatling gun. Smaller multi-cannons must spin up for a short time prior to firing, but the Size 4 will fire immediately and fires two larger shells per shot at a much slower rate. Due to the good sustained damage from this weapon and decent penetrative ability due to its size, it can be quite effective at targeting modules, but needs more time on target then a cannon, and its overall DPS won't be as stellar against larger ships as other, more specialized weapons in a size 4 hardpoint. Power-Specific: The Enforcer Cannon is an alternative fixed size 1 multi-cannon for Pranav Antal supporters. It is slower-firing (-44% rate of fire) but higher damage (+45% DPS overall) version of a size 1 multi-cannon. Unfortunately, it is only available as a size 1 fixed mount, which limits its deployment to smaller and more manuverable ships, and also severely limits its practical application on larger ships. CannonsMounting: Sizes 1-4 as a fixed, gimballed, or turreted mount (size 4 is fixed or gimballed only). Strengths: Very high per-shot damage, high piercing for its size make it dependable against larger hulls, low demand to distributor, higher-than-average breach chance and damage make it better against internal modules Weaknesses: Overall DPS is lacking, missing shots is very punishing, internal damage is dealt to the modules and not the hull, sometimes leading to lack of effectiveness against a ship's overall hull Notable Engineering: Auto-Loader experimental continually reloads the weapon even when firing, reducing the need to reload. Force Shells can physically push ships off-course when struck, especially lighter ships. High-Yield Shell reduces damage, but hits that breach the hull damage all modules around the point of impact instead of a single module. Long-Range can give Size 4 cannons a 9km max range. Overcharged or Short-Range can give larger cannons very impressive direct damage. Cannons are the other end of the spectrum for kinetic using single, high damage slugs to deliver damage to the target. They are great if you can follow up consistent hits. Regretably, since hull-breaching attacks do little direct hull damage, you may find yourself constantly breaching the hull instead of dealing hull damage with these. If you can reliably smack important modules though, you will have no problem nailing a power plant and sending a ship into critical. High-Yield especially helps with hull-breach attacks as even grazing hits to a module deals severe damage to multiple modules, often overwhelming any module reinforcements due to the amount of internal damage delivered. Force shells are great for redirecting ships and forcing them to cancel the new added momentum they have been given. Also, shooting ships into asteroids and other ships never gets old. Missiles/Torpedos & Mines Dumbfire Missile RackMounting: Size 1-3 fixed mounts Strengths: Explosive damage very effective against hull, rips apart modules mounted externally on direct or near hits, no distributor cost to fire Weaknesses: Fixed-only, needs manuvering and leading to target, low ammo capacity, can be neutralized by point defense at mid to long range Notable Engineering: FSD Interruptor experimental temporarily disables the target's FSD on hit, but severely hampers damage and rate of fire. Penetrator Munitions experimental allows missiles to damage multiple internal modules on hit. High Capacity can double the ammo capacity of an individual mount. Thermal Cascade causes shielded ships hit by this weapon to temporarily have heat increased (though very little effect on AI). Power-Specific: The Containment Missile is an alternative size 2 dumbfire missile rack which forces the target's FSD to reboot on impact, even if the target is shielded. FSD reboots can only occur about once every 30 seconds, even if repeatedly striking the target. A favorite of gankers to use on those who would rather not fight. Much less damage (-20%), ROF (-33%), and DPS (-47%). Dumbfire missiles. Contrary to popular belief these are not absolutely stellar at shelling out hull damage, though they are capable of doing so. Their real strength relies on being able to pour these on with additional damage from other weapons, plus shredding exposed external mounts like weapons and utilities. A few missiles in the right place can really damage clustered groups of weapons and utility mounts, crippling a ship mid-combat. If your hardpoint pattern supports these and you have a ship that can make use of them, these are great for some additional burst damage. Seeker Missile RackMounting: Size 1-3 fixed mounts Strengths: Automatic tracking after lock, nearly impossible to evade without countermeasures or extreme speeds, no distributor cost to fire. Weaknesses: Very low ammo, needs time to lock, easily defeated by point defense/ECM, very weak against majority of shields, less damage than dumbfire Notable Engineering: High Capacity can double the ammo capacity of an individual mount. Drag Munitions experimental causes the struck target's distributor temporarily stop increasing top speed from engine pips on the target Power-Specific: The Pack-Hound missile rack is an alternative size 2 seeker rack for Li Yong-Rui supporters, which, upon firing, splits itself into four sub-missiles which each seek the target in an erratic manner. This makes these vollies of missiles especially effective at overwhelming and destroying point defense turrets on the target as they have extremely high difficulty shooting the whole volley down. ECM can still knock out the tracking of a large group of pack-hounds, though. In terms of raw power, seekers have a much harder time matching dumbfire or other weapon mounts. However, for larger ships, these can be very useful to pressure or entirely dispatch smaller, more agile vessels who are unlikely to have utilities in place to counter missiles. Once thinly or completely unshielded, a small ship like an Eagle or a Viper can be dispatched with a few vollies of seekers instead of needing to track them down with fixed or gimballed weapons. Seekers quickly run out of fuel pursuing a target past 3-4 km. They also have a minimum range they need to arm which is in the range of 200-400 meters, so firing them point blank is a waste. In any case, seekers can be a valuable tool for a ship that cannot afford to stay on target for long, or a less manuverable ship that needs options against faster opponents. These also excel at swatting ship-launched fighters out of the sky as SLF's typically have no defense against missiles. Torpedo PylonMounting: Size 1-3 fixed mounts Strengths: Always deals full damage, high damage against hull, tracks indefinitely until disabled Weaknesses: Practically no ammo, expensive ammo, lackluster overall damage, EXTREMELY slow munition, easily defeated by point defense/ECM Notable Engineering: Reverberating Cascade experimental causes strikes to the target to directly damage the target's shield generator (even if shielded), eventually destroying it completely if enough damage is dealt. Mass-Lock Munitions causes the struck target's FSD to charge much more slowly for an extended period of time. Penetrator Payload always breaches the hull and causes damage to multiple modules near the point of impact. This weapon is practically useless unless you intend to take out extremely high value targets with very specific builds. Torpedos cannot and should not be relied upon to be used in general combat or bounty hunting simply because their ammo is abysmal and expensive. You only get 1/2/4 torpedos per mount using a size 1/2/3 mount, and each torpedo costs 15,000 CR to resupply. Contrary to belief a single or even two torpedos to the hull of most ships isn't enough to outright destroy it unless it is a particularly weak small ship like an Eagle, at which point the torpedo usually costs more than the bounty you collect (and the Eagle can easily outrun the torpedo because it only travels at 250 m/s). Reverberating Cascade is probably the only experimental that gives this weapon any serious use, but this is only useful to penetrating particularly tough shield generators, like a Cutter or other ship specifically engineered to have very heavy shields. On a ship using a size 7 or 8 shield generator, you will need 4-6 torpedos to damage the generator enough to bring it offline, so be prepared to commit. Furthermore, this entire cheese strategy is ground to a halt if the target or its support has Point Defence, ECM, or some other method of avoiding the torpedo. Given the number of hardpoints you would have to commit to this strategy, this can put you in a really bad pinch. But, if you pull it off, it is really funny to dunk on a heavily shielded ship with this strategy. Mine Launcher/Shock Mine LauncherMounting: Size 1-2 fixed mounts (Shock mines: Size 1 fixed only) Strengths: Virtually no distributor cost to fire Weaknesses: No guidance; relies upon direct collisions, explosions tend to hit civilians or system authorities who will immediately blame you with a bounty, low/limited ammo Notable Engineering: Reverberating Cascade experimental causes strikes to the target to directly damage the target's shield generator (even if shielded), eventually destroying it completely if enough damage is dealt. Ion Disruption causes a struck target's thrusters to reboot for a short time.. Shift-lock experimental reboots all FSDs caught in the blast. I've tried it. Typically a waste of a hardpoint for a number of reasons, such as: all point defense that's not your own will try to shoot mines down. Mines frequently get shot by point defense or collide with your hull as soon as deployed, so they don't have a chance to hit a target. Targets are not stupid enough to simply fly through a line of mines. Even when deployed in an aggressive and offensive manner, it is still exceedingly difficult to get mine strikes for lackluster damage. Mines have been designed as a sort of "escape-assist" tool as evidenced by engineering choices, and they are terrible for direct combat. Shock mines are only designed to push ships around and deal a lot less damage than normal. Notably the only other weapon with reverberating cascade besides torpedos. This can make them a bit of a trap card, but again, its a cheese strategy except this one is highly visible and much more dangerous to deploy, and you would realistically only deploy this if you were desperate and unable to breach someone's shields in the first place. Pulse/Burst/Beam Lasers Pulse LaserMounting: Size 1-4 as fixed, gimballed, or turreted mount (size 4 is fixed/gimballed only) Strengths: Cheap, comparatively low demand on distributor, effective for cost against shields, hitscan Weaknesses: Low overall sustained damage, falters against attacking the hull once shields are breached, sharp damage falloff, low piercing/breach chance Notable Engineering: Long-Range removes damage falloff and extends range up to 6 km. Concordant Sequence can greatly bolster your wingmate's shield regeneration for a short time when shot by the weapon. Phasing Sequence can cause a very small portion of damage to breach shields and attack hull directly, even when the target is still shielded. Scramble Spectrum can cause random modules on the target ship to malfunction for a short time. Power-Specific: The Pulse Disruptor is an alternative size 2 fixed pulse laser for Felicia Winters supporters. It is essentially a pulse laser with Scramble Spectrum built into it in that it causes modules on the targeted ship to malfunction for a short time. It is different in that it will cause the targeted module to malfunction only when that module is actually hit internally, whereas scramble spectrum is completely random. Very cheap and entry-level weapon system that comes with a low logistical profile to keep it firing during combat. If you need an energy weapon mount to help take down shields, pulse lasers can at least do the job without killing your distributor, but they won't be stellar in most aspects, even if engineered. Once the target's shields are downed though, most laser weapons like this one are not much help in attacking the hull since they lack any meaningful properties to help damage ship hull. Damage falloff hampers most laser weapons greatly, causing their already lackluster damage to get even weaker as they go outside a measly 500 meters. Long-Range greatly helps to alleviate this issue and makes laser weapons much more threatening outside of arm's reach. Concordant Sequence can be very useful if you fly in a wing. In my flights when I am using a bi-weave shield generator, the recharge rate increase after I haven't taken damage for a short time rivals that of most shield cells, and it does so for free without additional system capacitor draw. This can make it invaluable to help bolster your team's shields when they can avoid fire for a few seconds, especially if they have a strong shield generator. Burst LaserMounting: Size 1-4 as fixed, gimballed, or turreted mount (size 4 is fixed/gimballed only) Strengths: Slightly more sustained DPS than a pulse laser with similar demands, triple-shot burst fire increases hit probability, effective for cost against shields, hitscan Weaknesses: Low individual shot damage, slightly more demanding on heat and distributor compared to a pulse laser of equal mounting specification, lacks power against hull, sharp damage falloff Notable Engineering: Long-Range removes damage falloff and extends range up to 6 km. Concordant Sequence can greatly bolster your wingmate's shield regeneration for a short time when shot by the weapon. Scramble Spectrum can cause random modules on the target ship to malfunction for a short time. Intertial Impact can turn this weapon into a hybrid thermal-kinetic weapon, but makes the weapon near unusuable outside close range due to a 3-degree aiming jitter introduced. Power-Specific: The Cytoscrambler is an alternative fixed size 1 burst laser for Archon Delaine supporters. It has a greatly increased DPS (+136%) for very little change in demand to the ship, but has a short max range of 1km, a jitter of 1.7 degrees, and an armor pierce value of 5 which makes it only useful against shields. A slightly more effective pulse laser with only slight increases to logistical profile. There's not much more to say here besides that it is (besides some engineering experimentals) nearly identical to the pulse laser in almost every way. Beam LaserMounting: Size 1-4 as fixed, gimballed, or turreted mount (size 4 is fixed/gimballed only) Strengths: High sustained DPS, hitscan, generally easy to keep on target Weaknesses: Prohibitively high distributor draw make sustained fire very difficult, fairly high heat generation, sharp damage falloff, slightly lower piercing factor than other laser weapons Notable Engineering: Long-Range removes damage falloff and extends range up to 6 km. Short-Range can bolster this weapon's effectiveness against shields (and to an extent, hull) at very close range. Concordant Sequence can greatly bolster your wingmate's shield regeneration for a short time when shot by the weapon. Regeneration Sequence can actively repair a wingmate's shields instead of damage it, keeping their shields charged even under fire. Thermal Vent causes your ship's heat to decrease while striking a target, easily capable of cooling your ship to near-0% heat if you have a high degree of accuracy. Power-Specific: The Retributor is an alternative fixed size 1 beam laser for Edmund Mahon supporters. It does -50% damage but causes the struck target to generate a significant amount of heat while the beam is maintained, even if the target is shielded. This makes it threatening against ships with poor heat management, but needs to be constantly maintained. Larger ships generally have a much easier time venting heat and are not threatened by this weapon. The mack-daddy of the lasers. Many people love to mount these because of their good damage output and effectiveness at evaporating shields, but they have a very high logistical profile and will demand attention from your distributor if you want to keep firing it. Very large (size 3 or 4) beam lasers can be effective against enemy hull by sheer damage potential, and the hitscan nature makes it hard to avoid. Unfortunately for Regeneration Sequence, every time i've tried it out my ears have been assaulted by the tone of shields coming online every single game tic, so I can't use it in favor of Concordant Sequence because I value my hearing. Thermal Vent completely spins beam lasers from being a heat issue to being a heat management tool. Even one laser engineered as such vents an extremely large amount of heat while firing. Plasma Accelerators & Railguns RailgunsMounting: Size 1-2, fixed only Strengths: High penetration for consistent damage against all hulls, near hitscan projectile, thermal-kinetic damage is passable against both shields and hull, decent breach chance/damage making it decent at picking off internal modules with precise shots Weaknesses: Fairly harsh damage fall-off (1,000m with 3,000m max range), high distributor draw, high heat generation, limited ammo pool, smaller mounts only make it suitable as a primary weapon for smaller ships, weapon has to charge for a short time as the trigger is held before actually firing Notable Engineering: Plasma Slug experimental reduces damage by 15% but generates ammunition directly from ship fuel, essentially allowing unlimited ammo. Long-Range removes damage falloff and increases max range to 6 km. Feedback Cascade experimental causes strikes against targets deploying shield cells to directly damage the shield cell bank and reduce the amount of shields restored (but cuts damage by 20%). Super Penetrator experimental causes rounds to damage all modules along the point of impact with the hull, instead of damaging the first module hit. Power-Unique: The Imperial Hammer is an alternative Lavingy-Duval supporter version of the size 2 railgun which fires a three-round burst of projectiles instead of a single slug, with a proportionally tripled ammo pool. The potential DPS is slightly higher (+23% per burst) but has a substantially higher heat generation (+65% per burst). High velocity hybrid weapons that can quite easily reach out and smack ships with little warning, but require high skill to employ effectively. Multiple railguns are quickly a difficult logistical challenge as they have a high distributor draw and a high amount of heat generated per shot, requiring careful management if using more than one at a time. They are still effective all-rounders for most tasks, and if using long-range can be very useful to tag distant or retreating targets. They excel at harassment from a distance as there is little you can do to defend against them provided the gunner's aim is true, and they're good for slapping shields or hull. Railguns have a unique 'charging' mechanic, where the weapon needs to spool up before firing its shot. This requires you to track your target for about an additional second while the railgun charges and make sure your reticule is over the target just as it fires. This also comes with the bonus of being able to release the trigger before the weapon fires to cancel your shot. These weapons only come up to size 2, so they're usually not suitable as a primary weapon for larger ships that have larger mounts. They can be very useful on medium and small ships as a tool to harass larger ships from a distance. Plasma AcceleratorMounting: Size 2-4, fixed only Strengths: Absolute-thermal-kinetic damage mix makes this weapon equally effective against shields and hull regardless of resistances, high damage output per shot, always deals full damage against hull Weaknesses: Very high distributor draw, very high heat generation, limited ammo pool, needs periodic reloading, sluggish projectile makes leading outside short range difficult Notable Engineering: Plasma Slug experimental reduces damage by 15% but generates ammunition directly from ship fuel, essentially allowing unlimited ammo. Short-Range complements this weapon's role as a close-in weapon and substantially boosts damage, but causes a significant increase in heat generated. Phasing Sequence allows a small proportion of damage to bleed through a shielded target, damaging the hull directly at cost of damage potential. Power-Unique: The Adv. Plasma Accelerator is an alternative Denton Patreus size 3 Accelerator which has a much higher (+286%) rate of fire but a much reduced (41% of original) damage per shot. Overall it has a higher (+24%) potential DPS but a +16% distributor draw and a +45% thermal load. An up-front alpha damage dealer. No other weapon can be as consistent a threat up-close, and no other weapon can ignore resistances as much as this weapon can. For targets with a high overall resistance to damages, absolute damage can help even the playing field somewhat when superior firepower can't be achieved. Accelerators are very demanding as far as heat, power plant, and distributor goes, so they need to be carefully chosen as a primary weapon among your loadout and your secondaries cannot be too demanding on your ship. The biggest drawback of a P.A. is its low projectile speed which makes getting consistent hits on even mid sized targets at 1km or more difficult. It relies highly on pilot skill to employ effectively and it is extremely difficult to hit smaller or more manuverable ships than yourself with it. Therefore, any ship employing it should have significant mobility or other options to deal with smaller ships, as having it be your only realistic options to deal with a small ship can be troublesome. P.A's are still fearsome against larger targets as they aren't able to easily avoid getting hit, even at a distance, and the absolute damage will assist in nullifying any strengths they may have had against a particular damage type. Smaller ships trying to make use of accelerators will have difficulty venting the excess heat, and smaller power distributors will have a hard time keeping the system charged. Utility Slots Heat Sink LauncherStrengths: Vents an absolutely massive amount of heat from your ship, almost assuredly bringing it to 0% heat temporarily in a short time, thereby temporarily bringing you off the radar, charges weapon capacitor Weaknesses: Very low ammo (3 per mount), only useful if running builds with high heat concerns, stealth, or excessive distributor draw Simple as. It vents all heat in your ship into a brick which is then shortly ejected. Heat sinks can take you from 300% heat to 0% heat pretty easily, so they're very useful if you find yourself overheating when deploying shield cells or something similar. These also uniquely help cool your weapons system (the charge bar for your weapons in the power distributor is actually the weapon "cooling system"), so they provide a really good bonus to your weapons capacitor to help you extend the amount of time you can keep all of your weapons firing if you find yourself with an advantageous shot but not enough juice to keep firing. Chaff LauncherStrengths: Temporarily makes the tracking of gimballed/turreted weapons targeting you nearly useless, good ammo capacity, ammo is very cheap to synthesize in the field Weaknesses: Confuses allied gimballed/turreted weapons targeting you as well, no protection against missiles or fixed weapons Almost always useful as it can typically be spammed with reckless abandon. It can be very useful to at least temporarily reduce the incoming damage from weapons with tracking assist, but that's the only type of weapon it will protect you from temporarily. Two chaff launchers can be used back to back to provide near seamless proteciton. Electronic Countermeasure (ECM)Strengths: Disables missile/torpedo guidance and destroys all active limpets within 3 km when fully charged. ECM can be partially charged to affect a smaller area. Wide area of effect allows it to be used in a team setting. Weaknesses: Fairly specialized and not always useful unless interested in limpet/missile/torpedo defense, needs to recharge between use which can create gaps in coverage Useful if you find need to disable pesky torpedos and missiles, or hatchbreaker limpets. This outright destroys limpets and causes seekers and torpedos to immediately veer off course in a random direction until they explode shortly after, making it an effective tool against those types of weapons. Torpedos and seekers can still make it through the ECM while it needs to recharge (about 5-6 seconds), though, so it is not an impenetrable defense unless you have more than one equipped. This WILL disable your allies equipment when used as well, so be careful. The ECM can also zap hatchbreakers off of you even if they're already hacking your hold. Point Defense TurretStrengths: Provides limpet/missile/torpedo/mine defense by directly engaging them as they approach with high accuracy, virtually limitless ammo pool Weaknesses: Needs to be placed strategically in particular utility mounts to provide the best coverage, latency (especially in instances with other players) seems to severely impact the ability of PD turrets to actually hit their target, tends to engage things that are non-threats like enemy collector limpets Useful to place one near your cargo hatch to defeat hatch breaking attempts most of the time (an ECM can also be useful even if the hatch breaker latches on). As a bonus, can shoot down most missiles before they hit you if given enough time to engage, but faster missiles or missiles shot outside its coverage can still make it through. Shield BoosterStrengths: Bolsters your sheild's maximum capacity and resistances, multiple boosters are additive in effectiveness Weaknesses: High power plant demand on higher grade boosters Affectionately and derogatorally referred to as "skill boosters", most ships slap half of their utility mounts with these things simply for lack of other, better things to put in those mounts. Engineering these can seriously bolster your shield's resistances and overall shield strength, but the power draw is not insignificant. As a temporary pro-tip, when your shields are down, they need to recharge to half strength in order to re-form. If you disable your shield boosters, you can shorten the time it takes for your shield to re-form and then reactivate the boosters after your shields are back up. Just be aware your shields actually "recharge" at a much higher rate when broken and reforming, so if you do this, it will take longer for your shields to fully recharge than if you waited. Kill Warrant ScannerStrengths: If bounty hunting, reveals additional out-of-system bounties on a target which are awarded upon destruction, increasing payout anywhere from 0-75%. In anarchy systems, reveals out of system bounties which are awarded when the ship is destroyed. Weaknesses: Base scan time of 10 seconds is abysmal, scanning is only worth it on high-ranked targets in medium or large ships Im not going to be mentioning the other scanners because they are kind of out of scope here. The kill warrant scanner is a useful bounty hunting tool that can increase your payout, but its hard to see it in action without checking the bounty on the contacts panel before and after the scan. I've made a 260,000 CR bounty turn into a 540,000 CR bounty on a high ranking Anaconda NPC before, but its hard to tell exactly how much extra dough this pulls in for you. Very useful in a wing setting though as all bounties are duplicated for each participating wing member, and they all benefit from one wing member's warrant scan. I find overall, if I do math at a redemption office, your average increase from the bounties from other systems is overall about 15-20%. It also indirectly raises your relationship with the other systems when you hand in bounties belonging to them. A quick note on wanted status (note: no laws in anarchy system so you will never get bounties for doing illegal things in those systems): Clean - Target has no bounties in the current system (K-Warrant scan may reveal out-of-system bounties). Illegal to attack. Warrant - No bounties in current system, but target has bounties in other systems issued by factions not present in your current system. Illegal to attack, but will still award you the bounties on destruction. Wanted - Has bounty in the current system (K-Warrant scan not required to reveal this, just a normal scan with sensors). Lawful to attack, will not generate any bounties or hostile response from system authorities unless committing another crime (ex: firing inside no-fire zone). Lawless - Target is in a specific area of space where the law does not apply (ex: anarchy system, conflict zones). Lawful to attack, will not generate any bounties or hostile response from system authorities (if any). Engineering this for fast scan slightly reduces its range but reduces scan time from 10 seconds to 2 seconds. It is amazing. Shields Since they are so intertwined with combat, they deserve their own section. A powered shield generates a slowly-reforming layer of protection around a ship. Outside of very special circumstances, shields will always take damage before the hull of the ship (including collisions). The only time the hull is damaged directly despite having shields is during emergency supercruise drops/interdictions, heat damage, or specialty engineering which will allow a weapon's fire to pierce a shield. It is extremely important to note that the Systems capacitor not only provides energy to recharge your shields, but the more pips allocated to systems, the higher your overall shield strength is. This can immensely boost your shield's survivability during a fight if you can allocate more pips to systems while also being able to fight back. Shield hitpoints vary widly depending on the size of the shield generator, present shield boosters, mass of the hull, and base shield strength. We'll gloss over some of the finer details but all you need to know is: each ship has a "base shield strength" which determines how effective a shield generator is at its base on it. Next, each shield generator has a minimum, optimal, and maximum hull mass. If a ships base hull mass (no modules installed) is equal to the optimal mass of the shield generator, the ship gets its base shield strength out of that generator. If a ship has less mass than the mounted generator, then it gets a bonus, and vice versa for being heavier. This makes certain ships much more suited to having high shield strength via combination of large internal slots, low hull mass, and high base shields. This makes ships like the Imperial Cutter, with a 600 base shield strength and two size 8 compartments for a shield generator, extremely easy to stack heavy shields on to. The only other ships that can mount a size 8 generator are the Type-9 and Type-10, both of which have abysmal base shields compared to other ships in its class. Shields at their base are great at defending against kinetic and explosive damage but take bonus damage from thermal sources. Combined with at thermal weapon's easy of use, this makes them a typical choice to melt shields before deploying heavier weapons against the hull. Shields can be heavily bolstered by shield boosters which can make even dropping the shields on a stubborn ship exceedingly difficult without extreme focus. As a side note, the shield is projected in a bubble around the entire ship. This can make wider ships like the Imperial Clipper substantially easier to strike on the shield since it covers a much wider area than the ship itself. A shield that is flashing is being charged by a shield cell bank, which has a "wind up" period where it just generates heat and a "deploy" period where it actively restores shields. During a deploy period, the shield cannot collapse even if it takes damage past its limit, but any damage that "bleeds through" the shield (damage that would have caused it to collapse) damages the hull instead. If promptly attacked during windup and shields entirely broken before deployment, you can effectively stop the deployment of a shield cell. Basic Shield GeneratorStrengths: Accessable, lower tiers affordable, range of tiers available depending on needs of pilot, midline performance Weaknesses: A-rank generators expensive and power hungry, may not be as effective as a more specialized solution Basic shield generators can't really go wrong with. They offer good protection for what they do but have a "just okay" charge rate which can leave a lot to be desired. These are usually bolstered with limited-use shield cell banks which can be popped to generate more shields in an emergency as well as a ton of internal heat. Most ships will take lower-rank (E/D) shields for a little bit of collision insurance or maybe some light weapons fire while exploring/transporting, but usually an A/B rank is sought for combat alongside other defensive equipment. This pattern is seen among all internal modules, but note the rating system for shields: Rating Comments E Cheapest, least effective, heavy. Use only when on a budget or performance above bare minimum does not matter. D Cheap, generally okay performance, but will always weigh the least. Always use D-rank equipment when you have no need of a higher rank so you can reduce weight substantially (most D-rank modules are 60% lighter than E rank counterparts). C Midline performance and cost, but weighs as much as an E-rank. B High performance but high cost, weighs about +37.5% more than an E-rank. A Best performance characteristics but by far the most expensive. Weighs as much as an E-rank, but the performance gain is substantial. Downgrade to C or B if constrained by power. The size of the shield generator will determine essentially how strong of a shield it can project. There is a lower limit to the size of a shield generator for larger ships, wherein essentially shield generators significantly smaller than the ship they are mounted on are incapable of making a shield at all. You will be warned of such, so you can't slap a 1E shield generator on a Type-9. Bi-Weave Shield GeneratorStrengths: Substantially faster regeneration rate compared to standard shields, even A rank, shield reforms much more quickly after being collapsed and recharges faster after not taking damage Weaknesses: Fairly weaker overall shield strength compared to an A rank generator My usual go-to for hull-tank style builds. The high regeneration rate will allow your collapsed shields to be up much faster than usual, which will require the enemy to frequently re-break them and buys you extra time as they have to chip away at your now 50% shields again and again. The high regeneration rate helps you recover if the focus shifts away from your ship. Bi-weaves are not as useful on ships that are designed to shield tank as constant damage on the shield prevents it from recharging, so in that case a stronger overall shield would be more beneficial. Bi-weave shields are notably purplish when struck as opposed to the usual blue of a normal shield. Prismatic Shield GeneratorStrengths: Higher overall shield strength compared to A-rank of same size Weaknesses: Much higher power cost, much lower regeneration rate compared to A rank of same size, power-specific reward only, notably bright green when struck which is an instant giveaway of your shield strategy For the aspiring shield tank builds. These are the opposite of a bi-weave -- they're harder shields at the expense of regeneration. A prismatic offers about +15-16% more shields compared to an A rank generator of the same class, but has a higher power plant demand. As a side-effect of its lower recharge rate, it has a lower distributor draw, but a shield tank will typically keep all of its pips possible in systems to get the strongest shields possible. The types of ships that employ prismatcs are usually hoping their shields never collapse, because they'll usually be without them for a long time if that's the case and will be hard pressed to survive long enough to get them back up. You will typically see prismatic shield generators being supplemented by a large number of shield boosters and careful deployment of shield cell banks. As a side note, Reverberating Cascade and Feedback Cascade are two specialized anti-shield and anti-cell bank experimental effects for mines/torpedos and railguns respectively. These are typically employed if you know you are dealing with a heavily shielded opponent. Internal Equipment This is a generalized list of mostly combat-oriented equipment I have found useful. Auto Field-Maintenance UnitSize/Grade: 1-7, A-E; Higher size/rank increases the speed and efficiency of repairs Function: Repairs damaged modules without the need of station facilities Strengths: Allows for a hull tank or ship with poor heat management to have much longer deployments, reduces repairs costs when repairing very expensive modules, cheap to reload, greatly extends the life of module reinforcements Weaknesses: Limited "ammo" for repairs, must shut down modules for repairing, cannot repair itself, cannot repair power plant AFMU's are a valuable tool to those doing two things: constantly overheating their ship due to weapons fire, or those taking sporadic hull damage over the course of a long deployment. AFMU's have to power the module they are repairing down for the duration of repairs, so they are difficult to use in-flight without other options. Repairing your thrusters during combat, for example, doesn't usually do you any favors. Furthermore, they repair rather slowly (even large, high-ranking AFMU's can be rather sluggish on heavily damaged equipment). This usually requires the offending piece of equipment to be down for quite a bit. To boot, equipment must manually be re-activated after repairs are done, so this further complicates using it in combat. An important thing to note is that Module Reinforcements cost 1/10th of the normal amount of AFMU ammo to repair, so a unit can be very useful to keep your module reinforcements up and running, even if they take significant damage. The other important thing to note is if you repair your thrusters or FSD during supercruise, you'll immediately do an emergency stop, so don't do that. AFMU's can work in tandem with one another, and having at least two AFMU's can allow one to repair the other to circumvent the issue where you can't have an AFMU repair itself. The cockpit canopy can be repaired by an AFMU, but only if it hasn't been completely breached yet. FSD InterdictorSize/Grade: 1-4, A-E; Higher size/rank increases the effective distance of an interdiction tether Function: Forcibly causes targets to drop out of supercruise into normal space when successfully interdicting the target, allowing the target to be scanned or attacked Strengths: Required for some bounty hunting missions and piracy, or if you want to gank a player for some terrible reason Weaknesses: Requires you to be behind target which can clue the target in to your intentions, the interdiction minigame can be very tough to win for ships with very poor manuverability (Type-9/10), otherwise useless once in normal space It yoinks people out of supercruise. Its not much to write home about and you don't typically need one unless you are after specific bounty missions. Be aware that interdicting a target that is not wanted in the current system will incur a 300 CR fine or so with local authorities, not that anyone cares about a piddly 300 CR fine. Fuel TankSize/Grade: 1-7; Higher size/rank doubles the tons of fuel stored per rank (2/4/8/16/32/64/128 tons of fuel at each rank) Function: Store extra fuel outside of your ship's usual tank Strengths: I guess it can greatly increase the range of a taxi ship without needing to stop for fuel. On particularly small ships using Plasma Slug (using fuel for ammo), can effectively be taking extra ammo with you as it is easy to drain a small ship's tank utilizing such weapons. Weaknesses: Weight and really not that useful outside exploration, travel, or aforementioned small ship strategy You really do not need one of these unless for the strategy just mentioned. Fuel ScoopSize/Grade: 1-7, A-E; Higher size/rank increases the amount of fuel scooped per second Function: Enables collection of fuel for your ship from nearby stars that are scoopable Strengths: Allows exploration out into the black of space without the need for stations for fuel Weaknesses: Non-combat in the highest sense of the word, does nothing if you have no need of fuel away from stations. Don't even think about using this to try and recoup fuel costs. Fuel costs absolutely nothing and you will be hard pressed to spend more than 100,000 CR on fuel in 1000 hours of gameplay. Fighter HangarSize/Grade: 5-7; Higher size/rank allows for more types of fighter chassies to be maintained at once and also increases the number of each chassis that can be built before exhausting supply and requiring resupply at a station. Function: Deploy a ship-launched fighter (SLF) which can independently operate from the mothership a short distance and provide distraction/defense. Strengths: Can easily divide enemy attention between your ship and the fighter, provides supplemental and hard to stop damage, can be flown yourself for recon, multicrew players can fly fighters for you Weaknesses: Requires a pilot who will take a portion of bounties handed in at all times (even if inactive), fighters are fragile and quickly destroyed if focused, rebuild time of fighers put out of action can leave you without a distraction for some time, can only be mounted on very specific ships This is covered much more detail in my SLF guide. I am personally an advocate for the fighter bay because I think its cool. End of story. https://steamcommunity.com/sharedfiles/filedetails/?id=2439430996 Planetary Vehicle HangarSize/Grade: 2, 4, 6, G/H; High size doubles the number of vehicles which can be stored each grade (1/2/4 total vehicles), G-ranked bays have higher power draw but less mass, H-ranked bays are less power intensive but heavier Function: Holds Scarab SRVs for surface exploration Strengths: In terms of space combat, none, its useless. For the ground, kind of useful to collect things and blow up dumb sentry skimmers Weaknesses: SRV operates almost entirely independent of the mothership, unlike a fighter, which sucks. There's not really much interaction between your ship and an SRV. Holds Surface Recon Vehicles (SRVs) which are used to explore landable planets. They're really not very remarkable. Limpets Limpet ControllersSize/Grade: 1, 3, 5, 7, A-E; Higher size allows more active limpets at once, higher rating improves limpet characteristics like lifetime, operational range, and effectiveness Function: Must be used in conjunction with a cargo hold carrying blank limpets. Can program and deploy limpets of its specific task to perform autonomous work outside of the ship. Strengths: Limpets are virtually the only way of interacting with other ships in a non-hostile manner. Can be used in a wing or teamplay setting to increase the longevity of your wing without needing to stop for resupply, especially when a large ship houses the limpet controller. Weaknesses: Vast majority of limpet controllers are useless for combat. Requires a cargo bay internal slot to carry blank limpets to function which means this effectively takes two slots of decent size, only making it viable on large ships with lots of internal room. Unless using a multi-limpet controller, you need one controller per task to be carried out. You have a few options here. Keep in mind that Multi-limpet controllers of size 3 do a few similar tasks together (rescue will do repair and refuel, for example), while the same of size 7 can do every limpet task. Universal controllers are less adept at their individual tasks then the same size and class controller of its dedicated task, but make up for it with flexibility. Collectors: Autonomously collects cargo pods, engineering materials, and other floating debris and places them in your cargo hold. They can either target a specific object and pick it up quickly which destroys the limpet on delivery, or they can be launched targeting nothing to autonomously pick things up within range of the ship for a set amount of time (dependent on controller grade). These are very useful to collect ore, loot, or engineering materials in large numbers much faster then would be viable by cargo scooping them, especially in a larger ship. Fuel Transfer: Delivers one ton (1T) of fuel per limpet from your ship's fuel tank to the targeted ship's fuel tank. This is really only relevant in a rescue capacity, however smaller ships using Plasma Slug may have trouble with their fuel supply if they operate for a long time as Plasma Slug draws from their fuel reserve directly, so it can be a good way to keep smaller ships in your wing with those builds supplied with ammo from your much larger fuel tanks. Hatch Breakers: Attempts to sabotage the targeted ship's cargo hold. Once attached to the target ship and after a short time (depending on limpet grade), the target's hold will malfunction and vomit out a random amount of cargo (again, depending on limpet grade). Multiple hacks may be required to empty the hold. Not very useful as pirates are unlikely to have anything of real value. Hatch breakers can notably be used against Megaship cargo bays. These bays hold several tens of tons of random cargo, occasionally holding exotic commodities. A recon limpet may be required to first interrogate the cargo bay. Prospector: Only useful for mining. When it connects with an asteroid, it shows the type and amount of material in an asteroid and doubles the amount of ore which can be mined from it before becoming depleted. Will also reveal surface/sub-surface deposits and fissures for more valuable asteroids. Recon: Interrogates megastructure datapoints. This can shut down defenses or reveal weaknesses of certain parts of the megastructure. Certain parts of a megastructure may also provide engineering data when interrogated by a recon limpet (check communications arrays). Research: Only useful when hunting Thagroids. Collects certain thagroid materials from the vessels. I have never done it so it must not be important. Decontamination: Only useful when hunting Thagroids. Removes caustic debuff from a target ship and repairs a small amount of hull damage. Outside of that, useless. Repair: Repairs a set amount of the hull of the targeted ship depending on size and grade of controller. Any damage sustained to the ship while repairing (including to the ship's shields) as a result of enemy fire instantly destroys this limpet. Does not repair modules besides a damaged Cockpit Canopy. Can be used to repair yourself if no target is selected.This may be a bug, but once the repair limpet is attached both ships may move away from one another and are not required to stay within a set range. Defensive Enhancements (Reinforcements & Cell Banks) The following three items are the only items that can be placed in "Military" compartments on ships that have them. Military compartments are specific to a ship and can only be occupied by these combat-oriented internal modules and nothing else. Hull ReinforcementSize/Grade: 1-5, D/E Function: Increases overall hull health and damage resistances. Strengths: Multiple reinforcements can greatly strengthen a ship's hull and allow it to take a solid beating when it is without shielding, in addition to increasing the hull's damage resistances. Weaknesses: Internal modules frequently take damage when taking hull damage, requiring their own reinforcements or repairs. Over-reliance on your hull to take damage can leave you in a bad situation if your modules get heavily damaged. Notable Engineering: Heavy Duty can greatly increase the effectiveness of a singular hull reinforcement if mass is no concern. Resistant Specific Engineering can greatly increase the hull's resistance to a specific type of damage, at expense of the hull's resistance to other types of damage. Simple-as, these increase the overall hitpoints of your ship's hull. As a forewarning, never use E class reinforcements as they reinforce the hull less and weigh twice as much. Each reinforcement adds a flat amount of hull to your ship and slightly increases its damage resistances, but engineering can vastly improve the effectiveness of each reinforcement (even grade 1 Heavy Duty gives a 24% bonus to the amount of hull added and increases resistances). Any ship that plans to be able to still fight or escape with its shields down can do with some hull reinforcements, however the weight of each package is not insignificant. For ships that need high mobility and speed, too many reinforcements may weight it down too much to be comfortable. Module ReinforcementSize/Grade: 1-5, D/E Function: Diverts damage that would be dealt to internal modules on your ship into itself, preserving your modules for much longer and making them more difficult to destroy. Strengths: Greatly increases the survivability of your internal and external modules by taking part of the damage dealt to them into itself. AFMU's are particularly effective at repairing these instead of modules. Can be repaired in combat by an AFMU as it does not need to be shut down to function. Weaknesses: Can be quickly expended if it protects non-critical modules from damage. Some damage always bleeds through to the module, so determined attack can still destroy them. As a forewarning, never use E module reinforcements. They do last longer, but only because they take half as much damage in to themselves as a D reinforcement and have slightly higher total health, all while weighing twice as much. These packages are critical if you want to be able to take hull damage without having serious internal module issues. If bringing along an AFMU, it is recommended to go with smaller module reinforcements as the only difference between sizes is the amount of damage the package can absorb before breaking. They can easily be repaired between or during fights. An important thing to note about module reinforcements is how much damage they absorb: A "D" class reinforcement will take 60% of the damage dealt to an internal component as damage to itself, while an "E" class will only take 30%. Multiple reinforcements are multiplicative: Two "D" modules will allow 0.4*0.4 damage through, or 0.16, which translates to a 84% damage reduction. Module reinforcements are used in sequence as they take damage, so once the first package reaches 0%, the next one begins taking damage. Of particular note, externally mounted equipment (weapons, utilities) are only afforded half of the total damage reduction that internals are afforded (so for a ship with 60% reduction, external modules only get 30%, the remaining 70% damages the module). Shield Cell BankSize/Grade: 1-8, A-E Function: After a spool-up period, rapidly recharges an active shield and prevents it from collapsing for the duration of the charge. Strengths: Can greatly bolster the longevity of strong or effective shields and prevent a fragile hull from taking damage due to weapons fire. Weaknesses: Generates an extreme amount of heat on use, limited ammo, if shields collapse during spool-up period entire cell is wasted, provides no benefit while spooling up, high power draw As a forewarning, A grade Cell Banks have less overall reinforcement and one less recharge then B grade cell banks. They somewhat make up for it by having a higher amount reinforced per cell, but I would much rather have more cells and more overall health. Cell banks are great to buy your shield some more time and keep it charged if a collapse is impending, especially if you have a very strong or highly resistant shield. These are the shield version of hull and module reinforcements for shield-oriented ships. Heat management is key and you will probably need a heat sink if using a large cell bank if you want to entirely avoid taking heat damage. As many of these as you want can be installed and activated as you need them to avoid power draw issues, but they have a very long (20s) boot time which makes managing them during combat a hassle. Certain specialized engineering like the Railgun's Feedback Cascade can damage your cell banks while they are deploying and reduce the charge they give. Status Effects The following status effects can appear below your ship or the ship you have targeted on the HUD. Most of these are very specific to particular types of engineering and you won't see many of them often, but they can be good to know to get a better idea of how you are being targeted.
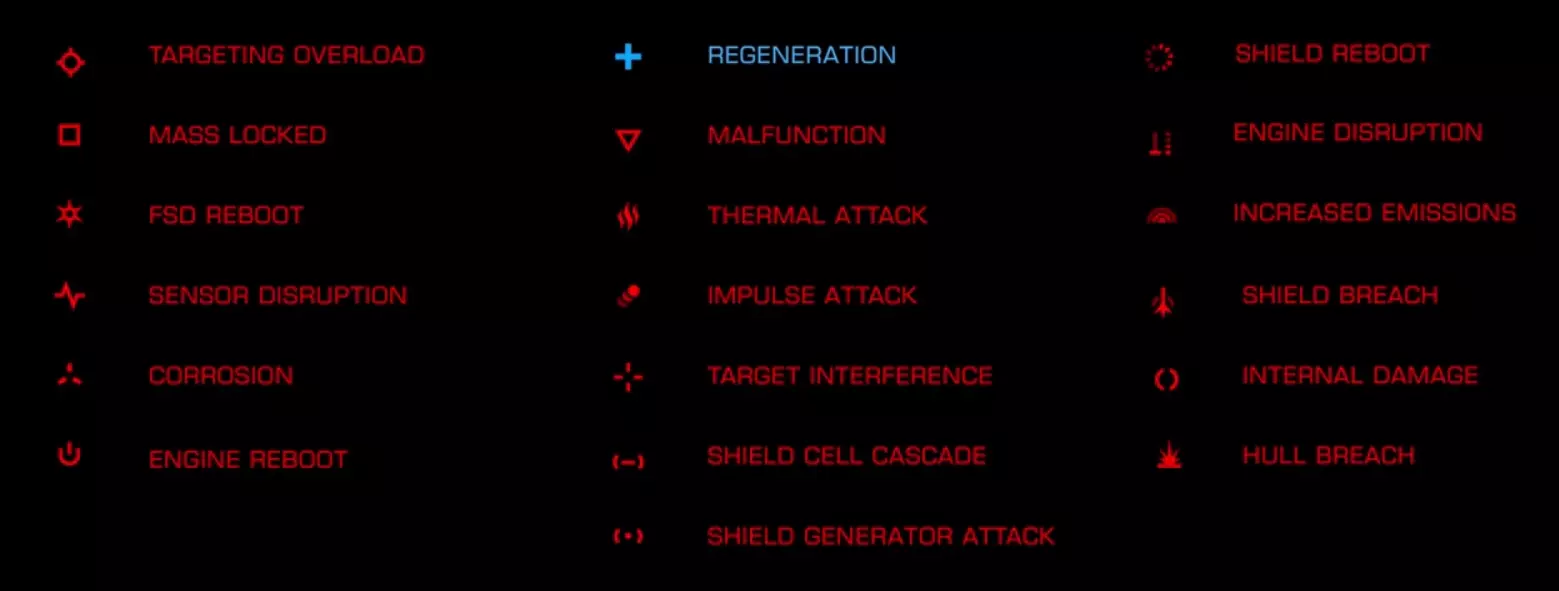
Targeting Overload - Affected ship's gimballed and turreted weapons have reduced tracking effectiveness for duration (caused by the Dispersal Field experimental for Cannons and Plasma Accelerators). Mass Locked - Affected ship's FSD charges much more slowly for duration (caused by the Mass Lock Munition experimental for Torpedo Pylons). FSD Reboot - Affected ship's FSD is forcibly shut down and rebooted for duration (caused by the FSD Interrupt experimental for unguided missiles, the Containment Missile powerplay module, and the Shift-lock experimental for mine launchers). Sensor Disruption - Affected ship's sensor range and reliability is reduced for duration (caused by the Dazzle Shell experimental for Fragment Cannons and Plasma Accelerators). Corrosion - Affected ship's hull hardness is reduced by 20 and all incoming damage is increased by 25% (caused by the Corrosive Shell experimental for Fragment and Multi-cannons). Engine Reboot - Affected ship's thrusters are forcibly rebooted for the duration, which also prevents the target from engaging their FSD (caused by the Ion Disruption experimental for Mine Launchers) Regeneration - Affected ship's shields recharge very quickly after not taking damage for duration (caused by the Concordant Sequence experimental for laser weapons). Malfunction - One of the affected ship's modules is malfunctioning. Yellow indicates a low malfunction chance while red indicates an active malfunction after subsequent hits on yellow (caused by the Scramble Spectrum for Pulse and Burst lasers). Thermal Attack - Affected ship's heat levels are directly raised (this is caused by all Plasma Accelerators, as well as Thermal Cascade experimental for Cannons, Seeker/Dumb missiles, on shielded targets, and caused by Thermal Shock experimental for Lasers and Multicannons). Impulse Attack - Affected ship's trajectory is forcibly redirected by strikes from this weapon (this is caused by all Railguns though the force is too small to notice, real force can be generated with the Force Shell experimental for Cannons). Target Interference - Affected ship loses lock on its current target (caused by the Target Lock Breaker experimental for Plasma Accelerators). Shield Cell Cascade - Affected ship's shield cells are directly damaged and the amount of shield restored by the cell during use is reduced (caused by the Feedback Cascade experimental for Rail Guns). Shield Generator Attack - Affected ship's shield generator is damaged directly (caused by station turrets and the Reverberence Cascade experimental for Torpedos and Mines). Shield Reboot - Affected ship's shield generator is forcibly rebooted (Nothing I know of causes this except certain Xeno-combat scenarios). Engine Disruption - Affected ship no longer receives speed and manuverability bonuses from engine system pips for duration (caused by the Drag Munitions experimental for fragmentation cannons and seeker missiles). Increased Emissions - Affected ship is easier to pick up on sensors (caused by the Emissive Munitions experimental for Pulse Lasers, Multi-Cannons, Seeker/Dumb Missiles, and Mines). Shield Breach - Affected ship's hull is dealt a small amount of damage absorbed by the shields directly to its hull (caused by the Phasing Sequence experimental for Pulse/Burst lasers and Plasma Accelerators). Internal Damage - Affected ship has taken internal damage to a module. This is caused by any attack that successfully breaches the hull and hits an internal module, as well as missiles which damage external modules. This also occurs if a ship takes module damage due to high heat level. Hull Breach - Affect ship has taken significant internal damage to several modules (this is caused by the High-Yield Shell experimental for Cannons as well as the Penetrator Munitions for Torpedos and Dumb missiles). Notable Engineering They really took the amount of engineering grind back a tad so i've had some time and resources to experiment a little. Force ShellShort Description: Imparts physical momentum on the attacked ship (even through shields) in the direction the shell was traveling at time of impact. The biggest takeaways you need to know are this: force imparted is proportional to the raw damage of the shell. Bigger, fixed cannons impart much more force, even more if you use Overcharged or Short Range to further increase the damage. Force is also highly dependent on where the ship is struck and its relative mass: larger ships are harder to move by a lot, but smaller ships will be sent flying. Hitting a ship closer to its center of mass will change its velocity more, while hitting something wafer-thin like a Cobra or Viper on the edge will send it into a tailspin (disorienting, and somewhat time consuming to recover from). The limits of this tool are to your imagination. Since shields absorb a lot of kinetic damage, you can use them to also push your allies. Force applied can also accelerate ships beyond their normal maximum velocity, or force ships backwards at staggering speeds, preventing them form doing annoying fly-bys. Use them to send Condors at 1000 m/s at your enemies. Long-RangeShort Description: Standard effect on most weapons that both increases range, increases projectile velocity proportional to range increase, and prevents damage from falling off with range. Almost all the time this is useful as a tool to help your weapons keep more bite out at a distance instead of doing much worse damage than usual. This is especially helpful on weapons like Railguns to keep them potent at long range where they are the strongest, or lasers where damage falloff severely neuters them outside arm's length. Plasma SlugShort Description: For Railguns and Plasma Cannons, removes extra ammo. Any time the weapon runs out of ammo, it reloads from the ship's internal fuel tank, costing approximately 0.02 Tons of fuel per shot reloaded. For a slight damage decrease you get a significant boost in ammo and a significant reduction in rearm costs. Functionally you can also take extra ammo by bringing internal fuel tanks (finally a use for these things). Of note, since the fuel use is proportional to shots reloaded, weapons like the three-round-burst Imperial Hammer railgun are 3x as fuel hungry per shot compared to an average railgun. Corrosive ShellShort Description: Experimental that temporarily reduces the hull hardness by 20 of the struck ship and increases all damage taken by the struck ship by 25%. This is as meta as it sounds. +25% increase to all incoming damage AND an effective increase to all weapons' armor piercing factor means that if they weren't doing full damage on the hull before due to being a small mount, they probably are now. Really, if you have some multicannon or something that can use this, there's virtually no reason to not use it unless you really want more ammo or don't want to play on easy mode so much. Explosive Shell/Penetrator MunitionsShort Description: Experimental that reduces direct damage, but causes hull-breaching attacks to damage all modules within a radius of the struck area instead of just what was directly struck. If you have the luxury of doing so or the disdain of dealing with a particularly hard hull, these types of experimentals can absolutely gut a ship's internals from inside out and usually instantly overwhelm module reinforcements from the raw damage. Unfortunately, pirate AI tends to cheat and doesn't really care about what's malfunctioning on their ship, so its kind of a tossup. It can at least accidentally destroy powerplants, FSDs, shield generators, or otherwise. Thermal VentShort Description: Attacks against an enemy ship reduce the firing ship's heat level by a significant margin, scaling with damage dealt. One of the few reasons that hot ships will also run a beam laser, this turns targets from a heat problem to a heat management tool. As long as you can keep it on the enemy ship you can usually vent most of your heat unless your ship is particularly redlined in the heat department. The more damage the beam does directly, the better the heat dissapation. Concordant SequenceShort Description: Attacks against a wingmate's shield gives a temporary five second buff which amplifies their shield's regeneration rate by 10x. This is also as overpowered as it sounds. Its only caveat is that the shield needs to be naturally regenerating, of which taking enemy fire causes it to temporarily stop healing. If you can keep their shields out of the line of fire for five seconds, this can make a bi-weave shield back to full in just seconds at no cost to the systems distributor. Since it amplifies the shield's regeneration rate, this makes the effect much less pronounced and useful on Prismatic shields and much better on bi-weaves, especially if they're engineered. Regeneration SequenceShort Description: Attacks against a wingmate's shield directly regenerates it instead of dealing damage. The healing beam version of the beam laser. I never use it because Fdev won't fix the stupid shield online noise that happens every frame these things contact your teammate. Otherwise, it is also overpowered as hell.