换一换
换一换 


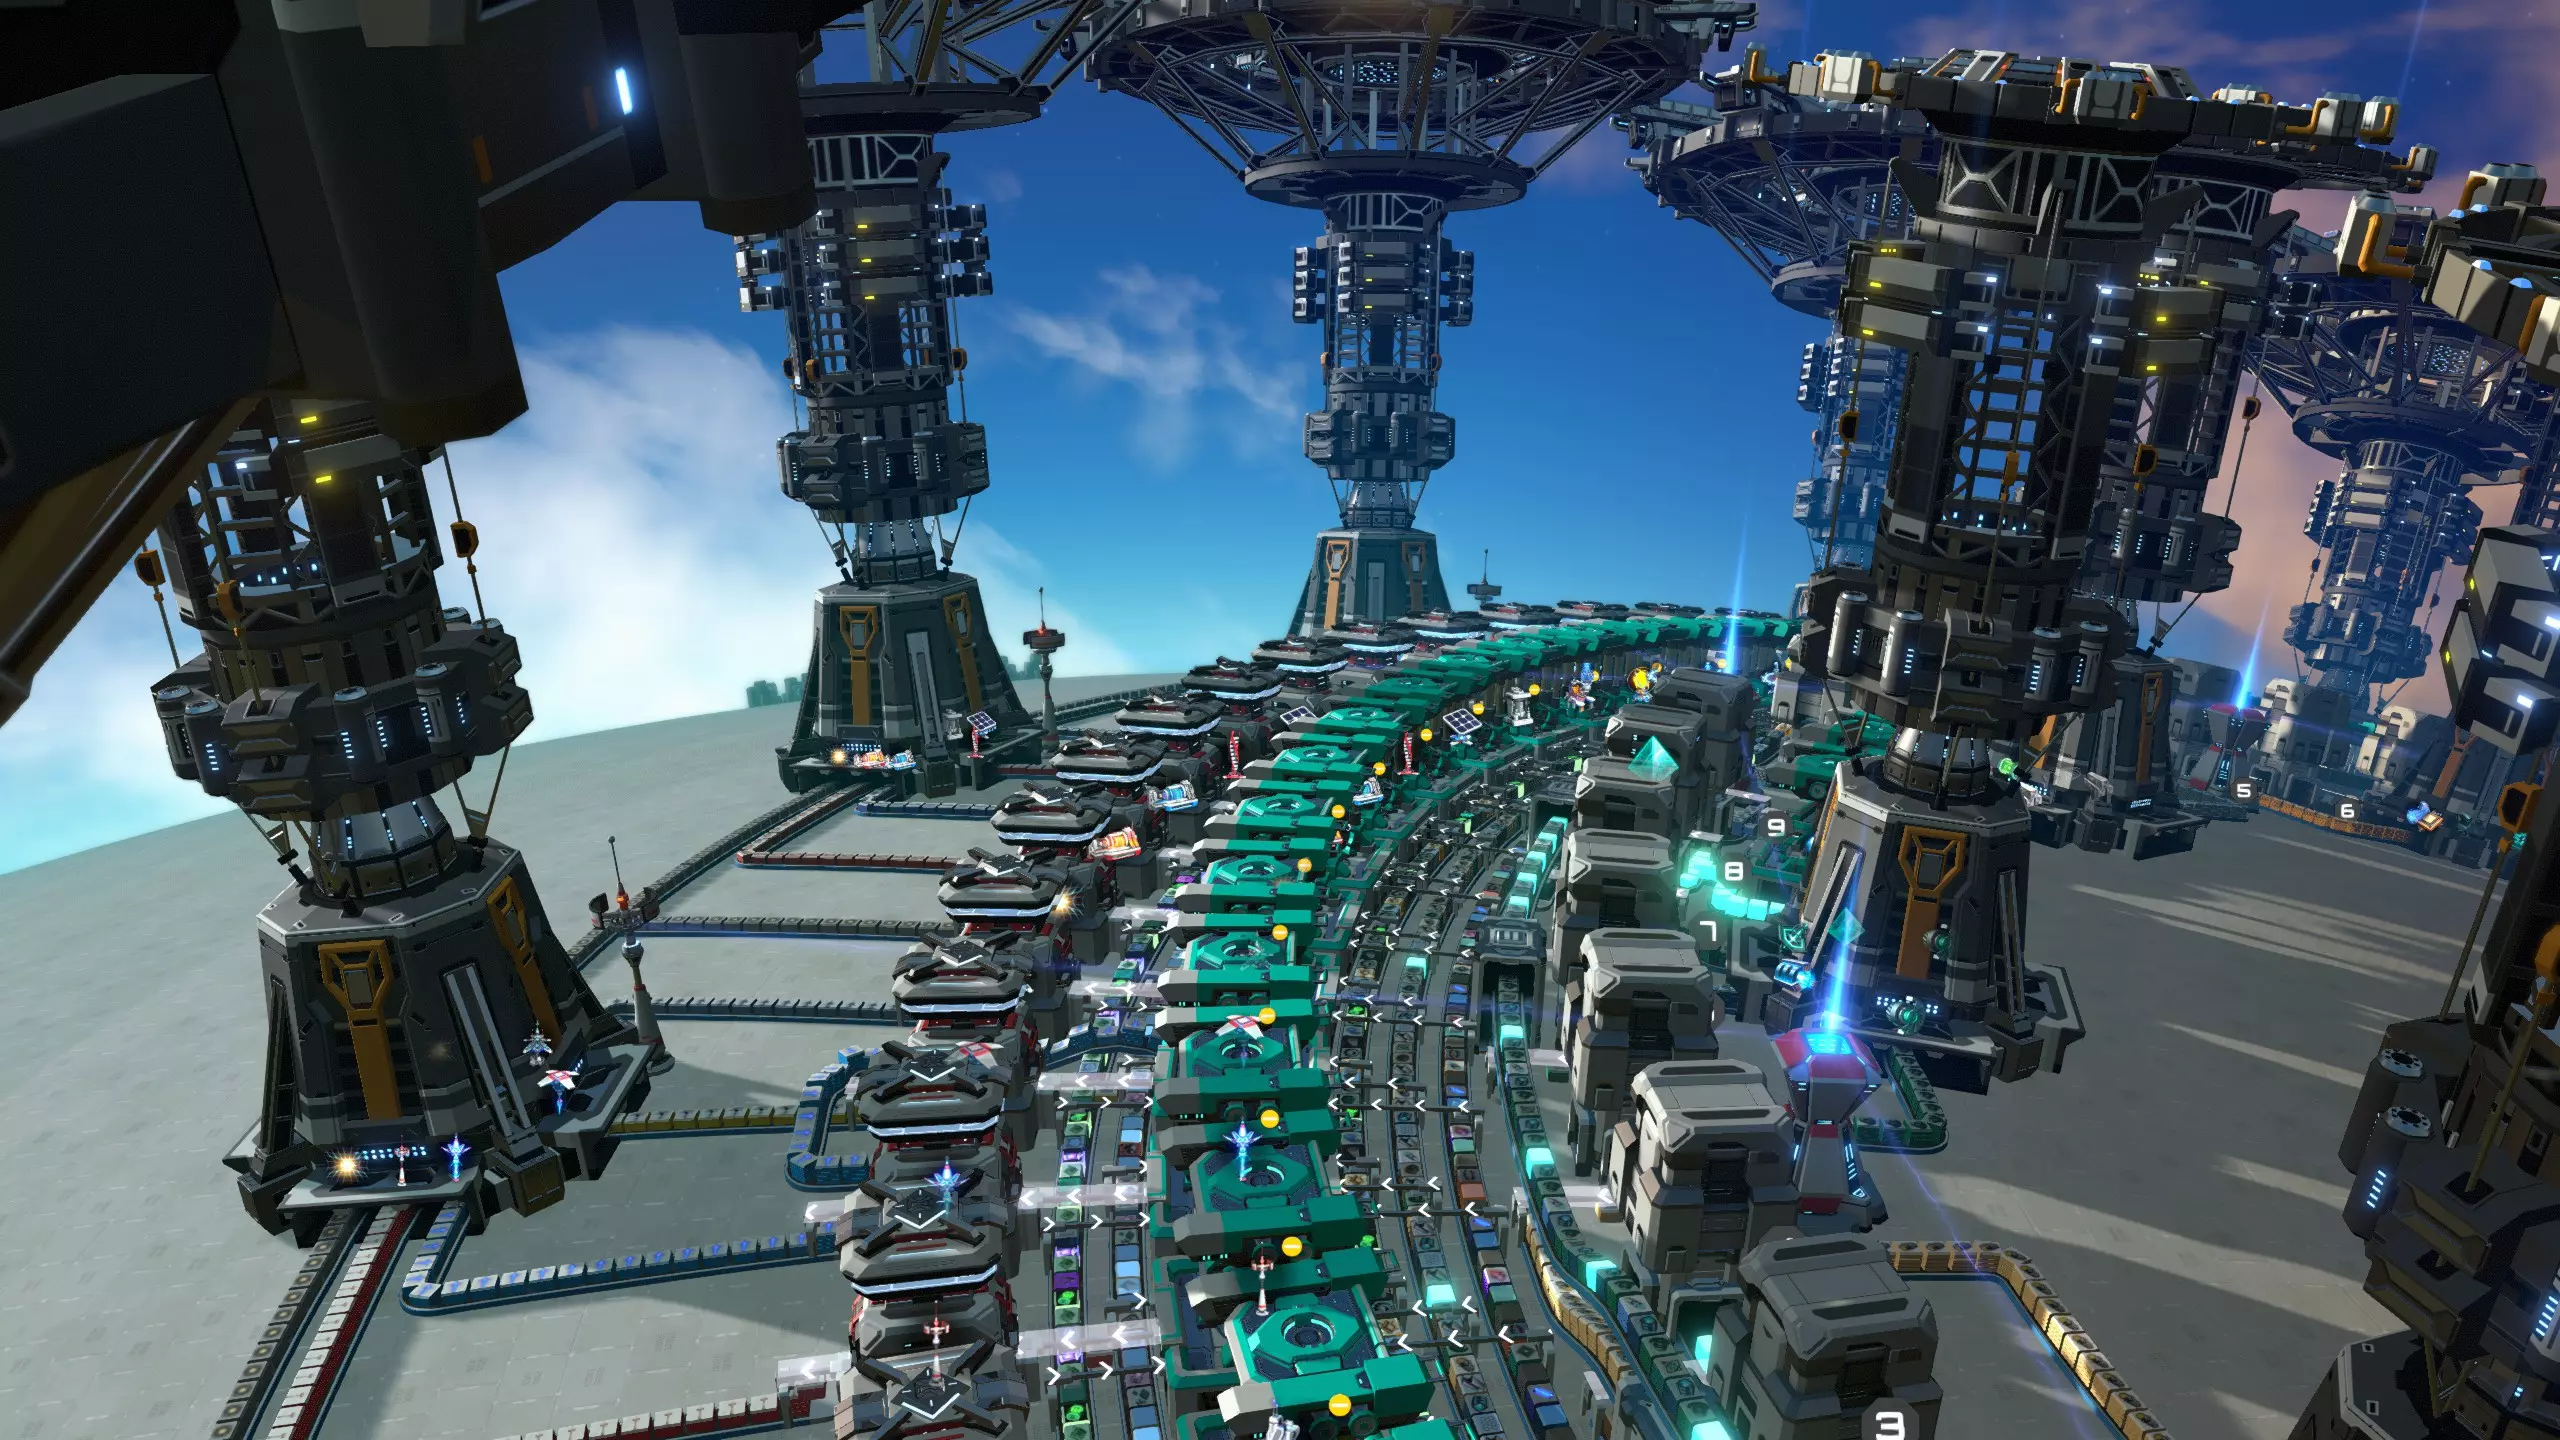
A mall automates the production of buildings, to help you play more efficiently. Over the years several different mall designs have come up, all with different advantages and disadvantages. This guide catalogues different types of malls, and discusses their pros and cons, as well as how to design and build them. The goal is to provide an overview of the possibilities, and to provide an in-depth understanding of each design's fundamental features and quirks. This should help you find the most appropriate solution for your game. It may also provide inspiration to come up with new ways of putting things together. Introduction I am a mall aficionado. I have designed a dozen or so malls, and I am always interested in new approaches, new features to add, or new ways to optimise. A couple of my designs I consider strong. Inevitably, this guide will be biased towards my design sensibilities and draw heavily on my own mall building experience. However I've done my best to give as fair an overview as I can provide, and to do justice to other people's designs and viewpoints as much as possible. Automating the production of all buildings in the game is a complex problem, and over time several rather distinct approaches have been developed. In this guide I will call such a design a mall (even though certain high profile youtubers don't like that term and prefer other terms like "manufacturing hub"). Malls can produce any item, but they are normally used to produce items that have a low or medium production rate: most malls involve just a single or just a few assemblers per produced item. This is what makes them especially effective for making buildings, although other low volume items can also be included, such as logistics drones, vessels, and bots, as well as attack drones. For items that are used in greater quantities, such as foundation, fuel cells, ammunitions, graviton lenses, space warpers, proliferator, carrier rockets and solar sails, it is normally better to use a dedicated production chain. Whether or not such a separate design is viewed as part of the mall or not is up for debate, but this guide will mostly consider the production of low volume items. The production of higher volume items is briefly touched upon in the section about hybrids. Currently there are 61 items listed on the "buildings" page of the replicator, and there are 8 types of drone, so a full mall produces 69 different items, which I will collectively call "buildings" even though not all of them are actually buildings. These buildings are produced from around 40 different input materials. So the problem that a good mall has to solve is how to connect 40 input materials to at least 69 different assemblers. Of course the input materials themselves ultimately have to produced as well; early game malls often include this initial processing and can work solely based on raw ores, which is very convenient. But later in the game that production becomes unwieldy, and how much you need depends greatly on play style, so late game malls typically assume that those materials are made available by another part of the factory. The best way to categorise malls is in terms of the technology they use to solve the core logistical problem of hooking up the right inputs to the right assemblers. Over time, several solutions have been developed, each leading to a different type of malls. Each mall type has its own dedicated section in this guide, where I will describe the core concept, give examples of how to build it and discuss strengths and weaknesses. The most common mall types are: A bus mall has a number of parallel belts, each carrying one building material. The assemblers obtain the materials they need from this "bus". A box mall uses a sequence of stacked mk1 storage boxes to distribute materials; three different materials per storage box. The assembler is attached to the storage box at the bottom and can access anything that is available in the entire stack. A bot mall uses logistics distributors to collect the right input materials for a building. A sushi mall uses mixed belts, or sushi belts, that contain multiple distinct materials types, to be able to present many different materials to the assemblers of the mall using only a few belts. A PLS or ILS mall uses logistics stations to import the materials required for a building. There are also choices about how to make the produced buildings available to the player. Since these considerations are mostly the same for each mall type, I have postponed most of this discussion to a separate section at the end. So, for the majority of this guide, we will look at the part of the mall that requests ready-made input materials in the way most convenient for it, produces buildings, and sticks those buildings in storage boxes. What happens before and after that is discussed in greater detail in later sections. Each mall type has different properties. Some of the most important properties are these: Tech level: what tech do you need to unlock before you can build this mall? Max throughput: at what rate can this mall supply the assemblers? Is perfect saturation guaranteed? Area per building: how much space do you need for each building in this mall? This only counts parts that are repeated for each building in my reference mall, including one output box. Note that all malls may need additional space to export produced buildings. Malls other than PLS and ILS may also need additional infrastructure to make all buildings available properly. Resource lock-up: if the mall is idle, then how many resources are locked up in storage buffers and boxes inside it? (These numbers are an estimate based on my own full fledged mall designs of each type; they include PLS buffers of about 1000 materials per slot, materials sitting on belts as well as inside storage boxes.) Another relevant issue is whether a mall design supports full proliferation. You can gain the extra products effect or the speedup effect on the production of any building that does not have another building as input material. However, upgraded buildings that take a lower tier building as input can only be proliferated for speed. Whether or not proliferation is worth it can vary even within a single mall type, depending on the details of your design, so this is discussed for each mall type individually. For a first quick overview, see the table below. For more detailed information, see the section for the mall type you're interested in. TypeTech levelMax throughputArea per buildingResource lock-upBus mallbluehigh44 - 27650kBox mallyellowhigh48320kBot mallredmoderate to high68 - 9670kSushi mallblue / redmoderate5250kPLS mallyellowvery high300140kILS mallyellow / purplevery high440140k Which mall should I care about? In case you're not browsing this guide out of idle curiosity, but actually looking for guidance on how to build a mall, right now, in your actual game, then here are some recommendations. If you have little experience with the game, or with malls:I recommend placing down a mall that you can understand and make your own, rather than downloading a blueprint and using it as a black box. The most straightforward malls are the five belt mall, the full bus mall, and the bot mall. The five belt mall is the most straightforward. You can start building the five belt mall once you have blue science research unlocked, so pretty early in the game. It is easy to build and it is effective until the late mid-game. At that point you will have more experience with the game and a better infrastructure, so you'll be able to switch to another mall design easily at that point, if you wish. The full bus mall is also easy to understand, it can also be built on blue science, and it can take you all the way to the late game. If you want to use this mall, you might also want to watch Nilaus' video about it; you can find the link in the appropriate section. Keep in mind though that this mall will be very large; you will definitely need to unlock foundation before trying to build this. The bot mall is a solution that many players find intuitively. You can build it once you've unlocked logistics distributors, which requires red science matrix research. Bot malls have few downsides, and like the full bus mall, they can be built out gradually. I would recommend using the bot mall segment blueprint from the bot mall section, or designing your own bot mall segment blueprint. You can then add buildings one at a time without too much hassle. If you have more experience with the game or you wish to broaden your scope: In this case you are probably already equipped to make up your mind which mall you'd like to try. I am personally very proud of my sushi mall design, which can also be built from a very early stage in the game, and which is completely reliable and effective until the late game, so I can't resist plugging that one. I have another guide specifically about how to build that mall. Alternatively you can use a five belt mall until the late mid-game and then stamp down the blueprint, obviously. If you don't like sushi, fair enough; in that case just read through the different designs and see which appeals to you the most. I have the least experience with the bento box mall and I think of it as somewhat niche. I really don't recommend building it unless you are already in the late mid-game and are producing at a substantial scale, or you want to experiment and see how it works for you. Bus mall: five belt design
这可能是游戏中最具标志性的商场类型,几乎每个认真游玩的玩家都曾建造过。其运作方式是创建五条传送带,输送早期游戏建筑最重要的材料:齿轮、磁线圈、电路板、铁锭和石砖。这些传送带沿着一排装配机构成的生产线运行,一侧三条,另一侧两条。每个装配机从这条总线上获取所需的所有材料,然后横跨两条传送带将产出存入储物箱。储物箱最初的存储容量被限制为1格,这样商场就不会无限制地大量生产每种建筑。这使你能够建造MK1传送带、MK1分拣器、特斯拉塔、风力发电机、分流器、MK1储物箱、采矿机、装配机、高斯炮塔、熔炉和 thermal power plants。特别方便的是,你可以将所有装配机简单连接到所有总线传送带,一旦选择总线支持的任何配方,它就会开始工作。 要为五条传送带备货,通常每条传送带分别使用2台装配机来制造齿轮、电磁线圈和电路板。需要一整条传送带的铁锭。对于石砖,3到6个熔炉之间的数量都比较合适。 这个物资站可以在游戏非常早期建造,甚至在蓝色科技研究之前。它极大地促进了早期扩张,并且往往能生产出足够数量的建筑。增加更多建筑 通过一些技巧,这个工厂可以支持更多额外建筑: 让一个工厂装配机生产电动机,并通过直接插入的方式制造水泵和MK2分拣器。 最终将总线上的齿轮换成玻璃,先制造交通监控器,然后是矩阵实验室和液体储罐。 将电磁线圈换成等离子激励器,将铁锭换成钢材,以制造液体储罐、无线电力塔、石油萃取器、石油精炼厂和化学实验室。 为中期游戏做准备
可以将这个购物中心建造得在整个游戏过程中都能使用,不过说实话,你可能会发现在某个阶段直接放弃它,等准备好后再建造一个新版本会更容易。 如果你确定要继续使用这个购物中心,从一开始就需要注意以下几点: 确保购物中心建在星球上你之后也觉得合适的位置。你可能不会想把它直接建在赤道上,因为那是你想用来做其他事情的黄金建筑空间。一个好位置是离赤道一条回归线的地方。将箱子放在距离回归线15格的位置,而装配机则放在离回归线更远的地方,也就是更靠近极点的位置。游戏初期,当地球被海洋覆盖,你需要寻找附近有便利资源节点的位置时,可能很难找到合适的地点。 在组装机之间留出一个额外的空间,将它们放置在高亮网格线上,间隔5个单元格。这样做是为了之后有足够的空间为每五个组装机添加一个星际物流站。 一旦解锁了星际物流站,如果你还没有升级所有传送带,只需将它们升级到MK2或MK3,并从物流站为购物中心供应所需的所有组件。有关如何设置星际物流站的更多信息,请参见【建筑交付】部分。变体方案:如果这座工厂仅打算临时使用,可以完全省去石砖,这样工厂只需要铜矿石和铁矿石。这种情况下,材料的生产规模通常也会缩减,齿轮、磁线圈和电路板各使用一个装配机即可。这种设置可以更快完成,但意味着熔炉等物品需要手动制作。不过,这是一个有效的临时解决方案。 部分玩家会在装配机列的两侧各使用三条传送带。这会导致装配机无法直接接触其输出箱,因此传送带会从装配机之间延伸出来,越过总线传送带,以便产出的建筑组件能够运出。吞吐量和依赖关系 如果所有装配机都在全力运转,前面的几台可能会消耗整条供应传送带的物料,导致后面的装配机缺料。这种情况在物资中心首次启动时尤为明显。之后,当大量储物箱装满,相应的装配机停止工作时,物料会继续沿着传送带向下流动,后面的装配机才能开始工作。 因此,你可以将更重要的建筑放在物资中心传送带的起始位置附近。不过实际上,在正常使用情况下,这种依赖关系通常不会太严重,你大多可以忽略这个问题。 通过在物资中心传送带起始位置附近使用储物箱来缓冲物料,可以平滑任何特定建筑的需求峰值。将储物箱放置在分流器顶部,这样就无需担心分拣器的吞吐量问题。如果其中一种材料的生产速度低于消耗速度,缓冲箱可以补充传送带的物料。(如果物流中心因传送带速度而出现瓶颈,显然可以升级传送带。)这些用于缓冲的储物箱在游戏初期也很方便,因为它们能让你轻松获取材料进行手动制造。 分拣器瓶颈:使用MK1分拣器时,必须警惕分拣器瓶颈。MK1分拣器每秒仅能输送1.5个物品,具体取决于它所连接的两个物体之间的距离。你可以点击分拣器查看其实际吞吐量。因此,连接组装机和输出箱的分拣器最多只能输送1个物品。5/3等于每秒1/2个建筑。对于生产速度较快的建筑,比如每秒可制造2个的传送带,你可能需要升级输出分拣器,或者使用两个分拣器而非一个。但要记住,这也会增加过早消耗铁供应的风险! 增殖:当然,如有需要,五条输入传送带可以进行增殖。不过,任何依赖直接插入的建筑都无法进行增殖,这意味着相当多的装配器通常无法获得增殖加成。你还必须确保在所有需要将传送带上的材料更换为其他材料的地方都进行增殖。 我通常认为对这个制造区进行增殖并不值得,因此不推荐这样做,但有些玩家确实更喜欢增殖。如果你想这样做,在建造这个购物中心时,一定要为喷漆工留出一些空间,这样可以省去一些麻烦。 总线购物中心:全总线设计
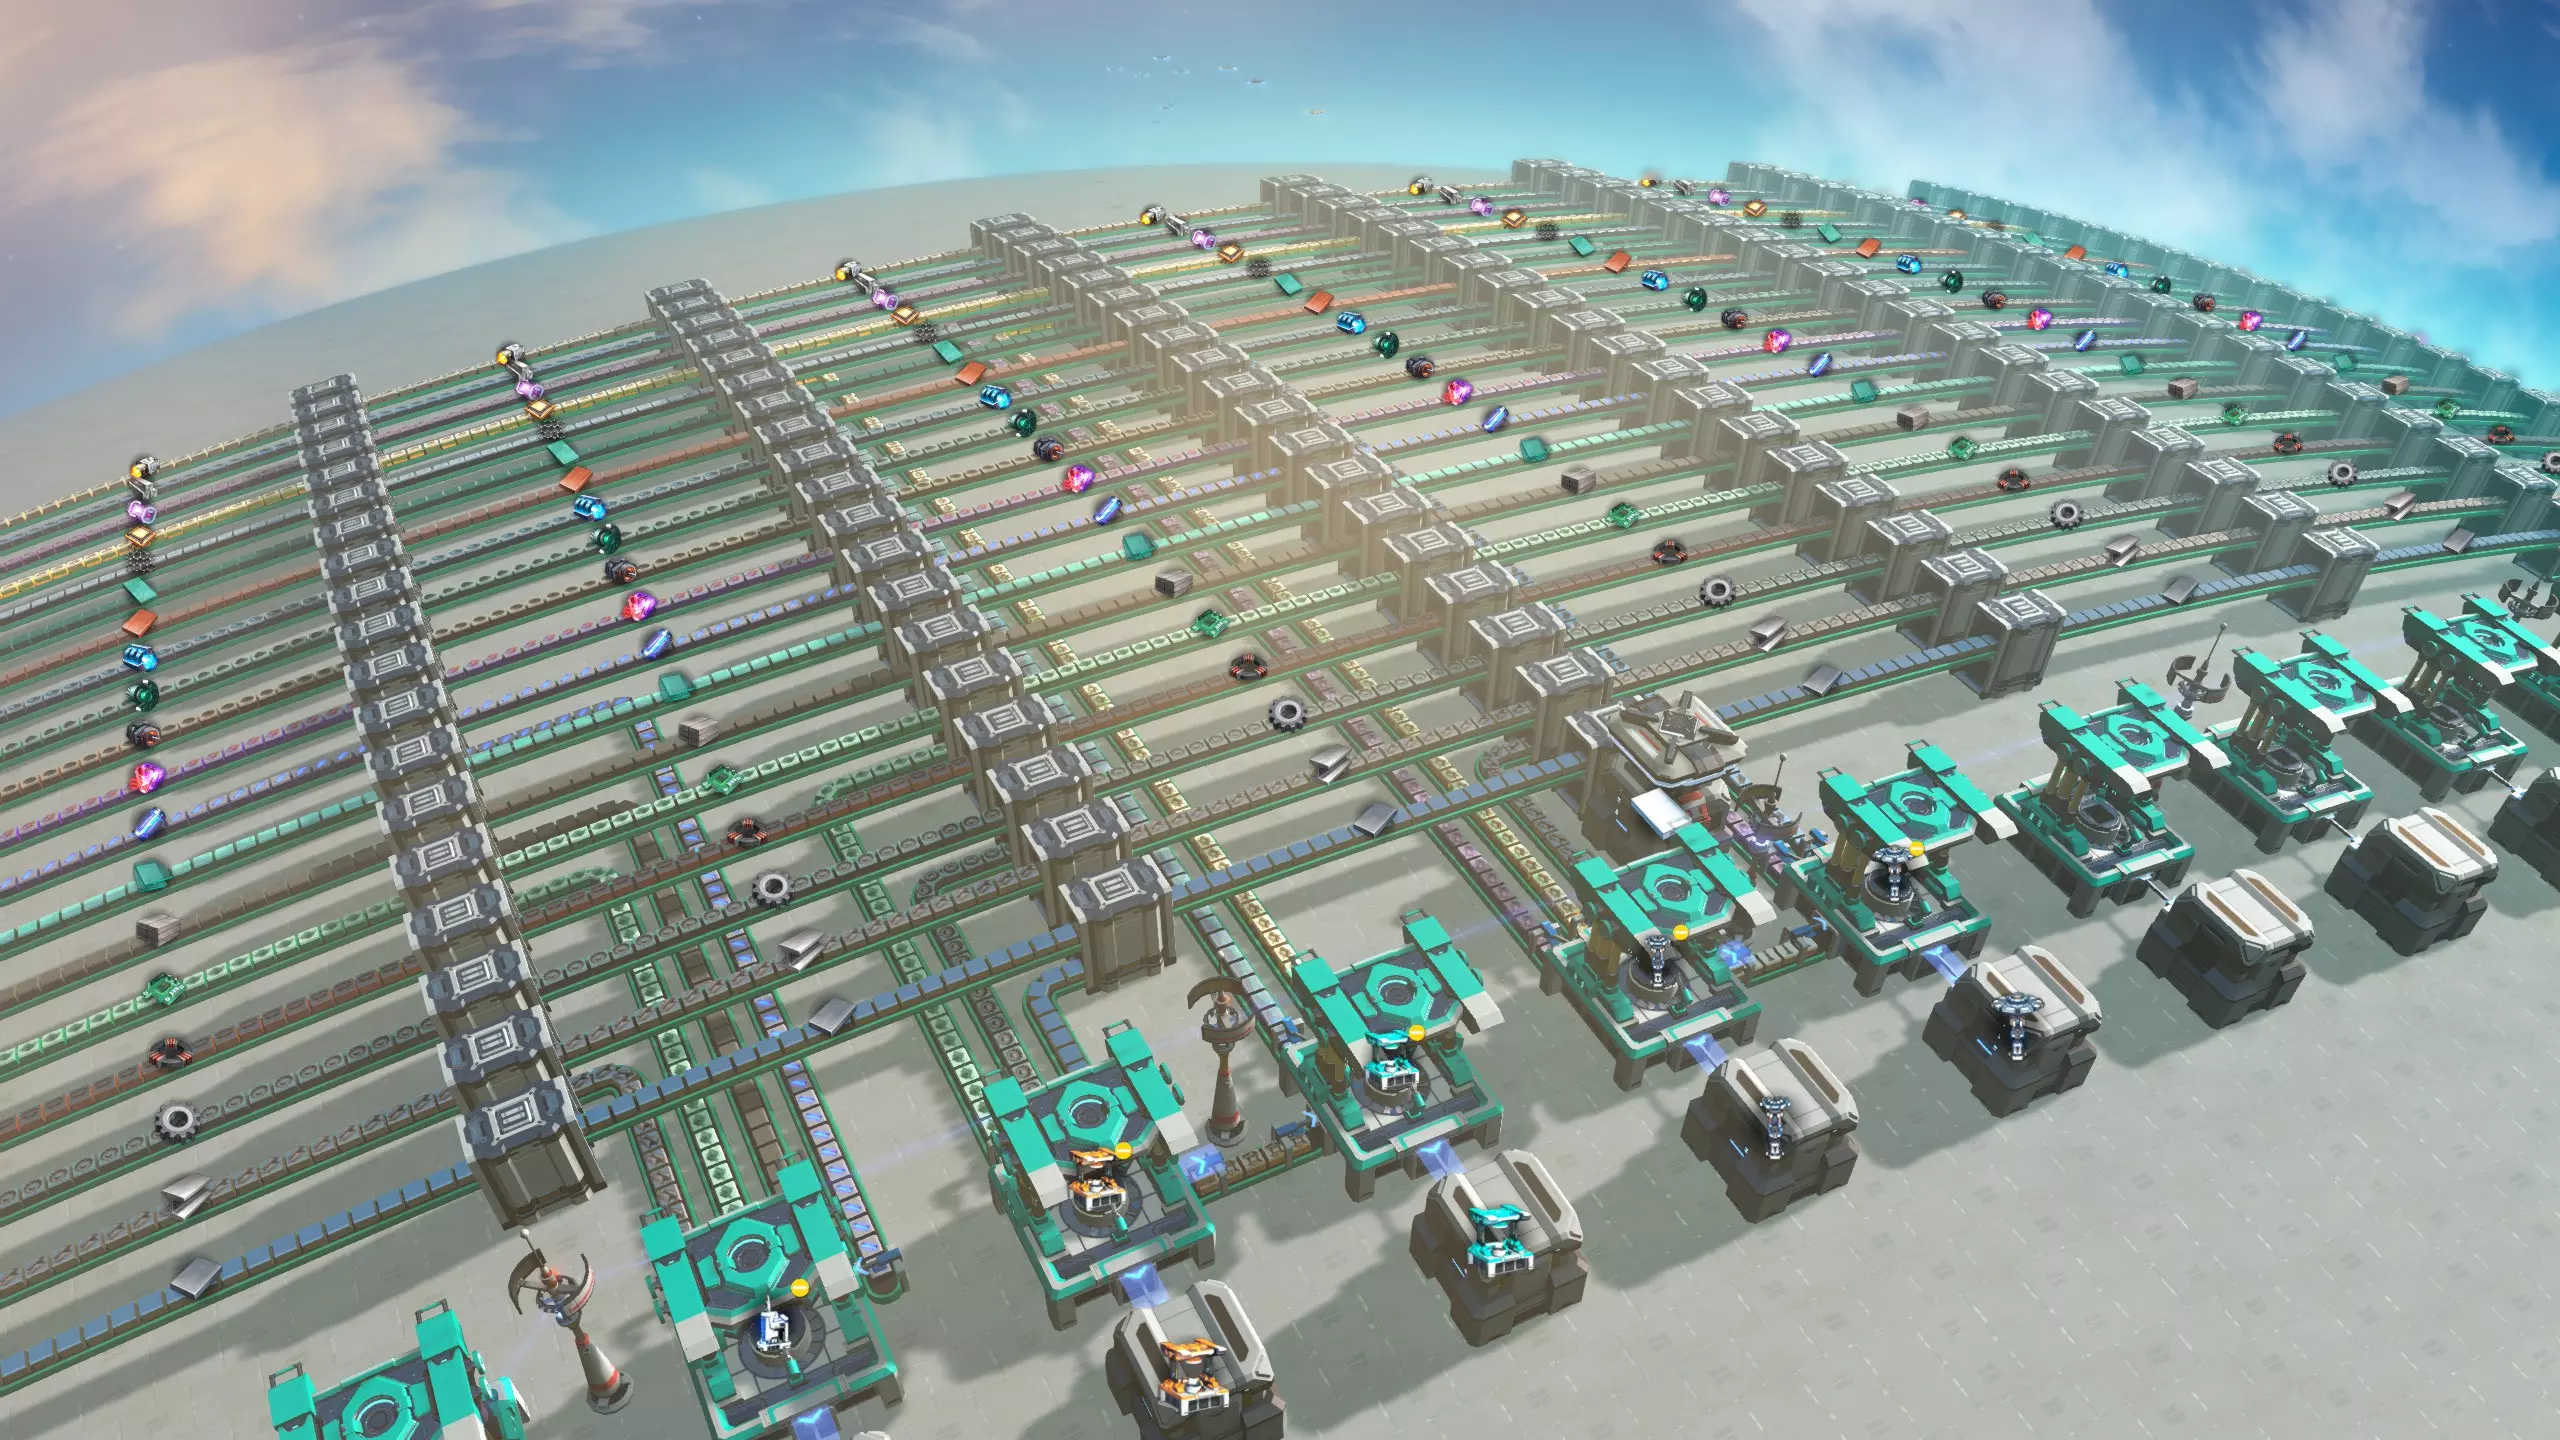
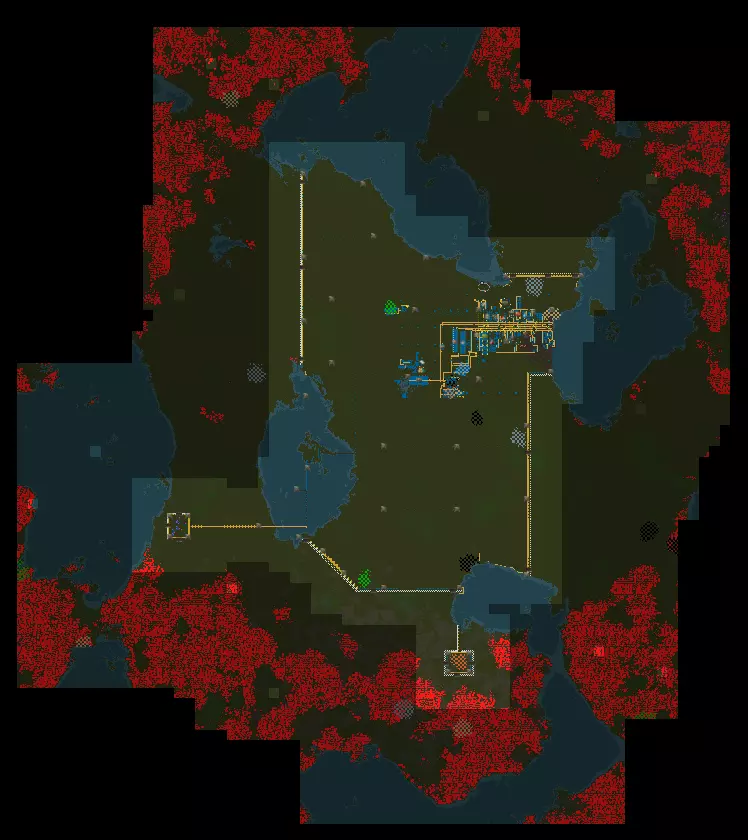
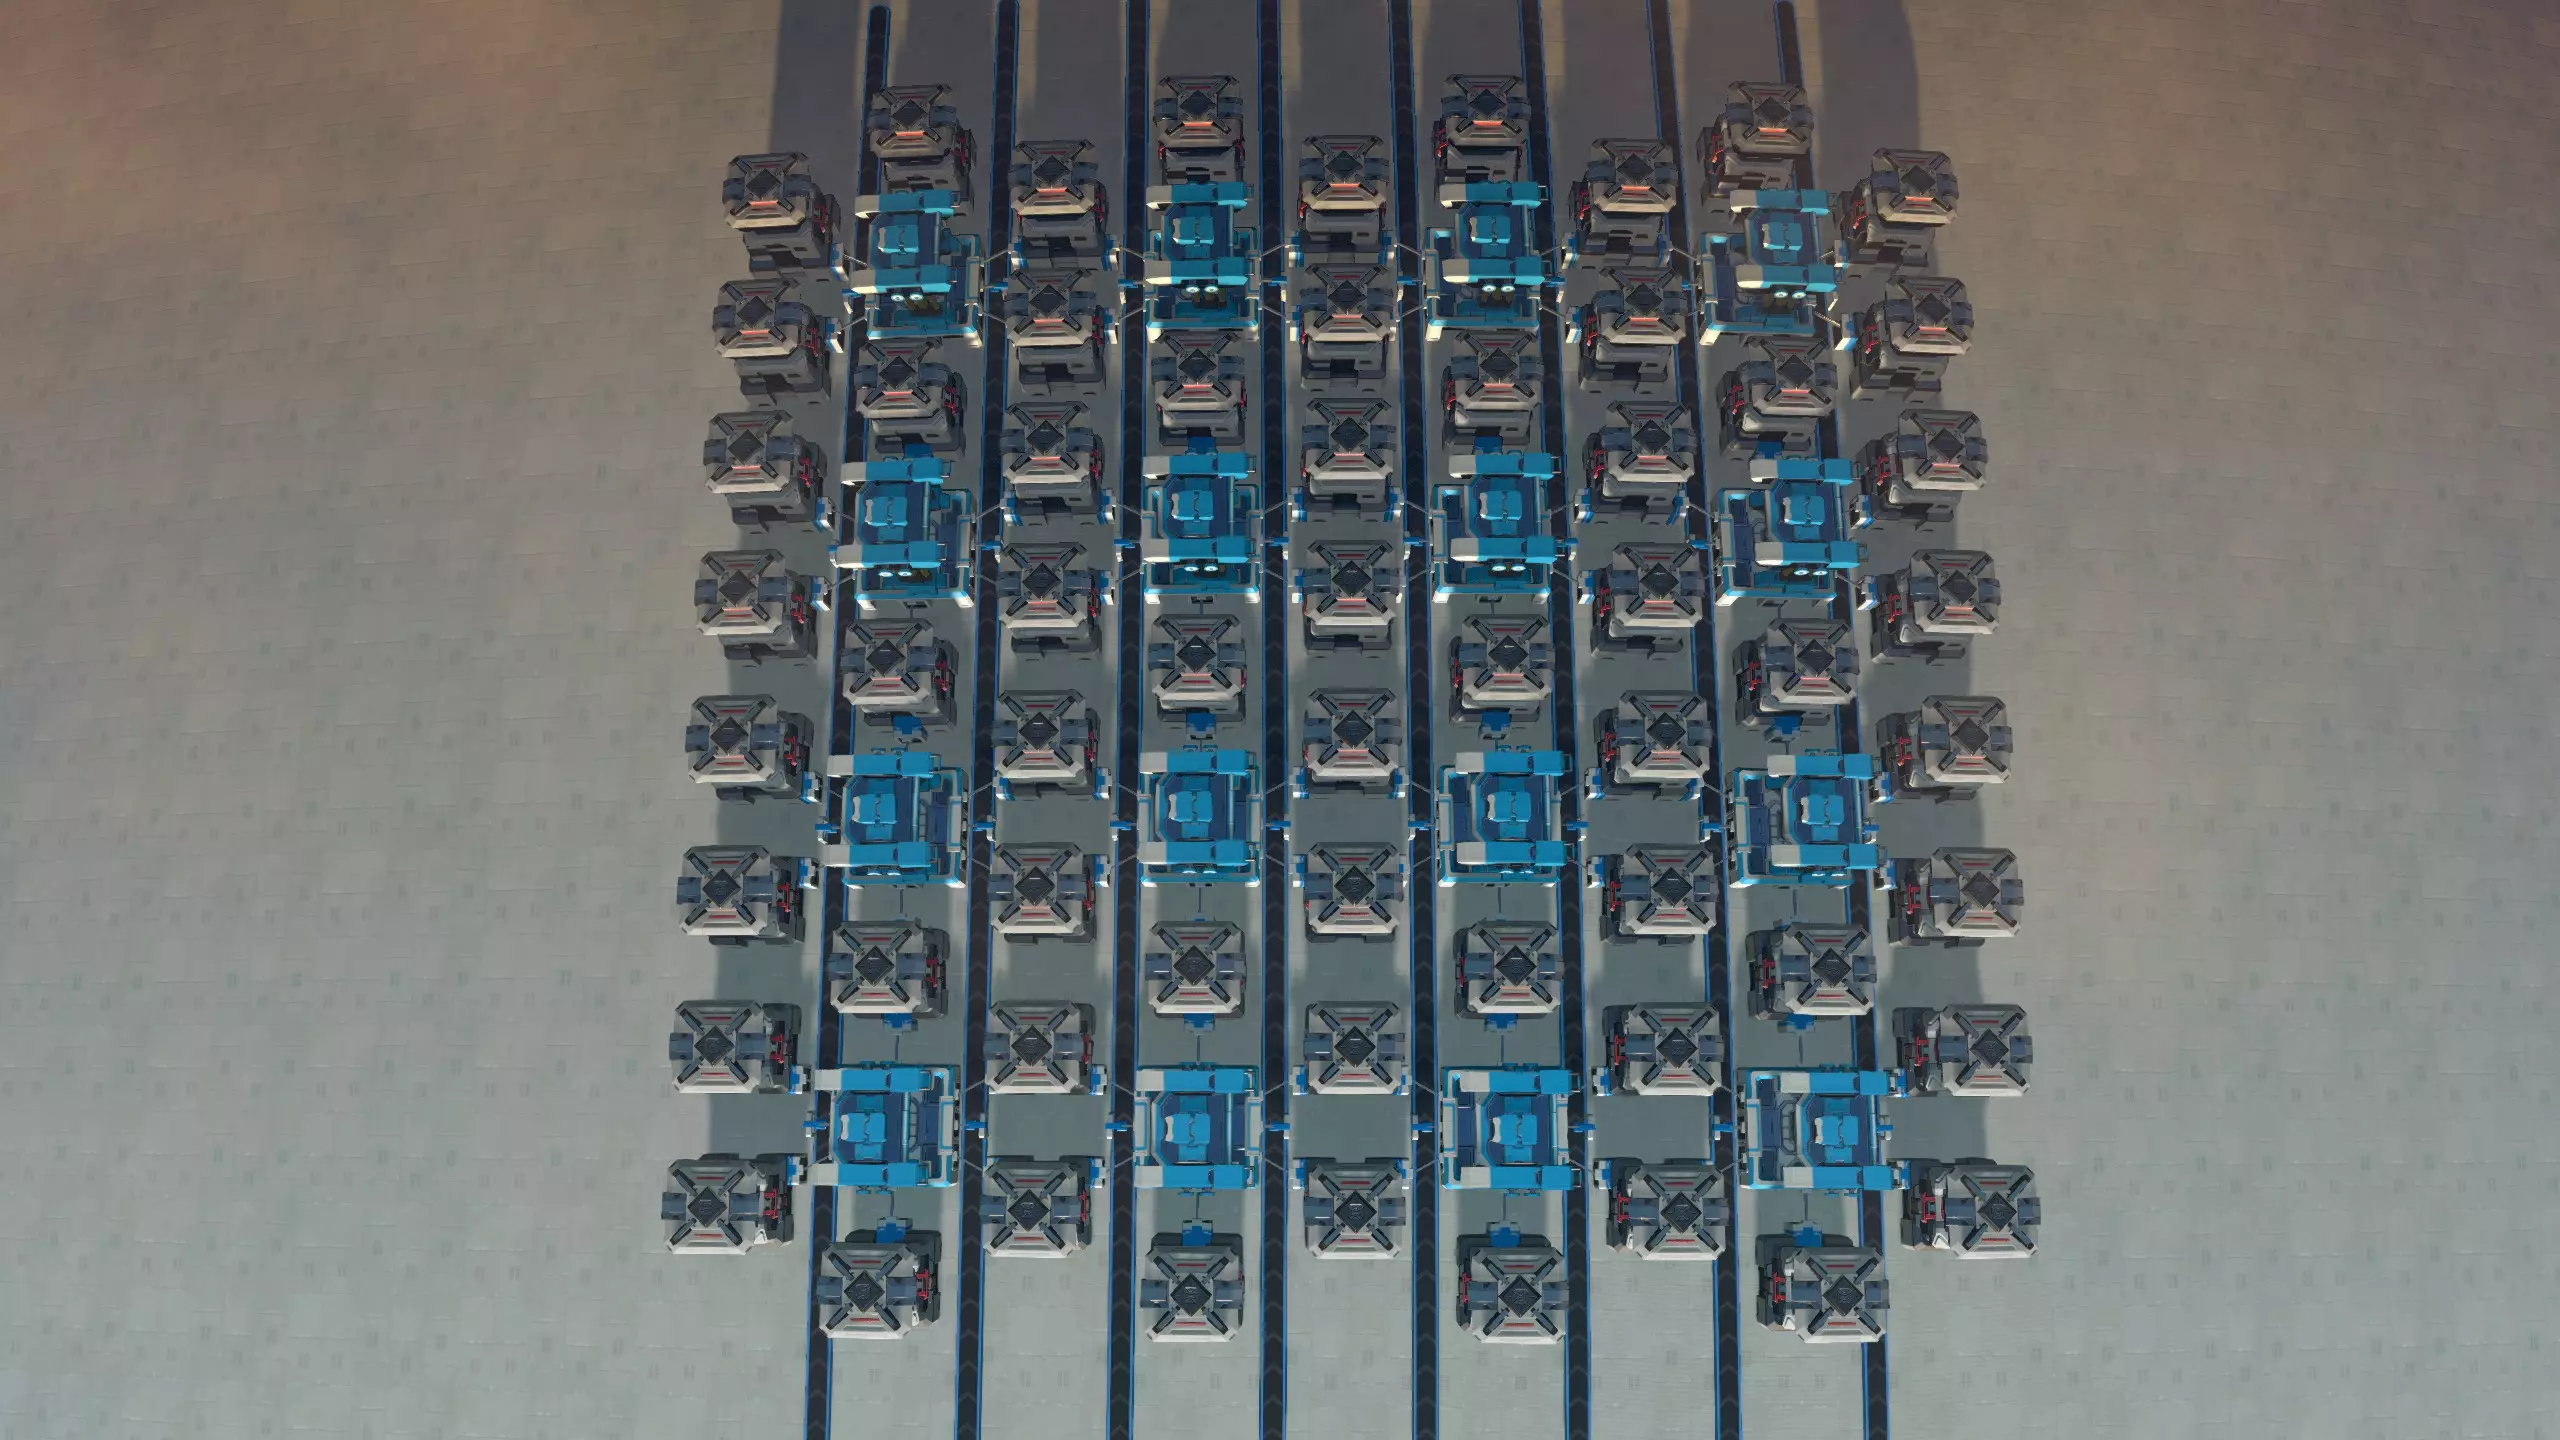
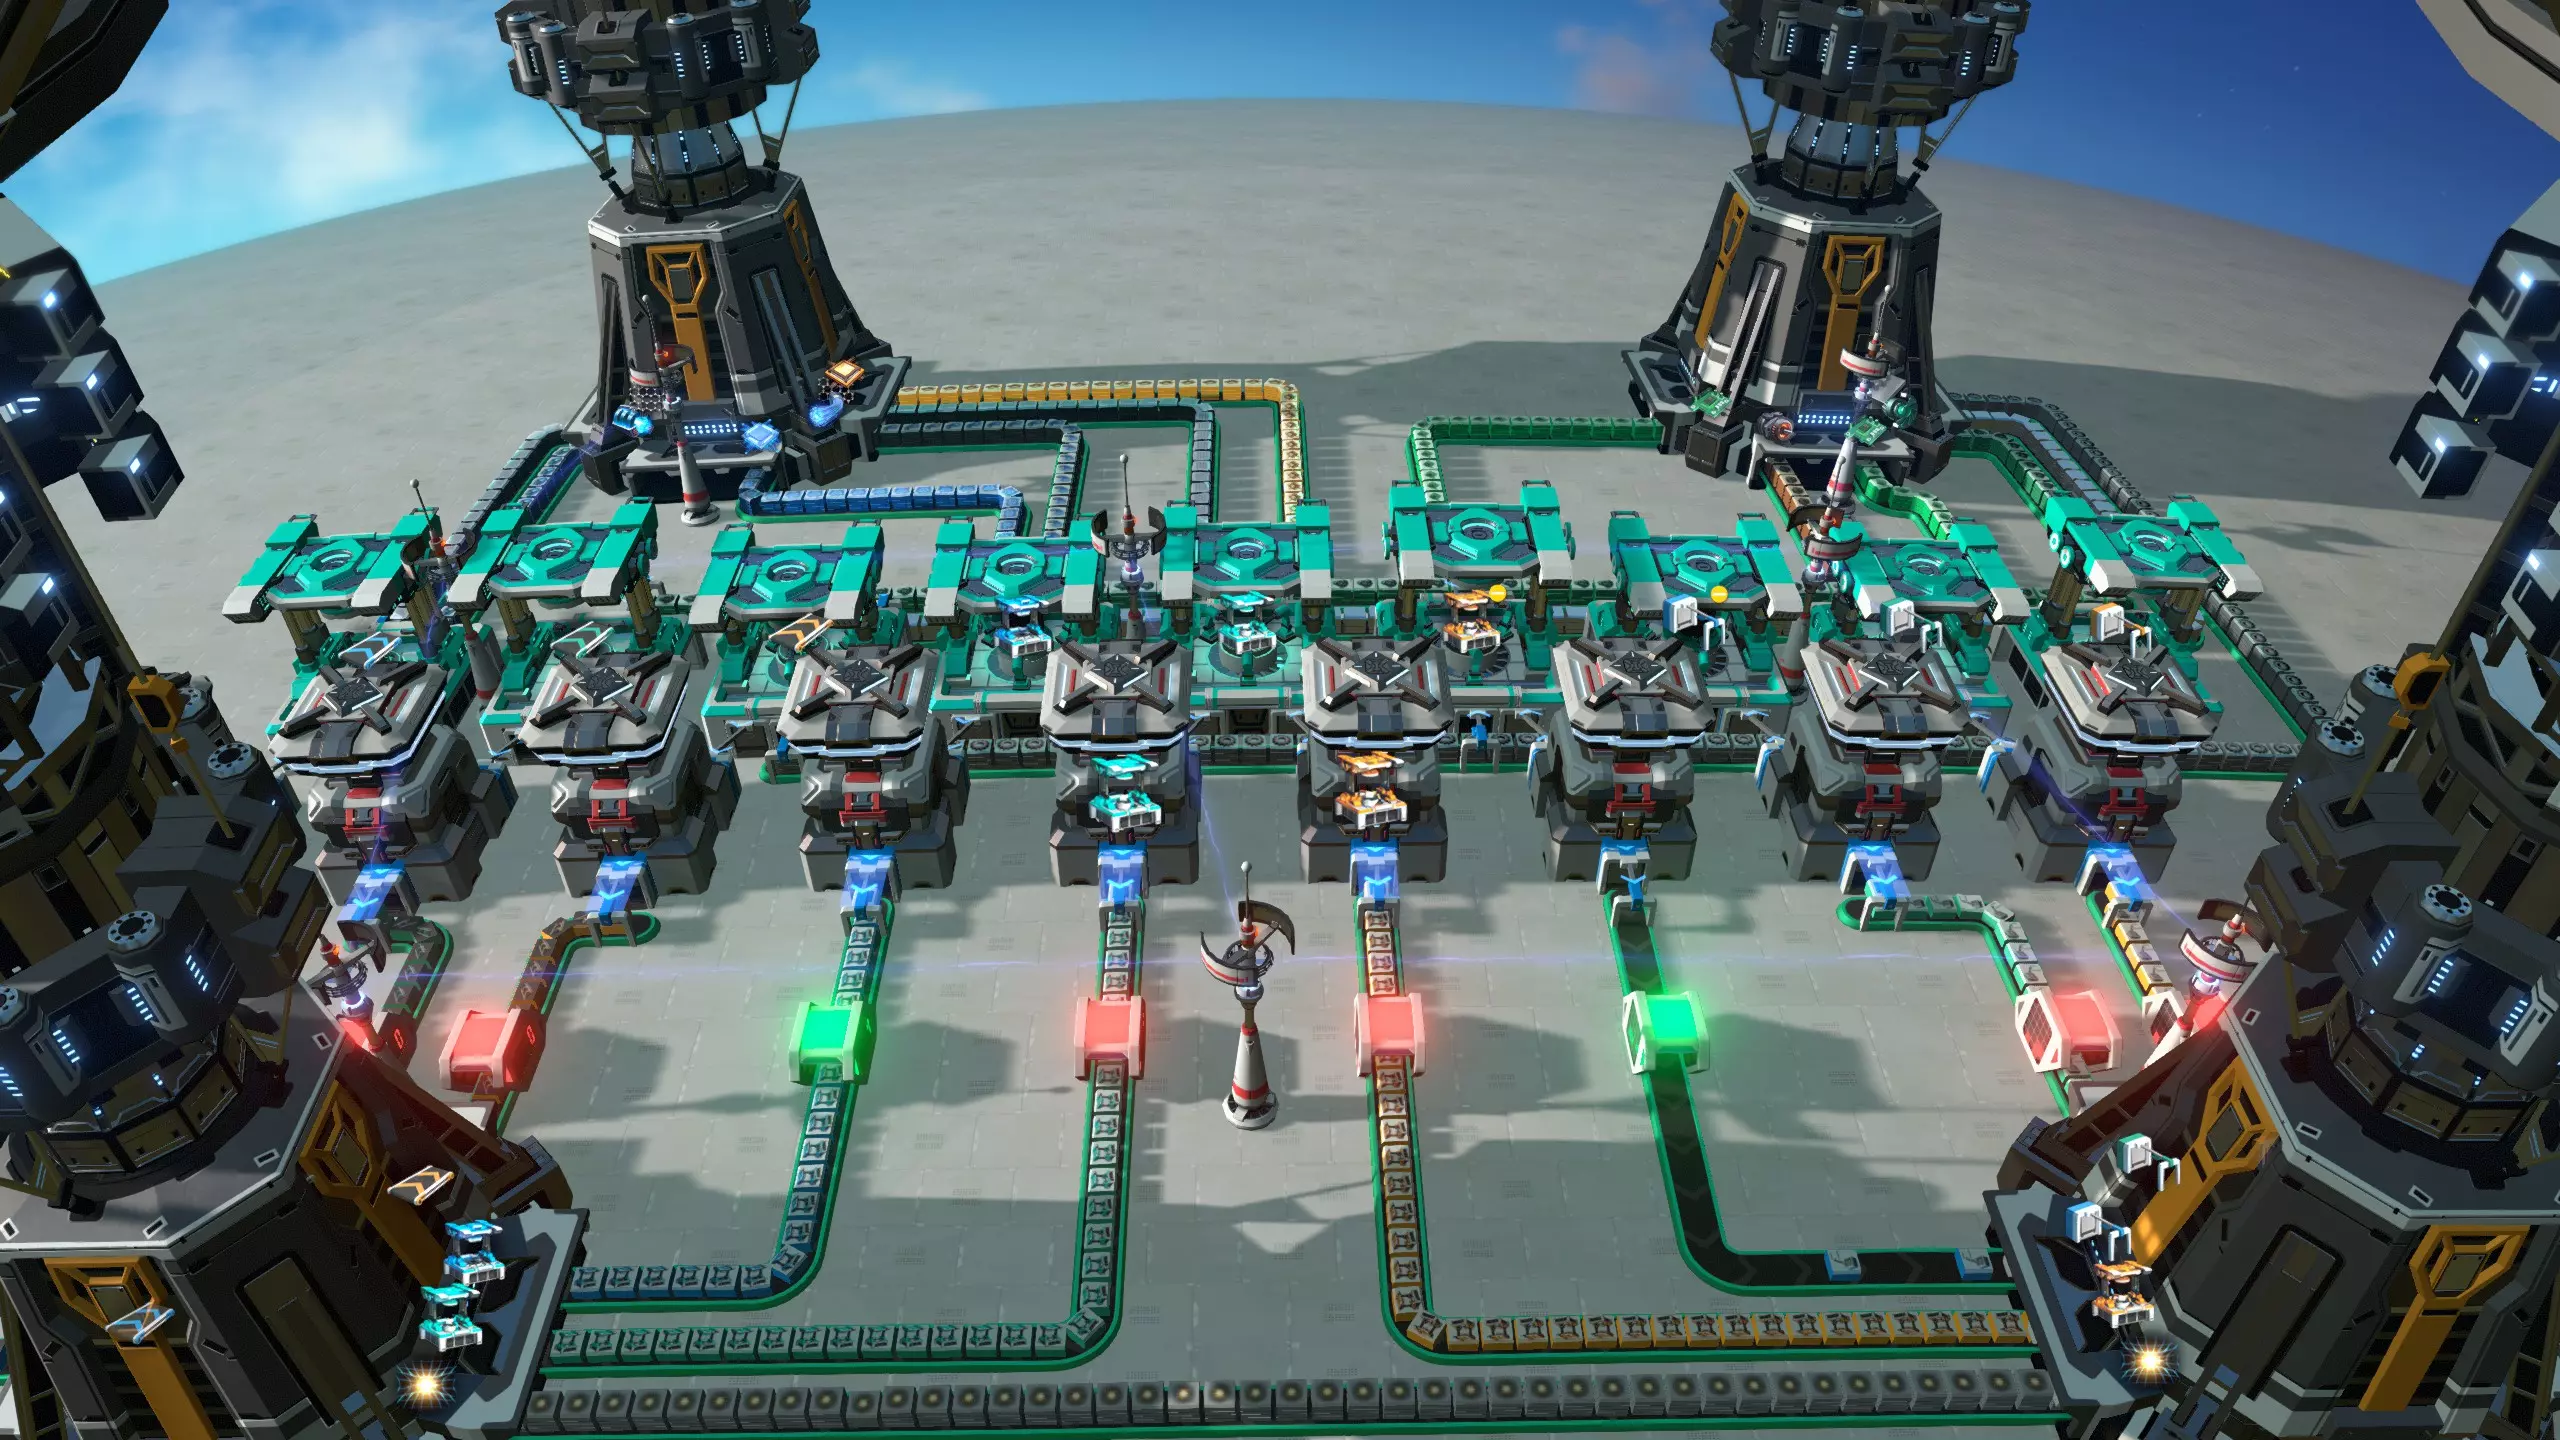
上一节介绍的五带式中央工厂很便捷,因为它建造时不占用太多空间和材料,还能生产许多重要的前期建筑。不过,如果要将其扩展到二十多个建筑以上,设计就很容易变得杂乱无章。 长期以来,大多数玩家认为在《戴森球计划》中,更大规模的总线式工厂效率不高,人们会采用其他技术来生产更高级的建筑,主要是使用星际物流系统中央工厂,后来也会使用机器人中央工厂。 然而,随着游戏中建筑数量随着每次更新不断增加,对于简单、灵活且能轻松扩展到中后期的解决方案的需求开始增加。YouTuber兼Twitch主播Nilaus随后开发了一种更大规模的基于总线的设计,该设计着重优化了易用性:其设计目标显然是从游戏初期开始,尽可能让大型购物中心的建造和扩展变得简单。 该购物中心的主要理念是将总线传送带抬高一个网格单元,并在它们之间留出一个网格单元的间距。这样就可以在每条传送带上定期放置分流器;材料可以非常容易地分流出来,为装配机供料。 虽然这种设计确实流行起来并广受欢迎,但也存在一些批评意见: 如上图所示,总线很快会变得非常庞大,占用大量优质的可建造土地,而在游戏初期,这类土地并不充裕。为了便于使用,蓝图包含了所有分流器,这意味着存在大量闲置的分流器。【戴森球计划】对分流器的模拟效率不高,因此在游戏后期它们会导致运行速度变慢。 建造步骤: 1. 首先为工厂找到一个合适的位置(见下文)。 2. 放置用于启动工厂的以下蓝图。
它充当着输入和缓冲站的角色:箱子有助于平稳生产中的波动,并存储你之后可用于手工制作的材料。 传送带干线的供应基础设施可以逐步构建。例如,你可以采用五条传送带商场的生产蓝图,并将其连接到前五六条传送带上,然后在开始生产更多产品时再添加它们。当你在游戏后期解锁相关技术后,在缓冲箱顶部使用物流分配器来输入材料也是很方便的。最终,你可能会希望使用物流塔。 一旦你布置好了一些传送带,就可以放置第二个蓝图,用两个组装机扩展干线,就像这样:
确保将相应的传送带图标与之前放置的缓冲蓝图对齐,以便蓝图能够无缝连接。现在你可以开始建造工厂了。选择一个装配机并将其设置为你想要制造的建筑。查看该建筑所需的材料,并在总线上找到每种材料。然后为每种材料从分流器拖一条传送带到你的装配机,优先选择离装配机最近的材料。完成!
哪些材料需要放在总线上?原则上,你可以随意扩展总线,并在上面放置任何建筑可能用到的材料。不过,为了控制空间需求,同时确保蓝图不超过300个设施的限制,这里展示的物流中心版本仅包含19种最常用的材料。 这意味着有些建筑所需的材料不会出现在总线上。例如,行星物流站需要钛锭,而钛锭不在总线上。这种情况下,你可以在最靠近装配机的分流器旁放置一个带有物流分配器的箱子,以导入装配机可能需要的任何额外材料。(在本部分顶部的图片中,你应该能辨认出这个额外的储物箱。) 显然,为高端建筑进口额外材料有点麻烦,也与设计理念相悖。你需要找到一个符合自己玩法的解决方案。“混合建筑”部分对这类问题有更多讨论。 建造位置 最终,你会希望通过星际物流站(ILS)扩建购物中心,以便在整个星团出口建筑。在决定购物中心的建造位置时,需要考虑到这一点。星际物流系统(ILS)应放置在存放建筑的储物箱后方10格处;因此你可以考虑将储物箱放置在距离赤道15格的位置,这样星际物流系统最终会距离赤道5格。
这样一来,你的工厂只占用一个半球,并且仍有充足的空间。由于装配机之间间隔6格,而每个星际物流站(ILS)可以输出5个建筑,因此星际物流站之间的间距为30格。第一个星际物流站应与第三个建筑精确对齐,所以如果第三个装配机放置在较粗的网格线上会很方便:这样每个星际物流站都会位于粗网格线的交叉点上。 当然,人们对这种设计进行了各种尝试。以下是我遇到的一些变体。它们都做出了合理的权衡,通常会大幅减小总线的占地面积,但会牺牲一些易用性。 传送带可以放置得更紧密,从而节省大量空间。不过,如果你这样做,分流器就无法再并排放置,因此不能包含在模板蓝图中,这使得这种变体的建造难度稍大一些。 你也可以在总线两侧都放置装配机,同样能节省大量空间。但这同样意味着传送带可能会相互阻碍,而且之后也无法向总线添加新的材料。 你可以将传送带垂直堆叠起来形成垂直总线,从而节省大量空间。然而,这样很快就会变成一团视觉上混乱的传送带,而且从这种总线上分流材料也很棘手。一种解决方案是在传送带旁堆叠储物箱,然后将相关传送带连接到最近的储物箱,并从最底部的储物箱取用材料。不过,这些连接只能在偶数高度进行。另一种解决方案是使用传送带的新选项来实现大角度运行,直接从垂直总线向下铺设传送带。这种方法可行,但需要研究【超级磁环】以解锁传送带的大角度功能,而且搭建传送带的过程会有些复杂。
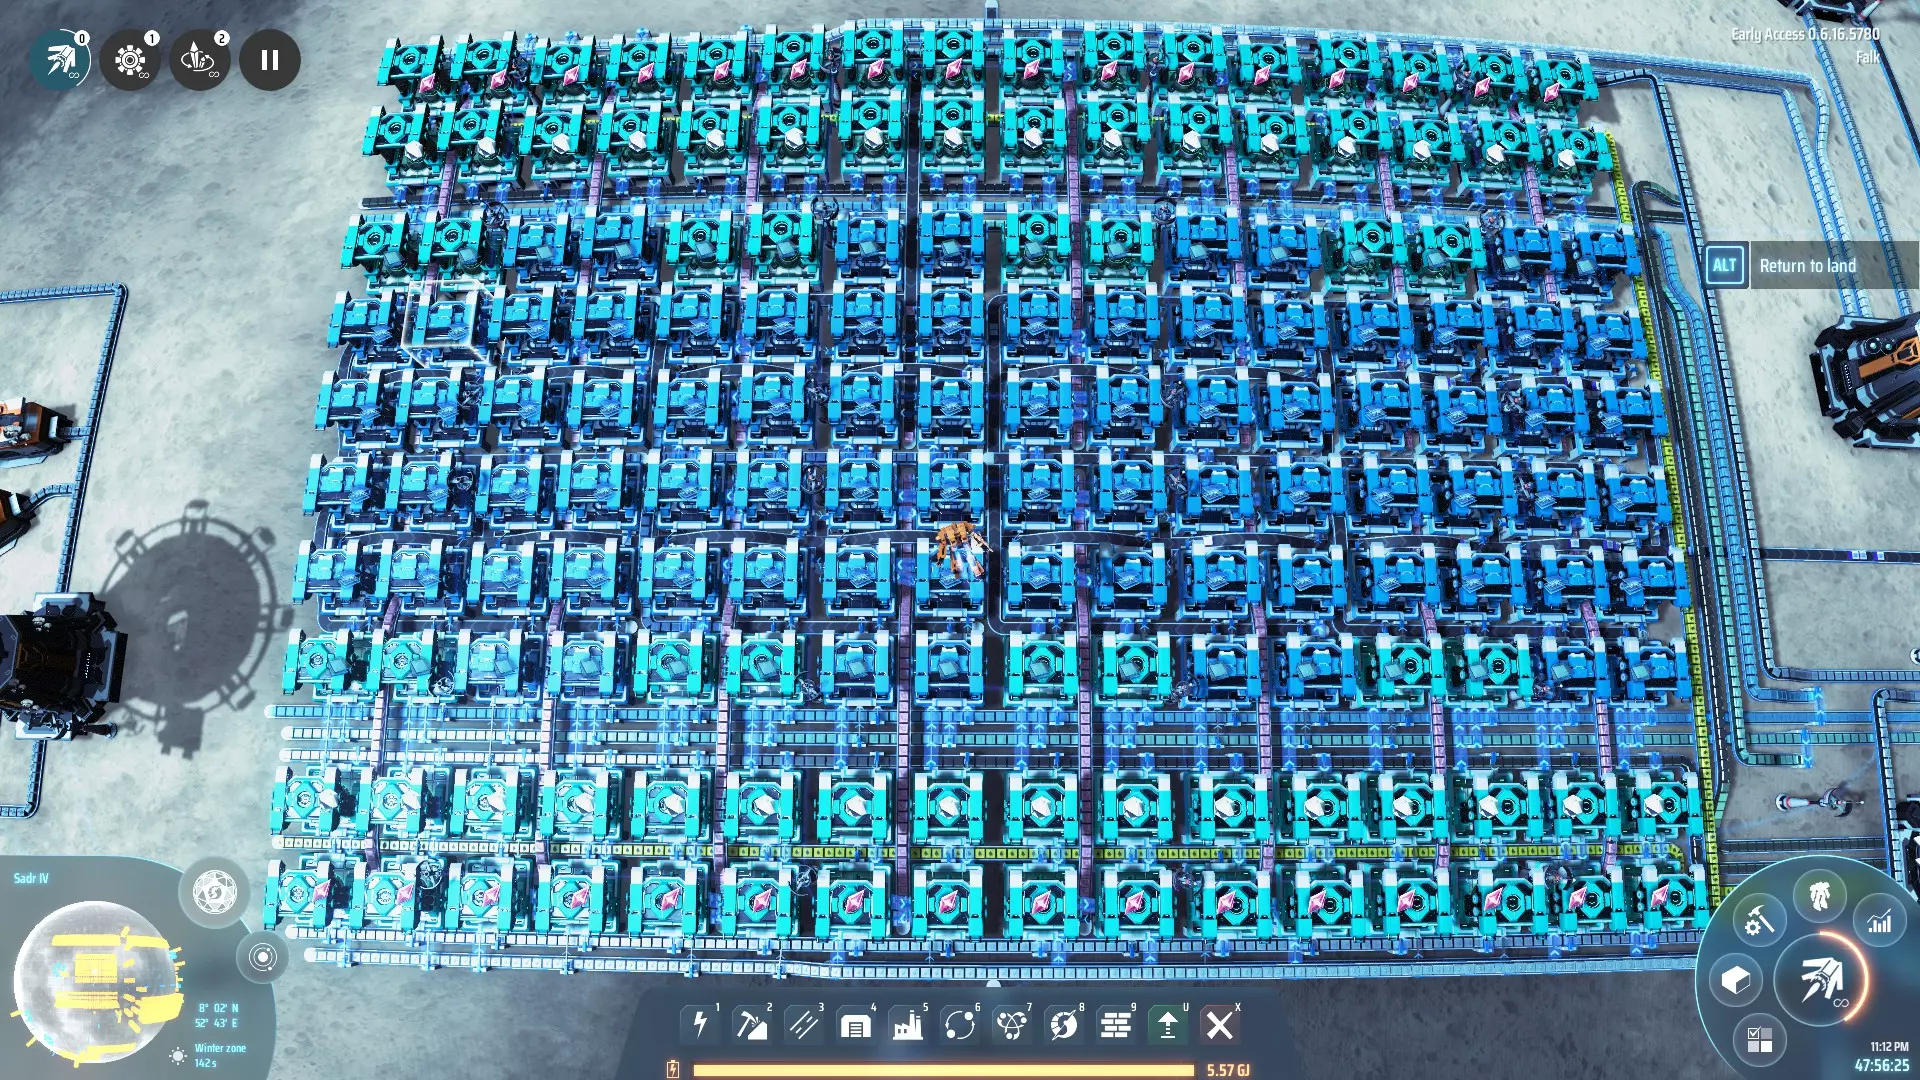
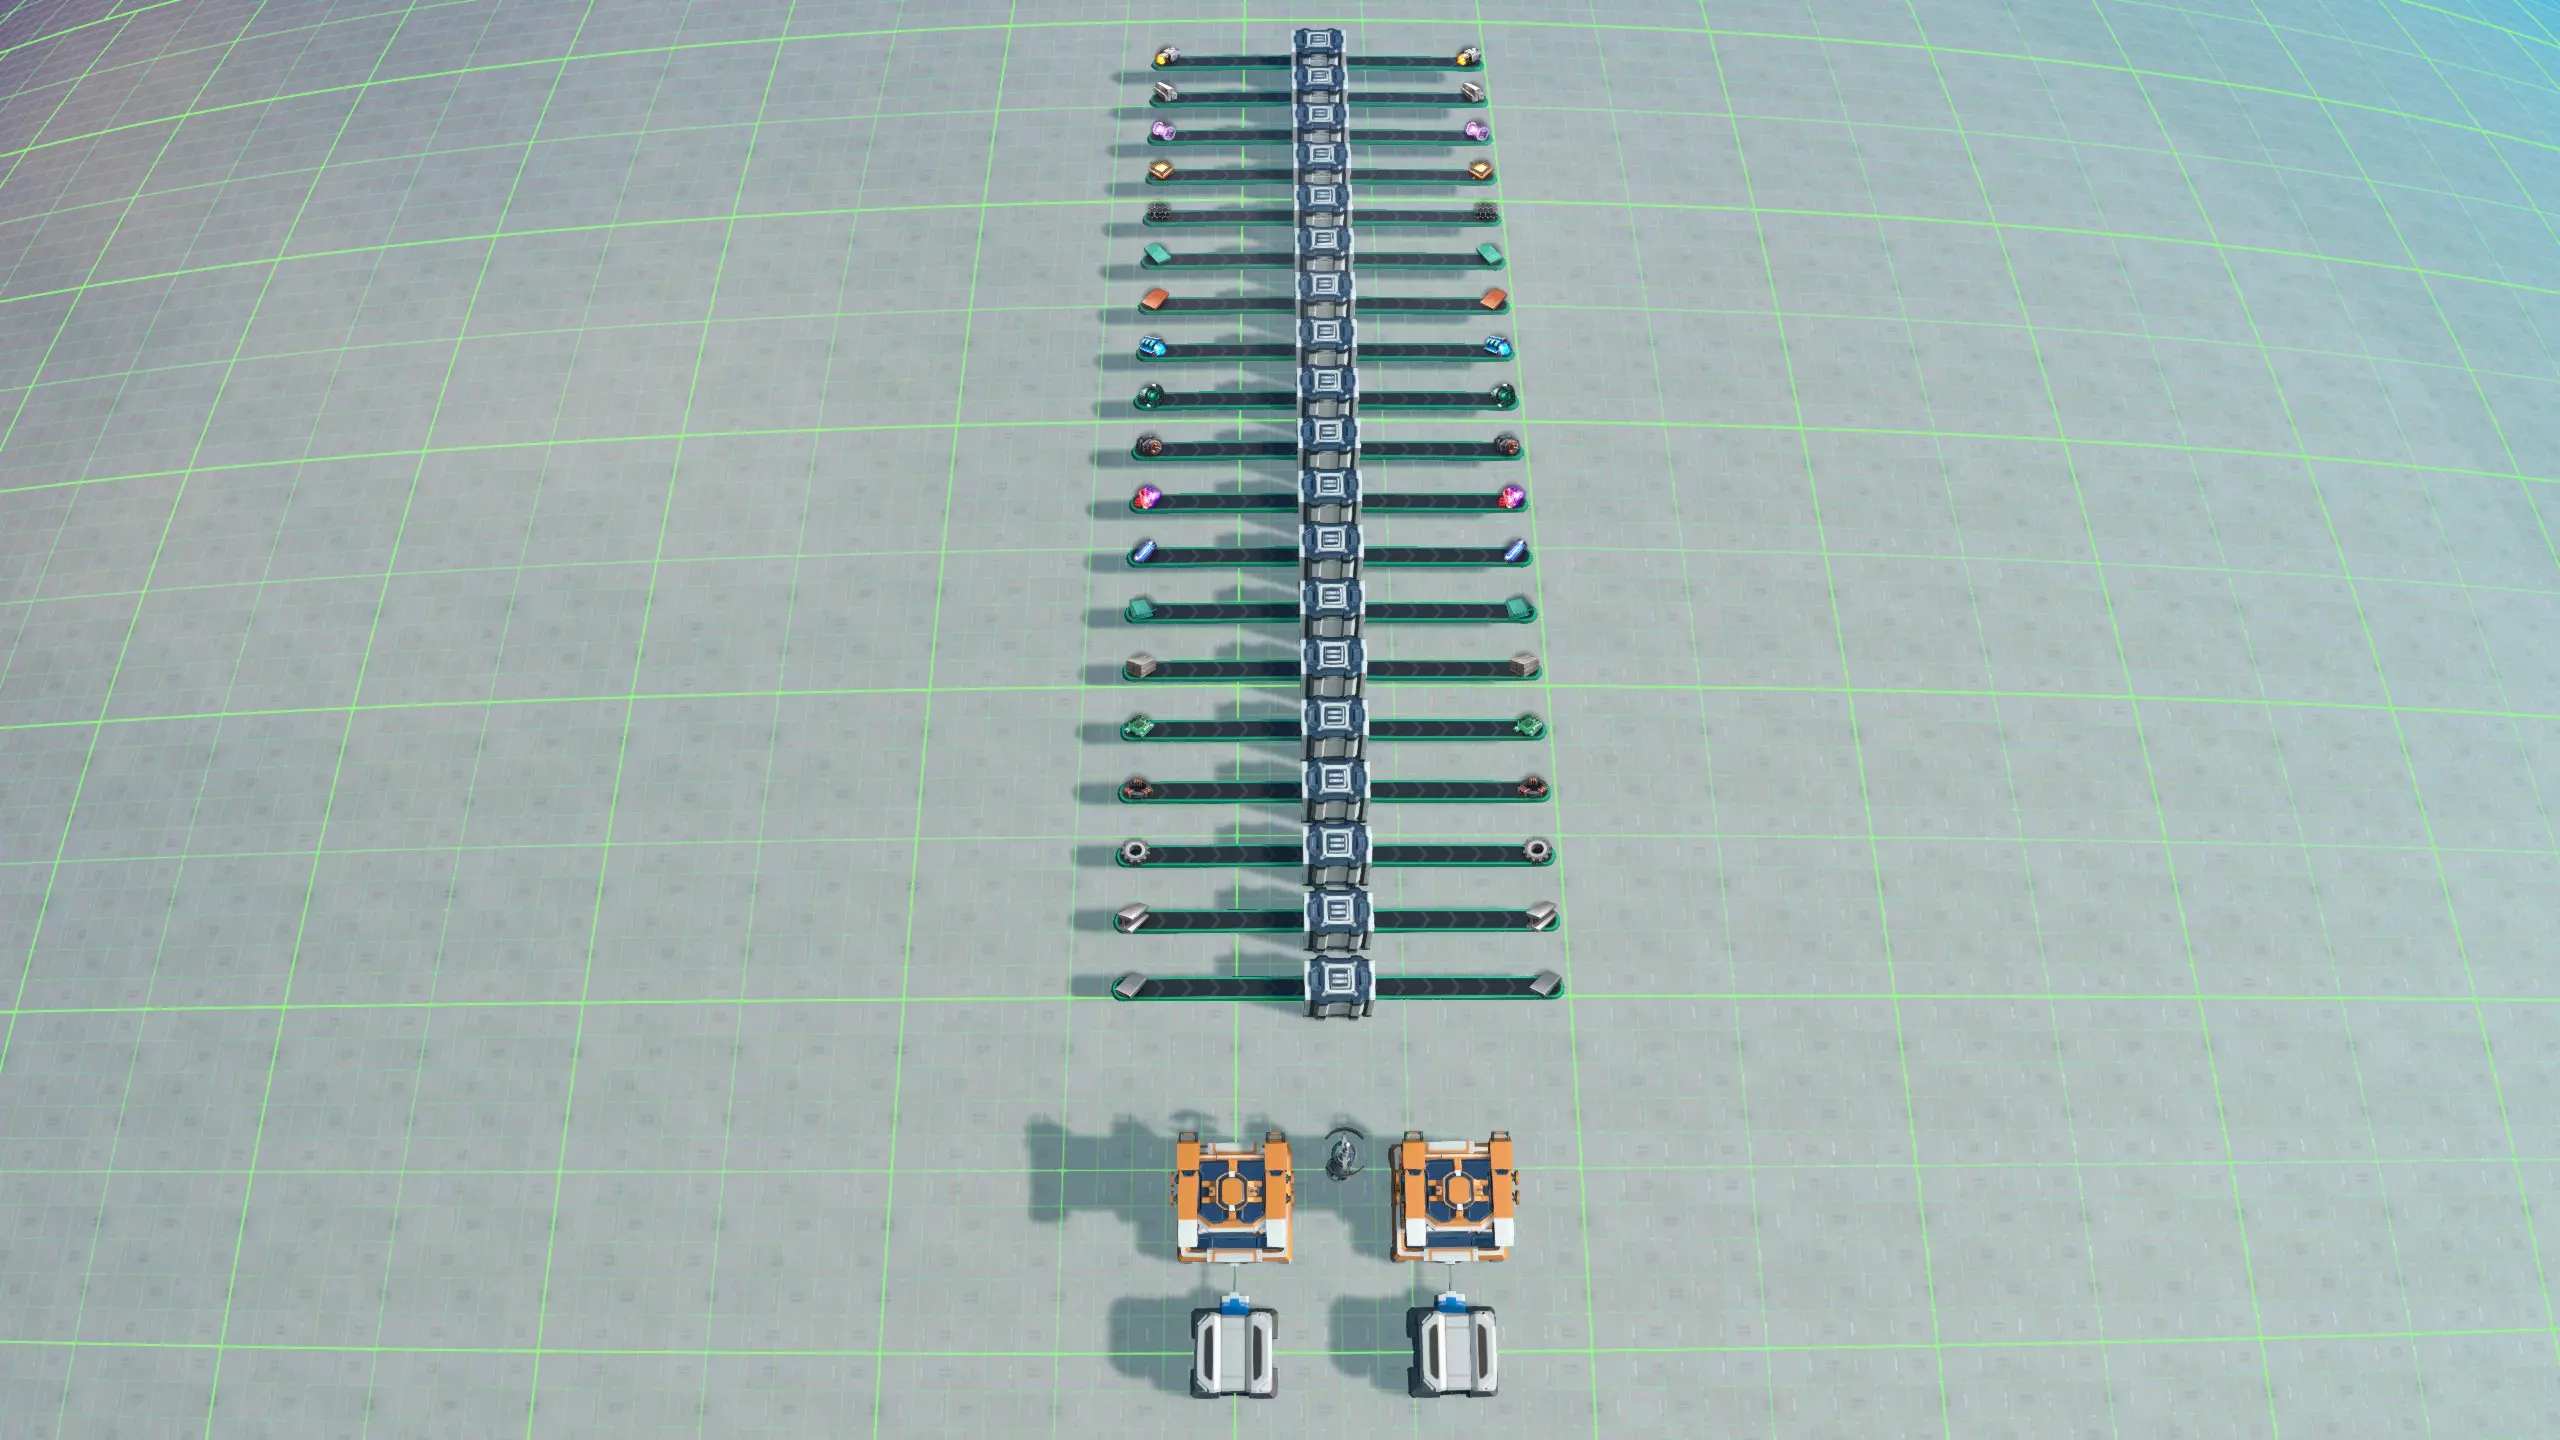
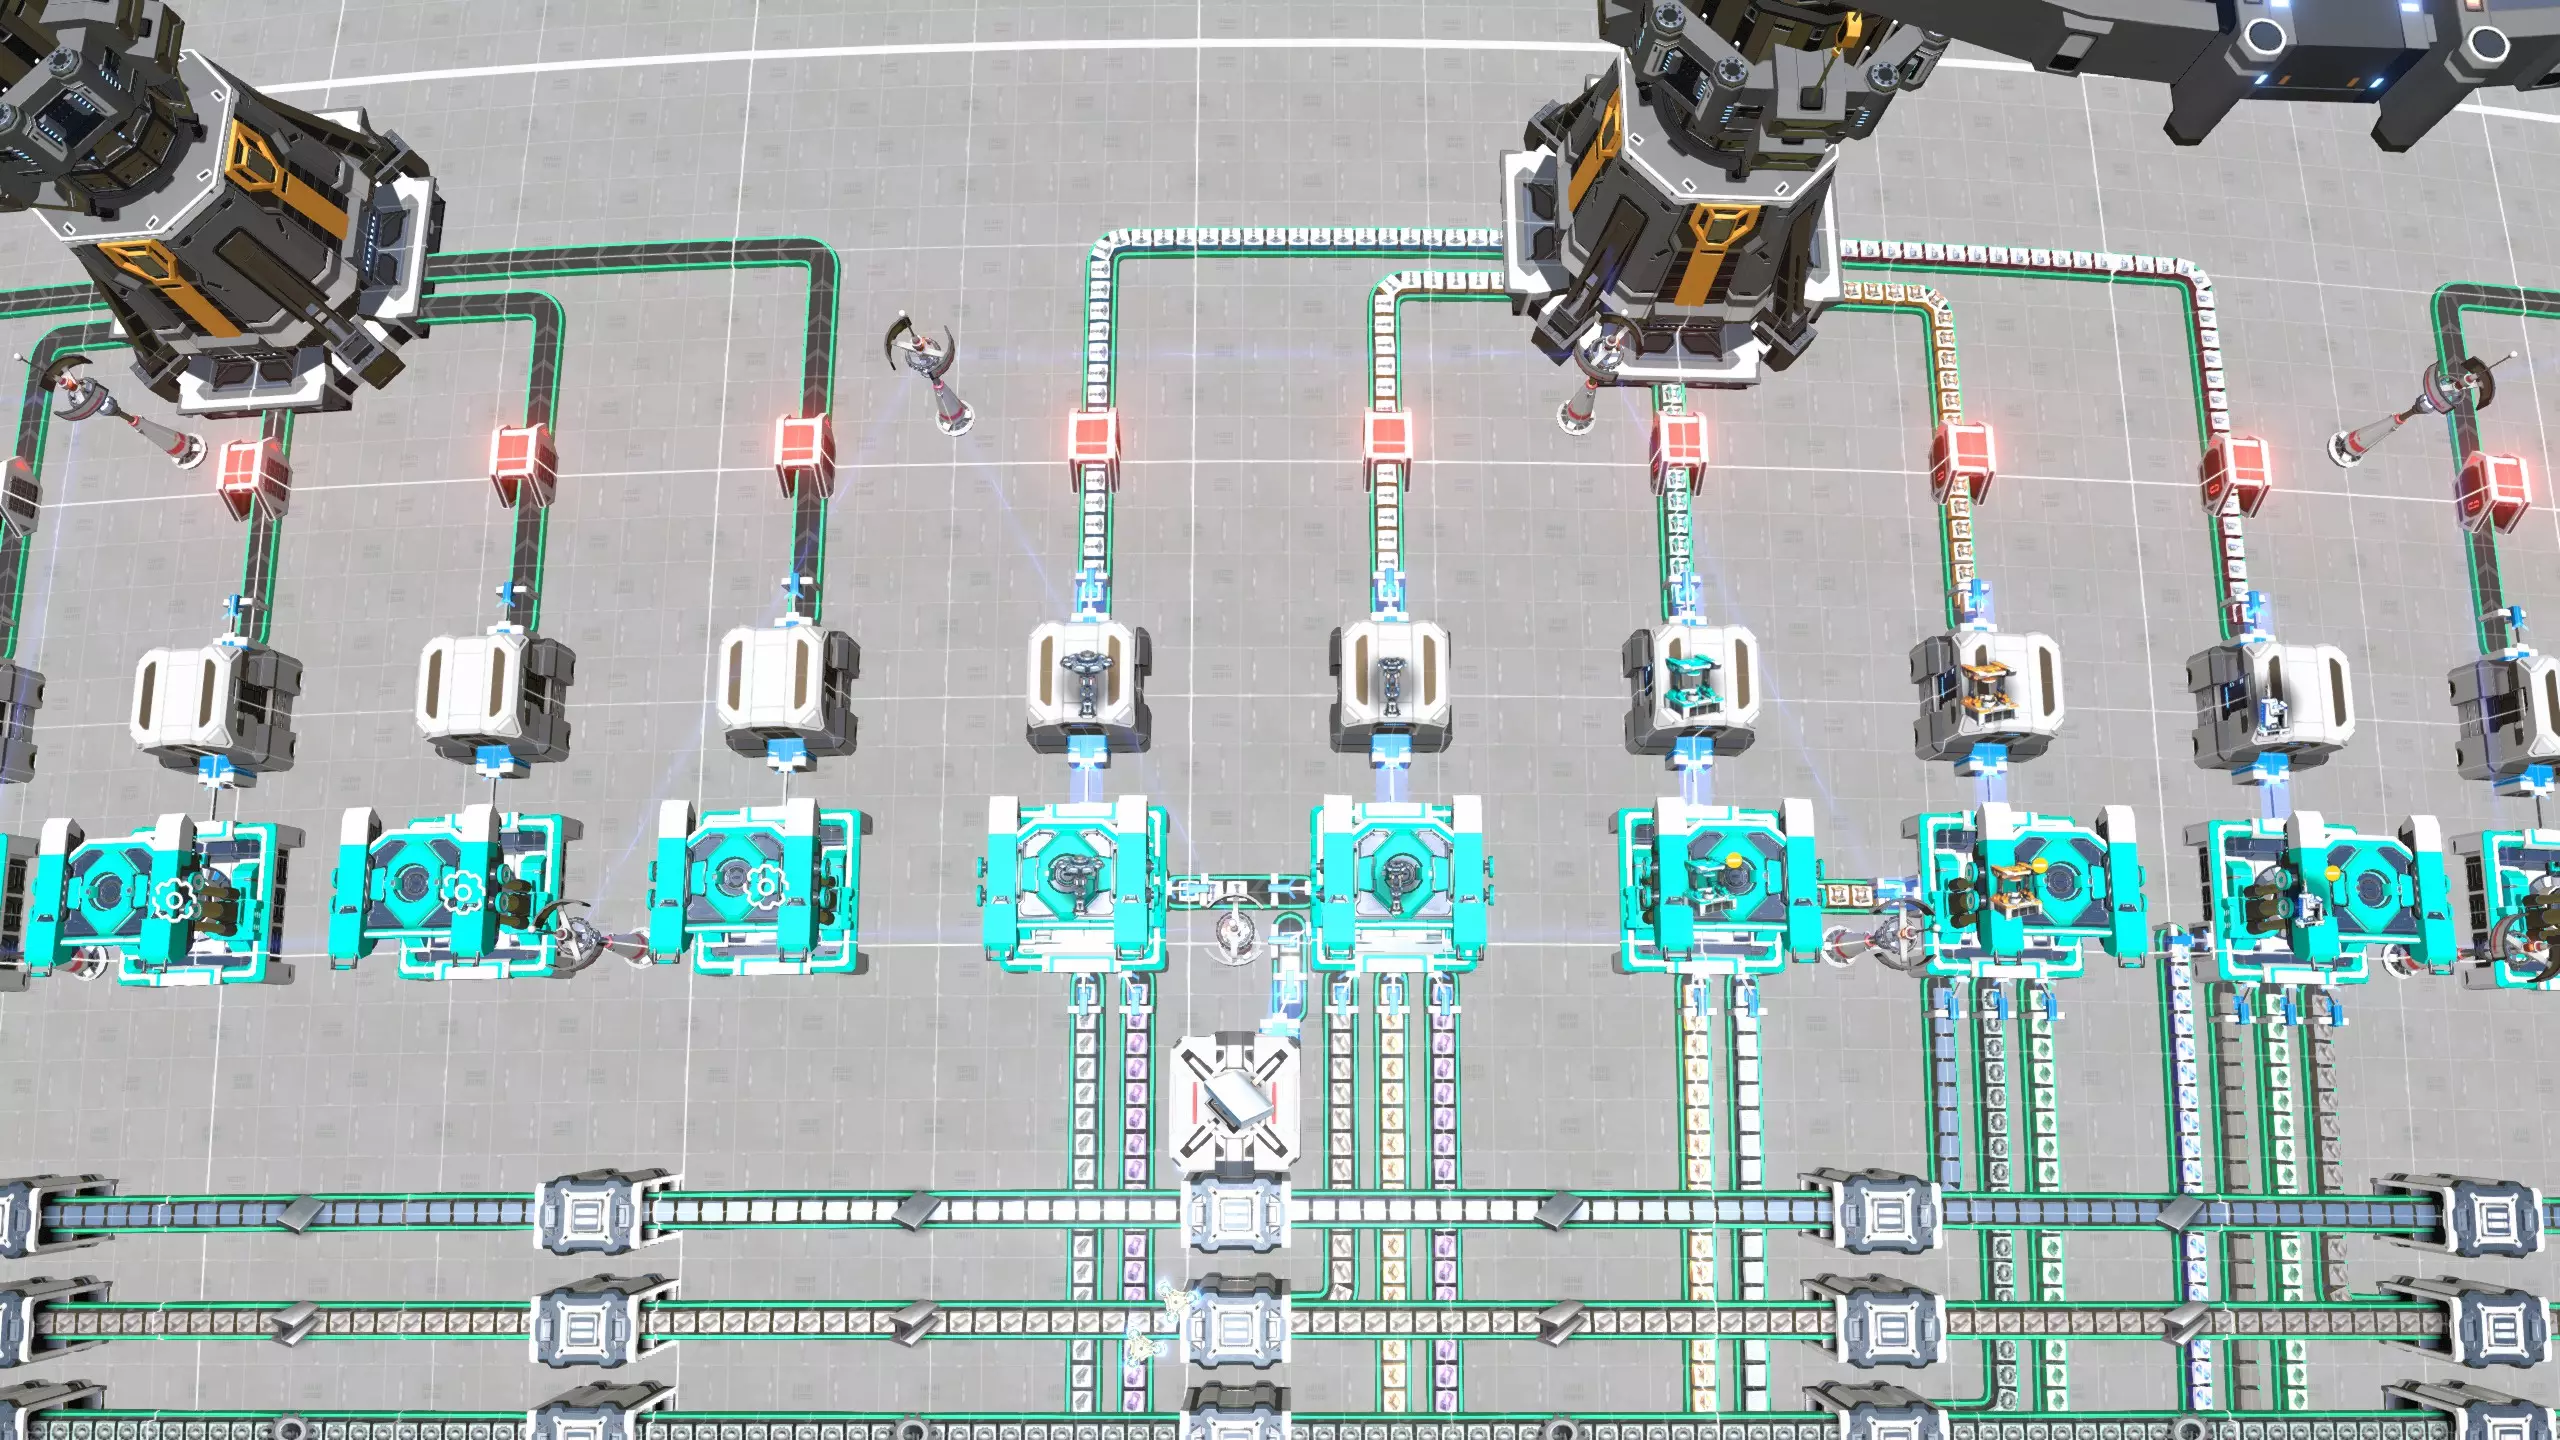
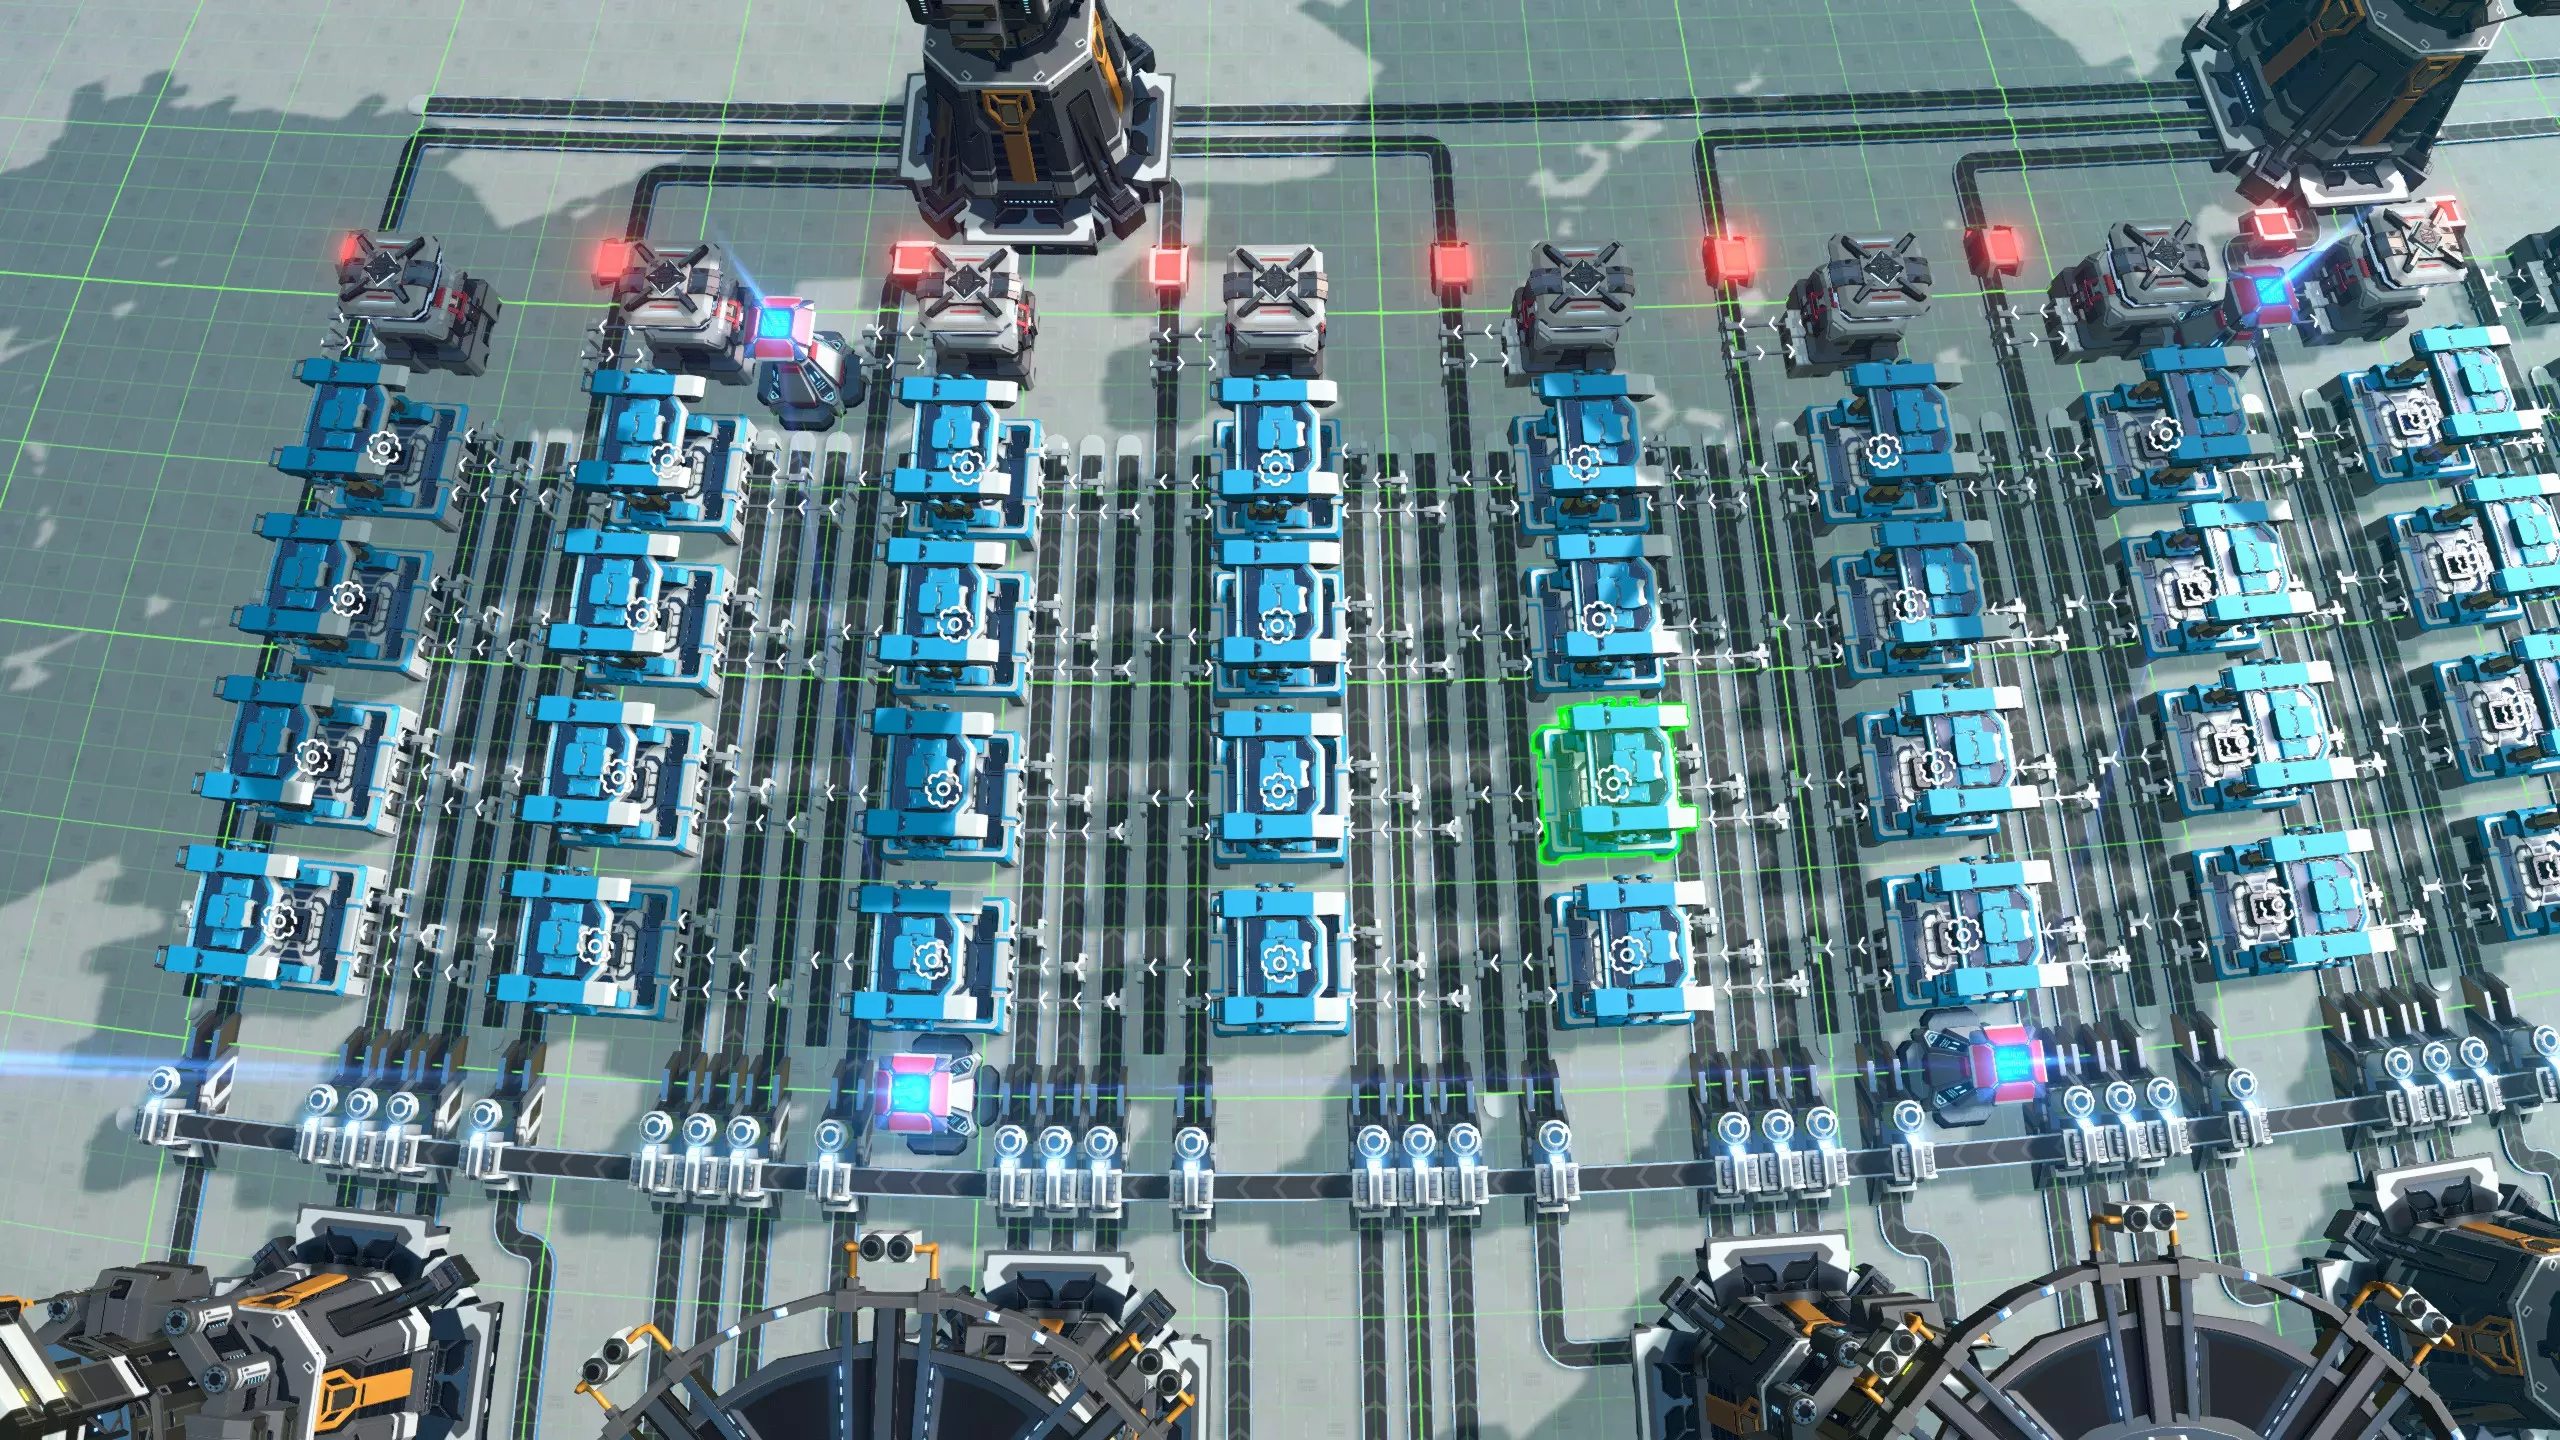
箱式商场依靠堆叠的储物箱链向组装机分发材料。组装机通过分拣器与最底层的储物箱相连,但根据游戏机制,它也可以方便地获取堆叠中更高层箱子里存储的材料。 下图展示了一个带有两层储物箱的箱式商场部分。底层存放铁锭、铜锭和钛锭,顶层运输磁线圈、电路板和处理器。
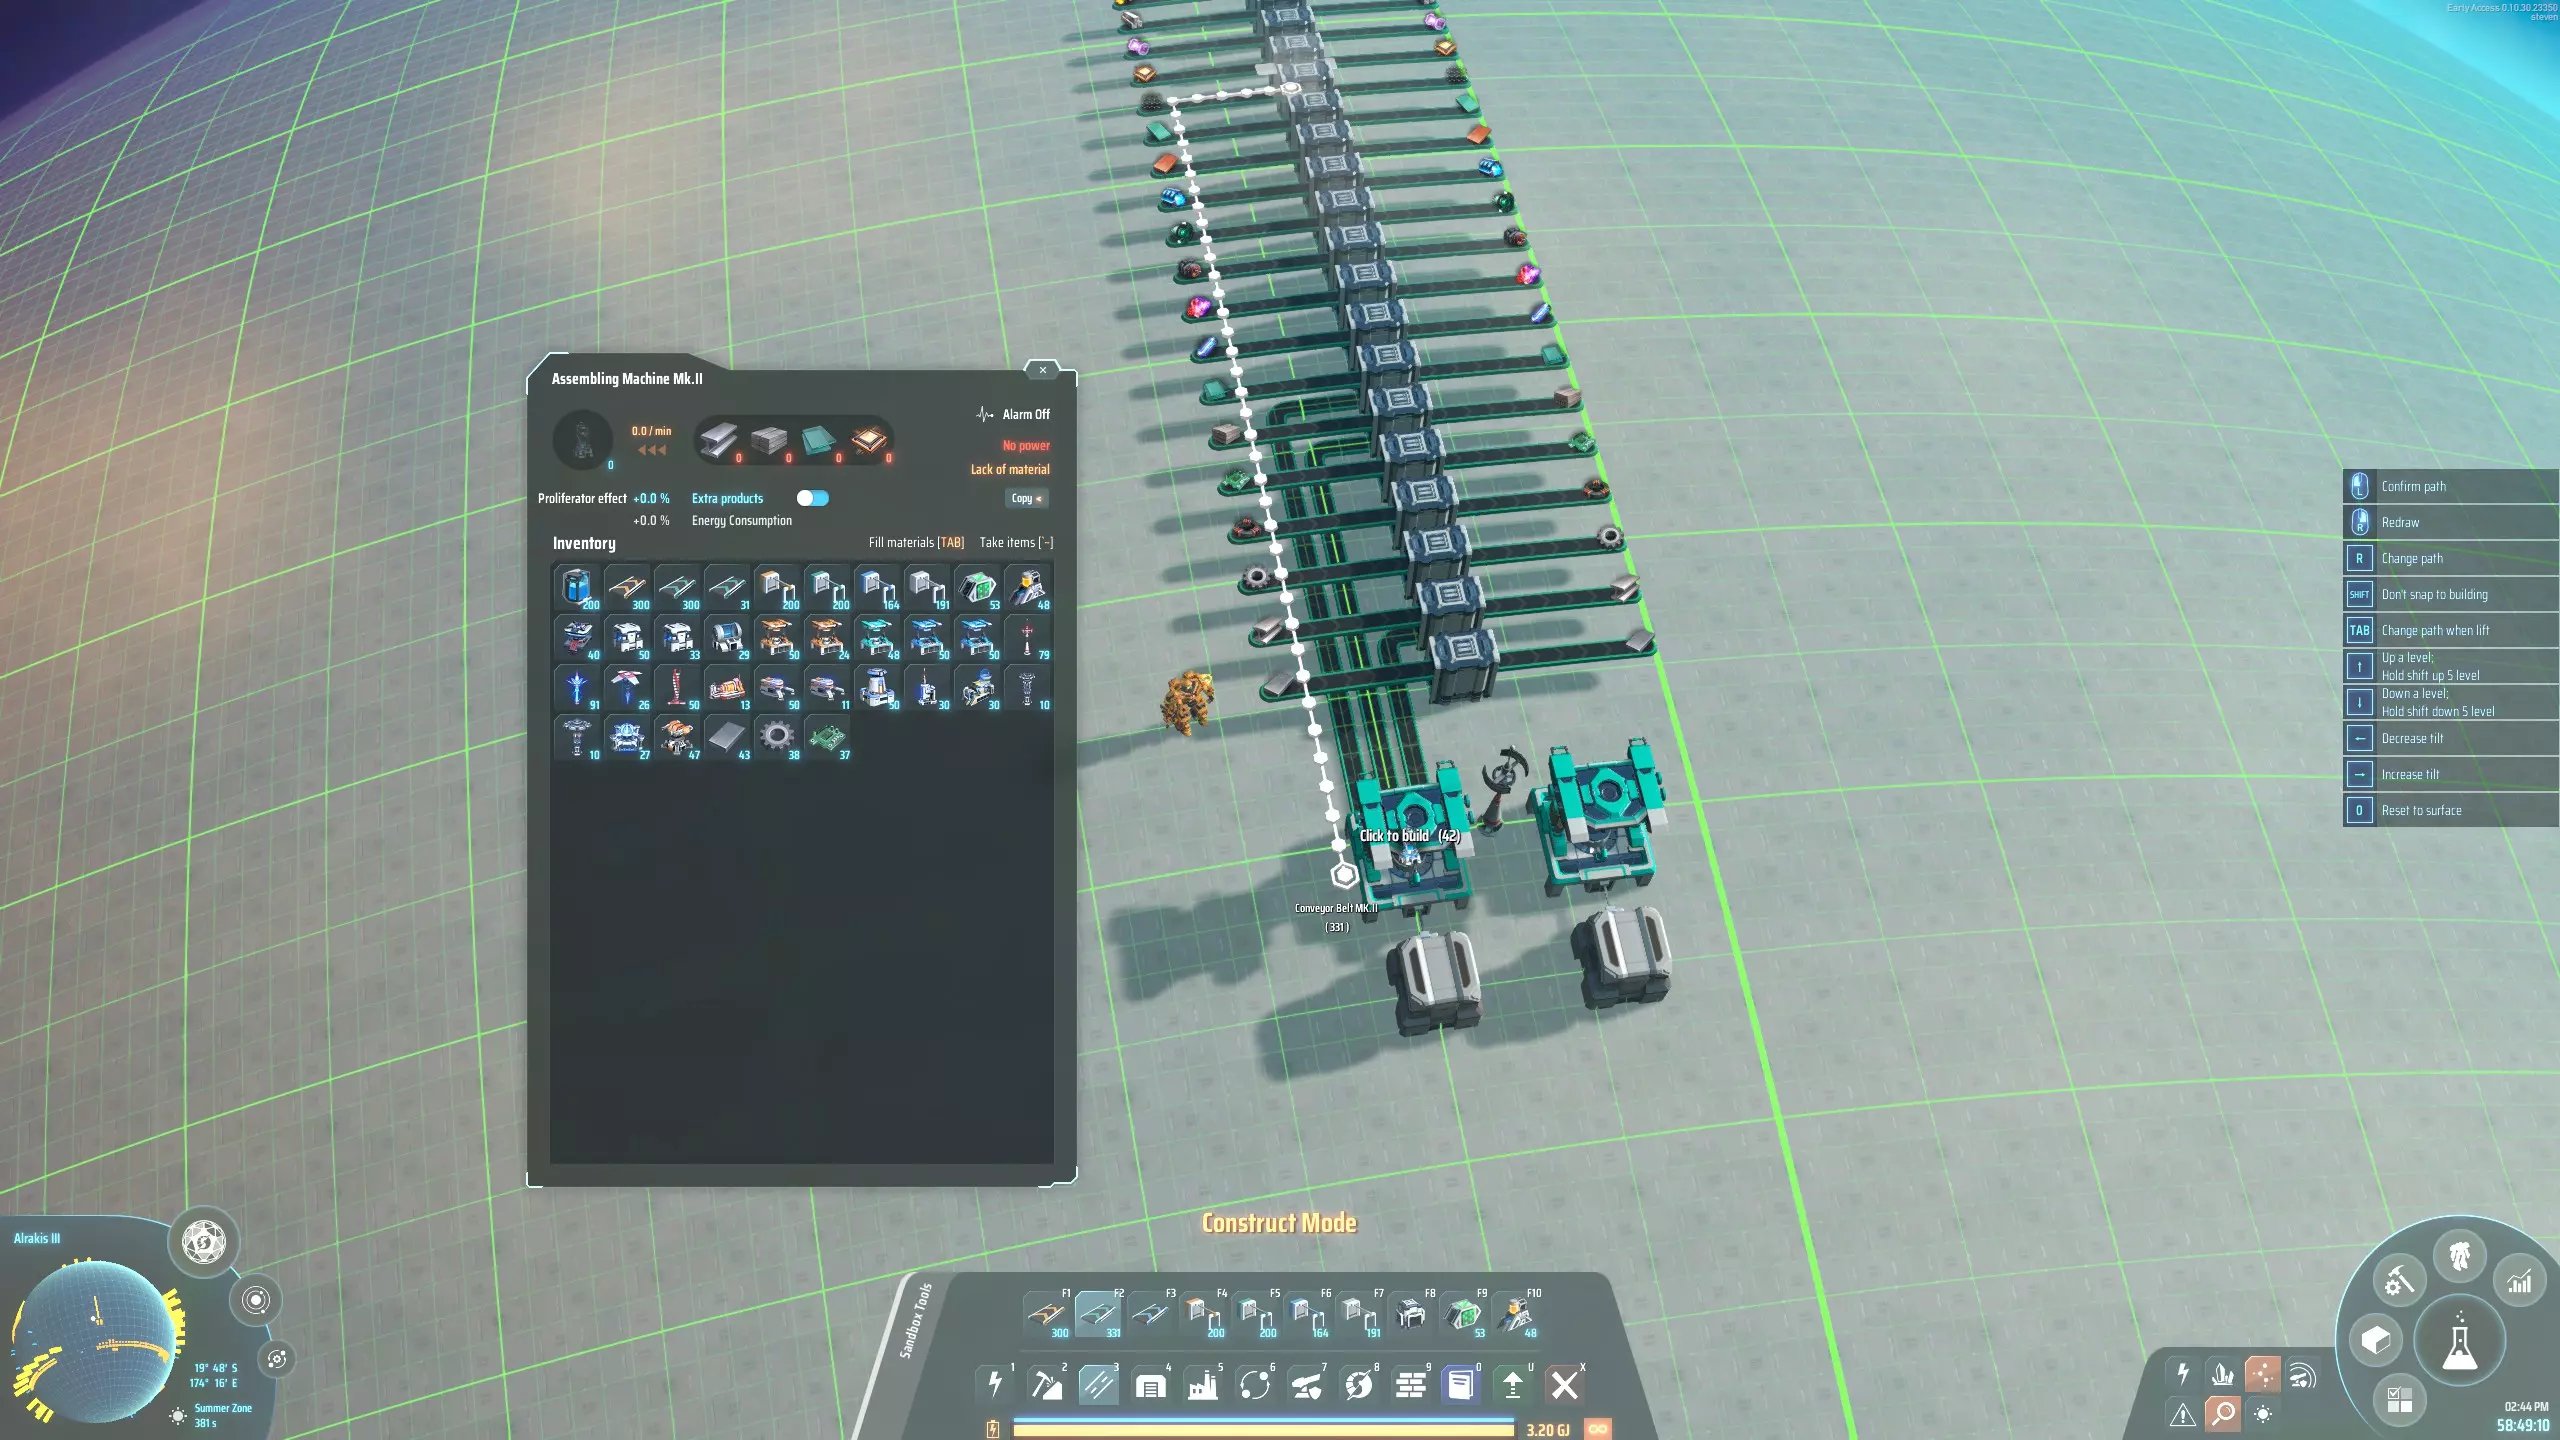
Box malls became possible when a game update introduced the possibility to restrict storage box spaces to specific materials. Without box filters, each storage box could potentially fill up with just a single material, leaving no room for additional materials to be transported. With box filters, three cells in each box can be set to three specific materials, so they cannot get in each other's way and there is always space to store some of each. In the picture, you can see that the top box filters are set appropriately. Each box must be connected to the next box using sorters. Again, it is vital that filters are set on these sorters, or else the sorters connecting box A to box B might grab the same material, which box B is already full of: then the sorters would stall even though B might be out of another material that is still available in A. So, we need a separate sorter with filter for each material to connect two consecutive boxes properly. This also means that we cannot easily transport more than three distinct materials per box layer, unless you want to run additional belts between boxes. While several players were experimenting with box malls immediately after the update, they did not immediately become widely popular. I think this is because while the approach seems simple enough to be useful in the early game, the concept is actually only effective in the late game. The reason for this is twofold: Each material that is carried in the boxes uses up one storage slot per assembler. Most materials have a stack size of 100 or 200. This quickly adds up: my reference box mall stores about 320k materials. Needless to say, for the early game, this is prohibitive. For the mid game it is still quite expensive. But in the late game, this may not be as much of a concern anymore. The rate with which materials can be added to the box mall is limited by the speed of the sorters. This limitation is severe: even with mk3 sorters you could transmit each material at a rate of only three per second from box to box! This is a very low throughput even for an early game mall. To make this mall work, you absolutely need to use the pile sorters, which have speeds up to 120 items per second. However, pile sorters are only available from the mid-game onwards.(The first design along these lines I saw was by Reddit user MrVagabond, referenced below.) Which materials?For every material that you put in the row of boxes, you will lose at least 7500 of them in storage slots. This may not be worth it if that particular material is used by only one assembler. In my implementation I chose to omit all materials that are used by only one assembler. I connect such assemblers to the logistics station directly. This applies to 16 out of 47 materials, reducing the height of the stack of boxes from 8 to 5. A drawback of doing this is that it complicates adding new buildings. You might need to add belts to a PLS somewhere to supply any materials that aren't carried by the boxes. So to keep it simple you could decide to simply put everything in the boxes. This would make it possible to set any assembler to produce any building without having to change anything else in the mall. How to buildFirst place a row of assemblers. Then put down a box next to one of the assemblers, and add pile sorters from box to assembler and from assembler to box. Set the box's storage capacity to 3 and its contents filters to the tree materials you want to transport. Then copy the box to an adjacent location along the row, and add three filtered pile sorters between them. Now copy one more of the boxes, this time including sorters, to get three connected boxes. Finally, shift click to copy the middle of those boxes, with sorters on both sides, and drag it along to build the box row 15 boxes at a time. Adding a layer above ground level works almost the same, except of course the boxes are not connected to the assembler. Also you unfortunately can no longer drag to place multiple boxes at once, you have to click down each one individually. Attach logistics stations to three of the boxes to supply the materials for this column. In my mall design the boxes are in a circular arrangement so it doesn't matter which box in the circle the logistics stations are attached to. The box we hooked up is the first box; it is important to remove the pile sorter leading back from the last box into the first box. ThroughputPile sorters can transmit an insane number of 120 items per second (as compared to 3 per second for mk3 sorters). This means that the mall will be able to supply any material up to that rate. This is more than enough for any realistic use case. If you are absolutely hell-bent on increasing the throughput even higher, you can get up to 240 items per second if you supply every material in two directions, going outward from a central box in the box row. There are then two final boxes at the opposite end of the circle. This has the potential of increasing the throughput of this mall, but it is harder to build since you need to worry more about sorter directions, and the throughput is already high enough as it is. ProliferationWhile materials can be proliferated before they are put in the boxes, as mentioned before a lot of materials are sitting idle in those boxes, which will then have been proliferated for no reason. This mall also uses direct insertion to make some buildings; for example the assembler making sorters mk1 is directly connected to the assembler making sorters mk2. Any assembler that uses direct insertion cannot be proliferated. I personally prefer to not proliferate malls that use direct insertion, but I have found that opinion is divided about this topic. Of course you can get proliferation on quite a few buildings by proliferating everything before it goes into the boxes if you like. FootprintThis mall is tiny, due to the vertical nature of the design and the fact that materials can teleport up and down the stack of boxes thanks to the mechanics of the game. Also note that any box in the stack can do double duty as an output box, further reducing the footprint. A logistics distributor on the top box can distribute any item in the stack of boxes. To make one building, you need just 4 x 11 = 44 cells of space for an assembler and two boxes. Of course you also need a logistics infrastructure around that to import and export everything. Links
回收箱工厂(由于此设计主要在游戏后期发挥作用,参考实施方案中包含一个回收器,详见建筑交付部分) MrVagabond的原始设计 关于我的工厂版本的Reddit帖子 机器人工厂

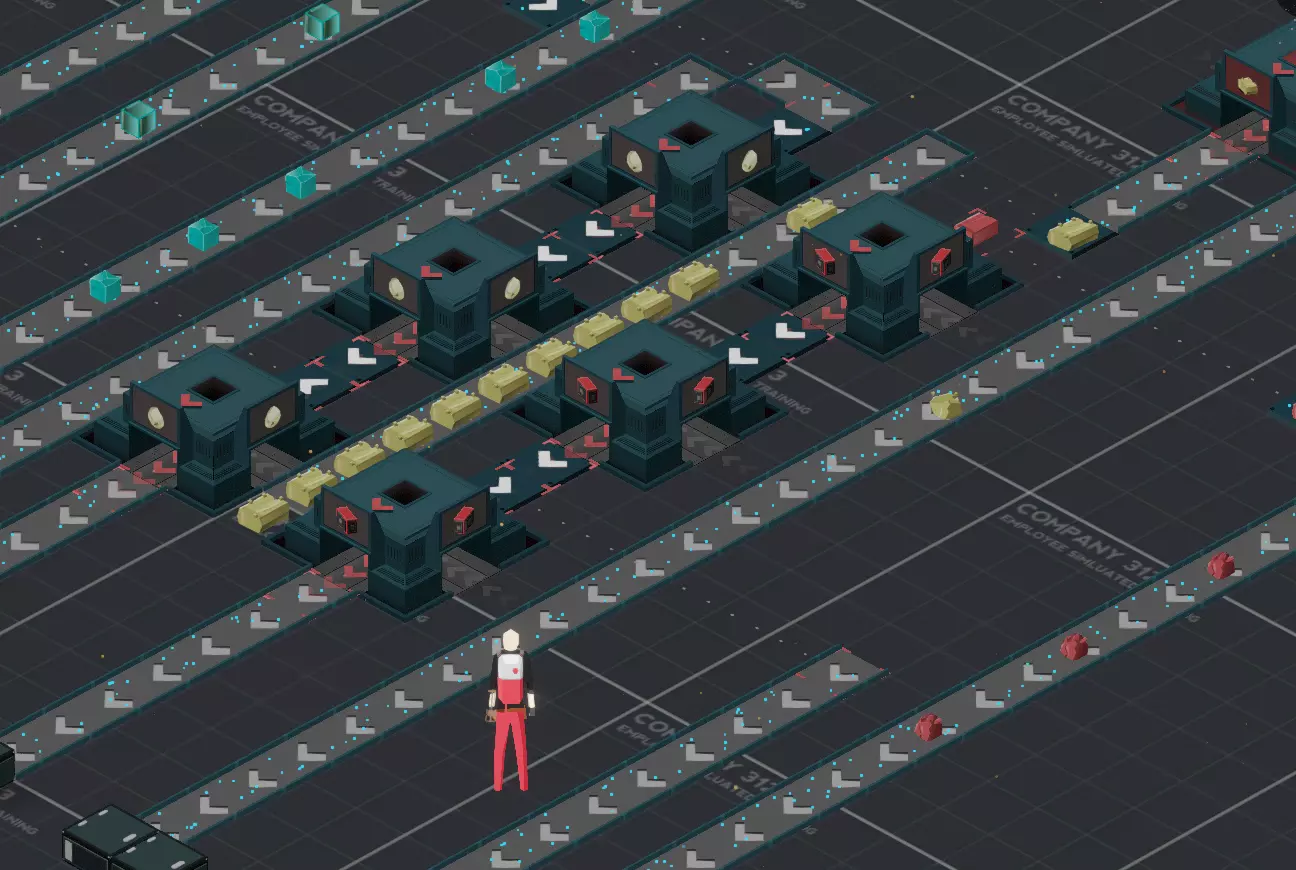
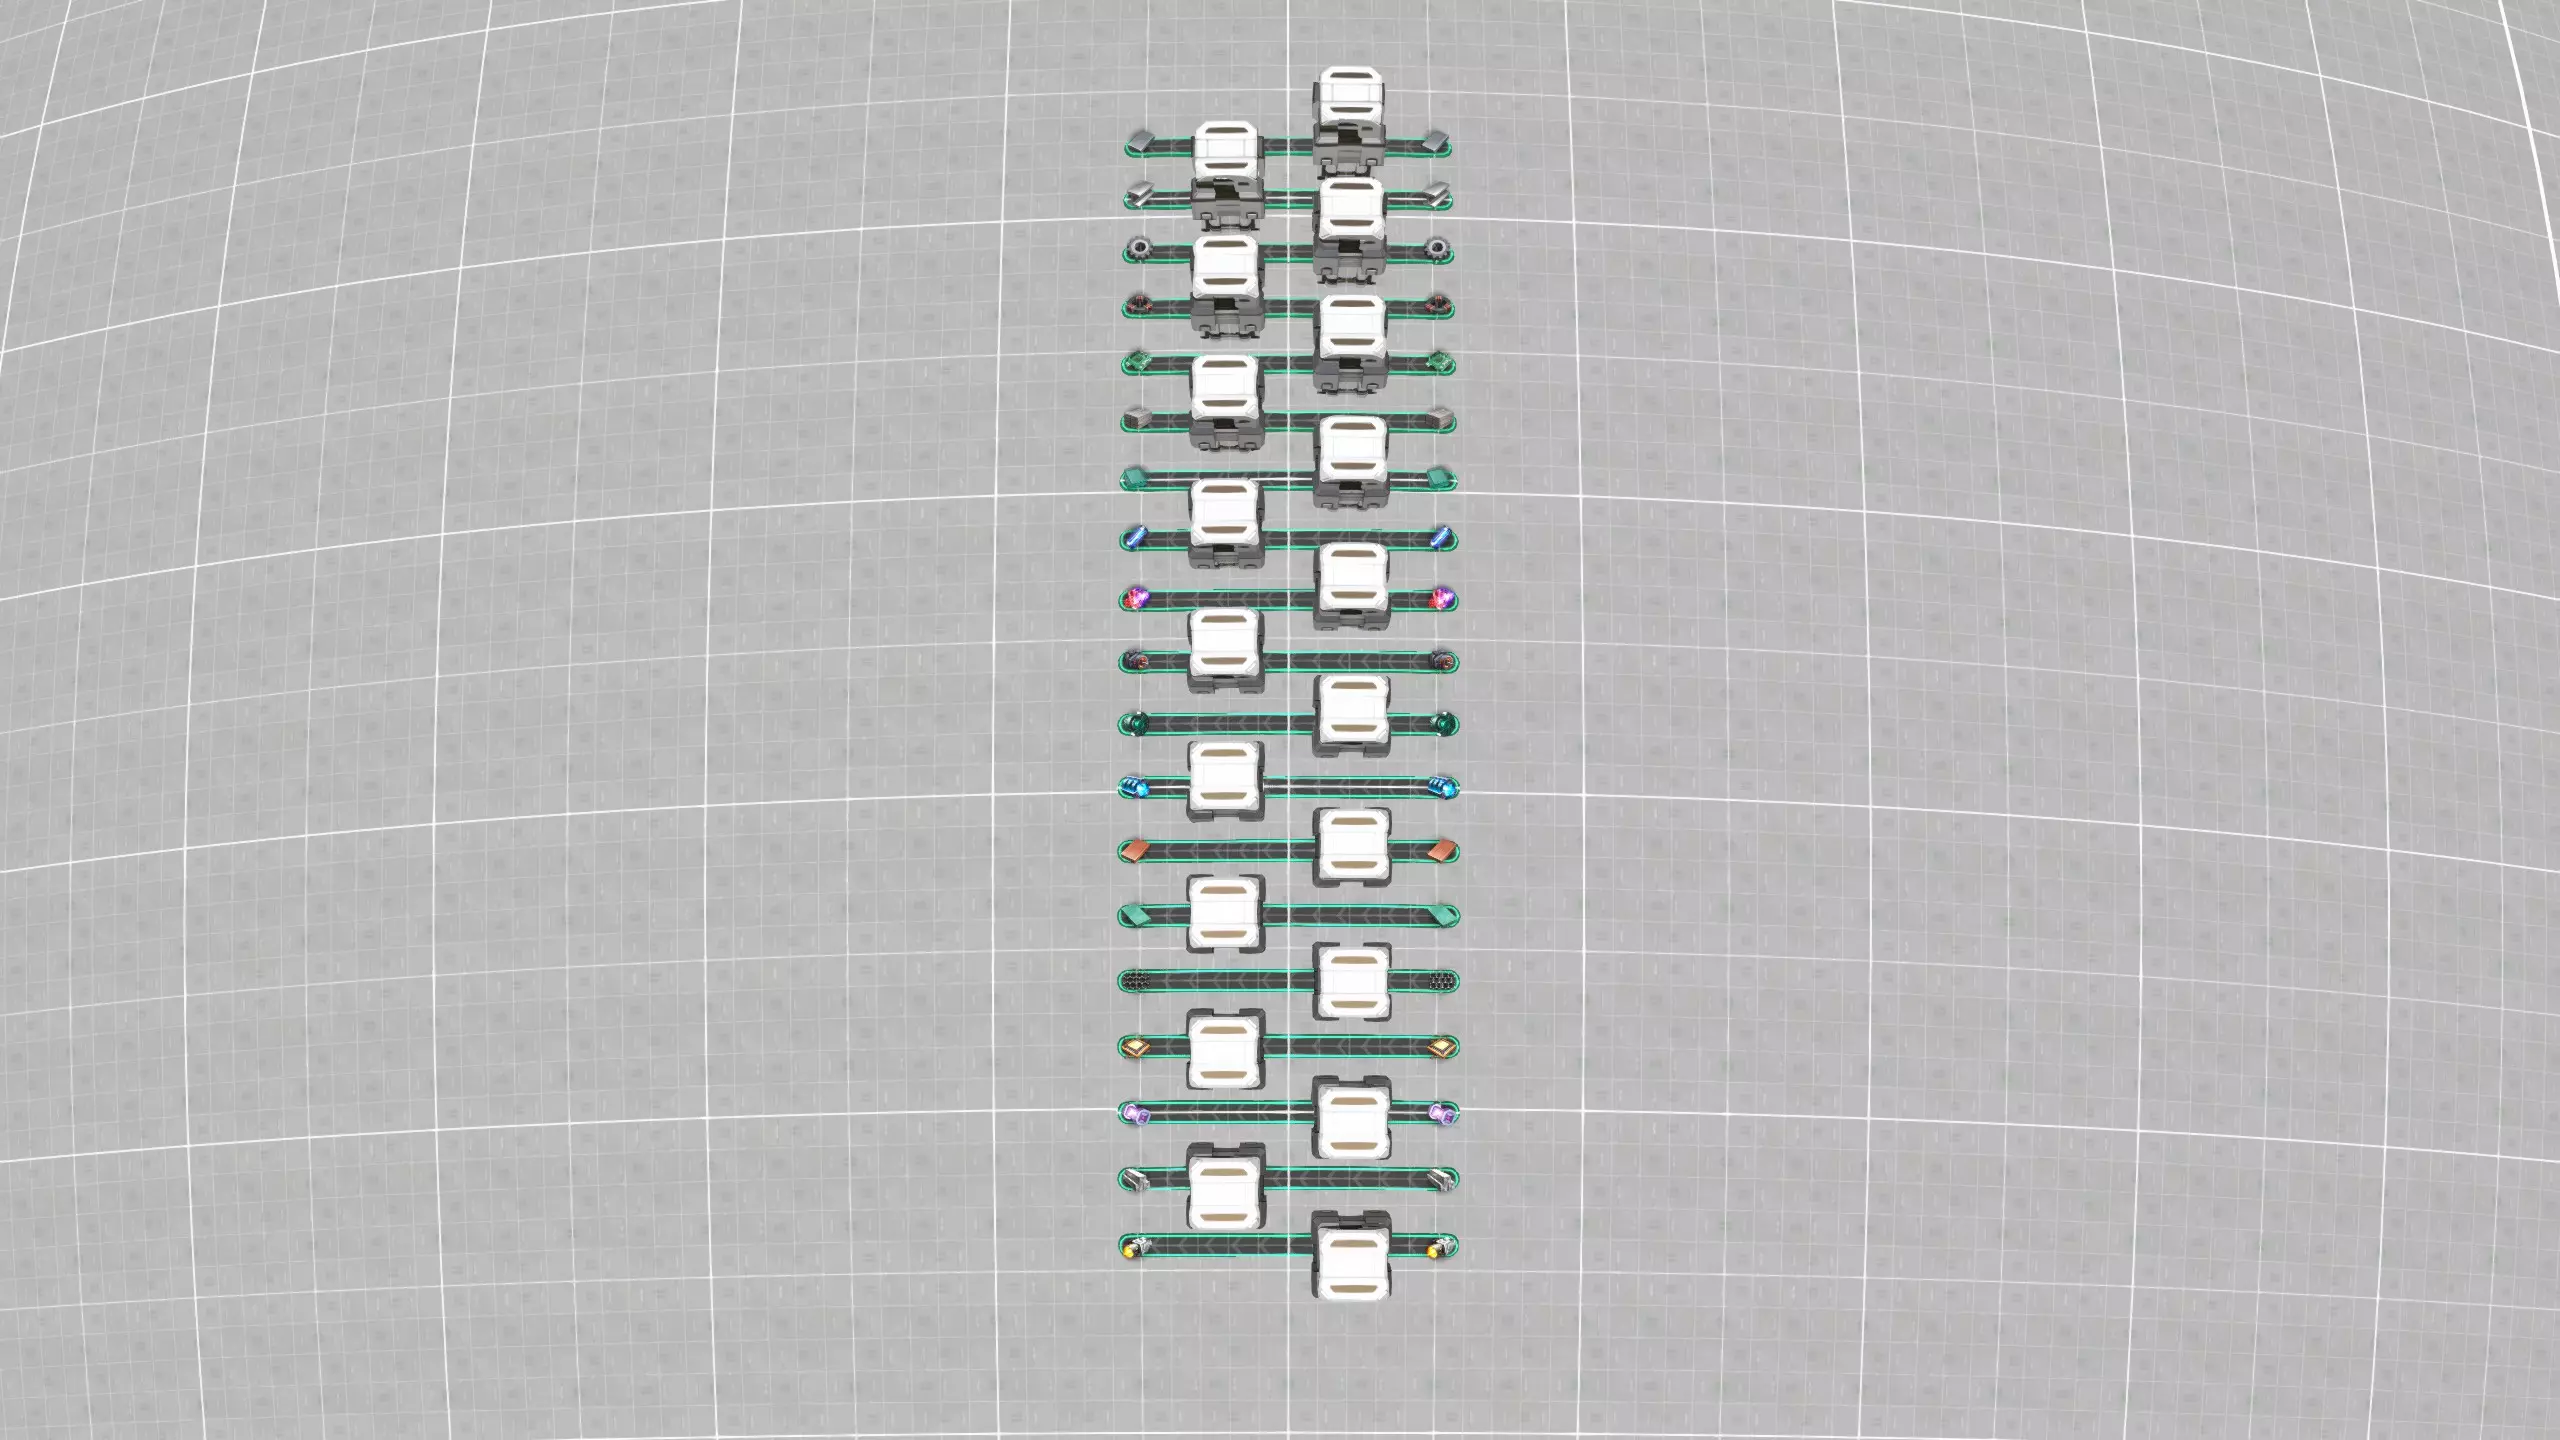
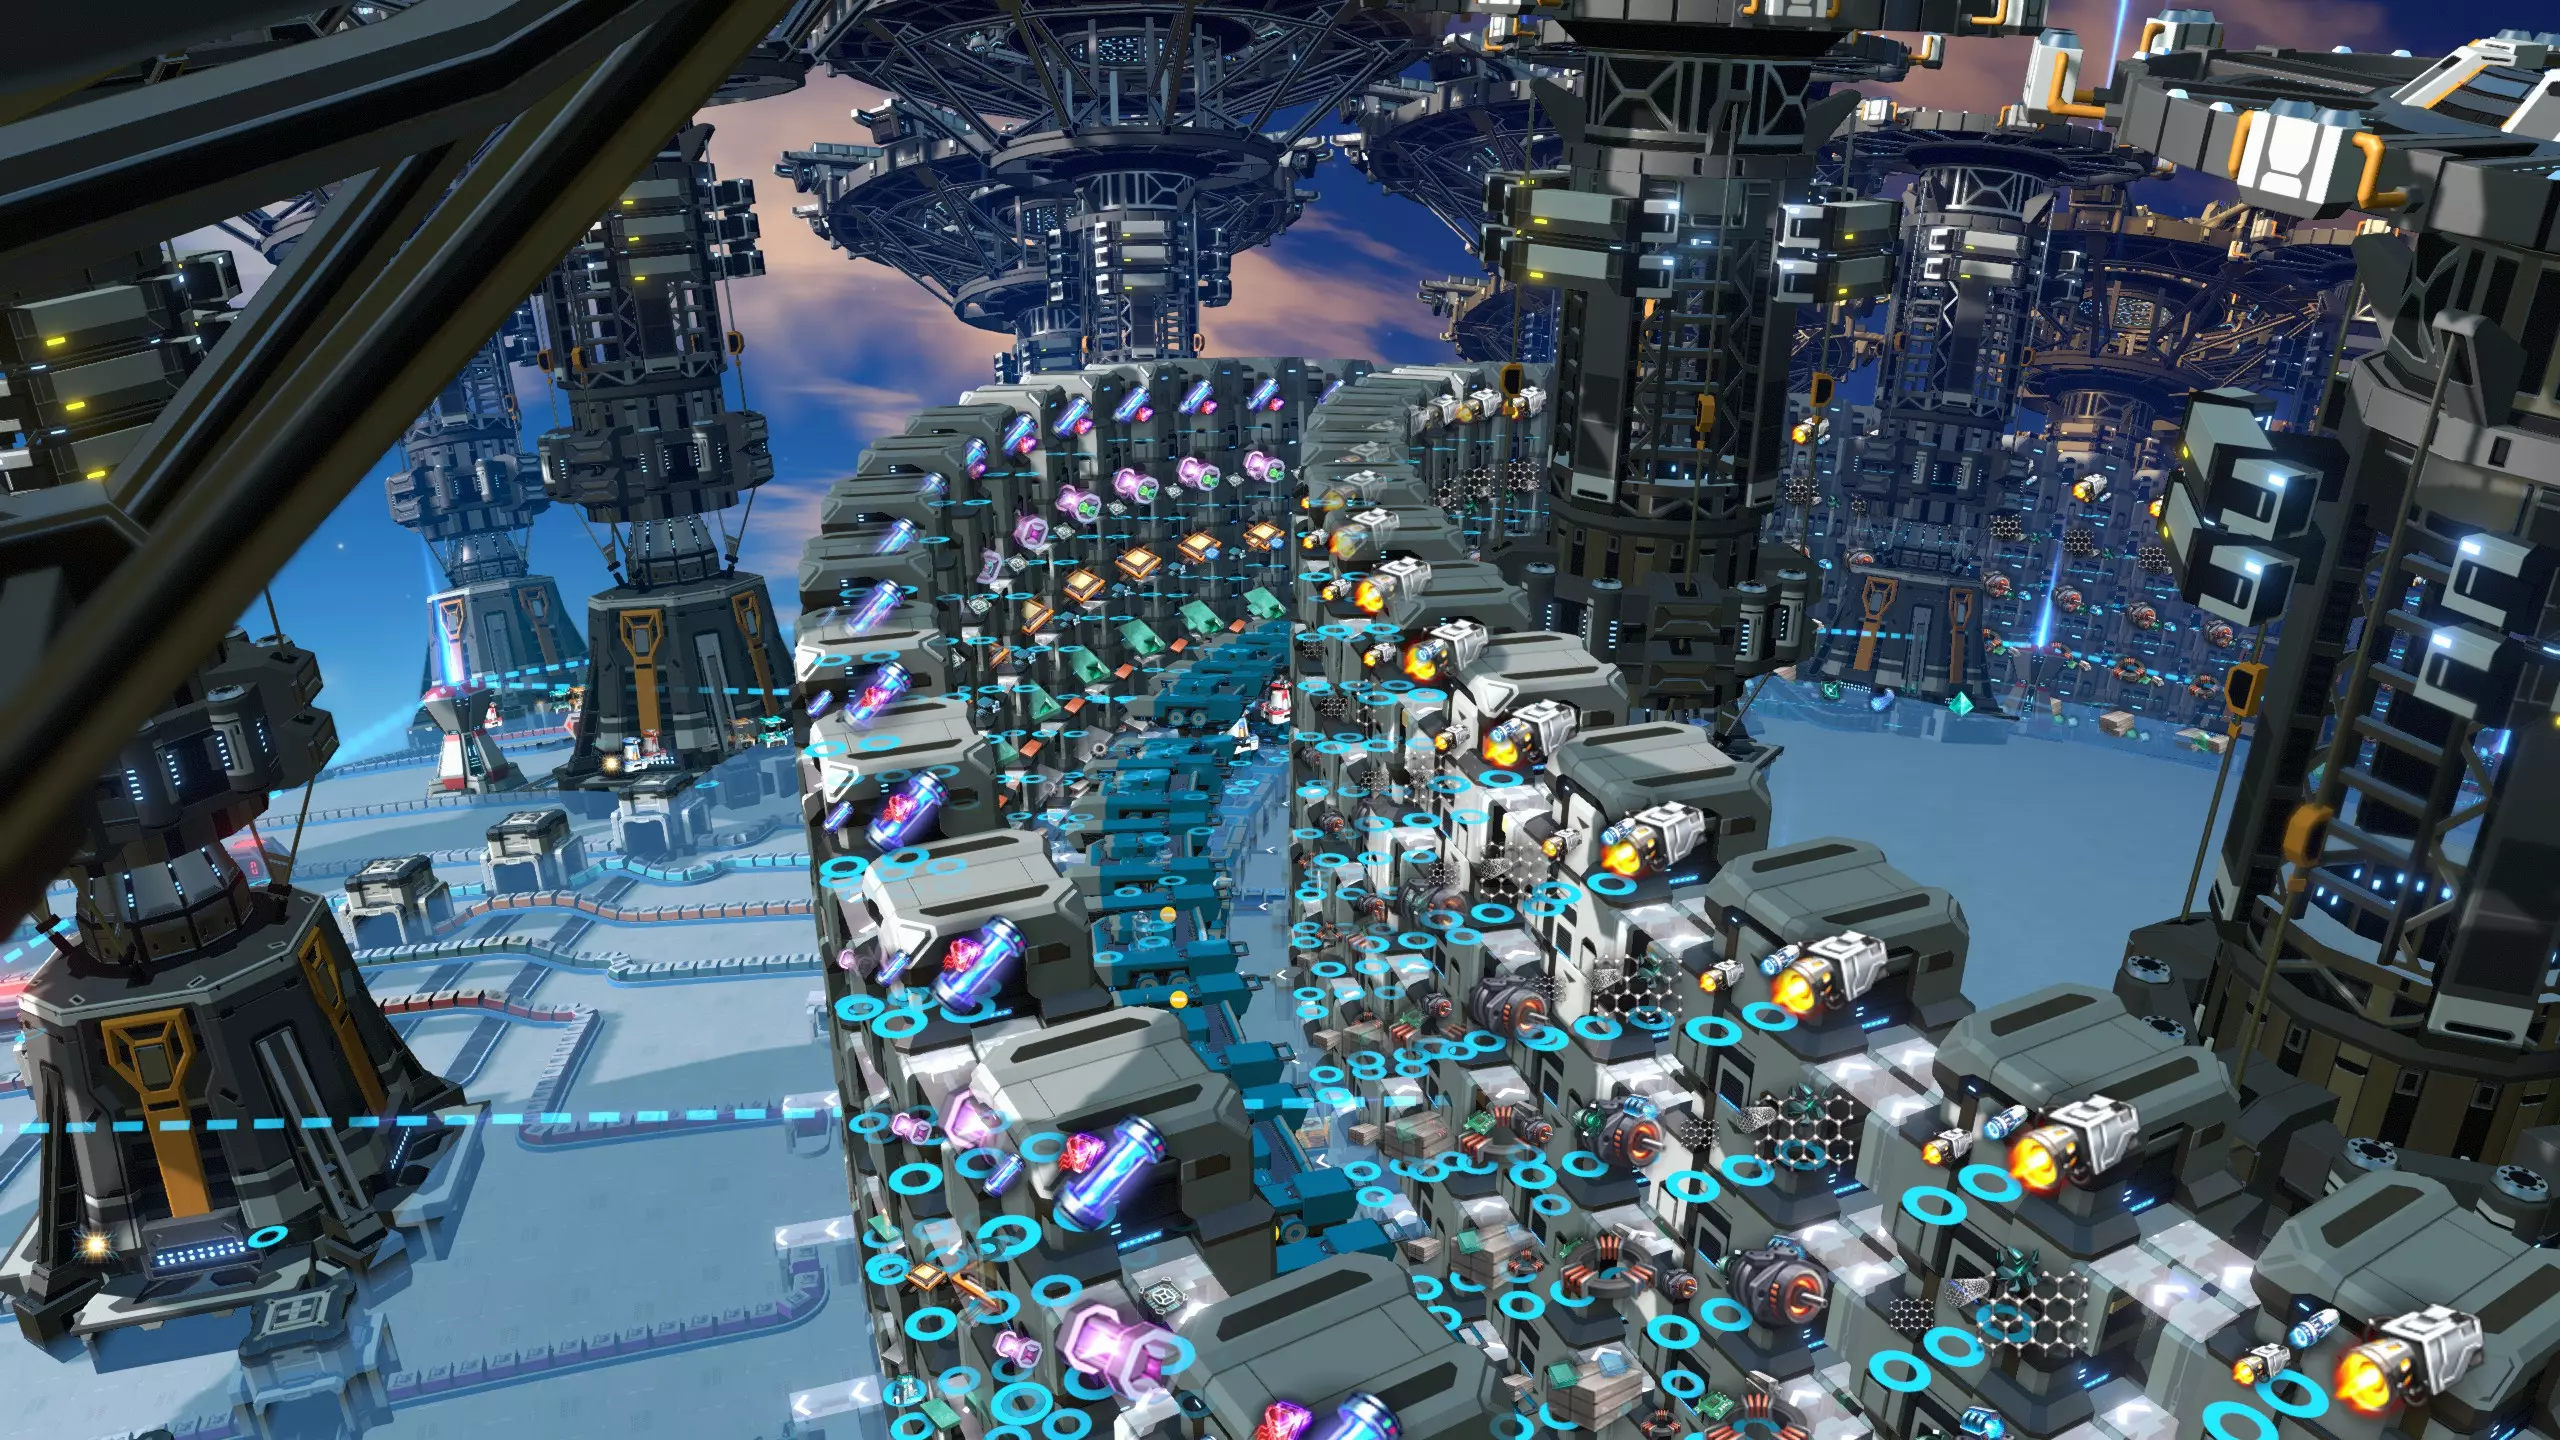
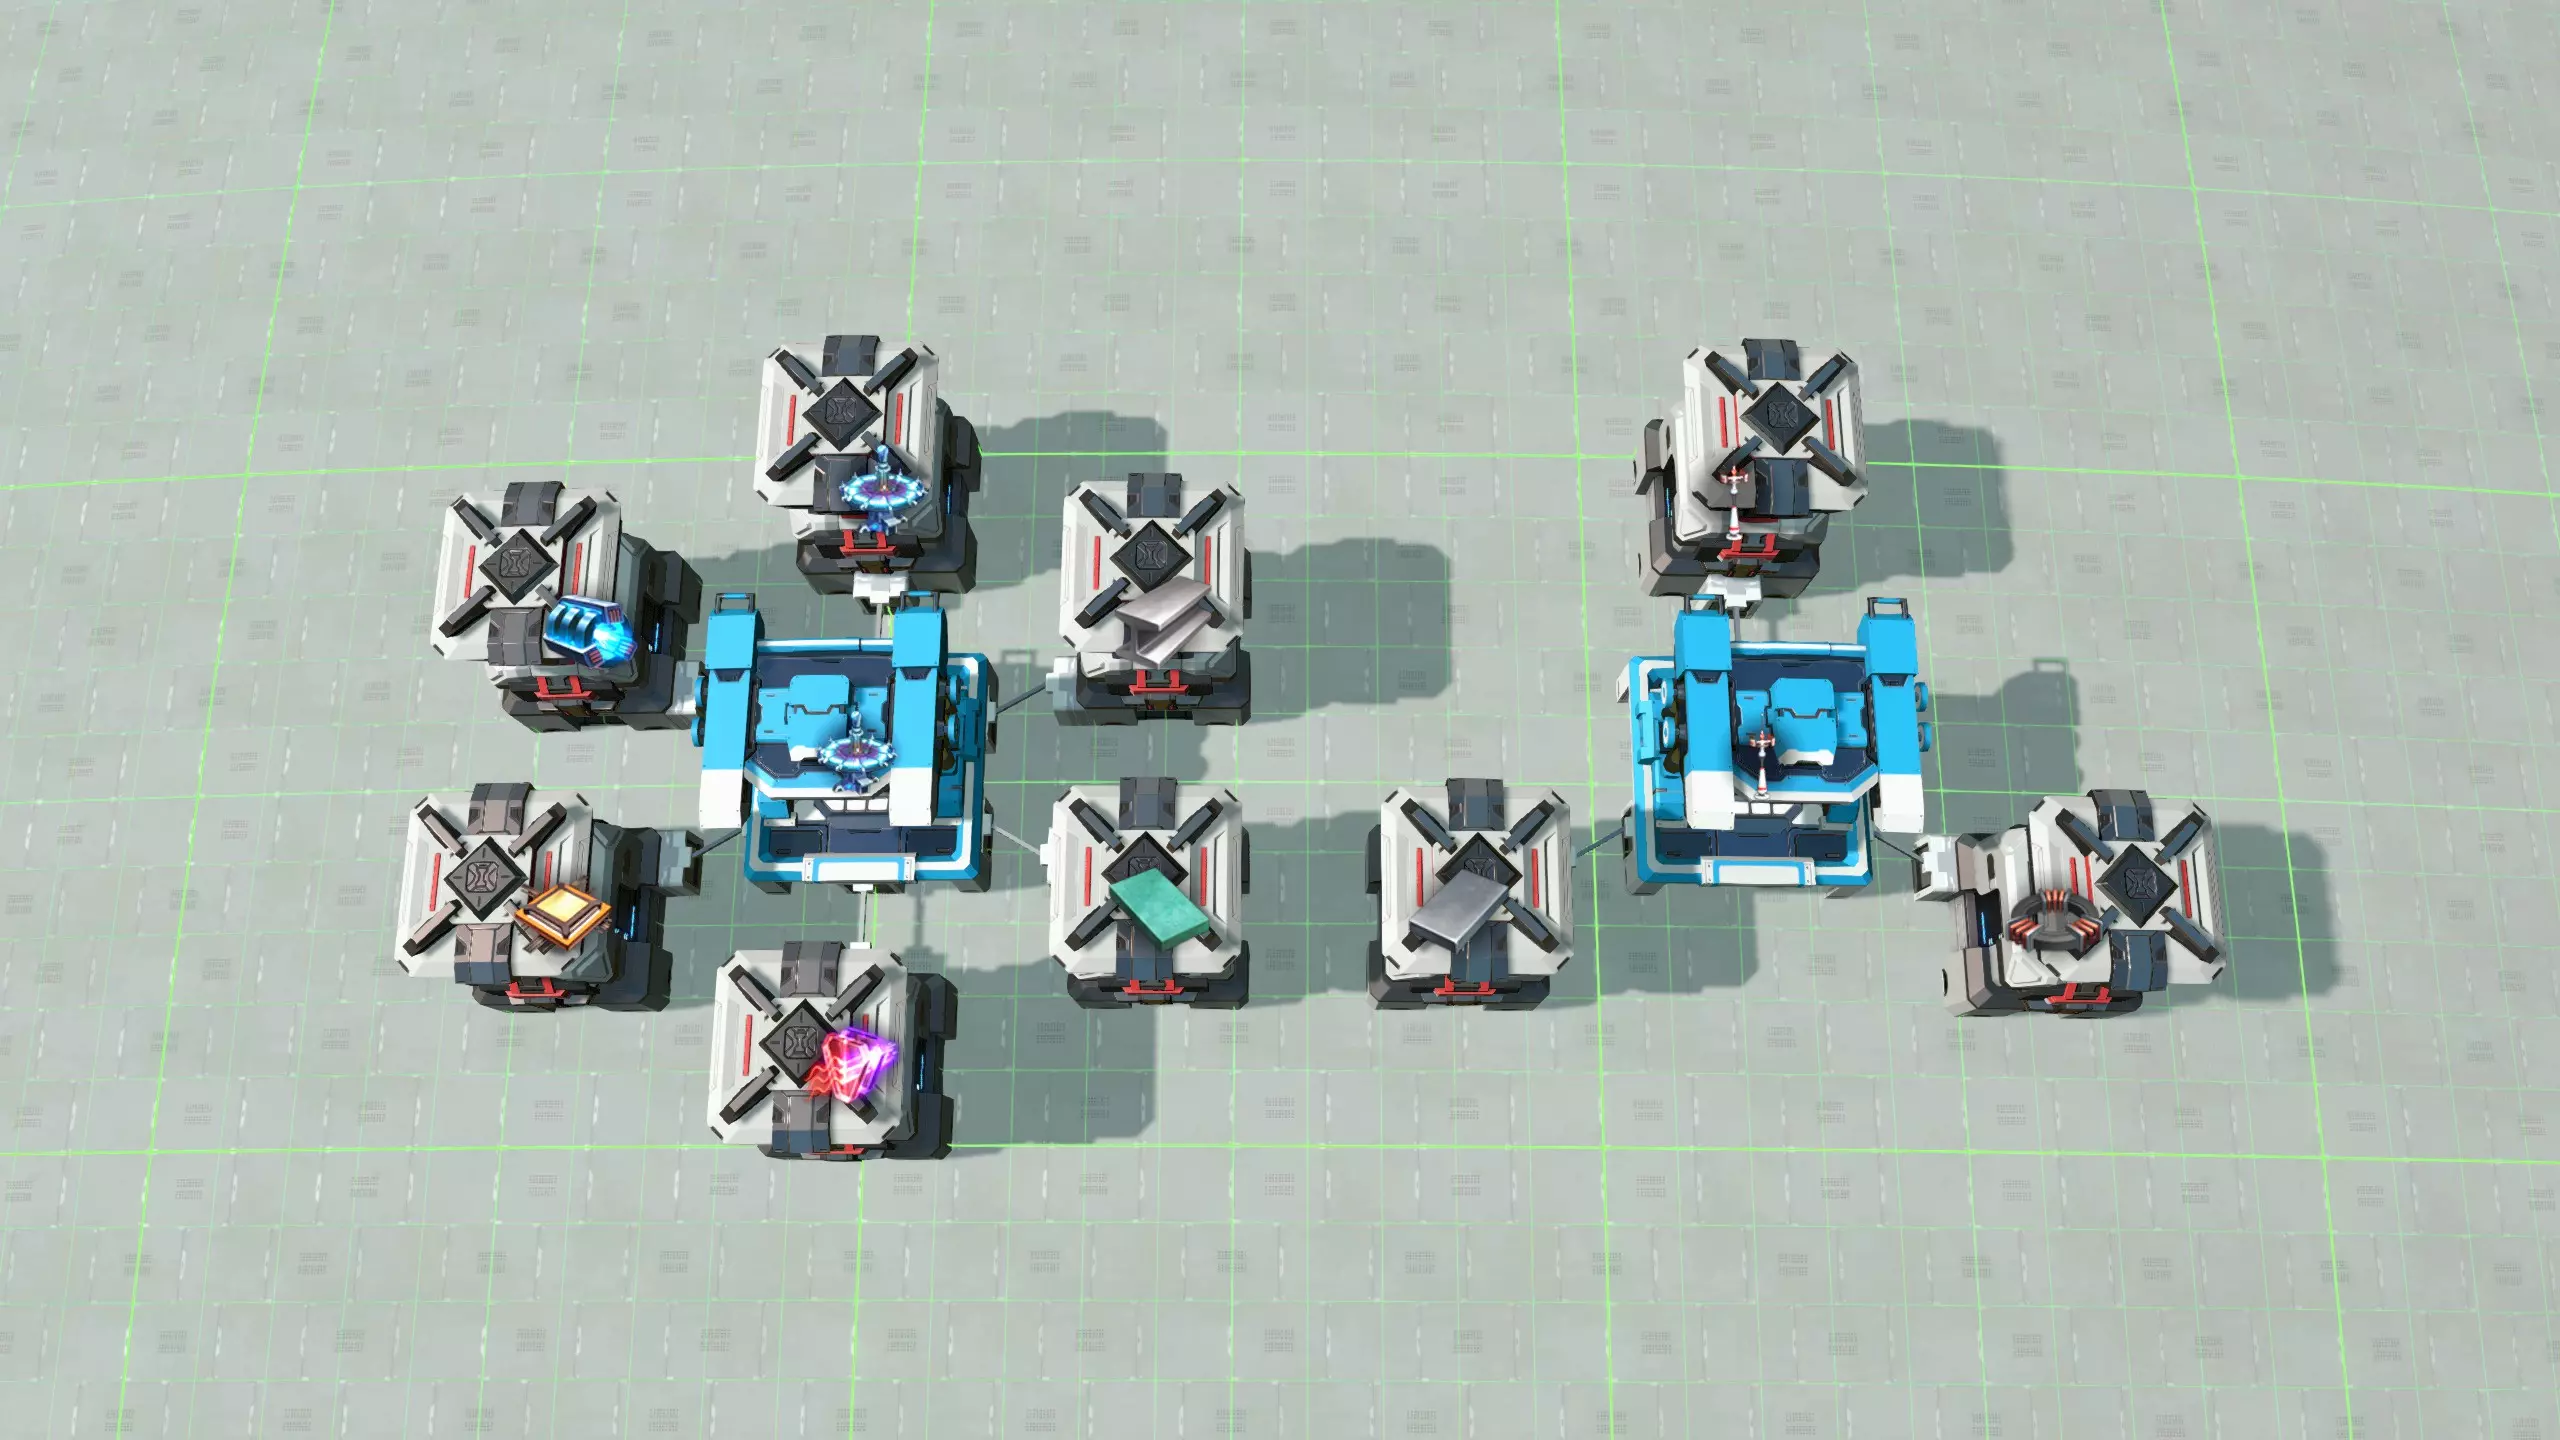
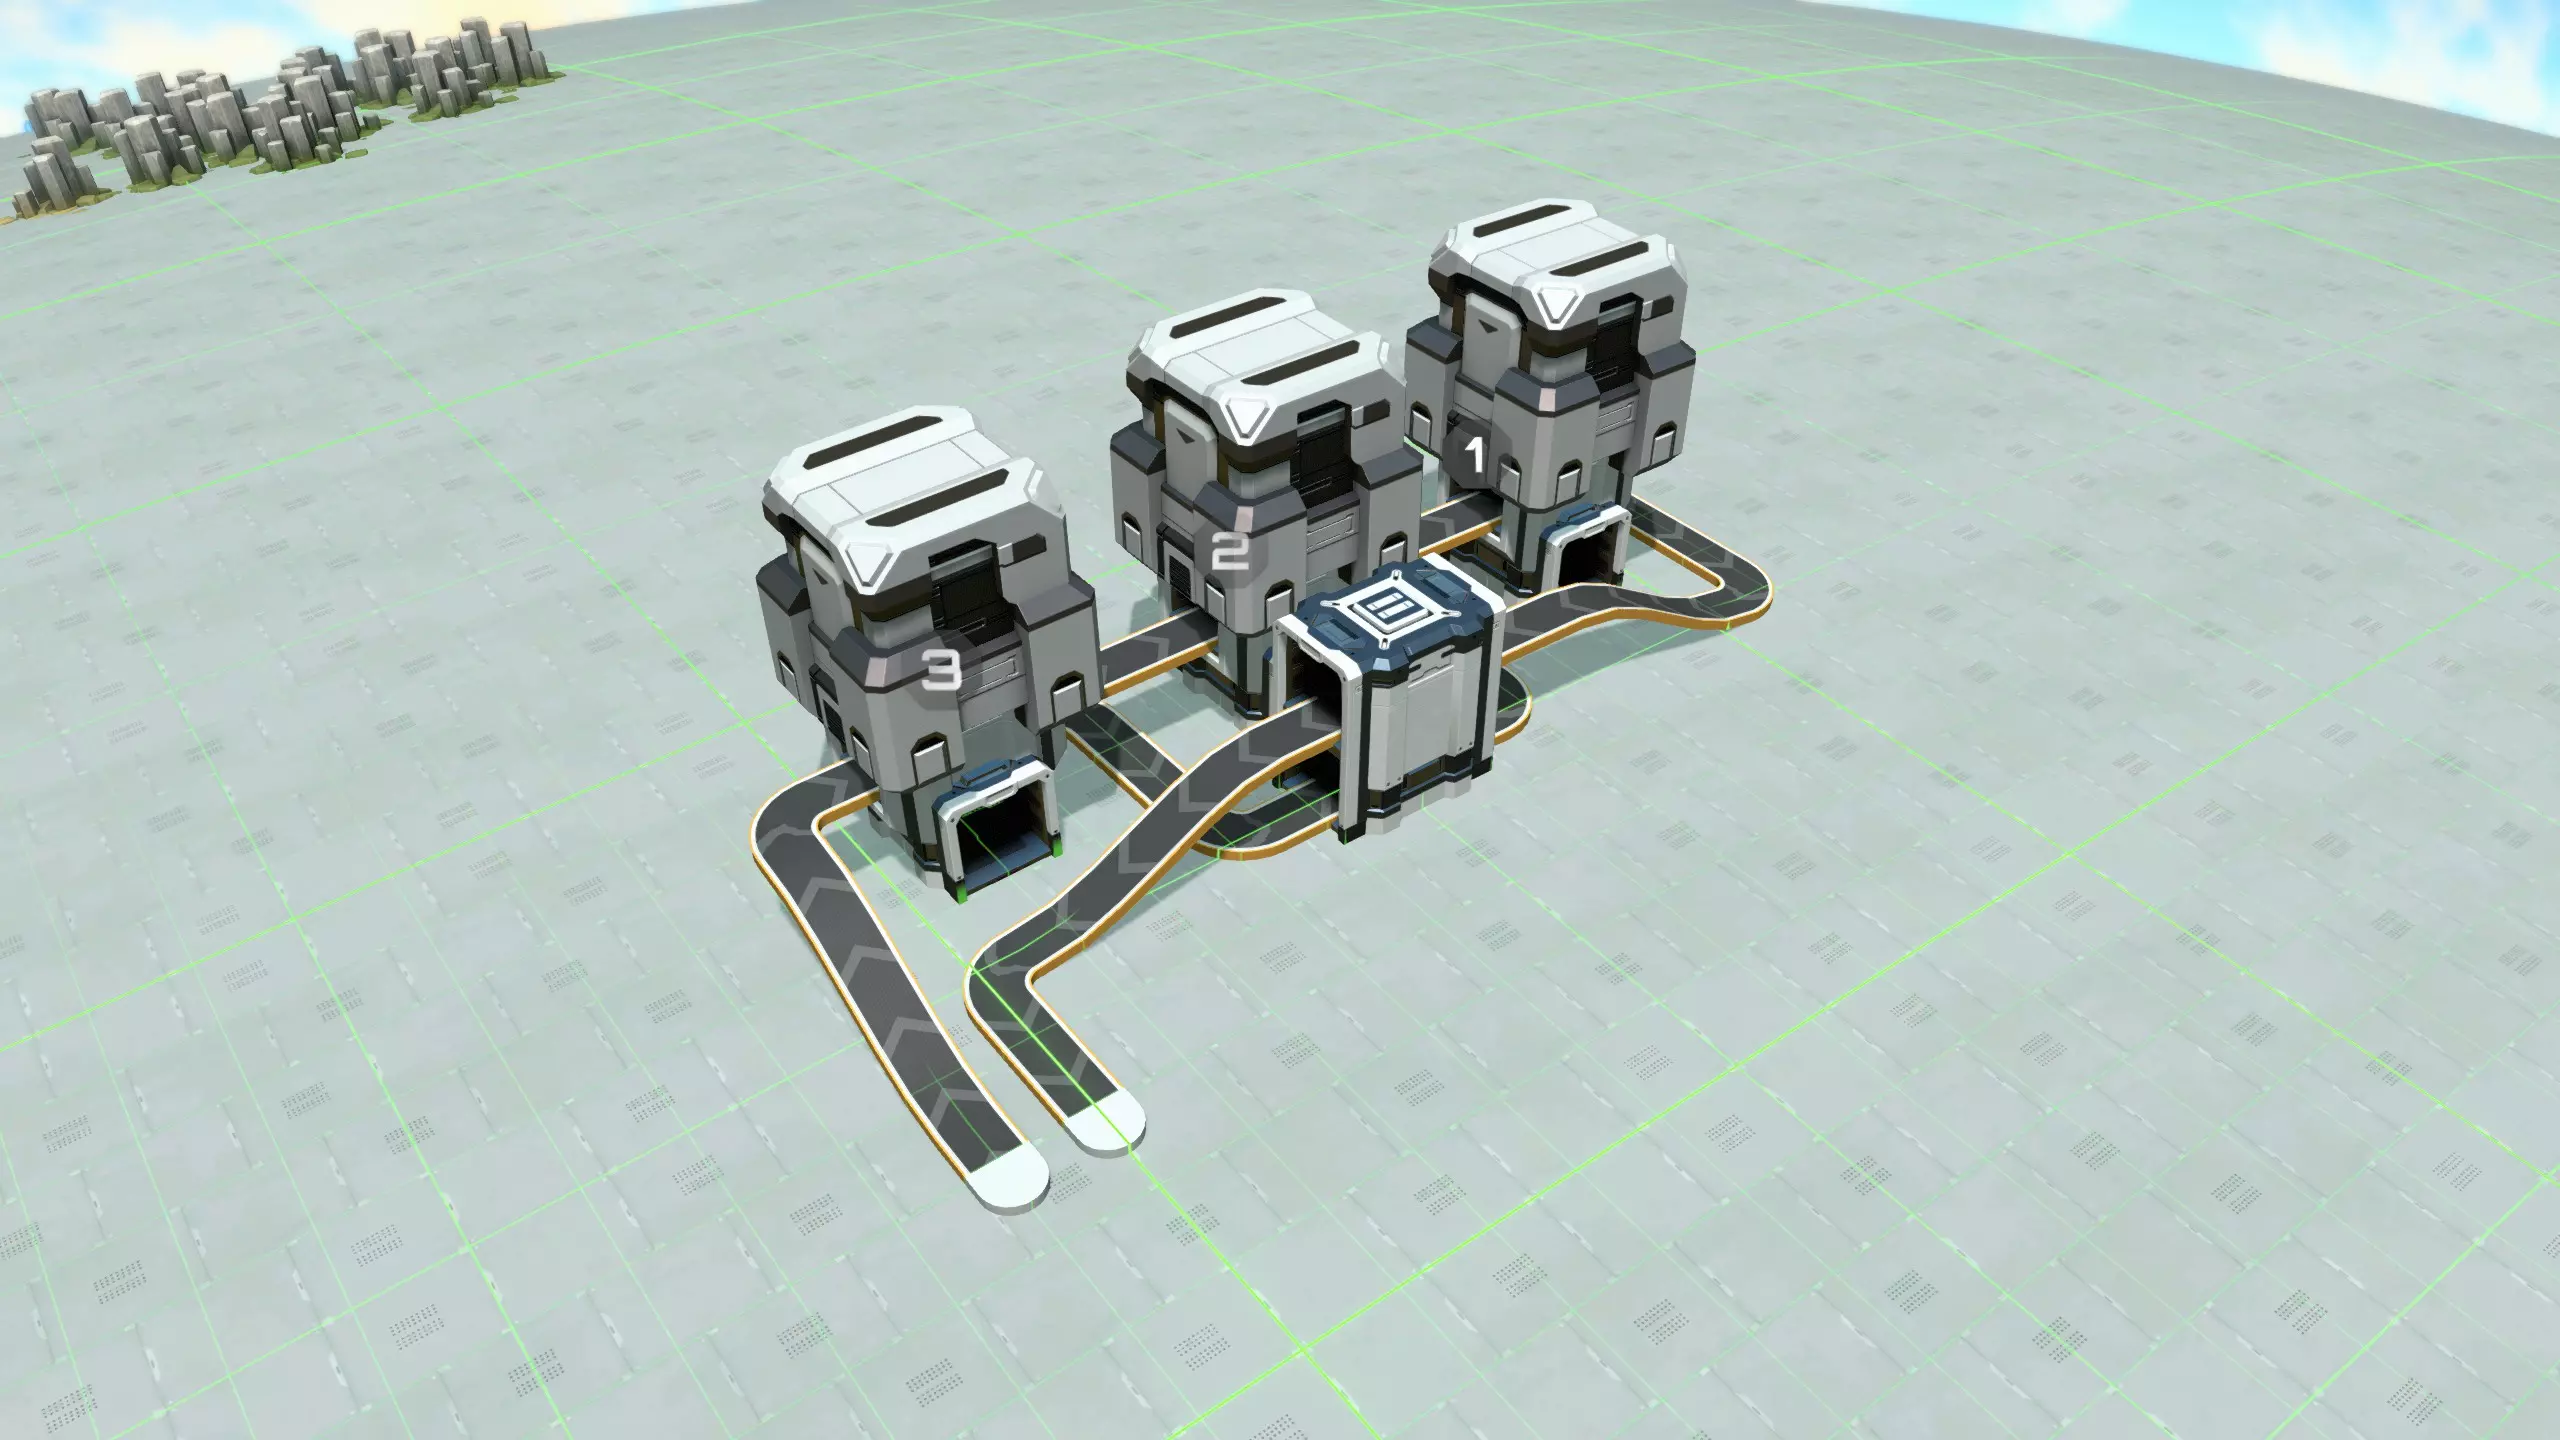
机器人商城的原理是通过物流分配器为每个装配机输入材料。其设计多种多样,主要区别在于装配机之间是否共享输入材料。 机器人商城的拓扑结构与资源共享: 最直接的设计是为每个装配机的每个输入端配备一个箱子,从而将所有装配机完全解耦,便于随时添加新建筑。根据所制造建筑的不同,这需要2到5个箱子。以下是采用这种方式制造的两种建筑。
组织箱子的方式有很多种,主要区别在于相邻的组装机之间是否共享材料,如果共享,具体如何实现以及每台组装机可用于导入材料的箱子数量。共享材料的明显优势是可以缩小工厂规模,并且减少各处箱子中缓冲的材料量。缺点是这样做会在建筑之间产生依赖关系,从而使规划合理的工厂变得更加困难。 例如,上图可能展示了一种六边形的箱子布局模式;通过采用这种形状并将组装机稍微靠近一些,我们可以构建出这样的工厂布局。
如你所见,每台组装机都能访问其周围的六个箱子,这看起来很宽裕。不过,其中一个箱子需要用来存放组装机的产出,另一个则用于存放相邻组装机的产出。剩下的四个箱子均与某个相邻的组装机共享。平均而言,每台组装机只能确定两个输入箱的内容。因此,必须进行相当巧妙的规划,才能确保所有建筑都能顺利建造。 在这种设置下,一个能让事情变得简单的技巧是:在组装机之间铺设传送带,并在上面运送最重要的材料(例如铁锭、钢等)。这样,每台组装机都能随时从传送带上获取最重要的材料,从而为其他材料腾出输入箱空间。当然,这在某种程度上违背了设计初衷,但仍然不失为一种可行的方法。再次说明,请参阅【混合模式】部分以获取更多相关讨论。 在实际操作中,像这种每个装配机平均仅配备两个输入箱的布局,很难进行规划和优化。尽管这种做法是可行的,而且将中央工厂建造得尽可能小巧高效似乎很有吸引力,但实际上,中央工厂能够轻松地进行动态调整才是更为重要的。因此,我建议为每个装配机至少预留三个输入箱的空间,其中一些输入箱最好可以共享使用。 建造机器人中央工厂,我最喜欢的设计如下:
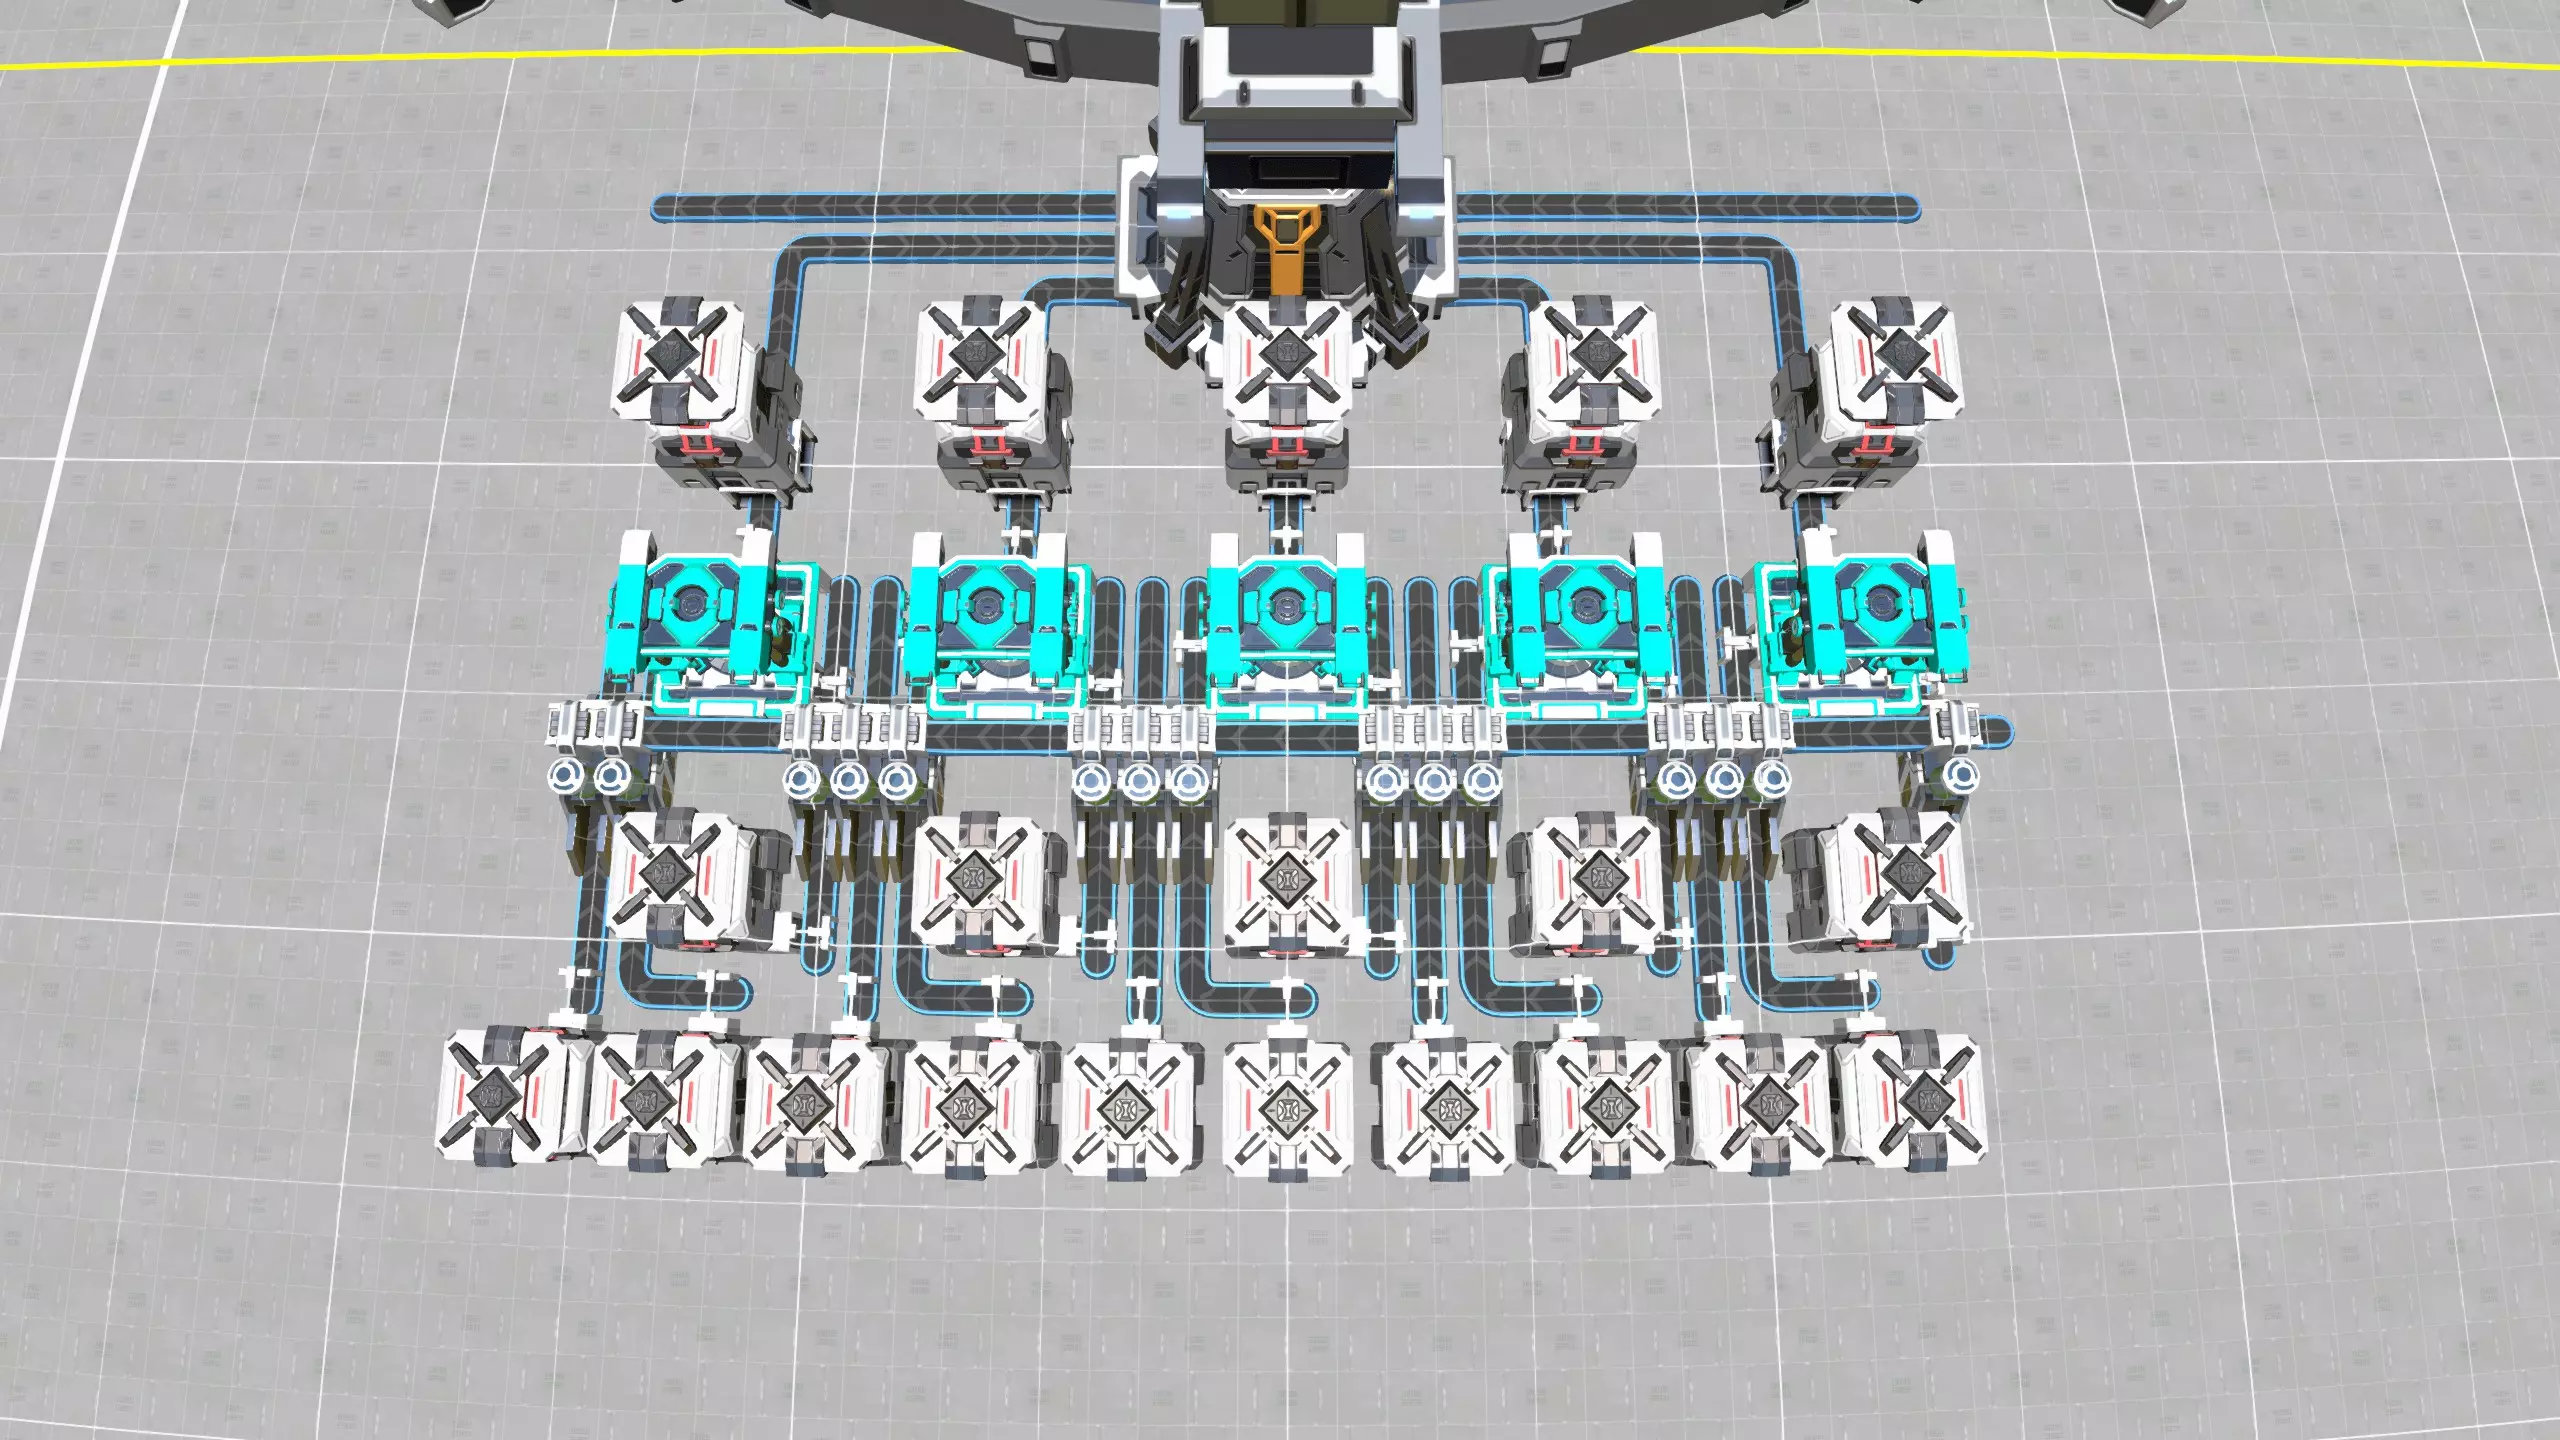
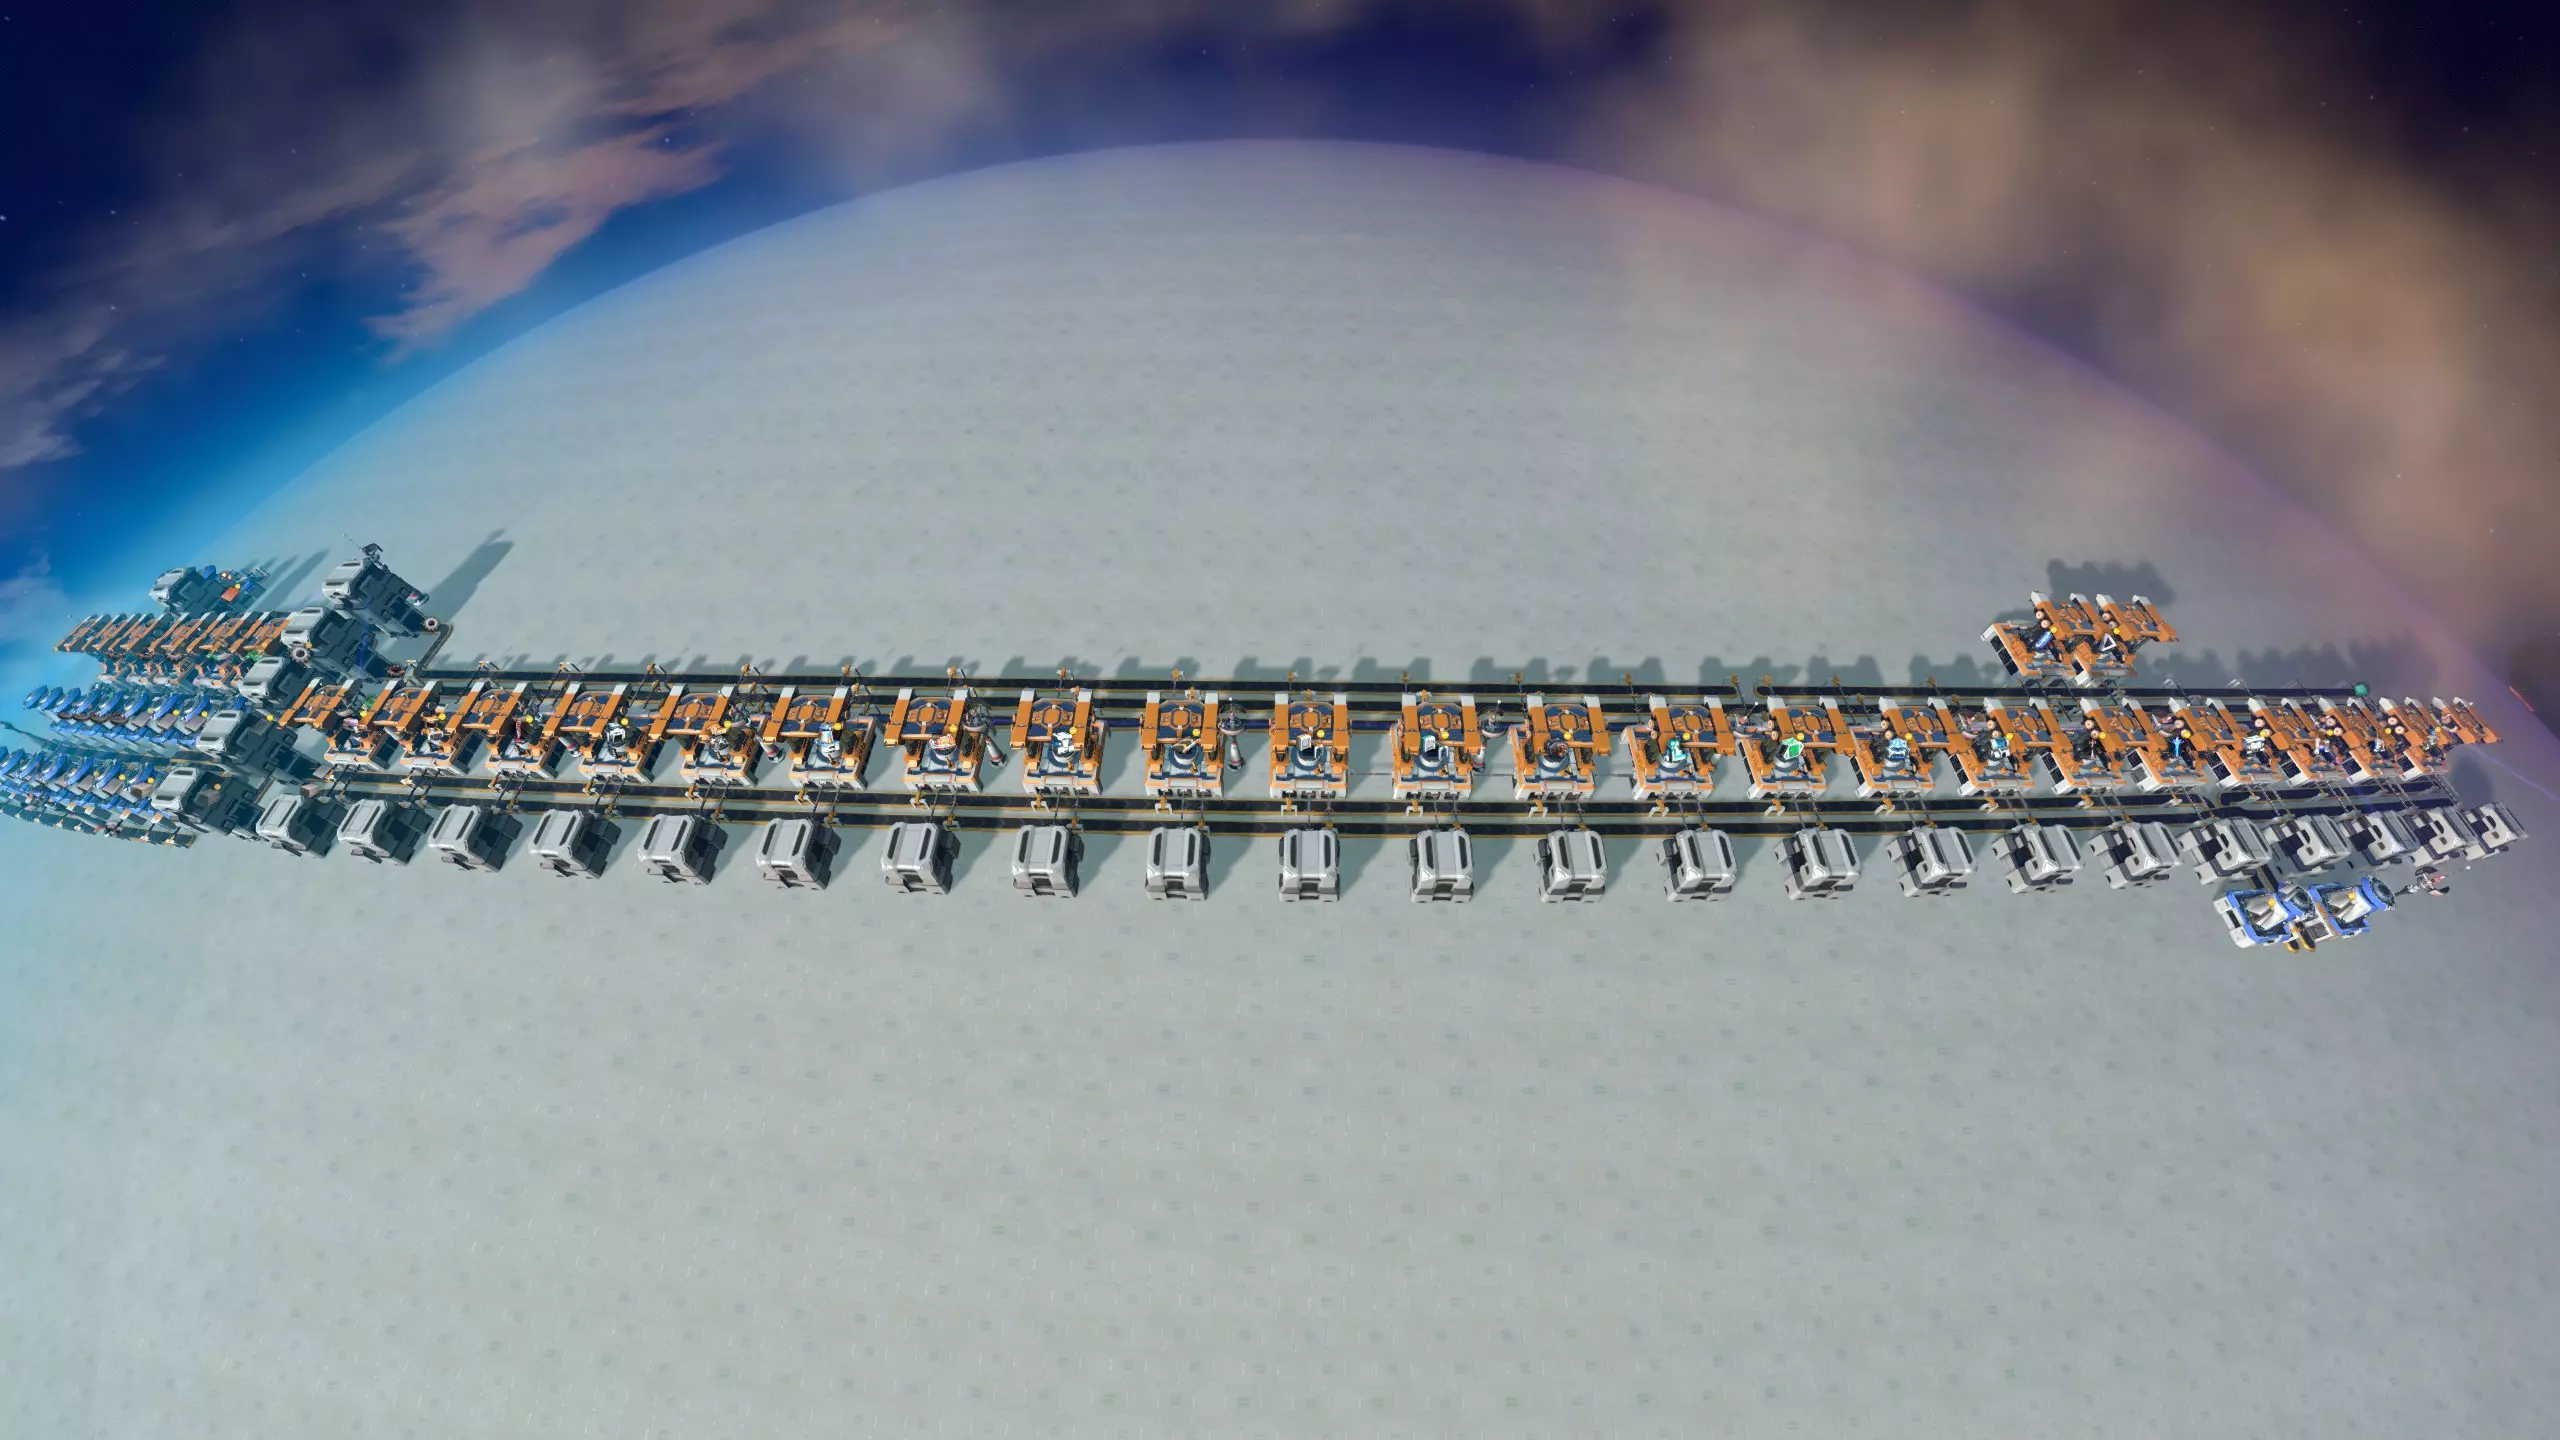
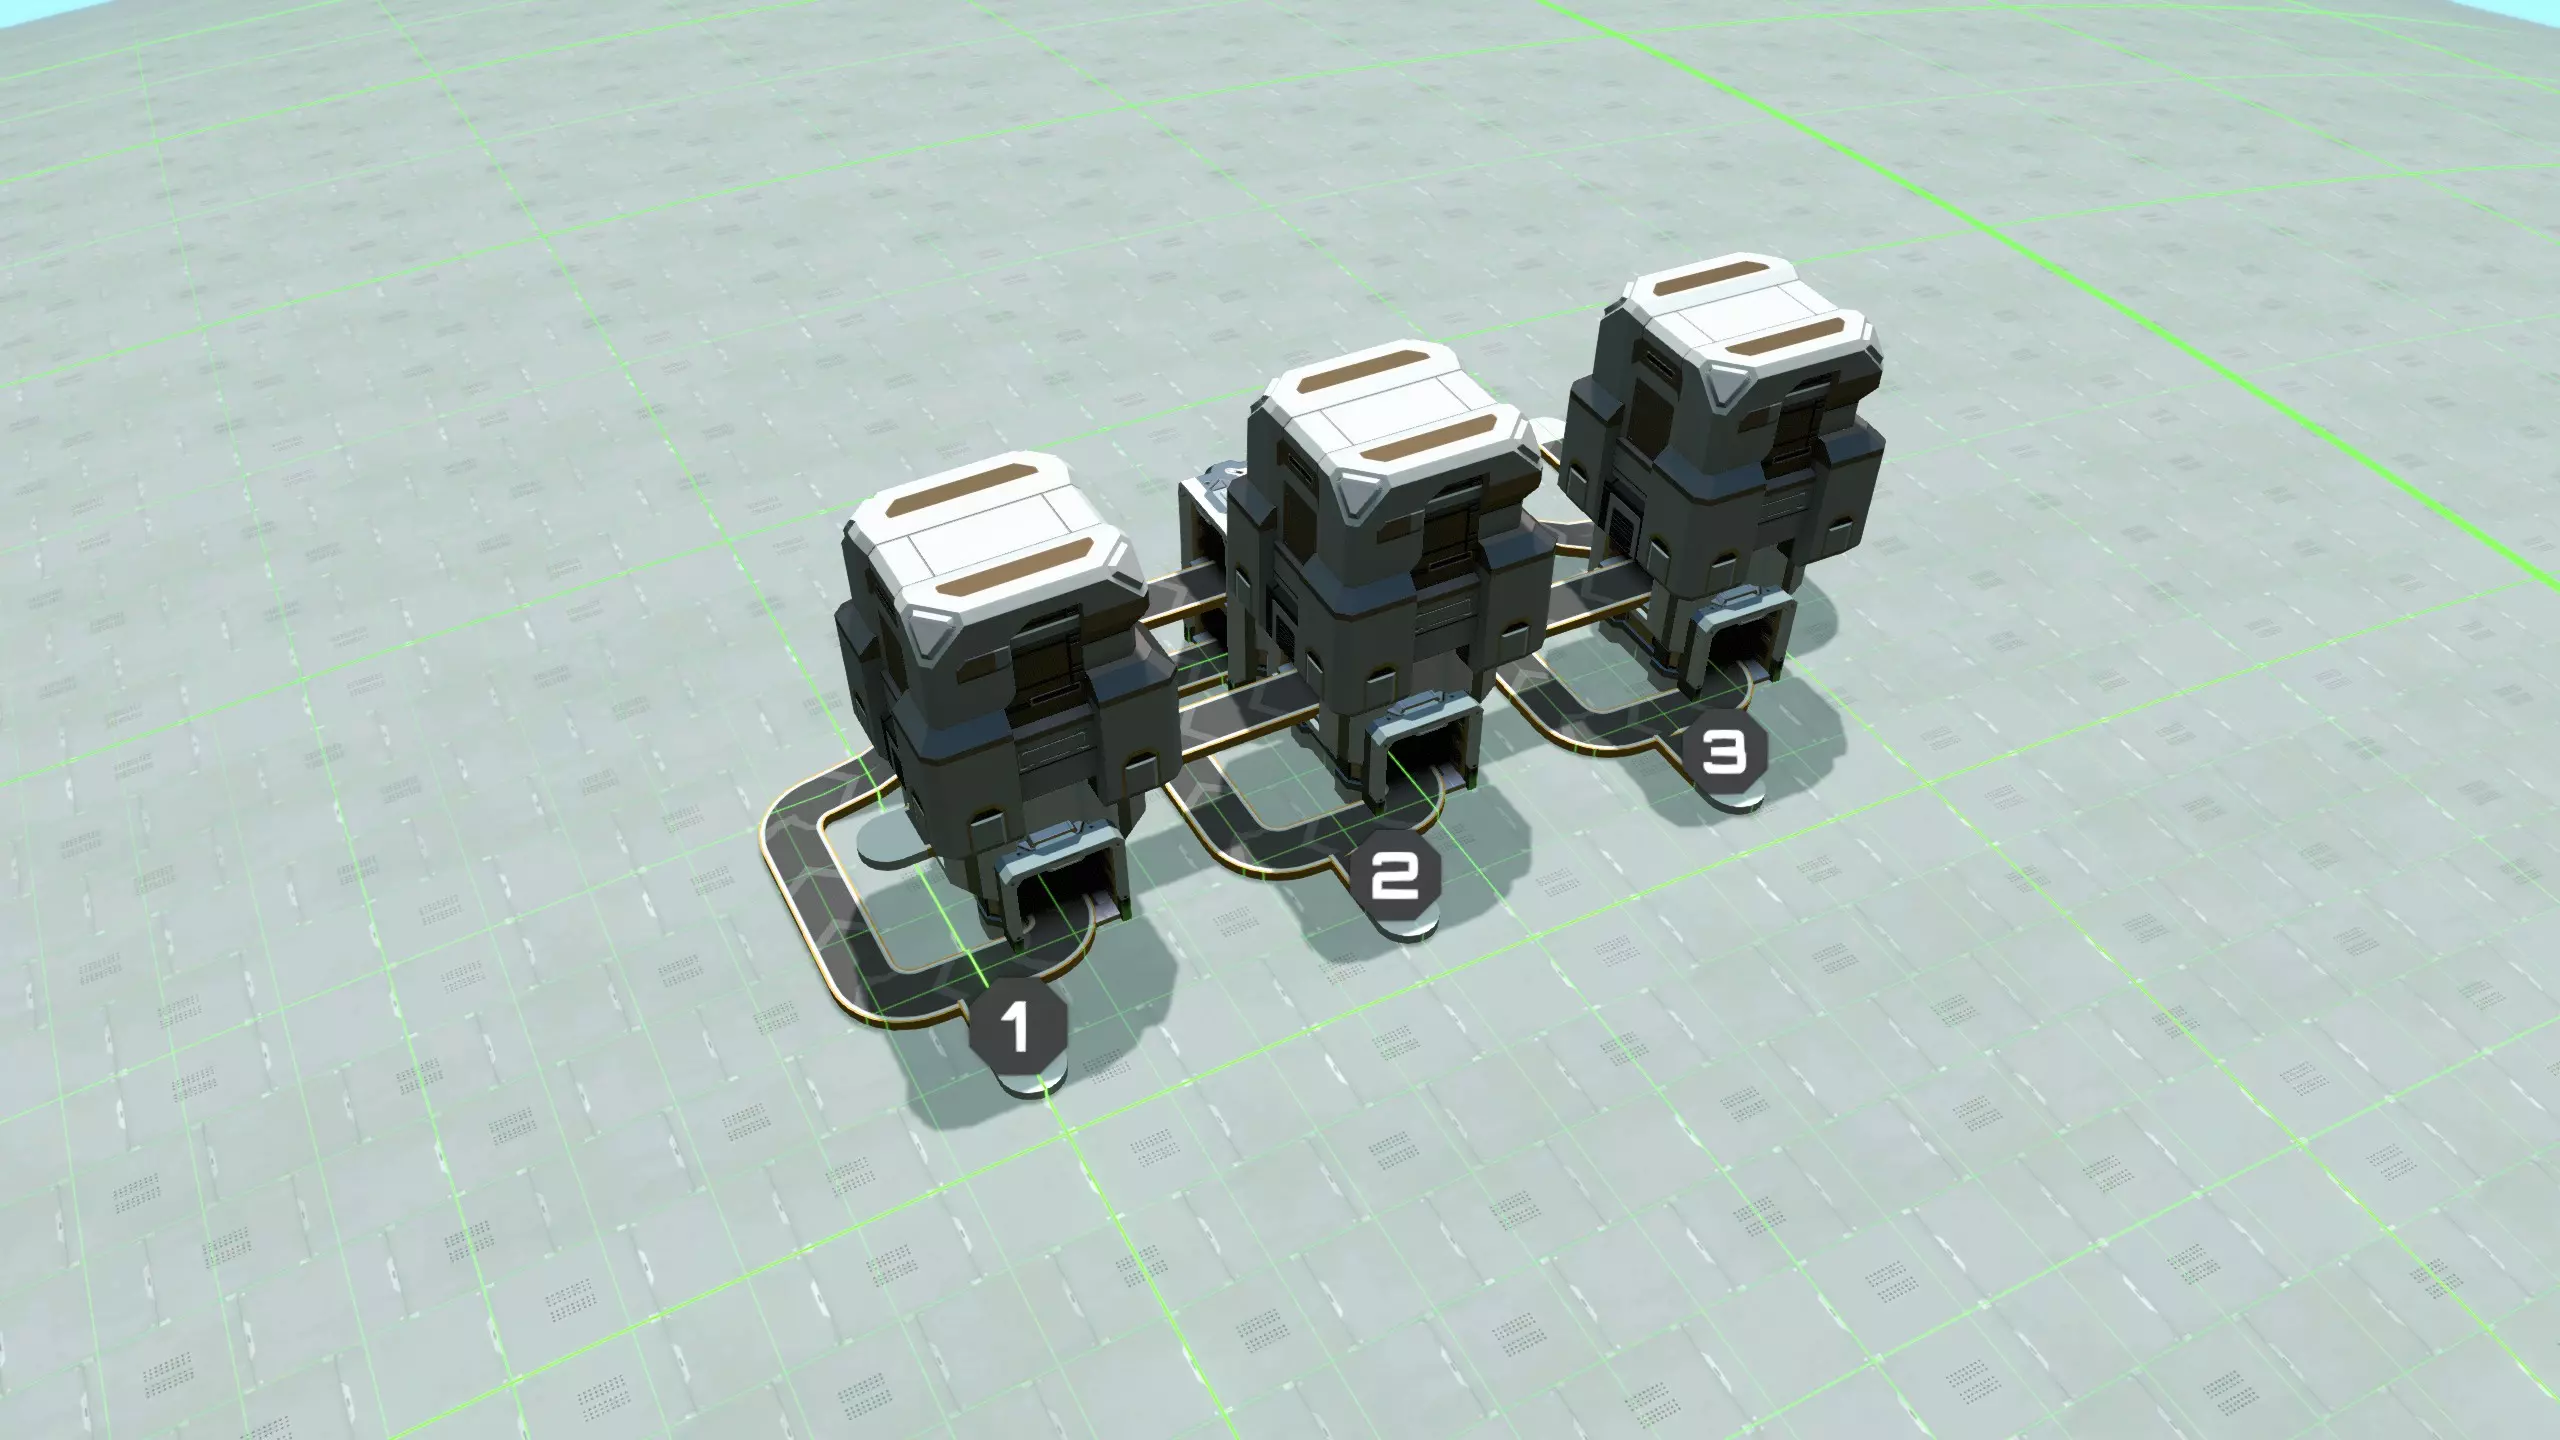
这个蓝图可以自我连接,并且能轻松扩展为一个可制造所有建筑的完整物资中心。每个蓝图副本都为五个装配机预留了空间,每个装配机各有三个输入箱。如你所见,该设计具有多项出色特性: 设计依然相当紧凑。 每个装配机可接入6条物料传送带:其中三条与左侧相邻装配机共享,另外三条与右侧相邻装配机共享。 设计不采用直接插入方式,因此每个装配机都能非常方便地进行增殖操作。 如有需要,输入物料传送带可从装配机后方穿过,实现更多物料共享。不过我个人觉得这种方式不太美观,所以在自己的设计中并未采用,但保留这种灵活性总是好的。每个组装机能够导入3种材料,在空间和资源效率与易用性之间取得了恰当的平衡。几乎总能轻松地按一定顺序放置建筑,使相邻建筑的输入之间存在部分重叠。 下方是第一张图片中机器人商城的细节,使用商城分段蓝图建造,展示了设置几个建筑后的外观。
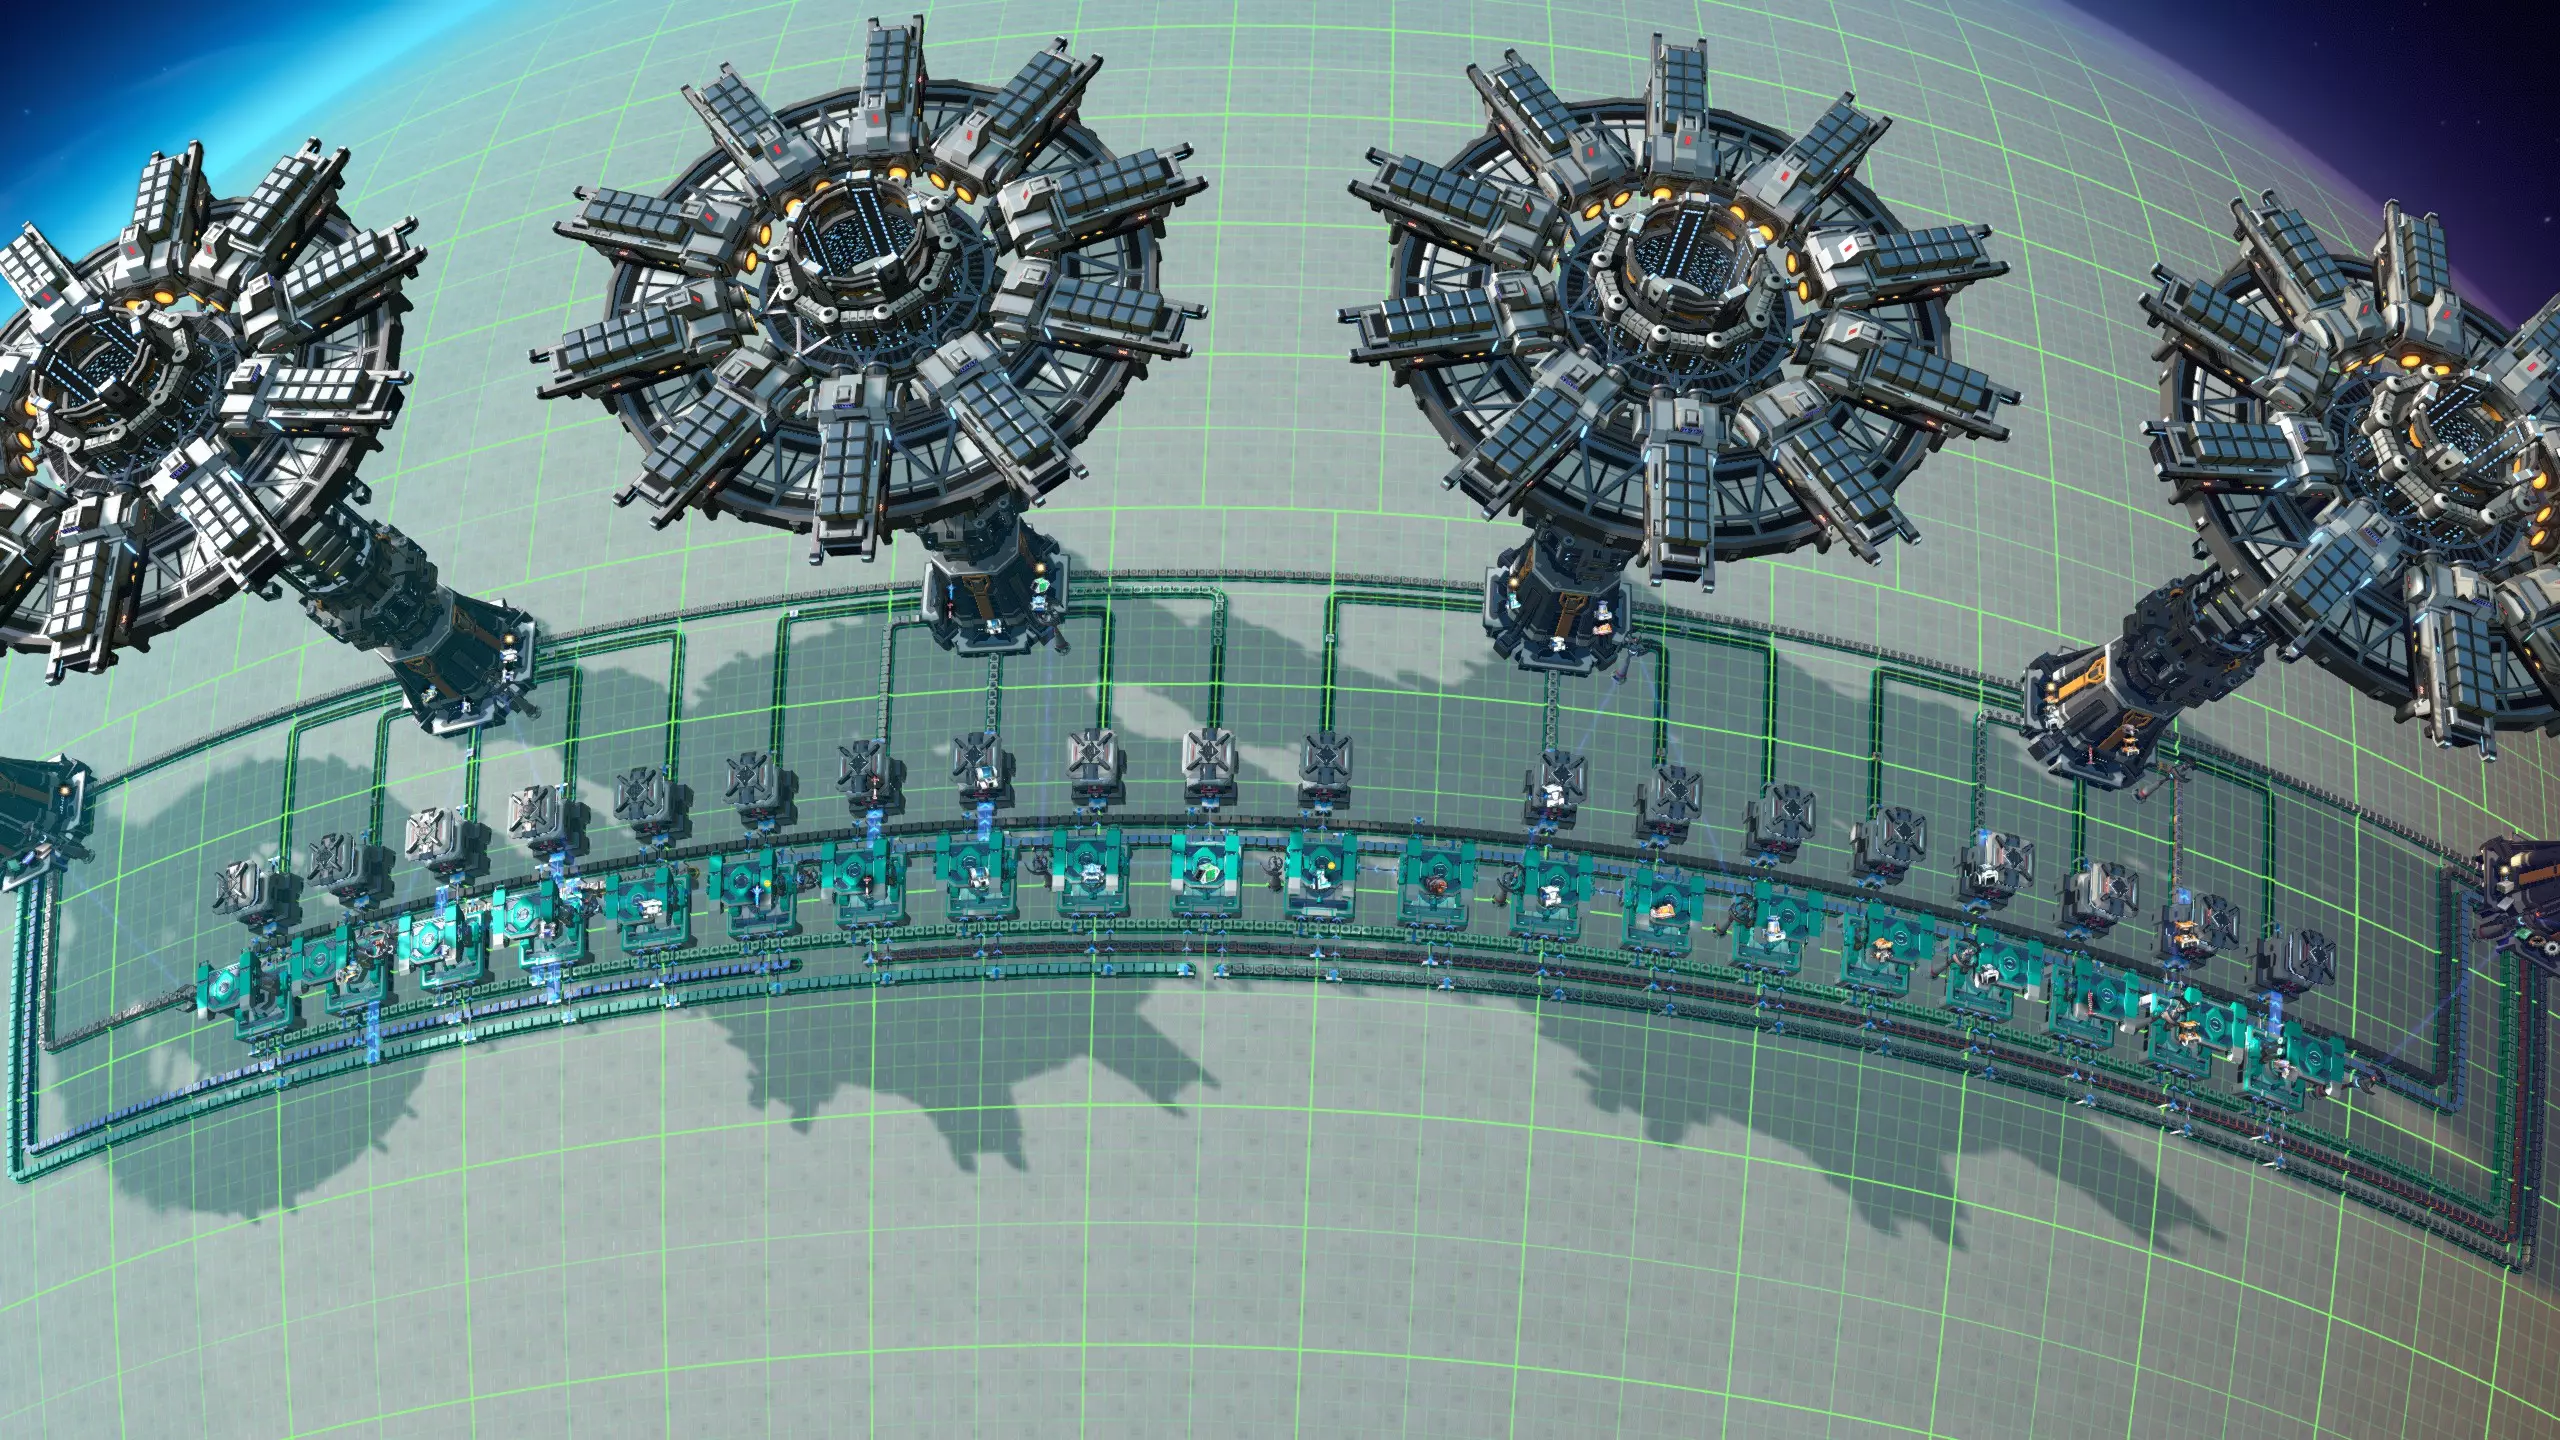
只要物流配送网络中已有所有材料,机器人商城就能开始运作。如果材料不足,你还需要建立行星物流站来进口所有材料,并将它们放入物流箱中。虽然这看起来有些间接,但它的优点是你可以有意将其放置在靠近商城的位置,这样物流机器人就无需长途跋涉。 下图展示了商城中负责进口材料的部分;相关部分位于蓝绿色地基上。请注意,该设计是在游戏的旧版本中制作的;如今我肯定会使用堆叠分拣器来储存箱子。

机器人商城的特性 在设计你自己的商城时,有几点需要注意: 你会看到大量物流机器人在各处不断飞行。这看起来是酷炫还是杂乱,取决于你的个人喜好。 机器人商城非常适合增殖操作,因为每个装配机都会将其生产的建筑输送到另一个顶部带有物流分配器的箱子中。因此,你无需直接插入,只需将建筑通过机器人运送到另一个装配机的输入箱,就能正确进行增殖。考虑一下你是否希望对商城进行增殖。要记住,大多数建筑的升级版本只能通过增殖来提升速度,而不能产出额外产品。这可能仍然是一个理想的功能,但这意味着你可能也需要为MK1建筑的装配机设置增殖以提高速度,这样更高等级的装配机就不会缺料。 机器人 malls 设计可能是所有 malls 设计中最灵活的,并且通常可以与其他 malls 类型混合使用,例如总线型或箱型 malls。有关这方面的更多信息,请参见混合 malls 部分。 机器人 malls 能在建筑之间实现很强的解耦,这意味着一个装配机不会轻易导致另一个装配机资源短缺。这是一个很好的可靠性功能,也有助于减少 malls 的启动时间。机器人 malls 往往比PLS或ILS malls小得多,虽然它们建造建筑的速度不快,但在游戏后期之前仍然足够快。不过,使用星球级蓝图的玩家可能需要更高吞吐量的传送带和分拣器。机器人商城模块 完整机器人商城 寿司商城
寿司传送带工厂是一种利用寿司传送带(即混合传送带)向装配机输送材料的工厂。寿司传送带能在单条传送带上运输多种材料。与总线设计相比,寿司传送带只需少数几条传送带就能将多种不同材料输送到装配机。 设计可靠且高效的寿司传送带工厂面临两个问题。首先,当寿司传送带经过所有装配机后,部分建筑材料会被耗尽,而其他材料则不会。传送带需要重新补充,并且需要按正确比例加入新的材料。这就需要一种名为【再平衡器】的装置。设计再平衡器的方法有多种,但并非所有方法都同样可靠,这让不少尝试设计再平衡器的玩家感到困惑和烦恼。 寿司传送带的另一个问题是,由于传送带由多种不同材料共用,很容易出现材料无法足够快地输送到装配机的情况,或者只是前几个装配机占用了其中一种材料,导致后面的装配机因材料短缺而无法继续生产建筑。 这两个问题使得寿司传送带成为一个技术性较强的选择。不过,所有这些问题都可以得到很好的解决。此外,寿司流设计规模较小,不会消耗大量材料,添加新建筑也很有趣,因为每个装配机都能制造任何物品,而且如果设计得当,它们在游戏后期也足够快。我写了一份单独的指南,详细描述了如何从游戏早期开始建造一个功能完善的寿司流商场。 平衡器
再平衡器的工作原理是,首先将混合传送带分离成多条独立的传送带,每条传送带上只运送一种不同的材料(也称为“解复用”),然后在必要时通过补充新材料来补足分离出的材料,最后重新填充寿司传送带。 大致有两种实现方式:可以使用分拣器进行解复用,或者使用分流器。我发现使用分拣器并不理想,原因有二: 1. 断电时,基于分拣器的寿司传送带设计无法对寿司传送带进行解复用,这会导致传送带停滞。在大多数设计中,发生这种情况时,你需要手动疏通传送带并重新启动。 2. 许多基于分拣器的设计在材料暂时供应不足时不够稳定。 为了缓解这些问题,我建议改用基于分流器的设计。上图展示了一个基于分流器的三向再平衡器,其构建方法如下: 通过一系列分流器对寿司传送带进行解复用。每个分流器与序列中的下一个分流器相连,并有一个侧向输出,该输出的过滤器设置为传送带上的一种材料。 在每个分流器上放置空储物箱。实际游戏机制中,这些储物箱只会存储与分流器输出过滤器相匹配的特定材料。它们大多会保持空置状态,但会起到缓冲作用,确保即使寿司带上某种材料暂时过剩,系统也不会停滞(例如,当另一种材料暂时无法供应时,寿司带就有更多空间容纳这种材料,这种情况就可能发生)。 用新的材料补充解复用后的材料。使用T型接头,让来自物资中心的解复用材料具有优先权。 可以考虑使用堆叠分拣器,确保解复用传送带堆叠高度达到4。 使用更多的分流器重新复用寿司带。通过以不同方式连接分流器,可以在传送带上实现不同的材料分布。 进入的寿司带从最后一个分流器出来时应该完全为空。如果出现问题,例如忘记设置某个分流器过滤器,那么某些材料还是会从最后一个分流器流出。通过移除这些物品,你将能够让系统重新正常工作。你也可以使用流量监控器,在材料从最后一个分流器流出时发出警报。 根据我多次零问题通关的经验,这种再平衡器设计100%可靠,即使在供应问题或电力波动的情况下也是如此,所以我认为它是中央工厂的最佳选择。 寿司传送带的吞吐量必然低于总线设计,因此在设计寿司式中央工厂时,你需要确保能够足够快地向中央工厂供应所有必要的材料。以下措施有助于实现这一目标: 1. 不要以相同频率将所有材料放在寿司带上。特别是高需求材料应在带上出现的频率相对更高。 2. 使用mk3传送带,并确保你的平衡器将所有材料在传送带上堆叠到4格高度。 3. 不要仅使用单条寿司带。 增殖: 如果需要,寿司带上的物品显然可以进行增殖。但你可能不会想在寿司带上放置低阶建筑,这意味着你将大量使用直接插入。在这种情况下,所有高阶建筑都无法增殖,这通常是我放弃增殖的充分理由。足迹:与总线设计相比,寿司传送带(sushi belts)可以做得非常小;你不需要为每种不同的材料都设置一条传送带,只需要少量的寿司传送带即可。这也减少了在传送带系统中滞留的材料数量。因此,这是一种高效的解决方案。 PLS和ILS传送带系统
PLS和ILS物流枢纽相对简单,它们通过物流站获取建筑所需的材料。 这类枢纽的大部分复杂性在于如何提供建筑,这一点对所有类型的枢纽都相同,将在“建筑交付”部分讨论。但我们将在这里探讨这些类型枢纽特有的一些问题。 PLS/ILS设计的主要优势是潜在吞吐量非常高,而且非常灵活,因为它们通常允许增殖,并且任何建筑都可以独立或几乎独立于其他建筑进行生产。另一方面,它们要求你处于相当高的科技水平,并且有大量的空间和材料来建造。因此,它们非常适合游戏后期,此时材料和空间不再稀缺。 PLS和ILS模块在混合模块中也很方便,其中PLS/ILS区域可用于制造那些需要高吞吐量的少数建筑,例如传送带、分拣器或地基,或者那些不太适合其他模块设计的建筑。 PLS还是ILS?ILS不能放置在任何其他物流站附近,因此会导致模块的紧凑性最差。另一方面,你无论如何都需要ILS来跨星团出口建筑,而且如果你有兴趣打造回收模块(另见“交付建筑”部分),那么进口ILS可以同时回收正在制造的建筑,实现双重功能,这能带来高效的设计。行星物流站(PLS)可以放置得更密集,但它们一次只能导入四种材料,这可能会带来麻烦,因为有些建筑需要五种材料。此外,行星物流站无法全局导入材料。 通常来说,最好让购物中心的材料在本地可用,这样可以使购物中心自成体系,不依赖星团其他地方的生产。如果我们将设计做得相对紧凑,相邻的行星物流站至少可以少量共享彼此的材料,那么需要五种材料的建筑所面临的问题就能得到缓解,这也能提高购物中心的效率。总的来说,如果你想建造一个大型工厂,能够以至少还算高效的方式生产多种不同建筑,那么推荐选择PLS工厂。而如果你已有其他工厂设计用于生产大部分建筑,但只想专门生产少量建筑(因为它们不太适合纳入主工厂设计),或者你根本不在乎工厂规模和成本,那么ILS工厂可能是更好的选择。 如何建造PLS工厂 由于需要支持那些需要五种材料的建筑,你无法让每个建筑完全独立于其他建筑。由于行星物流系统(PLS)物流站的优势在于其布局可以比星际物流系统(ILS)物流站更紧凑,因此将组装机相对靠近放置并让它们共享传送带是个不错的选择。本节顶部的图片展示了一个可平铺的蓝图,通过它可以实现这一布局。下方是该蓝图的特写。
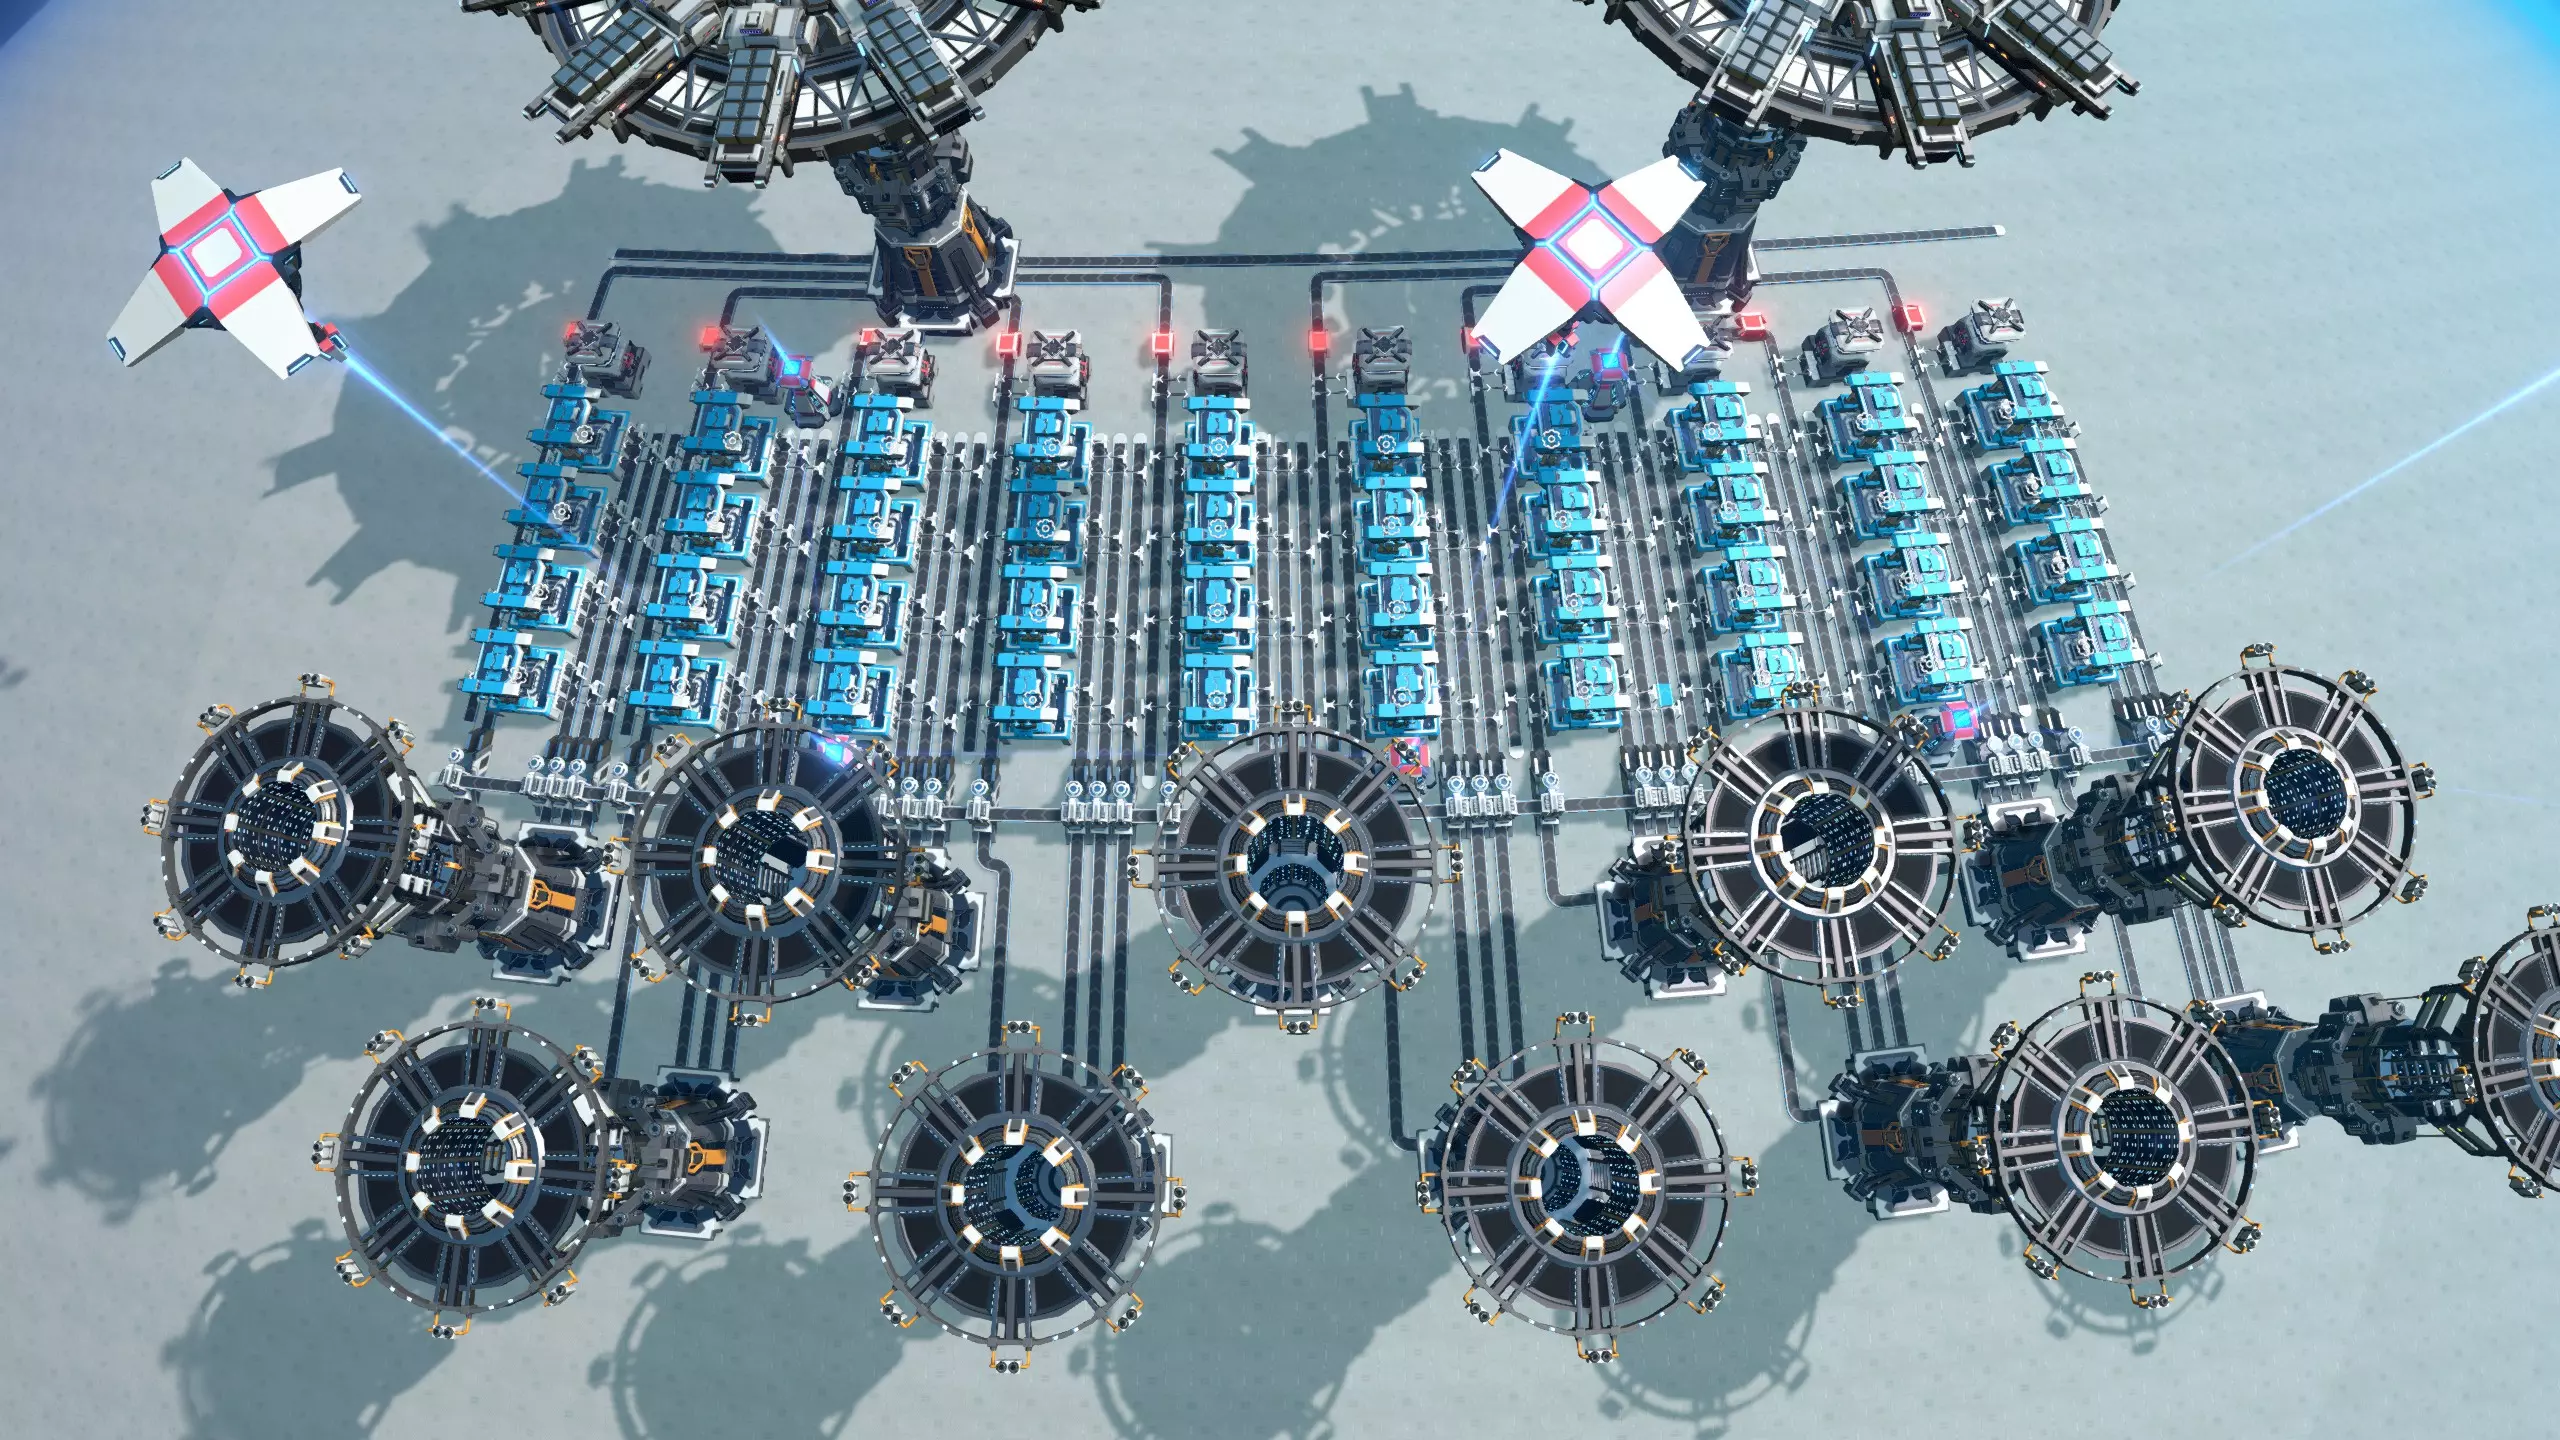
请注意,此设计已完全模块化。每列装配机负责生产一种建筑,因此在该设计中,每个建筑对应四个装配机。除了最硬核的极致玩家外,这样的配置有些过剩;显然,你可以根据自己的偏好和游戏风格调整设计。两列装配机之间有五条传送带:左侧装配机列有三条输入传送带,然后右侧列有一条输入传送带、一条输出传送带和另一条输入传送带。中间的传送带可供两列装配机共同使用,因此可用于为需要五种输入材料的装配机供料。 最终,生产出的建筑会暂存在箱子中,每五种建筑对应一个星际物流站,负责将所有物品跨星系导出(详见【建筑配送】部分)。如果你想确保你的商场拥有足够的产能,以支持你在游戏后期进行的各种疯狂操作,那么这样的设计或许适合你。如果你还纳入了回收系统,最终成品可能会是这样的:
如何建造星际物流系统商城 为充分发挥星际物流系统(ILS)的优势,我们完全无需考虑空间问题,可使用一种能够制造、输出并回收单个建筑的蓝图,同时避免依赖商城的其他任何部分。这意味着每个建筑需要两个星际物流系统。通过这种方式,我们可以导入所有所需材料、增殖剂、空间翘曲器以及用于回收的已生产建筑,完全无需任何外部依赖。 我的此类蓝图版本如下:
请注意,组装机最多可使用五种增殖输入材料。三个组装机正下方的输出传送带也用于回收建筑:它由左侧的星际物流站输入,并由右侧的星际物流站输出。 如果你为每个想要制造的建筑都按此布局,就能轻松打造一个高吞吐量、具备增殖功能且各建筑相互独立的回收式购物中心。如果你制作这样的蓝图并放置多个来构建完整的购物中心,可以将它们相互偏移以使其更紧凑:将第二个副本向侧面移动20格,并偏移15格。完整回收型行星物流系统商场 回收型行星间物流系统商场,单体建筑 供应所需材料
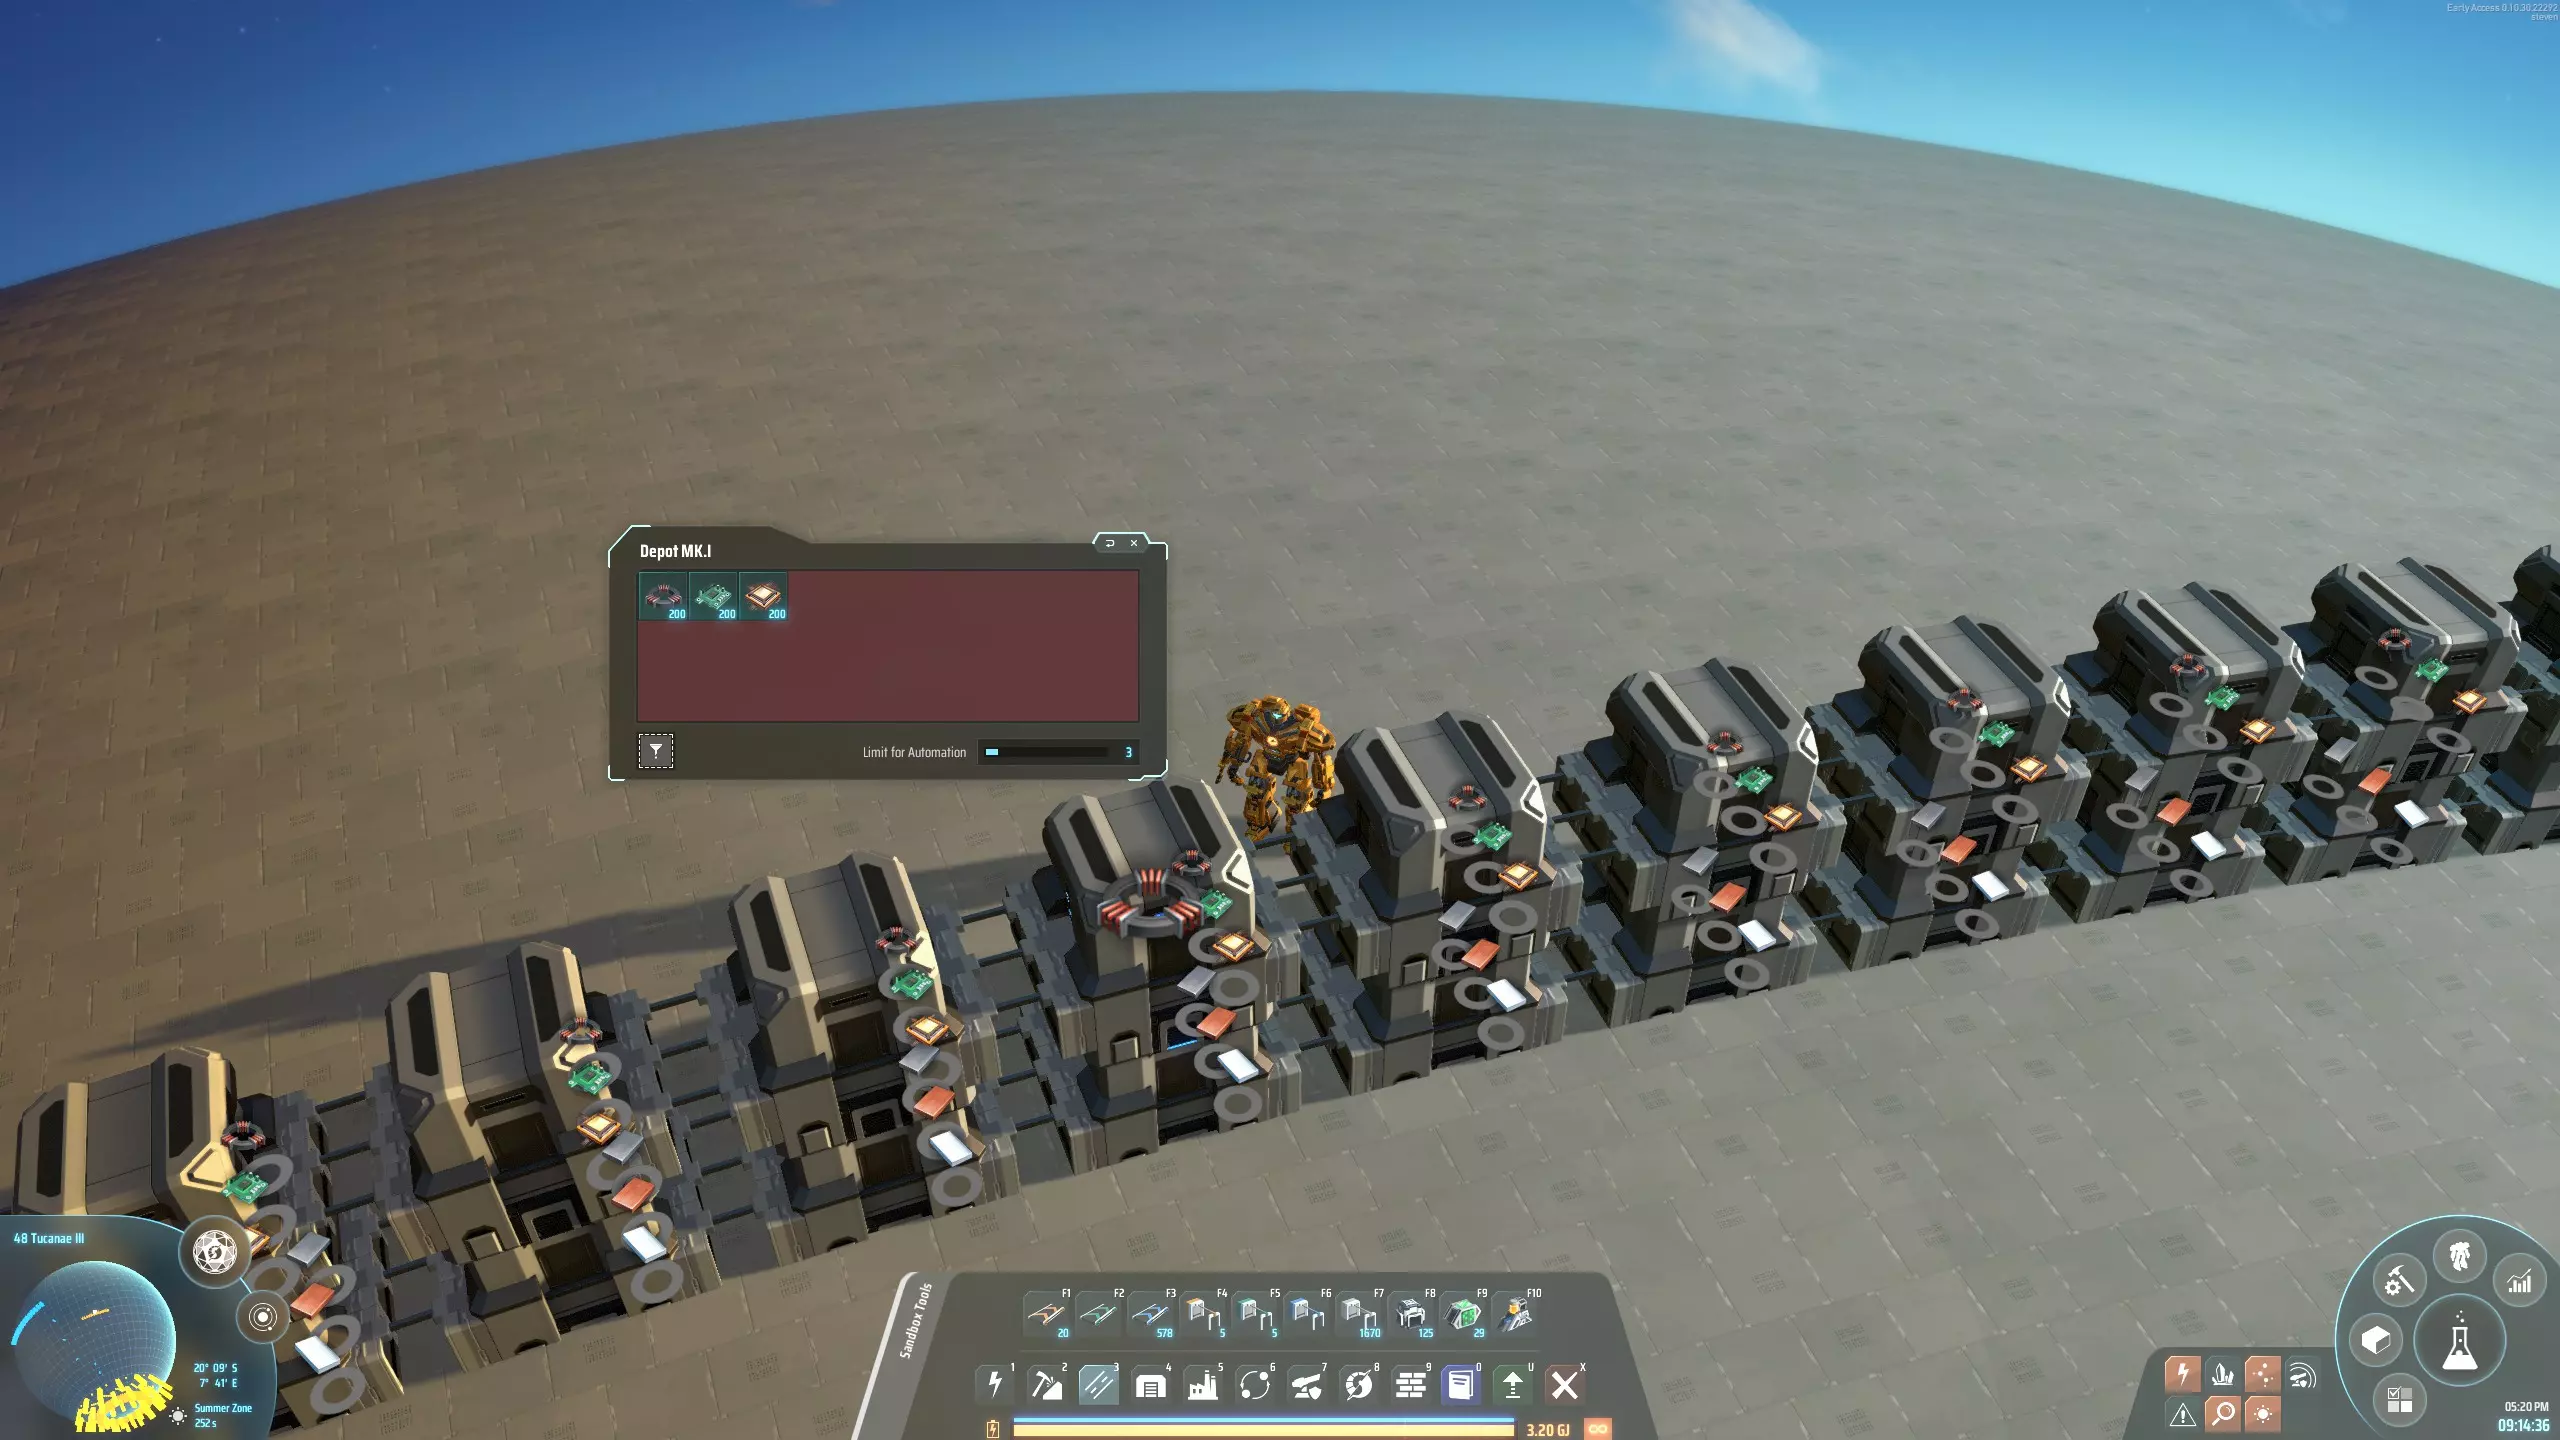
The way you supply your mall depends on which stage of the game you are in. In the early game, you don't have logistics solutions unlocked yet, and you need to supply your mall directly by processing some ores into the materials you need. Later in the game, your materials will be delivered using either logistics distributors, or logistics stations, with the latter allowing for a higher throughput. Early game productionThe image above shows a blueprint that I use with the five belt mall. It fits in the 300 facility blueprint limit, and it makes a reasonable amount of the materials that you need for early game buildings: 3/s magnetic coils, circuit boards, and stone bricks, 1.5/s gears, and 6/s iron ingots. This same blueprint can also be used for other early game malls, such as the full bus mall, or even a sushi mall. (My separate guide on building a sushi mall in the early game uses slightly different, but similar designs.) Some players prefer to produce in a little bit higher volume than this from the get-go, but that tends to result in lots of blueprints that need to be chained together, which I never like as much. But if you build from scratch, that is not a drawback, and you could choose to make full belts of each of those materials, as well as copper, glass, and steel. Logistics distributorsThe first more sophisticated logistics option that becomes available are the logistics distributors, when you are producing red science matrix. It is often tempting to use logistics distributors to hack additional buildings into a onto a mall design that is not very suited to it, like a five belt mall, or designs where it is not convenient to make absolutely every material available, which is the case for the full bus mall, the box mall, and possibly for the sushi mall as well (although in my own implementation the sushi belts do contain all building materials). There is nothing wrong with this as long as your base stays relatively clean, and adding buildings still feels easy. But if you start getting spaghetti, you might want to consider if you should maybe bite the bullet and build a genuine bot mall rather than pretending to build something else. If you are building a bot mall, logistics distributors are the method by which your mall ultimately should be supplied. So in this case, you might find yourself tempted to organise a large part of your base with logistics distributors, and produce not just buildings, but also some of the lower volume intermediate materials that way. If you do this, then make sure that your end products are ultimately produced somewhere close to your mall, so that they can be shipped to the right assemblers quickly. It is more common and usually better to use planetary logistics stations to organise production of intermediate materials. This means that to supply a bot mall, you need an interface, where 12 or so PLSs import all required building materials and make them available using logistics distributors. The section on bot malls shows an example of this. Planetary and interplanetary logisticsIf you use planetary or interplanetary logistics stations to organise your production from the mid-game, as most players do, then the next question is obviously: how much of everything do I need to feed the mall? This is difficult to estimate because it depends a lot on your play style. (That's also the reason why I think it's useful to decouple production from the actual mall design.) Another reason why it is difficult to give clear guidelines about this is that you usually start building your mall when you are still on your home planet. So your starting planet often ends up turning into your mall world. However, you often do other production as well on your starting world. For example you might do some science matrix production on your home world, or make the first few carrier rockets. If that same production infrastructure also feeds the mall, it becomes hard to disentangle. Not a bad way to estimate realistic production ratios is to make an estimate of how much of every building you will use per minute, put all of that in factoriolab[factoriolab.github.io], and use the ratios it gives you. However at the time when you build your mall, perhaps in the early mid-game, you might still find yourself on a single world, using intermediate materials not just for the mall but also for other kinds of production. So you could also decide to just add production on an as-needed basis. Although this is a bad strategy in the late game, because it leads to the dreaded "bottleneck chasing", it tends to work out okay in the early and midgame. The late game and decoupling productionWhile it is normal that during the early and midgame, you have different kinds of production on the same planet, going into the late game, I strongly recommend taking the opportunity to decouple different production processes from each other as much as possible. In this context that means: decoupling production for the mall from all other production. To do this, you need to do the production for your mall on the same planet as the mall itself. That way, you can make sure that no materials for the mall are exported anywhere else, and your mall world only imports raw ores. So for example, say you've built almost everything on your home world, but now you've reached the late game and you are ready to start scaling up science production. Then you move science production off-world, so that it cannot eat into the production from the mall anymore, or vice versa. All the quantum chips that you were making on your home world for green science you keep making, but now they are all just for the mall, which is great, because it means the mall has a robust supply stream for the late game when you will be taxing it more. Delivering the buildings Once all buildings are being produced, the next and final step is to make them conveniently available. The mechanism used to do this ranges from barebones to very sophisticated. Each method builds on the previous one, so we will discuss each in turn. Level 1: stick everything in a box
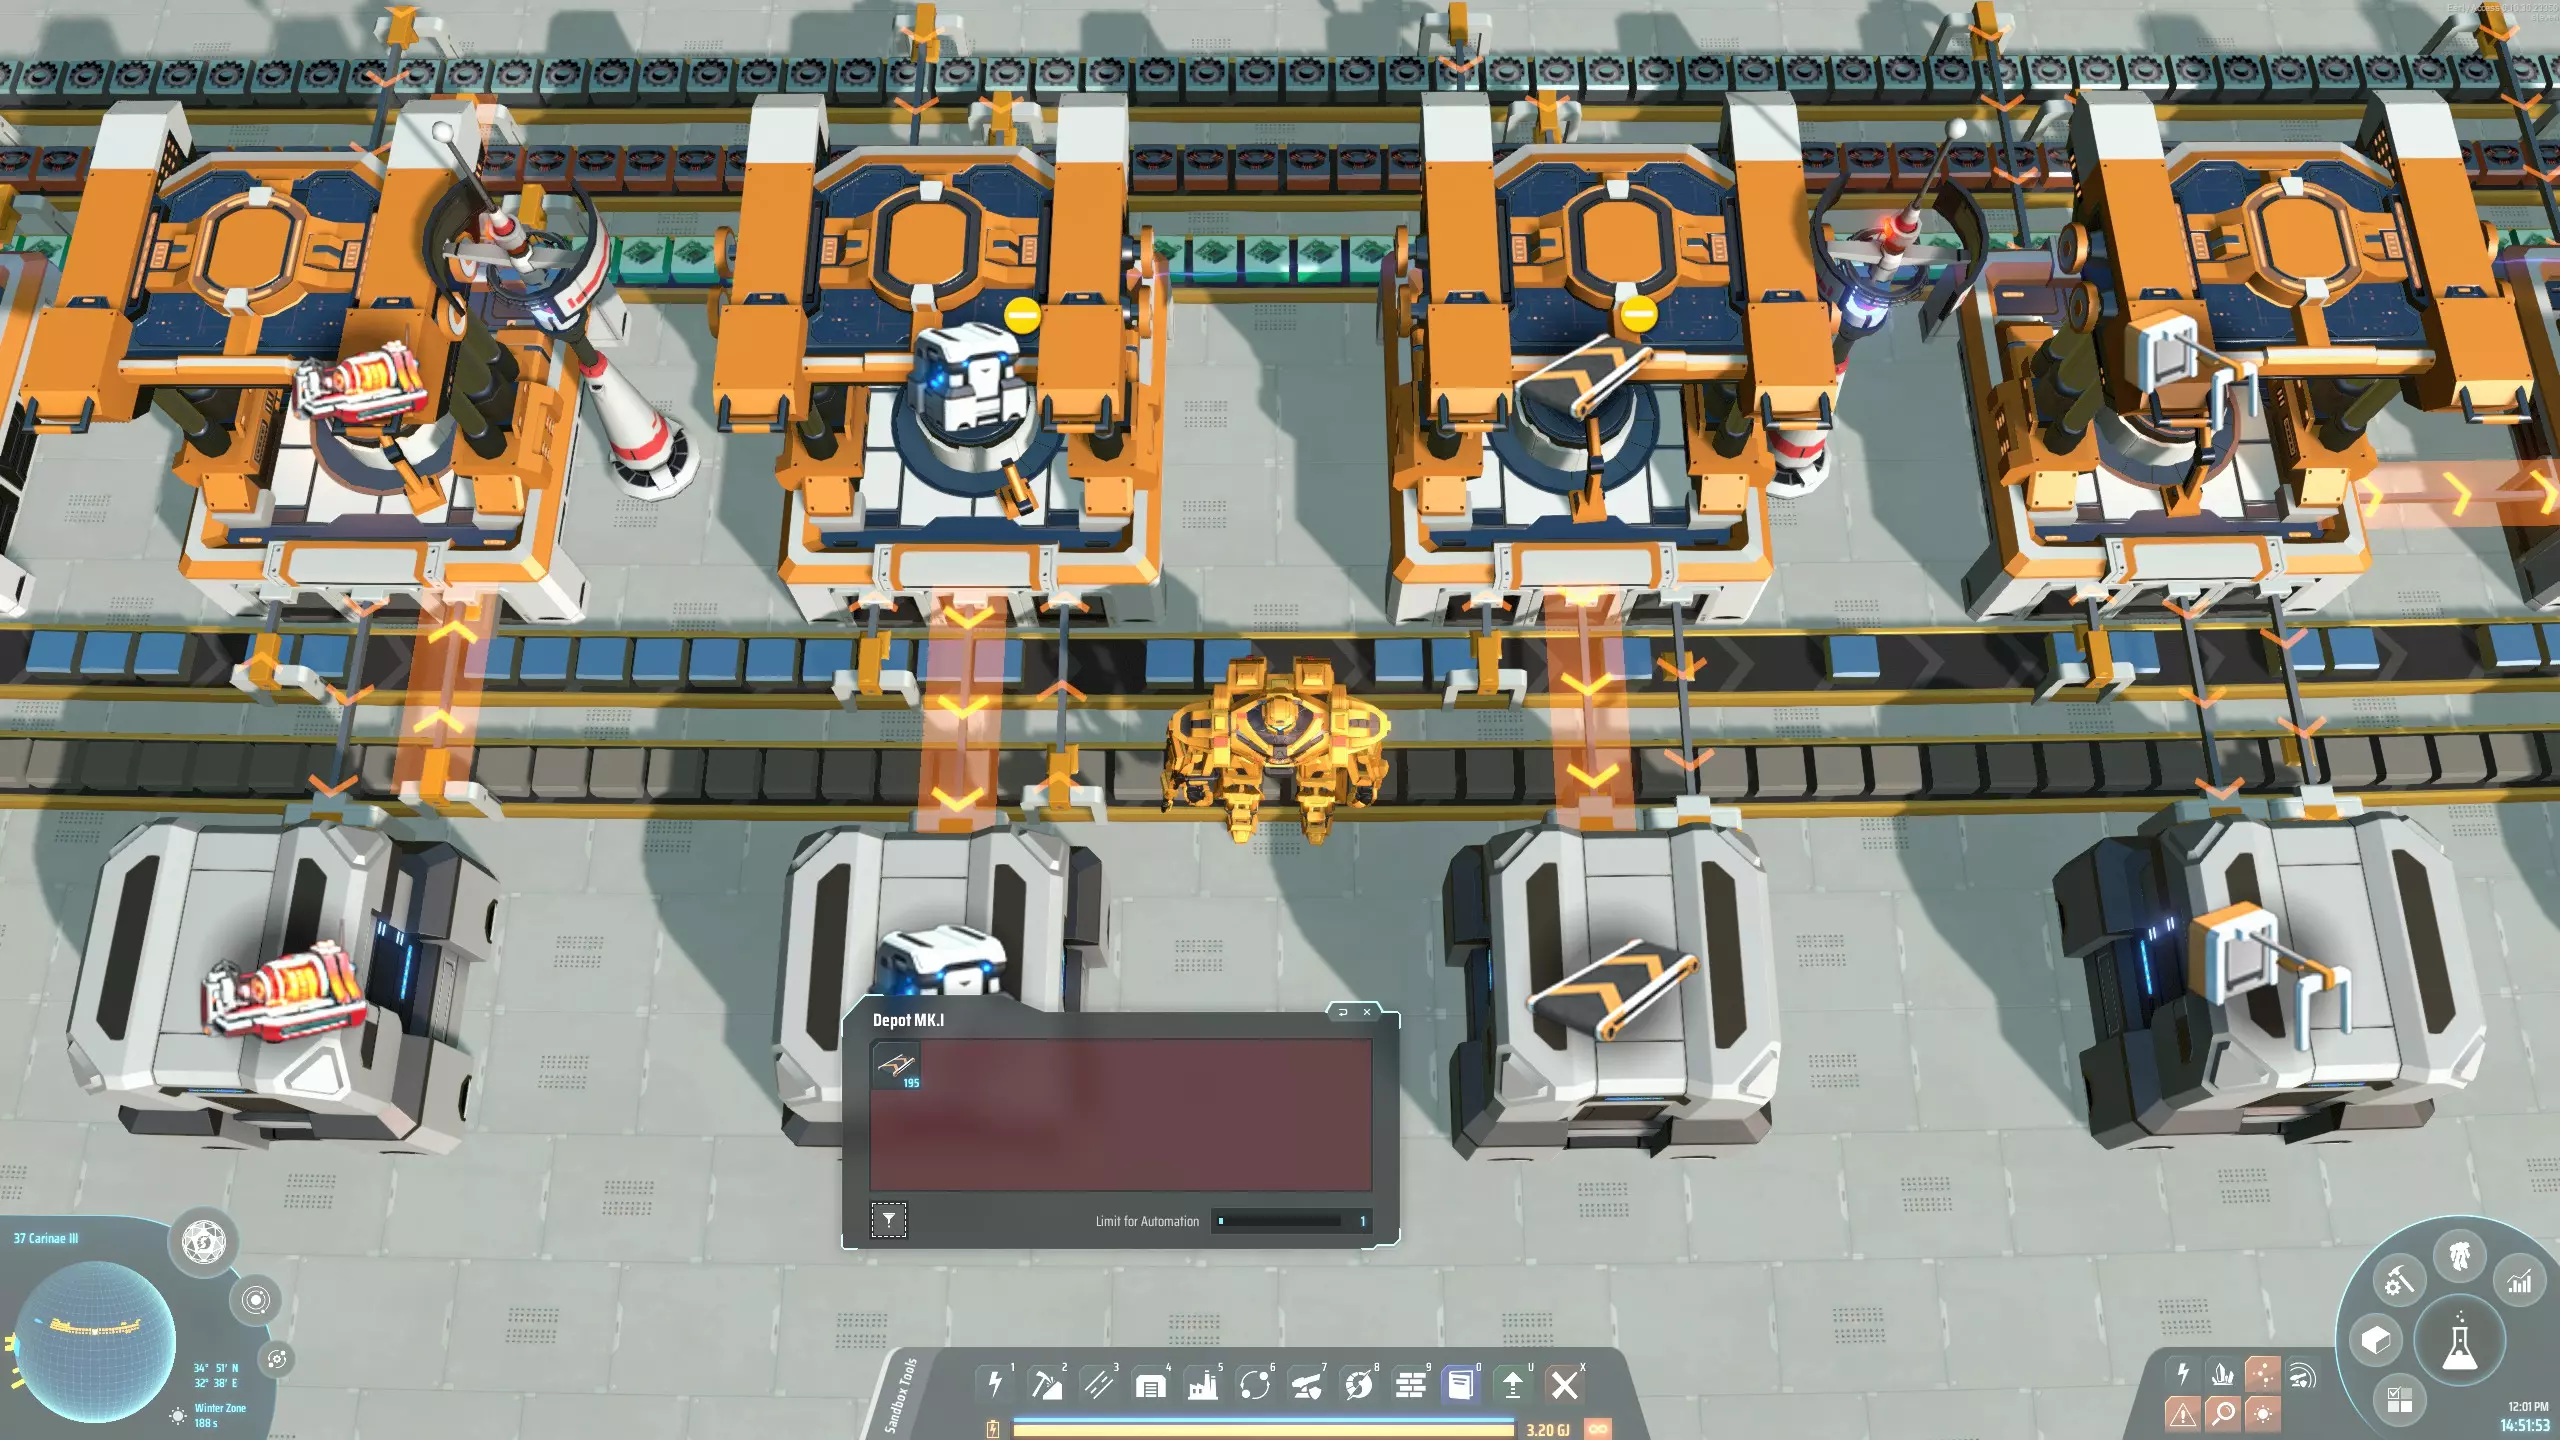
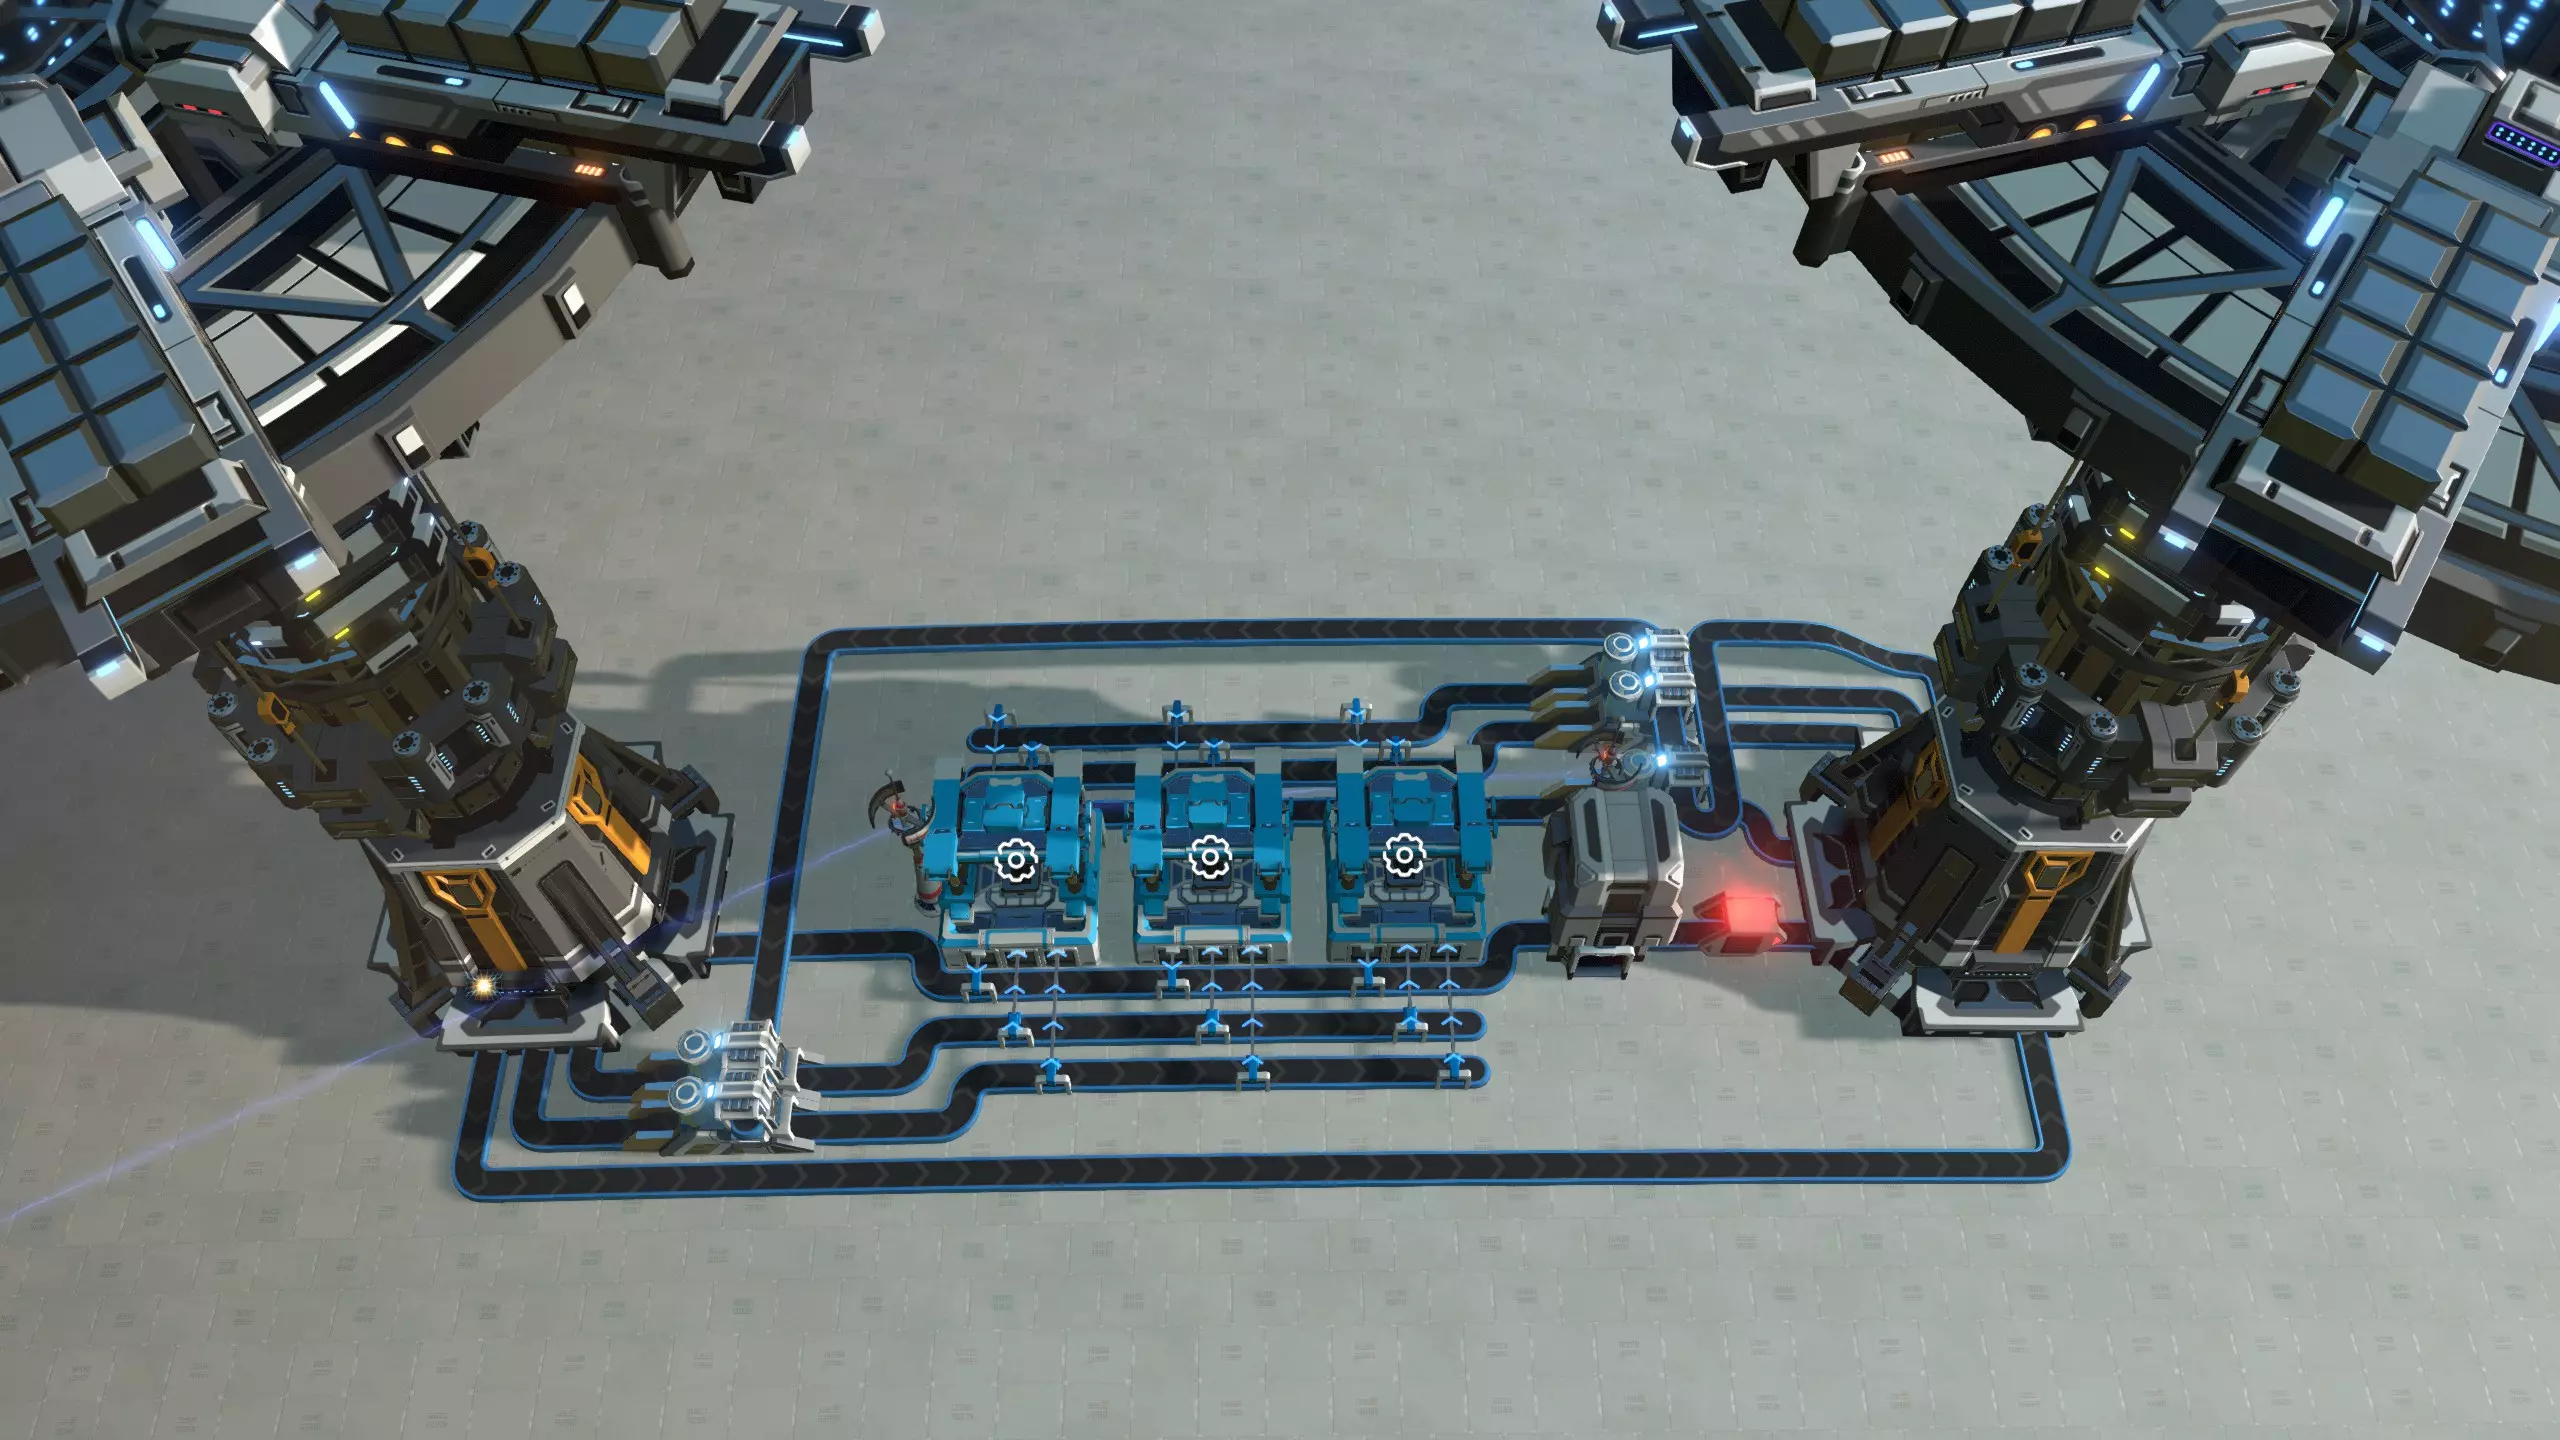
最简单的交付方式就是将生产好的建筑放入箱子中。 在游戏初期,如果组装机和箱子之间的距离较远,要注意分拣器可能会成为设计中的瓶颈。例如,一台MK1组装机每秒可生产2个MK1传送带。如果储物箱距离组装机3格(如图所示),一台MK1分拣器每秒只能运输0.5个传送带,这会使生产速度降低4倍。在这种情况下,你可能需要升级分拣器或使用多个分拣器。 此外,将箱子的存储容量设置为你想要生产的建筑堆叠数量也很重要,否则你可能会很快制造出大量昂贵的建筑。如果不确定,可将存储容量设为1,仅在决定要多收集某类建筑时再进行扩展。 等级2:物流分配器
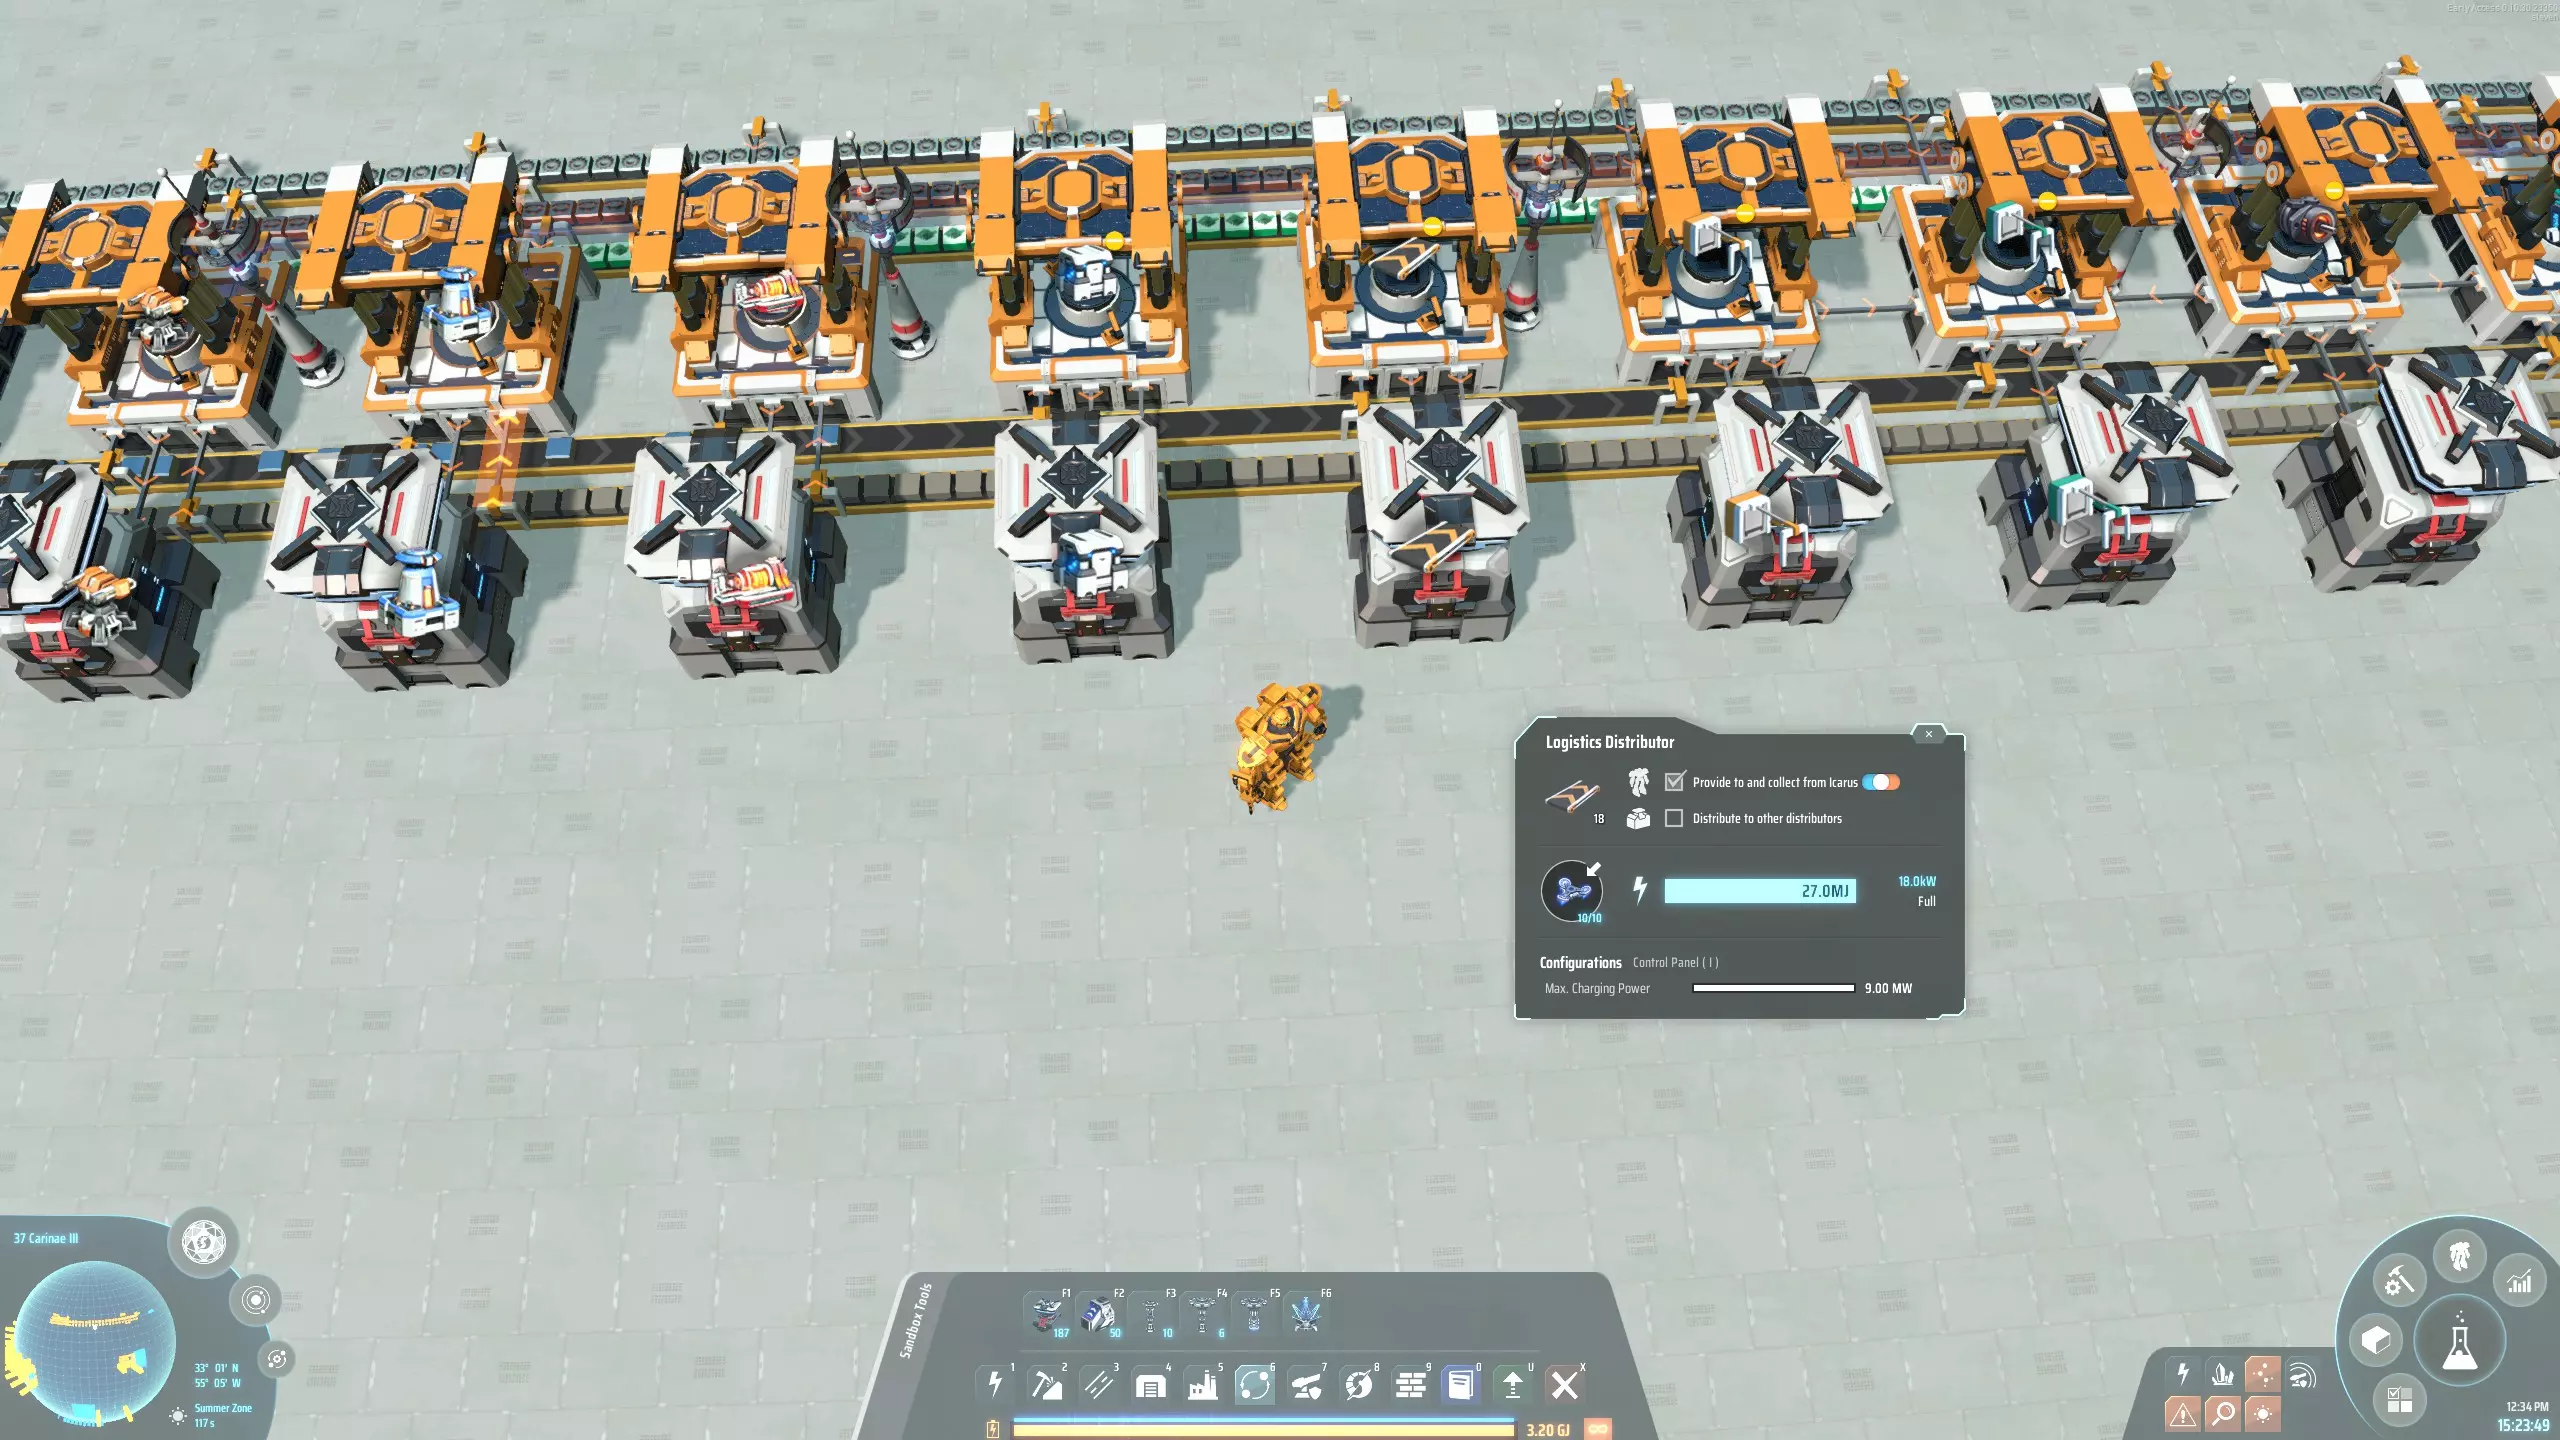
一旦解锁物流配送器,就可以很方便地给部分或所有储物箱“戴上小帽子”。这能让所有建筑材料自动运送到伊卡洛斯,极大提升游戏体验。只要你在母星活动,就不用担心传送带或分拣器耗尽了。 只有当你经常亲自待在枢纽附近时,物流配送器才能发挥作用。更高阶段需要将建筑分布在整个星团中。如果你很少去这类枢纽,物流配送器的价值可能不大,具体效果因人而异。 第三阶段:星际物流网络
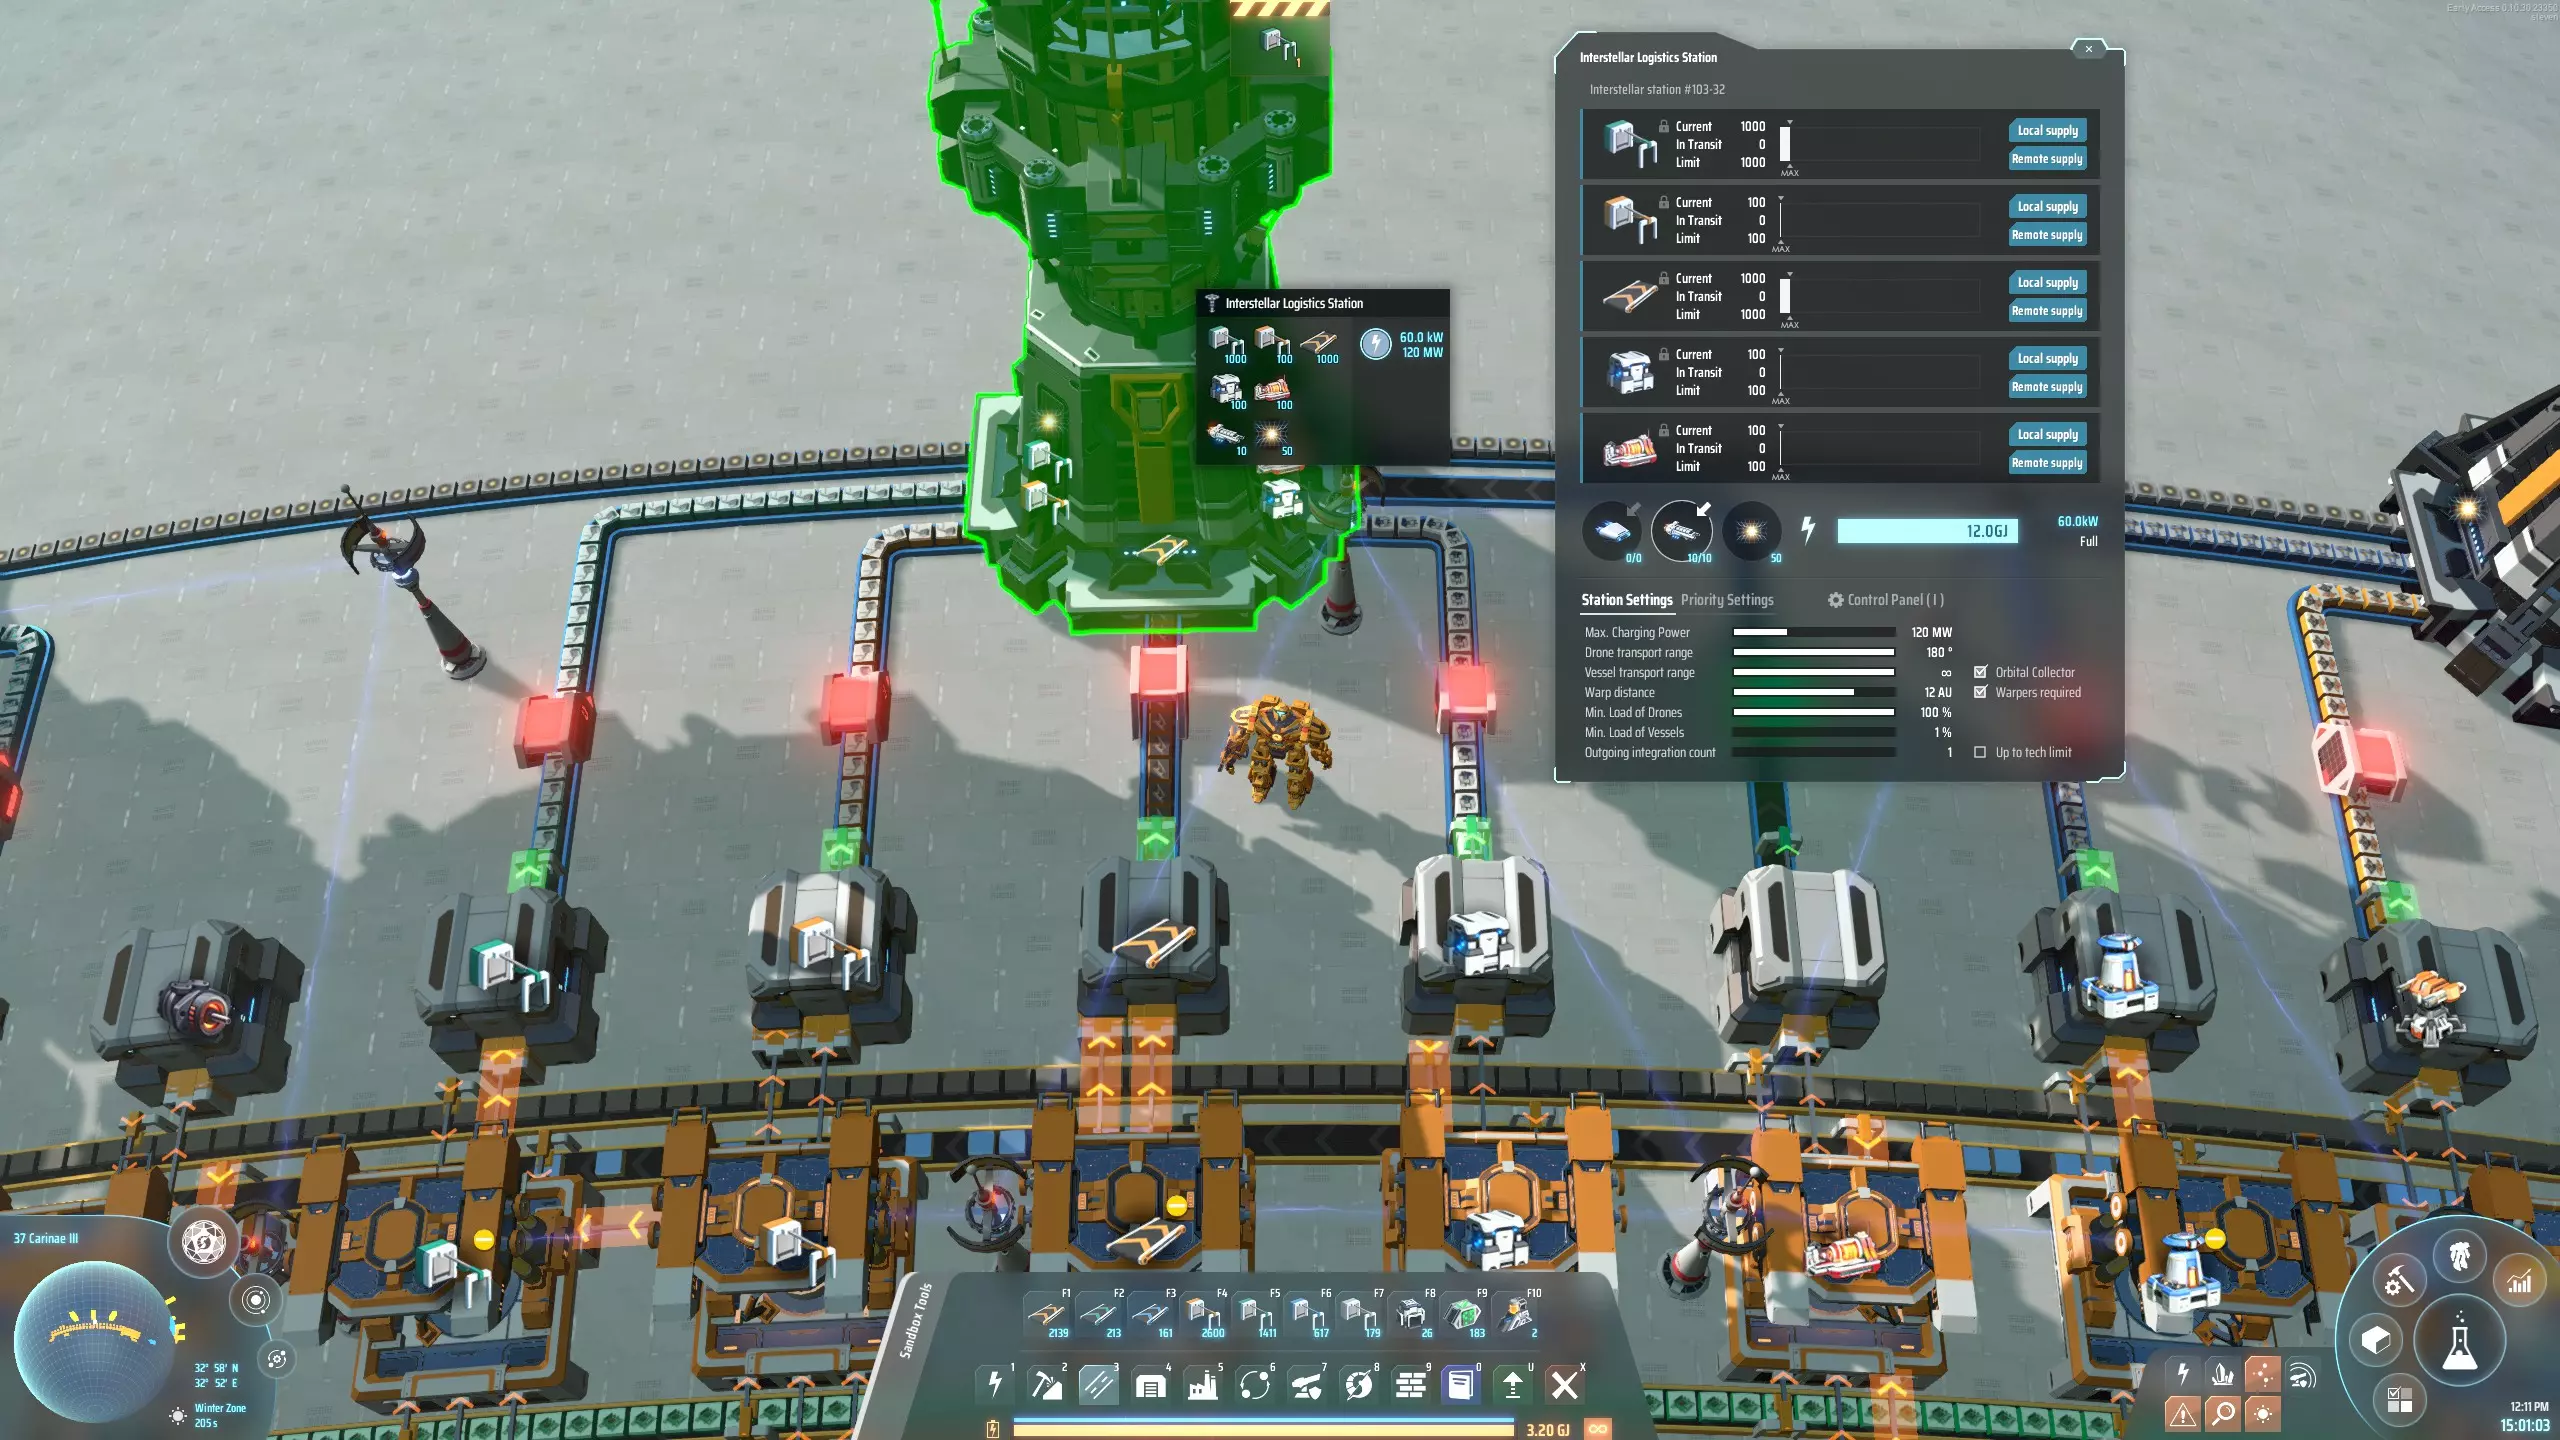
一旦解锁了空间翘曲器,你会希望基地通过星际物流站(ILS)向整个星团运送建筑。 星际物流站可以存储和运输最多五种不同的建筑。由于该站有自己的存储空间,你可能会认为之前用来存放建筑的所有储物箱现在都可以安全移除了。但出于技术原因,最好不要这样做。假设你正在某个偏远星球工作,决定要运送一些小型粒子对撞机。于是你放置一个星际物流站,将一个槽位设置为粒子对撞机,将存储上限设为100,并选择【远程需求】。遗憾的是,你会发现大约2000个粒子对撞机被运送(具体数量取决于你的物流船容量升级等级)。原因是当物流船离开星际物流站时,它总是会携带尽可能多的可用产品,无论实际需要多少。 因此,为了确保你的建筑以合理数量运输,你必须将中央工厂星际物流站的存储上限设置为你希望一次性运输的建筑数量。对于许多建筑,这将是最低100个。对于某些建筑,如传送带和分拣器,或者可能是太阳能板和物流无人机,你可能希望一次性多发送一些。随后,你还必须设置“最低”。将“载具负载”设为1%,这样即使载具未装满,也会按该数量装载建筑并出发。同时,我将每个建筑的条目设置为本地和全球供应。 一旦货物从物流中心发出,星际物流站应尽快补充库存,以防你需要请求更多建筑。这就是保留之前的储物箱很有用的原因。储物箱的存储容量应设置为大致能容纳与星际物流站相同数量的建筑。重要的是要快速将物品从储物箱中流出,这可以通过使用堆叠分拣器或将储物箱放置在分流器上来实现。物流站应配备物流飞船和空间翘曲器。这样,当你被困在没有电力的荒芜星球上时,只要放下一个未供电的星际物流站并请求建筑,飞船就会离开物资中心并直接飞往你所在的位置。根据你的物资中心设计,你可以通过传送带将翘曲器在星际物流站之间进行链式供应,这样就只有一个星际物流站需要请求翘曲器。或者,有时人们会使用物流分配器为星际物流站供应翘曲器。我通常将星际物流站设置为【本地供应】和【全球供应】,但不配备无人机,只配备飞船。 交通监控器 既然你在整个星团范围内使用物资中心,那么你亲自前往实际物资中心的次数可能会减少。因此,尽早发现建筑生产线的问题变得更为重要。可以通过在存储箱和用于出口建筑的星际物流站之间放置流量监控器来实现这一点。为了减少误报的可能性,将周期时间设置为60秒。将目标速率设为0,条件设为“>”,并在“失败且无货物”时触发警报。你可以为所有流量监控器使用默认警报图标,这样便于在各处放置;也可以通过为每个警报图标设置相关建筑来进行自定义。这样一来,若任何建筑因任何原因停止正常生产,屏幕顶部会出现一个警报图标。你可以点击该图标,然后跟随指引线前往商场内的相关位置,在那里你或许能够排查并解决问题。 等级4:回收利用
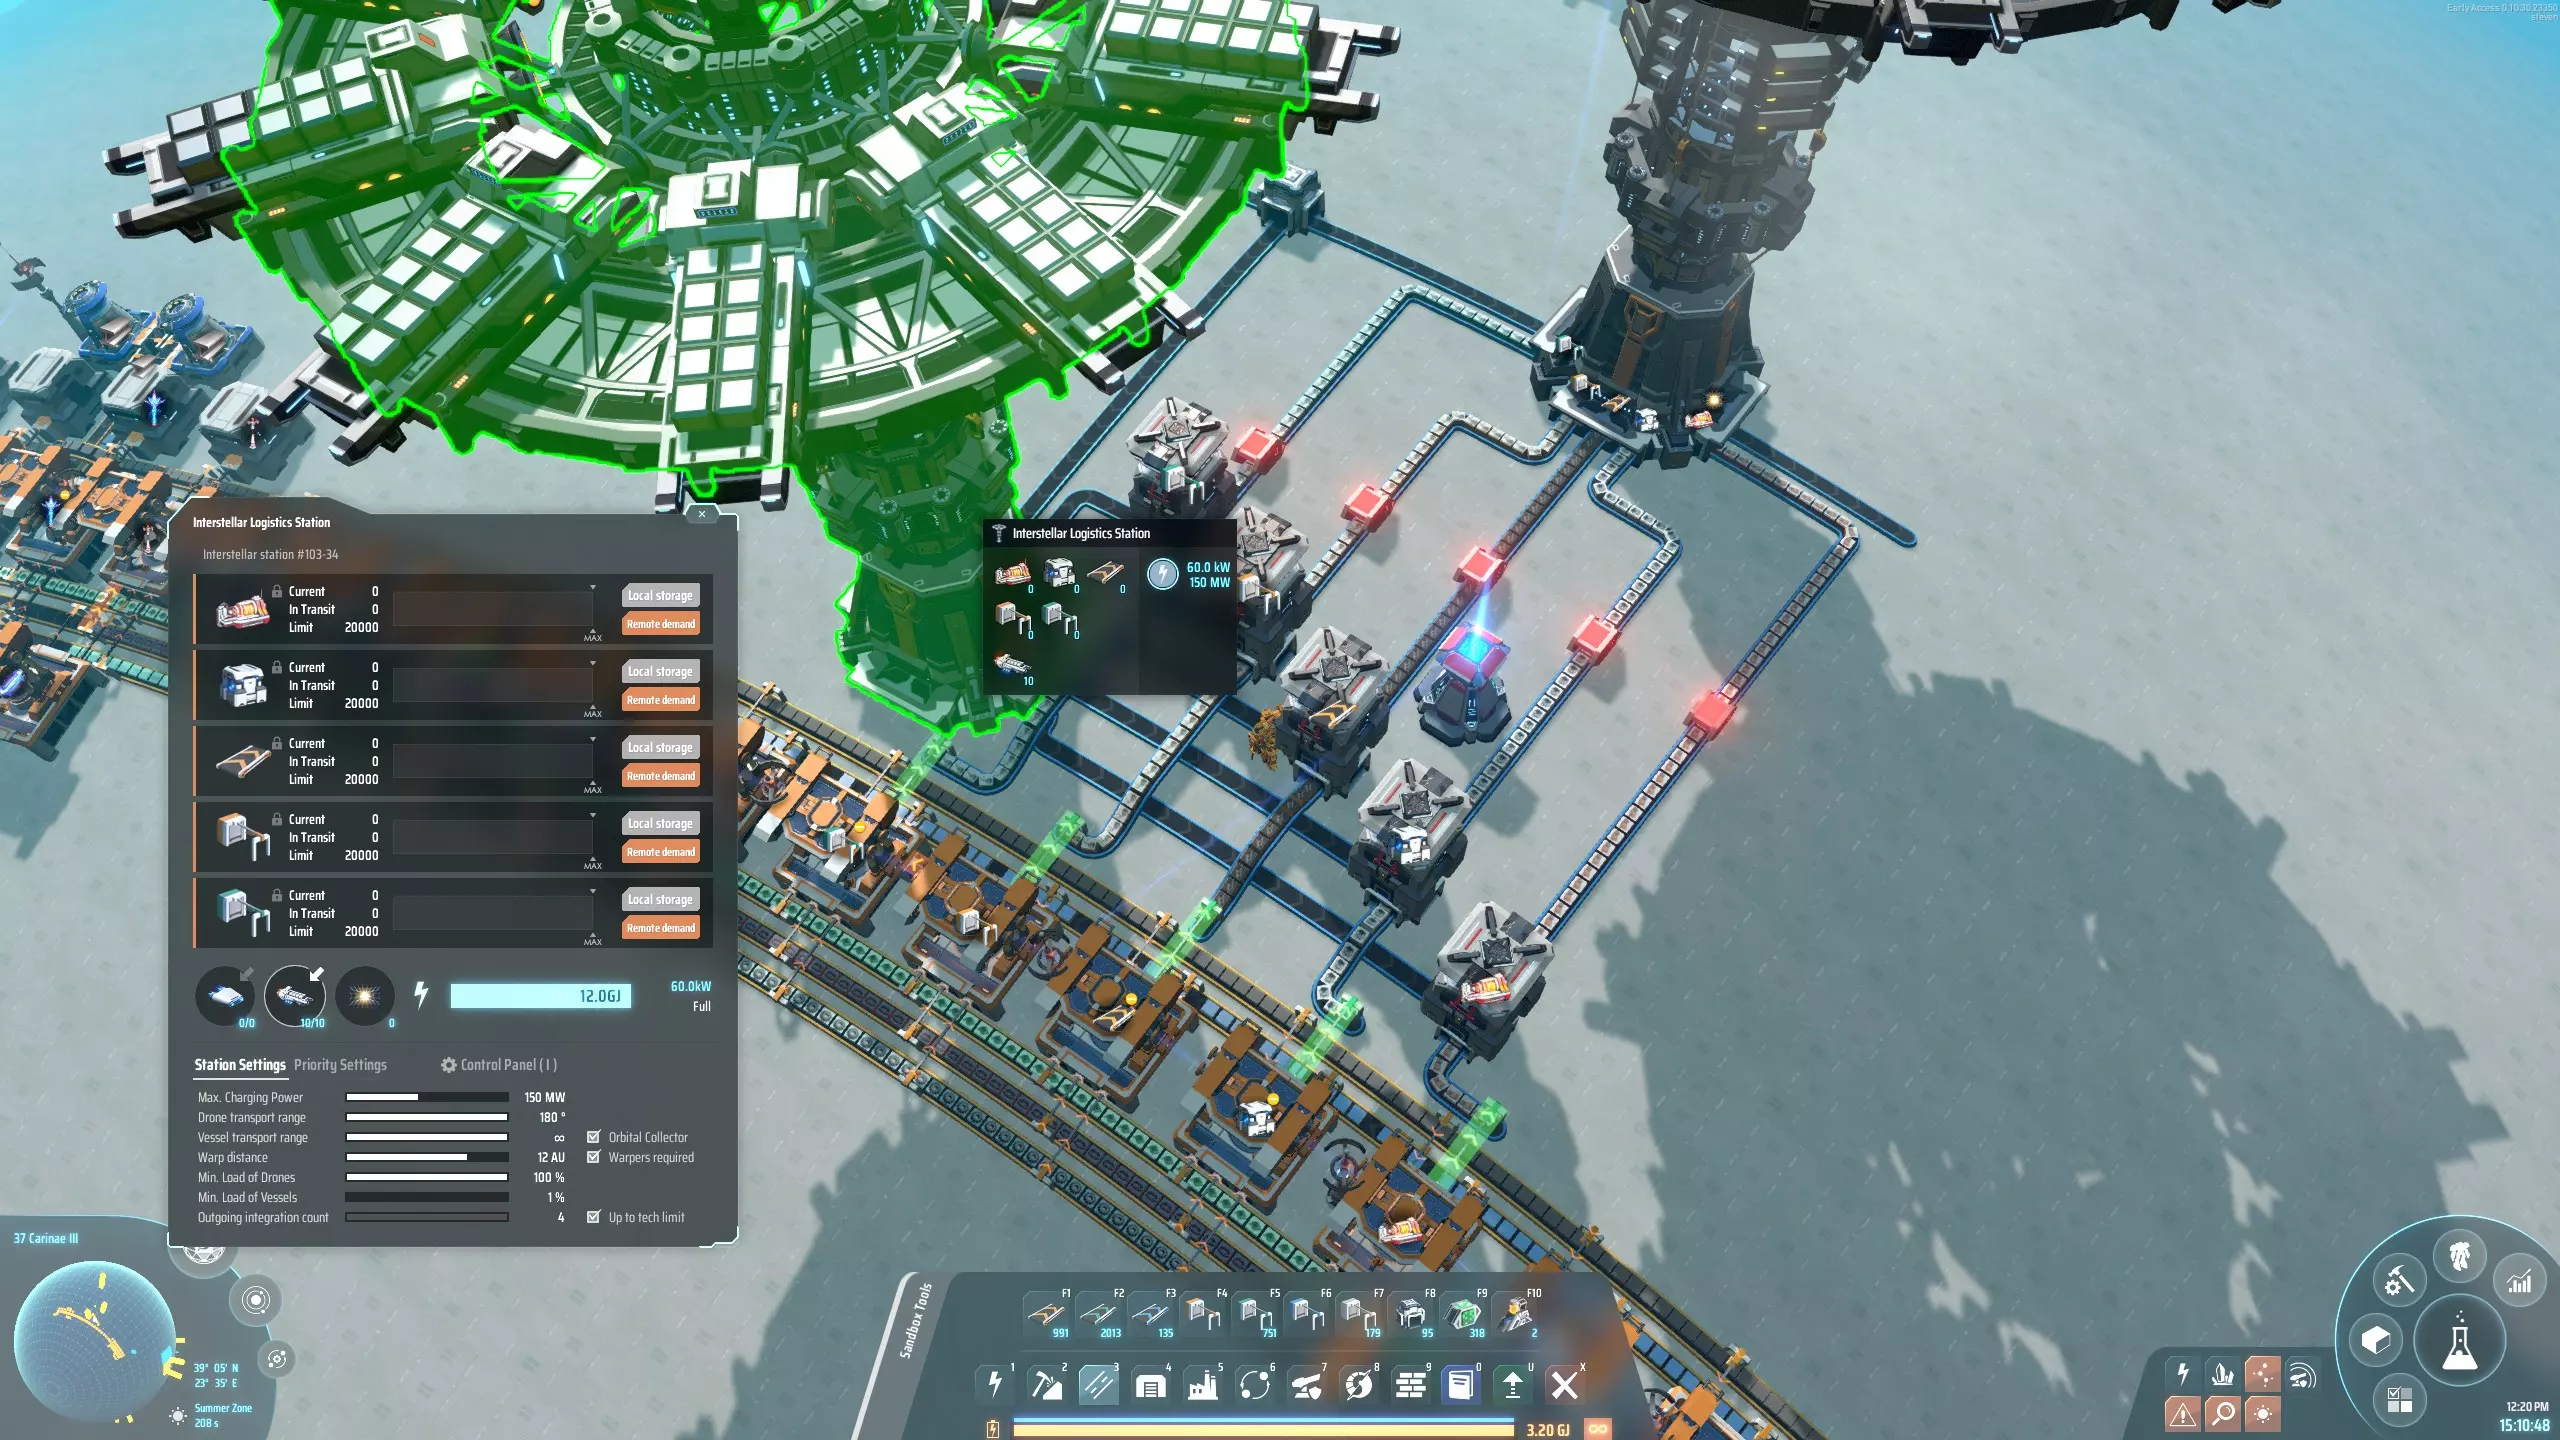
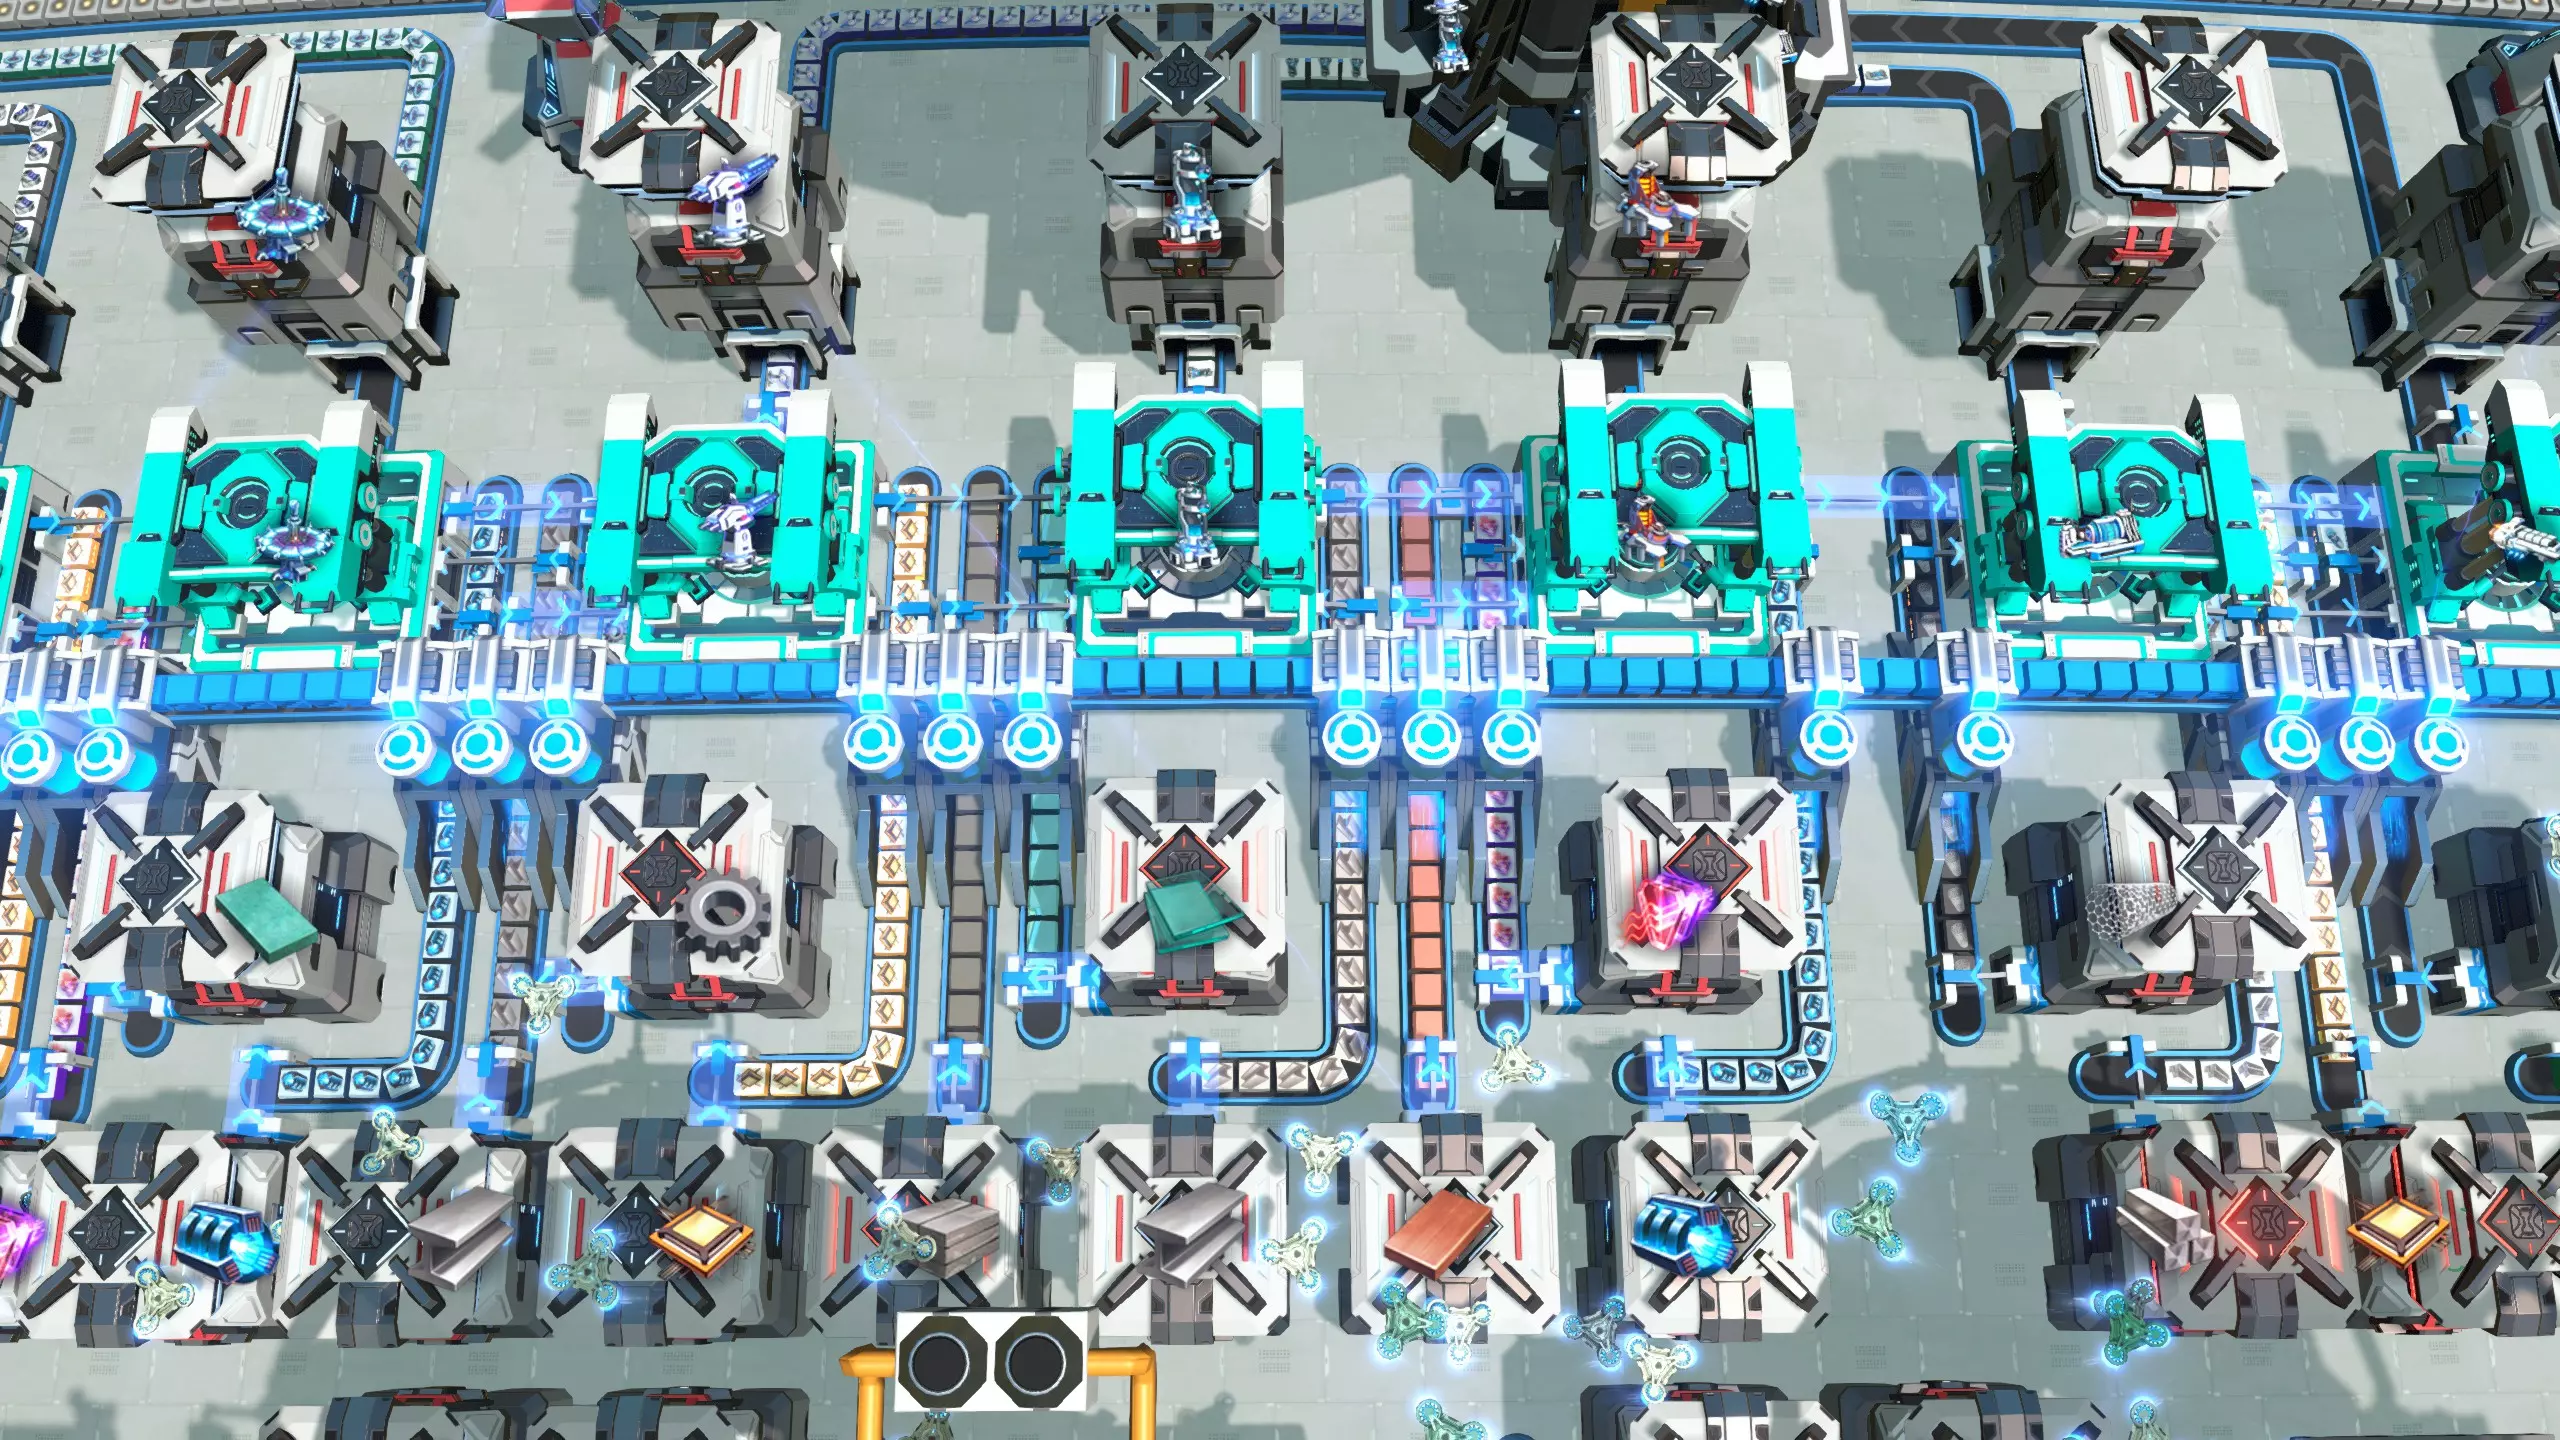
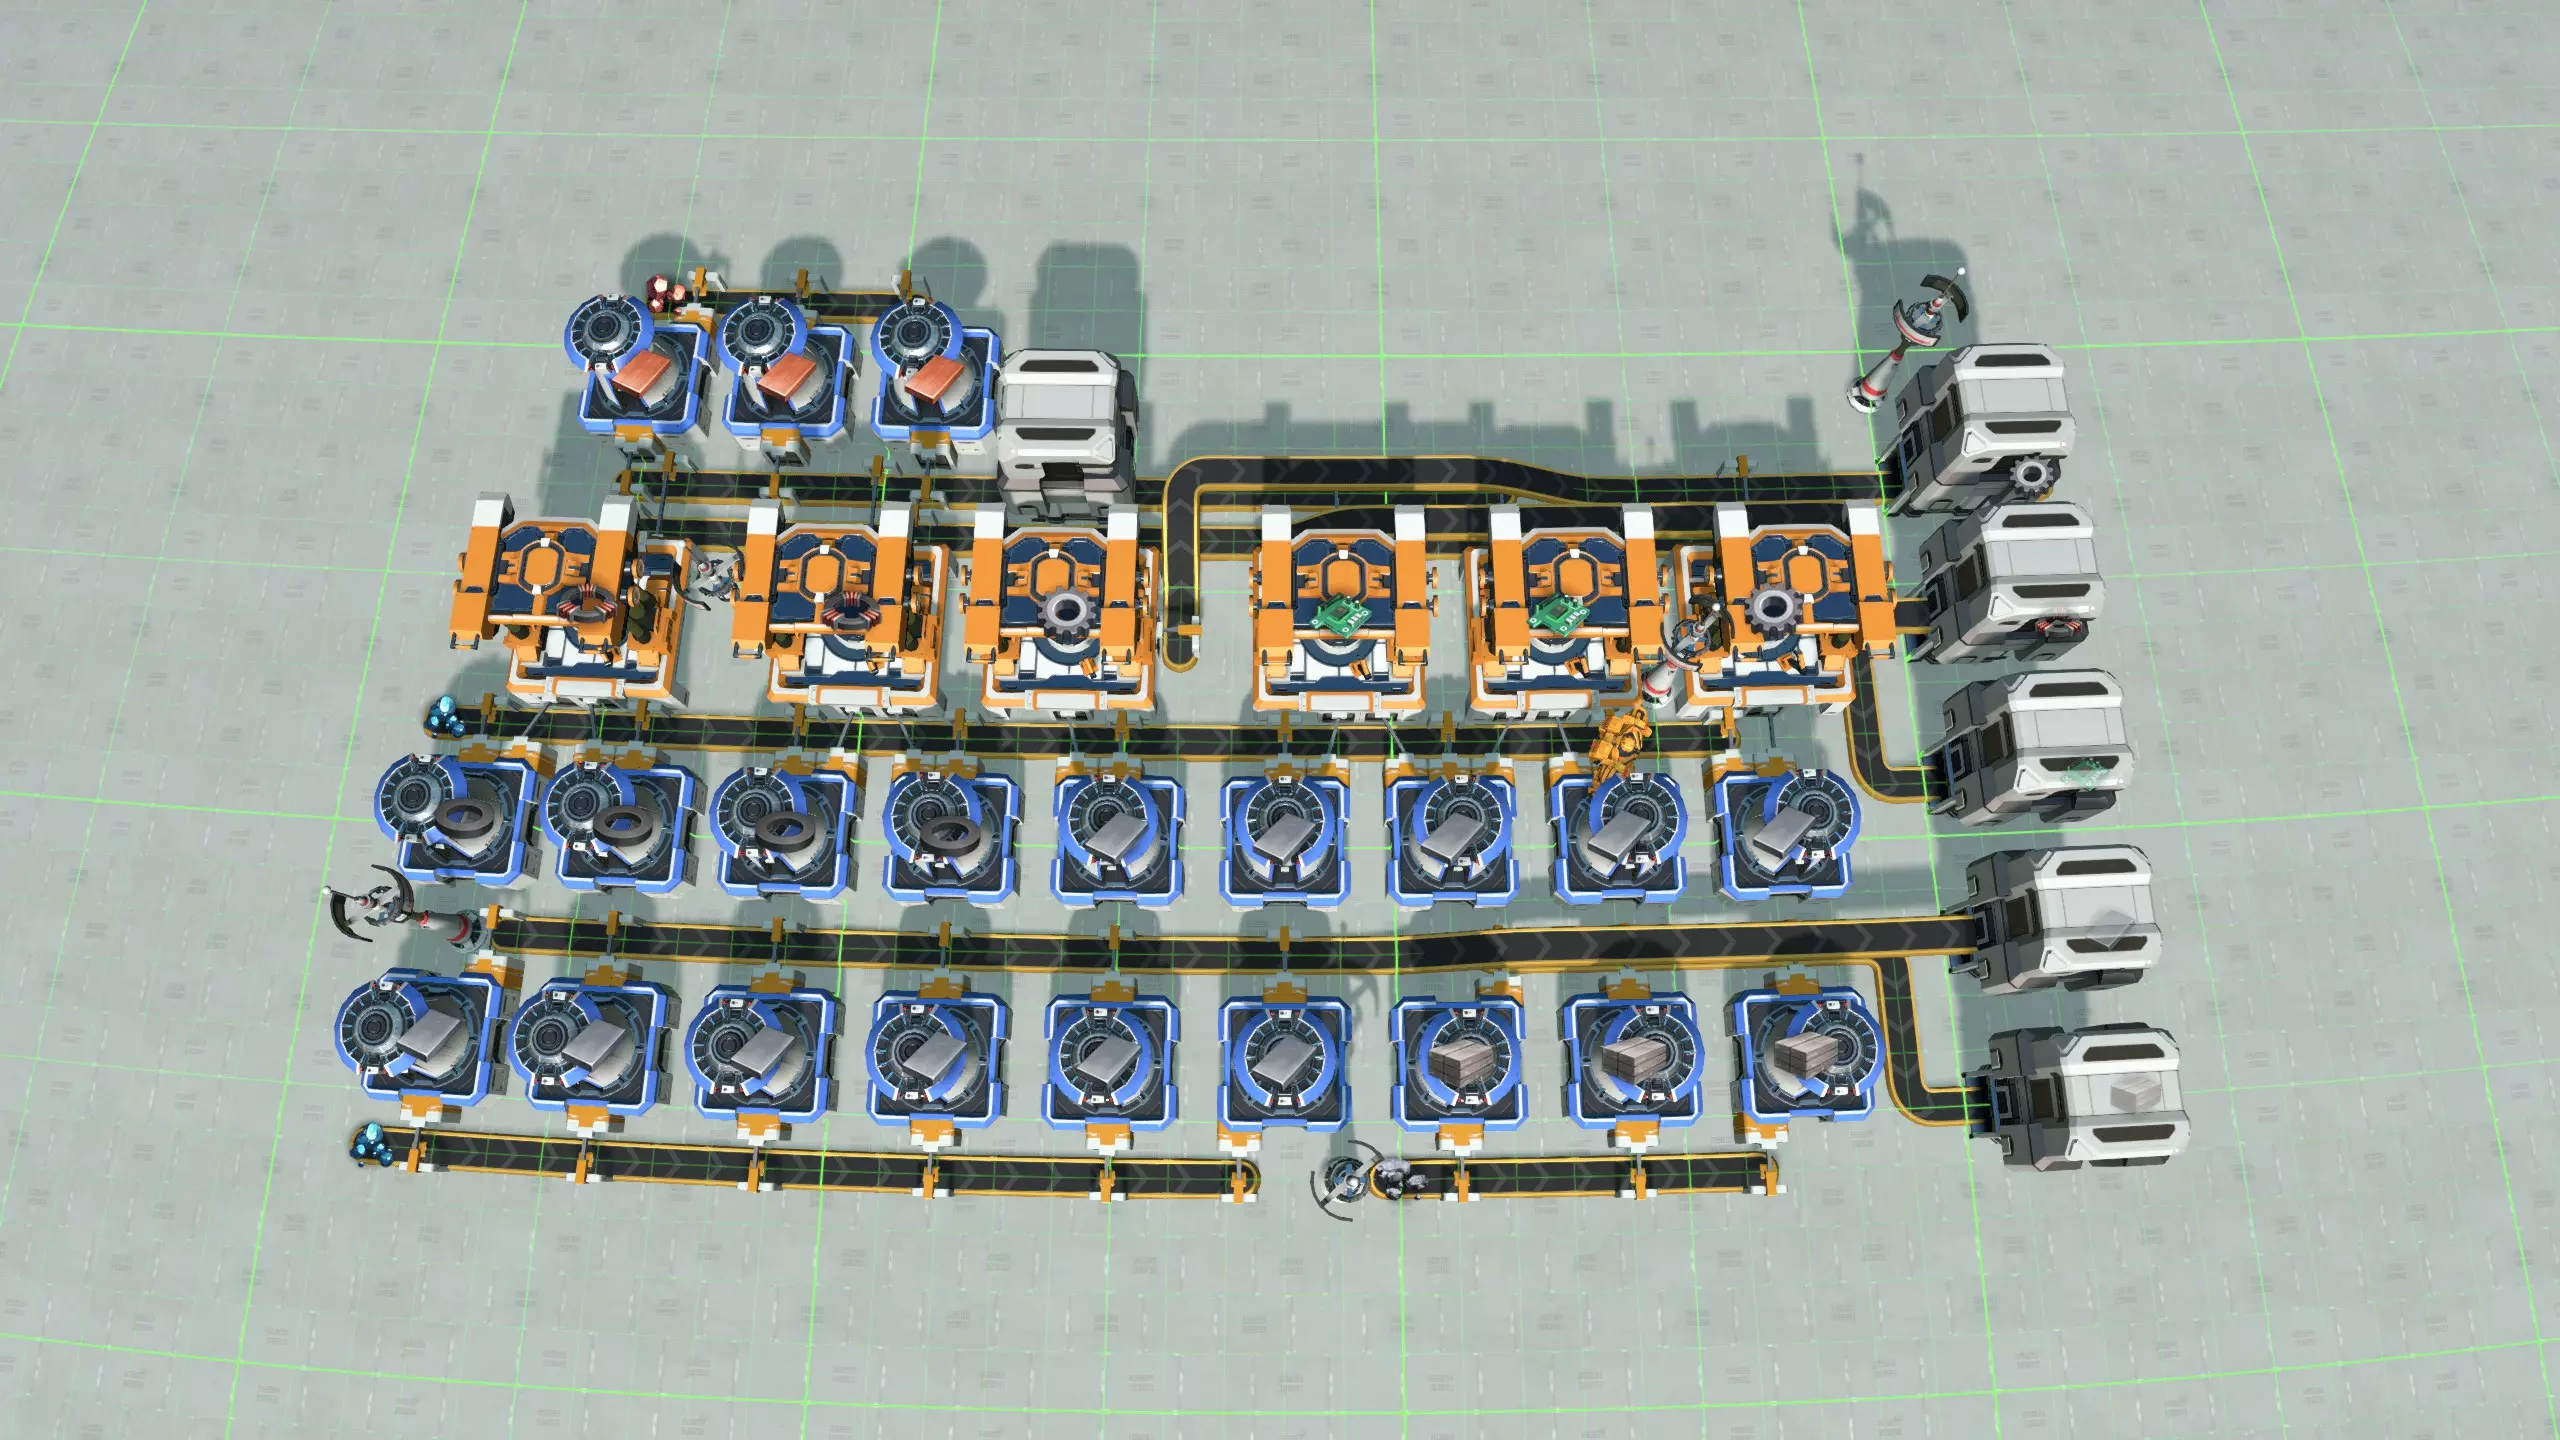
回收意味着物流中心不仅会按需发送建筑,还会在你拥有过多建筑时将其回收。如果你在星团的某个地方有不想使用的建筑,可以将它们放入设置为【全局供应】的物流塔,物流中心的运输船会前来收取这些建筑。之后,物流中心会为你保存这些建筑,并优先使用它们,而非生产新的建筑。 回收型物流中心需要大量额外的星际物流站才能正常运作。不过,根据你对空间、简洁性以及纯粹便利性的权衡,这可能仍然值得。 主要有两种回收设计。最简单的方法是在星际物流系统(ILS)商城中实现,即用于进口建造建筑所需材料的星际物流系统(ILS)同时也进口建筑本身。这些建筑随后被引导至一条传送带上,而装配机新生产的建筑也会被输送到这条传送带上。如果回收器已接收建筑,装配机将自动停止运行,直到所有回收的建筑都被用完。关于其具体工作方式,可参考星际物流系统/行星物流系统(PLS/ILS)商城部分的内容。 另一种方法是,在任何类型的商城中,将储物箱/星际物流系统(ILS)的组合替换为上图所示的设计。左侧展示了星际物流系统(ILS)的设置,该系统用于进口建筑。然后,这些建筑会与相应装配机的输出一起被送入一个分流器。来自循环物流站的传送带具有输入优先级。用于存储建筑的缓冲箱现在可以放置在这些分流器上方,最终建筑会被导入到图片右上角的输出物流站中。 输入物流站必须在全局范围内需求与输出物流站供应的完全相同的建筑。和输出物流站一样,它必须配备翘曲器和物流无人机,并且其槽位必须设置为【本地存储】和【全局需求】。 恭喜,你现在已经达到了消费者舒适度的顶峰 :) 混合模式 所有物资站设计都有缺点,有时通过结合两种不同的设计,你可以尝试减轻两者的缺点。大多数情况下,混合式物资枢纽仍会有一个主导性的组织原则:它仍可被识别为巴士枢纽、机器人枢纽等类型。但会应用其他枢纽类型的一些技术,以某种方式尝试改进枢纽。以下是每种枢纽类型的一些局限性,以及如何尝试通过混合来缓解这些局限性。 传送带、分拣器或地基专用枢纽 首先,大多数枢纽设计侧重于生产低吞吐量物品,但有些你希望全局可用的物品并非低吞吐量。最明显的例子就是传送带、分拣器和地基。 因此,在枢纽中设置一个专门区域来生产这些高吞吐量物品可能会很有帮助。这可以通过任何中央工厂设计来实现;下图展示了传送带、分拣器和装配机的生产流程,这些设备可能会配套一个五带式中央工厂。该设计本身采用了混合模式,即一条总线输送铁锭、齿轮和电磁涡轮机,同时结合星际物流系统(ILS)导入的额外材料,直接输送到相关装配机。 在游戏过程中,当你升级这些物品时,往往会在背包中积累大量低阶物品;这种设计允许你将这些物品放回低阶物品的输出箱中,作为一种早期低成本的回收方式。
总线式物流枢纽混合方案 总线式物流枢纽的缺点在于,对于每种想要使用的建筑材料,即使是那些极少使用或仅用于少数建筑的材料,都必须配备一条长长的传送带。因此,移除部分输送稀有材料的传送带,并以更具针对性的方式向相关装配机供应这些材料会很有帮助。通常,这些材料会通过物流配送器、行星物流站或星际物流站运来,这使得这些解决方案成为以总线为主题,但融合了机器人枢纽、行星物流站枢纽或星际物流站枢纽元素的混合方案。 箱式物流枢纽混合方案 箱式物流枢纽与总线式物流枢纽类似,减少箱子所承载的材料数量是其优势所在。这次倒不是为了节省空间,毕竟箱式物流区通常都很小,而是因为箱子要储存大量稀有材料,专门供给那一台需要它们的组装机。 虽然关注点略有不同,但解决方案与总线物流区相同;箱式物流区部分实际上展示了一种融合了行星物流站(PLS)物流区元素的箱式物流区设计。 机器人物流混合区:机器人物流区本身就可以很好地扩展,无需任何混合设计。不过,尝试减少每台组装机所需的箱子数量仍然很有吸引力。 实现这一点的一种方法是在组装机旁铺设输送重要材料的传送带。有时这些传送带可以紧密地安装在箱子和装配机之间的空间里,就像机器人商城区域展示的六边形设计那样,但也可以在装配机及其输出箱之间铺设一到两条传送带。 另一种方法是改用箱子商城技巧。如果机器人商城的设计使得相邻装配机的箱子可以相互触及,它们就能像在箱子商城中那样传递材料,从而让装配机能够从附近的箱子中同时获取多种材料。 通过这种方式优化机器人商城,就有可能开发出每个装配机最多配备两个输入箱的设计。然而,这类设计往往较为复杂,且难以新增建筑进行扩展;它在很大程度上失去了基础机器人商城理念所具备的灵活性。如果你只想将其作为蓝图直接应用,那没问题,但如果想在游戏过程中自然地对其进行扩展,就不太理想了。链接传送带、分拣器、装配机