换一换
换一换 


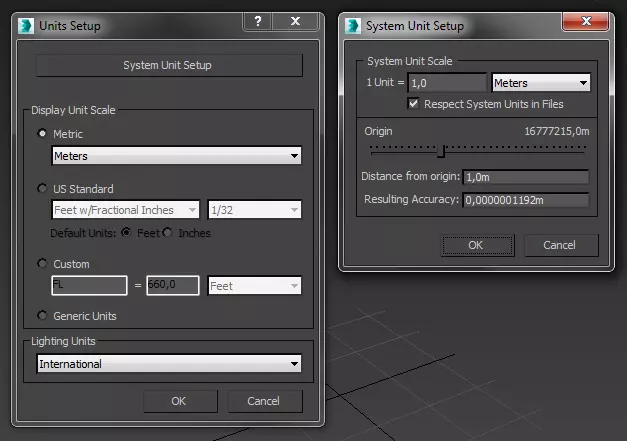
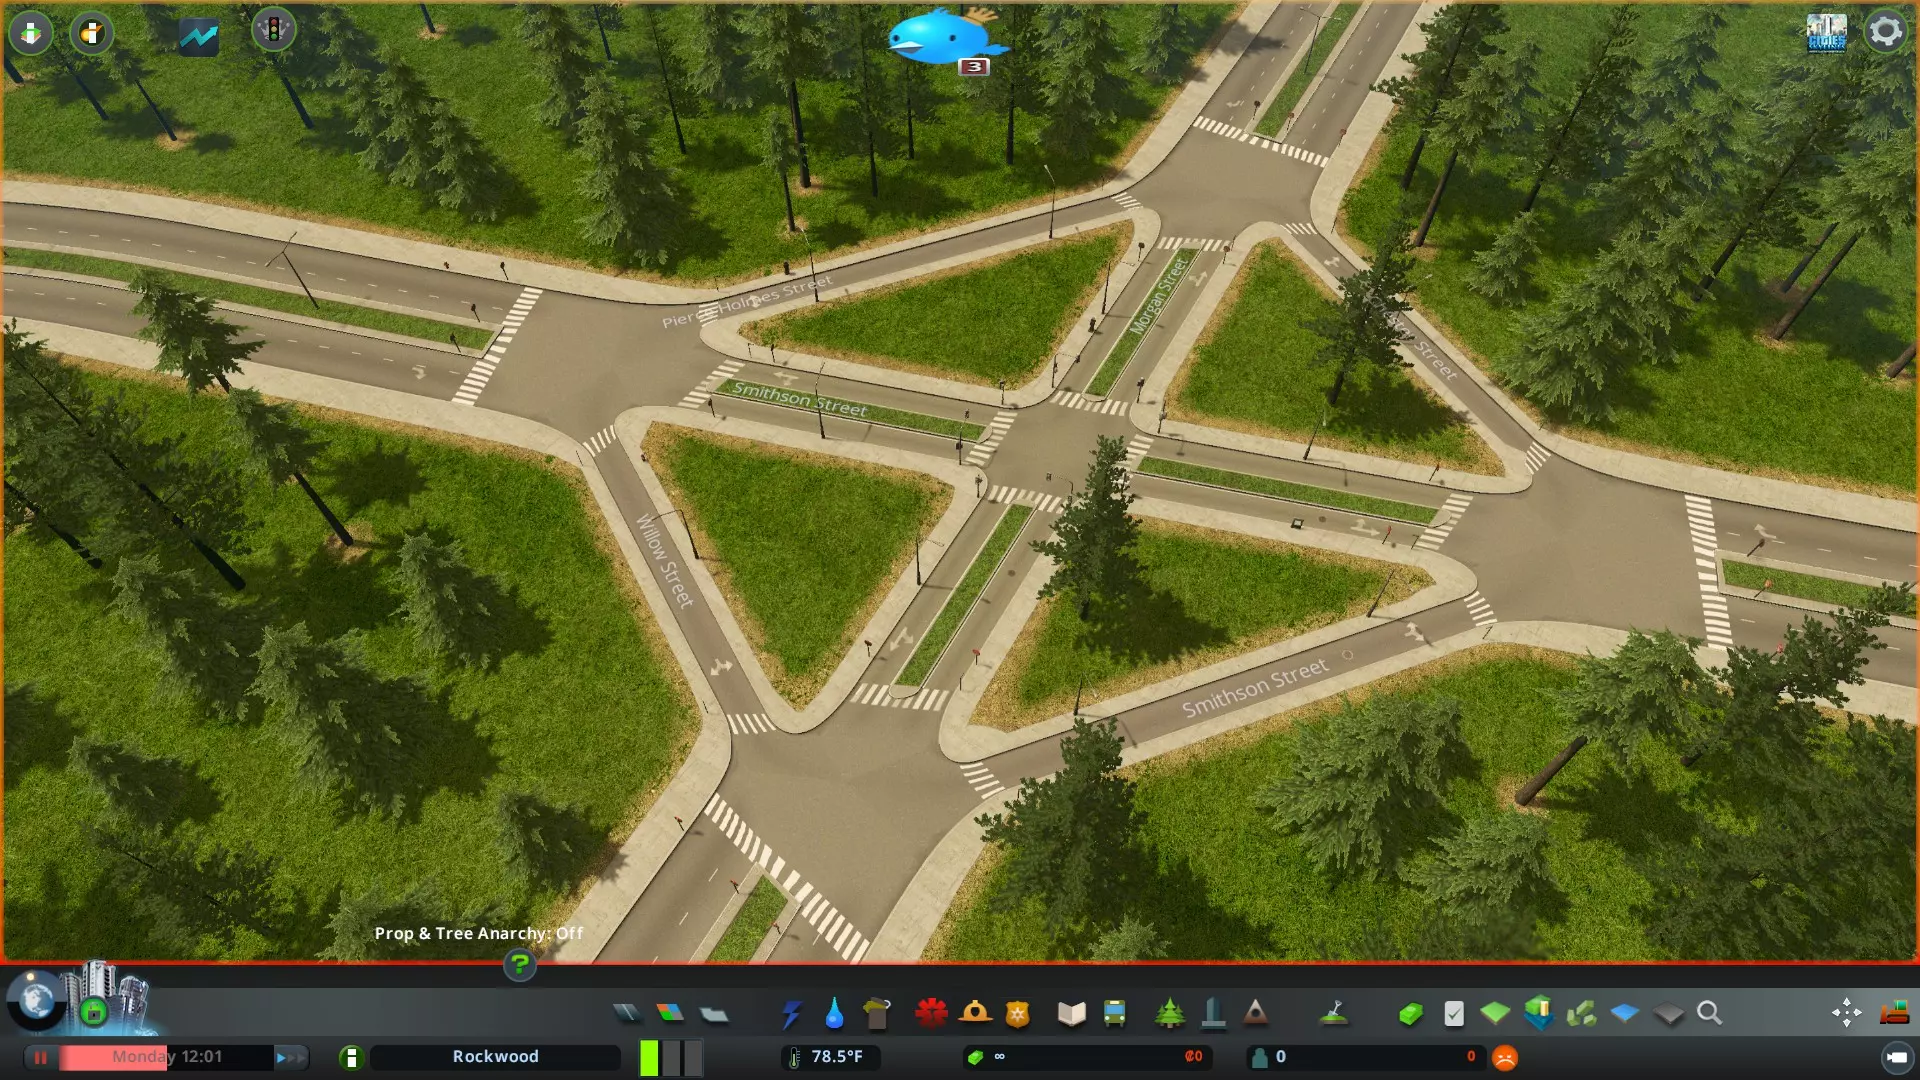
Welcome fellow amateur civil engineers! This guide aims to offer fairly new and "still learning" players of Cities Skylines some basic tools and principles to take their city-building skills to the next level. Sure the game has been out there for a while, but I reckon the game is very much in its prime with significant DLC's being developed. With that said, I am no professional--it has taken me oodles of time and readings to piece together some of the fundamental things that enable me to build realistic and functional cities (typical Paradox!). As such my goal is a bit different than most out there and sets out to provide players: - An understanding of basic game mechanics and sim behavior - Steps of city development from start to finish - Guidance on traffic control and selecting appropriate interchanges/intersections - Advice on beautification I am pretty passionate about Cities Skylines. Would go so far as to say it has changed my life in some very odd, eccentric ways. Most games I find myself soon bored when I discovery boundaries and limitations--but in Cities, when it comes to putting your creative and constructive brain muscles to the test, the sky is the limit (pun intended). This game took me quite a many hours of playtime and readings to "master" so I am hoping this guide help teach folks how to nail down the basics of glorious city-building in a one-stop-shop fashion. If you like what you see to follow, please rate up and favorite!!! Introduction Let me take a moment to tell you about my Cities Skylines playstyle. At first I was a die-hard vanilla guy, sticking with the progression system and trying to hammer out some basic cities that simply *worked* without getting totally clogged up, or look like a Pollock painting, or a cartesian plane. Over time, as I became more comfortable with the game mechanics, particularly regarding what things are needed and when, I began experimenting with the workshop which offers a wealth of wonderful player-created assets. As I got the hang of things, started looking at pictures of glorious user-created cities and watching youtubes of phenomenal, beautiful, intricately detailed cities, my experimentation caused me to arrive at the conclusion that imposing these optional boundaries on myself was only limiting my capabilities. Today when I play Cities, my goal is to create the most attractive, succesful, "ultimate" cities I possibly can, applying best practices to my city planning, layout, and decor. With that said, this guide does not cater to the min/maxers or the completionists. We will not go over how to set district policy or make piles of money. This is for the aesethetes, the perfectionists, and the dreamers. If you want to build a functional, beautiful, realistic city, you have come to the right place. Content Recommendations DLC The following is my list of must-have DLC's to maximize your creative city-building mojo. These add indispensable content and enable you to utilize virtually any user-created content. Mass Transit. Ferries, monorails, cable cars, and blimps. Blimps that educate your citizens on the necessity of brushing their teeth. Excellent. After Dark. Much more entertaining and lovlier day/nite cycle. Great service assets (cargo harbors, international airport). Snowfall. Trams. 'Nuff said. Mods The following mods are must-haves in my opinion, although they are roughly in order of importance. Even if you do not pile on a million beautification assets, these make the game far more user-friendly, enjoyable, and lovely. Precision Engineering. Extra tools to help you lay out your roads. Specify if a road is to follow the ground, use elevated roads, etc. Move It!. Will not only save you ages building nice intersections--will also allow you to make realistic road curvatures that are otherwise unattainable in vanilla. Extra Landscaping Tools. Terraforming. Make land level so you dont have weird divots everywhere. 81 Tiles. Build anywhere on the map. Grants you complete freedom to build wherever on a whim. Network Extensions 2. Additional super nice and practical road options (e.g. the 8 lane road gives a bridge model like the Bunker Hill Memorial Bridge [BOSTON STRONK!]). Quay Anarchy. Quays are supremely useful for quick and easily assembled inner city/harbor coastlines as well as barriers for sunken construction. Put them all over the place easily. Surface Painter. Perfect to clean up things like pesky dirty/odd looking spaces like those between turning lanes (thanks asphalt paint). More Beautification. Allows you to place props--nice little accent pieces like walls, signs, benches, etc. Prop and Tree Anarchy. Easily make high-density forrested areas. Loading Screen Mod. Supposedly speeds up game loading progress; a must-have for low-RAM (8 GB or less) users. See how long it takes to load your city and what mods are broken. Traffic Manager President Edition. Manually arrange the lanes used by sims and a million other traffic control options. Prop Line Tool. Make lots of props fast and orderly, essentially using road tools. Dynamic Resolution. immediately make your crappy city look super duper pretty. I have prepared a full mod collection for those of you who want a no-brainer, one-click option for all the most important mods that I believe will offer you the best possible cities skylines experience. The collection can be found here: http://steamcommunity.com/sharedfiles/filedetails/?id=1279401265 Keep in mind that you may not want all these mods active at all times (example, Super Demand mod if you want to play with vanilla zone demand) so you may want to at least review them, and enable on-off in the in-game content manager if you are ready/not ready to use. How to Mod without Breaking your Game Its easy to go crazy and download everything on the workshop. This can result in breaking your game. Here are some times to prevent this. Create dedicated collections to organize large numbers of assets. Example, "*insert your name*'s CS Service Buildings." This will help you keep track and cut down if necessary. Only choose assets that are low file size. Some trees, buildings, and packs can eat 25-100 mb! Do not download these. Max size recommendations: props shouldnt be more that 1-3 Mb, trees 1-5 mb, buildings 1-10 mb for most. If you really like an asset but you don't expect to use it frequently, "favorite" the item instead of downloading it. To Cheat or Not to Cheat? Verb. 1. act dishonestly or unfairly in order to gain an advantage, especially in a game or examination. "she always cheats at cards." 2. avoid (something undesirable) by luck or skill. Now that you know what motivates me about Cities Skylines, you may have an idea how I feel about "cheating." While the vanilla, standard unlock progression game I will certainly recommend to beginners still learning the basics mechanics, I encourage the more experienced among you to cast aside these shackles so you can take your Skylining to the next level. By the above, there is no "cheating" in Cities--this is a singleplayer game that I believe should be played in a manner that suits your motivations. If you are like me (and any of the talented youtubers out there putting out Cities content), then the usual restrictions need to be eliminated to get to the next level. Enable the following: Unlimited Money. In real life I reckon you get more than 70k to found a flipping city. Seriously, especially with all the trial and error that goes into design that you can't otherwise plan in advance, you will need the money. Unlimited Soil. Terraforming will play a big role in creating idyllic cities. Don't let the game's restrictions stop you. Unlock All. If you know what you are doing and have freed yourself from the burden of financial restriction, there is no reason to keep to the progression system. You will want to carefully place your most important services and buildings earlier than the game will otherwise allow it. Terminology The following is a description of terms used in this guide. Access Road. A minor road type that gives access from one major road type to another. Arterial Road. high-capacity road type that usually comprise dedicated 2+ lane one-ways running parallel. Roads that the game provides when you start a map are arterial roads. These roads connect towns/large districts/cities. Use anything from two to six lanes per one-way (the latter being overkill really; if you think you need them then you're probably doing it wrong). Arterial roads have very few entry/exit points and should not have entry points closely in advance of exit points as this results in weaving, a situation in which outgoing traffic conflicts with oncoming traffic. Collector Road. a low-to-moderate-capacity road type which serves to move traffic between local streets and arterial roads. These roads always connect to an arterial road at some point and link districts. These minimally use four lane and six-lane roads in high-density areas but two lane roads can be fine in lower-density areas. You can use one-ways for these, too, but intersections can get tricky. Unlike arterials, collector roads are designed to provide access to residential properties. Collector roads should not have many intersections. Place service buildings on these roads to maximize area of effect (AOE). Zone commercial areas on collector roads. Freeways. High-speed limited access express roads that are not obstructed by junctions that require traffic to come to a stop. This is critical to their function. Arteries are freeways. May be parallel one ways or two-way roads. Any road can be a "freeway" really if you connect it to other roads with highway ramps. Frontage Road. A low to mid-capacity road allowing the placement of several access roads to a collector or arterial road in close proximity while minimizing the number of access points to the artery, minimizing interruption of transit on said road. Grade Separation. aligning a junction of two or more roads at different heights (grades) so that they will not disrupt traffic flow when they cross each other. See Step 4 first image for an example. Highway. A road with long stretches that are without any intersections but may be accessed wihtout ramps and may have to come to a stop (stoplights). Highways typically have lower speed limits and may pass through inhabited areas where there are traffic signals, pedestrians or other slower traffic. Collector roads can double as highways. Please note I do ocassionally refer to a freeway as a highway colloquially. Interchange vs. Intersection. There is an important distinction to be made here. Interchanges connect collector and arterial roads in a free-flowing manner where traffic is redirected to a new direction by ramps or slip lanes without stopping (no traffic lights) and at high speed, while intersections connect low-speed local and collector roads roads that typically require traffic to come to a stop (exception: roundabouts). Local Road. Low-capacity "Neighborhood" road type generally comprised of two-lane or alley roads servicing residential areas. Close/numerous intersections on local roads are generally not dangerous. Neighborhood. Residential areas. The optimal neighborhood layout may converge a number of local roads into an access road leading to a collector road. Street Hierarchy. Each road type serves a specific purpose and services different types of areas. The size, intersection complexity, and level of access differs depending on the area to be serviced and the amount of traffic. Read here. https://en.wikipedia.org/wiki/Street_hierarchy Turning Lane. a diverging lane provided at an intersection to allow vehicles to turn without actually entering the intersection and interfering with through traffic, aka slip lane. Basic Mechanics and Planning Sim Behaviors Here are some general items for your awareness that are not readily apparent but will greatly help you in you city planning. - Sims prefer the highest speed roads/transit options to go between destinations. - Sims don't particularly care how far they have to go to their destinations. This means you can comfortablly place industrial zones as far from your urban areas as you like and they will still develop and work properly. - Sims prefer public transportation as long as they can reach a destination as fast as, or more quickly than, using the highest proximal high-speed road(s). - Sims determine what route they will take when they leave for their destination. Sims will not amend their routes based on traffic conditions. This can be a bane for poorly designed road networks, but a boon for carefully designed ones. - Sims travel to work (industrial, commercial, and office zones) from residential zones. Sims generally travel to commercial zones, landmarks, and parks before and/or after work. Commercial zones are the epicenter of traffic as goods and people both need to flow into these areas. Sim Transit and Well-Being It is important to understand the general flow of sims and the effect of pollution. Sims thrive in low-noise, low pollution environments (away from commercial and industrial zones). Sims' health and happiness are negatively impacted by exposuire to these zones, inhibiting development. Sims travel to work (industrial, commercial, and office zones) from residential zones. Sims generally travel to commercial zones, landmarks, and parks before and/or after work. Commercial zones are the epicenter of traffic as goods and people both need to flow into these areas. The worst-to-best heirarchy of suitability for proximity to residential zones to other zones is as follows: Industrial. High noise and pollution. Commercial and transit. High noise. Office/parks. Low noise/happiness buffs. Given this logic, the best cities (in terms of traffic) will have the following features: Commercial and industrial zones are placed on collector roads, the latter prefereably close to arterial roads, enabling easy and high-capacity access. Neighborhoods are created at a distance from commercial and industrial zones, the space between being occupied by office zones or open spaces (parks) . Road Hierarchy. Road hierarchy is not precisely a mechanic but not observing good practices here can be disastrous. Sim behavior is closely linked to road heirarchies in that have a good understanding of it and planning accordingly enables maximum traffic control. In order of connectivity and quantity, roads are constructed as follows: Arterial Roads (freeways) < Collector Roads (main roads/highways) < Local Roads (neighborhoods) If you do not maintain this heirarchy in your city layout, you will nearly always end up with traffic problems in your city. I often see this when folks do not make proper use of collector roads--that is, people do not specifically design roads as collectors. You are going to have a hard time if you only use a freeway < neighborhood road hierarchy. Here is such an example showing how this approach can totally fall apart:

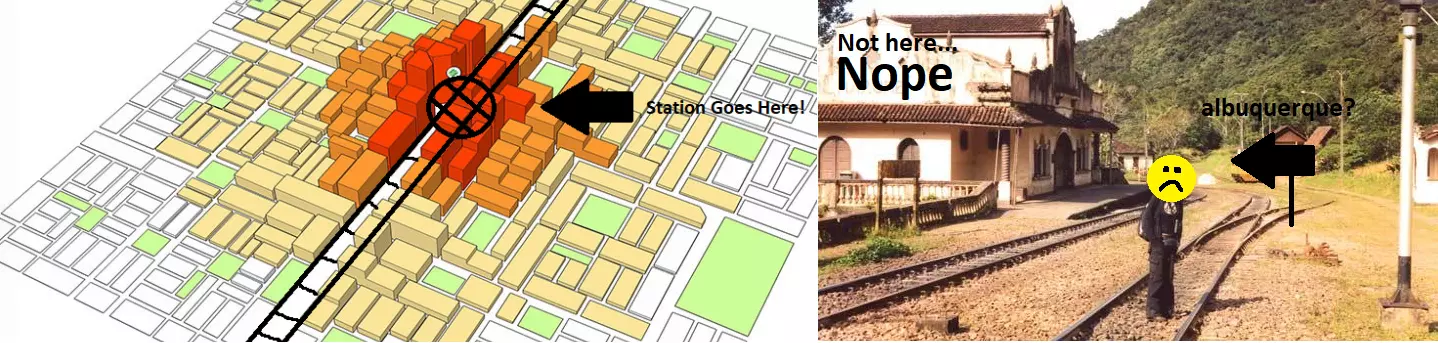
在这个看似市中心的示例中,道路等级划分并未得到遵守。在已开发区域附近没有合适的高速公路上下交流道。假设从匝道延伸出的道路是集散道,它们的数量与地方道路相当,且存在许多间距很近的交叉路口(约10单位距离)。 集散道需要保持基本畅通,交叉路口较少才能正常发挥作用。集散道应具有一定长度,用于连接城市的大片区域,而不是有许多交叉路口的断续路段,或在短距离后就接入地方道路! 【集散道配置与工业区交通】 为工作区域提供充足的集散道接入非常重要。如果你发现所有交通都汇集到一条道路上前往目的地,请重新考虑上述规则。更多的集散道路/接入方向会自动减少交通拥堵。 为城市区域提供服务所需的集散道路数量,会随着与主干道距离的增加而大幅增加。不要期望一条集散道路能充分服务距离主干道连接点100单位的区域。 这里的核心要点是,为商业区提供更多接收货物的方向能显著提高吞吐量。如果某条道路被甜甜圈卡车堵塞,可以考虑将部分工业区搬迁到能够从另一个方向/集散道路为商业区提供服务的位置。城市设计基础 分区规划 采用良好的分区规划和街道层级结构,有助于提升城市服务功能并预防交通问题。将高密度住宅区和商业区集中在城镇中心,能提高步行便利性,减少市民对汽车出行的依赖。规划专用的主干道,并将城市建筑集中在中心区域附近,可使公共交通、安全和医疗等服务高效地抵达目的地。 以下示例展示了两种截然不同的城市设计风格,说明了建设方式对步行便利性的影响,以及如何利用这些信息来最大化城市性能。为便于解释,示例采用了一些高度简化的微型城市设计。为便于讨论,将20单位面积描述为【区块】。 以下示例中,有一条单向双车道的超长主干道通向高密度市中心(蓝色箭头方向)。住宅区和商业区均沿道路进行规划。高密度区域的总宽度为8个区块。

该设计的优点在于城镇中心的区域布局合理,商业区被办公区环绕。办公区能够缓冲商业区对住宅区造成的噪音污染。高密度住宅区紧邻中心,低密度住宅区分布在外围,这样可以缩短居民上班和购物的出行距离。 不过,这种设计也存在一些问题。根据我的生活经验,我的老城区(可能有一条3英里长的“主街”)以及许多美国城镇都是这样规划的,存在以下问题: 单一的集散道路意味着所有车辆都需要汇入这条双向道路才能到达工作或购物地点,这可能会导致交通拥堵。 该区域的步行友好性较差。假设一个模拟市民住在城镇边缘,在最远的办公区工作。步行距离相当远——五个街区(120单位)。记住,模拟市民会选择开车来穿越长距离。 这个布局相当无聊。它看起来不好看,也没有提供太多让布局更有趣的想法。要解决这些问题,你需要从多个维度来考虑你的城镇。如果第一个例子展示了X维度的规划,那么下面的例子增加了Y维度,形成了一个效率更高,而且我认为是绝对最优且最现实的布局。在这种情况下,总分区面积与第一个例子几乎相同,但布局方式却大不相同:
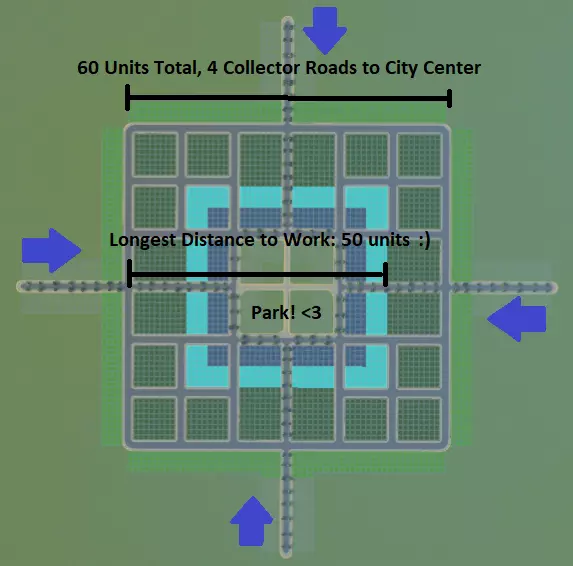
此设计的优势如下: 市中心有4条集散道路通向工作/购物目的地。假设所有市民都开车出行,交通效率较第一个示例提升了100%! 该区域步行友好性高。假设住在城镇边缘的市民想去最远的办公区工作,只需步行不到3个街区(50单位)就能到达(距离仅为第一个示例的一半!),因此他们很可能会选择步行。 建筑布局富有吸引力。这使得在城镇中心建造一片漂亮的绿地或广场成为可能,不仅可以进行美观的装饰,还能进一步提升步行友好性,在中心区域设置供市民通行的步行捷径和交叉小径,而非道路。工业区在这些示例中没有展示,它会产生污染,通常应规划在远离市中心的位置。将工业区分散设置在集散道路的另一端,这样可以为市民提供缓冲空间,同时为货物运输到商店提供多种途径。 不过不要误会我的意思。我并不是建议你把城市建成一个巨大的网格——这些示例纯粹是出于假设和学习目的。只需记住这个场景,帮助你构思城市布局,以最大限度地提高步行便利性并预防交通问题。现在去建造一些真正有趣的东西吧! 公交导向型开发 你可能会想,为什么在我们还没创建第一个城市之前就讨论城际话题呢?我相信你也认同,在一个已完全发展的城市中添加高效的铁路网络几乎是场噩梦。因此,为你的城市打造良好交通网络的最佳方式是在建设初期就规划好网络,而非后期再试图加入。甚至,为何不在修建任何道路之前就先放置火车站呢? 这就引出了【公交导向开发(TOD)】的话题。以下几张图片能让你对此有个概念:
言归正传,TOD(公交导向开发)旨在打造一个城市间的交通网络,其中交通枢纽位于人口最密集且人们最想去的地方。简单来说,你的交通中心周围是高密度开发区。高密度的住宅区和工作区都距离交通枢纽非常近,步行即可到达,而随着远离中心,密度逐渐降低,变为低密度区域。这意味着将交通枢纽设在市中心是个很棒的主意。回到我们之前的市中心/分区示例,这就是我们玩《城市:天际线》时TOD的呈现方式。
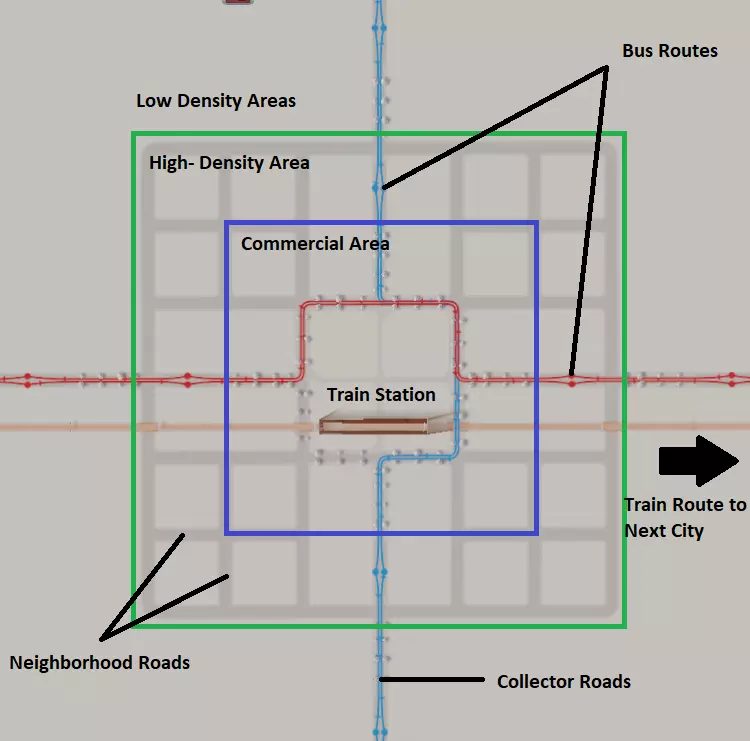
我们发现中央公园区域是建造火车站的绝佳地点。大多数想要前往邻近城市的市民都住在距离火车站仅两个街区的范围内!公交线路通过集散道路汇聚到中心区域,为居住在较远低密度区域的居民提供前往车站和工作区域的通道。 对于特别大型的城市,你可能需要将铁路分流至位于高密度开发区附近的货运站(未展示)。这样可以让货物绕过道路系统直接送达商业区,避免工业运输车辆与本地城市交通混行造成的交通拥堵问题。 你可能已经注意到,这里明显没有高速公路。高速公路不应位于城市中心。若想构建现代化且高效的城际交通网络,其基石应是公共交通而非高速公路。 要让TOD(公交导向开发)发挥最佳效果,你应继续推行限制私人车辆的策略,通过增加模拟市民使用私家车的不便性,同时大幅提升步行和公共交通的便利性。以下是TOD的全面实践案例。图中阴影区域显示了从高(红色)到低(绿色)的分区密度。
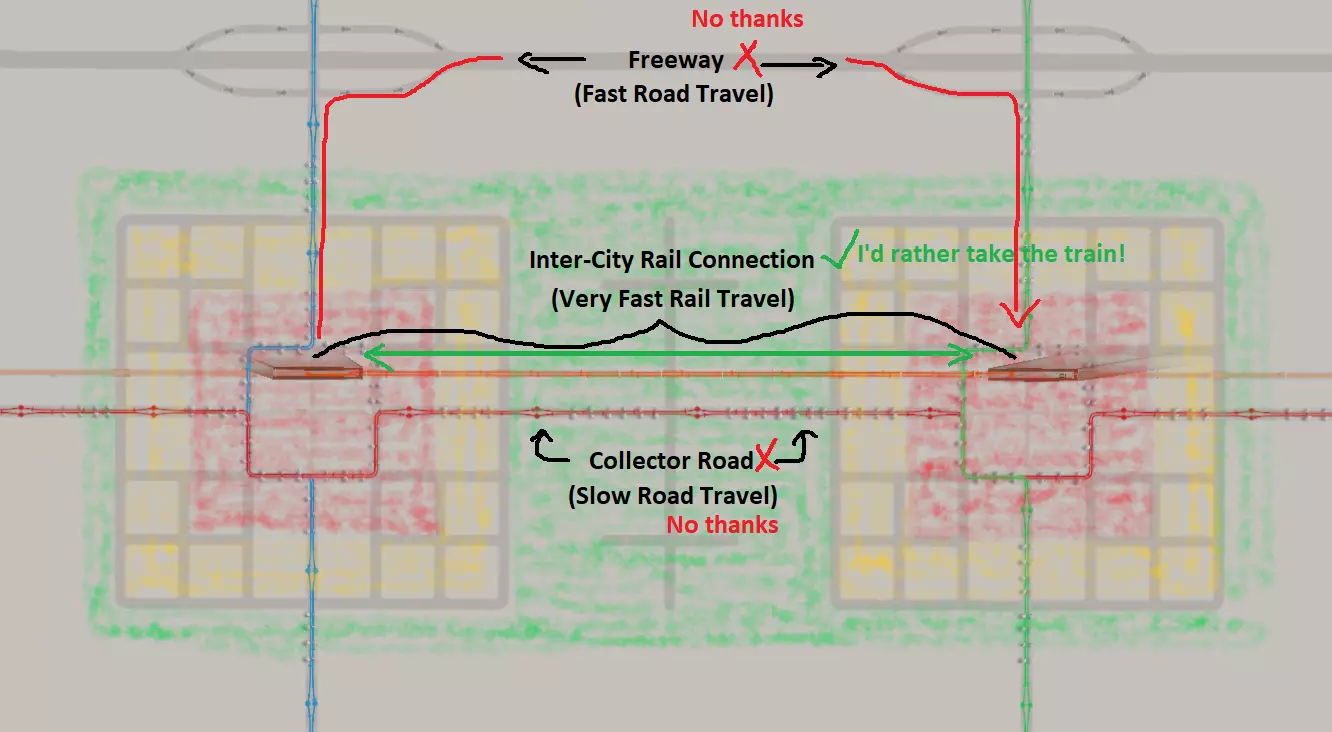
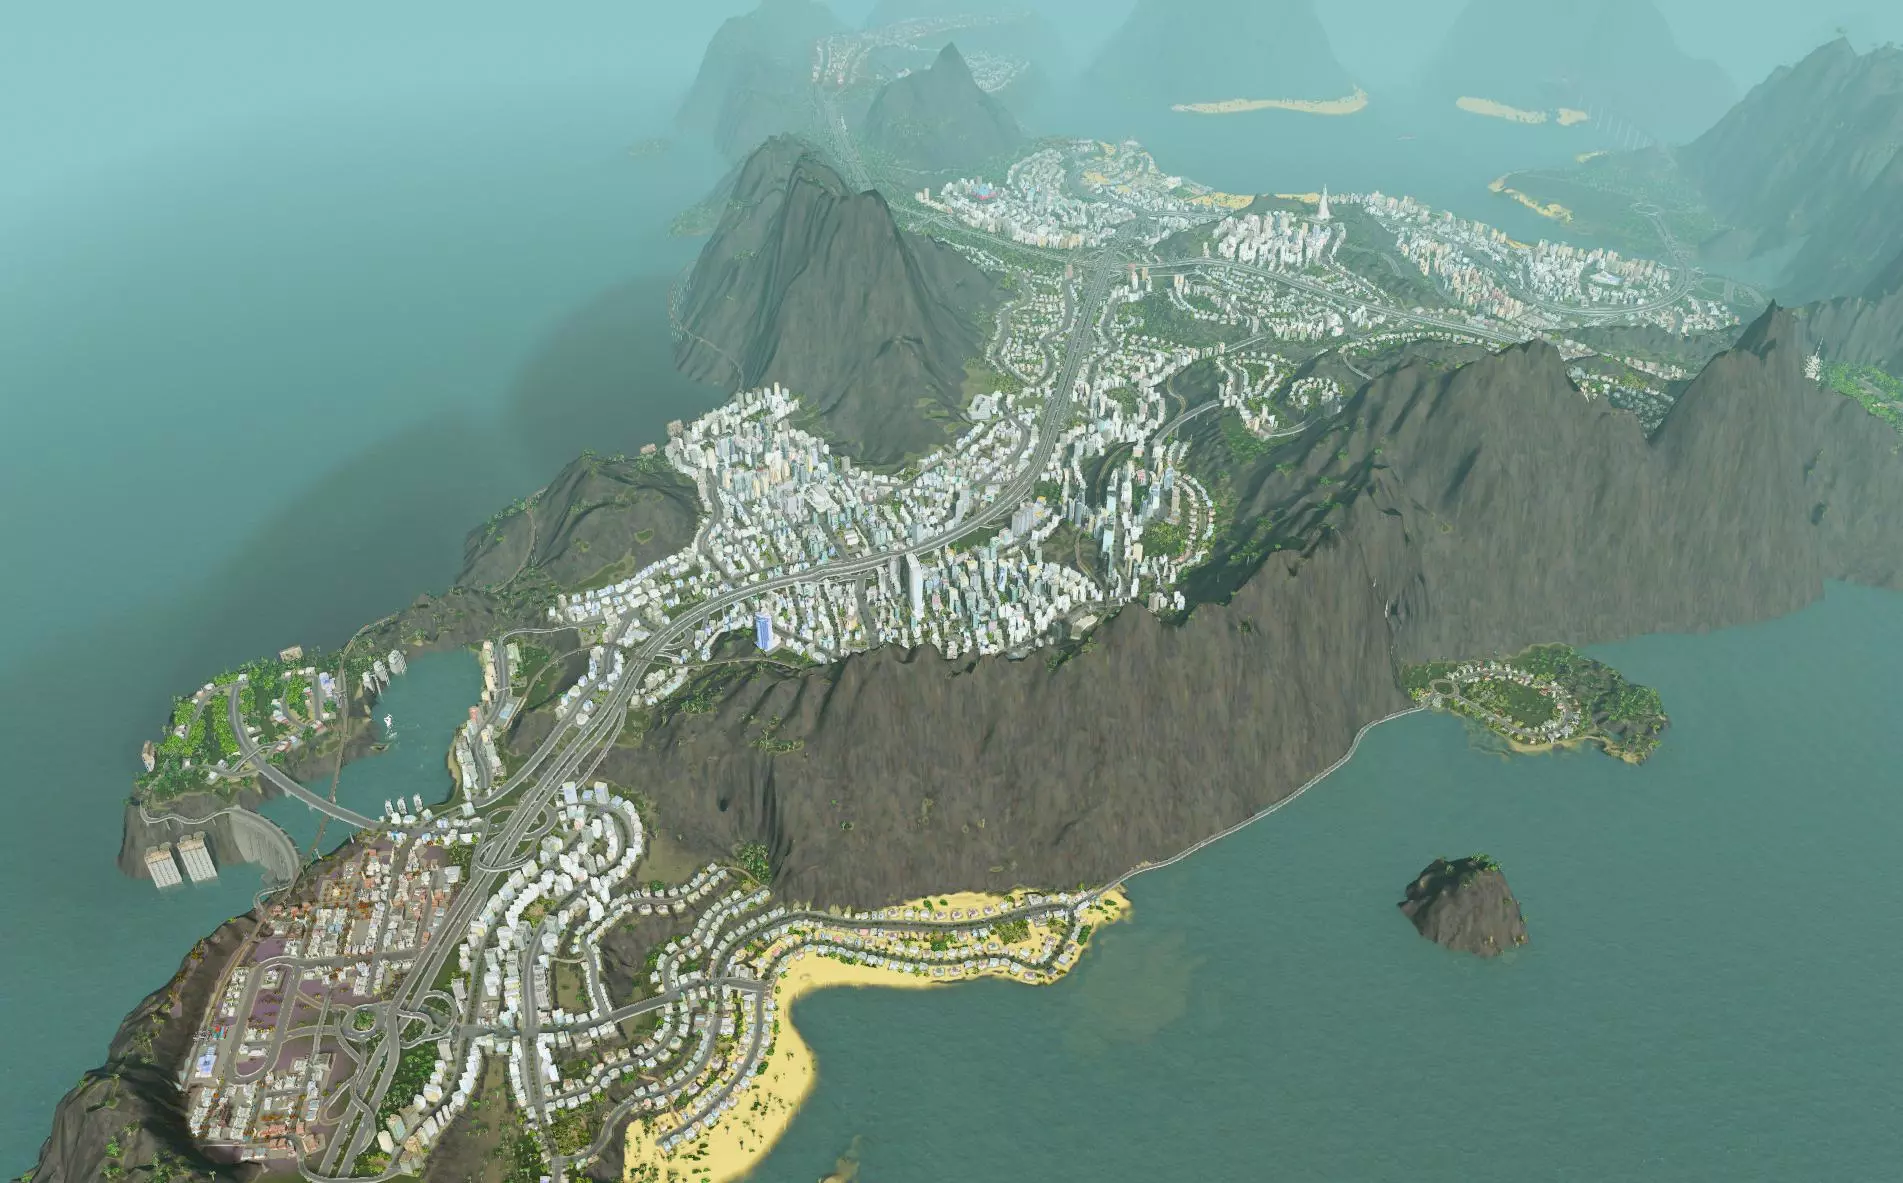
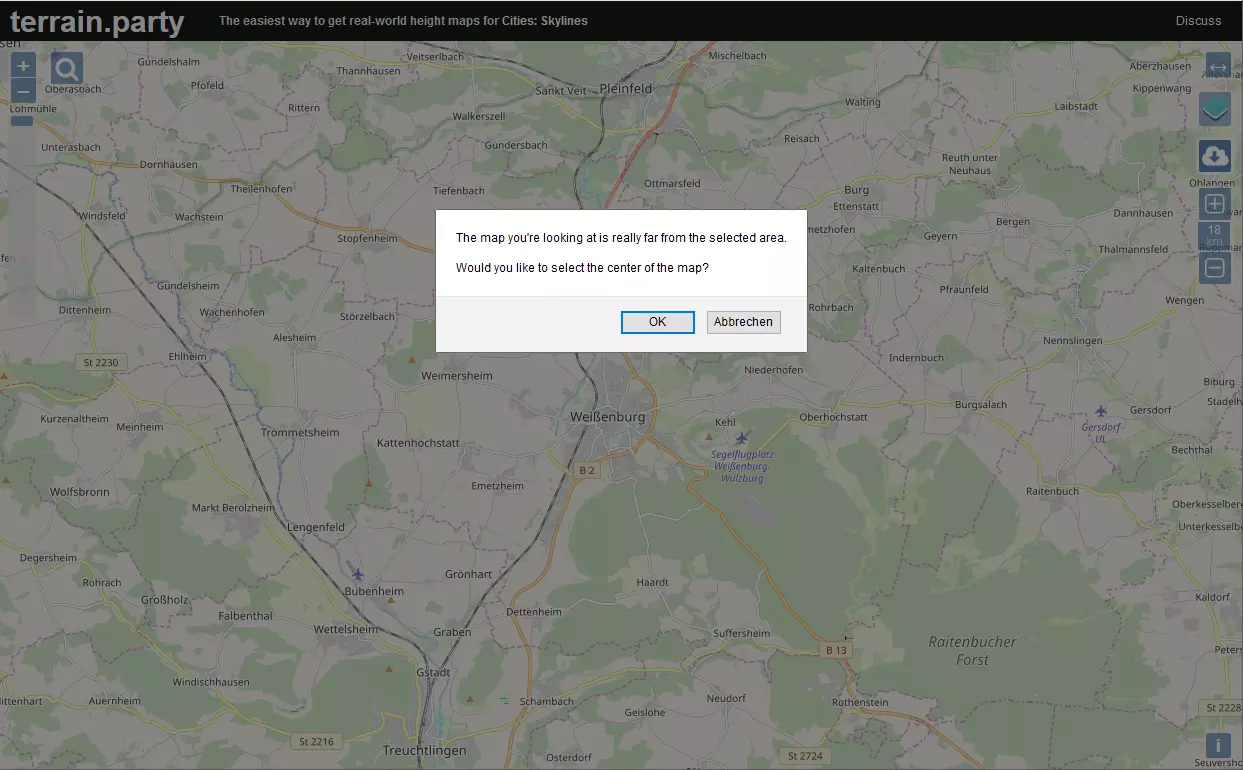
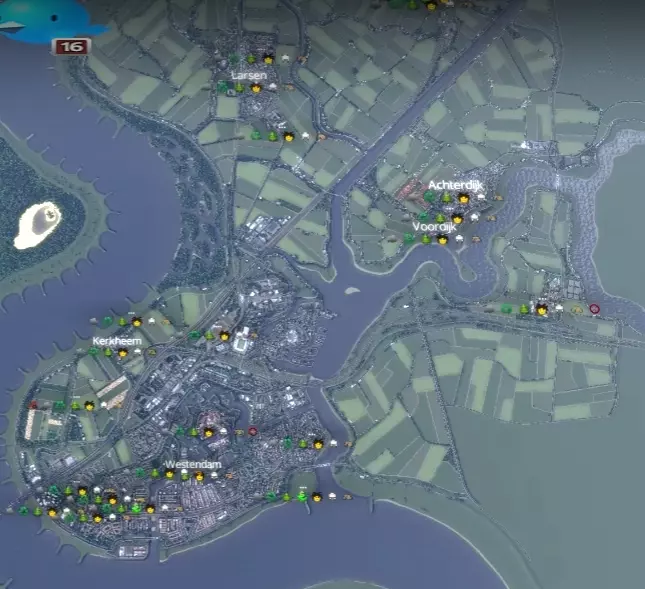
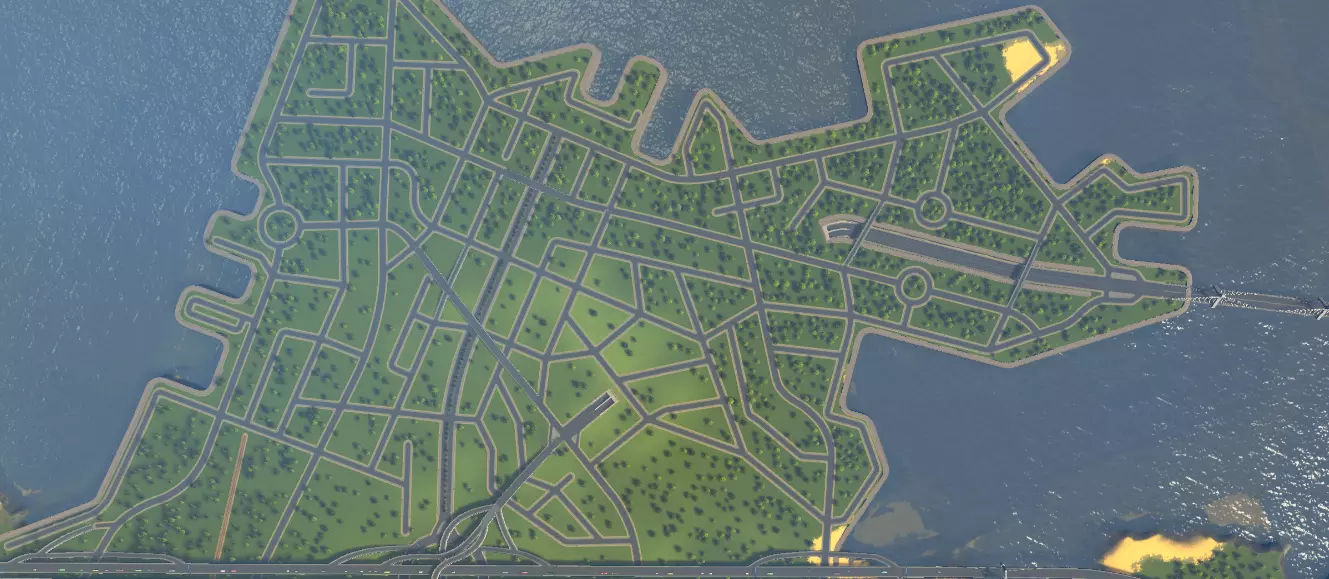
以下是这种布局可行以及你应在城市中采用TOD(公共交通导向型开发)的原因: 城市之间通过快速高速公路相连,但由于经此路线往返城市的间接性,出行会受到阻碍。城市之间也通过集散道路直接相连,但这些道路仅提供低速(小型/中型规模)行驶,而市民喜欢快速出行。这意味着出行将主要局限于低 residential 交通和工业交通,且并非首选方式。 高密度城市区域通过快速铁路直接连接。市民会倾向于选择这种交通方式,因为它是最快的选项。 该布局经济高效。经济实惠的公交线路服务于低密度区域,而成本较高的铁路则服务于高密度区域。由于良好的交通选择,城市间交通的混合情况被降至最低。 第一步:构思与地形改造 地图开发构思 选择一张你喜欢的地图,然后在开始铺设道路之前,先考虑你的基本城市规划和目标。强烈建议在创意工坊中搜索,并在网上查找一些优质的用户创建地图,这些地图通常比原版地图提供更精细的细节选项。从一张好地图开始,能让你在建造美丽新城市时自动占据优势。 假设你使用了【81格】 mod,那么你在城市的选址和建设方式上就有了很大的自由度。这是短期还是长期的建设项目?你希望它是欧洲风格、国际风格,还是两者的混合风格?你想体验轻松建造几座小型低密度城镇的游戏吗?你想打造一座拥有周边城镇的中小型城市吗?你想将整片区域打造成一座高密度的反乌托邦巨型都市吗?地图的发展方式多种多样,不妨尝试不同玩法,让游戏保持新鲜感! 我建议向地图边缘区域发展卫星城镇或区域,最终通过多条主干道和次干道与中心区域相连。这样能从多个方向为市中心提供良好的物资和市民通行条件。此外,建造每个城镇都像是在玩独立的小游戏,之后将它们连接起来的过程也充满乐趣,而且看起来非常真实。以下是由视频创作者Silvarret提供的示例,展示了其工作原理。
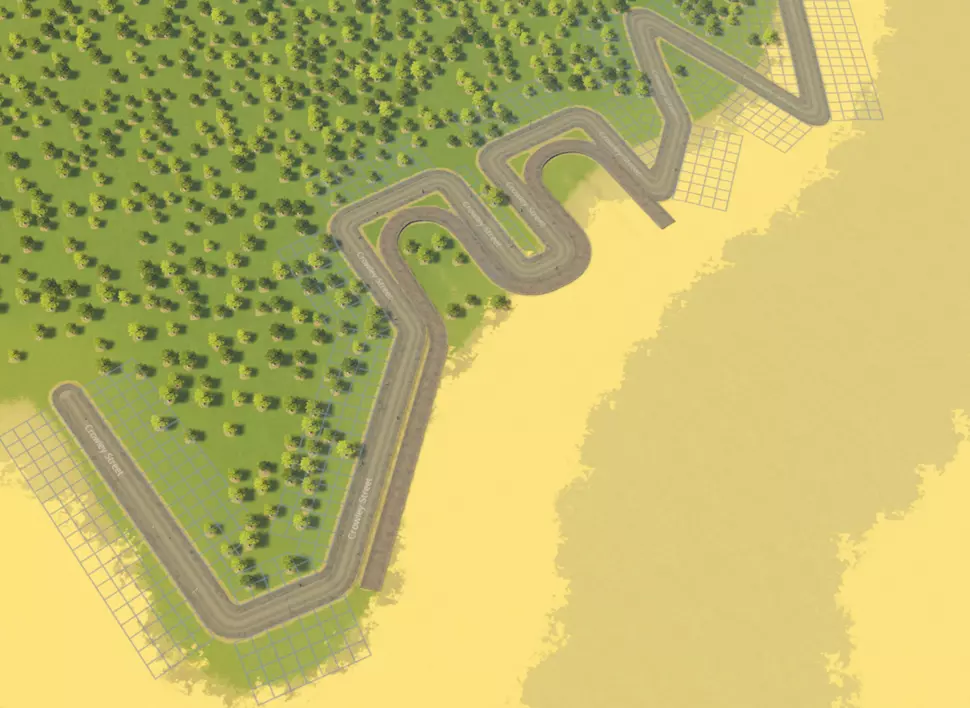
考虑你可能想要开发的有趣地点。通常来说,将最高密度区域规划在地图中心附近是个不错的主意。宜人的山谷、河流、半岛和海岸线比平淡的平原更适合开发。如果你已解锁建筑,还可以查看自然资源的位置,这有助于你选择工业开发区域。 地形改造 最好从平整城市地形开始。使用“平整地形”工具勘察地图也是个不错的开始,能帮助你识别相对平坦的区域。山谷通常是不错的起点,因为它们通常有相当平坦的底部。当你选择好城市区域后,使用工具进行一些地形改造,确保计划开发的主要区域平整,以避免出现一些奇怪的放置问题和视觉问题。 如果你要在 waterfront 建造,并希望城市边界或港口有整齐的边缘(例如码头或港口放置物),也需要这样做。你需要: 1. 将整个周边区域平整到所需高度,通常略高于水位线。 2. 使用道路创建边界。 3. 沿着道路添加港口放置物或码头。 4. 重新平整地形以匹配海床高度。 以下是开始操作的示例:
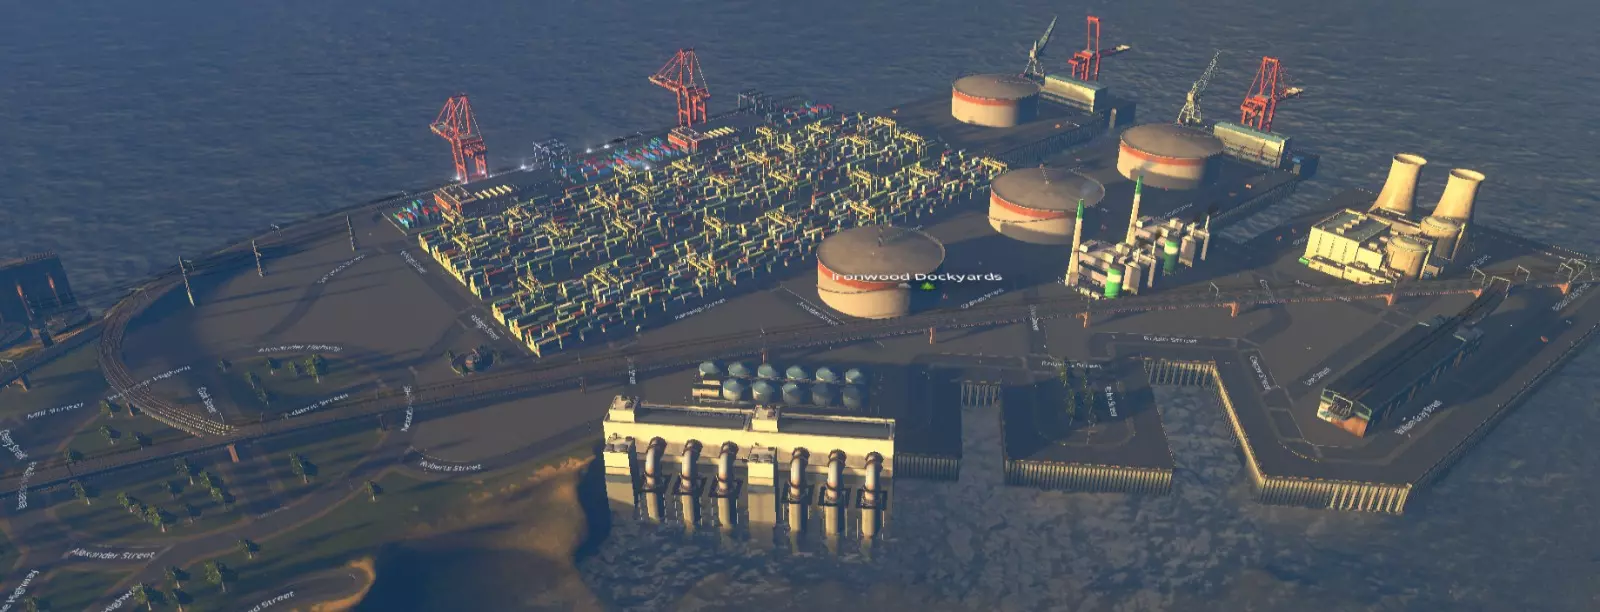
以下是这种开发方式的一种可能结果:该区域被指定为工业区,我使用了港口边缘的可放置建筑。
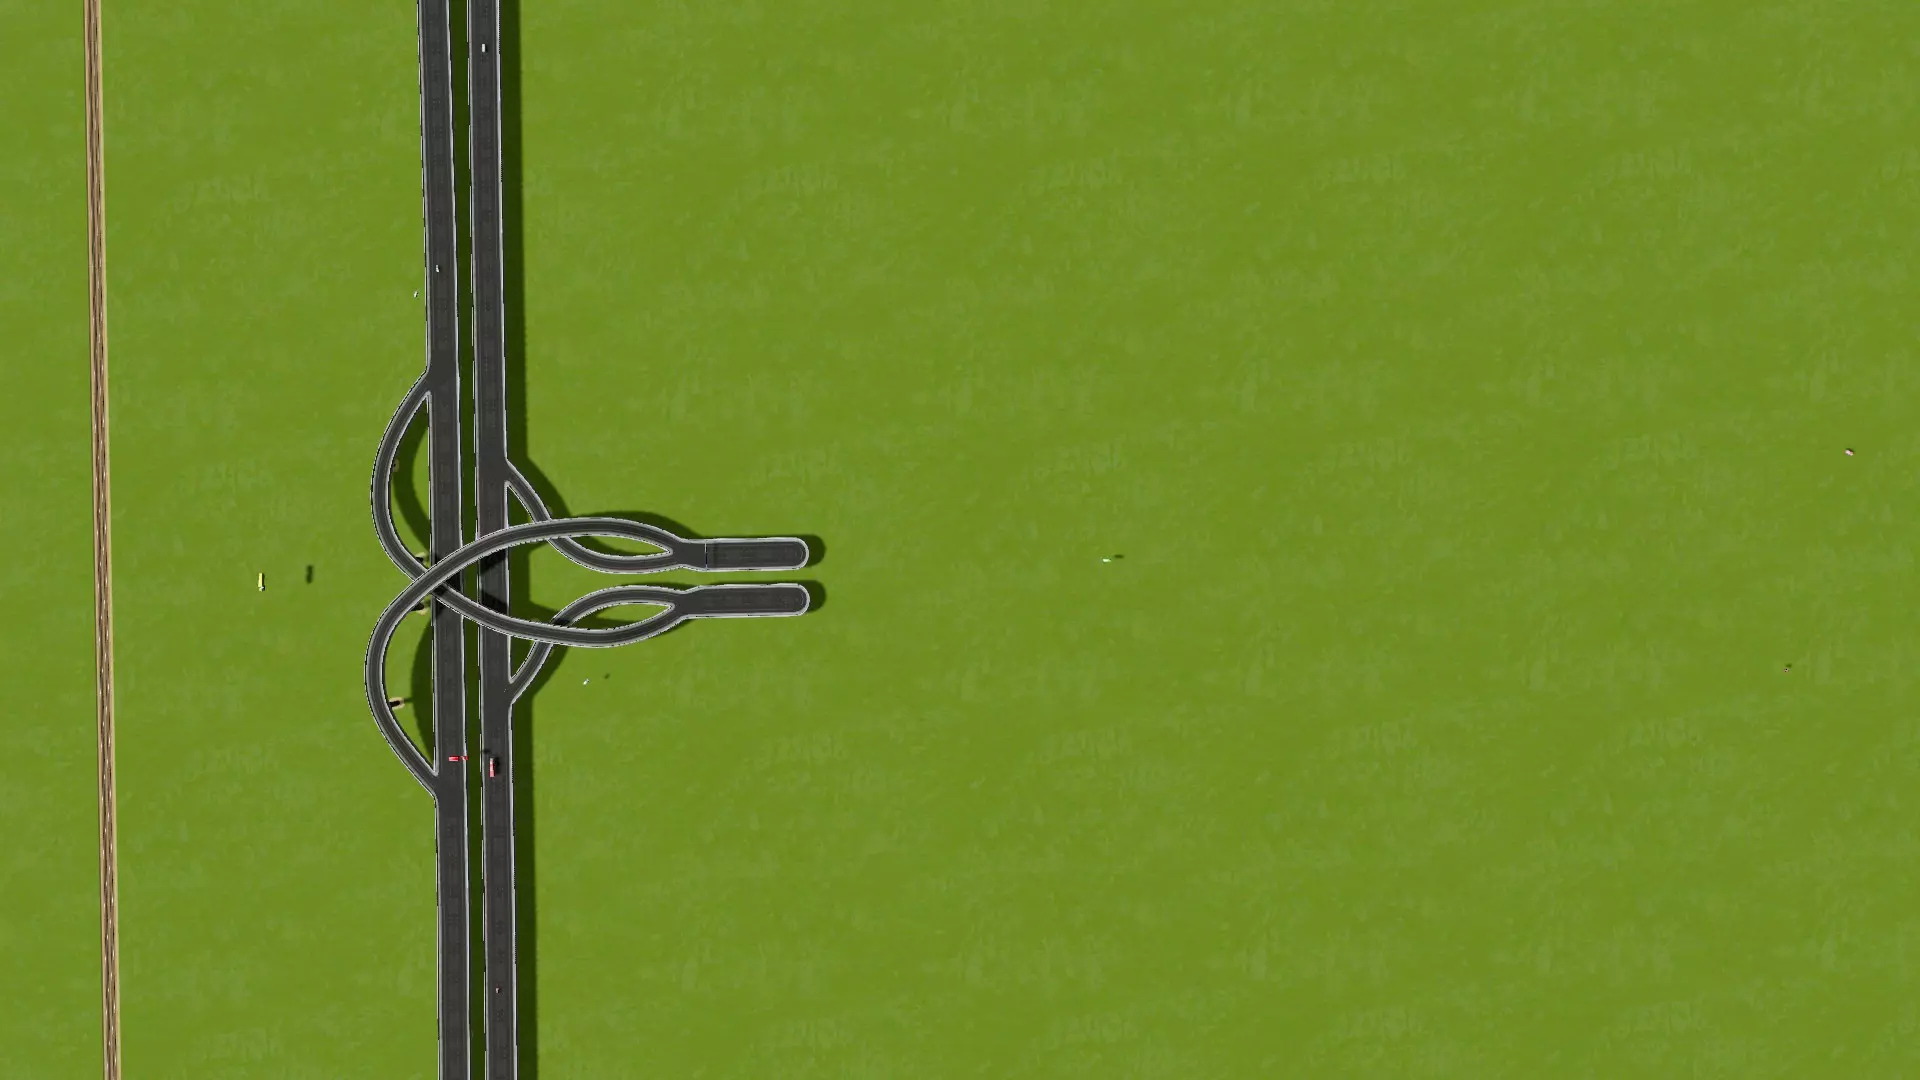
步骤2:创建集散道路基础设施 通过集散道路将市中心与主干道相连。 拥有良好的专用集散道路网络是避免后期交通拥堵的基础发展步骤,它能确保从主干道进入城市的交通保持顺畅流动。 集散道路/公路将作为高速公路和社区之间的连接纽带。大部分交通将通过这些道路疏导。集散道路通常以4-6车道为宜,这能为市民在交叉路口提供排队空间,从而改善交通流量。不过,无需过度建设集散道路,虽然它们的数量会多于主干道,以连接关键工作区域。确定你的市中心位置——即应作为交通和商业区主要枢纽的地点,如前一节所述。理想情况下,市中心需要通过多条集散道路/公共交通设施连接。接下来,开始规划一些基本的集散道路基础设施(根据市中心的距离和密度,1到3条道路为宜),使用自由形式的道路汇聚到市中心,使其看起来整洁。 以下是一个示例(主干道为红色,集散道为蓝色)。市中心将包含中高密度区域,建在两条主要集散道的四向交叉点附近。市中心有两个入口连接主干道,可从东西两侧通过主干道提供潜在的工业服务。
### 集散道路需求的确定 对于高密度区域,无论主干道与集散道路的连接质量如何,随着与主干道距离的增加,为城市区域提供服务所需的集散道路数量会大幅增加。不要期望一条集散道路能充分服务距离主干道连接点100单位的区域。 假设有这样一种场景:一条集散道路为商业区提供服务。这条集散道路长12单位,两侧规划为商业区,直接从主干道延伸而出,为6栋商业建筑提供服务。假设每栋建筑都需要一辆来自主干道的卡车提供服务。在这种配置下,6辆卡车通过一条路线在集散道路上行驶。假设这意味着立交桥的20%容量被利用。 现在将这条商业分区的集散道路延长至120单位。由于每个建筑仍需要一辆卡车,现在有60辆卡车需要通过同一条路线上的同一个立交桥前往目的地。此时,该路线的交通负载已增加到200%,交通完全陷入停滞!如果将通往分区的集散道路入口数量同等增加一倍,你或许能够勉强满足分区道路的需求(每条道路100%负载)。 现在考虑以下场景。你的商业区长度仍为120单位,但已通过 collector road(集散道路)连接了三个主要方向的工业区。外部交通有三个入口——东、西、南方向。这将相关主干道的负载降低到约70%。 关键结论是,为商业区提供更多方向的货物运输通道能显著提高吞吐量。如果单条道路被运输车辆堵塞,可以考虑将部分工业区迁移到能从其他方向为商业区提供服务的位置。 目前不必过于担心互通式立交。互通式立交应根据该区域的预期交通量进行设计,当你更清楚各区域的交通需求后再添加。一旦你对分区规划和已开发区域的规模有了概念,就能更好地选择合适的互通式立交方案。 步骤3:规划城市分区与布局 接下来,考虑如何在集散道路周围实施分区规划,但不必立即进行分区。在进入下一步之前,先确定你想要的分区方式是个好主意,因为这会影响你的选择。以下是一个示例:
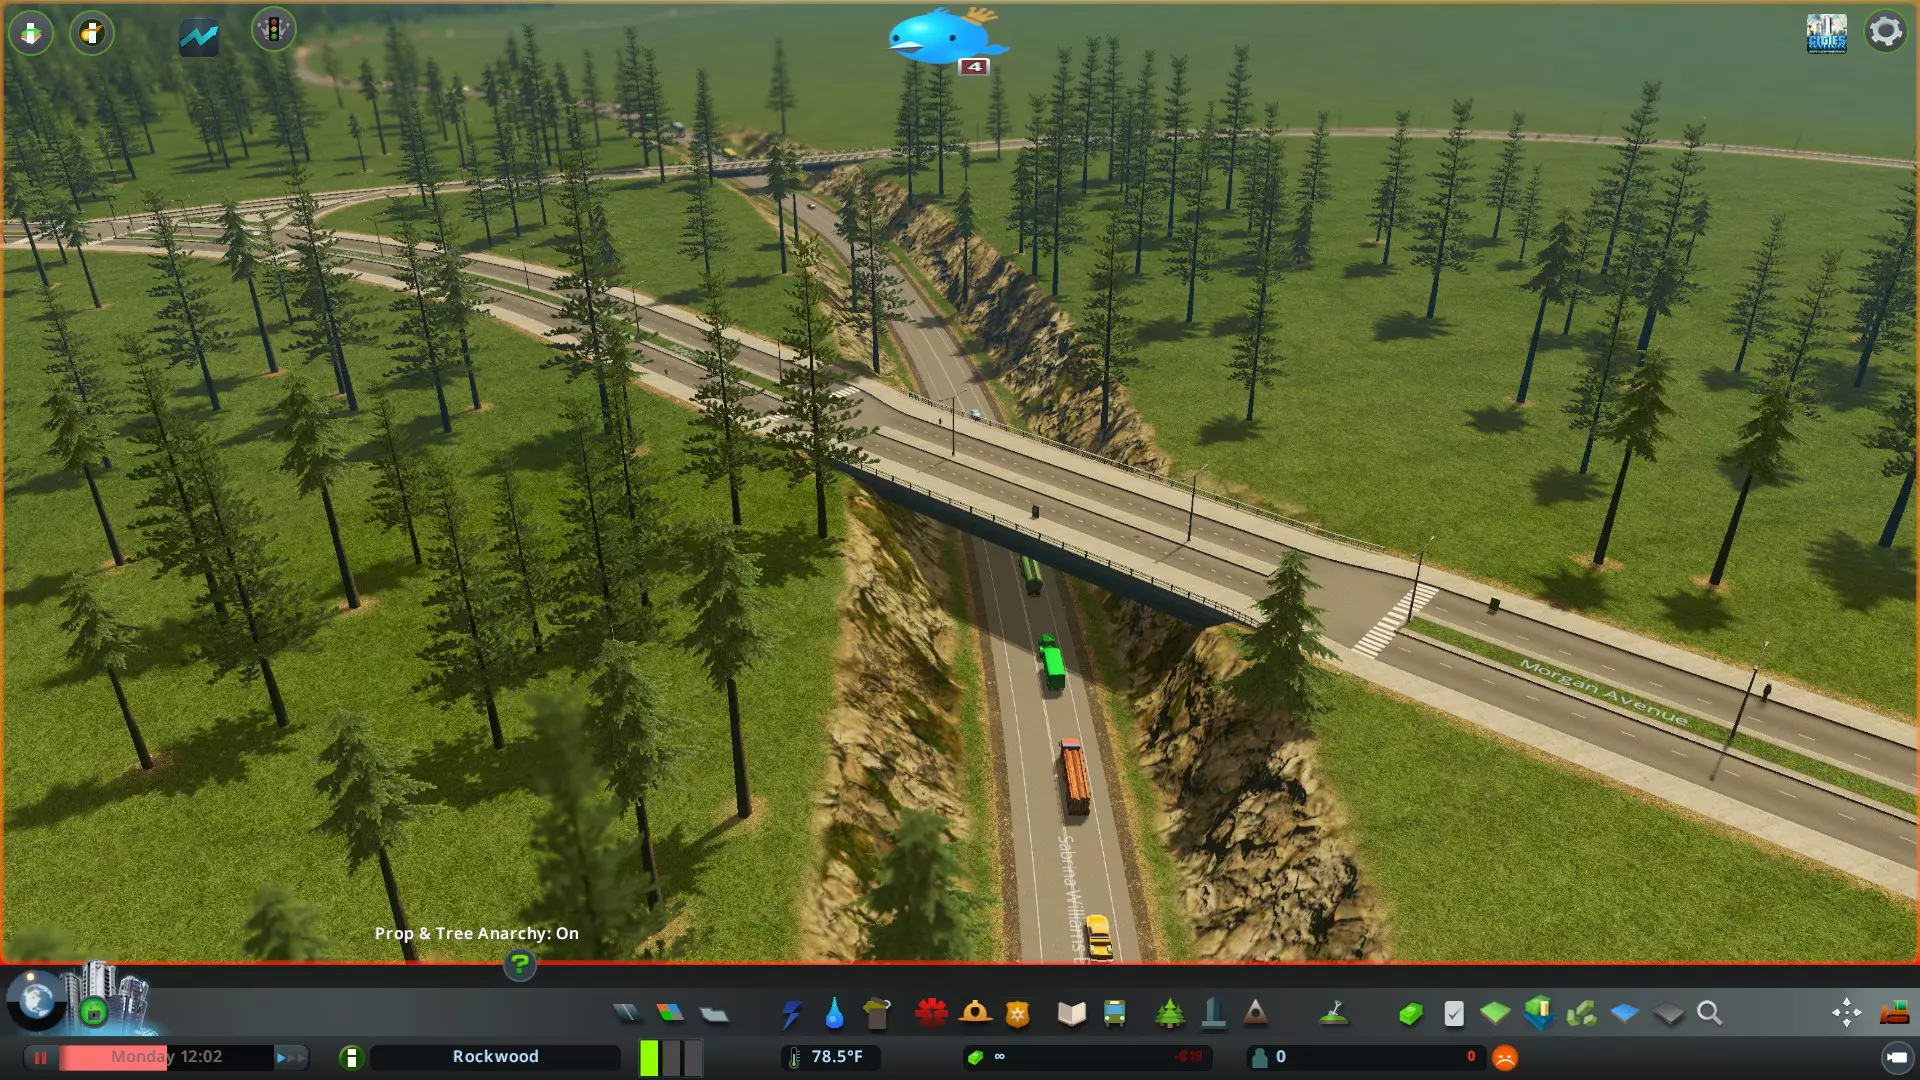
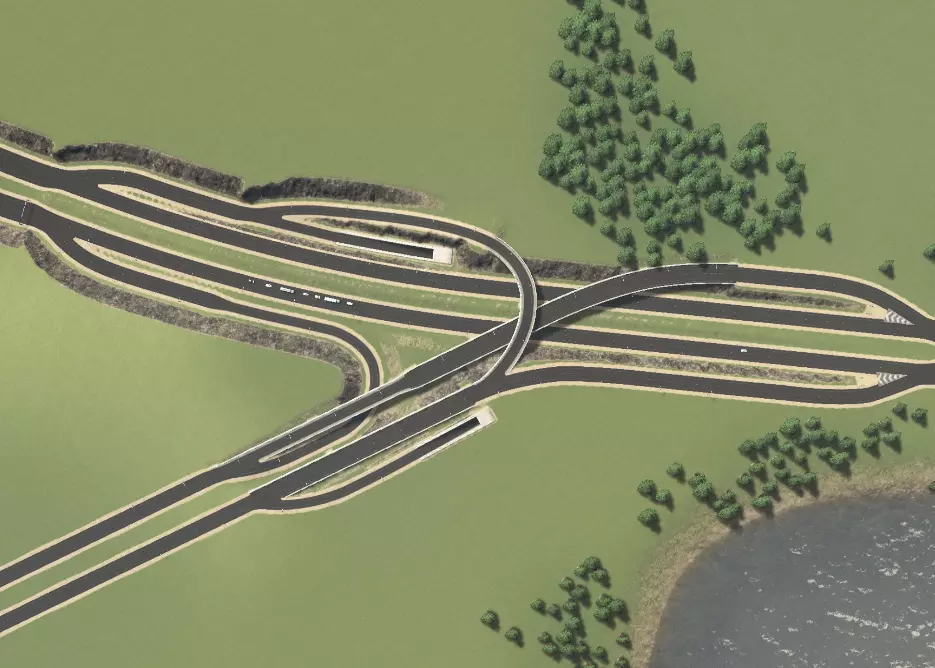
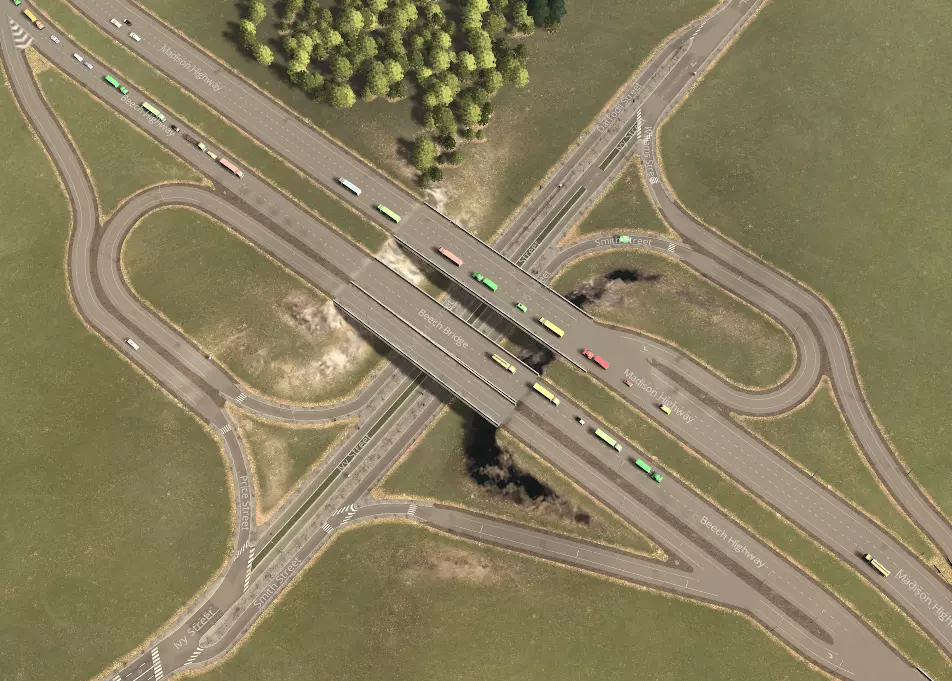
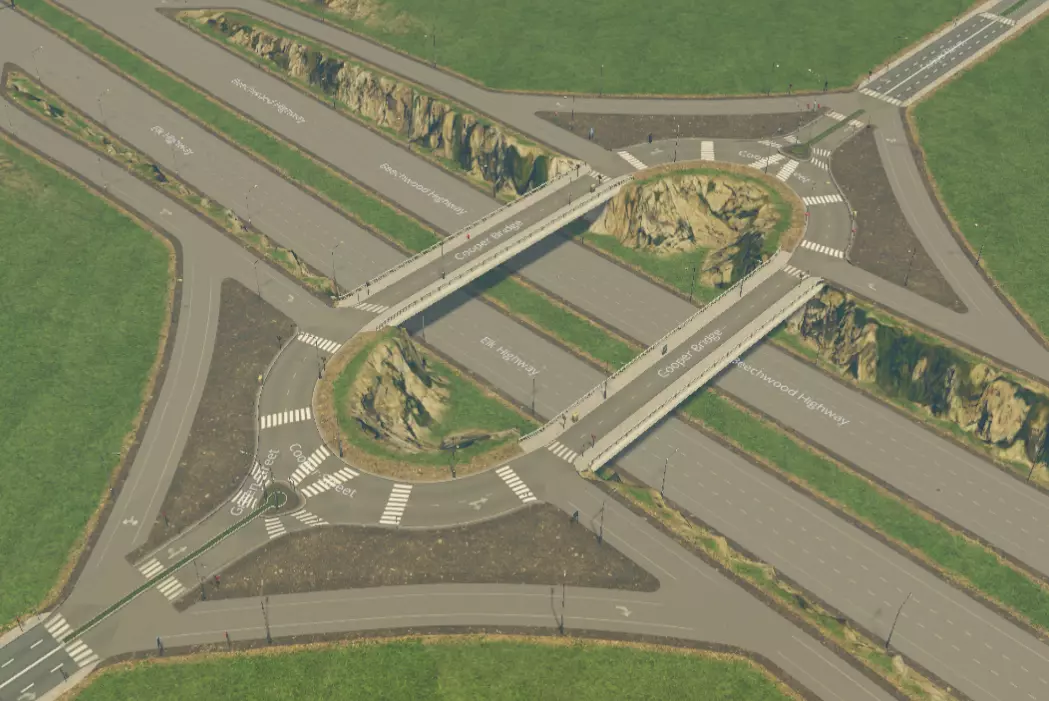
在主干道不远处的 collector roads(主干道连接路)交汇处将建设市中心。这将是市民进出城市的主要通道,也是他们聚集的地点。商业区将集中在该区域的主干道连接路沿线,并被办公区环绕以缓冲噪音污染。 工业区将规划在西北部靠近主干道的位置。这样可以通过主干道和主干道连接路直接通往商业区,使交通在很大程度上避开居民区。之后可能会在东部再建设一个工业区,以便从多个方向运送货物,缓解拥堵。靠近商业区的 collector roads(集散道路)之间的空间将用于规划住宅区。这样做的好处是,从工业区运送货物的模拟市民通常会使用不同的道路,且来自与那些前往市中心工作的模拟市民不同的方向。此外,模拟市民下班回家时可以经过市中心,这对商业很有帮助! 步骤4:建造互通式立交和交叉路口 添加主干道-集散道路交叉路口。 接下来,调整道路标高,在主干道和集散道路之间创建立体交叉,为高速公路互通式立交的建设做准备。立体交叉是建造有趣、真实且高效互通式立交的关键,在后续将主干道与其他主干道连接时也需要用到(参见城际交通部分)。这通常意味着要抬高或下沉主干道,以允许集散道路通过。在以下示例中,高速公路通过Move It!模组进行了下沉处理。
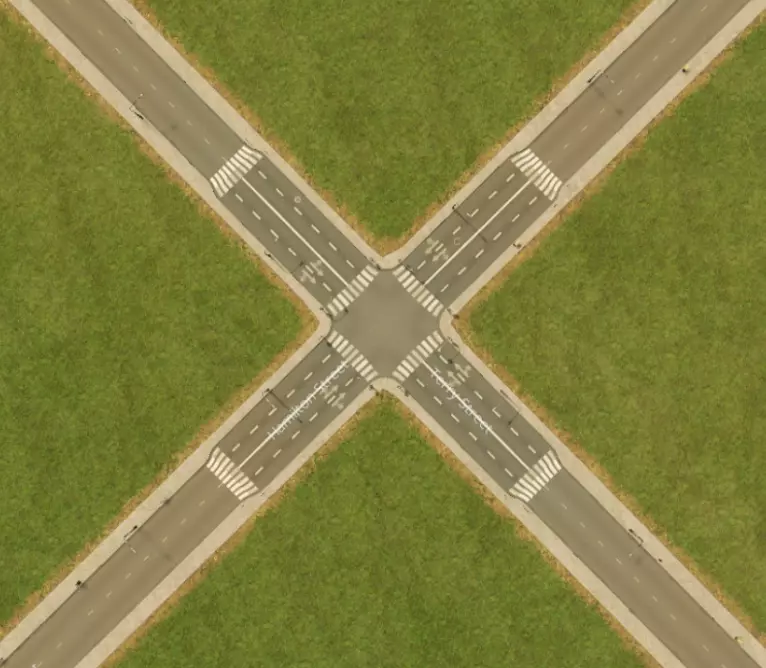
接下来,在主干道和次干道的交叉路口添加互通式立交。良好的互通式立交对于有效的交通控制至关重要。互通式立交很少需要设计得很复杂;如果城市规划合理,一个设计良好的基本互通式立交通常足以应对除最繁忙交通外的所有情况。记住——模拟市民会遵守交通规则,这使得交通管理比现实生活中容易得多。理想情况下,你应根据正确预测的预期交通流量来选择交叉路口类型。可以通过考虑你打算集中规划哪些区域作为工作场所(工业、商业、办公区)来预测交通流量。不存在“完美”的交叉路口。一种互通式立交类型并不一定比另一种更好——这完全取决于该区域的交通流量,关键在于建造一个足够用的立交。 下面我们选择了一个非常基础的带转向车道的菱形立交,适用于低密度交通。该立交在天桥入口处设有两个信号灯。这种立交成本低、构造简单、用途广泛,占地面积不大,可容纳中等流量的交通。
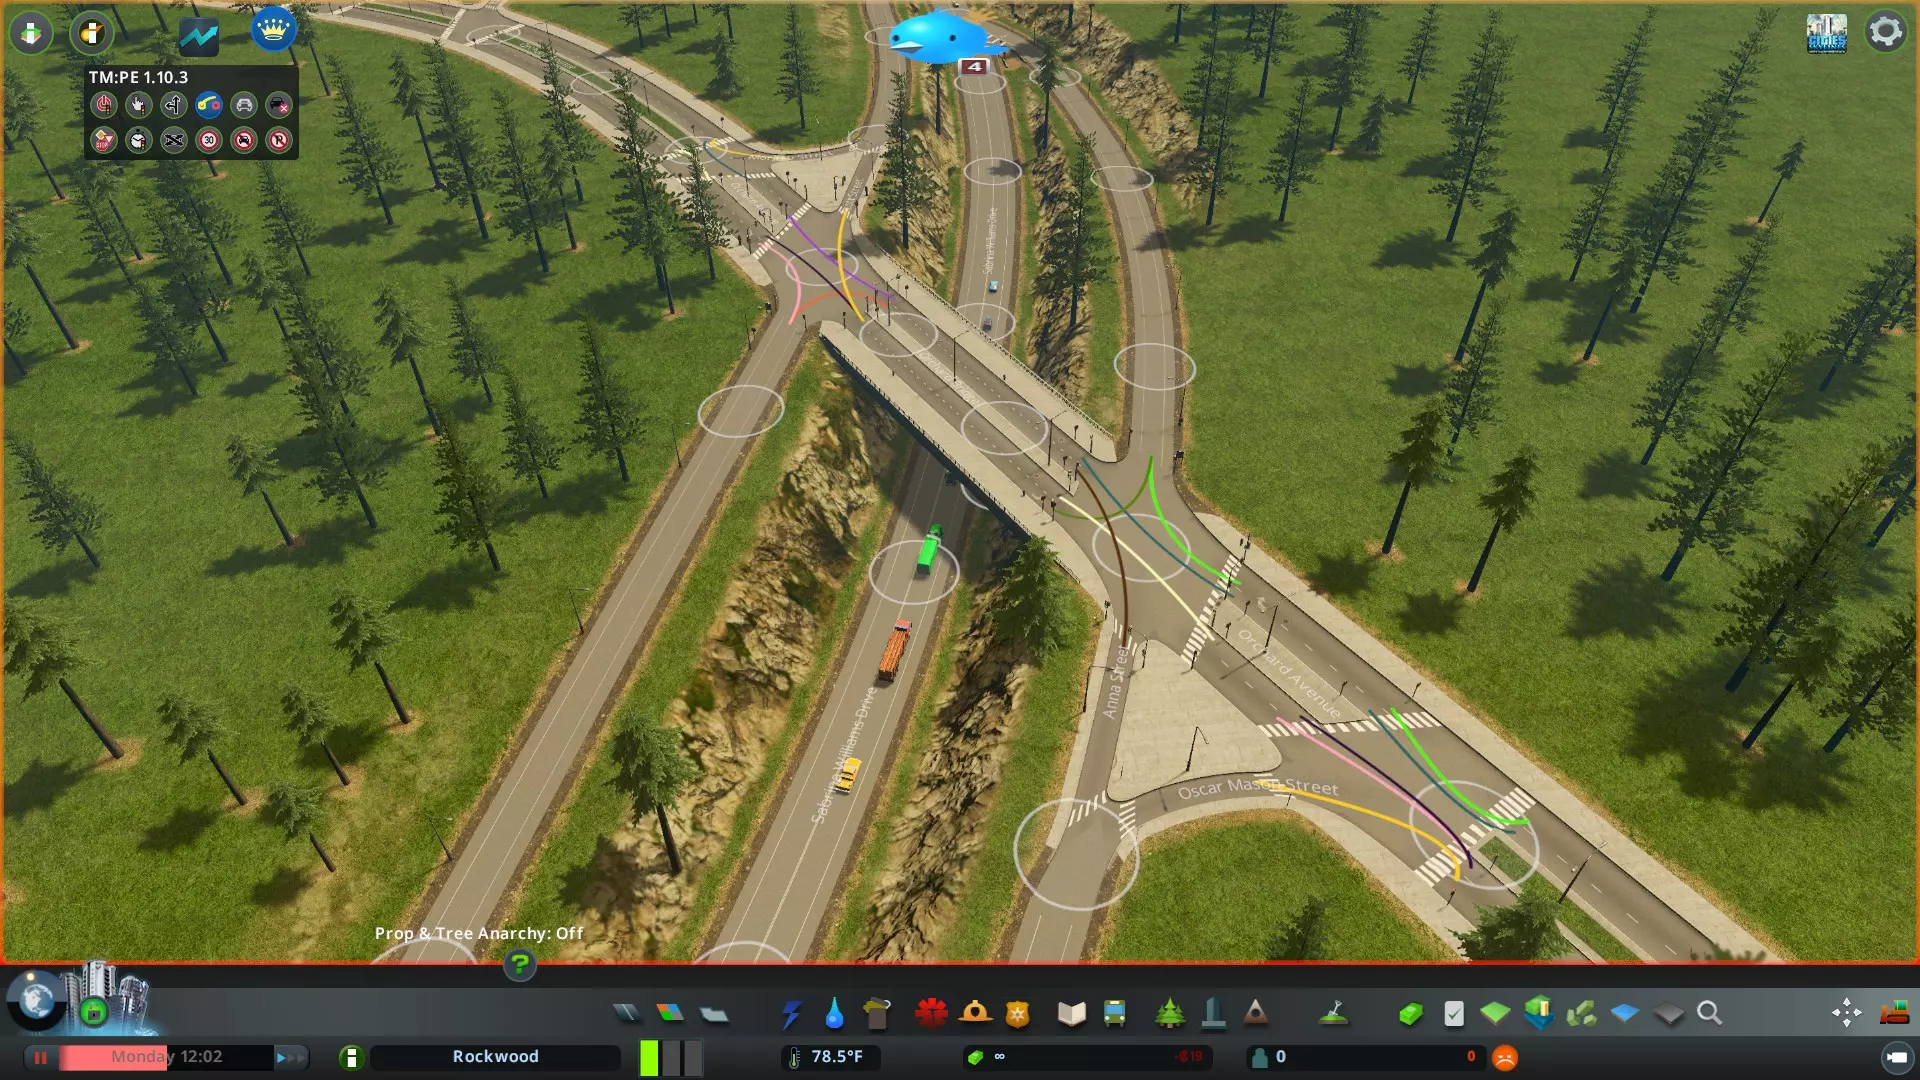
请注意,入口坡道的长度设计较为充裕(约25单位)。不要建造过短的入口坡道(小于15-20单位),因为这可能会限制在交叉路口排队的车辆数量,导致车辆溢出到主干道,从而阻碍主干道交通。此外,关键交叉路口的期望行驶方向已通过【交通管理器:总统版】进行了指定。这能确保使用转向车道的车辆始终向右行驶,不会尝试进行不当的掉头操作,以免干扰对向交通。有关主干道-次干道交叉路口的更多复杂设计思路,请参考附录2。 添加次干道-次干道交叉路口。 在这些道路之间建立连接。交叉路口应设计得比直线连接更为复杂,以促进良好的交通流量。任何位置的交叉路口都不应超过四向!更多的路口会导致交通混乱,除非是特别大的环岛,或许可以勉强设置五向路口。三向路口则特别理想。根据下方讨论,附录1中提供了更多示例。 转向车道。 在关键的集散道路交叉路口添加转向车道,使交通尽可能顺畅。添加转向车道后,车辆在交叉路口无需停车即可轻松完成转向。对于右行交通,这意味着在主路上增设向右转向的车道,以便车辆从主路驶入其他主路。

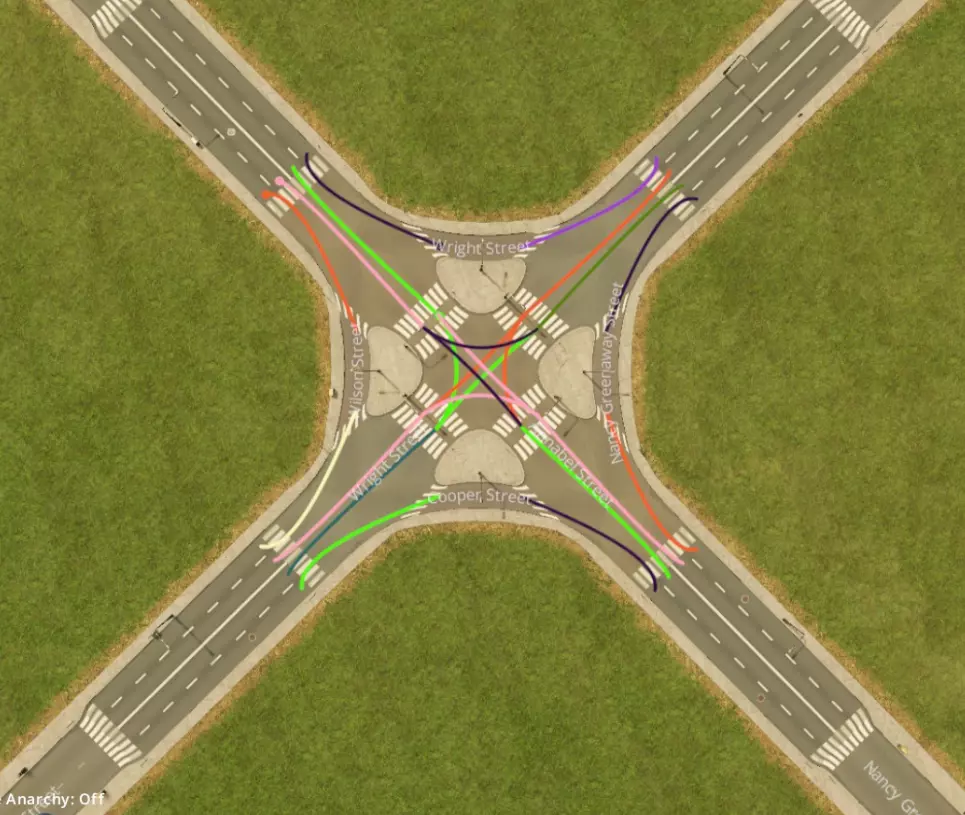
在这个简单案例中,已在两条集散道路的交叉路口处新增了一条转向车道,并使用【Move It!】工具进行了弯曲处理。这使得转弯车辆能够绕过红绿灯路口,因为车辆可以不受干扰地驶向左右方向的道路(所有车辆行驶方向相同)。此外,这样看起来也很酷。 当车辆驶入转向车道后,两条车道会分道行驶:一条直行车道通向交叉路口(通往双向道路),另一条为右转车道。这种配置通过将驶入的交通流分为必须经过信号灯(左转和直行车辆)和无需停车即可绕过交叉路口(仅右转车辆)的两部分,从而最大限度地提高通行量,减轻交叉路口的负荷。可以使用【交通管理器】将右转车辆引导至最近的车道(图中尚未进行交通管理),而其余车辆则使用靠近中央分隔带的车道。 车道数量。 理想情况下,驶入道路/交叉路口的车道数量应至少等于向新方向转移交通的车道数量。下面提供一个示例。该位置是上一节所示的计划作为市中心的集散道路的汇合点。请注意,两条四车道道路在此交叉路口交汇,每个方向各有一条单车道转弯车道分叉。在每个方向上,两条车道的车流汇入两条车道。
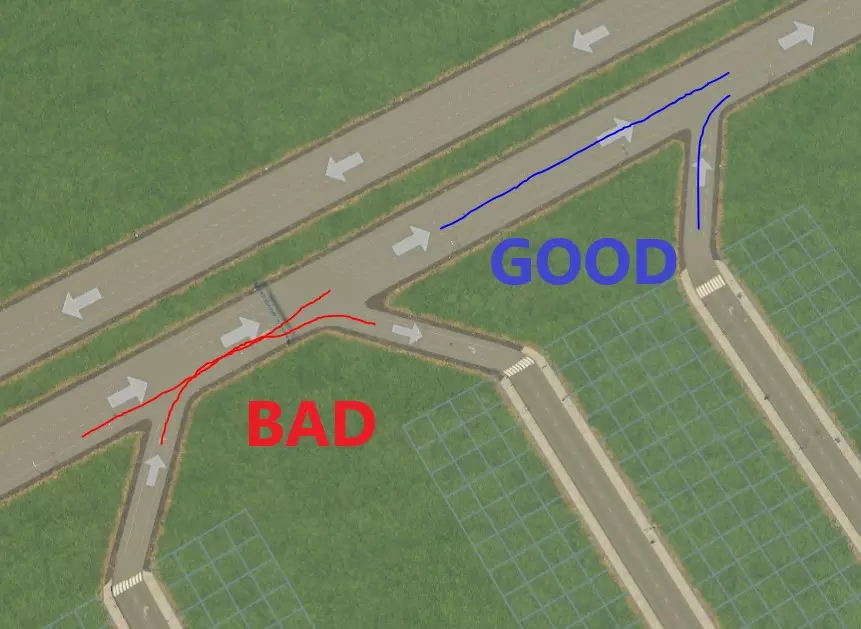
对于主干道和次干道,将X条车道扩展为X+n条车道(例如,高速公路单车道匝道分叉为两条车道)通常是可行的,但将X条车道缩减为X条或X-n条车道(例如,两条3车道高速公路[共六条车道]合并为一条高速公路)存在风险,应始终避免。不过,在交通量较低的次干道交叉口,将X条车道缩减为X条车道通常是可以的(例如,两条双车道道路汇合)。 交织问题。 最后,必须防止出现车辆为到达目的地而不得不交织的情况。当交叉口距离过近,车辆在某一点因没有操作空间而发生冲突时,就会产生交织现象。
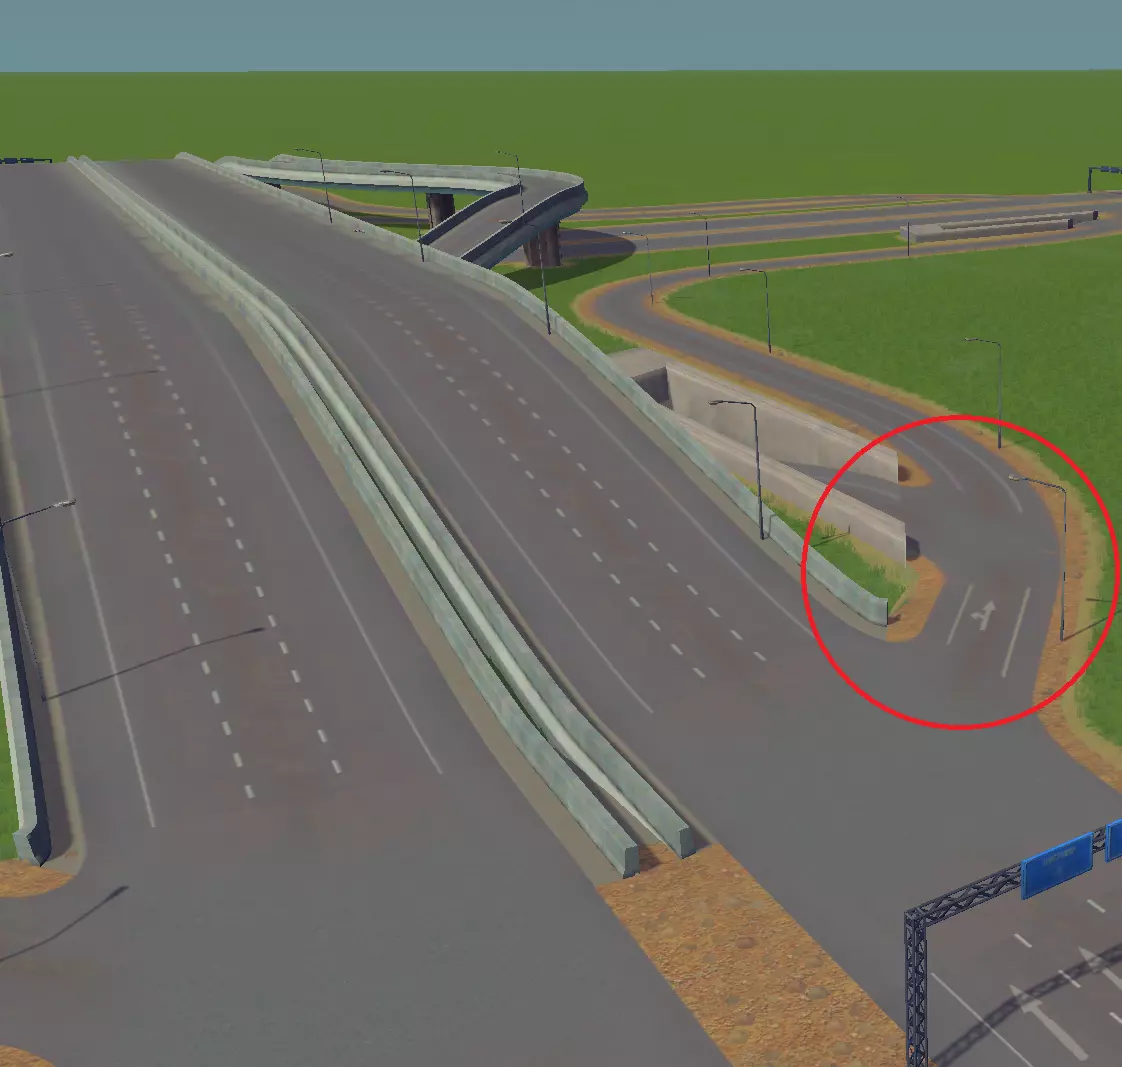
好吧,或许下面这张盗用的艺术家渲染图(感谢来源)能更清楚地说明这个问题……
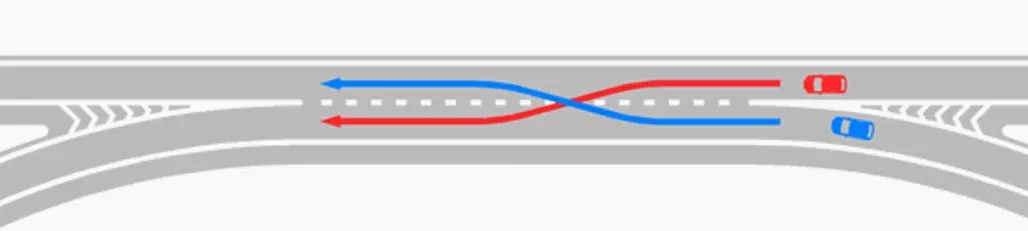
这可以通过以下方法解决:1. 确保驶离高速公路的接入道路位于驶出道路之前(右上);2. 按如下方式添加临街道路。
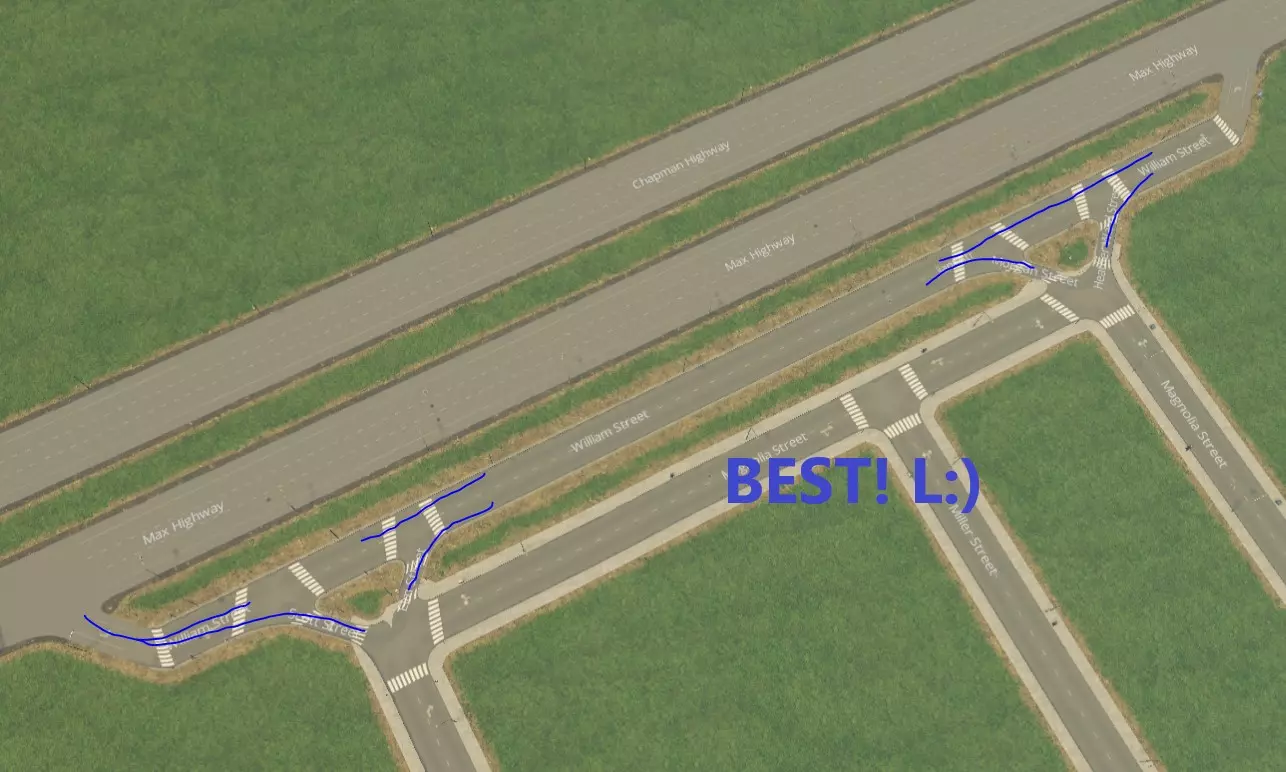
如果初始交叉路口不足以满足需求,你可以轻松升级交叉路口,只需添加带有额外车道/转向车道的路段,无需重新设计整个结构(示例如下)——你会发现简单的渐进式改进就能容纳更多交通流量! 不要害怕遵循这些原则创建一些自由形式的互通式立交!它们不仅看起来很酷,还能为你的城市增添许多特色,而且对于以特殊角度连接高速公路几乎是必不可少的。 步骤5:创建市中心 每个城市都应该有一个有趣且独特的市中心。市中心通常有一些开放区域,是城市商业和交通的枢纽。一旦你铺设好基本的道路基础设施,并且对城市后续的发展有了规划,就可以开始规划市中心了。以下是一个规划市中心的示例:
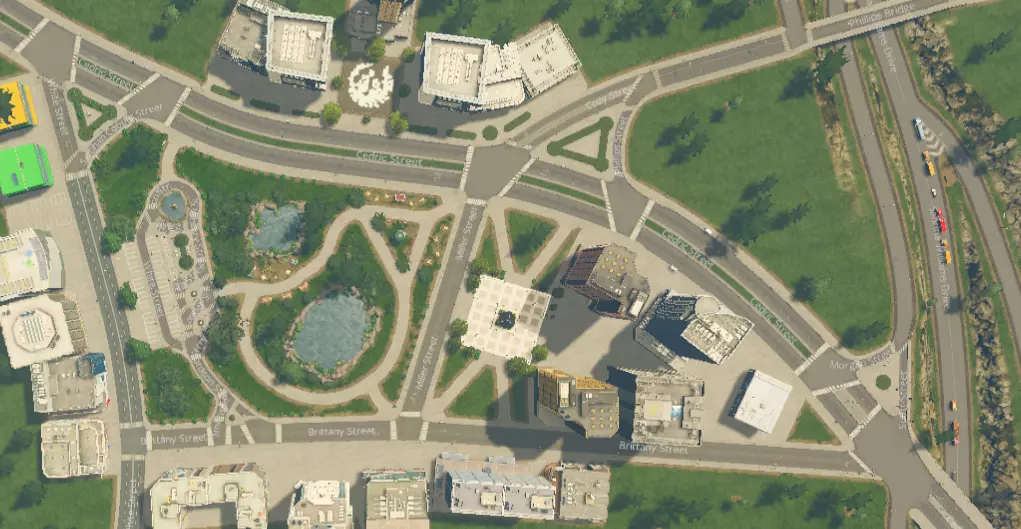
让我们来谈谈这个市中心的一些关键特点: 位置与交通。市中心靠近多条主干道,交通十分便利。右侧不远处即可进入高速公路,但又不会紧邻高速。有一条集散道路从高速公路延伸至市中心,提供东西方向的通道。注意左侧还有第二条主干道,可实现南北方向的通行。这意味着车辆可以从多个方向自由进出该区域,这总是一件好事! 开放空间。我知道对于你们美国人来说,这可能像是一个陌生的概念,但市中心并不一定意味着建筑密集、拥挤不堪!在主干道交汇处的中心有一个大型公园,园内设有步道网络,为行人提供了更直接的区域通行选择。在设计这些开放空间时,可以考虑加入露台、广场、花园等元素。这一核心特色不仅为该区域增添了独特魅力,也为模拟市民提供了一个休闲聚会的好去处——说实话,换作是我也会想去那里!此外,公园还能减少周边的分区密度,从而有助于缓解交通拥堵。如果你喜欢鹅卵石或砖块的外观,有个小技巧:可以先铺设人行道以确保通行,之后再用你喜欢的贴花覆盖该区域,这样就能完全遮盖沥青路面(如果需要的话)。 分区设计。这附近的区域将规划为商业区和办公区,让你的模拟市民在附近时有事情可做、有东西可买。你可以使用【Move It!】、【Plop the Growables】和【Ploppable RICO】等模组来按照自己的喜好进行布置,因为在处理弯曲道路时,游戏原版会出现一些奇怪的问题。你需要【Surface Painter】来绘制沥青并清理所有奇怪的边缘。这里也有一些开放空间,可以使用【Prop and Tree Anarchy】添加漂亮的道具、停车场、装饰品等。你需要从创意工坊获取这些内容。 交通方面,让一些交通服务汇聚在这个位置是个不错的主意。在这种情况下,我们选择了公交车,并将部分开放区域用作停车场和落客点。
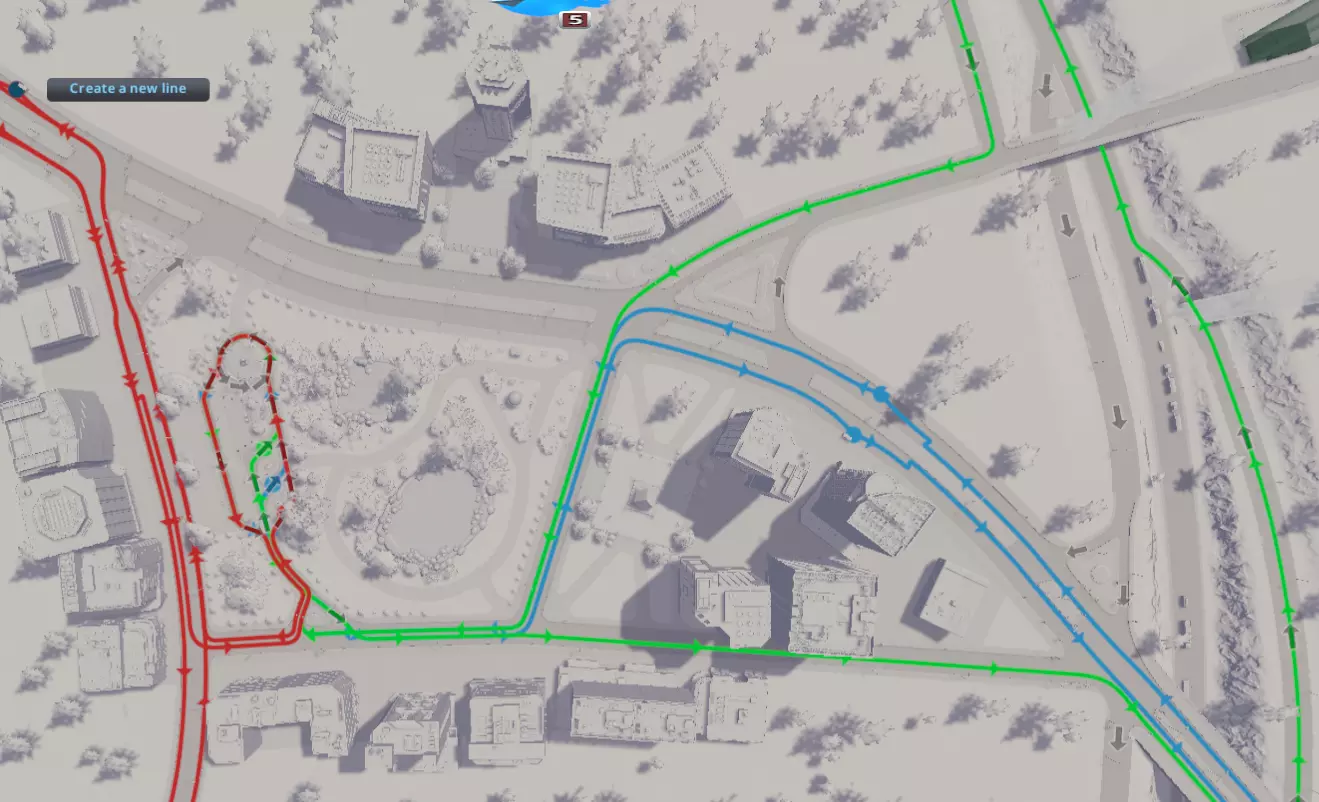
这有许多显著的好处。需要注意的是,附近的实际道路上没有停靠站,不会妨碍正常交通——公交车在其专用区域内有一定的操作空间。就连通往车站的通道也设置在主干道之外!公交线路沿着集散道和主干道向各个方向延伸,将市民引导至正确的方向。公交车将市民直接送到城市中心,他们可以在那里工作和购物,这有助于鼓励他们选择公共交通出行。在较大的城市中,可在该区域附近增设地铁、有轨电车和火车站,以进一步促进市民的出行! 一如既往,请发挥你的想象力。可以通过网络获取城市中心的设计灵感。祝你玩得开心!步骤6:放置城市服务设施 这部分相当简单。将服务设施放置在主干道沿线的中心位置,新创建的市中心就是个便利的选址。这样能让服务车辆轻松驶入多条重要道路,最大化其覆盖范围。根据需要服务的区域大小来选择服务设施的规模。至于管道系统,通常最好将主管道沿着主干道铺设,之后再添加分支管道覆盖各个社区,这样可以减少重叠并节省开支。 步骤7:规划社区 本地道路 通过添加本地道路来完成道路布局,这些道路将用于开发社区。社区通常不直接连接到主干道。它们与主干道有少量连接,或者通过上下立交桥完全避开主干道。本地道路之间可以有许多连接,影响不大,因为它们主要承载 residential traffic。尽量减少社区与主干道的连接点(间隔【20单位】以上是个不错的经验法则)。将交叉路口限制为三岔路口也很有好处。以下是示例:
If you want a very high density area, grids are not the enemy. Start with grids along collector roads and then get creative. Neighborhood roads are more grid-like nearest collector roads and become more free-form in the spaces in between. Zoning Now you can finally go ahead and zone your city. If you will be using growables its good to start zoning districts and allowing them to develop before moving onto the next to avoid growth problems like gaps in the power grid or worse, the dreaded death wave that comes when a million sims move in and die at once. Remember that zoning is as important as road layout. Always stick to your guns when it comes to zoning. Remember, if you try to start building commercial zones too far from your city center, you will end up with gridlock. If this happens, look at your zoning selections and see if you need to re-zone. If all else fails, reorganizing your zoning is not fun but can be a big help in solving traffic problems. Step 8: Implement Mass Transit Assuming you did not go the TOD route, now that you know where your main roads are going to be and where things willl be zoned, you can effectively select and place additional transit services. While your heirarchial road infratructure, intersections, and zoning choices constitute your blueprint for traffic control, mass transit options comprise your toolbox. Make sure your sims have lots of ways to get around the city. Your mass transit network needs to cover your collector and arterial roads and give access from residential areas to work areas to most effectively save car trips. Sims don't mind travelling a few blocks on foot or a few more by bicycle, but beyond that they are going to take a car or public transportation. Remember sims will prefer the shortest distance and the fastest mode of travel to get around! Conveniently, much like your road network there is a transport heirarchy. The below transportation options are given in order of number of fastest travel speed, highest quantity of sims that can be serviced, and the least number of services you will likely have per type to the slowest, fewest, and most numerous. Trains. Use trains to whisk sims between between and across cities. These often run along the same routes as arteries but can also cut through wilderness and sometimes neighborhoods. I would not space out train stops any closer than 300 u apart. Very expensive but necessary to get that cool factor. NOTE: there's a mod that let's you adjust ticket prices so you can actually be rewarded and MAKE money off of good ridership. Forgot the name... go find it! Metros, and Monorails. Place these along major collector roads to connect districts of large cities. Particularly good for very high-density cities as they have a small footprint and dont contribute to local traffic. Space these >/=150 u apart. Trams and Buses. These are a slower mode of transportation but serve the purpose of getting sims between blocks and for cheap when it comes to rural or low-medium density areas where it just doesnt make financial sense to have an elaborate rail network. Run these along your collectors as well including less important ones where you're not going to build subs. Particularly with buses, these can cut into large residential areas to make pickups if needed. Usually a stop every three blocks or so works well (50-60 units apart). The issues with buses and trams is although they are more cost-effective than rail, they will still contribute to traffic. Make sure that the bus depot is placed near arterial roads and and large bus stations near the center of town ideally with dedicated access as described in the City Center section to prevent congestion. Ferries and Blimps. For those efficiency buffs among you I bet you are wondering what the heck to do with these. While slow, Sims will use these when they provide a really direct route between areas that have natural boundaries otherwise only connected by lengthly roads or railways. Need to cross wide rivers, lakes, or large bays? Use a ferry. Is there a big old mountain range between your cities? Use a blimp. Sims would rather take this snail transportation than have to take winding roads around to get there. Plus, cool. Inter-City Road Infrastructure Aterial Connections Later if you want to build multiple interconnected towns and cities on the map, You will need additional arteries and some more complex interchanges to ensure your highways remain free-flowing. This means large interchanges with long access ramps and free of areas that contribute to congestion. Larger, more generously sized interchanges will always work better than small ones with short ramps to a "receiving" highway which can allow cars to pile up and obstruct traffic along the "sending" highway. Also, tie your cities together with your web of collector roads to give even more directions of access. Weaving conerns apply in building these roads and at high speeds are as important as ever. Prevent situations that will cause vehicles to have to weave to reach their destination. Additionally, be aware that harsher curves result in a reduction in traffic speed. Both of these factors will reduce the throughput of your interchange. These issues are minimized in interchanges like a turbine or stack and are why they are so much more effective than a standard cloverleaf for example, which has close on-and-off ramps and very tight loops. Refer to Appendix 3 for more examples of arterial interchanges. Dont be afraid to make some free-form interchanges following these principles! These can look cool and add a lot of character to your city and are all but necessary for connecting freeways at odd angles. Inner City Arterial Connections Ok, be warned, this section is going to get a bit hairy. It is likely your main city center is going to end up near a major arterial intercehange and you will need collector roads access not miles away. With that said it is very important you put together good collector intersections very close to this interchange in order to succeed. To build good collector intersections in such a location you are going to need to apply everything in this guide to do a good job. Use the below methods to make this happen. Think out of the box here. Just because we have arterial interchanges does not mean we cannot have good (albeit complicated) collector road interchanges nearby. We just need to be smart about the configuration. Here is an example of a situation where we need to build collector roads near such an intersection. the situation is a couple arteries connecting at a very harsh angle (< 45 degrees).
其思路是将主干道入口道路用作临街道路,以连接次干道。这样做的好处是,主干道交叉口的交通流不会受到阻碍,同时匝道会向不同方向分叉,与次干道相连。
这里有两条集散道路经过主干道交叉口附近。下方展示了主干道(红色)、集散接入道路(绿色)和集散道路(蓝色)的连接情况,主干道互通匝道未突出显示。
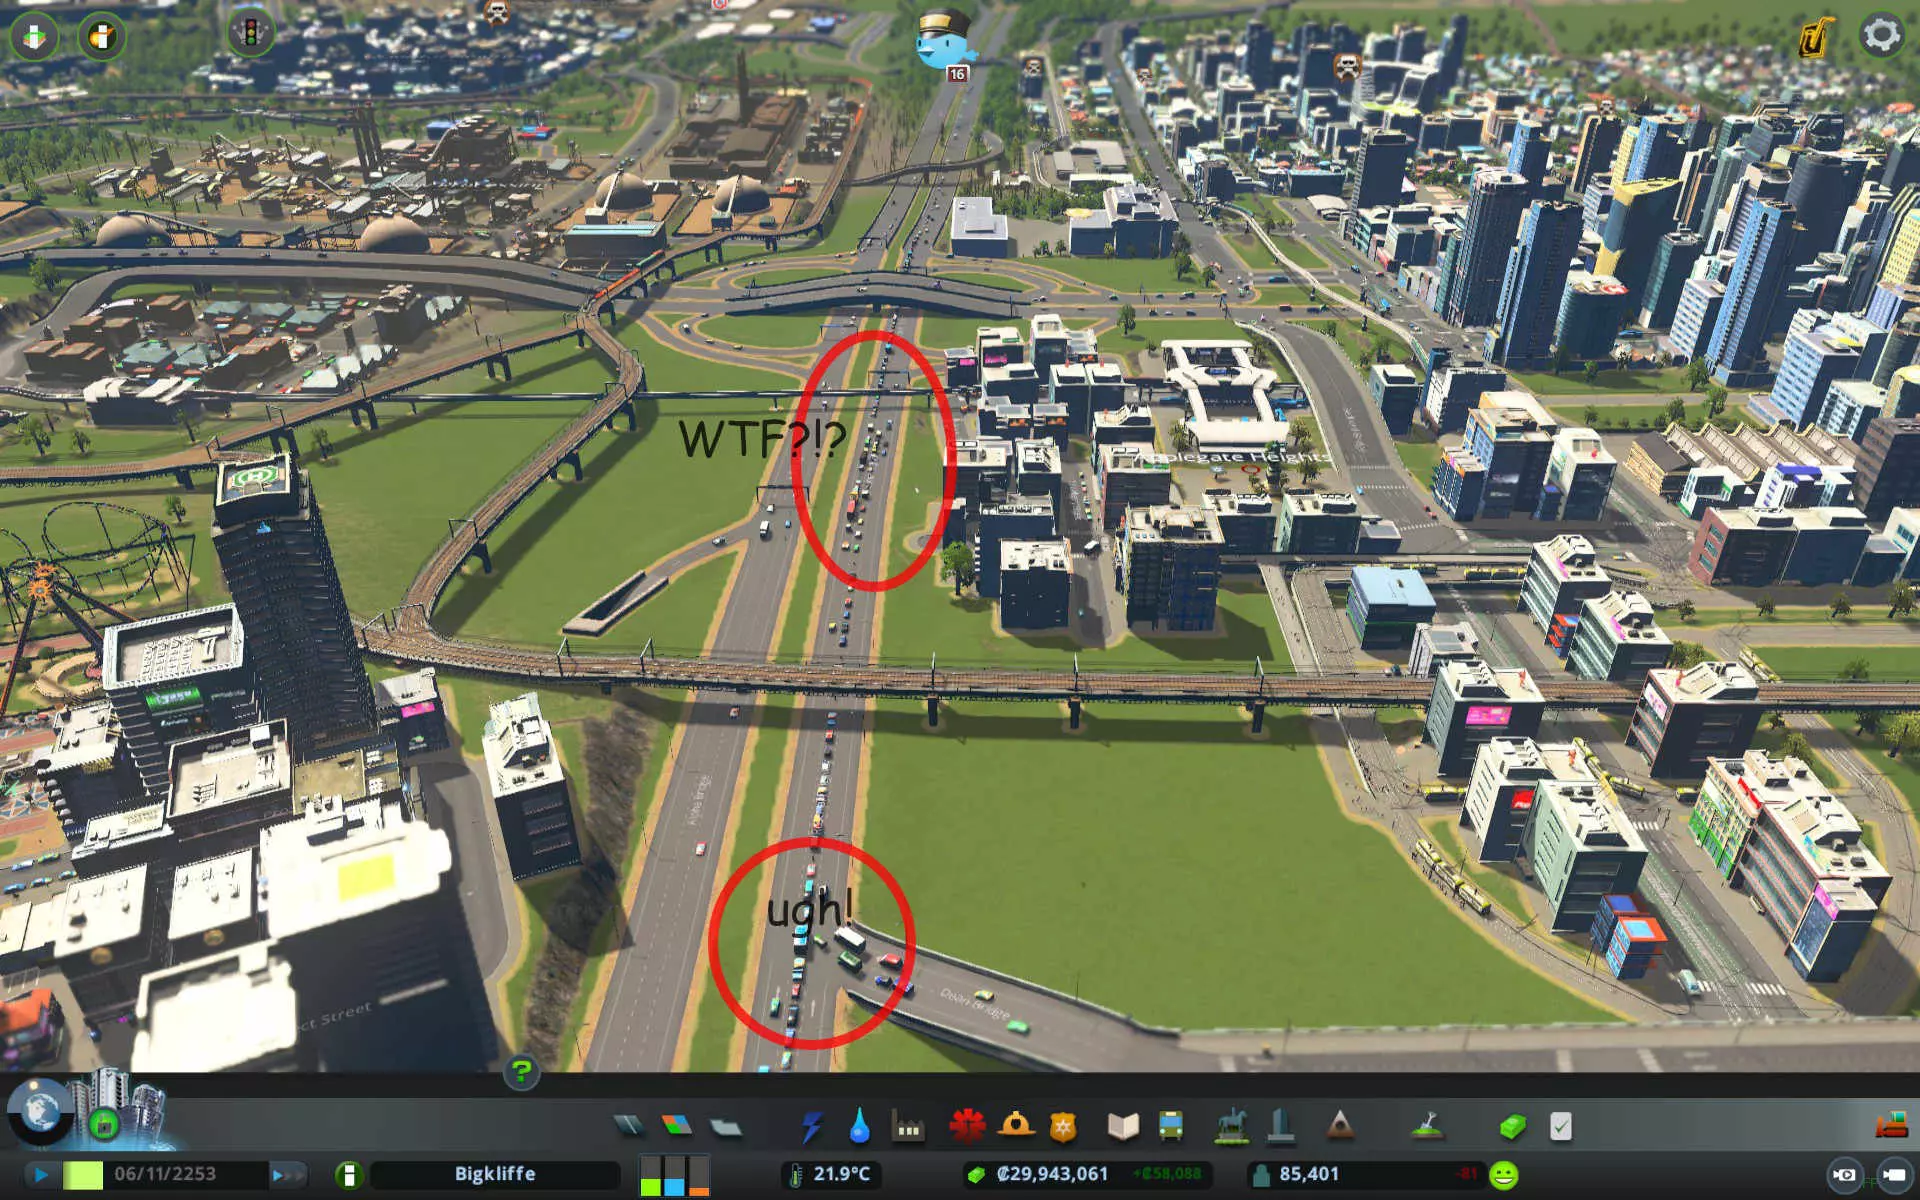
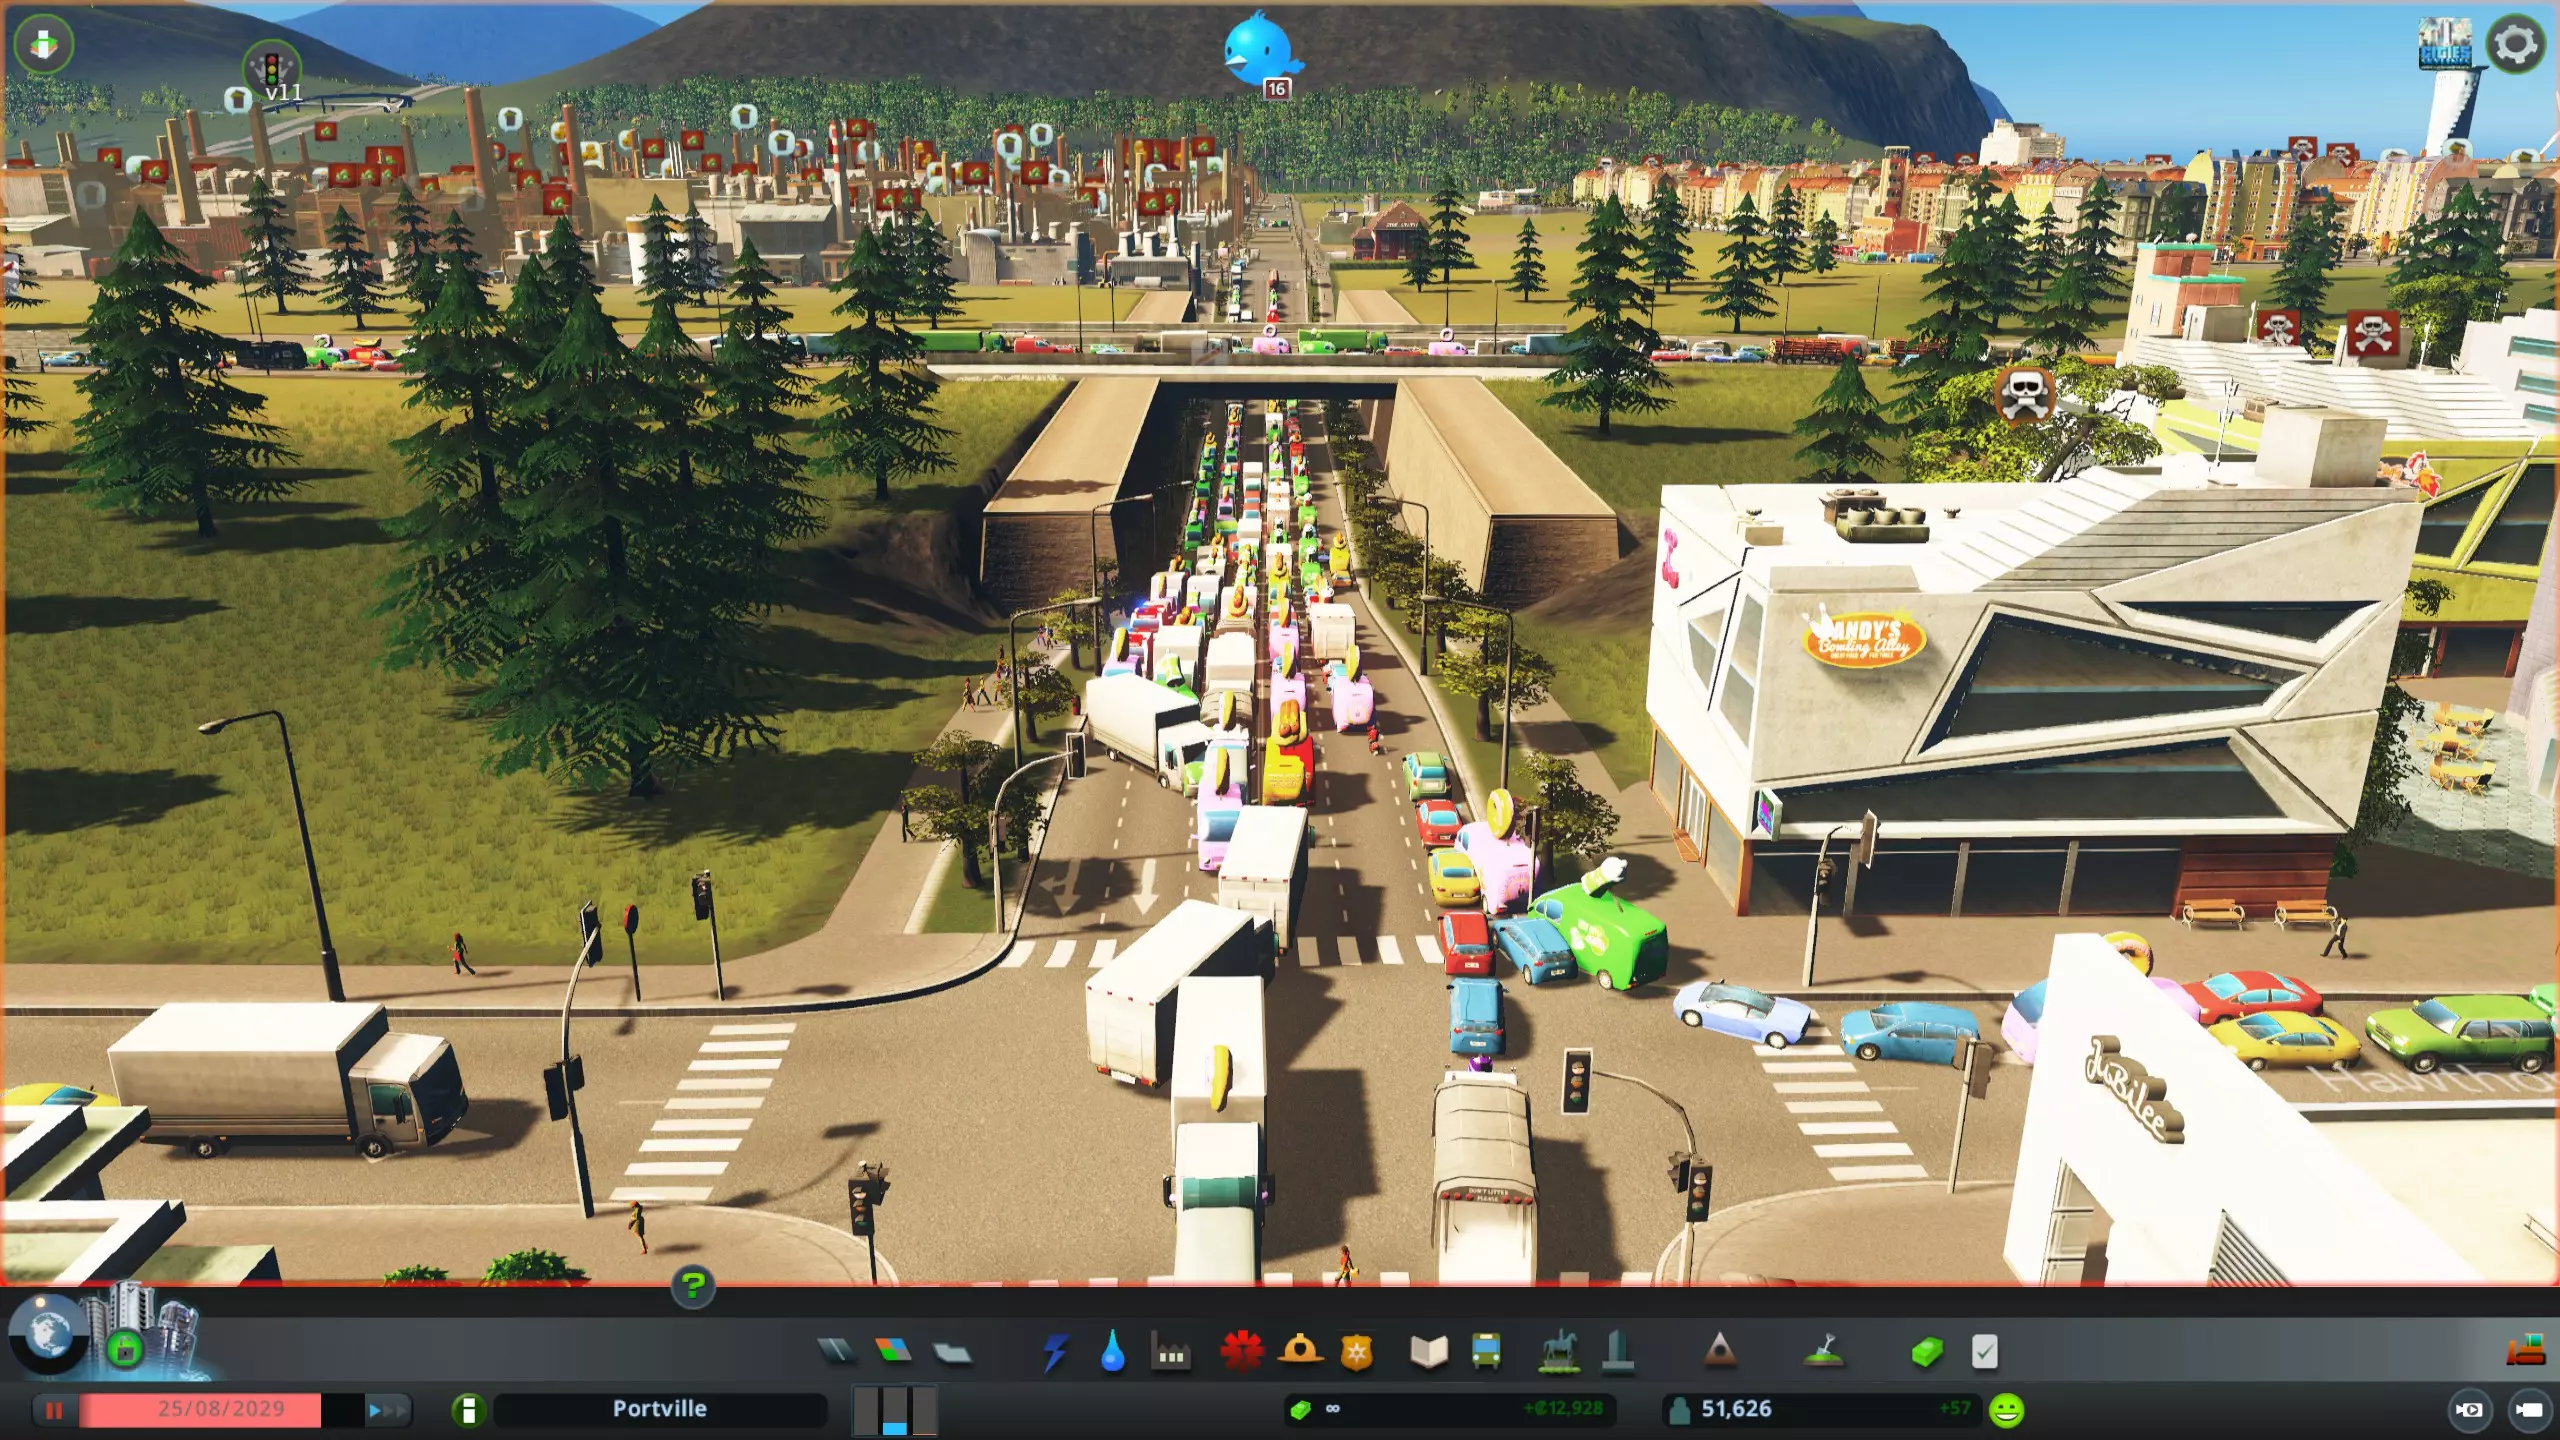
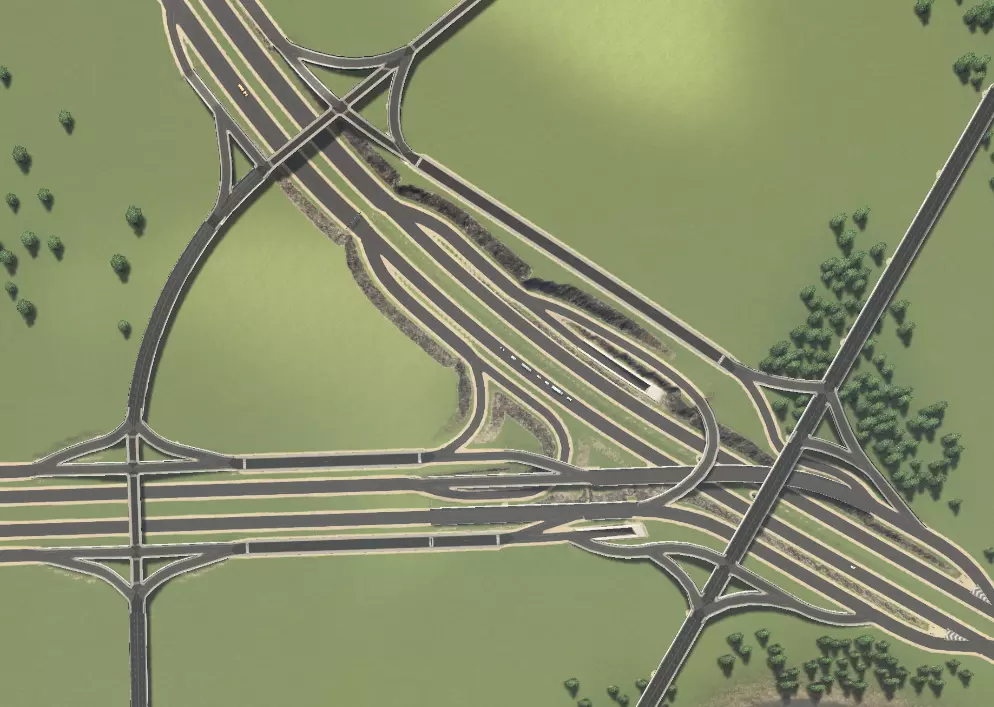
每种情况下均使用标准菱形交叉路口,但可按附录2所示进行改进。您会注意到,临街道路/地方快速路是良好设计的关键,因为主干道上的直行交通与进入集散道的交通完全分离。这是实现此目标的方式,因为我们让交通从匝道分流(请记住,交通分流总是比汇流更好),且不会为主干道增加额外连接。主干道匝道被100%利用以接入集散道,这在大多数情况下意味着主干道交通在交叉位置被分流而非汇流。 所有集散道均设有转向车道,以便车辆在允许右转的地方顺畅进出主干道。不过,你需要谨慎规划道路连接。由于集散道路距离较近,可操作空间有限;以西北方向的集散道路连接为例,我们没有完整的菱形互通式立交,这会使右下角中心区域的交通转换主干道变得复杂。在其他所有可能的位置,我们都通过入口坡道将菱形集散道路连接到主干道。 交通分析与故障排除 良好的交通流量对城市的发展和运转至关重要。糟糕的交通流量会导致城市发展缓慢甚至停滞、公共服务效率低下,而且看起来也会让你心情不佳。不幸的是,对于新手玩家来说,交通问题是游戏中最难解决的问题之一。在本附录中,我将以【修复交通】场景为例,逐步引导你分析潜在的交通问题。当前交通流量仅为可怜的57%!首先,让我们从整体角度审视城市,找出主要问题所在:
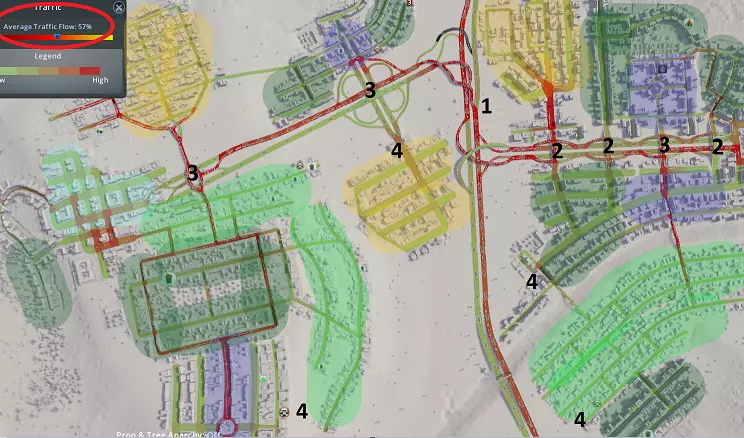
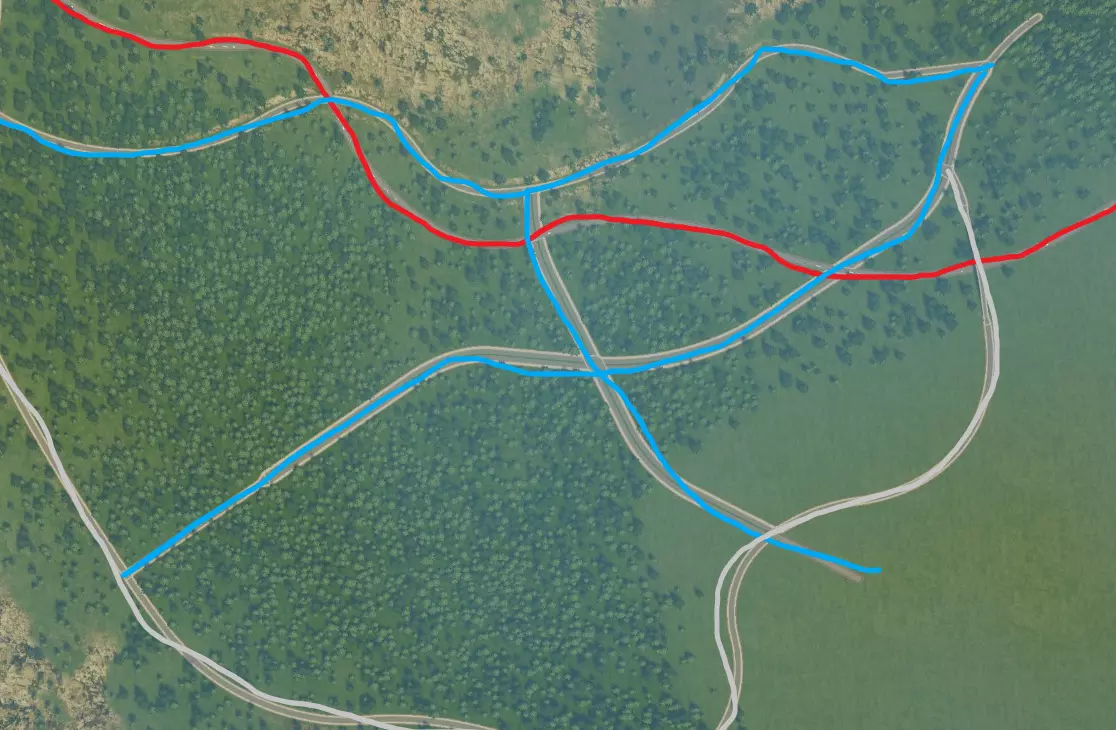
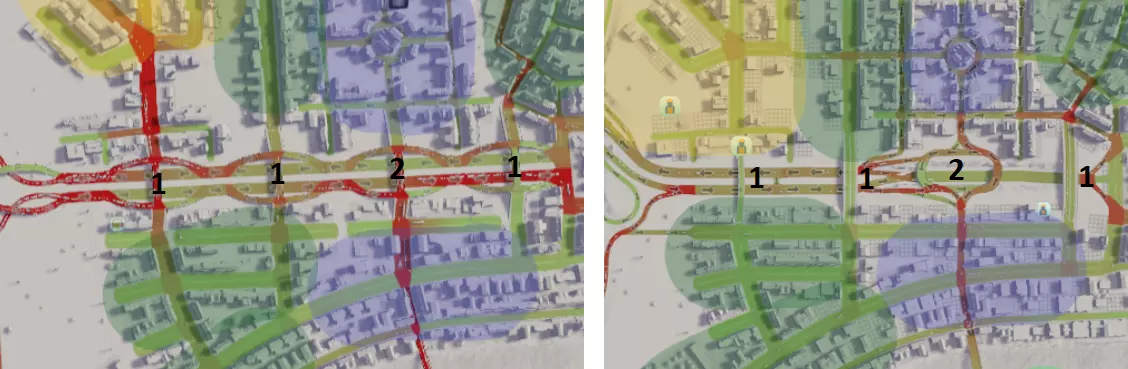
1. 地图中心的高速公路连接处交通拥堵严重,原因是这里是东西向交通的唯一通道,且互通式立交设计欠佳。 2. 相邻的互通式立交数量过多,导致车辆频繁上下高速,引发拥堵。 3. 关键位置的主干道/集散道互通设计存在问题。 4. 各区域出现“孤岛效应”。通常,某个区域的所有交通都会汇集到一两条连接高速公路的道路上。高密度区域和工业区要么没有足够的高速公路接入路线,要么缺乏集散道路相互连接。现在让我们更详细地剖析最大的问题领域,并研究选定的解决方案。
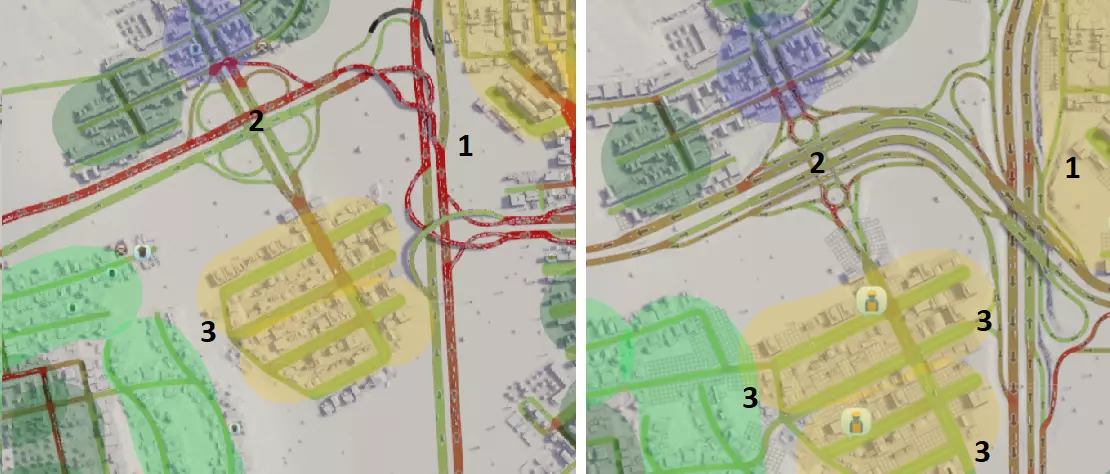
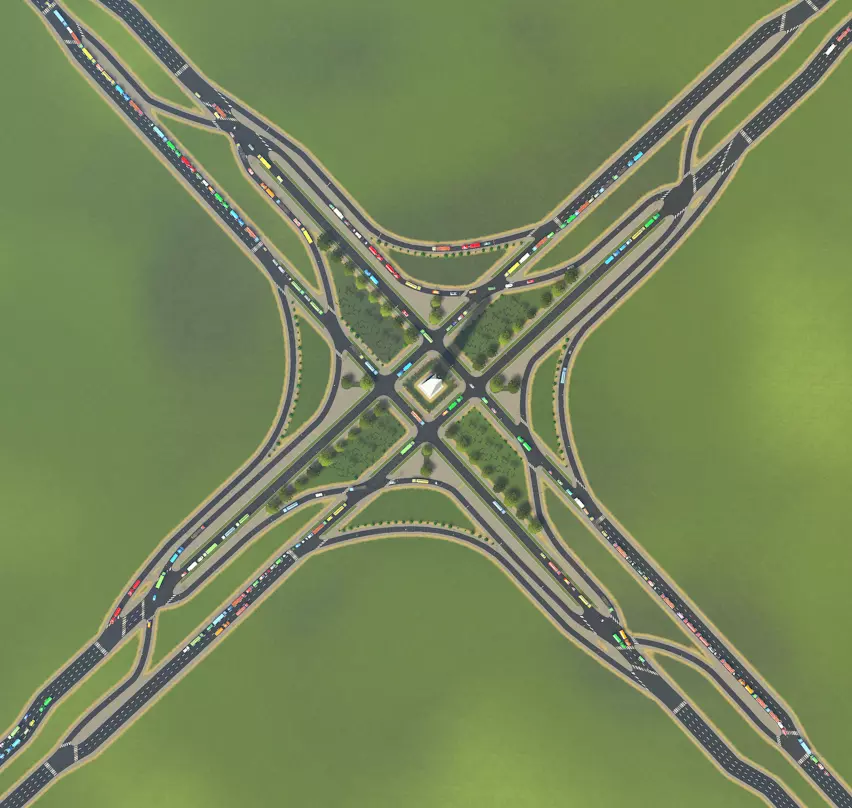
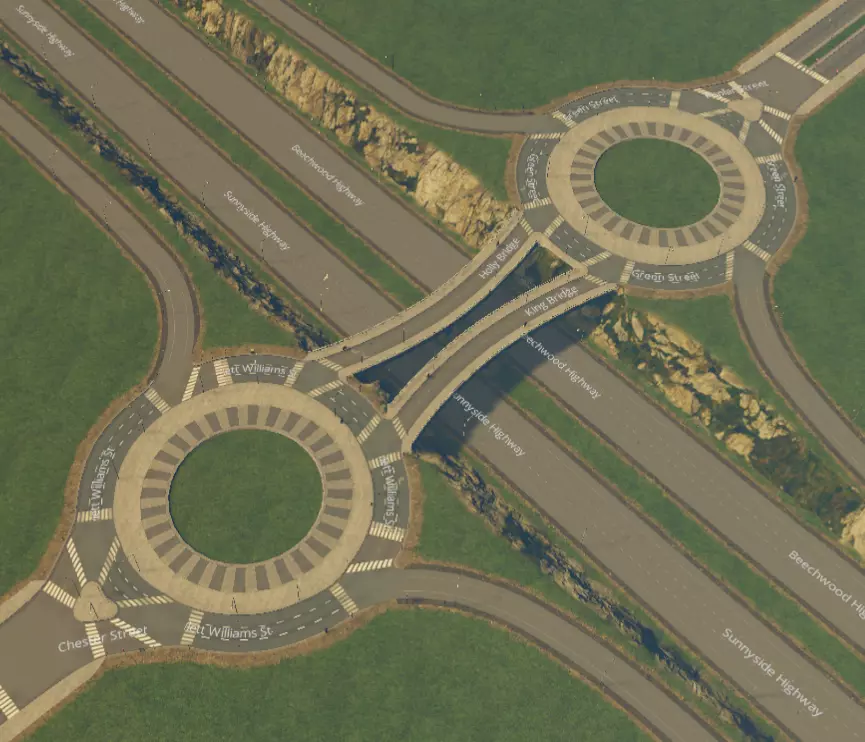
1. 三条高速公路的连接过于紧密,互通设计欠佳。现已更换互通结构,将高速公路数量从3条减少至2条。由于交叉角度特殊,最终选择了帕克洛互通(parclo interchange)。 2. 苜蓿叶形互通占地面积过大,导致车辆驶离高速公路后缺乏排队空间,引发拥堵。此外,该苜蓿叶形互通与主干道互通距离过近,造成车辆交织问题。现已改建为哑铃形互通,不仅为车辆提供了排队空间,还新增了集散车道(frontage roads),将驶出车辆与直行车辆分离。 3. 工业区仅与主干道有一个连接点。现已新增与主干道及其他区域的连接,以分散交通流量。
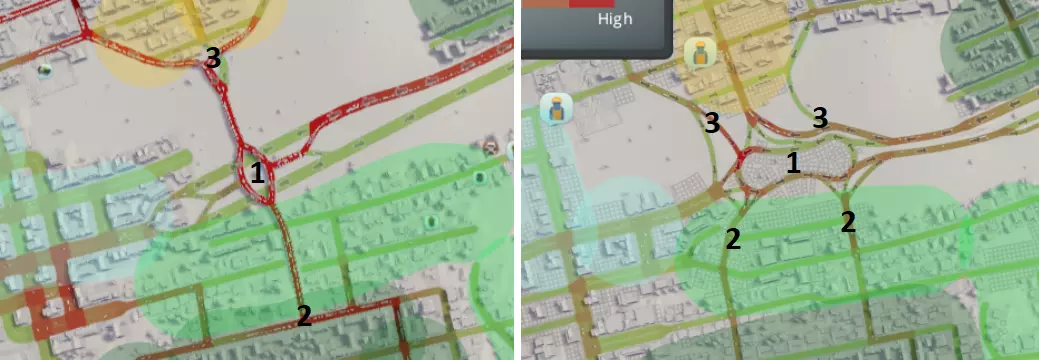
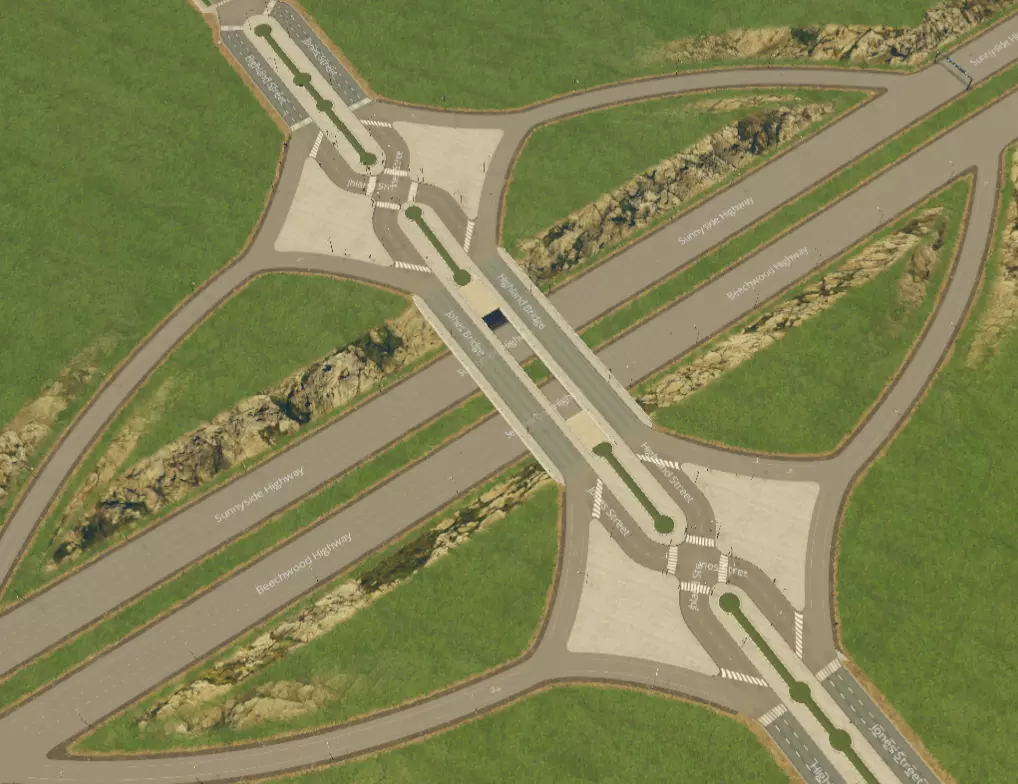
1. 互通式立交数量过多且间距过近,导致车辆进出效率低下。由于多数互通式立交并非必需,已将其改建为高架道路。 2. 重新设计了一个通往商业区的互通式立交。原菱形立交没有为驶出高速公路的车辆提供排队空间,现替换为加长型环岛,主要是因为它能适应狭小的空间。
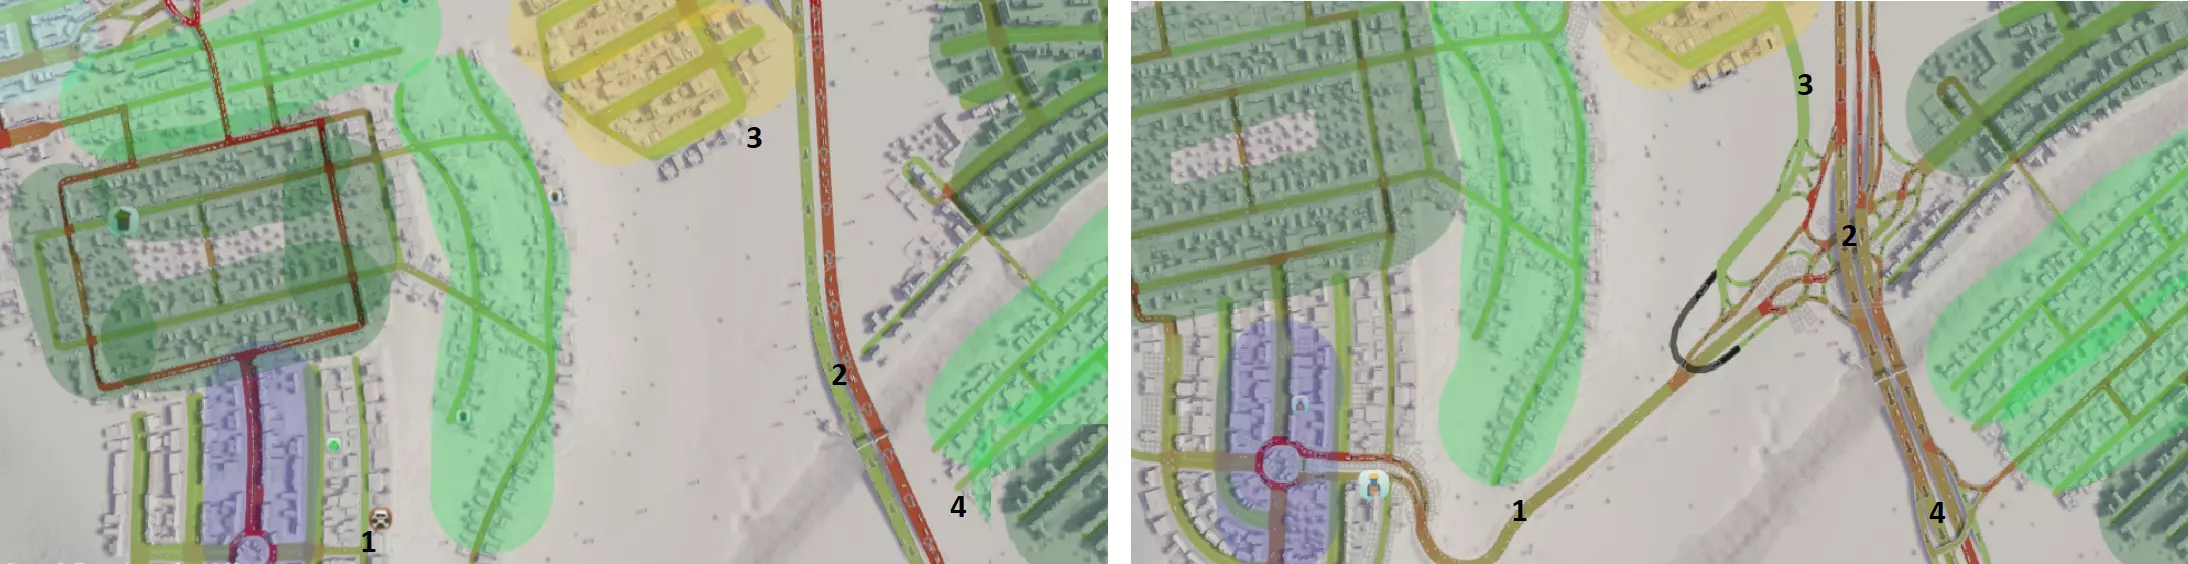
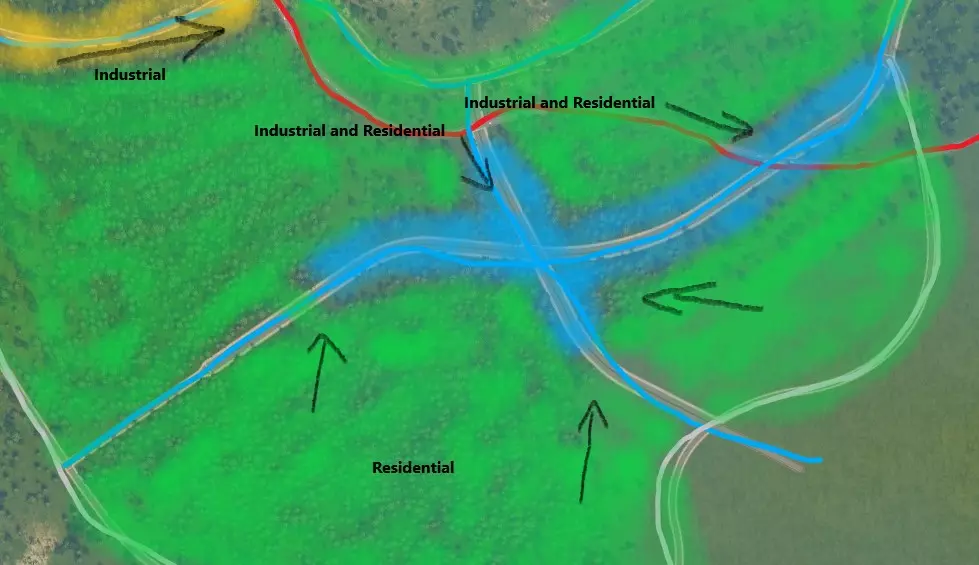
1. 主要商业区原本仅有一条从北侧进入的通道。新增一条小型公路连接高速公路南侧路段,以分散交通流量并提供更多进入该区域的途径。 2. 东部主要区域与西部主要区域之间缺乏集散道路连接,且未与高速公路相连,错失了分散交通的机会。通过新建公路并采用菱形互通式立交(确实如此!)连接两区,选择该设计是因为该区域建设空间有限。 3. 为工业区交通新增一条通往东部目的地的路线,以分散交通流量。 4. 这片高密度区域之前未与高速公路连接,现已新增连接。
1. 高速公路终点的互通式立交设计规模过小且形状怪异,导致出口处车辆频繁停车,交通分布状况不佳。现已替换为大型狗骨式立交,选择该设计是因其能安全容纳更多连接。 2. 南部大型区域原仅有一个连接点,现已增加至两个连接点以分散交通。 3. 北部工业区原仅有一个连接点,现已增设多个连接点,包括一条从高速公路延伸出的专用通道。因此,只有需向西或向南行驶的车辆才会进入狗骨式立交。 这些改进措施确实起到了显著作用。目前整体交通状况如下:运行顺畅,交通流量提升了25%!!!
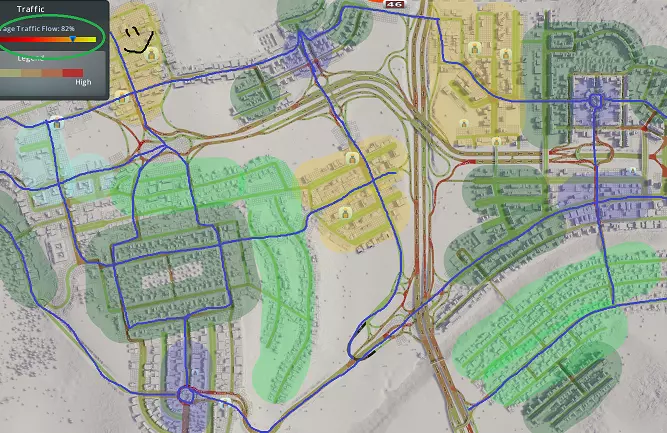
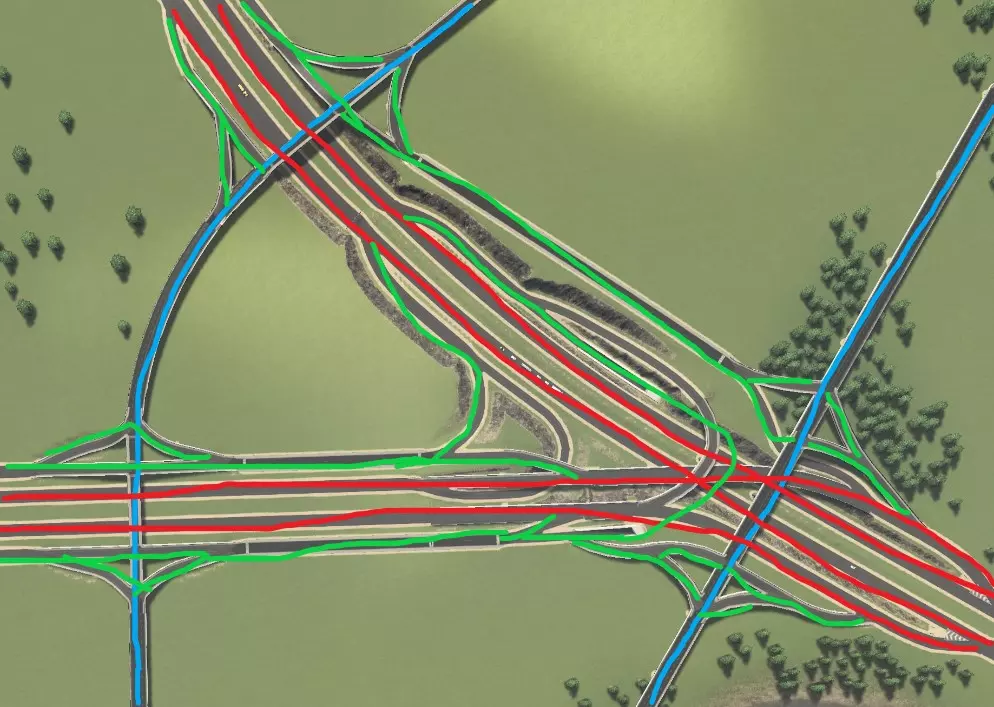
我想让大家注意的一个主要要点是新增的【蓝色高亮的集散道路基础设施】。这座城市原本的集散道路非常少,导致各区域之间的连通性很差。大家应该还记得,集散道路是指那些长度较长、交叉路口有限的主干道,它们不仅为高密度区域和工业区提供通道,还为市民提供了除高速公路之外的其他出行方式。集散道路对于构建一个高效运转的公共交通系统也至关重要。为打造这些集散道路而新增的连接经过了精心规划,旨在解决城市中存在的死胡同混乱问题。其结果是,高速公路的负担大幅减轻,各区域内的拥堵状况也得到了改善。附录1:主干道交叉路口 以下是一些适用于主干道之间转换的高容量交叉路口配置示例,按建设成本/难度从低到高、通行量从少到多的顺序排列。
升级后的十字路口。虽然非常基础,但展示了如何通过增加一段额外车道来轻松提高通行效率,这些车道能让车辆在十字路口处排队和转弯时更加高效。
带转向车道的交叉路口,可进一步提升通行效率。
基础环岛。具有良好的吞吐量且不会停止。注意,需要创建额外的节点(灰色圆圈)以允许车辆变道。在此处,只需用道路构建一个X形然后删除它们即可轻松实现。此方法适用于此处及以下所有环岛设计。
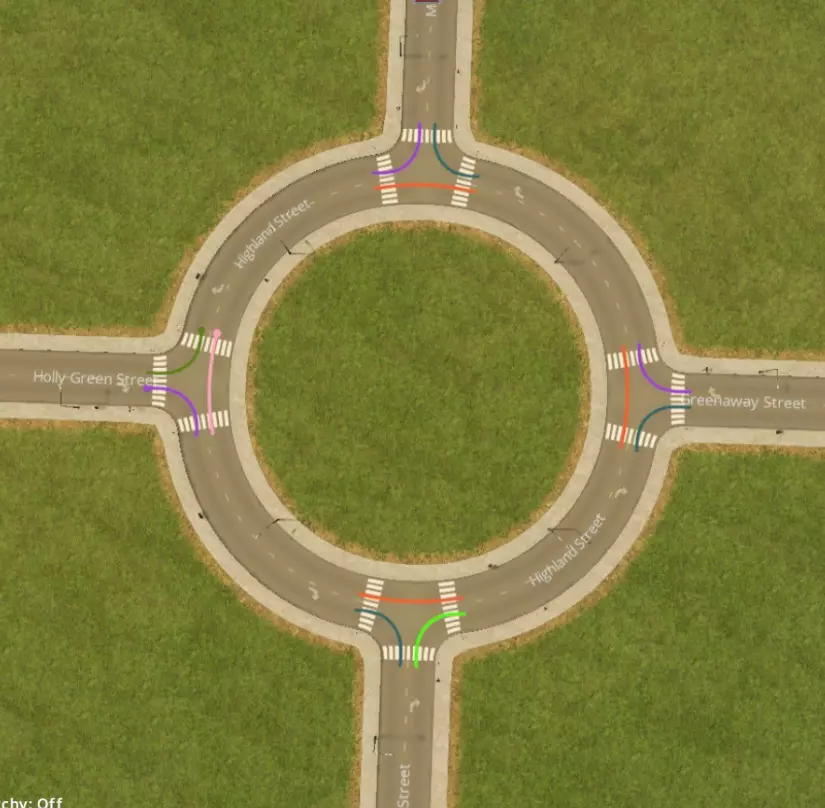
带有分流引道的环形交叉路口。无需停车即可提升通行效率,且外观美观。
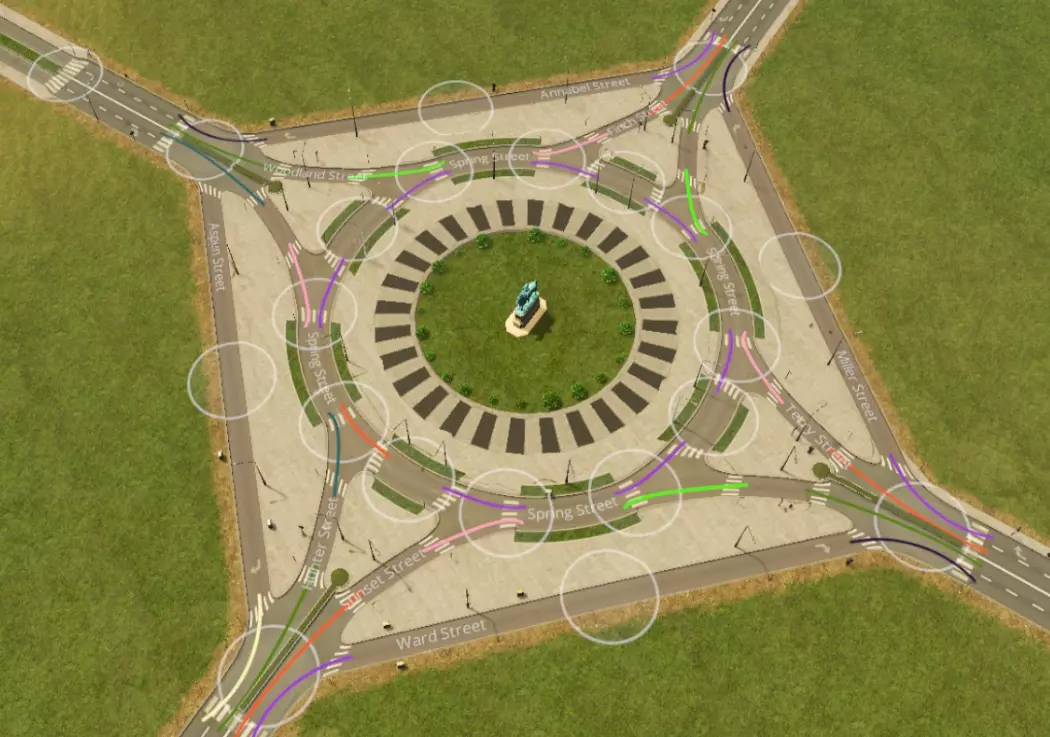
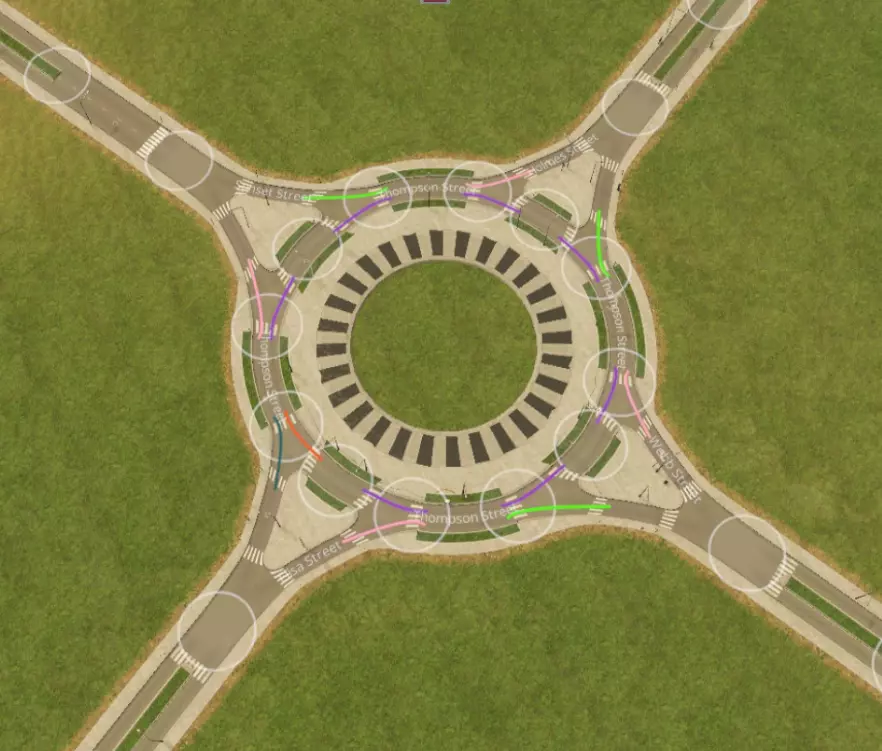
带有分流入口和加速车道的环形交叉路口。吞吐量最佳,但成本高且占地面积大。
需要大量车道和极高吞吐量?可以像这样设置分离式车道,并尝试连续流交叉口这类更高级的设计。使用两到四车道的单行道,而非游戏提供的双行道时,你能打造出真正创新、有趣、美观且高效的交叉口。不过缺点是,这基本上相当于一个平面的小型叠式互通立交(规模很大)。附录2:主干道-次干道互通式立交 以下是一些适用于主干道-次干道的现代化、高容量互通式立交示例,按吞吐量从低到高、施工难度从易到难排列。使用这些立交可以让你的模拟市民上下高速公路。注意,在高速公路为高架的情况下,你可以将这些设计倒置,即高速公路在上,次干道在下。
部分苜蓿叶式互通,这个是基于现实中的瑞士立交桥设计的!
单点式城市互通立交。在内侧出口匝道附近设有一个红绿灯。占地面积小,效率很高。
环形立体交叉路口。可以是圆形或长方形。长方形占用空间更大,但通行能力更好,且出入口道路之间的距离更远。无需停车。额外的好处是允许掉头。
狗骨式互通立交。容量大且无需停车,但占地面积相当大。
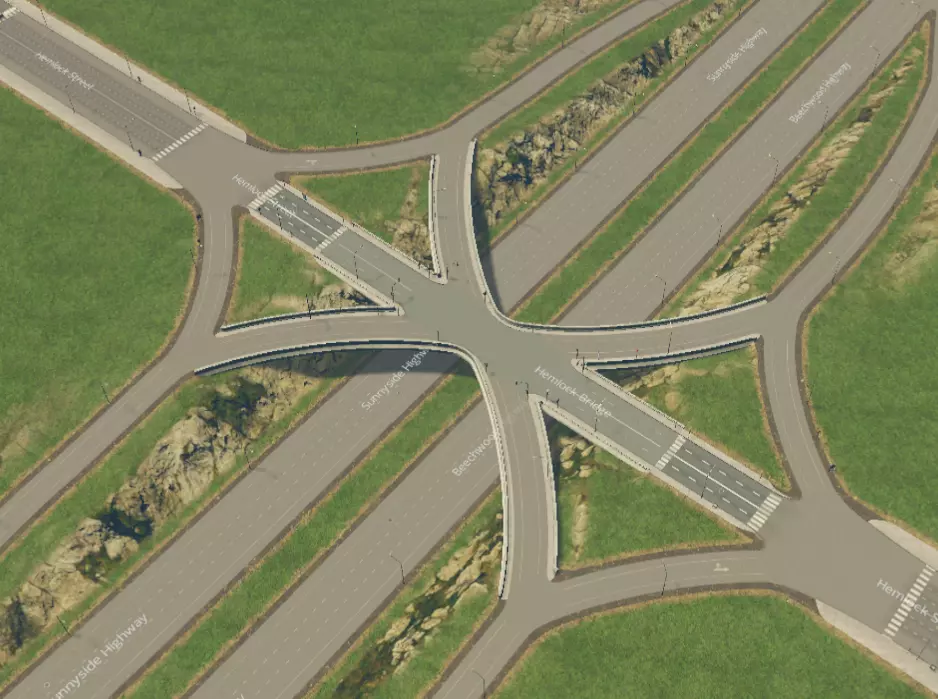
分流式菱形互通立交。出口匝道附近共有两个红绿灯。注意,跨线桥道路为交叉的单行道,可让车辆从主干道轻松驶入集散道,且不会干扰直行交通。用这个超级巧妙且创新的设计让所有朋友都羡慕吧! 不要只是使用这些设计。遵循最佳实践,发挥创意——混合搭配并尝试不同角度的交叉路口,让设计保持新鲜感。 附录3:主干道互通立交 以下是一些高效、现代化的交叉路口示例,按建造难度从易到难、通行能力从低到高排列。使用这些设计可以让你的模拟市民从一条高速公路驶入另一条高速公路。【移动它!】要获得良好(且美观)的坡道曲率,这是绝对必要的条件。
喇叭形互通式立交,用于在与另一条主干道交叉时终止当前主干道。
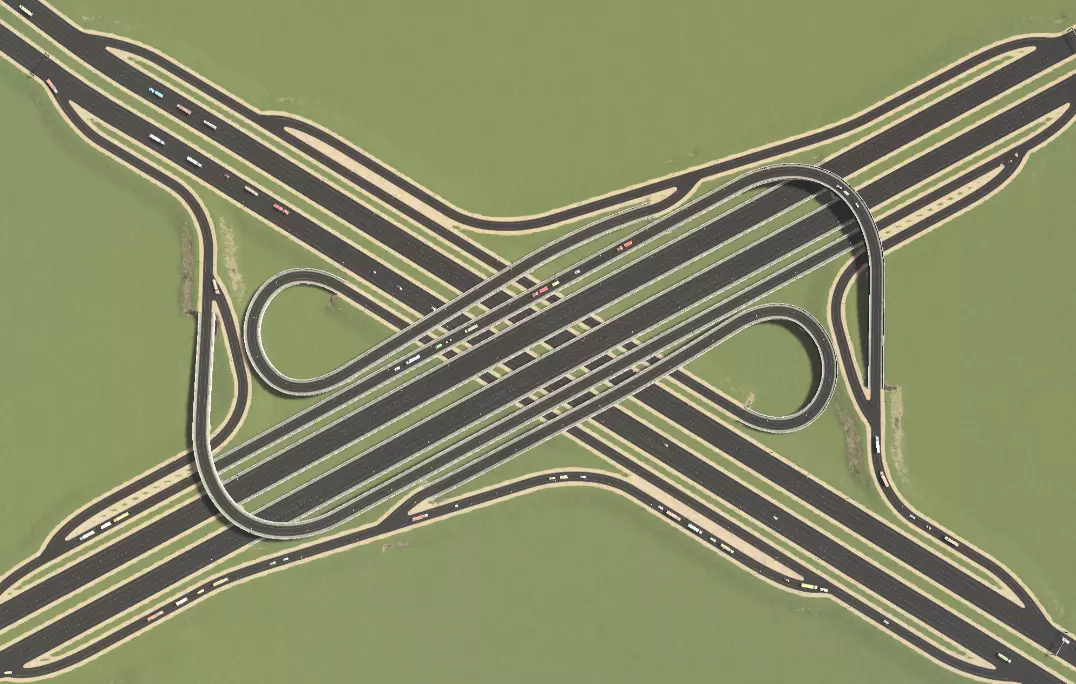
三叶草堆交汇处。感谢Agusingnavy!

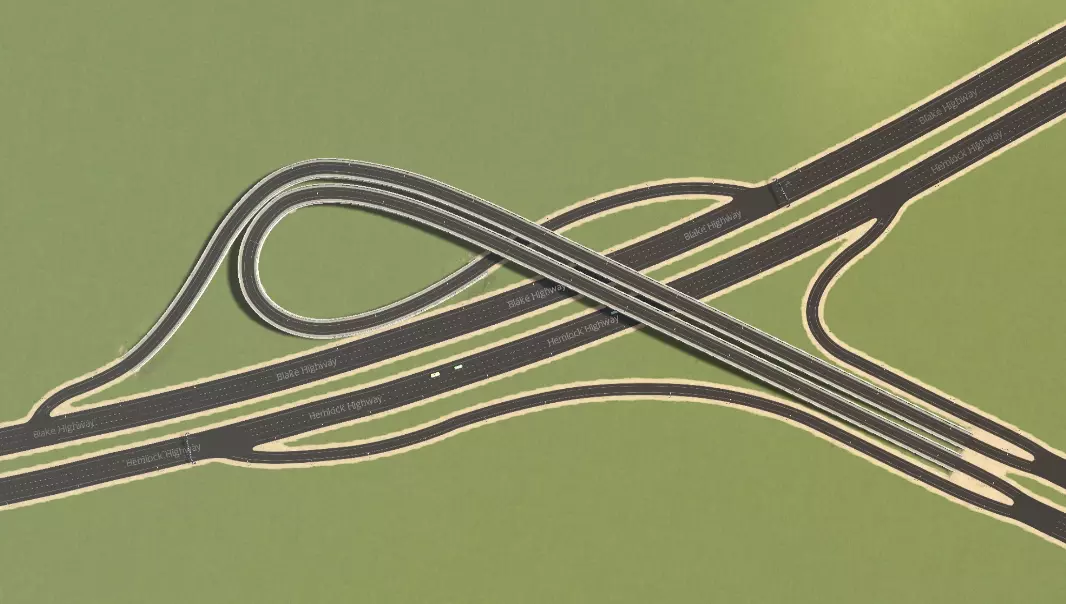
堆叠式互通立交。具有极高的通行能力,但非常占用空间。其秘诀在于以下几点的结合:拥有非常宽敞的转向车道,由于接近角度非常平缓(约50单位距离完成90度转向),车辆无需减速;专用出口车道与主高速公路交通流分离,在远离主路的位置进行分流和汇流;出口和入口之间的距离非常长(约120单位)。附录5 推荐阅读/观看内容 若想深入了解游戏并获取创意灵感,建议观看以下创作者的视频: HotKettle Strictoaster Skibitth two dollars twenty Silvarret Imperatur Crumbs McGee 附录4:硬件配置 若你希望长时间(拥有10万以上市民)享受高清画质下的城市建设,硬件配置要求会比较高。若使用低端电脑,游戏可能会出现卡顿,尤其是在以下情况: - 使用Move It!以及动态分辨率模组 - 拥有大量自定义资产 - 拥有大量道具(树木也是如此) 限制这些内容,尤其是禁用动态分辨率,应该有助于提升你的性能。不过,如果你预算不是非常紧张,我强烈建议配备16GB内存来运行这款游戏,以获得我们期望的游戏体验。 结论