换一换
换一换 


Gems? Chests? Time Gates? Free Plays? SH&T?! Some tips I wish I'd known when I started Line, hook, and sink? So you've recently installed the game, perhaps even finished the tutorial, and you'd like to keep playing, and are looking for some beginner tips. Sure! Grab your drink of choice and get comfy. It's going to take a while. Before you worry, yes there's lot to digest. You don't need to understand everything at once, it's a slow game after all. So get comfortable, go to your settings, switch the DPS (damage per second) from the lie that is Base DPS to the useful Average DPS, turn on Scientific Notation, and let's get going. BUD ("Base Ultimate Damage"), is a mechanic for Fire breath potions and Ultimates' damages, which are based off of the hardest single hit done by an Hero (decayed over time) instead of the party's DPS (Damage Per Second). It's THE most important metric, followed by Average DPS (how hard is your party hitting), then Favor ...what's that sound you ask? Oh, just the love letter your energy provider is attaching to your next electricity bill. Pay no mind. Heroes When you first start the game you have 12 heroes in as many slots along the bottom. They are initially hidden and appear as soon as you have enough gold to get their first level. If you pay for their unlock, you can pick and place them in the formation slots on the battlefield. They are known as the original (1 to 12), and their names are sometimes used as the Slot name in forums and such, e.g. "Swaps with Bruenor (slot 1)". Heroes are tied to a specific slot which you cannot change: Bruenor is always in the first, Celeste in the second and so on. This matters because you will eventually unlock other heroes, either by subscribing to the newsletter (Hitch: recommended!), completing missions (Drizzt, Azaka, Dragonbait), or completing Event and Time Gate quests; such heroes are equally be assigned to a slot which means you will have to make a strategic choice on which hero to use (Delina or Hitch?) as you can't have both in play at the same time. Speaking of heroes in the same slot, you can have them both unlocked. A "benched" (i.e. not in the battlefield) has their ultimate cooldown timer suspended, no active effect on the formation, and often (but not always) their effect on the enemies will disappear. Heroes you can obtain from Events (or Time Gates, or the Shop, which all give the same Heroes) are called Event Heroes (much original, very wow). All non-event heroes (that is, the Original and those unlocked in campaigns or newsletter subscriptions, are the Evergreen. Normal chests, which come in silver and gold variety, contain equipment exclusively for the Evergreen you have unlocked; if you want to equip your Event heroes you'll need specific chests, which you can obtain by going through the Character's Event Free Free play (which costs Event-specific tokens), or through the appropriate Time Gate, in Weekend chests where the Hero is boosted, Chest Codes (see the subforum), or you are very welcome to buying them in the Shop (developers need to eat too, after all!) In addition to the usual D&D stats, Heroes come with up to 3 Specializations and a number of Upgrades; they may be affiliated with a group such as "Force Grey" (composed of Arkhan, Calliope, Hitch, Jamilah, Tyril), some of which have affiliation bonuses (e.g. Force Grey boost gold find when together). Heroes also have an Overwhelm threshold, which is the maximum number of attackers the Hero can withstand before "sweating" (oh yeah, and suffer progressively more damage!). Then there are hero-specific Feats, in which you can unlock up to two feat slots per hero where you can place unlocked feats as extra boost. The first slot is unlocked fairly early, the second will require manual levelling up well past the official maximum level. Formation Formations slots are the places on the battlefield where you deploy your heroes. While you can move your heroes around in the formation slots, there are limitations: never to a slot ahead or on the columns where the nearest enemy is (no backstabbing, sorry!), and no hero under attack can be moved, but they can be swapped with another unlocked hero in the same slot even when downed (a useful trick). The position of the slots themselves can't be changed, they depend on the campaign or event you're playing, and sometimes not all slots are available, which makes things interesting and challenging. Heroes' Upgrades and Specializations, Blessings, and Mission Restrictions can (and will!) affect what happens where, so a bit of boring definitions may help: The first or rightmost column is the front, and positions which have a path to the outside of the formation are on the edge. It doesn't matter if the slots are actually occupied. The distance between two formation slots is the minimum number of adjacent formation slots you have to go through to reach the other, unless you're counting as the crow flies in which case missing formation slots can be traversed. Yes, that DOES affect abilities such as Calliope's! In most cases, hovering a hero above a slot will show which slots or heroes would be affected by dropping the hovered character there, though in cases of heroes with multiple formation abilities, only one of them will be shown (in Calliope's case, which heroes would be shielded by an attack) Characters you can't control do not count as heroes and, unless otherwise specified, do not deal damage. This means that abilities such as Bruenor's Inspired and Tyril's Moonbeam see those places as unoccupied When setting up a formation, it helps to choose one main damage dealer ("DD") will be, and set everything and everyone up to boost that value, to get everyone to the highest level as possible, which yields more profit, which in turn yields more Favor quicker. When you compare formations, wait for a bit and look at the "Hit" BUD and Average DPS: if they've gone up, the new one is straight better, damage-wise. Between two mixed-signal formations, the one with higher BUD tends to fare better. Keep in mind that damage and BUD depend on a number of factors: how many enemies, where, of what type, attack type of the DPS, etc. For example, Minsc grants a formation-wide boost when the Favored Enemy is hit, which is obviously not going to matter if none are on the screen. An Area of Effect attacker will deal more total damage when targets are clustered, but that is somewhat wasted when there's only one. Be smart. Quick Formation Slots To the bottom left of the screen are what I call the three quick formation slots, in which you can store, what else if not, well, blocks of cheese. Of course which Heroes and familiars you deployed where. By the way, the hotkeys for loading are q, w, e respectively for slots 1, 2, 3. It's handy for different situations, such as testing new formations and comparing DPS, personally I keep quickslot 1 for the startup phase (getting to the good bits quickly, event heroes Deekin, Sentry, and Shandie are great for that, plus the cheapest Heroes go in there, better if they are quick and multi-hitting) and quickly dispatching the occasional weak barricade or armoured enemy), and slot 2 for the high-damage, slow-progressing formation. Slot 3 I usually keep for the weaker but more lucrative gold find formation, or experimenting, special situations, or Challenges as needed. Since you can have up to 50 formations saved per campaign or event, you are welcome to find your own style. The good bit is it saves and stores per formation layout and familiar positioning, which means that two separate events sharing the same formation layout will use the same storage. The not so good bit is that formation load is compromised when you're being attacked. Yes, even stationary ranged attackers, or non-damaging attacks such as stuns. Clicking, Distractions, and Familiars It's an idle game, so clicking is important, right? Eeh, not very important it turns out. Until you have earned quite some Favor (by Completing missions and Resetting in Free play), clicking will do VERY little, and even levelling up the Click Damage will do so little, it's better invest in the Heroes themselves. Once you do, however, have enough Favour, it may be significantly faster to one-shot enemies (kill them with a single click), especially if you have a Familiar on field duty. Roughly speaking, the click damage level corresponds to the highest level where a single click will kill a non-boss enemy. Distractions are optional clickables in the top region of the screen, either moving and always clickable such as seagulls, rats, and scarabs, or scrolling with the background and only interactable at times such as rocks, bushes, snowmen, and spiders. When clicked they grant you coins at about the same value as a normal kill, or sometimes releasing extra enemies (blast them treacherous bushes!) Unless some Patron asks you to get rid of them, you can safely preserve your pointing device and disregard Distractions, they are just there if you're really bored and have nothing more interesting to do (still better than using drugs), BUT! they can give a bit of a jump start in the first level(s) when you are starting a new Campaign, Event, or Time Gate. Just saying. Familiars are useful little extras that will click so you don't have to. They first appear next to the inventory icon on the main bar when you first unlock your 9th slot. or when you've purchased one from the store. You can drag+drop them in a few chosen slots for some effect: - In the battlefield you can put up to 6 familiars (the position doesn't matter); they will click 5 times a second each. 3 or more will automatically pick up gold and drops; 5 or more will immediately open loot bags; 6 will destroy Distractions - Above the ultimate bar you can put up to 3 familiars; each will once every 30 seconds activate a random, fully-charged ultimate, if present. - On the ultimate themselves, to automatically trigger that ultimate as soon as it's charged - On the Upgrade buttons of heroes and click damage, will click once per second. Familiars also keep working while offline, granting the ability to upgrade heroes while your game isn't running. Gems Bosses appear every 5th level, once that level is first defeated (in that run) you get a bag containing green Gems, plus the occasional Silver Chest, the ever elusive Gold Chest (both the generic variety; yes I know you were hoping to get extra special event equipment but no), or even a time gate piece (roughly one per week). You also obtain gems from completing Missions, though once a Mission has been completed you can't play it again (only in Free Play, which doesn't give completion Gems anyway). Gems are an in-game currency you can spend to get generic Silver (50) and Gold (500) Chests, or to obtain some cashless Familiars (mage hand for the win!) There are many schools of thought on how to spend them, and even more for how best acquire them! The "gems are everything" school goes kind like "do the easiest Free Play and reset as soon as you hit your first defeat", or even "as soon as you can't autoclick your way through"; I'd personally suggest leaving that to when you have accrued much more Favour. Speaking of, you will want to buy Torm's second tier Gem Hunter as soon as you can. As to what to spend Gems on, a consensus seems to be Silver until all your Evergreen Heroes are fully equipped; then permanently move to Gold. Gem Feats are expensive and usually ignored until late game or they prove a significant boost, feel free to pass them by. Other guides (such as Chugworth's) rank them, should you want to look into that. I personally suggest a different approach: once all heroes have their slots equipped with green or better, go more Familiars, which can be assigned to auto-click on the field (5 times per second each, plus auto-collect at 3+, plus auto-open loot bags at 5+, plus click Distractions at 6), activate a random Ultimate (30" each), a specific ultimate (tries every second), or keep levelling up a single character (once per second) or the click damage (useful if you have familiars in the field) The auto-collect feature is mighty useful in speeding up the initial levels, which you most probably want. Equipment Equipment comes in the usual four 4 categories: Common, Uncommon, Rare, Epic. It can also have the attribute "Shiny", which looks Silver bordered, which will boost its effect by x1.5 compared to the non-shiny card (...a Shiny Common is still pretty lame is you ask me). Each equipment level is a +0.4 on the base card's value: does not look like much, but it will stack pretty well for non-event heroes. Equipment however can be upgraded and levelled by opening the appropriate Chests. Finding a rarer item will change the rarity and keep the level unchanged; e.g. a Common card upgraded with an Uncommon becomes Uncommon. Finding a [[DUPLICATE]] does not affect rarity but the level is incremented depending on the rarity of the duplicate: a Common adds one level, an Uncommon 2, a Rare 6, and an Epic a whopping 24!, so there is no "waste" in the process. Shiny items remains Shiny even when rarity changes, and if you buy the Golden Epic version of a Shiny card you have you get the Potion of Polish back. Equipment can also be levelled through Scrolls of Smithy, though the scrolls can only target Heroes with the full complement of 6 items, and randomly selects the Item to level up. The resulting level boost is the same with the duplicates, the rarity is unaffected. I would argue that investing in smithing Jarlaxle's equipment to maybe about lvl 200 per item will allow the best gold finder to get you more gold; he's also a decent DPS for a starter (of elf type, in case you're using Asharra) A Potion of Polish will render one random piece of one random (fully complemented) heroes' equipment Shiny. You get no control except when to use the potion, which I recommend to be "as soon as you get it". It will likely end where you don't care (thanks RNGod!) but never on an already polished item, nor on a golden epic NOTE: Since event champions' equipment can only by upgraded with that champion's chests, I recommend applying the Scrolls of Smithy only to them. Some simple maths shows that having an equipment level of ~30 is a good spot between added effect and scrolls used. Favor and Blessings "Favor" is earned on completion of a mission and depends on the earned Gold. Unspent Favour boosts your income by 1% per point, which means higher level Heroes, which means more Gold and Gems earned (after all, this is an incremental game) Well, to a point, as it stands you can hit your Heroes' maximum level when you have about 10^63 (1e63) gold, but we're getting WAY ahead of a Beginner's guide! When Favour farming, the general consensus seems to be to stay at your wall (the highest non-boss level where you don't die), and only for the time your favour is significantly improving (if you look at the "complete adventure" screen, do you see the number going up when someone dies?) Once you manage to unlock Azaka, a different strategy can be implemented: push as high as you can, get a lone non-boss survivor on a boss area, then swap to the gold find team, put Azaka (Resist the curse) in play, and a familiar on her ultimate. Drink speed and clairvoyance potions and let her give you profit! Favour can be spent on Blessings (if it's a Campaign divinity) or used to boost Campaign Favour (if it's Events and Time Gate Favour)
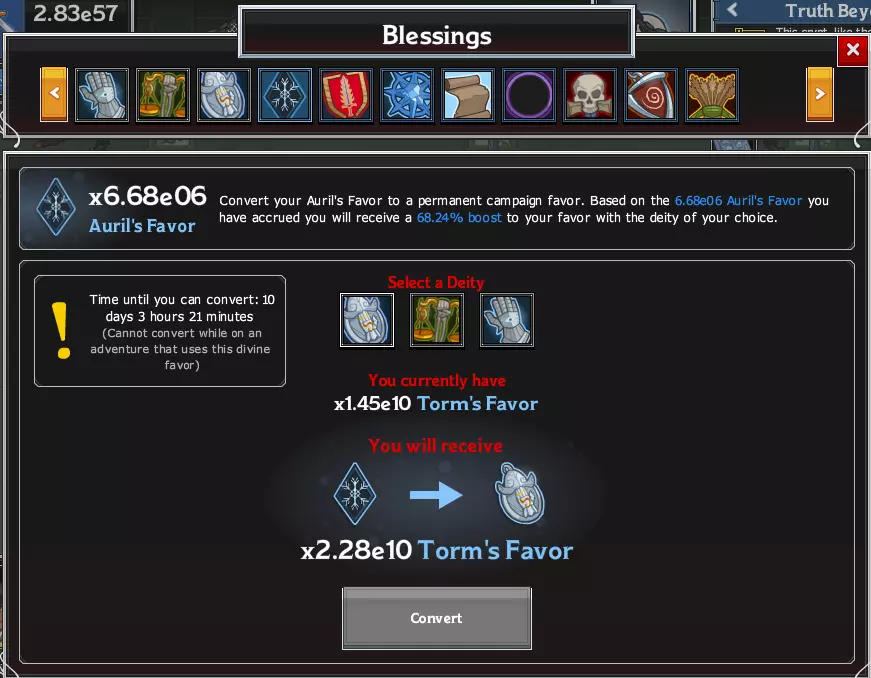
事件恩惠和时间之门恩惠的运作方式几乎相同——一旦事件(/时间之门)结束(/关闭),你可以将其转换为已获得的总战役神性恩惠的一定百分比(总战役神性恩惠指你可用的加上用于祝福的部分)。 这是一次性转换,不可拆分,不可撤销。 转换率为:事件每1e(10的1次方)恩惠可转换+10%,时间之门每1e恩惠可转换+2.5%。 这意味着除非你拥有大量战役恩惠,否则收割时间之门恩惠并不值得。 建议尽可能长时间保留未转换的恩惠,并刷取目标战役恩惠以最大化转换收益。现在不再有战役恩惠,取而代之的是祝福。祝福分为两种:小型祝福仅适用于特定战役,大型祝福则适用于整个宇宙。例如,如果你为托姆、克蓝沃和海姆兑换一级大型祝福,你的所有英雄将在任何地方、任何时间都获得8倍伤害加成,这可能正是你想要的效果。 当然,这意味着在获取更多金币(进而获得恩惠)和获取更多祝福之间需要权衡。 关于应该投入多少,目前尚无定论。有人说10%,有人说1%,还有人会等到英雄达到满级后再投入剩余资源。 我通常对每个祝福使用1%的上限(也就是启用警告选项),这对我来说已经足够了。我建议的例外情况是尽快获取【宝石猎人】成就,然后解锁所有一阶主要祝福,接着以三阶主要祝福【黄金幸运克蓝沃】为目标。对于这些主要祝福,我敢说花费20%甚至50%的资源都是值得的。 任务 你可能已经注意到,任务通常会附带额外挑战,而你的声望值会被用来评估任务的难度。不要被“评估”这个词误导,我曾完成过那些据说超出我能力范围的任务,也(至今)被那些很久以来本应觉得简单的任务难住!并非所有任务阶段的难度都是一样的!后期任务的基础敌人难度可能会显著高于初始战役任务。刷声望或宝石时,选择早期任务。 任务关卡每50关重复一次,但难度更高:51-55关与1-5关相同但更难,以此类推。50关(100关、150关等)通常有一场大型Boss战。 限制可用英雄的挑战(例如智力<12、力量>11等),在解锁(或购买)相当数量的活动英雄并为他们配备大量优质装备之前,你可能无法完成。 我应对这些挑战的方法是:在主任务中开始自由奔跑并正常游玩,然后检查是否能用受限的英雄组合通关最后几个区域(尤其是Boss战)。如果答案是否定的,我可以回到无限制进度模式获取更多【声望】/【宝石】,不会浪费太多时间(经常需要回溯,因为我没注意的时候游戏已经自动推进了,哎呀!)。 对于“无法使用这些编队槽位”的情况,我也会采取同样的做法。 至于其他挑战,比如“额外波次”之类的,我的策略仍然是【自由模式】,目标是比挑战要求多推进25-50关。应该足够了。应该…… 【装甲敌人】
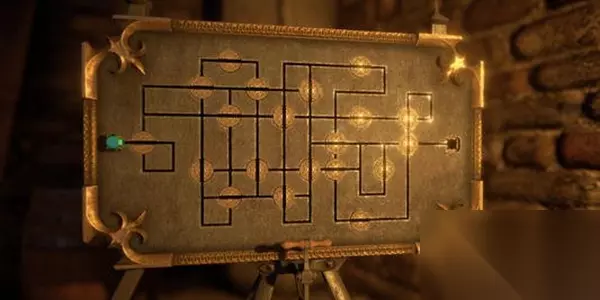
Barricades and some enemies (often Bosses) are impervious to click-damage: they are Armored Armour is shown as a blocky bar underneath the item or enemy, and at higher levels you may notice even your heroes may not have the strength to damage it. That's because it's all dependent on how damage is applied - different heroes do different "batches" of damage, and enough damage in a single batch is needed to reduce the armour. (This is relevant because multi-shot Heroes like Asharra may not meet the individual shot damage but may meet it if enough shots land on that enemy). In cases such as this, having on board a debuffer may mean that the resulting damage can have enough of a kick where you couldn't get enough without it. Others, such as Binwin (slot 3, swaps Nayeli) have special abilities that specifically target Armored enemies. The resulting formation may be sub-optimal in all other mission stages so... time to put that quick formation slot to good use! Time Gates Ah yes, Time Gates - the way to get those elusive Heroes you're still missing from your Pokédex, and better equip those you already have... and while you're there maybe get some more Favor, yes? Well... Time gates are kind of like, but not really, mini-events in their own. Once a gate is open, you have 3 clock days to access it then it closes until the next time. You can open any one manually with 6 Time Gate Pieces (which are dropped about weekly by Bosses or found in Gold Chests, or bought by Patrons). Alternatively one opens automatically every three weeks: you pick which one of the three choices you're given and in you go. BUT! Not all gates are created equally! One of the free gates will always allow you to get an Event Hero you're missing, if it exists. The other two are chosen randomly. The challenge level you have to beat depends on how many times you did NOT choose that Hero's Gate since the last free gate, in short it gets harder the more you visit that Hero, then eventually eases out to normal again. Which gate to choose depends on a few factors, especially personal choices. I'll give you some ideas: - Having two (three) champions per slot will allow you to unlock modron cores, which are a good way to earn more gems and complete challenges - Weekend heroes and Hero chest: if you have a chest that (may) contain equipment for some Hero that you haven't unlocked yet, it's a good indicator of which hero to try and get (you can keep unopened Weekend and Hero chests set aside if you want to) - Fully (or better) equipping an Hero you want to use is a good idea, - If you have a Challenge that could use one of the heroes you are offered, it might be worth it - If the Hero is a good one (do refer to other guides, wikis, and discussions to decide), get it - If the requested clear level is too high (you chose that Hero many times ago), maybe pass? - Any new hero you unlock will be mostly unequipped after one gate, probably even after two - If it's Deekin or Briv or Hew Maan, UNLOCK THEM! (good buffers, and a speed boost will get you quickly back to the juicy bits after a reset) - If there's nothing interesting, unlock someone you don't have, or try to better equip an Hero you already have The opened Time Gate offers three missions with Gold Hero Chest (one in each), and a free play one which is for Favor farming and will NOT count towards Event Free Play achievements (e.g. "reach level 175 in Free Play"). Why? Design choice. Some silver chests are replaced with event-specific silver chests, so there's a reason to try and get some extra equipment if you want. Time gates don't get the "Temporary Worship" blessing boost, if you have that one unlocked. All timegate favour is converted on close at +2.5% per e1 of gate's favour, which makes it a rather poor investment at low campaign favour levels. Ending the mission This section is mostly dependent on what mission you're playing: if you're in one of those Challenges where you just try to survive to the end and the Favor earned is pitiful, just press Complete. However, if you're in Free Play, or it' a mission in which you're faring ok, here's some tips: First question is if you reached your wall (the stage at which you can't progress further). If the answer is no, keep going! There's Favor and Gems to be earned, which is ESPECIALLY true in Events and Time Gates, in which you need as much Favor as you can; I will wait. NOTE: the Gold (hence Favor) earned from Chests and Bounty contracts depends on your highest cleared Stage, so make sure it's nice and high even if it means you will eventually get defeated, or switching the formation to get to that good spot This is the time for opening Silver Chests and, if you choose to, use the Bounty Contracts, which I usually keep for Events. Use them bit by bit, if you get enough gold or equipment to unlock a nice upgrade or push your wall, rinse and repeat for MOAR Favor! If you're in a campaign, can you spend Favor for Blessings? I generally recommend keeping the 1% alert on and sticking to it, but you may elect to invest (any part of) the Favor you'll earn by resetting (displayed by hovering on the Complete button) to gain more benefits. The order and amount in which you do these depends on what you think will give you the best benefits, see the chapter on Favor Buffing or de-buffing? In case you're not familiar with the terminology, "buffing" is increasing the damage your Heroes deal; "de-buffing" is reducing the enemies' resistance to your damage: Nayeli buffs your formation (especially the column behind her!) and Minsc debuffs the enemies he favors (I don't even want to think what he does to the ones he hates! ;) ). While the mathematical computation of the final damage may well be the same (buffing x10 deals the same as debuffing 1/10), there is more than meets the calculator when choosing who to deploy and how to specialize them. It used to be, but is no more, that debuffs were not really accounted for in the DPS (sword icon on the top left), which is now some running average damage dealt once all buffs, debuffs, area-of-effect are applied. Hovering on the value will show a useful breakdown of who deals what. Keep in mind: Base damage is an ESTIMATE of the damage the champion should deal; Running Average is the actual damage dealt over the last minutes. The BUD separates the party DPS from the Ultimate damage; While BUD and party damage are affected by debuffs, Ultimates do not deal extra damage to de-buffed enemies, which tends to give buffs some advantage over debuffs for ultimates, and disadvantage over normal attacks. The most important lesson: enjoy what works best for your formation and play style! Patrons You may have noticed them from the shield icon next to the "Complete Adventure" button: the stingy, demanding, and remarkably picky Patrons are the Harder version of the adventures you've completed so far: if you had nightmares because of the chicken or the archers overrunning your few formation slots, now you have to do the same with fewer heroes and for many more levels*! Still, they are worth unlocking and trying, at least some: not only because they offer valuable time gate pieces (1 each week, get them!), potions, feats, and chests (chests which I suggest you ignore until you've unlocked all available heroes AND all your evergreen have full purple equipment), but also because of the blessings ("Perks", they call them). Patrons also offer weekly free plays and challenges in exchange for their currency; it is worth to get at least the necessary currency to pay for the time piece, more if you can, want, and care to. Speaking of the perks, you absolutely want the Global (right) ones: they remain active even when you're not using (ahem, working for) that patron. In contrast the left ("Local") column gives bigger bonuses that only work when that patron is active: useful if you're stuck, and for those extra 5 perks to unlock the next tier. (*) really, ignore the chicken mission as much as you'd like, you probably need many more heroes, boosts, blessings, and favour than you have Potions There are currently 5 types of potions that come in 4 sizes, plus a few special ones. The 5 types are easy, they do what they say on the label. The only one worthy of clarification are the potions of Speed, which speeds up the game clock (monster spawns, Familiar clicks, Ultimate powers and so on). BUT! Three things are unaffected: - Potion timers are always in "real time" or "wall clock". Wouldn't it be utterly daft to have a speed potion that consumes potions quickly? - Event Tokens still drop at the normal speed. Sorry, no extra tokens for you this way! (though you COULD use it to farm Chests in hope of Bounty Contracts which DO drop Event Tokens *dons Wile E. Coyote thinking cap*) - Time gate pieces still only appear on a ~weekly basis. Sorry to disappoint! The sizes range from Small to Huge, in order of both power (the bigger, the stronger) and duration (between 5 minutes and "forever until reset"). Using multiple potions of the SAME size will increase the DURATION of the effect ONLY (2 smalls mean 10 minutes at same potency) Using multiple potions of DIFFERENT size will increase the POTENCY of the effect ONLY (1 small and 1 medium = stronger effect)... while leaving the individual potion duration unchanged (i.e. the smaller will still run out after 5 minutes from triggering it). Keep it in mind when you're going for those few last stages! Special potions are the Potion of Shiny and Potion of Specialization. Potion of Shiny upgrades an item, chosen randomly among all of the Heroes' items to Shiny, giving it a nice boost which will stick on type upgrade (e.g. a Shiny common will become a Shiny uncommon if you get the Uncommon version of the item). No you can't limit which hero nor item. No you can't undo it. Use as soon as you get it unless you really want to unlock some Hero first (in vain hope it might pick its gear). Potion of Specialization is used to, well, reset the specialization(s) you chose for a chosen hero during this mission. Useful if you really need to switch specialization to clear the last levels, for example Minsc's favored enemy. Achievements Achievements give an individually small but altogether significant DPS boost. The "In Progress" and (to a lesser but no less important extent) "Events" tabs of the Achievements screen (the one in-game, not the Steam one!) will show you the progress and the requirements for them. I recommend getting them as soon as reasonably feasible, but don't go too much out of your way to that end. Some need years to be had! Event Heroes' achievements are fairly standard - one for Hero unlock, one to get them fully equipped, one for using some of the Hero's abilities, one for completing a specific stage in Event Free Play, and one for completing the Event Challenges. The last two can ONLY be completed while the Event is on, and the "fully equipped" is best completed while the event is still going (otherwise it's a choice between Time Gates, purchase a Starter Pack, and Weekend Chests) Feats Feats are a welcome bonus, you can see them in the appropriate tab on each character's sheet. All characters start with two locked active feat slots, 1 or 2 unlocked feats that are useful but otherwise unremarkable, and have a number of locked feats with their unlocking requirement (12500 or 50000 gems, randomly found in golden chests at 0.1% chance, or bought through patron currency). You unlock active feat slots when levelling your hero, the first slot fairly soon, the second after many more levels - yes, it's after the maximum power upgrade, you have to keep going after well after the level cap (when the next upgrade symbol becomes a prohibited sign, you'll know when you see it). Once unlocked, the active feat slots stay unlocked, and active feats persist between runs, which is convenient. You can swap active feats at any time with no penalty nor cost. They are beneficial, but a total gem drain introduced for the endgame players to give them a use for the heaps of gems they couldn't otherwise spend: until you have an all-purple set of well levelled heroes' equipment (75+) and all the gem-purchasable familiars, they are not worth investing in with gems. Patron ones, however... be my guest! Remember feat selection is NOT saved in formation saves, so you might have to check all is in good order if you're actively swapping them around Multi-party and Modron Cores An interesting feature is the multi-party option. It becomes available once you have two champions in each slot. To activate the second party, you need to start a new special mission "Split the party": reach area 50 with no favour against harder enemies, and losing 50% of your fielded champions (which you can't remove) at specific levels. Familiar damage is out from level 6, so no fire breath either. The prize is the ability to an extra party (in background, which makes them quite slow), and you can switch between them via the multi-party interface. Once you have 3 champions in each slot you can unlock a third party via a similar process, "Split the party 2" has you lose 66% of your champs at the same threshold levels. Most interestingly, you get access to Modron Cores, a Pipe Mania type of game in which you try to connect power-up nodes in exchange for some benefit (higher damage, lower upgrade cost, more gold, etc). A specific node (called automation node) allows you to set a formation to be loaded at startup (including the specialisations and familiar placement), an automatic reset at a specific area, and automatic potion consumption at specific levels Offline Being an idle game, it seems mighty surprising to know that, as it stands, having the game closed is remarkably less effective than just running the game minimized. So, if anthropogenic global warming is no concern of yours and you want to afford the electricity bill, feel free to let it run overnight. Or all the time. It's your planet and your children's future after all. If your computer goes to sleep (or hibernate, or such other non-running states), the game will spend some time to catch up when you resume as if you'd closed it, so no harm done there. Offline play will continue the run as normal; you will advance levels as you normally would (if auto-advance is active), your familiars will keep working as they normally would. Some abilities are simulated (such as Zorbu's Lifelong Enemies), while others aren't yet (such as Shandie's Dash). It is still unclear how much and what is simulated and what isn't at this juncture. Free Chests and not-Free Golden Epics To keep the community interested, the developers and associates often release free chest codes either via the newsletter (an alphanumeric code which works only for the recipient) or via streaming (a readable code, often a pun, which works for everyone, such as IDLE-CHAM-PION-SNOW). You use them following the "Enter a code" button on the top-right of the Shop screen One public collection of the latter type of codes is the Idle Champions Wiki Chest Codes[idle-champions.wikia.com] page. Golen Epics, which you may have noticed while going through the Shop, are Epic Equipment that is much better compared to a Shiny Epic (which is itself much better than a "normal" Epic). In case it's not clear enough in the Shop description, you get one when you do a (real-money) purchase of (any number of) associated Gold Chast, Character Pack, or other real-money transaction as indicated in the shop. Monetary purchases for multiple chests also include a wall-clock time-limited in-game boost based on the size of the purchase. As these offers may change at any time, do refer to the shop if you want to learn more. Last words and testame... ahem Does that cover everything? Not even close. But it's what I wish I knew when I started not long ago. What about you, experienced player, is there anything important you'd have liked that's missing? Did I make mistakes? Are there errors? And what about you, newcomer: is there something not clear I could clarify? I don't know when I can update, but I shall certainly try to!