换一换
换一换 


终极单人战术行动手册: 《武装突袭:Reforger》及大型战术射击游戏中排名第一的破坏者作战权威士兵指南。 掌握步兵作战艺术,学习“老鼠”战术。本综合手册不仅教你如何游玩《武装突袭:Reforger》,还将传授深入敌后执行任务的方法。通过潜行、破坏、心理战以及各种令人头疼的骚扰手段,分散敌方团队的注意力和资源。你将学会如何在团队合作型游戏中享受单人玩法的乐趣,让自己这只“小老鼠”对比赛进程产生切实影响。 前言
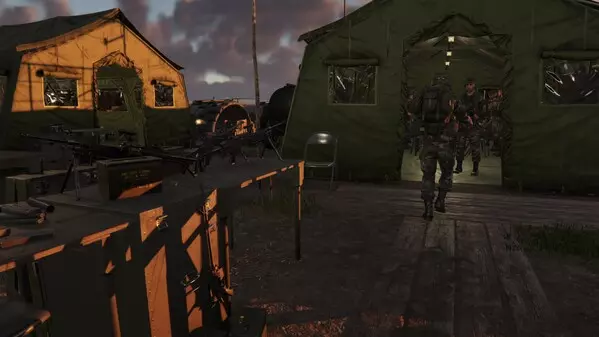
^ If you enjoy this content, please rate and favourite it to help others see it! Welcome. If you’re reading this, you are likely looking to improve your soldiering abilities and learn the ways of the Rat. This guide will teach not only how to be an effective Rat, but also how to be an effective digital soldier. As well as showing you how to conduct lone-wolf saboteur operations behind enemy lines, I have spent a lot of time writing content on generally how to soldier effectively in ARMA Reforger. The two concepts work hand in hand; squad play, by virtue of the benefit of your numbers, does allow you some flex when it comes to how well each individual is doing the soldiering side of their work. Rats employ themselves to the game entirely on their own most of the time, so it stands to reason they must also get the basics down very well to succeed. What is a Rat? Well, a Rat is a rather unpleasant pest that sneaks about causing a lot of nuisance and annoyance. In essence, we live our time in-game like our vermin namesake. We primarily work behind enemy lines, conducting solo missions to sabotage, disrupt, destroy and deter enemy forces. The main goal of the Rat, aside from annoyance, is to distract or kill as many enemy resources as possible while still having a tangible impact on the game as a whole for your team. The main tools of the Rat are cunning, stealth and knowledge. Unlike our vermin namesake, a good Rat understands where they can be a force multiplier on the map and make the most difference as a solo player. This guide will show you, in detail, how to go about your ratty adventures in ARMA Reforger. As well as doing that, this guide will show you how to be an excellent soldier. Of course, everything you learn here can be applied to squad tactics, and there is an argument that camping supply points in a coordinated effort with other Rats can be highly effective. Ultimately, this guide is here to help you be better at any FPS game out there, have fun even if you play on your own by choice or circumstance and become much better at the game in general. The guide is written based on real-world infantry doctrine, adapted for use within the game. I hope you enjoy it and utilise this guide for your Ratventures! — toast Suggestions?If you have any suggestions on topics or tips to add from your Rat operations, please comment them below or in the discussions. If your ideas are implemented into the guide, I will credit you in the new version of the guide. — Rat Doctrine & Mindset What is a 'Rat'? "Rat": the name captures the spirit of how we operate and how we are perceived. We call ourselves Rats because we thrive in the enemy's rear areas, disrupting their operations, ambushing their forces and vanishing before they can retaliate. When they do eliminate us, we reappear just as quickly, ready to strike again. The term comes from Escape from Tarkov, where it describes players who spawn into a map with minimal gear and scavenge everything they can find. It applies perfectly to our ARMA operations: we acquire equipment from fallen enemies, move stealthily through hostile territory, and spread chaos behind enemy lines through targeted strikes and sabotage. In ARMA Reforger, "Ratting" is the art of operating deep behind enemy lines, fulfilling the role of a commando or saboteur. The Rat acts largely alone or in small cells, leveraging sabotage, ambushes, theft, and harassment to destabilise enemy forces. Their goal is not to seize territory by force of arms, but to erode enemy logistics, morale and operational coherence through persistent, unpredictable attacks. Simply: be as disruptive and destructive as you can without being detected and without dying. If the enemy is devoting resources to hunting you down, then they are not fighting on the frontline. Mission accomplished. We are the single operator who forces the enemy to divert significant resources into dealing with us rather than winning the game. Rats do not fight fair, ever. They lurk in the shadows, strike without warning and disappear before the enemy can comprehend what has happened. Rats have received their namesake in part because their play style demands scavenging. They live off the battlefield, arming themselves with whatever they can recover from the dead, whether by their hand or someone else's. Your enemies will curse you. They will call you cowards. At that moment when you hear their frustration spill out over platoon chat on a radio you stole from one of their own, you will know you're doing your job right. What do Rats do? Rats deploy themselves to the battlefield and engage in clandestine operations to disrupt the enemy. This includes: Controlling key supply points across the map to restrict enemy resupply capabilities and limit their strategic options. Locating and eliminating enemy radio backpacks to deny mobile spawn capabilities. Capturing objectives solo while deconstructing base assets to drain enemy supplies and force redeployment from frontline operations. Sabotaging high-value assets like helicopters and tanks at enemy bases through infiltration strikes. Disrupting enemy supplies by stealing, destroying or sabotaging vehicles, ambushing supply convoys, mining roads and depleting resources at enemy arsenals. Delaying or destroying enemy reinforcements through ambushes and route denial operations. Forcing enemy overcommitment of resources like manpower, vehicles, and time to counter a low-cost, high-mobility threat. Infiltrating enemy bases to deplete their arsenal supplies by purchasing equipment and relocating it away from their operational area. Electronic warfare operations, including radio theft to monitor enemy communications and, where server rules permit, broadcasting on enemy frequencies to create confusion (always maintain respectful conduct). Conducting infiltration operations using captured enemy uniforms for deep reconnaissance and ambush (note: beware of XP penalties in Patch 1.3). Maintaining continuous operational pressure through persistent harassment and disruption tactics. Think Like A Rat OBSERVE > ORIENT > DECIDE > ACT Ratting requires a fundamental shift from your standard FPS mindset. You must abandon the "more kills equals good" mentality and embrace strategic thinking. Strategic shooters require you to be more mindful about what you are doing, where, and why. You cannot mindlessly float around the map and engage everything you see like in other shooters. While eliminating enemies remains valuable, effective Rats understand that every engagement carries opportunity costs and strategic implications. To make consistently good tactical decisions under pressure, successful Rats employ the OODA Loop, a military decision-making framework developed by fighter pilot John Boyd. OODA stands for Observe, Orient, Decide, Act, and it cycles continuously to keep you ahead of enemy responses. The Rat's OODA Loop in Action Consider this scenario: You've established an ambush position on a road leading to a key objective that your team are fighting to capture. The base is actively being captured, so to stop it, the enemy must reinforce it by getting bodies on the point. You are armed with two scavenged RPG rounds you took off a fallen foe. You are sitting on the main road into the point in a perfect position to ambush, with a long line of sight to see what is coming well before it is within your effective range. A lone soldier approaches in a jeep. Here's how the OODA Loop guides your decision: OBSERVE: What's the tactical situation? I see a single soldier in a jeep I know this road leads to a contested objective I have limited ammunition (2 RPG rounds, assault rifle available) I have good cover and concealment and know my escape route I can radio my team I know this objective is a key node to get the radio signal to a contested purple objective ORIENT: I analyse the strategic context and my options I recognise this could be reconnaissance before a larger enemy push I understand that revealing my position now limits future opportunities I consider my engagement options: RPG (guaranteed kill but easily missed and wastes precious ammo), assault rifle (might miss and reveal my position), or intelligence relay (keeps me hidden) I assess that providing intelligence may be more valuable than a single kill I realise waiting could yield higher-value targets using this same route DECIDE: I choose my course of action I decide to let the jeep pass and maintain my concealment I choose to radio my teammates with intelligence about the incoming threat I commit to holding this position and wait for a full jeep, truck or IFV I commit to relocate to X position if nothing comes through in the next X minutes ACT: I execute my decision and restart the loop I key my radio: "Russian jeep with one soldier approaching Charlie from the South road, ETA 20 seconds" I maintain my concealment and continue surveillance I immediately begin observing again for changes in enemy patterns I monitor team radio for confirmation I run the loop again OODA Loop vs Reactive Play Without the OODA Loop (Reactive Rat): See jeep, fire RPG, get one kill. Result: By the time a jeep with a fully geared squad rolls up, you have no RPG rounds left. Your one jeep kills radios his friends to tell them where you are, they simply avoid you going forward. You make no impact, and the enemy routes around you to attack the objective. With the OODA Loop (Strategic Rat): Observe lone jeep approaching objective. Orient that this could be better dealt with by telling my squad on point that he's coming, rather than engaging. Decide to radio teammates: "Russian jeep with one soldier approaching Charlie from the South road, ETA 20 seconds" Act by maintaining concealment and continuing surveillance. Your teammates prepare for the arrival while you remain undetected, and five minutes later, you spot the real prize: a troop transport full of troops rolling toward you. The OODA Loop reads like work, but when you think about it, OODA is simply a way to make more mindful decisions. When you shift your thinking like this, it becomes second nature very quickly. — How Patch 1.3 Changes the Ratting Meta Patch 1.3 fundamentally altered disguise operations. Previously, Rats could wear enemy uniforms and engage targets without penalty and still grind XP. The new system tracks what you are wearing and which team you're dressed as. Kill while wearing enemy colours and you receive an increased friendly fire penalty. You will be demoted through the ranks, ultimately reaching Renegade status. Renegades lose all arsenal access to any arsenal, friend, or foe. This is important because a Rat may rely on the enemy arsenal in bases they sneak into to resupply from, reducing them to pure scavengers. Some servers will also kick Renegade-ranked players automatically. Nametags have also been buffed in that they now appear when players are using binoculars, meaning it is much easier to spot someone in disguise than it used to be — this means the meta of hiding in plain sight is now basically dead. Disguises remain viable — but require new discipline: Use for passive infiltration only. Avoid combat while disguised. If you are going to carry out ops in disguise, accept the XP loss. See my 'Loadouts' section later in this guide to see just how close to Russian you can get before being de-buffed. ARMA REFORGER BASICS Military doctrine emphasises that no single operator, no matter how experienced, possesses all knowledge. The best tacticians study multiple sources, adapt techniques from peers, and continuously evolve their understanding. After three attempts to write a comprehensive basics guide, I realised I was trying to reinvent the wheel when superior resources already exist. Rather than produce an inferior duplicate, the tactically sound approach is to direct you to the best available training material. For foundational knowledge, head to this comprehensive guide by a fellow tactical enthusiast who has mastered the art of teaching Reforger basics: https://steamcommunity.com/sharedfiles/filedetails/?id=3402008832 You can learn the fundamentals there, then return here when you're ready to embrace the advanced, morally questionable, and thoroughly annoying tactics that define the Rat lifestyle. — The Supply Game Supplies dictate everything in Reforger. Understanding the supply system is fundamental to both supporting your team and sabotaging the enemy. Again, I take my hat off to my peers who have already written a definitive guide to supplies and logistics in this game: https://steamcommunity.com/sharedfiles/filedetails/?id=3245230536&insideModal=0 That comprehensive resource covers all the technical details perfectly. What I'll focus on here is the Rat's perspective on supply warfare later in the guide (in Tactics). — Capturing Bases As of 1.3, when you begin to capture a base, the enemy cannot spawn there and must spawn at the nearest other objective and travel to defend the base. As a solo operator, the fact that you can capture the base usually means there is no one around, within the cap zone, anyway, of about 50m. If you are capping the base, you can use your spade to dismantle things the enemy has built within 50m of their HQ tent. The HQ tent is the tent with the nation's flag on it. This means you can destroy radio relays, preventing the enemy from spawning even if you die and cutting off the network at that node. You can also destroy their defences, buildings and other things they have spent time and resources building. Be careful, as players are now wise to this. The meta is now to put the relay outside the 50m of the headquarters tent, so you can't destroy it on your own and will need someone else to cap the point while you destroy the relay. A further word of caution... If you destroy everything in an enemy base and then flip it to your team, remember that your team must then rebuild everything you destroyed themselves. Think about this before you start capping an objective, or your efforts to sabotage the enemy will sabotage your own as well. FIELDCRAFT “If the enemy can see you, and you are within range of his weapon system, he can engage and possibly kill you. So, you must be concealed from enemy observation and have cover from enemy fire. When the terrain does not provide natural cover and concealment, you must prepare your cover and use natural and man-made materials to camouflage yourself, your equipment, and your position.” — The Warrior Ethos & Combat Skills The following chapter is designed to give you the skills you need to know how to survive the digital battlefield. On modded servers, concepts like cover, concealment, and silhouetting are fundamental due to the availability of better camouflage, optics, and other enhancements. Some of this all may seem very basic, but a good handle on the basics is going to help you survive longer and cause more chaos. A simple understanding that the human brain is programmed to react to movement and adept at pattern recognition is going to reflect a lot in how you play the game. Stealth is simply about blending in (pattern recognition) and being deliberate in your movement so as not to draw the eye. This chapter will cover several concepts familiar to us from infantry manuals, but adapted for the game. It will also cover some ARMA-specific tips, such as camera view and posture when using 3rd person. — Silhouetting and Skylining Silhouetting occurs when a Rat's outline is visible against a contrasting background, making detection likely even at a distance. Skylining is the most dangerous form of this, happening when you position yourself against the sky.
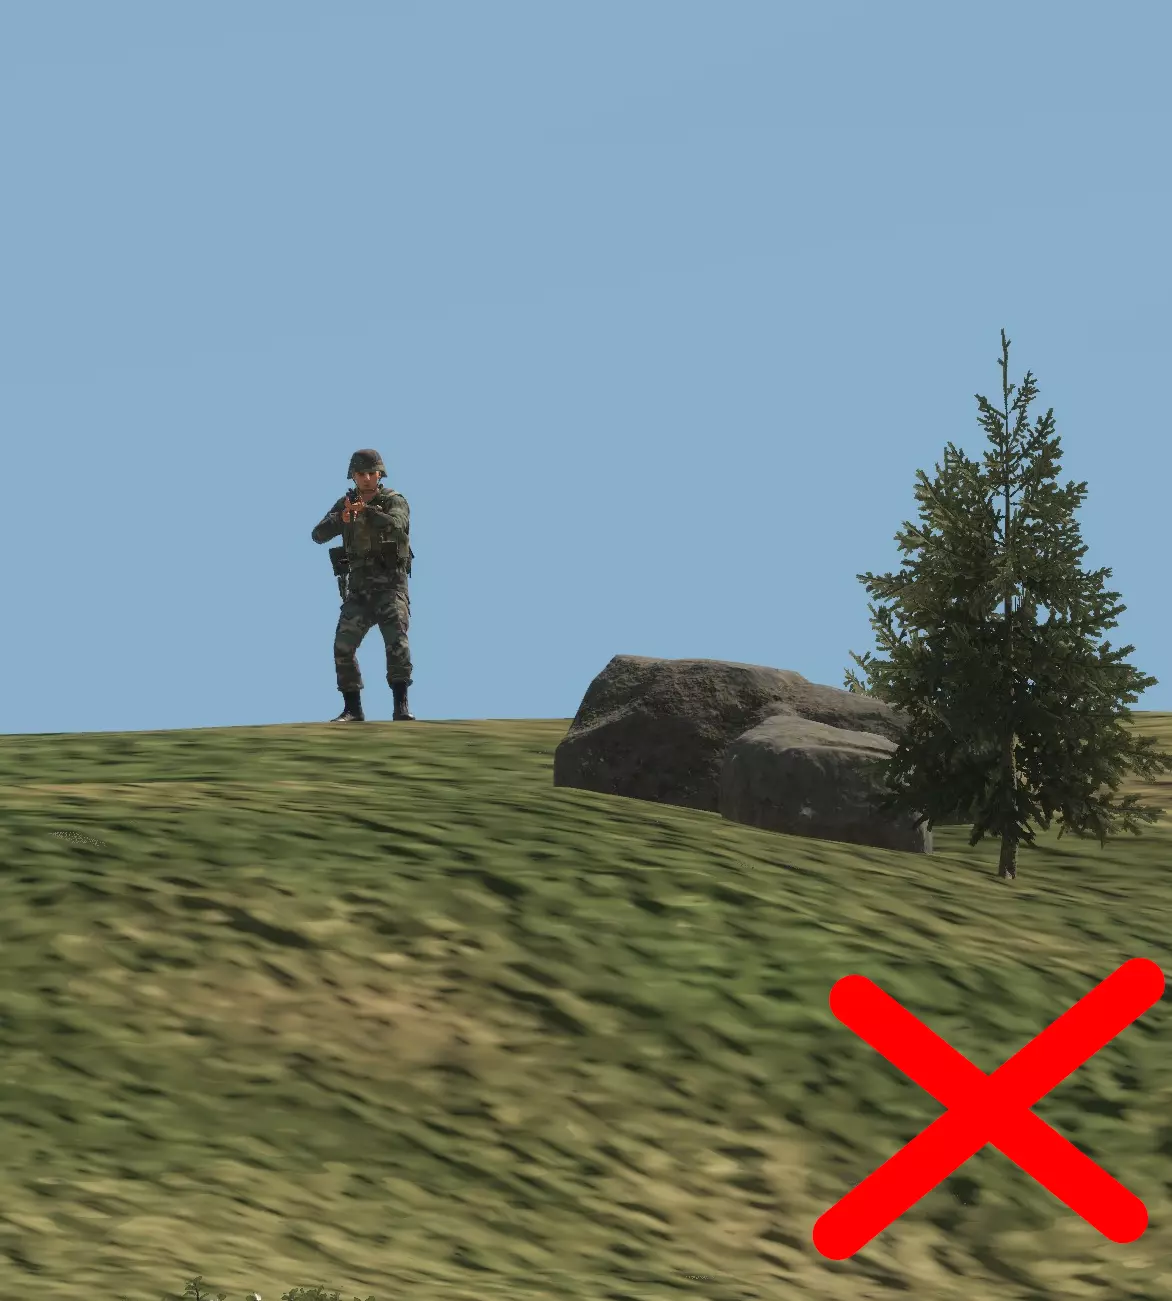

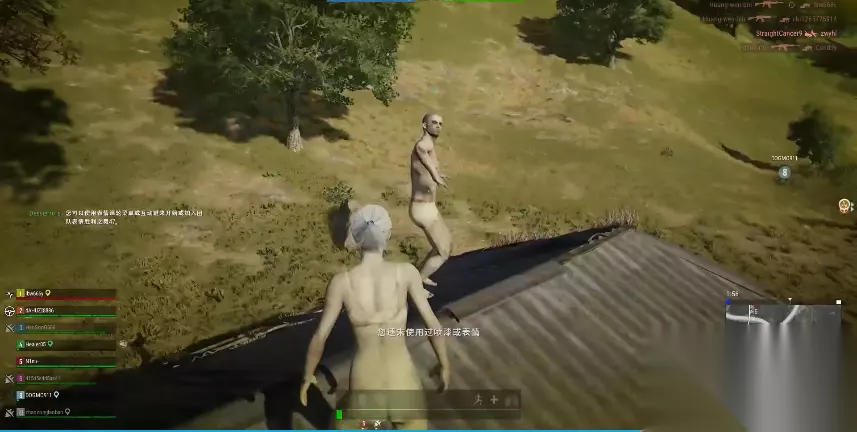
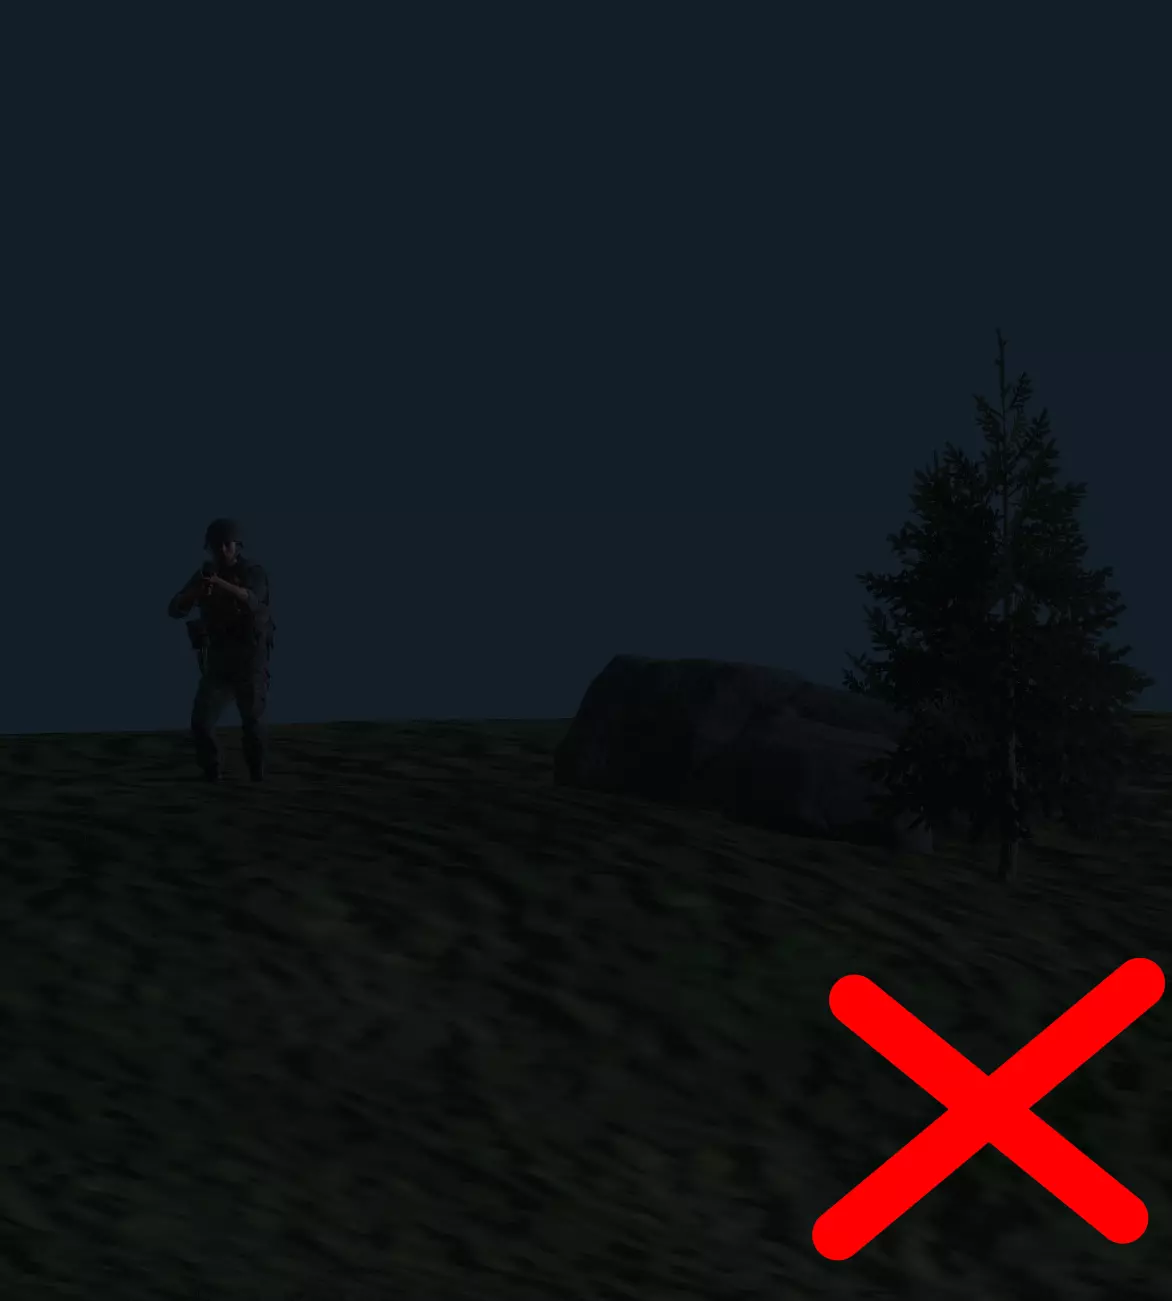
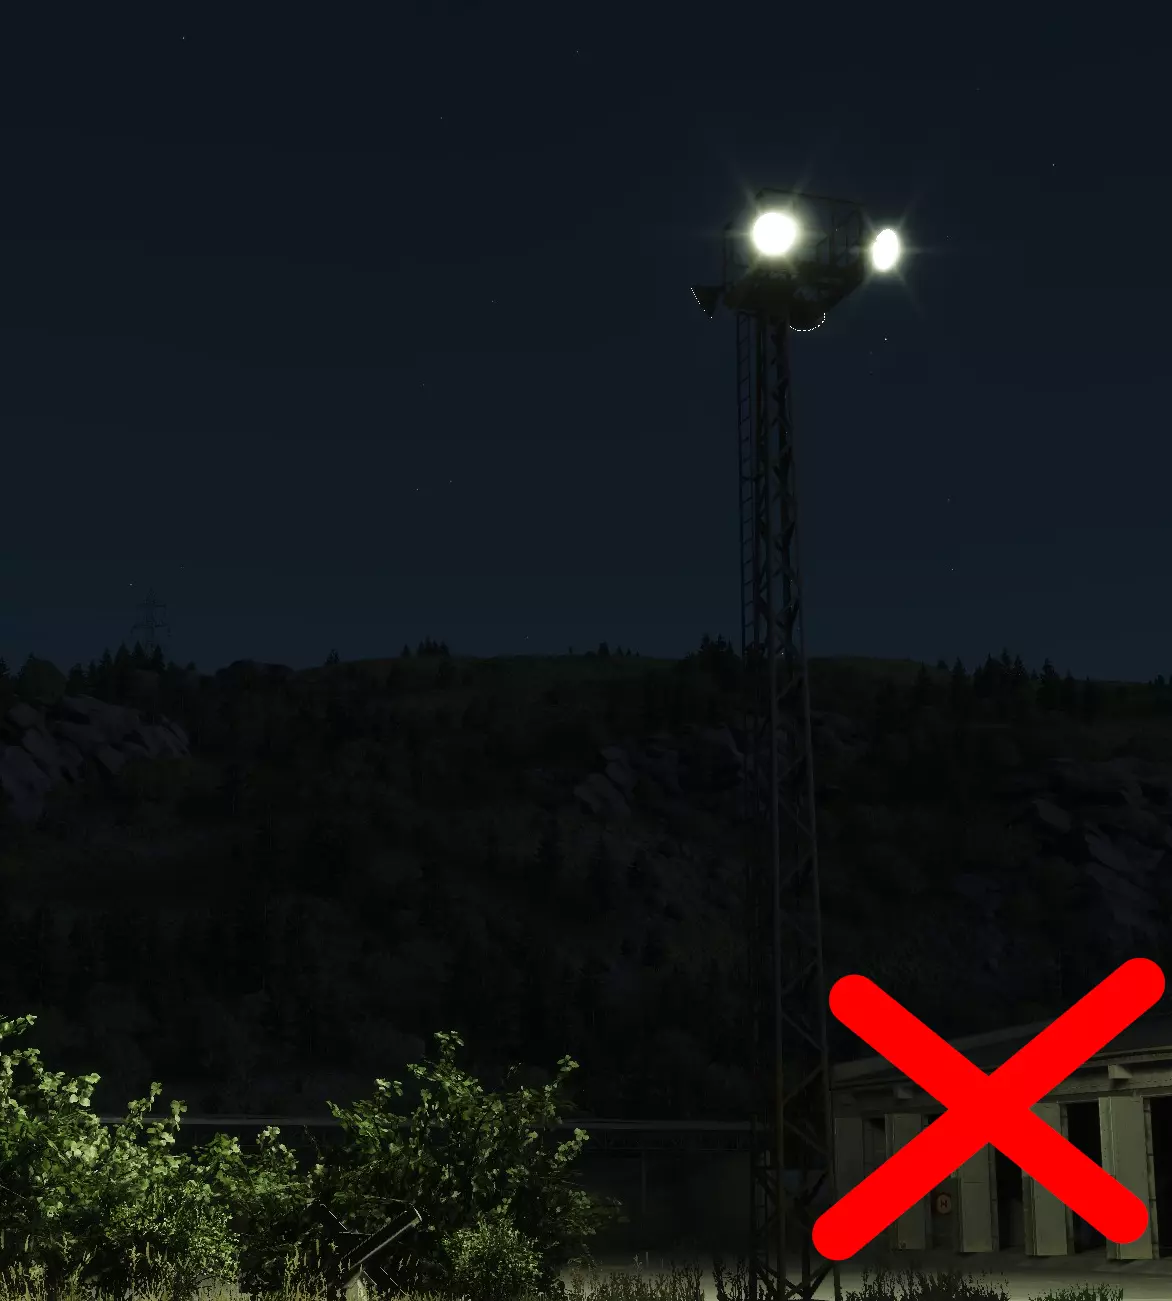
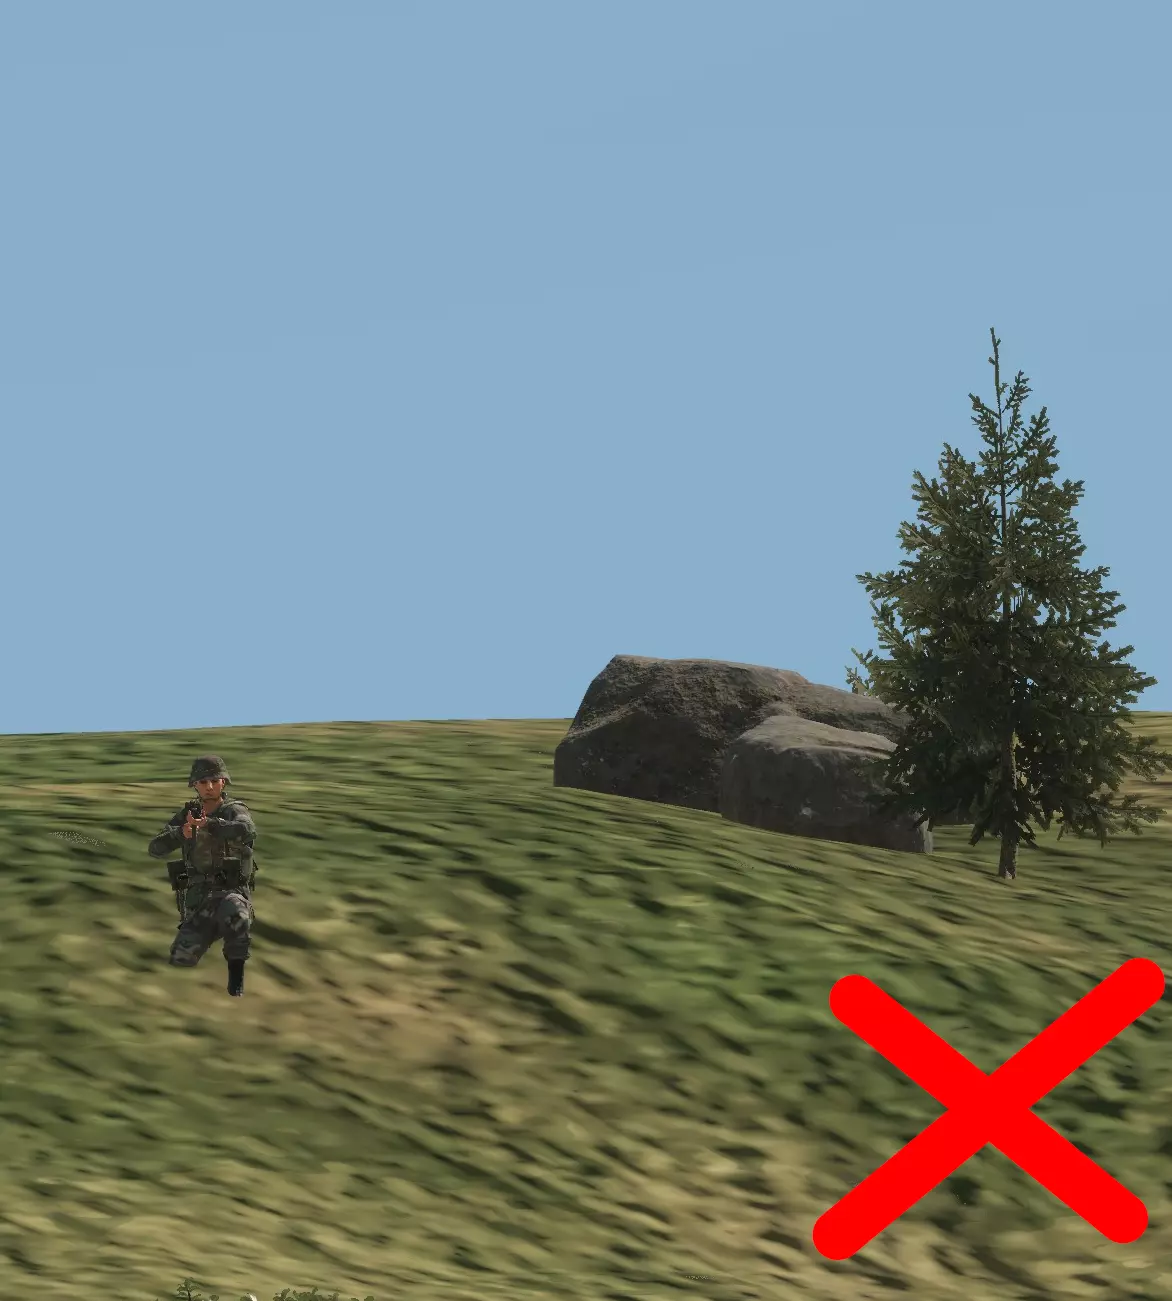
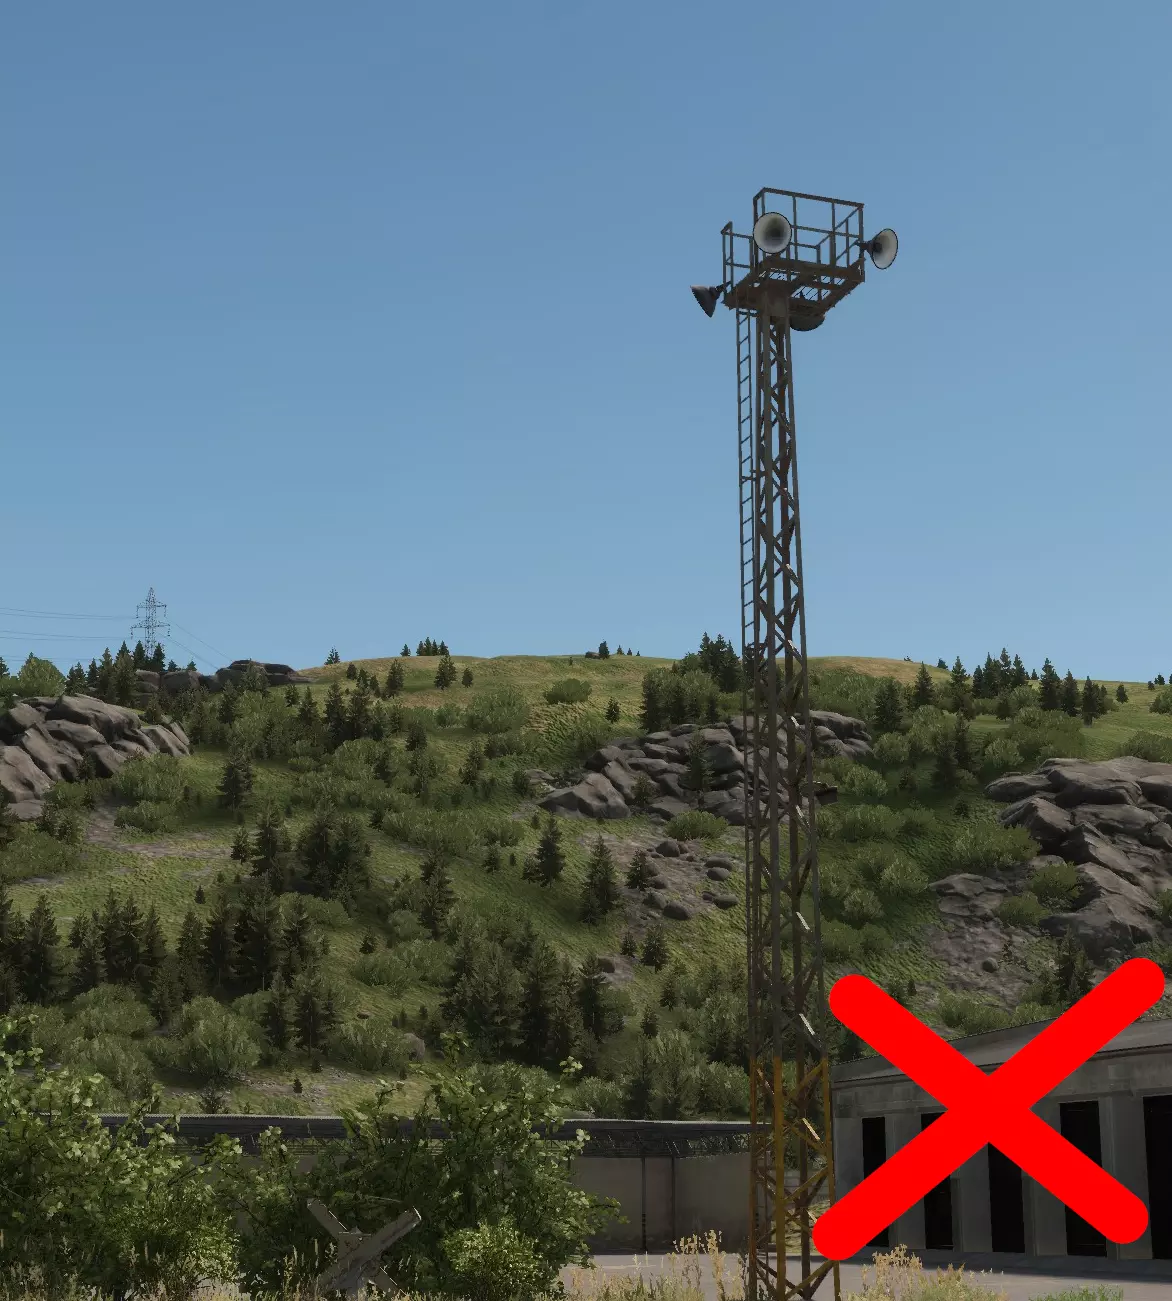
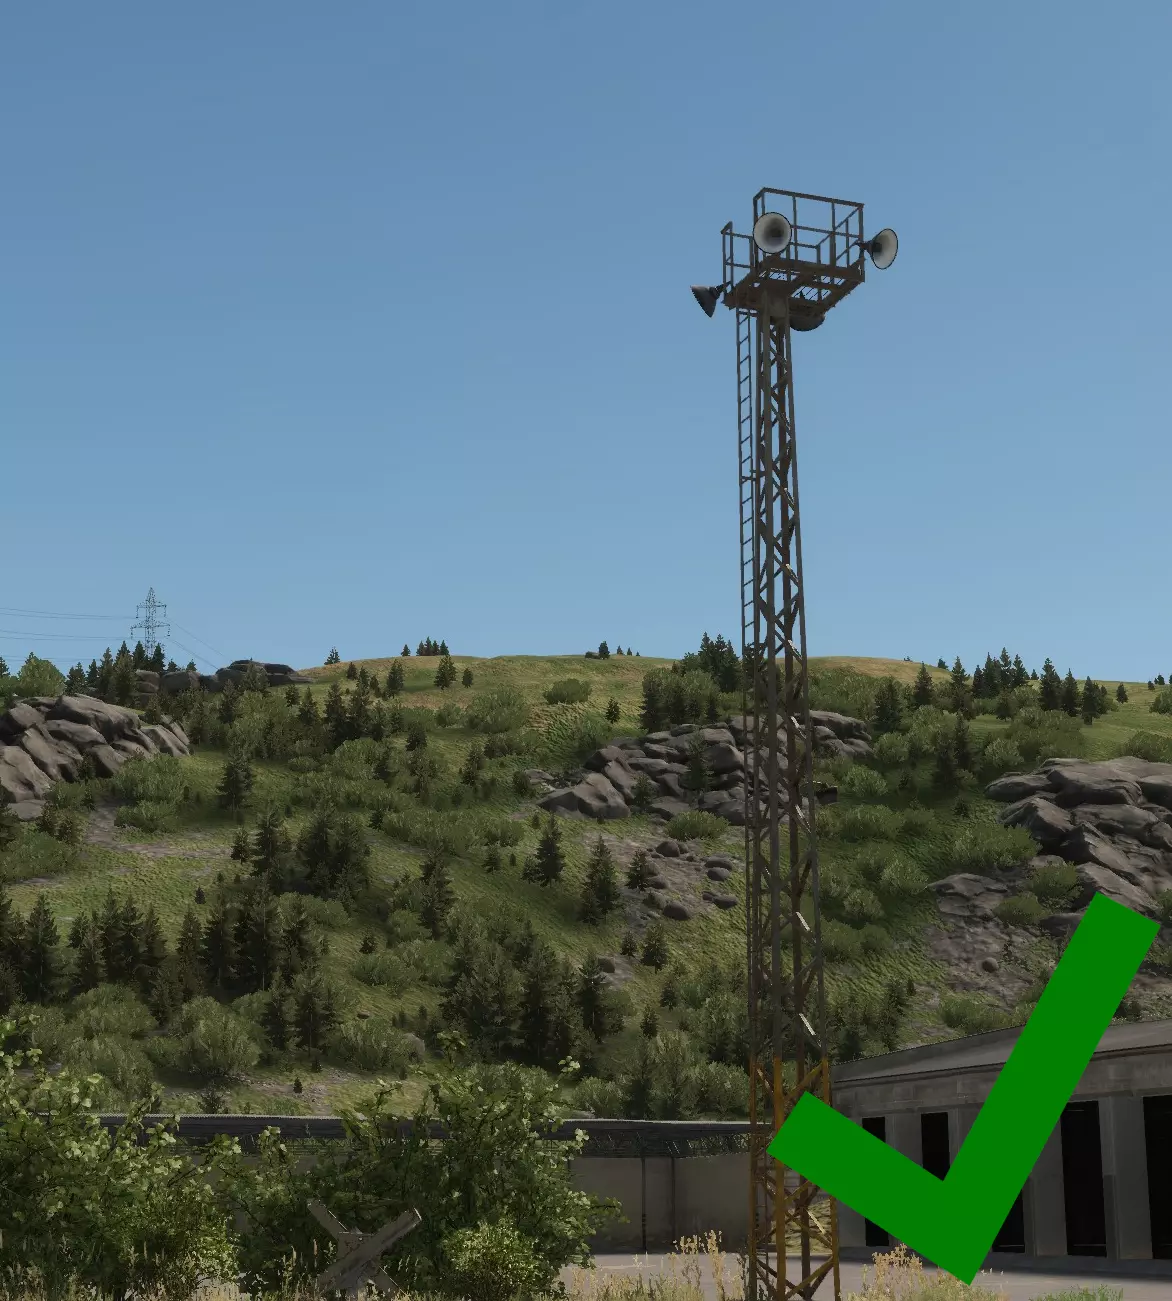
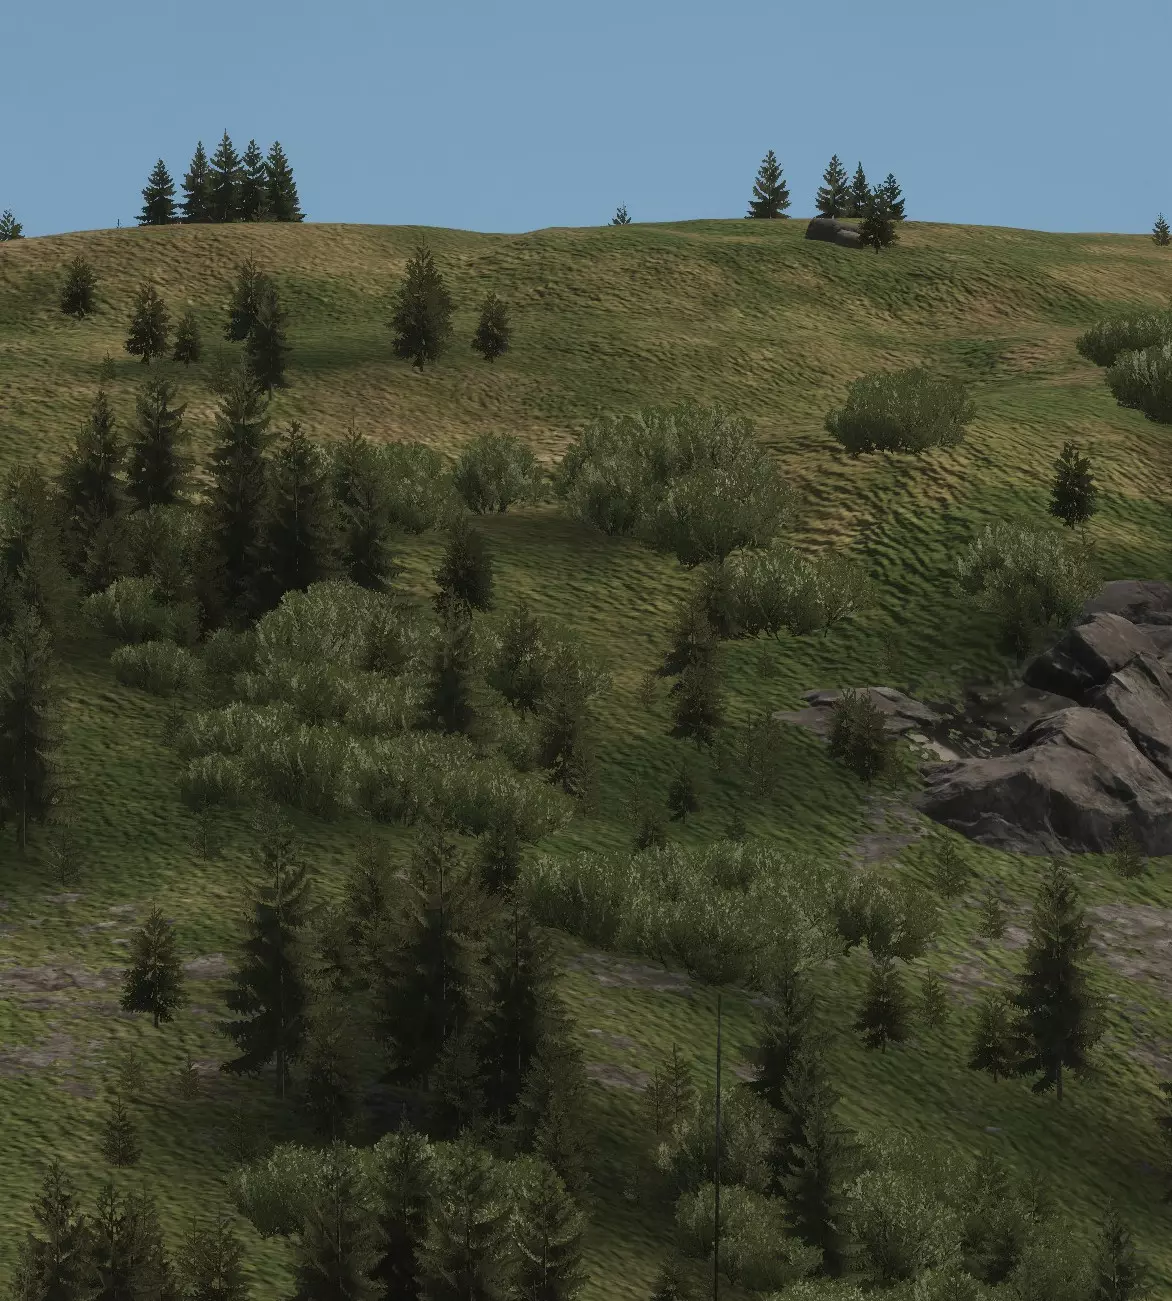
看看上面的图片(在浏览器中打开可获得更清晰的效果)。即使不使用右侧图片中的瞄准镜或望远镜,你也能清晰地看到天空背景下的人物剪影。这个问题非常严重,即使在极小的缩略图中,剪影也清晰可辨。再加上角色的移动,你就会像白板上的苍蝇一样显眼。 不要误以为黑暗能掩盖剪影。在夜空背景下,你同样会非常显眼:
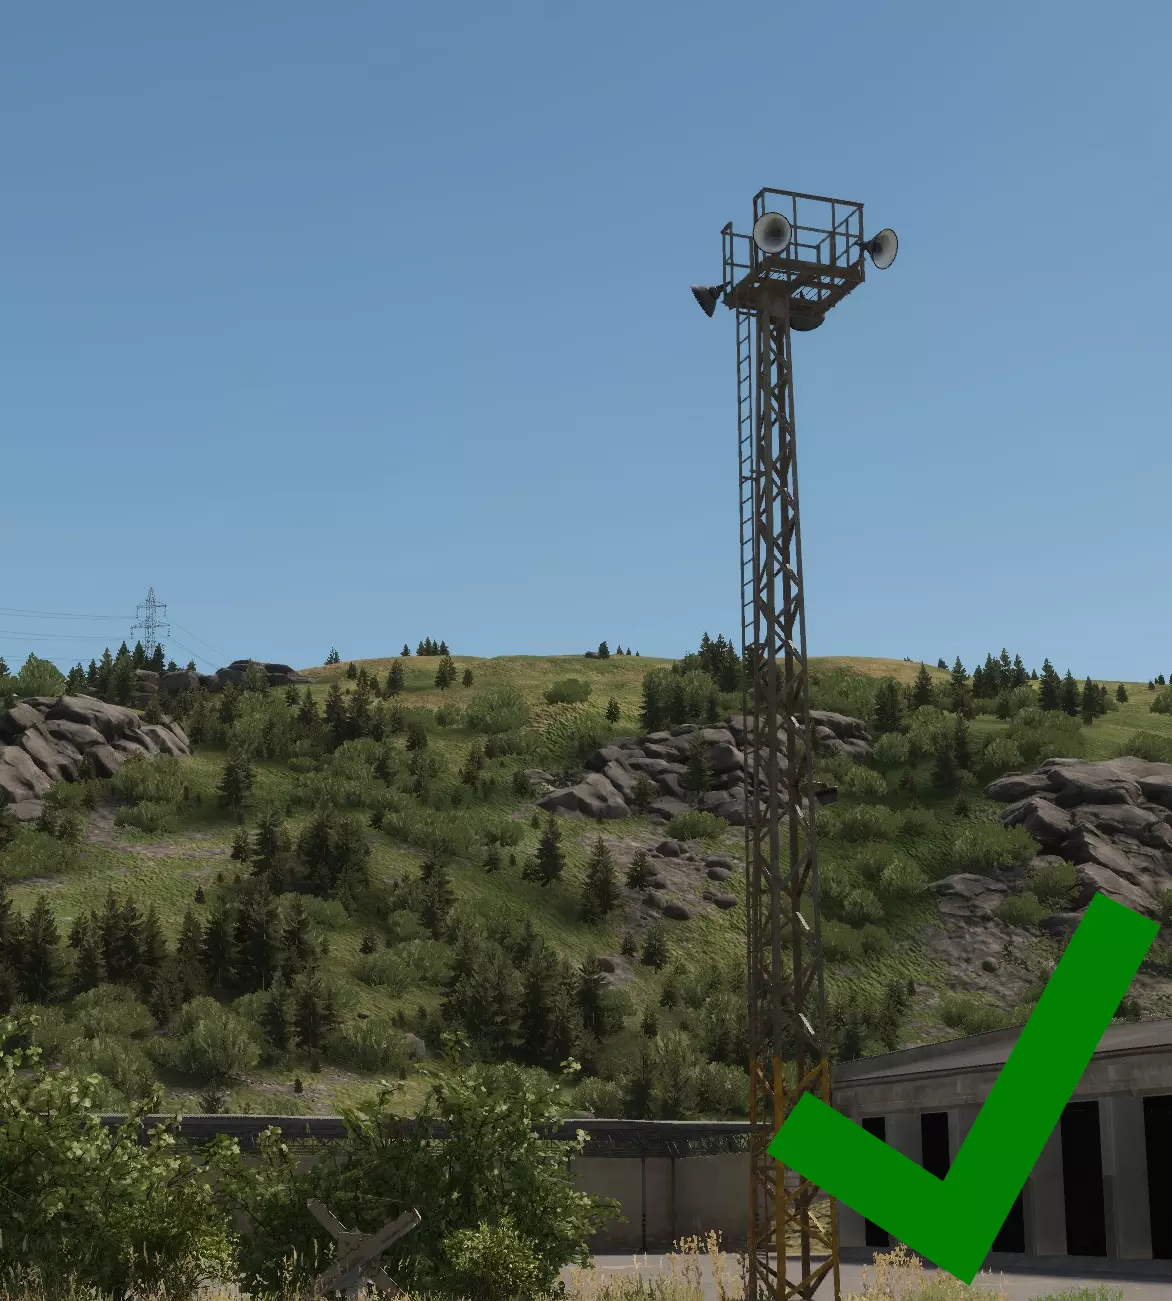
显而易见的解决办法是向山下移动,但这会带来另一个问题。你不再以天空为背景形成剪影,而是以身后的地形为背景形成剪影。
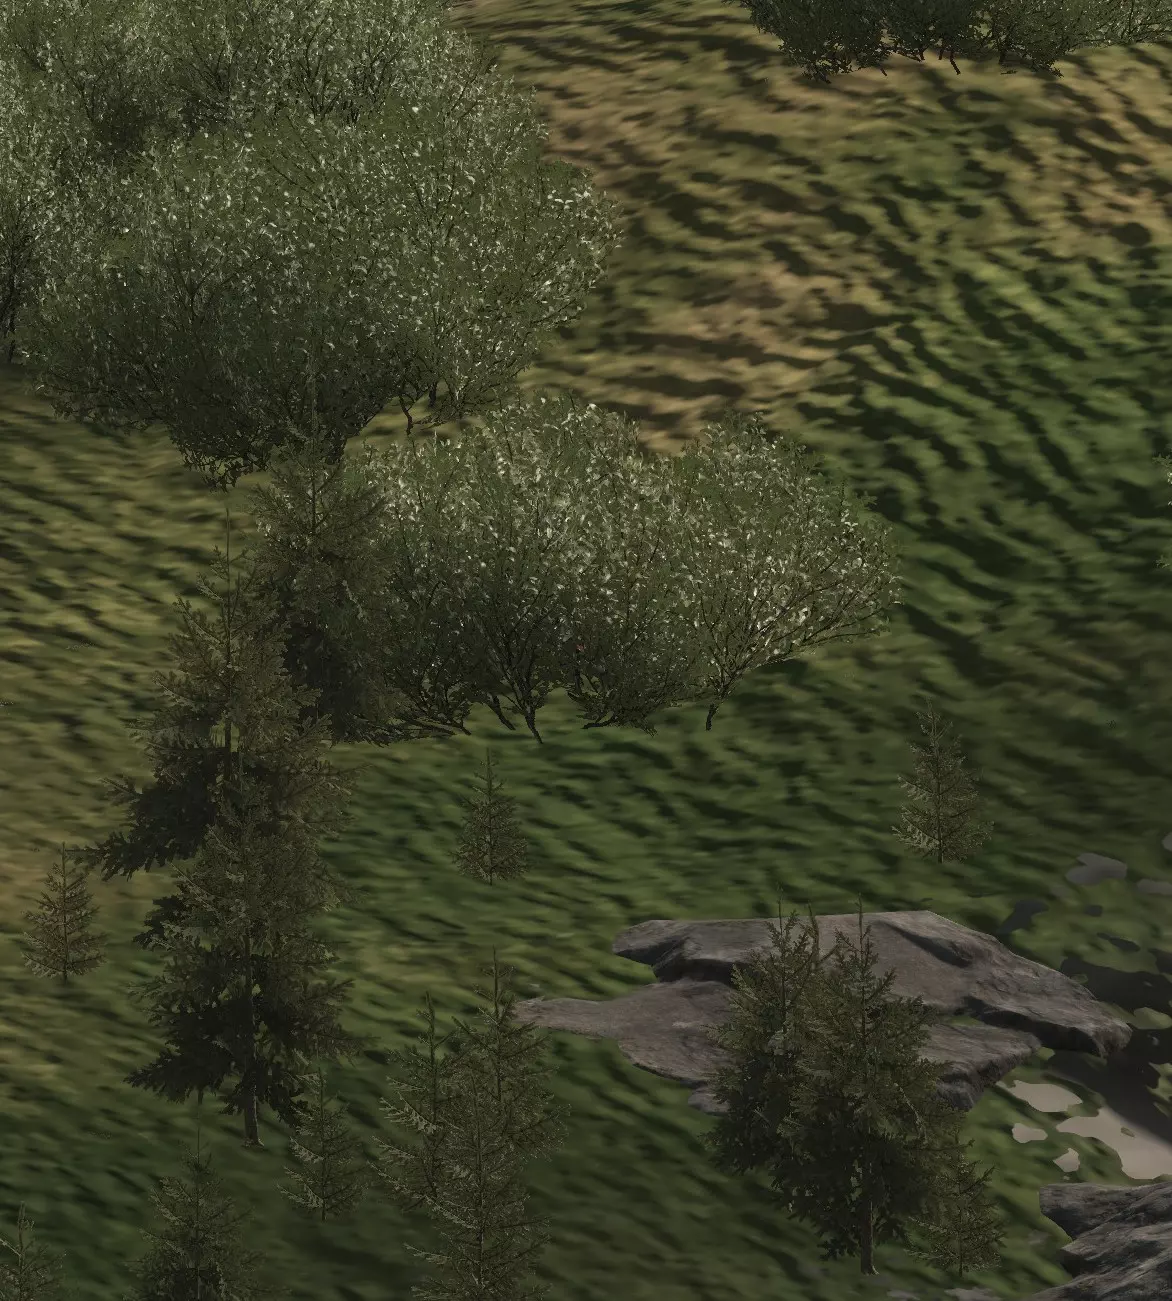
如图所示,每一名【老鼠】都必须注意,不要让自己的轮廓与所处的任何背景形成鲜明对比。以天空为背景形成的天际轮廓是最糟糕的剪影情况,但与地形形成对比也仍然存在问题,应尽可能避免。 成为剪影的【老鼠】就是死路一条。 注意:你可能会问,影子在哪里?草在哪里?为什么画面看起来这么糟糕?我这里是用最高设置运行游戏的;这就是《武装突袭》系列游戏对远距离物体的渲染方式。请记住,这款游戏也在Xbox和PS5平台上运行,对这些平台来说,画面看起来甚至更糟! 游戏只会渲染一定距离内的影子,因此你只能在该范围内依赖影子。考虑到主机玩家和调整设置的玩家,通常最好完全不要依赖阴影。在你的屏幕上看似隐蔽的东西,在设置或视距不同的敌人眼中可能完全暴露。 那么,我们如何解决这些轮廓暴露和天际线暴露问题呢? 隐蔽。 — 隐蔽 隐蔽能保护你避免轮廓暴露,因为它会利用树篱、树木等遮挡人体的形状。我们来看一下:

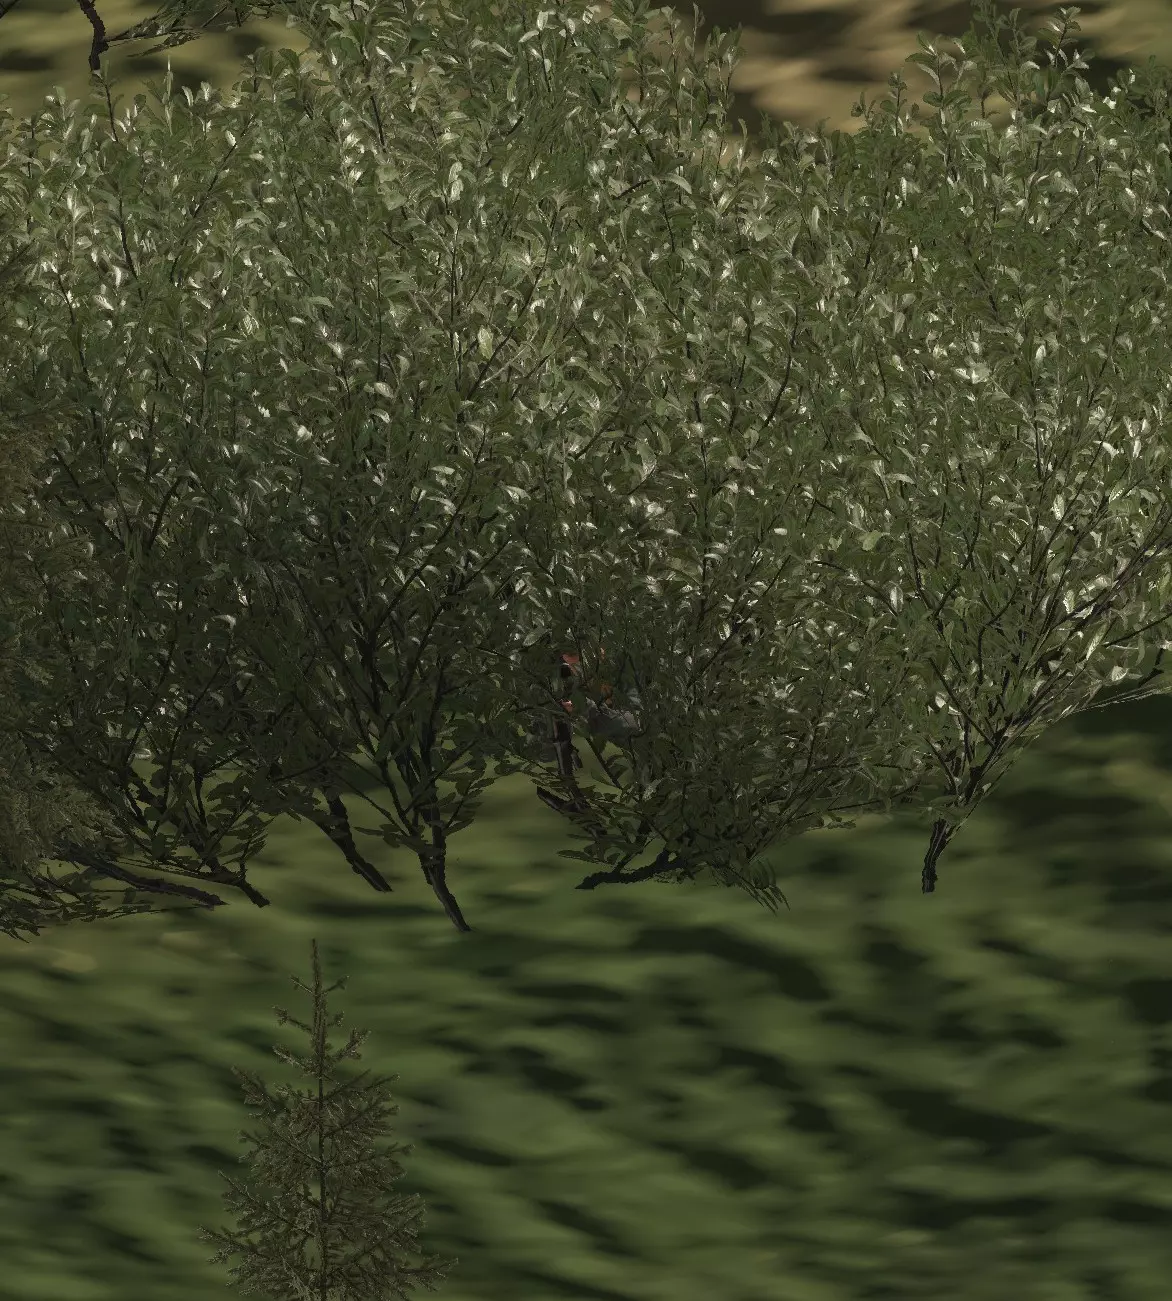
从远处看,你处于隐形状态,不会被发现。敌人必须使用瞄准镜和望远镜才能找到你,即便如此,除非对手仔细检查每一片树叶,否则你也很容易被忽略。这给了你,也就是【蹲逼玩家】充足的反应时间,可以在完成击杀后开几枪或迅速溜走。 在灌木丛中,这种隐蔽效果更好;树的底部会露出蹲逼玩家的手臂(我们可以通过长袖迷彩服来减轻这个问题),但树木仍然能很好地破坏你的轮廓,让你更难被发现。 《武装突袭:Reforger》中的隐蔽主要依靠灌木丛、草丛和阴影,但你要记住,对大多数玩家来说,阴影只有在特定距离内才会渲染,除非离得很近。不过要记住,如果这只躲在树根处的小老鼠开始被射击,那么它们的隐蔽就毫无用处了。隐蔽能隐藏你……但不能让你刀枪不入…… ——掩蔽物 掩蔽物是墙壁、岩石、沙袋,任何能阻挡子弹且你可以躲在后面的东西。它能保护你免受飞来的子弹伤害,并提供隐蔽效果,如果你蹲伏在这些东西后面,无论是部分还是完全隐蔽。 回到我们的例子……

那只老鼠现在藏在坚固的掩护物后面,一块不错的大石头。它的头盔曲线略微露出地平线,但轮廓与岩石完美融合。从远处看,就像我们右侧的图像所示,它完全看不见。 现在的好处是,如果我们的老鼠开始受到攻击,它只需滚到岩石后面,就能安全躲避来自基地下方的所有火力。 这是因为我们的大脑处理视觉信息的方式。军事理论认为,人眼特别擅长识别人类形态。我们是模式识别机器,经过进化能够识别直立的双足形状、肩膀宽度、头部比例以及人的独特轮廓。你的大脑能在几毫秒内识别出人体轮廓,即便在看不清具体特征的距离下也是如此。 这种掩护效果显著,因为它打破了我们大脑本能瞬间识别的人体形态。敌人的视觉处理系统会被不规则的岩石形状干扰,无法看到清晰的人体轮廓。这种姿势仅让老鼠自身从岩石后露出极小一部分,却能让老鼠完全观察到目标区域。 军事伪装理论称此为【破坏人体特征】。关键不仅在于隐藏,更在于专门干扰那些会向任何扫描该区域的人发出“有人!”信号的显著形状。你的肩膀、头部和直立姿势都是暴露身份的明显线索。良好的掩护能让你看起来像环境的一部分,而不是一个目标。从特写镜头来看,角色的手臂像山顶的灯塔一样显眼,我们的大脑在很远的地方就能识别出肉色的肢体,所以如果想完善这个例子,我们可以穿长袖上衣和手套。 — 结论 - 掩护与隐蔽 形成剪影 = 不好
夜晚也还是很糟糕
地形轮廓显示问题有所改善,但仍然较为严重
利用隐蔽来隐藏自己是个好方法
利用掩体和隐蔽物来隐藏自己并保护自己免受射击是最佳策略
The images above tell the complete story of Rat survival. You start completely exposed and silhouetted, looking like a billboard advertisement for "SHOOT ME HERE." Move down from the skyline and you're still visible but less pronounced. Add some concealment, and you're getting harder to spot. Combine cover with concealment and you've achieved the Rat ideal: almost invisible to the enemy but protected from their fire. The key lesson is layering your protection. Concealment hides you from observation. Cover protects you from fire. Proper positioning gives you both while maintaining your ability to observe and engage targets. But there's always a trade-off. Sometimes a concealed but uncovered position offers too good a vantage point to pass up. Sometimes, concealment is your only option, and you have to accept the vulnerability. You're constantly balancing along a spectrum from EXPOSED to CONCEALED to COVERED, because if you get too concealed and covered, you can't see or shoot the enemy any more. The art of being a successful Rat is knowing when to prioritise what. The best Rats find positions that maximise their tactical advantage while accepting only calculated risks. — Camera View, Posture, Concealment, and Cover Arma Reforger's multiplayer servers can be configured to either allow only first-person gameplay or support both first- and third-person perspectives. Always check the view setting that is being used when you join a server. You can do this by pressing the mapped change perspective key or button. If the view switches from first to third person, you are on a third-person server; if you are unable to switch back to the third-person view, you are on a first-person server. What you can do in concealment and cover will be affected mainly by the view modes available to you. Some players prefer to use first-person view exclusively. Others will take full advantage of third-person mode and play in a hybrid of 1pp and 3pp (1st / 3rd Person Perspective). The most significant advantage of the third-person view is third-person peeking, that is, the ability to see over or around cover without exposing your body. This provides a clear field of vision while denying the enemy the opportunity to engage. In terms of tactical leverage, this is considerable. Rats do not fight fair. If the server allows third-person view, you are expected to use the third-person peek. Every player on the server has access to the same tools, and, especially on consoles, the vast majority of players will be doing the same thing. Choosing not to use third-person peeking when it is available is a self-imposed handicap. Posture Controls are a critical component of concealment and visual discipline. In Arma Reforger, you can adjust your character’s stance incrementally using the Control key and scroll wheel. Each base stance, standing, crouching and prone can be fine-tuned through several sublevels, like this: STANDING ┌─ Level 10 (tallest) ├─ Level 9 ├─ Level 8 ├─ Level 7 ├─ Level 7 └─ Level 1 (lowest) ← Best for 3PP peeking CROUCHING ┌─ Level 5 (tallest) ├─ Level 4 ├─ Level 3 ├─ Level 2 └─ Level 1 (lowest) PRONE (Single height only) The Golden Rule: Go as low as possible while keeping the camera advantage. You should configure your character to be as low as possible while still maintaining the camera height benefits of the stance 'mode' you are currently in. The standing stance provides the highest third-person camera elevation, offering the broadest field of view. However, this also exposes the largest silhouette and target for the enemy. By adjusting your posture to the lowest possible setting within the standing stance, you retain the high camera perspective while significantly reducing your visible profile. This allows you to observe your surroundings from cover with reduced risk of exposure. The crouched and prone postures offer reduced height and improved concealment, but at the cost of corresponding decreases in mobility and camera elevation. In the third-person view, the camera lowers as your posture changes from standing to crouched to prone, reducing your observational advantage. When moving, remember that your character keeps its height setting when you stop — unless you switch between standing/crouching/prone, which resets it to default. That means if you are in a low crouch when you sprint crouch from cover to cover, when you stop, your character model will resume at the 'level' you were at before you moved. — Hiding In Bushes (Bush Wookie...ing) Bush concealment is fundamental in ARMA and a trick as old as time. As a Rat, you will depend on hiding within bushes on a very regular basis to go unseen. Often, hiding in a bush in plain view of the enemy is safer than hiding behind cover in terms of not being detected. Both Russian and American uniforms blend well with Reforger's foliage, especially the US disruptive patterns. Two factors determine success: positioning and camera control. This technique works on both server types but excels in third-person for the obvious reasons. Basic Technique: Enter bush and crouch provides the best balance of concealment and visibility. Lower your stance further with Ctrl + scroll wheel. Aim the weapon downward to tuck your profile into foliage. Double-tap Left Ctrl for weapon low-ready (reduces barrel exposure). Hold Alt for free look (observe without moving). Double-tap Alt to lock free look for extended observation. Third-Person Advantages: Crouching in 3PP keeps your camera elevated above foliage while your body stays hidden. In 1PP, you only see what your character sees, so you have to give up concealment for the sake of visibility. First-Person Considerations: Position deep enough that foliage obscures your upper body and partially obscures your view, so that you know your chest/weapon is not sticking obviously out of the brush. Accept some visual obstruction, clear view means you're exposed, branches and leaves should be in your way. Be more mindful of your weapon barrel and where it is sticking out. Adopting the low ready position can help. Tactical Trade-offs: If lowering your weapon to improve concealment, bear in mind it leads to a reactionary gap. In low-risk areas, prioritise concealment. In high-risk zones, keep the gun ready despite the larger profile. Key Warnings: Prone positioning often exposes legs beyond the bush edge, particularly to flanking enemies, hence why crouching is almost universally better. Your weapon barrel can betray your position even when your body is well-concealed. Remember that bushes do not protect from incoming fire; they hide you, they don't shield you. Your concealment needs will vary depending on your mission: total invisibility for reconnaissance may require accepting heavy visual obstruction. At the same time, ambush positions demand a balance between concealment and clear firing lines. Hiding in bushes will allow you to hide in plain sight. Typically, the enemy will not see you until they are literally standing on top of you. I have had players walk over me in foliage and still not know I am there (somehow). Why Bush Wookieing Is Being Nerfed (Spoiler: It's OP) Now onto a practical example which will show you exactly why the devs are looking to patch out bush wookie-style behaviours in the near future, or at least frustrate their efforts. The problem is that if you position yourself correctly in a bush (as I detailed above), you are impossible to see, EVEN WITH optics or binoculars. This is the case in vanilla, where the silencers are less endemic and sniper optics are not as strong. As I show you this in vanilla now, imagine the game is being played in a modded server and: 1. The enemy sniper has a perfect ghillie suit that displaces their silhouette seamlessly. 2. The sniper has a silenced rifle and is firing from 2x the distance of our sniper here. You can then see why this strat is being nerfed, let's begin:
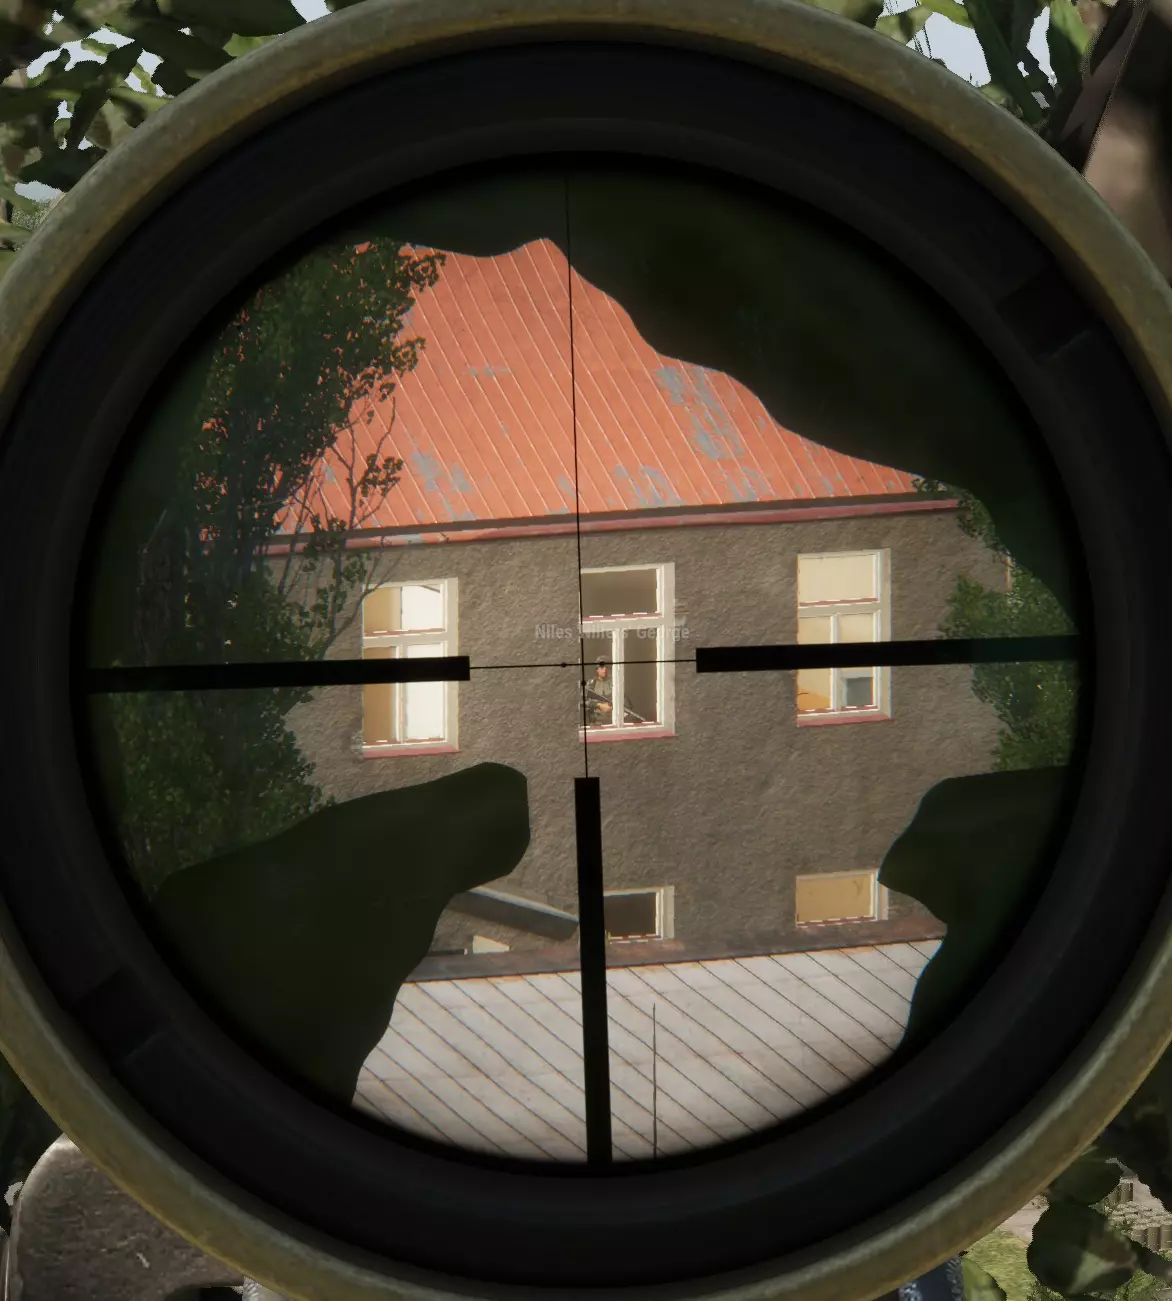
这是奈尔斯。 不幸的是,正如你所见,有一名狙击手正透过窗户瞄准他。奈尔斯显然没看过本指南,他把大半个身体都暴露在了窗户里,所以就算狙击手没打中他的头,也能击中他的身体。可怜的奈尔斯。 奈尔斯面临的问题是,狙击手的位置大概在这里:
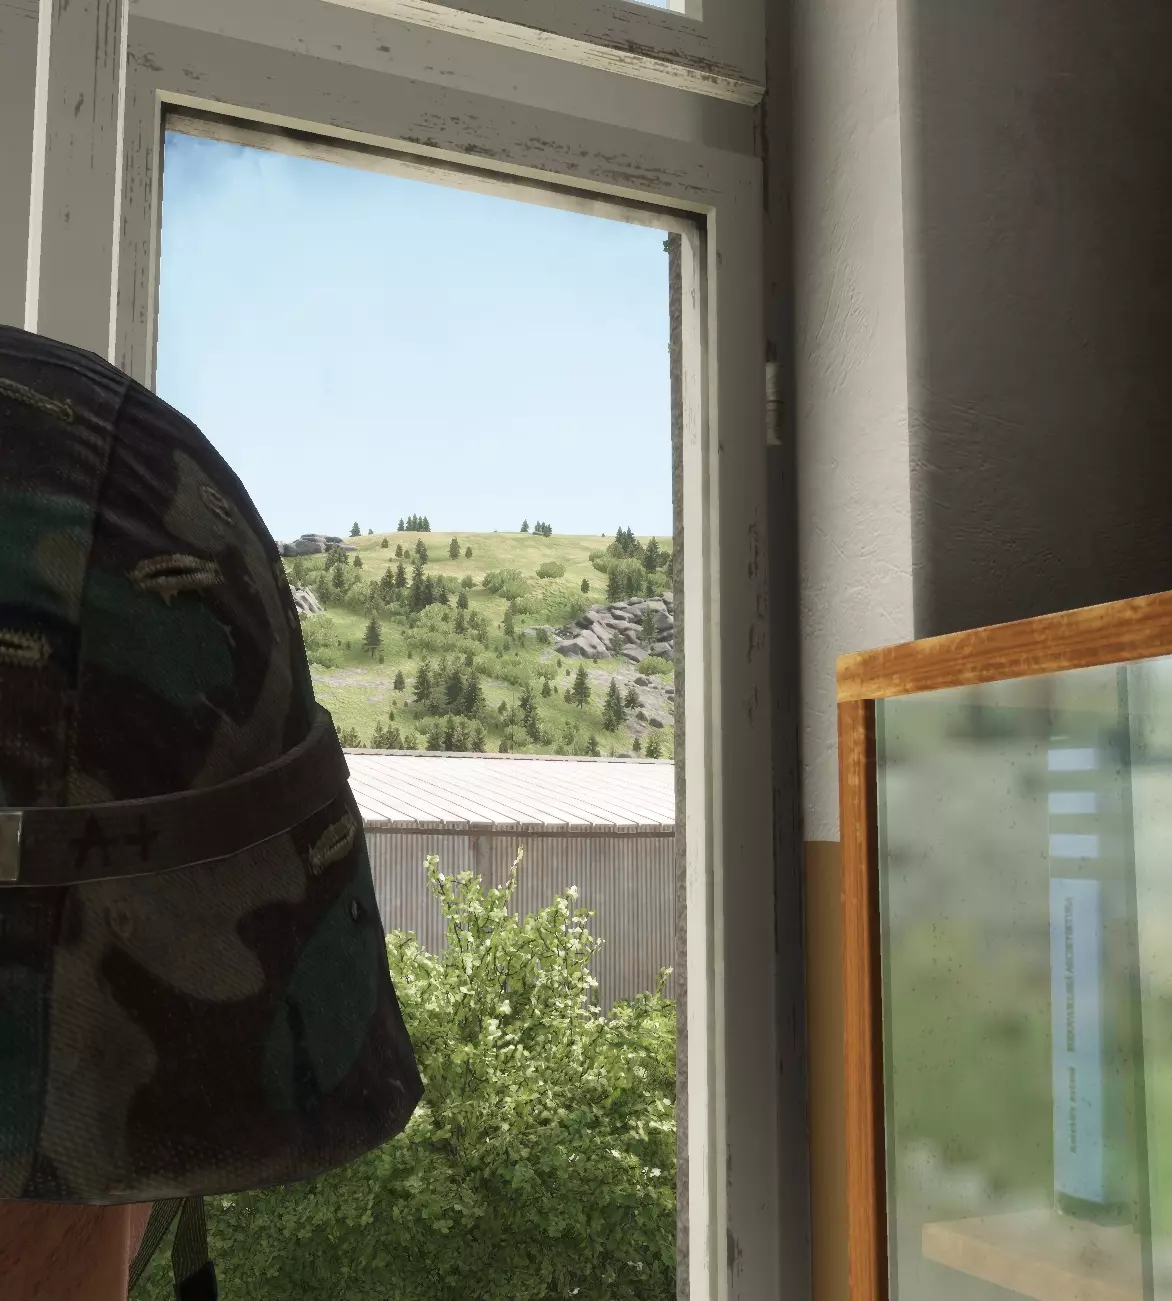
你发现狙击手了吗? 现在呢?
现在?
好的,你当时可能已经看到了。那现在呢?
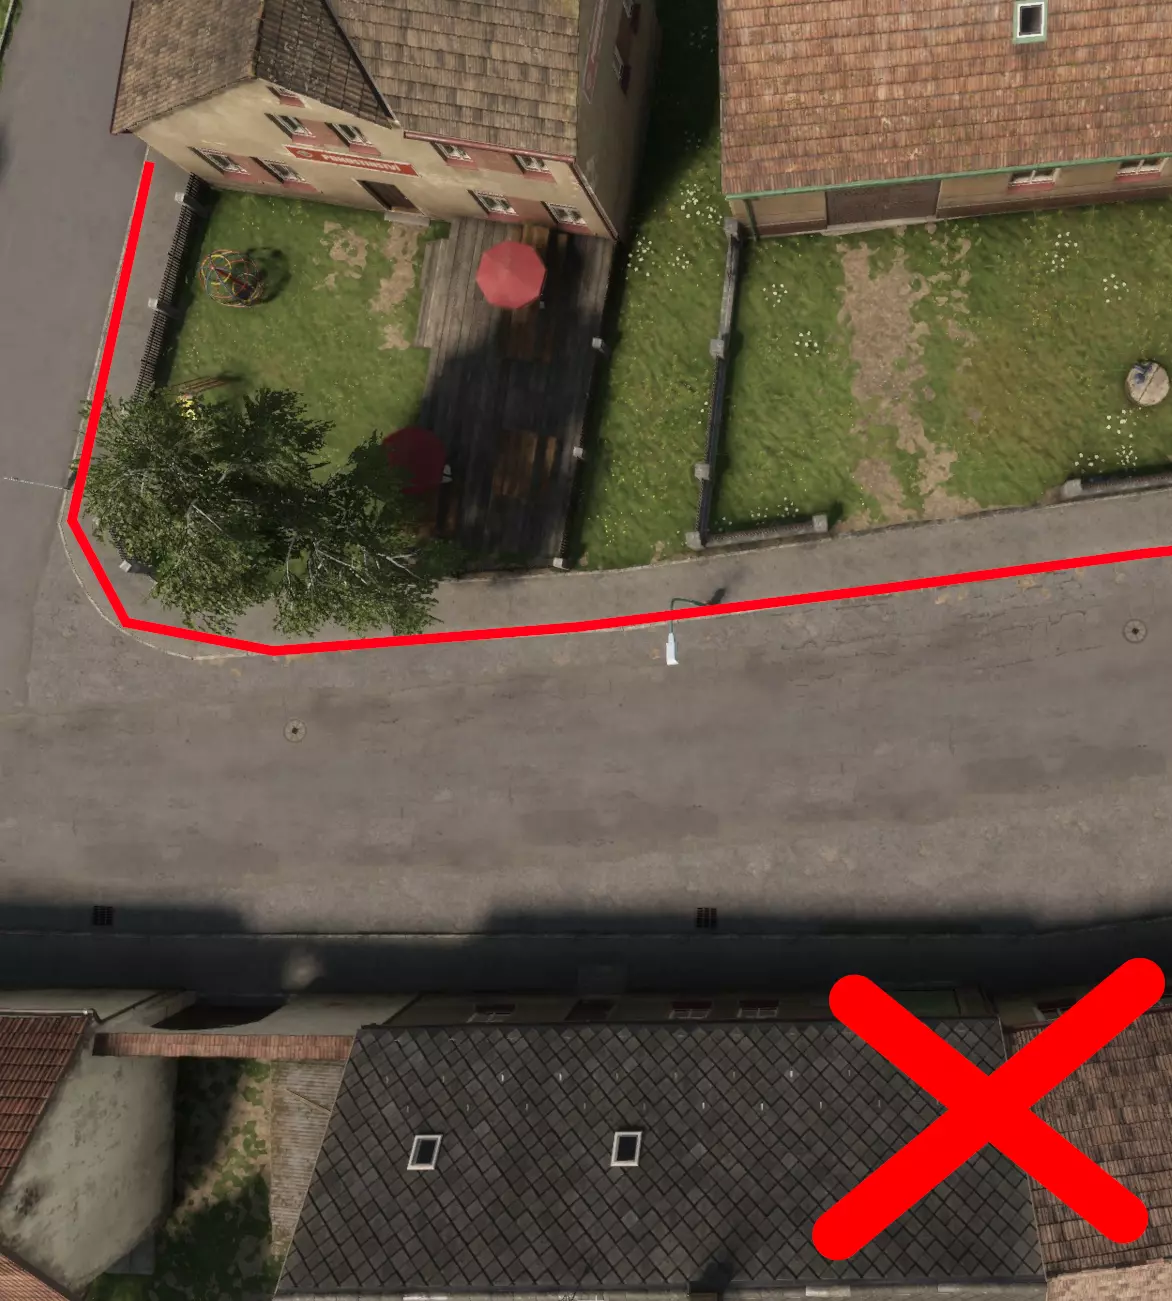
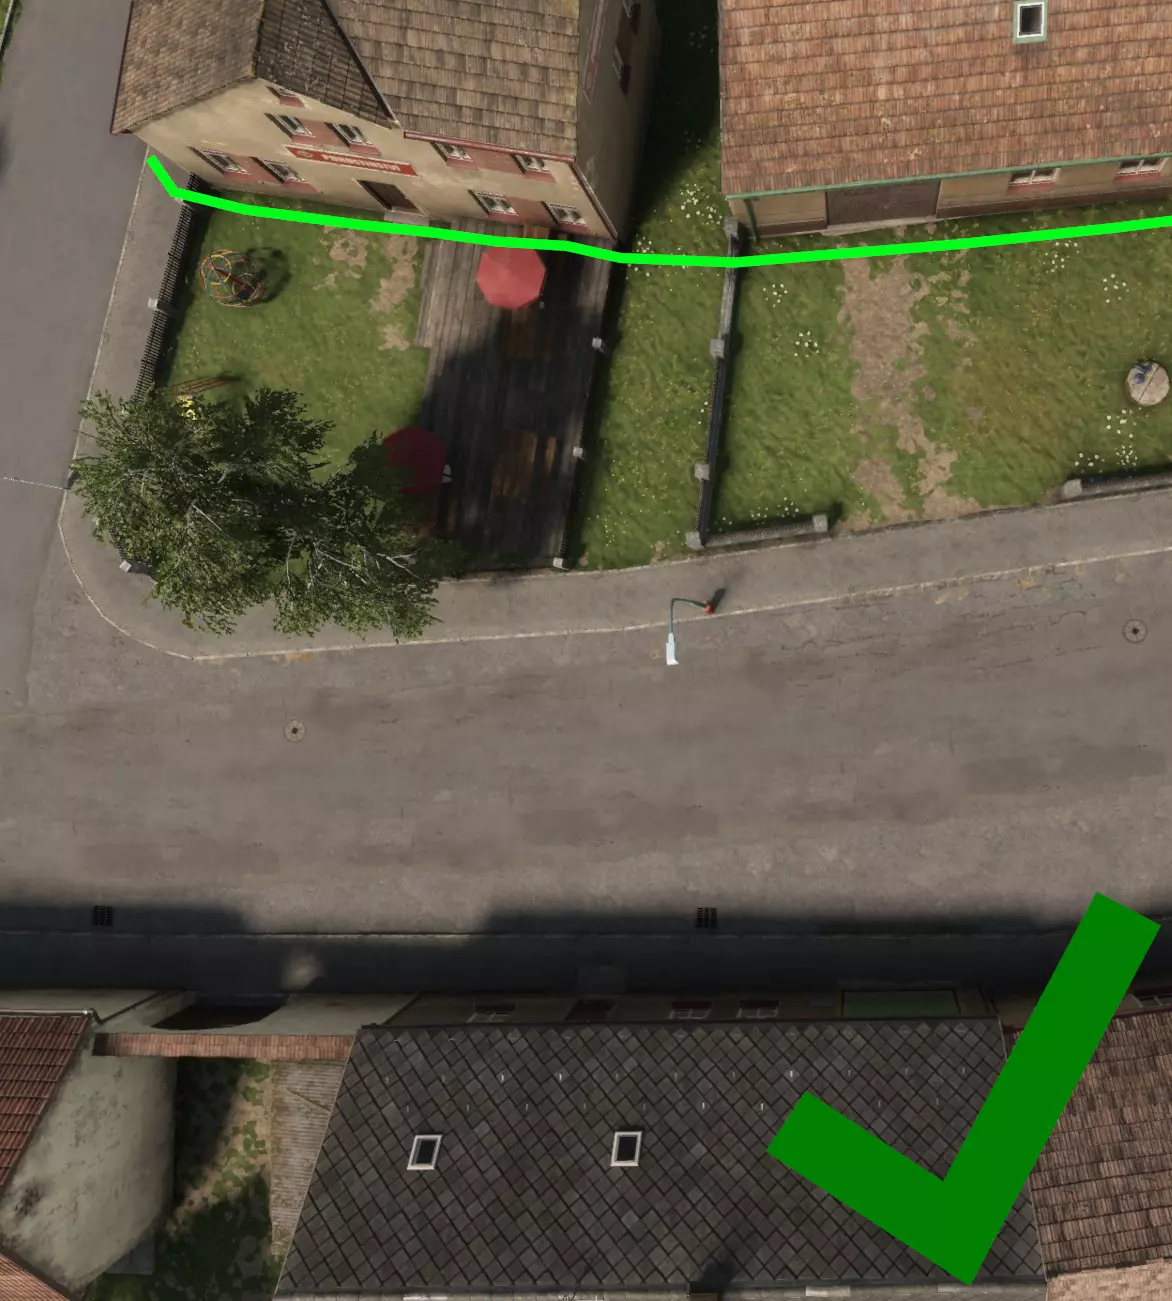
I won't insult your intelligence, but if you open up that image, you can just about make out the colour of the skin of the sniper, and a part of the scope. This bush wookie has FULL SIGHT of Nile's poor dome, and yet poor Niles would have to have 20X super vision to see him. Now you see the problem, work it to your advantage while you can. — Actions as Concealment Beyond hiding in bushes and behind cover, you can increase your concealment with actions, which usually means they are actions you SHOULDN'T do in order to assist in your concealment. As we covered already, if the enemy you can conceal yourself behind a rock or bush to help you to not be detected and killed. Here are some other things you can do to avoid detection when the enemy may be looking your direction: DO NOT MOVE! Everything aside from the swaying of the trees, bushes, waves in the ocean, occasionally birds which I will talk about in a second is STATIC. That means for the most part, the entire map is perfectly still. You know what isn't still? Players and NPCs, you know what is a threat to your life? Players and NPCs. The human brain may gloss over a well-concealed target, but if it MOVES, then you bet your enemies' monkey brain is gonna be locked onto you. If you need to look around you in a position of concealment, use free-look (hold ALT on PC), which allows you to move your head while remaining completely stationary. You can zoom with your magical ARMA eyes using right click, and you can even free-look while looking down a scope. Free-look instead of any other form of movement because your player model will stay perfectly still while your head is the only thing moving about while you look around. Only move if you absolutely have to, and calculate the risk that your movement could give you away. Rats can do a lot to help their stealth capability by being wary and mindful of their actions and how they might give them away. Every action you take has a signature that can betray your position to observant enemies. Understanding and controlling these signatures is the difference between successful infiltration and becoming target practice. DO NOT USE FLASH-LIGHTS! OR VEHICLE LIGHTS! A flash-light at night is a good way to see, it is also a good way to be seen, and since the models in ARMA Reforger put the flash-light on the chest, all you need to do is shoot at the light and watch it fall. Flashlights can be seen hundreds of metres away, even in conditions where your body's silhouette can't be, so you really need to ask yourself, is seeing right now worth dying? MUZZLE FLASH AND TRACERS GIVE YOU AWAY!, especially at night or in low light conditions. When engaging targets from buildings, fire from deep within buildings rather than at window edges, where your muzzle flash silhouettes against the frame. Your tracers are often the last 5 in the magazine until you can pick up mags without tracers. Please keep tracers in mind as you scavenge ammo from the map, you just need to reload before your last 5 shots to avoid revealing your position. Now and then, you will unknowingly pick up a mag JUST full of tracer rounds and will learn very quickly how much it sucks to give away your position with every shot. — Sound & Noise If you are not playing this game (or any competitive FPS or game) without headphones then you are actively harming your ability to play well. The ability to hear your environment and the noises that other players make within it is crucial to your survival and success. Each game has its own rules for how loud your movement will be. Quite often posture (crouching, crawling etc.) will affect how much sound you make, as will how fast you are moving. It stands to reason that someone sprinting while standing is going to make far more noise than someone doing their best slug impression crawling on the ground slowly. The ARMA games allow you to adjust your posture and your movement speed. In the current state of the game your speed dictates how loud you are, the slower you are, the quieter you are. Your posture and stance does not affect how loud you are currently! Bear that in mind. Vegetation and terrain features such as bushes, undergrowth, and branches aggravate movement noise, with snapping twigs or rustling foliage announcing your movement long before you are seen. If you are operating near enemies, you need to mask your sounds, or you will be compromised and you will die. Time your movement with other in-game sounds to help mask the sound of you moving. Move when the enemy is moving, firing, talking on their radio, or the wind is blowing through the trees and foliage. Rain, distant explosions, and vehicle engines all provide natural cover for movement and actions. Learn to use these environmental sounds to your advantage. Think logically about what your enemy is likely to be doing. Are you sneaking up on an abandoned base where the sound of another person approaching is going to cause concern? If you are approaching a busy area with a lot of footfall, it stands to reason the enemy you are sneaking up on is not going to be too startled by someone moving around, which gives you your window to strike. Likewise, if you're moving around while the enemy is also running about in groups of 2 or more then it stands to reason that your footsteps are not going to be noticed, or cause any concern. Some sounds in the game stick out like a sore thumb! Opening gates for example is a unique sound that is high pitched and slices neatly through much of the other FX in the game. Likewise big metal doors make a high pitch screech which stands out like a sore thumb. If you are being very sneaky, you are probably better off going OVER these obstacles instead. The noise of you climbing is similar to footsteps, and easier to conceal. Learn to recognize the distinct audio signatures of different actions. Experienced players can identify not just weapon types, but also reloading sounds, grenade pins being pulled, or equipment being swapped. Each has a distinct audio cue that betrays your position and intent. Russian grenades in particular have a familiar 'pop' sound when the pin is pulled that reveals any Russian player long before they are seen. Use this knowledge to your advantage by timing these actions when they'll be masked. In buildings, footsteps on different surfaces create distinct sounds. Wood floors creak differently than concrete, and metal surfaces ring with each step. Sound camouflage is very simple. If you think camouflage is the visual act of blending into your environment then sound camouflage is the same. Move when others are moving, and importantly use a weapon that isn't going to startle your enemy. If you are sneaking behind enemy lines and taking shots with an AK your enemy is less likely (but not guaranteed) to investigate. You can guarantee though if someone recognises the sound of a weapon system that belongs to the enemy behind their lines they will be looking out and ready for you. Learn to identify sound direction and distance. Most players can't pinpoint audio sources accurately, but good Rats can use this to their advantage. When you hear an enemy but aren't sure exactly where they are, use your freelook (hold Alt) to move your head left and right. This will help you pinpoint the exact direction of the sound as your ears pick up the subtle changes in audio positioning. Silencers are bread and butter for stealth and they are still prime loot when ratting or a go-to purchase when you get the rank. The thing with silencers is that they are not silent at all. In fact they have a distinct noise that is loud but not as loud as the alternative. The key to silencers is that they take the 'edge' off of the noise of a weapon being fired and in ARMA, make it harder to pinpoint where the enemy is firing from. Communication Discipline is critical for the Rat. Remember that when you talk on your team or squad radio, your character will also talk in proximity chat as you would expect in real life. This creates double audio exposure. Smart Rats use text chat when available for silent coordination, ensuring their position isn't compromised by an ill-timed radio transmission. Sound Escalation and Threat Awareness follows a predictable pattern that every Rat must understand. Fire once and the enemy knows you're in the area and generally which direction you fired from. Fire twice and they know exactly which direction you are and are actively looking for you. Fire a lot and start causing casualties, and you now have their full attention. You've rung the dinner bell and they will be gunning straight for you. This is why the Rat doctrine emphasises move, kill your targets, then withdraw. Every shot increases your threat signature exponentially. Vehicle engines can be heard long before the vehicle is seen, but Reforger allows you to turn off your engine and coast to your destination. This dramatically reduces engine noise and can allow you to approach targets undetected. Bear in mind that the roll of your car trundling along on coast will make noise, but nowhere near as loud as with the engine on. Plan your routes to use downhill terrain where you can coast longer distances. Park vehicles well away from your actual objectives to mask your true destination and approach direction. — Radio Comms Talking in prox. chat is obviously going to give you away, but bear in mind that when you talk on your team / squad radio, your character will also talk in prox. chat as you would expect to happen in real life. Totally silent faction / squad chat is achievable by using the text chat function on PC, to get messages to your team with your character model remaining completely silent. Just make sure you're not typing into global chat! — Why Rats Get Seen Despite following the principles of cover and concealment Rats are often still seen and exterminated in the wild. This is because Rats misunderstand concealment. Staying hidden relies on you applying the principles we have covered in this section in combination with understand how your enemy will see you. Visual detection is the primary threat to solo operators. The enemy does not need to see your entire body or gear, they only need to spot one small thing that does not belong. A shape that breaks a natural pattern, a shadow where none should fall, a flick of movement in the stillness. Some things to consider: The human brain is an expert in pattern recognition. It knows what to expect on maps like Everon. Empty buildings. Abandoned vehicles. Deserted roads. When everything should be lifeless, any sign of movement or presence triggers immediate attention. This is why a helmet edge in a window draws your eye from hundreds of meters away. It violates the expected pattern. Choose positions that match the context of the environment you are in. Movement discipline. Do not move without having a reason to move and a plan of where you are going and what you will do if you are suddenly compromised. Motion invites observation and creates noise, the human eye is naturally attracted to movement and gamers finely tuned to the sound of footsteps. Avoid moving your entire body by just moving your head using freelook. If you have to move, continue using cover and concealment, crossing open ground must be avoided unless you have literally no other choice. If you must walk across open ground, time it well, move as quickly as you can and try to use 'dead ground', which is an area of terrain where natural dips folds or obstacles obscure enemy sight of you. Movement is your greatest enemy. The human eye glosses over static shapes but locks onto motion instantly. You can remain invisible at 50 meters until you shift position, then get spotted at 300. This creates the Rat's dilemma: movement is necessary for mission success but deadly for concealment. Time your movements, plan your escape vector, movement discipline is key to your success. Shadows conceal, but they also betray. You can third-person peak from behind the corner of a house all you want. Just remember, if the sun is in the right position, your long shadow on the ground is giving you away and the enemy is looking to flank you. Be wary of the changing light conditions and how they affect your concealment. — Hides / Ratholes / Fighting Positions A hide is a static position from which the Rat will observe from, engage from if necessary, and fall back to to survive. A hide is a deliberate spot selected by you in your area of operations, and the use of such pre-determined hides can be a key element to remaining undetected or surviving if compromised. When selecting a hide, even a temporary one you only intend to use for a few moments or minutes — you must briefly consider the following factors. Selection Standards — The ideal hide provides a clear field of fire, while wherever possible denying the enemy a clean shot back. A second floor window overlooking a crossroads allows engagement while the walls offer protection, for example. A hillside position looking down into an exposed piece of road is an ideal hide and position to set up an ambush. Escape Planning — You need to know how you are going to escape your position if you are pushed by the enemy, remember, Rats are cowards and do not go down in blazes of glory if they can help it. Do not allow yourself to be cornered. When picking a hide you need to briefly think 'What am I going to do and where am I going to go, if this position is compromised?' A good hide has two avenues of escape dependent on the direction you need to go, you should have identified these routes when entering the hide for the first time. MOVEMENT Movement is survival, but careless movement is suicide. Every journey across the battlefield demands careful consideration of terrain, timing, and threat level. Watch any typical player, and you'll see them sprint straight from spawn to objective, only to catch a round in the head as they cross the final open field. Ten minutes of running ended in two seconds of poor decision-making. This is what happens when players move without thinking. Smart movement follows a simple framework: plan your route as a series of waypoints, not a straight line. At each waypoint, execute the SLL protocol: Stop, Look, Listen. Take 10–30 seconds to scan your surroundings and listen for movement before continuing. This brief pause creates the reactionary gap that keeps you alive when contact happens. Once you start putting this into practice, you will be able to count up the number of times that SLL has allowed you to notice the enemy, get ready for them and win any engagement. You will find that plenty of players do indeed run aimlessly and pretty much in a straight line to where they are going a lot of the time, it makes them easy to pick off. Simply stopping to listen and observe, even if ordinarily you have no cause for concern and continue onwards, will save your life countless times. You also get the added benefit that in ARMA, that gap will allow your stamina to build back up, so if you do need to fire your sights are a lot steadier than someone who has just been sprinting. Route selection matters more than speed. Choose paths through low ground, vegetation, and broken terrain. Hills and ridge-lines might offer great views, but they also silhouette you against the sky, making you visible to every sniper or player within a kilometre. That open field might save you two minutes of walking, but is two minutes worth re-spawning and starting over? Its a question you have to ask yourself. When you're conducting Rat operations that take you 10+ minutes just to infill to where you need to be, the answer is obviously no. Your movement should match the tactical situation: If Enemy Contact Is:Move By:NOT LIKELYWalking / Running / DrivingPOSSIBLEWalking / Running, with frequent Stop / Look / Listen pauses Note: If driving, a legitimate strategy is to just barrel through as fast as you can and hope for the best, it will work more than you think.EXPECTEDDO NOT DRIVE! Walking only, maximum Stop / Look / Listen discipline. Movement without purpose gets you killed. Take the extra minute to move smart. The player who rushes blindly into contact rarely survives long enough to learn from their mistakes. — Moving From Cover Once you've been firing from a position, assume the enemy knows your location and is waiting for your head to pop up again. This is when most players die — trying to re-engage from a compromised position. Never stand up where you went down. Instead, crouch or roll several metres to either side before coming up. The enemy's crosshairs are on your last position. Make them adjust. That split-second of confusion might save your life and cost them theirs. When you must cross open ground, use what soldiers call the “3-5 second rush”. Most players need 2–3 seconds to acquire a moving target, adjust their aim, and fire accurately. By limiting your exposure to 5 seconds maximum, you stay inside their reaction window. Pick your next cover point before you move. When you break from cover, sprint full speed for 3–5 seconds, then hit the dirt. Don't stop because the timer says so — stop when you reach cover. The key is unpredictability. Never establish a pattern. Sometimes rush for 3 seconds, sometimes 5. Sometimes roll right, sometimes left. Keep them guessing. Remember: Rats survive by being where the enemy doesn't expect them. Every time you move, ask yourself: “Where would they expect me to go?” Then go somewhere else. URBAN MOVEMENT Arma Reforger features small urban environments where specialised combat principles apply. Success as a Rat in these zones demands unique skills. You'll need proficiency in urban movement, building entry techniques, room clearing, and selecting tactical positions. For the Rat, CQC in urban areas is viable but risky. CQC tactics are covered in the sections below. The odds nearly always favour defenders unless you are outnumbered. Every “hide” you create must have escape routes that you've genuinely considered beforehand. Without proper planning, you'll get flustered when pushed. A squad storming your position quickly transforms your hideout into a coffin. There are some tips to bear in mind when transiting through or engaging in operations in urban areas, which if you bear in mind, will likely save your life on multiple occasions. — Avoid Open Areas Open areas such as streets, alleys, and parks should be avoided. They are natural kill zones for enemy shooters and snipers. Consider that every window facing your direction could have someone behind it, and you will see why open urban environments are so dangerous. Cross these spaces only when necessary, using smoke grenades if you know someone has a bead on you and / or the 3-5 second rush technique for protection. The optimal path through urban environments is via rear gardens and property backsides. These routes offer plentiful cover and significantly reduce enemy visibility. Whenever possible, navigate behind buildings rather than between them. Stay off the streets. Below is an example of a good and bad path, the bad path is much much quicker of course. The bad path also leads you down streets, down areas most likely to have enemies appear, and also puts you in front of countless windows behind which an enemy could be waiting.
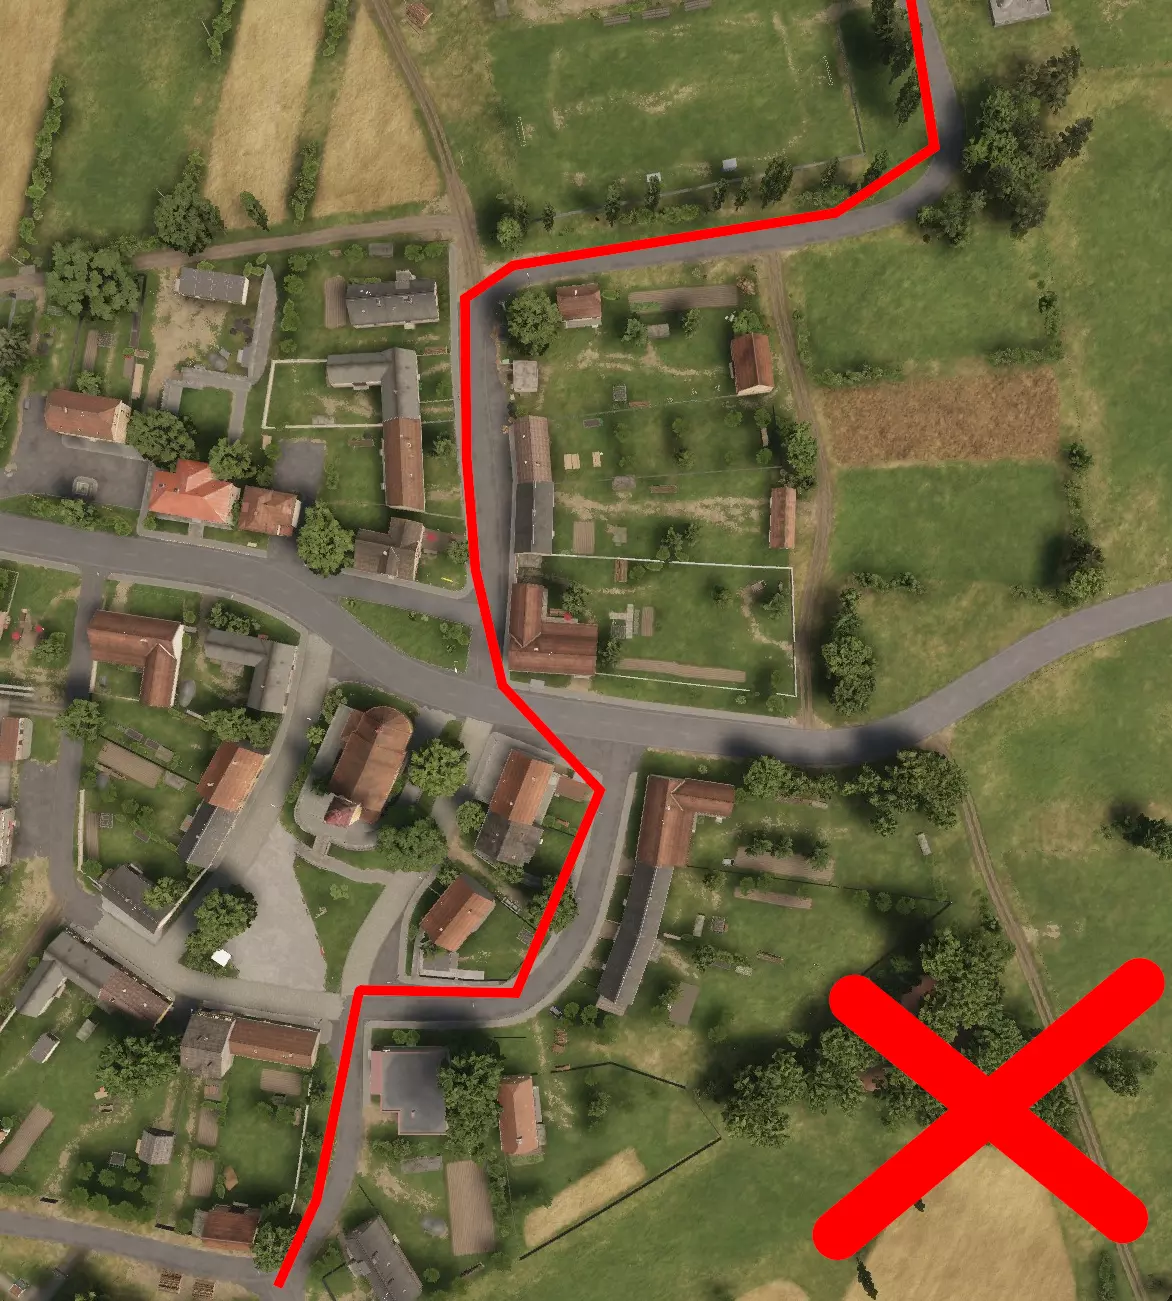

绿色路线会带你绕到房屋后方,你可以利用简易掩护,必要时还能从后门进入房屋。这里有树篱、树木、围栏和花园家具,能提供更多掩护和隐蔽。行进时要紧贴树木和隐蔽处,一旦被发现,你会有相对容易的逃生选择,而且在城镇内需要时,躲进房屋也最方便。没错,这条路线花费的时间更长,但如果你评估敌人存在的风险不为零,就应该慢慢来。 ——与建筑物平行移动 你可能无法总是将建筑物的后方或内部作为前进路线,有时可能被迫沿着街道在建筑物外侧行进。如果是这样,你应该沿着建筑物边缘平行移动。 然而,如果你明确知道敌人位于街道的某一侧,且无法通过对面建筑物后方的其他路线绕行,那么理想情况下,你根本不应该执行此机动。在有争议的城市区域进行街道层面的移动,对于单独行动的人员来说风险极高,应尽可能避免。 如果别无选择只能继续前进,你需要慎重决定使用道路的哪一侧。与直觉相反,你应该选择敌人可能所在的同一侧。这听起来似乎不对,但另一种选择是当你沿着对面的建筑物边缘潜行时,会给敌人提供一个清晰的目标。相反,直接移动到他们的窗户下方,你就能待在他们的盲区,并且(希望)不被发现。 尽可能待在阴影中,保持越低的轮廓越好,然后迅速移动到下一个位置。记住:这是最后的手段,与其他城市战斗尤其是近距离战斗一样,极有可能暴露或导致死亡。
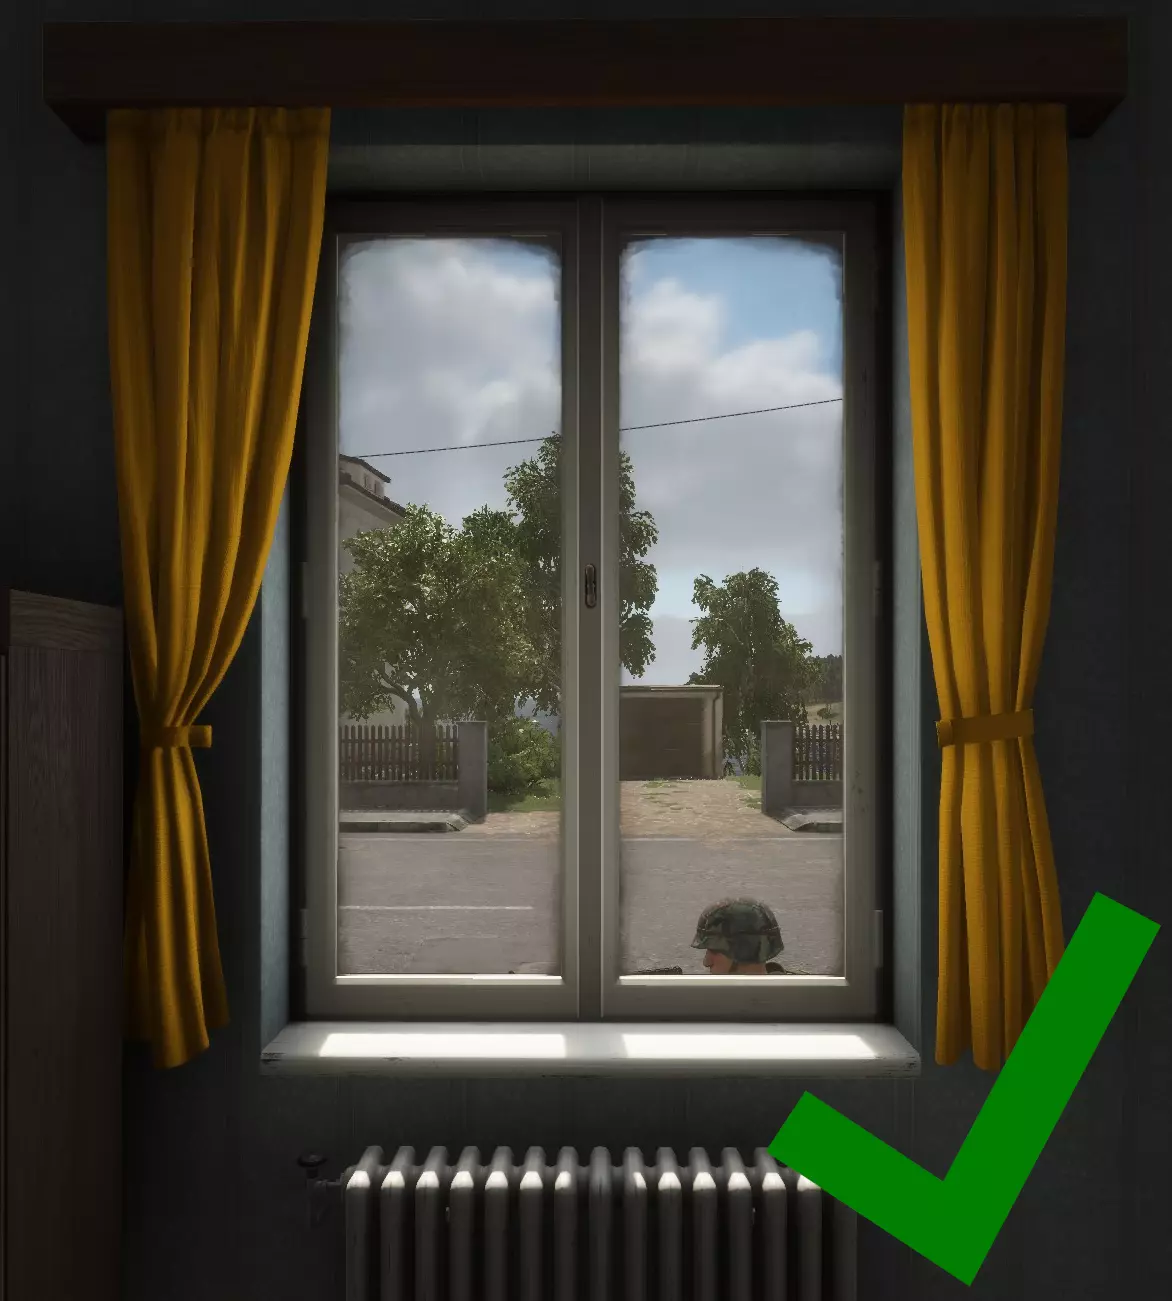
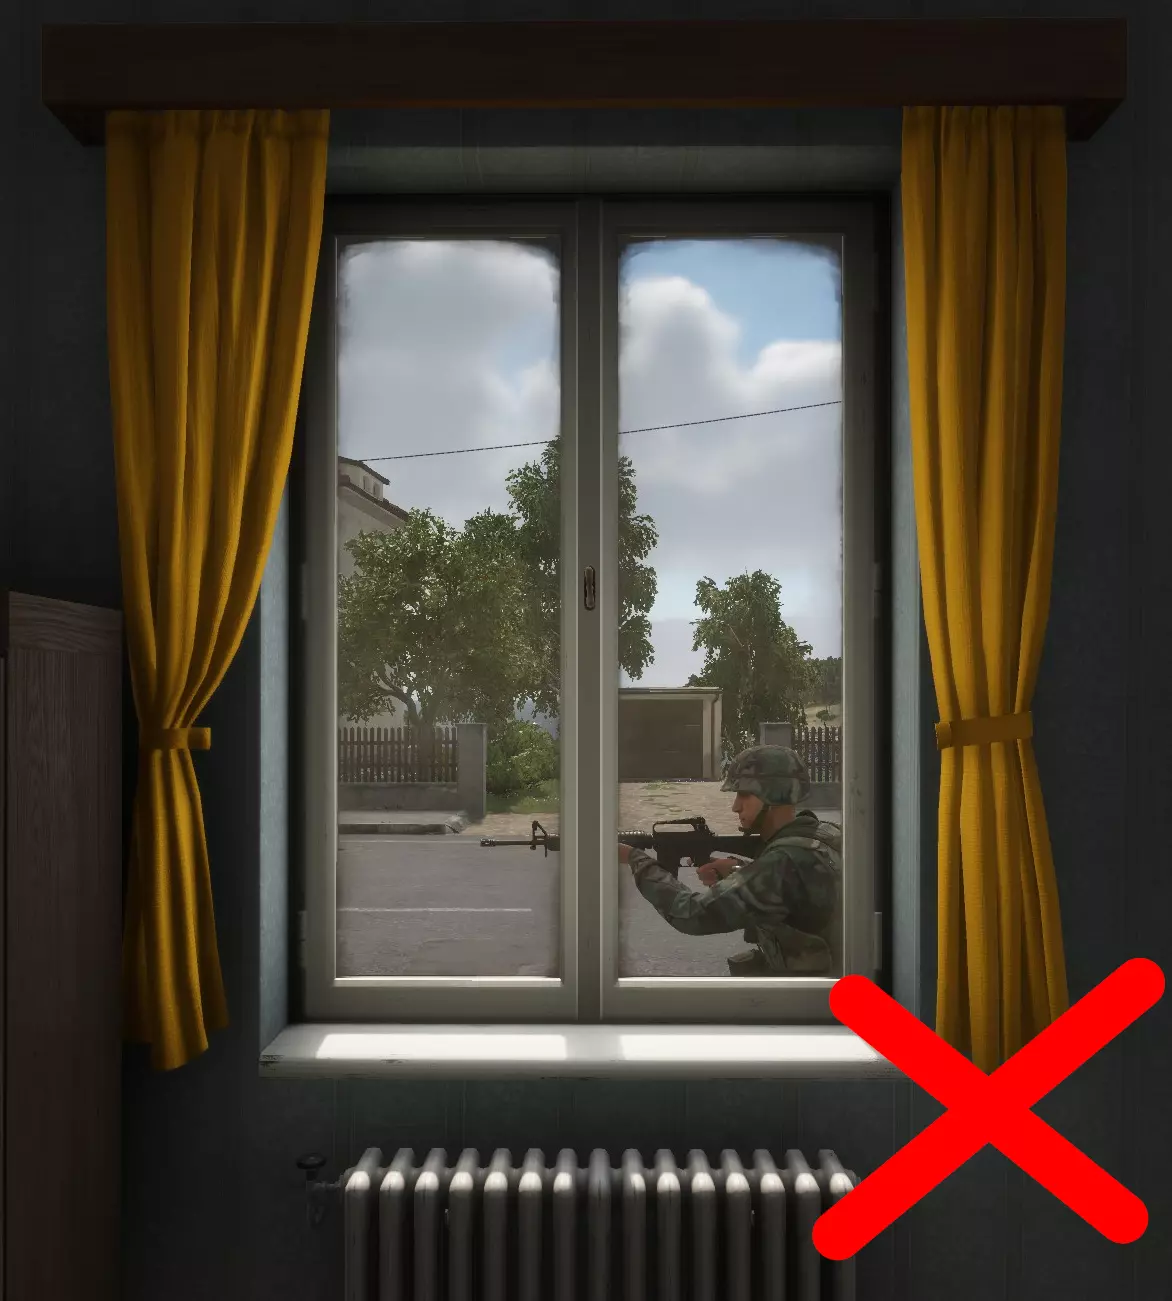
— 穿越窗户时 窗户是明显的危险区域,最常见的错误是在一楼窗户处将头部和胸部暴露给敌人。在可能的情况下,尽量靠近建筑物边缘并保持低姿可以减小你的轮廓。你可以通过蹲下轻松做到这一点,这样即使是蹲跑时,通常也能处于窗户水平线以下。
— 拐角移动 拐角是天然的瓶颈区域和伏击区。贸然进入拐角是致命的。新手最常犯的错误是在未清理拐角前,就将枪管或整个身体暴露在拐角处。如果敌人已瞄准等待,即使短暂暴露也会导致死亡。 不要过于靠近拐角。在大多数现代第一人称射击游戏中,过于贴近墙壁会使角色将武器举到非就绪位置。虽然走出时武器会迅速恢复就绪状态,但反应延迟可能会让你丧命。始终与墙壁保持一定距离,确保武器随时待命。 只要有可能,就应该采用“扇形搜索”清理拐角。“扇形排查”是一种有意识的区域清理技巧,操作方式是像切馅饼一样逐步、可控地调整视角角度。你无需大幅度摆动手臂离开拐角从而暴露自己,而是以大弧线移动,每次只暴露新区域的一小部分。这种方法能让你在保持自身暴露面积最小的同时,不断变换视野范围。如果操作得当,扇形排查拐角能让你在不过度暴露自身的情况下清理未知威胁。你的武器始终保持待发状态,移动也处于可控之中。 不过,如果你已经通过观察到的移动、听到的换弹声或其他能暴露敌人位置的迹象确定了敌人位置,那就不应该使用扇形排查,而应该对拐角进行预射击。
— 预瞄拐角 在本指南的下一部分,我们将讨论在近距离战斗中,主动出击如何赢得大多数交火。预瞄拐角或角度就是这种战术的典型例子。 预瞄指的是当你从掩体侧身而出时,开始向敌人所在的位置开火。当你暴露自己时,你已经在向敌人射击了。不言而喻,全自动武器非常适合这种技巧。 这是竞技射击游戏中的一项可靠技巧,预瞄结合敌人看到你到扣动扳机之间的反应延迟,再加上服务器/客户端延迟,能让你占据优势。如果操作正确,敌人在你进入其视野的瞬间就会被消灭。在他们看来,你一出现,他们就会莫名其妙地死亡。 如果你知道有敌人在等着你,那么在进入时提前开火是一个让等待的防守者陷入不利局面的好方法。 ——清理T型拐角 T型拐角是建筑物内外最危险的地形特征之一。在你暴露自己之前,你无法看到左右两边,而敌人可能已经瞄准好,在任意一侧埋伏着。 如果你知道有机会可以简单地避开这种情况,并移动到一个不会让你处于如此不利地位的位置,那么你就应该这样做。 大多数玩家会盲目地冲向一侧,并因此丧命。更聪明的玩家会逐渐观察两侧的弧线,依次只暴露每个区域的一小部分,如下所示:
这种方法能让你在完全投入前逐步清理两个角落。它不会让你刀枪不入,但能大幅降低遭遇静态伏击的几率。 当你到达决策点,必须踏入交叉路口时,不要贴墙。防守方几乎总会守住最近的边缘。相反,要远离墙壁划出一个大弧线,迫使敌人调整瞄准,为你争取反应间隙。这一瞬间可能决定战斗的胜负。 ——进入建筑 常规步兵战术建议,只要有可能,就避免通过门窗进入建筑,而是倾向于用爆破装置、破门炸药或坦克炮弹开辟新的入口。《武装突袭:Reforger》不会模拟此类结构性破坏,你只能通过尺寸合适的窗户攀爬或使用门进入。 这意味着你通常需要使用门,但这是个问题,因为防守方会在门后瞄准武器。 如果有可用且可进入的窗户,你应该优先选择窗户。大多数玩家会预料到从门进入。即使打破玻璃会发出声响,从窗户进入带来的出其不意也能给你带来关键的反应间隙。这个间隙通常足以消灭那些守着常规入口的敌人。 你的角色模型可以穿过任何足够宽的单块玻璃窗。许多窗户是中间有分隔的双扇窗,你无法穿过这类窗户,所以不要尝试。若情况允许,在进入前先投掷一枚手榴弹。爆炸会迫使防守方寻找掩护、离开射击位置、陷入混乱,甚至直接将其消灭。无论哪种情况,突击手都必须在爆炸后立即突入。任何延误都会丧失优势,导致你走进 kill zone 时被击中。 不要在入口处停留。移动、清理、消灭敌人。此时绝不能犹豫。当你与敌人身处狭窄空间时,便进入了近距离战斗…… 近距离战斗与城市近距离战斗 近距离战斗是突击手或任何士兵所能参与的最不稳定、最残酷且致命的战斗形式。近距离战斗不仅限于建筑物内。在茂密植被中与敌人意外遭遇会演变为近距离战斗,敌人从掩体后突然出现并在5米外向你射击也属于近距离战斗。任何反应时间缩短至毫秒级的交战都可被视为近距离战斗。以下原则适用于战斗距离缩短的任何情况,无论地形如何。 在现实战术中,近距离战斗被普遍认为是高风险的。在《武装突袭:Reforger》中,由于客户端/服务器延迟以及偶尔的同步问题,近距离战斗的危险性更是成倍增加。 正是由于这些原因,“老鼠”(Rat)的行动准则是:只在拥有绝对优势时才与敌人交战。只有当你确信自己处于绝对优势地位,敌人几乎没有生存机会时,才应刻意进入近距离战斗。你发动突袭,以压倒性的力量发起攻击。在这些时刻,“老鼠”将面临近距离战斗,无论是主动对敌人发起近距离战斗,还是被迫进入近距离战斗。“老鼠”必须摒弃犹豫,奉行压倒性的主动攻击原则。 ——主动攻击 主动攻击是赢得几乎所有战斗的关键。虽然潜行、躲避和欺骗是生存以及接近战斗的默认手段,但总会有“老鼠”必须直面战斗的时刻。当那一刻到来时,理想情况下应按照你的节奏进行,但无论如何,都必须以压倒性的力量、速度和决断力来执行。行动中的暴力是指突然运用突袭、攻击和控制手段来夺取主动权,并在敌人做出反应前将其消灭。这不是可选项,也没有商量的余地。在近距离战斗中,犹豫就等于死亡。 在近距离战斗中,胜利通常属于率先以决定性力量发起攻击的一方。“进攻方”和“防守方”的概念变得毫无意义,只有主动权才是关键。被突袭的防守方会和陷入埋伏的进攻方一样迅速死亡。如果无法预判危险,再好的位置也毫无意义。 近距离战斗的胜负通常在首次接触的瞬间就已决定。获得战术突袭、抢占先机的玩家几乎总能获胜。而这种优势可能在瞬间发生转变。露营玩家在敌人从意想不到的角度出现时会立即失去所有防御优势。激进的冲锋者在走进预瞄武器的瞄准范围时会成为受害者。然而矛盾的是,当攻击者移动速度快到防守者无法跟上并导致其第一枪打偏时,架枪防守的人反而会成为受害者。 OODA循环

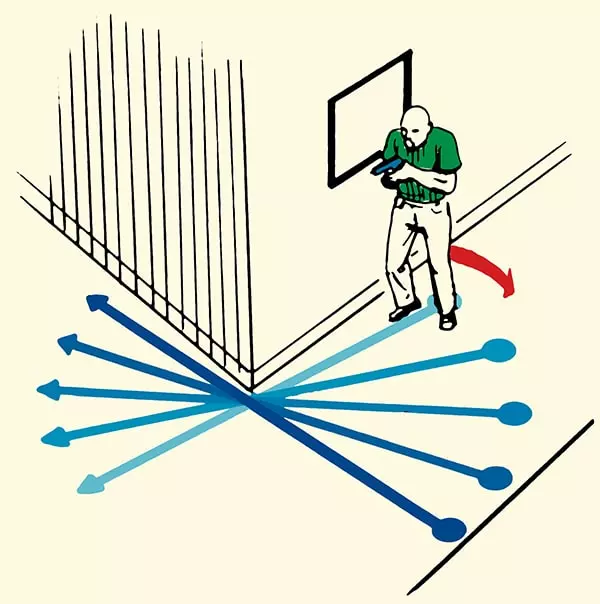
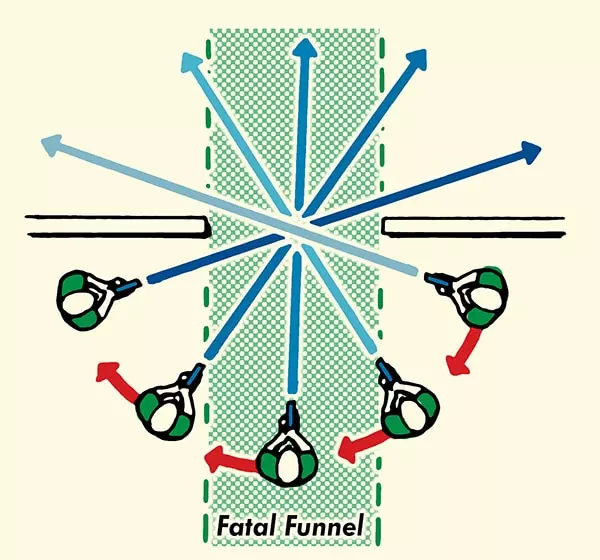
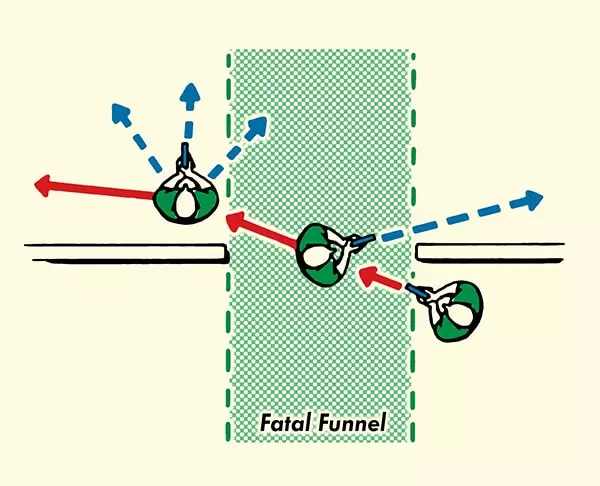
The OODA loop stands for Observe, Orient, Decide, Act. It is a framework to apply to how you think about combat engagements. Break down how you deal with an engagement in close quarters, play it in your mind in slow motion, and you will note that you and your enemy are spinning the OODA loop constantly. In CQC, both players race through this cycle in fractions of a second, but the one who completes it first gains the advantage. More critically, the player who disrupts their enemy's OODA loop while completing their own wins the fight. Violence of action gives you the upper hand because it breaks your enemy's thinking process. When you strike with speed and aggression, you force the enemy to restart their OODA loop from the beginning. They observe your attack, must reorient to your unexpected aggression and speed, struggle to decide under pressure, and act too late. By the time they complete their cycle, you're already into your second or third loop, adjusting fire, moving to better position, or finishing the kill. Have you ever been rushed when holding an angle in a building, missed all your shots as the attacker bore down on you and killed you while you struggled to even readjust your aim? That is violence of action in play. Your brain couldn't keep up with what was happening. This is why hesitation kills in CQC. Every pause extends your OODA loop. Every moment of indecision gives the enemy time to complete theirs. The Rat who acts decisively, even if imperfectly, forces the enemy into a reactive state they cannot escape. When CQC is initiated, whether by choice or circumstance, commit fully. Half-measures guarantee failure. Full automatic fire, aggressive movement, and overwhelming force create the chaos needed to survive. You must act faster than the enemy can process, creating sensory overload through multiple inputs, muzzle flash, incoming rounds and rapid movement that breaks their cognitive cycle. Initiative is everything. The moment you cede initiative through hesitation, poor positioning, or predictable movement, you become the victim. Seize it. Keep it. Use it. — Urban CQC - The House Always Wins Solo player or not, perfect technique or not, Urban CQC is a toss up between who wins and dies. You can execute movements perfectly and still die, this is the nature of urban CQC. As a result, for the solo operator especially, Urban CQC should not be voluntarily engaged in, unless you can be sure you are at an overwhelming advantage. Given that this is seldom the case, the best advice for your survival is to avoid Urban CQC entirely. Yes, run away. Take the random chance of urban CQC out of play by simply falling back, and keeping overwatch of the house you know an enemy is in instead, kill them when they come out to look around. Run out of your urban hide and take an escape route instead of staying to defend it. — The Solo Rat's Disadvantage Military doctrine almost universally approaches CQC as a team exercise. Standard infantry doctrine trains soldiers to clear rooms, enter buildings and use various types of grenades as part of a coordinated team. For the solo Rat, these tactics are simply suicidal. What military doctrine understands is that CQC favours the defender. Even elite level military units consider room clearing to be among the most dangerous operations possible. When military units conduct dynamic entries, they rely on overwhelming force, multiple simultaneous entry points and perfect coordination to overcome the defender's advantage. There's a reason you see them simply blow the entire building sky-high rather than enter it. As a solo operator, you possess none of the advantages a team would have clearing a building, you cannot split angles of fire, provide covering fire for yourself, attack from multiple directions or create sufficient violence of action. — When Should I Enter An Occupied Building Solo? Never. There are no scenarios where a solo Rat should voluntarily enter an occupied building, military doctrine supports this position. In warfare, isolated structures with known hostiles are typically contained, the enemy waited out inside, or the entire building is destroyed. You should never enter a building you know contains hostiles. If you suspect a building contains hostiles, assume it does. If you are already in a building and detect an enemy, extract immediately. — What If I'm Defending a Building? Get out. The instinct to defend your position is a trap, defending a fixed position without support, which will always be the case if you are Ratting, is a last resort. You will almost always die. When you choose to stay and defend, you go against the principles of Rat doctrine, namely: You become predictable. You limit your escape options. You allow the enemy to set the terms of engagement. You become vulnerable to grenades and squad entries. If they don't enter, they'll just wait for you to leave, then kill you. This is why you get out as soon as you can. A dead Rat isn't annoying anyone. Live to be a nuisance elsewhere. — I'm Going to Engage in Urban CQC Against Your Best Advice You're Doing It Anyway?Alright then. If you are going to engage in urban CQC despite the best of advice from Mr.Ratmeister himself, then fair enough. Despite its obvious disadvantages in terms of longevity of your character, it is fun and exhilarating to roll the dice in CQC. There are of course, even putting best practices into place, going to be various scenarios when despite best efforts you are forced into urban CQC. Examples include: A sniper is decimating your team and holed up in a building you are approaching. You have entered what you believe to be an empty building only to hear an enemy, your committed now and must deal with the situation. You're trying to escape and for whatever reason (usually because you are injured and need to heal or you will die) you are cornered in a building and now are forced to defend it. There's an enemy radio backpack within a building you need to sort out.It would be negligent of me as master Rat then not to show you the best practices on how to survive. Even military doctrine recognises that urban combat sometimes becomes unavoidable. What applies to conventional forces also applies to you as a lone Rat. The difference is that military units train extensively for these scenarios and operate with team support - luxuries you don't have. If you must engage in CQC, remember these principles: Intelligence gathering comes first - listen for movement and figure out to the best of your ability where in the building they are. Plan your entry and exit before committing. When possible, use grenades. Always pre-fire corners rather than just peeking if there is a chance the enemy is there. Move decisively - hesitation equals death. Accept that even perfect execution involves significant risk of extermination.The techniques in the following sections aren't making CQC safe - they're just making it slightly less suicidal. — How To Clear Doors Hallways and doors suck. Every doorway is a potential choke point, a bottleneck where defenders enjoy the greatest advantage. This zone is known as the fatal funnel, a narrow area in and immediately beyond the doorway where all incoming movement is focused and where defenders will distinctively aim. You want to be out of the fatal funnel if you can avoid it, depending on the layout of the building and the door itself. Pre-firing doors - Bullets penetrate doors and if you know or believe an enemy is or could be behind the door then you absolutely should be pre-firing the door by blasting through it at angles where you think a defender may be hiding. This gives you the element of surprise and there is every chance you kill the defender or force them to have to bandage themselves, giving you the drop. The Rat must consider every doorway as a know hazard. After pre-firing the door they now have to open it - the picture below advises on the best practice of opening the door:
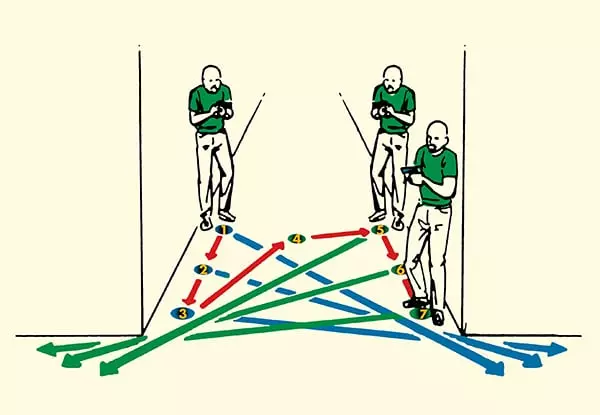
就像现实生活中一样,《武装突袭:Reforger》允许你像图片中所示那样侧着开门。根据门的类型和走廊情况,负责开门的队员(Rat)应立即退后,为后续队员进入房间进行切角观察(有系统地将房间的小部分区域纳入视野的方法)腾出空间。理想情况下,在对房间进行切角观察时,你应在保持能看到房间内部的同时,尽可能远离门口,以减少自己在防守者眼中的暴露面积。进行此操作时不要蹲下,防守者很可能瞄准你的躯干,蹲下会使你的面部直接进入对方的瞄准画面。 ——切角观察 门打开后,你需要在不进入房间的情况下,分小区域清理房间内部,完成切角观察。理想情况是,突击手能够在不进入致命漏斗区域或被迫突入房间的情况下清理房间。突击手沿着门口的外侧弧线逐步移动,如以下所示,慢慢地一点一点地观察到房间更多的区域。
每一次横向移动都会展现室内新的“区域”,让你能够在目标发现你之前扫描角落并锁定目标。这种技巧让你有机会发现那些可能正守着某个角度但尚未察觉你接近的敌人。 使用这种方法时,最安全的方式是与门框保持一定距离,不要紧贴着门框。距离太近会限制你的视野范围,并增加武器穿模或因角落几何问题暴露位置的可能性。与门口至少保持一个身位的距离,以保持武器处于就绪状态并确保最大视野。 如果房间空间狭小、角度不佳或掩护有限,且通过区域扫描确认房间内安全,那么不要进入。占据已清理但毫无隐蔽性、无任何优势且会使你陷入危险的区域是没有战术价值的。 然而,如果你的视野无法覆盖所有区域,仍有角落未清理(例如因门向内开等原因),或者你已目视确认存在无法直接攻击的威胁,那么你必须采取以下行动之一: 1. 预先开火并以压倒性的行动突破。 2. 撤退并重新评估你的策略。 绝对不要“缓慢探查”最后一个角落,不要慢慢侧身进入未清理的区域。任何缓慢的动作或让敌方防守者有足够时间调整瞄准并将你击杀的行为都不可取。 你要么在清理区域,要么在突破。犹豫只会让你丧命。切角是你清理房间的首要步骤,尽量用它来避免近距离战斗,但门一旦打开,你就开始计时了。每一秒你站在通道里,都会增加你本已极高的死亡风险。 ——房间突入 大多数战术文献都假设清理房间需要不止一个人。有两个或更多突击手时,可以分工负责不同角度、控制不同区域并掩护突破点。然而,突击手往往需要独自行动。这意味着每次房间突入都是一场赌博,你将身体暴露在潜在的埋伏中,却没有后援掩护你的侧翼。独自突破房间是近距离战斗中最危险的行动,只有在切角已经观察到房间内部大部分情况后才能进行。房间突入始于外部区域肃清之后;当你从外部清除了所有可见的“扇形区域”后,就需要突入以清除任何剩余的盲点。这些盲点通常是门后的空间、深处的角落,或是任何因房间布局而被遮挡视线的地方。 门口本身,也就是我们之前提到的“死亡漏斗”,是你可能丧命的“杀戮区”。这里是防守方最可能瞄准的位置。你在那里停留的时间越长,死亡的几率就越高。一旦决定突入房间,你必须立即、迅速且果断地行动。
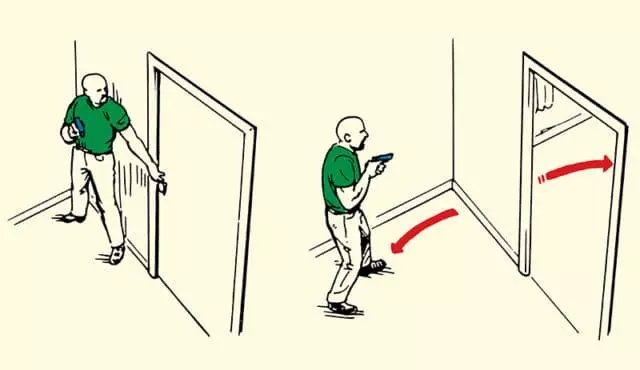
如图所示,老鼠会选择一个能主动避开最可能出现威胁位置的进入路线。这通常意味着以倾斜角度进入,大幅偏离门框,同时瞄准未清理的角落。向你正在清理的房间内开启的门后可能藏有敌人。如果你已经清理了房间的其他区域,这通常是最后的盲点,也是你必须首先处理的地方。 进入房间后,移动时要快速转身覆盖各个角度。除非房间已确认安全,否则不要在室内停留,在这种情况下,移动是有效的防御手段。犹豫和拖延会给等待的防御者调整瞄准的时间。 一旦房间清理完毕,立即离开并前往下一个房间。 — 走廊 走廊就是一个非常大的死亡漏斗。永远不要站在中间,因为这会让你暴露在来自多个角度的火力之下。紧贴门所在位置的墙壁,以最小化你的轮廓和暴露面积。 在走廊中移动时,要留意每个可能隐藏敌人的门口和开口。你经过的每扇门都可能是潜在的伏击点,走过的每一米走廊都会增加你被发现的风险。 军事室内近距离战斗训练强调正确的走廊移动技巧是有原因的——它们是城市战斗中最危险的环境之一。如果被迫穿过走廊: 1. 前进前清理走廊的每个区域。 2. 背靠你所跟随的墙壁。 3. 尽量减少在十字路口和T型路口的停留时间。 ——清理楼梯 楼梯也非常糟糕。楼梯和其他近身格斗移动一样,对“老鼠”(Rat)来说是极其危险的地方——如果建筑物内可能有防守者,且他们可能正在防守楼梯的话。楼梯是垂直的通道,没有任何掩护,移动选择有限,上下楼梯的任何动作都非常容易预测。
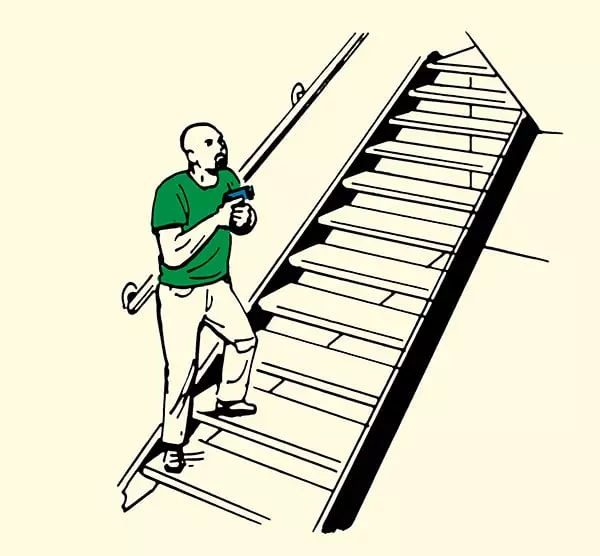
在小队战术中,楼梯区域需要通过小型掩护跃进和交叉火力来应对。但对于孤身一人的玩家来说,这些战术都用不上。你要么像大多数玩家那样慢慢向上爬,结果头盔刚一进入视野就被击倒,要么就直接冲上去。 正确的方法是先对楼梯底部进行扇形搜索,检查是否有人站在第一个平台(如果有的话),然后再冲上去。在有敌人防守的楼梯处,果断行动是必要的,这是你在本就渺茫的生存机会中唯一的希望。我再次强调,如果可能的话,你应该避免去清理有人占据的建筑。你要快速冲楼梯,因为防守方很可能正架着枪,等你靠近时你的头就会进入他们的瞄准镜。防守方就指望你慢慢摸上来,然后一枪爆掉你这个【老鼠】的头。所以你要反其道而行之,直接冲上去。 冲上去可以打乱他们的瞄准视野,破坏他们的OODA循环(观察-调整-决策-行动循环),迫使他们在你冲向他们时调整准星。而就在这个反应间隙,不是你死就是我亡。 结论:一旦你清理完一栋建筑,尤其是在里面交火过,就必须离开。你在里面开枪的那一刻,就算干掉了敌人,他们的队友也知道你在哪,并且会来复仇。你需要快速搜刮,立即撤离,最好从和进入时不同的出口离开。老鼠战术与策略 虽然野外生存技巧、移动方式和近距离战斗原则能帮助你战斗并存活,但“老鼠玩法”的核心在于你所运用的战术决策。作为单独行动的玩家,正确使用战术对于在任何战斗中存活至关重要,尤其是在人数处于劣势时——这是“老鼠”经常面临的情况。 — 装备配置 自从本指南发布以来,有不少人询问具体的装备配置。你偏好的装备配置取决于个人的游戏风格、喜好以及你的“老鼠式”任务目标。 进行“老鼠玩法”时,你应遵循以下原则: - 窃取你需要的一切,因此不要携带昂贵的装备配置。 - 消音器是必备物品,用于搜刮或在达到等级后添加到你的装备配置中。- 俄罗斯手雷在投掷时会发出声响,从而暴露你的位置,而美国手雷则几乎无声。 - 高风险的单人行动意味着你不应携带昂贵的装备,否则当你阵亡时,对团队的损害将大于帮助。 - 我是否提到过你不应携带昂贵的装备? - 尽量保持轻装,只携带必需品,其他物品都通过搜刮获取。 - 装备重量保持在40公斤以下,这样你才能快速奔跑。 - 不要带背包(唯一的例外是如果我从俄罗斯人那里缴获了火箭筒和他们的背包),因为背包太重,而且如果我用背包装满装备,就会消耗太多补给。 - 你想要火箭弹吗?俄罗斯人被击杀时总会掉落很多,直接捡取即可。 不过,我会向你展示我的常用装备: 美国1. 基础鼠式装备
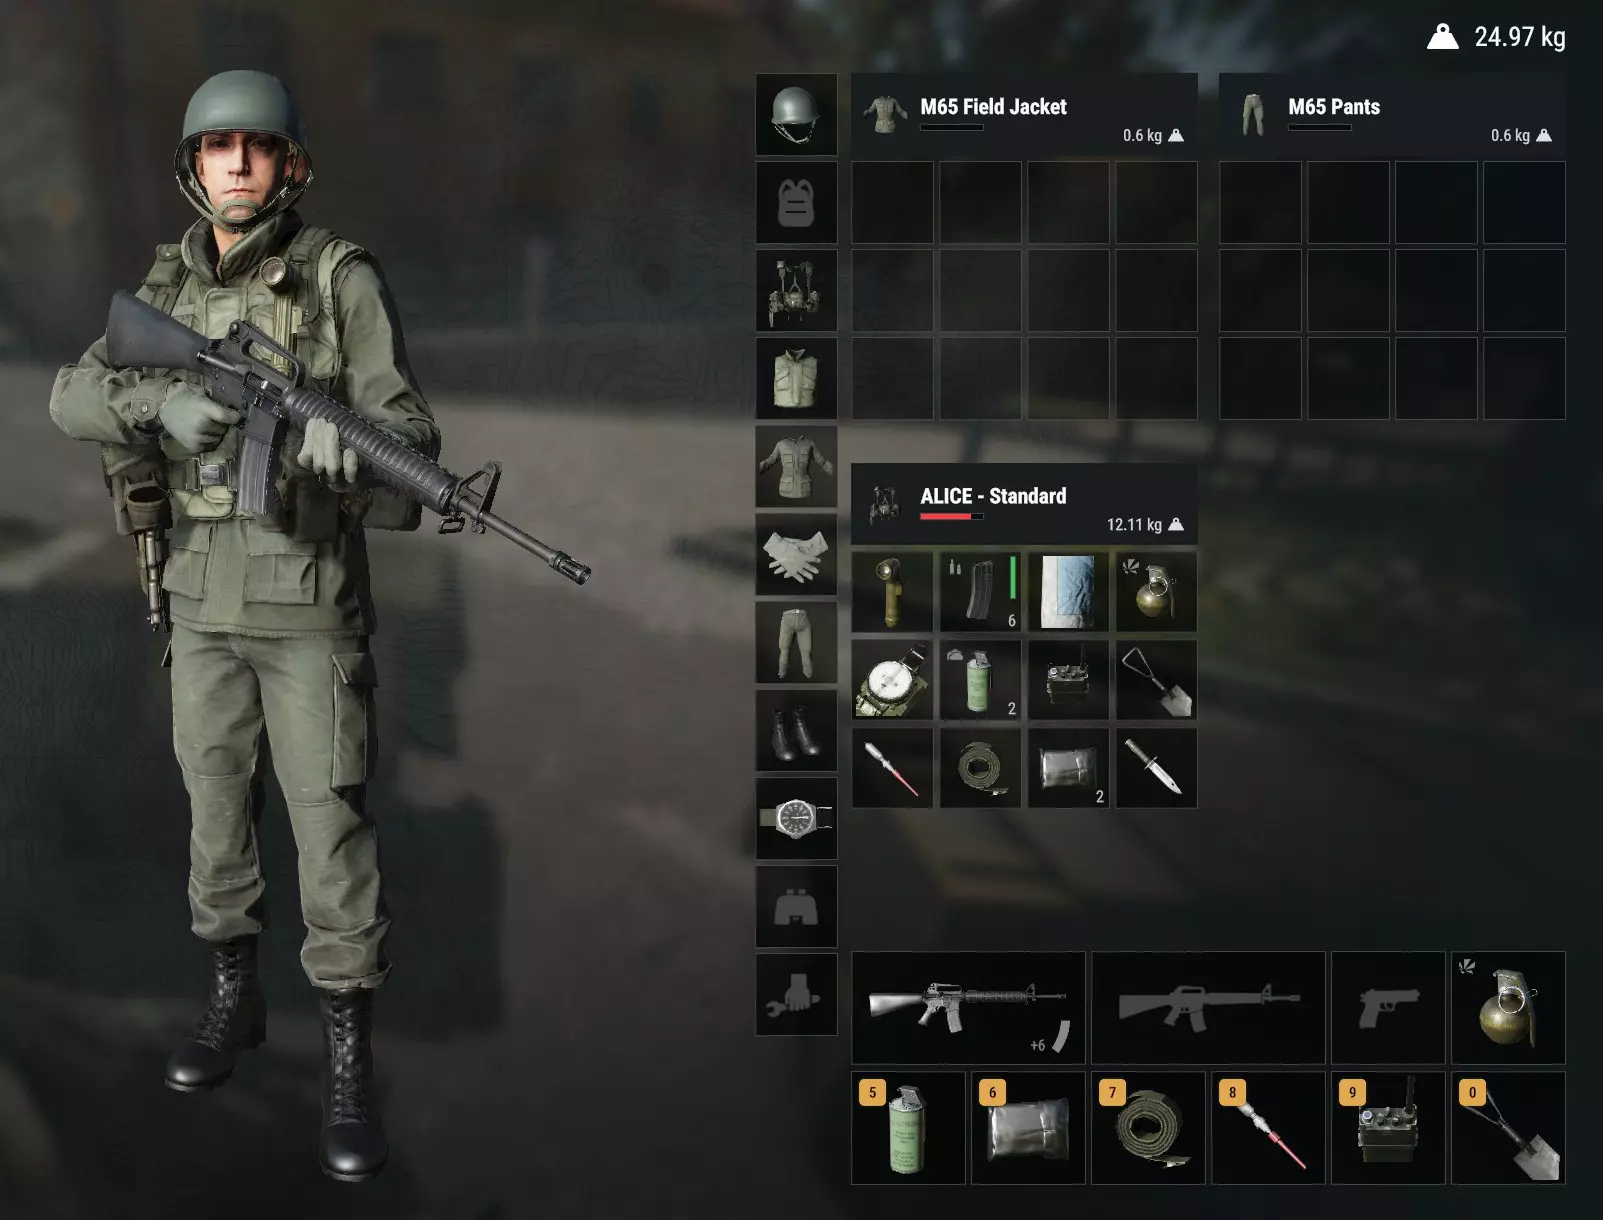
要轻松做到这一点,把你上衣和裤子里的所有东西都拖到背心(vest)里,然后换上纯绿色的衣服和头盔。 为什么呢?土绿色和环境融合得很好,而且你看起来还隐约像个俄罗斯士兵。大多数玩家识别敌人的关键是头盔形状。如果你用不同的颜色和头盔形状来干扰这一点,就能在开始交火前为自己争取到迷惑敌人的时间。从远处看,你甚至可能被误认为是俄罗斯人。对我来说,这无疑比经典的迷彩和头盔组合延长了从识别到首次射击的时间。 1.5 基础老鼠——间谍版
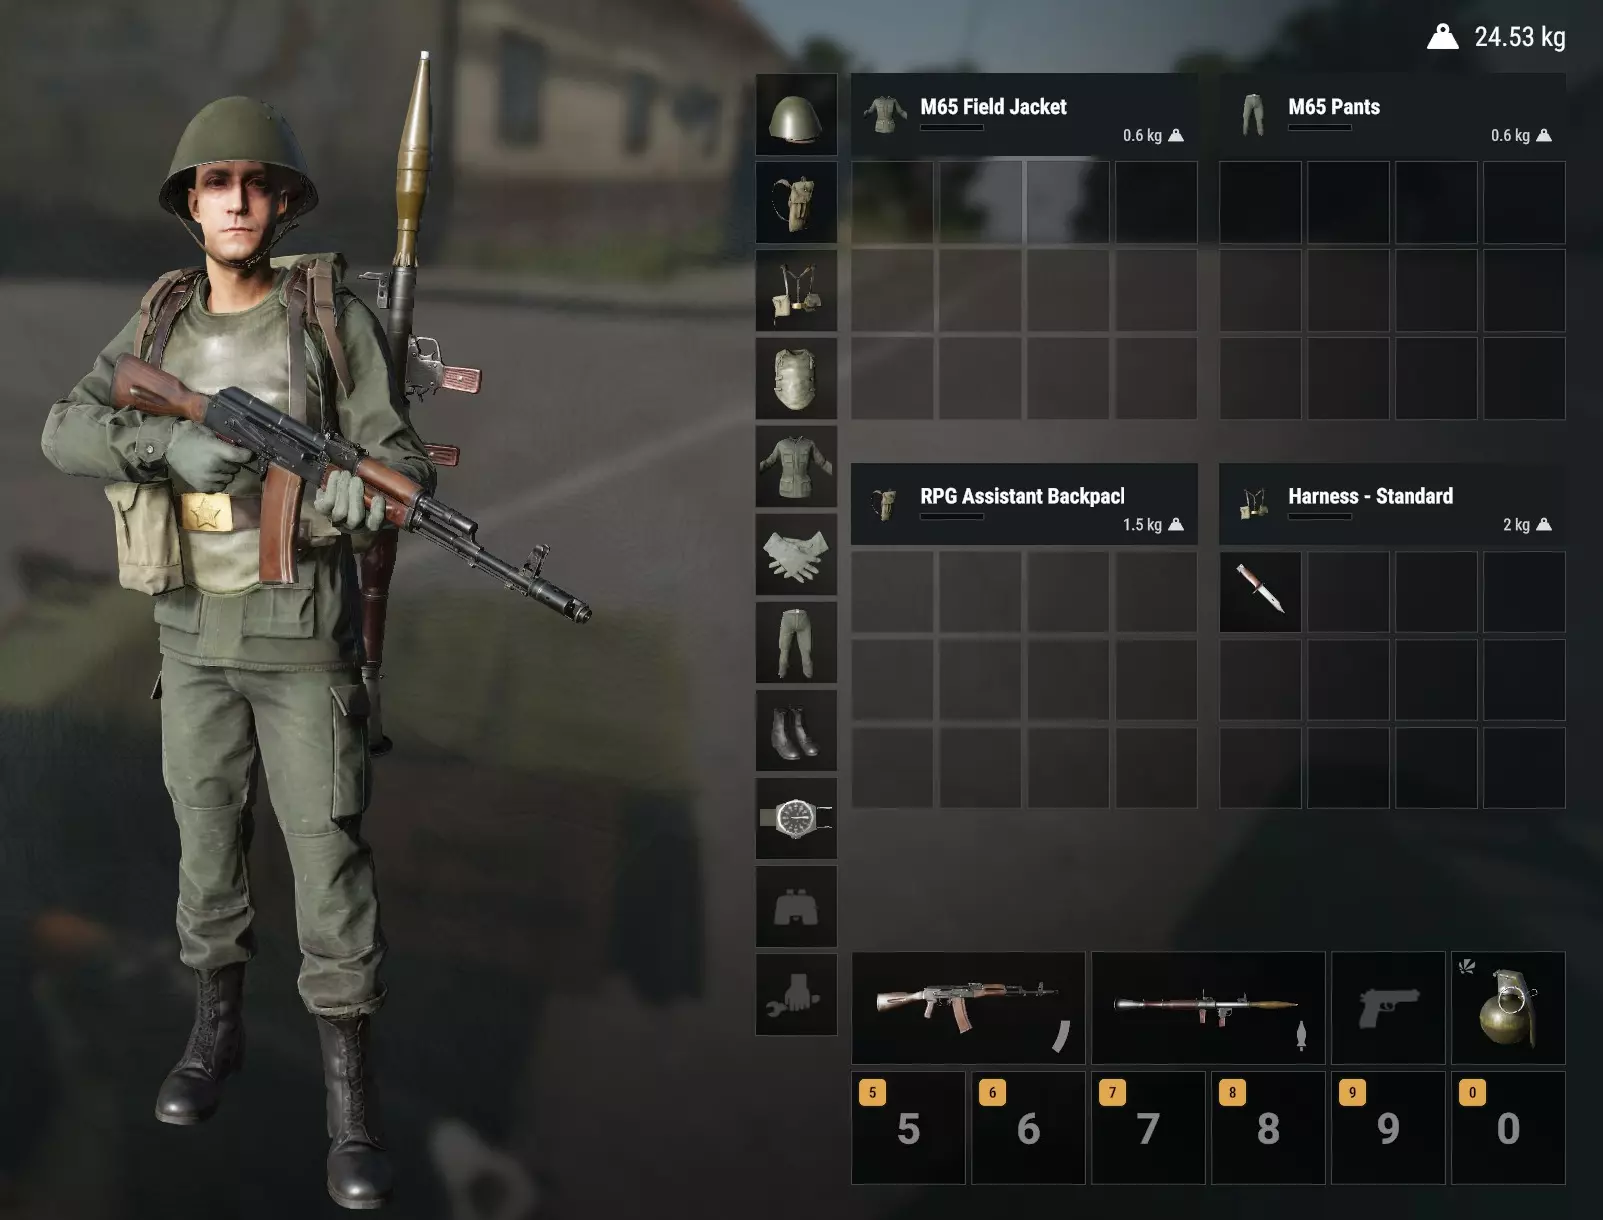
You can dress exactly this amount of Russian before you trigger the penalties implemented in 1.3. Yes, you can carry a Russian main weapon, body armor, helmet, harness and even boots and still be awarded XP. Once you take off the green trousers or top though, you will be marked as a spy and deducted XP for enemy kills, so this is the upper limit. As you can see, this is very confusing, and while the basic Russian beige is missing, it is enough to make players second-guess themselves in CQC where you have the upper hand. You will also encounter plenty of times when you are mistaken for an actual Russian, until they realize you don't have a name tag. I tend to play largely USA but in a complete crisis of identity, I really do prefer Russian weapons (when low rank, the M16 Carbine is great at higher ranks). They also give you a sound camouflage advantage in that behind enemy lines, an AK47 does not trigger the senses as much as an M16. General USA Loadout Tips Grenade launchers are nice but VERY EXPENSIVE on supplies. You can absolutely ruin your team's game by filling up your loadout, so I don't tend to equip them at all and will pick them up from those who no longer need them. Generally speaking, as a rat you spawn with bare minimums and steal everything you can. I tend to rank up to a suppressor and add that, but keep everything else default (except for clothing). I will generally hunt Russian infantry until I have rank to play the M16 carbine + suppressor as part of my loadout. - USA 4X Optics are extremely good and well worth using in single-fire mode. - USA Red dot is good but I am used to iron sights. - The LAW which is the USA AT launcher is one and done, so you can't carry ammo like the RPG. I don't tend to use it and will scavenge it (or an RPG) if I want one for my mission. — Trigger Discipline The vast majority of players will shoot the moment they see a target. Rats do not. Trigger discipline is the conscious decision to delay an engagement until conditions overwhelmingly favour you. It's the difference between reaction and control, between a hasty death and tactical victory. Your first opportunity to fire is rarely your best one. You might have only a partial sight picture. The target could be outside effective range. Your weapon sway might be too heavy after sprinting. Their movement might be erratic. And critically - you might not yet know if they're alone. Firing your weapon sets in motion a chain of events from which there is no return. A single shot alerts the area. A second confirms your position. Within 60 seconds, enemies will either be returning fire or closing ground to flank you. Rats don't engage unless they're in a position of advantage. Before pulling the trigger, ask yourself: Can I drop this target cleanly with my first volley? Is my exfiltration route already planned? Will this engagement serve a broader tactical purpose? Do I have overwhelming advantage in this situation? If the answer to any of these is no, hold fire. It's better to let an enemy walk past than to start a fight you cannot finish. Remember: you're not here to collect kills - you're here to survive and disrupt. Dead Rats accomplish neither. — Dead Time Exploitation Most kills in Arma Reforger happen during direct engagements, 1 v 1. However, Rats do not seek fair fights. Ratting doctrine prioritises attacking from a position of overwhelming advantage. One of the most reliable ways to achieve that advantage is to exploit what is known as dead time. Dead time is any moment when an enemy’s awareness is reduced when they are standing still, focused on a task, or otherwise distracted. Common examples include: Checking the map after spawning or getting into a vehicle, or any time spent checking the map. Looting or purchasing gear at the arsenal or from bodies. Reloading. Sitting idle in a vehicle waiting for passengers. Holding defensive positions inside buildings or behind cover (camping). Stopping to spawn a vehicle or build things in the base. Healing with morphine or bandages. The most predictable of these behaviours is looting gear from bodies or purchasing from an arsenal. Dead time provides the opportunity to fire at a completely stationary, preoccupied target. A single well-placed shot in this moment is more effective than three fired at a moving or alert target. The delay in the enemy’s reaction also extends your survivability affording you precious seconds to relocate or prepare follow-up shots before they identify your position. If the shot is placed correctly, the engagement ends before the enemy can react. If the shot fails, the responsibility lies with entirely with the Rat. You will begin to recognise that dead time forms behavioural patterns. Players spawn, then move to the arsenal. They spawn vehicles, then sit to check the map. After battles, they return to loot gear. Your job as a Rat is to observe these rhythms and exploit them. You must time your engagement so that you strike when the enemy is least capable of responding and disappear before they recover. — Body Baiting Body baiting is the deliberate use of casualties or wounded players to lure others into a compromised position. It is a psychological and tactical trap that is a strand of predictive ambush. Rats may initiate this tactic in one of two ways: by injuring or killing a target while already holding overwatch on the position, or by moving into overwatch after noticing a casualty in an ideal position. In either case, the objective remains the same - force the enemy to expose themselves. Players in FPS games that allow looting struggle to resist the impulse to retrieve loot or assist injured teammates. Most will move toward a fallen comrade or enemy body without first assessing the situation and as a result put themselves into a position of huge vulnerability. Once a player begins looting, they are immobile and all it takes is a well placed shot to prevent any sort of direct confrontation in the first place. Body baiting punishes greed, loyalty and carelessness in equal measure. Use it when terrain and concealment favour your position and when there is a high likelihood of multiple contacts entering the kill zone. — Ambush An ambush is a surprise attack delivered from concealment or cover. For the Rat, it is not a platoon-level fire plan but a solo strike: sharp, brutal, and brief, over almost as soon as it begins. Because Rats operate alone, every ambush demands some foresight and discipline. Before firing a single round, the Rat must select a kill zone, choose a concealed vantage point with clear sight of that zone and a pre-planned escape route, and mentally rehearse the sequence: engage, disengage, vanish. The ambush has the following objectives: Eliminate. The primary objective is a clean kill that removes enemy combat power and denies them the chance to react. Strand. If elimination fails, the secondary goal is to disable or immobilise the enemy. Force them to dismount, walk, or burn a respawn ticket. Time lost to recovery or to have to stay and heal, delaying their onward mission, is a tactical victory. Frustrate. If neither kill nor stranding is possible, the tertiary objective is to annoy. A single wounding shot or forced delay burdens the enemy with caution and slows their mission as they spend time searching for you. Before committing to an ambush, the Rat must assess whether the action will influence the match as a whole. A perfect firing position is useless if the only targets are isolated players. Conversely, an ambush laid on a key reinforcement route or an exit of a key base can decisively alter momentum in the team's favour. Always ask: Will this make a difference? If the answer is no, find another mission. Planning an ambush requires two critical elements: a kill zone and a vantage point. The kill zone is the area through which the enemy must pass and where fire will be concentrated. An ideal kill zone is long enough to allow for multiple shots, follow-up fire, reloading, or weapon switching if necessary. Narrow kill zones demanding a single perfect shot are unacceptable. Contingencies must be considered. A wounded driver may stop; a dead driver may crash the vehicle. The vantage point must allow continued engagement during such events without exposing the Rat to return fire. If the kill zone or vantage point is suboptimal, the ambush must be abandoned. No Rat should gamble their life unless the odds are overwhelmingly in their favour. Proper ambush sites create conditions where enemy survival is unlikely and pursuit is impossible. Trigger discipline is incredibly important when ambushing. If ammunition is limited, conserve it. If you have just one RPG then maybe the jeep with one player in isn't the best target, wait for the BTR, the supply truck, or the jeep full of troops to target. Engage only when the primary target is inside the designated kill zone. Temptation to fire early must be resisted, the kill zone is where your advantaged and so firing outside that will prompt the enemy to flee and never entry your kill zone to begin with. Waiting until the enemy enters the kill zone maximises your tactical advantage and improves the likelihood of a clean kill. Maintain fire until the enemy is neutralised, stranded, or suppressed. The litmus test for disengagement is simple: if the enemy begins returning effective fire towards your position, you must withdraw. The moment rounds strike near your cover, the ambush has served its purpose. Remaining in place only increases the chance of being overrun. Unless the engagement has reduced to a clear one-on-one or a severely disadvantaged enemy position, break contact immediately. Move to secondary cover and begin evasion. Continued engagement is justified only if the enemy remains stranded, confused, and unaware of your new location. A Rat who plans, strikes, and escapes with precision eliminates resources, drains time, and frustrates the enemy team's efforts to win the game. — The False Retreat A natural extension of the ambush, and a key tactic in the Rat’s arsenal, is the false retreat. Rats will find themselves using this technique in almost every operation they undertake. The false retreat mirrors elements of conventional infantry contact-break drills, but the term is better suited to the solo operator. Where conventional forces withdraw under pressure, the Rat withdraws deliberately — baiting the enemy into yet another engagement where the Rat holds the advantage. In a false retreat, the Rat falls back from their original vantage point after firing, then establishes a secondary position with clear oversight of the site just abandoned. Understanding the impulsive nature of players in FPS environments — where wounded or angered enemies will rush forward seeking revenge — the Rat turns enemy aggression into a trap. As the enemy pushes into the original kill zone, the Rat, now concealed in a new overwatch position, engages them once again from surprise. The false retreat grants the Rat a second opportunity to eliminate targets who survived the initial strike. Pursuers are often disorganised, wounded, or overconfident — all advantages to the Rat lying in wait. When conducting a false retreat, the fallback position must offer concealment, overwatch of your recent vantage point which now becomes your new kill zone, and impose fresh disadvantages upon the enemy. The same principles apply as in the original ambush. If the enemy gains sight of your fallback position and begins delivering sustained, accurate fire, you must immediately disengage. A Rat does not hold ground against superior firepower. False retreats will often be dynamic and fluid. Often the second position will not be as strong as the first. If your new position is weak, maintain overwatch at distance. Be patient. Many enemies will eventually return to the scene of the original ambush to retrieve wounded comrades, to recover supplies, or simply to resume their mission. When they do, the Rat repeats the ambush process. Strike again. Kill again. It is also an option to do nothing and wait for them to leave, believing you have either given up or died, before setting up your original ambush on the next party coming through. — Shoot & Scoot As stated in the foreword, most published infantry doctrine focuses on team-based tactics. When you're part of a fire team or squad, you have access to a wide array of techniques involving suppression, bounding overwatch, and coordinated manoeuvre. Solo operators do not have that luxury. And if real-world doctrine exists for lone soldiers acting as Rats, it isn’t publicly available. So we adapt. Shoot and scoot is a concept borrowed from artillery doctrine: fire, displace, do not wait to assess results. For artillery, this prevents counter-battery fire. For the Rat, it prevents death. This is not an ambush. There is no intent to hold ground, confirm kills, or re-engage from the same position. You fire — ideally at an exposed target — then immediately relocate. Whether you kill, wound, or miss entirely is secondary. The goal is disruption. This tactic is ideal in several scenarios. First, when you do not hold a strong positional advantage and cannot risk taking return fire. Firing from a poor position and staying there is suicide. Firing and moving forces the enemy to respond while you are already gone. Second, it is especially effective when the intent is not elimination but confusion. Surprise fire from an unexpected direction forces squads to halt, reorganise, or retreat. Even one well-timed shot can derail their momentum and focus attention away from the objective. Third, shoot and scoot is one of the most viable solo tactics against armoured vehicles. A lone Rat cannot face armour in a stand-up fight. Even with an RPG, engaging once from cover may reveal your position. Scooting to a new angle and firing again keeps the vehicle off-balance, unsure of where the next shot will come from. Never engage armour from the same position twice. Use shoot and scoot to apply pressure while remaining survivable. Fire, displace, reset. The enemy will be watching your last known position while you’re already preparing the next shot. That delay is your advantage. Maintain initiative. Control the tempo. Stay mobile, and stay alive. Thanks for reading! This guide took many hours of reading - drafting and then formatting into this guide, I hope it is useful to you. This is just the beginning of this guide, I want to look to expand this and make it as comprehensive as possible. The next updates are planned and mentioned in the foreword, I hope if you have any ideas, you can pop them into the comments below! CHANGELOG & THANKS Changelog:5/5/25: - v1.0 - Released to Steam! - Edited ranks in the beginner's guide section to include all ranks as some were missing. - Re-drafted erroneous information regarding backpacks from the beginner's section. - Another sweep for spelling and grammar errors. - Finished the 'Rat Doctrine & Mindset' sections as the Steam character limit had cut off the ending sections. - Added a note to the gameplay basics highlighting that the section is for Vanilla servers only. 6/5/25: - Translated to French and released to Steam. - Translated to German and released to Steam 22/5/25: - Spelling mistake in CQC edited (Thank you turntojesus!) 2/9/25: - Added images to Moving Past Windows - Added images to and redrafted Silhouetting and Sky-lining to clearly show the issue. - Added images to Cover & Concealment, made concealment its own section. - Added images to and created cover section. - Collated images and concluded cover & concealment. - Updated the ‘hiding in bushes’ section to include wookieing with images on why the strat is so strong and due to be nerfed. - Re-drafted Actions as Concealment 13/9/25: - Foreword re-written.