换一换
换一换 


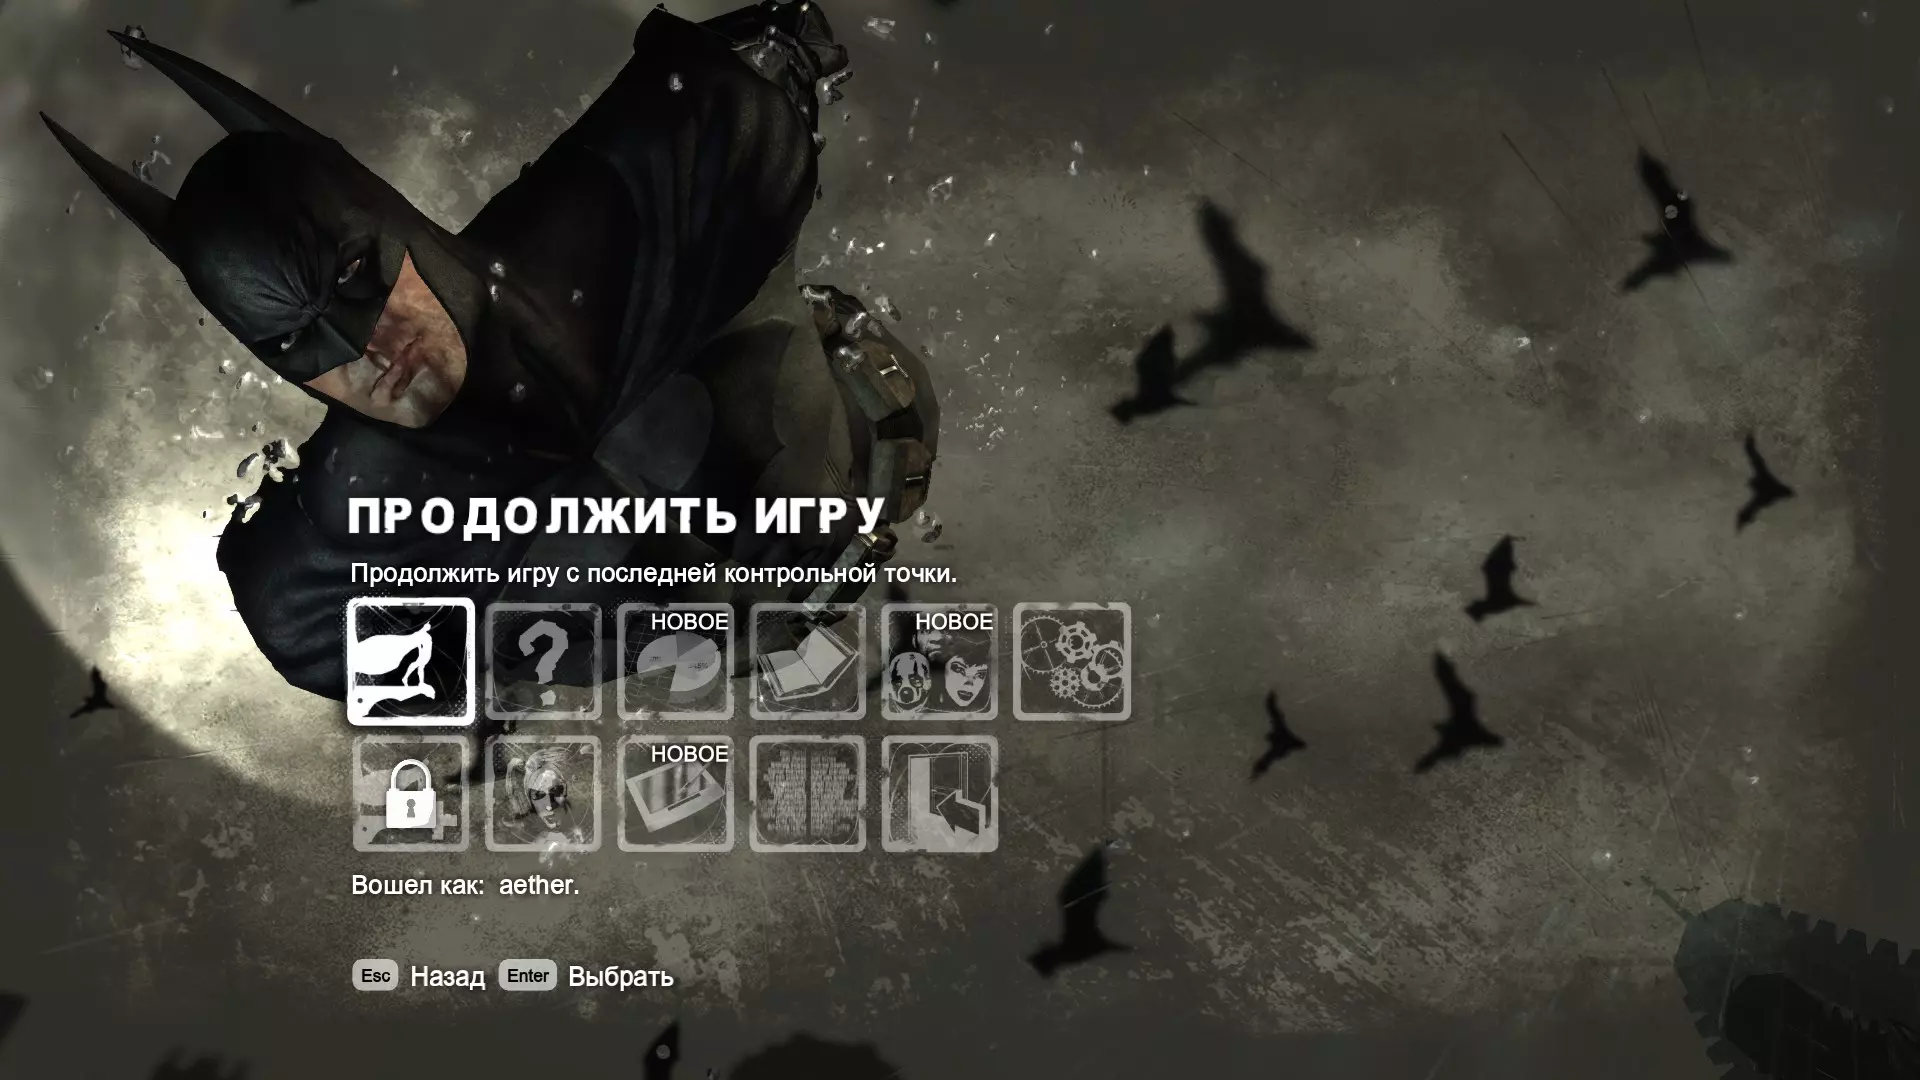
这是一份详尽的100%成就指南,包含从0到100%的逐步流程。如果你正在寻找特定的成就或收集品,可以使用Ctrl+F并在搜索栏中输入相关内容以获取更直接的帮助。 我会为我的所有指南提供支持和调试帮助。如果你有任何问题、遇到困难或发现指南中的错误,请随时留言,我会尽快回复你。祝你游戏愉快! 简介:
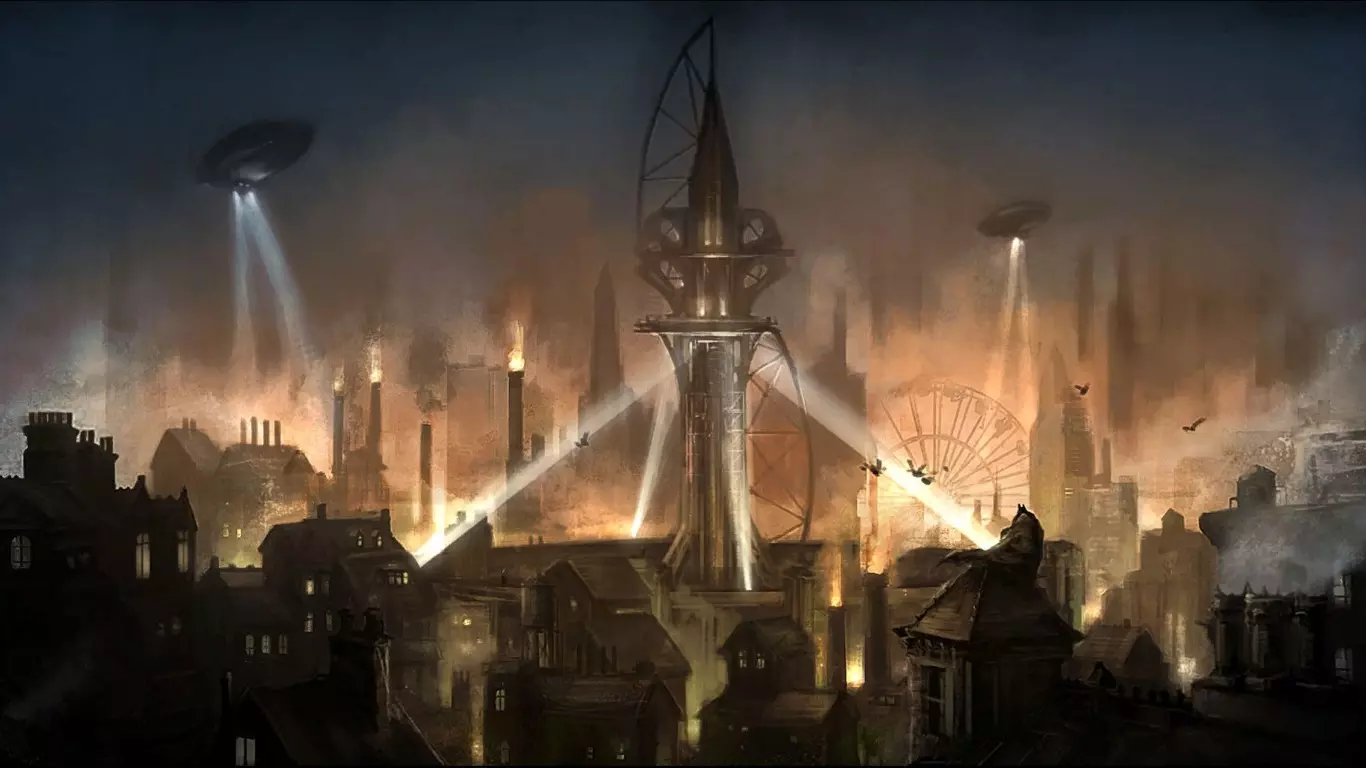
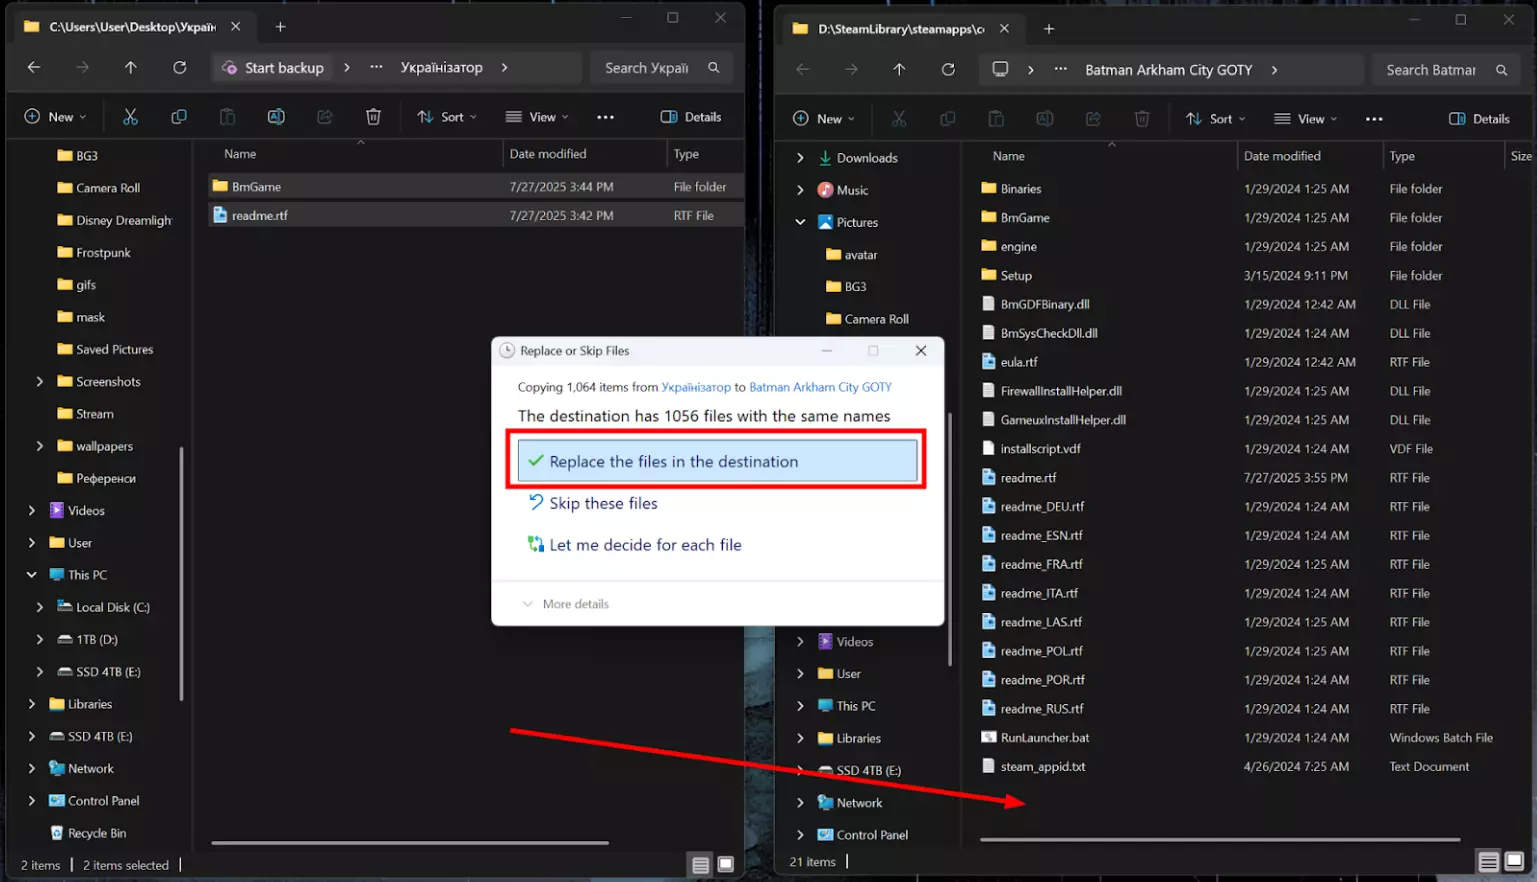
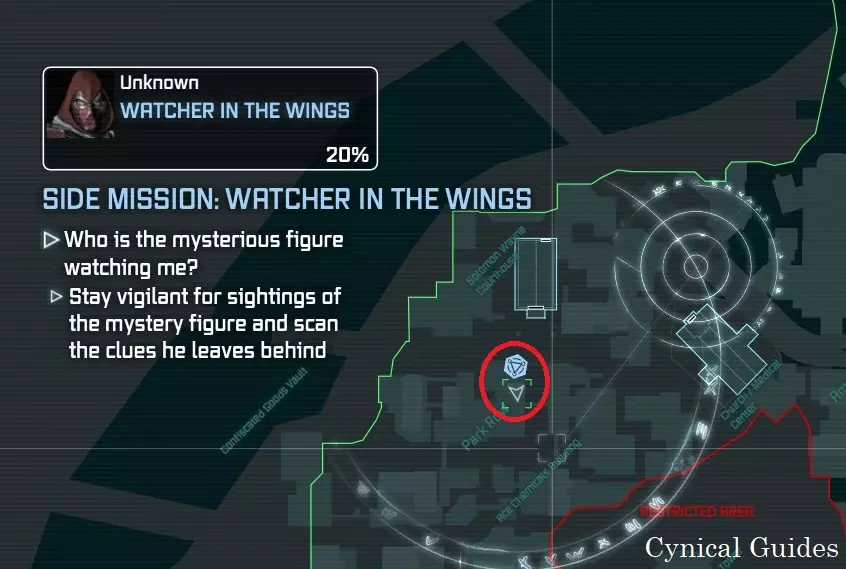
Achievement Breakdown: (44) Story Related: (16) Side Missions: (10) Collectibles: (7) Slay: (2) Miscellaneous: (2) Challenges: (7) DLC – Catwoman Bundle Pack: (6) Story Related: (3) Collectibles: (1) Challenges: (2) DLC – Robin Bundle Pack: (2) Challenges: (2) DLC – Nightwing Bundle Pack: (2) Challenges: (2) This is Part 2 of 2 for the 100% Achievement Guide: Batman Arkham City. Part 2 only covers NG+, Batman’s Physical Challenges, Harley Quinn’s Revenge DLC, & all levels of Riddler’s Revenge for the four playable Characters. Part 1, linked in the Conclusion of the guide, covers: our first playthrough & the locations of all 360 Riddler Collectibles as well as Catwoman’s DLC & its Collectibles/Challenges. Batman – Arkham City is going to a true test of your discipline & combat prowess; it is an extremely challenging 100%. For the Perfect Knight – Day Two Achievement, we will have to beat the game once on any Difficulty (Normal or Hard), beat NG+ on any Difficulty, beat all 12 Side Missions on BOTH the Base Game & NG+, as well as purchasing all Upgrades/Gadgets, finding all 400 of Riddler’s Collectibles, & beating all 72 Ranked Challenge Medals & 108 Campaign Challenge Medals of Batman’s difficult Riddler’s Revenge Challenges. Only the Side Missions need to be completed on both playthroughs; the Gadgets/Upgrades & Riddler Collectibles/Challenges, will remain completed & carry over into NG+ fortunately. The Harley Quinn’s Revenge DLC is a simple linear expansion where we get to play as Robin. For the most part, it is straight forward & relatively short. There are only 30 Collectibles across the DLC we have to worry about. Some of the combat related Achievements take a bit of set up but are not too difficult; they can also be unlocked during the Riddler’s Revenge Challenges if we play as Robin. If you played through Batman – Arkham Asylum, you will remember the brutal Combat & Predator Challenges we had to get 48 Medals in for the 100%. In Arkham City’s Riddler’s Revenge, we have to get 180 Medals in these kinds of Challenges. What is even worse… is that three of the DLCs add in Catwoman, Robin, & Nightwing as playable characters. We must also earn 180 Medals with each of these characters making 720 Medals total. Nightwing & Robin also have a few extra Challenges to boot; it is actually 744 Medals total. These 12 Achievements will seriously test your abilities & commitment as a gamer. For those interested, here is an organized list of all the Achievements/Secret Achievements. This is how I derive my Achievement Breakdowns & the first reference I create before I begin my 100% journeys. https://steamcommunity.com/sharedfiles/filedetails/?id=2773373426 Before You Play! – Game Stutter Fix!: Arkham City has an awful port to PC. No matter how good your PC is, when you are outside in Arkham City proper you will notice severe lag & drop in FPS; it is not as bad in doors. To fix this without mods you will need to go into your Save File settings & change some code around; this is not as hard as it sounds. First, go into the Computer Folder – Documents – WB Games – Batman Arkham City GOTY – BmGame – & Config. In the Config Folder, look for the Configuration Setting File called BmEngine; this will directly affect your Save File so be careful & only change what I list. In the BmEngine File, press Ctrl+H to bring up the Find Bar; this will allow us to search for things within the BmEngine File. Type poolsize into the “Find what” bar & select “Find Next” to where the Pool Size is located. Set the Pool Size to 4096 (this translates to 4gb & is safest if you are unsure what your VRAM is). Feel free to set it higher if you have more than 4gb of VRAM. The next step is to type sizeofpermanentobjectpool into the Find bar (if it says it could not find it, change the direction of the search to up instead of down so it searches above where we are located right now). Double the current value from 1160000000000 to 232000000000. Just change the first three numbers, leave all of the 0s. Lastly, we need to adjust the hysteresislimit & set it to 0. That is the last adjustment we need to do, but do not close out of BmEngine File just yet. Minimize the File, & right click it & bring up the File’s Properties. In Properties, set the Attributes to “Read-only”. If we close the File without doing this, all of our adjustments will not save; set it to read-only to hard save our changes so it will not reset when we close down the File. With that set, close the File & we can begin playing Arkham City as it was intended… don’t ask me why Rock Steady couldn’t Patch this themselves though… *Guide contains major spoilers. Sequence 1: NG+ 1. Main Story: Catwoman Episode 1 DLC, Bruce Wayne Held Hostage, Rescue Catwoman, Track Down Joker, The Steel Mill, Catwoman Episode 2 DLC, Finding the Cure 2. Side Missions: 1/12 3. Achievements: 38/64 ----------------------------------------------------------------------------------------------------- To unlock NG+ you must have beaten the game once already on Normal or Hard Difficulty. With the bulk of the game completed previously in NG, we can breeze through NG+ very quickly. All we need to do is beat all Main Story Missions, all 12 Side Missions once again, & make sure we have all 40 of Batman’s Physical Challenges completed (the ones we completed previously in NG will stay completed). Some things to note about NG+: 1. Enemies deal more damage & take more damage 2. Counter Icons are removed (making certain Boss fights a lot more challenging than they originally were in NG) 3. Harder enemies such as Shield Thugs, Armored Thugs, etc. are no longer Story Locked & will spawn at the very start of NG+ Park Row:Progress through Catwoman’s Episode 1, & the Prologue (if you have a good memory, you might be able to pick out Deadshot in Line A of the Arkham City Processing Center as we make our way through as Bruce Wayne…) Industrial District: Side Mission #1 – A.R. Training Basic 1-4: After we track down Joker at the Church, we will unlock the A.R. Training Side Mission. Head to the Waypoints & complete all four Gliding Challenges. Re-collect the Grapnel Boost to complete the first set of Challenges. 50% Complete Side Mission #1 – A.R. Training Advanced 5-8: With the Basic A.R. Training Missions complete we can now access the Advanced Training Missions. Go to the Waypoints, & complete the four Missions. Some of these can be pretty tricky; especially Advanced A.R. Training Mission #1. 100% Complete Amusement Mile: Side Mission #2 – Fragile Alliance 1: Head to the Krank Co. Toys building to initiate Bane’s Side Mission. Right off the bat, we can destroy the Titan Containers found in the Industrial District & in The Bowery. 30% Complete Park Row: Side Mission #3 – Acts of Violence 1: Head to the far West end of Park Row & we can find a hexagonal shape appearing on our World Map. Go to the Waypoint & rescue Jack Ryder from the Thugs. Speak with Ryder to initiate this Side Mission. Speaking with Ryan after he is rescued will now unlock instances of Political Prisoners needing to be saved from abusing Thugs. Once again, are 16 instances that we need to do to complete the Side Mission; they will randomly appear as we play the game. If possible, try keeping track of where you have already encountered an Act of Violence to save yourself backtracking at the end of the game; consult the event map for this Side Mission at the end of Sequence #34 in Part 1. Complete Main Mission – Rescue Catwoman. Side Mission #4 – Cold Call Killer 1: After we have rescued Catwoman, this Side Mission will now have the random chance to become active. As we explore Arkham City, keep your ears open for a ringing phone. If you hear one, quickly track it down & answer it to hear Victor Zsasz on the other end… Side Mission #4 – Cold Call Killer 2: Explore around some more in Arkham City & chip away at some Physical Challenges to pass some time. After a bit, there is a chance that we can hear another phone ringing. Turning on Detective Mode can help you triangulate the phone; it will have orange semi-circles denoting sound emitting from it. Answer the phone & it we will begin this Side Mission in full. After Zsasz hangs up, we will be timed to quickly locate the next phone. Follow the Waypoint through the city to a random phone location & answer it before the timer runs out. When you get to the phone, we will need to trace Zsasz’s signal while he talks. We can only trace up to a certain point before progress stops & we will need to locate a new phone. 19% Complete Side Mission #5 – Watcher In the Wings 1: Make your way to the location marked in the Screenshot to find the first location of the Mysterious Watcher. 20% Complete
继续推进主线任务以完成钢铁厂及猫女第二章DLC。

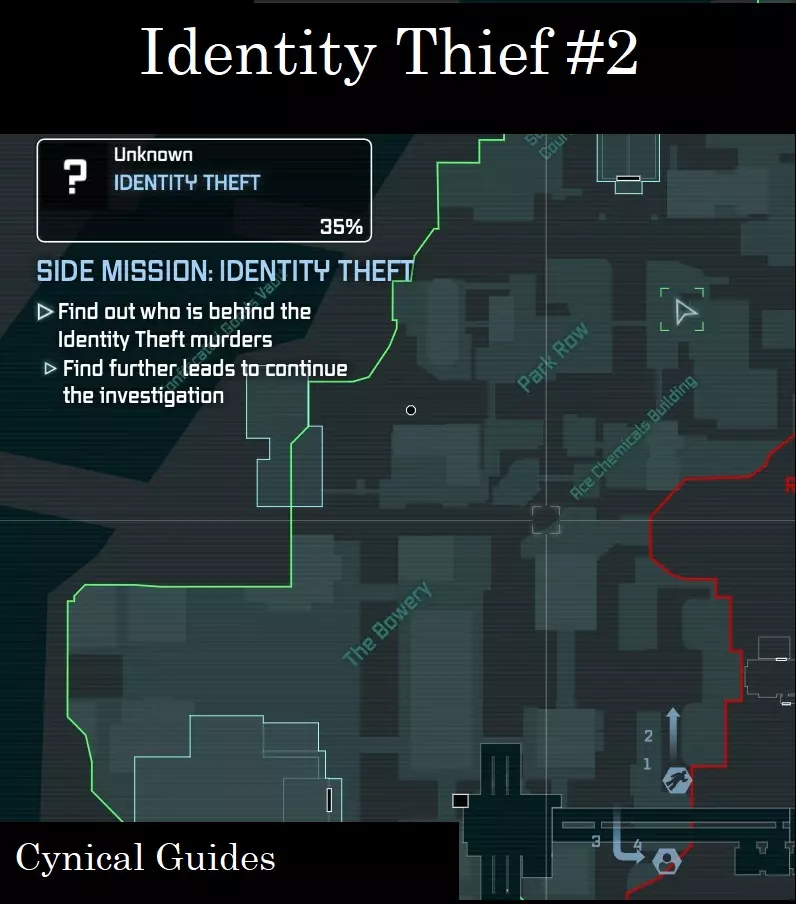
Achievement #38 – Gadget Attack: Use 5 different Quickfire Gadgets in one fight (any play mode). As we playthrough NG+, keep your eyes out for large fights we can take advantage of for this Achievement. In the same fight (not all in one Combo) use the Quick Gadgets: Batarang, Batclaw, REC, Freeze Blast, & Explosive Gel. The Explosive Gel is the hardest to use; after getting a Combat Multiplier of at least 1, use the Quick Explosive Gel first. Use Evade to get distance from enemies to fire off the last few Quick Gadgets. Look in your Waynetech Tab of the PDA to see the controls for each Quick Gadget if you need to. This Achievement is almost guaranteed if you will be attempting Riddler’s Revenge later on… Side Mission #2 – Fragile Alliance 2: After completing the Main Story Mission – The Steel Mill, head to the ground floor entrance of the building at the South end. Head through the door here & we can find a Titan Container around the corner to our left. 45% Complete Industrial District: Side Mission #5 – Watcher In the Wings 2: With the Steel Mill complete, Grapple to the top of the Ferris Wheel in the Industrial District to find the Mysterious Watcher; Scan the Symbol he makes to progress the Side Mission. 40% Complete Amusement Mile: Side Mission #6 – A Shot In the Dark 1: Enter into the Amusement Mile after completing the Steel Mill & if you look on your World Map, we can see a Side Mission Waypoint reading “S.O.S. Broadcast Source” where a Political Prisoner is trapped on the rooftop of the Gotham FM building. Get to the Waypoint & speak with the man who will shortly be shot. Set up a crime scene & follow the bullet trajectory back into the Industrial District. Find the shell casing from Dead Shot & we will end the first section of the Mission. We now need to be on the lookout for other murders to progress the Side Mission. Kind of an oversight on Deadshot’s part not to have sniped Batman right away after killing that Political Prisoner… 15% Complete Sequence 2: Enigma Conundrum Redux 1. Main Story: Finding the Cure 2. Side Missions: 1/12 3. Achievements: 38/64 ----------------------------------------------------------------------------------------------------- Park Row – Church/Medical Center:Complete Main Mission – Finding the Cure to progress. Side Mission #7 – Enigma Conundrum 1: When we exit the GCPD Building after dealing with Mr. Freeze, we can now access Riddler’s Side Mission in the Church. We will need to solve the Riddle “I am an instrument whose music always comes from the heart. What am I?” Go to the far end of the Church & enter Detective Mode; Scan the pipe organ at the back to complete the Riddle. Park Row – Solomon Wayne Courthouse: Side Mission #7 – Enigma Conundrum 2: Immediately after solving the first Riddle in the Enigma Conundrum, The Riddler will tell us that a Hostage can be found in the Courthouse. Enter the Courthouse, & we can find the Hostage being held by a group of Thugs. Dispatch the Thugs, & untie M.P.T. Eddie Burlow. He will then give us the Enigma Machine; open up the Enigma tab of your PDA & solve the Riddle: “If you know me, you’ll want to share me but if you share me, I’ll be gone. What am I?” The answer to the Riddle is “Secret.” After solving the Riddle, we will then be able to locate the next Hostage. 5% Complete Park Row: Side Mission #7 – Enigma Conundrum 3: Complete the Enigma Machine Riddle we unlocked; we can now locate our first official Hostage. Approach the Waypoint just West of the Church & interact with the wall of The Black Canary with a green question mark painted on it. Enter into The Black Canary & throw a Batarang at the Question Mark above the door we came through to unlock the way ahead. Enter the next room to find it full of electrified tiles; the Hostage tied up above us. Directly across from us is a Question Mark that will turn off a pathway through the tiles for 20 seconds; there is another one just to the right of the rooms entrance. Make your way from safe zone to safe zone until you reach the lift at the other side of the room. Strike the Question Mark on the wall to our left to activate the lift & take us to the top. Glide off the top of the lift over to the Hostage & rescue them. After saving the Hostage, we receive The Riddler’s next coded radio broadcast 6-2-5, 9-2-5. 20% Complete Amusement Mile: Side Mission #7 – Enigma Conundrum 4: Since we have already completed 400/400 Riddler Collectibles/Challenges we can unlock every single Hostage Rescue Mission one after the other & complete the Enigma Conundrum right away. Use the Cryptographic Sequencer & we can decode The Riddler’s next broadcast to receive the Riddle: “The more there is, the less you see. What could I be?” The answer is “Darkness”. Solving the riddle will let us go & save another Hostage. Make your way to the next Hostage Waypoint in Amusement Mile. Interact with the wall with the green question mark painted on it & enter the hideout. In the first room of the hideout, stand on the Pressure Plate on the lower floor & we will activate the mini-game to save the Hostage. The Hostage will be hidden behind one of three containers that will be shuffled around. This puzzle is rigged however as you will find out if you turn on Detective Mode as the Hostage is actually shuffled below the containers. Throw a Batarang at the Question Mark below where the Hostage is located & jump over to rescue them. Failing will kill the Hostage, & give us a Game Over Screen which we can Retry the mini-game from. 30% Complete Industrial District: Side Mission #7 – Enigma Conundrum 5: Use Hostage M.P.T. William North’s next coded radio broadcast 8-6-0, 1-2-0 & open up the Enigma Machine & solve the puzzle. The riddle is: “I have a head, a tail, but never any legs. Do you know what I am?” The answer is Penny. Make your way over to the third Hostage’s Waypoint in the Industrial District & head to the spray-painted question mark in the alley near some dumpsters. Sparta kick the wall & enter the lair. To solve this puzzle, use the Line Launcher to get over to a walkway across the water. From the walkway, look up to see that the water flowing over the two Question Marks can be manipulated by using the Remote Electrical Charge on the Industrial Motors. The Question Mark on the right can be hit with a simple Batarang while the Question Mark on the left will need to be hit by a Remote Controlled Batarang. With the Security Gate disabled, use the Line Launcher to ride past the first set of circular saw traps. Once you are through, fire another Line off to your right before passing through the next set & you will enter the next puzzle room. For this puzzle, simply use the Remote Electrical Charge to guide a Sionis Steel Pallet over towards a Pressure Plate with the three Industrial Motors nearby. With the next Security Gate disabled, we can now save an unnamed Doctor. The code she gives us is 6-0-6 1-2-0. 37% Complete Side Mission #7 – Enigma Conundrum 6: Enter the code 6-0-6 1-2-0 into our Cryptographic Sequencer & we will unlock the next Riddle for the Enigma Machine. The Riddle is: “I’ll be right under your feet, in the midday sun; you cannot lose me, no matter how you run. What am I?” The answer is: Shadow. Completing the Riddle will unlock the location of the fourth Hostage in the Industrial District. Head to the Waypoint, & break into the next one of Riddler’s hideouts. Use our Cryptographic Sequencer to disable a path through the Electrified Security Floor tiles to the safe zone. From there, throw a Batarang across the room at a Question Mark to disable another pathway over to the far side of the room. Climb up to the second floor & quickly get across the other end where we can use the Line Launcher to get inside a room to the left of the Hostage. Turn on Detective Mode here & we can see the Security Gate is being controlled by a Question Mark past a Structural Weakness. Destroy it with Explosive Gel, & use your Remote Electrical Charge on the Industrial Electromagnet to move a Steel Crate away from an opening in the fence; we can now deactivate the Question Mark with a Remote Controlled Batarang. Stand on the Pressure Plate in the next room to disable the final Security Gate & use the Line Launcher twice to tackle the Hostage in mid-air & safely take him through a glass window to escape. He will tell us the next digits for the code which are: 1-1-5 7-8-0. 60% Complete Sequence 3: The Toxicity of Our City 1. Main Story: Finding the Cure, Disable the Disrupters, The Museum, Mr. Freeze, Rescue Vickie Vale 2. Side Missions: 6/12 3. Achievements: 38/64 ----------------------------------------------------------------------------------------------------- Amusement Mile: Side Mission #7 – Enigma Conundrum 7: Open up the Enigma Machine after entering in the code & the next Riddle to solve will be: “Hit me hard & I will crack but you’ll never stop me from staring back. What am I?”The answer is Mirror. The fifth Hostage can be found in Amusement Mile. Enter the next hideout & rescue M.P.T. Anne Bishop. The puzzles here are not that difficult, we basically have to utilize each of our Gadgets one by one to solve mini puzzles to get to her. 75% Complete The Bowery: Side Mission #7 – Enigma Conundrum 8: When we exit the last Riddler hideout, Oracle will tell she has triangulated the Riddler’s final hideout location. Get to the Waypoint just below where the Iceberg Lounge entrance is & we will need to Glide over an electrified fence like how we previously did to collect a Riddler Trophy down here. Dive Bomb down towards the Waypoint & quickly pull up & Glide over the electrified fence. On the other side of the fence, we can find a door leading into the hideout. Carefully navigate around the track where the Riddler has the kidnapped Cops & medical staff walking & get below the Riddler’s position to perform a Takedown to put this Side Mission to rest once & for all... 100% Complete Subway:Enter the Museum to initiate the Main Story Mission – Disrupt the Disrupters. Disable the two Disrupters in Arkham City proper then head into the Subway for the final one. Side Mission #2 – Fragile Alliance 3: Head through the Subway Tunnels & we will come across our third Titan Container guarded by a few Thugs on our way to the final Disrupter. Dispatch them & use our Explosive Gel to destroy the Container. 60% Complete The Bowery: Side Mission #8 – Identity Theft 1: Exit the Subway after destroying the Communication Disrupter & head to the front entrance of the Arkham City Processing Center in the East side of The Bowery. From here, climb over the chain link fencing at the gates & make your way down the alley to the right of the Center entrance along the Perimeter Wall where we can find a dead body near a barrel fire. Approaching the body will activate the Side Mission; turn on Detective Mode & enter the Evidence Scanner which will allow us to track the victim’s blood on the ground. Follow the blood trail & it will lead us to a Political Prisoner, progressing the Side Mission. 35% Complete Museum:Carry on with the Main Story & enter the Museum; we can use the large battle in the Gladiator Pit to complete a lot of our Physical Challenges if you still need to… Side Mission #4 – Fragile Alliance 4: We can find the next Titan Container in the War Room of the Museum around the corner, after we dispatch the second Abramovici Brother. 75% Complete Park Row:
支线任务#8 - 身份盗窃2:追踪到刺客并获得绳索发射器后,前往地图上公园街的导航点,在一条偏僻的小巷中可以找到案件的下一位受害者。使用证据扫描仪收集更多关于凶手的信息。完成度50% 奇迹之城:现在前往奇迹之城,在主线任务 - 奇迹之城 中与拉尔斯·艾尔·古尔周旋。此时我在“冷血杀手”案件中的完成度为61%,“暴力行径”案件的完成度为24% 支线任务#4 - 脆弱联盟5:进入奇迹塔地基,从小丑的暴徒手中营救菲奥娜·威尔逊博士;在房间的二楼可以找到最后一个泰坦容器,使用爆炸凝胶将其摧毁。完成度90% 鲍厄里:

Side Mission #5 – Watcher In the Wings 3: After completing Wonder City, exit the Subway & go interrogate Quincy Sharp for information. When we fling him away, we can actually see the Mysterious Watcher on the rooftop across from us. Grapple over to him & Scan the next Symbol he makes to progress the Side Mission. 60% Complete Museum: Side Mission #9 – Remote Hideaway: Once we complete the Main Story Mission – Wonder City, we can see a new Waypoint on our World Map near The Museum reading “Undercover Cops with Gadget Upgrades”. Dispatch the Thugs outside North entrance to the Museum & head inside. Speak with Officer Jones & we will be given the Mine Detonator Upgrade for our Disrupter. As simple as that. 100% Complete Amusement Mile: Side Mission #2 – Fragile Alliance 6: Return to Krank Co. Toys after destroying all 6 Titan Containers & deal with Bane to compete the Side Mission. 100% Complete GCPD Building: Side Mission #10 – Heart of Ice 1: Carry on with the Main Story Mission – Mr. Freeze & head to the GCPD Building in Amusement Mile. Mr. Freeze is extremely difficult in NG+; take advantage of: Industrial Motors, Floor Grates, Drop Attacks, Sneak Attacks, Electrified Wires, & Explosive Gel. If you use a specific Environmental Move on him (such as Drop Attack from Railing) quickly guide him to all the railings & use that move on him as soon as possible before he disables that Environmental Move with ice. He disables Environmental Objects almost immediately after we use them on him which can actually screw you over if you are not fast at taking advantage of them. If you are quick, you can sometimes use the same Environmental Move multiple times if Freeze gets distracted trying to disable other things; I finally beat him after 5 tries because he kept trying to freeze a window & I was able to spam Drop Attack off a railing multiple times to finish him off. Also be sure to use Detective Mode sparingly; if you remain in it too long, Freeze will permanently jam it for the fight. Use it only for a second at a time just so you can quickly find his current location. Deal with Freeze, & we will begin the Heart of Ice Side Mission. 0% Complete Park Row:Complete Main Mission – Rescue Vicki Vale to continue. Side Mission #11 – The Tea Party: After we have rescued Vicki Vale, & we will receive a new Side Mission in Park Row. Go to the Waypoint marked “Cure drop off point” & go collect the cure… or try to. Batman got a dose of the good stuff instead… Complete Mad Hatter’s waves of Thugs & finish the Side Mission. 100% Complete Side Mission #8 – Identity Theft 3: Make your way over to the South face of the Ace Chemical Building in an alley way & we can find the third & final Victim. Use the Evidence Scanner to case the area & follow the bleach trail the killer left behind… past Jack Ryder… & to the Inmate who will tip us off to the killer’s hideout. Make your way over to the hideout, in the same complex as Catwoman’s apparently, & head inside. Escape the trap to complete the Side Mission. 100% Complete Sequence 4: Bitter Sweet 1. Main Story: Steel Mill 2: Electric Boogaloo, Catwoman Episode 3, Protocol Ten, Wonder Tower, Monarch Theater, Catwoman Episode 4, Post-Game 2. Side Missions: 12/12 3. Achievements: 39/64 ----------------------------------------------------------------------------------------------------- Park Row: Side Mission #6 – A Shot In the Dark 2: As we roam around Park Row towards, Hush’s Hideout or when we found his third Victim, we will shortly hear a gunshot marking the second part of this Side Mission. Head to the Waypoint, & we can locate the body on top of the broken overpass just above the Political Prisoner Camp in the North end of Park Row. Use the Evidence Scanner to find another clue about Deadshot’s where abouts. Only one body more to go… 40% Complete Amusement Mile: Side Mission #5 – Watcher In the Wings 4: Make your way over to the GCPD Building, & we can find the Mysterious Watcher on a rooftop near a water tower just West of GCPD. Scan the Symbol he leaves behind & we will now get to complete a puzzle aligning the circular emblem over all four of the Symbols we Scanned. When properly aligned, the Symbols will guide us to the Mysterious Watcher’s final location just outside the Church/Medical Center in Park Row. Head to the location, & there will be a large Symbol on the Church wall; Scan it & the Mysterious Watcher will have an over-the-top entrance to greet us. He will reveal himself as Azrael, the Angel of Death, & leave us with an omen completing the Side Mission. 100% Complete Industrial District: Side Mission #10 – Hearts of Ice 2: Head to the North East end of the Industrial District at the waterfront. In the area with the two cranes, turn on Detective Mode & we can see a door in the building off our left. To get inside, Glide over to the Falcone Shipping barge in the water & look back at the building in Detective Mode to see a Structural Weakness in the wall above the water. Use the Freeze Blast to make a platform & pull yourself over to the wall using the Anchor Points & our Batclaw. Destroy the Weakness with Explosive Gel & continue to pull yourself into the building using Anchor Points & enter into the building. Nora will be on the main floor; dispatch the Thugs inside & return to Freeze to complete the Side Mission. 100% Complete Side Mission #4 – Cold Call Killer 3: As of this point, we can now access all of Zsasz’s phone mini-games to locate him. You need to progress the Side Mission to 80% Complete before we can discover his location. This takes at a minimum of 6 phone mini-games depending on if you can max out your triangulation every time; this can take up to 8 phone mini-games at a maximum if you do not. To know where to search, access Cold Call Killer from your Side Mission tab & you can see all possible pay phone locations. Ones that are completed will be check marks instead of the phone symbol. Glide around to each of the pay phones still available & one will eventually start ringing. If none do, try entering/exiting a building or quitting to the Main Menu & reloading your game to reset Arkham City. Zsasz’s Hideout is located near the waterfront in the Industrial District. Sneak around the room in his hideout & perform a Takedown on Zsasz through a glass window once you get behind him. Note that we can chip away at this Side Mission while we do Acts of Violence at the very end of NG+ if we like as it can be completed in Post-Game. 100% Complete Steel Mill: Side Mission #12 – Hot & Cold 1: Enter into the Steel Mill & get to the Assembly Line where we can find Harley Quinn tied up during the Main Story Mission – Steel Mill 2. Take the tape off & she will give us our final Side Mission. Enter the Boiler Room from the Loading Bay/Freight Elevator & dispatch the Thugs inside; loot the Freeze Technology to complete the Side Mission. 100% Complete With that, we are in the home stretch. Complete all of the remaining Main Story Missions now & enter us into Post-Game Monarch Theater:

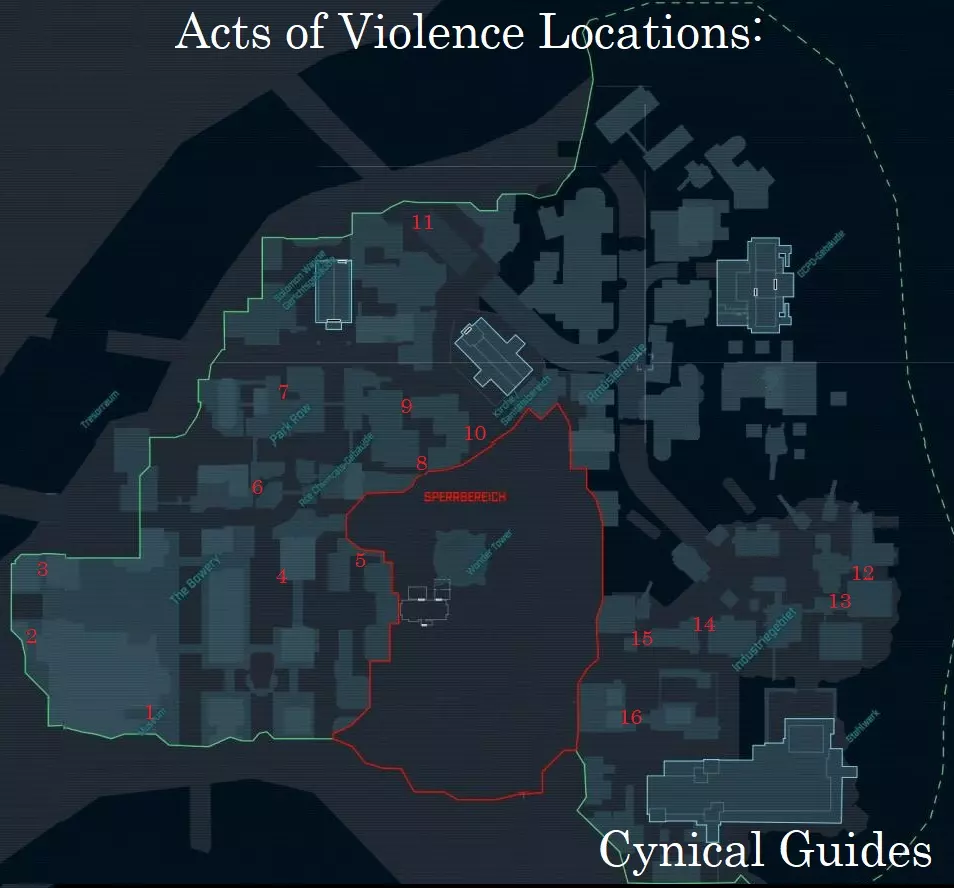
成就#39 - Twice Nightly:完成二周目。 剧情相关。在泥脸最终 boss 战中,我们需要采取极度防御的策略。始终将自己置于爆炸角落附近,引诱他滚动过来;不确定时,就闪避。如果在战斗中任何时候死亡,我们都必须重新开始整个战斗。在他的前两个阶段尽量不要被击中,为与他和他的爪牙战斗时保留所有生命值。最重要的是不要贪婪地滥用冰冻炸弹。 击败他后,该成就将立即解锁。 快速通关猫女第4章;由于这是DLC,我们不需要收集她的战利品,除非你想收集,因为这不会影响【完美骑士 - 第二天】成就。公园街: 支线任务#6 - 黑暗中的一枪3:作为蝙蝠侠,前往公园街,我们会听到一声枪响,标志着死亡射手的另一个犯罪现场。触发最终犯罪现场的条件尚不完全明确。我们确定需要在游戏通关后,但除此之外,它可能在任何时间触发。 我们可以在公园街最西端,靠近泰格 checkpoint 的外围墙附近找到犯罪现场,那里有一群暴徒聚集。调查犯罪现场后,我们会将死亡射手的位置缩小到三栋可能的建筑:12A、12B 或 12C。为了节省你的猜测时间……他在12A。登上该建筑的楼梯,拆除一个小房间后面的舱门,即可找到死亡射手的武器和个人数字助理。使用加密序列器破解PDA,以了解死亡射手的下一个目标。杰克·莱德是下一个目标。 在新游戏+模式中,我们只有2分钟时间到达上层鲍厄里的莱德所在地。先到达莱德并救下他,然后再对付死亡射手本人;只需到达死亡射手站立位置的下方并执行击倒即可。100%完成 支线任务#3 - 暴力行径2:现在我们只需完成这个支线任务。共有16个固定的袭击发生地点,但它们可能不会总是刷新。在阿卡姆城中前往所有地点,如果某些地点没有刷新(你可能已经完成过它们),退出到主菜单以重置该区域,然后再次循环访问这些地点,直到完成全部16个。由于我们处于游戏后期,所有可能的突袭地点都将开放。100% Complete
Sequence 5: Physical Challenges 1 1. Main Story: Post-Game 2. Physical Challenges: 13/40 3. Achievements: 39/64 ---------------------------------------------------------------------------------------------------- All we have to complete now for the Main Campaign is making sure we have all 40 Physical Challenges completed for Batman. To give yourself an easier time, I would recommend completing these on your NG file instead of our NG+ one so we can take advantage of Counter prompts. If you need to, Save & quit to the Main Menu to reset Thug spawns. Scroll through the list of Challenges below to the ones you still need to complete for their associated walkthroughs; if you have them all completed, you can skip down to where we start the Harley Quinn’s Revenge DLC. Navigational Challenge #1: Glide continuously for over 150m. (without using the Grapnel Boost Upgrade) This is best attempted from one of the tall smokestacks in the Industrial District. Grapnel Boost off of a high point (just to get started) & Glide, uninterrupted for over 150m. We cannot use the Grapnel Boost but can use Dive Bomb to give us a bit more altitude when we need it. Doing this from the Industrial District is good because we can Glide out over the ocean which is the lowest point in the city. This is very easy to do; I have a Glide record of over 215m… Navigational Challenge #2: Glide continuously for over 250m. (Grapnel Boost Upgrade permitted) The premise for this Challenge is identical to the first except this time we get to use our Grapnel Boost making it even easier. If you start from a high point in the Industrial District, Grapnel Boost up off a smokestack & down through the Amusement Mile Boosting off nearby buildings until the Challenge completes. Navigational Challenge #3: Perform a Vertical Dive for over 50m. The best place to complete this Challenge is once again using the tall smokestacks in the Industrial District in the North West corner near the waterfront. Grapnel Boost off the tall stack & as soon as we clear the buildings roof, immediately fall into a Dive Bomb. The stack should be well over 50m & it will unlock after touching the ground after your Dive Bomb. Navigational Challenge #4: Perform five consecutive Line Launches without touching the ground. This is best attempted in an area like The Bowery or Park Row where there are a lot of buildings. Simply engage the Line Launcher & continually fire off new lines to ride, without bumping into walls, to complete the Challenge. Navigational Challenge #5: Glide for 30m while maintaining a height of less than 5m above the water. This Challenge is a bit finicky & will take the most attempts out of the Navigational Challenges. Use are favourite Gliding smokestack in the Industrial District & when you get over the water drop into a Dive Bomb. As you get close to the water, pull up, & Glide as low as you can to the water for as long as you can. Since there is no distance gauge, it is very annoying to guess if you’re are 5m above the water or not. Combat Challenge #6: Achieve a x20 Combat Multiplier. Find a large group of Thugs like in front of the Solomon Wayne Courthouse or in front of the Church. Engage the Thugs & focus on using Cloak Stun & the Beatdown Attack to quickly rack up a Combo. Ignore Combat Finishers & just build that Combo up; it is extremely likely that you unlocked this Challenge through naturally play. Combat Challenge #7: Use 3 Quickfire Gadgets in one combat encounter. The easiest Quickfire Gadgets to use are: Batarang, Remote Electric Charge, Freeze Blast, or Batclaw. Use any of the three in a single encounter with a few Thugs to complete the Challenge. This will automatically unlock if you completed the Gadget Attack Achievement. Combat Challenge #8: Achieve a x5 Variation Bonus in one combat encounter. Similar to the above Challenge, though this includes none Quickfire Gadgets such as: Ground Takedown, Combat Takedown, Cloak Stun, & Evade. You most likely unlocked this when you attempted the Gadget Attack Achievement. Combat Challenge #9: Aerial Attack off a stunned Thug into another 3 times. Cumulative. To perform an Aerial Attack, Cloak Stun a Thug & double tap the Evade button to run up & slam the Thug (how we dispatch Shield Thugs). What you may not have known is we can redirect this attack at a different enemy mid-air. When you double tap Evade to perform the slam, push the move stick towards a different Thug & press your Punch button to launch at that Thug & perform the slam on them instead. Do this three times to complete the Challenge. Combat Challenge #10: Use the Slide to trip a Thug 3 times. Cumulative. This is very simple & can even be done on the same poor Thug over & over again. Simply sprint at a Thug & press the Crouch button to Slide into them, knocking them over. Do this three times to complete the Challenge. Combat Challenge #11: Perform a Beat Down to finish a Thug 5 times. Cumulative. To perform a Beat Down Takedown, Cloak Stun a Thug & repeatedly flurry punch them until Batman performs a Beat Down Takedown on them. This probably unlocked for you through naturally progression. Combat Challenge #12: Counter an enemy projectile 3 times. Cumulative. When a Thug picks up an Object, a Counter prompt will appear when they throw it at us; Counter a throw times to complete the Challenge. This is a much more specific Combat Challenge that is best attempted during the Main Story Missions as there are a lot of instances of enemies picking up objects. Trying to simulate this in Post-Game is trickier but not impossible; you just need to find Thugs near Environmental Objects… It is very annoying to do that in Post-Game, but fortunately I found a reliable place to do this. On NG, go to just outside of the Museum’s two entrances. Near the Iceberg Lounge will be three Green Crates & a group of Thugs, near the main Museum entrance will be two more Green crates & a Fire Extinguisher. That Fire Extinguisher is essential for the next Challenge… Make sure at least two Thugs don’t have a Shield or Bat in their hands or you will have to build up a small Combo to destroy their Weapons so they will grab objects to throw at us. The best way to reset these Thugs if you need more attempt is Saving & quitting from inside the Church; doing it from a Museum entrance won’t reset the Thugs that spawn directly outside of it. Combat Challenge #13: Hit an Explosive Object with a Batarang before it is thrown. Remember that respawning Fire Extinguisher outside the main Museum entrance? Bait a Thug into picking it up, & when they do, use Batarang Quickfire to destroy it in his hands to complete the Challenge. Sequence 6: Physical Challenges 2 1. Main Story: Post-Game 2. Physical Challenges: 28/40 3. Achievements: 39/64 ---------------------------------------------------------------------------------------------------- Combat Challenge #14: Take out 2 Thugs at once with the Glide Boost Attack. This Challenge you most likely will not get through naturally progression unless you have previously looked up how to perform this. To do a Glide Boost Attack, stand on a tall building over a Thug & perform a Glide Kick. As soon as you Glide off the building towards the Thugs, hold down the Crouch button in the air & a yellow bat symbol will appear over the Thug & begin to fill. When it maxes out it will flash red & we will perform a Glide Boost Attack that will Takedown that Thug. For this Challenge, we need to do that when two Thugs are standing side by side to Takedown both of them simultaneously. Once again, we will return to the main entrance to the Museum. Disturb the Thugs crouching outside the entrance & Grapple away to the building to the tall building to the South East, just past the Jezebel Center roof. From here, wait for two of the Thugs to pace beside each other & perform your Glide Boost Attack/Takedown. Gadget Challenge #15: Use a Combo Batarang in combat 10 times. Cumulative. Use Quickfire Batarangs will having a Combo of at least 1 ten times… extremely easy to do. Gadget Challenge #16: Perform a Batclaw Slam 5 times. Cumulative. Find some Thugs, ideally two or three, & use the Quickfire Batclaw to pull a Thug towards you. Follow up with an attack to Batclaw Slam them to the ground; do this five times to complete the challenge. Gadget Challenge #17: Use the Quickfire Remote Electrical Charge during a Combo 5 times. Cumulative. Find a group of Thugs & build up a Combo of at least 1. With that, just use the Quickfire Remote Electric Charge five times on the Thugs; it can even by all on the same poor guy… Gadget Challenge #18: Use the Quickfire Explosive Gel during a Combo 5 times. Cumulative. Quickfire Explosive Gel is a lot more finicky than the other Gadgets. Build up a Combo of at least 1 & lay down a Quickfire Explosive Gel. Then, while still holding onto your Combo, detonate the Gel & make sure it hits at least one Thug. Do this five times to complete the Challenge. Gadget Challenge #19: Use the Quickfire Freeze Blast during a Combo 5 times. Cumulative. This is similar to the Quickfire REC Challenge. Build up a Combo of at least 1 then spam Quickfire Freeze Blast on a group Thugs… or the same Thug to complete the Challenge. Gadget Challenge #20: Use the Smoke Pellet to disorientate Thugs into attacking each other. This is another very specific Challenge. We need either a large group of Thugs or some Thugs in tight quarters. Bunch the Thugs together & select your Smoke Pellet from our Gadget wheel (we have to manually select/throw it since they probably don’t have Guns). Throw the Pellet down in their midst & they will start swinging around blinded. If you are lucky, a Thug will stagger into another & punch them, completing the Challenge. Too often though they will stagger/punch away from each other & it won’t work. This may take a few tries to get right. Gadget Challenge #21: Finish a fight with a Combo Batarang 3 times. Cumulative. When facing a single Thug or the last remaining Thug of a group, spam Batarang Quickfire & it should slow down time & perform a Takedown on them. If it just knocks the Thug down, wait until they get back up, & spam Quickfire again at them. Takedown Thugs this way three times to complete the Challenge. Gadget Challenge #22: Use the Remote Electrical Charge to get a Gun Thug to fire his weapon & surprise at least one other nearby enemy. In Post-Game, there will be a lot of Gun Thugs on the rooftops around Arkham City. Approach a group of them unaware & wait until there are two of them close together. Aim your REC at one of them & fire a charge at them; they will begin firing their gun in shock which should startle the other Thug, completing the Challenge. Gadget Challenge #23: Use the Remote Electrical Charge to force a Thug to hit another 3 times. Cumulative. For this Challenge, we need to find a group of Thugs with some of them holding Weapons. Engage the Thugs & get them grouped together. Fire a REC charge at a Thug holding any Weapon & they should take a swing; if that swing hits another Thug it will count towards the Challenge. Do this three times to complete it. Gadget Challenge #24: Use the Remote Electrical Charge to blast one Armored Thug into any other Thug. In NG, we can find Armored Thugs in the Industrial District in Post-Game (in NG+ they spawn all over the place). Find an Armored Thug & engage him with his group of Thugs. Get them clustered together & fire a REC charge at the Armored Thug which will launch them backwards. We will complete the Challenge if they slam into some other Thugs will they are launched. Gadget Challenge #25: Use the Freeze Cluster Grenade to immobilize three or more Thugs at one time. The Freeze Cluster Grenade, when thrown, will make a small impact on the ground & then explode to freeze nearby Thugs. Find a large group of Thugs & bait them close together. When they are, throw down your Freeze Cluster Grenade at their feet, & we will complete the Challenge if at least three or more of them are frozen in that single blast. Gadget Challenge #26: Use the Freeze Blast to freeze a Thug then a Batarang to knock them down. This Challenge is literally self explanatory, we can even use the Quickfire versions of these Gadgets. Gadget Challenge #27: Perform a Grapnel Boost Takedown. To perform a Grapnel Boost Takedown, we need to perform a Grapnel Boost when a Thug is directly above where our Grapple lands. This is best done in the Industrial District where there are Gun Thugs up in easy to see towers. Position yourself below a Thug & make sure they aren’t going to walk away. Fire your Grapple directly below them & initiate a Grapnel Boost; if done right, we will launch up at the Thug & instantly perform a Takedown. Gadget Challenge #28: Use the Reverse Batarang to knock down a Thug. Reverse Batarang throws can only be performed using a Remote Controlled Batarang. When we hold a Remote Controlled Batarang, we will have the option of doing a Reverse Batarang throw; you need to hold down the button until it locks on to them. Simply target any unaware Thug & perform a Reverse throw to knock them down & complete the Challenge. They must be unaware, or it will not knock them down as well. Sequence 7: Physical Challenges 3 1. Main Story: Post-Game 2. Physical Challenges: 40/40 3. Achievements: 39/64 ---------------------------------------------------------------------------------------------------- Gadget Challenge #29: Kick a Thug while riding on the Line Launcher 3 times. Cumulative. Find an unaware Thug a little ways away from you & fire your Line Launcher at them. As you ride by, Batman will kick them & knock them down; do this three times to complete the Challenge. While it can be done in combat when you have a group of enemies in front of you, this is much more difficult as more often then not they will just dodge out of the way. Gadget Challenge #30: While riding on the Line Launcher towards an unaware Thug, use the Takedown attack to drop down & knock them out. Similar to the last Challenge, find a Thug that is a little ways away from you & fire your Line Launcher at them. If you were far enough away, you will have the option of pressing Line Launcher Takedown. When we do, Batman will ride towards the Thug as per usual, but drop off the Line & perform a Takedown when he gets to them. Gadget Challenge #31: Catch a Remote Batarang. Very simple. Stand on a high point & throw a Remote Controlled Batarang & guide it back to Batman. Before it hits him, he will catch it... no matter what part of his body you try & hit. Don’t ask me how it gets to his hands when you hit his foot… he’s just the Batman. If you played Arkham Asylum, you will remember this being an Achievement we had to unlock for it. Gadget Challenge #32: Fly a fully boosted Remote Batarang into a Thug & send him flying through the air. Find an unaware Thug & throw a Remote Controlled Batarang at them. As soon as you throw it, hold down the Boost button so that when it hits him, it will knock them over. Invisible Predator Challenge #33: Use the Freeze Blast to freeze a Gun Thug before taking him out. Locate any Gun Thug & while they are unaware, throw a Freeze Blast to freeze them. While frozen, walk up to them & we will be able to perform an Ice Smash Takedown which completes the Challenge. Invisible Predator Challenge #34: Use the Smoke Pellet to disorientate a Gun Thug & follow up with a Takedown. Once again, find a Gun Thug & this time provoke them so they start shooting at us. When prompted, throw down a Smoke Pellet beside them & they will become disoriented. Immediately after throwing it down, while they are confused, press Crouch beside them & perform a Silent Takedown to complete the Challenge. In theory this can actually be done on any Thug; Gun Thugs are easiest as they provoke us to throw down a Smoke Pellet automatically. Invisible Predator Challenge #35: Disarm a Thug using the Batclaw disarm 3 times. Cumulative. Find any Thugs holding Weapons (except Shields) & use the Batclaw to yank the Weapon out of their hands. This can even be done repeatedly on the same poor Thug so long as you’re not following up with Batclaw Slams. Invisible Predator Challenge #36: Use the Disruptor to jam the gun of a Gun Thug & then get him to try & fire. Locate a Gun Thug & use the Disrupter Firearm Jam to jam the Thugs gun. With it disabled, approach the Thug & provoke him so he tries shooting us with the gun. When it inevitably does not work, we will complete the Challenge. Invisible Predator Challenge #37: Use the Remote Electrical Charge to temporarily disable a backpack Jammer Device. This is best done during the Main Story when we have options presented to us. To complete this in Post-Game, make your way to the large Subway Terminal room in the Subway Station. In this room is a guaranteed Jammer Backpack Thug spawn we can use to complete this Challenge. Invisible Predator Challenge #38: Take down a Thug using the Sonic Batarang. First find any Thug & equip our Sonic Batarang. Throw the Batarang at their feet (not into the Thug) & we will have the option of detonating it. Do so, & the blast will knock out the Thug, completing the Challenge. Invisible Predator Challenge #39: Perform an Inverted Takedown from a Vantage Point. There are a few places around Arkham City we can perform this. The easiest is once again in the Subway Terminal (Subway, Armory room (Museum), or Wonder Tower Foundations (Wonder City). Grapple onto a Gargoyle & wait for a Thug to walk underneath it. When they do, Invert yourself, & we can then perform an Inverted Takedown completing the Challenge. Invisible Predator Challenge #40: Perform a Knockout Smash 5 times. Cumulative. Simple perform a Silent Takedown behind a Thug & while we are choking them out, we can press the attack button to Knockout Smash them hastening the process. Do this five times to complete the Challenge. As of this point, we should have completed: all Main Story Missions in NG & NG+, all 12 Side Missions in NG & NG+, collected all Gadgets, purchased all Waynetech Upgrades, & collected/completed all 400 Ridder Collectibles & Challenges. With this all out of the way, we just need to earn all 180 Riddler’s Revenge Medals as Batman to unlock the Perfect Knight – Day 2 Achievement. But we will not worry about that just yet… one last matter of business to attend to. 60% Complete Sequence 8: Harley Quinn's Revenge 1. DLC: Episode 1 2. Harley Balloons: 6/30 3. Achievements: 43/64 ---------------------------------------------------------------------------------------------------- DLC – Harley Quinn’s Revenge: (10) Story Related: (4) Missable: (2) Collectibles: (1) Slay: (3) There are a few Combat related Achievements we will have to keep on eye on throughout this DLC (note that they can be unlocked while playing as Robin in Riddler’s Revenge). 1. We need to equip Robin’s Bullet Shield & Shield Bash 5 different Thugs. 2. We need to equip the Zip Kick & perform a… Zip Kick on 5 different Thugs. 3. Equip the Snap Flash & use it on an Unarmed Thug, Gun Thug, on an Environmental Object to knock over a Thug, & on a Titan Thug (I will note each instance to remind us; this must be done all in the same playthrough of the DLC). 4. Use all 5 different Quickfire Gadgets in the same fight (not Combo) On top of these we need to destroy all 30 Harley Balloons scattered around the DLC; let’s get to it! Shipyard:

干船坞: 哈莉气球#1:DLC开始后,穿过干船坞,直到需要手动按下按钮进入下一个房间。穿过门道后,立即向左上方看,可以看到一个粉色的哈莉气球挂在我们离开的房间上;用手里剑击中它将其摧毁。 通道A: 进入通道后,会发现三个暴徒站在那里;利用这个机会对他们每个人执行飞索踢击和盾牌猛击。 飞索踢击快速释放与蝙蝠爪(Lt + Y)操作相同,盾牌猛击的操作方式与冰冻冲击(Rt + Rt)类似。 哈莉气球#2:在通道A中解决第一波暴徒后,走到房间最东侧的死胡同。在这扇钢门处,抬头可以看到天花板上系着一个气球。 哈莉气球#3:使用爆炸凝胶沿着走廊前进,直到进入下一个被水隔开的房间。从我们站立的位置,转身抬头看向我们刚穿过的门道左侧,可以看到天花板附近有一个气球。

成就#40 – Frequent Flyer:使用飞踢攻击5个不同的暴徒。 当我们在A号通道遇到下一波敌人时,会有4个暴徒。如果你之前已经对3个暴徒使用过飞踢,那么在这里再对任意2个暴徒使用该技能,就能解锁这个成就。

成就#41 - 破城锤:用盾牌猛击5个不同的暴徒。 与上一个成就类似;如果你之前已经对付过一些暴徒,在这次遭遇战中再用盾牌猛击至少两个暴徒就能解锁该成就。 泵房: 哈莉气球#4:当我们使用子弹护盾移动到狙击手暴徒处并将其解决后,可以看到右侧有一个气球绑在椅子上,就在开阔区域。 快速冻结#1 - 徒手暴徒:从狙击手暴徒处上楼后,会看到一群暴徒正试图封门。可以悄悄对其中一个使用快速冻结,或者用快速冻结速射将其放置在他们身上并引爆,这将计入成就进度。哈莉气球#5:解决掉暴徒后,查看他们正在切割的门附近,我们可以看到一个气球系在门左侧上方的铁栏杆上。 哈莉气球#6:当我们穿过钢门进入泵房南走廊时,会在一个死胡同发现一处结构弱点,右侧还有一扇门。忽略那扇门,使用爆炸凝胶摧毁墙上的结构弱点。进入房间后,在左侧经过一个满是垃圾的水池就能看到一个气球。 不要从那扇门进入,否则必须以蝙蝠侠的身份回到这里才能收集到哈莉气球#6!不过幸运的是,即便你不小心进入了仓库,这个气球也不会错过。 仓库:

成就#42 - A Few New Tricks:在《哈莉·奎茵的复仇》中,作为罗宾在一场战斗中使用5种不同的速射道具。 虽然这些道具必须在单场战斗中使用,但不必在同一连招中使用全部五种速射道具。当我们进入仓库时,中央会有一大群暴徒,这是我们尝试达成该成就的绝佳机会。 罗宾的速射道具操作如下: LT:速射手里剑 RT RT:速射子弹护盾 LT + Y:速射飞索踢 LT + B:速射闪光弹 LT + X:速射爆炸凝胶

成就#43 - Lost Property:任何打击犯罪的人都不能没有这个。 剧情相关。在仓库击败暴徒后,罗宾会发现蝙蝠侠丢弃的蝙蝠腰带,完成第一章节并解锁该成就。 序列9:遗留问题,鲁莽之徒 1. 下载内容:第二章 2. 哈莉气球:25/30 3. 成就:44/64 ---------------------------------------------------------------------------------------------------- 工业区:
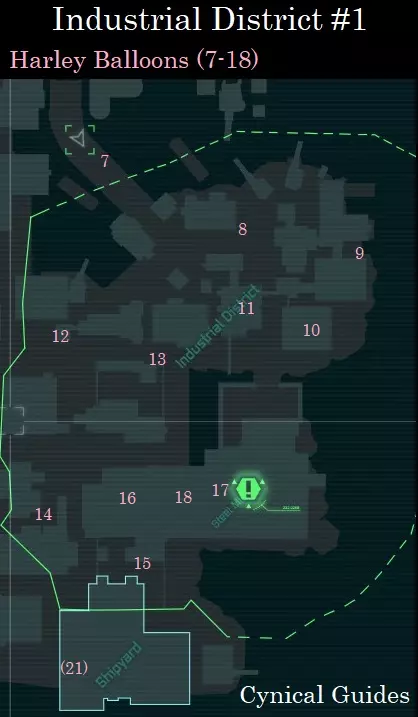
哈莉气球#7:当第二章开始时,我们将可以扮演老伙计蝙蝠侠。在与戈登局长交谈后,在做其他任何事之前,抬头看就能看到GCPD路障正前方的拱门上系着一个气球。 哈莉气球#8:当我们进入工业区后,前往该区域最东边的建筑群。如果我们回头看向来时的入口方向,会看到拱门上两侧各有一个胡桃夹子;左侧胡桃夹子的手中有一个气球。 哈莉气球#9:继续前往工业区的最东端,沿着 waterfront 向南走。在到达摩天轮之前,我们会发现一个被摧毁的屋顶,上面有两名持枪暴徒在巡逻。这个屋顶上会有一个非常大的烟囱;烟囱顶部会系着一个气球。 哈莉气球#10:现在前往摩天轮,用抓钩攀爬到最高点,在那里我们可以找到另一个气球。 哈莉气球#11:从摩天轮出发,向西滑翔到下一栋楼,楼顶有西奥尼斯工业的标志;这里还有三名持枪暴徒在巡逻。我们可以在屋顶中央的扬声器上找到一个气球。 哈莉气球#12:沿着这排建筑继续向西走,经过那些大烟囱,一直走到这排建筑的尽头,在靠近围墙的狙击手暴徒塔上可以找到一个气球。哈莉气球#13:跳到我们下方的街道,向东走,经过另一个建筑群;在建筑群拱门后,我们能发现一个气球系在一个胡桃夹子的帽子上。 哈莉气球#14:前往工业区的西南角,靠近西外围墙,我们会找到一个里面有一些暴徒的建筑群。解决这里的暴徒后,我们能发现一个气球系在一个靠在建筑群墙壁上、胸部破损的胡桃夹子身上。 哈莉气球#15:前往环绕钢铁厂南门的建筑群。如果你站在通往钢铁厂内部的门口,沿着建筑群墙壁向东走,我们能在下方靠近一个垃圾桶的地方发现一个气球。哈莉气球#16:现在用抓钩登上钢铁厂屋顶,前往西侧;在这里我们可以看到两个胡桃夹子互相伸出手。那个伸出手向下够的高架胡桃夹子,其伸出的手上挂着一个气球。 哈莉气球#17:沿着钢铁厂屋顶向东走,直到靠近巨大的烟囱。用抓钩爬上烟囱旁边最高的塔,我们可以在塔顶发现一个气球。 哈莉气球#18:本章节的最后一个气球,下到一楼,找到径直穿过钢铁厂的小型铁路隧道。在隧道内部靠近中心的位置,我们可以在一个翻倒的桶上找到一个气球。 钢铁厂:

哈莉气球#19:从屋顶入口进入钢铁厂,我们会在旧经理办公室里。下楼进入办公室,向左看,会看到一个气球系在婴儿摇篮上。 哈莉气球#20:从经理办公室下到主装卸区房间前,向右看;我们可以狙击一个系在聚光灯上的气球,它就在GCPD警察被吊着的位置右侧。我们也可以在解决下面的暴徒后击中它,但在救下警察后就不行了! 工业区:

成就#44 - Breaking & Entering:找到进入秘密基地的方法。 剧情相关。推进DLC剧情,直到我们追踪哥谭市警察局警员托尼·威克的血迹前往造船厂。获取造船厂改装安保控制台的三个密码,并用密码破解器入侵控制台以进入造船厂,解锁该成就。 哈莉气球#21:当蝙蝠侠进入造船厂时,可在入口门右侧的哈莉·奎茵人体模型上立即发现这个气球。 造船厂:
泵房: 哈莉气球#22:使用钩爪发射器穿过泵房南走廊的水池。当我们进入西侧房间时,可以看到楼梯顶部栏杆上系着一个气球,我们必须走上楼梯。 仓库: 哈莉气球#23:进入仓库,开始沿着楼梯向上走到顶部。在这里,楼梯会断裂,会出现一个孤立的上层区域;抬头看向这个区域,我们可以看到靠近天花板处有一个气球。 哈莉气球#24:在仓库的主房间内,我们必须从一大群哈莉的暴徒手中解救一名GCPD警官。解决掉六名持枪暴徒,但暂时不要解开警官的束缚!从房间中央的警官位置出发,在地面层直接向西看,能看到下一个区域出口门右侧上方系着一个气球。 哈莉气球#25:仍在底层时,前往房间最东北角的走道下方,可以看到一个气球系在一个打开的储物柜上。 当我们以蝙蝠侠的身份救出警官后,将结束第二章并在第三章中以罗宾的身份继续游戏。 序列10:时代的终结 1. DLC:第三章 2. 哈莉气球:30/30 3. 成就:49/64 ---------------------------------------------------------------------------------------------------- 造船厂:
我们扮演罗宾的时间有限,务必抓住机会完成他的战斗相关成就以及Snap to It成就。 小丑神殿房间: 哈莉气球#26:当我们重新控制罗宾后,离开仓库并进入小丑神殿房间。穿过门后,就能看到在前方一个冒着蒸汽的通风口旁的板条箱上系着一个气球。 哈莉气球#27:进入小丑神殿的主房间,能看到房间中央的天花板上卡着一个气球。 B号通道走廊: 快速冻结#2 - 持枪暴徒:进入B号通道走廊,我们会出现在两名持枪暴徒身后。利用这个机会对其中一人使用快速冻结并引爆;系统甚至会提示我们这样做。哈雷气球#28:解决持枪暴徒后,当我们从地板格栅进入下一个房间时,会被走廊尽头的一名狙击暴徒压制。在启动子弹护盾并向他们移动之前,回头查看死胡同处,会发现一个气球系在桶上。 瞬间冻结#3 - 环境物体:不要靠近狙击暴徒,这里是我们获取环境物体瞬间冻结以解锁成就的地方!摧毁气球后,我们可以看到在我们和狙击暴徒之间有一个由箱子组成的小型路障。这些箱子的右侧有一个可以爬进去的通风口。爬进去后,我们可以进入狙击暴徒右侧的一个小房间。在这个房间里,我们能看到一扇开着的窗户,窗外有起重机吊钩在传送带上从右向左移动。靠近起重机吊钩并在上面安装一个快速冻结装置。等待起重机移开,然后绕到狙击手暴徒身后引爆装置将其击倒。 如果因时机不当未能击倒他,或者快速冻结装置用完,请重新加载上一个存档并再次尝试。若失败将导致该成就失效,你需要重新游玩DLC才能再次尝试。 哈莉气球#29:解决掉狙击手暴徒及其手下后,进入走廊的最后一段。穿过一组敞开的钢门后,立即向左看,会发现一个气球藏在垃圾桶顶部。 干船坞:

成就#45 – How’s It Hanging?:清理干船坞。 剧情相关。进入干船坞并击败哈莉·奎茵即可解锁该成就。她的难度不算太高,先解决掉狙击手暴徒和几名持枪暴徒。如果你把她逼入角落,基本上可以用你的棍杖持续攻击将其击败。 哈莉气球#30:解决哈莉之后,我们现在可以摧毁DLC中的最后一个气球了。该气球位于房间的西南角尽头,附着在水中的一些垃圾上,就在一个大型潮汐格栅的前方。

成就#46 – Party’s Over:摧毁全部30个哈莉气球。 如果一直按照本指南操作,在戳破最后一个气球后将解锁该成就。 由于DLC的线性流程设计,若推进过远很容易错过气球位置。一旦发生这种情况,你需要重新游玩DLC才能回到该位置;不过已摧毁的气球在多次游玩DLC时会保持已摧毁状态。好在这组章节流程很短…… 小丑神社房间: 返回小丑神社房间,会遇到一大群暴徒需要应对。如果你还未完成三个成就,可以利用这些暴徒来施展我们的飞踢、盾牌猛击以及其他三个速射道具。 Snap Free#4 – Titan Thug:当我们在第三章接近尾声时进入小丑神殿房间,一名泰坦暴徒会加入最终战斗。跑向它并在其身上放置一个快闪闪光弹;当闪光弹引爆时,如果你之前已对其他三个目标使用过快闪闪光弹,该成就就会解锁。

成就#47 – Snap to It:使用快速冻结技能冻结一名未武装的暴徒、一名持枪暴徒、一个环境物体以及一名泰坦。 此成就可能错过。所有四个快速冻结目标必须在DLC的单次游玩过程中完成。如果重新开始DLC,你将需要重新完成所有四个快速冻结。

成就#48 - Bomb Squad:在3分钟或更短时间内拆除所有炸弹。 此成就可能错过。在我们救出蝙蝠侠后,需要前往并拆除附近的一枚炸弹。 第一枚炸弹完全拆除后,会出现5分钟的计时器,我们必须迅速找到并拆除接下来的炸弹;计时器剩余时间需超过2分钟才能解锁该成就。遇到的任何暴徒都要尽快打倒,不要拖延;利用地面击倒和战斗击倒技能。快速前往仓库的主房间,用钩爪爬上椽子。从这里,前往与狙击手暴徒所在位置相对的最北端(需要将其击倒,否则会向我们开枪;除非使用烟雾弹),我们可以看到一些蒸汽通风口挡住了去路。用冰冻冲击封锁通风口,这样我们就能找到第二枚炸弹并将其禁用。只要操作得当,这一步最多只需一分钟,此时计时器至少还剩三分钟。 第三枚炸弹位于水泵房。进入水泵房后,用抓钩抓住房间南端由起重机吊钩吊着的平台。使用远程电力 charge 启动工业电机,将平台移至北端,这样我们就能来到结构弱点前(可能需要对电机发射多次 charge 才能到达)。用爆炸凝胶摧毁结构弱点,就能找到最后一枚炸弹并拆除。 如果计时器剩余时间超过一分钟,我们就能解锁成就。我完成时还剩2分15秒。请注意,如果你在游戏中遇到困难、偏离路线或用时低于1分钟,重新加载最近的检查点即可回到起点重试。如果在1分钟内完成拆弹,你需要从头完整重玩DLC到该进度才能再次尝试。

Achievement #49 – The Last Laugh: The joke's on who? Story Related. Deal with Harley & her Robots in the final confrontation to complete the DLC & unlock the Achievement. 76% Complete Sequence 11: Riddler's Revenge 1. Achievements: 49/64 ---------------------------------------------------------------------------------------------------- It is best to start as one character & complete all of the Combat, Predator, & Campaign Challenges before moving on to the next character. That way you can master the flow & Variations as well as Predator Challenges of the character instead of having to swap your play style constantly as they do play quite a bit differently. Combat Challenges: The only DLC maps we need to complete are Freight Train as Robin & Wayne Manor Armory as Nightwing. Only these two Challenges will count towards Achievements; Catwoman & Batman strictly play Base Game Maps. We do not need to complete the Joker’s Carnival or Iceberg Lounge VIP Room Challenges at all for any character. Combat Challenge Basic Tips: 1. Keep your Combo going as long as possible for the highest amount Points 2. To maintain your Combo, constantly jump over/Evade enemies to give yourself ground or shuffle enemies around so you do not lose it 3. Use as much Quickfire Gadgets or Abilities as you can during your Combos for Variation Bonuses. There are 15 Variations for Batman & only 13 for Catwoman, Robin, & Nightwing 4. Armored Thugs are Point banks; Stun them & begin beating them down while simultaneously Countering the other attacking Thugs. The longer you can stretch out that Armored Thug/Countering cycle, the more Points you will chain together. 5. While difficult to pull off, completing Blade Dodge Takedowns gives you a very high amount of Points (100xCombo) 6. Normal knockouts are worth 10 Points with Combat Finishers earning around 50 Points (xCombo) 7. Ground Pounds are worth 75 Points (xCombo) & are the best way to end every Round when possible 8. Not getting hit at all during a Round will net you the Perfect Round Bonus for 500 Points 9. Maintaining a continuous Combo for an entire Round will net you a the Flawless Freeflow Bonus for 1000 Points 1. Batman: Batman is by far the easiest character to complete the Combat Challenges as. We have access to his full arsenal of Gadgets as well as all his Combat Moves. Try disabling/destroying Stun Batons, Knives, & Shields first with your Combos so you can just beat on the Thugs without fear. This will prevent a buildup of Weapons on the ground that will carry over across the Rounds. 2. Catwoman: Catwoman is sort of a one trick pony but that doesn’t necessarily mean she is bad to play as; in fact, I found it being the opposite. Her moves are limited & you will basically be Stunning enemies with your Whip & building up your Combo to use her Whip Trip or Whiplash Special Move. Catwoman is insane at crowd control & I found I ended up getting final scores way higher than I did with Batman. Catwoman suffers though because she cannot disable/destroy any Weapons which leads to a build-up of them on the ground to be picked up; her only Counters are Stunning & Whip Trip to get the Weapons safely out of Thug’s hands. She is also the only character that cannot ride Titans which means her only offense against them is just to Stun them & do Beat Downs until they are knocked out. 3. Robin: Robin is the most difficult character to play as I found. His moves are typically slow (especially his Ground Takedowns) & he is often left overextended to be hit by Thugs. His Combo Moves are also not great; Thug Throw has its uses but compared to Catwoman’s or Batman’s it is nothing special at all. Robin’s only golden Gadget trio is his Zip-Kick, Shurken, & Shield Bash; his Snap Freeze can also be very useful if you can land it without being hit in the process. 4. Nightwing: Nightwing has the highest attack speed of the four characters. His Gadgets are the worst in my opinion for combat however his Group Attack Special Move is only slightly worse than Catwoman’s Whip Trip & great for crowd control. Nightwing annihilates the Mr. Sickle/Hammer, Armored Thugs, & Titans with his high speed & can build up a Combo extremely fast. Nightwing also has an Electrical Blast Gadget that can temporarily daze nearby enemies which is also very useful. A downside of Nightwing is that I found his Escrima Stick Throw Gadget would fail my Combo 9/10 times I used it for some reason & reset it to 1; I recommend using it as an opening move for the Variation but then try not to use it through the fight. It did sometimes work, but rarely enough for what it is worth... For a full in depth look out each character’s Variations & how to perform them, check out the guide on Arkham Wiki. Just be sure to scroll down to the section for Arkham City… https://arkhamcity.fandom.com/wiki/Combat_Variations#Batman Predator Challenges: The Predator Challenges function identically as they did in Arkham Asylum. To unlock all 3 Medals in a Challenge, you need to take out Thugs in 3 specific ways. Unfortunately, since each of the 4 Characters have different moves & Gadgets, they have completely different Medal Objectives for obtaining the Medals. Much like the Combat Challenges in terms of difficulty, Batman’s Challenges are the easiest while Robin’s are the hardest. To a point; Nightwing might have the hardest Challenges though he has the best Gadget loadout second only to Batman. Due to the high specificity of the Medal Objectives & the number of them, it is extremely difficult for me to create a text guide around them. To assist you, I have included video guides by Batman Arkham Videos. While video guides are useful, they are also very specific, I never actually used many myself & opted to figure out my own strategies that worked. The Predator Challenges require a LOT of trial & error as well as memorization. While the videos listed here can be crucial for success, it should be noted that there is a lot of variance between Thugs reactions. Because of this variance, always stay vigilant for opportunities to achieve the Medals when they are presented to you regardless of when they occur in the videos. Note that your final time does not matter; take as long as you need to complete the Challenges. Campaign Challenges: There are 12 Campaign Challenges (36 individual Challenges) we must beat with all 4 Characters with an additional 2 Campaign Challenges that must be done with Robin & Nightwing. We receive 9 Medals per Campaign Challenge (3 per individual Challenge) for a total of 108 (or 114) Medals per Character we need to earn. Batman Arkham Videos has amazing playlists which include the Combat & Predator Challenges for every character. While the Combat Challenges are (more or less) self explanatory, the videos for the Predator Challenges can be extremely useful. They do include videos for the extra DLC maps, but we only need to do the specific Maps as Robin & Nightwing; Catwoman & Batman only need Base Game maps completed for their Achievements. Note, that Batman Arkham Videos is a legendary Arkham player, while it is unlikely you can replicate their videos, this is mostly just to give you some insight into how to attempt some of the Challenges. Batman:https://www.youtube.com/playlist?list=PL9342551B8C0A1630 Catwoman:https://www.youtube.com/playlist?list=PL297C2C568B75FAC8 Robin:https://www.youtube.com/playlist?list=PL16332961471AD09A Nightwing:https://www.youtube.com/playlist?list=PL8EB791753135DD51 Sequence 12: Combat Challenges 1. Batman – Ranked Medals: 18/72 2. Catwoman – Ranked Medals: 18/72 3. Robin – Ranked Medals: 18/84 4. Nightwing – Ranked Medals: 18/84 5. Achievements: 50/64 ---------------------------------------------------------------------------------------------------- Blind Justice:1Medal – 6000 Points 2 Medals – 12,000 Points 3 Medals – 24,000 Points For this Challenge, try maintaining a Flawless Freeflow as well as a Perfect Round to maximize your Points throughout the Challenge; apply as many Gadget Variations as you can per Round. It is good practice to try getting a Perfect Round (ideally a Flawless Freeflow as well) on every Challenge’s first Round. Round 1: Thugs x3 Round 2: Thugs x5 Round 3: Thugs x8 Round 4: Thugs x10

Achievement #50 – Flawless Freeflow Fighter 2.0: Complete one Combat Challenge without taking damage (any character). This is easiest attempted on Blind Justice for obvious reasons. Even with the limited amount of Thugs, it will still probably take a few tries, to get through Round 4 especially, & complete the entire Combat Challenge without being hit once. We can break our Combo however & do not need to do an actual Flawless Freeflow; just not take any damage. Survival of the Fittest:1 Medal – 8000 Points 2 Medals – 16,000 Points 3 Medals – 32,000 Points We will begin to fight Thugs with blade type Weapons starting on this Challenge. Performing Blade Dodge Takedowns provides a lot of Points if you can pull them off; I would highly recommend practicing the timing with them to capitalize on what they offer. Round 1: Thugs x4 Round 2: Thugs x8, Knife Thug x1 Round 3: Thugs x12, Broken Bottle Thug x1, Knife Thug x1 Round 4: Thugs x20 Rooftop Rumble:1 Medal – 8000 Points 2 Medals – 16,000 Points 3 Medals – 32,000 Points Armored Thugs are Point mines; as soon as a Round starts, make an effort to Stun them & continually Beat Down attack on them. Counter any attacking Thugs & return to Beating Down the Armored Thugs. If you get distracted by Evading a Knife Thug you may have to re-Stun them or you will risk losing your Combo. Unless you can get at least one hit on that Armored Thug before going in for a Counter, the Stun will wear off by the time you finish your Counter & you will to re-apply it. Getting a higher Combo is more important than taking out the Armored Thug, milk them for all they have to offer & get those Counter Combos going. Round 1: Thugs x4, Broken Bottle Thug x1, Knife Thug x1 Round 2: Thugs x7, Armored Thug x1 Round 3: Thugs x13, Knife Thug x1 Round 4: Thugs x10, Armored Thug x2 Hell's Gate:1 Medal – 8000 Points 2 Medals – 16,000 Points 3 Medals – 32,000 Points Assassins are a very annoying enemy to face; make an effort to dispose of them quickly with Combat Finishers. Assassin’s swords & Knives have different timings though so keep that in mind as you will have to learn both. If you can get the timing down, Assassins just become another high source of Points for Blade Dodge Takedowns. In my opinion, I actually find this the hardest Challenge out of the 12 due to the limited amount of Thugs & high concentration of Assassins. Round 1: Assassins x3 Round 2: Thugs x11, Armored Thug x1 Round 3: Thugs x7, Assassins x3 Round 4: Thugs x10, Armored Thug x1, Assassins x6 Funhouse Brawl:1 Medal – 15,000 Points 2 Medals – 30,000 Points 3 Medals – 60,000 Points Using Mr. Sickle to beat on can seriously crank your Points up; if possible, try beating him down with the same Combo without being hit then maintaining that Combo for as long as possible. You can get a Point bonus of over 20,000 Points depending on how long you can maintain that Combo for! Mr. Sickle/Hammer enemies are probably the best in the Challenges for this reason. Round 1: Thugs x4, Shield Thug x1 Round 2: Thugs x6, Knife Thug x2, Armored Thug x1 Round 3: Thugs x14, Armored Thugs x2 Round 4: Thugs x20, Shield Thug x1, Mr. Sickle x1 Prison Riot:1 Medal – 8,000 Points 2 Medals – 16,000 Points 3 Medals – 32,000 Points For the Shock Tygers, build up a Combo fast & disable the Shock Batons as soon as possible so you do not have to worry about them as Batman. For the other characters, pay attention to where they are in the room & either Whip Trip, Combat Finish, or knock them down with Gadgets. Round 1: Thugs x2, Tyger x3, Shock Tyger x1 Round 2: Thugs x4, Tyger x2, Knife Tyger x1, Shield Tyger x1 Round 3: Thugs x3, Tyger x5, Armored Tyger x1 Round 4: Thugs x3, Tyger x4, Knife Tyger x1, Armored Tyger x2, Shield Tyger x1, Shock Tyger x1 Sequence 13: Combat (Extreme) 1. Batman – Ranked Medals: 36/72 2. Catwoman – Ranked Medals: 36/72 3. Robin – Ranked Medals: 39/84 4. Nightwing – Ranked Medals: 39/84 5. Achievements: 50/64 ---------------------------------------------------------------------------------------------------- Blind Justice (Extreme): 1 Medal – 8000 Points 2 Medals – 16,000 Points 3 Medals – 32,000 Points While you think that the Extreme Challenges are harder than the basic Challenges, but they technically are not. We face more Thugs & Thugs worth more Points like Armored Thugs which translates to longer fights & in turn more Points. Round 1: Thugs x3, Knife Thug x1 Round 2: Thugs x5, Armored Thug x1 Round 3: Thugs x8, Knife Thug x1, Armored Thug x1 Round 4: Thugs x10, Armored Thug x2 Survival of the Fittest (Extreme): 1 Medal – 15,000 Points 2 Medals – 30,000 Points 3 Medals – 60,000 Points Round 1: Thugs x4, Armored Thug x1 Round 2: Thugs x8, Knife Thug x1, Titan x1 Round 3: Thugs x12, Broken Bottle Thug x1, Knife Thug x1, Armored Thug x1 Round 4: Thugs x20, Titan x1

Achievement #51 – Bronze Revenge: Obtain 24 Medals on the original Arkham City Ranked Maps (as Batman). If you have earned all 3 Medals for the 8 Combat Challenges we have done so far, this is the soonest we will unlock this Achievement. Rooftop Rumble (Extreme): 1 Medal – 10,000 Points 2 Medals – 20,000 Points 3 Medals – 40,000 Points Since this Challenge has Mr. Sickle, it is not too bad getting a high score right at the end of the Challenge. Round 1: Thugs x4, Broken Bottle Thug x1, Knife Thug x1, Shield Thug x1 Round 2: Thugs x7, Armored Thug x1, Assassins x3 Round 3: Thugs x13, Knife Thug x1, Shield Thug x1 Round 4: Thugs x10, Armored Thugs x2, Mr. Sickle x1 Hell's Gate (Extreme): 1 Medal – 12,000 Points 2 Medals – 24,000 Points 3 Medals – 48,000 Points Round 1: Thugs x8, Assassins x3 Round 2: Thugs x11, Armored Thug x1, Shield Thug x1, Shock Thug x1 Round 3: Thugs x7, Shield Thug x1, Assassins x3 Round 4: Thugs x9, Armored Thug x2, Shock Thug x1, Assassins x3 Funhouse Brawl (Expert): 1 Medal – 15,000 Points 2 Medals – 30,000 Points 3 Medals – 60,000 Points Focus on the Mr. Hammer & Mr. Sickle enemies, then the Titans, then the rest of the Thugs as an order of operations to maximize our Points. While going after the Titans first can work, you have a high chance of damaging the one-armed brothers while riding the Titan which will reduce the amount of punishment we can deliver to them with our fists which could make us lose out on a lot of Points. Round 1: Thugs x4, Shield Thug x1, Shock Thug x1 Round 2: Thugs x6, Knife Thug x1, Armored Thug x1, Titan x1, Mr. Hammer x1 Round 3: Thugs x14, Armored Thug x2, Shock Thug x1 Round 4: Thugs x14, Shield Thug x1, Titan x2, Mr. Sickle x1 Prison Riot (Extreme): 1 Medal – 12,000 Points 2 Medals – 24,000 Points 3 Medals – 48,000 Points With the two Shock Tygers right at the beginning of the Challenge, unless you are Batman, you will have to play on your toes the whole Challenge. At any point Thugs can pick those Batons up to use against us. Round 1: Thugs x3, Knife Thug x1, Tyger x4, Knife Tyger x1, Shock Tyger x2 Round 2: Thugs x6, Tyger x4, Knife Tyger x1, Shield Tyger x1, Assassins x3 Round 3: Thugs x5, Tyger x7, Armored Tyger x1 Round 4: Thugs x4, Tyger x5, Knife Tyger x1, Armored Tyger x3, Shield Tyger x1, Shock Tyger x1, Assassins x5 Freight Train (DLC): Robin Only 1 Medal – 8,000 Points 2 Medals – 16,000 Points 3 Medals – 32,000 Points The side scroller nature of this Challenge works against us & makes it difficult to track Thugs; it is very easy to lose our Combo on this Challenge. Since space is limited, only a few Thugs can attack us at once making the Perfect Knight Bonus a lot easier to achieve. Rack up as high of a score as you can manage & make up the difference in Round 4 when Mr. Hammer arrives. Round 1: Thugs x4 Round 2: Thugs x3, Baseball Bat Thug x1, Metal Pipe Thug x1 Round 3: Thugs x8, Baseball Bat Thug x1, Metal Pipe Thug x1 Round 4: Thugs x4, Mr. Hammer x1, Black Mask x1 Wayne Manor Armory (DLC): Nightwing Only 1 Medal – 15,000 Points 2 Medals – 30,000 Points 3 Medals – 60,000 Points This Challenge almost solely relies on your ability to perform Blade Dodge Counters. If you cannot, really focus on hammering on those Armored Tygers & maintaining a Combo for as long as possible. Round 1: Tyger x6 Round 2: Tyger x9, Armored Tyger x1 Round 3: Tyger x15 Round 4: Tyger x19, Armored Tyger x3 Iceberg Lounge VIP Room (DLC): Batman OnlyWe do not need any Medals from this Challenge for any Achievements; it is simply the best map to acquire this Achievement on.

成就#52 – Perfect Freeflow 2.0:使用蝙蝠侠的所有战斗招式完成一次完美连击(任意游戏模式)。 这是一个非常难完成的成就。由于冰山休息室VIP区域会无限刷新暴徒,因此这是尝试完成该成就的最佳挑战地图。不过冰山休息室的一大缺点是,由于敌人无限刷新,想要完成地面击倒会极具挑战性,需要非常小心。如果不想在冰山休息室尝试,大多数玩家建议在挑战地图“适者生存(极限)”的第三轮进行尝试。解锁此成就需要多次尝试……一定要记住你使用招式的顺序,并反复重复该顺序,直到成功使出所有招式。记忆非常重要! 我们需要使用的13种招式如下: 基础招式: 1. 攻击(X) 2. 披风眩晕(B) 3. 闪避(A) 4. 反击(Y) 5. 空中攻击(X,左摇杆+A,A) 6. 蝙蝠抓摔(Lt+Y,X) 7. 终极披风眩晕(B,B,B) 8. 地面击倒(Rt+Y) 9. 连续击倒终结技(多次按B,X) 特殊招式: 10. 战斗击倒(Y+B) 11. 特殊连击蝙蝠群(X+A) 12. 缴械并摧毁(Y+X) 13. 多重地面击倒(B+A) 这个成就最困难的部分就是记住哪些招式已经使用过,哪些还没有。 序列14:掠食者(蝙蝠侠) 1. 蝙蝠侠 – 排名勋章:72/72 2.成就:54/64 Meltdown Mayhem:持枪暴徒:5人 1级勋章:烟雾探测器——使用烟雾弹制造烟雾,在暴徒因烟雾恐慌时将其击倒。 2级勋章:小心碰头——用蝙蝠镖击倒暴徒,然后用地面击倒终结他。 3级勋章:震慑战术——用REC装置射击暴徒,使其向空中开火,惊吓另一名暴徒。 Police Brutality:持枪暴徒:5人 1级勋章:爆炸区域——引爆结构弱点攻击暴徒,将其击晕。(建议在暴徒未警觉/巡逻前开始尝试) 2级勋章:击倒猛击——在无声击倒过程中使用击倒猛击,立即制服暴徒。 3级勋章:破窗之痛——透过玻璃窗进行击倒。 自然选择:持枪暴徒:6名 1级勋章:武器卡壳——用干扰器干扰一名暴徒的枪械,待其尝试使用后将其制服。 2级勋章:空中突击——滑行踢击一名暴徒,然后在地面将其击晕。 3级勋章:好友同坠——悬挂在边缘时,同时抓住两名暴徒并将他们拉下边缘。(最佳尝试时机为暴徒未警觉/巡逻前的初始阶段;桥上的暴徒) 终点线:持枪暴徒:6名 1级勋章:踢出局——使用绳索发射器将一名暴徒踢下边缘并将其击晕。(最佳尝试时机为暴徒未警觉/巡逻前的初始阶段) 2级勋章:恐吓战术——突然出现,惊吓一名恐惧的暴徒。 3级勋章:冻结瞬间——对一名暴徒使用冰冻冲击,然后在其被冻结时将其击倒。 失落之城:持枪虎人:7名 1级勋章:格栅行动——在地板格栅中对一名暴徒执行击倒。 2级勋章:坠落之人——使用蝙蝠爪抓住一名暴徒并将其拉下走道以击倒。 3级勋章:破门而入——穿过软木板执行击倒。

Achievement #51 – Silver Revenge: Obtain 48 Medals on the original Arkham City Ranked Maps (as Batman). If you have collected all 3 Medals on all Combat Challenges & the previously completed Predator Challenges, then this is the soonest you will unlock this Achievement. Top of the World:Gun Tygers: x7 1 Medal: Fire Hazard – Batarang a fire extinguisher & silently Takedown a Thug caught up in the smoke. 2 Medals: Confiscated Weapon – Use the Batclaw to disarm a Thug, then take him down. 3 Medals: Mined Your Step – Detonate a Mine using the Mine Detonator as a Thug walks over it. Use the Gargoyles on the outside of the map to circle around the building & observe from the outside to sneak in to take out Tygers when possible. Meltdown Mayhem (Extreme):Gun Thugs: x6 Armored Thug: x1 Sniper Thug: x1 1 Medal: Armor Piercing – Take out the Armored Thug first. (Inverted Takedown from the Gargoyle above him) 2 Medals: Bringing Down the Roof – Explode a Structural Weakness ceiling onto a Thug to knock him out. 3 Medals: Venting Anger – Perform a Takedown through a vent cover on a Thug. Police Brutality (Extreme):Gun Thugs: x6 (Very Hard) Jammer Thug: x1 1 Medal: Don't Touch That Dial – Leave the Thug with the Jammer Backpack until last. 2 Medals: Feet First – While standing on a ledge directly above your target, perform a Reverse Ledge Takedown on the Thug below you. 3 Medals: Smash & Grab – Perform an Inverted Takedown from a vantage point through the glass ceiling. (Can be done immediately at the beginning with the Gun Thug below us to the right where we spawn) Natural Selection (Extreme):Gun Thug: x5 (Very Hard) Armored Thug: x1 Armored Sniper Thug: x1 1 Medal: Boom Box – Use Explosive Gel to stun a Thug getting a Weapon from the Weapons Crate. 2 Medals: Chaos Theory – Perform an Inverted Takedown from a vantage point on a Thermal Thug. 3 Medals: Deep Impact – Use the Shock Wave Attack on two or more Thugs. This is one of those Challenges with very obscure strategies; these can be done any whichever order you find works. For me, I did Chaos Theory, Boom Box, then Deep Impact with that final Challenge being the most difficult to set up. End of the Line (Extreme):Armored Thugs: x5 Armored Snipers: x2 Armored Jammer: x1 1 Medal: Perpetual Motion – Shoot an Armored Thug with the REC Gadget & send him over an edge to knock him out. 2 Medals: What Goes Up – When a Thug climbs to the top of a ladder, send him flying back down. 3 Medals: Don't Touch That Dial – Leave the Thug with the Jammer Backpack until last. Since Batman has the REC, this is actually an extremely easy Challenge. Outside of the Challenges, we can simply blast the majority of the Armored Thugs off of the trains or ledges to knock them out. Lost City (Extreme):Gun Tygers: x5 (Very Hard) Armored Tygers: x3 1 Medal: Bullet Proof – Take down all of the Thugs without taking damage. 2 Medals: Switch Hitter – Kick one Thug while on the Line Launcher, then fire the Line Launcher again from the current line & kick a different Thug. (Best attempted at the beginning before Tygers are alerted/patrolling) 3 Medals: High Speed Impact – Use a boosted Remote Controlled Batarang to knock a Thug over an edge. This is another difficult Challenge that will require a lot of your own trial & error; using the Floor Grates & winding halls at the bottom floor were the safest places to be I found to lure in Tygers/escape them. Top of the World (Extreme):Gun Tyger: x6 (Very Hard) Armored Tyger: x1 Jammer Thug: x1 1 Medal: Fists of Fury – Take down a Thug with a Beat Down. 2 Medals: Human Cannonball – Shoot an Armored Thug with the REC Gadget to send him flying back into another Thug. 3 Medals: Cold War – Use the Freeze Cluster Grenade to immobilize three or more Thugs at one time. For this Challenge, I liked Grappling along the Gargoyles counter clockwise to the lone Tyger on the balcony & taking him out with a Sonic Batarang. Then I would try luring a group of three or more Tygers out; either they would come out right away or I would have to bait them out by throwing Batarangs & Grappling between Gargoyles until enough come out. I could also complete Human Cannonball sometimes while luring out Tygers. Which sometimes got me discovered & I would die. After completing Cold War... the rest of my Challenge strategies would fall apart for me & I would just adlib things on the fly.

Achievement #54 – Gold Revenge: Obtain all 72 Medals on the original Arkham City Ranked Maps (as Batman). We will unlock this after unlocking all 36 Combat Challenge Medals & all 36 Predator Challenge Medals for Batman. Sequence 15: Predator (Catwoman) 1. Catwoman – Ranked Medals: 72/72 2. Achievements: 55/64 ---------------------------------------------------------------------------------------------------- Meltdown Mayhem:Gun Thugs: x5 1 Medal: Whipped Up – While climbing on the ceiling perform a Takedown on an enemy above you. 2 Medals: Silence Is Golden – Sneak up behind a Thug & perform a Silent Takedown. 3 Medals: Break Your Fall – Drop down on top of a Thug & then knock him out on the ground. Police Brutality:Gun Thugs: x5 1 Medal: Whip Into Shape – Trip up a Thug with the Whip & then finish him off with a Ground Takedown. 2 Medals: Scare Tactics – Appear out of nowhere to surprise a terrified Thug. 3 Medals: Hit & Run – Punch a Thug. Natural Selection:Gun Thugs: x6 1 Medal: Cat Nap – While climbing on the ceiling perform a Takedown on an enemy below you. 2 Medals: Grate Moves – While in a Floor Grate perform a Takedown on a Thug. 3 Medals: Have A Nice Trip – Slide into a Thug & then knock him out on the ground. End of the Line:Gun Thugs: x6 1 Medal: Bola'd Over – Knock down a Thug with the Bolas & then finish him off with a Ground Takedown. 2 Medals: Over the Ledge – While hanging from a ledge, grab a Thug & pull him down over the ledge. 3 Medals: Breaking & Entering – Perform a Takedown through a Weak Wooden Wall. Lost City:Gun Tygers: x7 1 Medal: Caltrop Trip – Knock down an enemy with the Caltrops & then take him down. 2 Medals: Round the Bend – Use Corner Cover to hide & then take down an approaching Thug. 3 Medals: Pouncer – Perform a Pounce Attack on a Thug & then knock him out on the ground. Top of the World:Gun Tygers: x7 1 Medal: Gun Thief – Disarm a Thug with an aimed Whip Attack. 2 Medals: Have A Nice Trip – Slide into a Thug & then knock him out on the ground. 3 Medals: Feet First – While standing on a ledge directly above your target, perform a Reverse Ledge Takedown on the Thug below you. (This is best done if you can wait for a Tyger to take the Hostage as they stand right below a walkway every time; setting this up “naturally” can be challenging) Meltdown Mayhem (Extreme): Gun Thugs: x6 Armored Thug: x1 Sniper Thug: x1 1 Medal: Lone Gunman – While climbing on the ceiling, perform a Takedown on a Sniper Thug above you. (Best attempted at the beginning before Thugs are alerted/patrolling) 2 Medals: Grate Moves – While in a Floor Grate perform a Takedown on a Thug. 3 Medals: Window Pain – Perform a Takedown through a glass window. Police Brutality (Extreme):Gun Thugs: x6 (Very Hard) Jammer Thug: x1 1 Medal: Gun Thief – Disarm a Thug with an aimed Whip Attack. (Quickfire Whip disarms Weapons) 2 Medals: Knockout Smash – During a Silent Takedown perform a Knockout Smash to takedown the Thug instantly. 3 Medals: Bullet Proof – Take down all of the Thugs without taking damage. This is the first Challenge that will probably make you want to tear your hair out with Catwoman. Make a point of taking out the Jammer Thug first so that we can use Thief Vision properly. Since the Challenges themselves are simple (minus Bullet Proof of course), really take your time & only take out lone Thugs. Save Knockout Smash & Gun Thief for the final two Thugs. Natural Selection (Extreme):Gun Thug: x5 Armored Thug: x1 Armored Sniper Thug: x1 1 Medal: Cat Fight – Perform a Beatdown on a Gun/Armored Thug. 2 Medals: Breaking & Entering – Perform a Takedown through a Weak Wooden Wall. 3 Medals: Pouncer – Perform a Pounce Attack on a Thug & then knock him out on the ground. End of the Line (Extreme):Gun Thugs: x3 (Very Hard) Sniper Thug: x1 Armored Thug: x2 Armored Sniper: x1 Armored Jammer: x1 1 Medal: Whip Into Shape – Trip up a Thug with the Whip & then finish him off with a Ground Takedown. 2 Medals: Friends Fly Free – While hanging from a ledge, grab two Thugs simultaneously & pull them down over the ledge. 3 Medals: Grate Moves – While in a Floor Grate perform a Takedown on a Thug. (Best attempted at the beginning before Thugs are alerted/patrolling) This Challenge becomes the new hardest Predator Challenge unfortunately. When the Challenge begins, immediately sneak to the Floor Grates at the far-right end of the map undiscovered & wait in there for the Armored Jammer to walk by. The Jammer’s undisturbed route will always walk him over there by himself where we can then perform the Takedown; we can then escape into the crawlspace dead ahead of us undiscovered & plot out the next moves. I usually then complete Whip Into Shape with the lone Armored Sniper in the upper balcony while the other Thugs are distracted; my strategy then always falls apart with no consistent way of getting Friends Fly Free. Lost City (Extreme):Gun Tygers: x5 Armored Tygers: x3 1 Medal: Whipped Up – While climbing on the ceiling perform a Takedown on an enemy above you. 2 Medals: Knockout Smash – During a Silent Takedown perform a Knockout Smash to takedown the Thug instantly. 3 Medals: Three Strikes – Punch any three different Gun/Armored Tygers. Top of the World (Extreme):Gun Tyger: x6 (Very Hard) Armored Tyger: x1 Armored Jammer Tyger: x1 1 Medal: Cat Fight – Perform a Beat Down on a enemy. 2 Medals: Caltrop Trip – Knock down an enemy with the Caltrops & then take him down. 3 Medals: Don't Touch That Dial – Leave the Thug with the Jammer Backpack until last. For the most part, all Challenges can be completed at the very end of the Challenge; the hardest part is just surviving to even get that far. Play extremely cautiously & use the Floor Grates, Vents, & Gargoyles to navigate around undetected.

Achievement #55 – Feline Revenge: Obtain all 72 Medals on the original Arkham City Ranked Maps (as Catwoman). We will unlock this after unlocking all 36 Combat Challenge Medals & all 36 Predator Challenge Medals for Catwoman. Sequence 16: Predator (Robin) 1. Robin – Ranked Medals: 69/84 2. Achievements: 55/64 ---------------------------------------------------------------------------------------------------- Meltdown Mayhem:Gun Thugs: x5 1 Medal: Shield Bash – Knock a Thug down with the Shield Bash & then take him down. 2 Medals: Over the Ledge – While hanging from a ledge, grab a Thug, & pull him down over the ledge. 3 Medals: What Goes Up – When a Thug climbs to the top of a ladder, send him flying back down. Police Brutality:Gun Thugs: x5 1 Medal: Bullet Shield – Block a Thug’s bullets before performing a Shield Bash, then take them down. 2 Medals: Feet First – While standing on a ledge directly above your target, perform a Reverse Ledge Takedown on the Thug below you. 3 Medals: Smash Landing – Smash through a glass ceiling onto a Thug below to take him down. (Best attempted at the beginning before Thugs are alerted/patrolling) Natural Selection:Gun Thugs: x6 1 Medal: Zip Kick – Knock a Thug down with the Zip Kick & then take him down. 2 Medals: Blast Zone – Explode a weak wall into a Thug to knock him out. (Best attempted at the beginning before Thugs are alerted/patrolling; there are two different Thugs on the lower level that walk in front of Structural Weaknesses) 3 Medals: Knock Knock – Distract a Thug with a Wing Ding thrown in the environment & then perform a Silent Takedown while he is distracted. End of the Line:Gun Thugs: x6 1 Medal: Shield Smash – Use a Shield Bash to knock a Thug off a ledge. 2 Medals: High Speed Impact – Use a boosted Remote Shuriken to knock a Thug over an edge. 3 Medals: Grate Moves – While in a Floor Grate perform a Takedown on a Thug. Lost City:Gun Tygers: x7 1 Medal: Snap Flashed – Knock down 1 Thug with a Snap Flash & then take him down. 2 Medals: Fire Hazard – Use a Shuriken on a fire extinguisher & silently take down a Thug caught up in the smoke. 3 Medals: Aerial Assault – Glide kick a Thug & then knock him out on the ground. Top of the World:Gun Tygers: x6 1 Medal: Zip Kick Off – Use the Zip Kick to knock a Thug off of a walkway. 2 Medals: Over the Ledge – While hanging from a ledge, grab a Thug & pull him down over the ledge. 3 Medals: Round the Bend – Use Corner Cover to hide & then take down an approaching Thug. Meltdown Mayhem (Extreme):Gun Thugs: x6 Sniper Thug: x1 Armored Thug: x1 1 Medal: Zip Kick Off – Use the Zip Kick to knock a Thug off of a walkway. 2 Medals: Have A Nice Trip – Slide into a Thug & then knock him out on the ground. 3 Medals: Friends Fly Free – While hanging from a ledge, grab two Thugs simultaneously & pull them down over the ledge. (The hardest Challenge, best to lure Thugs to the opposite end of the map from the Sniper Thug, takeout the Sniper Thug to lure the Thugs back, & try being quick enough to Ledge Takedown two Thugs as they investigate the Sniper) Police Brutality (Extreme):Gun Thugs: x6 (Very Hard) Jammer Thug: x1 1 Medal: Shield Bash – Knock a Thug down with the Shield Bash & then take him down. 2 Medals: Two For Two – Take down 2 Thugs with 2 different walls at once using Explosive Gel. (Best attempted at the beginning before Thugs are alerted/patrolling) 3 Medals: Smoke Detector – Use the Smoke Pellet to create a smoke cloud & take down a Thug as he panics in the smoke. For the Two For Two Challenge, all while being undiscovered, Glide over to the building across from where we start & quickly sneak inside to spray Explosive Gel on the Structural Weakness behind where a Thug stands; this Thug will only move if you are discovered. Now quickly sneak over to the room off our left (if facing the wall we just Gel’d) & wait for the patrolling Thug to walk out of your view in behind a different Structural Weakness. Before he can walk by it, place down the second Explosive Gel & immediately detonate. Then make an effort to Takedown the Jammer Thug so you can safely complete the rest of the Challenges.) Sequence 16.5: Predator (Robin) 1. Robin – Ranked Medals: 84/84 2. Achievements: 56/64 ---------------------------------------------------------------------------------------------------- Natural Selection (Extreme):Gun Thugs: x5 (Very Hard) Armored Thug: x1 Armored Sniper: x1 1 Medal: Snap Flashed – Knock down 1 Thug with a Snap Flash & then take him down. 2 Medals: Smoke Detector – Use the Smoke Pellet to create a smoke cloud & take down a Thug as he panics in the smoke. 3 Medals: Crowd Control – Take down three Thugs at once with one wall using Explosive Gel. When the Challenge begins, we will be on the lower level. A Gun Thug will walk down some stairs off our right & walk down a hall; a different Thug will walk a little bit past the mammoth toward the other Thug before turning around & heading down a different side hall. These two halls are divided by a Structural Weakness. As soon as the second Thug turns around to begin walking back down the hall, quickly sneak past the first Thug & place Explosive Gel on the Structural Weakness. Now quickly sneak around the Weakness to Silently Takedown the second Thug right in front of the wall so that it will lure over the others. Quickly, enter into the nearby Vent & wait for the Thugs to come over; when a group of three or more Thugs arrive, detonate the wall to complete Crow Control. This is extremely finicky as the Thugs distance from the wall & variance in patrolling can make this strategy inconsistent. End of the Line (Extreme):Armored Thugs: x5 (Very Hard) Armored Snipers: x2 Armored Jammer: x1 1 Medal: Triple Snap Flashed – Knock down 3 Thug with a Snap Flash. 2 Medals: Fists of Fury – Take down a Thug with a Beat Down. 3 Medals: Over the Ledge – While hanging from a ledge, grab a Thug, & pull him down over the ledge. Similar to how we started with Catwoman on this Challenge, begin by taking out the Armored Jammer from the Floor Grate. We can then takeout the lone Armored Sniper in the balcony with a Beat Down to complete Fists of Fury. From this balcony facing into the Subway, we need to get over to the far-right end of the map where some Soft Wood Paneling & Floor Grates are. Try alerting the Thugs to come over here with Shurikens or visual contact & hide in the Floor Grates. As they begin dispersing, try placing a Snap Freeze on one of the Thugs. Lure them back over with Shurikens, & sneak through the Floor Grates into the room behind the Soft Wood Paneling. With the Thugs in front of us, throw Shurikens at the walls or Soft Wood Paneling to alert the Thugs. Will standing out of the Grates, the Thugs should begin running around to enter into this room from behind us which is a narrow staircase. Ideally, our Snap Freeze Thug is here with them. When they group up in the staircase, detonate your Snap Freeze to complete Triple Snap Flashed. Then carefully begin luring the Thugs into this back room/staircase area to take them down; do not destroy the Soft Wood Paneling at all or it will ruin the safety of this area. Over the Ledge will have to be completed on the fly; if possible, leave a Thermal Vision Thug alive as they tend to stick to the upper levels of maps. Lost City (Extreme):Gun Tygers: x5 (Very Hard) Armored Tygers: x3 1 Medal: Shield Smash – Use a Shield Bash to knock a Thug off a ledge. 2 Medals: Snap Flash Trap – Place a Snap Flash on a stunned Thug, then use it to knock down a different Thug. 3 Medals: Grate Moves – While in a Floor Grate perform a Takedown on a Thug. Snap Flash Trap is a bit tricky to figure out. How it works in practice, is you need to knock down a Tyger either with a Shuriken or with a Super Cape Stun. With them on the ground, place down a Snap Freeze on them, & quickly perform a Ground Takedown. When the other Tygers come to investigate the body, detonate the Snap Freeze to complete the Challenge. That is the theory... but there seems to be a certain time limit for between knocking out downed Tyger & when the Snap Freeze knockdown will register. On multiple occasions I would do this & the Snap Freeze knockdown simply wouldn’t register which was really annoying. Top of the World (Extreme):Gun Tygers: x6 Armored Tygers: x1 Armored Jammer: x1 1 Medal: Bullet Shield – Block a Thug's bullets before performing a Shield Bash, then take them down. 2 Medals: Round the Bend – Use Corner Cover to hide & then take down an approaching Thug. 3 Medals: Fire Hazard – Use a Shuriken on a fire extinguisher & silently take down a Thug caught up in the smoke. Black Mask (DLC):Gun Thugs: x6 1 Medal: Shield Bash – Knock a Thug down with the Shield Bash & then take him down. 2 Medals: Zip Kick Off – Use the Zip Kick to knock a Thug off of a walkway. 3 Medals: Window Pain – Perform a Takedown through a glass window.

Achievement #56 – Robin Revenge: Obtain 78 Medals on the original Arkham City & Robin Bundle Pack Ranked Maps (as Robin). We will unlock this after unlocking all 36 Combat Challenge Medals & all 36 Predator Challenge Medals for Robin. We will also need to earn all 3 Medals for the Robin exclusive Challenges Freight Train & Black Mask. Sequence 17: Predator (Nightwing) 1. Nightwing – Ranked Medals: 60/84 2. Achievements: 56/64 ---------------------------------------------------------------------------------------------------- Nightwing is a bit broken in terms of Gadgets as we can use the Disrupter to disable Guns as well as the use the Wrist-Dart, which if hit in the head, performs a one-shot Takedown on an enemy. His Extreme Challenges unfortunately, are the hardest in the game so brace yourself for a big headachce. Meltdown Mayhem:Gun Thugs: x5 1 Medal: Bullseye – Shoot a Thug in the body with a Wrist Dart to stun them, then perform a Ground Takedown. 2 Medals: Fall Guy – Batclaw a Thug & pull him off a walkway to take him down. 3 Medals: Fists of Fury – Take down a Thug with a Beat Down. Police Brutality:Gun Thugs: x5 1 Medal: Pound the Beat – Knock down 1 Thug with the Electrical Blast, then take him down. 2 Medals: Grate Moves – While in a Floor Grate perform a takedown on a Thug. 3 Medals: Mind Your Head – Knock down a Thug with a Wing Ding & then finish him off with a Ground Takedown. Natural Selection:Gun Thugs: x6 1 Medal: Stick Up – Knock down 1 Thug with an Escrima Stick, then take him down. 2 Medals: Line Drive – Kick 1 Thug using the Line Launcher. 3 Medals: Break Your Fall – Drop down on top of a Thug & then knock him out on the ground. End of the Line:Gun Thugs: x6 1 Medal: Head Shot – Shoot a Thug in the head with the Wrist-Dart for a one-hit Takedown. 2 Medals: Weapon Jam – Use the Disruptor on one Thug's gun, let him try to use it & then take him down. 3 Medals: Knockout Smash – During a Silent Takedown perform a Knockout Smash to takedown the Thug instantly. Lost City:Gun Tygers: x7 1 Medal: Stick Up – Knock down 1 Thug with an Escrima Stick, then take him down. 2 Medals: Kick Off – Use the Line Launcher to kick a Thug off an edge & knock him out. 3 Medals: Over the Ledge – While hanging from a ledge, grab a Thug & pull him down over the ledge. Top of the World:Gun Tygers: x6 1 Medal: Bowled Over – Sneak up behind a Thug & knock him off of a walkway with the Electrical Blast. 2 Medals: Fall Guy – Batclaw a Thug & pull him off a walkway to take him down. 3 Medals: Grate Moves – While in a Floor Grate perform a Takedown on a Thug. Meltdown Mayhem (Extreme):Gun Thugs: x5 (Very Hard) Sniper Thug x1 Armored Thug x1 1 Medal: Triple Ricochet – Knock down 3 Thugs at once with the Escrima Stick. (Lure over a group of Thugs to a downed one & highlight three of them with the Escrima Stick which will knock them all down if thrown. Note that this will not work on Armored Thugs!) 2 Medals: Rope-A-Dope – While on a Line Launcher wire walk, perform a Drop Attack on a Thug. 3 Medals: Three Strikes – Punch any three different Gun Thugs. Police Brutality (Extreme):Gun Thugs: x6 (Very Hard) Jammer Thug: x1 1 Medal: Triple Header – Use the Electrical Blast attack on three or more Thugs. 2 Medals: Chain Reaction – Kick 2 Thugs in one move using the Line Launcher. 3 Medals: Confiscated Weapon – Use the Batclaw to disarm a Thug, then take him down. When the Challenge begins, Takedown the patrolling Gun Thug off our right through the Takedown through the glass ceiling. Then, quickly Grapple back up top & stand on the railing looking below. The Thugs will walk out of the entrance to the room behind us in a cluster where we can then use Electrical Blast & launch into them to complete Triple Header. If you are quick, you can also run away & then complete Chain Reaction while they are still clustered but it is very difficult; you may not to bait them over to a different downed Thug to reset them. Sequence 17.5: Predator (Nightwing) 1. Nightwing – Ranked Medals: 84/84 2. Achievements: 57/64 ---------------------------------------------------------------------------------------------------- Natural Selection (Extreme):Gun Thugs: x5 Armored Thugs: x1 Armored Sniper: x1 1 Medal: Head Shot – Shoot a Thug in the head with the Wrist-Dart for a one-hit Takedown. 2 Medals: Weapon Jam – Use the Disruptor on one Thug's gun, let him try to use it & then take him down. 3 Medals: Triple Ricochet – Knock down 3 Thugs at once with the Escrima Stick. Triple Ricochet has the same strategy as in Meltdown Mayhem Extreme, but easier. Grapple up to the Gargoyles above & head shot the Armored Sniper with our Wrist-Dart for Head Shot. Then when the Thugs come over to investigate, get into a position on the Gargoyles to see them all & use the Escrima Stick to knock them down. Remember that it will only work on regular Gun Thugs. End of the Line (Extreme):Armored Thugs: x5 (Very Hard) Armored Snipers: x2 Armored Jammer: x1 1 Medal: Triple Header – Use the Electrical Blast attack on three or more Thugs. 2 Medals: Switch Hitter – Kick one Thug while on the Line Launcher, then fire the Line Launcher again from the current line & kick a different Thug. 3 Medals: Fall Guy – Batclaw a Thug & pull him off a walkway to take him down. This may be the hardest Predator Challenge in the game. To start, I Grappled to the Gargoyles & used the Disrupter to disable both of the Snipers. If I was fast enough, I would also get a Head Shot in on the Armored Jammer with the Wrist-Dart. With the Snipers disabled, drop onto the walkway & use the Line Launcher to ride into the Armored Sniper here, then quickly use it again to kick an Armored Thug walking on the bridge. From there, my strategies would fall apart & I would have to adlib. This gave me a lot of trouble; video guides are very useful... Lost City (Extreme):Gun Tygers: x6 Armored Tygers: x2 1 Medal: Bowled Over – Sneak up behind a Thug & knock him off of a walkway with the Electrical Blast. (Best attempted at the beginning before Tygers are alerted/patrolling) 2 Medals: Confiscated Weapon – Use the Batclaw to disarm a Thug, then take him down. 3 Medals: Bullet Proof – Take down all of the Thugs without taking damage. Play very cautiously. I found it best to leap from the Gargoyles at the beginning of the Challenge & use Electrical Blast to knock a Tyger off the walkway. This is the hardest of the Challenges here so completing it first is usually your make or break for the run as the rest of the Challenge can be completed just through stealth. Top of the World (Extreme):Gun Tygers: x5 (Very Hard) Armored Tygers: x2 Armored Jammer: x1 1 Medal: Triple Head Shot – Shoot 3 Thugs in the head with the Wrist Dart for one-hit Takedown. 2 Medals: Feet First – While standing on a ledge directly above your target, perform a Reverse Ledge Takedown on the Thug below you. 3 Medals: Mined Your Step – Detonate a Mine using the Mine Detonator as a Thug walks over it. Triple Head Shot is best attempted at the beginning since if you miss a single shot your run is ruined. Grapple around the Gargoyles & wait for Thermal Vision Tygers to come outside; they stand still & line themselves up pretty easily to be shot. If possible, though it is rare, try using a Dart on the Armored Jammer if he comes out to look out a knocked out Tyger. Mined Your Step is not too bad, but Feet First can be really annoying as we don’t have a Hostage to conveniently set this up for us. Wayne Manor Main Hall (DLC):Gun Thugs: x6 1 Medal Stick Up – Knock down 1 Thug with an Escrima Stick, then take him down. 2 Medals: Fall Guy – Batclaw a Thug & pull him off a walkway to take him down. 3 Medals: Knock Knock – Distract a Thug with a Wing Ding thrown in the environment & then perform a Silent Takedown while he is distracted.

Achievement #57 – Nightwing Revenge: Obtain 78 Medals on the original Arkham City & Nightwing Bundle Pack Ranked Maps (as Nightwing). We will unlock this after unlocking all 36 Combat Challenge Medals & all 36 Predator Challenge Medals for Robin. We will also need to earn all 3 Medals for the Nightwing exclusive Challenges Wayne Manor Armory & Wayne Manor Main Hall. Sequence 18: Campaign Challenges 1 1. Batman – Campaign Medals: 36/108 2. Catwoman – Campaign Medals: 36/108 3. Robin – Campaign Medals: 36/114 4. Nightwing – Campaign Medals: 36/114 5. Achievements: 58/64 ---------------------------------------------------------------------------------------------------- Campaign Challenges are a set of three Combat or Predator Challenges that we must beat in one sitting. We do get 3 retries, but beyond that, & we must restart the entire Campaign Challenge. The Challenges are identical to the ones we have been completing previously so you should already have a good feel for how to complete them... for the most part. Each Campaign has a set of Positive or Negative Modifiers; by the end of the Campaign we will have needed to use all of them. I will include which Modifiers I used on which Challenge but by no means are these set-in stone; these reflect my play style; you might decide to approach the Modifiers differently. Play to your strengths! Some characters have conflicting Challenges so there isn’t always a perfect Modifier loadout for all four of them. If a character has conflicting Challenges then the base Modifiers I have set up, I will list them separately at the bottom of the Campaign. Search & Destroy: Modifiers: 1. Time Limit: Adds a time limit to complete the Challenge. Defeat enemies to extend your time. 2. Protective Aura: One enemy will be surrounded with a Protective Aura which prevents them from taking damage. The Aura moves from enemy to enemy over time. 3. Replenishing Health: The Player will slowly regain lost Health over time. Challenges: 1. Meltdown Mayhem (Predator) [Protective Aura] 2. Blind Justice (Combat) [Time Limit, Replenishing Health] 3. Police Brutality (Predator) Street Justice: Modifiers: 1. Decreased Health: The Player starts the Challenge with reduced Health. 2. One Hand Tied: In Combat, Counter Icons will not be displayed before an enemy attacks. In Predator, the Player will not be able to perform a Silent Takedown from behind. 3. Takedown Projectile: Upgrades your primary projectile weapon to knock out enemies with a single hit when thrown with the Quickfire button. Challenges: 1. Rooftop Rumble (Combat) 2. Natural Selection (Predator) [One Hand Tied, Takedown Projectile] 3. Survival of the Fittest (Combat) [Decreased Health] Robin Modifiers: Rooftop Rumble – Decreased Health Natural Selection – Takedown Projectile Survival of the Fittest – One Hand Tied Offensive Maneuvers: Modifiers: 1. Danger Zones: In Combat, Gun Racks will be activated during the Challenge for enemies to obtain Firearms. In Predator, the environment will have booby-trapped Vantage Points. 2. Scattered Weapons: In Combat, enemies will pick up & throw objects at you. In Predator, the environment will start re-mined with proximity activated explosives. 3. Replenishing Health: The Player will slowly regain lost Health over time. 4. Free Medal: Player is automatically given a Medal if they don’t complete all 3 Objectives at the end of the Challenge. Challenges: 1. Funhouse Brawl (Combat) [Scattered Weapons, Replenishing Health] 2. End of the Line (Predator) [Free Medal] 3. Hell's Gate (Combat) [Danger Zones] City Invader: Modifiers: 1. Gadget Malfunction: In Combat, all Gadgets will be disabled. In Predator, Detective Mode will be scrambled for the entire Challenge. 2. Increased Aggression: Enemies will be stronger, faster, & tougher. 3. Decreased Health: The Player starts the Challenge with reduced Health. 4. Super Powered: Gain the ability to punch through Shields, Armor, & Tasers without getting blocked. In Predator, you will move faster when crouched. Challenges: 1. Top of the World (Predator) 2. Prison Riot (Combat) [Gadget Malfunction, Increased Aggression, Super Powered] 3. Lost City (Predator) [Decreased Health] Nightwing Modifiers: Top of the World – None Prison Riot – Gadget Malfunction, Decreased Health, Super Powered Lost City – Increase Aggression

Achievement #58 – Campaign Bronze: Obtain 36 Medals on the original Arkham City Campaigns (as Batman). If you have earned all 9 Medals on each of the 4 Campaign Challenges so far, this is the soonest you will unlock this Achievement. Sequence 19: Campaign Challenges 2 1. Batman – Campaign Medals: 72/108 2. Catwoman – Campaign Medals: 72/108 3. Robin – Campaign Medals: 72/114 4. Nightwing – Campaign Medals: 72/114 5. Achievements: 59/64 ---------------------------------------------------------------------------------------------------- Midnight Assault: Modifiers: 1. Increased Aggression: Enemies will be stronger, faster, & tougher. 2. Scattered Weapons: In Combat, enemies will pick up & throw objects at you. In Predator, the environment will start re-mined with proximity activated explosives. 3. Danger Zones: In Combat, Gun Racks will be activated during the Challenge for enemies to obtain Firearms. In Predator, the environment will have booby-trapped Vantage Points. 4. Free Medal: Player is automatically given a Medal if they don’t complete all 3 Objectives at the end of the Challenge. 5. Replenishing Health: The Player will slowly regain lost Health over time. Challenges: 1. Natural Selection (Extreme) (Predator) [Free Medal] 2. Hell's Gate (Extreme) (Combat) [Danger Zones, Replenishing Health, Scattered Weapons] 3. Meltdown Mayhem (Extreme) (Predator) [Increased Aggression] Nightwing Modifiers: Natural Selection (Extreme) – Increased Aggression Hell’s Gate (Extreme) – Danger Zones, Replenishing Health, Scattered Weapons Meltdown Mayhem (Extreme) – Free Medal Hostile Takeover: Modifiers: 1. Time Limit: Adds a time limit to complete the Challenge. Defeat enemies to extend your time. 2. Decreased Health: The Player starts the Challenge with reduced Health. 3. Protective Aura: One enemy will be surrounded with a Protective Aura which prevents them from taking damage. The Aura moves from enemy to enemy over time. 4. One Hand Tied: In Combat, Counter Icons will not be displayed before an enemy attacks. In Predator, the Player will not be able to perform a Silent Takedown from behind. 5. Super Powered: Gain the ability to punch through Shields, Armor, & Tasers without getting blocked. In Predator, you will move faster when crouched. Challenges: 1. Prison Riot (Extreme) (Combat) [Decreased Health, Protective Aura, Super Powered] 2. Police Brutality (Extreme) (Predator) [One Hand Tied] 3. Funhouse Brawl (Extreme) (Combat) [Time Limit] Catwoman/Robin Modifiers: Switch Decreased Health with One Hand Tied; all others remain the same. Double Jeopardy: Modifiers: 1. Gadget Malfunction: In Combat, all Gadgets will be disabled. In Predator, Detective Mode will be scrambled for the entire Challenge. 2. Increased Aggression: Enemies will be stronger, faster, & tougher. 3. Protective Aura: One enemy will be surrounded with a Protective Aura which prevents them from taking damage. The Aura moves from enemy to enemy over time. 4. Scattered Weapons: In Combat, enemies will pick up & throw objects at you. In Predator, the environment will start re-mined with proximity activated explosives. 5. Takedown Projectile: Upgrades your primary projectile weapon to knock out enemies with a single hit when thrown with the Quickfire button. 6. Free Medal: Player is automatically given a Medal if they don’t complete all 3 Objectives at the end of the Challenge. Challenges: 1. Lost City (Extreme) (Predator) [Takedown Projectile, Free Medal] 2. Rooftop Rumble (Extreme) (Combat) [Protective Aura, Scattered Weapons] 3. End of the Line (Extreme) (Predator) [Gadget Malfunction, Increased Aggression] Catwoman/Robin/Nightwing Modifiers: Lost City (Extreme) – None Rooftop Rumble (Extreme) – Gadget Malfunction, Protective Aura, Increased Aggression End of the Line (Extreme) – Takedown Projectile, Scattered Weapons, Free Medal Ruthless Vengeance: Modifiers: 1. Gadget Malfunction: In Combat, all Gadgets will be disabled. In Predator, Detective Mode will be scrambled for the entire Challenge. 2. Time Limit: Adds a time limit to complete the Challenge. Defeat enemies to extend your time. 3. Decreased Health: The Player starts the Challenge with reduced Health. 4. Danger Zones: In Combat, Gun Racks will be activated during the Challenge for enemies to obtain Firearms. In Predator, the environment will have booby-trapped Vantage Points. 5. One Hand Tied: In Combat, Counter Icons will not be displayed before an enemy attacks. In Predator, the Player will not be able to perform a Silent Takedown from behind. 6. Super Powered: Gain the ability to punch through Shields, Armor, & Tasers without getting blocked. In Predator, you will move faster when crouched. Challenges: 1. Survival of the Fittest (Extreme) (Combat) [Gadget Malfunction, Time Limit, Decreased Health] 2. Top of the World (Extreme) (Predator) 3. Blind Justice (Extreme) (Combat) [Danger Zones, One Hand Tied, Super Powered]

Achievement #59 – Campaign Silver: Obtain 72 Medals on the original Arkham City Campaigns (as Batman). If you have earned all 9 Medals on each of the 8 Campaign Challenges so far, this is the soonest you will unlock this Achievement. Sequence 20: Campaign Challenges 3 1. Batman – Campaign Medals: 108/108 2. Catwoman – Campaign Medals: 108/108 3. Robin – Campaign Medals: 108/114 4. Nightwing – Campaign Medals: 108/114 5. Achievements: 62/64 ---------------------------------------------------------------------------------------------------- Combat Expert: Modifiers: 1. Time Limit: Adds a time limit to complete the Challenge. Defeat enemies to extend your time. 2. Increased Aggression: Enemies will be stronger, faster, & tougher. 3. Danger Zones: In Combat, Gun Racks will be activated during the Challenge for enemies to obtain Firearms. In Predator, the environment will have booby-trapped Vantage Points. 4. Replenishing Health: The Player will slowly regain lost Health over time. Challenges: 1. Survival of the Fittest (Combat) [Increased Aggression, Danger Zones, Replenishing Health] 2. Funhouse Brawl (Combat) [Time Limit] 3. Prison Riot (Combat) Predator Expert: Modifiers: 1. Gadget Malfunction: In Combat, all Gadgets will be disabled. In Predator, Detective Mode will be scrambled for the entire Challenge. 2. Scattered Weapons: In Combat, enemies will pick up & throw objects at you. In Predator, the environment will start re-mined with proximity activated explosives. 3. One Hand Tied: In Combat, Counter Icons will not be displayed before an enemy attacks. In Predator, the Player will not be able to perform a Silent Takedown from behind. 4. Takedown Projectile: Upgrades your primary projectile weapon to knock out enemies with a single hit when thrown with the Quickfire button. Challenges: 1. Meltdown Mayhem (Predator) [Gadget Malfunction, Scattered Weapons] 2. Lost City (Predator) [One Hand Tied, Takedown Projectile] 3. Top of the World (Predator) Robin Modifiers: Meltdown Mayhem – Gadget Malfunction, One Hand Tied Lost City – Takedown Projectile, Scattered Weapons Top of the World – None Combat Master: Modifiers: 1. Decreased Health: The Player starts the Challenge with reduced Health. 2. Scattered Weapons: In Combat, enemies will pick up & throw objects at you. In Predator, the environment will start re-mined with proximity activated explosives. 3. One Hand Tied: In Combat, Counter Icons will not be displayed before an enemy attacks. In Predator, the Player will not be able to perform a Silent Takedown from behind. 4. Gadget Malfunction: In Combat, all Gadgets will be disabled. In Predator, Detective Mode will be scrambled for the entire Challenge. 5. Protective Aura: One enemy will be surrounded with a Protective Aura which prevents them from taking damage. The Aura moves from enemy to enemy over time. 6. Super Powered: Gain the ability to punch through Shields, Armor, & Tasers without getting blocked. In Predator, you will move faster when crouched. Challenges: 1. Blind Justice (Extreme) (Combat) [One Hand Tied] 2. Rooftop Rumble (Extreme) [Scattered Weapons] [Decreased Health] 3. Hell's Gate (Extreme) (Combat) [Gadget Malfunction, Protective Aura, Superpowered] Predator Master: Modifiers: 1. Time Limit: Adds a time limit to complete the Challenge. Defeat enemies to extend your time. 2. Increased Aggression: Enemies will be stronger, faster, & tougher. 3. Danger Zones: In Combat, Gun Racks will be activated during the Challenge for enemies to obtain Firearms. In Predator, the environment will have booby-trapped Vantage Points. 4. Protective Aura: One enemy will be surrounded with a Protective Aura which prevents them from taking damage. The Aura moves from enemy to enemy over time. 5. Scattered Weapons: In Combat, enemies will pick up & throw objects at you. In Predator, the environment will start re-mined with proximity activated explosives. 6. Free Medal: Player is automatically given a Medal if they don’t complete all 3 Objectives at the end of the Challenge. Challenges: 1. Police Brutality (Extreme) (Predator) [Time Limit, Increased Aggression] 2. Natural Selection (Extreme) (Predator) [Free Medal, Scattered Weapons, Protective Aura] 3. End of the Line (Extreme) (Predator) [Danger Zone] Catwoman/Robin/Nightwing Modifiers: Police Brutality (Extreme) – Protective Aura Natural Selection (Extreme) – Increased Aggression, Scattered Weapons End of the Line (Extreme) – Time Limit, Danger Zones, Free Medal

成就#60 - Campaign Gold:在《蝙蝠侠:阿卡姆之城》原版战役中(以蝙蝠侠身份)获得全部108枚勋章。如果你已在所有12个战役挑战中获得全部9枚勋章,我们将解锁该成就。

成就#61 - Perfect Knight - Day 2:完成《蝙蝠侠:阿卡姆之城》中的所有挑战——15个主线故事、12个支线任务、27个升级、400个收集品、新游戏+以及180个谜语人复仇奖章(以蝙蝠侠身份)。 与剧情相关。如果你已100%完成新游戏、新游戏+,并以蝙蝠侠身份获得全部180个谜语人复仇奖章,最终将解锁此成就。

成就#62 - 战役小猫:在《阿卡姆之城》原版排名地图中(以猫女身份)获得全部108枚勋章。 如果你已在所有12个战役挑战中获得全部9枚勋章,我们将解锁该成就。虽然战斗不成问题,但猫女确实因缺乏 gadgets(道具)而处境艰难。虽然从概念上讲,她的 predator(潜行)挑战所需完成的任务还不错,但我们在智取方面空间很小,击倒暴徒的选择也非常有限。 序列21:战役挑战4 1. 罗宾 - 战役勋章:114/114 2. 夜翼 - 战役勋章:114/114 3. 成就:64/64 ---------------------------------------------------------------------------------------------------- 黑面具战役(DLC):仅限罗宾 修改器: 1.挑战效果: 1. 生命值降低:玩家开始挑战时生命值减少。 2. 单手束缚:战斗中,敌人攻击前不会显示反击图标。潜行时,玩家无法从背后执行无声击倒。 3. 装备故障:战斗中,所有装备将被禁用。潜行时,整个挑战过程中侦探模式会受到干扰。 4. 超级力量:获得击穿盾牌、护甲和电击器而不被阻挡的能力。潜行时,蹲下移动速度更快。 挑战列表: 1. 黑面具(潜行)【单手束缚】 2. 货运列车(战斗)【生命值降低、装备故障、超级力量】

成就#63 - 战役奇迹:在原版《阿卡姆之城》及罗宾捆绑包战役中(以罗宾身份)获得114枚勋章。 若你在所有12个战役挑战中获得全部9枚勋章,并在黑面具战役中获得罗宾的额外6枚勋章,即可解锁该成就。 韦恩庄园战役(DLC):仅限夜翼 修饰符: 1. 保护光环:一名敌人会被保护光环围绕,使其免受伤害。光环会随时间在敌人之间转移。 2. 危险区域:战斗模式下,挑战期间枪架会被激活,供敌人获取 firearms; predator模式下,环境中的制高点设有陷阱。 3. 散落武器:战斗模式下,敌人会拾取并向你投掷物品。在【掠食者】模式中,环境将开始重新布设 proximity activated explosives(近程触发炸药)。 4. 击倒投射物:升级你的主投射武器,使用速射按钮投掷时可一击击倒敌人。 挑战: 1. 韦恩庄园军械库(战斗)【危险区域,散落武器】 2. 韦恩庄园主大厅(掠食者)【防护光环,击倒投射物】

成就#64 - Campaign Nightwing:在《蝙蝠侠:阿卡姆之城》原版及夜翼捆绑包战役中(以夜翼身份)获得114枚勋章。 如果你在所有12个战役挑战中都获得了9枚勋章,并且在韦恩庄园战役中为夜翼额外获得了6枚勋章,我们就会解锁该成就。我发现夜翼的战役是最难的,因为他的 predator 挑战;这将是谜语人之复仇中最艰巨的成就,需要多次尝试战役…… 结论: 《蝙蝠侠:阿卡姆之城》的100%完成度很折磨人,但并非极度困难,只是需要花些时间;幸运的是,故事确实非常精彩,这是自克里斯蒂安·贝尔以来对蝙蝠侠最出色的刻画。对一些玩家来说,【谜语人之怒】可能会因为【猎手挑战】或【战役挑战】的难度,或是完成所需的时间而阻碍你达成100%完成度。【谜语人之怒】完全依赖记忆,以及了解每个挑战地图的操作顺序。我花了120小时才达成游戏的100%完成度,不过其中至少有40到50小时是额外花在撰写攻略上的。你实际达成100%完成度需要多长时间呢?我真的很好奇。你的耗时应该会比我少很多,大部分时间会花在一周目流程和【谜语人之怒】上。 特别感谢Caelan1963,他细致地帮助我进行攻略和收集品地图的质量把控!如果本指南帮助你达成了100%完成度,可以在评论区告诉我。这能让我了解自己的工作是否正确。
100%完成 感谢您选择Cynical Guides,我们下一个指南再见! 成就狩猎是我的热情,撰写这些指南是我为毕生爱好赋予意义的一种方式!我的指南现在是、将来也永远是免费内容。