换一换
换一换 


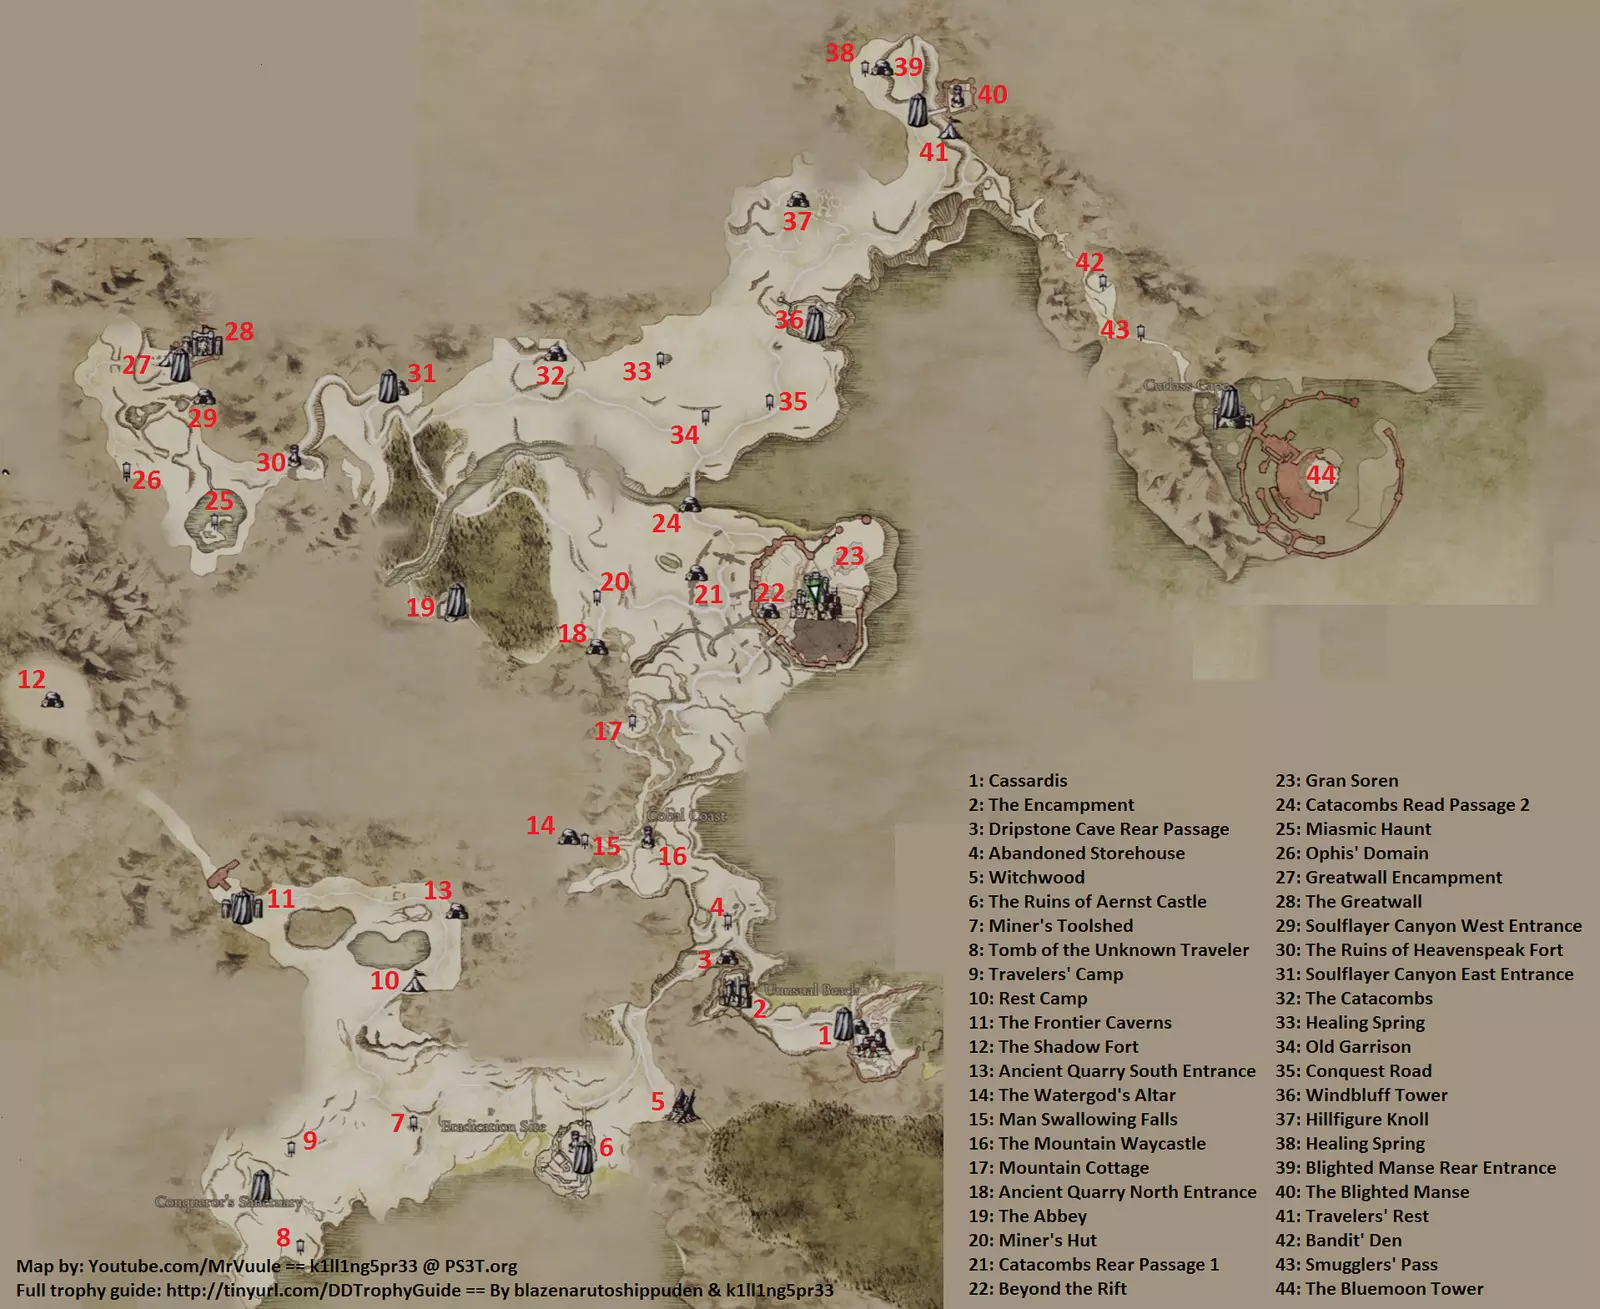
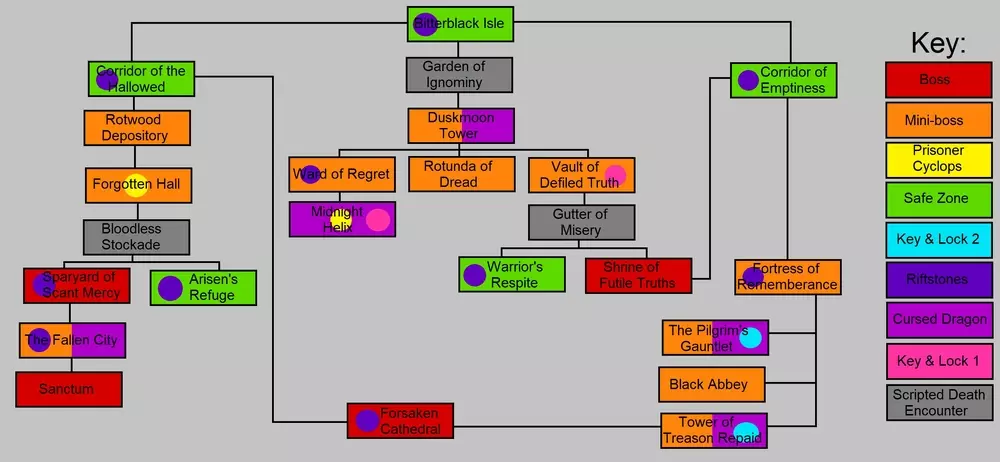
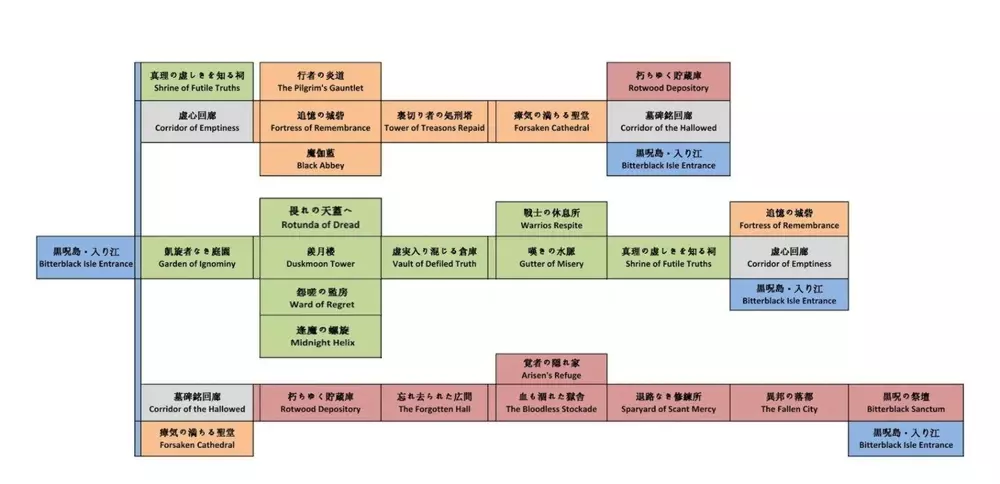
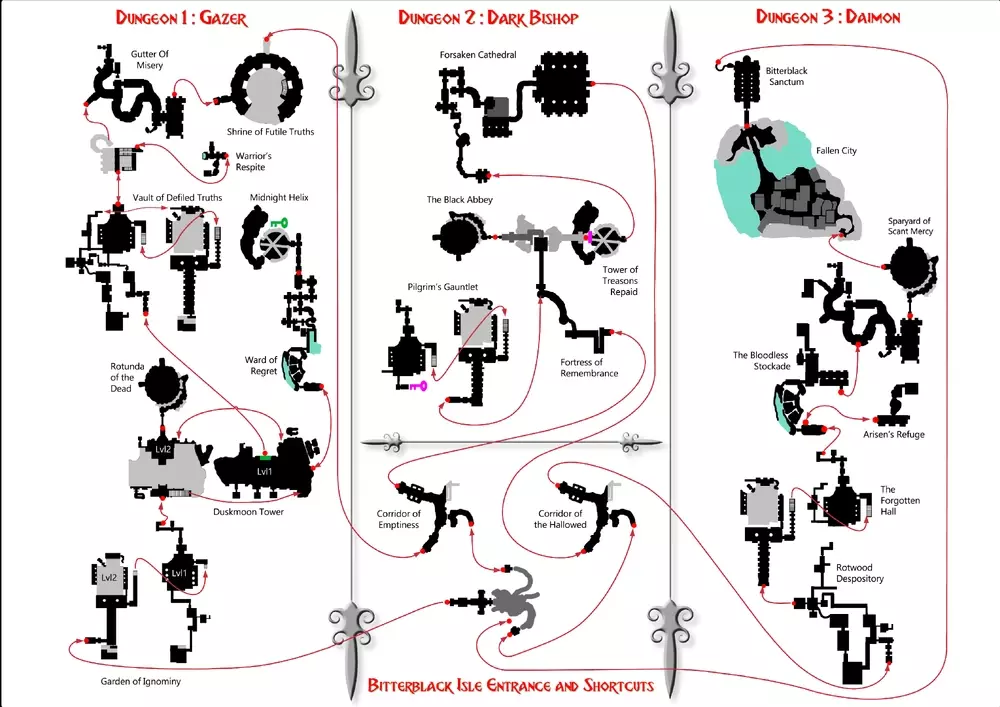
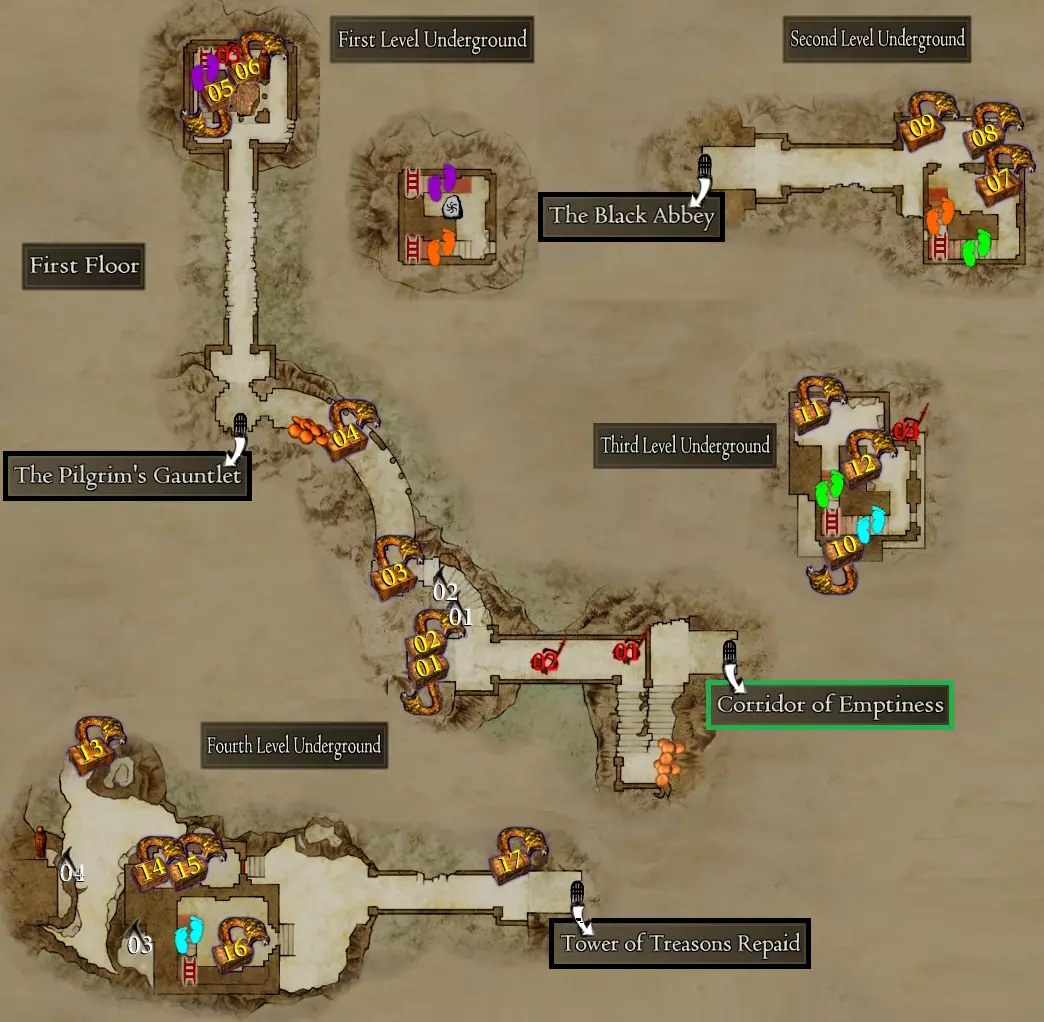
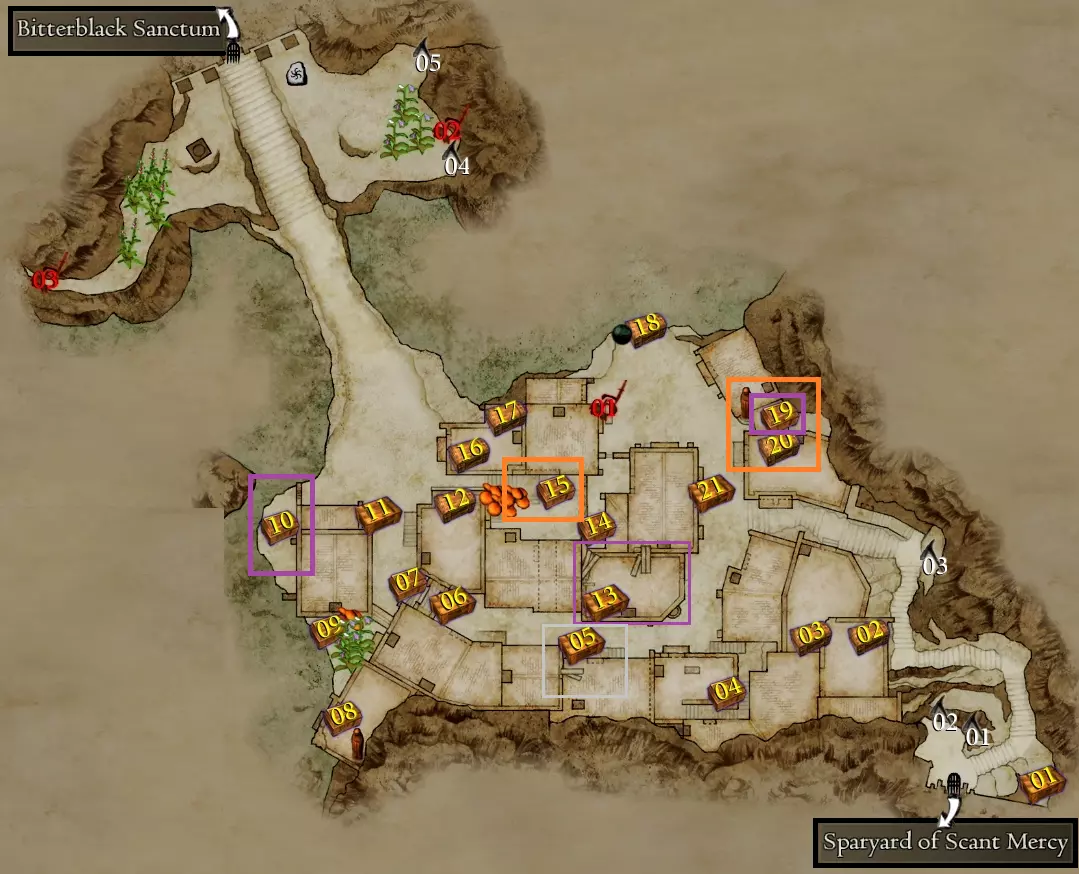
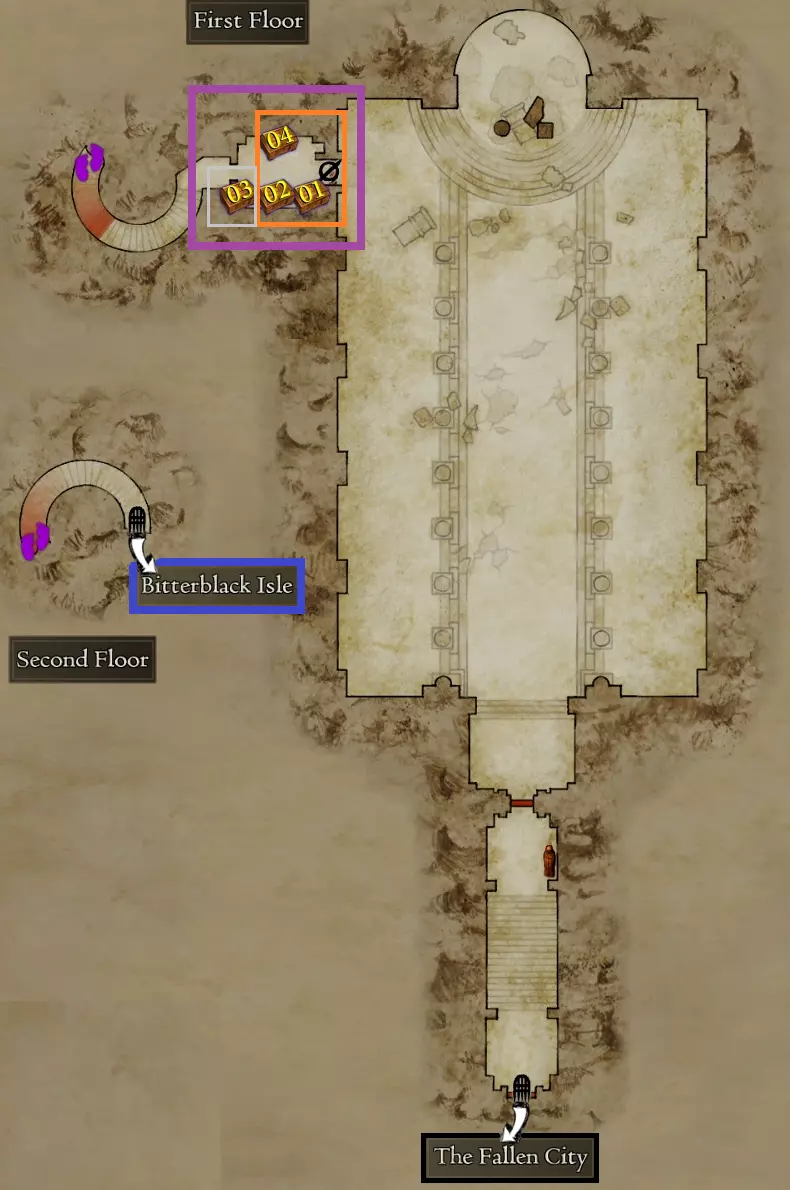
本指南旨在提供详尽的黑咒岛地图及流程攻略,同时解释击败大龙前后的关键差异。此外,还包含了可遭遇的主要 Boss 汇总,以帮助玩家更高效地刷经验并达到 200 级,助力玩家在这座充满挑战的岛屿中优化进度。 总览地图 这座复杂的地牢分为多个相互连接的区域,很容易在其房间内迷路。为了帮助你导航,我们首先会展示一张标有路线的示意图,让你了解房间之间的连接方式,以便快速高效地到达目的地。之后,我们将详细解析每个房间。击败【大恶魔】后,相同区域会重新刷新更强的敌人和升级后的宝箱。 地点日程
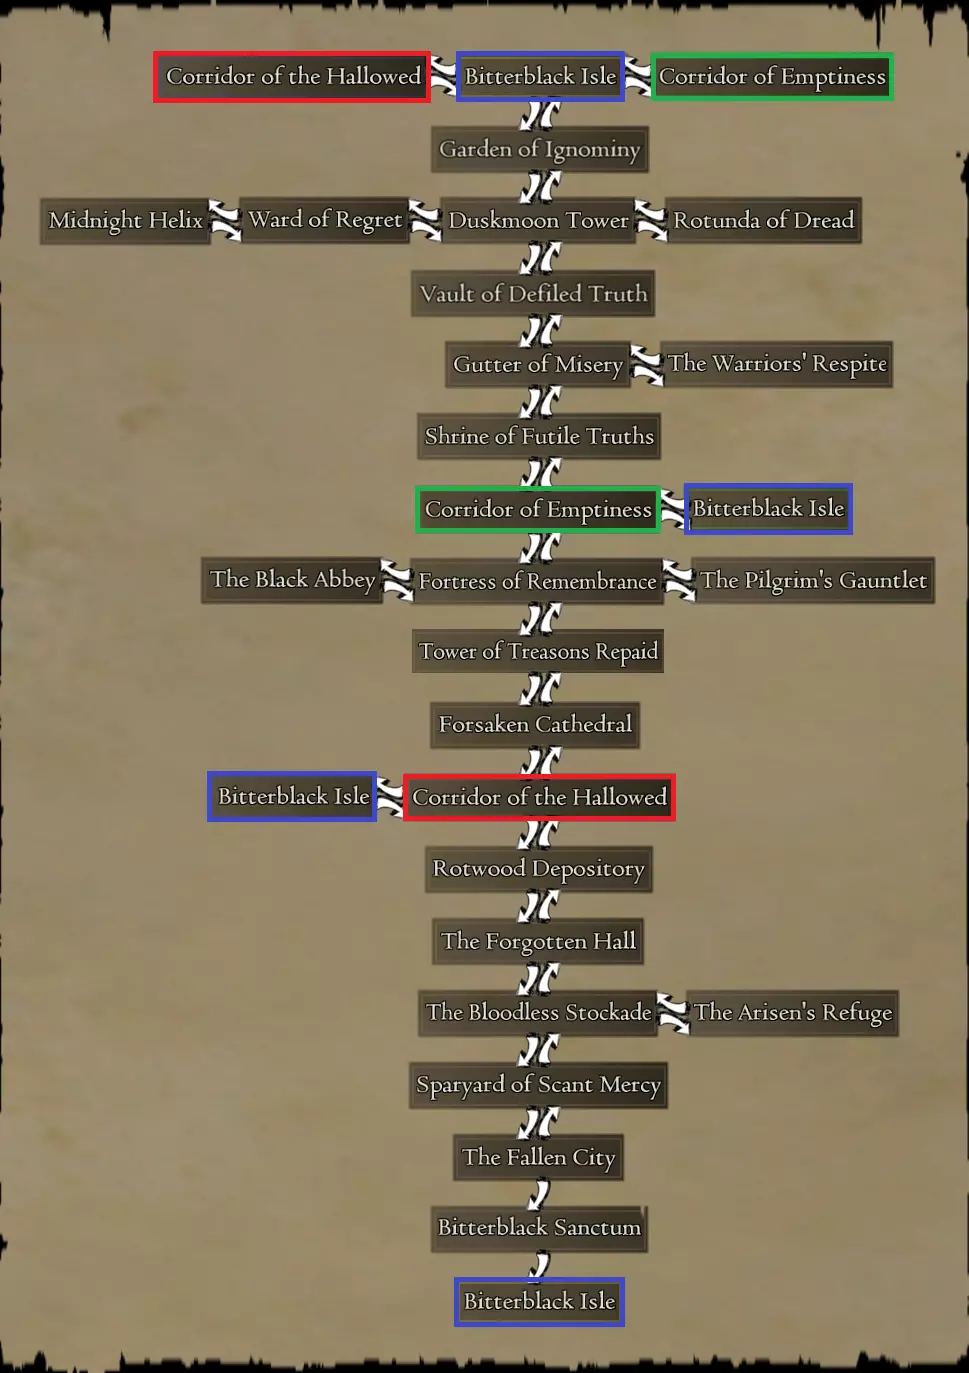
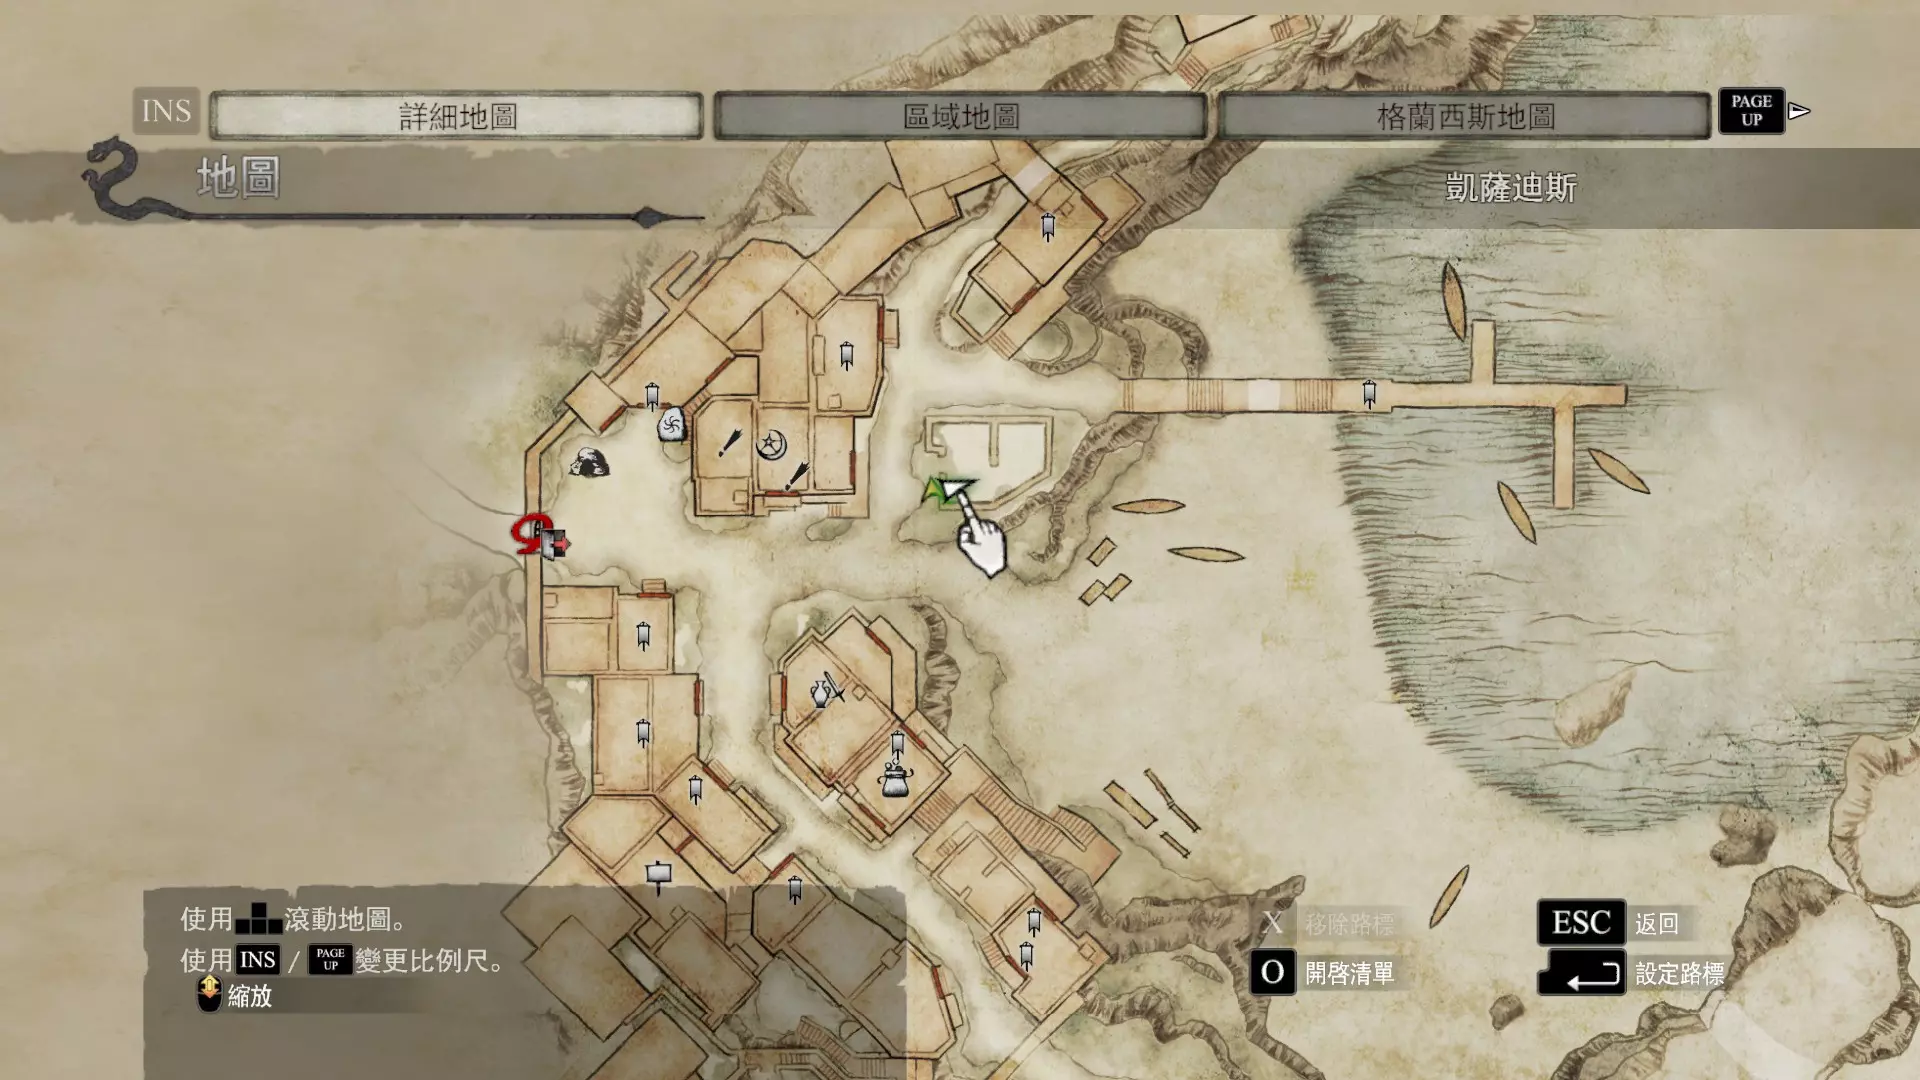
示意图攻略地图
无法识别或无法翻译,已删除。

BBI可打印地图
=========================================================== CHANGES BEFORE AND AFTER DAIMON After defeating Daimon, the map remains the same, although some areas that were previously blocked become accessible. The chests in the same locations may offer better rewards. While enemies appear in the same spots, their type and difficulty increase, and you'll notice a higher frequency of tough enemies or rare variants. Enemies, loot, and challenges in each area are adapted to provide much more challenging and rewarding content. This makes exploration more exciting in the post-Daimon mode without altering the overall map design. After defeating Daimon, he returns stronger, with new abilities and attack patterns, known as Awakened Daimon in his Second Form. Improved versions of bosses such as the Eliminator, Cursed Dragon, and Living Armor also appear, along with an increased presence of Death. While the environmental mechanics do not change, enemies become much more aggressive and resilient. This is an ideal environment for high-level players looking to maximize their gear and experience the game's toughest content. ASPECT PRE-DAIMON POST-DAIMON DIFFICULTY Enemies are powerful but manageable. Enemies become stronger and more aggressive. ENEMIES Living Armor, Garm, Ogres, and common variants. Elder Ogres, Gorecyclopes, advanced variants of Living Armor, and increased "Death" presence. MAP PROGRESSION Areas contain initial-level enemies and chests. Areas are repopulated with tougher enemies and enhanced chests. CHESTS Contains low-level "Bitterblack Gear" and initial Rift Crystals. Contains "Bitterblack Gear" level 2 and 3, and more valuable Rift Crystals. FINAL BOSS (Daimon) Initial form of Daimon, one phase. "Awakened" form of Daimon, with two phases and deadlier attacks. REWARDS Basic and progressive equipment. Rare and powerful equipment, more Rift Crystals. EXPLORATION Easier areas to explore with lower difficulty. More dangerous areas with stronger enemies and surprises (like more "Death"). BOSSES PRE-DAIMON BOSS[dragonsdogma.fandom.com] EXPERIENCE HEALTH AREA STRATEGIES DAIMON[dragonsdogma.fandom.com] 160,000 100,000 Bitterblack Sanctum Weak to Holy. Target its head to interrupt abilities; in Phase 2, avoid spectral hands. HYDRA[dragonsdogma.fandom.com] 16,000 100,000 Rotunda of Dread Weak to Physical. Cut off its heads swiftly and avoid being grabbed. CHIMERA[dragonsdogma.fandom.com] 7,700 15,000, 15,000, 500 Rotunda of Dread, The Black Abbey Weak to Goat and Snake. Kill the goat head first, then sever the snake tail. BOSSES PRE/POST-DAIMON BOSS[dragonsdogma.fandom.com] EXPERIENCE HEALTH AREA STRATEGIES DEATH[dragonsdogma.fandom.com] 420,000 660,000 See (A) Weak to Holy. Use holy weapons and cast Silence to interrupt its spells. Avoid direct attacks. CURSED DRAGON[dragonsdogma.fandom.com] 66,000 250,000 See (B) Weak to Holy. Equip fire resistance, aim for the heart, and use holy-enchanted weapons. DIRE DRAKE[dragonsdogma.fandom.com] 65,000 175,000 After defeating the Living Armor: Sparyard of Scant Mercy. Post-Daimon: Duskmoon Tower, Sparyard of Scant Mercy, The Black Abbey, The Pilgrim's Gauntlet Weak to Holy. Ground it with aerial attacks and equip fire resistance gear. DIRE WYRM[dragonsdogma.fandom.com] 62,500 140,000 Pre-Daimon: Sparyard of Scant Mercy (after defeating the Living Armor). Post-Daimon: Midnight Helix, Sparyard of Scant Mercy, The Black Abbey Weak to Holy. Attack its head to interrupt spells and use high magic resistance gear. DIRE WYVERN[dragonsdogma.fandom.com] 60,000 160,000 Pre-Daimon: Sparyard of Scant Mercy (after defeating the Living Armor). Post-Daimon: Duskmoon Tower, The Fallen City Weak to Holy. Use ranged attacks to target its wings and force it to the ground. PRISONER GORECYCLOPS[dragonsdogma.fandom.com] 57,000 150,000 Midnight Helix, Rotunda of Dread (random encounter with Fiend-Luring Incense), The Forgotten Hall, The Black Abbey Weak to Lightning. Attack the eye to stagger, deal heavy damage before it breaks free. LIVING ARMOR[dragonsdogma.fandom.com] 35,000 82,000 Fiend-Luring Incense:The Black Abbey. Pre-Daimon: Sparyard of Scant Mercy. Post-Daimon: The Fallen City, The Bloodless Stockade, Ward of Regret, Rotwood Depository, The Black Abbey Phase 1: Weak to Blunt, use blunt weapons. Phase 2: Weak to Magic, switch to magic. ELDER OGRE[dragonsdogma.fandom.com] 32,000 94,000 Fiend-Luring Incense: Rotunda of Dread. Monster remains or placing a Rancid Bait Meat may trigger its appear: Ward of Regret, Gutter of Misery, Fortress of Remembrance (on the uppermost bridge or lowest level room), Forsaken Cathedral, Rotwood Depository and The Bloodless Stockade (on the walkway before the stairs leading to Sparyard of Scant Mercy) Weak to Fire. Dodge charges, attack from range, and use fire-based weapons or spells. GARM[dragonsdogma.fandom.com] 29,000 75,000 Garden of Ignominy, Vault of Defiled Truth, The Forgotten Hall. Placing Rancid Bait Meat also can cause Garm to appear in the above locations. Or with Fiend-Luring Incense several may be found in The Black Abbey Weak to Fire. Use fire or explosive attacks, aiming before they charge. GORECYCLOPS[dragonsdogma.fandom.com] 26,500 63,000 The Black Abbey, Rotunda of Dread. Pre-Daimon: Tower of Treasons Repaid. Post-Daimon: Vault of Defiled Truth, The Bloodless Stockade. Weak to Lightning. Stagger by hitting the eye, attack when unbalanced DRAKE[dragonsdogma.fandom.com] 25,000 (C) 80,000 Rotunda of Dread (Pre-Daimon) or with Fiend-Luring Incense. Weak to Ice. Target its heart, use ice or water-based attacks, and ground it when it flies ELIMINATOR[dragonsdogma.fandom.com] 24,000 48,000 Fortress of Remembrance. Fiend-Luring Incense: Rotunda of Dread. Pre-Daimon: Rotwood Depository, The Bloodless Stockade. Post-Daimon: The Fallen City, Gutter of Misery, The Black Abbey, Forsaken Cathedral Weak to Ice. Evade mace swings, counterattack with strong ice-enhanced abilities. WYRM[dragonsdogma.fandom.com] 24,000 60,000 Rotunda of Dread, The Black Abbey. Fiend-Luring Incense: Rotunda of Dread Weak to Physical. Interrupt its spells by attacking its head and prioritize physical damage WYVERN[dragonsdogma.fandom.com] 23,000 70,000 Pre-Daimon: The Black Abbey, Rotunda of Dread. Post-Daimon: Rotunda of Dread, The Fallen City. Fiend-Luring Incense Rotunda of Dread. Weak to Fire. Target wings and heart, using fire-enchanted equipment for faster takedowns EVIL EYE[dragonsdogma.fandom.com] 20,000 66,666 Rotunda of Dread Weak to Holy. Strike the central eye, carry cures for petrification, and eliminate minions quickly COCKATRICE[dragonsdogma.fandom.com] 10,800 45,000 Rotunda of Dread, Vault of Defiled Truth. Pre-Daimon: The Black Abbey Weak to Head. Avoid its breath, equip petrification resistance, and aim for the head. GOLEM[dragonsdogma.fandom.com] 8,600 28,000 Rotunda of Dread. Post-Daimon: Vault of Defiled Truth, The Pilgrim's Gauntlet Locate and destroy all Medallions embedded in its body. OGRE[dragonsdogma.fandom.com] 5,000 20,000 Vault of Defiled Truth (Pre-Daimon), Rotunda of Dread (Post-Daimon) Weak to Fire. Attack from high ground or range, avoid direct charges, and use fire-based damage. LICH[dragonsdogma.fandom.com] 4,800 15,000 Pre-Daimon: Rotunda of Dread, The Black Abbey, The Forgotten Hall. Post-Daimon: Rotunda of Dread, Fortress of Remembrance Weak to Holy. Use holy magic and eliminate it quickly to prevent summoning spells. BOSSES POST-DAIMON BOSS[dragonsdogma.fandom.com] EXPERIENCE HEALTH AREA STRATEGIES AWAKENED DAIMON[dragonsdogma.fandom.com] 200,000 200,000 Bitterblack Sanctum Weak to Holy. Target its head to interrupt abilities; in Phase 2, avoid spectral hands. ARCHYDRA[dragonsdogma.fandom.com] 30,000 100,000 Rotunda of Dread Weak to Fire and Holy. Focus on severing each head using fire-enhanced or holy-enhanced weapons and magic. Attack the exposed neck stumps after decapitation for massive damage. Avoid its constricting attacks and poisonous breath by staying mobile. GORECHIMERA[dragonsdogma.fandom.com] 13,000 30,000 30,000 10,000 Rotunda of Dread, Garden of Ignominy Weak to Holy. Prioritize targets in order: kill the snake tail first to eliminate its petrification attack, then the goat head to disable magic casting, finally the lion for the main body. Use holy-enhanced weapons or magic. Stay mobile to avoid its area attacks. METAL GOLEM[dragonsdogma.fandom.com] 11,800 5,000 per disc Rotunda of Dread, Tower of Treasons Repaid. Destroy the floating Medallions with ranged attacks. NOTES (*) LANGUAGE: By copying the link and pasting it into Google Chrome you could translate the guide into your native language. (*) EXPERIENCE: Can be more or less depending on a few factors such as: Having fewer pawns Being under the effect of Weal Use of the Bezel Crown bow Being in Hard Mode Having higher or lower level pawns(*) DIRE: While the forum suggests that Dire Dragons still appear, some claim they are exclusive to the first playthrough, Pre-Daimon, at least in most standard routes. They are then replaced by their regular versions Post-Daimon. (A) DEATH: Is one of the most dangerous threats in BBI. It’s resilient and can instantly kill allies with its scythe. Appears on BBI only. It will be encountered appears on the first visit to the: Garden of Ignominy and Fortress of Remembrance. It appears with regularity in: Gutter of Misery. Additionally as a Necrophage: Garden of Ignominy, Forsaken Cathedral, The Forgotten Hall, The Bloodless Stockade, Sparyard of Scant Mercy and The Fallen City. As a Necrophage (Post-Daimon only): Ward of Regret, Midnight Helix, Vault of Defiled Truth, Fortress of Remembrance, The Pilgrim's Gauntlet and Forsaken Cathedral.TIPS: Mobility: Avoid staying in one spot for too long; Death tends to strike in confined spaces. Silence: Use the Silence debuff to disable its spellcasting. Magical Weapons: Equip magic-scaling abilities. Death is highly vulnerable to Holy damage. Magic Towers: Abilities like Seism or Gicel are effective for area control. Avoid fallen allies: If a pawn dies, Death will attempt to permanently eliminate them unless revived quickly. Lighting: Bring lanterns or abilities like Light Cure; Death thrives in darkness. (B) CURSED DRAGON: The Dark Bishop's summoned Cursed Dragon has only 12,500 Health. On BBI as a Necrophage appears when lured by monster corpses or by a Rancid Bait Meat: Duskmoon Tower Midnight Helix The Pilgrim's Gauntlet, after picking up the Void Key or randomly (Pre-Daimon only) Tower of Treasons Repaid Sparyard of Scant Mercy The Fallen City (can cast spells) In the Forsaken Cathedral a lesser version summoned with the Dark Bishop. Additionally in The Black Abbey two can be baited with Fiend-Luring Incense, with a flock of six Sirens. (C) DRAKE: 50,000 of experience for the Conquerer's Sanctuary Drake. (*) OTHER BOSSES PRE/POST DAIMON: BOSS[dragonsdogma.fandom.com] EXPERIENCE HEALTH AREA STRATEGIES CYCLOPS[dragonsdogma.fandom.com] 4,000 25,000 Pre-Daimon: Garden of Ignominy, Rotunda of Dread, The Pilgrim's Gauntlet. Post-Daimon: The Bloodless Stockade, The Black Abbey Weak to Eye. Target its eye for critical damage and maintain distance to avoid counters. WIGHT[dragonsdogma.fandom.com] 2,500 6,000 Rotunda of Dread, The Bloodless Stockade, The Black Abbey (Pre-Daimon or with a Fiend-Luring Incense) Weak to Holy. Use holy weapons, clear minions before attacking the Wight itself. =========================================================== KEY

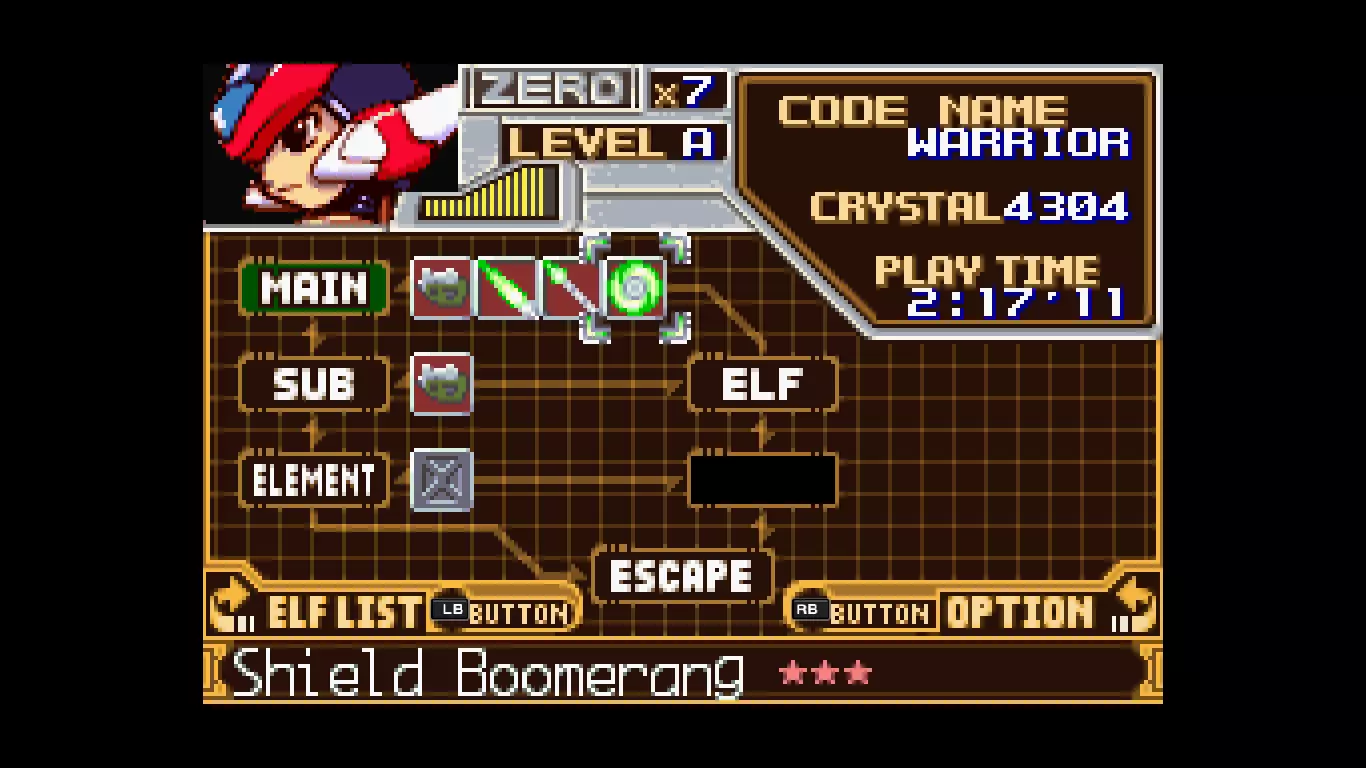
【诅咒装备】指任意等级的【黑咒装备】,包括职业专属戒指。 1级和2级诅咒装备指可能包含【黑咒武器】和【黑咒防具】的宝箱。仅在一周目可用区域出现。 3级【觉醒后】宝箱需首次击败最终Boss后才会开始产出物品。 ========================================================== 黑咒岛入口
耻辱花园
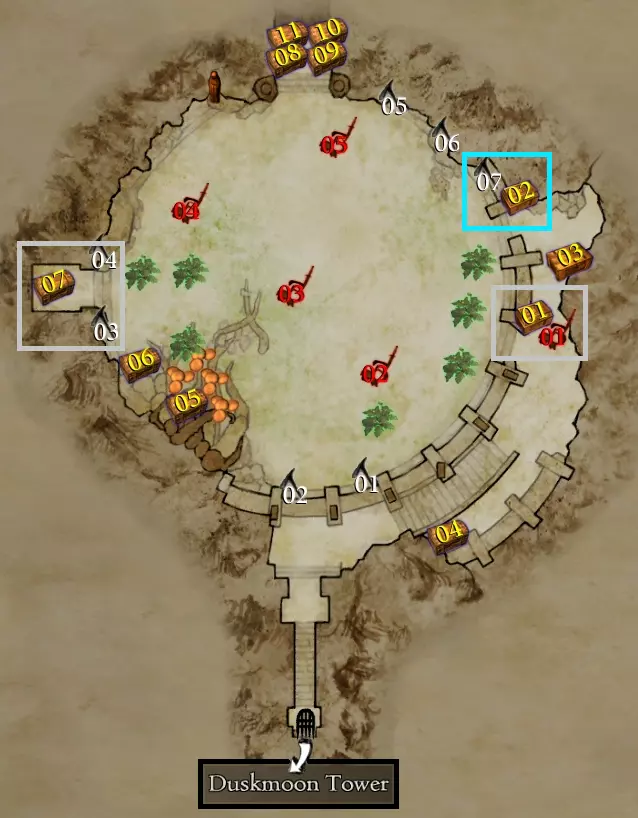
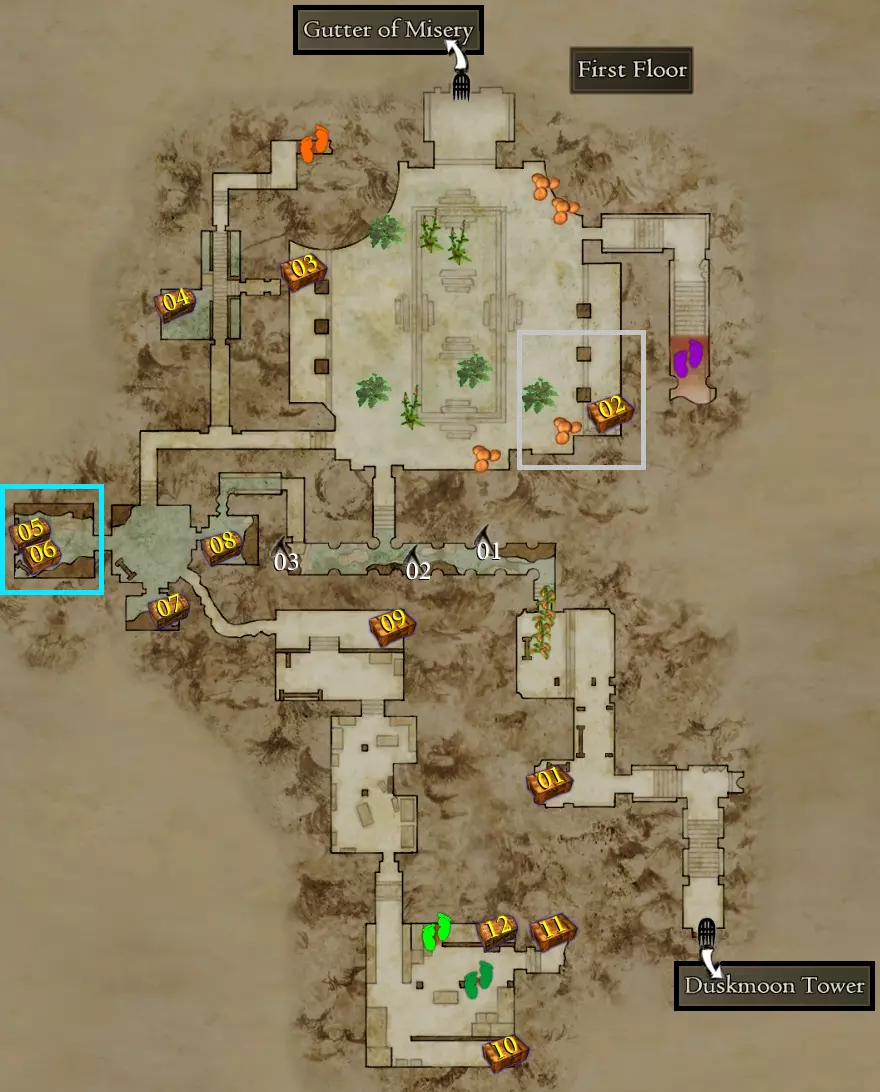
【黄昏月塔】

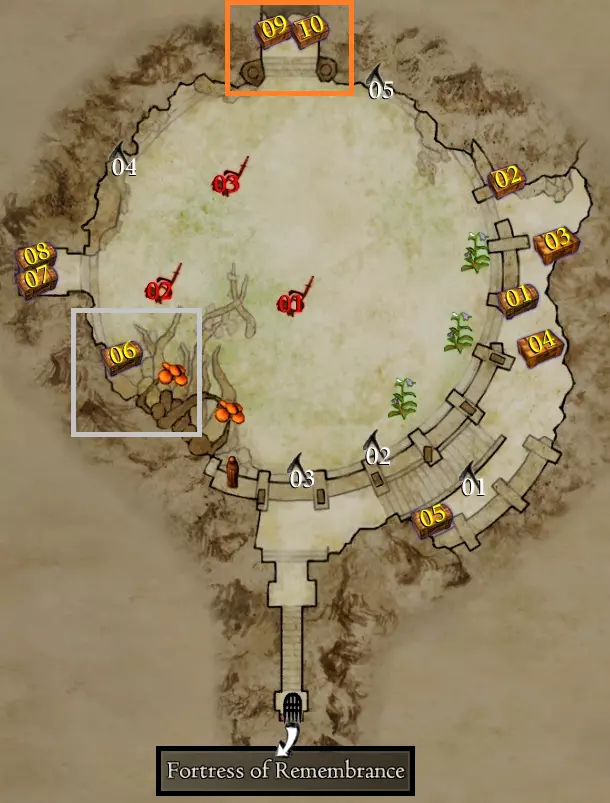
恐惧圆形大厅
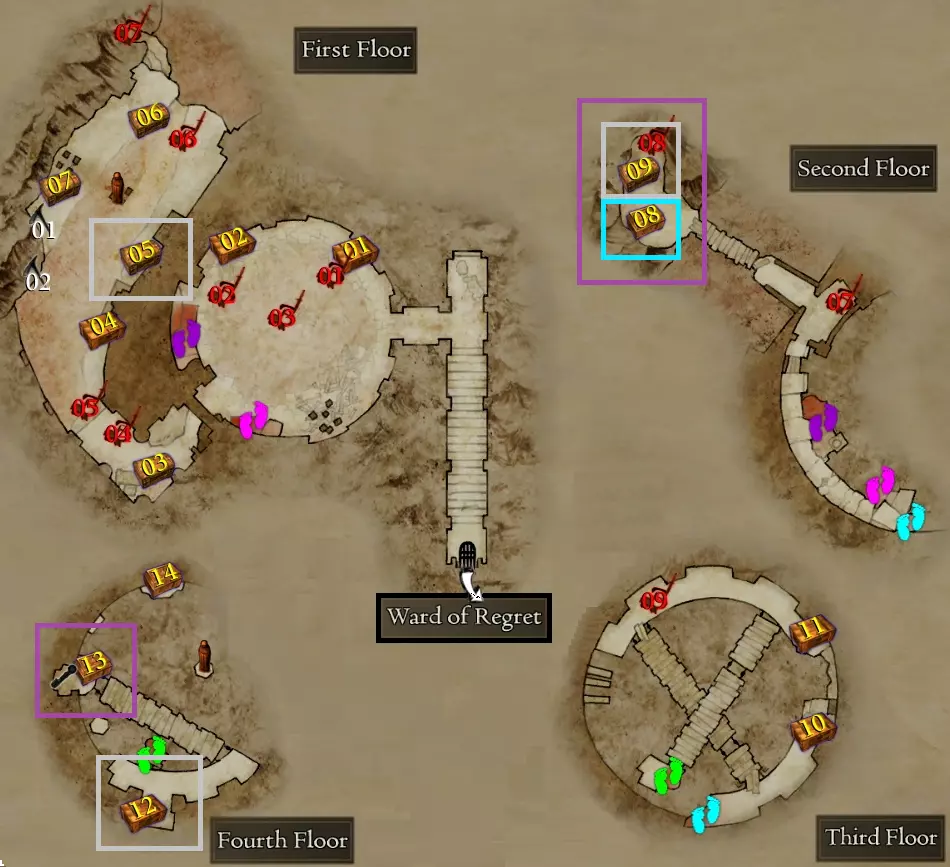
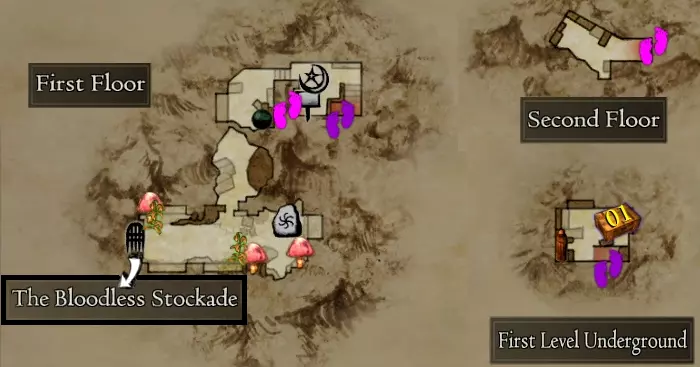
每次进入都会遇到多个强敌,其中一些是解锁Steam成就所必需的。 【悔恨之障】 战前 - 鸡蛇、邪眼、龙兽、古龙与巫妖、九头蛇、两只奇美拉、两只独眼巨人、三只独眼巨人与一个魔像、巫妖、三个骷髅领主 战后 - 上古九头蛇、邪眼+巫妖、古龙+巫妖、金属魔像、金属魔像与三个巫妖、双足飞龙、两只古龙、两只魔像、三只血腥奇美拉、四只血腥独眼巨人、三只食人魔与一只鸡蛇、巫妖与骷髅蛮兵 使用引魔香后 - 两只囚徒血腥独眼巨人、三只长老食人魔与三名歼灭者、龙兽+古龙+双足飞龙
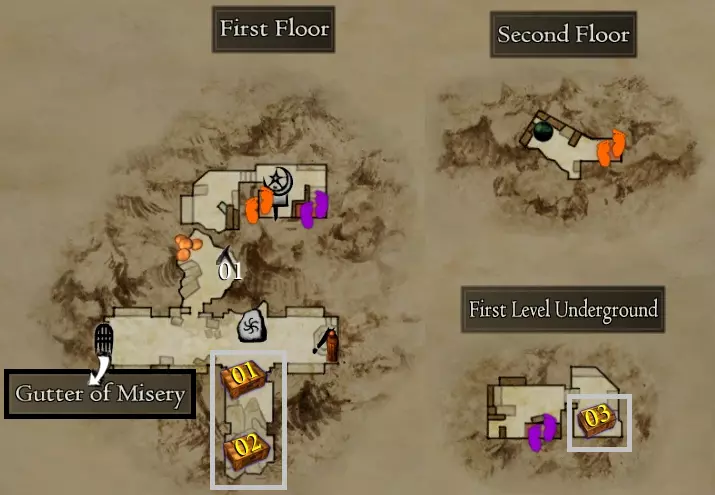
你需要【虚空钥匙】才能进入该区域。 午夜螺旋
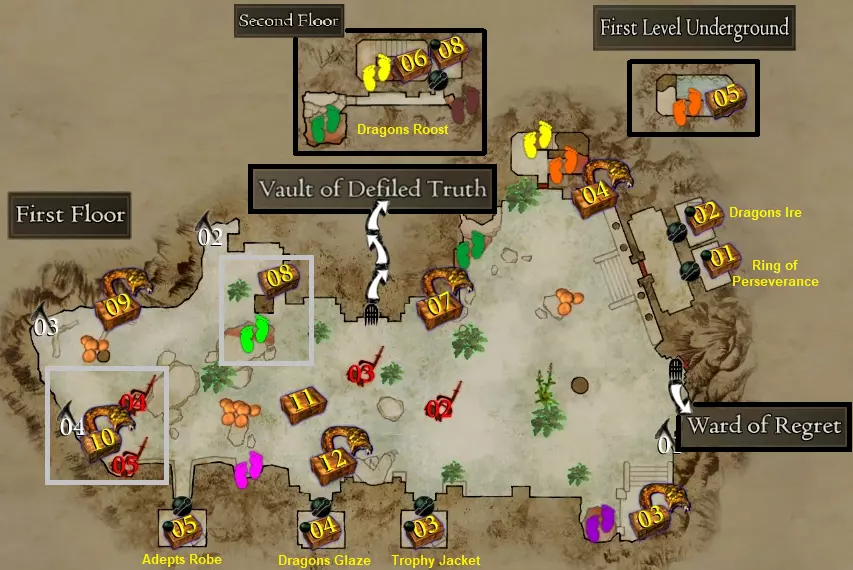
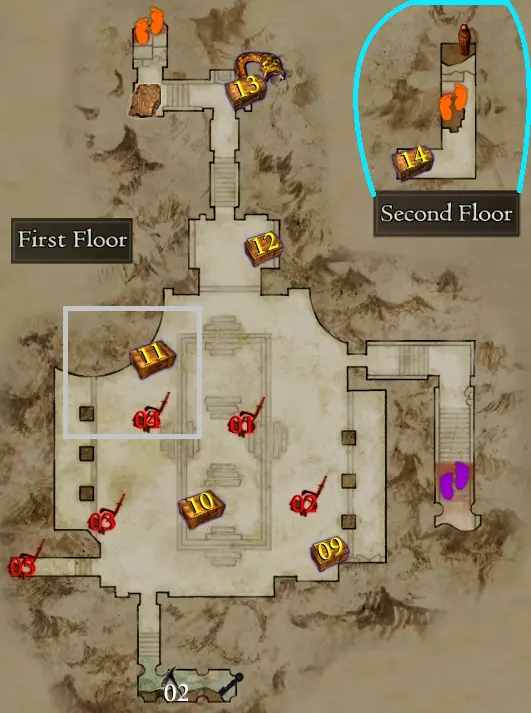
污秽真理之库

无法识别
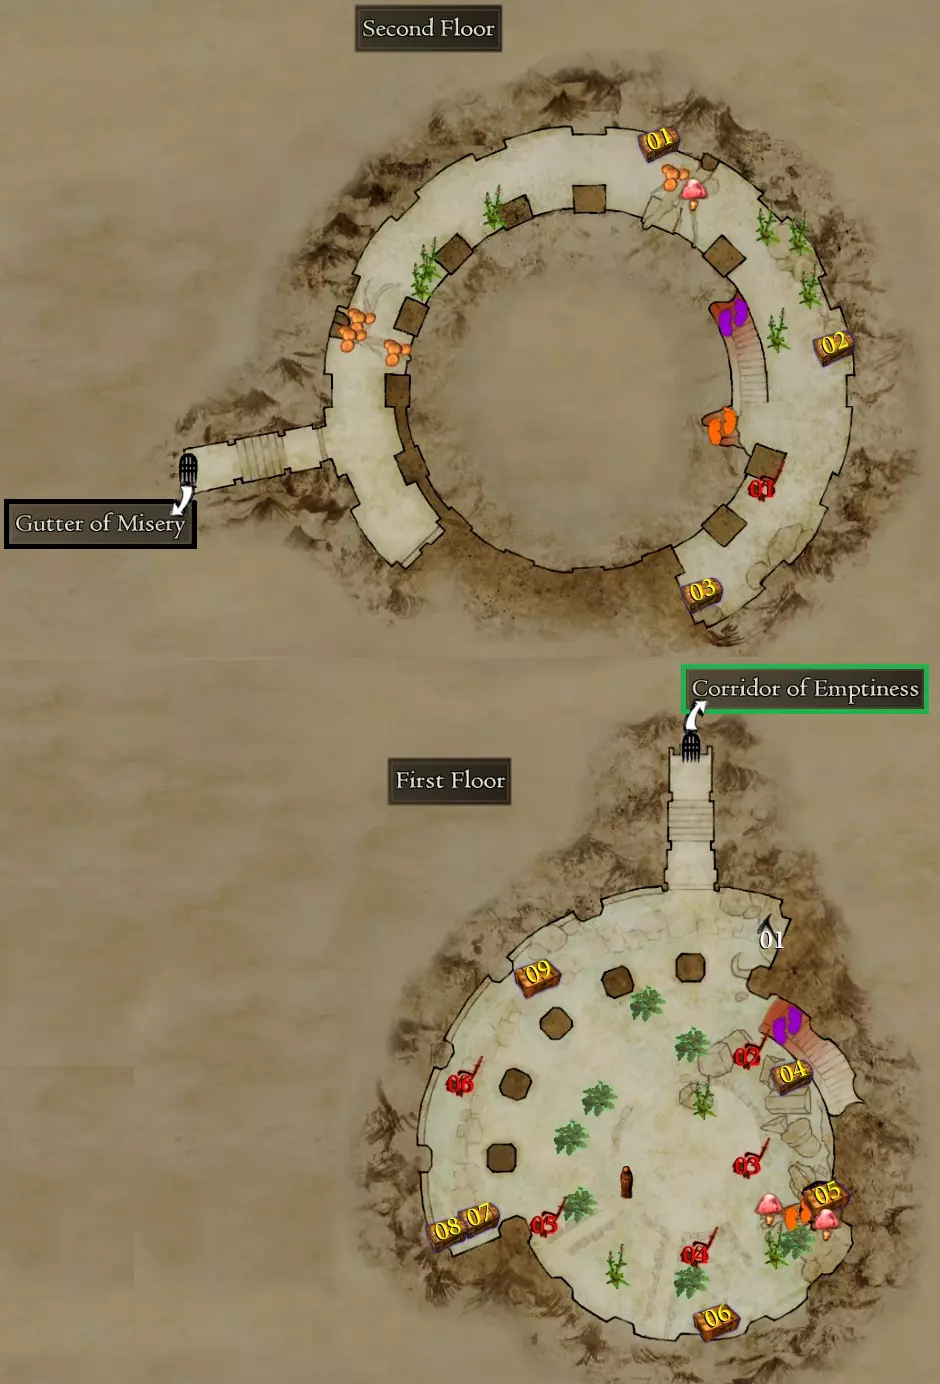
确保你在勇士休憩区的告示板附近找到月光宝石。三个宝箱中的每一个都可能掉落1级诅咒装备。
徒劳真理神殿
空洞回廊
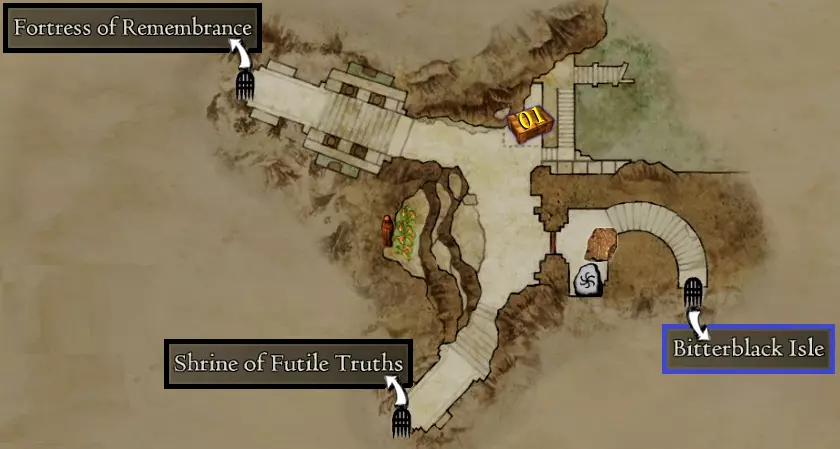
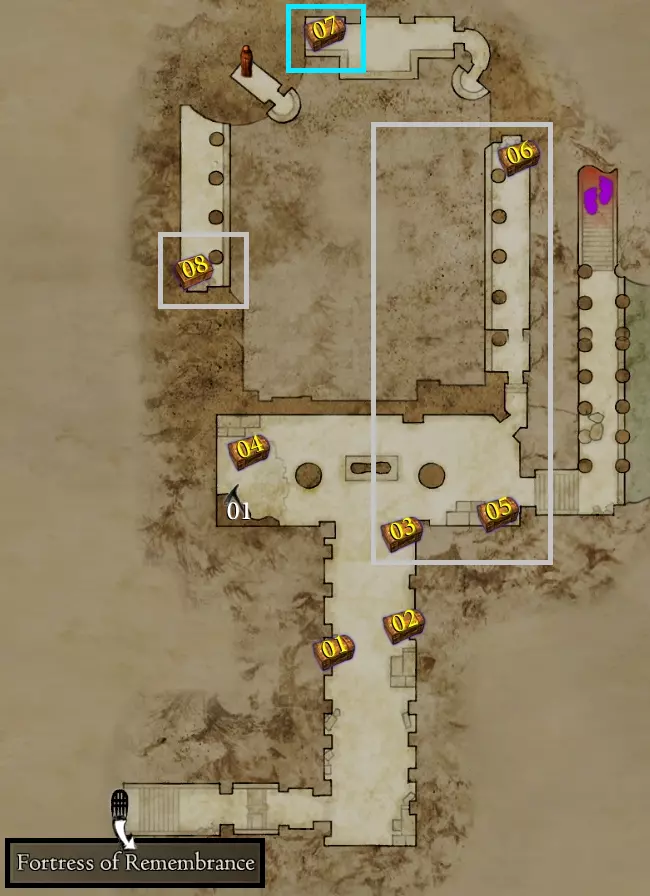
记忆堡垒
朝圣者的护手
黑修道院
由于“TOWER OF TREASONS REPAID”并非已知的Steam官方游戏名,且无明确官方中文译名,根据规则无法准确翻译,故删除。
被遗弃的大教堂
神圣走廊
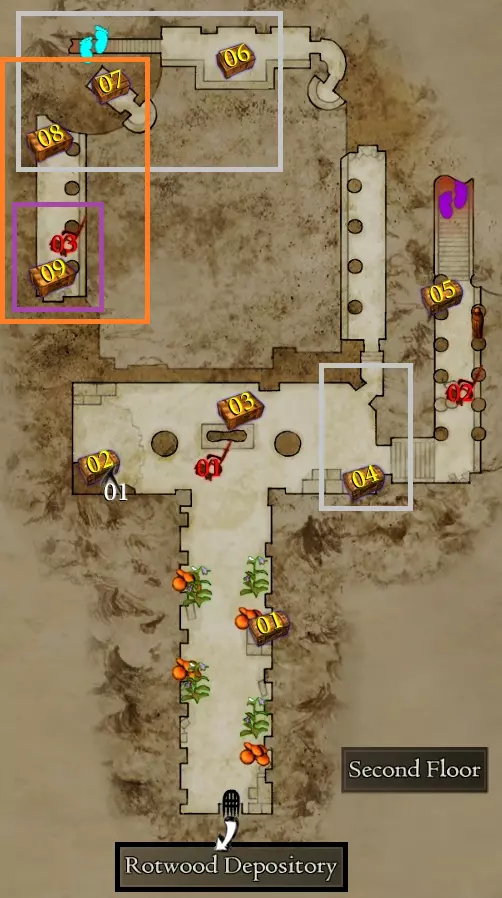
罗特伍德仓库
忘却之庭
无官方中文译名,无法准确翻译,已删除。
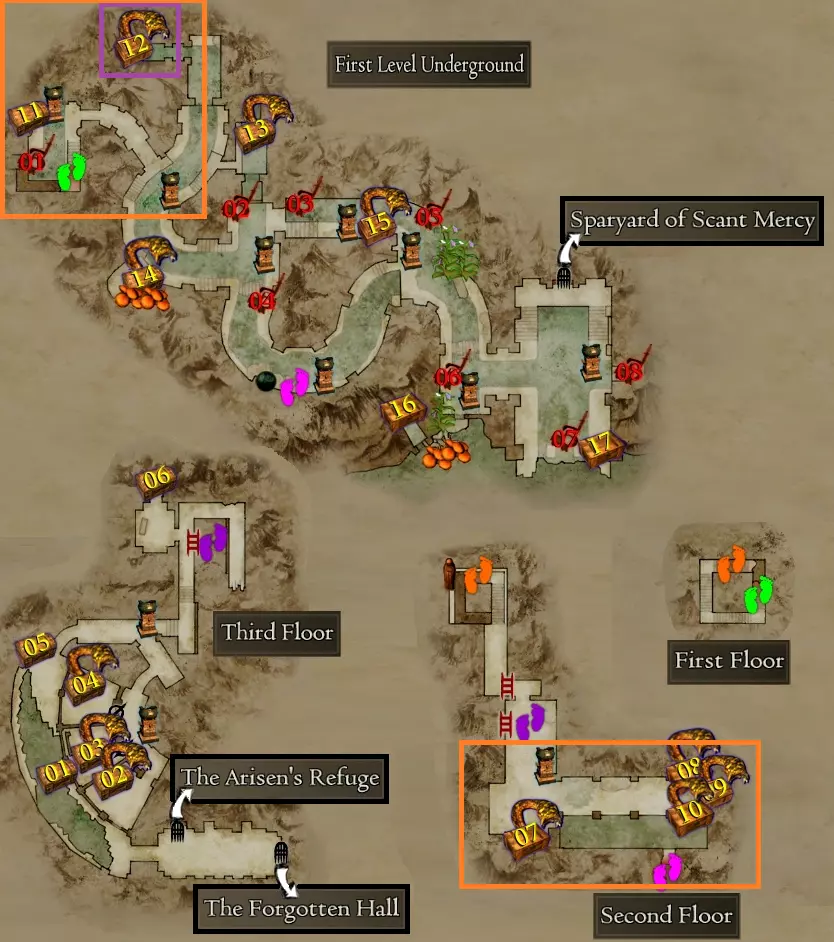
觉醒者的避难所
无情喷溅场
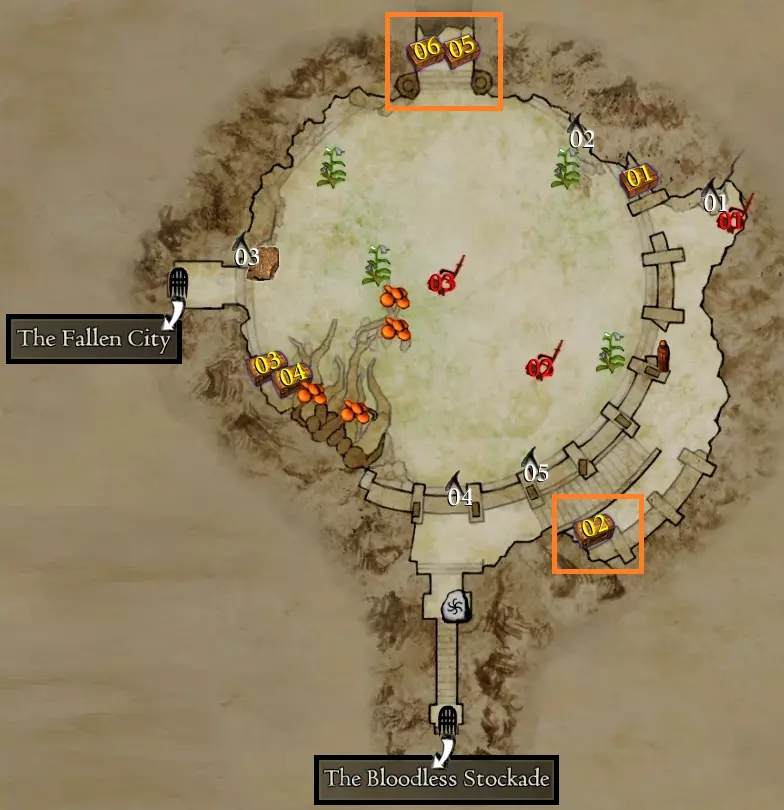
堕落之城
黑咒岛
你可以通过相关途径获取《龙之信条》的前暗黑觉醒与后暗黑觉醒地图,以及无任何标记的清晰地图。
OTHER GUIDES