


Artipic
 Steam Deck

Excellent tools to perfect your great shots! Artipic is a multi-platform image editing system that allows you to quickly and easily edit, retouch, compose and distribute your pictures and photos. - Are you an amateur or professional photographer? - Do you take a lot of great photos when traveling? - Do you want to edit those using professional tools and publish online? - Are you tired of paying a fortune for graphics packages where you never use 80% of the functionality? Then Artipic is the way to go! With Artipic you can work up your pictures like a pro: - Enhance and retouch your pictures using a professional tool set. - Compose your best photos and designs. - Distribute your art to surprise your network with your sense of style and creativity. Artipic features: 1. Rich set of tools for painting and transformations. Artipic features quite an extensive array of editing functions and components, ranging from the more common (select, crop, rotate, stamp, color picker, apply text, or red-eye reduction), to the more professional-oriented ones for retouching and compositions such as fully customizable brushes, special tools (blur/healing brush), layers and masks, gradients, shapes and paths. 2. Filters and adjustments to enhance your great shots. Artipic allows you to adjust your photos for a greater look by applying a wide set of adjustments (‘Brightness & Contrast’, ‘Hue & Saturation’, ‘Curves‘, ‘Color Balance‘, ‘Gamma Correction‘, ‘Color Temperature‘, ‘Tint‘, ‘Color Enhancer‘, etc.) and filters (‘Smoothen’, ‘Sharpen’, ‘Vignette’, ‘High Pass’, ‘Diffuse Glow’, ‘Shadow’, ‘Gaussian Blur’, etc.). 3. Reversible Stylization. Style Module allows managing presets of effects (all the image adjustments, filters and effects mentioned above) and applying them to images without affecting the source. The effects are ‘real-time’, so you can continue editing picture (painting, etc.) with the effects constantly applied. 4. Batch Processing. Batch Module empowers to format large numbers of images by applying predefined action sets. Automatically adjust and upload your images for further distribution (be it Instagram or an e-commerce CMS platform) with a single click. 5. Well-structured look. The main window of Artipic comprises the working area, where you can open and manipulate with your photo while the ribbons and panels keep various other functions handy. Both ribbons and panels can be integrated or separated from the main screen, as well as closed if no use for them. 6. Easy to learn and use. Using Artipic is easy. If you have worked with similar tools in the past, you will find Artipic familiar, as it keeps in tune with the pattern set by graphic editors in general. 7. Well-rounded photo editor to try. To summarize, Artipic is a high-level photo editor that can equally serve both novices and experienced photo lovers in enhancing their pictures. Artipic offers powerful functions and tools, but spares you from complex aspects.
游戏圈
共15条帖子

LV.
2026-03-26 16:00:26 · 发布在 「Artipic」
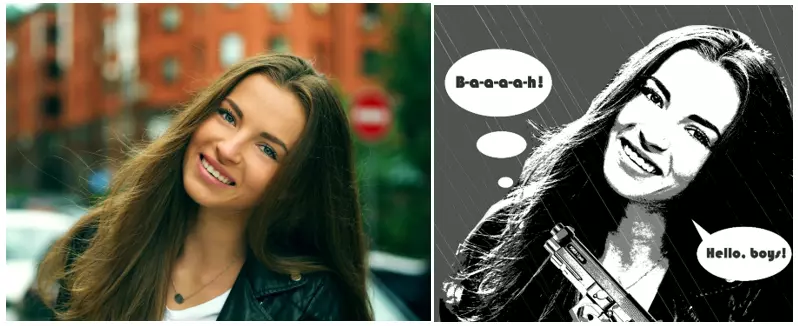
让我们来看看如何制作美式杂志黑白漫画风格的插画。
教程
让我们来看看如何制作美式杂志黑白漫画风格的插画。步骤1
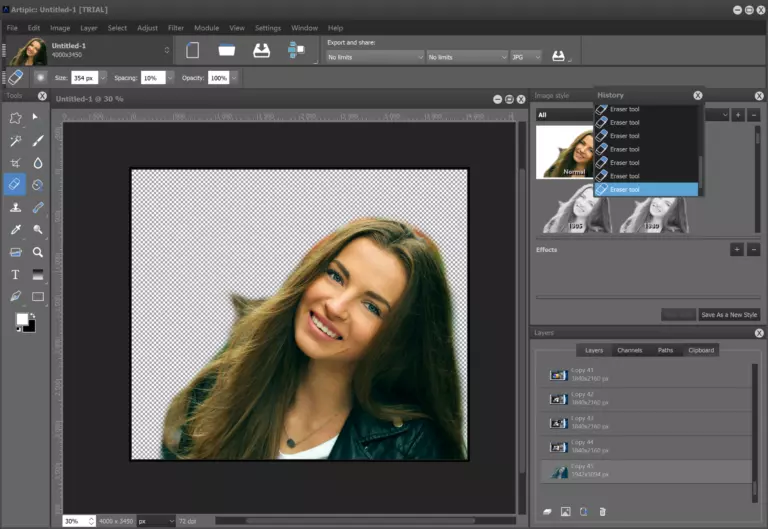
创建一个具有透明背景的正确尺寸的新文件。使用选择工具(套索或多边形)选择并复制女孩的轮廓,然后将其粘贴到我们的文件中作为新图层(菜单>编辑>粘贴为>新图层/图层面板>剪贴板选项卡>按钮)。删除图像附近多余的背景:步骤2
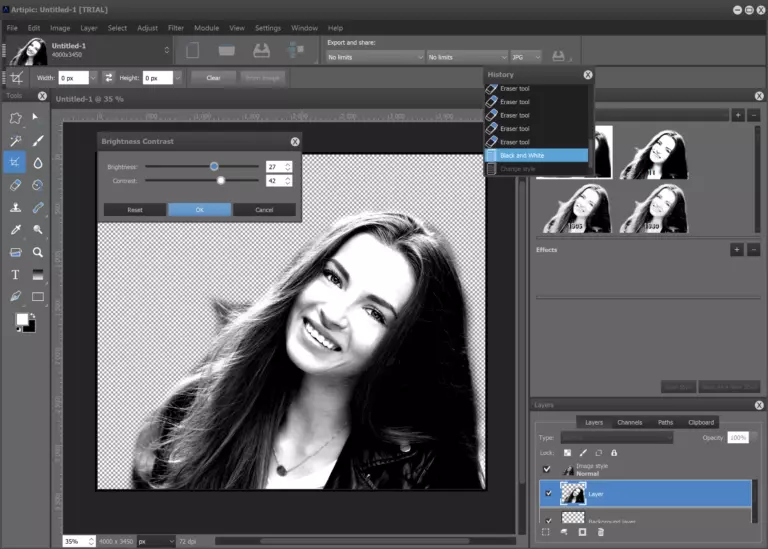
下一步是借助校正工具将肖像转换为黑白图像(菜单>调整>黑白/去色),然后略微提高亮度并增加对比度(菜单>调整>亮度对比度)。步骤3
要提高清晰度,我们使用滤镜菜单>滤镜>高反差保留。第四步
现在我们要让肖像具有图形感,类似于海报效果,操作步骤如下:通过菜单>调整>色调分离,并将色阶数量减少到3。步骤5
你可以添加一张图形图像。将其复制到新图层。移除背景。若要调整枪支至合适大小并进行正确放置,请使用菜单>编辑>自由变换/变换。第六步
对枪支图像执行与肖像相同的操作——将其去色,提高对比度,并应用色调分离效果。第七步
现在我们来处理背景和对话框。背景层填充与肖像中相同(或稍暗)的灰色。要在新图层上创建对话框,请使用椭圆工具和钢笔工具绘制对话框轮廓。将轮廓填充为白色。第9步
现在我们来制作斜向的雨。使用线条工具创建不同粗细的倾斜直线(我们使用了1、2和3像素宽的线条),并用白色填充这些轮廓。第10步
你可以删除轮廓。现在将这个带有倾斜线条的图层复制1到2次。然后我们要更改叠加类型(下层我们使用柔光,如果你希望白色面部上能看到雨线,上层中的某一个可以使用差值)。我们将2个雨图层放在人像图层上方,1个放在其下方。接着使用橡皮擦工具让线条呈断断续续的状态,而非实线。为了让效果更自然,我为该工具选择了大直径的画笔,这种画笔呈现出单个小喷雾的形态。

虚拟存在
2026-03-25 10:00:15 · 发布在 「Artipic」
教程
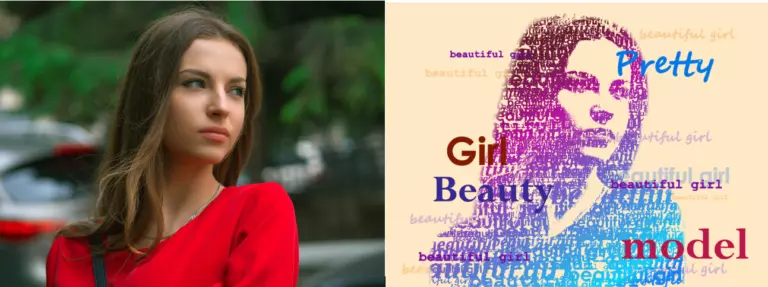
在本教程中,我们将为你介绍如何对一张简单的人像照片进行自定义编辑,并将其制作成令人惊艳的艺术海报。那么,让我们开始吧!打开你的Artipic照片编辑器。步骤1.
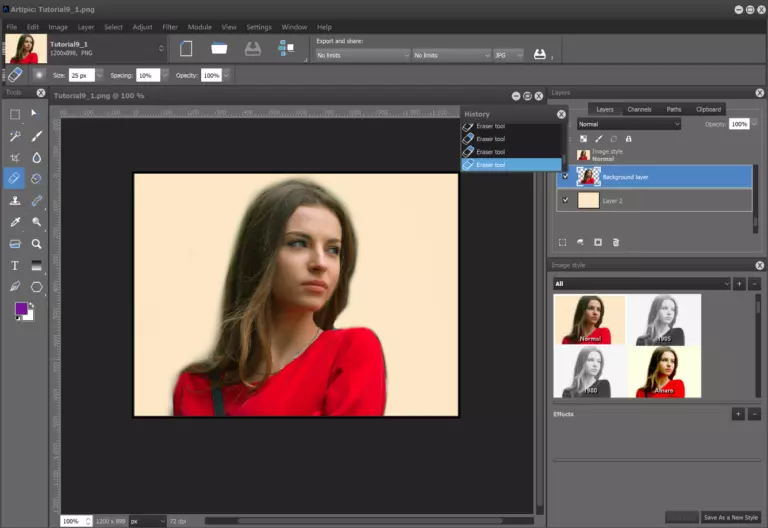
要创建图形图像,请将人像作为第二层放置在背景图层上方(在我们的示例中,背景为纯米色),然后使用软边橡皮擦工具(硬度=0%)从照片中移除初始背景。步骤2。
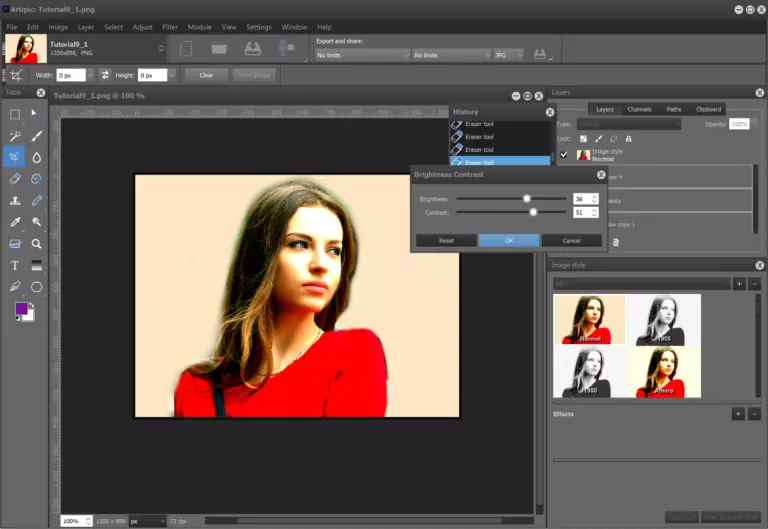
接下来,通过以下命令提高肖像的亮度和对比度:
菜单>调整>亮度对比度:第三步。
下一步,通过菜单>滤镜>高反差保留(High pass),将半径设置为20以上,以增强色彩对比度。步骤4.
使用菜单>选择>色彩范围,通过吸管工具选择肖像上的所有亮部区域。选中肖像中的明亮区域并将其删除。你的图像应呈现如下效果:步骤5。
建议复制此图层,以便用于其他海报设计。现在,在复制的图层上,使用魔棒工具选择所有透明区域,反转选区(菜单>选择>反向选择),然后创建新的图层蒙版(菜单>图层>创建图层蒙版>显示选区)。
之后,转到人像图层并激活图像(点击图像缩略图)。使用列表中选中的渐变填充图像:步骤6.
现在我们继续,为图片添加文字。为此,你需要创建多个带文字的画笔:
- 创建一个小尺寸的新文件(例如350×100像素),背景设为透明
- 使用文字工具创建所需的黑色文字
- 如有需要,使用裁剪工具裁剪文件
- 将文件保存为png格式
- 再创建几个类似的文件,更换文字内容和字体样式步骤7.
现在你需要将带有文字的新画笔上传到应用程序中。为此,请打开画笔属性面板上的参数窗口。在右下角你会找到【导入新画笔】,并在上下文菜单中选择【从文件导入】。进行设置,并务必点击【保存当前画笔】箭头来保存画笔。步骤8.
新建一个图层,使用已创建的带文字的画笔,将文字应用到肖像上,用不同密度和大小的文字覆盖彩色区域。第9步。
在文本图层上,使用魔棒工具(容差参数设为55-75)选择文字,然后激活带有蒙版和渐变的图层(可关闭文本图层的可见性)。
接着反转文本的选区(菜单>选择>反向选择),并在蒙版图层上激活蒙版(点击蒙版缩略图)。之后,删除蒙版上选中的文本区域:第10步。
最后一步!
新建一个不透明度较低的图层,并将其放在肖像下方一点的位置。制作几个不同颜色的文字。然后新建文字图层,并将其稍微放在肖像上方。我们的图形海报就完成了!
作者信息
下载233乐园APP
专心推荐好游戏
纠纷处理及不良内容举报电话:
4006600910 (工作时间: 9:00-12:30,14:00-18:00)
北京市朝阳区启阳路4号院2号楼15层1803室
本公司产品适合10周岁以上玩家使用 未成年人家长监护