可运行抢先体验

--

+关注

--

热度

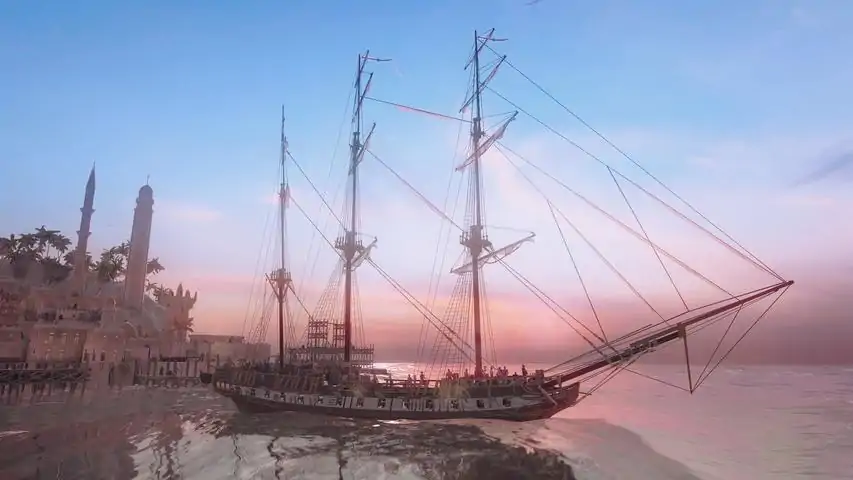
World of Sea Battle 是一款以大航海黄金时代为背景、充满动作元素的开放世界大型多人在线游戏。 游戏中包括数十种历史悠久的帆船、海盗、PvP/PvE 模式、玩家驱动的经济系统,以及领土公会战。在这场历史海战体验中,你将亲自掌舵,与其他玩家一同航行、战斗、升级并进行贸易,在公海上追寻属于你的荣耀!欢迎登船! 你只是公海上众多船长中的一员。 通过贸易、掠夺、探索和战争,争夺控制权、荣耀与财富! 你会沦为无名沉船,还是会崛起成为让敌人闻风丧胆、受盟友敬仰的传奇?从普通的双桅纵帆船到巨型战列舰乃至更庞大的舰船,船长,你将亲自掌控这段精彩旅程。 游戏包含 50 余艘可升级、可自定义的大航海黄金时代的历史舰船,涵盖双桅纵帆船、加利恩帆船、双桅横帆船、护卫舰等。在“群岛”,你几乎见不到相同的舰船。发现船只! 地平线上出现敌舰! 操控你的舰船,参与史诗级 PvE 或 PvP 海战,展现你作为霸气船长的实力! 使用实心弹、炽热弹、链弹等多种炮弹,扭转战局,成为令人畏惧的海上霸主!扬起风帆,驶向未知海域!突破地图边缘,进入无垠海域。这片海域未经勘探、未被征服,充满了神秘色彩。 积累足够的黄金,即可拥有你自己的私人岛屿。这里是权利的前哨站,可以在此修理舰队,源源不断的财富也将从远方矿场何工坊流入。黄金是万物运转的动力,而如何赚取黄金,由你决定。 你可以打劫商船掠夺物资,可以通过产业链打造贸易帝国,可以在不同地区间运输稀有货物,也可以出海捕鱼赚取利润。 无论通过战斗还是经商,财富永远青睐勇敢者。独自航行虽有诸多好处,但也伴随着极大的风险。 与好友组队,或者招募船员,共同称霸海洋。 若想参与更大规模的战斗,进行更有深度的策略对抗,那就加入公会,投身港口战争、政治博弈,在“群岛”中争夺统治地位。
游戏圈
共45条帖子
ULuo
2026-02-19 19:00:13 · 发布在 「World of Sea Battle」
海战世界
A guide that gives new players a quick reference explanation of the game mechanics, so you do not go bananas, within the World of Sea Battles®. Come here if we can stop some depression and aggravation; Always trying to help keep people happy. Remember: The only people you can trust in this game, or any other game, are yourself or real-life friends. If you are one of the few lucky ones who discover a friendly group, you have hit more than just good luck and should maintain excellent relationships and karma. Also, if you notice something that needs to be added, please submit a suggestion at the bottom of the guide with your request, and we will consider it if we can help you. It will also serve as a reminder for us to explore solutions for you. First Look Assistance to the New We will keep this updated as much as possible. Keep in mind that many updates, changes in the game, and unannounced implementations can occur at any time. We will ensure that our information is accurate to the best of our abilities. Please rate us too! Helps motivate us to keep adding to our Guide. Check One Two... Check.. Check When you first enter the game, check your server region. ONE SERVER, ONE CHARACTER, NO CHANGES OR MOVES. IT'S A SALES MODEL THING. Many people went bananas who played the Beta, days before the Early Access full release. Only one server, the EU, was running, and you were auto-placed there. Sadly, on launch day, your EU character did not get migrated over to the NA server if you are a NA-located player. To my shegrin, no bueno, no good, start over, piss off. Also, to our disappointment, any purchases made on one server do not carry over to other servers, but the gold used to purchase those items does. Weird. Ports for Ship Building and Tiers This will be updated, as we await information from the developers. The list below, is of all game ports, directly from their public CSV files provided by the developers. Challenge; More explicit clarification on which ports can build specific ships. Solution; Hovering was discovered late, near the 10th hour of game time. We will simplify here. Check often. KEEP IN MIND... TIERS GO FROM 7 down to 1 Example Tier 5 port allows ship building... this is higher than tier 6 and 7. Only ships that are V, VI, and VII can be built at that port. If you want a tier 4 ship you would need a port that builds tier 3 and lower. It can be confusing... remember to visit here. To make things easier, as suggested, I am putting the best ship number beside each port, so you know that any number higher can be built. Higher is NOT better; the lower the number, the better the tier. Cursed City; III (3) Nisogora; III (3) Oneg; II (2) Gelbion; III (3) San Cristobel; IV (4) Pirate City; IV (4) Everston; II (2) Aruba; II (2) San Martinas; V (5) Aldansk; IV (4) South Bastion; V (5) Gray Island: V (5) St. John: V (5) Fiji: VI (6) Severoangelsk; IV (4) North Bastion; V (5) Los Catuano; VI (6) Brandport: VI (6) Santa Maria: VI (6) Northside; V (5) Puerto Salada; VI (6) Freebooter Bay: VI (6) Freedom Bay: VI (6) Making Money How to make money easily and quickly, especially if caught exploiting a community server by a big clan of seasoned players, making you pay an arm and a leg. (That is why there are so many one-legged pirates on the seas!) :=)Solution; Three main ways of achieving this. First is kill ships, the obvious, but if like we were, losing more than winning to start, this was NOT a fast option, but it still is an option. Second is to *trade manually. Not exciting, time-consuming, but still pays well if you keep doing the peaceful trade of buying and selling. Third is to do missions. The most lucrative, because you can do peaceful, combat, or *trade routes. Peaceful missions, you go pick up X and deliver Y. Get your sailing experience, and much more. Combat missions are also a no-brainer. Kill and loot, return. Risk and reward. Trade Lanes Missions: You will be chased, NPS will hunt you, and you will find the game version of trade more exciting and riskier. (* You can do trade routes manually for less, without the danger, or get extra doing them thru the game system, where you must fly the semi peace flag, which means NPC or in this game known as NPS-Non-Playter Ships) The best way we have made some wealth: While playing, we began making rare items that take time to craft. We receive enough requests for items, such as bulkheads or canvas, which can be manufactured in the factory. Selling it on the open auction market and fulfilling orders. Always in demand, pays really well, and all you have to do is sink NPS(NPC) ships, take the wood and iron, smelt the iron ore if not in bars, and make bulkheads for everyone wanting to make any ship. Ammo types and Use Here is a list of basic cannonballs and use situations: (We will enlarge the list as we explore the game) Regular Heavy Cannonball - Always for every ship that has no armor and is not large. Structure damage and port seizing mainly, but if armored well, you going to need extra or a ton of these. Your staple when you have nothing else. Burning ball – For burning anything, literally. Port or ships. Damage over time. Hit the ship or water it travels on. Chain and Balls – Used for slowing fast ships, must hit sails, if they pull their sails down when you arm (NPS DO THIS AUTO), and you shoot, you hit nothing. Until they make the NPS, not KEY STROKE reactive, only *“burn and bullet” is what we coined the term early game. “BIRD SHOT” BALLS – For taking out crew, must be shot close range, before boarding only. Flaming Kegs – The Early day of “Depth Charge” that floats. Toss them off the back of the ship, for would-be pursuers. Short delay and poof. Great for anyone who wishes to go around chasing and harassing sailors. Keep away from children. The IcewaterCreek® team coined "BURN AND BULLET" which translates to Burn em to Half health then bullet "Bird Shot" them, and board them. The Shallows and the Deep When going from region to region, the depths that are not stated at any point in the game thus far, at the time of our guide creation, come into play when you get into tier 5 ships. If you go into deep water, you will not know it until you wish to return to Fiji for example, you can't. Larger ships, shallow water, deep hull. Could you keep one SMALL SHIP FOR THE LATER GAME TO GO BACK AND GET YOUR THINGS FROM THE STARTER PORT OR WHEREVER YOU STOCKPILED, AS MOST PORTS ARE ALL IN SHALLOW WATERS, and the LIGHTHOUSE perk you can't get to either with a large hull ship. 20 hours in, found out the hard way, and took another 20 hours to get enough to build a small ship or buy, with nearly 24 runs to collect our RSS (Resources) from Fiji while paying absurd port fees totaling 24,000. Now you can pay coin to have things moved, you do get one free one, and then its 549 or around there for each move. Costly, and it only moves what is in your ships HOLD then to your targeted port, but the good news is you can put 900 TONS of items in the per move. Nice! Speed and a small ship do not always guarantee success, because it is a ton of work, and mortars can one-shot you, not to mention random PVP protections are removed without any markers, only playing gets you to know where... however.. There is a pop-up that says turn back or we have a meet and greet with Mr. Jones in 20 seconds. NOTEIf you open your large map ("M" Key), you will see that a scribbled wall surrounds all ports and areas of shallow water, once you have explored enough to move the fog of war. You will only be able to sail tier VII(7) and VI(6) ships in these shallows, with the exception of higher-tier fast-moving small cutters. Boarding Troubles?? Oh, how BOARD am I... well, not for long. The biggest request from everyone in the early game. Why can’t I board! Is it a bug! I am sinking them always! Someone keeps sinking what I am trying to board! Let us assure you we feel your pain, but the mechanics need work. BUT... here is how you board, and you MUST be alert and wide-eyed, not on a 10-hour bender. Go to an area with few players. Find a small ship, yes.. Start small. Burn and Bullet® our coined phrase Attack it with a burn to half. You can just move in and watch your health to pull along side. Bird shot balls to lower the crew number, and after a few of those, use a chain to immobilize. You will then see a prompt... [SPACEBAR TO BOARD] and it is so hard to see with everything going on, so when you are alongside the enemy, just hit your spacebar until you see swords come up. It auto-fights in five seconds, the ship with the most crew wins. Quick, and then you choose, loot, take hostage crew, or capture. Take it back to a port as soon as possible, repair, and use. BE SURE TO HOLD DOWN "Z" KEY... and choose FOLLOW ME! That is how you control NPC ships. NOTE: You can’t use your other ships in your inventory to create a fleet to sail and hunt with; you must use captured and repaired ships only for a fleet or sail with people who are friends or in a clan in their solo ships. Ship Upgrades Upgrades for your ship to start are beneficial at grade 2, not stock. If you can’t upgrade your ship upgrades to max level, you won't benefit. Example: +1000 Large Cellars and prevents food spoilage. True if grade 2, not if grade 1. Grade one is the storage, but the game does not define this. Our suggestions for NEW SHIP AND PLAYERS: Crow's Nest Large Cellars Copper Plating Extra Sails and in slot 6 (Unlocked with Experience Capt. Points)... Anything that helps vision distance Later in the game, you can choose from more beneficial fighting items that get unlocked as you get past level 20. Early game, please be sure to not confuse yourself, as enough is going on in the seas to confuse anyone. As a new player, you need to see further NPS to avoid NPS if not prepared for combat. Also, it helps if you are doing combat to see the fleet of some NPS. Food or Famine for crew Sadly, the game does not explain this at all. Let's start with what you can use for food.... Anything you can eat if you were a real pirate at sea. Beer, Grog, Fish, Rations, Ale, Wine, Meat... anything that is edible. OK... I have that in my hold, but they never eat it! Relax. Here is where the game needs major work that will never come. It has been requested for 2 years in Beta. You must select one item WHEN YOU ARE OUT TO SEA.. and there will be a little window to the right that shows CONSUME and has a slider to how much can be used for auto feeding and you need to check the box on that item. You can do it for any item in your hold that is food, intended for the crew, until you turn it off. Some people were recently SCREAMING in chat... this game is BUGGED... WHERE DID ALL MY FISH GO??? I WAS WHALING AND FISHING FOR HOURS, AND MY INVENTORY IS GONE!! SCREW THIS... just to get hammered with replies saying check your food for crew settings. Rage... rage... against the dying of the light. In the end, they said Oh wow, they forgot since the beginning. The problem is... they forgot to turn off fish use for the crew, from early game play, and now the crew eats it in a large ship as fast as they catch it. In closing, we recommend two items that you will always use with ease, and never use any other item that could compromise the ship's workings. (NO, IT IS NOT Beer and Grog, which will slow sails, speed, firing... they all have negatives as you would imagine) Use PROVISIONS. PROVISIONS can be made from FISH AND MEAT. You will ALWAYS need FISH AND MEAT forever. Especially as the crew size increases and multiple ships are involved. Meat can be bought in your starting port, and it weighs a considerable amount. Fish can be caught everywhere if you have tackle on your ship and it is well-equipped. TACKLE is made from cloth and features some wooden pieces from ship fragments. All this is done in the port in the Manufacturing tab. Points of interest as to our logicProvisions are..... Easy Sustainable No adverse effects Lightweight You must activate the PROVISION when you are out just sailing, open your inventory "T", find PROVISIONS IN YOUR HOLD, click it, mark it on the right as ALWAYS FOOD SOURCE. You are set forever on all ships. The only time you will use PROVISIONS otherwise is for your factories, such as mines, rum, or the like... that you can leave rations for the workers at the factory site, to boost the numbers. NOTE Do not mistake PROVISIONS for FIXED RATIONS. Fixed can also be manufactured. IT is not RATIONS for feeding the crew. It's an activated resource, unlike PROVISIONS, which you keep in your hold that the crew can get to. The difference is that this is an activated item you can carry. It can be one of the three activated upgrades you have for repairs or sails, accessed using the C, X, and V keys. You can also make a FIXED RATION, which is an emergency crew boost. Costly to produce, but in a pinch, it maximizes reloading, speed, and maneuverability for a time. It is, like all activated provisions, such as repairs, that will always be hidden in the port. Used across all ships you take out. We would only use and have mixed rations preparing for the PvP event or the FORT takeover. Not really something to feed the crew with. We'd like to repeat, FIXED RATIONS ARE NOT SOMETHING YOU CARRY IN YOUR HOLD. It is activated. PROVISIONS, however, are a food source that will show up as a white bundle in your hold, which must be in the hold of the ship to use at sea and marked only when you are out on the sea, as your crew's food source. Hope this helps... it stinks that the game, by default, does not mark something to feed your crew, but in that decision, it is better to bring the players' attention to it through us, than redo their terrible tutorial. Be sure to rate us! Factories at Sea Factories at sea can be seen on the large map ("M" key) with a pickaxe icon. Rum, Wood, Ore, Animals, Resin, etc. are all various factories that produce goods for you to trade when online or offline. Level them up high enough, and they will continue to work even when your stock resources run out. To level them up, you need Gold, Bulkheads, and Plates for many. Some require additional items, but for maximum efficiency, plan to bring provisions for the bonus. Why can't I build ships!?!? Many factors come into play. Have you used the ship you are in enough to get experience to unlock the next ship in that row? Do you have enough resources? Does the Port you are currently docked at allow the ship you want to build to be crafted there? So we have this checklist always when wishing to build anything. First, check the port. Hover over the port you are at, and it will indicate the ship tier that is built there. Anything below that ship tier, if it says 'TIER VI (6)', then that means only Tiers 6 and 7 can be built there. Second, go into the shipbuilder tab in the port, select the ship you want by hovering it to see the experience, and if green, you are good to go to the next step. Now click on that ship. The window opens, displaying the resources required. Do you have these resources? Not on the ship hold that you are currently using, but in the port storage? If your resources are in your ship's hold, move them to the port. If you have enough, then you are good to go. If not, get them and return here when you have them. If there is no BUILD button, and only TRACK AND PREVIEW, you are missing any one of the above. Once you have met the experience requirement for the lower ship in that line, have the necessary materials, and the port you are at is capable of manufacturing your level of ship, the BUILD button should appear. Guilds This is a very complicated subject. Guilds, since the 24 hours before Early Access, showed seasoned players just being bullies on many levels. Exploiting port FIJI, the group attacks new players for experience and loot. Then other clans took foothold on others and upping it up to nearly 1k to port. After they made millions, it settled about four days in now, still steep, but not as bad. Only accepting new players in guilds to get your game name and target you, knowing you do not know how to defend yourself, is a risk you take. It happened to us the moment we asked a question that exposed we were completely new. A few things that made guilds toxic and untrustworthy: players who played BETA for 2 years, became friends, and found a reason to exploit the community. Now they are rich and have not even been in for a week; they have tier 3 or tier 2 ships. Shocking in one week. They had numbers upon login after the Early Access launch that showed: Russian servers averaged 549 players over 24 hours. The EU server had an average of 1100 players NA servers had an average of 447 players. Developers noted the extremely low numbers, so they changed it today to pictures of sailors, to mask how depleted the behavior stated above discouraged many on the Early Access launch day two days ago. To us, this is a sign of trouble. Be honest, changing numbers to pictures to mask is just like lying. In their own posting, the development team posted that upgrades to the game, and at what speed, would depend entirely on money. You can check on the internet for their current server numbers on Steam here: https://steamdb.info/app/2948190/ At the time of our guide, only 2276 players were online. FAR from the 24-hour BETA pre-release. Why?? Exploitation, toxic abuse, and discouragement of the new player base. If they had not allowed such nonsense—Guild abuse toward new players and atrocious behavior in chat —perhaps this would be different. We experienced this firsthand when we asked for a guide or help. So we decided to make this one. They still have time to fix the behavior issues and save the game, but Guilds are for the pay and strong, and the new and weak must make their own to be targets for the big. You'll be able to join a guild with caution until time sorts this all out. If you do join one, be silent, read or listen if in Discord, and risk nothing by asking questions. Come here and we will find out for you.
ULuo
2026-02-19 01:00:21 · 发布在 「World of Sea Battle」
海战世界 - 注意事项
关于《海战世界》北美抢先体验版的一些想法、见解和信息。本文以初次玩家的视角撰写,主要关注在悬挂和平旗状态下的PvE内容。 基础操作 【注意:以下提到的促销代码已失效】在游戏中,你大部分时间都将以第三人称视角操控船只。其余时间则会在各种与港口、灯塔、资源节点、个人岛屿等交互相关的界面和菜单中度过。大多数操作只需通过左键点击即可执行。 操控船只时,请注意以下几点: 1. 游戏中几乎总会显示风向指示器。它会根据你行驶的方向影响船只的加速速度和最大速度。 2. 注意:本游戏支持抢风航行。简单来说,通过变换角度逆风行驶,比直接逆风行驶速度更快。例如,当你正对着风时,先向左转30度,再向右转30度,这样来回转向行驶的速度会比直接逆风直线行驶更快。 你只能在达到最高速度的第二阶段时才能开炮和开枪。游戏中有三种速度可供选择,即低速、中速和高速(当然还有停止状态)。速度越慢,转向速度越快,因此在海上机动时要考虑到这一点。 如果你保持正确的速度,火炮会自动显示其射击弧线和瞄准十字线。然而,只有按住【Q】键时,回旋炮才会显示十字线。此时你只需瞄准并松开按键即可开火。不按【Q】键也能开火,但你可能无法准确知道炮弹的落点。战斗采用技能射击系统,因此你可能需要根据目标的速度和距离来预判提前量,以及调整瞄准高度。 在非PVP模式下,你不会与其他玩家的船只发生碰撞,但会与NPC船只相撞(甚至造成伤害)。 另一个实用工具是望远镜,按住【E】键并移动鼠标即可使用。它能让你更好地观察远处的物体,对准其他船只时甚至会显示额外信息。初始缩放效果已经相当明显,你还可以通过鼠标滚轮进一步放大。虽然你在海上的大部分互动都是与其他船只战斗,但你还可以做以下这些事: 钓鱼只需进入钓鱼点范围内(海上绿色高亮区域,若在范围内,小地图和主地图上也能看到),按住空格键直到收获所有鱼类。注意要保持在范围内,因为鱼群实际上会移动。 救援船员是当你在海上看到非常小的船只时可以进行的操作。这些船只在地图和小地图上呈特定的蓝绿色。在这个小游戏中,你需要进入范围内并按住空格键,直到两个箭头指向进度条的绿色部分,然后松开空格键,即可收集免费的单位和资源。注意 - 如果你离小型船只太远,你派去回收的船员将会失踪,船只也会消失。当你朝着救援目标前进时,会有一个数字指示器显示有多少船员正在执行救援任务。 在海上也可以进行捕鲸活动。鲸鱼在地图和小地图上都有自己的图标。有两种捕获鲸鱼的方法(使用武器造成伤害或使用渔具造成伤害 - 通过类似长矛的投射物在任意距离攻击),但两种方法都需要将它们显示的生命值降至零,然后执行一个与钓鱼非常相似的简短迷你游戏。请记住,虽然渔具造成的伤害比其他武器低,但它不像加农炮那样有最小射程限制。当你攻击鲸鱼后,它会试图冲撞你的船只,这时这点就派上用场了。鲸鱼体型越大,造成的伤害就越高,所以不要低估它们。我见过生命值低至125、高达3500的鲸鱼。和救援时类似,随着进度条的推进,会有数字显示有多少船员正在外出收集鲸鱼。如果离得不够近,你可能会失去他们。【注意】与摧毁船只不同,对于死鲸,不会根据造成的伤害来“分享”战利品。无论你造成了多少伤害,只有第一个完成鲸鱼收割进度条的人才能获得资源! 此外,在你遇到的一些岛屿的海岸线上,会有资源采集点。这些在小地图上以铲子图标显示,当距离足够近时,你可以消耗船员饱食度来收集它们。其他注意事项 不要犹豫,充分利用地图上遍布的港口——每次停靠港口时,你的船只都会得到修理,船员也会被完全补给。完成主线任务需要大量木材,所以如果能避免将木材用于修理,会很有帮助。 花时间和精力学习如何稳定地登船是值得的,即使你只是为了拆解船只获取资源: 当你捕获一艘船时,你还会获得船上货舱里的所有物品,包括弹药。所以当你前往港口时,一定要选择查看货舱并掠夺所有物品。接下来,你需要拆解船只以获取原材料,通常是横梁、木材和布料。注意——双击左箭头不会掠夺弹药。所以你必须手动拖动才能获取全部内容。不过实际上,你可以通过双击左键来完成这个操作。 当你捕获一艘船时,需要打开“Z”菜单并命令它跟随你。不过它会保持一段较远的距离跟在你身后,所以如果它离你不是很近,不要感到惊讶。当你停靠港口时,它实际上可能离你相当远,但你仍然可以与它互动,进行 loot 和拆解操作。【注意】除非你拥有登船后能将船只修复至最大生命值50%的技能,否则我还建议通过“Z”菜单命令船只“停火”,因为如果它向你开火,你可能会试图逃跑,而你不会希望它因此吸引到其他船只的仇恨。如果你带着捕获的船只位于港口时,意外或故意快速旅行到另一个港口,你不会丢失该船只。它会停留在原港口,直到你下次靠近到足够距离,它才会尝试跟随你。不要将岛屿资源收集相关的建筑升到满级,因为主线任务中有一步要求你建造一个此类建筑(该任务不支持回溯完成)。初始阶段你最多可以建造2个,不过后续技能会允许你建造更多,其中第一个后续技能会将建造上限从2提升至4。 在公海上与搁浅的小型船只或沉船互动时要小心。有时掠夺它们会触发附近海盗船的仇恨。大多数情况下可能只有一两艘海盗船,你可以选择消灭它们或逃离。但有一次我没注意,附近竟然有4艘。 【注意】能够提升移动速度的大型帆消耗品是应对这种情况的绝佳逃生工具。保存你的鱼是值得的,因为海上有特定的商人【渡船夫】会用某些资源来交换你的鱼。除了资源外,他们有时还会出售更精致的造船材料,例如舱壁、船梁和帆布。 不要忽视酒馆里能接到的任务。酒馆是港口特有的,所以每个港口都有自己的一系列任务可供接取。即使你只做那些允许挂和平旗的任务,也很有可能有很多机会在不进入危险区域的情况下完成它们。你甚至可以无惩罚地拒绝不想做的任务,这样它们就不会在主地图上显得杂乱。 注意 - 获取传闻时,也有机会免费获得一名特殊船员。主地图是帮助你确定方位和了解所在区域情况的重要资源(尤其是在寻找船夫或任务地点时)。此外,如果你用左键点击并向某个方向拖动,甚至可以看到大致的距离(以米为单位)和预计的旅行时间(以分钟为单位)。 并非所有NPC船只都是海盗。其中一些只是特定阵营的商人,所以不要疯狂攻击你看到的每一艘船。如果你击杀了足够多的商人船只,其他NPC船只将会开始追捕你。 大多数NPC船只在你攻击它们之前对你保持中立,但也有某些船只一直在搜寻你,如果你在其范围内停留足够长时间,它们就会发起攻击。幸运的是,这些船只在小地图上会显示为红色轮廓,并且在它们上方会有一个巨大的望远镜图标。一旦该图标完全亮起红光,就意味着你已被发现,它们会试图追捕你。 注意:你进入危险水域的次数越多,这类船只就会出现得越多。如果在地图和小地图上看到铲子图标,这是一个迷你游戏的触发点,你可以通过玩这个游戏来收集一组资源,代价是降低船员的饱食度。 不要忽视给角色分配技能点。有几个技能只消耗技能点(不消耗金币),却能显著提升你的能力。以下是我最喜欢的几个: - 每2小时允许一次免费快速旅行。 - 允许你最多携带3艘捕获的船只。 - 使你可以建造的资源收集建筑数量翻倍(2→4→6)。 - 拆解船只时提高木材和布料的获取量。 - 增加港口的总 crafting 产量(分阶段提升,300→600→1000)。 - 成功登船后修复你的船只。将你成功捕获的舰船修复至其最大生命值的50%。不要忽视给你的船只升级。许多升级能极大提升你的能力,而且大多数升级只需花费150-300金币。注意——由于深水机制,永远不要卖掉所有小型船只。你可能需要一艘小船回到大型船只无法进入的区域! 警告与注意事项: 使用爆炸桶时要格外小心。如果你触发了自己的爆炸桶,仍然可能被炸到! 当你看到可以为你侦查且在你停留过久时会攻击你的船只,攻击前一定要检查它们是否有同伴。如果有敌方的支援船只突然出现,战斗局势可能会迅速对你不利。在摧毁个人岛屿前(例如移动岛屿时),请确保取出停靠在岛上的所有船只。否则,这些船只将会丢失! 海上的可 loot 残骸中有时会混杂着一两个爆炸桶。如果撞上它们,就会发生爆炸! 船只撞击陆地会受到损伤。 尝试调整位置进行登船时,注意与目标船只的速度匹配。如果在按空格键触发登船时速度过快,从船侧射出的钩爪可能会 miss 目标。再次尝试的冷却时间相当长,大约 20 多秒,这段时间足够你承受大量额外的侧舷炮击伤害。你可以安装在船上的升级部件具有特定于其类型的有效耐久度。请务必定期检查耐久度,并在其损坏前进行维修(通常只需少量金币),否则维修成本会显著增加。Letting your crew run out of satiety in southern waters of the sea just lowers their effectiveness. Running out in the northern waters of the sea will result in their death. NOTE - You'll get a prompt on the screen when passing into northern waters. As with most online MMO games with an auction house of some sort, take the time to do a little research on what the value of things are. The game allows players to set Buy Orders and Sell Orders that are way out of bounds of what things are really worth. For example, it's not uncommon to see players put up Buy Orders for ship building materials (beams, bulkheads, canvas, etc) for a value that's less than what the raw materials are that went into those materials. When thinking about pricing your own Sell Orders for crafted items, make sure to take into consideration the value of any production/manpower you spent making them at ports or your personal island (since it's limited, it's functionally a currency as well). NOTE - Each port has it's own auction house, but you can still see the prices for some of the nearby port auction houses as well. More About Ships (Work In Progress) While ships themselves aren't overly complicated, there are a variety of considerations worth taking into account as you work towards getting the most out of each one you command as well as engage in strategic planning for acquiring the ones you want in the future. Ship UpgradesThe upgrades you can apply to ships can drastically affect weapons, speed, handling and a variety of defense and utility capabilities. Since there are only a max of 6 possible upgrade slots, it's worth taking a moment to review all of the upgrades (and their costs!) to determine which ones are appropriate for the playstyle you're going for in the ship as well as how long it will take to meet the requirements. For example, if you are going for a general PvE style beginner approach: Slot 1 - Sail Only - This slot is required to be a type of sail. Ideally you want to go for the fastest one, but in addition to gold it requires a special resource that you might have to play a while to get (Voodoo Skull). Personally I went with the Stitched Sails (+45%) first and then when I got the Voodoo Skull I applied the Tarpulin Sails (+70%). Slot 2 - 'Combat Crow's Nest' for visibility range and aim speed increase. Visibility range is excellent for spotting aggressive spyglass ships as far away as possible. Slot 3 - 'Cellars' for additional cargo hold space and prevention of goods perishing. Great for the early game when you're most likely sailing in the South where perishing is an issue. Slot 4 - 'Small Hooks' to increase boarding range, item collection speed and fishing speed. Slot 5 - 'Advanced Gun Carriages' to increase weapon angle and aiming speed. Slot 6 - Locked - The amount of grinding you have to do to 'unlock' this slot makes it practically unavailable to most players for a while. See the "Ship Research" section below for more details.Slots 1-3 are unlocked and available by default. Slots 4 and 5 need to be unlocked individually by accumulating the appropriate amount of experience while commanding the ship and then having enough Battle Marks as indicated by the specific slot. Once you have both, go into a port and open the Upgrade screen to complete the unlock. Keep in mind that the experience cost is separate for each slot. So if Slot 4 requires X amount of experience and Slot 5 requires Y experience, you need X + Y in total. However, the experience you gain doesn't start getting credited until you unlock the previous slot. So if you have the experience for Slot 4 but not the Battle Marks, all the experience you get in 'excess' of the Slot 4 requirement is not carried over to Slot 5. NOTE - The cost to apply upgrades drastically increases as you move up the rates. For example, an upgrade that might just cost 300-600 gold on a rate VII ship will be roughly the same gold in addition to requiring a few Voodoo Skulls (3), a good chunk of Battle Marks (20-30) and quite a bit of rum (150-250) for a rate IV ship. Ship WeaponsEarly on this is a fairly straightforward process that mostly just costs gold. There are a handful of weapon types as well as their size category (light, medium, etc) which is intended to govern which rate ships can equip which weapons. For each of these there are also crafted and drop only variants that are incrementally more powerful. ***************************************** * Placeholder for supporting visual * ***************************************** The general categories are cannon, bombard and mortar. Within cannons you have ones that are general purpose when it comes to range, penetration, weapon angle and accuracy spread, then a sniper and high damage shorter range variants. NOTE - Crafting guns requires a significant amount of resource investment, especially when you start outfitting ships that have more and more gun ports. Ship Repair and IntegrityWhen you're using rate VI and VII ships repairs are largely just a gold sink. However, once you start using rate V and above, you'll notice they have a "Ship Integrity" value. You'll lose integrity every time your ship is destroyed and when all the integrity units are depleted you'll have to complete a "Major Repair" before you can continue using the ship. I haven't been destroyed enough in my rate IV Essex to test out exactly what this means. Ship ResearchResearch is essentially how the game refers to experience gain specifically for a ship or ship category (Fast, Combat, Heavy, Transport, and Siege). Each category has it's own specialty and general stat characteristics (i.e. transports obviously have high cargo capacity). You gain research toward a specific ship/line by simply gaining experience while commanding that ship. For me, since I've spent 80% of my playtime using the Horizont (rate VII Combat ship), by the time I had collected enough resources to build an Essex (rate IV Combat ship), I also had gained enough research in the Combat line to have it fully researched. As a side note, the game won't tell you the construction cost or let you build a ship that you haven't researched yet. NOTE - Because you can buy ships on the Auction House, a player can still command a ship they have not yet researched, however they will incur a stat penalty if they do so. Now lets pause for a moment and revisit something I mentioned above in "Ship Upgrades". The last ship upgrade (Slot 6) is locked behind a requirement that the player have all five ship lines (i.e. branches) maxed out in terms of research. As you can imagine, that's going to be a good bit of time spent grinding experience in at least 5 or more different ships. Ship Map NavigationAnother key aspect of using ships is understanding the limitations based on ship rate in terms of where a ship can sail and where a ship can dock/undock. When you open the world map you'll notice these markings that appear like boundaries around certain ports. Within those boundaries is the ship rate, which indicates which ships can dock at ports in this area and if the player will get a "shallow waters" warning when going there. For example, if you attempt to dock at South Bastion in a rate IV ship it won't work because that area is marked as rate V, meaning that only V - VII rate ships can dock or undock in those waters. This means that you can't try and be clever and dock at South Bastion with a rate V ship and then undock with a rate IV. If you try it, the game will display a popup indicating you can't do it without a different rate ship. Fortunately these boundaries are localized around ports, which means that most of the map can still be accessed by rate I - V ships. There's also usually at least one NPC port in each region of the map that can be docked at by any rate ship. Boarding One of the best ways to immediately boost your gains from dealing with other ships is to board them rather than destroy them. The boarding process is relatively simple, however there are plenty of things that can go wrong which may make the process frustrating from time to time. See below for information on the crew that participates in the boarding mini-game: https://steamcommunity.com/sharedfiles/filedetails/?id=3594345592 Step #1 - Choose The TargetThis is probably the most important step of all because winning the boarding fight is largely a combat crew vs. combat crew numbers game. For example, if the total crew on your ship is 75 and 40 of them are sailors, offensively you only have 35 left to do the real work. So attacking a ship with a current crew of 100 will be fairly risky unless you deplete their numbers in advance using grapeshot (or collateral kills from other ammunition hitting the deck). NOTE - Unfortunately there's no way in the UI to see the crew breakdown of the target ship. Alternatively, you could chose to lower your sailor count and take the penalty to "work speed" which will affect reload speed and maneuverability in exchange for extra musketeers which would provide a much more deadly boarding offense. The challenge with reducing crew numbers is that while you are taking the time to drop the target ship's crew, unless they are a player they aren't trying to drop your crew back, they are trying to blow you up. As you might imagine, it's a lot easier to do hull damage than it is to reduce a crew's numbers significantly for the purposes of boarding. Another technique that can be used to stack the deck in your favor is overloading your boarding party by bringing reserves. You can do this two ways: Load up extra crew at a port. Collect extra crew by rescuing them from small boats.You can only overload by a certain amount though, for example the most I could get on a Horizont was 98/78 crew. This can either help you tackle a much larger crew ship, or significantly reduce your losses against matching or smaller crews. In summary, choose a ship you could easily outright kill and who has a crew size at or below your own at first. Once you get comfortable and skilled at the process you can go for ships with larger crew sizes. Step #2 - Prepare The TargetIf you don't need to drop the crew numbers on the target, then your first move should be to drop its HP to 50% as soon as possible so you can position your ship parallel alongside it to start the boarding process while minimizing the damage you sustain from the target. If you do need to drop crew numbers, you'll probably want to open up with one or two bar shots to do some initial sail damage while you can. Once the fight starts the AI is pretty good at simply pulling up their sails the moment you load bar shot making it incredible difficult for you to do any significant sail damage. Therefore after a couple bar shots, you'll want to go full grapeshot until their crew numbers match whatever threshold you are comfortable with boarding at. Keep in mind that though grapeshot reloads faster than other ammunition it has a lower effective range and a much smaller optimal target area. For example, there is a sweet spot where you want to aim your grapeshot such that it hits crew standing on the deck without shooting too high and without hitting the deck or the hull itself. If you are dropping the crew by 3-5 with every volley you're doing good. Less than that, and you need to adjust where you're trying to hit. Step #3 - Getting In PositionThis is the part that probably sounds easy, but in practice it can get complicated in a hurry because of the following: The other ship baits you into coming up on one side and then quickly maneuvers away. The other ship shoots fire ammunition (or drops an explosive keg) causing you to have to reposition to avoid significant damage. Wind direction affects your maneuvering approach more than you anticipated. Another NPC or human player gets involved in the middle of the engagement. The other ship collides with you during positioning in such a away that it is able to get away before you can adjust accordingly.What I've found to be helpful (though it sounds counter-intuitive) is to sometimes let the target ship hit your ship (especially in the middle) to sort of "stun" or lock it in a stationary position for a few moments while you slowly rotate left or right such that the moment the target ship tries to move forward or backwards it has no choice but to be parallel to your ship allowing you to immediately trigger boarding. NOTE - As you can imagine, this is also extremely dangerous if the other ship decides to shoot fire ammunition at point blank range in this situation. However, I found that 90% of the time AI ships won't shoot fire ammunition on you this close up. I've also not seen them use explosive barrels in this situation. Step #4 - Launching The Boarding ActionOther than positioning, the key to a successful boarding action is relative speed both before and after the boarding hooks are fired. If you are moving too fast when you get the prompt to press spacebar to shoot the hooks, one or more of them are going to miss the target ship and the boarding mini-game won't be triggered. You'll have to wait 20 seconds before doing it again. Even if all the hooks hit the target ship, if for some reason you or the other ship have too much momentum afterwards, they can still separate enough to cancel the boarding mini-game and you'll have to try again in 20 seconds. This is usually only a problem when you get in the parallel position in the opposite direction of your target.The hooks ship upgrade can allow you to shoot the hooks from a further distance and increases the total number of situations where you can trigger boarding. Step #5 - Winning The Boarding FightThis part is fairly straightforward but I'm still not 100% sure what happens in the background. Once the boarding hooks land and the mini-game starts you have 5 seconds where all you can do is watch. After the 5 seconds are up you can choose to hold down ctrl and then left click on one of your own crew squads to apply a shield icon to them as well as choose which enemy crew squads to attack (usually it starts out targeting multiple units so you are essentially unselecting the others). Once the 5 seconds are up you have 30 seconds to win the fight. I think that whoever has the most crew at the end of 30 seconds wins, however, I've rarely seen a fight go longer than 15 seconds. Usually 2-3 seconds after I've killed their musketeer squad the fight is over. Also at that point they usually still display as having some crew left, so maybe there's a threshold or something such that if their total crew drops to X% the fight is over even if it hasn't been 30 seconds. Personally I "feel" like shielding your highest damage unit (usually musketeers) and single targeting the enemy's highest damage unit (usually musketeers) results in a faster and more successful outcome. Regardless of what approach they use for calculating damage output, based on the crew member stats I provided at the start of this section, I would consider single targeting the highest damage output units in order the best plan. Step #6 - Aftermath Of A Successful BoardingUpon successful boarding the target ship will be under your control and should automatically start following you, but it will also be in an aggressive stance. You can issue commands by holding down the 'z' key and clicking on a command with LMB. The moment boarding is finished I issue the "Hold Fire" and "Everyone Follow Me" commands and then move on to the next target or the nearest port. Personal Island The Personal Island is essentially how a player is able to establish their own "base" in World of Sea Battle. Here are some basic facts about them: Personal Islands can only be established at specific locations along the coastal areas of certain land masses. They are clearly marked on the map as a tent looking icon. At the start the player can only have one. At significant cost they can have another one via a skill that costs 1 skill point and 300k gold. Only a single workshop type can be established on a Personal Island at a time. Though you can switch them, it would be a resource intensive decision. Personal Islands use a separate pool of "crafting production" called "manpower" which comes from the the number of buildings you have constructed and can be replenished through the deployment of "captives". Every time you construct a building on a Personal Island the subsequent building cost increases significantly. For example, the first building costs X Plates Y Wreckage Z Resin and a certain amount of gold. The next one costs X+12 Plates and so on. So make sure you prioritize your first few buildings accordingly. Personally I went with Pub and Plate Construction for my first two, and planning for the third to be Mission. Fourth will probably be the building that lets you manufacture trade goods. Using the workshop on your Personal Island will reduce the cost of crafting via resources by 20% (except the gold cost). The manpower cost per unit is also significantly lower than if you were using a Port. Only the Personal Island can allow the player to "dock" their captured NPC ships so that they disappear from the world (and therefore can't be attacked by other players or NPC ships). When a Mission is constructed on a Personal Island the player can spend manpower to collect resources from established resource collection structures that are within 7km range. You can check this from the map by placing the mouse cursor at your Personal Island and then holding the CTRL key and dragging to each potential resource collection structure. That way you can position your Personal Island accordingly to ensure the Mission can collect from the maximum number of nodes. Frequently Asked Questions Where do I get iron?You can acquire iron from a variety of sources, it's up to you to decide the best way to stock up on it based on how you'd like to play: Merchant Villages on the coast of islands. If you are lucky you can find 200-300 available for sale for 2 or 3 gold each. The Ferryman NPC ships that you can see labeled on the main map. They sometimes sell iron (as well as other useful supplies) in exchange for fish. Iron Mines you construct on specific island nodes that you can see from the map. From destroying (and perhaps capturing?) ships that have iron in their hold. I believe you can see this when you scope them. Auction Market sell orders from other players. Smelting iron ore or volcanic ore (has higher iron yield) using coal. You acquire this ore from shovel nodes on the coast of islands. NOTE - Nice thing about using the Smelting tab from the workshop is that it doesn't use "production". Smelting canons that you can purchase for gold through the Smelting tab of the workshop. NOTE - Would only do this if you are desparate. It's pretty expensive relative to other methods. How can I see what I have in the warehouse of ports that I'm not currently docked at?Open the main map and mouseover the port you want to check. Press the left or right arrow button on your keyboard to flip through the pages which will show the contents of your warehouse there. How do I switch ammunition for my cannons?Single tap the appropriate number key on the keyboard for loading it into a single side. Double tap the appropriate key to load the ammo on all sides. Is this game very grindy?As with most online F2P MMOs, yes it is. From the moment you start you'll be grinding for the following: Experience so you can level up and apply skill points to improve the capabilities of your ships and structures. Gold so you can afford fees associated with purchasing crew, ammunition, keeping special crew paid, repairing your ship, paying mooring fees set by player guilds, applying certain skill points, purchasing certain goods from Fishing Villages, building on your Personal Island, building resource gathering structures, constructing workshops at NPC ports, purchasing from NPC markets, and from the player driven Auction House. Research (via gaining experience based on the ship being used) so you can construct higher rate ships. Faction reputation (partly via completing rumors from taverns) so you can get discounts on building ships. Battle Marks so you can build new ships, unlock upgrade slots on ships, and in some cases outright build certain ships (yes, some ships' only construction cost is Battle Marks!). Fish so that you can use it as currency for certain Ferrymen and Fishing Village purchases. However, the more you play the game there are many opportunities to enhance and optimize key grinds through skill points and structure construction such that it feels less like a chore or at least ends up being worth the time you spent doing it. The economic infrastructure that you can ultimately get setup can be pretty impressive when compared to what you're capable of in your first 10 hours of play. Is this game P2W?On the surface it's pretty straightforward to make a case for the fact that the game is P2W. It doesn't take very long after glancing at the in-game store to determine that there isn't much that you can't buy or make easier with the expenditure of real life currency. However, typically the rationale is more complicated than that, as over the years people tend to break down P2W into two camps: If you can purchase anything relevant to gameplay with real life currency then the game is P2W. Personally I tend to consider this more of a purist view. There's not many F2P games in 2025 that don't fall into this category. The game is only P2W if there are things you can purchase with real life currency that you can't get over time by grinding in the game that provide a gameplay advantage. This viewpoint is sometimes referred to as "Pay to Progress" or "Pay for Convenience". Personally I consider this to be more of a practical view, as it's usually this type of monetization that some people are still comfortable dealing with as a F2P or low spend account. Another relevant consideration is: "How does the monetization model impact your playstyle?" After all, you can literally play much off the game with your Peace Flag up 24/7 and experience a significant amount of the game at your own pace. Not only that, but even when you do want to venture into the PvP scene it's not that difficult to look for battles where you're not vastly outclassed simply because the other player threw their wallet at the game.

下载233乐园APP

专心推荐好游戏

关于我们 · 联系我们 · 隐私政策 · 营业执照

侵权投诉 · 开发者中心 · 用户协议 · 免责声明

不良信息举报中心

纠纷处理及不良内容举报电话:

4006600910 (工作时间: 9:00-12:30,14:00-18:00)

北京市朝阳区启阳路4号院2号楼15层1803室

本公司产品适合10周岁以上玩家使用 未成年人家长监护

首页 / World of Sea Battle

抵制不良游戏 拒绝盗版游戏

注意自我保护 谨防受骗上当

适度游戏益脑 沉迷游戏伤身

合理安排时间 享受健康生活

京ICP备18003564号-3

经营许可证编号:京B2-20181741

京公网安备:11010502052873

Copyright © 2025 233leyuan.com All Rights Reserved

北京龙威互动科技有限公司版权所有

热门游戏: 我的世界 | 三角洲行动 | 原神 | 王者荣耀 | 超自然行动组 | 蛋仔派对 | 和平精英 | 火影忍者 | 二重螺旋 | 英雄联盟 | 梦幻西游 | 明日方舟 | 斗罗大陆 | 光遇 | 鸣潮 | 无畏契约 | 模拟山羊3 | 樱花校园模拟器