


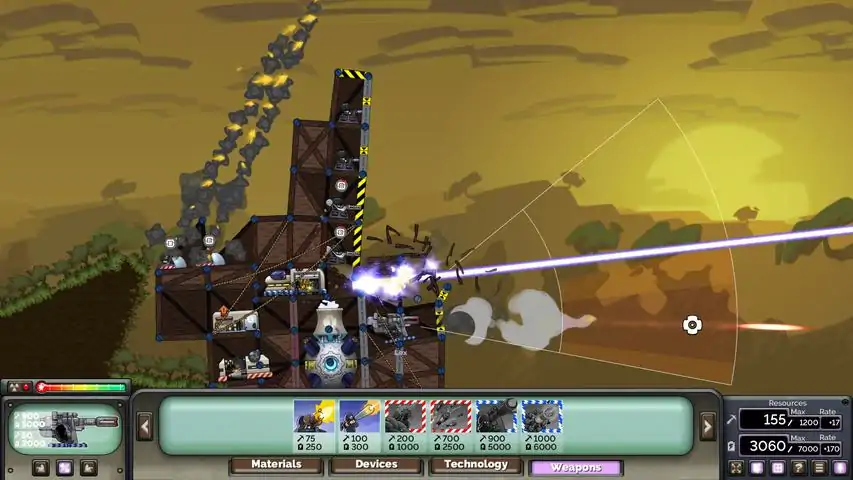

Forts
 Steam Deck
 家庭共享
家庭共享 云存档
云存档 创意工坊
创意工坊

加入官方 DISCORD!关于游戏在《进击!要塞!》中,尽情释放你的的创造力和策略才能,收获基于物理的即时战略游戏带来的惊喜体验!设计、建造和定做属于自己的雄伟要塞,用毁灭性的火力发起猛攻,将敌人的建筑炸成瓦砾! 沉浸于实时建造和资源管理的刺激体验,在无情的生存竞争中奋勇直前。研发自己的科技树,解锁致命的先进武器库,针对敌人的弱点施以最猛烈的攻击。眼见敌人曾经庞大的要塞被瓦解为硝烟四散的废墟堆,品尝胜利的甘甜! 准备好开启一场肾上腺素爆棚的建设、毁灭和称霸四方的征程了吗?立即加入《进击!要塞!》的行列,尽情战斗吧! 实时构建你的专属基地,管理资源,研发科技树,在扣人心弦的单人战役中披荆斩棘,称霸战场;或在多人模式种与至多七位其他玩家进行混乱的对战,将敌人的要塞炸成碎片! 用 16 种先进的武器武装你的要塞,铲除其他威胁,打击敌方弱点。从机关枪到导弹与狙击手,甚至等离子武器:只要战斗需要,总有一款适合的武器可以解锁,助你克服挑战! 你是被“疣猪”的强劲火力所吸引,还是对“铠甲犰狳”的顽强韧性一见钟情?又或许你更喜欢“什克诺夫”的狡诈实力,或是“建筑师”的建筑造诣?从 12 个不同的指挥官角色中挑选,《进击!要塞!》总有一个适合你策略的指挥官! 渴望在与其他玩家交锋之前磨砺自己的技能,或者刚刚结束高强度的多人对战,想要好好放松休息? 单人战役模式由 28 个不同的任务组成,既有不断刺激肾上腺素的激烈战斗,又有不容小觑的脑力挑战,让你沉浸体验丰富有趣的精彩内容,从邪恶的黑企鹅石油公司手中拯救世界。 在激动人心的排位赛中尽情展现你的实力!在为期两个月的紧张赛季中征服对手,提升自己在排行榜上的排名。勇攀 1v1 竞技场的巅峰,将众人梦寐以求的奖牌收入囊中,书写自己的游戏传奇。胜利在向你招手,迈向荣耀时刻! 在你巧妙构筑要塞之时,我们也在马不停蹄地为你革新新功能!自发布以来,《进击!要塞!》在充分的支持下蓬勃发展,其中包括: High Seas DLC - 在海战中追捕海盗集团,在公海上建造并打击巡洋舰、战列舰和航空母舰。掌握更丰富的物理动力学元素,全新的水体和浮力技术,并主持多人游戏,让所有玩家尝试完整的“起航远洋”特性和武器!Moonshot DLC - 在环太平洋战役中对抗 BPO 恶势力,夺回梦寐以求的月球科技!在四个全新战斗竞技场建造和战斗,获取全新的致命军火库,探索挖掘空间传送门等独特功能!主持游戏,让房间里所有玩家都能亲身体验“目标月球”的科技和军火库!多人训练 - 精心设计的任务,旨在帮助新玩家顺利掌握玩法,进入激动人心的在线游戏领域!《进击!要塞!》进击不息!- 《进击!要塞!》不断发展,每两个月推出新更新,配合新的排位赛季、提供错误修复、进行平衡调整和添加震撼的新功能,例如……免费 DLC - 新版武器包“巨量大炮”(武器林立),维修站(维护要塞机器人伙伴),额外的指挥官角色(每个角色都拥有颠覆性的能力),以及更多……模组 - 《进击!要塞!》为助长模组制作进行了精心构建,能够与 Steam 创意工坊无缝集成,通过内置的地图编辑器、由玩家设计的武器、科技和战役来丰富创意,并通过不断加入新功能来丰富游戏内容。多人排位排行榜 - 觉得自己的要塞坚不可摧? 要证明自己,就来参与《进击!要塞!》1v1 两月赛季,挑战其他玩家。在激烈的战斗中勇攀巅峰,争夺独一无二的的收藏奖牌。季节性内容 - 在《进击!要塞!》特别内容的陪伴下度过最喜欢的节日,例如万圣节和其他主题假日。充满活力的社区 - 立即加入 Forts Discord 服务器,充满热情的成员们都在这里等待着与你一起聊天和分享!在这个活力满满的社区里,学习战术和策略技巧,参加高水平的官方锦标赛,也可以在遇到模组开发问题时寻求专业解答。
游戏圈
共41条帖子

虚拟存在
2026-02-14 22:00:11 · 发布在 「Forts」
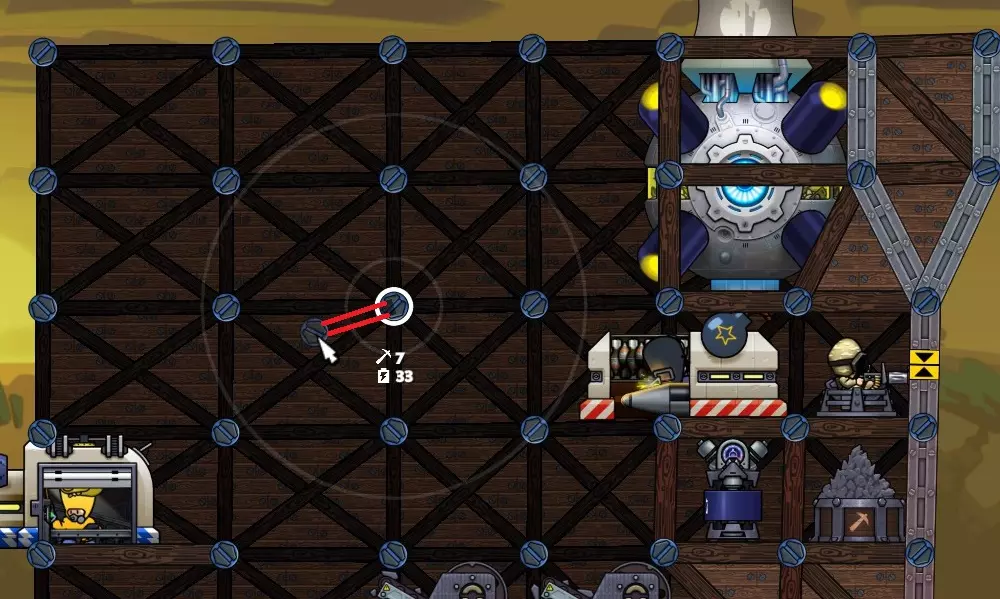
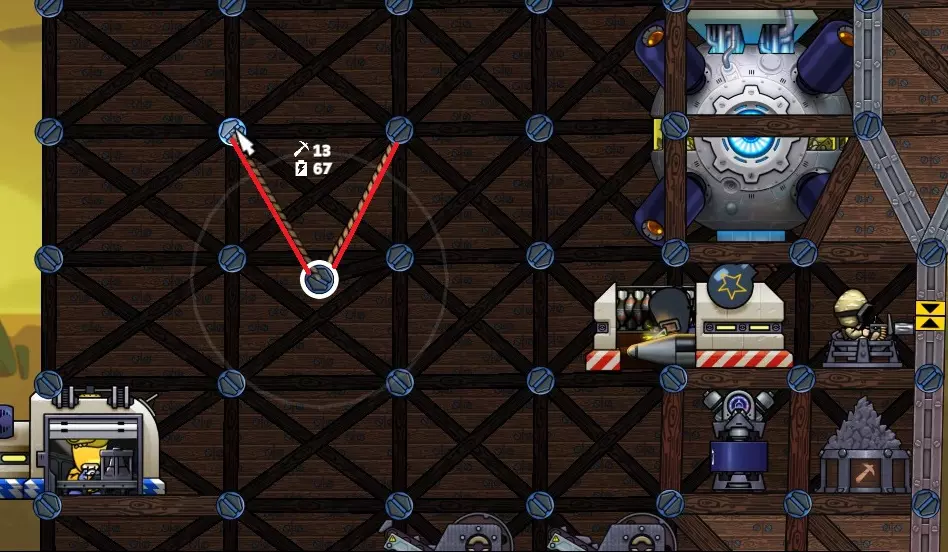
在本指南中,我将向你展示如何制作【三级火炮】
1.你必须关闭游戏网格,因为它会造成干扰如何制作
[1] 首先制作一个小梁立即系上两根绳索,确保横梁不会倒塌然后你需要安装第一根横梁之后你可以放下枪注意!此时你可以摧毁自己的基地……首先需要移除这根横梁。你应该会得到类似这样的东西之后你需要用绳子把枪从这个地方(圆圈内)扯下来立即上膛çťĺą

SS0B
2026-02-14 19:00:08 · 发布在 「Forts」
This is an exhaustive guide to all points of forts gameplay in a vanilla multiplayer lobby. Players are presumed to have an understanding of basic forts gameplay. If you feel like you do not have this understanding it is recommended you play the forts campaign before reading this guide.
Introduction
G'day FORTS fans!
If you are reading this we presume that you are wanting to improve your skills within the multiplayer experience. Maybe you've just finished the campaign and want to give multiplayer a shot, or generally play with gameplay changing mods on. Or, maybe you play vanilla forts but aren't very good at it. Well then, This is the guide for you! We, the contributors for this guide are all skilled forts players who have been playing the game for an extensive period of time. We hope you find this guide helpful to your general multiplayer forts experience.
This guide will follow a star system. The number of stars depicts how advanced a tip or trick is:
0 stars: Basic info everyone should know
1 star: Info advanced players should know
2 stars: Info pro players should know
3 stars: Info only madlads know
Starred information will be blocked behind a spoiler. Hover your mouse over it to read the text (actual spoilers will be marked {spoiler} before the spoiler).
For example: * Forts is the best game in the universe!
About the Author(s)
ma1kawa11
Hello, my name is ma1kawa11 (but most people call me M). I am the main contributor, author, and editor of this guide. I have been playing forts since the game came out, and currently have over 450 hours of experience at the time of writing. Most of those hours have gone to vanilla forts in 2v2-4v4 matches, however I've also had experience in mapmaking, and a little bit of modding.
42 Scientist
Greetings, I'm 42 scientist but you can call me 42. I am one of the side contributors of this guide. I have been playing forts since it came out, but mostly after Tons of Guns, with now more than 1500 hours played (and it's not going to stop anytime soon). Winner of a 2v2 tournament with Sgitkene (back when I was called Inixix_), I organized all the recent official tournaments as well as other smaller tournaments. I'm no modder nor mapper, but I have been optimizing all strats since Tons of Guns came out, with the help of others player to create those strats. I'm also studying in high-tier math, and play the piano when I get the time.
Cronkhinator
Hey, I'm Cronkhinator but feel free to call me Cronk! I am another one of the side contributors of this guide. I've been playing Forts since May 2018 and been enjoying it ever since. I have also taken part in multiple tournaments and won three official ones (XV, XIX, XX). I organized the first ever Map Making Tournament, won the second and organized all AI Tournaments. I'm currently studying Data Science and AI (1st term). In my free-time I'm either gaming or playing the piano.
What is Vanilla Forts?
Multiplayer Vanilla Forts is defined as a forts multiplayer lobby in which no gameplay changing modifications (mods) are added. A gameplay changing modification is a modification that changes the existing gameplay of multiplayer forts (such as weapons, devices, and material additions/changes, or conceptual changes). Or, it is a map that does not have balanced teams nor starts out with basic forts.
Some Examples of gameplay changing mods are:
Tanya's Mod (Adds additional weapons and changes the balancing of pre-existing weapons and commanders
Indefinitely Upgradeable ... (Changes the function of existing devices, weapons, and materials)
Mine x10 ... (Changes the function of existing devices)
Large Sandbags (adds additional devices)
Battle of Jakku (A map which does not start off with equal or basic forts)
Truce 6 minutes (A developer made mod that prevents the firing of weapons for 6 minutes)
Fast Build (A developer made mod that creates near instant build times for all weapons/devices/materials)
Keep in mind that not all mods are gameplay changing mods. A mod is not gameplay changing if it is created by the developers of forts, changes a part of forts that is not gameplay related (such as the music or the map theme), or is a workshop map that starts out with balanced teams and equal, basic forts.
Some examples of non gameplay changing mods are:
Tons of Guns (A free update to multiplayer created by the forts developers)
Moonshot DLC (A DLC that adds new weapons and map themes to multiplayer)
Repair Station (A device added as a part of tons of guns)
Portals (A material type added as a part of the Moonshot DLC)
Any music mod.
Any mod that changes terrain themes.
Boxed In (a map created by the developers which has balanced teams and equal forts)
Improved Vanilla 4v4 (a map created by the user m4r0x which removes the wind ceiling of vanilla 4v4)
Permafrost 4v4 (a map created by the user EndoRPY which has balanced teams and equal forts)
A lobby is not vanilla if it contains any game changing mods such as, but not limited to, the examples provided for gameplay changing mods above. A lobby is vanilla if it has non-gameplay changing mods such as, but not limited to, the examples given for non gameplay changing mods above. A lobby is vanilla if it contains no mods whatsoever.
"The art of war is of vital importance to the state. It is a matter of life and death, a road either to safety or to ruin. Hence it is a subject of inquiry which can on no account be neglected."
-Sun Tzu
Common Mistakes
If you are new to the game you probably have some bad habits formed. Before we teach you how to play the right way, it is important to first break these bad habits. Otherwise it will be harder to learn the material presented later in this guide. For that reason we discussed some "Golden Rules" that you should follow in order to become a pro. These Golden Rules arose from common mistakes we've seen new players do in vanilla games.
The Golden Rules:
#1 Try to avoid creating new foundations!
The term "New foundations", is where one connects a strut to the ground when there isn't already a current strut (node) in place. By doing this, not only is a cost charged for the strut, but also an additional cost for the new foundation. Resources that could have gone towards more mines and turbines are lost, which ultimately delays the time when weapons can be built and fired.
#2 Do not largely expand the Fort before building extra resource income!
This is the most common mistake new players do. Before placing mines or turbines or tech, many new players largely expand their Fort which costs a lot of resources. This rule is connected to rule #1 for similar reasons.
#3 Do not create huge boxes unless necessary!
When expanding the Fort, the standard size is a 2x2 box. A 2-wide and 2-high box has enough space to support most devices and weapons, and are also more stable and more compact.
Try to avoid building boxes that are 3 wide or 3 high, because they are unstable and occupy lots of space.
*some weapons require at least 2.5 high boxes to be covered completely: cannons, emps/rockets, howitzers, magnabeams
#4 Crossbrace the first few layers of the base!
This is a safety measure so that a Fort won't collapse as easily. When crossbracing ( |X| ), add more stability to the Fort and also a little more protection from that extra strut.
#5 Don't shoot the damned machine gunner!
Instead of wasting your resources on shooting the pre-built machine gunner (that won't do any damage anyway), sell it to get additional resources. Shooting the machine gun will also signal to opponent that you are new to the game.
#6 Double-door important weapons!
This is something that will be discussed in more detail later in this guide.
Since one door is not enough to secure an important weapon from late-game weapons, one should always put at least two doors on their most important weapons. The opponent will still able to hit a weapon through a single door using an AP-Sniper.
#7 Hide doors!
When one doesn't hide doors properly, the opponent will be able to see the exact position of a fort's weapons and target them. Additionally, they will be able to see whenever you open these doors and then effectively "door-snipe" the exposed weapons.
In order to hide a door, just put some background bracing in front of it. The simplest way of doing this is shown in this picture:术语与俚语
在深入探讨任何内容之前,有必要先明确一些职业玩家常用的缩写和特定名称的定义,这要么是为了更高效,要么是因为听起来更酷。缩写 实际名称
20's/20 mils/20mm/dakka 20毫米机炮
AA 防空
APM 每分钟操作数
BG 背景支撑
Crossbracing X形额外支撑(在箱子上添加X形额外支撑)
Eco 经济(资源生产)
FG 前景支撑
Greedy 贪(玩家采用高风险策略时)
MG 机枪
Nuke 弹头
Potato 卡顿/劣质(形容某物糟糕或缓慢时)通常指某人的电脑或网络
T3 三级迫击炮(向上发射的火炮)
Woodspam 紧密放置的木板
基础知识
“夫将者,智、信、仁、勇、严也。”
——孙子
在我们开始讨论核心摇摆和T3等高级技巧之前,需要先对要塞游戏体验的基础有扎实的理解。本节将深入分析以下内容的功能:
- 大厅
- 键盘快捷键
- 材料
- 装置
- 科技
- 武器
- 比赛目标
- 基本比赛结构理论材料、设备、技术、武器和指挥官部分(将在另一部分中分析)的统计数据来源由42位科学家提供。请注意,该文档会随着每次游戏更新而不断更新。
- 大厅
本部分列出了大厅菜单中的各种功能。Key:
玩家名称(房主会看到其他玩家旁有一个类似X的按钮,点击此按钮可将其踢出)
等级:显示玩家在1v1模式下的当前等级(如适用)
队伍:显示玩家属于队伍1、队伍2还是观察者
胜场:显示玩家在当前大厅中的胜场数
状态:显示玩家正在聊天、游戏中还是回放中
准备:显示玩家是否准备就绪
延迟:显示玩家的延迟值
踢出玩家选项:踢出玩家(仅房主可见)
显示光标:允许队友查看彼此的光标,已知可能导致卡顿
锁定队伍:阻止玩家切换队伍
强制开始:强制开始比赛,并将未准备的玩家切换为观察者状态
聊天:显示游戏内聊天内容模组:显示模组列表以及添加或移除模组的按钮。(若需要下载模组,该按钮旁会显示红色下载箭头)
地图:调出地图选项列表供选择。(若需要下载地图,该按钮旁会显示红色下载箭头)
团队AI:启用/禁用自动防空火力。
AI:更改AI难度。
指挥官:选中后允许玩家选择想要使用的指挥官。
地图名称:显示已选择的地图名称。
模式:在团队死亡竞赛和合作模式之间切换。
退出按钮:退出大厅。若主机退出,大厅将被删除。
邀请按钮:允许玩家邀请Steam好友进入大厅。开始按钮/准备按钮:对于主机玩家,该按钮用于开始比赛;对于其他玩家,该按钮为准备选择按钮。
- 键盘快捷键
在《forts》的“选项>输入”中,可以查看和编辑游戏内的所有按键绑定。本指南仅讨论与原版多人游戏玩法相关的按键绑定。QWERTY键盘的常用按键绑定如下:
- 暂停/菜单:Esc、F1
- 切换总览(在所有堡垒和己方队伍视图间切换):空格
- 拖动视图:在空白处按住鼠标左键拖动,或按住鼠标中键
- 放大/缩小至全屏:双击鼠标中键
- 缩放视图:鼠标滚轮
- 平移视图:W、A、S、D
- 选择/建造/开火:鼠标左键、E、双击鼠标左键
- 自动开火所选武器:E
- 上下文菜单:鼠标右键
- 取消选择:在空白处点击鼠标右键、Esc
- 关闭舱门:Q
- 区域维修:R、按住鼠标右键+鼠标左键
- 武器编组:Ctrl/Shift+鼠标左键、鼠标左键拖动
- 保存编组:Ctrl+数字键
- 恢复编组:数字键(重复按可恢复屏幕和光标)
- 废弃所选项目(删除所选物品):Delete
- 下一个材料/设备/武器(循环选择可能的材料/设备/武器选项):Z/X/C/V
- 激活指挥官:T指挥官按钮 升级装备/武器 U,右键+升级 切换物品 按住右键+鼠标滚轮 切换武器 Ctrl+Tab 切换就绪武器 Tab 显示/隐藏界面 F2 切换状态(显示延迟和比赛时间) F8 显示控制台(支持游戏内聊天) ~ 团队聊天 控制台打开时按Tab 切换到下一个可用武器并立即开火 Tab+E 这些按键绑定大多足够使用,但有一些可以更改。要更改按键绑定,点击对应操作或按键的文本并输入新按键。如果该按键已被使用,会出现提示,之后可以重新绑定该按键。这主要取决于个人的键盘布局。建议的按键绑定更改如下:
操作:删除选中物品
原按键:Delete
推荐新按键:Q
这一更改的原因是为了避免在删除支柱时,左手或右手需要离开鼠标或WASD键的原始位置。请注意,由于Q键已被占用,因此需要重新绑定。其他可选的按键绑定更改:
操作 原始按键 可选新按键
升级 U E
重开火 E Y
扩展界面 Q F
选择可用武器并开火 Tab + E 武器组、呼叫武器组(使用武器组编号时左键点击3次)、鼠标左键
- 材料
在原版要塞(包括月球射击DLC)中有七种不同的材料类型:
支撑材料背景支撑çç˛《门》çťłç´˘ć¤çž传送门Bracing:
This is the standard building material. It is essential to expand a Fort and is used to support Weapons and Devices. One can also use this material in high amounts within small spaces to have a cost-effective means of protection. This strategy is called woodspam and is used commonly in pro-player matches.
* There are different types of woodspam. It is possible to either make lots of small cubes or bigger boxes. The small boxes help counter lasers or cannons while the bigger cubes are effective against AoE weapons such as warheads and rockets. There are countless types of woodspam out there. Feel free to customize it as you wish.
Background Bracing:
This material is also essential for fort expansion. When a weapon or a device is placed on background bracing, it turns into normal bracing. Background bracing can be used to cover up wind turbines, since it lets air pass through. In addition, most incoming projectiles will also pass through background bracing without destroying it. Exceptions are: the plasma laser, the buzzsaw, and the howitzer. Other projectiles, such as the incendiary mortar, can light background bracing on fire while passing through it.
* Use background bracing as a protection against buzzsaws or Howitzers. Put some big boxes of background bracing in the front of a fort to have buzzsaws and howitzers collide with those instead of important parts of the fort.
Armour:
Armour is a tough and expensive material used to protect a fort from incoming fire.
Use it to protect the core or other sensitive parts of a fort. However, don't spam it all over since it is expensive. Armour can also be used to stabilize a fort and prevent it from collapsing if it is too heavy.
Doors:
Unlike simple background bracing, doors can be opened and closed. When closed, they are as strong as armour, but when opened they let projectiles and wind pass through. Use doors to protect weapons, and make sure to double-door important weapons since one door often isn't enough to stop heavy projectiles.
*** Doors can be used to protect turbines from missiles, simply close the door if there are incoming missiles.
Ropes:
Use ropes to stabilize a fort by pulling it towards the ground in the place with which it is attached. A secondary usage is to support hanging extruding material, or to build out towards another buildable terrain. Ropes can also be used to swing a core or explosive device on teammates (keep in mind you might be kicked from the lobby) or an enemy. Ropes can light on fire and burn up. They also let most projectiles pass through: exceptions being the buzzsaw, the howitzer, and the plasma laser.
Use ropes when a fort is really heavy on one side. Just attach a rope on the other side and make it equal.
* Instead of using ropes to stabilize a fort, it is possible to put a counterweight built with bracing on the back of the fort (if it is leaning forward), simply build bracing on the top of the back of the fort, to counter the leaning.
** Using ropes, it is possible to move a core. This requires good practice and also means the core is no longer connected to the fort for a few moments, meaning it won't build/produce resources.
** Before portals were introduced, ropes were used to make cannons shoot upwards, leading to what is called a Tier 3 mortar (or T3). It takes some practice to achieve.
Shields:
The main purpose of shields is to reflect incoming laser fire. When any laser hits an energy shield, it gets reflected back at the same angle that it was hit by. Shields also reflect Sniper, Machinegun/Minigun, Shotgun, Flak and 20mm projectiles.
Energy Shields have enough HP to stop a cannon shot, however they get destroyed upon collision. When hit by an EMP, Energy Shields are disabled for a few seconds. Shields are one of the few materials that drain energy while activated. Depending on their length, shields lower a fort's energy production rate and will disable themselves if energy stock reaches 0.
When disabled, shields let every projectile pass through.
Use shields to protect wind turbines (they let air through) and other important parts of a Fort.
** They can be better doors for weapons:
Keep them activated until you want to shoot and then deactivate them. When done shooting, double click on the shield to reactivate it. If the Moonshot DLC is used, the commander Moonshine allows shields to open and close like doors.
Portals:
Portals are added by the Moonshot DLC. They transport projectiles between one another instantly.
They work in pairs: when two portals are linked (left click one and drag the cursor to another) there will be colors displayed on each side of the portals in the linked pair.
If a projectile touches the blue side of the 1st portal, it will be teleported to the blue side of the other portal with the same speed. However the angle varies depending on how the portals are angled between each other.
They can also be used alone: activate a portal using the context menu and both sides will turn orange, meaning projectiles will pass through as if nothing was in their path.
There are 3 buttons in the context menu:
1 Arrow going through a line: allows projectiles to pass through, just like BG.
2 Arrows: changes the orientation of the portal (changes colors)
Cross: deactivates the portal.
Portals can be hit by swarm missiles and EMPs - the latter also deactivating the portals for a few seconds, like shields. Friendly swarms/EMPs don't destroy friendly portals.
Their main use is to teleport the projectiles of one's own weapons, meaning one can put a weapon inside a fort and place portals to give it a line of sight. Keep in mind that portals go both ways.
* Return to senders (R2S) are pairs of portals that are usually put on a front wall of a fort, linked for the purpose of returning enemy projectiles to the sender. They are effective if the wall covers most of the fort.
** Accelerators are a portal shenanigan that is used to store friendly projectiles, focus them in a single point and accelerate them through the use of gravity. It consists in an infinite portal loop, with the top portals being shorter than the bottom ones. This is because portals teleport according to relative positions (if a projectile hits the middle of a portal, it will come out from the middle of the other portal). Once the projectiles are fast enough, you use a final pair of portals to shoot all the projectiles at once. Usually this is done with 20mm cannons, as they deal huge amounts of damage when they all hit the same spot. An example of accelerator can be found in this video: https://youtu.be/m8aV8HyUELY
*** Concentratinators are another portal shenanigan that only works with beam-type weapons. It focuses up to 3 of them into a single beam, using relative positions of portals. This time, portals need to be parallel and connected as follows. An example of concentratinator can be found in this video: https://youtu.be/-WSQYJKdWMw
- Devices
In Vanilla Forts there are eight different devices (including the repair station and upgraded devices):
Mine
Upgraded Mine
Turbine
Upgraded Turbine
Metal Store
Battery
Sandbags
Repair Station
Mine:基础金属生产装置:可放置在可见矿脉处或地下。大多数原版地图初始有两座矿场,上限为五座。强烈建议在任何比赛的前十秒内建造第三座矿场,以确保良好的开局经济。
矿场对任何武器都非常脆弱,因为维修它们的成本极高(且维修时会停止工作)。
矿场工作时也会消耗能源,因此大量矿场可能会略微降低能源产量。
矿场可通过升级中心进行升级。
在原版模式中,你可以出售最底部的金属部件来放置第六座矿场。但这意味着你的矿场和堡垒将变得极度脆弱。
升级后的矿场:矿场的升级形态,这种装置比普通矿场产出更多金属,但能源消耗也会翻倍。如果尚未建造最大数量的矿场,不建议升级矿场,因为升级后的矿场需要更长时间才能回本。通常在建造完所有矿场后才会选择升级矿场:要么是在中期追求高经济时,要么是在后期为了能够维修或提升实力时。
涡轮机:基础能量生产装置。涡轮机需要放置在高处以获取更多风力(取决于地图),其效率基于自身高度和附近遮挡结构的数量。通常应放置高效涡轮机,因为它们能产生更多能量。大多数地图初始没有涡轮机,但建议在任何比赛开始的前十秒内建造一个,以建立良好的初始经济。涡轮机拥有相当数量的生命值,因此对机枪的抵抗力较强。不过,它们容易受到迷你炮和其他武器的攻击。
防御涡轮机的方法是放置护盾或沙袋。涡轮机可通过升级中心升级为升级型涡轮机。
使用沙袋是防御涡轮机的廉价方法。将常规背景支撑的高度减半后,可以将两个沙袋叠放在一起,这样应该能防御任何初期武器。
***可以建造T3涡轮机。但这既愚蠢又耗时,而且没什么用处,所以别这么做。升级型涡轮机涡轮机的升级形态,该装置比普通涡轮机产生更多能量。和地雷类似,如果有空间,建议建造更多涡轮机而非升级现有涡轮机。只有在没有空间建造新涡轮机且仍需要能量时,才考虑升级涡轮机。这种情况通常发生在需要更多武器开火的时候。
金属储存库:金属储存仓用于增加可同时拥有的最大金属数量。每个金属储存仓可提升300金属容量。大多数地图初始会配备一个金属储存仓,但要建造等离子激光炮或榴弹炮则还需额外建造一个。电池:电池相当于能量储存装置。每个电池可使最大能量容量增加2000。大多数地图初始会配备一个能量储存装置,但要放置等离子激光炮还需额外一个,而放置榴弹炮则总共需要三个。
电池被摧毁时会发生爆炸,并可能引发连锁反应。应避免电池连锁摆放,最重要的是,避免将电池放置在核心附近。
沙袋:沙袋是防御大多数武器的廉价手段,但对火箭弹、弹头或转轮机枪效果不佳。建造沙袋无需消耗金属,但会占用空间并增加堡垒的重量。
沙袋能完全阻挡火焰光束,这是它们的主要用途之一,此外在缺乏金属放置装甲时,也是一种廉价的防御选择。
使用沙袋保护涡轮机非常有效,如前所述。
当对手拥有火焰光束时,可以大量部署沙袋,因为多层沙袋会让敌方很难射穿。但问题在于,堡垒变形可能会导致无法正常重建沙袋。
维修站:维修站会修复其范围内任何受损的结构/建筑,并以更快的速度自动扑灭火灾。维修所需的资源总量不变,只是资源消耗速度会加快。维修站有能量维持需求,即使在不进行任何维修时也会消耗能量。维修站还能驱散烟雾,其实际作用半径比显示的更大,这意味着它们是对抗烟雾弹的有效手段。
由于维修站灭火速度较快,因此能很好地对抗火焰光束以及火鸟的主动技能等其他火源。
科技
在《香草堡垒》中,有五种不同的科技建筑:
工坊
军械库
升级中心
弹药工厂
工厂
工坊:建造工坊是解锁迫击炮、导弹和圆锯的必要条件。建造工坊后,还将解锁军需工厂和工厂。军械库:建造完成后,军械库允许玩家制造EMP火箭弹、高射炮和烟雾弹。建造完成后,还将解锁军需工厂和工厂。升级中心:与其他科技建筑不同,升级中心不会解锁特定的新武器,而是允许玩家升级已解锁的武器和设备。升级设备可提升其生产速率。升级武器会改变其性能,而不仅仅是提高伤害输出。重型武器、已升级武器和 moonshot 武器无法升级。弹药工厂:建造军需工厂后,可解锁加农炮、20毫米加农炮和榴弹炮。工厂:建造工厂后,玩家可以建造等离子激光炮、火焰光束炮和磁力光束炮。
- 武器
共有20种独特武器:
机枪
迷你机枪
狙击枪
穿甲狙击枪
燃烧迫击炮
重型迫击炮
电锯炮
蜂群导弹
弹头
烟雾弹
高射炮
霰弹枪
电磁脉冲炮
火箭弹
20毫米加农炮
加农炮
榴弹炮
火焰光束炮
磁力光束炮
等离子激光炮
-- 第一部分:默认/工坊武器
机枪:机枪是玩家击落来袭飞行敌方投射物(如火箭弹、蜂群和弹头)时的好帮手。它是少数拥有自动防空系统的武器之一:会自动瞄准并射击来袭投射物(不过精准度不高,建议手动瞄准)。
机枪在比赛开始时即可使用,且建造成本相当低廉。不建议在机枪手位置安装舱门,因为舱门开启时间过长,会大幅降低击落来袭火力的反应时间。将机枪用作防空武器的最佳方式是在堡垒前方放置几挺。机枪很容易被狙击,因此要及时重建。如果已建造升级中心,机枪可升级为迷你炮。
- 机枪是获取或保持地图控制的有效方式,可通过攻击敌方机枪或狙击手实现。
- 持续射击敌方可充能主动技能,但充能速度很慢。
迷你炮:(需要升级中心)
机枪的升级版本——迷你炮,拥有更小的弹道散布,因此精度更高。炮弹飞行速度更快,造成的伤害也更高。
与机枪不同,迷你炮没有自动防空系统。
不过,它可以手动操作以击落火箭弹、蜂群等目标。
狙击手:狙击手,也被称为狙击小子或因库萨斯的最佳伙伴,是一种强大的压制武器。它主要用于攻击暴露在外的武器,最常见的是敌方防空炮。
和机枪一样,狙击手在比赛开始时就可以使用,而且建造成本相当低。
狙击手拥有独特的能力,可以为蜂群和弹头绘制激光目标以引导它们进行攻击。
它可以通过升级中心升级为穿甲狙击手。
【门狙技巧】:
等待敌人开门射击他们的武器,然后利用狙击手的精准度摧毁该武器。这需要相当高的技巧和不错的每分钟操作数。
门狙技巧常被用于摧毁受门保护的敌方防空炮,例如高射炮。用迫击炮或类似武器吸引防空火力以打开舱门,然后趁舱门打开时进行狙击。
使用两名狙击手是更轻松摧毁敌方武器的有效方法,无论是防空武器还是通过舱门狙击。
在单人模式中,让狙击手暴露在外会增大大多数武器的瞄准弧度。将其放置在更高位置也会增强此效果。
穿甲狙击手:(需要升级中心)
穿甲狙击枪,正式名称为装甲穿透狙击枪,具备穿透一块金属或支架并对后方目标造成伤害的能力。这对于摧毁仅由一扇门保护的敌方武器非常有用,这也是建议始终使用双门的原因之一。需要注意的是,与标准狙击枪相比,它的弹道偏差有所增加。
持续向同一位置发射多把穿甲狙击枪可以摧毁金属。
燃烧迫击炮:要建造燃烧迫击炮,需要先拥有工坊。
燃烧迫击炮可以向上发射,从空中打击敌人基地,这与大多数基础武器不同。顾名思义,燃烧迫击炮造成的伤害较低,但会点燃击中的区域。
如果拥有升级中心,燃烧迫击炮可以升级为重型迫击炮。
【迫击炮防护】:由于迫击炮是向上发射的,你只需在它前方放置一小段木制支撑结构,就能保护它免受敌方狙击手的攻击。可以发射迫击炮来吸引敌方防空武器的注意力,借此对其进行门射攻击,或让更重型的空中投射物得以穿透。
通过让多门迫击炮交错射击,有可能使敌方机枪过热,从而让空中投射物在数秒内得以穿透。
重型迫击炮:(需要升级中心)
燃烧迫击炮的升级版:重型迫击炮的运作方式与燃烧迫击炮相同。但它能造成高额伤害,且不会点燃敌方堡垒。
它是一种强大的前期武器,能够快速结束战斗。
电锯:圆锯是来自“ moonshot”DLC的武器,需要工坊才能建造。它的主要用途是穿透大量的支撑物/背景支撑结构。使用它可以推倒堡垒的脆弱部分。圆锯对装甲或沙袋的伤害不大,并且会被盾牌偏转。一些1v1原版地图的承重支柱并非全部有金属覆盖,这使得圆锯可以一击摧毁它们。确保在游戏初期用沙袋保护这样的堡垒,如果发现对方堡垒没有保护这些位置,可以尝试一击摧毁。圆锯在发射三次后会爆炸。
在夺旗模式比赛中使用它们来切断对手与井架的连接。
蜂群导弹:蜂群导弹是一种替代地雷埋设在地面的发射井,需要狙击手才能发射。建造蜂群导弹发射井需要先建造工坊。蜂群导弹发射井会发射一组导弹,这些导弹先飞过基地,然后直接飞向被狙击手“标记”的地点,撞击后爆炸。虽然单个蜂群导弹的伤害相对较小,但两到三个一组使用时效果更佳。蜂群导弹可以被防空武器击落,例如机枪或高射炮,也可以被手动控制的迷你炮/霰弹枪击落。
- 蜂群导弹擅长摧毁涡轮机。
- 使用蜂群导弹保护弹头免受敌方防空武器攻击,以提高其抵达敌方基地的可能性。将蜂群导弹部署在比弹头更靠近核心的位置,以确保它们在弹头之前发射。
蜂群导弹是仅有的两种能够瘫痪传送门的武器之一。如果敌人正在使用“反弹”技能,蜂群导弹可能是摧毁它们的最有效手段。
如果发射时机足够早,使用足够数量的蜂群导弹有可能摧毁一座堡垒。
弹头:(需要升级中心)
弹头,也被称为核弹,是蜂群导弹的升级形态。它发射一枚核弹,命中时会造成显著伤害和溅射伤害。核弹也可被防空武器摧毁,但拥有两点生命值。如果它们受到损伤,会产生更大的偏差,因此被称为【醉酒核弹】。
* 用放置在弹头前方的导弹发射井保护弹头,可提高弹头突破敌方防空的可能性。
* 部署两枚弹头,如果均命中,可对敌方堡垒造成致命伤害,但它们更容易受到防空武器的攻击。
* 延迟发射第二枚弹头,可提高其中一枚命中的可能性,并降低被等离子反击摧毁的几率。
——第二部分:军械库武器
烟雾弹:烟雾弹是【Moonshot】DLC中的一种武器,可通过军械库部署。它会发射三枚弹头,弹头引爆后会形成烟雾团。该烟雾能阻止对手建造、维修、灭火,并会阻挡所有防空型武器的视线。若集群单位或弹头穿过烟雾,其瞄准系统会被干扰。当狙击手瞄准烟雾区域时,也会出现相同的干扰效果。烟雾还能阻挡火焰光束,并大幅降低等离子激光造成的伤害。烟雾可被火焰相关弹头(火箭弹、火焰光束)和维修站驱散。若烟雾弹被摧毁,其位置会生成一团烟雾,同时引发火灾,这意味着玩家在灭火前火势会有一定程度的蔓延。烟雾弹搭配火箭弹或其他高伤害投射物时效果非常强大,因为它能阻止对手重建建筑,还能使防空武器无法正常运作。
高射炮:高射炮是一种需要通过军械库解锁的防空武器。它对可被防空武器摧毁的投射物极为有效。但由于其所有炮弹会一次性齐射,因此很容易被诱骗。高射炮的建造成本远高于机枪,所以建议在其前方至少设置一道门以延长使用寿命。高射炮也可用于进攻,对敌方堡垒造成轻微骚扰。
玩家可以通过瞄准机制调整高射炮炮弹的引爆时机。瞄准位置越近,炮弹引爆越早(该位置由一道弧线标示)。
手动操作高射炮是实现良好防空效果的最佳方式。
通过炮弹引爆系统手动操作高射炮效果更佳,但操作难度更高。高射炮可用于主动摧毁敌方防空武器,在一定程度上甚至能破坏设备。但最近这方面的性能被削弱了,效果远不如从前。
霰弹枪:(需要升级中心)
霰弹枪是高射炮的升级形态。它发射一组逐渐向外扩散的子弹。霰弹枪在摧毁敌方防空武器和设备方面非常高效。它对非倾斜装甲和舱门也能造成伤害,这使其成为吸引敌方注意力和消耗其资源的良好工具。
- 霰弹枪以两到三个为一组使用效果最佳。
- 一个鲜为人知的事实是,通过X轴瞄准霰弹枪实际上可以控制子弹的扩散范围,瞄准点距离武器越远,扩散范围越小。
EMP:EMP是一种需要军械库才能使用的武器。它会朝敌方基地大致直线发射一枚EMP弹。该武器造成的伤害极小,但能在大范围内禁用所有设备和武器一段固定时间。这会严重阻碍敌方基地的经济。不过,由于EMP弹的飞行方向固定,且防空武器可一击将其击落,因此它很容易成为敌方机枪的目标。
使用两枚EMP弹时,若交错发射,可对堡垒的某一区域进行持续EMP干扰,这种方法在骚扰时特别有用。
火箭:(需要升级中心)
火箭是电磁脉冲(EMP)的升级形态。它不再发射单发炮弹,而是发射两枚,命中时会造成大量的溅射伤害。火箭大致沿直线飞行,且可被防空武器(AA)一击摧毁,因此它们相当容易受到机枪的攻击。
* 以两到三枚为一组使用火箭,能提升效果。
* 使用高射炮或霰弹枪摧毁敌方防空武器。
* 火箭可与电磁脉冲配合使用,在造成伤害的同时,阻止敌方拥有足够经济进行自我修复。
* 使用烟雾弹可使对手的防空武器失效,或阻止他们在烟雾覆盖区域重建。
——第三部分:重型武器
20毫米机炮:也被称为20毫米炮或20炮,20毫米机炮通过弹药工厂建造。它们发射9枚小型炮弹,具有小范围的爆炸伤害。它们对武器造成额外伤害,因此非常适合摧毁暴露的武器或防空炮。然而,它们的弹道散布非常大,意味着炮弹会散布在整个敌方堡垒上。如果不是因为这种散布,它们将是伤害最高的武器。其较长的射击动画使其更容易被【门口偷袭】。
- 以2到3门为一组部署,对整个敌方堡垒造成大量伤害。
- 最好一次发射一门,以确保更多炮弹落在同一位置。
- 使用加速器可以几乎消除所有散布,造成巨大伤害。使用散射炮指挥官来减少弹道扩散,造成大量伤害。
加农炮:加农炮(常规加农炮,不要与20毫米炮混淆)由弹药工厂建造,发射一枚重型炮弹,该炮弹具有一定穿透力,且在爆炸时会产生范围伤害。其穿透力足以摧毁单个带门武器并造成范围效果。加农炮存在一定散布,但总体而言精度较高,因此是进行门狙的良好武器。尽管其范围伤害不算很大,但仍会消耗对手的资源。加农炮也是稳定的伤害来源。
- 建议以2到3门为一组使用,散布有时会使炮弹命中同一位置,从而产生额外穿透力,这通常是致命的。
- 通过传送门,你可以制造所谓的3级迫击炮(或T3),即向上发射的加农炮。第一炮若命中,可打对手一个措手不及并造成可观伤害,因为炮弹无法被防空武器击落。
- 稍微向上调整火炮角度,以便在3v3或4v4对战中击中高处的堡垒。
- 使用磁力光束手动减小火炮的散布范围,以实现深度穿透。同时略微抬高瞄准,让炮弹呈弧线飞行,从上方落下。
- 没有DLC的情况下,可以使用绳索将火炮升级到T3,这也是最初的升级方式,且无需消耗能量来维持。
榴弹炮:榴弹炮,简称榴炮,由军需工厂建造,是一种超重型迫击炮,对前线和后方的掩体造成巨额伤害(并具备一定穿透力)。榴炮炮弹可以被击落,但拥有所有炮弹中最高的生命值。不过霰弹枪对摧毁榴炮炮弹极为有效,只需命中2发霰弹即可。榴炮可以按常规迫击炮角度发射,并和迫击炮一样有威力等级。
避免成组发射榴炮,因其炮弹可能发生碰撞。
使用其他类型的炮弹分散对手防空火力,同时发射榴炮。榴炮命中对对手是极其严重的打击,既会破坏其经济,也可能直接消灭对手。如果用火焰光束点燃榴弹炮,它会失去所有穿透效果,但会在更大的火焰区域内爆炸,因此点燃榴弹炮并不总是好的选择。
火焰光束:火焰光束由工厂建造,可能是游戏中用途最广泛的武器。
它们可以点燃任何投射物,使其造成更多伤害,但也可能导致投射物在一定时间后燃尽(具体时间取决于投射物类型)。光束会略微穿透堡垒并将其点燃。若击中金属,穿透距离会缩短;而光束完全无法穿透沙袋。不过光束本身造成的伤害并不高。
【使用技巧】
- 用于在重型投射物即将落地前将其点燃,例如核弹或榴弹炮炮弹。
- 点燃敌方核弹十分危险,因为它们在燃烧状态下能持续4秒。在像原版地图这样的小地图上,即使在发射时就点燃,4秒也不够(让其燃尽)。使用几道火焰光束足以摧毁门后的任何武器,除非门之间至少间隔2个网格方块,只有少数高手在看到火焰光束时才会这么做。
火焰光束击中木头时,会造成足够的伤害,使木头的生命值变得极低,这样等离子激光就能瞬间瓦解木头,即便面对大量木头堆砌的防御也能实现巨大的穿透力。这被称为火焰光束/等离子组合技。
可以使用火焰光束防止防空武器击中投射物,因为机枪投射物一旦被点燃,连一秒都撑不住。
以前有个漏洞能让火焰光束旋转,点燃所有敌方堡垒。不过这个漏洞已经被修复了(至少我们认为已经修复了,因为针对这个bug已经发布了很多补丁)。磁力光束磁力光束是【Moonshot】DLC中的一种武器,需通过工厂建造。它会发射一道持续时间较长的光束,在撞击点产生一个磁场。该磁场会吸引附近所有友方投射物(但不会增加其速度)。磁力光束本身不造成任何伤害,因此必须与其他武器配合使用才能发挥效果。磁场仅在撞击点产生,所以光束被护盾反射的情况不计入在内。当磁力光束被摧毁时,会产生一个吸引附近所有武器的磁场,使用时需注意。
- 与20毫米机炮配合使用时威力极强,能将所有伤害集中在单个目标点上。
- 可以让加农炮的炮弹绕过堡垒,使其从上方甚至后方命中目标,通常能造成暴击伤害。一些加速器设计会在发射前使用磁束来聚焦弹丸。等离子激光:Plasma Lasers are built with the Factory. They deal high penetrative damage to a single spot, doing no AoE damage. In fact, it is the weapon which does the most penetrative damage on its own, being able to destroy 2 doors and deal a bit of extra damage. It is often used to topple forts by hitting weak spots. Since the beam is a perfectly straight and has no deviation, it is the ideal weapon to doorsnipe with.
** If used with a firebeam, it can destroy an infinite amount of wood within 3 grid squares depth. Indeed, a plasma laser instantly destroys any low HP wood (due to how the damage is applied, and if the HP is low enough, it is applied on all struts at once). This is known as the firebeam/plasma combo.
** It can be used to counter nuke players. With precise enough timing and good accuracy, one can shoot the nuke (and swarms) when they launch. The drunk nuke will then turn back into the opponent's fort, which usually cripples them.
*** Plasma Lasers can destroy Howitzer shells, if they hit for a long enough time.
*** Using a concentratinator, one can combine three plasma lasers for devastating damage.
- Match Objectives & Basic Match Structure Theory
Match Objectives
During any given forts match in multiplayer there are several different objectives during a match. Most likely the one most thought of is:
Destroy all enemy forts
Although this is the primary objective to win a game, it is not the only objective within a given forts match. There are many other objectives that are equally important in order to ultimately complete the primary objective. A list of basic objectives in the order they should be accomplished is as follows:
Plan Desired Strategy
Technology
Economy
Structural Integrity
Awareness of Enemy Strategy
Sacrificial Bracing
Offensive Weaponry
Team Cooperation
Ensuring Survival of Team Forts
Destroying Enemy Forts
Notice that the primary objective is the last objective to be accomplished. That is because all the previous objectives are required in order to complete the primary objective. For instance, one cannot destroy an enemy fort without weapons, or place weapons without tech and economy. It is also impossible to survive an enemy attack without structural integrity and sacrificial bracing. Make sure that objectives higher on the list are completed before objectives lower on the list to ensure higher success rate. It is sometimes better to change the order of those objectives, or even do them in parallel.
** Doing all objectives in parallel is the ideal goal of all RTSs, since you're not wasting time at any point.
Basic Match Structure Theory
Basic Match Structure Theory is a more specified and customizable objective list that includes time markings for each objective. Match Structure theory differs from strategy to strategy, but the basic premise remains the same. Here is an example of a Basic Match Structure for the first portion of a Cannon Rush, using pinchfist on vanilla.
Objective Maximum Time Completed By Place First Tech 00:03 Place Third Mine 00:08 Delete Front Core Armor and gunner 00:12 Place two windmills 00:25 Scouting 01:00 Heavy Weapons Tech 1:04 Delete Workshop 1:12 Place 2 mines 1:20 Build Battery/Metal Storage 1:30 Structural Integrity/Building up for cannons 1:50 Extruding Bracing / Protect Windmills 2:10 Place First Cannon/Scouting 2:35 Place Second Cannon/Sell a Metal Store 3:10 Sacrificial Bracing/Protection 3:30 Double-Door Cannons/Scouting 4:20 Fire the Cannons 5:00
Keep in mind that this is a basic table which assumes ideal circumstances. In a lot of forts games this will not be the case, so it is important to be able adapt your Match Structure based on what is seen while scouting. This forms the basics of Advanced Match Structure Theory, which changes and evolves constantly. A player ultimately looses a game when they fail to be able to successfully Implement Match Structure so it is very important to understand and implement this concept.
Commanders
Whew! You've made it through "The Basics", Congratulations!
Things tend to get more interesting from here. Next up is Commanders.
Commanders are a unique part of forts because they change buff statistics in different certain areas to provide an advantage to the player. Different commanders give different buffs. Buffs are divided into "Active" and "Passive" Categories. Active means that the buff is only in effect for a short period of time and then needs to be recharged. Passive means that the buff is always in effect.
There are currently 15 commanders in forts, split into 5 factions:
Iron Bear Alliance
Eagle Empire
Dragon Army
Combined Forces
Black Penguin Oil
Each faction contains three commanders. Each faction also groups buffs by type.
Iron Bear Alliance (Buffs Economy):
Pinchfist
Spook
Armourdillo
Eagle Empire (Buffs Weaponry):
Eagle Eye
Warthog
Firebird
Dragon Army (Buffs Building):
Hurricane
Overdrive
Architect
Combined Forces (Buffs Misc.):
Buster
Moonshine
Phantom
Black Penguin Oil (Buffs 'Cheats'):
Scattershot
Seep
Shockenaugh
Commanders apply to the whole team. The game picks a commander from the different ones players in the team chose, and then the game picks one at random. If 2 players chose the same commander, the probability for the commander is doubled.
The commander ability charges with damage dealt and received. It charges about 3 times faster with damage received.
* For abilities that boost projectiles' damage or add effects, fire the weapons at the very last moment of the active, so that when the projectiles hit and deal damage, it charges the next active faster.
- The Iron Bear Alliance
The IBA consists of the 3 following commanders which all buffs some form of economy:
Pinchfist被动技能:
捏拳的被动技能可使地雷和涡轮机的产量提升10%,且出售物品时可100%回收金属。
主动技能:
他的主动技能能在短时间内将所有武器的开火成本减半。
捏拳是《forts》玩家群体中非常受欢迎的指挥官。凭借其技能,捏拳拥有极强的速攻潜力,因为10%的产量提升能带来大量资源。使用捏拳时,需通过精心规划的建造顺序来最大化效率。利用捏拳的主动技能,既能持续开火,又能保留资源来扩充武器库。* 出售初始建筑和装置可获得大量额外金属
* 吝啬鬼在过去已被削弱,削弱前它还能提供100%的能量回收,但这被认为过于强力
* 用额外资源建造装置后可在之后出售,实际上将其变成了临时存储
* 使用吝啬鬼是实现所谓【复合速攻】的唯一可靠方法,即研发多种不一定属于同一科技树分支的武器
幽灵被动技能:
幽灵的被动技能可以显示对手最后放置的建筑及其资源情况。此外,当自身要塞受到伤害时,本应产生的破损孔洞不会显现,从而有效隐藏其内部结构。幽灵还能看到敌方队伍的指挥官以及敌方队伍何时可以使用其指挥官技能。
主动技能:
她的主动技能是移除战争迷雾,这意味着可以完全看清对手要塞的内部。使用该技能时,己方队伍会从每个对手那里窃取200金属和2000能量,并在核心之间平均分配。
幽灵是一名极其强大的指挥官,能够 counter 几乎所有依赖突袭的快攻战术(例如任何幻影快攻)。玩幽灵时,要通过速经济和/或直接针对敌方策略来适应敌人。尽可能使用主动技能,尤其是在敌方策略的关键时刻,比如他们开火前后、放置武器时,或者正在修理的时候,这样可以严重破坏他们的经济。
犰狳装甲车被动技能:
其被动技能为降低护甲、门和护盾的成本。门的开关速度提升两倍,R(修理)区域半径增加50%(修理站同样适用)。门和支架更轻且更便宜。迷你炮可升级为穿甲迷你炮。
主动技能:
主动技能为修理速度提升8倍,总体成本降低50%。穿甲迷你炮/狙击枪可额外穿透一扇门,但 reload 时间延长。
装甲龟是一名乌龟指挥官,拥有极强的防御潜力。使用装甲龟时,常见策略是快速发展经济和重型武器,以发挥其优势。通常来说,装甲龟在前期rush中承受的时间越长,比赛就越会向对其有利的方向倾斜。不过要记住,使用主动技能时,修理成本为正常的50%,但时间仅为正常的1/4。这意味着资源消耗速度会快4倍,因此拥有足够的存储空间来应对这一点非常重要。不过他的主动技能冷却很快,这使他在炮台对战类游戏中表现出色。
装甲犰狳的其他优势包括快速门,这能有效 counter 大多数门狙尝试。穿甲迷你炮在某些情况下可用于清除带门的防空武器和其他武器。
穿甲迷你炮仍会被倾斜金属反射
鹰帝国
鹰帝国由以下3位指挥官组成,他们都能增强进攻属性:
鹰眼被动技能:
鹰眼的被动技能可使瞄准弧线范围扩大25%,缩短狙击塔建造时间,降低炮弹弹道下坠,机枪自动攻击,增加机枪和迷你枪的弹容量。迫击炮和狙击塔可为狙击塔装填弹药。狙击塔可进行编组,除激光武器外,所有武器均配备激光瞄准镜。
主动技能:
鹰眼的主动技能是使子弹具有爆炸效果,但开火成本更高。
鹰眼擅长快速建造小型武器工坊,例如迷你枪、狙击塔、穿甲狙击塔等。因此,他以“迷你枪速攻”的玩法而闻名。不过,鹰眼也能与其他早期速攻战术很好地配合,如蜂群战术、迫击炮战术,有时还能配合核弹战术。但他在后期的弱点非常明显。使用鹰眼时,务必避免长时间的对战。
- 若对手使用倾斜金属,使用穿甲狙击枪有助于充能主动技能。
- 另一种有效击败毫无准备的对手的方法是:集中使用穿甲狙击枪(至少6把)攻击同一位置,以此击倒对手。
疣猪被动技能:
疣猪的被动技能使重型武器的瞄准精度提升20%、 reload速度加快,且霰弹枪获得自动瞄准辅助。
主动技能:
他的主动技能使所有重型武器造成25%额外伤害,重型导弹 projectile的飞行速度提升25%。若重型武器未命中目标,则立即 reload。
疣猪是最优秀的重型武器指挥官之一。额外伤害往往能对敌人造成致命打击,而且主动技能的充能也不是特别困难。通常,最适合与疣猪搭配的武器是核武器、加农炮和榴弹炮,但激光武器也能有不错的效果。使用疣猪时,要充分利用其能提供额外伤害的优势进行战斗。疣猪的主动技能激活期间,核弹处于燃烧状态时能产生前所未有的巨额伤害输出。
这一伤害可以通过在疣猪主动技能激活期间使用加农炮供能的加速器来超越。
而这一组合可以用【反弹】来克制。
火鸟许多玩家认为她表现不佳,但如果使用得当,她能发挥出色。
被动技能:
她的被动技能可提升火灾修复速度,减缓火势蔓延,增大迫击炮/火焰光束的火焰半径,还能禁用对手的火警警报。火焰光束整体得到增强,加农炮获得燃烧半径加成,20毫米炮具备燃烧效果。
主动技能:
火鸟的主动技能使所有武器获得燃烧属性,可点燃一切物体。
使用火鸟时,应搭配任何能与火焰属性良好配合的武器来骚扰对手。大多数武器都能与火鸟很好地配合,尤其是在她激活主动技能时,其中燃烧迫击炮、蜂群、核弹、加农炮、20毫米炮和火焰光束可能是最强力的选择。燃烧核弹尤其可能是整个游戏中最强的武器增益之一!
火鸟最棒的地方在于能禁用敌人的火警系统,这让火势变得超级棘手!
- 激活状态下使用机枪射击,很容易让整个敌方单位着火。
- 一切都在燃烧!
- 龙军
龙军的主要作用是为建筑单位提供增益。龙军的三位指挥官分别是:
建筑师:建筑师在一定程度上对重型武器速攻有帮助。不过,在她的被动技能被削弱后,平奇菲斯特在这方面的能力通常会超过她。
被动:
建筑师的被动技能使加固建筑价格降低20%,材料建造时间减少50%,存储容量增加30%,建筑建造速度提升100%。
主动:
建筑师的主动技能使建造速度提升300%。
主动技能让玩家在遭受早期速攻骚扰时拥有很强的翻盘潜力,因为使用该技能可以在30秒内建造出等离子激光炮。
经过削弱后(以前是+50%),增加的存储容量不再能加快速攻速度,因为进行等离子激光炮速攻或榴弹炮速攻仍然需要额外的存储空间。哨所指挥官更新建筑师也很擅长速攀树木,尤其是在对抗核武器时,再加上建筑建造速度的提升。
她的被动技能让你能轻松通过快速建造廉价树木来龟缩防守。
在团队战斗中,队伍可以牺牲两名成员让能量电池爆炸,从而极快地充能主动技能,实现2分15秒的激光突袭。不过自从削弱后就再也没人尝试过了。
过载:过载因其主动技能中的经济加成效果而被频繁使用,这赋予了他强大的翻盘潜力,同时在游戏后期也能提供出色的经济支持。
被动:
过载的被动技能可将升级时间减少50%。这使得快速获取升级武器的速度大幅提升。过载还能够降级已升级的武器。
主动:
过载的主动技能能使金属/能量产量提升100%。
在经济方面,过载相较于 pinchfist 的优势在于,他的主动技能对自身经济的增益远大于 pinchfist,通常能在游戏后期带来更强的经济实力。不过,pinchfist 在游戏前期表现更为出色。
正因为如此,过载适合采用龟缩战术。但需要注意的是,升级时间减少的效果并不像人们想象中那么强大。核弹的释放速度或许可以稍快一些,但如果有人选择使用核弹,其实还有很多更好的替代方案。
- 利用升级被动技能来更快地提升经济
- 利用升级被动技能来快速研发强力重型武器:弹头、重型迫击炮、火箭等
飓风:飓风并非一个超强指挥官,尤其是在一次或许并无必要的削弱之后,但对于某些速攻战术仍然有用。
被动技能:
飓风的被动技能可减少10%建造时间、75%出售时间,并提升50%维修速度。大多数人认为10%的建造时间减少能改变游戏局势,但实际上并非如此,因为玩家往往缺乏资源来充分利用这一优势。
主动技能:
飓风的主动技能可减少50%装填时间。如果团队的主要策略是在对手做出反应前,以快速连续的火力压制对方,那么这个技能会非常有用。
飓风的问题在于,通常没有足够的资源来发挥更快建造速度的优势。不过,当拥有足够的武器和能量来实现快速射击时,他的主动技能会极具破坏性。在缺乏足够初始金属来防御圆锯的地图上使用飓风战术,因为这是最快出其不意击败对手的策略。
- 联合部队
联合部队是 moonshot dlc 的一部分,实际上是龙军、鹰帝国和铁熊联盟的联合力量。联合部队拥有各种不同的增益效果,适用于多种不同情况。
破坏者:巴斯特是占点模式中的优秀指挥官,适合利用工坊或弹药厂进行快攻。使用巴斯特快攻重武器时,建议在人数较多的对局中使用,这样有助于平衡因未使用Pinchfist而损失的时间。
被动:
巴斯特的被动技能允许穿甲狙击枪标记目标以引导导弹,还能建造免费地基。免费地基使他在占点地图中相当强势。
主动:
巴斯特的主动技能能让重型迫击炮、火箭筒、弹头、20毫米机炮、加农炮和榴弹炮获得穿甲属性。这使得炮弹能更深地穿透敌方堡垒,有助于对抗龟缩防守和木材滥用战术。穿透敌方基地还有机会引爆其堡垒内的电池,这可能造成致命后果。主动技能可作为穿甲狙击使用,能穿透掩体并造成定向伤害。由于所有穿甲弹版本的伤害量相同,因此该技能在配备多发炮弹时威力相当强大。
- 搭配20毫米炮组和巴斯特的主动技能可提升伤害输出,在团队战斗中效果显著。最近20毫米炮的穿透距离被削弱,所以加农炮的穿透更深。不过20毫米炮依然更具成本效益,也很适合娱乐玩法,尽管其原始伤害因炮弹散布而低得令人失望。
- 在占领地图中使用免费地基,这样可以节省大量资源。
月光月光在人数较多的对战中是个不错的选择,因为任何护盾都能阻挡其后方的武器。不过,这样做成本相对较高。一个实用的特点是,由于护盾能完全阻挡炮弹射击,并且对激光免疫,因此它能克制许多战术,从激光/火焰光束到磁轨炮/加农炮组合均可应对。
被动技能:
月光的被动技能使护盾能像门一样阻挡穿甲狙击枪。这一特性可在多种情况下发挥作用,例如对抗激光,但成本可能较高。
主动技能:
月光的主动技能为 splash 武器(范围伤害武器)赋予 EMP 效果,其作用半径等于 splash 武器的最大范围半径。
若与大量投射物或具有大范围效果的武器配合使用,月光的主动技能可能极具破坏性,因为 EMP 效果会随这些武器的特性而增强。消耗对手的经济是个不错的策略。
- 使用核弹配合月光酒可以瘫痪整个堡垒。
- 集中使用20单位也能达到类似效果,并且能造成大量伤害。
幻影幻影是1v1模式中非常出色的指挥官,她的能力能迷惑敌人,让他们误以为对手使用的是某种策略,而实际上并非如此。同时,她还能让敌人时刻警惕武器的部署位置和开火时机。
被动技能:
幻影的被动技能允许部署无科技限制的虚假武器/装置,并且武器在开火前处于隐形状态。装置和武器还能在2秒内移动,舱门开关无声,受损材料不会变为半透明状态。
主动技能:
幻影的主动技能能让武器开火时几乎无声,并使所有堡垒消失。
幻影在迷惑敌人方面表现极佳。当使用幻象占位虚假科技让对手误以为你要进行突袭,而实际上你并不打算这么做时,你可以利用他们浪费在反击上的时间发起反攻。被动可移动武器有很多可操作的空间。
* Spook在识别幻象的诡计方面表现出色
** 将武器移动到射击位置,开火,然后在激活期间将其移回原位,再次保护它。
- 黑企鹅石油
黑企鹅石油是【剧透警告】《forts》战役的反派。他们是一群诡计多端的角色,通常拥有被视为“作弊”的主动技能。然而,社区普遍认为这些指挥官中的大多数都相当弱。
散射炮:散射射击适用于门口狙击以及充分利用高散布武器。
被动技能:
其被动技能使护盾能够反射非爆炸性子弹,武器散布增加35%, burst武器(20毫米除外)额外发射2发子弹,狙击枪每次射击可发射2发子弹。
值得一提的是狙击枪可射击两次,因为如果两发都命中,玩家能更轻松地对重武器进行门口狙击。
主动技能:
主动技能使武器几乎无散布(burst武器散布降低65%,20毫米武器则发射3次,每次3发子弹)。子弹轨迹会显示。
散射射击状态下的20毫米武器非常强大。20毫米武器的输出伤害超过加农炮,但其主要缺点是标准差较大,而散射射击能缓解这一问题。20秒冷却的武器可以相当低成本地进行连射,且较短的射击时间使其更难被门后偷袭。请记住,像霰弹枪、转轮机枪等武器在未激活主动技能时效果会极差。
- 选择散射射击通常意味着要搭配20毫米武器,因为主动技能会使其几乎没有散布。
- 用护盾覆盖整个堡垒虽然诱人,但效果并不理想,尤其是考虑到传送门的存在(能将攻击反弹回 sender)。
- 在4v4大厅中与队友协调,每人携带三门20毫米炮,每次集中攻击一个基地。这是快速骚扰对方队伍的方法,也被称为【 dakka 】。
渗透被动技能:
- 弹头发射后会分裂成15个蜂群
- 电磁脉冲会将导弹反弹回发射者
- 发射井的开火延迟从5秒缩短至2秒
- 激光瞄准器对敌人不可见,但队友可见
- 可以看到对手的瞄准位置
- 烟雾范围更大且持续时间更长
主动技能:
- 使导弹和火箭弹飞行速度提升32%
- 让电磁脉冲、火箭弹和蜂群获得承受第二次攻击的能力
这使得导弹和火箭弹有更高几率命中目标。
在核弹或军械库速攻时,渗透者(Seep)极为强大。常见策略是速出蜂群,瞄准对手的涡轮机,升级至核弹,然后压制所有防空火力。需要注意的是,渗透(seep)需要非常特定的游戏风格,并且仅适用于特定的低级武器,但如果使用得当,可以非常有效地对抗重武器突袭。
Shockenaugh肖肯诺
肖肯诺在玩家能正确使用其主动技能的情况下表现出色,不过这在很大程度上依赖随机数生成。
被动技能:
她的被动技能可让护盾吸收激光,将最大组队规模提升至4,能建造在核心被摧毁时仍可让堡垒继续建造的桶,并能将圆锯进行组队。
提升最大组队规模这一效果在多种情况下都非常实用。
主动技能:
她的主动技能会禁用敌方涡轮机,20毫米炮发射加农炮弹,火焰光束发射等离子束炮弹(按新消耗计算)。
肖肯诺非常擅长以较低成本形成压制性火力,前提是队伍有有效的方式充能主动技能。火焰光束/激光组合能更快成型,主动技能期间每个基地部署3门20毫米炮会形成大量炮弹,难以应对。结合禁用敌方涡轮机,再加上配合默契的队友,敌人很可能无法很好地进行反击。放置桶可以抵消失去核心的部分缺点,该成员或许仍能为团队提供帮助。
团队礼仪
在多人游戏体验中,总会有其他玩家。因此,基本的社交原则同样适用。与某些网站不同,Steam并非匿名平台。你的所作所为都能追溯到你本人。forts社区通常没有此类问题,但还是要提醒一句,不要说任何你在现实生活中不会说的话。
在说明了这些显而易见的事情之后,以下是一些注意事项:
除非赛前已达成一致,否则不要团队伤害(火焰兵除外)。除了在Incursus的直播中,他可以随时进行团队伤害。
比赛开始时,告知队友你的策略以及你所在的基地位置。
赛前与队友讨论战术。
告知队友敌方武器的放置位置,如果你了解某个敌方玩家,也可以提供他们可能的位置。如果敌方部署了导弹发射井,提醒队友部署防空武器。若敌方暴露了科技,也要及时告知队友。总之,任何你能提供的信息对团队都很有价值。
不要因为新玩家表现不佳而对他们态度恶劣,应给予他们改进的建议。
必要时,尽快下载模组或第三方地图。
如果房主准备开始游戏,尽快做好准备。不要刷屏请求模组或地图。
不要在聊天中刷屏,以免给他人带来困扰。
比赛开始前讨论选择哪个指挥官。
如果你是房主,请踢出捣乱的玩家。
如果你要暂时离开,请告知其他人。
与队友讨论计划时使用队伍聊天。
不要以阻挡队友武器的方式建造。
运用基本常识。
结构完整性
堡垒的结构完整性有助于其承受重量或抵御高击退武器。因此,了解并掌握如何建造稳定的堡垒非常重要,这不仅能建造更高的堡垒、容纳更多武器,还能在例如核弹攻击下幸存。
请注意,本节所涵盖的内容可能与当前主流玩法不符,且本指南尚未添加高级稳定性技巧。不过,此处提供的信息在基础层面上仍然适用。
本节将涵盖:
1. 良好堡垒设计的重要性
2. 不良堡垒设计的特征
3. 地基结构完整性
4. 垂直与水平结构完整性
5. 直立式基地
6. 悬挂式基地
7. 侧面基地
良好堡垒设计的重要性
如前所述,良好的堡垒设计能帮助玩家达成以下几个主要目标:
- 能够部署大量防御武器
- 不会因自身重量而坍塌
- 不会因微风而坍塌
- 堡垒不会晃动(对激光武器尤其重要)
- 能够承受大型武器的攻击
- 全方位防御
- 能将所需物品妥善隐藏在堡垒内部能够达成上述所有目标会大大增加无法存活的可能性,但如果使用合适的武器,或许甚至能赢得比赛。- 什么是糟糕的堡垒设计
糟糕的堡垒一眼就能看出来。即使是普通玩家有时看到别人的堡垒也会想“这家伙根本不会玩”。
问题在于,有些堡垒看起来不错,但存在无法立即发现的重大缺陷。以下是堡垒设计不佳的常见迹象:
- 建造大型立方体结构
- 在游戏初期建造过多地基
- 扩张速度过快
- 未进行良好的重量管理
- 未对堡垒最底层进行交叉支撑
- 武器存放箱过小/门过窄
- 遮挡涡轮机的风力
- 武器暴露在外/重型武器仅有单扇门保护
- 爆炸物离核心过近
- 链式电池布局
- 初始金属资源点缺乏防御
- 生态系统暴露
- 金属屋顶
- 无用的护盾
- 武器没有视野
类似问题还有很多。当然,即便是一些非常优秀的玩家,有时也会犯类似的错误(比如电池串联,或者将爆炸物直接放置在核心上方,这些问题往往不易被察觉),但意识到自己的错误并积极尝试改正,会让你的建造技巧变得更加出色。- 地基结构完整性
现在,让我们开始了解一些关于地基结构完整性的技巧。地基结构完整性指的是堡垒在地基节点方面的稳定性。
显然,在比赛初期不应建造大量地基,因为其建造成本很高。但在游戏中后期,拥有合理的地基布局有助于建造更高的建筑。
首先要做的是对堡垒的第一层进行交叉支撑。这样做可以提高整体稳定性,减少晃动,同时增加支柱之间的重量分配,意味着每个单独支柱承受的重量会减少。
下一步是将地基节点的数量增加一倍。这将使堡垒更加稳固,并允许在第一层交叉支撑上添加更多支柱。玩家可以使用更小的方块来替代默认的2x2方块,比如2x1方块,甚至1x1方块。不过,只建议在堡垒的最前端这样做。请记住,在确定结构完整性的方法时,应考虑省时策略。
以下是一个夸张的例子,展示了良好的地基结构完整性是什么样的。在实际对战中可能永远不需要用到这种方法,但它有助于展示良好的地基结构完整性是什么样的:- 垂直与水平结构完整性
垂直与水平结构完整性是在确保地基结构完整性后需要考虑的结构完整性形式。
垂直结构完整性:
垂直结构完整性指的是堡垒在保持结构完整性的前提下能够建造的高度或深度。这一点很重要,因为武器和风车通常放置在堡垒核心的上方,这往往意味着需要建造得更高。
首先,要实现垂直结构完整性,需要先稍微向外扩展堡垒以增加稳定性,然后再向上建造。建议的方块尺寸尽可能为2x2,直至核心部分。
向外扩展后,确保每个方块都进行交叉支撑。这能为堡垒提供更多支撑。还有几种不同的技巧可以进一步提高稳定性,例如交叉支撑或在箱子内部再制作箱子。在决定使用哪种方案时,必须考虑时间效率。优先考虑核心正下方的区域。
另外,确保建造时始终从底部开始,逐步向上进行。唯一的例外是建造配重块时,因为配重块不应与地基相连。
最后,建造容纳武器所需的箱子。这些箱子的大小可能因使用的武器而异。虽然不需要对这些箱子进行交叉支撑,但当有物体穿透到该层时,交叉支撑会有所帮助,这样可以防止整体结构坍塌。为节省资源,存在多种类型的“木材堆叠”(woodspam),它们能提供足够的垂直稳定性,从而延迟在堡垒后方扩建的需求,以便更快地进行武器速出。其中一个由m4rox创造的例子,如下列图片所示。水平结构完整性:
水平结构完整性指堡垒在水平轴上的稳定性。这对于防止堡垒倾倒以及从堡垒向外建造牺牲性支撑结构以保护核心区域都至关重要。判断堡垒是否具有良好水平结构完整性的一个方法是观察它是否向一侧倾斜。可以通过多种方法来缓解倾斜问题。
在部分地图(如【原版】)中,堡垒初始状态会略微前倾。这种情况可以通过删除前方核心装甲来解决。绳索是防止倾斜的另一种有效工具。沿堡垒倾斜的相反方向系上绳索,以产生拉力。
对所有结构进行交叉支撑。
如果堡垒向后倾斜,从后方向上建造支撑物是解决该问题的有效方法。
请记住,前倾的堡垒比后倾的堡垒危险得多,也更难修复。这是因为前方可能有其他堡垒,倾斜的堡垒可能会倒塌在上面。此外,在大多数地图上,堡垒前方几乎没有空间来建造基础节点,而其后方则有足够的空间。
- 直立堡垒
直立堡垒被视为堡垒中的标准基地,因为这是默认地图设计。它们在垂直和水平结构稳定性方面往往存在最多问题。以原版为例:
初始堡垒略微前倾。
基础节点不足,难以支撑有效的木材堆叠。
堡垒完全没有交叉支撑。
直立的堡垒核心通常防护最差,也是最容易倒塌的类型。
请记住,所有这些问题都可以通过结构、垂直和水平完整性的相关方法来解决。
建造直立堡垒时需要考虑以下几点:
武器几乎总是放置在核心上方,堡垒是否有足够的结构完整性来建造到足够的高度以放置武器?
建造得越高,堡垒的摆动幅度越大。需要水平完整性来缓解这一问题。你的堡垒是否有足够的水平完整性来向上建造?由于常设堡垒往往最为脆弱,因此与其他类型的堡垒相比,它们通常需要在前方建造更多的牺牲性支撑结构。这还需要保持水平整体性,因为大量堆叠的木材往往相当沉重。
始终记住要从底部开始向上建造。这样可以防止堡垒在建造过程中过度晃动。交叉支撑也有助于防止这种情况,因为它能加固结构。
一个增强结构整体性的实用技巧是,在初始金属部件上以特殊方式添加一些支柱,因为这些支柱通常是最先断裂的。添加这种小型结构有助于释放这些支柱所承受的部分压力。至于交叉支撑,建造得越早越好。它还有助于进行早期的轻型木材堆叠。虽然下图使用的是金属,但木材也适用。- Hanging Forts
Hanging Forts are generally the easiest to work with since they are the most structurally sound. The weakest part of a hanging base tends to be foundation structural integrity, as it is often very difficult to double the amount of foundation nodes due to the default top layer of boxing being 3 by 2. Hanging forts tend to have the best horizontal/vertical structural integrity of all fort types, and its core is usually the easiest to protect.
Some things to consider with Hanging Forts:
Is the fort positioned directly above another fort? If so it is possible for the enemy team to get a 'double kill', by cutting the core off from the rest of the upper fort, dropping it onto the fort below.
Sometimes if a hanging fort is positioned lowest it can be hard to gain a line of fire towards upper enemy forts.
Weapons tend to be most often placed below the core of hanging forts, especially on maps with only hanging forts. Make sure those weapons have line of fire towards upper enemy forts.
Then, the same tricks for the Standing forts apply to the hanging forts, since you can just put it upside down mentally.
** The same trick with the starting metal applies.
- Horizontal Forts.
Horizontal forts are generally the most hated type of fort within the multiplayer community. This is mainly because it is often very difficult to work with its design. Horizontal forts struggle the most with horizontal structural integrity, since they are literally 'hanging off the side of a wall'.
Some things that horizontal forts tend to struggle with the most:
Protecting the core, and woodspamming in front of the core due to horizontal integrity issues.
Less room to place tech or devices without exposing them.
Less room to place windmills without going building another level.
Indeed, the struts that end up breaking first are the top foundation nodes. That's why it's very important to make more foundation nodes around that point.
Some things to consider when playing on a horizontal fort:
Is your core adequately protected?
Are your devices positioned in a safe place (make sure batteries are not positioned next to each other or behind the core to prevent a chain reaction).
Weapons are generally built above side forts, does the fort have enough vertical integrity to support them?
Crossbrace
* A way to improve the horizontal structural integrity of a horizontal fort is to increase foundation structural support by doubling the number of foundation nodes, as well as using boxes within boxes techniques.
** The structural reinforcement shown for the other two types isn't as handy, so it's not recommended.
The Rush
"Quickness is the essence of the war."
-Sun Tzu
Now we have come to the fun part of this guide: The Rush
Rushing is essential in competitive vanilla Forts, but in order to implement rushes it is critical to first understand what a rush is, and eliminate common misconceptions about it.
Definition: The Rush
When a player tries to reach a specific state of design as fast as possible it's called a rush.
"Specific state of design" can be anything. For example, one can rush for heavy-eco where it is attempted to get a lot of mines and turbines really quickly. Or, one can rush for all kinds of weapons. The most effective rushes find a way to maximize both the economy of a base and number of weapons, while minimizing time taken. This often involves selling unneeded components of a fort.
The Rush can be paralleled to the German Strategy of Blitzkrieg during World War II. Just as the Germans attacked France Quickly and Swiftly, overrunning them with their entire army, so does The Rush overwhelm an opponent with sheer force, ideally before they have built weapons of their own.
Some objections that some players have about rushing is that it delegates the entire game to who can get weapons the fastest. Those players retort that they can't play the game in an eco-heavy playstyle since they always loose to those who do rush. This is not a legitimate argument. Although a rush does primarily aim to get weapons out quickly, the most effective way to do this is to maximize economy in the process'. Players who make this objection simply have a false understanding of what a rush is.
A rush is reliant upon a high APM, or "Actions per Minute". Actions per Minute is literally defined as the amount of actions a player can perform in one minute. The more actions able to be performed in a minute, the quicker a player is able to implement a rush and adapt to other players.
But a rush isn't always that easy:
One might have gotten the perfect time for a weapon-rush already, but that's just in theory. In a real online match their are opponents shooting, which could potentially mess up the rush. Therefore one must adapt to their opponents and teammates. If it is seen that an opponent is building rockets or something similar, get AA ready and also prepare defenses against other weapons.
Additionally, keep in mind that a rush isn't everything:
Assuming you've managed to build two cannons in 5 minutes, can you successfully hit the enemy fort on your first shot?. If not, then all that rushing was in vain and the enemy now has the upper hand again. Apart from having a great rush, one also needs to have a good aim. To practice aiming cannons or other weapons we suggest the multiplayer training missions or sandbox mode.
Likewise, perhaps you've gotten down your rush to the millisecond, but that match the enemy was expecting it and counters you. Your rush now is completely useless against your opponent. It is extremely important to have a good strategic sense. After all, forts is a real time strategy game. Strategy within forts will be covered more in detail in a later section.
This Section Contains information on:
Heavy Weapons Rushes
Early Rushes
Support Rushes
Meme Rushes
How to Create a Rush.
- Heavy Weapons Rushes
Heavy weapons are usually what people think about when creating a rush. They are the hardest rushes to make viable, since early rushes often force the player to adapt and "break the rush": slowing it down a rush to be able to defend properly against an attack.
When doing a heavy weapons rush, a non-rush mortar strat can also counter heavy weapons, forcing the player to totally break the rush and transition into another strat.
This category will focus on 2nd tier weapon rushes, and not 1st tier upgraded weapons (such as nukes or rockets).
Tips for rushing heavy weapons:
Always put tech as your first priority
Sell the first tech when you put down the second one
Make sure to scout regularly
Build the proper defense for what the opponent is doing
If you can't tell what your opponent is going for, do a generic defense (like standard woodspam and some AA)
Unless playing against a heavy weapon rusher, you should win in the first few hits.
Although the rush's goal is to have the weapon ready an ideal time, it's very important to have strong eco when doing a heavy weapons rush, simply to give oneself a good margin to adapt.
Turtling up to get the weapon done is what heavy weapons rushers usually do. One needs to be very good at defending when doing this type of strat.
* If the first shot doesn't bring victory, you'll need some extra plans. Usually heavy weapons have a weakness against some type of defense (lasers and shields, cannons and metal), so Plan B should be a counter to that counter. When Plan B still isn't enough, you can have a Plan C, and so on.
** If you do have to totally break the rush, transition into a faster rush that your opponent didn't expect such as mortars or missiles./
- Early Rushes
The opposite of heavy weapons rushes are early rushes. Early rushes are harassment rushes that come out very fast. The point is generally not to win with the weapon rushed, but to give enough time to step up into something more deadly.
A good early rush example is a mortar rush. The point here is to make the opponent live in hell on earth, by weakening their structure and ruining their eco. Doing this will let one build more mortars, upgrade mortars, or get some missiles up to finish them off.
Although this category is meant for very early rushes, some of these tips still apply to nuke rushes.
Things to remember when doing such rush:
Eco is not the main concern, the main concern is being able to fire all your weapons at all times
In those regards, fire your weapons constantly, your opponent should not be able to breathe
Timing is key, especially when discerning when to step up and get more weapons.
Map control is very important, more about that later
If the opponent is going for heavy weapons, an option is wait to fire until one gets stronger eco/weapons, since they won't be firing as soon.
Map Control
Having Map Control means one has AA while their opponent doesn't. All early-game rushes come down to shootable projectiles (except for shotguns and miniguns, but those usually aren't good enough on their own), which means you'll need to destroy any AA your opponent has.
Maintaining map control is the key for early game rushes, and will decide how likely it is to win.
Some tips regarding map control are:
Always have some MGs up. Use them frequently to harass the opponent.
Having good sniper aim helps, since it'll be the main way to destroy opponent AA and snipers.
Using an armoury strat will help a lot for map control, since you can build flaks and shotguns which are insanely good to destroy MGs and light defense.
If you lose map control, make sure to build your new MGs and snipers behind wood (or even doors if you can afford those)
If it's impossible to keep map control, transition into a new set of weapons which either don't require map control or let one regain it, like shotguns.
* Instead of keeping map control, if you have missiles and mortars, you can use mortars as bait for the opponent AA to shoot at while your missiles go through.
** Going for multiple techs is a dangerous path, but can be devastating if you can get both mortars/missiles and shotguns.
- Supporting Rushes
Supporting rushes are useful to help teammate(s) get their strat going and working. This type of rush is totally useless by itself though.
The goal of those rushes is to make sure teammate(s) don't have trouble to achieve their own goals. For example, the most common support is to destroy the other team's AA.
But, there are other ways to help out a team, like buying time. If the opponents focus another target, it'll buy time for the rest of the team to get strong weapons/eco and destroy them a bit later.
To some extent, early rushes can be supporting rushes since they buy time for the team.
Some tips for those rushes:
Unless doing an early rush, go for the armoury, as it offers great support weapons
Destroy the opponent's AA using any weapon you're planning to go for
Although flaks are seen as an AA weapon, they can be used to either destroy the opponent's AA or harass them by destroying turbines or exposed stuff
Using EMPs on smaller maps can delay the opponents quite a bit
Buying time by being focused isn't the only way to do it. Also use EMPs and other means (destroying turbines) to slow the opponents down in their strategy.
- Meme Rushes
Meme Rushes are defined as a rush in which a player (in 1v1) or an entire team rushes just one type of weapon. This sometimes occurs in combination with a commander that can make that weapon ridiculously over-powered or funny (with a few exceptions). Meme rushes are generally only something to try do if the entire team is co-operating and coordinated enough to pull them off. A list of the current official meme rushes are as follows:
Sniper only with Eagle Eye
AP Sniper only with Eagle Eye
Minigun only with Eagle Eye
Incendiary mortars with Firebird
4 Missles for each fort in matches 3v3 or higher
All double nuke rush in matches 2v2 or higher
Shotgun only with Scattershot
20mm only with Scattershot or Buster (AKA Dakka)
Firebeam only with Shockenaugh or Firebird
Magnabeam/Dakka using buster
All Howitzer in matches 2v2 or higher
Several T3s for each fort
Accelerator/concentratinator rush
All machine guns has not been tried and is not recommended.
- Creating a Rush
Copying other players' rushes is lame. (isn't that right matteo?). For this reason we have created a cooking recipe with all the ingredients you need to create your own rush.
Requirements for this section:
Advanced (1-star) knowledge
Creativity
When one has successfully understood this section, they will be able to start reading 2-star (Pro) hints.
Creating a Rush - the Cooking Recipe:
First, you should think of what your rush should accomplish:
Do you want to annoy your opponent with miniguns?
Do you want to make high amounts of resources?
Or do you want to have rockets and nukes rain down on your opponent?
Once you have figured out how you wish to molest your opponent, think of what you need to do to get to this point of design:
If you have decided to go for a specific weapon or weapon combo, take a look at which technology(ies) is(are) required to build it. The first thing to do when rushing for this weapon is to place down the required tech. If you've chosen cannons or lasers then it is needed to build a temporary tech to get the actual required tech for the chosen weapon. In order to choose between the workshop and the armoury, think about how you would adapt if your rush didn't work quite as you expected.
If you think an eco-rush is the best way, start off the match by placing mines and turbines. Maybe even build up to get higher turbine efficiency. You can't win a match with a high resource production, but it helps a lot. Once you have about 4 mines and 2 turbines, you can start rushing for your main-weapons. Doing an eco-rush is usually not the best choice though.
Now you have a rough idea on how your rush should look.
Next, you want to experiment in skirmish mode with these little steps:
Start off your rush as described above - place your tech or make economy
If you started off with a tech building, the next thing you want to do if get a mine and a turbine for additional eco.
You might realize that there is always a short period of time where you're just watching and waiting for your devices to finish building. Use this time to scout on your opponent and see what he is doing. Depending on what the other team is building, try to adapt to that by building cheap defenses like MG as Anti-Air or woodspam. And there we come to the next big step:
Choosing your woodspam
As mentioned earlier in this guide, there are countless types of woodspam. You have the possibility to either create your own, or to choose the best one to counter what your opponent is doing,
Here are some basic types of woodspam as an example:
The common spam: 1x2 crossbraced boxes of wood, really cheap but also effective in early-game stages.密集木刺阵:由1x1的小型交叉支撑木箱紧密排列而成。造价不算昂贵,但也并非十分便宜。能有效抵御激光和加农炮的攻击。大型木箱:大型2x3或3x3箱子,无交叉支撑。价格便宜但非常重,确保你的堡垒稳固(用绳索固定)。对核武器、火箭弹和激光有很好的防御效果。使用这些木材速采战术来有效对抗对手,同时执行你的快攻。不要把所有资源都浪费在木材速采上,因为你仍需要这些资源来完成完美的快攻。现在你已经完成了快攻的基本布局,恭喜!当你在遭遇战模式中尝试快攻时,可能会遇到资源短缺或其他容易解决的问题:
选择合适的指挥官
每个指挥官都有独特的能力,可帮助你完善快攻(查看指挥官部分)。根据你计划的快攻策略,需要选择能强化该策略的指挥官。例如机枪、鹰眼、经济、过载或铁拳等。以及应对敌方单位的幽灵等指挥官。当你达到这一步时,你的快攻战术已经可以用于多人游戏了。进入一些原版大厅,用你的新战术去游玩吧!在实战中不断改进它。
你可能已经意识到,有时你的快攻战术会失效,这是因为对手的适应能力太强。因此,你可以为快攻战术制定一个B计划,以便在出现意外情况或比赛进入后期时启动。时刻做好准备!
策略
"兵者,诡道也。故能而示之不能,用而示之不用,近而示之远,远而示之近。"
"兵事莫重于秘。军队的每一步行动都依赖于此。"“兵者,诡道也。”——孙子
现在我们来讨论本指南中最重要的部分:策略。毕竟,《要塞》是一款即时战略游戏。每种武器和建筑材料都存在克制与被克制的关系。每场比赛的胜负取决于玩家在赛前选择的策略以及各自适应对手的能力。不懂得运用策略的人总会输给善用策略的人,而无法适应变化的人也终将败给懂得随机应变的对手。
有时,即便面对会适应的对手,双核弹速攻也可能因随机数生成机制(RNG)而获胜。但请不要以此为借口。本节涵盖以下信息:
对战意识
防御对策
进攻对策
1v1策略
2v2策略
3v3-4v4策略
排位赛
占领点
- 对战意识
“夫未战而庙算胜者,得算多也;未战而庙算不胜者,得算少也。”
- 孙子
对战意识是理解《forts》战略的第一步。时刻留意周围环境至关重要,这能让你判断敌方堡垒的策略,并在其实施前进行反制。
侦查:
侦查是对战意识最基本的形式,包括观察敌方堡垒以尝试判断其行动。在比赛开始时,要时刻留意并识别敌方的科技。这能帮助你对敌方可能的计划做出合理推测。例如,如果发现敌方建造了导弹发射井,就应建造防空设施。
建造风格:
不同类型的速攻战术会根据所使用的武器采用不同的建造技巧。以下是一些在标准模式、标准大型模式或标准4v4模式中常见的建造风格示例:
- 机枪速攻通常会将机枪建造在基地前方。
- 迫击炮速攻往往会在堡垒前方建造突出的方块结构,或者在堡垒顶部建造顶部敞开的细长突出结构。
- 导弹/核弹速攻的基地通常不会从堡垒后方完全展开,即使展开,也只会在底部用一层支撑结构进行覆盖。大多数其他武器通常建造在堡垒之上。不过,可以通过所使用箱子的大小和数量来猜测正在建造的武器类型。三个大箱子可能意味着霰弹枪、火箭筒或20毫米速射炮(在某些情况下也可能是三联加农炮速攻,但这种情况不太常见)。两个大箱子通常表示双联加农炮或双联榴弹炮速攻。一个大箱子通常表示榴弹炮、加农炮或磁力光束炮。小箱子通常表示激光速攻,而两个小箱子则表示激光与火焰光束的组合速攻。
当然,更聪明的对手可能会尝试通过某种建造方式来迷惑你,尽管他们实际上在执行另一种策略。
判断武器位置:
在武器开火前预判其可能的位置,这对于一场比赛来说至关重要。明显暴露的门通常意味着后面很可能有武器,但真正厉害的玩家不会留下暴露的门。不过还有其他方法可以猜测武器的位置。
放置武器时,其前方的支架(迫击炮和导弹除外,它们的支架在顶部而非前方)会自动转换为背景支架。要留意堡垒顶部或正面边缘的任何背景支架,这可能暗示武器的放置位置。但按住Ctrl键放置武器会禁用此功能,而且大多数高手会在武器准备开火前保留堡垒前方的木头作为支架,以隐藏武器的位置。确定武器放置位置的最有效方法之一,是寻找较大箱子前方的一个1×2小型支柱。这种支柱通常用于建造多个门,以更少的资源获得更好的射击角度。One final method is to know the common weapons placements for each map, in order to guess where weapons might be.
* Once you know where a weapon is, you can try to doorsnipe it using snipers for example when the opponent fires their weapons.
Know Your Enemy and Yourself:
“If you know the enemy and know yourself, you need not fear the result of a hundred battles. If you know yourself but not the enemy, for every victory gained you will also suffer a defeat. If you know neither the enemy nor yourself, you will succumb in every battle.”
― Sun Tzu, The Art of War
** Sun Tzu's words can be applied greatly to forts, especially in 1v1s. Learn your opponent's build styles and what they like to accomplish, that way it will be easier to counter them. Likewise know yourself. Know what your own common build styles are and change them up constantly in order to trick your enemy into thinking you are doing something you are not. /
- Defensive Counters
"The art of war teaches us to rely not on the likelihood of the enemy's not coming, but on our own readiness to receive him; not on the chance of his not attacking, but rather on the fact that we have made our position unassailable."
-Sun Tzu
In Forts, each weapon and material counters and is countered by another weapon or material. This allows for players to adapt and change strategies mid game to constantly counter their opponent. The First of these counters are defense counters. A defensive counter is a material or device that counters a weapon, preventing it from doing significant damage. These defensive counters are also countered by different types of weapons. Here is a table listing materials/devices, what they counter, and what they are countered by:
Material/Device Type Counters Countered By Bracing Counters all weapons Can be countered by all weapons except machine guns and snipers. Background Bracing Howitzers Buzzsaws, firebeam, incendiary mortar, fire Armour/Door All Cannons, All Lasers, buzzsaws, sniper, machine guns, incendiary mortars Splash weapons, miniguns, shotguns, heavy mortars, AP sniper (for 1 layer of armour only)
Slanted Armour/Slanted Door All Cannons, All Lasers, Buzzsaws, Sniper, machine guns, incendiary mortars, shotguns, miniguns. Splash Weapons Shields All Lasers, 20mm, one cannon shot, miniguns, shotguns, machine guns, sniper, flak, shotgun, buzzsaw. missiles, nuke, emp, rockets, cannon, howitzer Portals All Lasers, all cannons, flak, shotgun, machine gun, minigun, sniper, nuke, rockets, buzzsaws missiles, emp Sandbags firebeam, missiles, All cannons, buzzsaws, sniper, EMP, flak, shotgun, machine guns nukes, rockets, miniguns, laser. Repair Station non-critical damage to materials, devices, and weapons, fire All Weapons that can hit it
- Offensive Counters
"Attack him where he is unprepared, appear where you are not expected .”
"The opportunity to secure ourselves against defeat lies in our own hands, but the opportunity of defeating the enemy is provided by the enemy himself."
- Sun Tzu
An Offensive counter is an offensive means to counter other weapons. This generally involves destroying the weapon with some other kind of weapon, disabling the weapon for a short amount of time, or in some instances, destroying the weapon projectile.
Here is a table showing how weapons counter and are countered by each other. Keep in mind that not all weapons counter or are countered by everything. Weapons can be countered and counter other weapons at the same time. Counters are prioritized by weapon tier. High tier weapons do not counter lower tier weapons because it is more likely to use other lower tiered weapons to counter those.
Weapon Counters Countered By Machine Gun EMP, Rockets, Missiles, nukes, howitzer, incendiary mortars, heavy mortars, sniper sniper, machine guns, miniguns, flak, shotgun, smoke Minigun Exposed Weapons, mortars, missiles, EMPs, rockets, howitzer, shotguns sniper, other miniguns, shotgun, flak, missiles Sniper Sniper, exposed weapons, weapons behind opened doors Sniper, machine guns, miniguns, flak, firebeam AP Sniper weapons behind one layer of closed doors, one shot shotguns sniper, firebeam, flak, shotgun, minigun Incendiary Mortar exposed building aa, exposed weapons, smoke machine guns, miniguns, flak, shotgun, firebeam Heavy Mortars weapons without proper vertical defenses, exposed building AA. machine guns, miniguns, flak, shotgun, firebeam Missiles exposed building aa, mortars, exposed weapons, smoke machine guns, miniguns, flak, shotgun, smoke, sniper & AP sniper (taking out the enemy sniper when painting the target) nukes weapons protected behind doors, any fort that's not stable enough, smoke machine guns, miniguns, flak, shotgun, smoke, sniper & AP sniper (taking out the enemy sniper which aims for the missile) Buzzsaw Exposed weapons not covered by doors, weapons behind opened doors. sniper, shotgun, minigun Flak exposed machine guns, exposed miniguns, mortars, missiles, nukes, EMPs, rockets, howitzer. sniper, flak, minigun, shotgun, firebeam Shotgun Exposed weapons, machine guns, moratrs, missiles, nukes, EMPs, rockets, howitzer Sniper, AP sniper, Shotgun, minigun, firebeam EMP All weapons within it's splash radius for a limited period of time, smoke machine gun, miniguns, flak, shotgun, sniper Rocket Weapons behind doors, smoke machine gun, miniguns, flak, shotgun, sniper, firebeam Smokebomb machine gun, flak, laser, firebeam, magnabeam sniper, firebeam, shotgun, minigun 20 mm taking out exposed weapons or weapons behind 1 door. sniper, cannon, firebeam, laser, shotgun, rockets, nuke Cannon all weapons behind more than 1 layer of Doors sniper, cannon, firebeam, laser, shotgun. Howitzer literally counters everything sniper, machine guns, flak, shotgun Firebeam useful for taking out weapons behind several doors sniper, firebeam, laser, cannon, shotgun Magnabeam does not directly counter anything but can be used in conjunction with anything to destroy weapons from unprotected angles. sniper, firebeam, laser, cannon Laser useful for taking out weapons behind several doors. The best door sniping tool sniper, firebeams, lasers, cannons, shotgun
- 1v1 Strategy
When doing a 1v1, a player is one their own, alone. Everything has to be done by them, and they can't be carried by other people, which makes 1v1s both stressful and a good indicator of skill, although being skilled in 1v1 doesn't mean a person is skilled in team fights (nor does it work the other way around).
Now, for some actual 1v1 tips and strategies.
There are two ways to do 1v1s. Going for an early strategy or a mid/late strategy.
Early strategies
Since a player is on their own, going for any support strat makes absolutely no sense, since there is no one to support. It's best to go for a strategy that works without needing any exterior help.
When going for an early strategy, it is important to have plans on how to defeat the opponent, since early weapons aren't usually enough to actually kill someone. This is why it's extremely crucial to have an idea on how to step up.
Stepping up after having achieved a 1v1 strategy isn't always easy, as one will be spending resources to gather more fire power, while still firing the old weapons to keep delaying the opponent and preventing them to retaliate. This can be done either by upgrading one's current weapons (going from incendiary mortars to heavy mortars),by adding more of the same weapon tier (6 mortars good, 15 better), or by going for a higher tech. The important part is really to not let the opponent do anything while stepping up, or at least defend correctly if they do retaliate.
When stepping up, it's important to understand what is currently preventing one's strategy from killing the opponent. Either a person doesn't have the firepower, or the opponent is using a counter against the strategy to stay alive.
If it's the latter, choose the right weapon when stepping up. Some weapons combo well with others, because the 2nd one will destroy the counter of the 1st. At this point, counter the counter. 1v1s can go a long way through is process, until there is no more room or resources to add the right weapon.
Heavy strategies
When going for a heavy strategy, time is the counter. If the opponent goes for a faster strat, it could counter yours if done properly. This is why the important part about these strategies is to know how to defend against early rushes. Also, it is important to get the heavy weapons fast, to be able to retaliate.
A common rush that doesn't require that much turtling because of how fast it's achieved is the double nuke rush, slower than very early rushes but still faster than most heavy weapon rushes.
If going for an actual heavy weapon rush though, turtling will be a big part of the strategy, so here are some tips.
Scout a lot more, to be prepared to any assault. Whatever the strategy is though, it's best to have the proper defense at the right timestamps (for example having basic woodspam when mortars/swarms come out, and a shield on turbines by 4:00 when firebeams come out).
When weapons are ready, do heavy damage to the opponent. Either destroy their fort entirely, or destroy their weapons/eco. Find an edge whenever possible and use it to either kill the opponent, or step up as described above, to give them a finishing blow.
- 2v2 Strategy
Unlike 1v1s, instead of being alone there is one handy dandy teammate by your side to help you out in life. With the addition of this teammate, the concept of roles are implemented. Whereas in a 1v1 everything must be done by 1 person, in a 2v2, tasks can be split between two individuals.
A role is a specific function that a person presents to their team. There are a number of different roles available to play, and roles can change over time. The most common roles present in a 2v2 match are:
Early Strategy
Heavy Strategy
Support Strategy
With all the main strategies listed, here is a brief overview of how the strategies counter each other:
Early Strategy counters Heavy Strategy
Support Strategy counters Early Strategy
Heavy Strategy counters Support Strategy
Early Rushes and Heavy Rushes maintain the same concepts as in a 1v1 match, with the addition of team cooperation. Let's talk for a moment about the new role:
Support Strategy:
The Support Strategy is most commonly used to support early rushes, which tend to include projectiles which can be shot down by AA such as EMPs or missiles. The ultimate Goal of a support strategy is to deny the enemy team the ability to position AA in order for one's teammate's weapons to successfully penetrate their target. However, a support role is not limited to just taking out enemy AA. It also includes building defensive AA of one's own, and harassing enemy weapons (for instance with a sniper). A support rusher should attempt to step up to a heavy weapon if their role is not sufficient to win.
Role Cooperation:
The addition of a teammate also means there are several different combinations roles which can be used as a valid strategy.
Common effective role combinations are:
2 Early Strategies (assuming one will step up)
1 Early Strategy, 1 Support Strategy
1 Early Strategy, 1 Heavy Strategy
1 Support Strategy, 1 Heavy Strategy
Before a match starts further specify which weapons each person uses for their role, in order to make sure that the weapons chosen both compliment each other and cover each other's weaknesses.
Role combinations to avoid:
2 Support Strategies (it just isn't a good idea)
2 Heavy Strategies (Weapons cannot be put out fast enough making the team vulnerable to early rushes).
Finally, a more in depth analysis of role combinations and rules concerning their usage:
2 Early Strategies:
In this role combination both forts rush early weapons such as mortars, EMPs, missiles, or miniguns to harass the enemy. This can be effective in delaying the enemy's rush, however, it tends to not be a valid option for the entire match. At some point, it will probably be necessary for one base to switch to either a Heavy or Support Role to end the match. Never stay on this role combination for two long as it is weak against a Heavy Rush. If played right this can counter 1 Early Strategy, 1 Support Strategy rushes. Overwhelm the support strategy base first.
1 Early Strategy, 1 Support Strategy:
In this role combination one fort rushes early weapons, while the other weapon supports the early rush by taking out any counter the enemy fort might have to make the rush ineffective. Again, if this role combination does not immediately end the match it is recommended the support base step up to a heavy role in order to finish off the remaining forts. This counters 1 Early Strategy, 1 Heavy Strategy rushes.
1 Early Strategy, 1 Heavy Strategy:
In this role combination one fort rushes early weapons, while the other fort rushes heavy weapons. The early rusher is meant to slow down and annoy the enemy long enough to divert their attention towards that fort. While they do this the heavy weapons fort can come out with large damage dealing weapons in order to end the match. Keep in mind that the heavy rusher is vulnerable to an early weapons rush, so try and divert enemy fire onto the early rusher. This can be used to counter a 1 Support Strategy, 1 Heavy Strategy rush if played correctly. Divert the attention of both bases onto the early role fort, and then have the heavy weapons fort take out the heavy weapons of the enemy.
1 Support Strategy, 1 Heavy Strategy
In this role combination one fort rushes support weapons, while the other fort rushes heavy weapons. This is a more defensive approach to a 2v2. In this case, the support rusher also operates differently from when supporting an early rusher. The primary objective of support, in this case, is to support the heavy rush from an early rush or another heavy rush. This includes the placement of AA, as well as trying to disable any weapons from the opposing team that could threaten the heavy weapons rush. The heavy rusher brings out heavy weapons as quickly as possible to end the game. This strategy is mainly used to counter a 2 early rush strategy.
- 3v3 - 4v4 Strategy
In 3v3-4v4 strategy there are two noticeable differences from 1v1-2v2 strategy.
1) Heavy weapons serve an increasing role while early rushes generally only serve as minor harassment.
2) AA destroyable projectiles are less effective due to easier aa spam.
3v3-4v4 strategy includes all of the roles within 1v1 and 2v2 strategy but has an additional pseudo-role.
Early Strategy
Heavy Strategy
Support Strategy
The Turtle (pseudo-role).
The Turtle:
In a 3v3 or 4v4 match a common occurrence is for all team members to focus one single base to attempt to quickly knock it out of the game. Generally speaking the closest base to the enemy fort is the most likely to be targeted first. However in a match with good players, the highest threat will always be targeted first. The targeted fort then becomes the turtle, attempting to survive the onslaught while diverting enemy fire onto it instead of other forts. This allows the rest of the team to build up their resources and retaliate. It also gives them information on the strategy the enemy is using, and time to counter it. The turtle is a pseudo-role because it is not a role that any player wishes to be in, and yet sometimes finds themselves in anyway. It can change multiple times during the game, or not appear at all, but there will always only be one turtle.
3v3 Strategy:
In 3v3 strategy there are several different role combinations that can be used. Here are the most common ones used:
2 Early Rushes, 1 Support Rush.
2 Early Rushes, 1 Heavy Rush.
1 Early Rush, 1 Support Rush, 1 Heavy Rush.
1 Early Rush, 2 Heavy Rushes
1 Support Rush, 2 Heavy Rushes.
2 Early Rushes, 1 Support Rush
the two early rushes must concentrate on one base. The goal is to quickly overwhelm individual opponents to end the game quickly. The support rush takes out enemy aa and counters any other early rush the enemy has. If this rush fails then the support rush must switch to heavy weapons.
2 Early Rushes, 1 Heavy Rush:
This strategy attempts to overwhelm opponents with an early rush which distracts the enemy enough for heavy weapons to be built. This should be done before the early rush is countered by a support rush.
1 Early Rush, 1 Support Rush, 1 Heavy Rush:
This is the most balanced strategy option for most scenarios. 1 early rusher to harass the enemy and divert their attention from the heavy base, 1 support base to take out enemy aa and counter any strategy from the enemy, and 1 heavy base to bring out heavy, endgame options.
1 Early Rush, 2 Heavy Rushes:
This strategy can be used as an attempt to force the game into late-game and if done well can be used to overwhelm the opponent with heavy weapons fire. 1 Early rusher harasses the enemy enough to divert all enemy fire onto it, while the two heavy rushers bring out big guns in order overwhelm the other team.
1 Support Rush, 2 Heavy Rushes:
This is a more defensive version of the previous strategy. This rush expects an early rush from the other team. The support rush puts up defensive aa, as well as attempts to destroy the offensive weaponry of the enemy early rushers and support rushers long enough for the other bases to build heavy weapons.
Some role combinations that are not recommended:
3 support rushes (just don't.... why even try...)
3 early rushes (Not good against any rush with a support role)
3 heavy rushes (extremely vulnernable against early rushes).
1 early rush, 2 support rushes (not enough firepower to take out the enemy)
1 heavy rush, 2 support rushes (not enough firepower to take out a good enemy)
4v4 Strategy:
4v4 Strategy is the same as 3v3 strategy with the addition of another base. Some common role combinations are:
2 Early Rushes, 2 Support Rushes
2 Early Rushes, 1 Support Rush, 1 Heavy Rush
1 Early Rush, 2 Support Rushes, 1 Heavy Rush
1 Early Rush, 1 Support Rush, 2 Heavy Rushes
2 Early Rushes, 2 Heavy Rushes
2 Support Rushes, 2 Heavy Rushes
2 Early Rushes, 2 Support Rushes:
2 Early Rushers overwhelm the enemy, 2 support rushes prevent aa from being built and defend against other early rushes. Is weak against heavy rushes.
2 Early Rushes, 1 Support Rush, 1 Heavy Rush:
2 Early Rushes to harass the enemy, 1 support rush to defend from early rushes and take out aa, and 1 heavy rush to finish off bases.
1 Early Rush, 2 Support Rushes, 1 Heavy Rush:
A more defensive strategy, 2 support rushes to counter enemy early rushes. 1 early rush to divert the attention of the enemy, and a heavy rush to finish off the enemy.
1 Early Rush, 1 Support Rush, 2 Heavy Rushes:
An early rush to harass the enemy, a support rush to build defenses and counter enemy early rushes, and 2 heavy rushes to finish the enemy off.
2 Early Rushes, 2 Heavy Rushes:
Two early rushes to harass the enemy and divert their attention long enough for heavy weapons to finish the enemy off.
2 Support Rushes, 2 Heavy Rushes:
The Ideal defensive strategy. Two support rushes to counter any early rush from the enemy long enough for 2 heavy rushes to finish the enemy off.
Some role combinations to avoid:
4 support rushes (not a good idea. Just don't.)
4 early rushes (great as a meme but not much else)
4 heavy rushes (extremely vulnerable to early rushes
3 early rushes, 1 support rush (not enough support to take out aa to make early rushes effective)
3 heavy rushes, 1 support rush (not enough support to counter the enemies early rushes)
3 support rushes, 1 early rush (not enough firepower)
3 support rushes, 1 heavy rush (not enough firepower)
- Ranked
Since April 2020, 2v2 ranked has been deleted from the game since it wasn't played enough. Thus, only 1v1 ranked will be covered.
When playing ranked, the opponents you'll be faced with will have roughly the same rank. This doesn't mean they have the same skill. They could have a low rank since they just started (while being a very good player), or they could have been propelled (boosted) to the top of the leaderboard using other accounts (while being a bad player).
Anyway, it is best to play when you're good at the game, so that it is possible to reach a good rank. It can also be interesting to play if you're good and are seeking a challenge, since you can play against good players (hopefuly).
When playing ranked at a high level, it's important to know what strats are good at the moment (aka the "meta"). As this guide is being written, the meta is to use pinchfist, and playing a double nuke rush. Firebeams are also quite strong, very powerful when multiple are used.
Once you know what's currently good in the meta, consider learning how to do these strats, or innovate a strat by yourself that uses those weapons.
The issue though, is that the map is randomly chosen from the map pool. This is why it is crucial to learn good strats for each of the maps (some maps are trivialized by buzzsaw rushes for example).
It is also possible to play Capture mode ranked matches, but to be honest the game-mode isn't that popular among the community, so it isn't played at all in ranked.
To prevent boosting, it's impossible to play more than 3 times with the same opponent in the last 10 matches.
At the end of a ranked season (which lasts for a couple months), medals are given to the 3 top ranked players (each medal is different), as well as a medal for the 20 top ranked players (which appears red).
- Capture Point
Capture point mode is distinct from Team Death Match and Coop, since the goal is to keep derricks under control until the opponent's blast door opens, making their core vulnerable.
At the start of the game, it is impossible to attack the opponent core, since it is protected by an invulnerable Blast door as well as Barrier materials. There are some no build zones preventing anyone to build in front of the blast door to protect their core.
There are also some derricks placed throughout the map, which let both teams reduce the amount of points they have. Once the points on one team reach 0, the opponent blast door opens.
It is an unplayed game mode for some players, simply because the strategical aspect is quite low, and the stress is real throughout games.
Most of the capture point mode is based around bridge building. As a result, pro players usually build primarily out of BG, since it can only be interacted with few weapons (plasma, buzzsaw and howitzer). This means that most likely the only weapons you'll be seeing are those three, with some exceptions.
Some players go for rockets to destroy the foundation nodes of the opponent, to disconnect them completely from their whole structure. As a result, AA is also a valid option, especially since nukes are extremely strong in this mode. Indeed, the very short distances involved in most maps make nukes very hard to counter, and the splash damage they do to BG is often enough to disconnect the opponent.
Since all strats are about the same, there is no real strategical aspect to this mode. This means that the games will be decided on both pure APM (how fast you can act and bridge) and/or luck (because of some RNG on critical shots (nuke shots or AA)).
To be honest, capture can be fun on anything but 1v1, because team cooperation can be exciting. But besides that, everything said above stands.
Trivia and Lore
This section is filled with a list of random facts about forts and forts lore you might find interesting:
The Forts Campaign is a parody of the three global superpowers going to war. Eagle Empire is the United States, Dragon Army is China, and the Bear Alliance is Russia. Black Penguin Oil is most likely representative of all of the worlds oil companies.
The portal was created by a person named Fred, who tried combining a laser and a shield. The experiment succeeded, but Fred was lost in the portals. Later on, Fred was found back and he upgraded portals, to be able to be placed.
The Commanders Spook and Firebird are canonically female as stated by the developers. In a video on the forts homepage, the two commanders have voice lines voiced by male actors but with female sprites. Although not confirmed, this could mean that spook and firebird give transgender representation to the Commander roster.
It used to be possible to make horizontal mortars before portals were a thing, but that was patched long ago. Using portals this effect can be recreated.
There was a time long ago when neither moonshot or tons of guns were a thing. Both the cannon and laser were able to be accessed by the factory. Cannons/Lasers were split between the factory and the munitions plant with the tons of guns update. However, in the forts campaign, the old method is still used.
Less than 1% of forts players have beaten the original campaign on hard.
The cute little dude that shoots your weapons changes appearance based on the commander faction chosen, and if commanders are disabled, defaults to eagle empire.
Extra Resources
Here is a list of extra resources that might be helpful to improve your knowlege or answer any questions you might have. This list includes youtube channels, additional guides, and information/data.
(Forts Variables by 42 scientist)
https://docs.google.com/spreadsheets/d/15JAVHcctK1rDe5MBDXIMMVNCrgaK4O4WyGzMf4ogw_w/edit#gid=1536769234
(Base Building Guide by Joepocalypse)
https://steamcommunity.com/sharedfiles/filedetails/?id=1308699887
(Surviving the Rush Guide by Romerolagus)
https://steamcommunity.com/sharedfiles/filedetails/?id=1260542687
(Upgrading Mines and Turbines Guide by Romerolagus)
https://steamcommunity.com/sharedfiles/filedetails/?id=1396766019
(Forts Glossary Guide by Romeralagus)
https://steamcommunity.com/sharedfiles/filedetails/?id=1380793614
(Commander Overview Guide by [DEV] Blammo and [DEV] Nozehed)
https://steamcommunity.com/sharedfiles/filedetails/?id=914462469
(FAQ Guide by [DEV] Blammo, [DEV] Nozehed, and [DEV] BeeMan)
https://steamcommunity.com/sharedfiles/filedetails/?id=916759602
(Common Issues Guide by [DEV] Nozehed and [DEV] BeeMan)
https://steamcommunity.com/sharedfiles/filedetails/?id=1373894256
(Project Incursus Gaming Youtube)
https://www.youtube.com/channel/UCLt1h4r2RaDFc4J1fujvCGg
(Cronkhinator Youtube)
https://www.youtube.com/channel/UCgrk3nWYbdcbm12zDO-AymQ
(42 Scientist Youtube)
https://www.youtube.com/channel/UCNfNDTH4gdy2c5kOJummrIw
(Forts Wiki)
https://forts.fandom.com/wiki/Forts_Wiki
(Forts Steam Page)
https://store.steampowered.com/app/410900/Forts/
Practice Makes Perfect
Congratulations! You've made it through this entire guide! Phew, that was a lot of reading! Actually, if you've read this from start to finish you've read almost 20,000 words and over 100,000 individual characters!
I can assure you that all this reading has not gone to waste. Most of the knowledge contained within this guide is essential to understand and learn to play forts. After all, knowing is half the battle.
But keep in mind that it is only half the battle. You'll still have to practice in order to accomplish those things. So, we encourage you to try and apply the knowledge learned here in the future matches you play. Don't be frustrated if you don't immediately get better. This kind of stuff takes time. Most pros have been playing forts for at least a year.
Keep practicing, but most importantly, Have fun!
Conclusion
"All men can see these tactics whereby I conquer, but what none can see is the strategy out of which victory is evolved."
-Sun Tzu
In conclusion, this guide covers all relevant aspects of Multiplayer Vanilla Forts. The ultimate goal here was to help new and even intermediate players increase their skills. It's always more fun to play with and against experienced players than those new to the game. Hopefully we reach our goal, and hopefully this guide helps you :)
Also, if there are any errors or topics not covered in this guide, we'd love to hear your thoughts. Feel free to fill out this form so that we can make sure that we have covered everything:
https://docs.google.com/forms/d/e/1FAIpQLSfztBwhxG7VgcxNEDaYMAUeNBISmK6je1Cm9m5vkdiyeBhbPg/viewform?usp=sf_link
Happy Forts Playing!
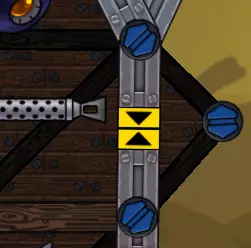
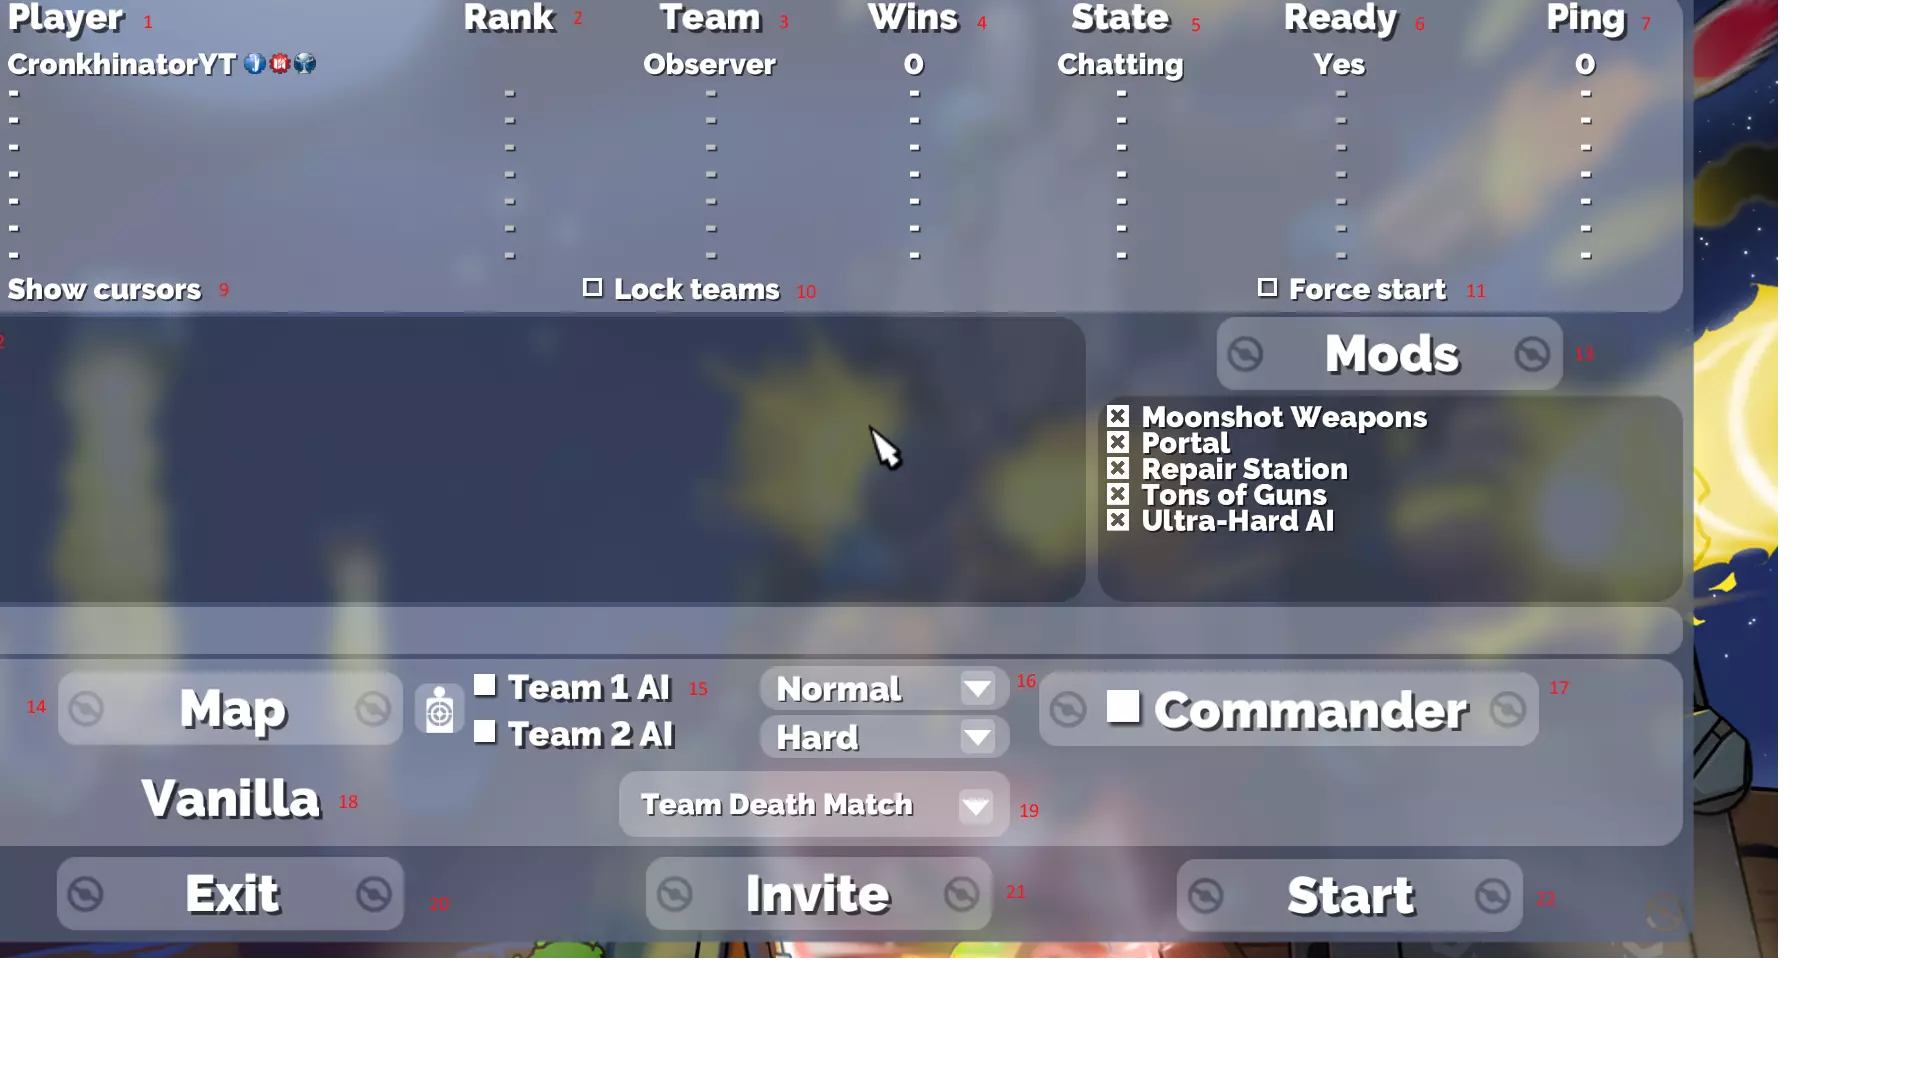

下载233乐园APP
专心推荐好游戏
纠纷处理及不良内容举报电话:
4006600910 (工作时间: 9:00-12:30,14:00-18:00)
北京市朝阳区启阳路4号院2号楼15层1803室
本公司产品适合10周岁以上玩家使用 未成年人家长监护