


《环世界》1.3及1.4版本 发型模组制作指南
一份助你将创意发型付诸实践的综合指南。本指南涵盖了图形创建和编程的基础知识,如果你是首次为《环世界》制作模组,不妨从此开始。 ### 简介 恭喜你完成了任何项目中最艰难的部分:搜索相关指南并迈出探索未知领域的第一步。既然阅读了本指南,你就有义务至少为《环世界》设计一款发型——没有借口,不可反悔,本指南已成为一份书面契约,现在是时候投入其中了! 本指南将带你逐步完成绘制自定义发型、将其植入《环世界》以及创建Steam创意工坊页面的全过程。 本指南面向所有能力水平的用户。所以,如果你觉得自己不会画画或编程,没关系,因为我刚开始的时候也不会。我们现在就开始吧。 软件 制作发型模组需要两款软件:一款用于绘制发型,另一款用于实现发型。
在此处下载[notepad-plus-plus.org]。我们将使用它来让模组正常运行。

在此处下载试用版[www.adobe.com]。我们将使用它来为我们的模组创建图像。你可以使用任何支持阿尔法通道(透明度)的Photoshop替代软件,例如GIMP和Krita。或者,你懂的,“海盗行为”总是一种选择……
在此处下载[drive.google.com]。此ZIP文件包含创建模组所需的所有图形模板,以及帮助您从零开始快速设置模组的必要文件。 范围 这完全是可选步骤,但作为一个组织能力很差的人,我需要这一步。建议您先构思并规划发型模组的创意,可以在Steam创意工坊、Pinterest上寻找灵感,或者看看镜子里帅气/漂亮的自己。 请记住,您创建的每个发型都需要具备:

一旦你确定了要给自己安排多少工作量,就查看一下你下载的【Roo's Hair Tutorial】模板[drive.google.com]文件夹。其布局如下:
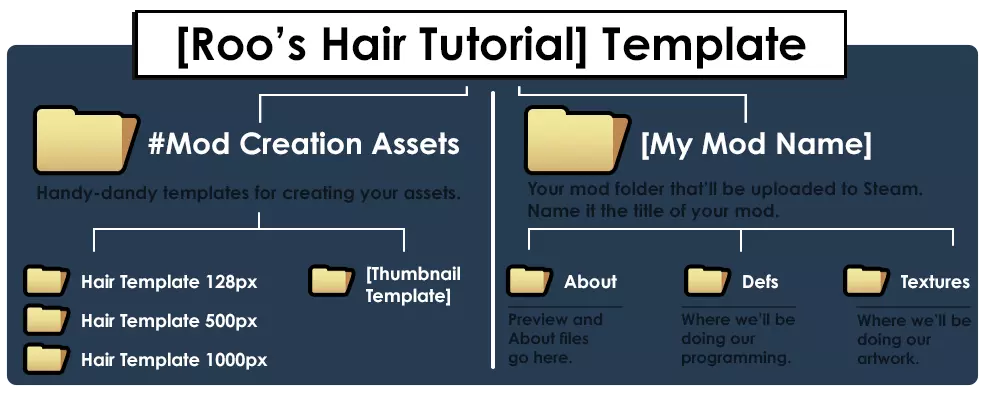
你可以随意修改#Mod Creation Assets文件夹。这里存放着我为你制作的所有图形模板。将[My Mod Name]文件夹重命名为你想要的发型模组名称。但暂时不要修改其中的任何文件或文件夹。 绘制
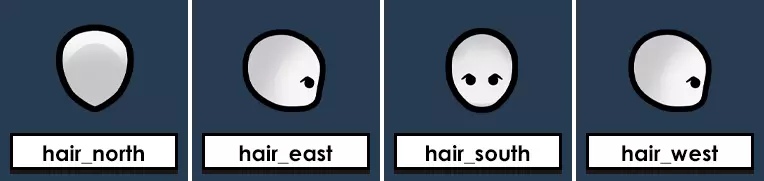
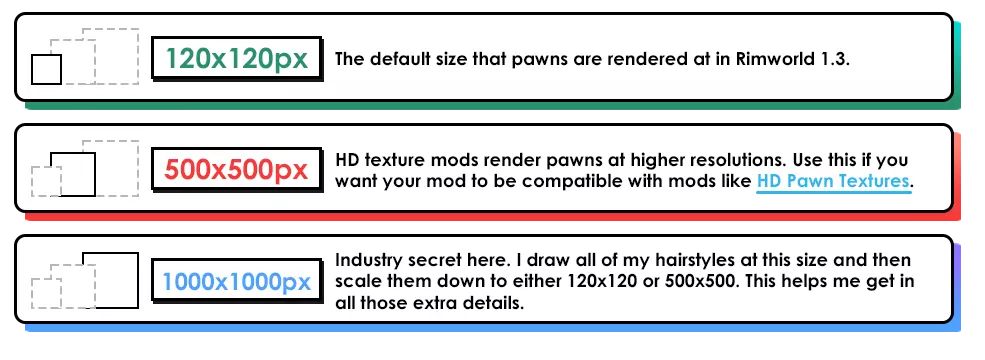
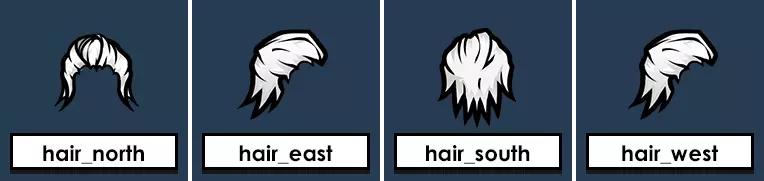
每个发型都有4种不同的精灵图,它们遵循以下命名规则。 你会注意到,东向和西向发型的头部朝向相同。游戏会在运行时自动翻转图像,因此无需手动处理。 [Roo's Hair Tutorial]模板[drive.google.com]文件夹包含3种不同版本的发型模板。
Sketch
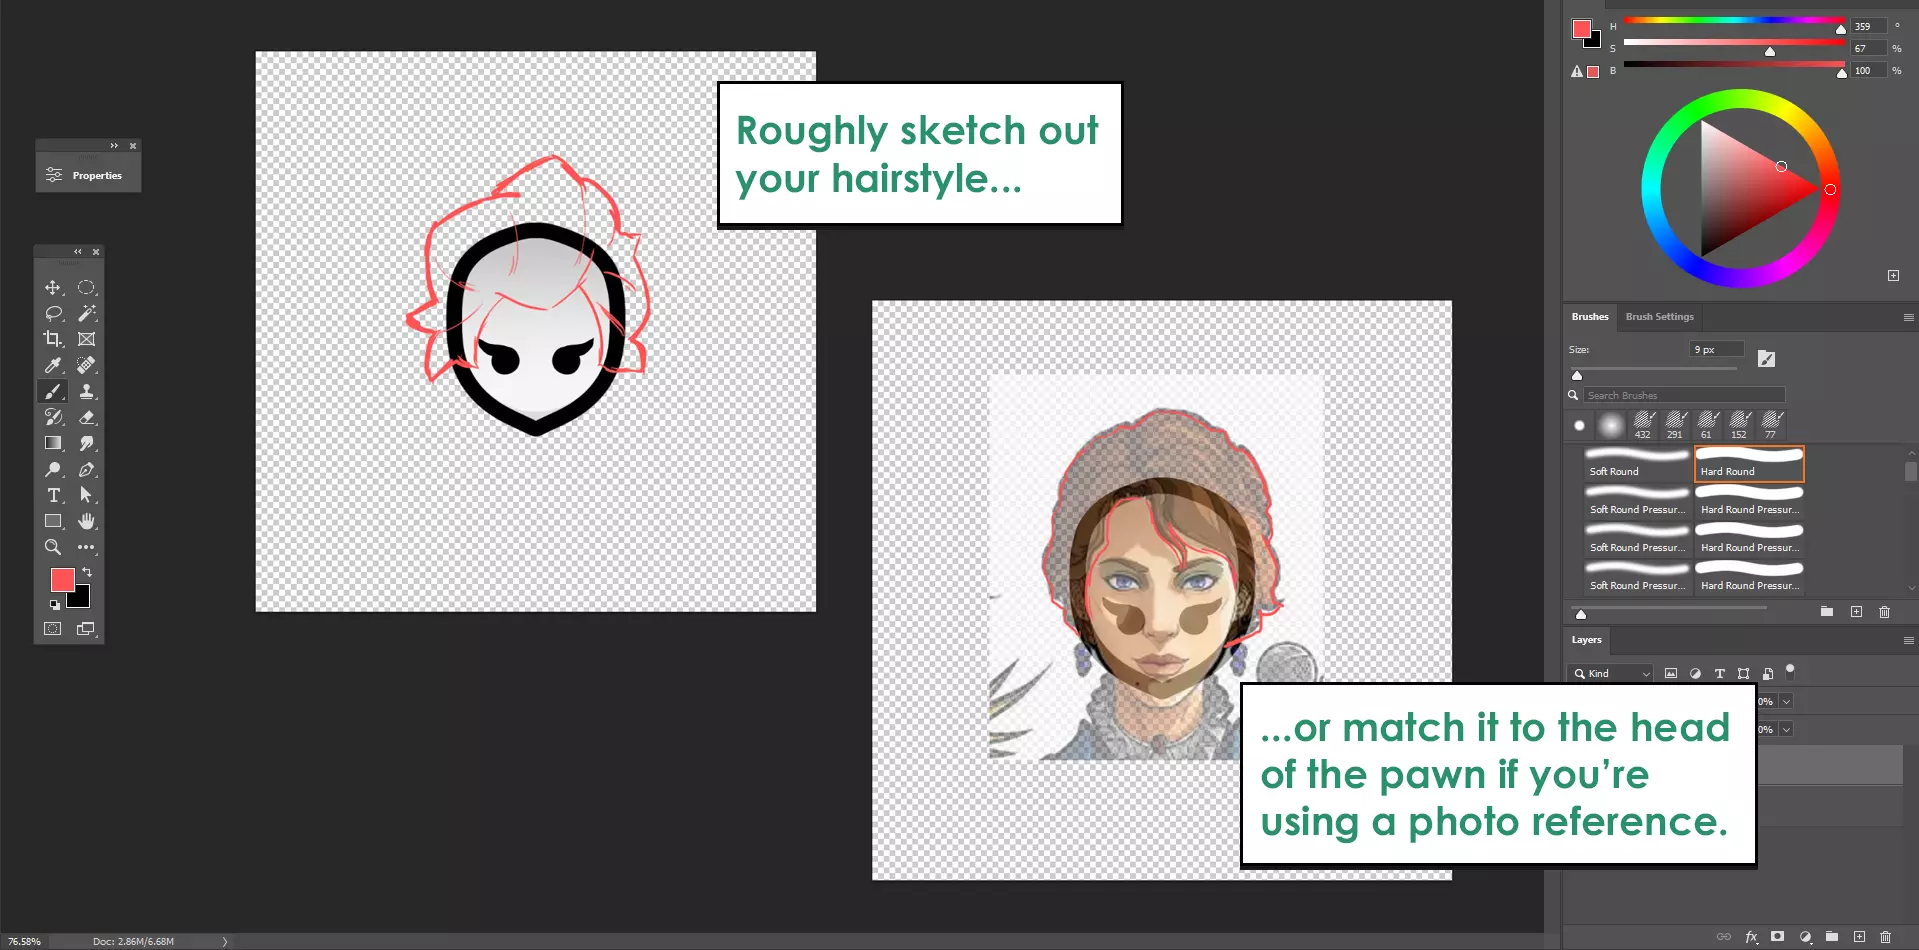
我建议你第一次尝试时使用500px的模板。不过,你也可以选择任何你喜欢的尺寸模板。首先打开hair_south.png文件。 创建一个新图层(快捷键:Shift + Ctrl + N),大致勾勒出你的发型轮廓——如果你使用照片作为参考,可以将参考图片粘贴到画布上,将图层不透明度设置为50%,然后尝试将其与角色头部对齐。这一步的目的只是确定基本形状。 勾线
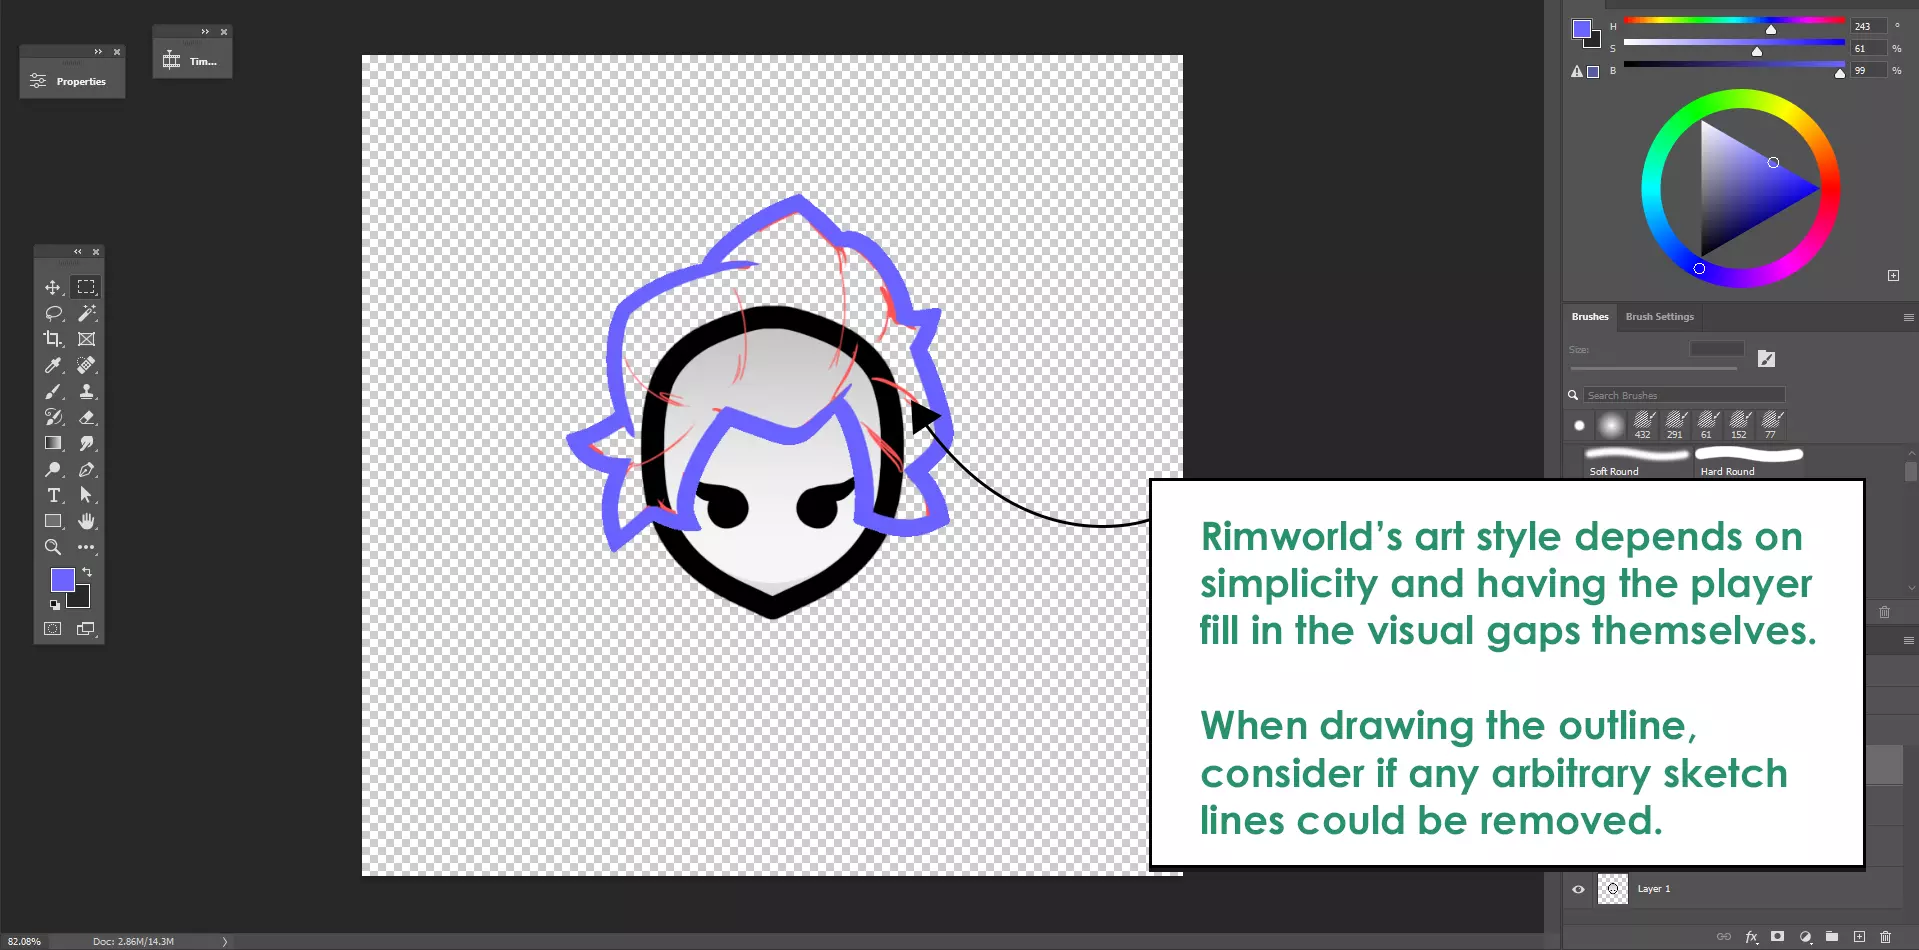
为你的线条创建一个新图层,并在草图上进行描摹。你的绘图软件可能有“平滑”设置,它会减慢画笔速度并让线条更整洁。在Photoshop中选择画笔工具时,可在顶部栏找到此设置。 《环世界》会在游戏中自动为 pawn(殖民者)的头发上色,因此我们在绘制发型阴影时只需使用灰色调。我们将使用 3 种色调来绘制头发,我们称之为“色板”。

在轮廓下方新建一个图层,并用中间色调填充轮廓。你可以手动填充,也可以使用填充工具或魔棒工具。
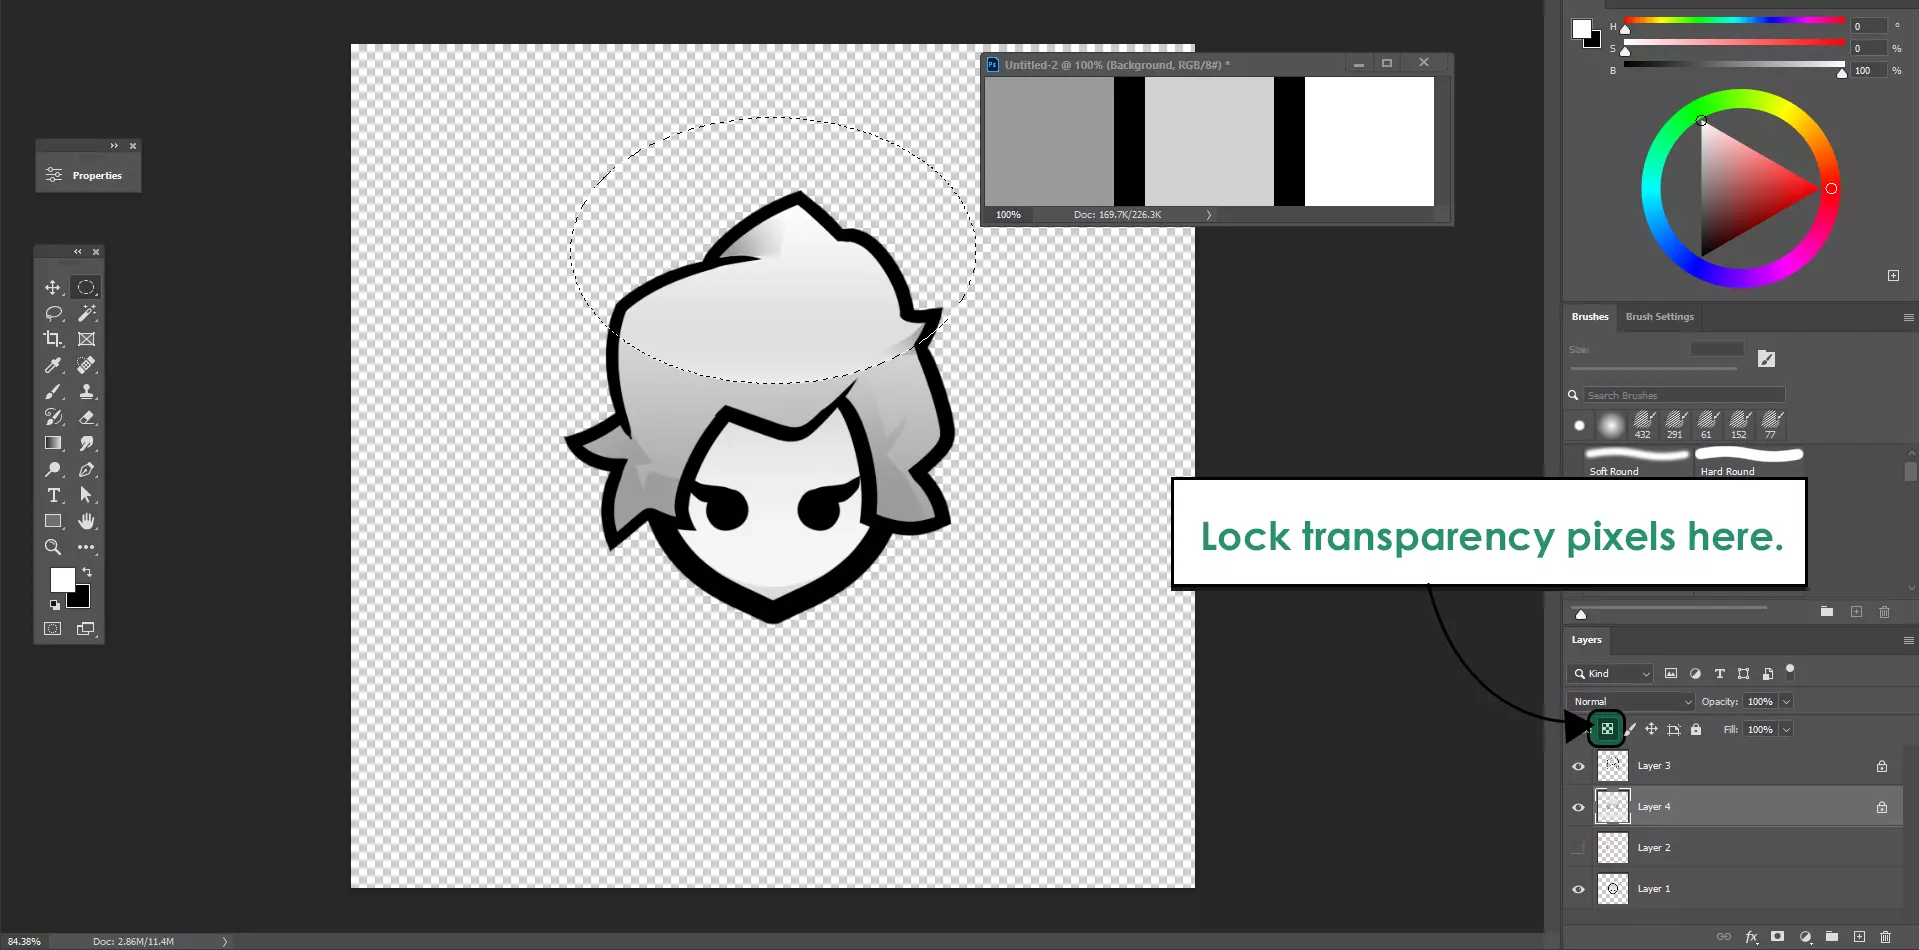
一旦你为头发上好颜色,就锁定图层的透明像素。选中你的图层并按下 / 键。这样可以防止你在着色区域外进行阴影绘制。
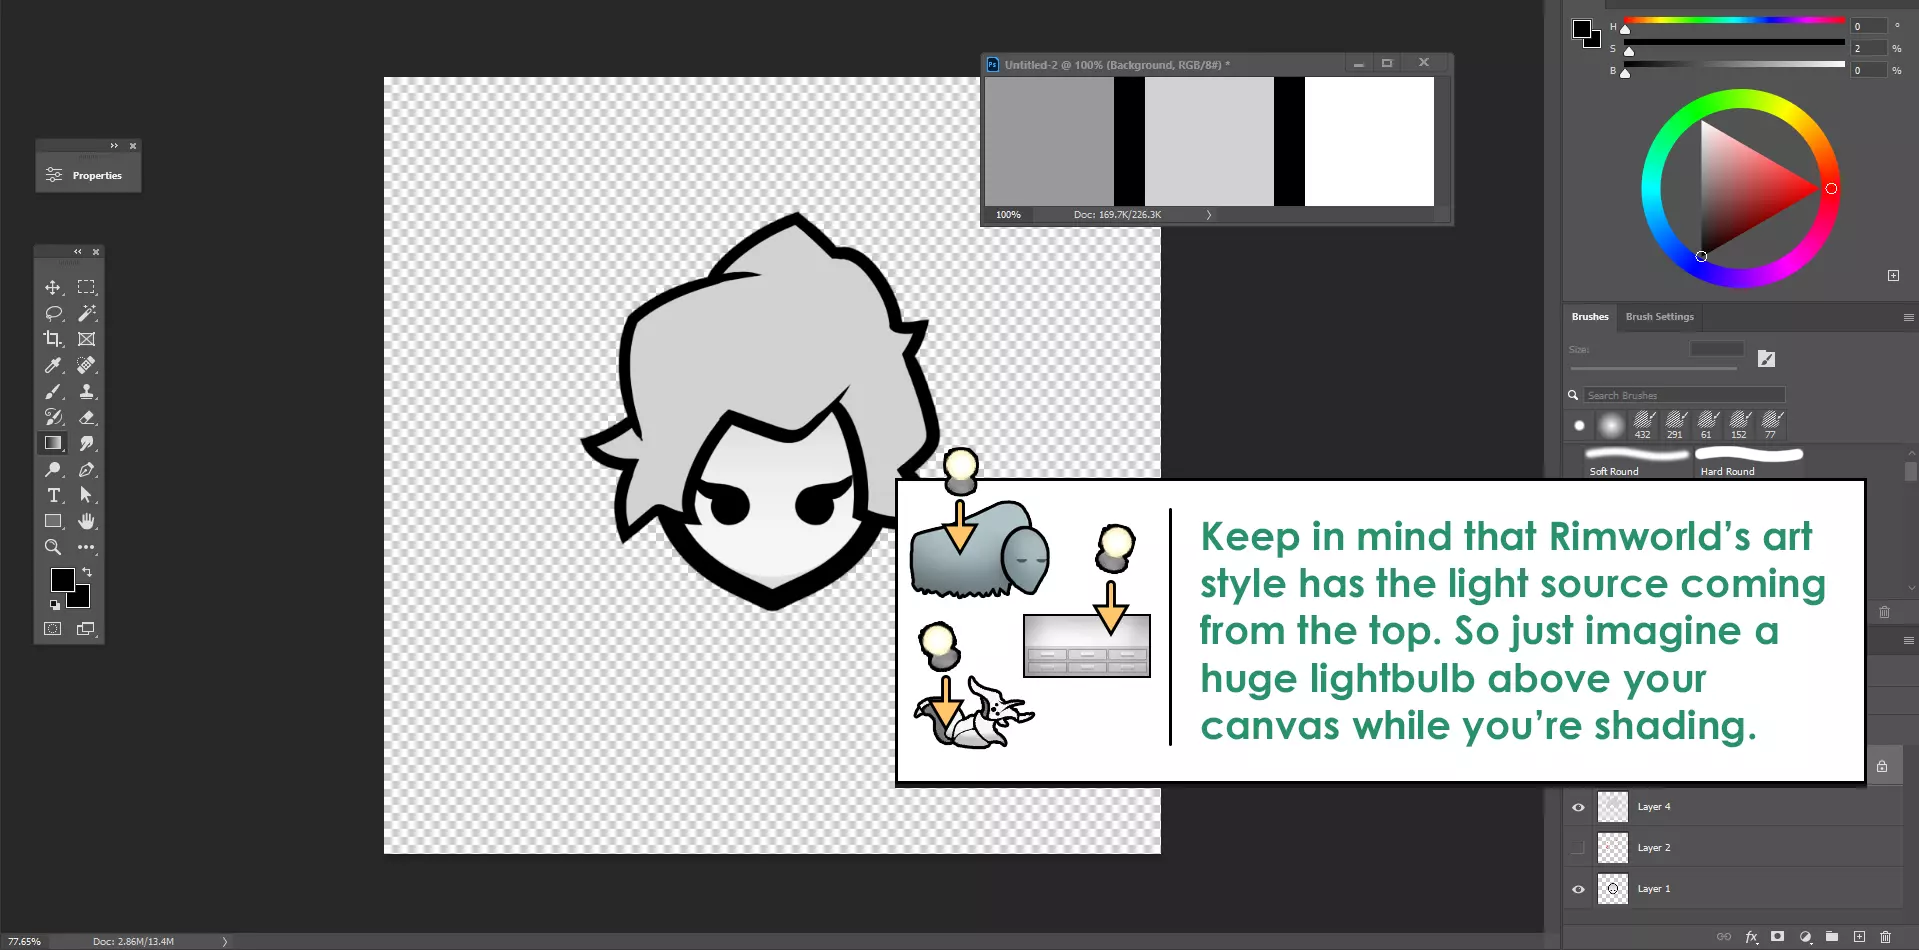
现在是时候进行阴影处理了——说实话,这可能是一个“顺其自然”的过程。一般规则是将阴影集中在头发底部,高光集中在顶部,因为光源位于角色模型的上方。可以尝试使用的好用工具包括:

《环世界》很少对头发或动物等有机物体使用硬阴影。将你的主色和辅助色设置为两种色板颜色,并在所选区域创建从一种色板到另一种色板的柔和渐变。

套索工具可用于创建不规则形状的选区,之后你可以将其与渐变、加深或减淡工具结合使用。这有助于为你的头发增添微妙的纹理效果。

一种快速便捷、简单直接的发型上色方法。加深工具和减淡工具可分别用作加深和减淡涂抹区域的画笔。如果不想设置色板,就使用此方法。 **优化** 现在你的头发看起来已经上色良好,是时候进行最后的修饰了。虽然并非必需,但以下两个实用步骤可确保你的头发看起来符合原版风格。不过,如果你想采用更独特的艺术风格,也可以跳过此步骤。 看看这些《环世界》的素材。你注意到了什么?
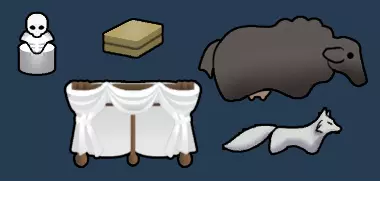
注意最外侧轮廓与形状内部轮廓的宽度差异——例如北极狐脸颊的绒毛或“骷髅雕塑”的躯干部分。《环世界》使用粗黑色轮廓来强调资源的剪影,但在处理剪影内部的这些精细细节时,很少使用粗轮廓。实际上,披风与仿生部件甚至完全没有任何黑色内线。 收尾技巧1 - 可变轮廓
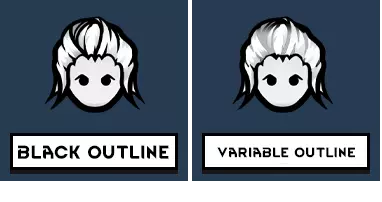
让我们尝试将这些观察结果应用到我们自己的作品中。左侧的示例发型完全使用黑色轮廓。它看起来不错,但与原版艺术风格不符。 右侧的发型使用了相同的轮廓,但内部线条有所减淡。选择你的轮廓图层,按“/”键锁定透明像素,然后将阴影色板应用到内部线条上,你可能会发现那种“这个发型有点不对劲但又说不上来哪里不对”的感觉消失了。 收尾技巧2——《环世界》是个“大块头”。
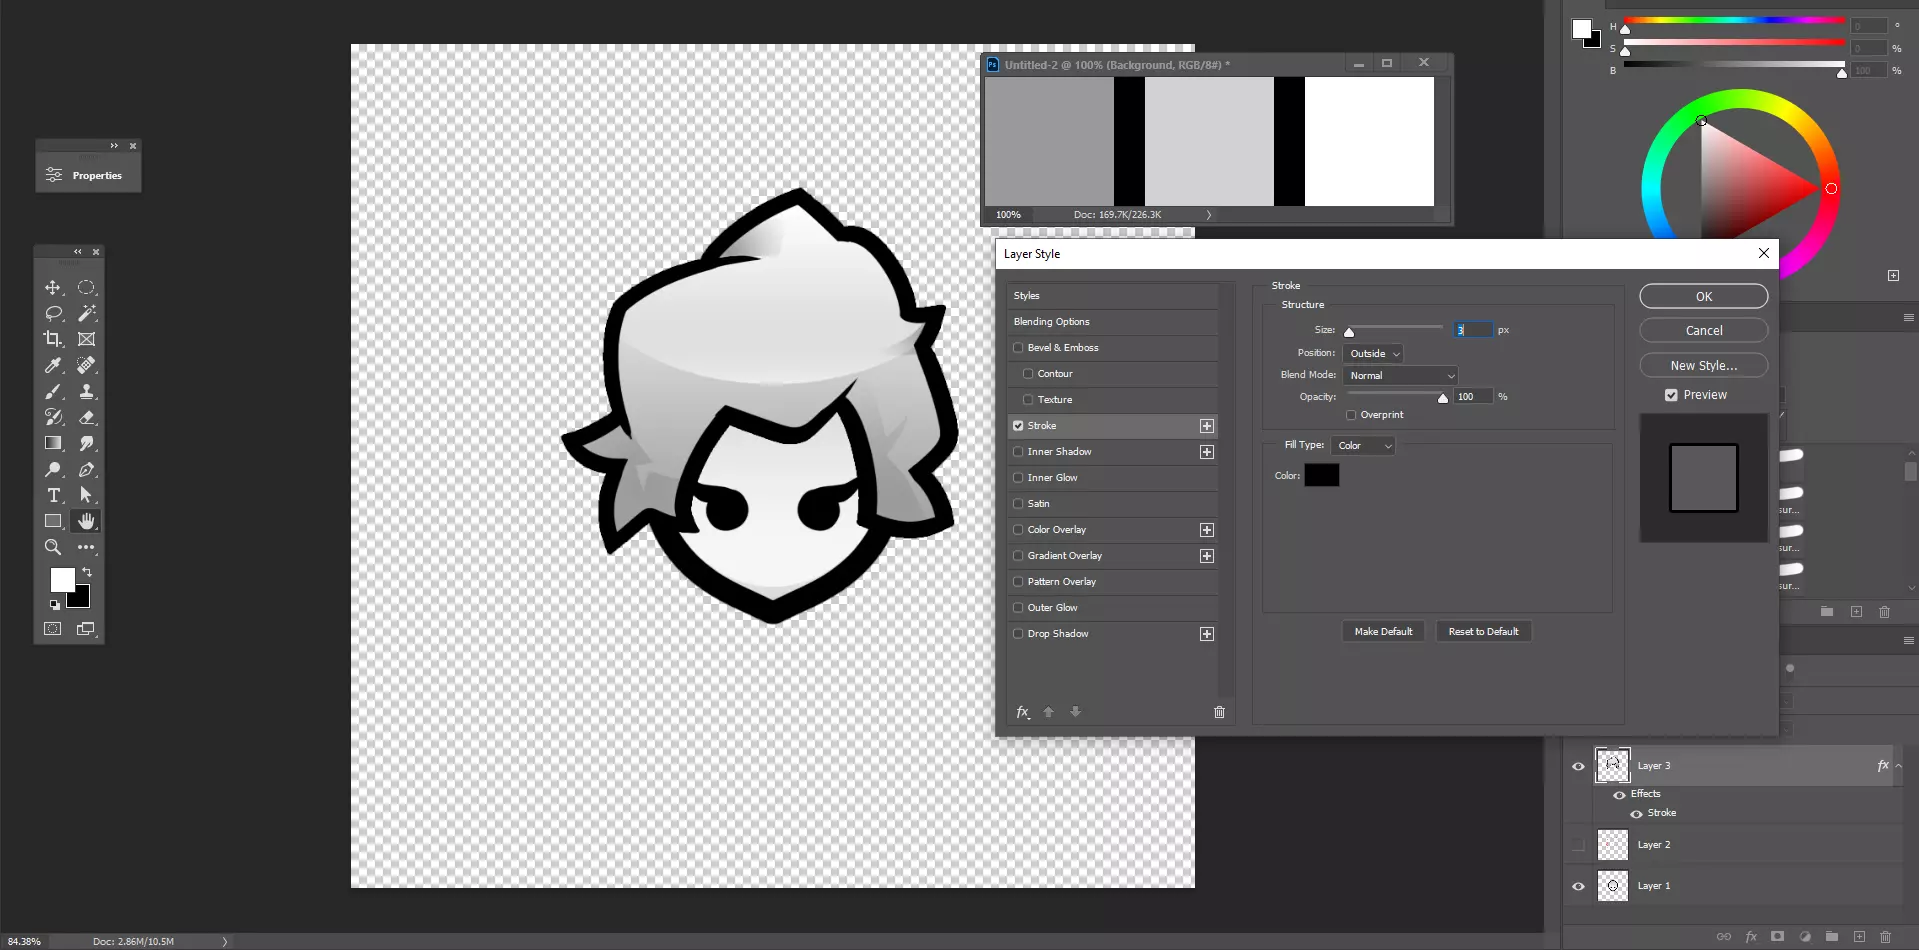
现在,我们来为发型添加更粗的外轮廓线。将你的轮廓图层和颜色图层合并,然后双击图层面板中新建的合并图层。此时会弹出“图层样式”对话框。选择“描边”选项,并确保描边的不透明度为100%,描边颜色为黑色。描边大小会因你使用的模板而异,所以只需尝试将其调整到与人物头部轮廓的粗细相匹配即可。这样就能为你的头发添加更粗的轮廓,就像我们在上面看到的原版资源那样。 如果你的软件不支持图层样式,也可以手动用更粗的画笔沿着发型的外轮廓进行描绘。 导出时,移除人物头部图层,这样画布上就只留下你的发型了。如果你使用的是1000像素模板,请前往“图像”>“图像大小”,并将图像的宽度和高度调整为500像素或128像素。
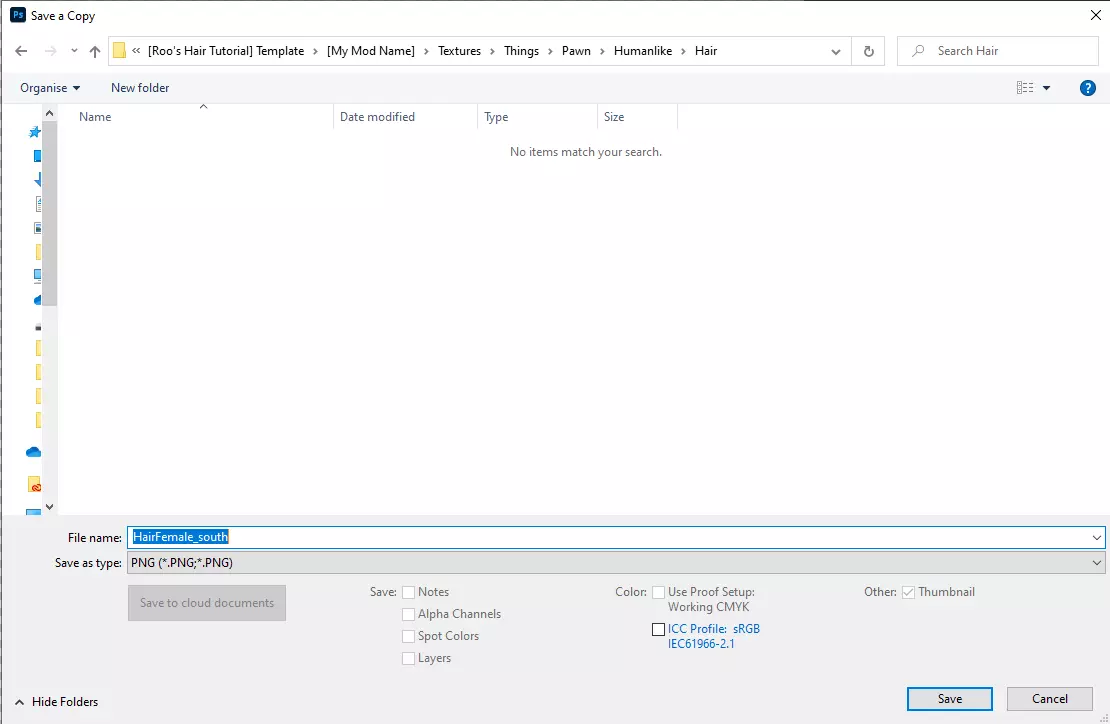
打开【我的模组名称】,将图片保存到“Textures > Things > Pawn > Humanlike > Hair”路径下。 请遵循“hair_south”的命名规则,将“hair”替换为视觉标识符,例如“Mullet_south”或“Mohawk_south”。 注意: ● 不要使用空格。 ● 除下划线(_)和连字符(-)外,不要使用任何特殊字符。 ● 方向必须全部小写。 ● 图片格式必须为PNG。 导出后,使用北、东、西方向的模板重复上述操作。完成全部4个方向后,你的Hair文件夹中应包含4个类似以下名称的文件:
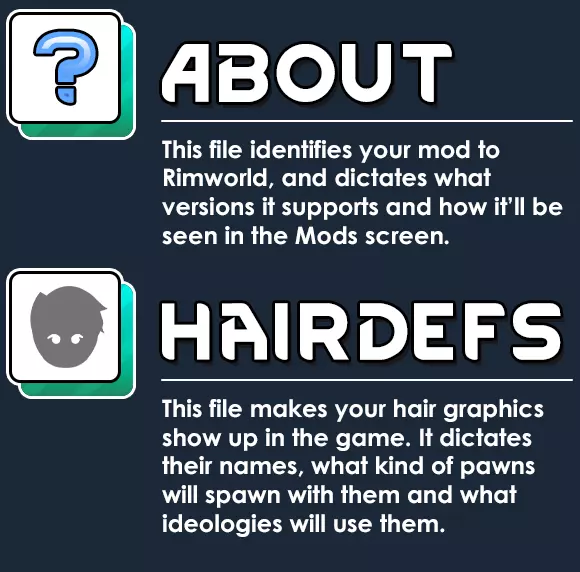
编程 创建发型模组的编程工作可以在制作视觉资源之前、期间或之后进行。我们将使用两个.xml文件。
ĺ łäş
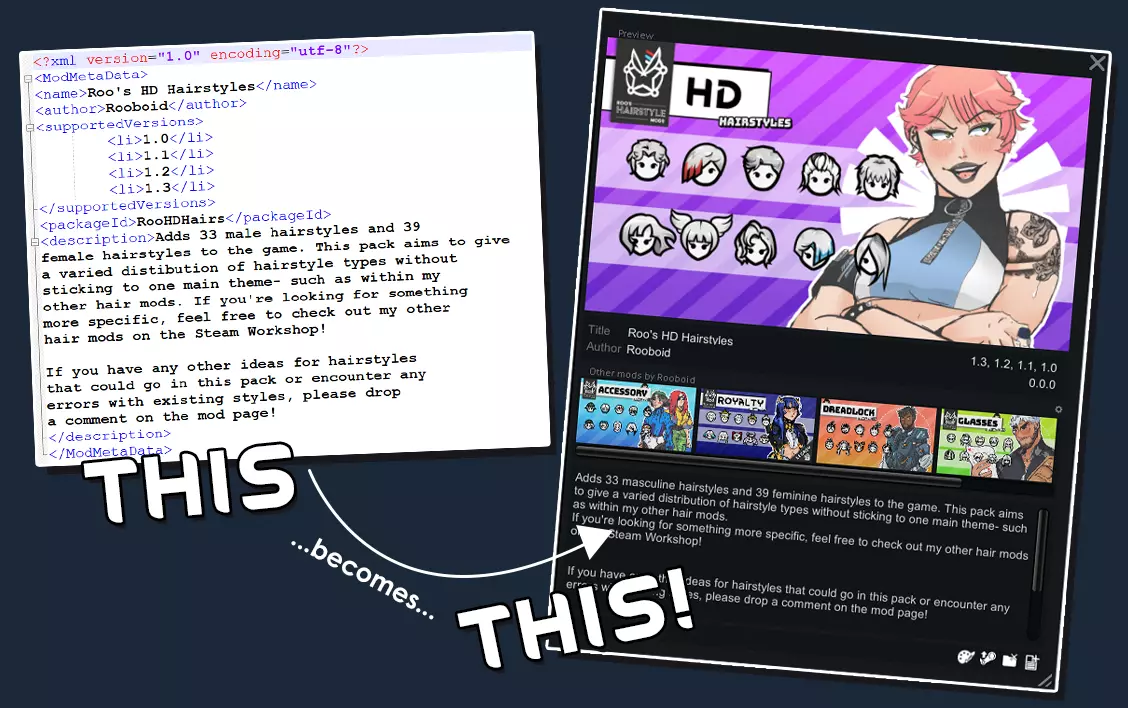
进入[我的模组名称] > About文件夹,右键点击“About.xml”。用Notepad++打开该文件,你将看到模组元数据。在每组标签(即类似<name> </name>的部分)之间,你需要输入以下内容: ● <name> - 模组名称,将显示在模组界面上。 ● <author> - 你的用户名。 ● <supportedVersions> - 此模组支持的《环世界》版本。 ● <packageID> - 游戏用于识别模组的唯一ID。即使两个模组名称相同,它们的packageID也不能重复。你的packageID应遵循<packageId>作者名.模组名.具体信息</packageId>的命名格式。 例如:<packageId>Roo.Example.Hairs</packageId> ● <description> - 在模组界面中选择你的模组时显示的文本。 你可以根据需要在About文件中添加其他标签,但以上是关键的几个。如需了解更多标签信息,请点击此处[rimworldwiki.com]。 以下是一个完整的About文件示例: <?xml version="1.0" encoding="utf-8"?> <ModMetaData> <name>Roo's HD Hairstyles</name> <author>Rooboid</author> <supportedVersions> <li>1.0</li> <li>1.1</li> <li>1.2</li> <li>1.3</li> <li>1.4</li> </supportedVersions> <description>为游戏添加33种男性发型和39种女性发型。本发型包旨在提供多样化的发型类型分布,而非局限于单一主题——就像我其他发型模组那样。 如果你正在寻找更特定的发型,可以去Steam创意工坊查看我的其他发型模组! </description> </ModMetaData> HairDefs

Go into [My Mod Name] > Defs > HairDefs and open Hairs_MyModNameDef.xml in Notepad++. This file contains all the details for each hairstyle you make. ● <HairDef> - Between these two tags are the details for one hairstyle. Within this file, you'll need to open and close a new set of HairDef tags for each style. ● <defName> - The ID of the hairstyle that the game uses. It can't match that of any other hairstyle, so include a unique prefix before the hairstyle name, such as the mod initials or your username. Don't use spaces. For example: <defName>RB_Mohawk</defname> ● <styleGender> - What gender of pawns this hairstyle will spawn on. Before Rimworld 1.3, this was called <hairGender>. The options are: Any Appears on any gendered pawns. Male Appears only on males. MaleUsually Can appear on any pawns, but mostly male ones. Female Appears only on female pawns. FemaleUsually Can appear on any pawns, but mostly appears on females. Note: ● Pawns can still be manually given hairstyles not assigned to their gender by using mods or the Styling Station introduced by the Ideology DLC. ● <Category> - What category this hairstyle will be sorted into within the Ideology DLC. This was added in Rimworld 1.3. Your hairstyle may only go into one category. If unassigned a category, it will be auto-sorted into 'Misc'. The options are: Minimal Tribal Cannibal Punk Urban Rural Royal Soldier Moustache Misc ● <texPath> - Where the game will look for the hairstyle textures, and what filename it'll look for. If your hair's graphics are called 'Mohawk_south.png', 'Mohawk_east.png' etc, you'll just need to write 'Mohawk' at the end of the path. For example: <texPath>Things/Pawn/Humanlike/Hair/Mohawk</texPath> ● <styleTags> - What kind of pawns this hairstyle will spawn on. Before Rimworld 1.3, this was called <hairTags>. You can include as many tags as you like. The options are: Wild Appears on wild pawns with certain ideological precepts (e.g Nature Primacy). Tribal Appears on pawns that use the Corunan style (e.g tribes). Rural Appears on pawns that use the Rustican style(e.g outlander unions). Urban Appears on pawns that use the Astropolitan style (e.g the player faction). Royal This tag has to be used in conjunction with Urban or Soldier to work. If a hair has both the Royal and Urban tags, it'll appear on noble pawns of the empire faction- such as the Stellarch. If the hair has both the Royal and Soldier tags, it'll appear on fighter pawns from the empire faction. Punk Appears on pawns that use the Kriminul style (e.g pirate factions). Soldier Appears on fighter pawns across multiple factions. HairLong Xenos with the Hair_LongOnlygene. HairShort Xenos with the Hair_ShortOnlygene. Within your Def file, a new set of <HairDef> tags needs to be made for each hairstyle your mod adds. Here's what a completed HairDef file containing two hairstyles looks like: <?xml version="1.0" encoding="utf-8"?> <Defs> <!-- Angel Wings Hairstyle --> <HairDef> <defName>Roo_HD_Hair_AngelwingsL</defName> <label>RBHDL Angel Wings</label> <styleGender>Female</styleGender> <category>Urban</category> <texPath>Things/Pawn/Humanlike/Hair/LHDHAngelwings</texPath> <styleTags> <li>Urban</li> <li>Rural</li> <li>Royalty</li> </styleTags> </HairDef> <!-- Brave Hairstyle --> <HairDef> <defName>Roo_HD_Hair_BraveL</defName> <label>RBHDL Brave</label> <styleGender>Any</styleGender> <category>Tribal</category> <texPath>Things/Pawn/Humanlike/Hair/LHDHBrave</texPath> <styleTags> <li>Punk</li> <li>Rural</li> <li>Tribal</li> </styleTags> </HairDef> </Defs> Testing 引用自 some guy: 10% of the work takes 90% of the time. Testing your hairstyle mod takes 150% of the time. The first part of testing your hair mod is making sure that it works on your end. If you're planning on uploading your mod to the Steam Workshop, it'll save you a lot of post-upload troubleshooting to make sure that it works for others too. Step 1: Moving Over Your Files to the T E S T I N G Z O N E
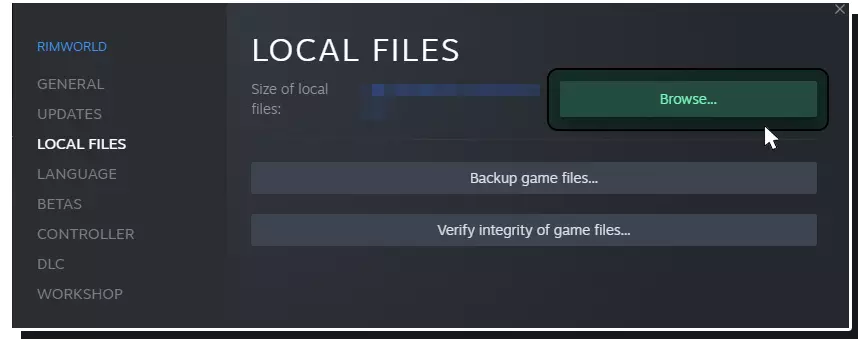
要测试你的模组,你需要将其本地副本保存到《环世界》的Mods文件夹中。进入Steam库,右键点击《环世界》,选择“属性”。在弹出窗口中点击“本地文件”,然后选择“浏览本地文件”。 此时会打开《环世界》的文件夹(Windows资源管理器或Mac的访达)。进入“mods”文件夹,将你的[我的模组名称](或你为其命名的任何名称)文件夹复制到mods文件夹中。 **步骤2:启用模组并重启《环世界》**
Open Rimworld, and enable dev mode in the options. Next, go into the mods menu. I recommend disabling all other mods other than any official DLC. Your mod should be there somewhere, accompanied by a folder icon to indicate that this mod is indeed a local copy. The preview image should just be a boring old preview with some bald pawns on it for now. Enable your mod, restart Rimworld, and pray. Step 3: Startup Errors ❌Upon restart, it's possible that you'll be passive-aggressively greeted by the debug log. If so, check the errors it lists to see if any of them are caused by your hair mod. Error Fix Mod [My Mod Name] is missing packageID in About.xml! You need to add a Package ID into the About file. Scroll back to the 'Programming' section for help. Mod My Mod Name <packageId> (UniqueModIdentifier) is not in valid format. Your packageID should follow the naming pattern of <packageId>AuthorName.ModName.Specific</packageId>. Go into your About file and change your packageId. Mod [My Mod Name] is missing supported versions list in About.xml! You need to add the versions of Rimworld that your mod supports into the About file. Scroll back to the 'Programming' section for help. Could not resolve cross-reference: No RimWorld.StyleItemCategoryDef named X found to give to RimWorld.HairDef Y The hairstyle (Y) uses a none-existent category (X) within the Defs. Unknown Parse Failure The file listed at the end of the file path contains a syntax error. This could be something as simple a tag not being closed. Note: These are not of the all possible errors, just some very common ones. Step 3: Gameplay Errors ❌We've made it past the startup screen. Now it's time to test our mod in-game. Create a new save and use a styling bench (or mod) to check out your hairs in action. Got errors? No problem: Error Fix When my hair is on a pawn, they appear bald. Discriminating against baldness isn't OK. But this means that Rimworld can't find the textures. Even just one of the sprites of that hair being wrong can make this happen. Check your hairs' file names and that they're consistent with the texture path within your Defs. Some of the hairs are facing the wrong way. Check your file names, that they're all named with the correct directions accordingly. Remember, don't flip hair graphics to make the hair_west sprite. The game flips them automatically. A pawn that had X hairstyle no longer has it when I reload my save. The hair defName has changed and the game can't find the old defName. The hairstyle is using a different hairstyles' graphic. Two of your hairs are sharing the same defName so the game doesn't know which one to load. Make sure defNames are all unique for each hair. The top/bottom/side of the hair is visibly cut off. The hair texture has been drawn too close to the edges of the canvas. Shrink it down a little bit and try again. The hair doesn't fit on the pawn. All hairs should be designed for the 'average' head shape. Rimworld will automatically scale down hairstyles to fit the 'narrow' head shape. Check that your hair textures fit the template included in the [Roo's Hair Tutorial] Template[drive.google.com]. Step 4: Finishing OffOnce you've finished the preliminary testing, sleep for a while. Yes, good. When you wake up, there are a few other testing tips you can follow to ensure that your mod is as polished as it can be. ● Use dev mode to spawn some raids and make sure your hairs are appearing on the right factions, if at all. ● If your hairstyle textures are 500px, install a HD pawn mod and Camera+ to make sure they're looking top notch during gameplay. ● Use mods such as Character Editor to quickly scroll through your created hairstyles. ● Install your usual mods and use your hairstyles alongside them in gameplay. You might notice further errors or things you'd like to change. ● Test your hairs on pawns of different head and body sizes. ● To ensure that the mod works for others, ask someone else to test your mod and bribe them with thrumbofur. Packaging and Uploading Who's Hair Modder(Legendary)? You're Hair Modder(Legendary)! All that's left to do now, is to get your mod ready for upload on the Steam Workshop. Making A PreviewRemember that crusty, boring preview thumbnail in the mod screen? It's time to replace that with something a little more exciting. Important things to remember about your preview are: ● The mod preview image is stored in the About folder of your mod, alongside About.xml. ● The preview image in this folder will be seen on the mod screen in-game, and as the thumbnail for the mod in the Steam Workshop. ● As long as the ratio of your preview thumbnail is 16:9, there's no right or wrong way to create it. If you're not sure where to start and you have downloaded the [Roo's Hair Tutorial] Template[drive.google.com], go into #Mod Creation Assets > [Thumbnail Template]. Here you'll find a handy template in both .psd and .png format. PSD's are Photoshop's native file type, but other image editing software can usually open them. If yours can't, don't worry, you can use the .png provided. None of these files require credit at all, so use them to your heart's content.
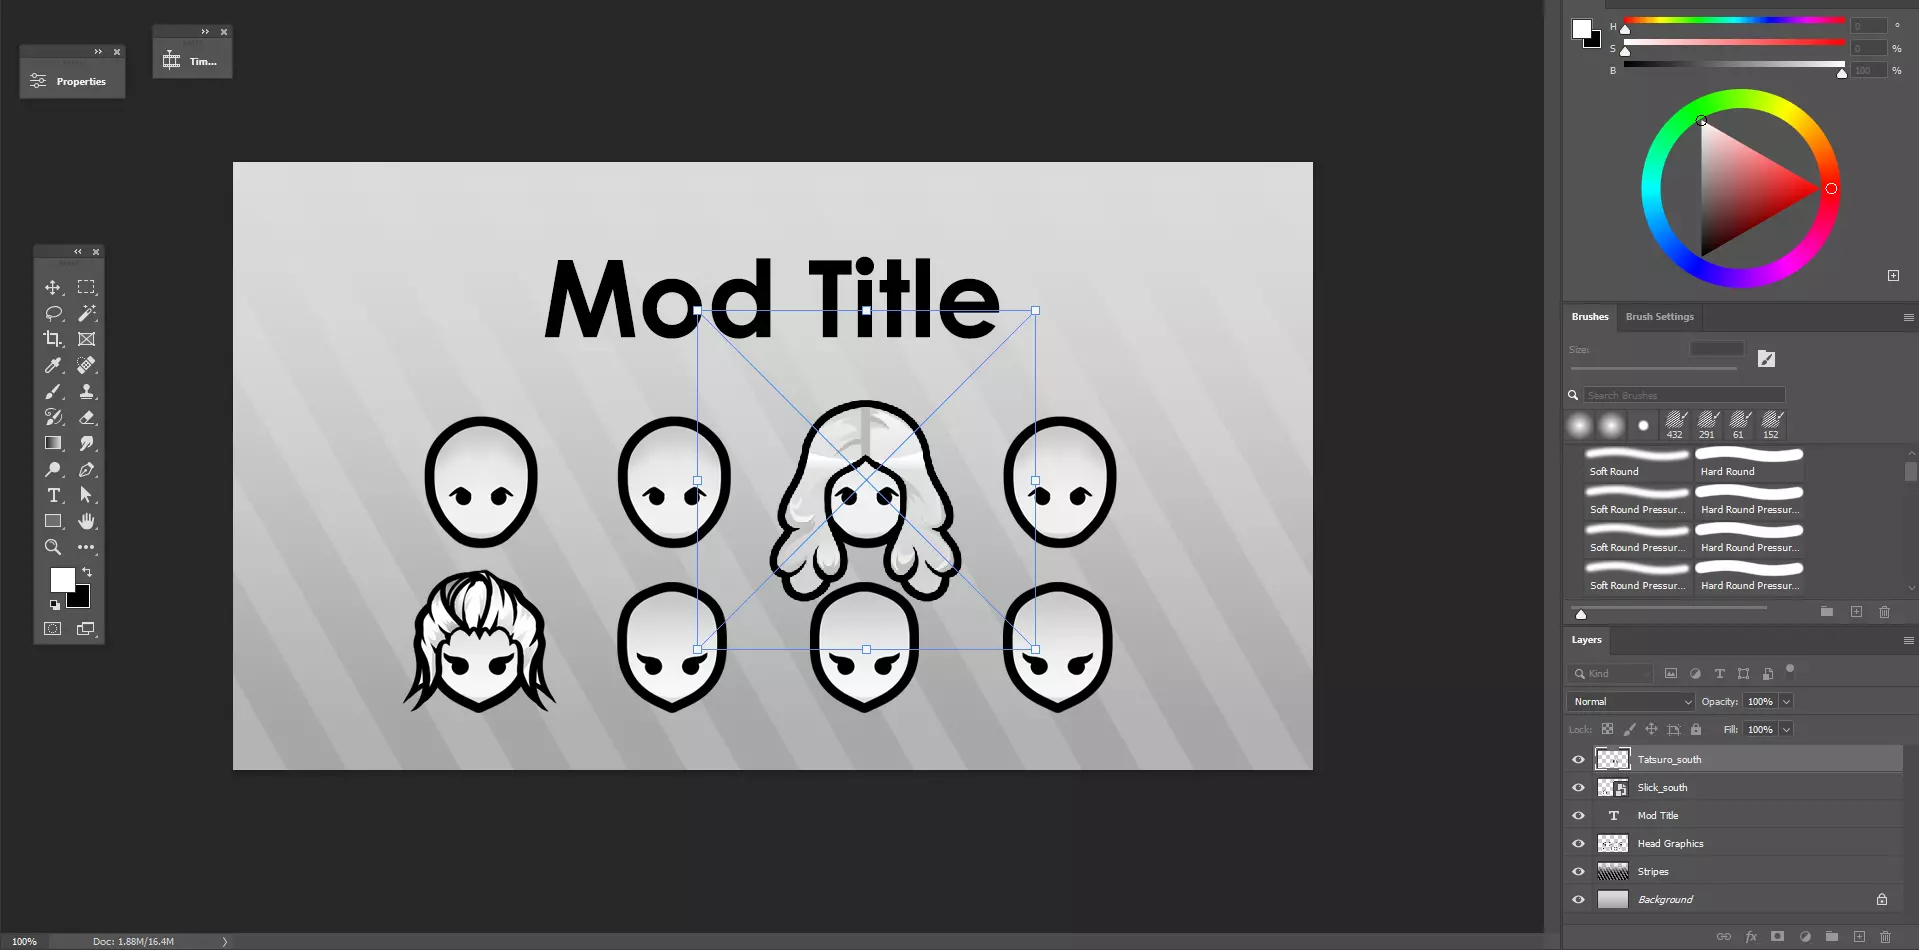
通过更改背景颜色、标题,并在人体模型上添加一些你的发型,你就可以完成制作并将其导出为.png格式文件。 导出文件后,将“About”文件夹中的“Preview.png”替换为你的新缩略图。确保新文件仍命名为“Preview.png”。最后检查一次,确保你的预览图能在《环世界》的模组菜单中显示。这样,你的模组就制作完成了。 上传你的模组
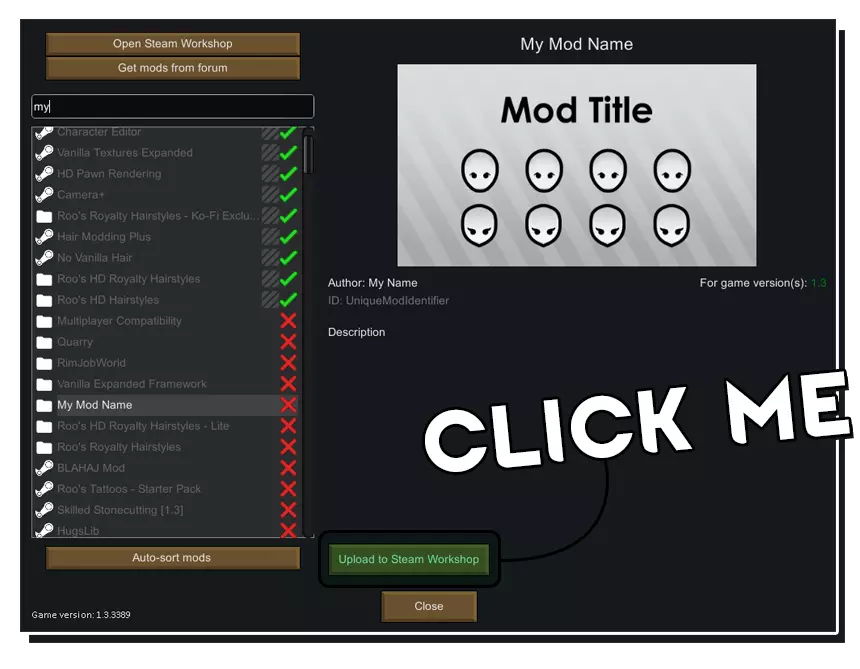
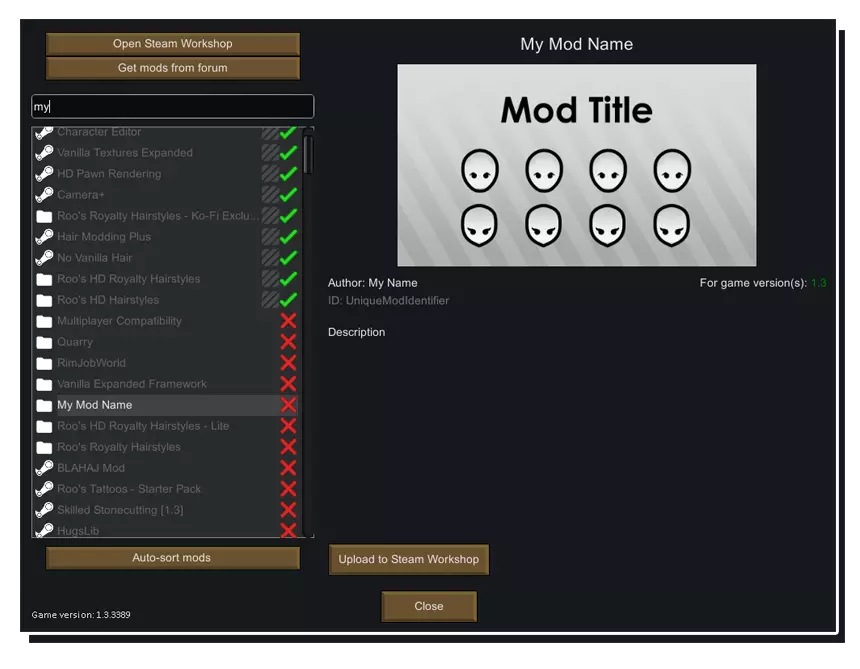
当你在《环世界》的模组菜单中时,选择你的模组,然后点击“上传至Steam创意工坊”。上传完成后,该模组会处于公开隐藏状态,直到你准备好正式发布。这让你有机会为模组描述填充一些关键信息,例如: ● 模组的主题是什么。 ● 它是否有任何模组依赖或不兼容问题。 ● 常见问题解答。 提示与特别感谢

以自己的作品作为参考。 完成一个发型的首个精灵图像后,你可以用它来辅助绘制后续的精灵图像。将已完成的精灵图像复制到下一个方向的模板中。使用辅助线来确保再次绘制时发型的特征能够对齐。 你可以先绘制所有精灵图像,然后再导出,这种方式可能最适合你。或者,你也可以从东侧精灵图像或北侧精灵图像开始绘制,哪种方式对你来说最有效就用哪种。
你不需要hair_west精灵图。 如果不包含hair_west精灵图,游戏会自动使用hair_east精灵图并进行相应翻转。你可能需要包含hair_west精灵图的唯一原因是,当发型不对称时,从不同侧面观看会有所不同。 特别感谢 我在2020年发布了第一个创意工坊mod,当时完全不知道自己在做什么。非常感谢那些帮助我学习的人: Zelan - 帮助我测试发型mod,支持我撰写本指南,并且在各方面都给予了巨大帮助。 Chicken Plucker - 撰写了最初的[1.0]创建发型mod - Chicken run教程指南。你真是个了不起的传奇人物。
2026-02-13 15:01:40 发布在  环世界
环世界

说点好听的...
收藏
0
0