换一换
换一换 


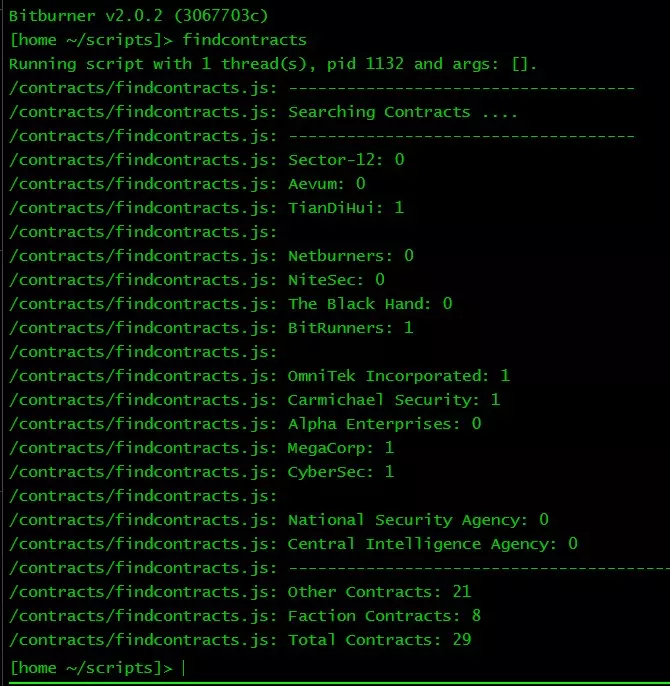
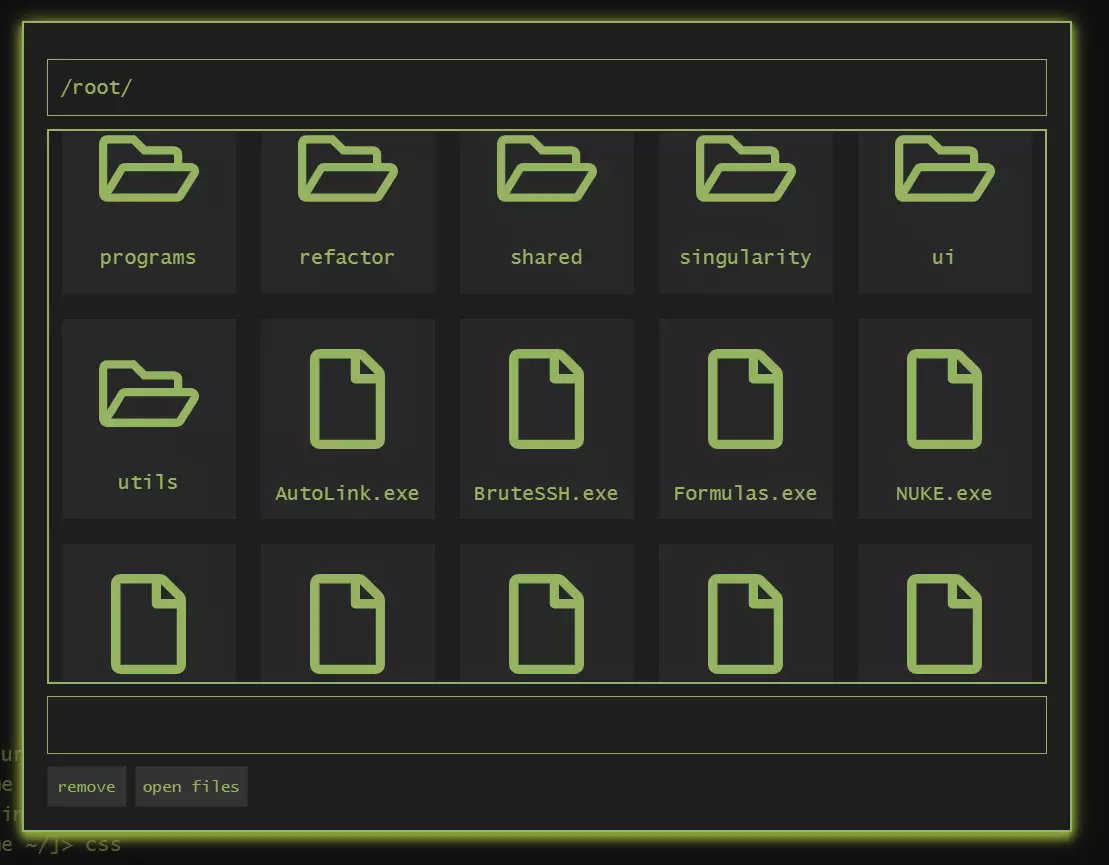
想要用户界面提供更多实用功能?自己动手制作吧! 我会展示一个我制作的文件资源管理器窗口示例(你知道的,就是用于处理文件的图形用户界面,类似Windows资源管理器,不要和Internet Explorer混淆),以及我为简化制作过程所开发的工具(辅助脚本)。 前言 首先,我们要归功于应得之人:我的灵感来源于Temorok的一篇指南。我最初的一些用户界面编辑脚本就是基于他指南中的脚本制作的。 免责声明 我知道这么大篇幅的脚本在Steam的代码块中显示效果不佳,我可能会在有时间且愿意的情况下创建一个GitHub仓库,将脚本放在那里,以便于查看。虽然我已经测试并运行了这些脚本(它们确实能正常工作),但我还没有对其进行整理,也没有检查是否有更好的实现方法。我想分享这段代码,是为了向你展示利用这款游戏的用户界面可以实现哪些功能,同时也想说明你可以创建自己的小型框架,让编写这些修改用户界面的脚本变得更加容易。 关于本指南 本指南的目的并非是要教你具体的知识,更多的是想告诉你可以做哪些事情,并展示我所做的一些尝试(希望这能激励你自己动手制作类似的东西)。安装文件资源管理器 如果你有兴趣使用我编写的文件资源管理器程序,以下是快速安装指南: 1. 复制粘贴下方包含的所有脚本,并将它们命名为我使用的名称(脚本上方的标题行即为我使用的名称)。你也可以重命名,但之后需要编辑代码以匹配新的文件名。 2. 同样复制粘贴所有“.txt”文件(保持相同名称)。 3. 设置别名,这样每次运行程序时就无需输入完整脚本(否则会影响易用性),我会在下方代码块中提供我使用的别名。 alias explorer="run /css/main.js; run /programs/exe/explorer."我已包含运行主CSS脚本的步骤,因此你无需单独运行(尽管每个游戏会话只需运行一次主CSS脚本)。启动时,文件资源管理器的显示应大致如下:
The primary color should be the color from your own color scheme, but I did use some hard coded colors as well, so to change those you should look into the CSS file. The making ofThe rest of this guide is less of a guide and more of a diary/report on what I did to make this 'program'. Feel free to look at the code, copy the code, reuse the code and so on. Though it would be nice if you would credit me when using (parts of) my code and presenting it to others. Plans for the futureI plan on improving this program (because I find it a usefull program with lots of potential) and will probably update this guide with newer versions of the program from time to time. I do however not plan to give (at least not a lot of) support for this program (i.e. I don't plan to go fixing bugs for other people). A heads upI ran into one bug, while making this program, that I could not reproduce: I was no longer able to write to the terminal (I could still loop through older commands and execute them, I just couldn't type any new ones). I had to restart the game to get rid of the bug, I got the bug while I was debugging some things in the debug tool, and I don't know when exactly the bug was caused. If you run into it as well, let me know, I'm still trying to find out what happened. It is however very likely that I simply did something wrong with my debugging and the bug is not caused by the script itself. What are the helper scripts I wrote a couple of helper scripts / frameworking tools: A marker based template parser A collection class for storing 'placeholder => value' pairs to use in the template parser A css gatherer / injector Marker based templatingI wrote a basic marker based template parser (marker based templates use placeholders like '###MONEY###') which supports basic loops. I'm planning to expand on it in the future to give better loop support and to also support simple if statements, but I didn't need those for my file explorer program, so I haven't put them in yet. The marker based templating means that I can easily write a html file (though the game forced me to change the file extension to '.html.txt' because it only allows '.txt', '.js' and '.ns'), which I personally find way easier to work with than building all html from javascript. Collection classI wrote the Collection class to make working with the template parser easier. It doesn't really do a lot, apart from automatically grouping placeholders into either a 'single-valued' group or a 'multi-valued' group, which is usefull for the template parsers loop system. CSS gatherer / injectorI wrote (well more rewrote, since it's a modified version of some of the code from the guide I linked at the start of this guide) a script to gather all CSS files (once again with a different extension because the game wouldn't let me use '.css' so I'm using '.css.txt' as my file extension for CSS files). This script gathers all CSS files present on the home server and turns the contents into a single string value and then injects that css into the game by adding a <style> element to the document object. Running commands from the terminalThough I haven't seperated this part into its own script (yet), it is supporting code that you would need for a lot of utility scripts. The code for this was provided in the documentation[bitburner.readthedocs.io], though I may have renamed some things. Making the file explorer script/program One day I decided it would be nice to have a GUI for browsing the files on my home server, because there are a lot of them by now (I also thought about making a project sidebar for the editor, but gave up on that idea for the time being, because it sounded a lot harder to make than a file explorer). Getting a hook into the documentWith the 'ns.alert()' function and the string "<div id='explorer-window'></div>" passed to the function as the argument, I managed to get both an overlaying window and a hook into that window. After that the window could be accessed by using: document.getElementById("explorer-window"); And to combat the ram requirement of 'document' (a whopping 25GB), I simply replaced that by: let doc = eval("document"); Making the file structureWith the help of 'ns.ls()' and some string manipulation I made a file structure. The file structure is a tree with files as leave nodes, that way I could easily print all relevant files and folders to the file-explorer while keeping irrelevant files and folders from it. Adding click event handlers to files and foldersBecause I know what classes and ids I've given the files and folders when making the template, I could easily fetch them from the DOM document with: let files = doc.getElementsByClassName("explorer-file"); let dirs = doc.getElementsByClassName("explorer-directory"); And from there I could add the event listeners to the file and folder DOM elements with a simple 'for..of' loop: for (let dir of dirs) { dir.addEventListener('dblclick', function (e) { selectedFiles = []; currentPath.push(dir.id); update(); }); } And a similar 'for..of' loop for the files. Adding buttonsThe HTML for the buttons could simply be added to the HTML-template and be given functionality by the script by looking the buttons up in the DOM document and adding event listeners: doc.getElementById("explorer-remove").addEventListener('click', function (e) { removeFiles(); }); doc.getElementById("explorer-open").addEventListener('click', function (e) { openFiles(); }); Adding the path and backlinksAdding the path with the backlinks was done a bit sloppier, because I haven't implemented a proper for loop in the template parser (a for loop with room for more than one placeholder inside of it). So the path with backlinks was added fully using javascript and then passed to the template as a whole: let currentPathText = "/<span class='explorer-back-link' data-target='0'>" + "root</span>/"; for (let index in currentPath) { currentPathText += "<span class='explorer-back-link' data-target='" + (parseInt(index) + 1) + "'>" + currentPath[index] + "</span>/"; } data.add("PATH", currentPathText); Possible additionsI've been thinking about what things to add to the file-explorer that might be usefull. To name a few: Adding a list view with file sizes Adding drag and drop file renaming (moving files to folders) Adding file renaming (and possible folder renaming, a.k.a. mass file renaming) Adding minimizing and closing buttons to the window (probably means using a log window instead of an alert window) (code) Helper scripts / frameworking tools /programs/data/collection.js/** * Collection class * A collection of data for marker based templating */ export class Collection { #data; /** * Collection constructor */ constructor() { this.#data = {}; } /** * @return {{string: string|number}} */ get single() { let single = {}; for (let item in this.#data) { if (typeof this.#data[item] !== "object") { single[item] = this.#data[item]; } } return single; } /** * @return {{string: string[]|number[]}} */ get multi() { let multi = {}; for (let item in this.#data) { if (typeof this.#data[item] === "object") { multi[item] = this.#data[item]; } } return multi; } /** * Add a key-value pair to the data * Replaces existing key if it matches new key */ add(key, value) { this.#data[key] = value; } } /programs/template/parse.jsimport { Collection } from "/programs/data/collection.js"; /** * TemplateParse class * Parser for a marker based template */ export class TemplateParser { #html; /** * @param {NS} ns * @param {string} template */ constructor(ns, template) { this.#html = ns.read(template); } /** * Parse the template for the given data * @param {Collection} data * @return {string} */ parse(data) { let html = this.#html; // Parse all single-valued data items let single = data.single; for (let placeholder in single) { let regex = new RegExp(" # # #" + placeholder + " # # #", "g"); html = html.replace(regex, single[placeholder]).trim(); } // Parse all multi-valued data items let multi = data.multi; for (let placeholder in multi) { // Build a regular expression for the placeholder let regex = new RegExp(" # # #START LOOP " + placeholder + " # # #(.*) # # #END LOOP " + placeholder + " # # #", "s"); // Get the inner template for the placeholder let innerTemplate = html.match(regex)[1]; // Build the resulting html string let htmlResult = ""; for (let value of multi[placeholder]) { let regexInner = new RegExp(" # # #" + placeholder + " # # #", "g"); htmlResult += innerTemplate.replace(regexInner, value).trim(); } // Replace the inner template for the resulting // html string in the main html template html = html.replace(regex, htmlResult); } // Return the parsed template return html; } } /css/main.js/** @param {NS} ns **/ export async function main(ns) { // Get a reference to the document let doc = eval("document"); // Build the css let css = ""; for (let cssFile of ns.ls("home", ".css.txt")) { css += ns.read(cssFile); } // Add the css to the game let styleDiv = doc.getElementById('myCustomStyles'); if (!styleDiv) { // Make a new new div styleDiv = doc.createElement("div"); styleDiv.id = 'myCustomStyles'; doc.getElementsByTagName('head')[0].appendChild(styleDiv); } styleDiv.innerHTML = "<style>" + css + "</style>"; } (code) File explorer script /programs/exe/explorer.jsimport { TemplateParser } from "/programs/template/parse.js"; import { Collection } from "/programs/data/collection.js" /** @param {NS} ns **/ export async function main(ns) { var doc = eval("document"); let template = "/programs/html/explorer.html.txt"; var parser = new TemplateParser(ns, template); var fileStructure = { dirs: {}, files: [] }; let files = ns.ls("home"); for (let file of files) { let filePath = file.split("/"); let struct = fileStructure; while (filePath.length > 0) { let part = filePath.shift(); if (part !== "") { if (filePath.length > 0) { if (struct.dirs[part] === undefined) { struct.dirs[part] = { dirs: {}, files: [] }; } struct = struct.dirs[part]; } else { struct.files.push(part); } } } } ns.alert("<div id='explorer-window' class='explorer-window'></div>"); var explorerWindow = doc.getElementById("explorer-window"); var currentPath = []; var selectedFiles = []; function runCommandInTerminal(command) { // Get the terminal input field from the DOM const terminal = doc.getElementById("terminal-input"); // Print the command to the terminal input field terminal.value = command; // Get a reference to the React event handler. const handler = Object.keys(terminal)[1]; // Perform an onChange event to set some internal values. terminal[handler].onChange({ target: terminal }); // Simulate an enter press terminal[handler].onKeyDown({ keyCode: 13, preventDefault: () => null }); } function openFiles() { let command = "nano"; for (let file of selectedFiles.values()) { command += " " + file; } runCommandInTerminal(command); } async function removeFiles() { let command = ""; for (let file of selectedFiles) { command += "rm " + file + ";"; } runCommandInTerminal(command); } function toggleSelected(file) { if (currentPath.length > 0) { file = "/" + currentPath.join("/") + "/" + file; } else { file = "/" + file; } if (selectedFiles.includes(file)) { selectedFiles.splice( selectedFiles.indexOf(file), 1 ); } else { selectedFiles.push(file); } } function update() { // Make a new data collection for template parsing let data = new Collection(); // Find the currently selected folder let struct = fileStructure; for (let part of currentPath) { struct = struct.dirs[part]; } // Add data for parsing to collection data.add("FILE", struct.files); data.add("DIR", Object.keys(struct.dirs)); let currentPathText = "/<span class='explorer-back-link' data-target='0'>" + "root</span>/"; for (let index in currentPath) { currentPathText += "<span class='explorer-back-link' data-target='" + (parseInt(index) + 1) + "'>" + currentPath[index] + "</span>/"; } data.add("PATH", currentPathText); let selectedFilesText = ""; if (selectedFiles.length > 0) { selectedFilesText = "[" + selectedFiles.join(", ") + "]"; } data.add("FILES SELECTED", selectedFilesText); // Parse the template html let html = "Something went wrong!"; try { html = parser.parse(data); } catch (e) { console.log(e); } // Update the explorer window inner html explorerWindow.innerHTML = html; // Make new listeners let dirs = doc.getElementsByClassName("explorer-directory"); for (let dir of dirs) { dir.addEventListener('dblclick', function (e) { selectedFiles = []; currentPath.push(dir.id); update(); }); } let selectedFilesTextDiv = doc.getElementById("explorer-files-selected"); let files = doc.getElementsByClassName("explorer-file"); for (let file of files) { file.addEventListener('click', function (e) { file.classList.toggle("selected"); toggleSelected(file.id); let selectedFilesText = ""; if (selectedFiles.length > 0) { selectedFilesText = "[" + selectedFiles.join(", ") + "]"; } selectedFilesTextDiv.innerHTML = selectedFilesText; }); } let backLinks = doc.getElementsByClassName("explorer-back-link"); for (let backLink of backLinks) { backLink.addEventListener('click', function (e) { currentPath.splice(backLink.dataset.target, currentPath.length); update(); }); } doc.getElementById("explorer-remove").addEventListener('click', function (e) { removeFiles(); }); doc.getElementById("explorer-open").addEventListener('click', function (e) { openFiles(); }); } update(); } (code) HTML template and CSS file /programs/html/explorer.html.txt<div class='explorer-path'>###PATH###</div> <div class='explorer-content'> ###START LOOP DIR### <div class='explorer-directory' id='###DIR###'> <svg class='primary-color explorer-dir-image' xmlns="http://www.w3.org/2000/svg" viewBox="0 0 576 512"><!-- Font Awesome Free 5.15.3 by @fontawesome - https://fontawesome.com License - https://fontawesome.com/license/free (Icons: CC BY 4.0, Fonts: SIL OFL 1.1, Code: MIT License) --><path fill="currentColor" d="M527.9 224H480v-48c0-26.5-21.5-48-48-48H272l-64-64H48C21.5 64 0 85.5 0 112v288c0 26.5 21.5 48 48 48h400c16.5 0 31.9-8.5 40.7-22.6l79.9-128c20-31.9-3-73.4-40.7-73.4zM48 118c0-3.3 2.7-6 6-6h134.1l64 64H426c3.3 0 6 2.7 6 6v42H152c-16.8 0-32.4 8.8-41.1 23.2L48 351.4zm400 282H72l77.2-128H528z"/></svg> <span class='explorer-dir-name'>###DIR###</span> </div> ###END LOOP DIR### ###START LOOP FILE### <div class='explorer-file' id='###FILE###'> <svg class='primary-color explorer-file-image' xmlns="http://www.w3.org/2000/svg" viewBox="0 0 384 512"><!-- Font Awesome Free 5.15.3 by @fontawesome - https://fontawesome.com License - https://fontawesome.com/license/free (Icons: CC BY 4.0, Fonts: SIL OFL 1.1, Code: MIT License) --><path fill="currentColor" d="M369.9 97.9L286 14C277 5 264.8-.1 252.1-.1H48C21.5 0 0 21.5 0 48v416c0 26.5 21.5 48 48 48h288c26.5 0 48-21.5 48-48V131.9c0-12.7-5.1-25-14.1-34zM332.1 128H256V51.9l76.1 76.1zM48 464V48h160v104c0 13.3 10.7 24 24 24h104v288H48z"/></svg> <span class='explorer-file-name'>###FILE###</span> </div> ###END LOOP FILE### </div> <div class='explorer-files-selected' id='explorer-files-selected'> ###FILES SELECTED### </div> <div class='explorer-buttons'> <button id='explorer-remove' class='css-18nrgbo'>remove</button> <button id='explorer-open' class='css-18nrgbo'>open files</button> </div> /programs/css/explorer.css.txt.explorer-window { width: 800px; height: 100%; white-space: normal; } .explorer-path, .explorer-files-selected { min-height: 24px; margin: 10px 0; padding: 10px; border: 1px solid currentColor; } .explorer-dir-name, .explorer-file-name { width: 100%; text-align: center; display: block; overflow: auto; max-height: 22px; text-overflow: ellipsis; white-space: nowrap; font-family: "Lucida Console", "Lucida Sans Unicode", "Fira Mono", Consolas, "Courier New", Courier, monospace, "Times New Roman"; } .explorer-directory, .explorer-file { width: calc(20% - 20px); margin: 10px; height: 160px; padding: 0; background-color: #272727; cursor: pointer; } .explorer-directory:hover, .explorer-file:hover, .explorer-directory.selected, .explorer-file.selected { border: 1px solid currentColor; width: calc(20% - 22px); height: 158px; } .explorer-dir-image, .explorer-file-image { max-width: 80px; max-height: 80px; display: block; margin-left: auto; margin-right: auto; } .explorer-content { display: flex; justify-content: start; flex-wrap: wrap; height: 440px; overflow: scroll; border: 2px solid; width: calc(100% - 4px); white-space: pre-line; } .explorer-buttons { display: flex; } .explorer-buttons button { margin-right: 7px; } .explorer-back-link:hover { text-decoration: underline; } .explorer-back-link { cursor: pointer; }