换一换
换一换 


这是一份旨在提供《超越光速》最佳玩法和技巧的综合指南。 关于本指南 本指南试图全面汇总《超越光速》中所有有助于成功的最佳玩法、技巧和策略。 除非另有说明,本指南主要针对开启高级版内容的困难模式。它假定你已基本了解《超越光速》的游戏机制——通常几小时的游戏体验便已足够。本指南一般不会详细介绍武器、船员等的具体数据。此外,本指南会提及“秘密种族”和旗舰战,如果你认为这些内容属于剧透,请谨慎阅读。本指南主要是根据我在游戏中一千、两千、三千、四千小时的游玩经验凭记忆写成的。当发现新技巧或记录被打破时,我会定期更新本指南。如果你发现有错误之处,或者希望我针对某个主题添加更多细节,请告诉我。感谢阅读,希望本指南对你有所帮助!
All screenshots are mine unless otherwise noted. General Upgrade Strategy In every encounter for the entire run, you want to base all of your decisions off of the idea that you need to maximize total number of jumps and collected scrap while minimizing hull damage. Part of this challenge is to not waste scrap by spending it on the right upgrades at the right time. The following guidelines are generally how you'll want to time your upgrades for an average run. But be flexible and use what you're given! If you find good weapons, focus a little more on those rather than defense. If you don't find much in the way of offense, look for ways to optimize your defense, so you take less damage as you deal with your enemies. Just be sure to keep a little scrap onhand for essential system/weapon purchases. Sector 1 With most ships, your first upgrade should be level two shields. This will pay for itself quickly in repair costs, and it will keep your essential systems safer. You generally won't have to buy reactor upgrades to power them - rob other systems of power till you can afford more reactor power. If you like, you can almost always find a ship that can't break level two shields - this will allow you to get experience for your pilot and engines crewmembers - possibly shields and weapons as well. This will yield 10% extra evasion. Generally, you'll want to put a little more into engines right after upgrading shields. Level 3-4 engines is a good goal. If you have a Defense Drone I, you don't have to put quite as much into engines because you won't be relying on evasion alone to avoid missile damage. After the essential upgrades, you'll want to start collecting some spare scrap. At this point, you'll find that around 65-80 scrap is a good amount to have around in case a store has something useful. Try not to save much more than that though because it could be better utilized on investing in defensive ship upgrades. Early Sectors: 2-4 This is where strategy starts to diverge based on what you've randomly been given, and what useful items you've found in stores. If you have good weapons, start putting more scrap into weapon system upgrades. If you have a decent boarding team, focus on defense and being able to take out their medbay/clone bay. If you have a Defense Drone I, put more into shields. And again, don't forget to keep some spare scrap onhand for stores. You might consider purchasing an optional system around this time to compliment your loadout. If you have a decent boarding team and some way to damage their medbay/clone bay, consider mind control. If you have only average weapons and a couple Mantis or Rockmen, consider teleporters. No good boarding crew and average weapons? Drone Control for a Defense Drone I. Cloaking is usually too expensive to buy until later sectors. And when in doubt, hacking is always useful considering the cost of the system. Only upgrade doors if your crew isn't good at fighting or if you're very short on crew. If you have a spare crewmember to man them, wait a few sectors to upgrade. Most fires and boarders can be handled with good suffocation techniques. Level two doors don't help that much, and the scrap can usually be spent on better things. I usually keep my fourth crewmember on doors at the beginning of each jump. If the other ship doesn't board, I move him to shields. Your weapons should be able to reliably deal with level two shields at the start of these sectors, and level three by the end. Late Sectors: 5-7Generally, this is more of the same. Build on what you've been given. You should try to have level three shields around sector four or a the latest five. You should have level five engines soon after that (especially if you like to use each sector to the fullest and fight the rebels at the end for that one last jump - it really helps to get you out of there in a hurry). You should also have an optional system by now. Preferably two by the end of these sectors. When your ship starts to feel powerful enough and you have the scrap to spare, you should upgrade all of your level one systems and subsystems to level two. It doesn't take that much scrap, and it will give you a bit of a damage buffer. You'll have more time to deal with fires and boarders before they destroy the system. These damage buffers are usually not essential though. Your weapons should be able to reliably deal with level three shields at the start of these sectors, and level four by the end. The Final Showdown: Sector 8 When you fight the Flagship, you should at the bare minimum have level three shields and level five engines. You should also have a couple of optional systems of some sort to make the battle easier. Your weapons should be able to reliably deal with four layers of shields. Sector Choice Profitability should generally be the driving factor when choosing a sector. Reddit user mekloz did a very thorough study about overall average sector rewards. Please check it out, but the summary is: civilian and rebel sectors have the highest rewards followed closely by Lanius and Zoltan. Uncharted sectors are definitely the worst. This was done without Long-Range Scanners though, so slug sectors are undervalued a bit if you have them. Red sectors generally have more hostile encounters. If you're low on weapons or hull, green sectors are less hazardous to your health. They'll also have more beacons with free rewards or weapons but also more empty beacons to make up for it. That said, Zoltan sectors can be as difficult as red sectors. If you have a lot of scrap to spend, or you desperately need a store for other reasons, prioritize sectors that have more stores. Engi, Slug, and Civilian sectors have the most stores.
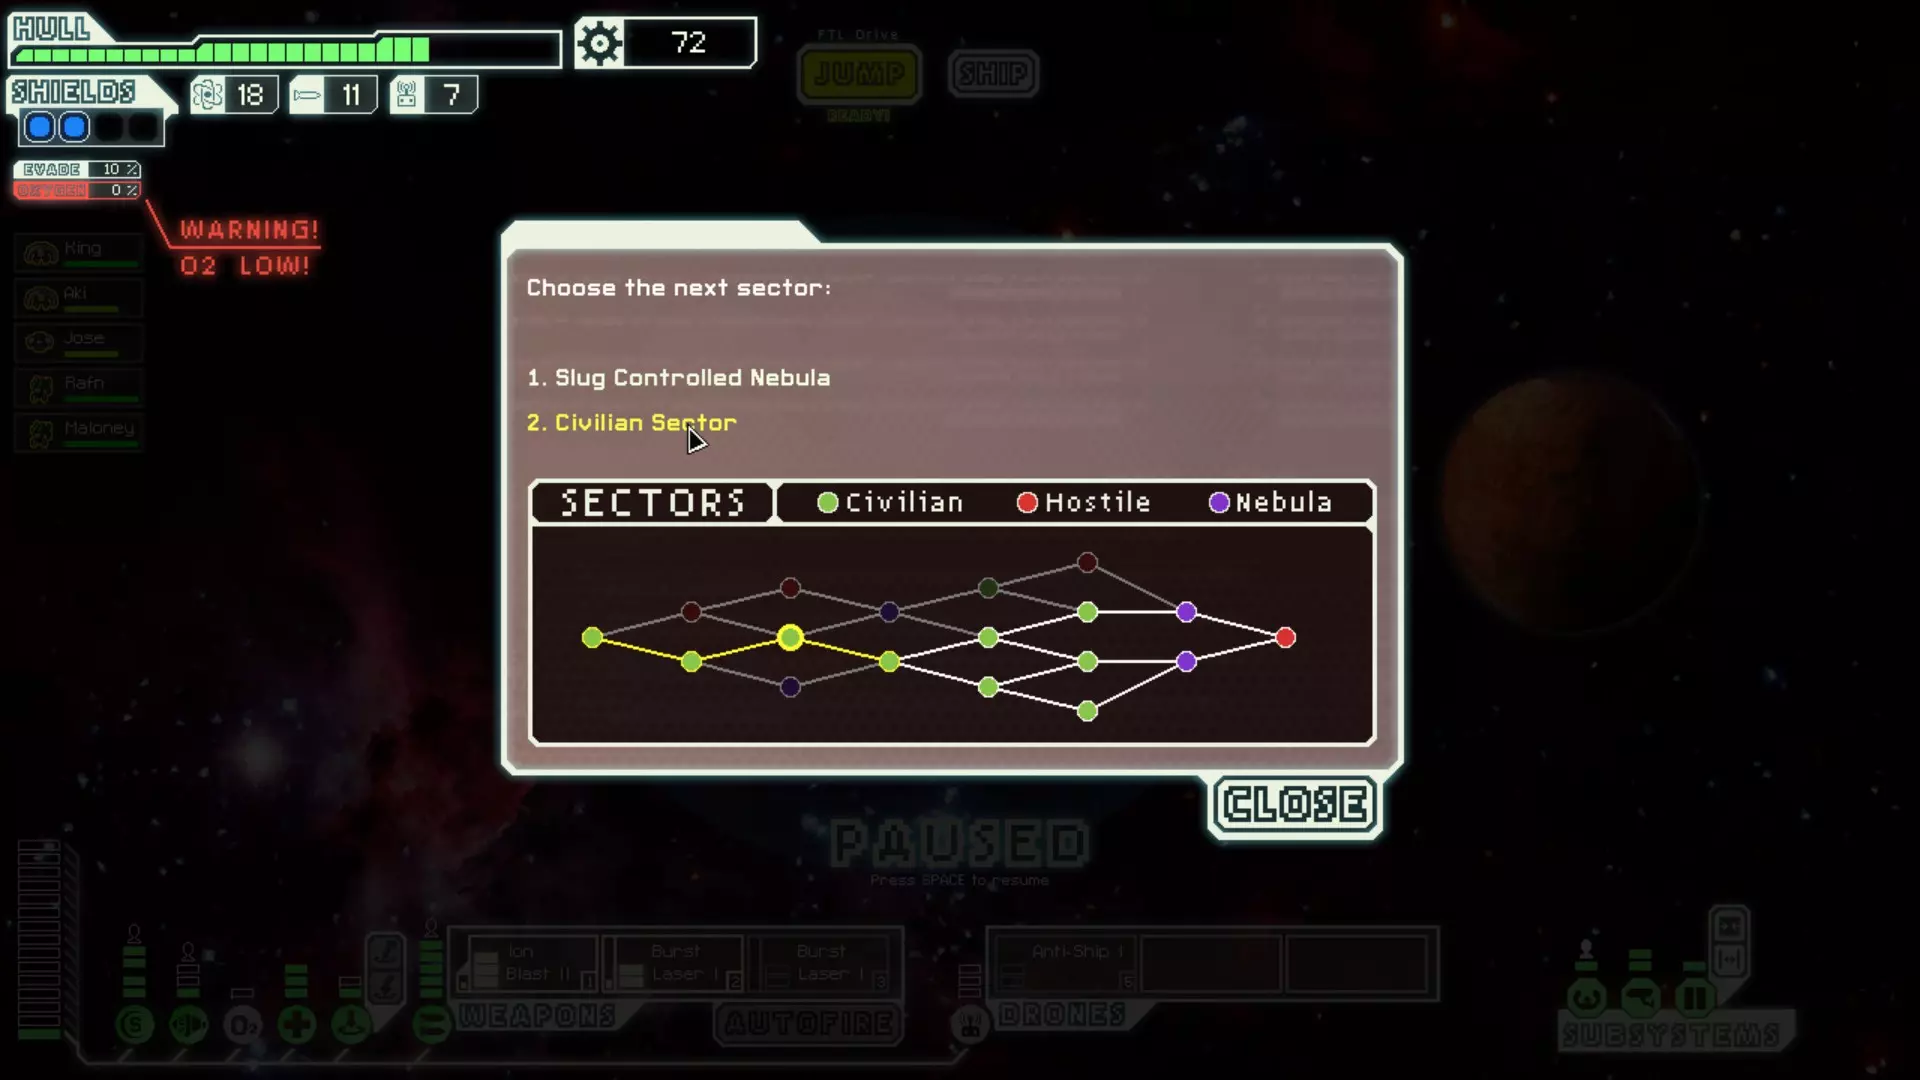
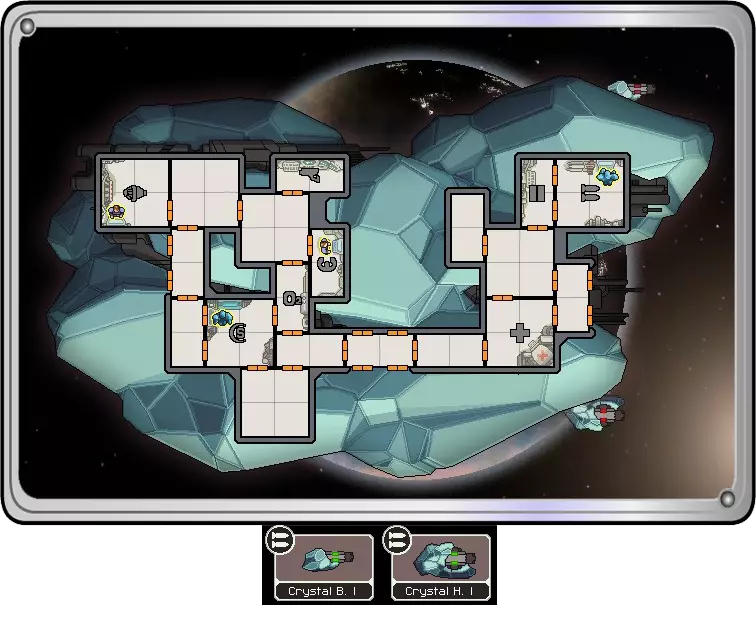
You should usually choose a homeworlds/stronghold sector over other sectors. They have a unique event with substantially higher rewards - the ship unlock quests. Know what you need for the quest before making this call. For example, the Mantis Homeworlds and Engi Homeworlds have very different requirements and rewards. If you have teleporters, upgrade your medbay/clone bay and go Mantis Homeworlds. If you don't, but have an Engi crew, go Engi Homeworlds. All this said, I never go out of my way to choose Slug Homeworlds because the ship unlock quest requires forfeiting rewards - its generally not profitable. If you have the Long-Range Scanners augment, slug sectors can be very profitable. They allow you to seek out encounters, and you get a couple of extra jumps because the nebula slows down the rebel fleet. If you have slug crew, a couple Zoltan crewmembers or a Backup Battery, you should also consider slug sectors. Those make you much more resistant to common events and ion storms. Also, when choosing your sector, look at the entire path rather than just the next sector. If one path funnels you into several other sectors that you don't like, take another path. Specific Sector Types Know the benefits and hazards of each sector and how your ship will deal with them. Rock sectors have many asteroid belts and sun encounters, so they may be hard on your ship if you're low on shields. Their ships tend to have missiles more often than your average ship. Their ship layouts are particularly susceptible to beam and flak weapons. Civilian sectors are your "generic" friendly sector. You'll encounter a fair amount of mercenaries and slavers. They'll usually have a few nebula beacons. Sector one is always a civilian sector. They have lots of stores if you need equipment. I will almost always prioritize this sector type when choosing. Slug sectors are nebula sectors with lots of dishonest slugs, ion storms, and mind control. Sensors never work in nebula. If you encounter a Slug sector beyond four or five, you should consider upgrading your oxygen to level two because they have events that hack it. Rock crew have a few fairly common blue text events in this sector type. If you have a teleporter, there is a common event that can get free crew. Slugs will often plead for their lives with an unknown reward. Most of the time this reward is less beneficial than just destroying their ship. They also have lots of stores if you need equipment. Nebula sectors are similar to Slug sectors but with less Slugs and fewer stores. These have the lowest scrap rewards. I never choose this sector type if I have an option. Zoltan sectors have lots of Super Shields, so be sure you can remove those quickly before choosing this sector. There will also be several nebula beacons in this sector. Otherwise, this is a very profitable sector choice. Engi sectors have many defense drones, so be careful if you're relying on missiles. Engi are very weak to boarding. This sector has a lot of free rewards including drones and weapons. They also have a lot of stores, so this is a great sector to choose if you're struggling. Engi crew have several beneficial blue text events in these sectors. Mantis sectors have lots of boarding events, so be careful if you have a weak crew. You should usually try to start an encounter with one of your crew manning the door system, and maybe consider upgrading doors if your crew is very weak. It may seem counter intuitive, but Mantis ships are also more susceptible to boarding. Mantis sectors have very poor scrap rewards overall. Abandoned sectors have many blue text events for your Lanius crewmember. If you're focused on boarding and you have a crew that happens to breathe oxygen, you should avoid these sectors (Crystal boarding can still be successful here if you're careful). Early (sector 2-4) abandoned sectors are usually very easy, and late abandoned sectors are usually very hard because the large Lanius ship has a lot of systems and weapons. Otherwise, this is above average with its scrap rewards. Rebel Controlled sectors are your "generic" hostile sector. They aren't particularly weak nor strong against any type of offense. They have some boarding events. There are also a fair amount of airless auto-scouts in these sectors. This is the sector type is almost as profitable as civilian sectors, but its generally a little more difficult. Pirate sectors are not a bad choice if you need crew - they have diverse crews and a good amount of slavers and distress beacons. But this sector has below average scrap rewards. You'll basically always want to go to the Crystal Sector if you have a chance. Its a full extra sector of unique dangers and rewards! Individual Sector Routing At the beginning of each sector, you need a basic plan for a route. Familiarize yourself with the sector layout, and make sure that you don't run into any dead ends. Many runs have been cut short because the sector path wasn't planned. The rebel fleet can be extremely unforgiving - especially in early sectors. Generally speaking, you'll want to plan your route so you can pass beside as many beacons as possible. You'll want to do this so you don't miss any stores or distress beacons. I usually accomplish this by generally making an "S" shape through the sector. Exploring like this is even more beneficial when you have Long-Range Scanners, so you know exactly what you're up against and what you want to avoid. You'll also want to consider "diving" into the rebel fleet. It can be very dangerous, so carefully weigh out the costs and benefits. In the first couple sectors, you'll almost never want to engage the rebel fleet. Your low evasion and very slow FTL charge rate will be working against you. In late sectors, you'll almost always want to dive. The scrap rewards are much higher, and the danger will be lower. If you have level 6 engines, or level 4-5 engines with cloaking, you can almost always make it out of those without damage. If you're planning on diving (especially if you know you're going to have more than one rebel fleet encounter), its usually a good idea to repair your ship a little higher than you normally do to give yourself a damage buffer. Note: Make sure that you have the option enabled that shows which beacons you can jump to when you hover. It will save you from a lot of nasty surprises. Races and Crew Positioning [1] Some races are better suited for certain roles because of their attributes, and others are more desirable for their blue text events. Having a good mix of races and keeping them in the right positions could mean victory. Try to get a balance of skills and abilities. If you don't have sensors, Slugs are very valuable. If your crew is mostly Engi or Zoltan, try to get a Mantis or two for protection. If you have mostly Rock crew, try to get a Slug, Engi, or Mantis to deal with issues quickly. Try to not leave yourself open to one type of threat (fires, boarders, damaged systems, etc.) Generally, you should man your systems in the following priority: Piloting, Engines, Weapons, Shields, Doors, Sensors. There are tons of exceptions to this which depend on the scenario. If you don't have weapons, obviously, you shouldn't be manning them. If you have only four crew, you may want to put your fourth crewmember on doors or sensors at the beginning of each jump till you assess the threat. If the enemy can't break your shields and has no missiles or bombs, you don't even need a pilot. And so on. There are buttons under the crew menu on the left to save your current crew positions and to return them to those positions. You should return your crew to their ideal positions before every jump. You can also change the names of your crew at any point, so feel free to name them something more convenient or memorable. Blue Text Generally, you'll want at least one Engi and one Rock crewmember. They each have several very common blue text events that have great rewards. Most other races don't have many common blue text events other than Lanius - they have a bunch of them, but they're mostly in the Abandoned sectors. Slugs have a few blue text events, but they're less common, and they're focused on nebula sectors. The rest of the races only have one or two blue text events, and they're generally not worth factoring in when you're considering what crew to get or keep. Captain Slug at the Helm Some races are better equipped to handle certain tasks than others, so who you leave to man each system could mean the victory. Humans aren't bad at anything (and they learn skills slightly faster), so when in doubt, use a Human. However, they're not good at anything either, so there are generally better options. Often, Rocks are the best pilots. They have 150 health, so they can put up with some weapons fire or hand to hand combat without needing to flee to the medbay. Also, they don't take fire damage. Slugs are excellent pilots as well because they're resistant to mind control. If you have your own mind control system, you can counter enemy mind control. In that case, there's little benefit in having a Slug pilot. Lanius are very good here because fires will be extinguished quickly, breaches aren't a threat, and boarders suffocate. Engis aren't the worst choice because they're good at repairing and putting out fires. However, they'll usually need other crew nearby to help them fend off boarders. Engines are similar in requirements to piloting, so the same crew are usually desirable. Rocks and Engis are very good here. If engines are mind controlled, you lose far less evasion than piloting, so Slugs are still useful, but not as desirable here. Zoltans are an excellent choice for engines because of the consistent source of power that they supply. Also, if your engines should be completely offline from ion damage, you'll still have one power from the Zoltan, so you'll still have a little evasion. Weapons can be safely manned by most races. Mantis aren't generally desired because their combat skills are often required elsewhere, and their repair speed is terrible. Zoltans can be good here, but be careful when you have them leave the room. If you don't have any spare reactor power, they'll remove power from your leftmost weapon, losing its charge.

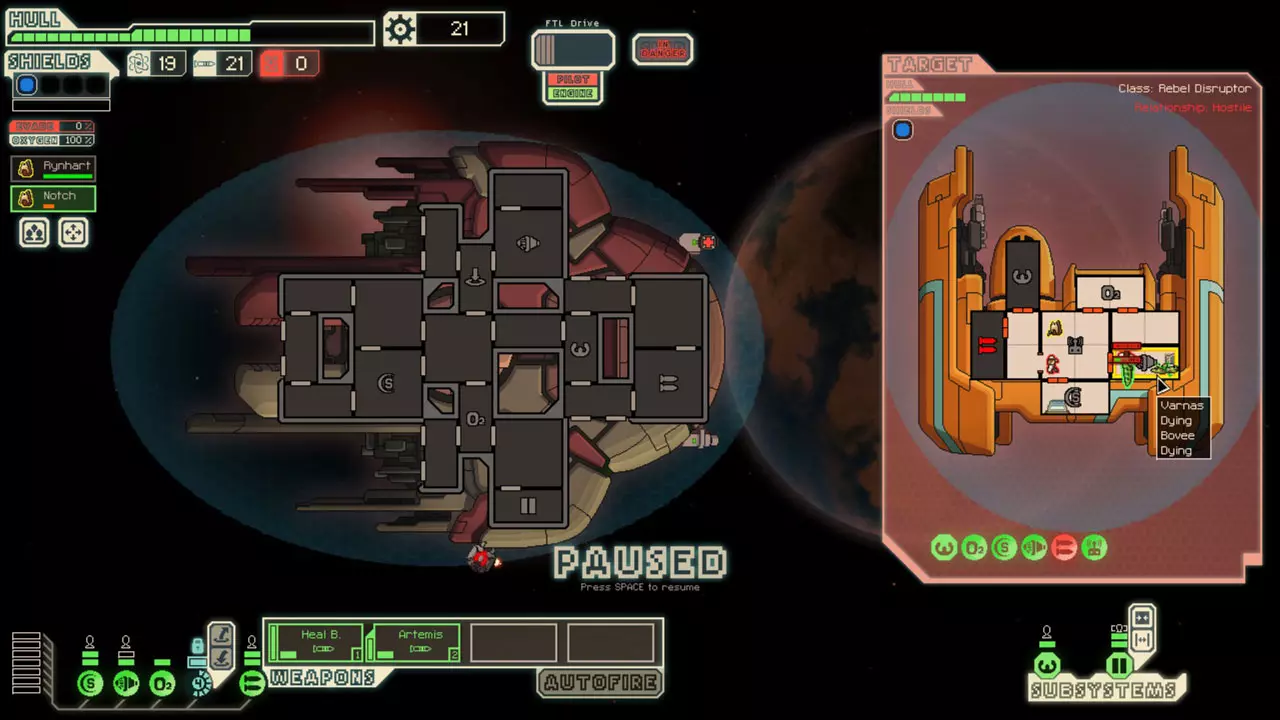
大多数种族都可以操控护盾,但工程师通常是最佳人选。护盾受损时需要尽快修复。此外,如果护盾无人操控,其作用会大打折扣,因此工程师可以跑去协助其他船员进行修复,负面影响很小。再次提醒,若让佐尔坦操控护盾需格外小心——当你没有多余的反应堆能量时移走他们,会失去一层护盾。不过,若有多名佐尔坦在护盾室,你的护盾将具备离子抗性。两名佐尔坦可提供一层不会被离子消除的护盾,四名佐尔坦则可提供两层。(见截图)如果你有多余的佐尔坦人,并且他们在房间里来回走动,理论上可以拥有三层甚至四层离子抗性护盾,但这几乎不具备实际操作性。 舱门可以由任何方便的种族成员操控。通常,我会安排我所说的“漫游工程师”负责舱门。他是第一个会紧急处理舱室破裂或系统损坏的人。我选择工程师是因为舱门是应对登船者的有效手段,而工程师自身对抗登船者的能力较弱。 传感器也可以由任何方便的种族成员操控。但如果我有多余的螳螂人,他通常会负责这个位置。有时候你只需要窥视一下敌方舰船内部。工程师可以维持舱门控制,同时螳螂人负责应对登船威胁。将螳螂人作为初始位置留在传感器室可以实现这一点。 非系统房间的人员配置考量: 任何额外船员都应根据其他船员配置的弱点安排在空房间中。如果你的飞船某区域船员实力较弱,可在附近空房间安排一名螳螂人。如果你的行动迟缓的岩晶人集中在飞船另一区域负责系统,可在附近安排行动更快的船员协助维修。 船员应安排在空房间以分散伤害。例如,若一枚破甲导弹击中某个房间,导致其中两名工程师受伤并引发火灾,他们很快都需要撤离进行治疗。但如果有一名工程师在附近且未受伤害,他就能轻松灭火,因为他初始状态是满血。拉尼厄斯族和岩石族船员也擅长在特定船只的孤立区域作业,比如联邦A舰和C舰的前部武器舱,或是螳螂C舰的引擎室。拉尼厄斯族尤其适合这些孤立区域,因为其他船员无需穿过这些无气房间。 在长时间战斗中,你的船员通常会受到不小的伤害。根据威胁情况,你可能需要在船员受伤后立即将其轮换出来治疗——对于佐尔坦族船员,你肯定要这么做。绝不能让生命值较低的船员留在岗位上,因为
有许多伤害来源往往无法完全规避。 永远不要让船员默认待在医疗室。如果不够小心,黑客入侵可能会迅速杀死他们。 附近的截图展示了一些实际可行的船员站位。拉尼厄斯族炮手独自待在飞船的前部。岩石族飞行员无需离开自己的岗位。螳螂族船员刚刚参与过战斗,但他正在操控舱门,因为登船的敌人正在窒息,而四名空闲船员即将赶回引擎室进行快速维修。在此期间,这些船员会轮流前往医疗室以保持较高的生命值。种族与船员配置[2] 船员招募与奴隶贩子 通常,你应尝试招募至少五到六名船员,理想情况下当然是八名满员。除非船员数量严重不足,或者你想招募一名engi(因其实用性和众多蓝色文本事件),否则通常不应从商店购买船员。如果你正在进行登船作战,且拥有一支不错的登船队伍,那么几乎无需担心船员招募问题,因为通过标准登船奖励通常会随机获得数名船员。如果最终决定购买船员,务必先查看他们的技能。 奴隶贩子是获取船员的重要来源,尤其是早期星区的奴隶贩子。在这些星区,一名船员是相对有价值的奖励。摧毁飞船可能只能获得20单位废料,但他们可能会提供一名价值50单位废料的免费船员。所以如果你船员不足,或者该船员能弥补你的短板(战斗或蓝色技能),你应该考虑接受。话虽如此,如果你在战斗中击杀了敌方船员,无论如何都有很大几率获得一名奴隶。到了游戏后期,奴隶船员奖励的相对价值会低很多。很多时候,摧毁飞船获得的废料价值至少和获得奴隶相当。如果你船员已满或接近满员,并且他们提供的船员种族你已经拥有,那么你可能需要拒绝这个免费奴隶的提议。 获得并留住船员的一个好方法是将医疗室升级到二级。有几个蓝色文本事件可以让你获得免费船员,还有一些事件能让你在不冒船员生命危险的情况下利用局势。大多数能拯救生命的克隆舱事件在克隆舱等级为1时就能触发。 一如既往,要清楚哪些事件对船员生命安全,哪些不安全。 修理 大多数情况下,你需要尽快修理系统、修复破损和扑灭火灾。火灾尤其危险,因为它们会蔓延并损坏系统,但通常应该通过通风来处理。你需要优先修理关键系统,通常从驾驶或护盾开始,引擎和武器紧随其后。 但很多时候,你可以将修理工作留到遭遇战结束后再进行。如果无系统的房间被击破,无需优先处理。如果传感器或舱门受损,也可以稍后再修。只要敌人没有向你发射导弹,无人机控制台就不是必需的。有时,你甚至应该延迟修理氧气室,以保持较高的闪避率。 部分系统修理会在最后一名船员离开房间时重置。修理缺氧房间时,有时需要将船员轮换到医疗室。舱室破裂会逐步修复,因此无需担心船员轮换问题。 如果必须修理已通风的房间,请使用拉尼厄斯族船员。 登船与徒手战斗[1] 如果有机会,你应该进行登船作战。当你通过任何方式消灭敌方船员后,发现随机船员、武器、强化装置或无人机的概率会大幅提升。 通用的登船策略是尽可能利用人数优势作战,并且在敌方船员进入医疗室时立即对其医疗室造成伤害或摧毁它。如果敌方有克隆舱,务必在他们重生前将其摧毁。 水晶人、螳螂人和岩石人是最适合登船作战的种族。如果你有两名兰尼乌斯人协同作战,他们的效果至少能与螳螂人相当。出于明显的原因,不建议将兰尼乌斯人与非兰尼乌斯登船者混合使用。接下来是蛞蝓人(因为他们对心灵控制有抗性),然后是人类。 如果你拥有较高等级的克隆舱和多名佐尔坦人,佐尔坦炸弹策略也是可行的。当它们死亡时,会对房间内所有敌人造成15点伤害。 工程师通常只应在需要将其用作伤害吸收体以保护其他登船船员时才进行登船。
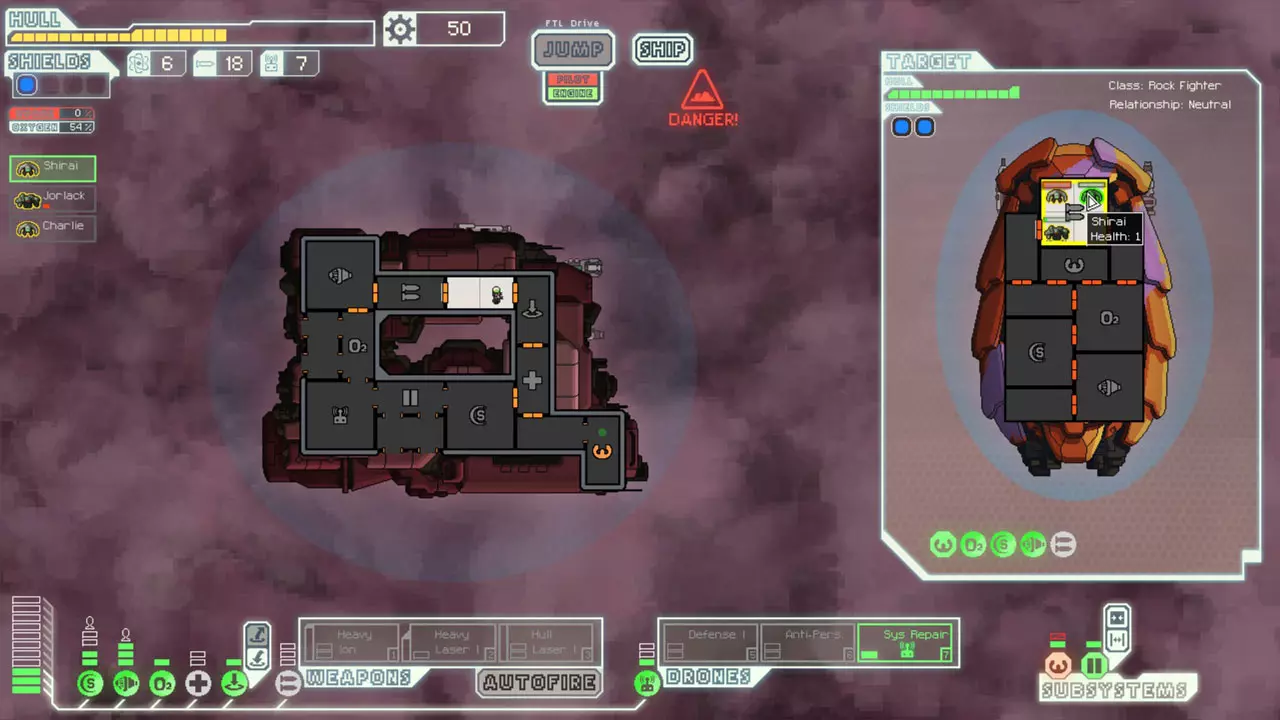
二级传送器的速度足以应对几乎所有登船情况。它们还有一个不错的蓝色文本选项,能在奴隶贩子事件中为你获得一名免费船员。不过,凭借良好的策略,一级传送器也能让你使用很长一段时间。 当你对登船作战非常熟练后,你会确切地知道如何指挥登船船员,以及他们能承受多少伤害。右侧截图中的工程师每人只有1点生命值。 船员在每个房间都有填充顺序,依次为左上、右上、左下、右下。只有当某个系统需要人员操控时,这个顺序才会改变。系统岗位会优先被占据,之后才会按照正常的填充顺序进行。 你可以利用这一知识进行“船员调度”。如果一个房间内有多名船员,你可以让他们在不离开房间的情况下调换位置。只需暂停游戏,选择你想要调换位置的船员,让他们移出房间(不要取消暂停),然后根据填充顺序的规则,逐个将他们移回房间。 你可以在战斗中利用这一点。你可以选择让哪个船员承受敌人的伤害以及对哪个敌人造成伤害。例如,如果你有一名螳螂族船员和一名人族船员,正在与一名螳螂族敌人和一名engi(工程师)敌人战斗,当对方的螳螂族敌人快要打死你的船员时,你不必逃跑。只需在战斗进行到一半左右时交换对手即可。 医疗室 - 站立空间有限
Sometimes you'll find yourself in a situation where more than three of your crewmembers are low on health and need to be healed. You can actually heal them all at the same time because medbays heal everyone in the room even if they're just walking through. There's no limit to the number of crew that can receive healing, so pause and micromanage their paths so that they all receive the healing they need. Note: This doesn't really work on Stealth B because its medbay only has one entrance. If you're really in a pinch, you can probably get three crew in there continually, but it doesn't work well. Crystal Boarding Crystal are by far the best boarders. Their higher health and lockdown ability allow them to win any fight. Depending on the situation, you'll want to use lockdown at one of two times: Either when you initially teleport into the room (to kill the first crewmember quickly or damage a system), or when the opponent is leaving the room to heal. If you're fighting against a Mantis or Rockman, you should use lockdown when you initially beam into the room - its dangerous to fight two of those at the same time. You'll be able to kill the Mantis before the lockdown wears off and either take on another enemy or flee. The Rockman may survive a single lockdown. If you're fighting against lesser enemies (Humans, Slugs, Engi, or Zoltan), you can fight two at a time, and wait till they're about to leave before locking down the room. You should be able to finish off two with a single lockdown using this technique. If the enemy crewmember about to flee isn't standing beside the door that he will be fleeing toward, you can wait till he starts moving toward the door before locking down. Doing this, he won't be doing damage to your crew but to the sealed door instead. When you activate lockdown, the effects are instant. Any crewmember that's not on the way through a door will be locked into the room for the duration of the lockdown. A crewmember counts as being on the way through a door if he is past the center of the tile next to the door. Crystals are also the only crew that can safely board Lanius ships. Be sure to fight them one at a time, and switch your crewmembers' places when the opponent has half health to even out your damage. You can also use lockdown in one room of a ship to block off access to other rooms. This is especially important to utilize on ships that only have two tile rooms. If you don't have Crystal crewmembers, Lockdown Bombs can be used for the same effect. Unfortunately, they're not nearly as good for several reasons: You can't time them as easily, they can miss, and they use missiles. Four Person Teleporters Only a few ships have a four person teleporter. Generally, it just allows you to handle situations more quickly and easily than you otherwise would be able to. But it also has a couple of unique opportunities and pitfalls. One of the room layouts for the Slug Interceptor has the oxygen and engine systems isolated from the rest of the ship. It has been lovingly dubbed the "Flying Coffin" by some of the community for good reason. When Advanced Edition was released, the two enemy Slugs were moved so that if you were boarding with a standard teleporter, you couldn't kill them both at once. However, with a four person teleporter, you can. If you board the engine room on the lower-right, two crewmembers will appear in the two-person room, but the other two will appear in the main body of the ship. You can kill both at the same time for a much faster and safer encounter. One of the few pitfalls of a four person teleporter are the few ships that don't have any four tile rooms. If you beam into these ships, you will have to be careful about retrieving your crew. But with good timing, your teleporter can still retrieve all four crewmembers if they're all in one room. If you happen to have a four person teleporter and crystal crewmembers (i.e. Crystal B), you have unique boarding opportunities. The best boarding team is 2-3 crystal with the rest being Mantis. Its debatable which combination is better, but I generally prefer three crystal crew, so you have more control over enemy movement. If you have this setup, you can board and lockdown enemy weapon rooms to completely destroy their weapons early on in the fight. This technique obviously works much better when boarding four-person weapon rooms. It will buy a lot of time for you to deal with rest of the crew. Boarding and Hand to Hand Combat [2] Kiting and Doors On most ships, you only have a two person teleporter to work with. Unfortunately, this leads to a lot of situations where you can't quickly and easily kill the enemy crew. Often, it would be better to board with four crewmembers at the same time. With some practice, you can do this with a two person teleporter. If you have four crewmembers you can spare to board, you can send over two at a time. The first two you send over should immediately begin running around the enemy ship randomly to avoid damage from attackers. This is called "kiting". This will also pull enemy crew away from their stations, giving you slight advantages. You'll usually be outrunning your enemies, because they'll keep trying to move into the rooms to attack you rather than directly chasing you. Which crewmembers you send over first depends on the situation. They will take damage. If you're good at kiting, they should only take 10-15 damage before help arrives. You could send over Mantis first because they're slightly faster and they can avoid a little more damage than the rest. You may want to send over Rockmen because they have health to spare, but they'll take a lot more damage in the process. You may want to send over slightly more disposable crew first because they'll be in greater danger. If your first two take too much damage to safely finish the battle, just recall them for healing. You can retrieve all four of your boarding crew at the same time even if you only have a two tile teleporter room. The main goal of sending over four crew at the same time is to fight with a numbers advantage, overwhelm, and eventually destroy their medbay. Unless they have a level three medbay, you should definitely score a kill or two the first time you send over multiple sets of boarders. The following times you send over boarders, you should focus on destroying the medbay. You can do this by luring the enemy into another room like the shield room while another set of boarders attack the medbay. If you have Engi crew, you can have them attack the enemy crew to give you more time to disable the medbay. The fight should be easy after its down. This boarding technique is viable with even level one teleporters in most situations, but its much safer with level two teleporters. Usually level three teleporters aren't necessary. The above boarding technique only works when you can move freely between rooms. If the enemy has level two or even three doors, you can still make this work. Whenever your boarders break down doors, the enemy AI never closes them. You can use this to open a path of doors around the ship before you start attacking crew. Once the path is open, you can safely kite damage and board freely. This technique is especially useful in certain rare situations when fighting the flagship. Unfortunately, this technique requires a lot of time, and it should only be used if the enemy weapons aren't a threat. Knowing your enemy A primary consideration on how to board a vessel is how many crew they have and their race composition. If you're not in a nebula and you have any sensors, this is trivial. If you have level one sensors, briefly man them to see in their ship (or the person that normally mans shields could be stationed on sensors initially, then moved to shields after you take a peek into their ship). With most ships, you can tell what kind of crew they have just by their type. And you can tell roughly how many crew they have by what sector you're in. Early sectors will only have two to three crew, but later sectors could have up to six (more if you're boarded by an event and they have a clone bay). Most ships are manned solely by the race of their manufacturer. Zoltan ships are manned by Zoltans. Rock ships are manned by Rockmen, Etc. However, Mantis ships usually have one Engi around for repairs. There are a couple of exceptions from this rule: events, and pirate ships. The crew types from events are spelled out in the event text (Mantis that have taken over Engi ships, rebels that have stolen mantis ships). But pirate ships have random crew types. If the enemy is moving from room to room, pay attention to the duration that doors stay open. If a door is open for a long time, its Rock. You can also use this to tell the difference between Lanius, Mantis, and the rest if you're paying close enough attention. Doors are open slightly less time for Mantis and slightly more for Lanius. Paying close attention to the timing of sounds, system damage, and crew movement will also allow you to know what your enemy is doing as the battle progresses. Listen to what rooms are breached when you hit them. If the enemy crew is low on health, they may not be able to repair the breach before fleeing the room. Watch system damage and door movement as the enemy crew moves around because of a fire. This knowledge can let you know how to handle the battle and where to send another Fire Bomb or laser blast to finish off their crew. Venting If you have someone manning doors, or if you have level two or three door control, you have a great deal of control over boarders. To vent rooms faster, open as many exterior and interior doors as possible leading to the boarders. Breaches and Lanius cremembers work the same way, but they don't vent nearly as fast as an exterior airlock. Also, shutting off oxygen for a few seconds would speed things up. You'll often want to try to herd the boarders toward your medbay, so you can fight on your own terms. If they're nowhere near the medbay, you can wait till their room is vented, then send one of your crew at a time to fight them. They'll be taking suffocation damage, and they'll be forced to fight your crew before escaping. This is the fastest way to deal with boarders if you need to try to kill them before their teleporter cools down. Engi are great for this task because they're not terribly useful for their hand to hand combat damage in the first place. If you're fighting in an airless room, you have decent doors, and you don't have a lot of crew health to spare, you can quickly move your crew in and out of the airless room. The boarders will be forced to confront your crew when he is in the room and will switch to attacking the door when he leaves. If you do this quickly enough, the boarders will spend most of their time walking back and forth. They will eventually break down the door but at a great cost to their health and very little to yours. Be careful if boarders are attacking your oxygen or doors. If they're attacking doors, make sure you close your doors before they're destroyed. If they're attacking oxygen and you expect that you can't stop them in time, you probably won't want to vent at all. The more doors you have opened, the faster the oxygen level changes. If you need to quickly fill a section of your ship with oxygen, open all interior doors that you can which aren't leading to Lanius or breaches. If possible, pre-vent rooms that boarders are attempting to enter. Also, you can allow oxygen to flow back into rooms that you've previously forced boarders from. The already-low O2 levels will allow you to juggle boarders back and forth between rooms not causing system damage to any of them. If you have an Anti-Personnel drone or a Crystal crewmember, make sure the room is vented during the fight. Other boarders are more affected by lack of oxygen than they are. And if you're boarded by Lanius, you'll want to keep your ship's airflow high - open doors and increase power to O2. If you're severely outnumbered or outgunned and you don't believe you have a chance of fending off the boarders by any other means, vent your entire ship and put your crew in the medbay. You'll get rid of the boarders in a hurry. You could also leave one room on the opposite side of the ship with oxygen to force them to move - this will also prevent them from doing one or two system damage as they suffocate. Boarding and Hand to Hand Combat [3] Overwhelming the Enemy Medbay There are certain boarding situations that will force you to fight in the enemy medbay. This is sometimes feasible. If you expect that you'll have to fight in the enemy medbay, pay close attention to the speed at which the opponents heal (if you happen to only have level one sensors, briefly move a crewmember to man the sensors to observe him healing). With practice, you'll be able to tell the difference between a level one and level two medbay. Level three medbays heal at a ridiculous rate, so they'll be easy to identify. Most ships won't have level three medbays. Before you engage enemies in the medbay, make sure that they're damaged as much as possible - never take on crew starting with high health in their medbay. If your opponent has a level one medbay, mantis can easily outdamage the medbay. Unskiled humans damage slightly slower than the medbay, but fully skilled humans damage at roughly the same rate. You can easily win against a single opponent with a two person, non-Engi boarding crew. If your opponent has a level two medbay, 2v1 teams can still outdamage the medbay. A fully skilled Mantis deals damage at roughly the same rate that it heals. Because damage is random, you'll sometimes be able to kill them but it may take several attempts. This can be time consuming, so only attempt if you're not in danger from the enemy weapons. If your opponent has a level three medbay, don't bother. You might be able to outdamage them if you're fighting them 4v1, but its essentially never feasible. You'll be forced to damage or hack it if you want to kill the crew. Boarding Auto-Scouts In some situations, its necessary to board auto-scouts which have no air. This can be dangerous for obvious reasons, but it can still work. This may be necessary if your ship doesn't have the firepower to break the scouts shields, if their evasion is high, or if they have particularly menacing weapons or drones. Obviously the Emergency Respirators augmentation will help greatly. Level one teleporters can safely take Crystal crew back and forth. They can also just barely transport Rock crew. Level two teleporters can transport everything but Zoltans. Most species will have 9-10 health left. Level three teleporters can safely transport all crew to and from airless auto-scouts. Be careful when doing this! If your teleporter is damaged at the wrong time, you will lose your crew. Unfortunately, its sometimes necessary to take the risk. Take a quick assessment of their weapons and your defenses. Only board if you think its worth the risk. Whether or not to board is highly situational - you'll have to make the decision from your own experience. Of course, if you have a clone bay, don't worry about bringing your crew back. If the enemy has threatening weapons, board their weapon room first to protect your clones' lives. If necessary, you can destroy the scout entirely with boarding damage. Medbay vs. Clone Bay There's a bit of a debate as to which is better, but generally they're close enough that its not worth buying the other to replace what your ship comes with. If you're using Slug B, you'll usually just end up getting what the first store has in stock. When it comes to events, clone bays are probably slightly better than medbays. Level one clone bay definitely has better events than a level one medbay. But when comparing them at level two, its a toss up. Keep in mind that clone bays don't have many blue text events, but they allow you to safely recover from bad outcomes from other events (I'm looking at you, giant alien spiders). The medbay is superior when your ship is boarded.You have more control over your crewmembers' health, and their lives aren't in immediate danger if a stray missile hits the wrong room. Rotate your crew out for healing in the medbay, and watch for incoming missiles or bombs. If one is about to impact the room that your low health crewmember is walking into, turn him around.
If you have a clone bay and you are relying on boarding, you should consider the DNA Backup augment. If you don't, you'll have to be much more cautious about stray missiles destroying the clone bay at the wrong time. (See Screenshot) Also, the Reconstructive Teleport augment is extremely useful. Your crew won't be dying all the time, so they won't have the skill penalty. Its even more helpful when using lanius boarders. With normal crewmembers, after each battle, you can send them to the "medical airlock", so they can get healed. Not so with Lanius - Reconstructive Teleport works very well instead. Personally, I prefer the medbay for a couple of reasons. Your crew never dies, so you don't have to worry about the room being taken offline at the wrong time killing everyone. Also, your crew keeps a 20% combat skill bonus. Its often hard to maintain even the level one skill bonus when using the clone bay. If you're careful with your crew and understand the risks to their lives in any given situation, you should almost never lose a crewmember when using the medbay. Boarding and Hand to Hand Combat [4] Miscellaneous Boarding Info Be aware of what systems enemies will prioritize when they need to be manned or repaired. This knowledge will help a lot in knowing what room to board first and what room will make the enemies scramble to repair. Piloting will always be manned first, followed by engines, weapons, and shields (this order changes in lower difficulties). Enemies repair shields with the highest priority followed closely by oxygen and weapons. If you only have a two person boarding team you generally shouldn't beam into a four tile room. This will give the enemy a chance to outnumber you, and you won't have as much control over the damage each crewmember will receive because they may be attacking random targets from across the room. Be careful when boarding enemies with Anti-Personnel Drones. They have a lot of health. Sometimes it may be beneficial to you because they move slowly - you can get a fair amount of damage on one crew member before they arrive. When it does arrive, you can always run to another room and briefly have the numbers advantage again. Sometimes, you may be required to repeatedly destroy drones to exhaust them of their drone parts in order to execute your boarding strategy. This is much easier if they have System Repair Drones to kill quickly or defense/boarding drones which can be shot down. Don't forget that enemy crew can't teleport away if you're cloaked. If you really need to finish off a couple of their crew, cloak before they hit about 20% health. On the other hand, you can't teleport to or from an enemy ship while they're cloaked, so be careful. Make sure you either have good timing with the teleporters, or that they have level one doors so that you can move freely to kite damage. If you have a level one teleporter and they have cloaking, the cooldown is the same. That means that if you beam over as soon as they uncloak, you'll be stranded on their ship as it cloaks again for five, ten, or fifteen seconds. Know the duration of their cloak, and wait for awhile after they uncloak so that you can retrieve your crew while the ship is uncloaked. Level two and three teleporters can safely board and retrieve crew during a single cloak cooldown. Sometimes if an enemy ship is particularly powerful and you know you must flee, you may want to send over boarders just as a distraction. Make them run room to room to remove system manning bonuses. This could save you some damage and allow you to deal some damage to their weapons. Just make sure that you have time to safely retrieve your crew before you jump. Be careful that enemy ships don't jump away with your boarding team. You can use your boarders to lure the crew away from piloting to increase the time it takes to jump. If the enemy is fleeing, the safest way to ensure they won't jump away with your crew is to disable piloting, then board it before its repaired. Also, be careful of one Mantis event that has an extremely short jump timer triggered by hull damage. If you have a Fire Bomb (or some other way to reliably ignite their ship) and Rock crewmembers, you should set their medbay on fire and beam them into it. You can wait a few seconds before teleporting in, so the room has some time to take damage while your crew isn't. Just make sure you beam in before they put out the fire. Waiting before beaming your Rockmen in is especially useful on ships with four-person medbays. If the enemy has particularly dangerous weapons, set that room on fire and fight in there first. Make sure that you don't Fire Bomb the room when your crew are in there, so they don't receive the 30 damage from the initial explosion. If you're boarding a ship with a clone bay, the battle will usually be much easier. The first time you send crew over, you should attempt to do as much damage as possible without killing crew. This will make your second boarding mission much easier. Keep in mind that hand to hand combat damage is slightly random. Even if your Human may have a level in combat, its not guaranteed that he will win an even fight. There is also a small margin of time after you teleport away where your crew can still take damage. Unless you like teleporting corpses, pay very close attention to the health of your crew. In certain scenarios, you may be forced to use your weapons to finish off the enemy crew. Even if they have a level three medbay, you can still kill fleeing crew with weapons. Bombs are the best option because they can't be shot down with drones, and they don't cause hull damage. Missiles are nearly as good, but they'll work in a pinch. You can even use beams or lasers for this if you time them well. Just keep in mind that, unless otherwise specified, for every one system damage a weapon does, it deals 15 damage to crew. Generally, you'll need weapons that deal two damage to kill fleeing crew. A fairly advanced and situational technique requires you to synchronize the deaths of your Zoltans. This is most useful if the enemy ship has a medbay, and you have no good way to deal with it. If you have 2 or more Zoltans, move them around within a room to try to make sure they take damage at even rates and die at the same time. If you can do this, the enemy crew will take damage too quickly and die before they can flee to the medbay. If you're about to retrieve your boarding crew after the battle, make sure there's no incoming missiles or other damage that could potentially kill your crew before they can be healed.
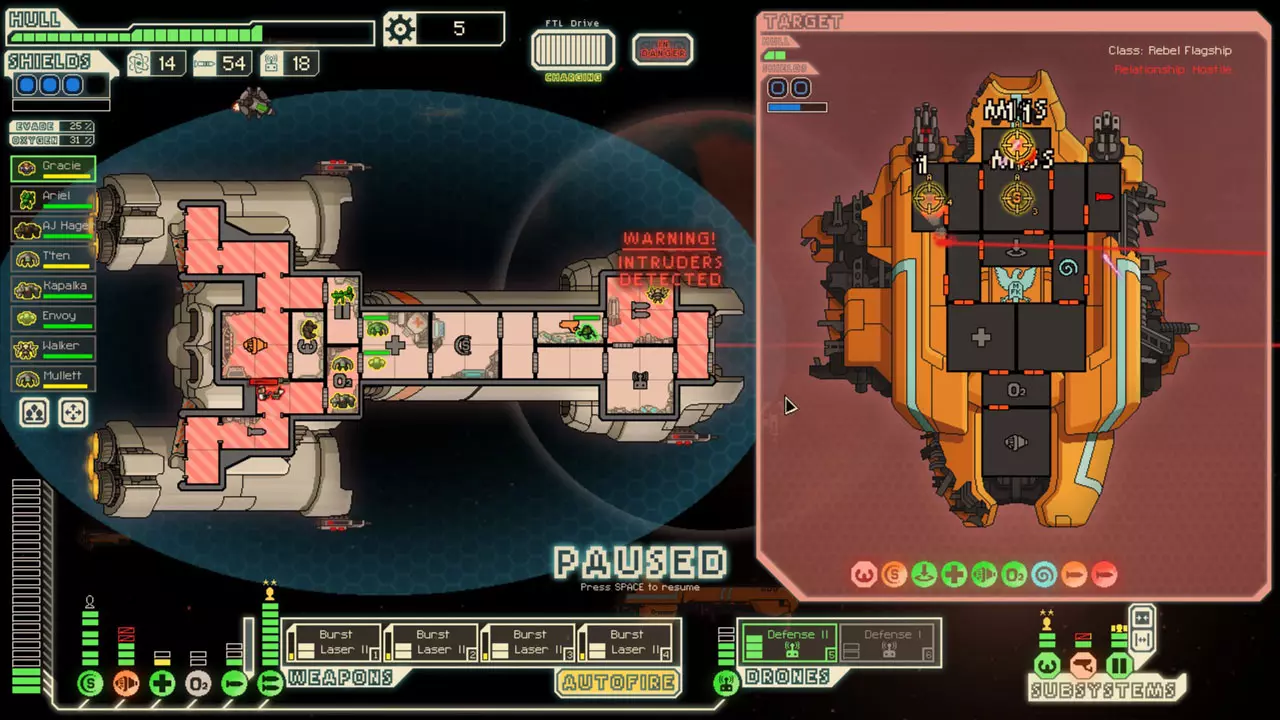
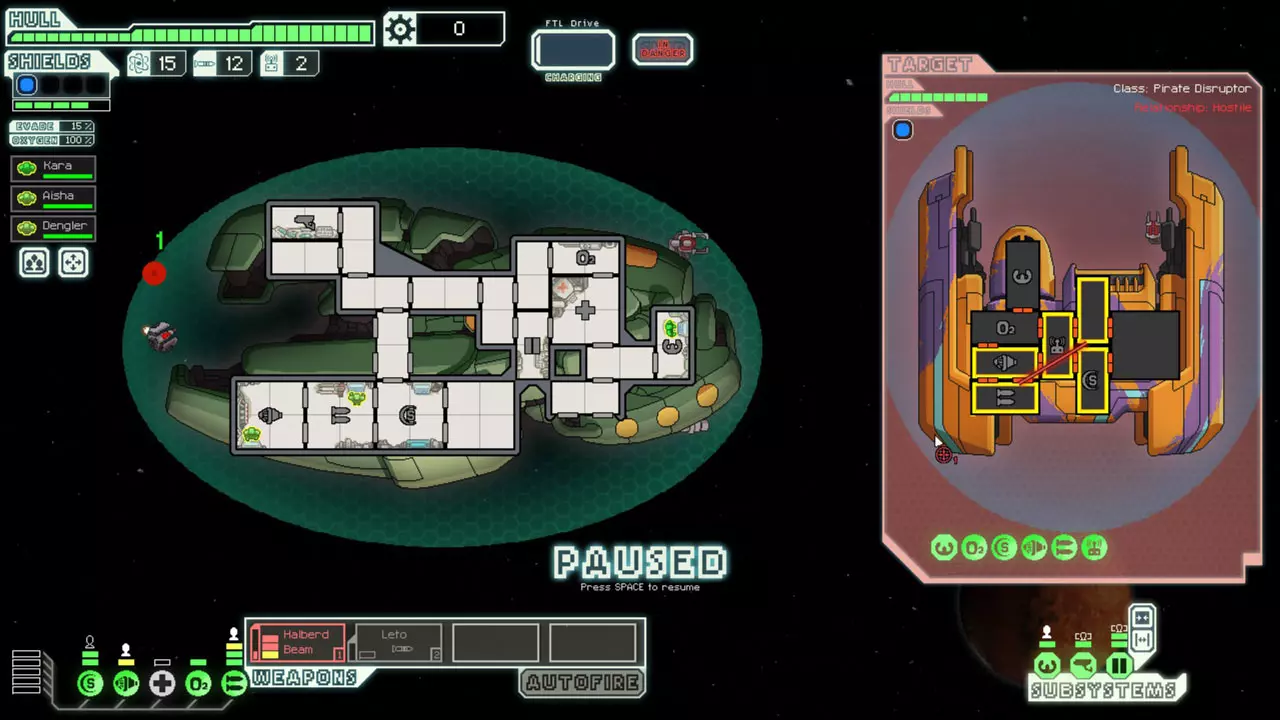
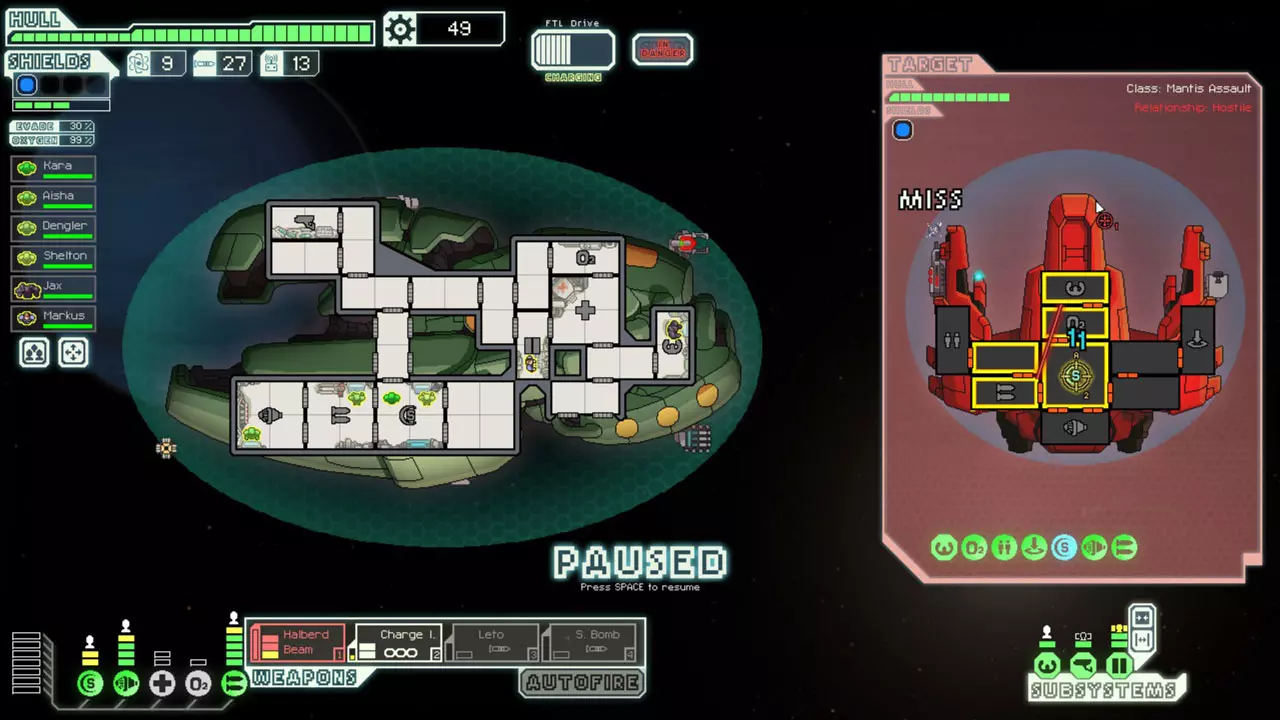
If you have enough ion power, you can disable their medbay or clone bay to prevent healing or respawning. All races and skill levels deal damage at the same rate to systems. That means that an unskilled Engi can damage an enemy system as fast as a fully leveled Mantis. And yes, its somehow possible for a fistfight to end in a tie. (See Screenshot) Power Management You never need to have all systems fully powered. If you're not actively using a system, it doesn't need to be powered. Good power management can free up scrap to allow you to buy or upgrade things long before you otherwise could. Systems Powering Preferences You'll want to do your best to have shields fully powered and recharged at the beginning of each jump. This is because you'll sometimes jump into an asteroid field or a ship with Combat Drones. If your shields are down, asteroids could keep them down long enough for the enemy's weapons to deal damage. The same can be said about Combat Drones. A Combat Drone II might even score a hit before your shields come up. If you assess the enemy ship and determine that you don't need to have your shields fully powered, remove that power from the shields to use elsewhere. Aside from this, the only other time its safe to rob shields of their power is when your shields have recently been hit, and you still need to dodge some lasers. For example, lets assume you have level three shields, level six engines, and you're in an ion storm so you have half reactor power. Lets say the enemy has a Burst Laser III. You have enough power to fully power shields, but only two power into engines. If the first laser hits your shields, reroute two power (from the layer of shields that just went down) to engines. And the next time that a laser hits, reroute two more power from shields to engines. You can substantially increase your evasion during a volley with this technique and save a lot of hull damage. How you want to handle weapon system upgrades and powering depends completely on your entire loadout. If you have strong boarding, you'll only need minimal weapon power to support the boarders. If you have a Weapon Pre-Igniter, you'll probably want to put a lot more into weapon system upgrades and make sure they're fully powered before each jump. Sometimes, you'll have two weapon "sets" to choose from, and they don't both require power simultaneously. Consider the following loadout: Fire Beam, Burst Laser II, Ion Blast I, Ion Blast I. If you have this fairly early on, you really only need four weapon power to be effective. Generally, you'll either want to destroy the ship or kill the crew. If you're killing the crew, the Burst Laser II isn't required (however, it can definitely be helpful, so you'll want to purchase those system upgrades eventually). Engines are one of the first systems I rob to use power elsewhere unless I'm trying to flee. Its always a good idea to have one or maybe two levels of engine more than what you can power. You only need engine power for dodging, and engines need no time at all to adapt to the new power. Its easy to quickly steal power from oxygen or another system to attempt to dodge a missile or laser volley. Generally, you don't need to have a reactor power solely for the oxygen room - just borrow it from engines whenever you don't need the evasion. If you have a defense drone, you don't need to have enough power exclusively for the system to run it continuously. Power up the drone only after the first missile is fired (sometimes it can be shot down accidentally or you could disable their missile launcher before it fires). You can always rob engines and oxygen for this. If you're using a ship that is particularly large or long, its a good idea to move the drone into a good position after a missile is shot down because defense drones have limited range. Position it by leaving the drone power on while the drone traverses the nose and and more importantly, the tail section. Cut power when it starts back around the side. It will be able to cover much more of the ship next time its powered on. Power management for the rest of the systems is very situational. You'll almost never need to keep power in mind control. Hacking is very useful in many situations, but all three power is rarely required. Cloaking is incredibly useful, but its easy to steal power from another system to run it (just make sure your engines are powered enough to give you 100% evasion or as close to that as possible). Types of Power There are three types of power sources: Your reactor, Zoltans, and the backup battery. The backup battery is a supplemental power source, and it should be used accordingly. Neither your primary defense or offense should rely on it. You can determine which systems are supplied by each source. Zoltans need to be moved from room to room carefully, so they don't depower important systems like weapons or shields when they leave. The other power can simply be assigned in the lower left system menu. Its a good idea to take your time and decide which systems should receive backup battery power because once the battery runs out, two or four power will be removed immediately. You can do this by assigning power to all of the systems that need continuous power first, then assigning power to the systems you want powered by the backup battery. Systems like weapons and shields need to be powered continuously to be effective, so they shouldn't receive backup battery power. Systems like oxygen, medbay, engines, and even offensive drones don't need continuous power, so they won't be harmed if power is momentarily cut and rerouted once the battery is drained. Its most efficient to use the backup battery on systems that have a cooldown. Cloaking, mind control hacking, and teleporters are all candidates. Both these systems and their power source have a cooldown, so your reactor power won't be locked into the disabled system while its cooling down. Stealing Power Zoltans can steal power from systems that are cooling down. If you have just finished cloaking, usually the cloaking system will lock in the power you used for 20 seconds while the cloak recharges. If you walk a Zoltan into that room, he displaces some of the power that was locked. When he leaves, you can use that power elsewhere. This technique works with all systems that cool down. You can also do this with multiple Zoltans to steal more than one power at a time. A good place to use this is Stealth B - just make sure you have a spare, unused reactor power before you move, so you don't remove power from your Glaive Beam! Assessing the Enemy and Attack Priorities One of the questions you'll be asking yourself most frequently is: How should I go about this encounter? Should I flee? What should I target? This all depends on many factors including their firepower, your defenses, their systems, and your systems. Pause at the beginning of every encounter and determine the biggest threats of the enemy and how your ship will be able to handle those threats. You can actually pause when the event text is displayed to save yourself a brief moment. Every encounter should begin with a cost benefit analysis. Take a look at their ship and your ship. If you think you'll be receiving more damage than the potential reward would compensate, you should flee. The vast majority of the time you should fight because fleeing doesn't improve your ship. Repairs take 2-4 scrap depending on what sector you're in, so make a guess of how much hull damage you'll be taking from the encounter, and if you'll be able to cover the repair cost in gained scrap. You should be more conservative when you hull is low, and a little more aggressive if your hull is near full. Also take into consideration where you expect stores to be. For example, if you know you've already passed all stores in a sector, and you have many jumps left, you should be a little more conservative with your hull. First off: what you shouldn't target. Unfortunately, this list won't be very long. You should never target empty rooms or sensors. Sensors don't do anything for enemy ships because they choose targets randomly. You should almost never target doors as well. Most of the time you can get through doors just with patience and your boarding crew (see Boarding and Hand to Hand Combat: Kiting and Doors). You should generally only have to attack doors if something went wrong with your boarding strategy, and you need to kite damage while waiting for your teleporter to cool down. Breaking doors will also allow fires to spread between rooms faster, but this is not generally useful. Pretty much every other system is a potential target, but shields, weapons, and piloting/engines are generally the biggest priorities. You should target weapons if they are particularly menacing. If they have a missile launcher, lots of lasers, or some other threatening combination of weapons and drones, you should definitely start with weapons. Sometimes, enemies will have pairs of weapons. Two missiles firing at the same time will always overwhelm your defense drone. Two or three Burst Laser II's firing at the same time are a huge threat. You'll almost always want to focus on their weapons in order to desynchronize them. After they're not firing in volleys, you can reevaluate your options. If the enemy can't can't penetrate your shields with its combination of weapons and drones and isn't fleeing, you have all the time in the world to deal with them. You should try to kill the crew for the extra rewards. This usually involves breaking their Oxygen system and attempting to breach it or set fires. Try to deal as little hull damage as possible during this process. Also, know which weapons are best to deal the damage to the room. Heavy Lasers, and Hull Lasers are really good for this for their fires and breaches. Mind Control and Hacking make this process much easier and faster, but its definitely possible otherwise with practice. If the enemy is a minimal threat, its usually better to start with shields or piloting. In earlier sectors, it almost always better to start with shields. This is because early enemies already have low evasion. In later sectors, you may want to start with piloting to increase the chances of your next volley landing. If a ship is attempting to jump away from you, its almost always better to start with piloting, then switch to engines once piloting is disabled. Keep in mind that partially disabling enemy engines will NOT give you more time for the encounter. The enemy FTL drive doesn't charge the same way yours does. Their ship will jump away after a specified time. If you're fighting unmanned ships, keep in mind that they repair systems at Mantis-speed. Also, they can't repair rooms that have been breached. Auto-Scouts have some of the highest evasion of any ship. This makes breaching and disabling piloting extremely useful. One advanced trick for unmanned ships is that catching a room on fire resets repair progress - so your Fire Beam isn't as useless as you thought! The rest of the systems can be targeted situationally, but they should usually only be targeted if a ship's primary threat isn't its weapons. Engines are usually my next choice for targeting after the big three. It helps to ensure your future shots connect. Drone Control is rarely a primary target. There are only a few situations where drones are a substantial threat. If you don't have shields, or the situation is keeping your shields from being as effective as they should, drones would be a good target. Some example of this are if shields are hacked by an event, hacked with a drone, you encounter an ion pulsar, or even if the enemy ship just has a bunch of ion weapons. Generally, you won't be damaging their drone control to manage boarding drones or ion intruders - you should only do this if your crew isn't capable of destroying them before they cause too much havoc. There are a couple of fairly rare situations you may want to target drone control to disable defense drones. If you only have missiles for some reason (like if you're using Rock A), and the opponent has a defense drone, you could send two missiles in a volley to disable it. Sometimes enemies have a Defense Drone II that needs to be disabled in order to start doing real damage. Usually, those only appear on Engi ships, so they'll be back up and running again quickly. Sometimes you'll want to target cloaking to allow you to do more continuous damage. This is especially useful for when you're using ion weapons and cloak would break the effect. Medbays or clone bays should generally only be targeted in conjunction with efforts to kill the crew - Usually boarding, sometimes fire or suffocation. Attempt to deal the damage to the medbay just as the injured crew enters. Mind Control should usually only be targeted if its causing problems for your pilot. With most other systems the negative effects of mind control can be mitigated (See Mind Control for more detail), but such a large drop in evasion is never good. Hacking is sometimes a good target if their hacking drone is compromising essential systems like weapons or shields. Rarely, you'll want to destroy their teleporter to strand enemy crew on your ship so you can be rid of them. Oxygen should only be targeted if you believe that you can keep it down long enough to suffocate the crew. Sometimes it may be good to target it as a distraction to pull crew away from manning systems - it has a fairly high repair priority. When to Give Up Never.
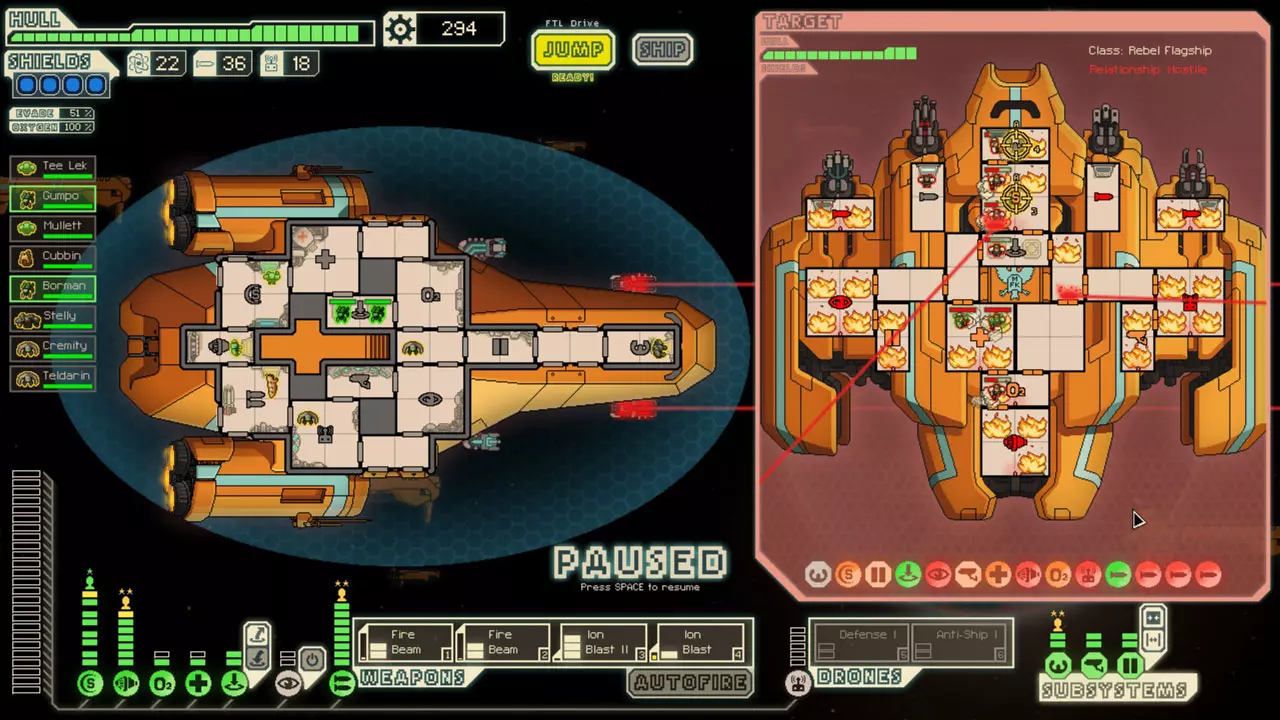
就算你的飞船毫无准备,八名船员已损失七名,仅剩的一名还被精神控制,护盾全无,船体也只剩几点耐久,也要继续尝试。 在逆境中战斗往往能让你学到最多。有时你会惊喜地发现自己能够扭转乾坤、赢得胜利,这样的胜利才是最棒的。 如果你觉得陷入僵局或已经彻底失败,不妨暂停一下,想想还有哪些选择。很多时候,升级医疗室就能让你摆脱困境,这样船员就能恢复足够的生命值去修理氧气系统。如果处于危险区域,试着派人到驾驶舱进行跳跃,或许就能争取到修理和升级的机会。请注意,升级损坏的系统并不能修复该系统——你只会多一个需要修复的损坏系统进度条。 武器使用技巧与开火顺序: 一般来说,武器应成组发射,且最有效的武器应在敌方护盾被摧毁后使用。 如果你的装备中有导弹,且它们对战斗有帮助,就先发射导弹。你需要根据敌方的情况和你的武器特性,判断优先攻击驾驶系统还是护盾系统。 高射炮虽然在精准打击方面表现不佳,但在移除护盾方面效果显著。要安排好时机,让它们在你的激光武器之前命中目标。 普通激光应在船体激光或重型激光之前发射,所有武器都应在光束武器之前发射。显然,目标是让所有攻击都在敌方护盾再生前的短暂窗口内命中。 记住,大多数舰船的武器在物理位置上存在间距,这会影响齐射时机。如果你使用前两个槽位的武器和后两个槽位的武器,就必须考虑到后方武器发射的炮弹需要飞行更远的距离。不同的投射物也有不同的速度:高射炮和离子炮较慢,激光束较快,重型激光束则更快。 如果有佐尔坦人操作武器,甚至只是路过武器室,要格外小心。佐尔坦人会从左到右为武器供能。如果你正在全力输出,那么索尔特人离开房间时会从武器系统中窃取能量。最糟糕的例子就是隐形B型舰。如果你让索尔特人操控武器,当他离开房间时,光矛光束可能会轻易损失20秒的充能时间。你可以通过释放能量来防止这种情况——为每个在房间之间移动的索尔特人预留一个未使用的能量,这样就能完全安全。氧气系统通常是暂时移除能量的理想选择。 记住,你不一定需要将武器系统升级到足以驱动所有武器的程度。通常你会携带一枚炸弹或导弹来支援你的登船队员,同时配备一门高射炮和一门激光炮来造成伤害。你不需要同时启动两套武器系统,所以不必担心升级武器。 如果武器系统损坏到无法为所有武器供能,最右侧正在供能的武器会停止供能。不过,其充能不会立即耗尽。如果操作够快,你可以暂停并重新排序武器,避免失去全部充能。 类似地,目前有一个利用此机制的功能/漏洞(我认为是Reddit用户The_Sven首先发现了这个故障)。如果你装备了武器预点火器,在跳跃结束后可以发射超出供能上限的武器。例如,假设你有预点火器、一门Flak 1和一门Burst Laser II,但武器系统等级只有2级。在进行跳跃前,让【高射炮1型】完全充能(这种情况下任何武器都可以)。充能完成后,暂停游戏,关闭【高射炮1型】的能源,为【爆裂激光2型】充能,然后进行跳跃。跳跃结束后,两种武器都会处于满充能状态。发射【高射炮1型】,一听到发射声就暂停游戏,然后切换能源至【爆裂激光】。
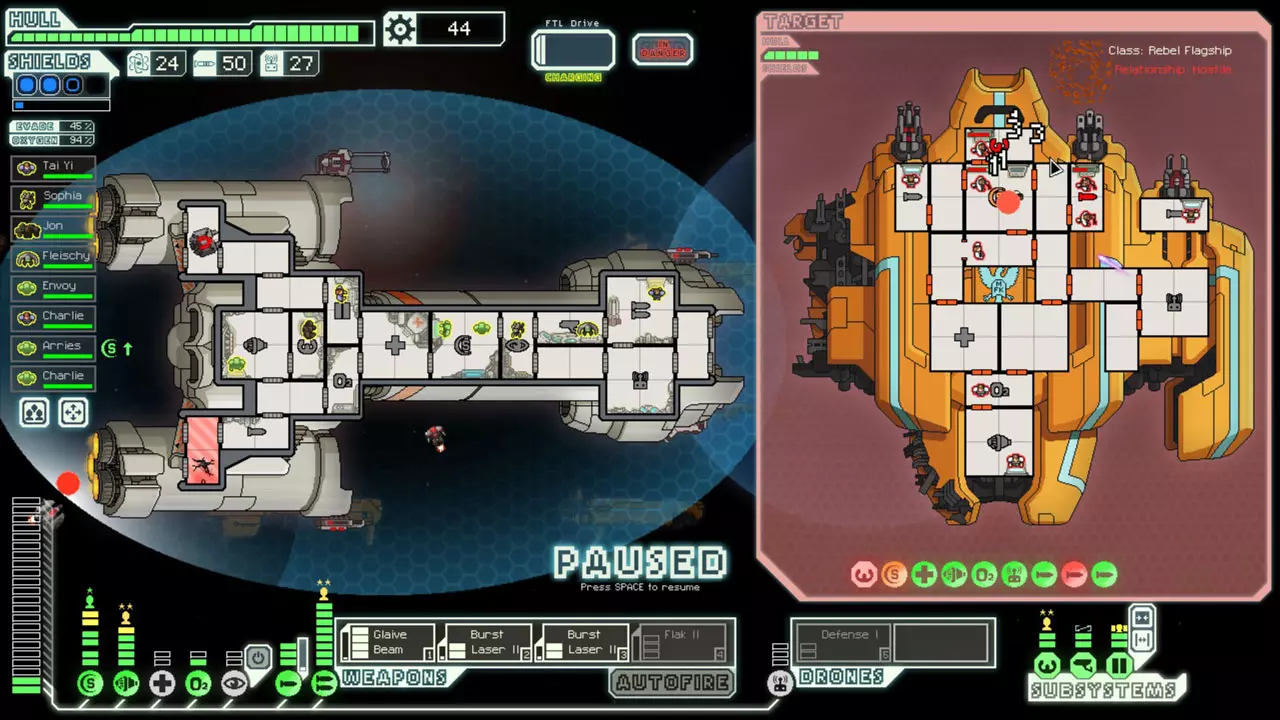
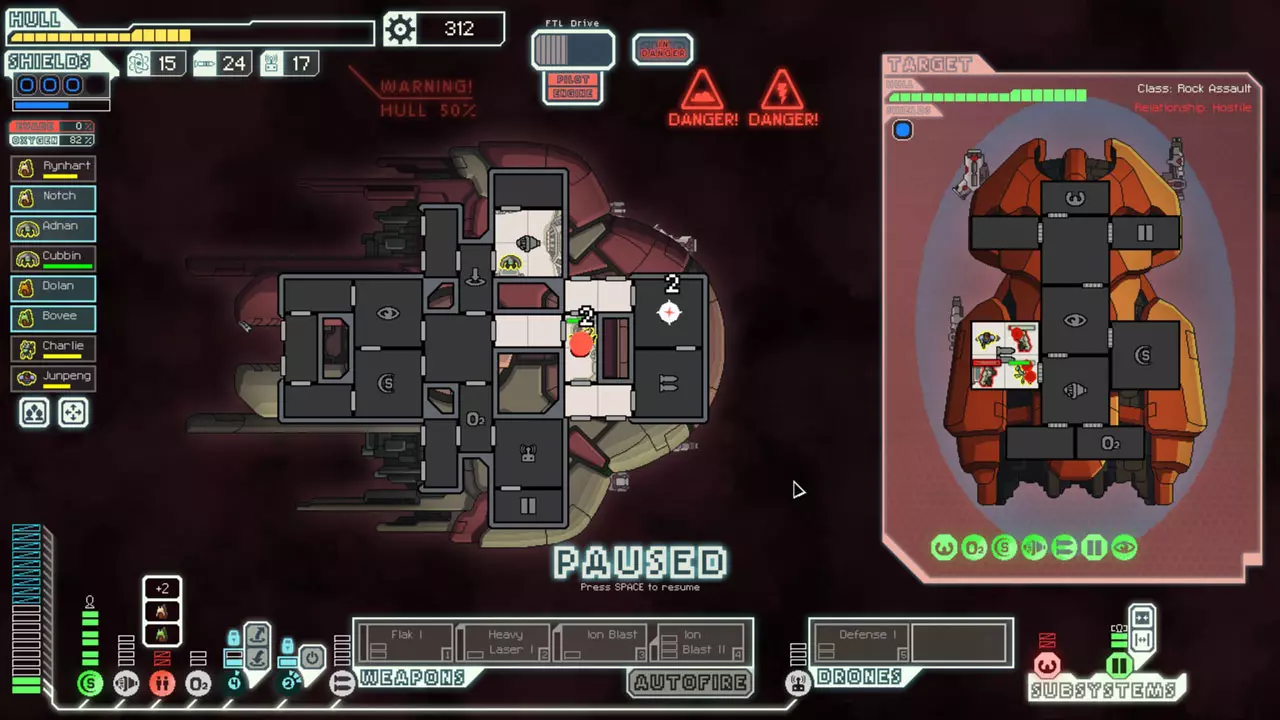
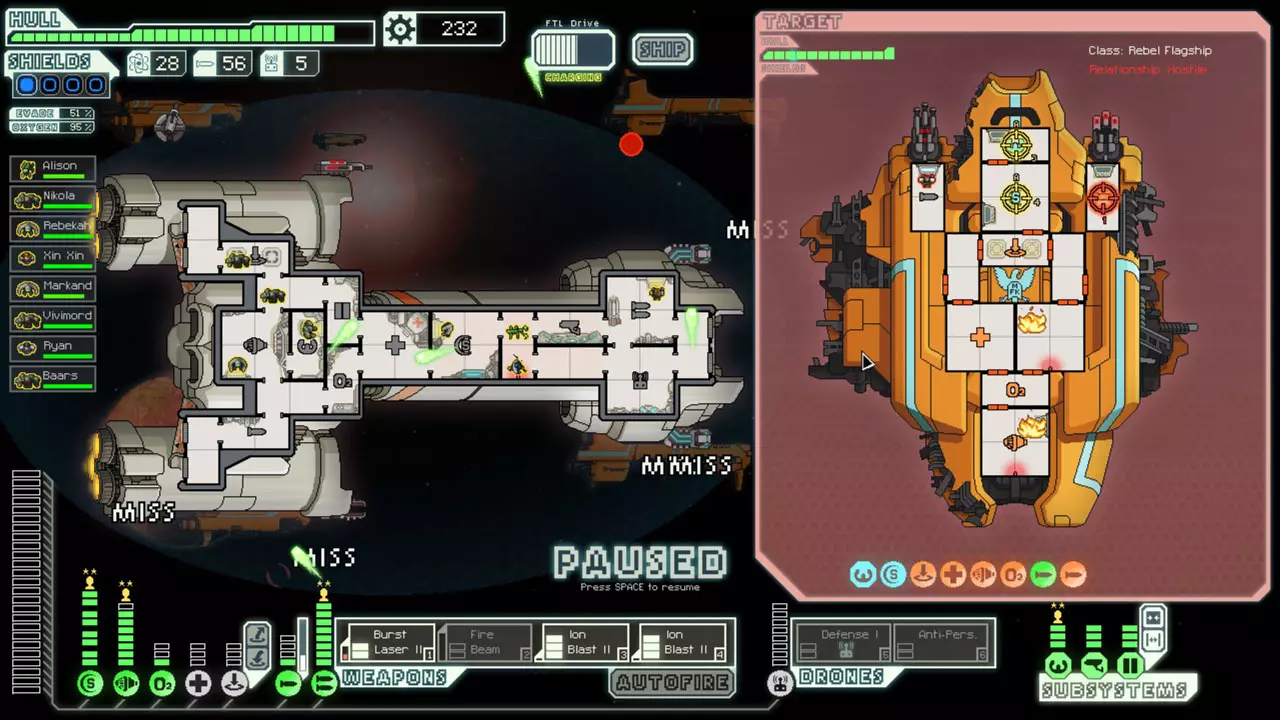
使用【激光Ⅱ】并自由开火。 你也可以用这个技巧来为【充能离子炮】或【充能激光Ⅱ】这类武器积攒多层充能。在跳跃前让它们完全充能,但要确保跳跃时这些武器【没有能量供应】,否则它们会重置为只有一层充能。 附近的截图就是使用该技巧的示例。先发射【高射炮Ⅱ】,然后将能量切换到其他所有武器。几秒钟后,同时发射两门【连发激光Ⅱ】,待护盾完全被摧毁后再发射【 glaive 光束】。最后一道激光命中后,旗舰只剩下4点船体值。这张截图是在战斗开始后四五秒时截取的——敌方的登舰无人机甚至还没着陆。以下是由Eirh提供的实际运行视频示例。
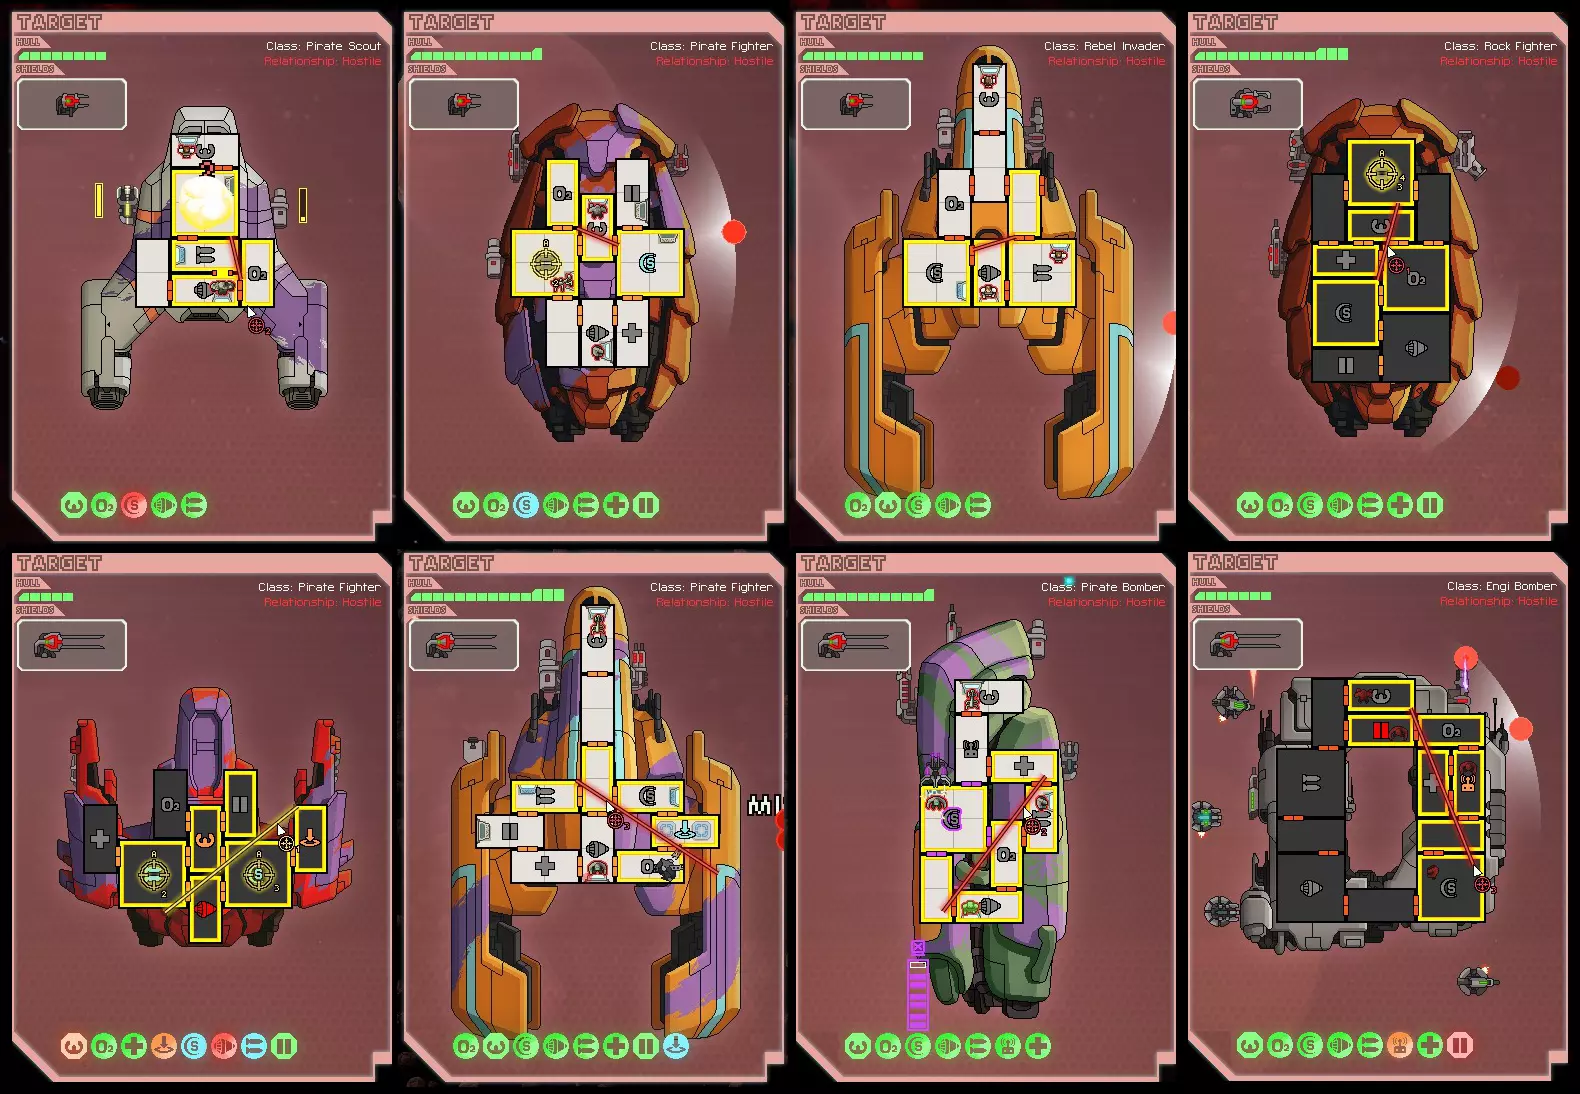
武器排序 通常,你需要按照武器的实用性和充能时间从左到右排序。连锁武器和充能武器应始终放在左侧,因为它们需要更多时间才能生效。不过,理想的武器排序极具情境性,甚至可能因战斗而异。以下是一些武器排序示例。 如果你有【爆裂激光II】和【高射炮I】,将高射炮放在右侧。它充能时间更短,且精准度较低。在这两种情况下,即使它离线,你的损失也较小。 使用【隐形舰A】时,通常应将【双联激光】放在第一个槽位,【迷你光束】放在第二个槽位。通常来说,将光束武器放在左侧没有什么好处,因为双激光炮在没有迷你光束炮的情况下也能在多种场合发挥作用。不过,如果你正在对抗一艘没有护盾的飞船,通常把迷你光束炮放在左侧会更有用。 如果你有像基础激光炮这样额外的弱武器,它应该始终放在右侧。 如果你使用的是链式火神炮,它应该始终放在左侧。 进阶技巧:如果你是一名经验丰富且专注的玩家,武器的排序并不像武器在飞船上的实际位置那么重要。以联邦飞船为例,它配备两门I型高射炮和两门II型连发激光炮。你会希望把高射炮放在飞船前方,因为它们的 projectile speed(弹丸速度)要慢得多。这将使首次射击的衔接速度提升整整一秒,后续齐射的时机也更容易把握。再次强调,只有当你准备好在受到伤害的瞬间精准暂停时,才使用此技巧。届时你需要重新评估武器的排列顺序。 武器类型 激光 激光是通用型攻击武器。它们操作简单、精准且易于使用。激光射击对船体和系统造成1点伤害,并有小概率引发火灾。
船体激光通常应在普通激光之后发射,因为它们有额外的破甲几率——无论你是否在攻击无系统的房间。如果你有重型激光中的任意一种,应在其他激光和辅助武器之后发射它们。重型激光造成两倍伤害,有更高的起火几率,并且能造成破甲。 右侧的舰船拥有良好的激光类武器配置。 导弹 导弹通常威力强大,有不错的起火和破甲几率,并且能穿透所有护盾层数(不包括超级护盾)。你几乎不应该依赖导弹来造成伤害。如果依赖导弹,你应该寻找武器来替换导弹(岩石族A舰就是一个很好的例子)。导弹的成本过高,无法作为可持续的伤害来源。同样地,你几乎不应该购买导弹。不过,导弹对于许多配装来说是很好的补充。如果你要进行登船作战,它们非常擅长摧毁敌方的医疗室。如果你的其他武器威力不是很强,导弹可以用来破除一层护盾或降低敌方的闪避率。但不幸的是,如果敌人有防御无人机,导弹几乎总会被击落。 高射炮 高射炮是非常出色的辅助武器,但并不适合进行精准打击。它们精度不高,所以你无法持续命中目标房间——炮弹可能会击中附近的房间,或者完全打偏飞船。不过,如果你有足够多的高射炮,就能用它们压制任何飞船。它们通常用于移除护盾,以便激光或光束武器能发挥全部效果。它们是飞行速度最慢的投射物,因此需要比所支援的激光提前几秒发射。 注意:高射炮武器会发射超出武器描述所显示数量的额外高射炮弹片。这些弹片不会命中护盾或对舱室造成伤害,但会显示小型撞击效果或“未命中”。不过,它们仍会被无人机锁定,因此即使你的无人机击落了来袭的高射炮I型炮弹中的一片,仍可能有三片命中并造成伤害。 光束 光束武器命中率100%,会对光束触及的每个舱室造成伤害,但对护盾的穿透能力非常弱。它们几乎总是需要离子武器、高射炮、激光武器或黑客系统的支援来移除敌方护盾。如果你使用戟式光束或 glaive 光束,它们具有部分护盾穿透能力——每有一级敌方护盾,伤害就会减少一点。
如果你向拥有二级护盾的舰船发射 glaive beam(光矛光束),它仍然会对每个房间造成1点伤害。 瞄准光束时,要密切注意房间周围的黄色高亮,这能让你准确知道光束发射时会击中哪些房间。通过仔细瞄准,你通常能比最初想象的多击中一个房间。 光束武器会对 Zoltan/Super shields(索尔特护盾/超级护盾)造成两次伤害,因此对它们造成双倍伤害。如果护盾在第二次击中时被摧毁,光束末尾(约5%的光束长度)仍可能对房间造成伤害。 光束武器是唯一在发射时不会消耗当前 cloak(隐形)时间的武器。 更多信息请参见【光束机制与放置】。 离子:离子会瘫痪系统,但不会造成伤害。若使用得当,离子武器便是终极支援武器。每对某个系统造成1点离子伤害,该系统就会瘫痪5秒(系统图标上方显示的每个蓝色数字代表5秒的瘫痪时间)。离子弹的飞行速度慢于激光,但快于高射炮。 离子武器在清除护盾以让其他武器命中目标方面非常有效。和大多数投射物一样,离子弹只有在敌方护盾被摧毁后才能命中其他目标。因此,所有离子伤害都会作用于护盾系统(攻击护盾舱室和直接攻击护盾本身并无区别)。要完全瘫痪敌方护盾,你的离子武器需要形成“叠加效果”——即造成离子伤害的速度要快于伤害效果的消退速度。大多数时候,如果你想确保离子伤害能够叠加,你需要不止一件离子武器。离子冲击II、充能离子炮和链式离子炮(最终形态)能够在没有自动装弹器辅助的情况下独立叠加离子伤害。不过,如果这些武器与另一件离子武器搭配使用,其可靠性会大大提高。有趣的是,在拥有完全熟练的船员和足够的自动装弹器的情况下,所有离子武器都能叠加伤害。 对于像佐尔坦B型初始配备的离子武器组合(两门离子冲击I),人们普遍存在一个误解,认为交错释放离子伤害总是比同时开火更有效。当离子伤害命中时,它会在现有离子伤害的基础上增加五秒(而不是重置计时器)。那么,如果离子伤害计数器显示“2”和几个刻度,当它再受到1点离子伤害时,计数器会显示“3”和几个刻度。 有趣的是,对抗闪避率较低的舰船时,同步释放离子冲击会稍好一些。如果对抗闪避率较高的舰船,交错释放效果更佳。 充能离子炮与其他武器的不同之处在于,它的设计目的是能可靠地与自身叠加效果。如果敌人只有一层护盾,就像使用其他离子武器一样将其设为自动发射即可。
But if the enemy has two or more shields, leave it charge up all three blasts. This can immediately remove two layers of shields and it gives you 15 seconds of ion damage from the beginning. So even if you miss a shot or two in the upcoming blasts, your ion timer won't reset. This strategy is essential for Zoltan C. If only one blast connects, charge up and try again. To the right, you'll see a very effective set of ions paired with beam weapons. Usually, you can safely set your ion weapons to autofire. Notable exceptions are Ion Bomb (use manually because it consumes missiles), Charge Ion (especially if the enemy has a lot of shields to be removed), and when the enemy has cloaking (you'll often want to hold your fire if the enemy is about to cloak). Ion Stunner is a good weapon to use if you plan on damaging shields. It will keep those in the shield room stunned more than doubling the amount of time it takes them to repair the room. Ions deal double damage to Zoltan/Super shields (one ion damage deals two damage to the shield). Bomb Bombs consume a missile and teleport directly to their destination to achieve their purpose, but they are blocked by Super Shields. They cannot be shot down by defense drones nor can they deal hull damage. There are several different types of bombs with vastly different uses. Several types of bombs are extremely useful to aid with boarding to disable systems, prevent crew movement, or heal your own crew (just don't completely rely on this health because bombs can be evaded by the enemy ship). Ion Bombs are very useful for removing a full two layers of the enemy shield, and they're even better when paired with a standard ion weapon. If you're firing a bomb on your own ship, it will not miss. Crystal Crystal weapons act like a cross between lasers and missiles. They travel slower than lasers, and they can be shot down by defense drones, but they pierce one layer of shields. Some are substantially more powerful than others, so be sure to time them so that the most powerful ones get past shields and defense drones. Weapon Synergy Weapon synergy is simply how well your weapons work together. This is always something to strive for when considering what to buy and sell. Things to consider are type, damage, power usage, missile consumption, and charge time. Usually, you should try to pair weapons with similar charge times to deal the most damage as fast as possible. You could also factor in drones with weapon synergy, but they're generally only useful when you can continually keep the shields down. Also, there's the negative of using drone parts unless you have the Drone Recovery Arm. The Chain Vulcan either synergizes with almost everything or nothing depending on the timing. Until its fully charged, it doesn't help any weapon loadout. After the 30-40 seconds it takes to charge, it keeps the shields down enough for nearly anything else to be useful. Ions don't work well with it because the enemy shields should never be at full capacity (other than the fact that ions can prevent the shield recharge manning bonus). Missiles and bombs are very useful for hitting piloting to reduce evasion thus making the Vulcan even more powerful. Good Synergy Here are a couple of examples of weapons with good synergy and why (along with my preferred ordering). Glaive Beam, Flak II - They have similar charge times, Flak II can fairly reliably take down most shields to allow the Glaive to be used to the fullest. All of the shield layers are removed at almost the same time, so the Glaive Beam can hit all rooms with its full power. Even if one or two layers of shields remain, its still a good idea to fire the Glaive because the charge times are so close. This loadout also allows for another low power supporting weapon of some sort. Fire Beam, Ion Blast II, Heavy Laser I, Ion Blast I - Those ions working together can reliably remove shields from nearly any ship. If the ship is manned and isn't a huge threat, you can take your time and burn them out (and even send a Heavy Laser blast into their medbay to greet them if necessary). After shields are down, the Ion Blast I can be switched to piloting or cloaking. Even if its a scout, you can quickly disable the proper systems with the Heavy Laser. Breach II, Burst Laser II, Flak I - For many earlier encounters, the flak and burst laser will be enough by itself. But when its necessary, you can use the breach to completely disable piloting for an extended duration, or shields for a one or two level reduction and a longer shield recharge time. Breach has the added benefit of supporting boarding crews and preventing auto scout systems from ever being repaired. Flak I, Heavy Laser I, Heavy Laser I, Flak I - A personal Favorite. Most of the time the flak will
移除护盾,让激光有机会穿透。在首次命中驾驶系统或护盾后,每十秒将造成超过四点船体伤害,并引发大量火灾和舱室破裂。 右侧截图中的武器组合同样具有良好的协同效果。离子武器能稳定击落敌方护盾,长戟光束可造成伤害,而火焰无人机可在敌方无威胁时使用。 协同效果不佳的组合 以下是一些协同效果较差的武器组合示例: 高射炮II、重型激光I、离子冲击I——离子武器和激光的射速是高射炮II的两倍多,因此存在大量时间浪费。离子武器总体作用不大,仅能让高射炮II多命中一发炮弹。基本上,这种配置相当于每20秒发射一次重型激光。pike光束、船体粉碎激光、重型离子炮、火焰炸弹——离子炮无法与任何武器叠加。火焰炸弹通常仅在特定登船战术中有用。这种配置只能应对三级护盾的舰船,且操作缓慢且不稳定。 连锁离子炮、反生物光束、I型船体激光、眩晕炸弹——连锁离子炮速度极慢且耗电严重。当你终于将敌方护盾削弱到可以造成伤害的程度时,或许应该瞄准驾驶舱(以降低连锁离子炮的闪避率),但这样会失去激光的船体伤害加成。不过,如果能配合登船战术,这种配置可能还有些许用处。 船体导弹、阿尔忒弥斯导弹——对佐尔坦人效果极差。导弹消耗速度过快,实用性很低。注意:黑客技术能让许多通常缺乏良好协同效果的装备组合依然发挥出强大作用。如果你没能获得期望的武器,这是最佳的备用方案。 光束武器机制与瞄准 本节将详细介绍光束武器的机制和瞄准方式。关于光束武器的基础信息,请参阅【武器类型:光束】。 火焰与生物武器 火焰光束和反生物光束应与其他光束区别对待,因为它们不会对船体或系统造成伤害。其效果作用于单个格子而非房间。 使用反生物光束时,只需命中船员当前所在的格子即可对其造成伤害。尝试拥有一名鼻涕虫船员、二级传感器,或者至少安排人员操作一级传感器来了解你面对的敌人。
将反生物光束与其他伤害手段配合使用可获得最佳效果。由于该光束的伤害基于每格计算,因此实际上可以用同一道光束对敌方船员造成两次伤害。如果敌方船员在光束开始时处于某一格,且在光束触及另一格之前移动到那里,他们就会受到双倍伤害。若你拥有两道反生物光束并能破除敌方护盾,就能立即消灭非岩石人种族的敌方船员。 使用火焰光束时,你的目标通常是击中尽可能多的房间以及这些房间中尽可能多的不同格子。尽可能击中更多房间,能让火焰有更多机会扩散。此外,点燃较大的房间效果更好,因为火焰在单个房间内有更多蔓延的机会。 关于火焰光束以及如何有效使用它的更多信息,请参阅【火焰武器:火焰光束】。 光束瞄准 光束武器的一个不错特性是,当你进行瞄准时,所有将受到影响的房间都会有黄色高亮显示。这让你可以暂停游戏,然后精确瞄准武器。 注意:如果你开始在房间边缘进行高亮时房间是黄色的,并且在点击拖动时颜色发生变化,那么即使该房间不再有黄色高亮,武器仍会与第一个房间相连。 光束瞄准有时可能比较棘手。通常,你会希望在尽可能多地破坏系统的同时,造成尽可能多的船体伤害。攻击的精确落点在很大程度上取决于敌方飞船的布局以及哪些系统对你的威胁最大。如果你使用的是像长戟光束和 glaive 光束这类高功率光束武器,务必尽早瞄准护盾室,这样可以对其造成损坏甚至可能使其失效。这能让你用剩余的光束造成更多伤害。 一个相当高级的技巧是迫使特定的敌方船员去修理特定系统。例如,假设敌方飞船上有一名岩石人、一名螳螂人和一名工程师,他们分别负责驾驶、引擎和武器系统。船员会按照系统操作优先级的相反顺序(驾驶、引擎、武器、护盾等)被调离岗位。如果你想让螳螂人修理护盾从而延长其失效时间,那么用光束武器攻击的第二个系统就选护盾。工程师会去修理第一个受损系统,而螳螂人独自修理护盾会花费相当长的时间。 索尔特护盾在被完全摧毁前会阻挡光束伤害。不过,光束最后的大约5%仍可能造成伤害。这种情况应用场景较少,但你最常在【隐形B型】飞船对抗早期索尔特族飞船时用到这一点。以下是如何利用这一特性的示例。 光束瞄准示例: 这个瞄准点从护盾室附近开始,并尽可能连接更多房间。如果敌人只有一级护盾且没有额外的伤害缓冲条,那么护盾室之后的每个房间都会受到2点伤害,而非1点。
这个敌人的护盾已被离子化,因此即便护盾受到攻击,此次攻击也不会使其护盾值减少。这个(技能/效果)从武器室开始生效,因为顺序无关紧要,但它会尽可能攻击多个系统。
这个迷你光束炮实际上从护盾室启动。我第一次瞄准护盾时,它被高亮显示,所以它仍然会连接到所有四个房间。显然,这会在其中一次双激光 blast 命中后发射。
通过精心放置,微型光束炮能够连接四个房间的另一个例子。希望导弹发射器能保留下来,而不是重型激光炮。
以下是Reddit用户sukuro120提供的几个随机的优秀光束放置示例
这是我发现的一个相当高级的光束瞄准技巧。一门 glaive beam( glaive 光束)可以一击摧毁 Zoltan 护盾。光束最后的一小部分会对房间造成伤害。我发现你可以小心地瞄准光束,实际上可以让它在第一次射击时伤害到两个房间。下面的截图就是一个在首次射击中摧毁 Zoltan 护盾并造成四点伤害的例子。
这里有一种由Reddit用户mekloz发现的进阶光束瞄准技巧。通过将光束的路径完全置于飞船两个房间之间,就能同时击中这两个房间。要确保同时击中两个房间,你需要确保瞄准时光束不会照亮其中任何一个房间。这能让你在遇到的许多飞船上至少多击中一个房间。不过这个技巧非常 tricky,需要多加练习。截图同样由mekloz提供。 Reddit用户Masala对这项技巧进行了改进和完善,并将其命名为【刁钻扫射】。他甚至找到了能让某些房间被击中两次的方法。
关于iPad版本的说明 iPad版本与PC版本几乎相同。但最大的区别在于光束武器。在某些舰船布局中,光束武器的最佳位置取决于像素级的精准放置。当你必须用手指瞄准光束时,这极其困难。大多数时候,我发现自己只能采用次优的放置方式,因为完美放置太耗时了。 不过,iPad版本有一个PC版本绝对无法实现的功能。由于光束的放置位置可以自由移动,你可以让光束从任何位置开始。而在PC版本中,光束必须从房间内开始。这一功能实际上只有一种实用应用场景,而且你极少会用到它。它需要一艘佐尔坦族舰船,并且至少需要装备戟式光束炮或巨镰光束炮才能发挥作用。如果你用这两种武器中的任意一种摧毁了佐尔坦护盾(如上文所述),你可以移动光束,让光束的末端连接到敌舰的任意房间。PC版则会根据舰船布局限制你只能连接到特定房间。我曾用这个技巧,通过一门爆裂激光炮II和一门戟式光束炮,在敌舰导弹发射器开火前就将其瘫痪——这在PC版上是不可能实现的。 开火武器 感谢reddit用户MegaVolti提供了这部分内容。除了少量编辑修改和截图外,内容完全由他提供。 火焰是消灭敌方船员的好方法。它能让你无需实际登船就能获得登船的所有收益。它还会摧毁医疗室和克隆舱,因此无需额外考虑这些设施。火焰炸弹、火焰光束或火焰光束无人机都能稳定制造火焰。火焰光束和火焰光束无人机都需要先摧毁护盾,因此与离子武器配合使用效果显著。由于火焰武器异常强大且会改变游戏玩法,我将详细解释每种武器。敌人AI无法修复着火的房间,这在对抗旗舰时尤为重要。当所有船员被消灭后,火焰武器会阻止启动的AI进行任何修复,这大大降低了旗舰战的难度。它也无法阻止火势蔓延,这意味着一旦船员无法应对且火势燃起,旗舰就注定会被摧毁。 火焰光束 火焰光束是最出色的独立火焰武器。它通常能引发足够多的火灾,即使是岩石人在内的普通敌方船只船员也会被火势压制。

他们当然不会死于火焰,但火势蔓延的速度通常会快于他们灭火的速度,最终火焰会摧毁他们的氧气系统或耗尽氧气,导致他们窒息。火焰光束最好与离子武器搭配使用,这样它就能在冷却结束后立即发射。离子武器也不会损坏敌人的船体,从而确保通过消灭船员来获得胜利。离子武器还为其他伤害性武器提供了完美的基础,以消灭那些无法被火焰杀死的船只(例如自动侦察机)。任何其他伤害性武器(最好是使用两点电力的武器,这样就可以在不需要额外升级武器系统的情况下激活它来替代火焰光束)
它可以用来摧毁那些舰船。(见左侧截图)任何攻击性无人机也足够使用,而且无人机部件应该不成问题,因为并非每次跳跃都需要它们。火焰光束还可以与高射炮或连发激光配合使用以摧毁护盾。在这种情况下,它们不再能与攻击性无人机很好地配合(对抗对火焰免疫的目标),因为护盾不会永久失效。使用高射炮或连发激光通常也会导致一些炮弹击中船体,从而存在过度损坏舰船的风险。当火灾摧毁一个系统时,会造成1点船体伤害。使用高射炮或激光时,舰船往往在所有船员死亡之前就解体了。仅用火束炮摧毁旗舰可能比较困难,因为敌方船员数量众多,医疗室的治疗速度极快,而且敌方的隐形装置还会中断你的武器射击。建议将火束炮与黑客技术(阻止敌人自由移动,让火势更容易蔓延)或任何能摧毁医疗室的手段(使敌人无法在灭火间隙治疗,最终阻止他们进入着火的房间)结合使用。 火焰无人机
The Fire Drone starts fires faster than the Fire Beam but can not be controlled. This can lead to lengthy battles, especially against ships with a medbay, since enemy crew will survive much longer because the medbay can not be kept on fire / destroyed reliably. It also means the weapon system can not be kept on fire / destroyed reliably and thus the damage taken in a fight might be higher than when using the Fire Beam. The advantage is that the weapon system does not need to be upgraded past level four which is generally enough to power two ion weapons to take down any enemy shields. Having a low level weapon and a low level drone system is much cheaper than having only a high level weapon system. The scrap saved can be used for additional defences. In this case an offensive drone is useful for dealing damage to ships which can not be killed with fire since using a weapon would require additional weapon system upgrades. The Fire Drone alone is strong enough to overwhelm the flagship crew eventually, although it might take a while and having the means to take out the rocket launcher in phase one beforehand is very useful (e.g. a bomb or missile). Phases two and three will then be very easy since the fires can not be stopped by the AI. Fire Bomb The Fire Bomb is fundamentally different from the Fire Drone and Fire Beam. Combining them is of little use since beam and drone on their own are enough to kill any enemy which can be killed with fire, adding the bomb to this does not provide a great benefit and it does cost scrap in terms of weapon system upgrades to power it. The Fire Bomb is too weak to kill most ships with fire on its own. The fires are limited to one room and usually easily extinguished. It requires multiple bombs to eventually overwhelm the enemy crew which is generally not sustainable due to limited missile supply (even with Explosive Replicators). However, the Fire Bomb does shine as boarding support weapon when using Rockmen boarders. Setting a room on fire and teleporting the Rockmen into it will make sure the fire can not be extinguished and it will help the Rockmen kill enemy crew much faster. It will also take care of clone bays and medbays passively while boarders are fighting in them. The Fire Bomb is one of the best boarding support weapons in the game when using Rockmen boarders. However, for all other situations its usability is quite limited. Additional Notes Thanks again to MegaVolti for that information. Reddit user Poppis86 brought one helpful bit of information to my attention that I had neglected. Crew will almost never try to extinguish rooms that have four fires in them - they'll flee to other parts of the ship when all four tiles catch on fire. This knowledge can be very helpful in deciding which rooms to target. Optional Systems [1] These are systems that don't come pre-installed in all ships. Technically, shields and medbay/clone bays fall into this category, but these are essentially required unless you're doing a challenge run. Cloaking Cloaking is arguably the single, most useful optional system. It is helpful for any loadout in many situations. It can be used at will to add 60% to your current evasion and dodge the most significant threats. If you are attempting to dodge something, rob other systems of power, and put it in engines to make sure you're at at least 100% evasion. Some enemy weapons like Breach Missiles have a long enough charge time that every single shot can be dodged. Cloaking is also extremely useful in each phase of the flagship battle (see Flagship Battle). The evasion bonus from Cloaking is applied instantly, so don't cloak earlier than you need to. If you're fighting an enemy that has a burst of five lasers, and you only have level three shields, wait till all of your shields have been taken down before you cloak. Another benefit of cloaking is that enemy weapons don't charge while you're cloaked. So if the enemy has particularly powerful weapons, you can use level two or three cloak to delay their weapons even longer. Longer cloak has several benefits. If you absolutely have to flee the battle, cloak as long as possible when you evade damage. If you're fleeing the rebel fleet, and they have Anti-Ship Batteries, try to time it so that you cloak any incoming missiles (or other significant damage) and the ASB blast in the same cloak. It can also be used to give your weapons more time to build a charge while the enemy can't. This can be very important if you have weapons with a long charge time. Longer cloaks can also can be used to trap enemy boarders on your ship, so you can finish them off before they flee. Even though weapon systems on enemy ships are stalled during cloak, Anti Ship Batteries and Power Surges aren't. This can be used to your benefit if you know the timings. For example, you can dodge the first missile volley and the first Power Surge in phase two and three of the flagship battle if you use the right cloak duration. Generally, you won't be firing while your cloak is activated because it will substantially reduce the remaining cloak time. However, if all of your weapons are charged and you're not concerned about fleeing the battle, firing while still cloaked would be slightly beneficial. The Stealth Weapons augmentation removes the firing penalty, but its rarely a worthwhile augment to keep around. The vast majority of the time, you'll want to stay cloaked as long as possible. You'll usually want to wait till the moment your cloak ends before firing. However, there are a few times when you may want to end your cloak early to attempt to be ready to cloak the next attack. This is only beneficial for attacks that aren't affected by your cloak timing like the Anti Ship Battery and Flagship Power Surges. To do this, simply fire weapons to force yourself out of the cloak. Hacking Hacking can be even more beneficial than cloaking in certain circumstances. Its an extremely flexible system that is capable of aiding almost any loadout. See the Hacking section for details about what to hack and how hacking affects each system. Mind Control Mind Control temporarily turns an enemy into a friendly which you can't control. Higher levels of mind control increase the duration of the effect as well as the health and damage of the target. You must be able to see the target before you can mind control him. Ways to see the target include: Line of sight of your crew on your own ship or during boarding Level two sensors when you're not in a nebula Level one manned sensors when you're not in a nebula Having a Slug crewmember Having the Lifeform Scanner augment Hacking a room Bombing a room Mind Control has several different applications. It can be used to help your weapons destroy the enemy ship, and it can be used to aid in boarding. If you need to improve the odds of a volley connecting, fire the volley, then just before it is about to connect, mind control the pilot. This will greatly reduce their evasion and might even remove it completely if they don't have upgraded piloting. It can also be used on other crewmembers on the ship to create a diversion and remove manning bonuses on other systems. You can also use it to help your crew fend off enemies when you are boarded. You can mind control one of the boarders to help take down the other. Doing this, you'll only have to fight one at a time. Note: If you're mind controlling an enemy that is on your ship, it will follow the same logic that enemy AI uses on its own ship. It will start to work on the highest priority task that is not currently being handled. So if you're fighting the enemy with your own crew, he will happily leave you do that while he runs off to man the door system. If you want the mind controlled enemy to engage his friend, you need to remove all of your crew from the room the enemy is in. Then, the mind controlled enemy will see this as the highest priority task and will engage. You can then safely add your own crew to the room to aid him if you like. Mind control is a very effective boarding aid as well. It can be used to turn the odds in your favor. If you only have a two person boarding team, you can mind control an enemy to help in the fight. Sometimes if you have no better options, you can mind control an individual enemy in the hopes that two other enemies will engage him and kill him before the mind control wears off. Level two mind control works well for this. This is reliably accomplished on the flagship. If you mind control the crewmember manning shields, two opponents will engage him and kill him. This can be used more than once to remove several crew. If you don't have a good boarding crew, but you have teleporters and mind control, you can still kill the enemy crew. Mind control and enemy, then use your teleporter to retrieve him. You can then fight him alone in the comfort of your own ship. There are a couple ways to counter enemy mind control, and mitigate the damage it could do. If the mind controlled crewmember is in an essential room, send a spare crewmember to that room to suck up damage and prevent him from damaging the system. This crewmember shouldn't engage the mind controlled crewmember, but he should just run back and forth in the room as a distraction. However, if the room isn't essential and one or two system damage wouldn't be a threat, you should just leave him damage the system. If nothing else, you'll get free combat and repair skills. If your pilot is mind controlled, try to have one of your crewmembers nearby if you're not engaging him continually. Never let him destroy the system. If the enemy is firing something that could damage you like a volley of lasers or a missile, move your other crewmember into the room to get the piloting evasion bonus. If one of your crew is mind controlled, and the enemy then boards your ship, the boarders will attempt to join the mind controlled crew. This can usually be used to your advantage because they'll often have to break down several doors on the way. Have your combat crew follow them around you ship. They'll deal a lot of damage without receiving any. If you have a mind control system, and one of your crew is mind controlled, you should usually use your mind control on your own crewmember to regain control. A level one mind control can counter any level of enemy mind control. But be careful! If your mind controlled crewmember is in the same room as an enemy, using mind control on that room won't necessarily give you your crewmember back - it may take the enemy instead. This is almost never desirable, so be careful who you're attempting to control. Optional Systems [2] Drone Control Drone control is an extremely versatile and useful system depending on what drones you have to stock it. The single most important drone is the lowly Defense Drone I. Its always recommended to have one of these in the first slot of your drone control. Ideally, you should try to purchase a drone control system that comes with a Defense Drone I. Normally, missiles will be your primary source of damage, but this drone will shoot down the vast majority of them. It will also help with incoming Boarding Drones, Ion Intruders, and to a certain extent Hacking Drones. Hacking Drones are much faster and aren't targeted as reliably. The Defense Drone II is a decent alternative to the Defense Drone I. It fires faster and also targets incoming ion blasts and lasers. However, this is often a bad thing. If lasers and missiles approach your ship at the same time, the Defense Drone II will target whatever it sees first. It doesn't prioritize missiles (or at least it doesn't prioritize missiles if a laser blast leads a missile by a narrow margin), so often you'll receive damage when you wouldn't with a simple Defense Drone I. That said, it is a good option if your shields or evasion aren't quite as good as they should be. Its also nearly indispensable if you're trying for a shieldless run. If you only have a Defense Drone II, and you see that the enemy has fired lasers and a missile at the same time, you may be able to "convince" the drone to target the missile instead of the laser.
If you power it off till the laser is almost upon you then power it back on again, it may ignore the laser and shoot the missile instead. The screenshot to the right is an example of excellent supporting drones (even though most aren't currently in use). The Defense Drone I will take care of incoming missile threats. The System Repair Drone can repair the ship while the crew is occupied (or safely hiding on the enemy ship), and all three have decent blue text events. If you're running defense drones, you should always try to have one extra system upgrade beyond what you need as a damage buffer. There's nothing more frustrating than having your missile defense being taken offline by missiles. If you have a defense drone as well as cloaking, you can wait till you see if the defense drone will shoot down the missile before you cloak. Just be aware of exactly when the evade/hit decision occurs: If your shields are currently up, the evade is decided when the missile crosses your shields. If your shields aren't powered up at the moment the projectile crosses that line, the evade is decided when the projectile reaches its destination. Note: the effectiveness of defense drones depends on the size and shape of the ship. Larger ships aren't covered as well. You may want to turn the power off on your drones to put them in a better position for the next volley. The usefulness of all other drones depend on the rest of your loadout. If you have decent ion weapons, combat and beam drones are very effective. Sometimes Boarding Drones and Ion Intruder Drones can be effective, but they're usually not worth spending the power and drone parts to run. Shield Overcharger Drones are almost never useful. They take too much power to run, the shield takes too long to build up, and they're almost always removed by things that wouldn't have caused damage anyway. Anti-Personnel Drones should be kept around until you have a better replacement, but they are almost never needed if you can manage boarders well (See Boarding and Hand to Hand Combat). Engi B is a notable exception to this general rule - the lone engi often needs the help of its drone bodyguard. System Repair Drones are always a good choice to have around if you have a spare slot. They have several blue text events, and they help with system repairs, breaches, and fires, so you don't have to micromanage your crew as much. Hull Repair Drones are good to have around if you're taking more hull damage than you like and you have the drone parts to spare. Anti-Combat Drones target all enemy drones near your ship. This includes incoming boarding drones of both types, and all combat and beam drones. It fires an ion blast, so the drone will be disabled and possibly destroyed. Fire Drones are generally only helpful if you have a good ion loadout. If you can properly support them with ions, they'll eventually kill the enemy crew. Most of the time you shouldn't worry about purchasing drone schematics from stores - you'll usually find one that's useful from events. If you don't have a second (or third, depending on the ship) drone to fill up the slots by sector seven, its often good to purchase an inexpensive filler drone. Good choices are System Repair or Anti-Drone. If you have combat drones, they greatly improve the effectiveness of hacking shields. Start hacking shields just as the combat drone is about to fire to instantly remove one layer of shields. It can hit another time or two to help remove shields in record time. Note: If you have a Hull Repair Drone and a Drone Recovery Arm, you can use the Hull Repair Drone before each jump. After it repairs two hull, jump away. It will be collected, and you will receive free repairs. Teleporter Very useful to have if you have the crew (and possibly weapons) to support it and the scrap to afford it. It will always pay for itself in the 10% extra scrap rewards. More importantly killing the crew grants a much higher chance of finding a random weapon, augment, drone schematic, or crewmember. For more information and how to effectively use it, see Boarding and Hand to Hand Combat. Subsystems Subsystems are systems that don't require power to use. They have a passive benefit, and most can be manned for a greater effect. Piloting Piloting is by far the most important subsystem. Always have this system manned unless its absolutely necessary for your pilot to be elsewhere or if you know you can't take damage from the enemy. Upgrading this system only improves unmanned evasion bonuses. That said, when you have the scrap, its always a good idea to upgrade this system to level two primarily to give yourself a damage buffer. Its generally not necessary to upgrade this to level three. Level two piloting also has a blue text event for nebula, but if you have a clone bay, it produces similar results. Sensors Sensors are good to have if you don't have any slug crewmembers. Manning sensors grants a single level bonus to the system. They can aid in finding breaches or fires, but you should already know where those are if you're paying attention to incoming damage. Briefly manning sensors will usually give you enough information about your enemy to plan your attack. After that, you can usually track enemy movement just by watching doors open and close. Level two sensors have one or two blue text events. If you get a quest for a hidden Federation base, you should upgrade your sensors to level two to be sure that you can claim a reward. Doors Doors are very useful at controlling boarders and to a lesser extent fires. Level zero doors allow enemy crews to move freely. Level one doors force boarders to take a few seconds to break down the door before entering the next room. Each higher level takes longer for boarders and fires to breach. Just like sensors, manning doors grants a single level bonus to the system. Its usually a good idea to man doors before you jump to control possible boarders. You can move that crewmember on to other more important tasks if there are no boarders. Note: If enemies break down one of your doors, that door will remain open after it is under your control. You can tell if you control a door based on how far open it appears. If it isn't opened completely, it isn't under your control. Backup Battery The Backup Battery grants two or four extra power for a time before it needs to cool down. This system is inexpensive, and it can be useful depending on your loadout or planned sector path. If you're planning on visiting a lot of nebula sectors, this can be purchased as a safety net. It helps counteract the lost power in random ion storms. Its also handy if you're using a lot of systems that have long cooldown periods. For managing how to use the power the battery provides See Power Management:Types of Power Hacking [1] Hacking is the single most versatile system. It can be used offensively, defensively, and to help with boarding. Aside from the effects of the hack itself, it has the added benefit of restricting crew movement because you indirectly control the doors to the hacked room. Another passive benefit is substantially slowed repairs in the hacked room. The only difference in the three levels of hacking is the duration of the hack: four, seven, or ten seconds. If the enemy hacks a non-essential system like doors, sensors, or mind control and that system is then destroyed, its usually best to leave it destroyed so it can't be used against you. On the other hand, if they hack an important system, it might be a good idea to send an engi or other free repair crew to the hacked room immediately. This way, they'll be able to start repairs immediately without breaking down a door first. If a ship only has one defense drone, it can still be hacked. There's a decent chance that your hacking drone will make it past without any assistance. You can spam hacking drones at a ship until one connects. Only do this if you have drone parts to spare or if its absolutely necessary. Another technique is to fire a missile so that the defense drone is occupied with it rather than the hacking drone.
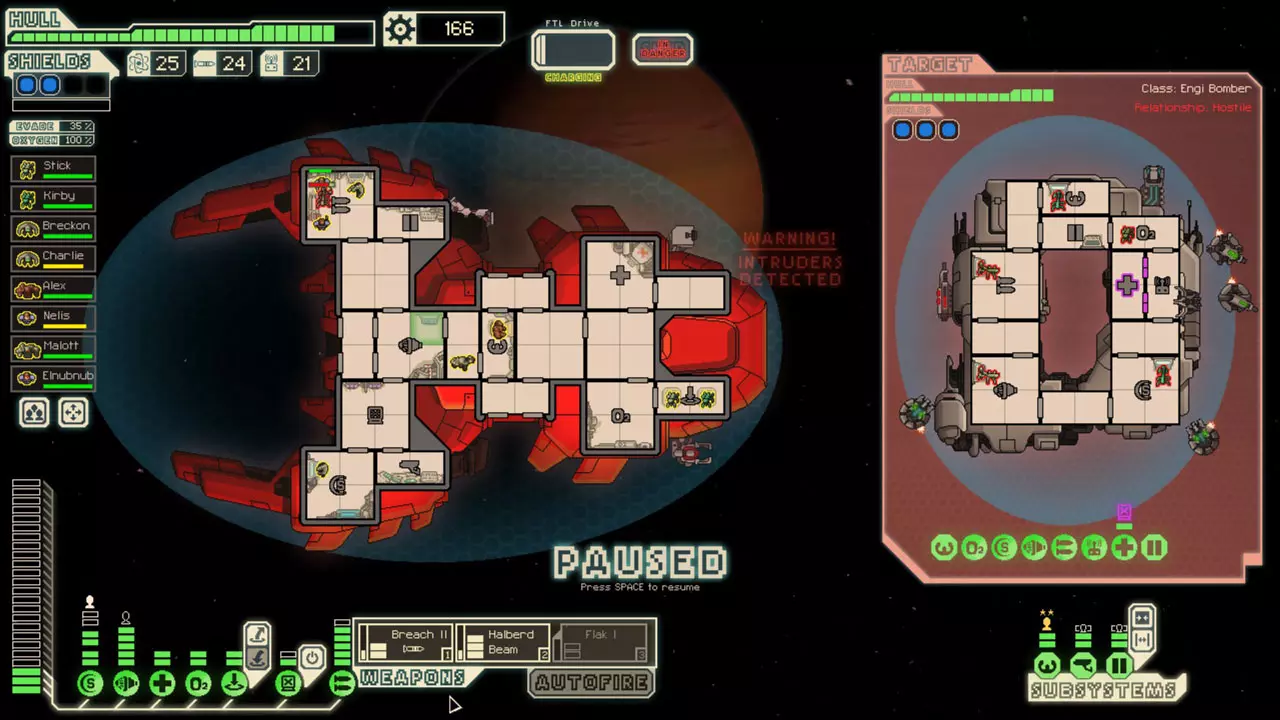
Note: there is a trick that can be used that allows Hacking drones to reliably get past defense drones and anti-drone drones. (See screenshot) When you send out your hacking drone, watch the defense drone(s) as soon as it fires, pause, and remove all power from the hacking system. This will freeze your hacking drone in space causing the blast to miss. Power it on very shortly after it is powered off. You can use this trick multiple times in a row if they have multiple defense drones. Try to launch the hacking drone when the defense drone(s) aren't going to be in line with the approach of the hacking drone because the defense drone will be much more likely to connect. Remember that you have to be more careful with defense drones than anti-drone drones because anti-drone drones fire ion blasts which can't destroy an unpowered drone. Its worth noting that a hacked door always takes exactly 10 strikes from crew to break down. You can also hit it 9 times then walk away to weaken it. This can be useful for tricks that require careful timing. I'll try to cover all the systems you can hack and what their effects are on you and your opponent. Shields Shields are almost always a good option to hack. Level one hacking will remove one layer of shields. Level two hacking will remove three layers of shields. Level three hacking will remove four layers of shields. If you have ions and you are hacking, send the ions first because there will be fewer layers of shields to be removed. You can also send projectiles to make the shield removal process go faster - flaks are a good candidate for this. If you have a Fire Beam or Anti-Bio Beam, hacking will be a very good system to have. If your shields are hacked, you should usually focus on disabling enemy weapons. If you can't mitigate the extra damage you'll be receiving from hacked shields, you may need to flee the battle. Piloting / Engines Hacking piloting or engines has nearly the same effect - reducing the evasion to zero. It also has the passive effect of removing the 5% bonus that manning the system would grant. Most often the one you'll want to hack depends on the layout of the ship. Hack the room that would restrict crew movement the most. If you're dealing with an auto-scout, you'll often want to hack piloting then destroy the system. It probably won't be able to repair it before you finish it off. Whether you hack shields or piloting should depend on your weapons. If you are relying on beam weapons for damage, you'll probably want to hack shields. However, if you have things to deal with shields, you may want to hack piloting instead. A good example of where hacking piloting would be better than shields would be Flak I / Flak I / Heavy Laser I / Heavy Laser I. The flaks will easily remove the shields, and the lasers will deal significant damage. Also, if you have level three hacking and good timing, you can fire those weapons twice. Generally if your piloting or engines are hacked, it won't have a huge effect on the battle because enemies hack and fire weapons randomly. You'll be taking a little more damage from the passive effect. Just plan around the potential increased damage and consider focusing on enemy weapons or fleeing. Weapons / Artillery Discharges weapons. If you have cloaking as well, you can often avoid all significant damage. For example, if they have a missile, cloak the first missile. Right before it fires the second one, use a level two hack to discharge it. By the time its charged again, your cloak will be cooled down. In standard battles, hacking weapons generally isn't as useful as hacking shields, piloting, or another system. However, hacking missiles is often useful in the Flagship fight. If your weapons are hacked, you can usually still handle the battle without incident, but there are definitely times where you should flee. The flagship battle isn't necessarily one of those times. (See Flagship Battle for more info) Note: If you hack weapons the moment a burst weapon starts firing, the hacking will not interrupt it - all of the projectiles will still fire. Oxygen Hacking oxygen quickly drains oxygen from the ship. Most of the time it isn't practical to do this to an enemy ship because they often have medbays/clone bays or upgraded oxygen systems. However, if the enemy ship isn't a threat, you can hack their oxygen system then destroy it (thanks to reddit user Kuirem for this tip). The enemy crew will have a tough time getting through the doors to repair it. You'll need to damage any medical facilities, and possibly repeat the process to kill them. This is an extremely good strategy for Slug C in early sectors. Level two hacking can drain a ship with level one oxygen. If your level one oxygen system is hacked, end the battle quickly or damage their hacking. If you have weak offense but good defense, you could preemptively purchase level two oxygen to remove the hacking threat (especially useful in later Abandoned and Slug sectors). This also has the passive benefit of a blue text option when being hacked by an event. Drone Control When your drones are hacked, they're all disabled, and they all have a chance of being destroyed each time hacking is activated. Its seldom the best choice to hack enemy drone systems, and it can be very damaging to have yours hacked if they're an essential part of your loadout. Medbay / Clone Bay Hacking the clone bay will disable the clone bay for the duration of the hack. This is useful for boarding if you have no other way to disable the clone bay after you kill their crew. If your clone bay is hacked, you can still kill your own crewmembers and have them respawn while the hacking is cooling down. Having your medbay hacked quickly drains health from any of your crew inside. If your crew needs health during this time, it is dangerous but still manageable. If you time it so that you break through the doors right as the hack ends, you'll be able to heal your crew quickly. Make sure that you remove them and unpower the system before the doors close again. Hacking the medbay is extremely effective if you're also boarding. After the drone is attached to their medbay, remove all power from your hacking system, teleport into their medbay, wait for a couple enemy crew to join you in the medbay, then power up the system and hack using at most level two. They'll be trapped while your crew attacks them and the medbay drains them of health. Hacking [2] Backup Battery Having your backup battery hacked not only disables the system, but actually removes a couple of your primary reactor power as well. This is usually more of a minor inconvenience than something to fear. Teleporter Having your teleporter hacked will retrieve any crew you have on the enemy ship. If you have good timing, you can still have successful boarding runs in the interval between hacks. Hacking their teleporter will remove their crew from your ship. This is mainly useful if you have a particularly weak crew. Be careful of the timing - it will only remove the crew from one room at a time. Cloaking Hacking cloaking immediately stops the cloak effect or prevents you from beginning the cloak. This can be used on an enemy to prevent it from cloaking entirely. This is sometimes useful on the Flagship - especially if you have an ion heavy loadout and the cloak would break the effect. Mind Control Randomly mind controls an enemy. It also breaks mind control on your own crew members. You may need to do this if you have few/weak crew and you've been boarded. That said, its generally not beneficial to hack enemy mind control. Door System Inhibits crew movement during the duration of the hack. More of a nuisance than a threat. This could be used to aid your boarding crew or allow fire to catch and spread. Its generally not beneficial to hack enemy doors. Sensors Disables your sensors during the duration of the hack. Again, more of a nuisance than a threat. Never hack enemy sensors because they don't rely on visibility for decisions. Ship Info And Tricky Achievements [1] Most ships have three layouts. The first layout is unlocked either by a quest or by beating the game with the previous ship. The second layout is unlocked by completing two ship achievements, and the third layout is unlocked by reaching the last sector in the second layout. The general ship strategies are usually only applicable early on. The weapons you find and the systems you buy will change your strategy dramatically as you progress. Not all achievements are listed here. Only ones that may cause you trouble or that have a trick to them. Kestrel Cruiser Achievements: The United Federation - To get six unique aliens, be sure to visit a variety of sectors. Each sector type is biased to give you a certain type of crew. Pirate sectors usually have the biggest variety. Tough Little Ship - This can be achieved in a variety of ways. If you're attempting this, make sure you have a safe path to a store (or a full hull repair event) and that you have the scrap for repairs. You can use fires or enemy boarding to damage systems. You can simply receive damage from enemy ships, then jump away at the correct moment - all damage ceases during the jump. Just be sure you're counting weapon damage correctly. I don't recommend using a sun for damage. Sometimes it can cause more than one damage. However, you can use the sun to start the fires. You can also use asteroid fields to deal the damage. After the battle is over, just shut off your shields and wait! Just be ready to power them back on at the right moment - you never know when that last asteroid might hit piloting preventing the jump. Kestrel A The iconic ship. Very average in every respect with no real weaknesses. Good starting weapons that you can easily build on. You should essentially never sell your Burst Laser II, and the Artemis Missile is a good spare weapon to keep around for difficult engagements. If the enemy isn't a significant threat, just use the Burst Laser II on him. Even if the enemy is fairly threatening, you should only need to fire one or two missiles for the average battle - usually targeting shields or piloting. Venting is pretty good other than the cockpit, so Lanius and Rocks make the best pilots for this ship. Kestrel B Excellent early game gunship, but the starting weapons generally won't be useful after a few sectors. As long as you still have your starting Basic Lasers, it is one of the few times where you can safely set all your weapons to autofire. Other fast-firing lasers and Flak Is compliment the starting Basic Lasers well. This ship is good for boarding because of the starting Mantis and position of the teleporter once its purchased. The many doors, and their distribution ensure the ship has excellent venting. I prefer to put the Zoltan in engines, so I don't accidentally unpower one of my weapons. Kestrel C Average Advanced Edition ship. The Dual Lasers is an excellent weapon for the required power - there's a very good chance you'll want to keep this weapon around for the entire run. Make sure you focus at least some damage on their shields because firing the Ion Stunner on them will substantially slow the repair process. Since you start out with an ion weapon, getting any other ion weapon will allow ion damage to stack. The starting Lanius will give you some nice blue text events if you can visit Abandoned Sectors. I like to leave the piloting to my Lanius because venting in the front of the ship is poor. However, venting in the rest of this ship is very good. You can usually herd the enemy crew in circles with your crew taking minimal damage. Engi CruiserUnlocked by reaching the fifth sector with any Kestrel Cruiser Achievements: I hardly lifted a finger - This is easily achieved if you encounter a shieldless scout or if you're fighting a ship with level one shields in an asteroid belt. The guns... They've stopped - You can get this in Engi A with the help of any other ion weapon. Or you can simply visit a pulsar. Systems ioned by the pulsar count toward the achievement. Engi A An exceptionally powerful ship. The Ion Blast II is fast enough to stack with itself, so its offence can be built on with nearly any other weapon or drone. All Engi ships only have three weapon slots, so you'll generally want to keep good, high power weapons. If you plan on using drones as your primary offence, try to get a Drone Recovery Arm. You may want to purchase doors a little earlier than normal because of your fairly weak crew (the same goes for all Engi ships). Try to keep the Engi Med-Bot Dispersal around for at least a little while - it helps with boarders and has a very nice blue-text event. Venting is fairly poor, but Engis are great at putting out fires. Boarders will be a bigger problem, but you usually have the option of herding them into the medbay to fight. If you can, turn on the medbay during fights/fires/breach repairs to take advantage of the Engi Med-Bot Dispersal and minimize damage taken. Engi B An exceptionally weak ship. Its one starting Engi is very susceptible to boarders, so use venting combined with your Anti-Personnel Drone to take care of them. Try to time it so that the room with the boarders runs out of oxygen just after your Anti-Personnel drone arrives. I know its boring, but if you really want to succeed, you should wait for your drones to fully heal up between battles. If you're forced to fight with your Engi, make sure you use venting to funnel them into the medbay first. You should also use venting to deal with fires. Its a common mistake to keep the majority of the ship vented permanently. Don't do this! You lose control of boarders, and you're forced to deal with O2 repairs sooner. Its starting weapons can be built on fairly well, but by themselves, they're very weak. So an efficient, low power weapon should be your first purchase if available. Early game in this ship is one of the few times where purchasing crew could easily be justified - try to get something with decent combat ability though. You can safely sell one System Repair Drone and your Drone Reactor Booster at the first store for some extra scrap. Don't hesitate to have your Engi move around the ship to do repairs or man other systems - your starting engines aren't going to be doing much good, anyway. You'll need every trick in the book to win with this ship, so if you can't take damage from an early enemy, target their Oxygen system to try to suffocate them. Very often the Heavy Laser will cause a breach or start a fire to help your cause. Engi C A deceptively powerful ship. Dual Lasers is a good weapon to keep around for a long time. You'll probably keep it for the whole run, but don't hesitate to trade up for something more powerful because you only have three weapon slots to work with. Hacking is extremely versatile - don't forget to use it to help suffocate the enemy when they're not a threat. The Beam Drone is good, but you'll probably want to sell it once you have better weapons. Only keep it around if you can't find anything better. Keep the Defense Scrambler around as long as possible because it will make a lot of difficult situations much easier - especially if you rely on drones. Upgrading hacking is usually going to be a fairly early purchase. It will help keep shields down longer, and allow you to get another hit or two in. This ship is fairly weak against boarders, so if you're boarded, the first step should usually be to move one of your Engis to door control. Then you can use the good venting to your advantage. Ship Info And Tricky Achievements [2] Federation CruiserUnlocked by defeating the partially-built Flagship in the Rebel Stronghold sector. (empty beacon if you have Long-Range Scanners) Achievements: Artillery Mastery - Upgrade your Artillery Beam early and focus on all forms of defense. Diplomatic Immunity - Focus on green sectors and distress beacons. If you have Long-Range Scanners, visit a lot of empty beacons. Federation A already has a great crew for this. Federation A Starts with the best crew for blue text options and one of the best weapons. The artillery beam pierces all shields (other than Super Shields), and is a nice supplement to any loadout, but if your other weapons are competent, you won't need to focus on it. This is a strong gunship to start out, so focus on defense if you're struggling to improve the offense. Worst-case, you can always destroy the enemy with your artillery beam - it just takes time. If you are forced to rely on your artillery for damage, be sure to upgrade it once. It doesn't even have to be powered full time, but the damage buffer will often save you. I like to use Rockmen as pilots, so I'll often change the crew positioning. I'll move the Human to engines and Mantis to weapons as well. Venting on this ship is bad, but you shouldn't have to rely on it with your strong and diverse crew. Federation B Not as good as layout A. The Slug makes a great pilot. Most of the ship has excellent venting, but the front of the ship is very susceptible to fire because the only way to vent it is through the medbay. If you feel it necessary, you might want to upgrade doors a little earlier than normal to make up for the weaker crew and the poor venting. The starting Leto Missile isn't great, but the Dual Lasers makes up for its weakness. You may find yourself relying on the Artillery Beam more with this ship because of its initially weaker offense - thankfully, it starts out at level 2, so it charges faster and has a damage buffer. Federation C A very unique ship. The Flak Artillery only appears on this ship. It is slow to fire and inaccurate, but it has the same damage as the Flak Gun II. Its not terribly useful initially because of its extremely slow firing speed, so you'll want to keep an eye out for other weapons. Early on, you'll want to use boarding as much as possible with two possible strategies - Zoltan bombs or Zoltan/Mantis boarding (If you leave both Zoltans to man the ship, you'll be wasting one power in piloting). Also, the Emergency Respirators augment allows you to easily board and destroy airless scouts. Once you have nearly any damaging weapon, you can safely sell this augment. Be careful which ships you choose to board! If you board a ship that can destroy or disable your level two Clonebay, you may be sending your crew on a one way trip. Focus on defense with this ship because one way or the other, you'll be needing a fair amount of time to deal with the enemy. Zoltan CruiserUnlocked by spreading peace in the Zoltan Homeworlds (empty beacon if you have Long-Range Scanners) Achievements: Givin' her all she's got, Captain! - Having an upgraded backup battery can make this achievement much easier - you won't even need Zoltans. Zoltan A A good ship with a great starting weapon. Find weapons that allow you to use the Halberd Beam more effectively. In early sectors, this usually means finding a laser or ion that only takes one power. One way or the other, you'll need to upgrade your weapon system fairly early. This will give you a damage buffer and allow you to use the Leto missiles in conjunction with the Halberd Beam. Upgrade engines slightly sooner than normal with this ship to make the Zoltan Shield last longer. Also, move your pilot Zoltan to a system that requires power when you get another crewmember. Venting on this ship is fairly good, and you'll need to rely on it a lot because of your weaker crew. Zoltan B An exceptionally powerful ship with great starting weapons. Reorder your weapons so the pike beam is on the left. Finding another ion weapon or getting a more powerful beam weapon would be ideal early weapon upgrades, but essentially any other weapon builds on the starting weapons. Move your pilot Zoltan to a system that requires power when you get another crewmember. Don't forget to upgrade your shields because this ship starts with an unusable shield system. Venting isn't great for much of the ship, so you'll probably want some stronger crew to balance things out. If you're wondering weather you should stagger your Ion Blasts or fire them at the same time, just fire them at the same time. That said, there's some fairly complicated math that suggests that staggering them is slightly better against ships with more shields and higher evasion. Zoltan C Tricky to get started with, but very powerful if you can survive the early sectors. Juggling power with the backup battery and by moving Zoltans around makes the early sectors interesting. If your enemy just has one layer of shields, you can set the Charge Ion to auto-fire. If ships have two or more layers of shields, leave the Charge Ion build up all three blasts before firing, then set it to auto-fire if more than one hits. Don't activate your Battery Backup till you need to. This usually means that you need to wait till you know the enemy shields are going to be down, and you'll need the extra power for the Beam Drone. To save 2-3 seconds on your first possible damage, activate the drone at the very beginning of the battle, and leave it move closer to its initial firing position before deactivating it and waiting for the shields to go down. The Charge Ion is one of the best weapons in the game, so nearly any other weapon will compliment it. I like to move the Zoltan in shields to weapons until I get more power or crew - you don't need the power in shields for the first part of battles because of the Zoltan shield. Move your pilot Zoltan to a system that requires power when you get another crewmember. This ship is excellent for nebulas - Ion Storms aren't threatening because of your Zoltan Power and your Backup Battery. Also, Pulsars aren't very threatening because you can stack your Zoltans in your shield/weapon room to keep them up and running. Venting in the rear of the ship is very poor. Be careful you don't lose your Clone Bay! Ship Info And Tricky Achievements [3] Mantis CruiserUnlocked by slaying KazaaakplethKilik's crew then finding and helping survivors with advanced medical facilities in the Mantis Homeworlds. (ship beacon if you have Long-Range Scanners) Achievements: Battle Royale - Find a ship that's easy prey. Kill all of their crew but one, then suffocate your extra crew. Mantis A Very weak to airless scouts and Zoltan ships early on. You'll probably want to keep one mantis on piloting till you can find a better pilot, keep your Engi on engines, and keep your other two Mantis in the teleporter room to start out each fight. Mantis Pheremones isn't a bad augment, but it can be sold for scrap. The Small Bomb is excellent for destroy medbays/clone bays when necessary - you'll probably want to keep it for the entire run unless you happen to get a Breach Bomb II. All Mantis ships only have three weapon slots, so you'll generally want to keep boarding support weapons and good, high power weapons. Venting isn't great, but boarders won't be much of a threat on this ship. Mantis B One of the very best ships. The only ship to start with upgraded shields, and the only one to start with a defense drone. You'll want to keep your eye out for a boarding support weapon like a bomb and something to take down Zoltan Shields. You'll generally find crew quickly because you'll be boarding, so fill it up and have fun. If you encounter an airless scout early on, send your Boarding Drone over, and grab a sandwich as it slowly destroys the ship. You should avoid Abandoned sectors because you'll be relying on boarding ships with oxygen. You can sell your Mantis Pheremones augment when necessary. Keep your boarding drone around until you have weapons capable of handling airless scouts. Venting is decent, but you might have some problems with fires in the extremities of the ship. Try to get four crew that are best for boarding (Mantis and Rock), and have the rest of the crew be something that can actually man and repair systems. Mantis C Another potentially powerful boarding ship which starts with great boarding support weapons. If you can get four Lanius, they make a great boarding party, but that usually won't happen. You'll probably eventually move your starting Lanius to piloting or engines. You should probably set the starting position of your Mantis to the teleporter room, so you can board faster. You can sell your Mantis Pheremones augment when necessary. Reconstructive Teleport is extremely valuable on this ship as it will allow your crew to start battles at full health and gain experience. You may also want to look out for a DNA Backup if you're unsure of your boarding skills. You can sell one of your starting weapons at the first store because they're fairly redundant - I usually prefer to keep the Lockdown Bomb because it allows more control, and you can deal with more crew per bomb. Aside from your boarding support weapon, make sure you use your two remaining slots to keep good, high-power weapons to deal with other threats. Slug CruiserUnlocked by showing mercy and looking for information in the Slug Home Nebula. (ship beacon if you have Long-Range Scanners) Achievements: Disintegration Ray - If one of the crew you're attacking is a Rock, don't forget that he'll take one extra hit with the beam. Slug A Excellent for early game crew kills. Dual Lasers are great at removing shields, and Breach I is great for disabling medbays. Have your second slug start on weapons, but move him to engines temporarily when you need the extra evasion. Killing the crew can take some time, so make sure you focus on defense. After you have decent defense, upgrade your weapons once, so you can use all three at the same time to better deal with their crew. After the first few sectors, this method of killing crew will become less and less useful because of the better medical facilities and more shields. You'll need to either shift to boarding or a gunship. This choice will depend almost entirely on what you find from your early crew kills. If you find a couple mantis and have scrap to spare, go with boarding. And as always, if all else fails, get hacking. Find a Flak I, or some other decent weapon, probably go with the gunship route. The Slug Repair Gel can be sold for scrap. Venting is fairly poor, but you start with upgraded doors and your starting crew should be able to deal with most threats easily. Slug B A misunderstood and underrated ship in my opinion. It requires good boarding technique to be useful, but obviously you should be careful because you don't have a medbay or clone bay. Make sure you distribute crew damage as much as possible and try to only use a couple missiles each battle. Don't forget that the bomb works on EVERYONE in the room, so if you need to heal five or more crew, have them walking through the room as it goes off. To save on health, suffocate boarders in the maze-like ship, and if you know a bomb or missile is about to hit a room, pause, and have your crew momentarily walk out of it. Buy your preferred medical facility early to save on missiles, I always go with the first one I encounter. Once you get a medical facility, you can sell the Healing Bomb for scrap. The Artemis Missile will make a decent supplement to other weapons until it can be replaced with something better. The Slug Repair Gel can be sold for scrap. Slug C A versatile ship because it starts with mind control as well as hacking. If early ships aren't a threat, you can use mind control to have the crew kill each other, then finish off the last one with lasers. Another great technique to use with this ship is hacking oxygen to kill crew: Hack oxygen and damage it right as the hack ends. You can also mind control the repairman just before oxygen comes back on line to make this technique even more effective. It will take a long time to repair, and you'll be able to repeat the process to kill the crew (See Hacking - Oxygen for more information). Once you get to sector two and enemies start having level two shields, be sure to upgrade your Hacking system to level two to remove more layers of shields. Venting on this ship is great, and it starts with upgraded doors, so you shouldn't have to worry much about fighting boarders or fires. The Slug Repair Gel can be sold for scrap. Ship Info and Tricky Achievements [4] Rock CruiserUnlocked by proving your fortitude to a mighty warship in the Rock Homeworlds. (ship beacon if you have Long-Range Scanners) Achievements: Is it warm in here? - Easiest to get in Rock B with the Fire Bomb. Regular missiles and Heavy Lasers blasts have a decent chance of starting fires also. Defense Drones Don't Do D'anything! - Its easiest to get this achievement in Normal or Hard mode in sector one or two. Just fire your missiles in volleys and aim for the Drone Control room first. Engi sectors have a lot of defense drones if you have that option. Ancestry - Have great luck to get this achievement. (To help that luck along, See Ancestry and Unlocking the Crystal Cruiser) Rock A Personally, my least favorite ship because it relies on a fair amount of luck. If the enemy's weapons are a significant threat, you'll probably want to soften them up first. Otherwise, you should use the Artemis missile to destroy piloting, then use the Hull Missile for damage on empty rooms. If the enemy is no threat at all, and it has eight or less hull, you'll probably just want to spam Hull Missiles on empty rooms. If you encounter a Zoltan Ship before getting a non-missile weapon, you may just want to flee unless you have a lot of spare missiles. If you can get a teleporter, this becomes an excellent boarding ship - keep the Artemis missile to destroy medical facilities. Usually, you'll be scrambling to find some way to damage enemies after you run out of missiles, so you should show mercy to ships that offer you a fair amount of missiles. The Rock Plating is good to have around, but you'll often need to sell it for scrap. Don't hesitate to sell the Hull Missile if you can get a decent laser of some sort. Rock B If lacking other firepower, you should always get a teleporter for this ship. Rock boarding with a Fire Bomb is extremely effective. Firebomb their medbay, wait a few seconds to let it take damage while your crew isn't, then board it (See Boarding and Hand to Hand Combat: Miscellaneous Boarding Info for a more detailed boarding technique). This ship has no door system and no airlocks, so if fires get out of hand, you can always shut off oxygen to help it burn out. You shouldn't need doors with this sturdy crew, so don't worry about purchasing the system. But if you do buy doors, you can leave certain non-essential rooms breached to help venting in some circumstances. The Heavy Pierce Laser isn't a great weapon, but you'll need to keep it around till you can replace it with something better. The Rock Plating is good to have around, but you'll often need to sell it for scrap. Rock C Not a terribly great ship. Keep the Crystal weapon around for at least awhile because it makes a good addition to many loadouts. Swarm missiles aren't very good, but they can help take down enemy weapons or evasion if they're a threat. You'll definitely need better weapons or at least hacking very quickly to make this ship viable. It has excellent venting to help control boarders as long as you put someone in the door control room. This ship is very useful as an alternative way to unlock the Crystal Cruiser. Since you won't have a quest beacon to guide you, try to get Long-Range Scanners and find empty beacons in the Rock Homeworlds. Alternatively, you can use the exploit of naming you Crystal crew to "Ruwen" before entering the Rock Homeworlds - this will reveal the correct quest beacon. (this exploit has been patched out) The Rock Plating is good to have around, but you'll often need to sell it for scrap. Stealth Cruiser Unlocked by having your Engi aiding his troubled friends in the Engi Homeworlds. (empty beacon if you have Long-Range Scanners)
Achievements: Bird of Prey - This is most easily achieved in early sectors with Stealth B. Phase Shift - The single best place to get this on the third phase of the Flagship fight. Dodge a power surge and a volley of lasers/missiles in the same cloak cycle. The second missile volley usually lines up closely with a Power Surge. Tactical Approach - Avoid Rock sectors because they have lots of hazards. Nebula sectors can be almost as threatening to this achievement. Sometimes, you'll be completely prevented from being able to get this achievement, so be patient. (See screenshot) Stealth A Very powerful little ship. Reorder the weapons so that your Dual Lasers are on the left for most encounters. These weapons are very strong and quick to fire - you'll probably want to keep them both around for quite awhile. As with all Stealth ships, you'll want to purchase shields as soon as possible. Venting on this ship isn't great, but at least the starting crew have no real weaknesses. The Titanium System Casing can be quickly sold for scrap. Stealth B Powerful at first glance, but very dependent on RNG to get your run started. Unlike most ships, you'll want to spend your first 50 scrap on cloaking. At the beginning of most early battles, you'll want to use your full level three cloak. This will allow you to fire first, usually ending the battle. Obviously, start the attack on or very near the enemy Shields to do the most damage. If you can find a low power ion or laser, you'll be in good shape for a long time. But hacking is almost essential for this ship unless you get other good weapons to replace or support the Glaive Beam. Hacking can sometimes be purchased before shields depending on the situation. After the first couple essential purchases and upgrades (cloaking, shields/hacking) consider upgrading weapons to give yourself a damage buffer. Don't forget to "steal" power from cloak with your Zoltan as its cooling down to increase your evasion (See Power Management), but be careful not to remove power from the Glaive in the process! The medbay is small and positioned so that you can only get two crew in at a time, so be very cautious when dealing with boarders. They can easily overwhelm your weak crew if you're not careful. Advanced tips for Hard Mode: This is arguably the worst ship, so you need every edge you can get. Hard mode has different rules that govern enemy targeting (See Difficulty, Luck, Vocab, Etc.), so you can exploit those rules to give yourself a very small edge early on. If you keep Oxygen levels below 50%, it gives the O2 system a higher priority for being attacked. Likewise, if you're able to toggle the power of your Glaive off for a few frames when the enemy fires, it gives weapons a lower priority for being attacked (the timing on this is very precise - I don't even use this trick). Both of these together should make your weapons a significantly lower priority target. Stealth C This "stealth" ship unfortunately doesn't start with cloak. Some regard it as the worst ship, but its far less dependent on luck than others. I like to use the Slug or maybe Rock crewmember as the pilot. The Shield Drone is slightly better than normal Shield Drones because it requires one less power. That said, it still does very little to block incoming damage. Don't forget to use your Anti-Drone Drone to help with enemy attack drones. It has a three slot drone system, so at least you'll be able to keep a couple handy drones around. Your first upgrade should be a damage buffer on your weapon system. Next should be your Drone system. This will allow you to use both drones at the same time, or at least you'll still be able to run your Shield drone when the system is damaged. You'll definitely want to save up for shields though because those drones don't do much for preventing damage. Venting is pretty good, but boarders can still be a problem if you don't have a crew starting the battle in the door room. Ship Info and Tricky Achievements [5] Lanius CruiserUnlocked by unlocking four other ships. Achievements: Scrap Hoarder - Play conservatively. Only buy what you need. Loss of Cabin Pressure - Beware of all hacking because it closes doors! All doors are closed if they hack the door system. If this happens, you'll need to cycle power to oxygen so you don't get over 20%. The alternative way to get this is to suffocate all of your weak, oxygen-dependent crew before your first jump. Lanius A A fairly average ship. It does start with hacking, so take advantage of that if you're short on weaponry. Venting is excellent with the many doors and Lanius crew. If you're boarded, make sure you fight them with Lanius in a vented room. Beef up defenses and hacking early. Also hack and damage oxygen to kill crew for greater rewards (See Hacking - Oxygen for more information). This is an excellent ship to use for boarding because it starts with two Lanius, Hacking, and even an Ion Stunner. The Stunner will allow you to sit in the shield room, having the enemy suffocate while stunned. If you don't go with boarding, its a good idea to make one of your Lanius the pilot. The Emergency Respirators are definitely useful, but they're not at all necessary, so they can be sold for scrap. Lanius B An exceptionally powerful and flexible ship. The two Lanius and mind control should be used for boarding. You'll want to set their default positions in the teleporter room. This is the only ship that can safely board airless scouts from the beginning. It also starts with an amazing Advanced Flak gun that charges faster, is more accurate, and uses less power than its standard counterparts. As always with the clone bay, make sure it won't be damaged or disabled if your crew are going to die. Unfortunately, your Lanius crew can't be sent to the "medical airlock", so you'll have to attempt to have them die at opportune times. If they're not taking much damage from boarding, you may just opt to upgrade your clone bay to get a higher passive health bonus each jump and to get the damage buffer. The Emergency Respirators are definitely useful, but they're not at all necessary, so they can be sold for scrap. Crystal CruiserUnlocked by having great luck. (To help that luck along, See Ancestry and Unlocking the Crystal Ship) Achievements: Sweet Revenge - Take an early opponent down to one hull and wait for them to kill themselves. Clash of the Titans - This can be a very frustrating achievement! It may take many tries to even encounter enough rock ships to have the opportunity to get the achievement. If you don't see a lot of red sectors when you hit the end of sector one, you may just want to restart. Other than Rock sectors, give preference to Pirate Sectors, then Nebula Sectors to maximize your chances. Crystal A A fairly average ship overall. Its absolutely massive, so good crew positioning is important. Venting is good overall. Unless you get really good weapons, you should probably get a teleporter to use with your Crystal crewmembers. If you don't get a teleporter, you should put your Crystal crew in piloting and weapons because they have more health and can lock out dangers when necessary. Obviously, you should fire the Heavy Crystal after the Burst Crystal. The crystal weapons can be supplemented with most other weapons. However, they're slow to fire, so you'll usually want to replace them with something a bit faster. You should sell the Crystal Vengeance augment for scrap. Crystal B Widely regarded as the most powerful ship. Its weak to airless scouts and Zoltans until it gets any sort of a weapon. You can still board scouts to take down their weapons if they're threatening. If you don't find any damage dealing weapon in the first couple stores, you might consider buying a clone bay - it will allow you to destroy auto-scouts with boarding. Four person boarding with Crystal crewmembers is extremely powerful. You have complete control over enemy movement. If the ship is a threat, board the weapon room first and destroy it - then you can kill the crew at your leisure. Crystal boarding also makes the Flagship battle trivial even on hard mode. Its Cloaking system is very useful for buying you time as you kill the crew. You should avoid Abandoned sectors because you'll be relying on boarding. You should sell the Crystal Vengeance augment for scrap. This is the definitive ship to use for scrap hoarding challenge runs. Reddit user mekloz has discovered a method of destroying airless scouts without weapons further strengthening this awesome ship. Ancestry and Unlocking the Crystal Ship There are actually three ways to unlock this coveted ship: Beating the Flagship with every A and B layout (other than Lanius) Using Rock C and stumbling upon the correct non-ship beacon in the Rock Homeworlds (while keeping your Crystal crewmember alive) The Crystal QuestThis section will cover the three parts of the Crystal Quest. First Part - Finding the Damaged Stasis Pod This event can be found in a non-ship distress beacon in any of the following sectors: Pirate, Engi Sector or Homeworlds, and Rock Sector or Homeworlds. You should search for the ship, but if you have Rock Plating, you get a blue text option for a guaranteed success. Second Part - Finding the Zoltan Research Facility This event can be found in a non-ship beacon in any of the following sectors: Engi Sector or Homeworlds, and Zoltan Sector or Homeworlds. They'll be able to fix the Damaged Stasis Pod, and you'll be rewarded with a Crystal Crewmember named Ruwen. Third Part - Find the Ancient Device You have to be in the Rock Homeworlds (which is a red sector and can occur in sector five to seven) to get this event. If you've done the previous steps in the process, there will be a quest beacon waiting for you. If you haven't done the previous steps, and you just have your Crystal crewmember from using Rock C, it will be at a non-ship beacon. After this, you'll be in the Crystal sector. There will be a quest beacon waiting for you with your reward. Congratulations! Maximizing Your Chances Even while doing everything you can to maximize your chances, you may still only have the opportunity to get this ship in maybe 5% of your runs. So you want to do everything you can to increase those odds. Some things should be obvious, but others might not be so apparent. Play on Easy - Gives you much more scrap to work with and a much higher rate of not dying. Use Rock B - Comes with Rock Plating, Less reliant on RNG than Rock A, and you can use boarding for better rewards. Buy Long Range Sensors - Do this to make sure you're visiting the right beacon types when you're in the sectors you need to be. Reveal the map - Even if you do have Long Range Scanners, you should often make event choices that would reveal the map. It will allow you to plan a route through the sector that would hit the most beacons of the right type. Buy Distraction Buoys - One extra jump could mean the difference. Sector Choice - At the end of the first sector, make sure there are at least some green sectors early, and red sectors late. The more the better. If you don't have a path that allows this, or if there are too few of either, restart. Slow down the fleet - When you're in a sector that you need to be in, give yourself more time. Always booby trap the cache and pay mercenaries to slow down the fleet or scout the sector. Make the right choices - If you're asked to help, usually refuse. This will pollute the sector with quest beacons that could prevent you from finding the beacon you really want. But if someone is out of fuel, consider helping them because it could reveal the sector. Dive - If you can get one or two extra beacons by going past the exit beacon, do it. Know when to give up - If the opportunities have passed, don't hesitate to restart. Be patient. You'll get it eventually. (most of the above optimizations provided by reddit user 1-800-thewolf) Note: If you're using Rock C, and you name your Crystal crewmember "Ruwen", the quest beacon will show up in the Rock Homeworlds sector. You have to name him before entering the sector to get it to work. Most consider this cheating, but play as you like! This exploit has been patched out. Flagship Battle [1] Sector eight or The Last Stand should be used similar to the other sectors. Plan your route to explore as many beacons as possible in the time given. The biggest difference is that you want to try to get to the base at the same time as the Flagship. You have three jumps to deal with the Flagship when it reaches your base, but you'll want to try to make sure you have time to jump away and back in case something goes wrong. Scrap rewards are extremely high in this sector, so grinding a few extra beacons could mean victory. Its especially important to give yourself route options in this sector because beacons randomly become hostile. Don't get cornered! The Last Stand always has one store, but often you won't be able to find it before its overtaken. When you get to this sector, you'll be given more than enough fuel and your hull will be repaired by ten points. Take this into consideration in sector seven, so that you don't spend unnecessary scrap on excess hull or fuel. Use repair beacons as necessary, but they have much lower scrap rewards than your average encounter. The goal of your entire run should be preparing for the Flagship battle. Its a challenge, but its the only battle where you'll know exactly what you're getting into beforehand, so you can prepare accordingly. Generally, you'll want to have a bare minimum of level three shields, level five engines, a couple optional systems and enough weapons to reliably penetrate level four shields (accounting for evasion) OR a reliable way to kill all the crew. If you're ever able to safely kill the crew on the flagship, that should be your goal. The biggest threat present on every phase of the flagship fight is the missile launcher. You should try to have Cloaking or even a defense drone to help deal with this damage. If you have hacking and cloaking, you can use them so that you'll be able to cloak every volley from the missile launcher. Even if you just have cloaking, if you deal a small amount of damage to the missile launcher, it will slow down reloading enough that you can cloak every volley. Phase One The unique threats on this phase are cloaking, hacking, and a burst ion. If you're playing on Easy or Normal, all of the flagship's weapon bays are detached from the main body of the ship. Boarding them is a trivial task. You should teleport two into their missile launcher, two into their ion bay, take the two out of the missile launcher for healing, then teleport them back over to the beam room. After those three rooms are completely disabled, retrieve all your crew and heal them. Leave the laser gunner alive because lasers are the smallest threat. If you kill him, and all of the other crew are dead, AI will take over the ship, and systems will start repairing themselves. After the three weapons bays are disabled, you have all the time you need to kill the crew. On Hard mode, the missile launcher and laser bays are attached to the ship, so you won't be able to keep them down reliably. Killing the crew on Hard works the same way, but you have to have much better defenses or be able to kill them much faster. There are many things you can do to kill crew on the flagship: Board into their medbay and hack it. Plenty of ions and Fire Drones or Fire Beam. Mind control individuals in the shield room to have them take out their own one at a time (you can't kill all the crew this way, just reduce their numbers by two or three). Mind control crew and teleport them over to your ship to deal with them one at a time. Set the medbay on fire (using fire bomb, beam, heavy lasers, missiles, bombs, or even lasers) and board it with Rocks. Damage crew, and as they walk into the medbay, hit them with a bomb. This kills the crewmember and damages the medbay. If you have very strong boarding and no other way to kill crew, there is still one difficult, time consuming method you can use. You can break down a lot of doors on the ship (which stay open), and bring over multiple sets of your crew while kiting damage with the ones already there. Then put four of your crew in a large room (like shields) then set up a path of your own men between that room and the medbay. Your most damaging crewmembers should be in the path, not in the room. You'll sometimes be able to kill enemy crew on their way to get healed. Be very careful of this strategy because it is dangerous if not executed correctly. This works best with a four person teleporter. Even if you're not able to kill the entire crew, killing any crew is better than none because they'll be boarding you in later phases. At the very least, near the end of the fight try to damage cloaking and doors to get a few crew into the wing of the ship that will be destroyed (this seems to only be the case on easy and maybe normal). Crew in those rooms will not be back. The primary targets for your weapons should usually be the missile launcher, shields, and cloaking. Keeping the missile launcher from firing will save a lot of hull damage. Hitting shields, cloaking, and piloting will make the battle go faster. If you have multiple defense drones, you should enable them at the beginning of the fight. Don't mix Anti-Drone Drones with defense drones - they might just temporarily disable the hacking drone, allowing it to slip by your defense drone. Hopefully, you'll be able to shoot down all of the Flagship's hacking drones. You'll almost never be able to do this with only one drone defending you at a time. It will run out of drone parts eventually. There's a trick to coerce the flagship into hacking a specific system (sensors, level two oxygen, or doors would have the least impact on the fight). If you see the hacking drone approaching the specific area of your ship you know to be associated only with that system, you can sometimes pause and disable your drones to leave it through. A more reliable way of telling where the hacking drone is approaching is to watch where your defense drone points the moment before it fires. If weapons are hacked, don't flee by default - hacking and cloaking are nearly synced, so you'll only be losing a relatively small charge with many loadouts. In this case don't attack cloaking or hacking unless you can reliably keep them both down. Phase Two Phase two is the drone phase. The unique threats are a Boarding Drone, a couple attack drones, and a very deadly drone power surge. If you have an Anti-Drone Drone, now is the time to use it. If you combine it with a defense drone, you shouldn't have to worry about their Boarding Drone. Also, note that one damage to the Drone Control room will temporarily disable the Boarding Drone. If you shoot down enough drones, you can eventually deplete the Flagship of its supply of drones. After that, it won't be able to redeploy the Boarding Drone, Combat Drone, or Beam Drone. However, the Power Surge will always bring in a wave of new drones even if the Flagship runs out of drone parts. If you have cloak, it should either be used for dodging missiles or the Power Surge. If you only have level three shields, it should almost definitely be used for the surge. However, if you have decent evasion and level four shields, you may want to save it for missile volleys. With good timing and a higher level cloak, you can sometimes use it for both. If you're relying on hacking for your offense, you can use a trick to get your drone past its Defense Drone I. Momentarily toggle off the power to your hacking drone when the defense drone fires (See Hacking for more details) This is also another opportunity to kill more crew to make phase three easier. You can use all of the same techniques listed in phase one. Crew in drone control or sensors when the ship is destroyed in this phase is over won't be around for phase three. Note: The mix of drones in the power surge is unique for every fight, but the same for every surge during the fight. Flagship Battle [2] Phase Three The unique threats in this phase are a Super Shield, boarding, mind control, and a Power Surge consisting of a large volley of laser blasts. If you have your own mind control system, you'll want to use it to counter the enemy mind control. The enemy mind control is very strong, but it can be countered with level one mind control. If you don't have mind control, you'll have to use other crewmembers to soak up damage or simply leave them damage the system (See Optional Systems:Mind Control for more detail about mitigating the damage). With this in mind, you should preemptively place your extra crew in non-essential systems like sensors, doors, oxygen, Ect. If you can keep other crew in the room with your mind controlled room for only a few seconds, he'll only have time to take down one bar of the system rather than two. I find that its usually best to figure out what positions are the best, then save those new crew positions as your default - one way or the other, you won't be needing the old ones after this battle. Do what you can to get rid of the Super Shield as fast as possible. As with all Super Shields, ions and beam weapons do double damage. If you have offensive drones, activate them while you're not shooting down missiles or lasers. If some of your weapons have significantly higher charge times than others, don't fire those ones when the Super Shield is almost down - try to time it so that all of your weapons are ready to fire at the same time when the ship is vulnerable. If you have cloaking, you'll either want to use it to dodge their missiles or their volley of lasers from the Power Surge. If you have level four shields and decent evasion, its a toss up, but I usually use it to doge missiles. If you only have level three shields, the Power Surge is probably a bigger threat. If you happen to have level three cloaking, you can usually dodge the first missile volley and the first power surge in the same cloak - just make sure you wait as long as possible before starting the cloak. When you are boarded, you will need to deal with them as quickly as possible because they'll be joined shortly with several friends. If you're playing on normal or easy, you may want to board their missiles immediately if you think your other crew can handle the boarders. Otherwise, keep them around until the threat is gone. Try to suffocate the boarders quickly or overwhelm them with numbers. After a short time, most of the crew will have boarded your ship, so that will only leave a couple on the Flagship. If you haven't used your boarding crew, now is the time to board. Just be careful of their mind control, make sure its not going to target one of your boarding crew as soon as they teleport over. If you know you won't be able to deal with boarders and fight the Flagship at the same time, there is a trick you can use to your advantage. Wait till as many crew beam over as you can handle (probably four or six), then jump away from the Flagship to a safe beacon. You'll then be able to deal with the boarders and repair any damage. The Flagship will be missing those crew when you jump back making the battle much easier. Note that this trick won't work if the Flagship is about to destroy your base. If you think you may want to use this trick to your advantage, its best to plan ahead so you can safely jump to your base when you flee. (Thanks to reddit user Vrachos for this tip) Each phase of the Flagship has more evasion than the last, so if your weapons were struggling to penetrate their shields before, you're going to have a hard battle. Try to do things to decrease their evasion. I usually prefer to damage the missile launcher and other systems to force the pilot to fix them. If you don't have mind control to counter theirs, that's another possible target. This phase of the Flagship is very weak to fire after their boarding crew has been dealt with. If you can get the remaining crew to run around and extinguish fires, they won't be manning systems and repairing others. If you take too long to destroy the ship, the flagship will use one of its Power Surges to replenish its Super Shield. This is the last stage of the Flagship. If you destroy the ship, you win! Good luck! A Few Notable Augmentations Almost always useful Long-Range Scanners - Allows you to be prepared for hazards, and more importantly, you won't be wasting jumps on empty beacons. It also helps to search for homeworld quests. This is the only augmentation that I will always attempt to purchase. By far the best returns for the cost. Can be safely sold in late sector seven or eight. Zoltan Shield - Excellent at blocking all damage saving you from damaged systems and using drone parts. Its much more useful when you have high evasion. Weapon Pre-Igniter - Never a bad choice, but its far more helpful with loadouts that have a long recharge rate. Scrap Recovery Arm - Great for scrap, and it even has a blue text event. Only sell it if you find a better replacement, otherwise keep it because rewards are very high later on. But generally speaking, you shouldn't be buying it because there are usually better things to spend your scrap on at any given point, and it takes too long to pay itself off. Distraction Buoys - Very good augmentation for getting more scrap. It can be about as rewarding as a Scrap Recovery Arm. Also with this one, generally speaking, you shouldn't be buying it because there are better things to spend your scrap on, and it takes to long to pay itself off. Don't forget to sell it to any store in sector seven. Situationally useful Automated Re-loader - Almost never a bad choice, but there are often better options as well. This augmentation stacks. (See screenshot for the amazing visual of some good augmentations)
反向离子力场 - 总体表现良好,在旗舰战第一阶段尤其有用。该强化可以叠加,如果你有两个,就能免疫离子伤害。 备用DNA库 - 对于配备克隆舱的舰船来说通常是个不错的强化,尤其是在进行登船作战时。它能让你更加大胆地行动,并抓住更多登船作战的机会。 重构传送 - 对于配备克隆舱的登船舰船而言,这是一个极佳的强化。它能让你的船员在原本无法升级的情况下获得等级提升。 高级超光速导航 - 如果有多余的强化槽位,这是一个值得保留的强化。它确实有助于探索出口之外的信标。如果你穿过出口,且出口后面还有其他几个信标,你就不必为了再次到达出口而一路战斗穿过多个反叛舰队信标。此外,这在旗舰战中可能会有所帮助。如果你经过商店或维修信标附近,必要时(且它们尚未被占领的话),你可以在旗舰战中途跳回这些信标。 FTL干扰器:如果你火力较低但防御尚可,在某些情况下它会很有用。 维修臂:一种有争议的强化部件。有人说它从来都不是一个好的强化部件,应该立即卖掉。但在某些时候,留着它也可能会有好处。如果你在早期区域受到的船体损伤超出预期,那么使用机械臂进行修理实际上比在商店购买修理服务更便宜。这是唯一应该保留该强化部件的情况,而且绝对不应该主动购买它。 无人机回收臂——如果你使用的配置需要无人机控制,那么这个部件非常出色。如果你恰好拥有船体修复功能,每次跳跃都能获得两点免费船体修复,那它的效益会格外显著。 佐尔坦护盾穿透器——对于可靠地进行登船作战很有帮助。在旗舰战的第三阶段尤其有用,因为旗舰在该阶段拥有巨大的超级护盾。 生命形式扫描仪——只有当你需要心灵控制某个目标,且没有其他方法看到他们时,这个部件才有用。除此之外,通过密切关注门的移动,几乎总能获取它所提供的信息。 技巧与进阶技巧[1]
经常暂停来考虑你的选择。这是提升你游戏水平的最佳方法。由于暂停非常重要,我已包含一张暂停战斗的截图。 所有来袭的投射物都会击中房间的正中心。你可以利用这一点来决定如何应对当前情况。你可能需要根据这一点将船员移出房间或使用隐形。 无人机在开火前会瞄准一个房间。有时,你需要留意它们可能瞄准的房间。一个能用到这一点的情况是在早期使用隐形B型舰时。如果你正在与一艘配备无人机的舰船战斗,不要立即隐形。等到无人机即将开火时再行动。如果它要击中的不是武器室或隐形室,你或许应该先等待再隐形。
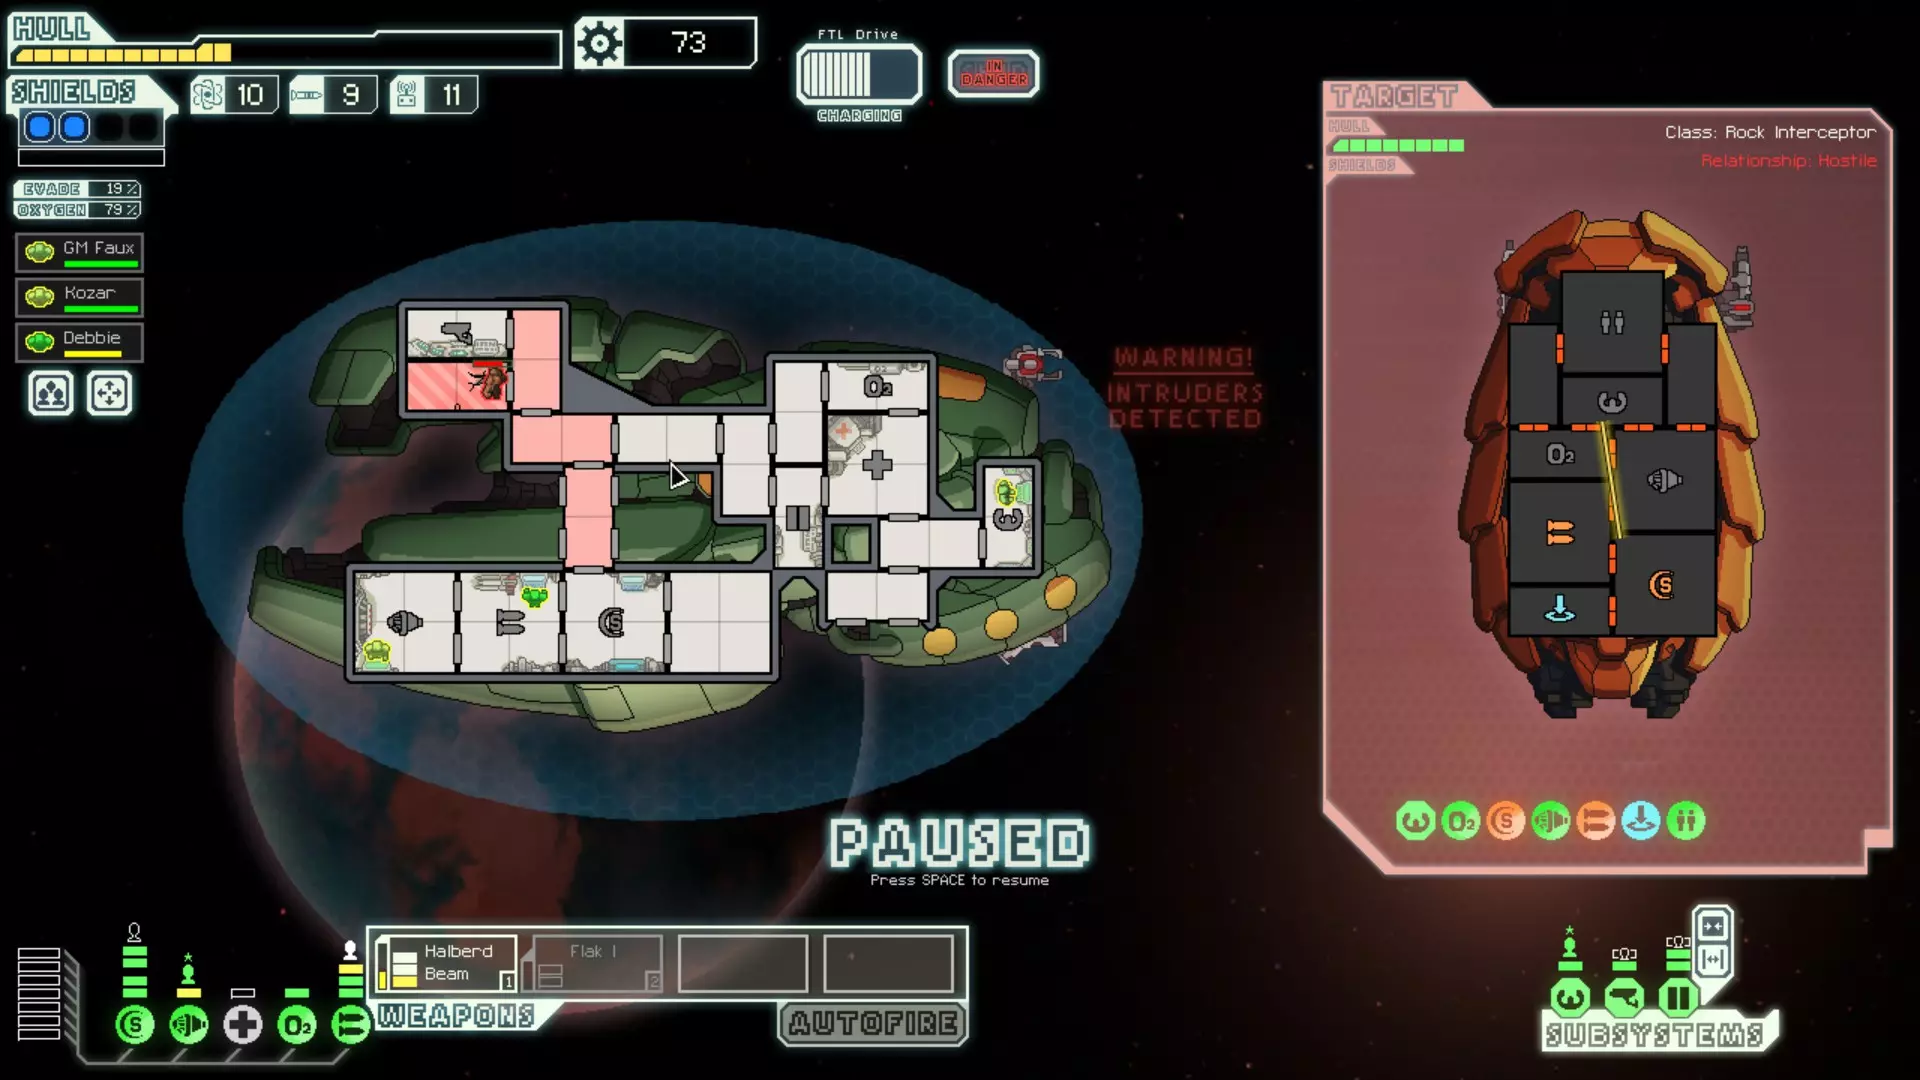
有时候,最好让破损的舱室保持开放状态。以联邦A型舰为例,如果任何带气闸的舱室发生破损,你应该让它们保持开放,因为这些舱室里没有任何系统。破损会让你的飞船更快地排出空气(注意左上角那个舱室。如果你要传送回濒死的登船敌人,而传送室里有人,敌人会传送到左边没有氧气的舱室里……我可能是通过惨痛教训才明白这一点的)。另一个例子是岩石B型舰。它没有气闸,所以如果右下角的某个舱室破损,我通常会让它保持开放,直到有充分理由才关闭。可以参考附近的截图,这是一个故意让破损舱室保持开放以帮助应对登船敌人的理想示例。与佐尔坦人战斗时,若你攻击某个房间,使佐尔坦人不得不穿过护盾室,他们往往会从系统中移除一份能量,导致护盾等级暂时下降一级。抓住这个短暂的机会,让额外一道激光得以穿透。你也可以通过攻击房间来迫使佐尔坦人穿过护盾室。 空格键和鼠标中键都可以暂停游戏,要经常使用。 如果你只有足以摧毁无空气自动侦察机护盾的武器,但同时拥有火焰光束,你仍然可以摧毁它。当护盾消失后,尝试点燃飞船护盾室(以及其他房间)的尽可能多的区域。大约20%的情况下,火焰会燃烧足够长的时间,从而损坏系统,让你能再发射一道激光。 此外,关于火焰光束和无空气侦察机,你可以用光束来重置维修进度。当房间开始燃烧时,任何维修进度都会立即被取消,因为飞船正在灭火。这可以用来在飞船失去行动能力时为自己争取更多时间。 了解你的事件。找出最有利的选项。知道什么时候该冒险,什么时候该稳妥行事。了解哪些种族、强化部件、武器和无人机能触发最有利的蓝色文本事件。 船员在跳跃过程中有2-3秒的时间进行移动、治疗、维修或战斗。这一点可以为你所用。
瞄准目标时按住Ctrl键,可单独将武器(如离子炮或链式火神炮)设置为自动开火。 这不算什么技巧,不过这里有一张滑稽科学家的截图,博君一笑。 保持灵活。如果获得了一把好武器,不要犹豫,调整策略来适配它。如果有螳螂人船员且有足够的废料,就买个传送器。如果是激光流配置,却拿到了长戟光束炮,考虑换个思路。 不要购买长时间内用不上的武器。选择高效且能补充当前配置的武器。 强化部件无法储存,所以如果没什么用就卖掉。除非已有非常好的强化部件,否则尽量留一个空位,以防免费获得新的。只有在投降条件非常诱人时,你才应该接受投降,因为摧毁飞船总能获得更多废料。如果你需要导弹或燃料,且对方提供的数量较多,那么可以接受。如果对方提供武器、无人机或强化组件,你几乎总是应该接受投降,因为至少这些物品可以出售换取废料。 奴隶贩子飞船在被摧毁前通常会向你提供一名奴隶,但有时不会。如果你消灭了所有船员,他们有很大几率会奖励你一名船员。如果你的装备合适,你可以选择自己的奖励。将飞船的船体生命值削减到只剩几点(如果能安全地将其削减到1点船体生命值,就这么做)。如果他们不提供奖励,你仍然可以登船,这样找到奴隶的几率比摧毁船只更高。 通常不要从不值得信任的海盗那里购买武器,你通常会后悔的。 如果你在废弃区域的地图上看到反舰炮台,它是友方的。你会想要前往那个信标,因为战斗应该不会很困难,而且该事件可能会有高于平均水平的奖励。 星云信标的出口处绝不会有反舰炮台,因此探索出口之外的区域可能会有利。但要小心,那里经常会有离子风暴。 有些敌方导弹发射器看起来完全一样。有时,区分它们很重要。你可以根据它们的充能速度来做到这一点。这种情况的最佳例子就是区分船体导弹和破甲导弹。破甲导弹的发射时间要长得多。观察武器上的红色指示灯来判断充能进度,这样你就能分辨出是哪种导弹了。 对付海盗船通常不必手下留情。如果你遇到海盗船正在攻击另一艘船,摧毁海盗会获得奖励,有时你救下的船也会给你奖励。 要时刻暂停游戏来考虑你的选择。 如果你有足够的离子炮能量,且敌方船只无法对你造成伤害,你可以让敌方船员窒息。即使他们有医疗室,你通常也能移除足够的电力使其无法运作,从而杀死船员。记住,氧气室和医疗舱可能是二级或三级,需要更多离子伤害才能完全使其失效。 离子脉冲炮会优先攻击开启的护盾。没有护盾对飞船的生存非常不利。如果在离子脉冲炮即将命中时关闭护盾,它们不一定会被优先攻击。但护盾仍可能被随机击中并完全失效。为避免这种情况,先关闭护盾,然后重新为护盾系统充能,但在脉冲炮命中前不要让护盾充能到完整的一级。这样,即使护盾被脉冲炮随机击中,你仍可能保留一到两级护盾可用。 你暂停得不够多。多暂停。技巧与进阶技巧 [2] 如果你的飞船被击破,你可以通过打开船上所有内部舱门来为维修人员争取更多时间。这样能让房间在失去氧气前多维持几秒。当房间失去氧气后,再次关闭舱门,以免全体船员窒息。 二级氧气系统可以抵消击破或拉尼厄斯(相当于击破效果)造成的氧气流失。如果需要在缺氧房间进行维修,打开所有内部舱门(除了其他击破点所在的舱门),启动二级氧气系统,等待几秒钟。房间会充满足够的空气,让船员在维修时不会受到伤害。 经常暂停游戏,以至于有人可能会把《超越光速》误认为是回合制策略游戏。
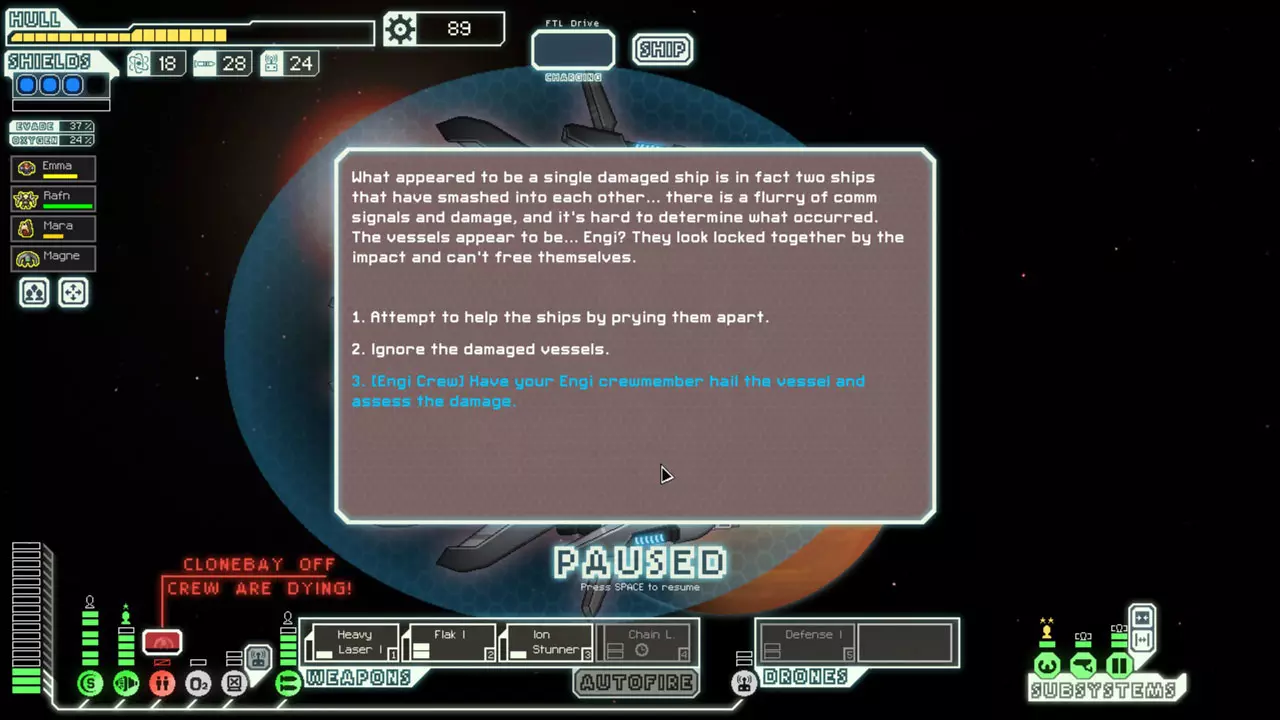
Crew that are dying in a Clone Bay that's offline can still be used for events. Sometimes, you can make a couple frantic jumps hoping to use them or find a DNA Backup augmentation before they die. (See screenshot) On a similar note, you can use this time to fix the clonebay. While you're jumping, the clonebay can be partially repaired, but no "de-cloning" progress occurs. It might take 2-3 jumps, but sometimes you can fix the clonebay, so you don't lose your crew. If you have essential crew actively perishing in a destroyed clone bay, if you buy a medbay before they're gone, they'll be locked in a sort of stasis. They won't be alive to be used, but you'll still have them. If you repair the medbay, then later buy a clone bay, you can get them back. All ships have a limited supply of drone parts and missiles (other than the Flagship missile launcher and drone Power Surge). Many times, it will be necessary to exhaust the enemy of missiles before rerouting power from drone control and starting your offensive. Sometimes you'll just barely have enough laser blasts to penetrate the shields of an Engi ship, and they have a Defense Drone II. If you want to win this battle, you'll have to fire until you randomly destroy all of their drone parts, then keep firing to damage the hull. This can take a very long time, but you'll usually need every advantage you can get. If you're low on crew or power, consider purchasing Zoltans from a slaver or store. The more your reactor upgrades currently cost, and the fewer crew you currently have, the more it makes sense to purchase a Zoltan. Usually, you won't want to overload your ship with Zoltans because they're weak against boarding. They're also great for ion storms because the power they provide isn't halved like your reactor's. With the right weapons, you can kill the crew of many ships in the early sectors without ever boarding. Heavy Lasers are great for this because they have a decent chance of starting fires and causing breaches. You'll usually want to target the O2 room when attempting this. Track the damage you're dealing to the crewmembers. Listen for breaches. Watch system damage and crew movement. If you see a system break when you know that crew is in there, then doors open, this means that the crew has given up on fighting the fire in that room. Wait it out. Usually the fire will overtake the ship, and you'll be rewarded. If the enemy ship only has a Heavy Laser I and a Mini Beam, and you know that he has no one manning the weapon system, move one of your crew to your shield room as soon as you jump. The bonus from manning shields will usually block the first hit of the Mini Beam. Generally, you should try to have 12-15 fuel on hand at all times. Some recommend only around 8-10 fuel, but I suggest more for a couple of reasons. Sometimes, you may not have an opportunity to visit a store for a long time. Other times, you won't have any reason to stop at a store other than fuel. If you have the fuel, these won't be a problem. Also, there are several events where other ships request fuel. You'll always want to have enough on hand to give some away. You never want to run out of fuel. Even with the distress beacon on, the encounter and reward rate is lower than being able to jump freely. If you'll be heading into a nebula or if you're early on in one, buy a little extra fuel due to the fewer ships you'll be encountering (especially if you don't have Long Range Scanners or if you're in an uncharted nebula) However, you can leave yourself run dangerously low on fuel in sector seven. The moment you jump to sector eight, you're given enough fuel for the rest of the run. Generally, you should keep around 2/3 hull. You'll usually not want to repair beyond that because there are events that give you free repairs. There are many exceptions, though. If you want to try for a few jumps beyond the exit, give yourself a few more hull to work with. If you know you'll be going into a sector with few stores, repair more. If you know you'll be going to a hull repair quest, don't repair at all. If you know that you'll be jumping into a sector that has a higher repair cost, buy a couple extra before the price raises. You can use an Ion Stunner autofiring on shields to easily kill enemy crew by boarding. If you autofire the Ion Stunner on shields, it will stun everyone in the shield room even if their shields are still up. The stun duration for the Ion Stunner is rather long compared to the firing speed, so crew hit in this fashion will spend a lot of time stunlocked. With very good micro, you can have your boarders in shields and carefully kite them out of the room just before the ion stunner hits the room. If you pull it off (it's easy with practice) then the enemy won't quite be out of the room whereas your boarders will be, giving you ample time to finish off stunned enemies. Even if you screw up, it's likely that everyone will end up stunned so your crew won't take extra damage. (Thanks to reddit user Paradigmist for this tip) Small and breach bombs can be used to destroy your own systems instead of fires or boarders. This will prevent you from taking hull damage. Bombs never miss your own ship, so you don't have to worry about turning off your engines momentarily. (Thanks to reddit user Histidine for this tip)
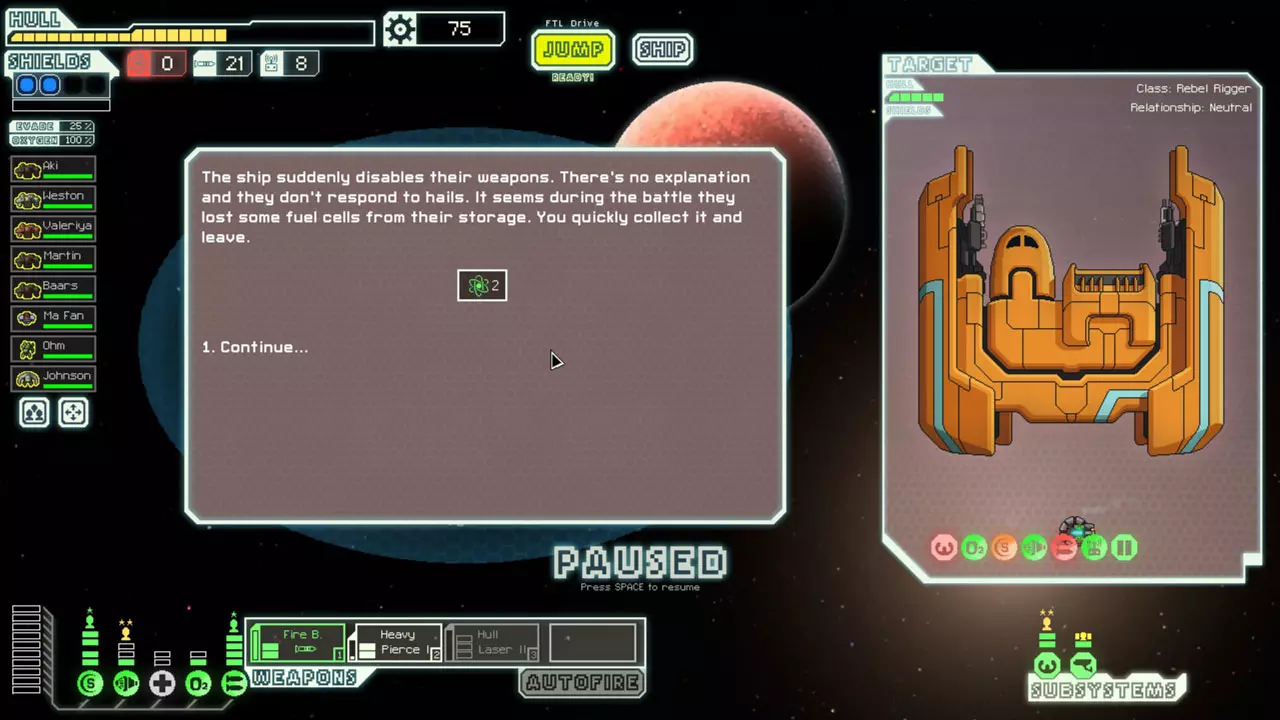
There is a rare event that will occur under very specific circumstances. If you have no fuel, and you permanently disable the enemy ship's engines or piloting, this will prevent them from jumping away. You usually have to disable their systems by breaching and destroying piloting or engines, breaching and destroying the medbay, and damaging the crew to the point that they can't fix either. Rather than a stalemate, the enemy ship gives up and ejects fuel. (See screenshot) You can micromanage Combat drones into directly firing at enemy Defense II drones, which is a godsend for Engi A. Just park it as it prepares to fire and wait for the target to drift into the line of fire. (Thanks to reddit user slowriderxcorps for this tip) Weapon ordering priority on the iPad version is bottom to top rather than left to right. Manning engines actually speeds up how fast your FTL drive charges. So if you need to jump in a hurry, make sure you have someone in there. Also, the charge bonus is greater according to the level of the crew manning the system. Everything damages systems at the same rate. Even though Humans, Engis, Mantis, Boarding Drones, and all mind controlled enemies damage crew at very different rates, they all damage systems at the same speed. Skill level is also irrelevant to system damage. You should be pausing more than you are. Tips and Advanced Techniques [3] Know how to play the odds at stores. Some things will turn up regularly, and others won't. For example, you might want to delay a purchase of an optional system such as hacking in favor of a good weapon such as a Burst Laser II. Burst Laser II's are rare, but there are a very limited number of systems, and you'll almost always have more than one chance to get them. Generally speaking, if you need a good weapon (or augment) at a store that also has a system you'd like, give priority to that weapon. (Thanks to reddit user Sixfortyfive for this tip) All friendly lasers, missiles, ions, and drones can connect with and potentially destroy all non-friendly lasers, missiles, ions, and drones. Ions only stun drones with a chance of destroying them, but any other connection instantly destroys the projectile. This can be used to your advantage in times of need. If you see a large missile coming in toward the front of your ship, and one of your weapons is in line to hit it and ready to fire, you can time it so that the missile will be destroyed. The timing is very precise, so this will take practice. Evasion is calculated when a projectile passes your shields if they're up. If your shields are not up or you don't have shields, evasion is calculated when the projectile would connect with the room it is about to hit. There are a few certain scenarios where its better to depower your shields to give yourself an extra moment before the evasion is calculated. One example of this is the Flagship missile volley. Sometimes the cloak timing is very close to the missile volley. If you depower your shields, it could buy you the extra half second you need to avoid the damage. How much scrap you should keep on hand depends on a lot of factors. If you don't have great weapons, you'll want to try to keep around 80 extra scrap on hand for the next store. If you're low on hull, you'll want to keep enough around for the repair costs (accounting for how much it will cost for the sector you're in). Even if you're not saving up for anything, you'll usually want to try to keep 30-50 extra scrap on hand for cheap crew, discount system upgrades, or other random events. If clone bay is offline and a crewmember is about to die, JUMP to buy him some health before he dies. Depending on the situation, you could possibly even upgrade the Clone Bay for a larger health bonus. If you have enough time, you can force a drone into targeting a specific room. Do this by waiting till the drone is about to fire, seeing the direction its aiming, and guessing which room it could possibly connect with. If you see that its not going to hit a room you want, depower it right then. It will not fire and move on. One specific application of this is for getting early crew kills - especially if you have Mind Control. Use Mind Control to get the crew to low health, then use the drone to pick him off. If a scout or rebel ship is about to jump away and double the fleet pursuit, you can simply jump away first to prevent it from happening. (Thanks to reddit user Rooonaldooo99 for this tip) If fire or boarders are about to destroy a system, remember that your ship is invulnerable during a jump. Jump immediately before the system is destroyed - they will destroy the system during a jump, but your ship won't take hull damage. Here's a useless tip! If a room is locked down for whatever reason, you can actually break through the locked door. It takes 6 crew almost the entire lockdown time, but you can get out before its over. If you have more crew working on the door, you can get out even faster. Here's an exploit for you: Use the Stun Bomb on your active hacking to hack again much sooner. If you hit your hacking system just before the end of it running out, you will only get the cooldown from the five seconds of ion damage rather than the full 20 seconds. This can make hacking far more powerful at the cost of a missile or two. This can also be used on other systems with varying effects. Of those other systems, battery is most useful because it can give you even more power than the max. Thanks to reddit user mekloz for the Stun Bomb research. This definitely falls under the category of bug, but there's a way to get double rewards for battles. If you kill the crew while there's a fire on the enemy ship, the ship will continue to burn after the fight. If its been damaged enough, it will destroy the remaining systems, and the ship will explode. Do this exploit by killing all the crew while there's a fire on board and planning ahead so that the ship will explode afterwards. You'll get rewards when you kill the crew, then let the ship explode. You can then go to the main menu, and return to your game, and you'll get rewards for destroying the ship as well. This can even be used for double rewards in specific quests - for example, you can get two Engi Virus crewmembers with this trick. Most consider this trick to be cheating because it requires you to drop out of the game to complete it. This has been fixed as of version 1.6.1! Here's another one that's definitely a bug. Here's a way to get the single most important drone any time you buy drone control. If your store has drone control, but not a Defense Drone I, just save and reload. The game apparently doesn't save drone schematics and Defense Drone I must be one of the defaults. And again, most consider this to be cheating because it requires you to drop out of the game to complete it. Here's another save/reload bug - it reverses the effect of crystal lockdown. Use Crystal Lockdown, then quit to the main menu. When you reload your game the visual will remain, but effect will be gone - you and enemies can walk freely between rooms. However, there's one more benefit from this. Enemies will THINK that the room is still locked down. So they won't try to enter or leave the room unless they were already on their way. You can use this to trap enemy crew in a room while you wreak havoc on the rest of their ship. When the enemy weapon system is damaged, the weapon with the lowest charge is taken offline. This also means that if you have perfect timing, you can damage their weapon system the moment a particularly dangerous weapon begins to fire - immediately taking it offline and preventing it from firing completely (thanks to reddit user Threarah for this tip). Tips and Advanced Techniques [4] If you have a regular beam weapon, you can often deal damage to crew without doing hull damage to their ship. Beam weapons only deal damage when they enter a new room, but they deal damage to crew when the beam enters the tile they're standing on. So consider this example: You have a Pike Beam and a Heavy Laser, and the enemy ship has one shield. If you attack the ship with the beam weapon, wait till the beam is in the room with the crew before allowing the laser to hit the shields (therefore no hull damage). If the beam enters the tile with the crew after that, the crew will be damaged. As of update 1.6.x, there's a new mechanic in place that prevents unpowered drones from being destroyed by ions - ever. This means that if you are in a situation that would be less dangerous if the enemy has good ion weapons, you can park one of your drones right in its path, turn off the power to the drone, and it can't do a thing about it. That means with this trick, you can completely disable the flagship's burst ion. Another application of unpowered drones not taking ion damage. With enemy Anti-Combat Wait till the Anti-Combat drone fires, and toggle the power off for a moment until the ion blast connects. The blast will do nothing to your drone - not even stun it. The timing is tight, so you'll have to be quick. There's an extremely severe bug with ion damage, and another one with crew deaths.. but I don't want to give details because they're both game-breaking. These are public knowledge now, check out the last section for details! I recently discovered a bug that lets you charge up the Chain Laser from zero to fully charged instantly: Leave the weapon fully charge without firing. Pause. Target a room on the enemy ship to fire. Advance the game ONE FRAME and pause again. (The best way to do this is to try to press both pause buttons at the same time: space bar and middle mouse. If you did it right, this will increase the weapon fire count, but the charge bar will still be full) Unpower the weapon. Advance the game another frame (it doesn't have to be exactly one frame this time, but the fewer, the better) Repeat! It makes the weapon far more viable and is fairly easy to execute once you practice it. If boarders are giving you problems, you can draw them back to their own ship by destroying three of their systems (thanks to mekloz for this tip!) Pause. Right now. Because you're still probably not pausing enough. Challenge Runs If you're winning too much and too easily, these are ways you can play to make things more difficult and interesting. Speedruns Play on easy, and attempt to beat the game as fast as possible. Reddit user Twinge holds the record for original FTL at 19:00[www.twitch.tv]. And ThomasPettersson keeps besting his own record in AE. The current record is 12:40[www.speedrun.com].
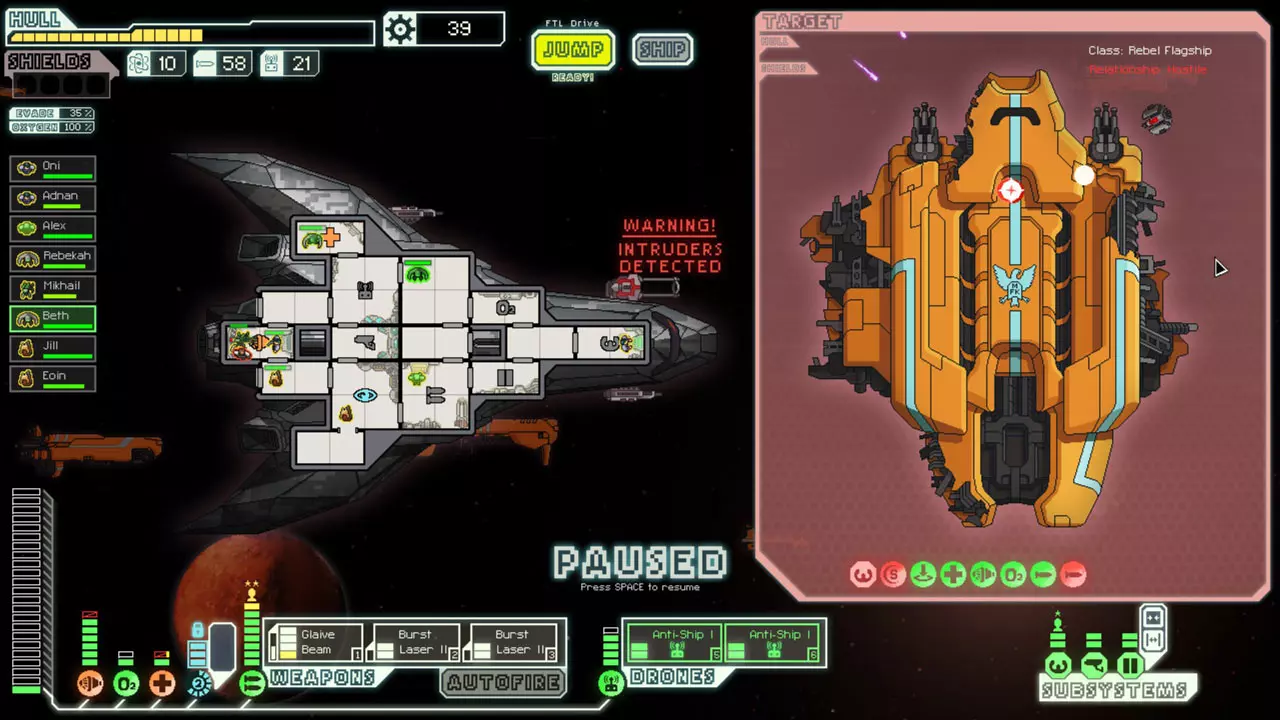
无盾挑战 全程不购买护盾。(见截图)你可以使用任何隐形舰或佐尔坦B型舰完成此挑战。Reddit用户DiscordDraconequus已经进行过多次此类挑战。 无氧挑战 在第一次跳跃前关闭氧气系统并排空飞船氧气。大多数人认为使用拉尼厄斯船员属于作弊行为。水晶舰、拉尼厄斯舰和工程师A型舰是完成此挑战的最佳选择,但理论上任何舰船都有可能完成。Reddit用户Paradigmist甚至用鼻涕虫B型舰成功完成过。 无暂停挑战 不允许暂停游戏。这是一个考验你快速思考能力的绝佳挑战。如果你已经习惯了暂停(这本该是你的本能),开始前应解绑暂停键。这通常不允许使用高级登船技巧,因为它们需要精确的时机把控。斯科特·“连体衣”·威尔逊在困难难度下连续完成了所有28艘舰船的通关。【废料登船】
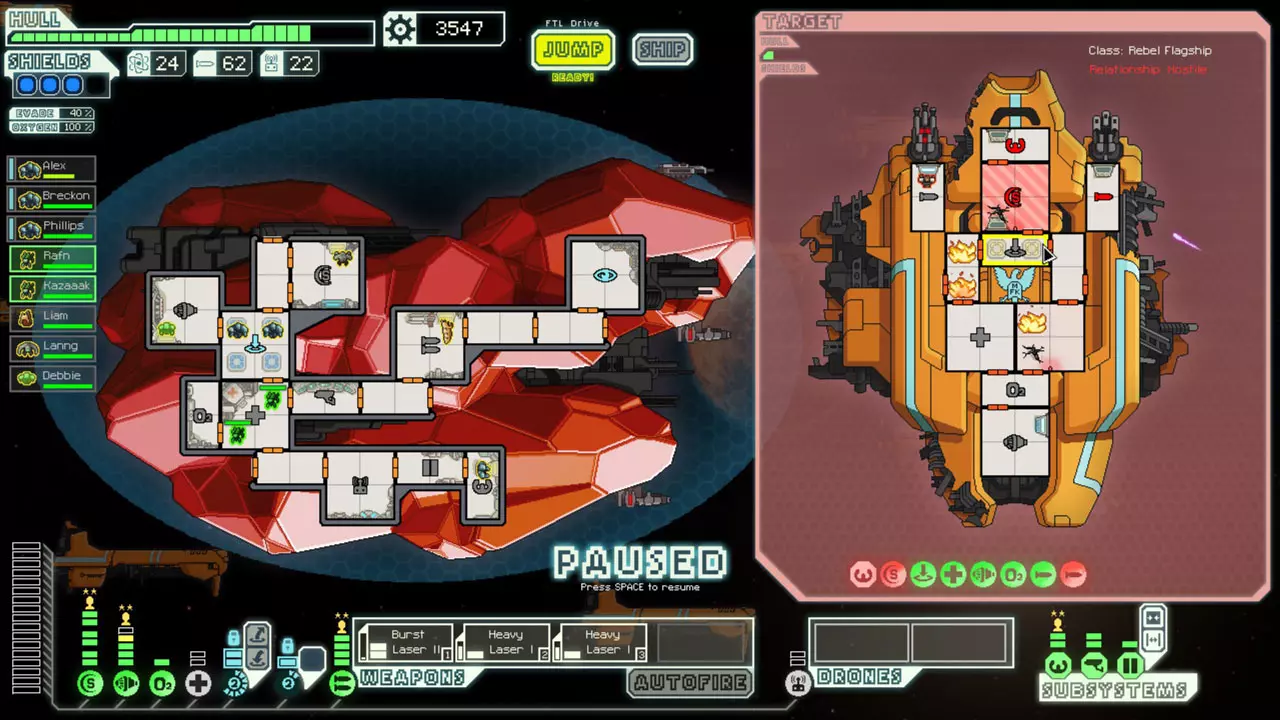
Personally my favorite challenge. Attempt to beat the Flagship with as much unused scrap as possible. Boarding is a must. Long-Range Scanners are almost essential with some combination of Distraction Buoys and Scrap Recovery Arms. Crystal B is the favored ship for this challenge. No Medbay / Clone Bay Use Slug B and never buy a medical facility. You'll have to pause, moving your crew to dodge incoming missiles and bombs for this one. Here's one example. No Death / Consecutive Wins Play on hard, select random ships (or play the ships in order), and see how many times in a row you can win. Thomas__P recently became the new recordholder with an absolutely insane streak of 80 wins. I don't see this being broken any time in the near future because having 80 runs in a row where victory is even possible is rare to encounter.. let alone having the knowledge and skill to do it. I recently got the longest streak of 83 wins, but I used exploits. It would have to be considered a separate category. Powerless Never upgrade your reactor. Backup battery and Zoltan power is a must. This challenge is generally only feasible on Zoltan ships. No Upgrade A harder version of Powerless - never upgrade any system including the reactor. You can buy other systems, but you can't upgrade them either. You'll have to rely on teleporters and/or hacking a lot. Probably not a challenge you'll want to try on hard. Let me know if you are aware of any errors in these records, and I'll gladly update them. If you know of other challenges you'd like to see listed here, please let me know. Difficulty, Luck, Vocab, Etc. RNG and Luck How much of a factor does luck really play when it comes to the end victory? Not as much as you might initially believe. Obviously, the entire game is based on randomness, so some runs you'll have a really easy time, and others you may not have any opportunity to win at all. I've started out some runs on normal with the most powerful ship, and I know for a fact that there was nothing I could do to survive till the second jump (Auto-Scout in front of a sun with missiles, ion and a drone. My shields and engines were destroyed immediately, and nothing could be repaired in time to jump. It was brutal.) This is partially dependent on the chosen difficulty and your chosen ship, but even on Hard, you should be able to win the vast majority of the time with most ships. Difficulty The biggest difference between the difficulty levels are scrap rewards and enemy loadout. Crew priorities are slightly different, and you start with more scrap on easier difficulties as well. There's a fairly large gap in difficulty between easy and normal, but there's a smaller gap between normal and hard. The Flagship layout is also different in hard mode making the battle much more difficult and interesting. On easy, the Flagship only has three shield layers. Also, there are no ASB for when you want to farm sectors and let the rebels take over the exit beacon. Its also been observed that enemies have a higher probability of hitting systems rather than empty rooms in higher difficulties. To my knowledge, there haven't been any comprehensive studies on this, but there definitely seems to be significant evidence for it. The game developer has confirmed this behavior. Also, people have recently dived into the code, and on hard mode there's a 25% chance of the enemy targeting an "important" system. Things like: Targeting oxygen when its low, targeting the clone bay when crew are cloning, Etc. Here are the rules we currently believe to govern hard enemy targeting The devs have confirmed the following conditions for targeting important systems: Shields: When powered (even one Zoltan power counts) Engines/Piloting: Evasion is currently above 25% Weapons: When powered (even one Zoltan power counts) Drone Control: Always (assuming you have drones) Cloaking: System is not on cooldown Artillery: Within 4 seconds of firing Door Control: Ship is currently on fire, or if there are intruders Oxygen: Oxygen is below 50% Clone Bay: Crew are currently being cloned Hacking: Hacking in progress Mind Control: Mind Control in progress Teleporter: Boarders currently on enemy ship Targeting rolls appear to happen when the weapon fires (when it turns green). Targeting for all projectiles from a burst weapon appear to be calculated at this moment as well. Any scrap reward numbers mentioned in this guide are for hard mode. If you're playing on normal or easy, the numbers will be higher. Vocab Words I use that may not be 100% evident in their meaning in the context of the game. Most are commonly used by the community. Tile - Place where a crewmember can stand (some rooms have tiles where crew can't stand). Every room is made of two or four tiles. Stack - Referring to ion damage. For ion damage to stack, you need to deal ion damage faster than the previous damage wears off. Loadout - Everything you have. This includes weapons, shields, engines, systems, crew, augments, drones, and anything else currently at your disposal. Volley - Firing more than one weapon at a time to increase the effectiveness. RNG - Randomness. Specifically "Random Number Generator", or more comically known as "Random Number God". Grinding - Hitting as many beacons as possible for their rewards before you're forced to move on. Run - An entire attempt at winning, start to finish. Dive - Purposefully going beyond the exit beacon for profit. This will force you to engage the rebel fleet. Micro - Micromanage, or precisely move crew and time weapon fire/placement to your advantage. Engi - This isn't here because you don't know what it means, but I've seen many people that were unsure of the pronunciation. Its pronounced en-gee as in engineer. Save Editors Although I wholeheartedly recommend that you unlock everything for yourself, there are many reasons that you might need a save editor. Sometimes the file gets corrupted or lost. Sometimes Steam Cloud sync decides to delete it. Regardless, here's a link to one that the dev's recommend: https://sourceforge.net/projects/ftleditor/ Bugs As perfect as this game is, the are a couple bugs. I've documented every bug that I'm aware of in the following thread. Please let me know if you encounter any others, and I'll add them! https://www.reddit.com/r/ftlgame/comments/cgcna5/full_bug_list_version_3/ Thank you! Thanks for reading my guide. I hope it was helpful and that you enjoyed it. If you did enjoy it, also check out reddit user AyCarrumba's guide: From 'Oh no!' to Pro. It sets the benchmark for comprehensive guides. Also, Twinge has a great set of informational videos: Faster Than Light Tips & Tricks And Mike Hopley has a playlist of very advanced and useful tips.