换一换
换一换 


如果你厌倦了摸索获胜方法,并且还没玩过《火影忍者:漩涡忍传2》 简介 好吧,因为我看到有些人根本不想花心思去理解这个模式,只是胡乱尝试各种方法,所以我不妨帮你们节省点时间,直接说说关键要点。我玩了不到300小时,经过一些简单的试验后就比较快地解锁了玉级奖励。正如指南简介所说,我玩过《漩涡忍传2》,它的系统和“查克拉聚集器”模式类似但更深入,所以在这里“破解密码”相对容易。 下面是一些通用技巧。 保持移动。“精神冲击”是一种会在玩家一定半径内生成敌群的游戏模式,靠墙站立或者真的停在一个地方都不是好主意。如果你在某个区域停留过久,物品将不再刷新,导致弹药和生命值掉落减少。 许多敌人的等级并未调整到离谱的程度,所以这并非类似【轮回9】难度的挑战。此外,【觉醒】效果会根据角色进行调整,避免出现不合理的条件(例如,雷洛的某个觉醒效果从要求敌人在远处变为要求敌人在近处)。无论选择哪张地图,你都不会有寻找掩护的动力。 通过武器而非角色技能来优化Build。不要带着技能流Build进入此模式,开发者并未平衡技能伤害以使其跟上节奏。如果你凭借技能伤害获胜,那往往是因为随机数生成(RNG)以及像琳或莫莫这样高效的角色——她们要么施法速度快,要么拥有强大的范围攻击(AoE),或者两者兼具。如果你选择其他角色来打技能伤害,会让游戏难度大幅提升。 我有没有违背自己说的话去尝试过?当然有。但你来这里是为了学习的。先熟练掌握基础,再尝试那些可能搞砸你游戏进程的玩法。 【可靠性优先——初始玉符】 本指南不会深入探讨所有测试和可能的build。如果有足够多的人询问,我或许会去做。过去已经有很多人推荐过与太子相关的元素build。不过我认为,当你对基础游戏有较高理解后,这个模式其实相当直观。精神突袭模式的作用就是移除基础游戏中的所有便利功能,同时加快飞升进度和秘卷收集速度。我确实更喜欢这种玩法,因为唯一能体验到类似模式的地方就是每日挑战。多人游戏中几乎遇不到其他玩家,但实际上,只有当你已有计划,或者有队友愿意牺牲部分单人玩法的配置来提升所有人(比如共享秘卷、武器)时,你才需要偏离这个配置。如果还没解锁这些内容,建议尝试解锁,其中最重要的是【空中冲浪者】,用它来替代【预付防御】。
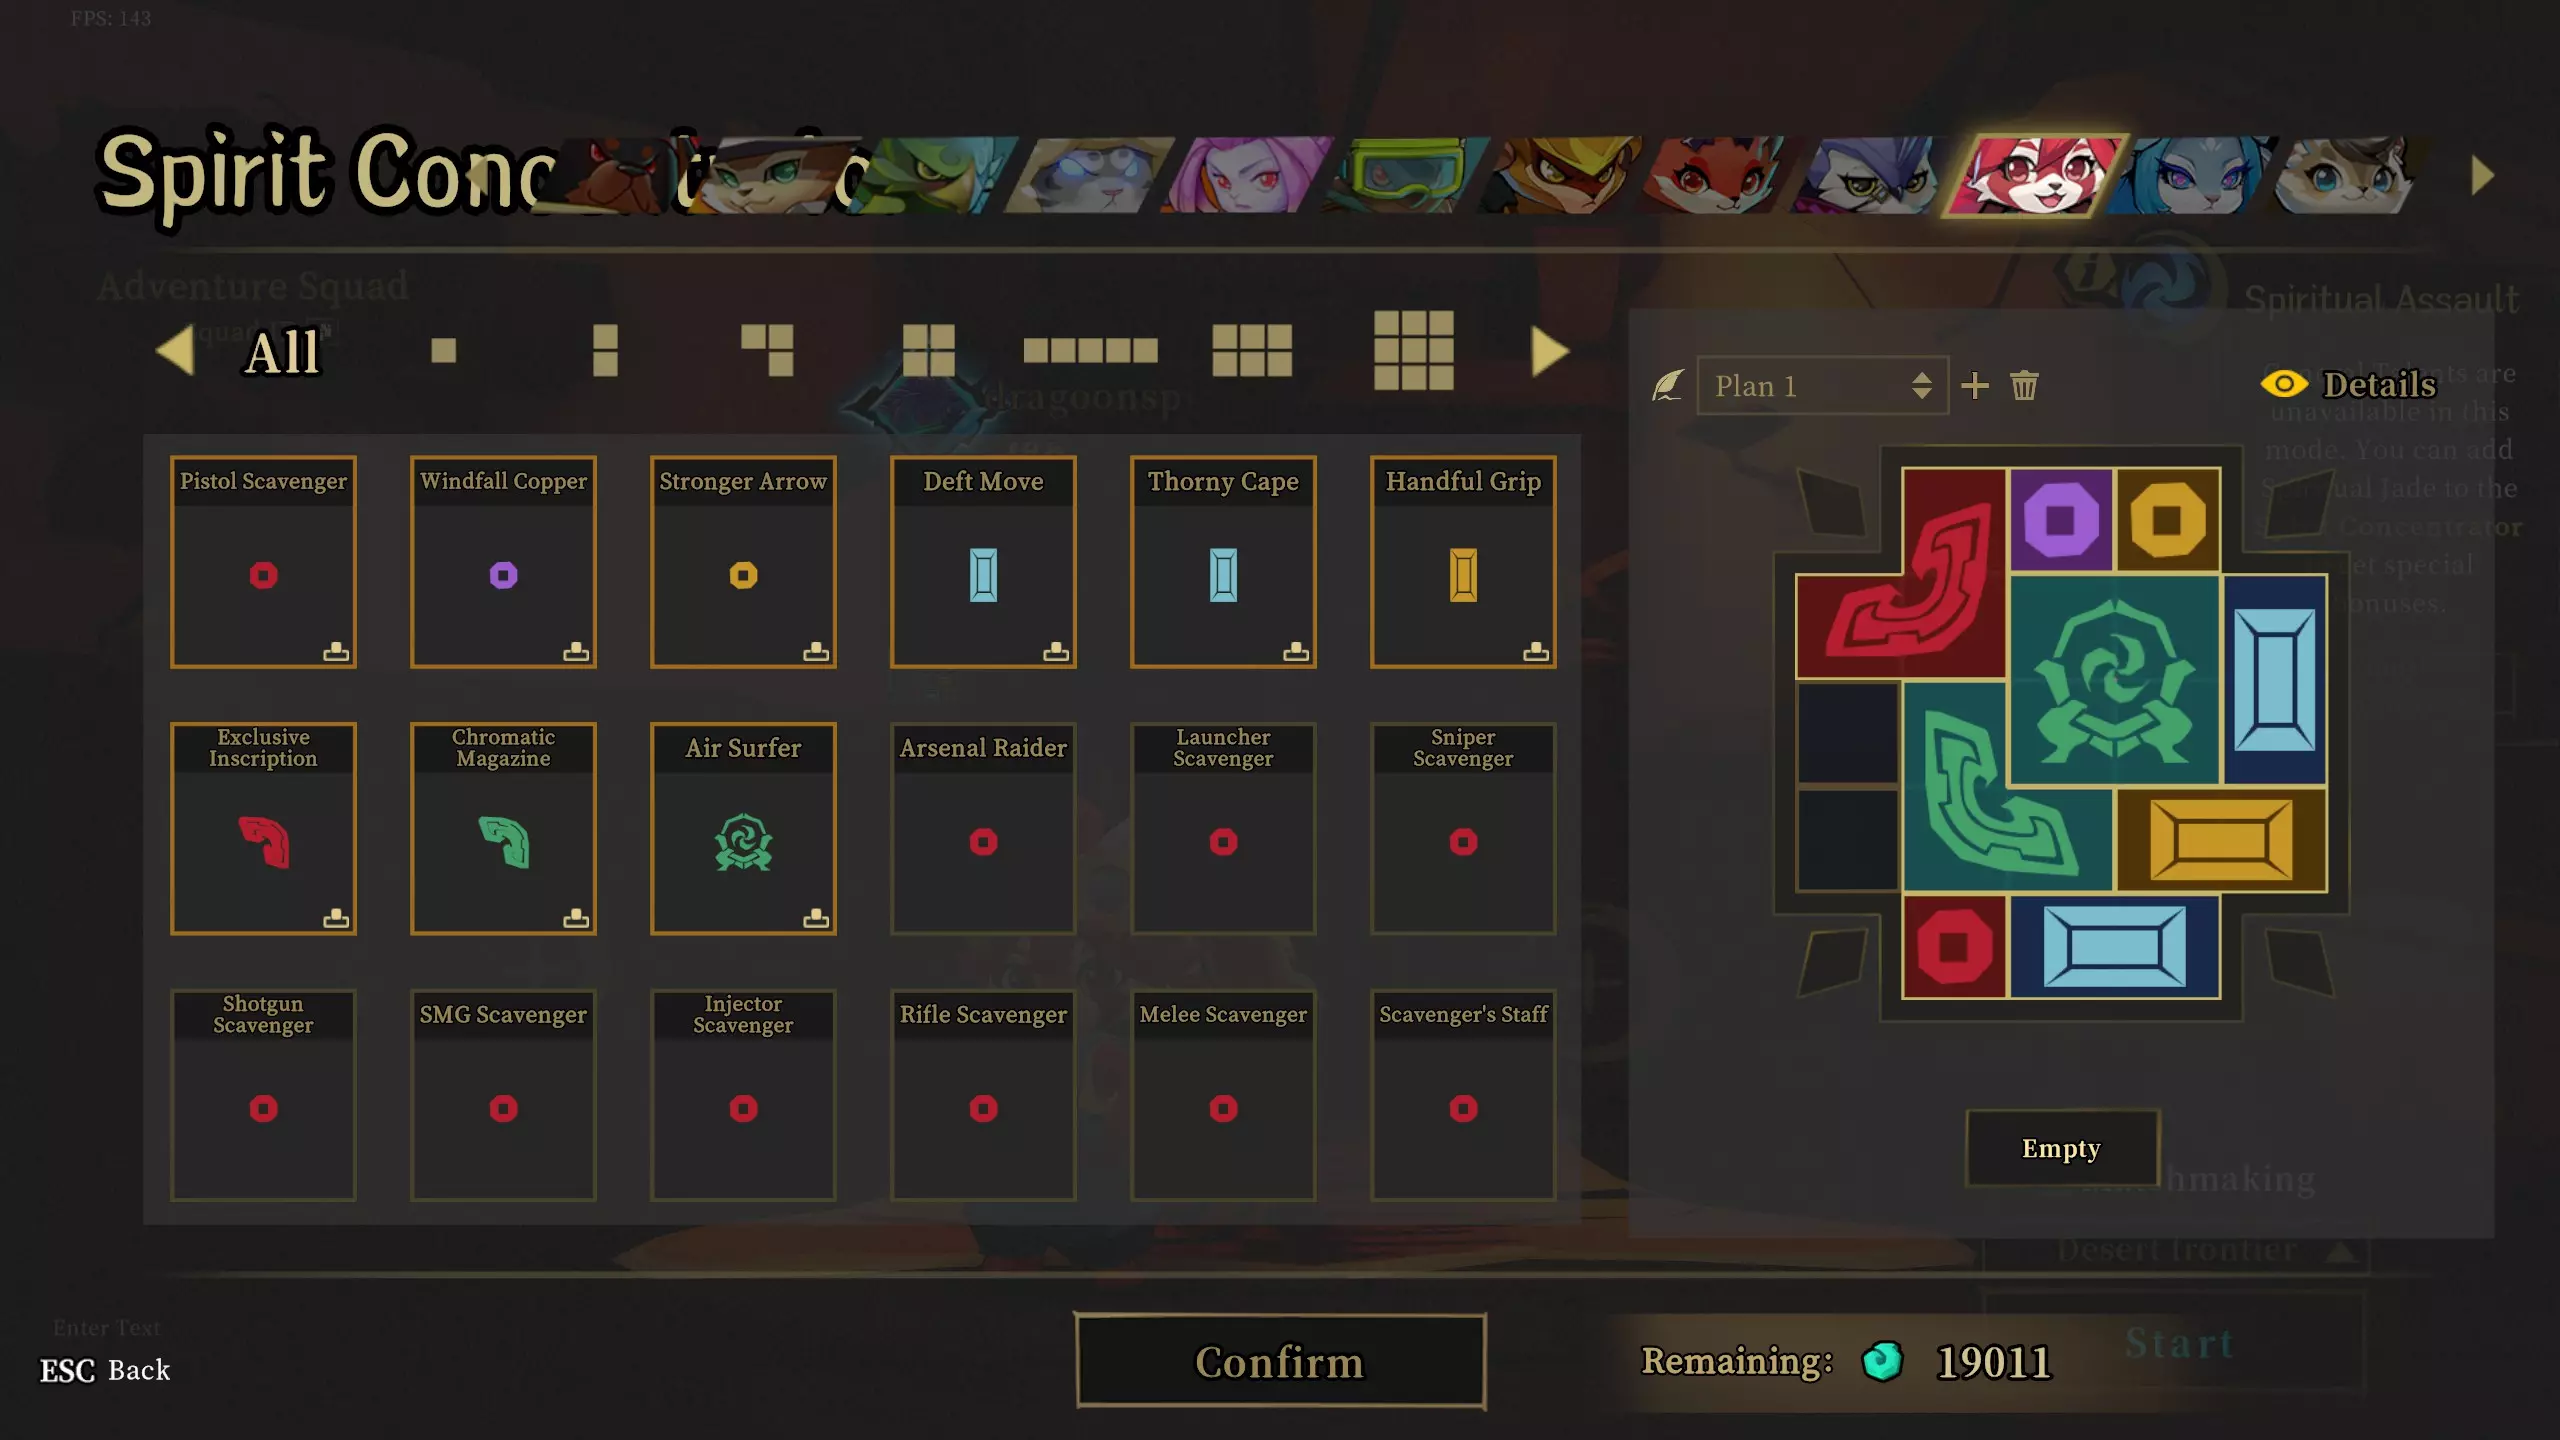
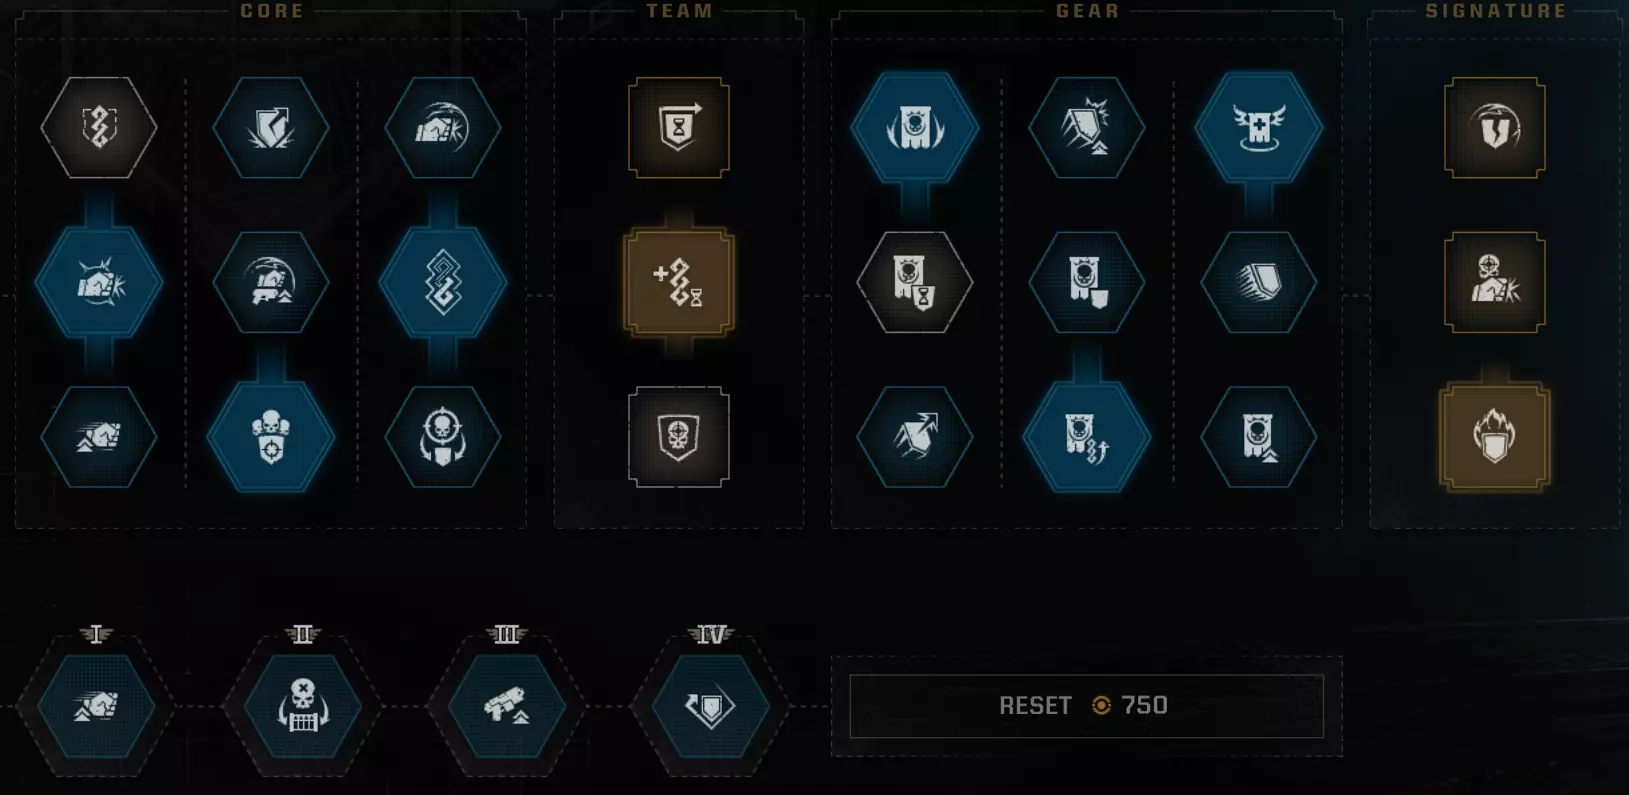
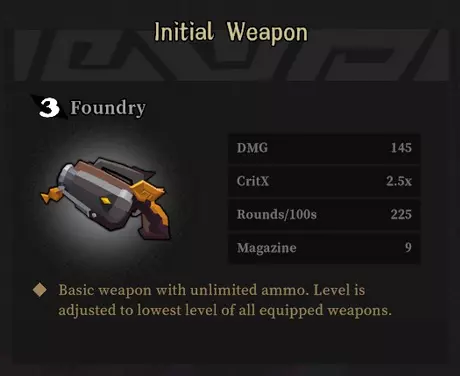
Here you'll see the build I commit to as the generic "solve-all." I'll explain, but if you really wanted the best win then you'll go with Nona as she synergizes the best with this and has a free teammate in solo runs. The developers have not nerfed this generic build and it comes as an easy fallback when RNG just doesn't reward you for 10 whole minutes. I have to say though, the recent changes to decrease the time of SA punishes the player if they can't speedkill for EXP. This build will get you there as long as you follow the general tips, but you'll see performance dips for playing more fairly. Chromatic Magazine Easily the strongest effect in the entire mode. This is game breaking and the devs haven't nerfed it. For good reason too; it can't carry endgame but it defines the entire 5-10 minutes for anyone with decent apm (actions per minute, taken from RTS games). The main reason being that Foundry has infinite ammo, therefore you have infinite elemental procs of doom wiping foes like Mr. Clean on your dirty kitchen stove you never wipe down after frying something with oil. Human science is really something. Be thankful this Jade exists. Abuse it to easily carry yourself to mid game. Now, very important. Do not: Use weapons that cannot reload like bows, Icy Spear, etc. Use Genesis scroll unless you have Aura Venom that can circumvent a single shot reload failure by simply mashing right click and mashing reload until it works. Use Advanced Depot or anything removing direct ammo reload options. Use characters' ascensions that prevent ammo consumption.This sounds limiting but the reality is that you are only excluding a small fraction of build options and scrolls for a superior playstyle with Reload condition scrolls (which boost damage resist or give you outright immunity to all damage). Aura Venom lets you make use of pretty much any flexible adjacent build like magazine empty, merged magazine Gemini (as long as it isn't a high mag weapon anyway), and CritX builds. Still an S tier weapon in SA. Just note that technically anything using single magazine Gemini will be maxing out Chromatic's value. I fondly remember a Lei Luo run with Deafening Mortar and treating it like a melee Sniper on him due to scrolls and Chromatic. Pistol Scavenger and Handful GripStaple for Nona. She is a DLC character so obviously if you don't have her, you'll need to get the next best option. However, just remember this will typically come down to key weapons for characters like Hell or Wild Hunt so you keep the Chromatic Magazine effect. The main reason we want pistols is for Handful Grip to speed it up, but don't feel too bad. Foundry counts as a pistol and therefore benefits from Handful Grip. I particularly use Scorching Rounds and look for decreased reload time bonuses before looking at single magazine Gemini weapons to remove pressing the reload button altogether. Any reloadable pistol works, but you'll typically want Scorching Rounds, Aura Venom or Sunder. You'll be click mashing with reload mashing for a long time, so just be aware of that. Windfall CopperI would argue this is somewhat optional in multiplayer. The key role of this Jade is to get your reforges when you're trying to finally complete a build in the level 20s or low 30s. Stronger ArrowStaple for weapon builds, shouldn't need an explanation. Exclusive InscriptionCompletely optional but allows you a lot more freedom with weapon choice across the run. My main issue is how expensive Duoyi made "best in slot" weapon farming in SA when your character plays like a person with a broken leg on a cold Alaskan expedition early game. You're not going to sacrifice your reliability and defensive options for ALL mainline weapon builds when playing. It's debatable even when in parties of 4. So this is my compensation that doesn't compromise the build and can easily be swapped out in favor of character 1*3s when finally getting a clear. Deft MoveGet out of jail free card. MUST have in every build. It will save your life more times than you can count. Thorny CapeThe fact that this exists amazes me because it just makes Flesh and Bones more viable than Paranormality. Regardless, I use this as a staple to halve damage when shield is broken. THIS STACKS WITH DEFENSIVE BONUSES. Needless to say it makes you near immortal when you stack resists. Air SurferObviously you won't have this if you haven't won yet, but just substitute with Prepaid Defense to get yourself familiar with the early game. If you think you don't need Prepaid Defense, then substitute with an Advanced Armory to get Gemini effects sooner. You will be bunny hopping like an idiot but mark my words, you will be extremely difficult to kill. They've nerfed Rock-Steady Determination to give damage instead of defense, but I notoriously was sitting between 70 to 90% damage resist before the changes. Slow and Steady Spiritual Blessing combined with this makes it nearly impossible for you to lose if you keep aware. Effective SweeperPost change, this is now a 1*2 piece which is a welcome change. Now you can focus purely on enemies instead of trying to pick these up as you kite around. Previously you would have to circle back the same areas, but this build has room to fit this. Know the enemy types The most dangerous thing you can do in this mode is convince yourself that you are invincible just because you reach a point where you are hard to kill. There is no self-revive in this mode, and Fake Death doesn't really zone you out of your focus to make you realize that yeah, you just died. Average foes like Kappas and Spiders can absolutely bomb you if you forget about them. My rec build allows you to ignore Exploding Lanterns if you never get exhausted irl, but these are threats if you're deviating from a reliable build. The NUMBER ONE KILLER in this mode stems from Elites. Elite Monks will delete you for remaining in an area. Having a Thanos Snap or Time Freeze G key (bought from the shop or gotten as a drop typically) can practically save your life because you can see what is actually hitting you, or kill what is. What mostly got me ended up being the Lobsters because of weak sound design; I can't tell that their shots are landing on me and I don't typically look at the ground as much as the next enemy's face. Circle around the map when Elites spawn unless you are killing them in two clips (i.e. Aura Venom Lucky Shot + Crit on Magazine Share with headshots). Good luck I have never found this game mode to be RNG with Nona, but many unpredictable things can happen if you're not paying attention. My Iron Wing got shredded within 6s with no self-destruct ascension before in this game mode, so don't get cocky just cause you're ahead. Imagine turtle and something oneshots you from behind. Lol. Thanks for reading this guide and have fun with SA.