换一换
换一换 


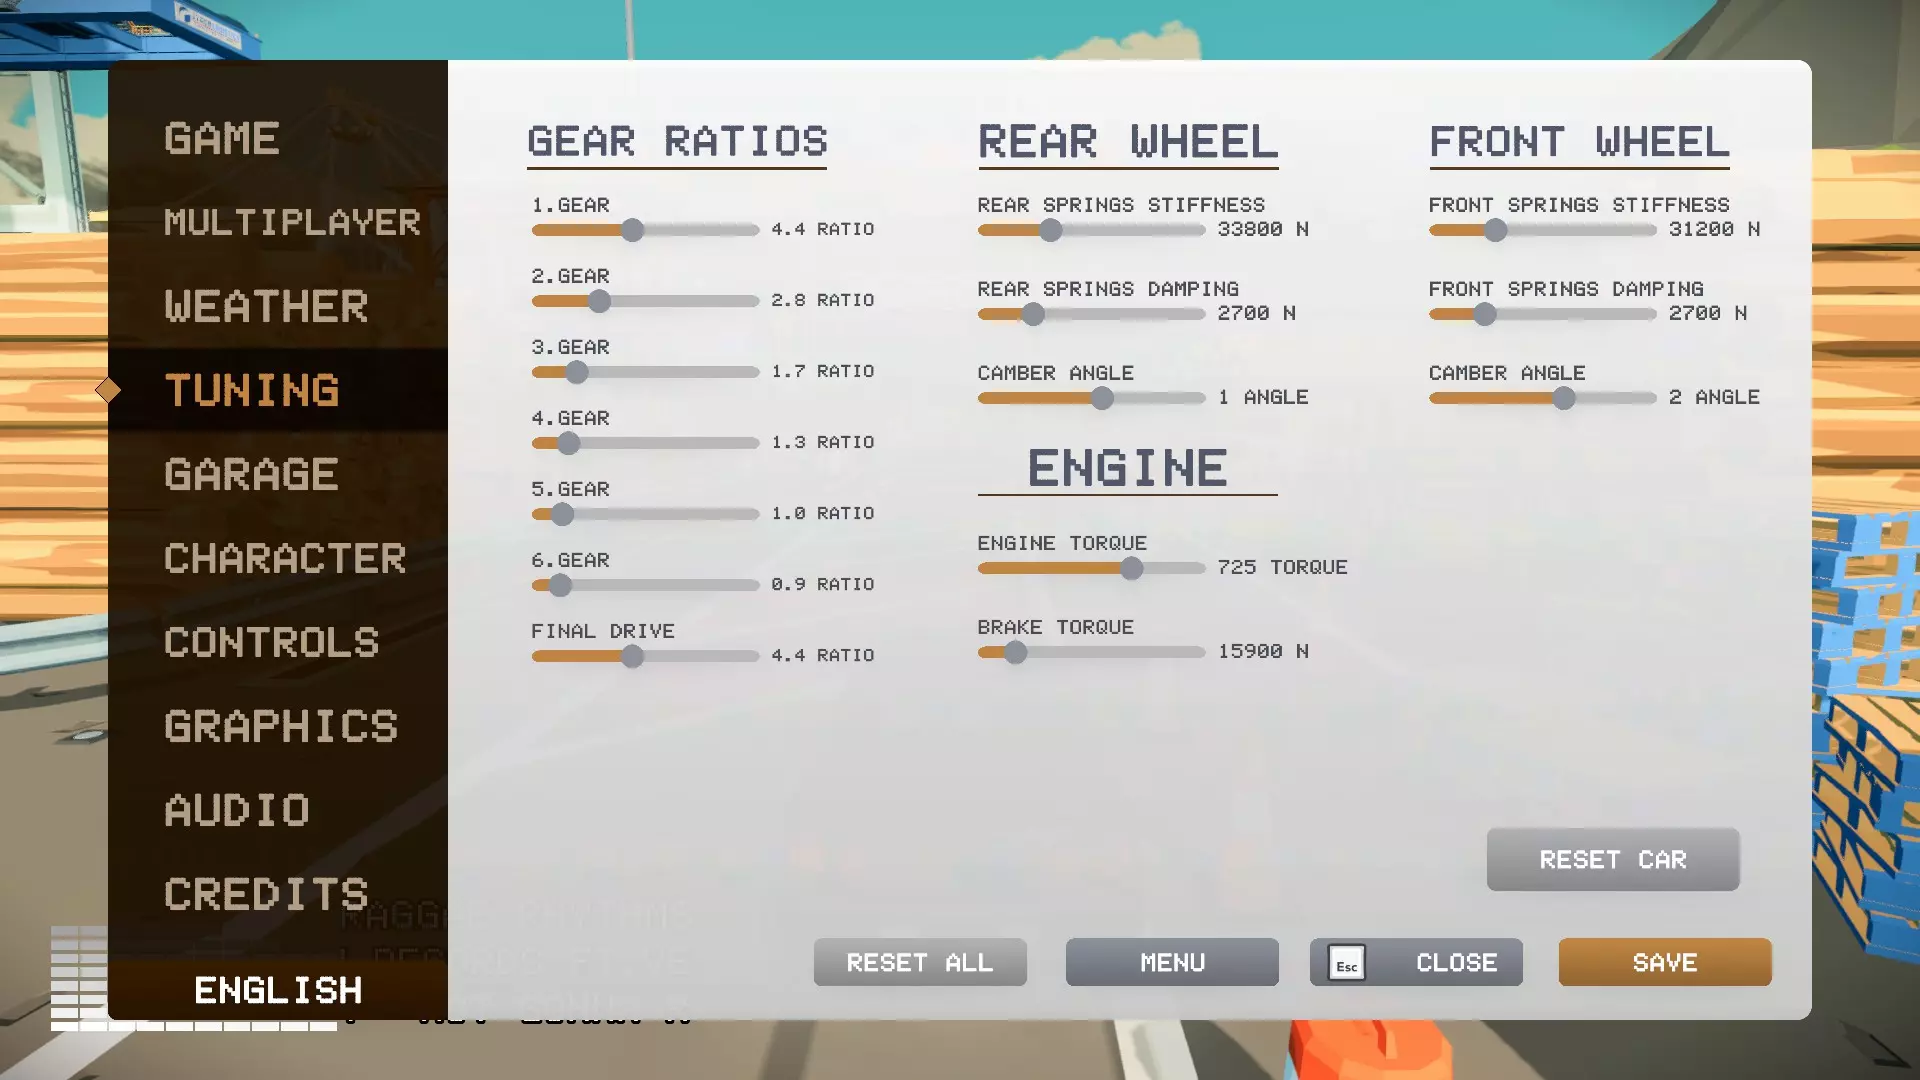
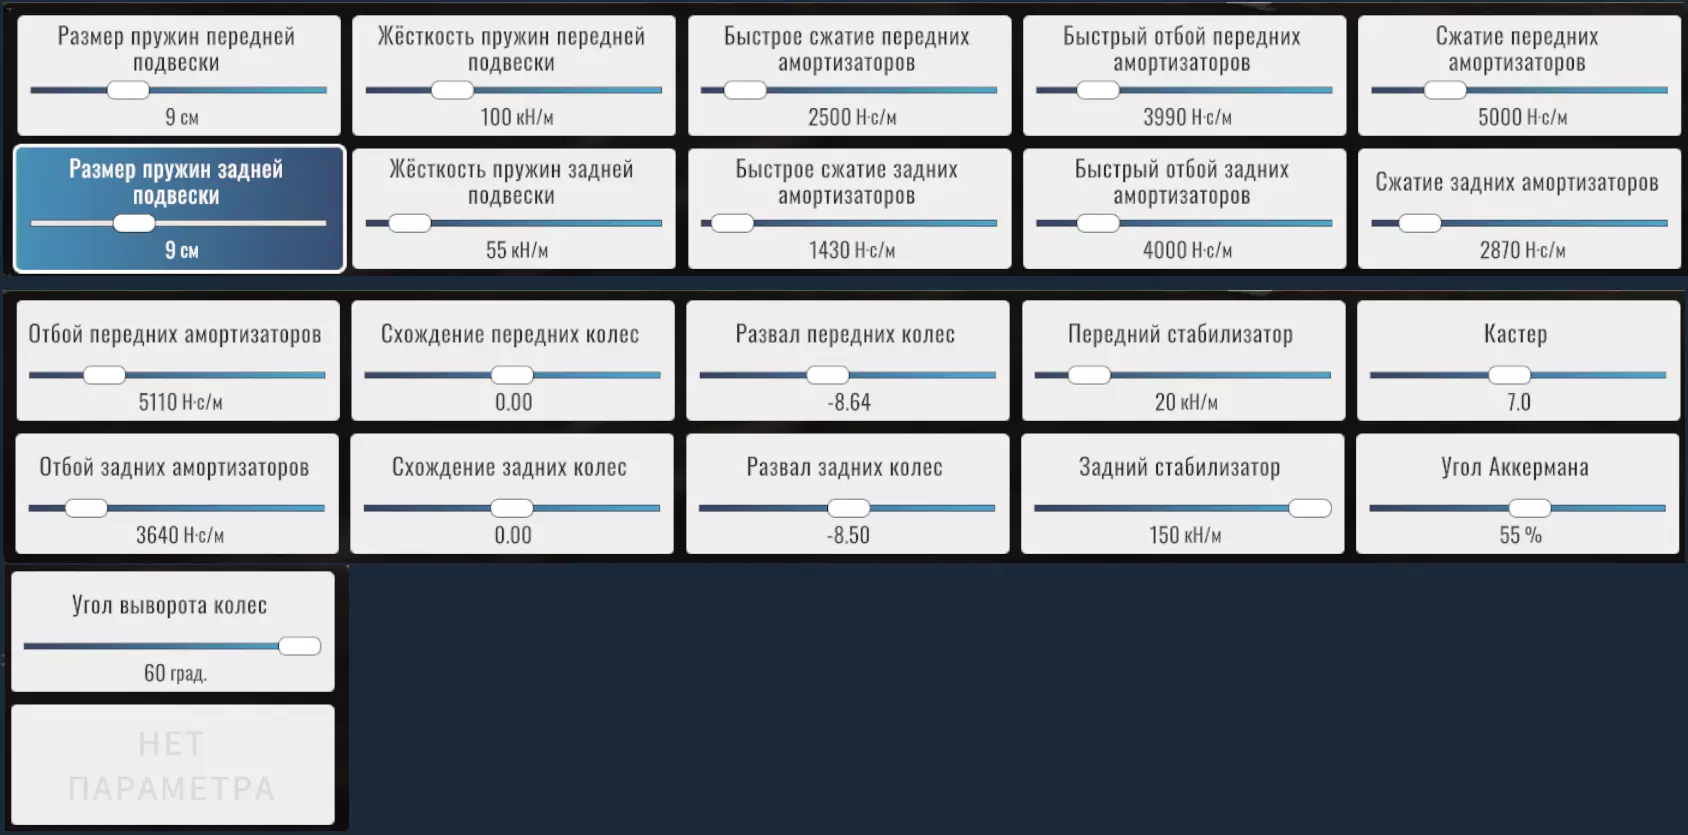
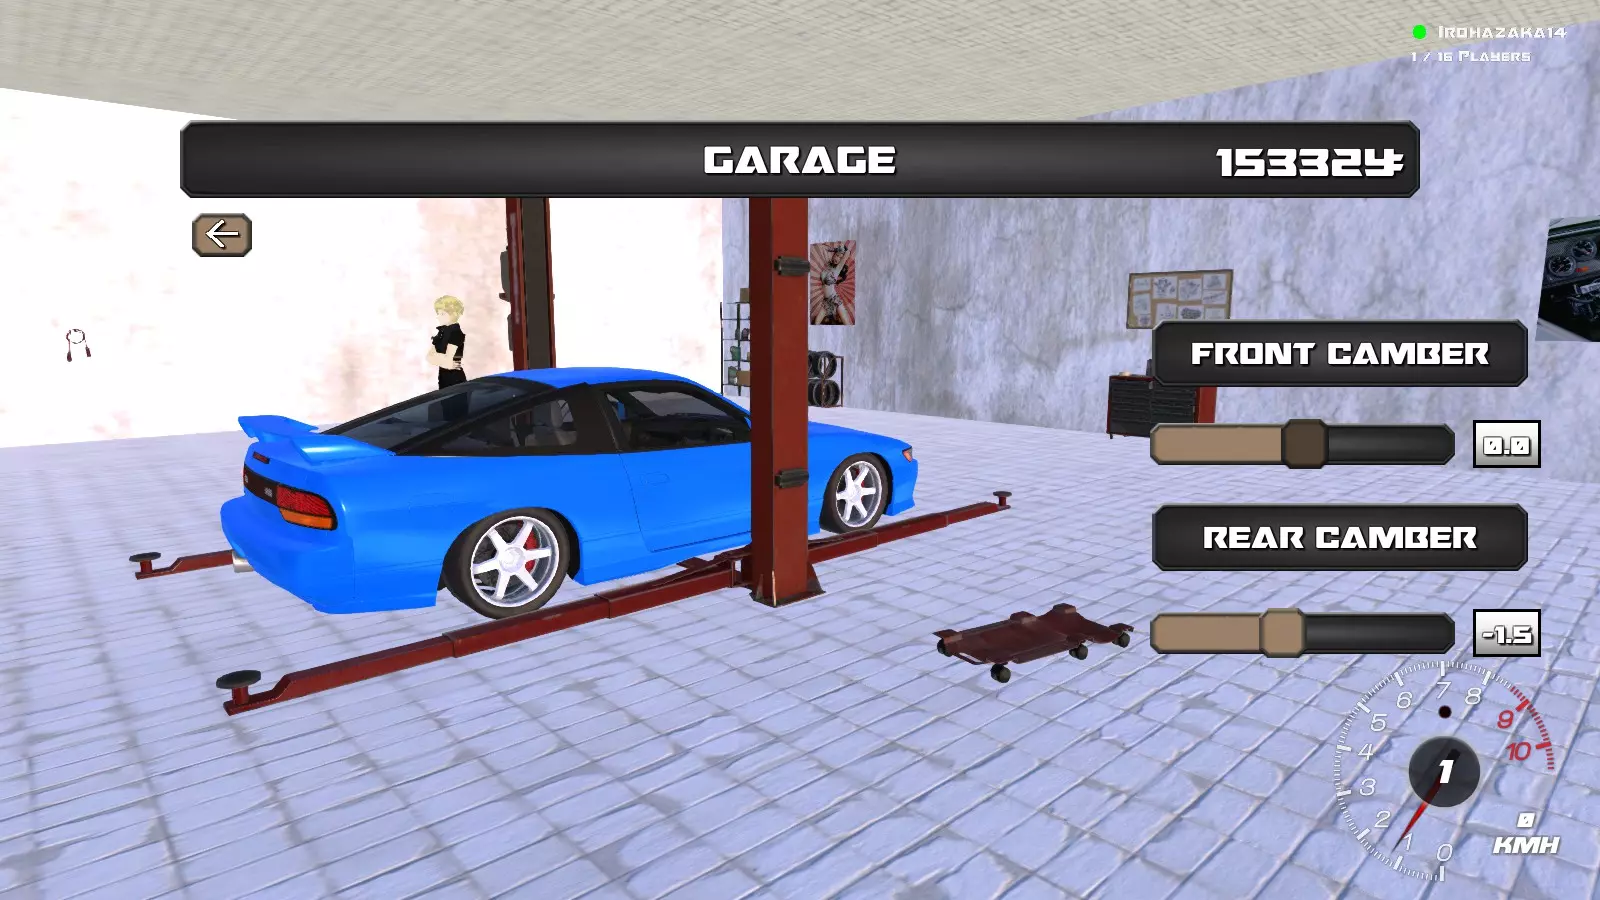
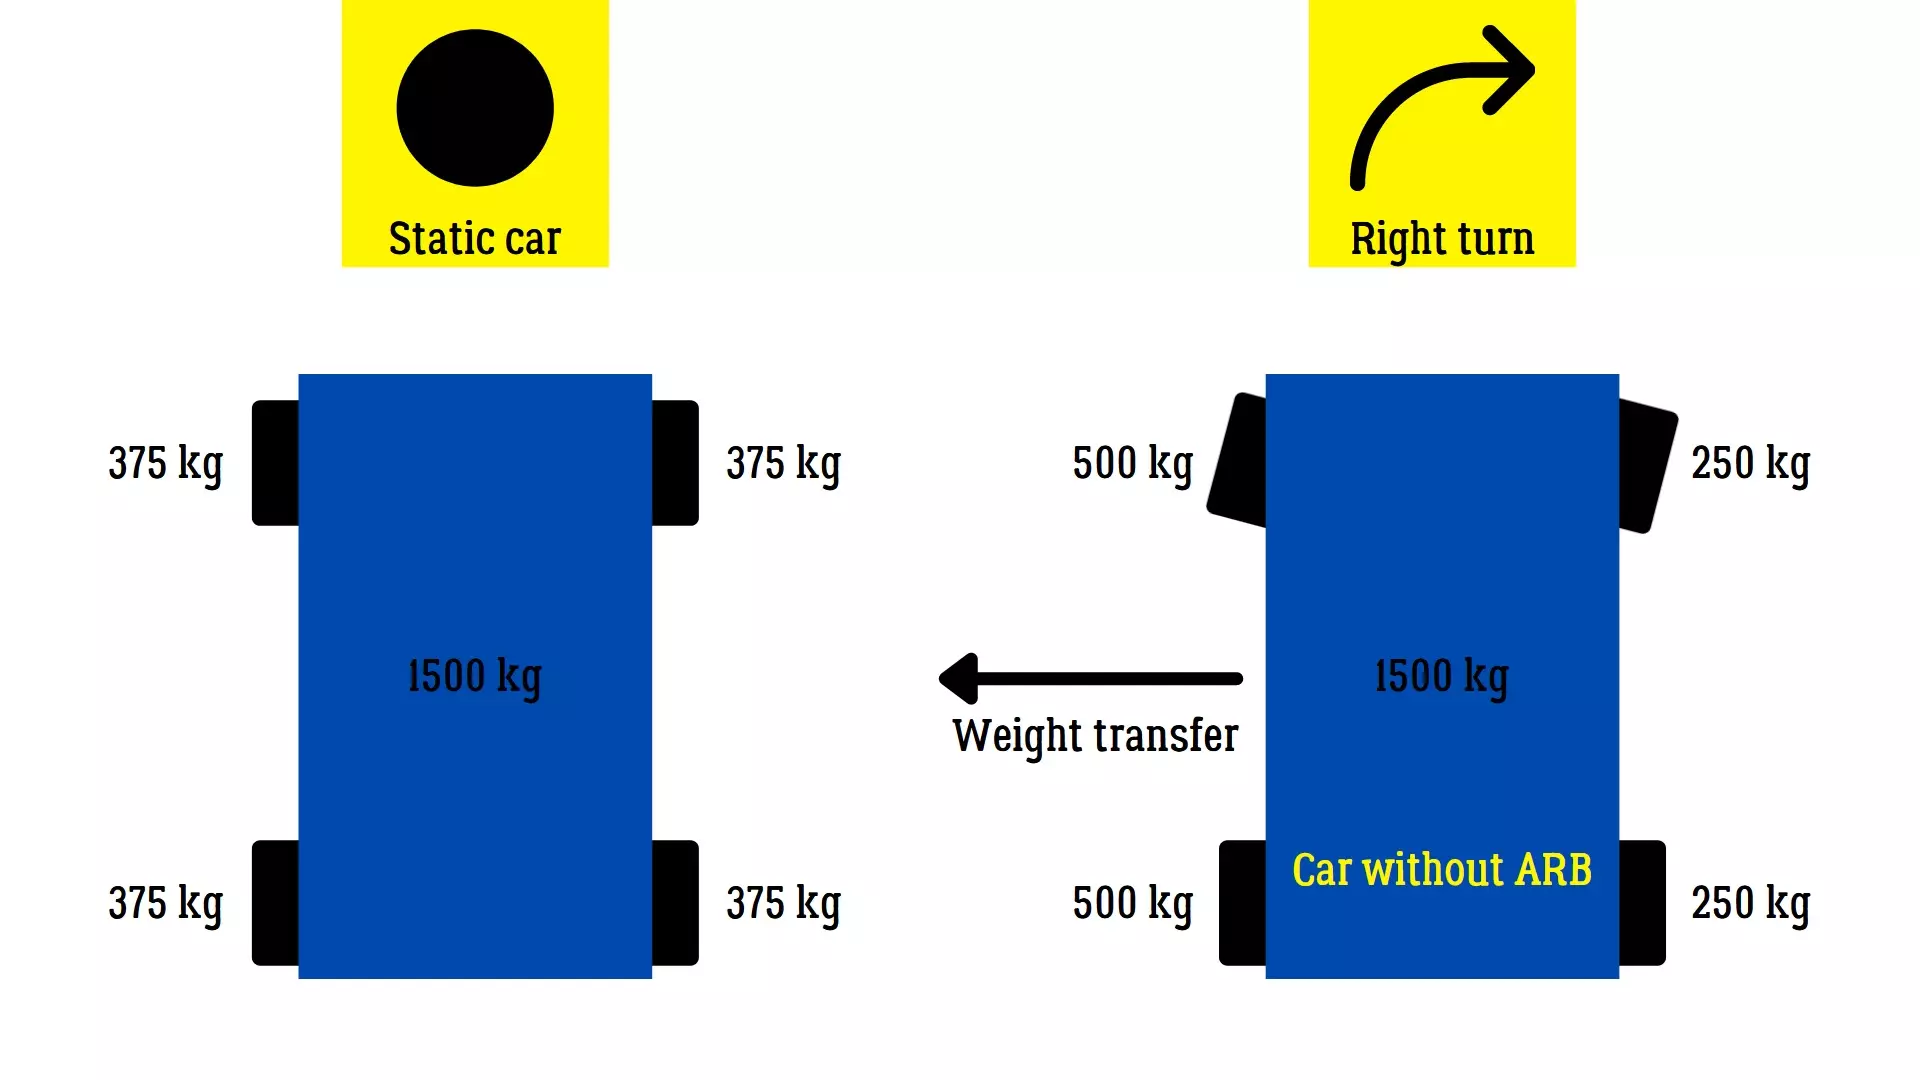
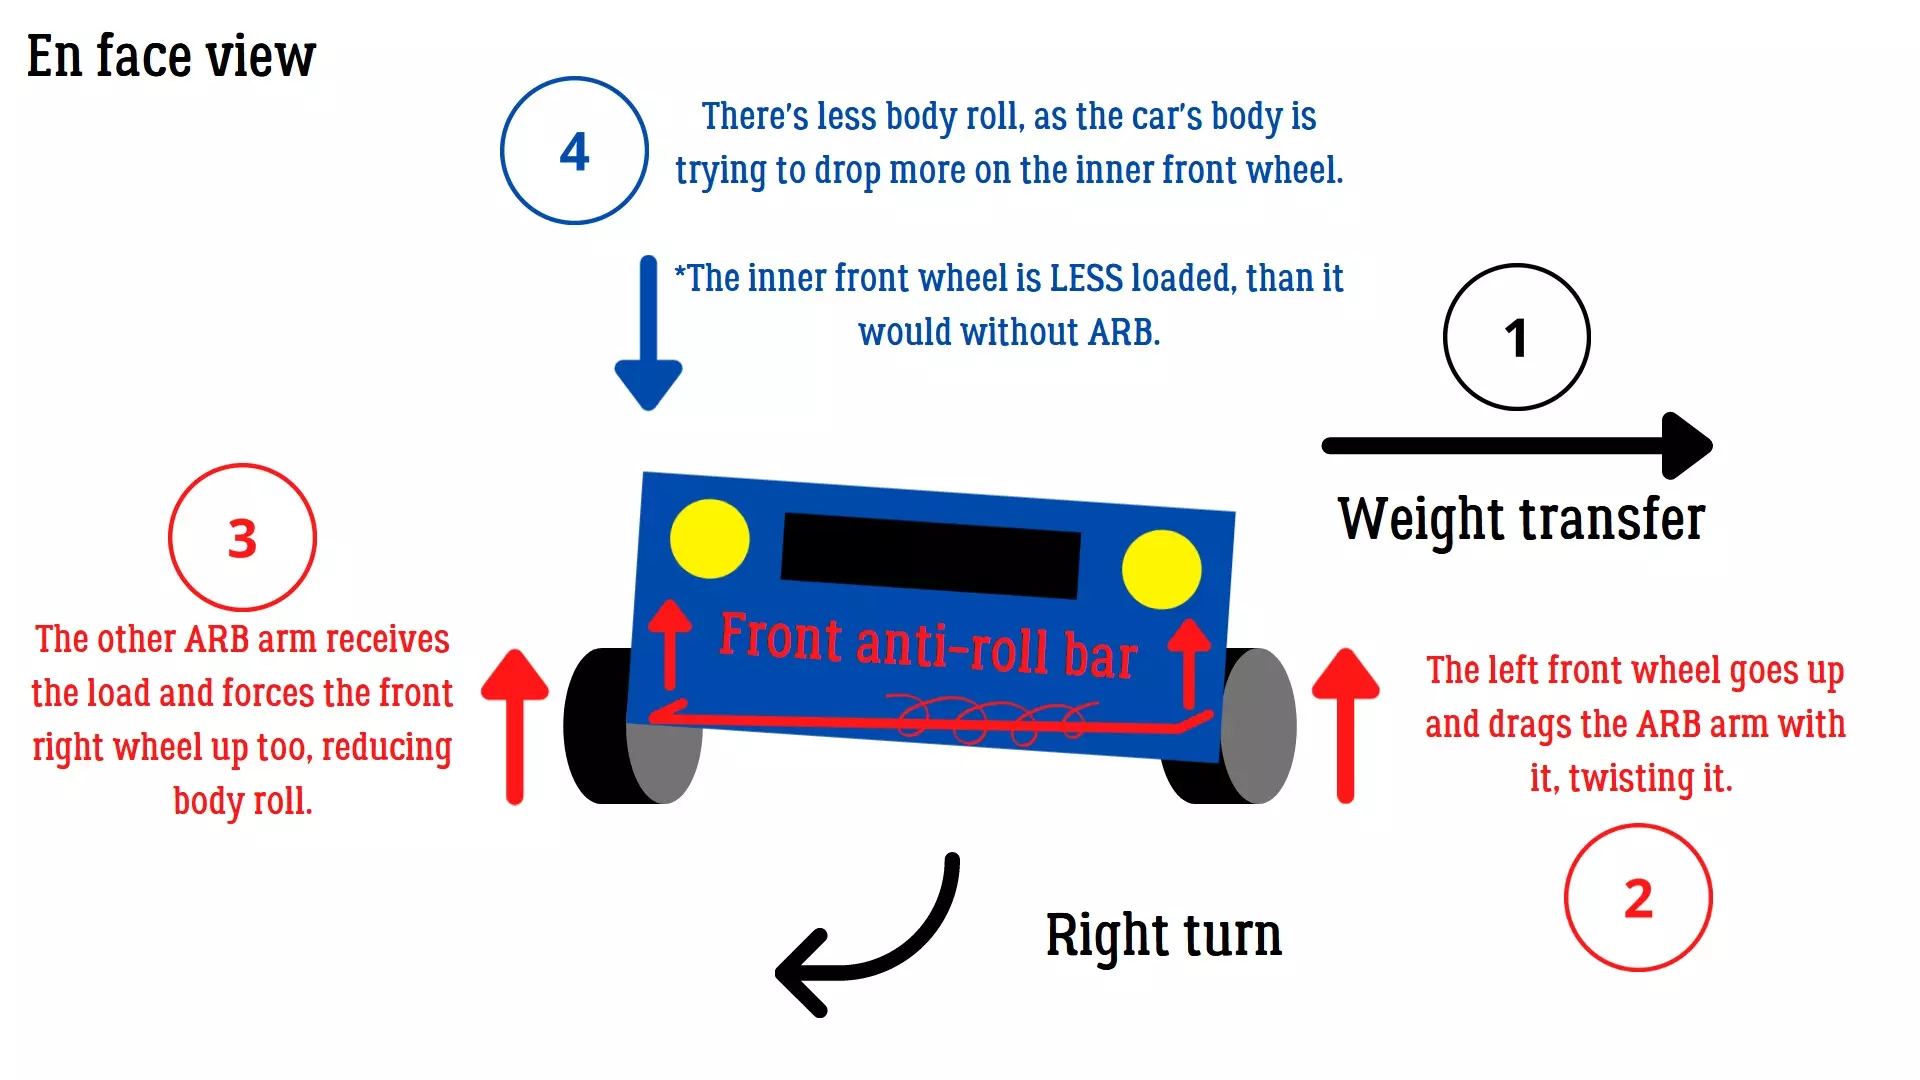
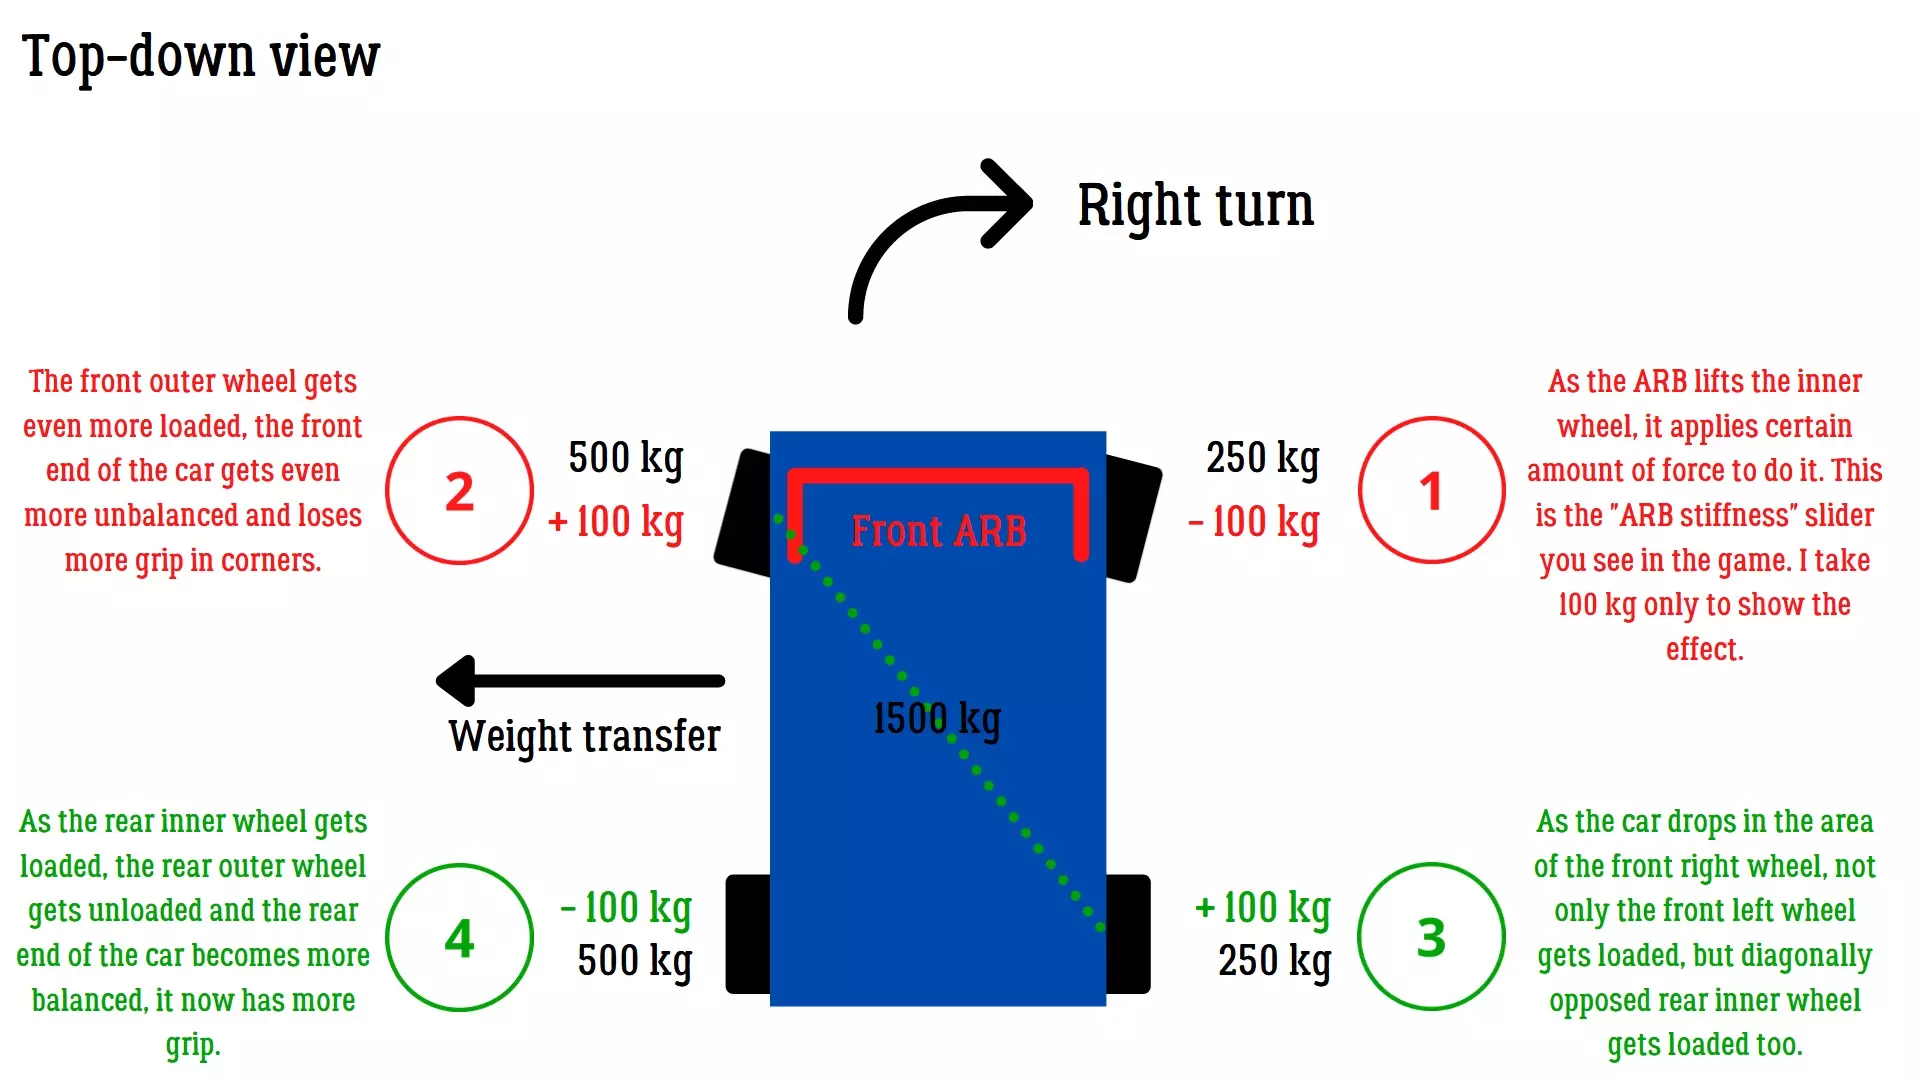
This guide should help you to correctly adjust your car for the best performance. § INTRODUCTION Greetings! I don’t have an engineering degree, all the recommendations provided in this guide are based on the information/feelings I have collected and are subjective as such. Along this guide I will also provide my settings for Spector RS (S15) that I found good both for drifting with my FFB wheel and keyboard. § SUSPENSION SECTION PT. 1 In this section you will find the adjustments for the following components: Spring length Spring stiffness Damper: slow bump and rebound Damper: fast bump and rebound Toe Camber Spring lengthThe spring size determines how low your car is. Generally lower stance allows for better car control because of the lower center of gravity. You should avoid the extremely low settings though as you'd risk bottoming out the car. Basically with very low settings you will lose control on curbs and bumps. The front springs should be higher than the rear ones, this is useful when you enter a drift while braking, so your rear end doesn’t lose that much traction because of weight transfer. ParameterFront springs lengthRear springs lengthValue9 cm8 cm Spring stiffnessThe spring stiffness allows you to control how reactive the suspension will be. Higher values (stiffer springs) mean very fast response but high chance of losing the car at the same time, this is because you need to be much more precise with your inputs. Lower values will make suspension’s response smoother and more forgiving. Usually you want to make the front suspension stiffer and the back softer. ⚠️ If your car oversteers, make the front suspension stiffer and/or the rear one softer. ⚠️ If your car understeers, make the front suspension softer and/or the rear one stiffer. ParameterFront stiffnessRear stiffnessValue75 kN/m60 kN/m Damper: slow bump and rebound"Slow" defines weight transfers from driver's input. This includes braking, accelerating, drifting, making transitions and so on. Bump determines how much resistance is applied on suspension’s compression. Rebound determines how much resistance is applied on suspension’s decompression. Higher values mean more resistance, slower reaction. Lower values mean less resistance and faster reaction. Extremely high values will not allow suspension to compress leading to a traction loss. Extremely low values will provide the same effect as above, the car body will simply fall down, losing traction. Generally, you want to find a sweet spot in which the car reacts fast enough to be controllable and smooth. Wrong setup will make it janky and unpredictable. You can easily test the work of bump and rebound settings (slow and fast) with the help of "Suspension stiffness" slider. Simply drag it back and forth. Slow movements with mouse will correspond to slow settings and fast movements to fast settings. Your goal is the reaction where the car's body remains at the same height and the wheel stays glued to the ground (no traction loss). ⚠️ If the body weight transfer is too fast and results in grip loss, increase the overall stiffness. ⚠️ If you lose grip because of a very slow weight transfer, decrease the overall stiffness. ⚠️ If you want an easier drift initiation, use higher settings on the front and/or lower settings on the rear. ParameterFront bumpRear bumpFront reboundRear reboundValue7000 N s/m6000 N s/m9000 N s/m8000 N s/m Damper: fast bump and reboundThe working principle is the same as for the "slow" parameters. The difference is that "fast" parameters work mainly for fast weight transfers, like hitting road bumps and other imperfections. ⚠️ If you drive on bumpy tracks, decrease the overall stiffness. ⚠️ If you find your car jumping around bumps too often, increase the overall resistance. ⚠️ If you find your car losing drift because of a bump or jump, decrease the front settings and/or increase the rear ones. ParameterFront fast bumpRear fast bumpFront fast reboundRear fast reboundValue10000 N s/m8000 N s/m12000 N s/m10000 N s/m ToeToe is the adjustment of the wheels according to the longitudinal axis of the vehicles. Negative toe means that the wheels are facing "outside" hence why it’s called toe-out, the positive one gives the opposite effect, thus the wheels are facing "inside", alternatively called toe-in. For front wheels I would recommend to use a negative setting, as it may help you with transitions between corners and increases the maximum steering angle. A slight toe-in on rear wheels can be beneficial to gain grip and to push the car a bit forward when applying gas. ParameterFront toeRear toeValue-0.30.25 CamberThe camber settings will help you to balance your car while in drift. The less camber you have the more traction you have on a straight line and less traction while drifting. Meanwhile, in drifting, negative camber on front wheels can add traction. It is possible thanks to weight transfer. Usually the front camber should be more negative than the rear. For the rear either stick with 0 or slightly positive camber, because the car will lower itself under power and that slightly positive value will make a perfect zero for the best traction. ⚠️ If your car understeers, decrease front camber and/or put rear camber slightly positive or to 0. ⚠️ If your car oversteers, increase front camber and/or increase camber on the rear. ParameterFront camberRear camberValue-9.60.45 § SUSPENSION SECTION PT. 2 In this section you will find the adjustments for the following components: Anti-roll bar Caster Ackerman angle Max. steering angle Anti-roll barThe anti-roll bar reduces body roll and allows to find balance between understeering and oversteering. Do not underestimate the effect of this setting, this is one of the most important setting for controlling the amount of oversteer on your drift car. The anti-roll bar loads the outer wheel more and takes off load from the inner wheel, while forcing the latter up. This allows the car to roll less and reduces the grip on the end of the car where the ARB is installed. Meanwhile, the other end of the car becomes more balances and starts to have more grip. If you install a stiff ARB in front, you give more traction to the rear end. This can be useful on a drift car, if you find that you lose the rear end too quickly and cannot hold angle for very long. If you make your ARB in back is stiffer than in front, you will slide all over the place and the front will be grippier. This setting can help you if your car is underpowered or if you want your car to change its lateral position easier in drifting (for example for faster transitions). ParameterFront ARBRear ARBValue60 kN/m10 kN/m
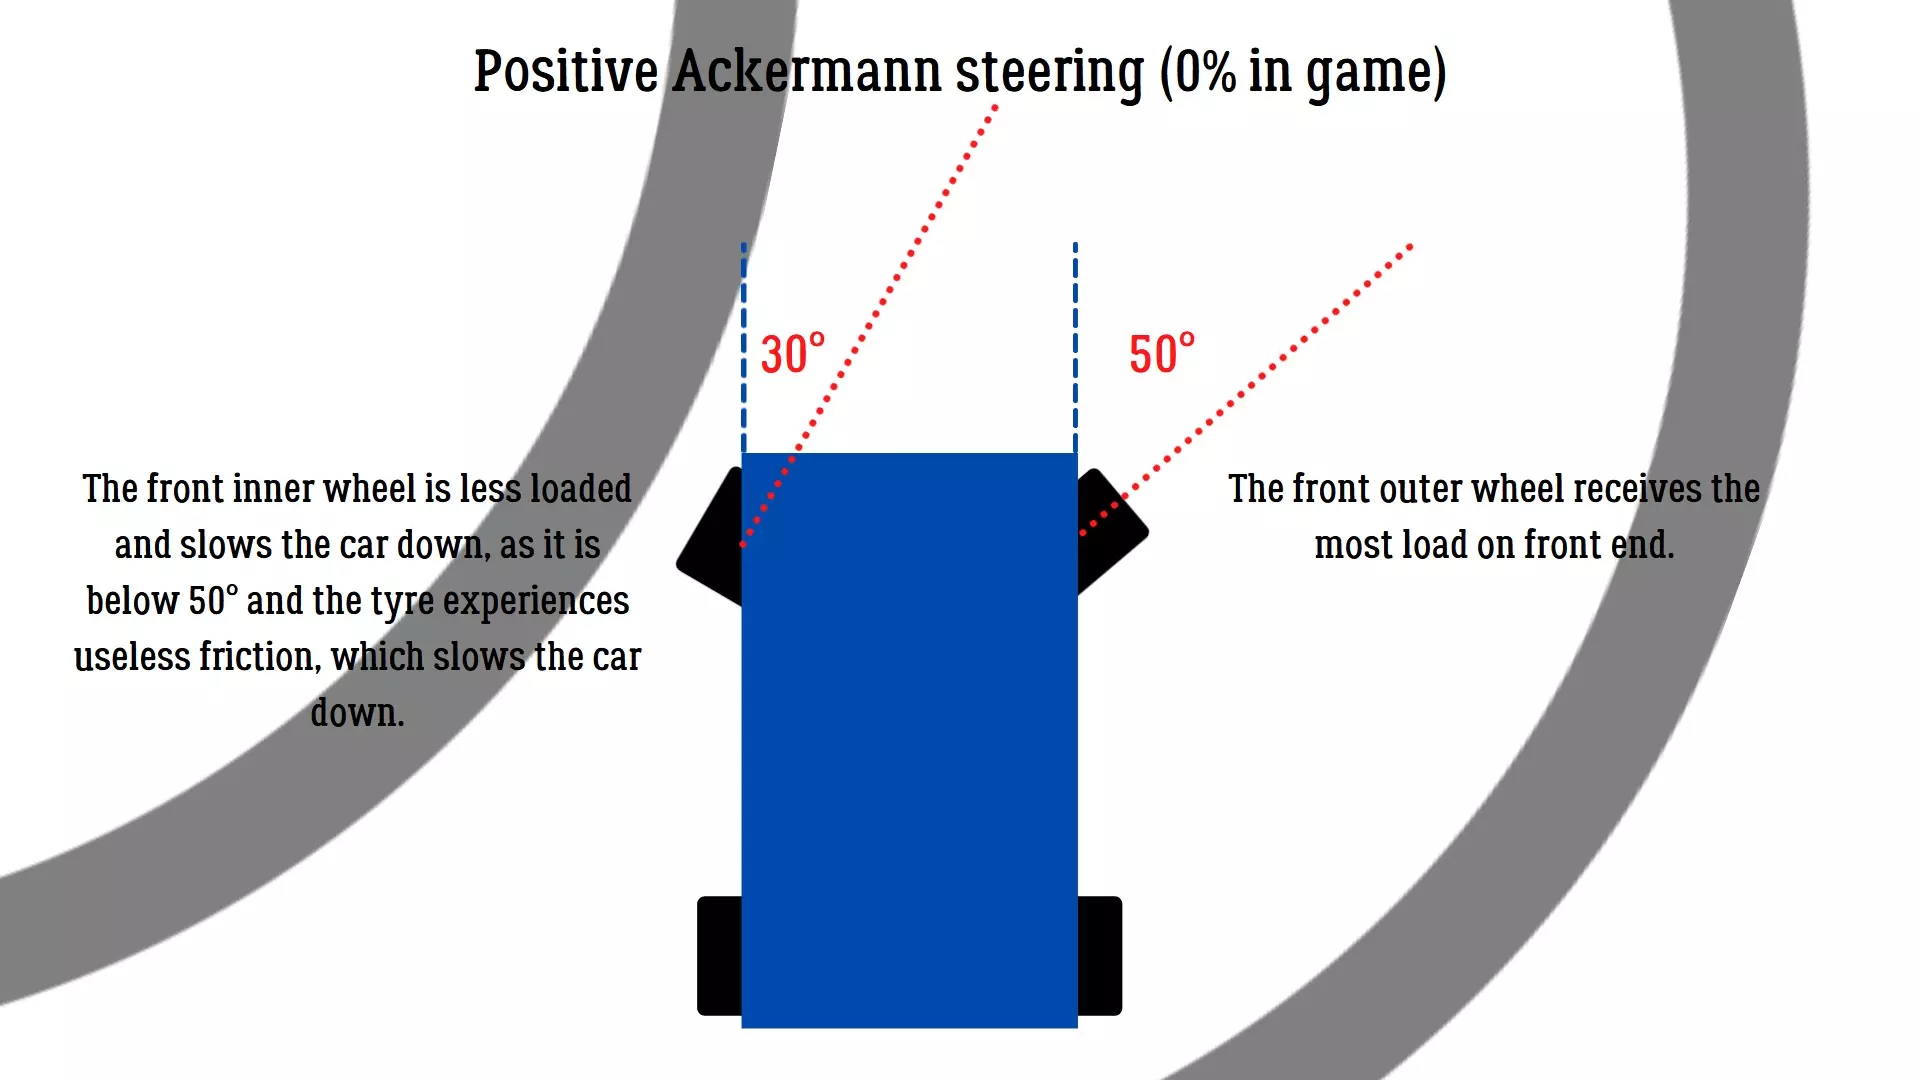
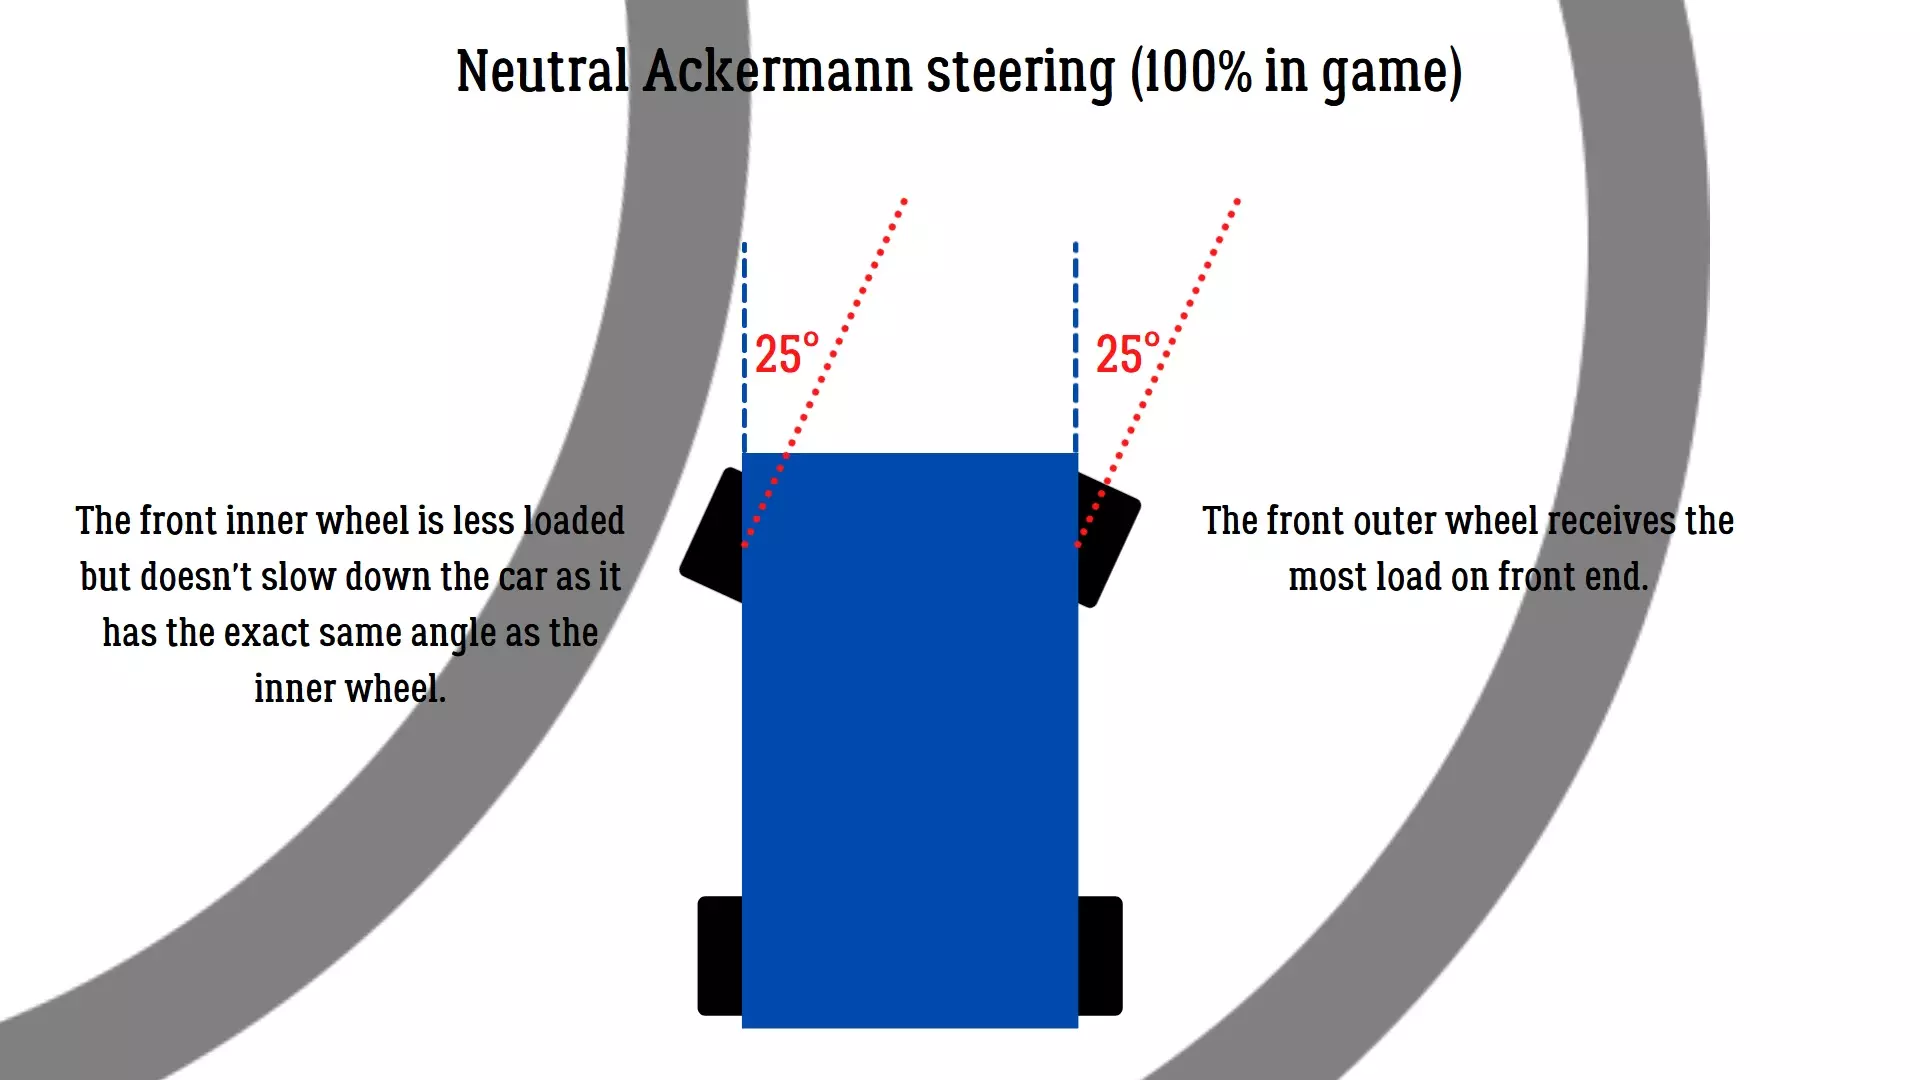
主销后倾角 主销后倾角有助于稳定车辆。主销后倾角越大,方向盘回正至中立位置的速度越快,甚至会开始向相反方向转动,这对车辆重心转移非常有帮助。 参数 主销后倾角值:10 阿克曼角 此设置取决于个人偏好。 0%为最大正阿克曼设置(标准模式); 100%为平行阿克曼设置(零角度); 通常为追求速度,建议将设置保持在50%至80%之间。但需注意,数值越高,车辆失控的风险越大,因为更难维持大角度漂移。较低的数值会带来更顺滑的驾驶感受,但实际上会因前内侧轮胎摩擦力增加而导致过弯速度变慢。我建议从20-30%的转向角度开始,随着你对驾驶和设置越来越熟悉,再逐渐增加百分比。 参数:阿克曼角 数值:65%
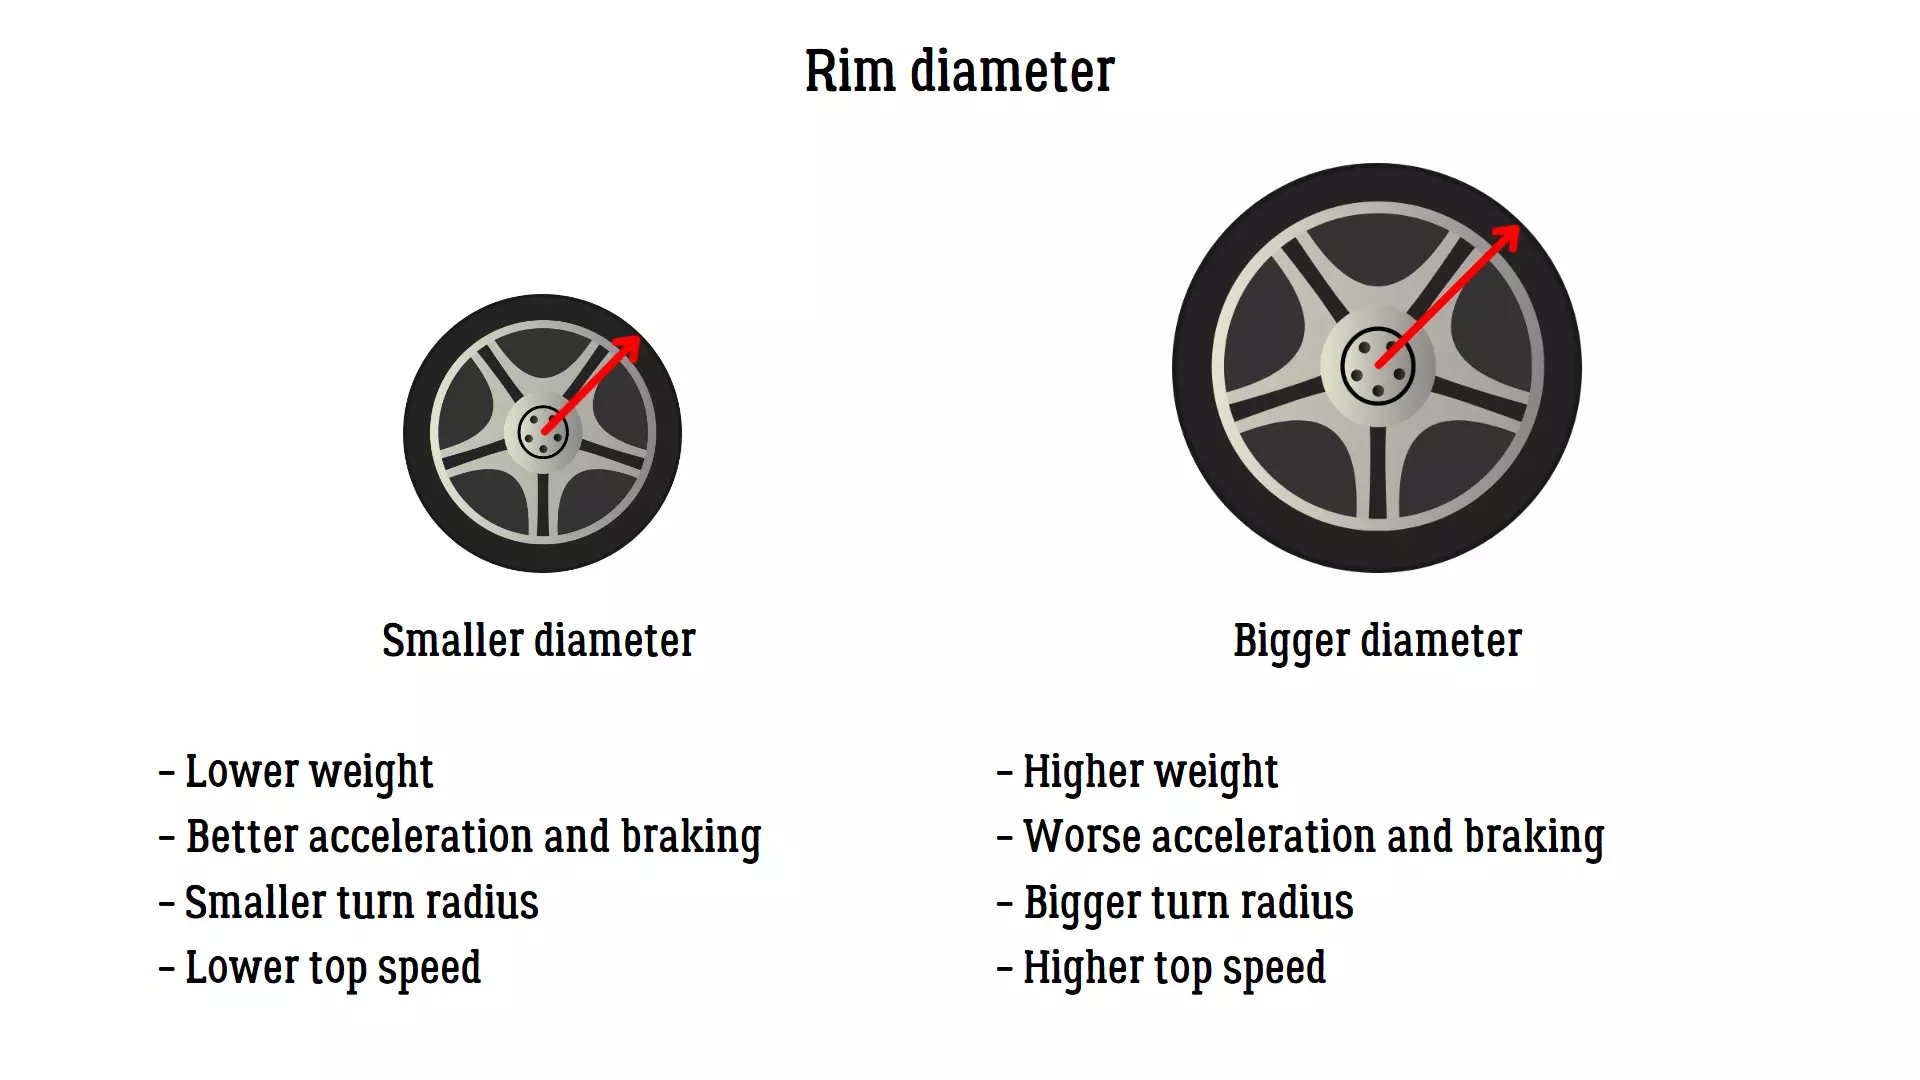
最大转向角度 这是一个非常简单直接的设置,如果你还没有设置过,直接调至最大即可! 参数:最大转向角度 数值:60度 车轮部分 在本部分中,你可以对以下组件进行调整: 轮辋直径 轮胎宽度 轮胎气压 车轮附着力 轮距 轮胎扁平比 轮辋直径 【注意】如果你希望更容易起漂、获得更好的操控性和加速性能,请使用较小的轮辋直径。如果你的目标是最高速度,则使用较大的轮辋直径。 参数:前轮辋直径、后轮辋直径 数值:18英寸、18英寸
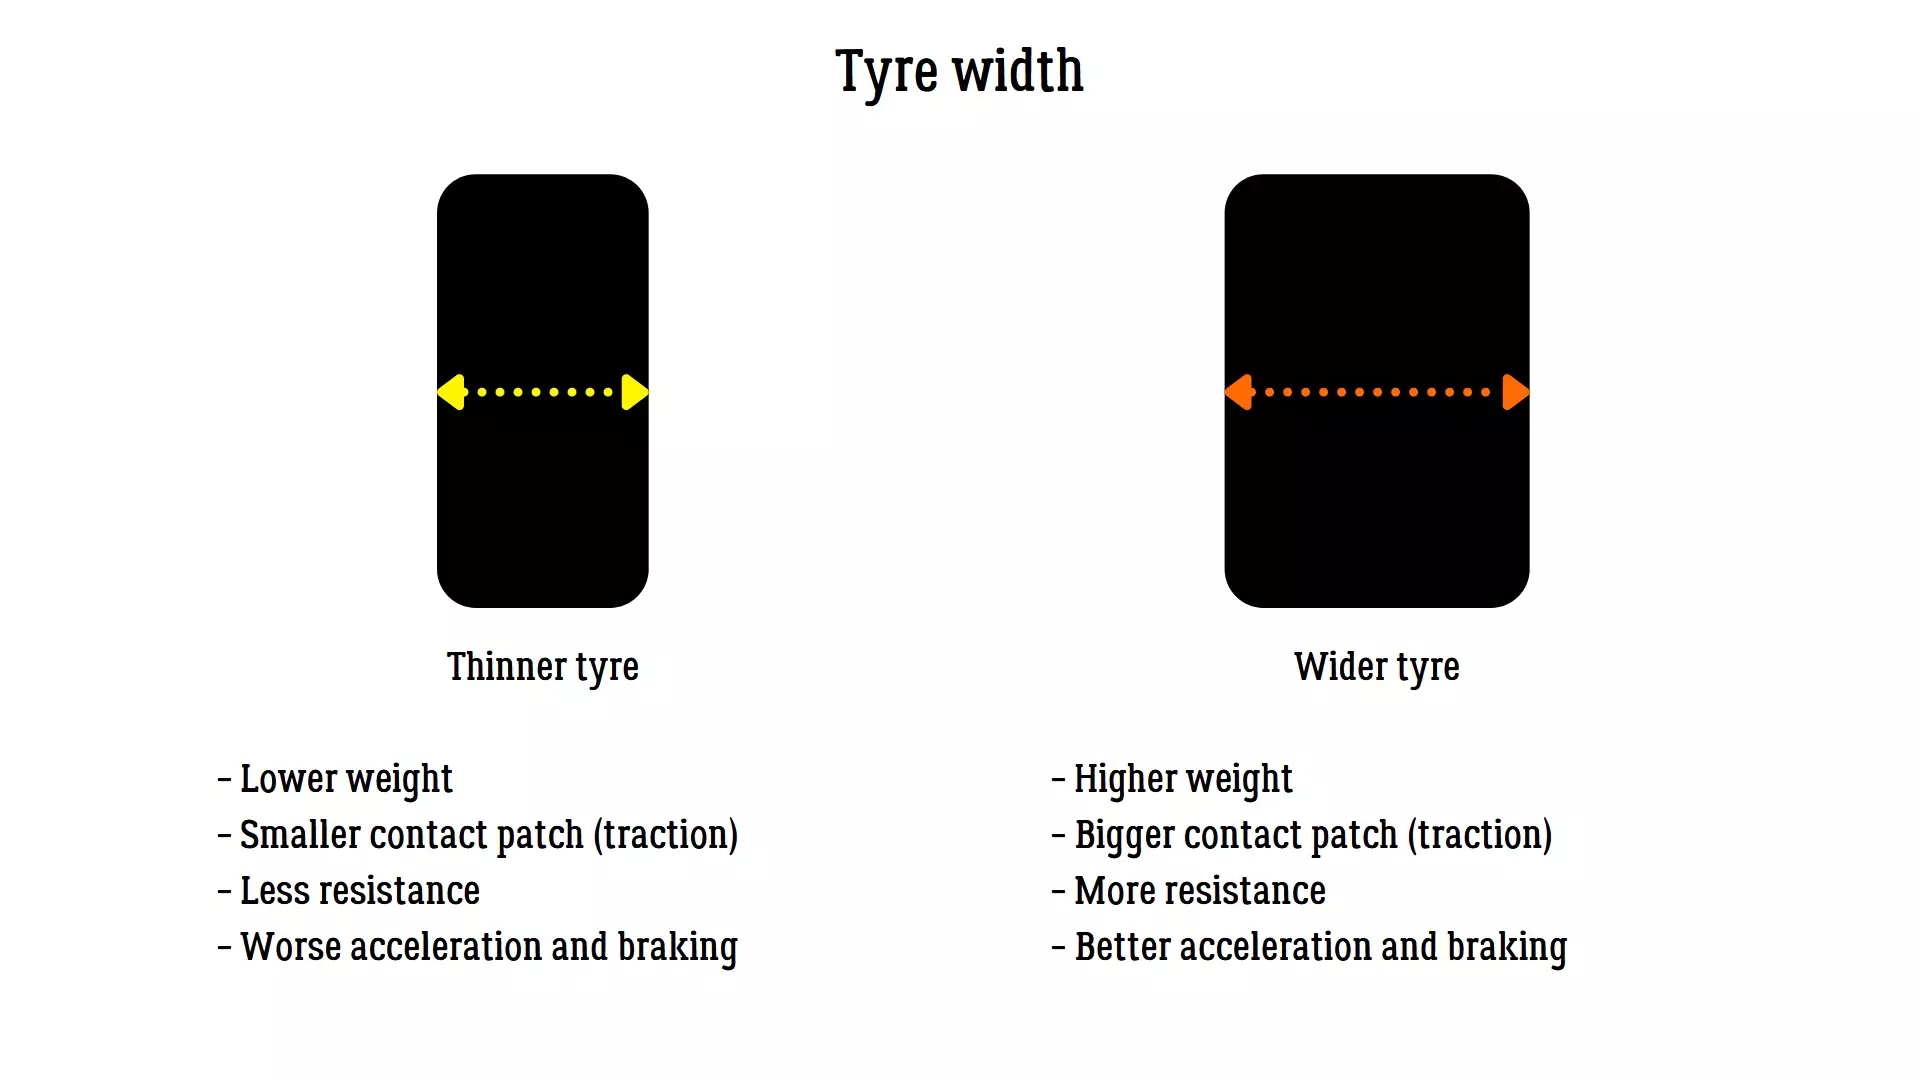
轮胎宽度 轮胎宽度越大,该轮胎获得的抓地力就越强。同时要记住,与轮辋直径一样,更宽的车轮重量更大,也更难转动。 【注意】如果车辆转向不足,减少前轮宽度和/或增加后轮宽度。 【注意】如果车辆转向过度,增加前轮宽度和/或减少后轮宽度。 参数 前轮宽度 后轮宽度 数值 255毫米 265毫米
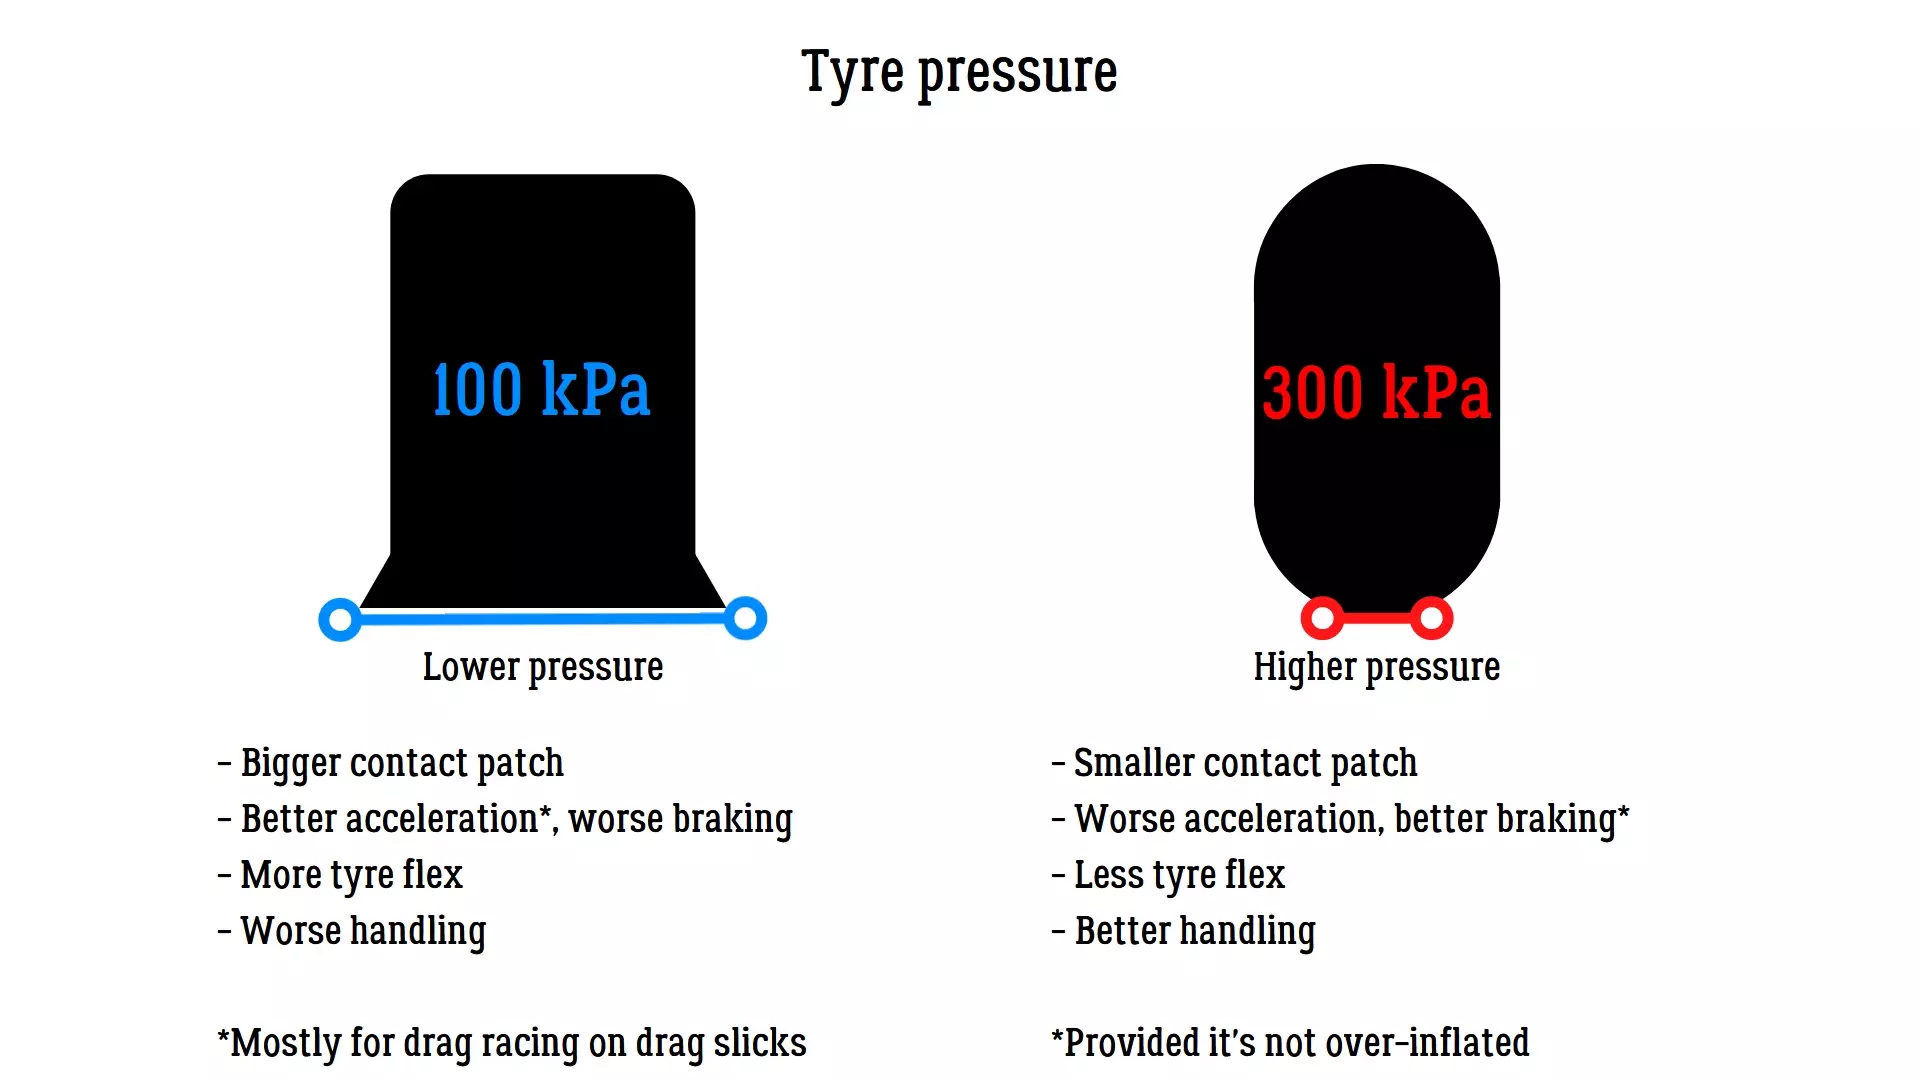
轮胎压力 轮胎压力决定了接地面积的大小(即抓地力的大小)。 较高的压力值会使接地面积变小(轮胎与路面的接触减少),较低的压力则能提供更多抓地力。 但压力过低也不利于抓地力,因为这会产生过多摩擦,导致车速下降。 由于CarX未模拟轮胎温度,调整此参数时无需考虑后胎的升温情况。 【注意】如果车辆出现转向不足,可增加后胎压力和/或降低前胎压力。 【注意】如果车辆出现转向过度,可降低后胎压力和/或增加前胎压力。 参数 前胎压力 后胎压力 数值 190千帕 180千帕
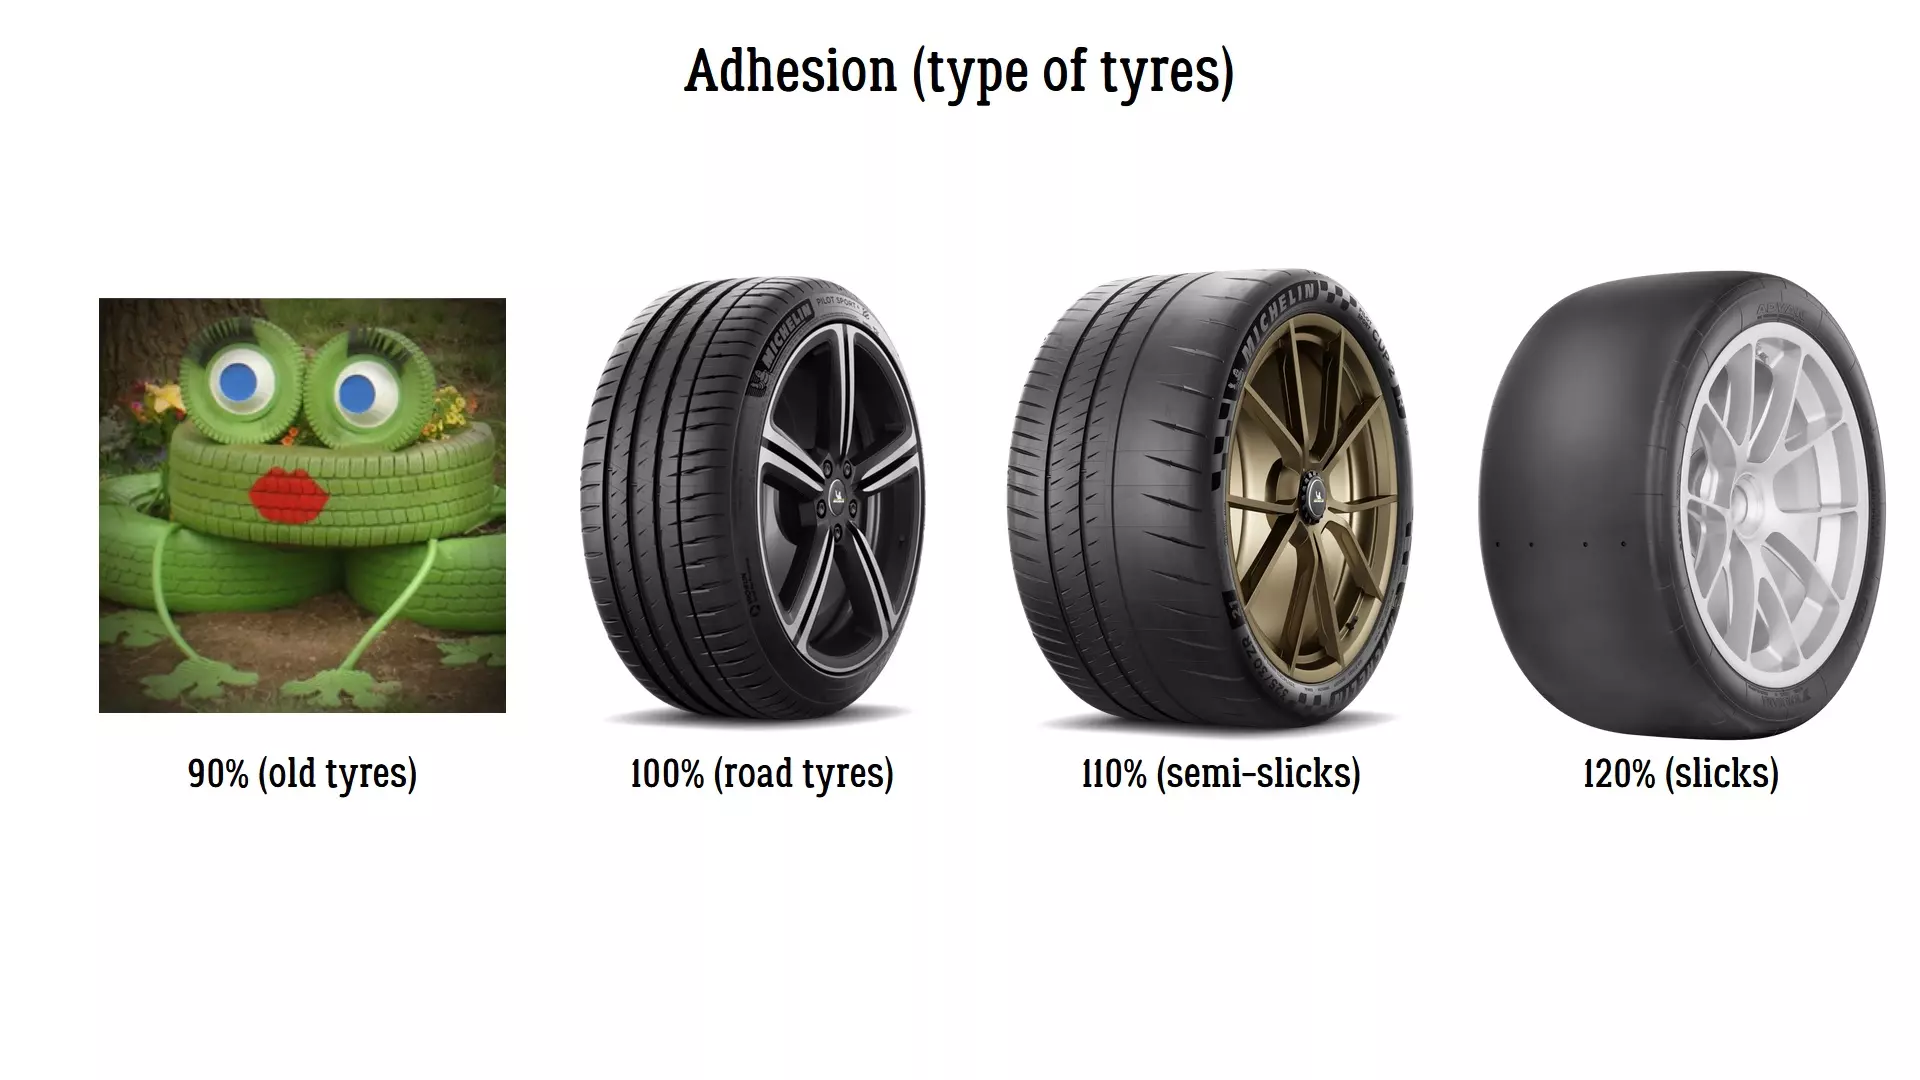
轮胎附着力 这是一个非常容易理解的设置,轮胎与路面的附着力越大,轮胎能提供的抓地力和速度就越高。 附着力参数可参考以下数值: 90% - 复古胎(旧胎/磨损胎); 100% - 街道胎; 110% - 半热熔胎; 120% - 光头胎。 【注意】如果车辆出现转向不足,可降低后轮附着力和/或增加前轮附着力。 【注意】如果车辆出现转向过度,可增加后轮附着力和/或降低前轮附着力。 参数 前轮附着力 后轮附着力 数值 120% 120%
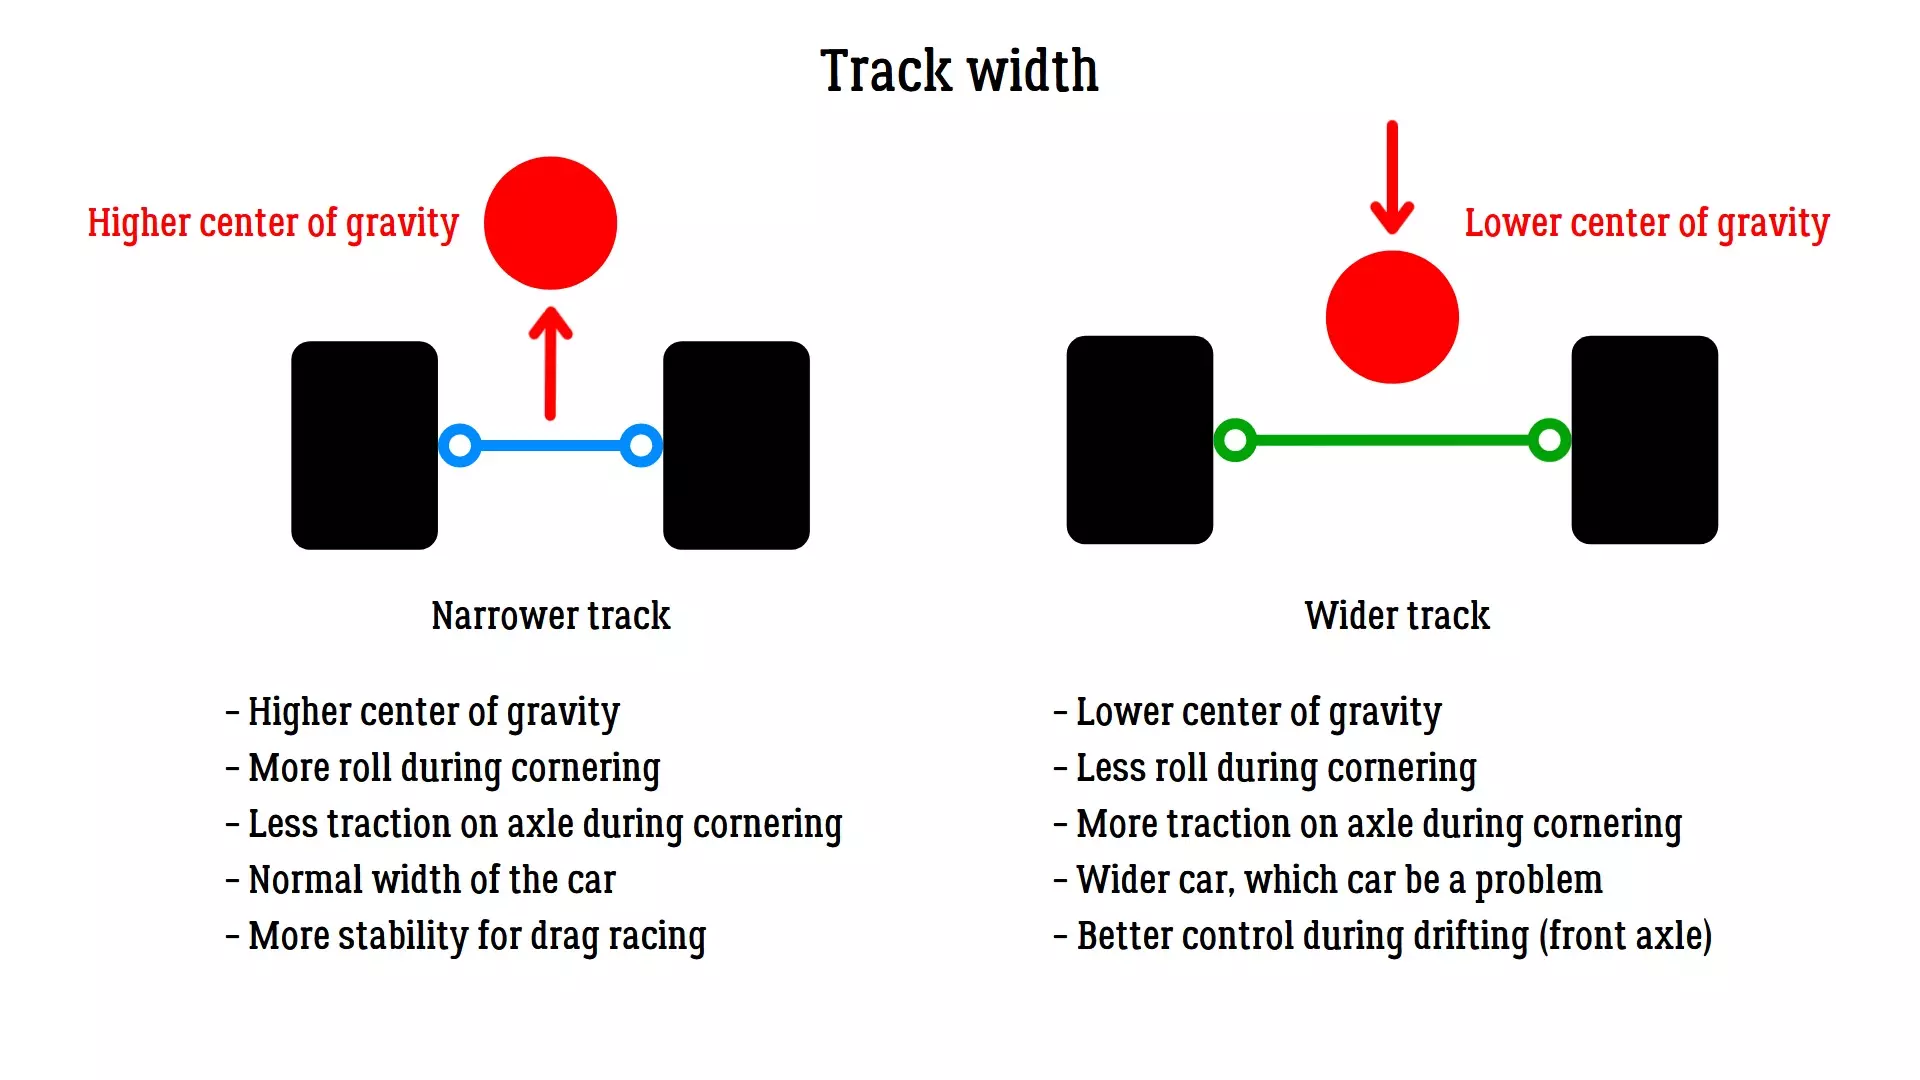
轮距:轮距有助于降低重心并提升操控性。通常漂移赛车会采用更宽的前轮距,以在漂移时获得更好的操控。参数:前轮距、后轮距,数值:51
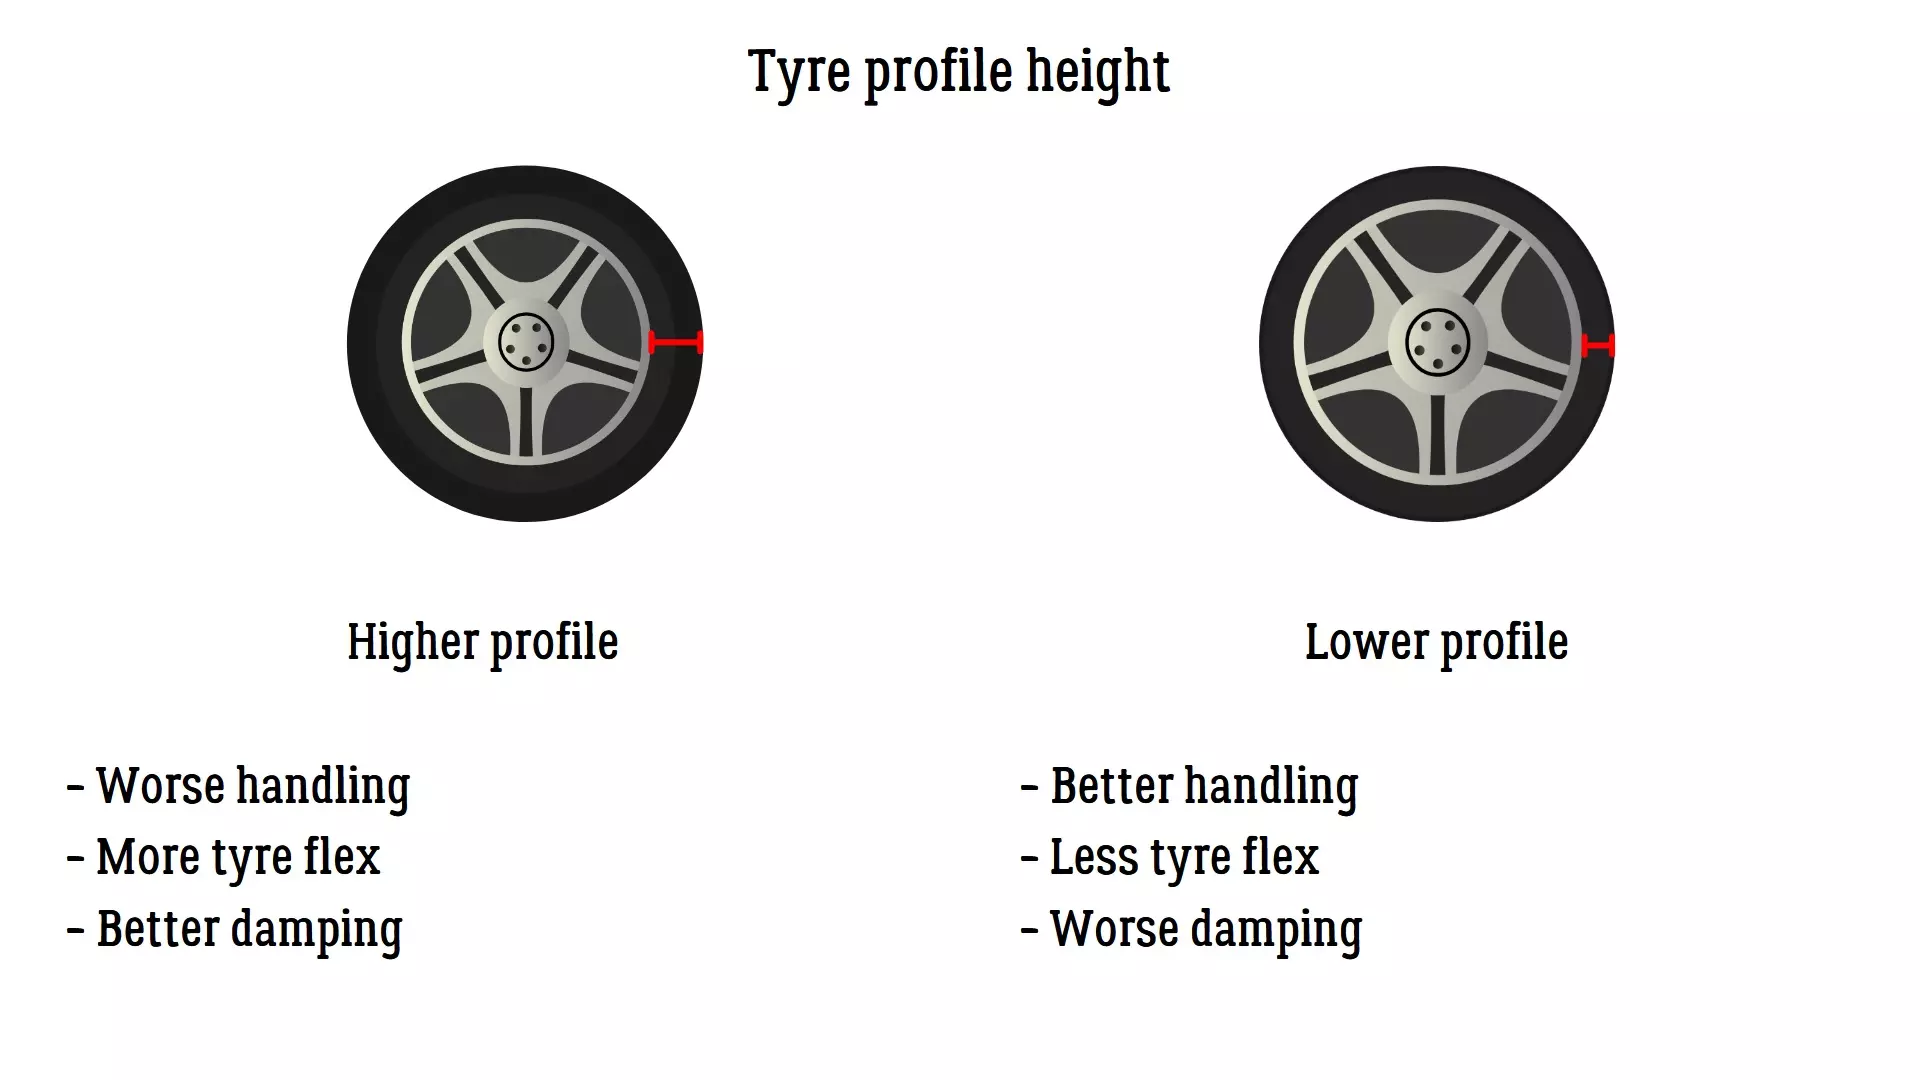
轮胎扁平比 轮胎扁平比越小,你对车辆的操控性就越好,整体抓地力也越强。 但要注意,过低的扁平比可能会导致不可预测的结果,因为胎壁将不足以吸收车辆的动态变化。 参数 前轮扁平比 后轮扁平比 数值 35% 35%
§ ENGINE SECTION In this section you will find the adjustments for the following components: Tune-up Max. torque Rev limiter Turbocharger Turbocharger air pressure Tune-upBasically an ECU tuning, the more the better. ParameterEngine tune-upValue5 % Max. torqueTorque is the rotational force applied to crankshaft of the engine. The more, the better. Meanwhile, the power is rate of the work done, the higher the better too. The most important part to understand, is that the Power is calculated as following: Torque x RPM / 5252 = Power 5252 is the constant RPM number, where Torque and Power curves always meet (you can check that in the game too). Usually one doesn't go without another. You can try to lower this setting, if you see that the acceleration times are getting better, otherwise keep it high for most power. ParameterMax. torqueValue4800 rpm Rev limiterAdjust it to your liking. In CarX you cannot damage the engine, so there's no need to limit the RPM. ParameterRev limiterValue9115 rpm TurbochargerA part that allows you to suck in more air into the engine, increasing the efficiency of the burning process and thus increasing power output. While mandatory on some low powered cars, high tier cars may drift well without it. I personally believe there is such thing as too much power. Adjust it to your preference. ParameterTurbochargerValueYes Turbo air pressureThis setting adjusts the efficiency of turbocharger, bigger values give you more power. ParameterTurbocharger air pressureValue2.0 atm § TRANSMISSION SECTION In this section you will find the adjustments for the following components: Diff. locking ratio Final drive Gears Diff. locking ratioAdjustable limited-slip differential. 0% is an open differential, which means that both of rear wheels are rotating independently. 100% is a completely locked differential, both of rear wheels are rotating at the same speed.⚠️ The more the differential is locked, the easier it is to initiate drift. ParameterDiff. locking ratioValue0.80 Final driveThe final drive adjusts the overall length of all gears, without altering the ratios of every gear individually. Bigger values mean shorter gears, lower values mean longer gears. Typically this is adjusted according to the track layout, tracks with a lot of tight turns would need shorter gears for faster power output, while long configurations with high-speed sections would require longer gears. In the end you’ll want to find a sweet spot that would suite the majority of tracks. Adjust this setting first, before tuning the individual gear settings. This setting can be also seen as a final torque multiplier, the bigger the number, the faster is the acceleration. ParameterFinal driveValue3.90 GearsThe individual adjustment of every gear’s ratio. Bigger values mean shorter gear, smaller values mean longer gears. As with the final gear ratio, this is a torque multiplier, hence why shorter gears give more acceleration. This setting is useful if you find yourself switching gears on corners where it’s not really needed. It is quite hard to adjust, as you need to constantly test the results on track for every gear. I can recommend you to search IRL gear ratios for the desired car (or at least something close in terms of performance). Personally I managed to adjust Voodoo (Viper), simply by finding gear ratios for IRL Vipers. ParameterGear 1Gear 2Gear 3Gear 4Gear 5Gear 6Value2.601.801.501.201.000.80 § BRAKES SECTION In this section you will find the adjustments for the following components: Brake torque Front brake bias ABS Launch control Brake torqueThe force applied to brakes, the bigger it is, the faster the car will stop. More brake torque also can ease the wheel lockup if you do not use ABS and adjust a particular braking bias. Adjust it to your liking. ParameterBrake torqueValue3800 N/m Front brake biasThis setting tells the car where to apply the braking force. More front brake bias will mean that the front wheels will do more to stop the car, than the rear wheels. Too much front bias can make car understeer when entering a corner. More rear bias (lower settings) will make initiating drift easier. Very low settings, though, are not desirable, since they can make a car unstable when braking. ⚠️ If you want your car to straighten from drift on pedal braking, make a choice towards rear bias. ⚠️ If you want your car to remain sideways on braking, then adjust more braking to the front. ParameterFront brake biasValue75 % ABSThis settings helps you prevent locking the wheels when braking. Disabling it in couple with rear braking bias will allow you to initiate drift with pedal braking (provided rear wheels will lock). With the front bias, locking front wheels will lead to a massive understeer and missing a corner entry point. ParameterABSValueNo Launch controlThis setting is used in tandems mode. It allows you to have a clean start without too much wheelspin. ParameterLaunch controlValueNo Additional information Make sure to check my other guide about adjusting cars for Time Attack mode: https://steamcommunity.com/sharedfiles/filedetails/?id=2547828993 Thank you for your attention.