换一换
换一换 


获取最后一个成就的一些技巧 - Completionist++ 什么是Completionist++? Completionist++是你需要获取的最后一个成就。它要求所有150个joker都获得金色贴纸。
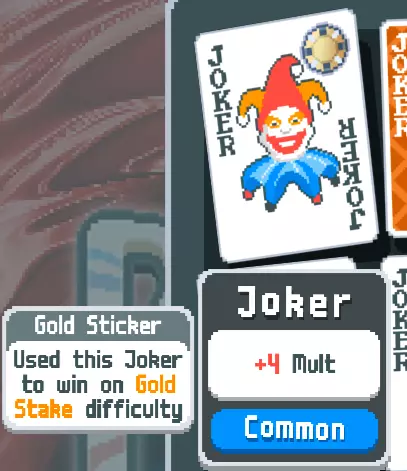
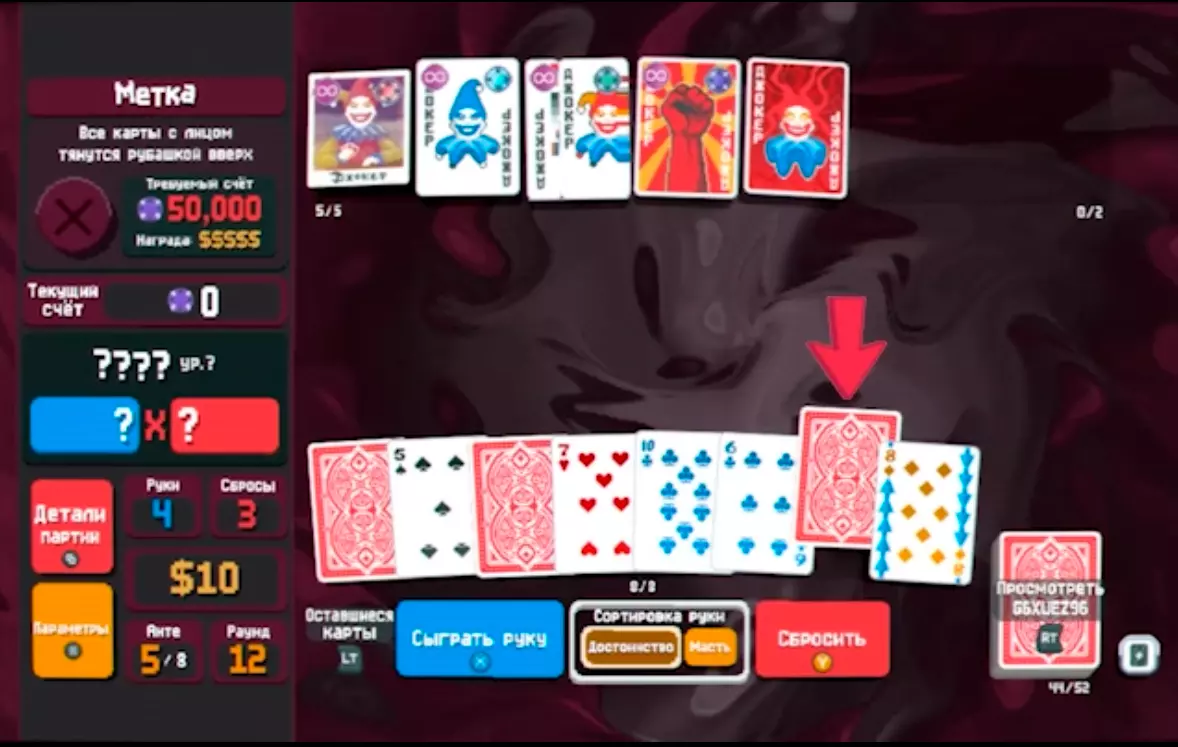
当你在黄金赌注难度下击败第8轮赌注,且持有某张百搭牌时,该百搭牌会获得金色贴纸。为了让百搭牌计入统计,在击败第8轮赌注的首领时,它必须在你的物品栏中。如果百搭牌处于减益状态(因【易腐】贴纸导致时间耗尽),仍会被计入。但如果在击败首领时百搭牌已消失(例如【爆米花】的倍数耗尽,或【 Gros Michel】触发了1/6的消失概率),则不会获得金色贴纸。 你可以在收藏中查看百搭牌的贴纸。注意橙色贴纸和金色贴纸外观非常相似,可能需要将鼠标悬停在百搭牌上才能确认具体类型。 这意味着你需要在黄金赌注难度下,让每张百搭牌都处于物品栏中完成对局。即便是那些在游戏后期变得糟糕或无用的,比如【降神会】和【第六感】。即便是那些会自行消失的,比如【爆米花】和【 gros michel】。追踪你的进度

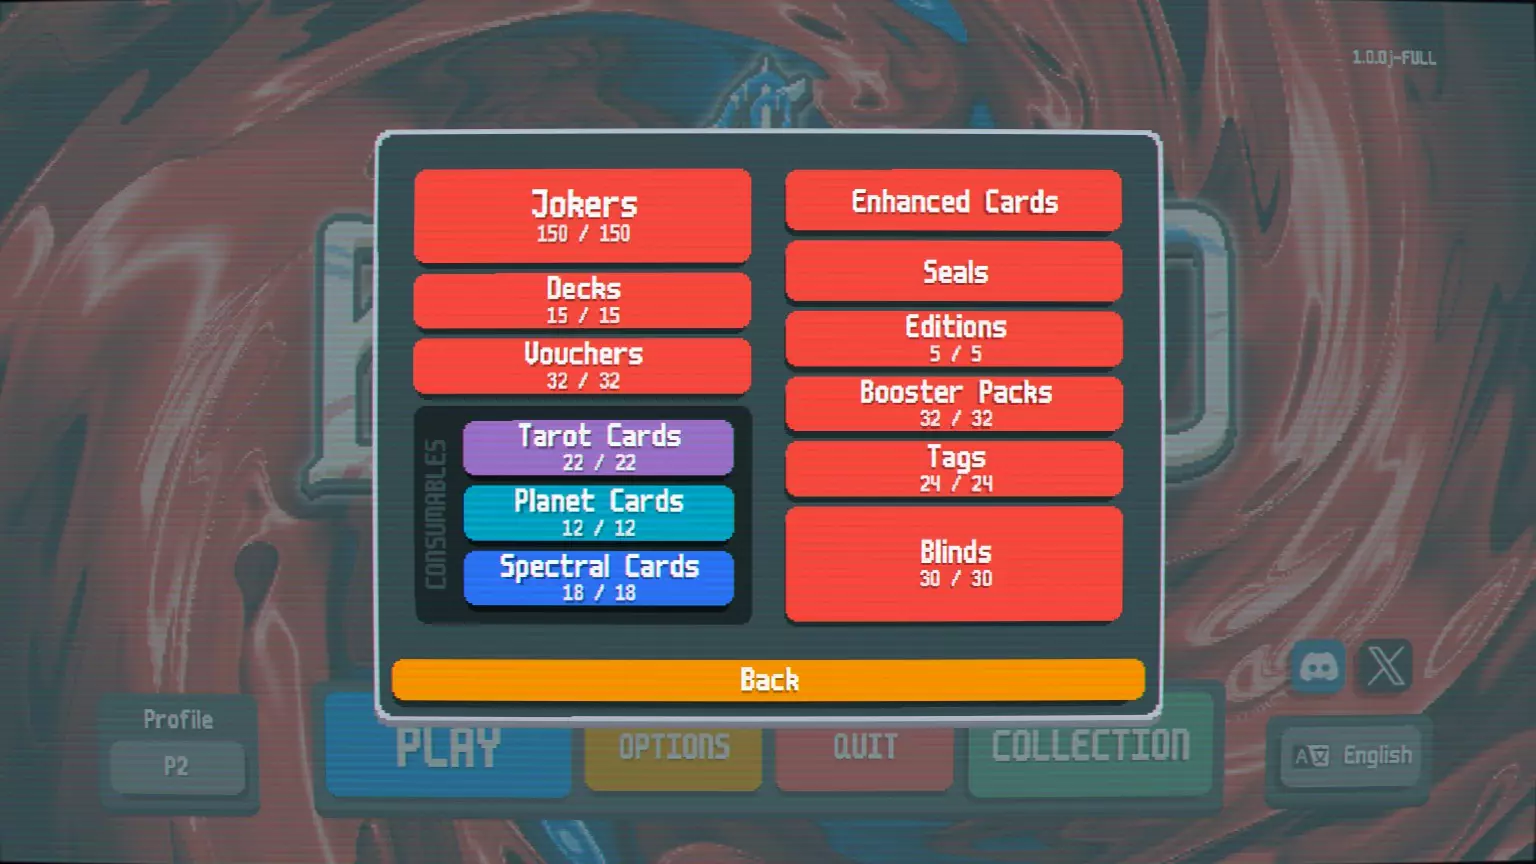
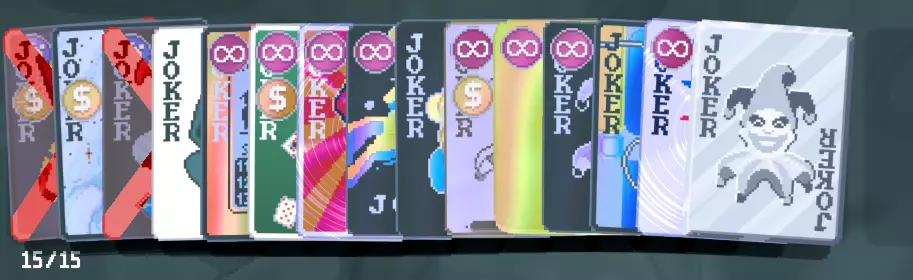
在选项菜单内的统计页面中,有一个名为【小丑贴纸】的部分。这里会显示你在1200个进度中的完成情况。 不过,这部分不会显示你还需要获得金色贴纸的小丑数量——因为8个等级中的每一个都会单独计算(8个等级×150个小丑=1200),而非只统计金色贴纸。因此,一个带有橙色贴纸的小丑会在总数中计为7,因为橙色等级是第7高的等级。 在选项菜单中,有一个【在游戏过程中显示等级贴纸】的选项,启用后小丑会显示你已获得的贴纸。这将让你在游戏过程中轻松分辨出哪些小丑仍需要金色贴纸。如果你想记录哪些小丑牌已获得金色贴纸以及哪些尚未获得,你需要创建自己的列表。获取金色贴纸的最快方法获取金色贴纸的最快方法就是拥有更多小丑牌。这听起来可能很明显,但拥有大量小丑牌有一个很大的优势:你需要在不好的小丑牌上获得金色贴纸,而且如果你有更多小丑牌,就更容易在整个游戏过程中保留一张不好的小丑牌。
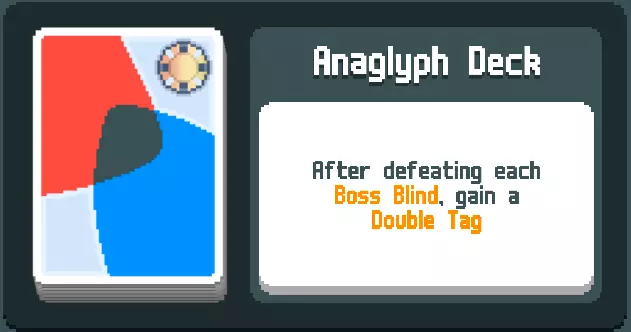
平均而言,拥有最多百搭牌的套牌是【立体视觉】套牌。该套牌在每次击败 Boss 后会给予你双倍标签。
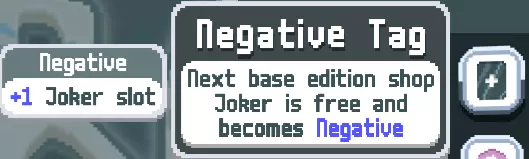
立体视觉套牌之所以比例如黑色套牌更好,是因为【负面标记】的存在。负面标记会使商店中下一个基础版百搭牌变为负面且免费。负面百搭牌不占用百搭牌槽位,这意味着可以免费获取并保留至本局游戏结束。这意味着我们要尽可能将免费的双重标记用于负面标记上。 此外,立体视觉套牌本身就很出色。或许不是最强的套牌,但绝对是最佳套牌之一。双重标记的能力极强且用途广泛。
这种策略的胜率并非最高——尽可能将双标签保留用于负面百搭牌意味着你无法在金钱或其他有用标签上投入过多,因此失败的概率会略高一些。像方格套牌或等离子套牌这类其他套牌可能会为你带来更高的胜率。该策略之所以最佳,是因为它能为你提供尽可能多的百搭牌,而这是获取新金色贴纸的最佳途径。在一局游戏中获得10+百搭牌是比较常见的情况,所以尽管你赢的次数可能减少,但每次获胜都能获得更多金色贴纸。 使用双标签的建议 在理想情况下,你应该尽可能保留双标签,并且只在负面标签上使用它们。这并非总能实现——有时你需要在其他牌上使用双重标签才能赢得本局。记住——除非你赢得本局,否则无法获得金色贴纸。赢得本局比每局获得尽可能多的负面百搭牌更重要。我不会提供赢得本局的详细步骤指南——如果你追求【Completionist++】成就,你应该已经足够了解如何构建本局策略。但这里有一些关于使用双重标签并让本局尽可能成功的建议,这些建议可能并不明显:何时跳过盲注在第一局,如果你遇到带有高价值标签的小盲注,就跳过它。投资(击败 Boss 后获得 25 美元)、全息(商店中下一个基础版百搭牌免费且为全息版【+10 倍率】)和优惠券(下一家商店有免费物品)都值得放弃小盲注。其他盲注(如底注 1 大盲注、底注 2 小盲注等)对于这些标签来说可能也值得放弃,但第一次盲注是放弃的最佳时机。如果你想最大化获胜机会,甚至可以重置游戏直到第一个标签是这些中的一个。 游戏初期(大约底注 2-5 阶段),将双重标签兑换为经济标签(资金翻倍,最高 40 美元)可能是值得的,这会让游戏进程轻松很多。越早兑换越好——在底注 2 阶段获得额外 30 美元比在底注 7 阶段获得 200 美元影响更大。如果你获得了不错的固定倍率(如【乘公交】、【绿色小丑】、【超新星】等),那么用双标签兑换【多彩小丑】(1.5倍倍率)是值得的。 其他一些标签也有强大的使用场景。【杂耍】标签(下一轮手牌上限+3)可以帮助应对棘手的第8关首领战(确保直接跳过普通关卡进入首领战,避免在大盲注阶段浪费效果)。【轨道】标签(随机一张扑克手牌等级+3)能大幅提升战力——只需确保你能轻松组成那张手牌。【便利】标签(本局每玩过一手牌+1美元)和【垃圾】标签(本局每有一张未使用的弃牌+1美元)可以提供可观的金钱,但通常不如【经济】标签多。 【灵质】灵体卡牌
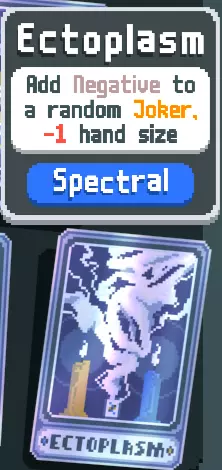
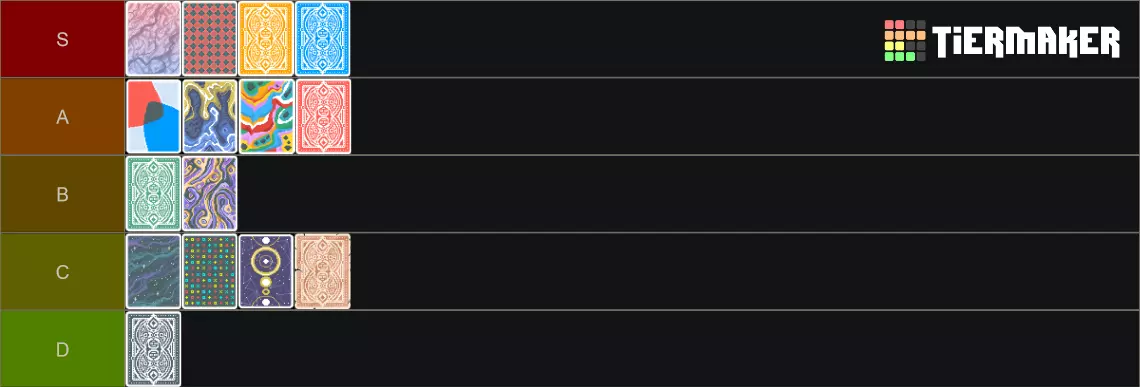
If you have a build that doesn't need hand size, be sure to check Spectral packs for Ectoplasm. That will open up more slots for jokers. If you see a Spectral tag late in the run, it may be worth spending double tags on that. Ectoplasm doesn't always show up, but can still be very effective - if all of your jokers are scoring enough points for you to win, then turning one of them negative gives you a free inventory slot to include any random junk joker for a free gold sticker. Just remember the hand size penalty! The first Ectoplasm gives you -1 hand size, and the second one -2 hand size. While minus hand size might not matter much for a High Card build, it can still cause you to lose if you run into the Psychic (requires 5 cards to be played) and your hand size is lower than 5. If you ever have a hand size of 0, you will lose. If you're reliant on hands more complicated than Pair (for example, you're using Two Pair to scale the Spare Trousers), minus hand size can cause you to lose the run. As I said before, winning the run is the most important thing - don't imperil the run on a whim! Which jokers should I focus on stickers for? Early on when you're collecting gold stickers, you'll end up having many options for jokers to win the run with and get gold stickers on. You'll be holding on to some jokers you need and see many more in the shops as you progress and reroll. So which ones should you prioritize getting gold stickers on? Jokers which don't score are going to be the hardest to get gold stickers on. Economy jokers like To The Moon or Golden Ticket are harder to fit into a winning build, since you'd normally want to have replaced them with scoring jokers by the time you get to ante 8. Same with a lot of pure utility jokers like Luchador, Astronomer or 8 Ball. Jokers that require certain cards in your deck before they show up. Lucky Cat (lucky cards), Stone Joker (stone cards), Glass Joker (glass cards), and Steel Joker (steel cards) will be more rare than other cards of their rarity because you need to have at least one of the related card in your deck. Rare/Legendary jokers will be much harder to find than Common/Uncommon ones, so if you have a choice between stickering a common or a rare joker, pick the rare one. When you're getting a ton of negative jokers for free from negative tags, you're mostly going to get common and uncommon jokers. A lot of bad commons & uncommons will randomly get gold stickers along the way thanks to this. If you don't get a rare/legendary joker as an option, favor keeping uncommons over commons. Jokers that require specific builds to work can be more difficult to hold on to as well. Four Fingers, Sock and Buskin, and The Family are examples of jokers that can be really good but require you to play certain hands or strategies that may be difficult to get going. Jokers that delete themselves naturally can be difficult as well. Popcorn and Gros Michel are the hardest since they can last the least amount of time, but Ice Cream and Seltzer are in there as well. If you're specifically trying to get these, remember that you can skip blinds to keep them around for longer. You'll want to pick these up as late as possible in order to reduce the chance of them disappearing before you beat the ante 8 boss. Other tips If you get to ante 8 and none of the jokers you have are ones you need gold stickers for... go get one! Even though winning is the most important thing, the goal is to get gold stickers - if none of the jokers you currently have need gold stickers, then winning the run won't give you any progress! But don't worry about this until ante 8 - there's always time to pick up Negatives you still need gold stickers for before then. Making the most of your negatives You almost always want to take Negative tags when you see them. Negative tags are relatively rare, so you may not see one later in the run. Grab the negative jokers while you can. If a negative joker is a rental and isn't useful to the run, check if you have a gold sticker on it already. Just because it's negative doesn't mean you need to pick it up if it's going to hurt the run. If you get useful negatives, that might free up some space to sell some of your non-negative jokers and pick up jokers that you need gold stickers on. Once you get to ante 8, judge your scoring to see if you can sell any non-negatives you already have gold stickers on and pick up some extra gold stickers. Useful vouchers Hieroglyph/Petroglyph each move you back 1 ante, giving you extra time to build up and hopefully find a Negative tag to spend your double tags on. Keep the -1 hand and -1 discard penalty in mind, as they can have a significant negative impact on your ability to win. Antimatter gives +1 joker slot, though it requires getting the Blank voucher and then getting lucky that Antimatter shows up. It's worth spending $10 on the Blank voucher for the chance at an extra joker slot, except on ante 8 of course. Vouchers that make it easier to find good jokers or even more negatives in the shop, like Reroll Surplus and Overstock, are almost always worth purchasing. These are very valuable jokers on the runs when you have a strong build going into ante 8 and want to reroll the shop a bunch to try and find jokers you need gold stickers on. Rerolling Rerolling is something you'll end up doing a lot in ante 8. This is your last chance to spent your money to try and maximize your gold stickers (or to maximize your odds of winning the run, in some cases). Unless you have a joker that scales off of money like Bootstraps or Bull, you'll want to spend all of your money before the ante 8 boss. The cost of rerolling is $5 + $1 for each previous reroll in this shop. Because the cost increases each time you reroll, you want to spread out your rerolls, rather than doing all of them in a single shop. In general, you'll want to spend roughly 1/(X + 1) of your money, where X is the number of shops you have left to visit in the run. So in the shop after the ante 7 boss, you have 2 more shops to come. That means you should spend around 1/3 of your money on this shop, 1/2 of your remaining money after beating the ante 8 small blind, and all of your money after beating the big blind. The math changes some depending on your income, any hermit/temperance cards that show up, and blinds you may skip. Don't get too caught up in it, though, in the end it's a pretty small benefit to try and maximize your rerolls. Just focus on spreading them out a bit. Getting the last few gold stickers Once you only need a couple more gold stickers, the best strategy will shift. Spamming negative jokers is really effective at getting stickers on lots of common jokers, but it won't help you get stickers on Legendary jokers for example. You'll want to make a list of all the jokers you still need gold stickers for. I wouldn't do this until you're getting somewhat close to the end - I did it at around 20 gold stickers remaining. This will make it a lot easier to know which jokers to buy/sell at the end of a winning run, since finding gold-less jokers in the collection is a pain. When you only need a few more gold stickers, the best way to get a gold sticker on a particular joker is to have an open inventory slot and reroll shops until you find it. That means you need to be able to score enough to win the run with only 4 jokers. This will be a relatively reliable way to get at least one gold sticker on a winning run. Other decks are worth considering due to their power. This is largely personal preference on what deck you want to play, as there are multiple powerful decks. Anaglyph, Checkered, Plasma, Blue and Magic are the ones I would personally consider, but almost any deck is reasonable. Black deck might be tempting due to the extra joker slot, but keep in mind that it will have a much tougher time early in the run due to the -1 hand penalty. Painted deck I also wouldn't use, as it's a lot harder to have a winning run with only 3 jokers so you can pick up one that needs a gold sticker. If you're still going to use the Anaglyph deck, here's some additional tips for using double tags: Negative tags are still useful in this situation, they're just not as good as they are when you still need a bunch of gold stickers. If the negative jokers help you score, they can open up an inventory slot for a bad joker you need a gold sticker on. If you're lucky, the negatives you get can still be ones you need gold stickers on. You can focus more on getting money or free polychromes with your double tags. If you have a better build, it's easier to score enough to win with only 4 jokers, and money and polychrome jokers are both very helpful for getting you to that point. Uncommon and Rare tags become more valuable if you mostly or only need gold stickers on jokers of those rarities. Note the rarities of the jokers you need, and if you have a lot of uncommon/rare jokers you can use double tags to force jokers of the needed rarity. Charm tags (free Mega Arcana pack) and to a lesser extent Ethereal tags (free Spectral pack) can help you find Legendary jokers. On gold stake, the first legendary joker of each run is guaranteed to be one you don't have a gold sticker on. If all else fails Buffoon tags can give you a bunch of rolls at jokers you might still need a gold sticker on. If you're really lucky, negatives can show up in these as well. The most important thing to remember There will be failures. Gold stake isn't free, there will be losses. Sometimes you won't get any gold stickers because you get unlucky. Sometimes the Negative tag just doesn't show up at all. Sometimes none of your Spectral packs have Ectoplasm. That will happen. This is not a fast achievement to get. How long it takes will depend a lot on how many gold stickers you have to start and how lucky you get. It took me about 50 hours to get all of the gold stickers, after around 100 hours getting all other achievements. Others have taken 300 hours or more to get Completionist++.