


Dungeon Defenders
 Steam Deck
 家庭共享
家庭共享 云存档
云存档 反作弊
反作弊 创意工坊
创意工坊 支持手柄
支持手柄 在线合作
在线合作 同屏/分屏
同屏/分屏


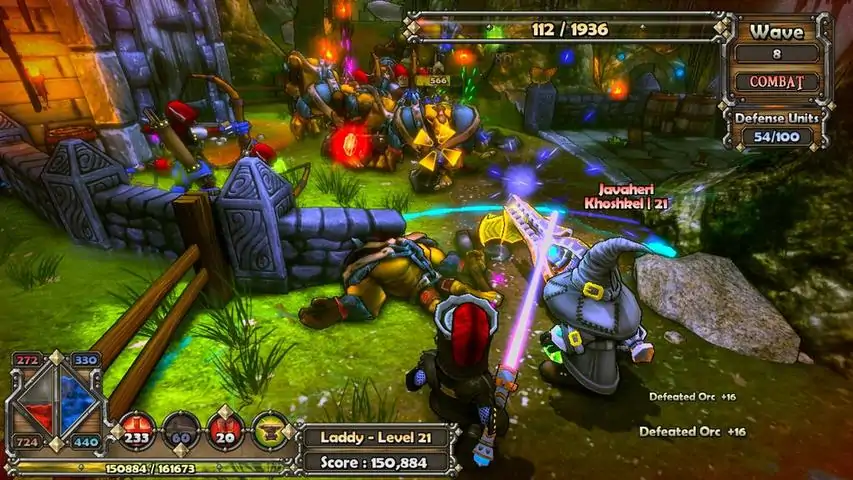
Dungeon Defenders is a Tower Defense Action-RPG where you must save the land of Etheria from an Ancient Evil! Create a hero from one of four distinct classes to fight back wave after wave of enemies by summoning defenses and directly participating in the action-packed combat! Customize and level your character, forge equipment, gather loot, collect pets and more! Take your hero through multiple difficulty modes and challenge/survival missions to earn more experience & even better treasure. Join your friends with 4-player online and local (splitscreen) co-op to plan your strategies together or compete in PvP Deathmatch. Key Features 4-player Online and Local Co-Op - Team-up with up to 3 friends to defend cooperatively, with character classes that support each other’s strengths and weaknesses. Dynamically combine local (splitscreen) and online players and leave/join any time, so that the game’s always full. Tower-Defense Meets Action-RPG - Choose your class, customize your character & equipment, strategically assemble your defenses, and participate directly in action-packed battle to preserve your castle against the invading horde! 4 Distinct Character Classes - Each character class has a different skill tree, set of towers, and even basic attacks! You can choose if you want to play stealthy, turn invisible, and plant traps behind enemy lines with the Huntress or go all out, block off choke points, and brutally beat your foes into submission with the Squire! Loot and Level-Up - Grab the mounds of money and items that your defeated foes drop and trade them or store them for later use in your Item Box! Getting kills and completing waves earns you experience points, which can be used to upgrade your characters, skills, equipment, and towers on a per-statistic basis. Do you want to enhance Hit Points, Attack Rate, Damage, etc? The choice is yours... Store your massive overflow of money in the 'Mana Bank' and then spend it to improve your equipment or trade with other players. Proudly show off your best equipment in your own 'Adventurer’s Tavern', without fear of item theft! Tons of Enemies and Huge Boss Fights - Over 100 simultaneous enemies will attempt to tear through your defenses and gigantic Boss Monsters will appear to rain down havoc upon everyone. Only by employing the most effective defensive strategies, teamwork, and strong characters will you defeat such devilish foes! Many enemy types run the gamut from big dumb Orcs swinging huge axes, to lithe Dark Elves that strike from the shadows, to crazy kamikaze goblins! Can you defeat the epic boss battles and collect the special loot while still defending your crystals? Mission & Game Play Variety - Each level has a different visual setting, layout, enemy types, traps, and distinct surprises. To collect all the loot and reach the highest levels you must take your character through 4 difficulty modes, survival missions, challenge maps, and more! Some maps force you to have mobile defenses, guarding a crystal which warps around the map. Others have YOU attacking enemy encampments! Collect and Trade Pets Online - A variety of pets exist to assist you in the land of Etheria, each with distinct behaviors. These pets can be leveled-up and customized to match your unique play-style. They can even be traded online with other players! Secure Trading System - Afraid another player won't live up to their word? Use our secure trading system to trade your precious weapons, armor, and pets with other players online! Watch your name and fame spread online, as people seek out the best pet raisers or item forgers! A Mountain of Stats - Every shot you take, kill you make, and defense you build is logged and recorded for posterity. Pore over the voluminous charts and graphs at the end of each session to analyze your team’s performance, quickly review your best statistics for each level, and compare your data online with other players to see who is the greatest hero of all. Furthermore, your Achievements are visible for all to see within your very own Adventurer’s Tavern, and the highest scores for each of your heroes are ranked on the worldwide leaderboards! Dungeon Defenders Development Kit - Dungeon Defenders includes a free development kit where you can create and edit new Dungeon Defenders missions and more utilizing all of the existing Dungeon Defenders assets. Download and share these user created levels via Steam Workshop for an endless Dungeon Defenders experience!
游戏圈
共22条帖子

ULuo
2026-04-02 16:00:04 · 发布在 「Dungeon Defenders」
关于在噩梦难度下选择和培养输出型英雄的所有须知
简介
大多数无论是新手还是有经验的玩家都会回答:野蛮人是最佳输出型英雄。这完全不正确,我们来深入分析一下。讨论输出型英雄还包括装备、武器和宠物。因此,在介绍英雄本身之前,我会先解释一些基础知识。
培养输出型英雄
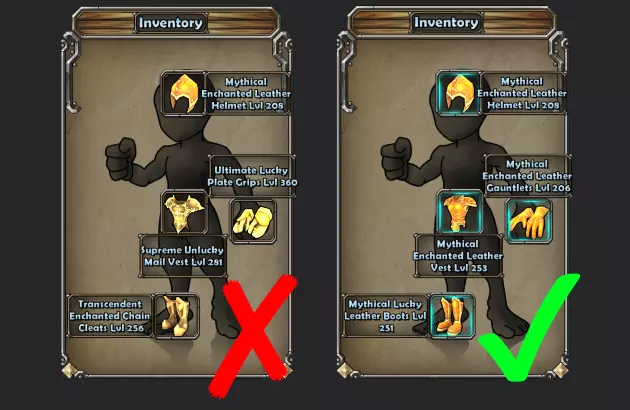
首先你需要装备,但不是随便什么装备都可以。你必须穿戴套装!
什么是套装?
装备类型(例如链甲或皮甲)并不重要,但所有部位使用相同类型会为你带来属性加成。当你在【英雄信息】界面看到装备周围有漂亮的蓝色轮廓时,就说明你穿戴了套装。即使不同类型装备的属性看起来更好,混搭使用也并不值得。套装加成实在是太强大了。神圣品质装备可使你的属性提升25%,神话品质提升30%,超越品质提升33%,至尊品质提升36%,终极及更高品质提升40%。无需所有装备都为同一品质,你可以混合使用【诅咒-神圣】和【神话-终极++】品质的装备。
升级你的输出型装备
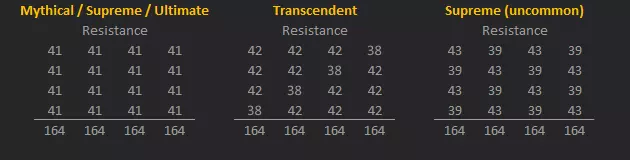
抗性对于输出型英雄来说非常重要,无论你的输出有多高。如果你无法存活,那你实际上毫无用处。升级输出型装备时,应优先升级抗性。考虑到套装加成,你总共需要达到164%的抗性,才能在噩梦难度中获得90%的抗性减免。通常每件护甲为41%,但有几个例外情况(见下文)。你从最高的抗性开始升级,并将其提升到上限。请注意,每升级十次,你就可以额外投入一点到该抗性中。这一点非常重要,不要错过。你的第二选择是将点数投入到通用抗性或火焰抗性上,直到达到它们的上限。你需要将通用抗性和火焰抗性“超额提升”至41%(或以上图显示的数值为准)。一旦所有抗性都升级到上限,你就可以将点数投入到英雄属性上,优先考虑英雄伤害。
我建议在噩梦难度下,至少将通用伤害抗性和火焰伤害抗性提升到90%。其他抗性虽然重要性较低,但并非不重要。如果其他装备的抗性不佳,你也可以通过将某些抗性提升到高于建议值的方式来进行弥补。我经常用我的终极装备来弥补一些升级较少的超越装备。有些人说我浪费了漂亮的终极装备,但我不介意在抗性上投入多达10点(以在噩梦难度达到90%的抗性),而不是在英雄伤害上,因为英雄伤害在噩梦难度会被削弱。
选择宠物
你必须在龙、海马和巨型鸡之间做出选择。猫的使用基本上仅限于野蛮人,其他所有英雄都更适合使用其中一种攻击型宠物。巨型鸡是更优且最佳的选择,但龙和海马也非常强大,不要低估它们。选择武器
每个英雄都有许多武器,但并非所有武器都有资格成为噩梦难度下的输出武器。几乎可以肯定地说,所有普通掉落的武器都是垃圾,所以你必须从武器奖励中进行选择。对于噩梦难度下的输出武器而言,升级后的基础伤害比属性本身重要得多。
重要术语解释
请仔细阅读本节,以便正确理解结果。近战 - 你使用近战攻击,你的巨型鸡使用近战攻击
近战范围 - 你使用远程攻击,你的巨型鸡使用近战攻击
短程 - 你使用远程攻击,你的巨型鸡使用所有投射物
远程 - 你使用远程攻击,你的巨型鸡使用一个投射物武器仅用 - 仅使用武器的每秒伤害输出,不使用技能
猎鹰仅用 - 仅使用技能(此处指猎鹰技能)的爆发伤害输出
综合 - 同时使用武器和技能的每秒伤害输出,爆发伤害将折算为每秒伤害计算第一行 - 使用武器和可用技能的DPS输出
第二行 - 装备巨型小鸡后的DPS输出
第三行 - 装备巨型小鸡并受到僧侣英雄强化加持后的DPS输出
第四行 - 装备巨型小鸡并受到僧侣英雄强化和螺旋桨猫加持后的DPS输出
地牢守护者护甲计算器
知名网站DDFRBR已下线,该网站曾提供出色的护甲抗性计算器。现在我提供自己用Excel 2007制作的计算器。欢迎大家提出反馈。
更新内容:
根据收到的反馈,图形版计算器仅适用于Excel 2007。使用其他软件时,需选择轻量版本。
学徒:
尽管学徒在启用【过载】后是出色的升级者,比其对应角色【元素使】的【即时升级】技能更优,但他并未得到太多关注。可惜的是,他的第二个技能【魔力炸弹】在【噩梦】难度下的效果极差,与其他英雄技能相比是个巨大劣势。另一个劣势是他生命值较低,在没有【力量汲取光环】的保护时非常脆弱。不过,就输出能力而言,他并不算差,但与其他英雄相比,他是“较弱”的英雄之一。学徒最常见的DPS武器如下:
经典鹰徽法杖,可在疯狂或噩梦难度的首领速刷中获得。
永恒法杖,完成噩梦难度水晶维度的奖励。
黑曜石棍棒,在阿卡蒂丛林击杀黄金机甲时有几率获得。一把出人意料的好武器但并不常见,那就是来自莫拉戈沙漠城镇生存的【血丝法杖】。无论你与敌人的距离如何,这把武器都拥有最高的每秒伤害,优势巨大。不过,它只造成毒素元素伤害。点击此处查看学徒的数据表
野蛮人
野蛮人无疑是一名强大的输出型英雄,但他被远远高估了。大多数人只看到酒馆假人上的那些数字就兴奋不已。他们常常忘记,在噩梦难度下,英雄造成的伤害仅为疯狂难度下的15.5%,而我们可爱的宠物则获得了伤害加成。这两个原因使得野蛮人不再是噩梦难度下的最佳输出型英雄。
情况变得更糟——通常搭配螺旋桨猫的装备让他成为团队中最弱的输出型英雄(注:召唤师不算输出型英雄!)。公平地说,所有队友都能从这种装备中获得很大收益,但他仍然是最弱的——这绝对出乎意料。你可能会说“嘿,你这个笨蛋,你忘了鹰之姿态!”抱歉,没有忘!鹰之姿态已经被考虑在内并计入了他的输出计算中。那么我是如何计算的呢?我对他的【鹰姿态】进行了视频分析。再次使用【鹰姿态】需要整整4.8秒。【鹰姿态】动画时长为1.8秒,动画结束后将触发3秒的冷却时间。在此期间我们也可以使用武器。因此最终计算公式如下:
综合DPS = [(3秒×武器DPS)+鹰姿态爆发伤害] / 4.8秒
最常见的野蛮人DPS武器有:
【永恒之剑】:用于在【水晶维度】中以骑士或野蛮人的身份击败【旧神】。
【黑曜石短剑】:在【阿卡蒂丛林】击杀【黄金机甲】后随机获得。
【蒸汽锯】:在【天空城】成功从【哥布林战列巡洋舰】跳回后获得。
咳咳,开个玩笑。和许多其他玩家一样,我花了很长时间才解决跳回的问题。情况只会越来越好。如果你的队友使用了螺旋桨猫,而你能给你的野蛮人使用巨型鸡,那么他将再次成为一个同样强大的盟友。注意:不要觉得我讨厌野蛮人,我经常玩我2000级的野蛮人。如果你需要一次性造成大量伤害,他的鹰之姿态会非常有用。
女猎手
女猎手是我最喜欢的英雄之一,玩起来极其简单。你可以轻松覆盖地图的一整个区域,让她带着攻击型宠物几乎独自作战。只需放置一个毒气陷阱,激活你的隐形技能,然后和她一起待在敌人的路径上。只有黑暗精灵战士能够追踪你,但这些对宠物来说应该不成问题。如果你使用的是造成元素伤害的宠物,那么你只需要额外放置一个黑暗陷阱,你的宠物也能攻击元素免疫的敌人。
她的隐形技能不仅强大,穿刺射击也同样强大。例如,对抗超级丘比特或攻击来袭的食人魔。她确实是最容易上手的英雄之一,遗憾的是很多玩家低估了她的能力。不过,她最常用的输出武器有:
完成任意难度的【工匠实验室】可获得的【爆破步枪】。
在【水晶维度】的噩梦难度下可获取的【永恒能量炮】。
成功完成任意难度的【国王游戏】后给予的【卒弹枪】。点击此处查看女猎人的数据表
小丑
小丑是最常见的英雄之一,我也经常使用。高生命值、高伤害、高施法速度,具备成为专业升级者所需的一切条件。她可以同时装备两把武器,因此一个槽位可用于装备【 lupine bow 】,另一个槽位则装备强力的输出武器。在所有防御塔完全升级前,你可以使用拥有8000-15000点魔法收集加成的【 genie 】(如果使用【 lupine bow 】,则无需29000点加成的)。之后,你将更换为攻击型宠物,开始作为输出英雄进行游戏。
她的【 tower move 】技能在少数情况下可能有用。更有用的是她的第二个技能【 wheel o' fortuna 】。你可以通过这个技能极大地支援你的防御塔和队友。最重要的组合是...尽管小丑能够装备游戏中的任何武器,但她通常被当作远程英雄使用,因此我只对比了法师和女猎手的武器。你或许可以装备一把具有100%伤害减免的骑士武器,这样只要按住鼠标右键就能处于无敌状态。来自莫拉戈沙漠城镇生存的学徒血丝法杖对小丑来说也是一把很棒的武器。记住,该武器只造成元素伤害。点击此处查看小丑的数据表
僧侣
僧侣是我一直以来的最爱,是游戏中最酷的英雄。与其他所有英雄相比,他纯粹的武器每秒伤害是最低的之一,但他的宠物伤害加成却是目前最高的。因此,你基本上必须装备一个远程攻击型宠物,比如龙、海马或巨型鸡。使用其他任何宠物都纯粹是浪费每秒伤害。
不要为了收集魔法值而使用精灵,也就是社区中所说的辅助僧侣。如果你缺少攻击性宠物或者属性分配不当,辅助僧侣就完全没用了。我强烈建议你至少在属性达到2000点之前保持属性平衡。一旦达到这个数值,你就可以专门提升辅助能力或英雄伤害。我选择继续保持属性平衡,因为这两种能力的加成效果都不太理想。看看下面的表格,问问自己:“为了多获得十分之一的提升,再投入500点真的值得吗?”别误会,僧侣的技能确实极其强大,在我看来是游戏中最重要的。一个没有僧侣的输出队伍根本算不上输出队伍。僧侣的英雄强化技能,只需投入500点,效果就能超越任何螺旋桨猫。
如果这还不够,僧侣的防御塔强化技能能极大地支援你的防御设施,而且他还能通过建造力量流失光环和诱捕光环来守住一整个区域。这需要投入约500点到防御塔范围属性上,其他防御塔属性并不重要。只需站在光环范围内,你的宠物通常就能表现得很好。所有这些都让僧侣成为游戏中最强的输出英雄,简直就是最厉害的角色。不多说了,最常用的武器有:
永恒之枪,在水晶维度击杀旧神后获得。击败哥布林战斗巡洋舰后可从天空之城获得【僧侣扳手】。黑曜石雀鲷是阿卡蒂蒂丛林的随机奖励。再次回到那个问题:僧侣应该作为远程英雄还是近战英雄使用?考虑到 DPS 输出,这其实并不重要,更多的是个人喜好问题。如果你喜欢在地图上四处奔跑,击杀敌人并猎杀食人魔,那么我强烈建议你使用近战武器。近战攻击可以击中周围多个方向的敌人,而不仅仅是正前方的敌人。这也意味着你能更顺畅地在密集的敌群中穿梭,从而降低被蜘蛛用蛛网困住的风险。此外,你仍然可以用未升级的远程伤害来引诱灯神和直升机。如果它们互相卡住了,那么……杀死第一个被卡住的敌人确实需要多花一点时间。但谁在乎呢?如果你更喜欢待在防御塔附近,那么选择远程武器当然也是可以的。我刚开始玩远程武器,但后来改用了近战武器。像狂战士一样在怪物堆里穿梭对我来说有趣多了。;)
系列EV
系列EV是一个被低估的英雄。很多玩家不喜欢将她当作输出型英雄,因为她的质子冲击消耗“大量”魔力。但如果我们仔细观察就会发现,它消耗的魔力其实并没有人们想象的那么多。你有很多时间收集魔力,所以通常魔力是满的。假设你的英雄等级是100级,当你放下魔力时,她的质子冲击已经充能一半了。所以你只需要再击杀四五个食人魔就能充满质子冲击,但其实没必要。通常半充能的质子冲击就足以杀死迎面而来的食人魔群或 bosses。系列EV和小丑一样拥有第二个武器槽,因此她也可以作为升级者使用,一个槽位装备 lupine 弓,另一个槽位装备DPS武器。一个拥有8000-15000法力收集加成的精灵(如果你使用lupine弓,就不需要29000的加成)在收集法力方面表现出色。当所有东西都完全升级后,你只需切换到射击宠物即可。
你还可以使用攻击性宠物并在其前方建造带有反射光束的物理墙,或者使用她的全息诱饵来覆盖地图的整个侧面。不过,她可以装备法师和女猎手的武器,尽管女猎手的武器似乎更常见。如果你查看EV系列的资料表,会发现螺旋桨猫与质子冲击的组合使她在2人队伍中成为比装备螺旋桨猫的野蛮人更强的替代选择。要记住,你无法永久使用质子冲击,但这仍然令人印象深刻且非常出人意料。
骑士
骑士没穿裤子!——真是个“聪明”的家伙 :)
好了,说正经的,他的纯武器DPS与其他英雄相比不算出色,但他的血性狂暴技能能大幅提升整体DPS,使他成为有力的竞争者。他在 solo 时拥有第二高的DPS,但遗憾的是,他的血性狂暴与僧侣的英雄增益叠加效果不佳,因此他会被舍弃,否则在噩梦难度下他的DPS能超过1亿!不过,和他一起玩还是很有趣的,尤其是在激活【血性狂暴】的状态下,值得一试。卫兵最常用的输出武器有:
用于在【水晶维度】中以卫兵或野蛮人身份击败【旧神】的【永恒者巨剑】。
在【阿卡蒂蒂丛林】击杀【黄金机甲】后随机获得的【黑曜石短剑】。
在【天空之城】成功从【哥布林战列巡洋舰】返回后获得的【蒸汽锯】。
咳咳,开个玩笑。起飞啦,冲呀。咳咳。点击此处查看【护卫者】的数据表
服装
每个英雄都有大量可解锁的服装。所有服装均通过DLC提供。部分服装在购买DLC后立即解锁,其他服装则需要通过游玩并完成DLC内容来解锁。
仅有少数服装会改变英雄属性。通常来说,增加英雄生命值会导致英雄速度降低,反之亦然。这意味着生命值提升得越高,移动速度就会越低。点击此处放大
僧侣的异常现象:部分僧侣服装会附带新的攻击动画。忍者的动画最容易辨认。不过,这会使武器DPS提升,达到纯武器DPS的116.66%。实际伤害倍率不会改变,意味着单次攻击造成的伤害与之前相同。
总结
最大的惊喜
我玩这款游戏的时间不短,但在制作本指南的过程中,还是有几次感到惊讶。有些是我从未想过的事情,有些是本以为正确但没想到如此极端的情况,还有些则完全是错误的。我无法一一列出所有发现(部分内容“隐藏”在数据表格中),但会分享其中最主要的几点。学徒的血丝法杖——我从没想过这把武器能接近鹰纹法杖,事实上它要好得多。
野蛮人伤害输出——你能想到野蛮人的伤害输出这么低吗?真让人失望!我知道他的伤害输出不如僧侣,但没想到连学徒的伤害输出都比他高。缺少射击宠物的影响太大了,而其他英雄却能从野蛮人的猫那里获益。下次再声称自己是伤害输出最高的野蛮人时,可要记住这一点哦;)
女猎手的爆破步枪——由于穿刺射击的伤害输出取决于所用武器的基础伤害,我原以为拿着我的高端卒弹枪四处跑会更好,但爆破步枪的综合伤害输出却像永恒能源炮一样高。卒弹枪太让人失望了。僧侣的扳手——简直了,如果我能记得是谁告诉我僧侣的扳手是远程武器,我一定会给他/她一巴掌。太令人失望了……又来了。看来又得去刷天空城了,尽管僧侣的所有武器都是近战的。
系列EV的质子冲击——实际上,我本以为装备射击宠物后它会拥有游戏中最高的每秒伤害,现在有了确凿的证据。她的伤害比僧侣高出约20%,比野蛮人高出85%。没错,你没看错,就是85%。
带猫的系列EV——实际上,在噩梦难度下,任何伤害比其宠物高的英雄(例如法师、小丑)都可以换成至少有178点强化强度的螺旋桨猫,但带猫的系列EV会比带猫的野蛮人更强。这意味着对于一个2人队伍而言:
系列EV+僧侣强于野蛮人+僧侣
骑士的DPS——我曾以为骑士是游戏中DPS最高的,但遗憾的是他的血性狂暴和僧侣的英雄强化无法很好地叠加。尽管如此,他仍然是非常强力的DPS英雄之一,拥有最高的DPS数值之一,但我敢肯定他能胜过系列EV。
谁是噩梦难度下的最佳DPS英雄?总而言之,只要你操作得当并明智地选择装备,每个英雄都可以变得强大。一些技能非常有用,例如小丑的命运之轮、野蛮人的鹰之姿态、女猎手的穿透射击等等。一个优秀的队伍需要包含多个英雄以应对不同情况。不过,这只是我的个人看法,但综合考虑一些因素后,僧侣是噩梦难度下最佳的DPS英雄,原因如下。他在噩梦难度单刷中拥有迄今为止最高的每秒伤害(接近2500万)。
他的【塔防强化】能极大地支援你的防御设施(为对抗敌人提供额外伤害)。
他的【英雄强化】提升全队每秒伤害的效果比任何猫系英雄都要好得多(没有僧侣——就没有高输出队伍)。
最终说明
本指南仍可能会有变动。我已做了大量工作和检查以确保这些数据的准确性。无论如何,如果你认为我哪里出错了,请在下方留言并尽可能提供详细信息。
所有测试均基于2000点英雄伤害属性以及两项技能。只要你的英雄属性相近,这些结果就具有代表性。显然,不要拿2000属性的女猎手和5000属性的野蛮人进行比较。如果我心情好的话,会添加更多英雄的内容。现在数字太多啦;)
我想感谢……
jemmajule 帮忙检查拼写和语法,你太棒了!
ddace 和 grey-1 给我武器、装备和其他物品。
DanielSound 过去的出色工作。
以及所有其他我忘记提及的人,无意冒犯。:)
如果本指南对你有帮助更新日志
2014年7月3日
发布本指南
2014年7月22日
新增【服装】章节
2014年11月3日
修复因官方论坛变更导致的链接失效问题
2015年6月4日
修复数据表的链接失效问题


星霜
2026-04-05 10:00:25 · 发布在 「Dungeon Defenders」
Welcome to my solo guide for completing all the campaign maps and challenges required for the Ultimate Defender achievement in Dungeon Defenders!
Introduction
Here it is, the beginning of the quest for the Ultimate Defender trophy!
I've written the walkthrough in the form of a daily log, because I decided I'd be writing a guide for the game before I even started playing it. It's definitely not a short game, so this guide should help players get a better idea of the overall progression and pace of Dungeon Defenders. I've written other guides describing some of the aspects of the game in more detail. These are:
Weapon Guide
FAQ Guide
Lab Assault Guide
If you're looking for builds for specific maps, there are a couple of great guides already on Steam, so I didn't see any point in basically replicating what they've already done. If you're interested in checking out their video guides, I can definitely vouch for the following:
pew pew pew's "Clear the game on Nightmare" - HERE
wat's "Collection of Map Builds" - HERE
For other useful links, the following is pretty much all you ever need if you're just starting out:
The "Simple and Illustrated" general guide for newbies - link HERE[www.dungeondefenders.com]
It's nice and short, with plenty of screenshots and images. While it's mainly geared towards nightmare difficulty, it still has many valid points even for complete beginners and lower difficulties.
I'd also like to mention the incredibly useful controller emulator that allows you to add up to three extra players in split-screen mode. The emulator is mainly used to get extra rewards for completing certain maps, as well as powerleveling several characters simultaneously. It's easy to install and easy to use. Link HERE[www.dungeondefenders.com]
Now, there were three ground rules that I set upon myself before I started the game. Those were:
1. Only use self-found items. It should also prove that it's possible to beat the entire game without having to resort to buying overpowered gear.
2. Only play solo. This is another thing that I prefer to do in these types of games, because I like going through the content at my own pace. And again, it goes to show that every campaign map and challenge is completely possible to complete solo.
3. Avoid farming for items. This rule will be broken somewhere along the line, but I definitely wanted to avoid farming for as long as possible. Whenever I felt that my stats were insufficient for a certain map, I'd just play a different map or challenge instead of farming for better items. This strategy actually worked out very well, at least for a time.
With all that out of the way, let's get on with the walkthrough!
Day 1
Started the game!
Chose the Squire as my hero class. I did a quick search for "best starting class" and the Squire kept popping up as a suggestion, so there.
Played the first map – The Deeper Well – on easy difficulty, which felt way too easy. Played it again on medium and hard hardcore. Certainly more challenging, but could still go higher. Finally played on insane hardcore, which felt much more appropriate. Gaining a few levels on the previous difficulties and unlocking more defenses was definitely helpful. Harpoon turrets seemed crucial for beating the map on insane. By the end of Deeper Well, my Squire had already leveled up to 13. All stat points went into tower health and damage, with the exception of first five points into hero speed (the Squire is sloooow). Those five points didn’t seem to do much, so I guess I’ll just have to live with it.
The build I used: [expired ddplanner link]
The game also skipped the tutorial for whatever reason, so I played it after completing Deeper Well on easy difficulty. However, having already played a single map, the tutorial offered no new information.
Initial thoughts:
Loving the art style of the short intro clip. Not taking itself too seriously is also a huge plus in my book.
The design of the first level looks very nice, if a bit generic.
The camera control seems really wonky. I know it’s likely just a matter of getting used to it, but I find it hard to actually rotate the camera in a fluid way.
The map overlay (Shift key) is very confusing. Again, I’m sure it just needs some getting used to.
The AI doesn’t seem to be too bright. It was pretty easy to lure archers into spike blockades, for example.
Insane difficulty definitely adds a new spin by including a time limit for the build phase. I can already see this becoming a major issue in later maps.
I also tried nightmare difficulty, by the way. The first wave includes an ogre with 800k health. I guess I won’t be playing nightmare any time soon.
Having purchased the game during a Steam sale with all DLC included (-85% discount, yay), it took literally two minutes to skip through all the DLC pop-ups the first time I loaded up the game :P
Achievements:
Smithy (upgrade your first piece of equipment – go to the defender’s forge, choose hero info, click on the piece of equipment you want to upgrade, enable pro mode and choose any stat to upgrade.)
Good Student (complete the tutorial – can be accessed by clicking „reset tutorials“ in the options menu and then selecting local mode when making a new game.)
Pupil (reach hero level 10)
Day 2
Played the second map – Foundries and Forges – on hard hardcore, then played it again on insane hardcore. Leveled up to 29 after multiple failures on insane difficulty. The ogre during the final wave had a much more manageable 70k health compared to the 800k ogre on the very first wave of nightmare Deeper Well. It was still pretty hard to take him down, though. Note: each map from this point onwards is played on insane hardcore.
Build: [expired ddplanner link]
Magus Quarters. I had previously equipped the DLC Pyro pet (level requirement: 25) and started dumping all my mana into upgrading its tower damage stat. The 400k health ogre in the final wave completely blindsided me and crushed my defenses. I reached hero level 33 by the time I beat the map. Found my first Godly-quality item on the map as well.
Build: [expired ddplanner link]
Alchemical Laboratory. First boss map! Tons of Godly-quality items dropping in later waves. I appreciate the fact the boss can’t hurt the crystal. However, I don’t appreciate the boss killing me 5 seconds into the fight. The harpoons were fortunately enough to finish him by themselves (700k health on the boss, by the way). My first attempt was a disaster, as I didn’t have nearly enough firepower pointed in the right direction. I eventually won and reached hero level 36. Tower stats after the first four maps: 75 / 99 / 12 / 21. Hero stats: 14 / 3 / 19 / 10.
Build: [expired ddplanner link]
Servants’ Quarters. It took multiple attempts to even make heads or tails of this map. The dark elf mages in the northwest corner proved to be especially troublesome. At least there were no ogres, so that’s a plus. Finally had a use for the bowling ball turret as well. Reached hero level 39 after beating the map and finally managed to put together a full set of plate armor. It bumped my tower stats up to 100 / 141 / 21 / 33 and hero stats to 37 / 0 / 35 / 34. That set bonus is no joke.
Build: [expired ddplanner link]
Castle Armory. I think I hate dark elf warriors even more than mages. Like the previous map, it’s a real pain to run between the different choke points to repair/upgrade defenses. I needed some well-timed upgrades to survive the ogre in the final wave. Reached hero level 45 by the end of the map.
Build: [expired ddplanner link]
Hall of Court. Before I got the build just right, I failed this map countless times, either due to front barricades falling to the 500k health ogre or because of wyverns slipping past my defenses and sniping a crystal. The onslaught of dark elf mages didn’t make matters easier. I gained a ton of experience, though, eventually reaching hero level 58. Silver lining and all that.
Build: [expired ddplanner link]
The Throne Room. Another boss map! Once again, I didn’t know that the west (left) side needed a lot more defenses in comparison to the east side, so I was crushed the first time I made it to the boss. The boss fight involved a lot of jumping around and drawing the boss’ attention away from the harpoon turrets, so they could keep firing. Actually surviving is definitely more important here when compared to the first boss map. Reached hero level 64 after beating the map. Tower stats, now with full Godly-quality armor: 162 / 271 / 28 / 54. Hero stats: 9 / 26 / 8 / 23 (mainly downgrades).
Build: [expired ddplanner link]
More thoughts:
While the design of the second, third and fourth maps felt largely uninspired, I really loved the cramped maze-like layout of Servants’ Quarters, as well as the wide open spaces of the following two maps. The Throne Room looked especially nice.
I’ve noticed that chests often contain superior equipment when compared to random drops. It definitely seems like it's worth it to open them whenever possible.
Correctly timing the tower upgrades to instantly heal them often seemed crucial for dealing with ogres in many maps. That's the result of sub-par stats, I guess.
I wish there was an option to return to the tavern after completing a map, instead of going immediately to the next map. Returning to tavern by pressing ESC and seeing the "Are you sure? Progress will be lost" message feels kind of weird.
Achievements:
And This Is My Weapon (upgrade an equipment to maximum level – each equipment has a certain number of upgrade levels, so you could easily max out a weapon/armor with a low number of upgrades for very little cost, instead of trying to max out an item with dozens of upgrades.)
Obedience Training (upgrade a pet to maximum level – same as with the previous achievement, just buy a cheap pet with a low number of upgrades from the tavernkeep.)
Veteran (reach hero level 30)
From The Depths (complete the first four campaign maps on any difficulty)
The Belly of the Beast (complete the first four maps on hard difficulty)
From Fire with Brimstone (complete the first four maps on insane difficulty)
To The Rooftops (complete the next four campaign maps on any difficulty)
The Body of the Beast (complete the next four maps on hard difficulty)
Through The Crowded Keep (complete the next four maps on insane difficulty)
Divine Intention (pick up a godly weapon)
O Mighty Smiter! (wear a full set of godly items – make sure the item quality is listed as godly and all the four pieces match: either all leather, all chain, etc.)
True Nobility (earn the Lord award on any map – get 50 kills in 5 seconds; all defense (tower) kills count towards this total as well)
Day 3
Royal Gardens. Another nice-looking map. Surprisingly, the entire west side holds up with very few defenses needed. The main threat is basically everywhere else – tons of dark elf mages in the south, kobolds in the north and ogres in the east, not to mention wyverns flying in from multiple directions. Lots of hopping between choke points and repairing/upgrading was needed to keep the defenses from falling. Reached hero level 67 by the end.
Build: [expired ddplanner link]
The Ramparts. The map designs just keep getting better and better! I tried a lot of different choke points until finally managing to build a decent setup. The harpoons on the southern parapet doubled as an anti-air defense and helped thin out the mob approaching from the southern pass. Like with most maps containing wyverns, I placed an extra harpoon behind the crystals to catch any that managed to slip through. Reached hero level 70 by the end.
Build: [expired ddplanner link]
Endless Spires. Really loving the layout here. Fairly standard setup for defenses, although the number of ogres has really ramped up. The dark elf warriors are also being a huge nuisance. Still manageable, although I haven’t found any good upgrades to my gear for a while now.
Build: [expired ddplanner link]
The Summit. Final boss map! Well, it’s not gonna happen on insane hardcore, that’s for sure. There’s literally no way to do it with only a builder Squire. I ended up placing as many harpoons as possible at each of the three potential spots the boss could appear, then darted around the map and tried to hit the boss with one of the war ballistas. Let me tell you, it’s not easy to do as a Squire with a grand total of 8 movement speed. The boss had only 500k health on hard difficulty, so it didn’t take too long for the harpoons to kill it. I even turned off hardcore mode to avoid getting screwed over by the fireballs, but ironically didn’t die once during my successful attempt. Reached hero level 71 by the end.
Build: [expired ddplanner link]
Glitterhelm Caverns. First map with four crystals to defend! I can’t tell you how many times I attempted this map until I finally beat it. They really ramped up the difficulty here. The choke points are placed so far apart that I could barely reach them in time to repair my defenses if an ogre showed up. Speaking of which, the ogres start appearing already by the second wave and there are multiple ogres each wave after that. They also spawn in random entrances, so if two ogres happen to spawn in the same place and I’m far away, my defenses will certainly go down. The wyverns are also a pain and they often managed to snipe the western crystal, until I finally got the message and put down multiple harpoons there. Goblins from the middle spawn point often also went to attack the eastern crystal instead of turning left and were responsible for several failures until I put the bouncer blockade there (I was usually either dead or too far to reach them in time). On the bright side, I got a TON of useful armor, so my overall stats increased remarkably. Reached hero level 72.
Build: [expired ddplanner link]
With the campaign completed, I tried my hand with the challenges. Since my only hero was a builder Squire with pitiful combat stats, I skipped any challenge that didn’t allow me to build defenses. I also played them on medium difficulty, except for those that had a separate achievement for insane.
Unlikely Allies was easy enough. I placed defenses near the spawn points and sat back while enemies just keeled over.
Warping Core was very similar. Multiple harpoons pointed at spawn points were enough to shut down any threat.
Raining Goblins was easy even on insane. I placed a circle of eleven bouncer blockades around the crystal, which held up just fine against all goblins and orcs.
Wizardry was another easy challenge. My blockades held up fine while I hunted down the vulnerable dark elf mages (used the same choke points as in the campaign).
Ogre Crush on insane was a bit tougher, but still manageable. Three harpoons and a spike blockade for each choke point, combined with well-timed upgrades did the trick.
Chicken was basically the same setup as in the campaign, only infinitely easier because it was on medium and there was no boss.
Moving Core also had a setup similar to the campaign, only the western defenses were closer to enemy spawn points.
Death From Above I actually failed, as my harpoons simply didn’t have enough damage to kill the super wyverns in time, although I did manage to make it to the final wave.
Treasure Hunt took a long time, but since there was basically infinite time and mana to upgrade all the defenses, I was never in any danger of losing.
After the challenges, I played survival mode on Deeper Well to get the four related achievements, using the same build I did for the campaign. I also did the Daredevil achievement – played some of the easier maps on insane, let the crystal get damaged below 100 health on the first wave, then built my defenses and cruised to victory.
Extra thoughts:
I never find myself using spike blockades or slice n’ dice blockades, because I feel that the bouncer is simply superior in terms of the cost-to-effectiveness ratio. Bowling ball turrets are only used whenever I have a ton of defense units to play around with, as harpoons seem to be better in pretty much any situation.
The first upgrade costs 100 mana and the fifth upgrade costs 1220 mana, but both improve tower damage/health by the same amount.
So the main storyline wraps up neatly, with more to come in the Shards of Eternia campaign. Looking forward to playing that, but first going to get some more achievements done...
Achievements:
Defender of Etheria (reach hero level 70)
A Taste of Victory (complete the last four campaign maps on any difficulty)
The Crown of the Beast (complete the last four maps on hard difficulty)
Dungeon Crawler (complete all twelve campaign maps, plus Glitterhelm Caverns on any difficulty)
Dungeon Raider (complete all twelve campaign maps, plus Glitterhelm Caverns on hard difficulty)
Daredevil (earn the Skin of Your Teeth award on any six maps)
Friends Forever (complete the Unlikely Allies challenge on medium difficulty)
88 Core (complete the Warping Core challenge on medium difficulty)
Ella, Ella (complete the Raining Goblins challenge on medium difficulty)
Dancing in the Rain (complete the Raining Goblins challenge on insane difficulty)
Wizard Hunter (complete the Wizardry challenge on medium difficulty)
You No Take Mushroom (complete the Ogre Crush challenge on medium difficulty)
Ogre Block Party (complete the Ogre Crush challenge on insane difficulty)
In A Fowl Mood (complete the Chicken challenge on medium difficulty)
Core Cardio (complete the Moving Core challenge on medium difficulty)
Gold Rush (complete the Treasure Hunt challenge on medium difficulty)
Gold Blitz (complete the Treasure Hunt challenge on insane difficulty)
Survivalist (reach wave 15 on any survival map on medium difficulty)
Thick Skin (reach wave 20 on any survival map on medium difficulty)
Tough Guy (reach wave 15 on any survival map on hard difficulty)
Iron Man (reach wave 10 on any survival map on insane difficulty)
Day 4
I replayed the campaign on medium difficulty to get the Perfectionist and Mastermind achievements. I also did the Defense Is the Best Offense achievement, which took forever because the waves in pure strategy mode seemed to go on forever.
My Squire stats after about 30 hours of gameplay are as follows:
Hero stats: 41 / 105 / 90 / 77
Tower stats: 251 / 345 / 45 / 119
Resists: 24 / 27 / 7 / 21
My Squire is level 73, with a Squire Guardian pet (earned by beating the Summit) and The Earth Shaper weapon (earned by beating Glitterhelm Caverns).
Next step: create new heroes! To beat the tougher challenges and maps (as well as for playing nightmare difficulty) using a single hero obviously isn’t enough. I began leveling up other heroes by playing Glitterhelm Caverns on hard hardcore, building the defenses as a Squire, then switching to another hero for the combat phase and getting a ton of experience for beating the wave.
The first new hero I leveled up was a Monk. After a single run on hard HC Glitterhelm Caverns, the Monk had already gained 40 levels. I then tried to play the map on insane hardcore. Even with losing the bonus XP multipliers in most waves, it took only three insane Glitterhelm Caverns runs to have the Monk reach hero level 70.
The second new hero I leveled up was a Huntress. I went straight to insane hardcore Glitterhelm Caverns. It took a total of four runs to hit level 70. Still picking up every single piece of armor and every weapon.
The third new hero I leveled up was an Apprentice. It took five runs to level him to 70, because I got killed early by dark elf warriors in one attempt and was unable to repair the defenses in time.
I gathered tons of gear during those attempts and ended up with full armor sets for all the other heroes as well. I also completed The Summit with the other three classes to get the A Matter of Perspective achievement.
Additional thoughts:
I reached a total of 30 million mana sometime during the leveling process. I haven’t really had a reason to spend it on any upgrades, because I’m constantly switching gear around anyway, so most of it becomes obsolete really fast. Just gonna keep saving for now.
The AI is really funky on several maps, with mobs getting stuck behind pieces of terrain. For example, 90% of the time there’s going to be an orc stuck behind a northern parapet in The Summit at the end of any given wave. Similar things happen on other maps as well.
Each of my three new heroes greatly outpaces the Squire, even with far fewer points put into hero speed. I guess the Squire is just the slowest hero overall.
Achievements:
Perfectionist (earn the Flawless Victory award in all twelve campaign maps, plus Glitterhelm Caverns - don't let any crystals get damaged, except for the first wave)
Mastermind (earn the Master Strategist award in all twelve campaign maps, plus Glitterhelm Caverns - don't use weapons or pets to kill any enemies, except for the first wave)
Defense Is the Best Offense (reach wave 10 on pure strategy in all twelve campaign maps, plus Glitterhelm Caverns - you only need to reach the wave, not complete it)
Master Banker (store 15 million mana in the bank)
A Matter of Perspective (complete The Summit with the four main hero classes)
Group Hug (reach hero level 70 with the four main hero classes)
To the Limit (wear fully upgraded equipment in all slots – this means all four armor pieces, weapon and pet)
Day 5
This is actually the point where I felt that I’ve hit a huge difficulty spike. I want to progress to nightmare, but my current equipment feels pretty weak. I got demolished pretty solidly when attempting to beat The Deeper Well on nightmare, because I have no chance against the ogre on the first wave. The complete lack of a DPS hero is very noticeable. These are the stats for my four heroes after about 40 hours of play:
Squire (lvl 73): hero stats: 66 / 108 / 102 / 97; tower stats: 226 / 342 / 56 / 106
Monk (lvl 71): hero stats: 59 / 95 / 130 / 89; aura stats: 208 / 243 / 93 / 70
Apprentice (lvl 70): hero stats: 33 / 37 / 86 / 63; tower stats: 160 / 366 / 47 / 83
Huntress (lvl 70): hero stats 69 / 53 / 93 / 48; trap stats: 204 / 244 / 68 / 118
The heroes are using mostly godly-quality armor and weapon drops from Glitterhelm Caverns. The pets are still the Pyro and the Guardians (awarded for beating The Summit), nothing spectacular.
The suggestion I got from Steam forums was to use the Series EV and Summoner heroes. Back to Glitterhelm Caverns it is, then!
Trying insane hardcore survival mode for leveling now. I first leveled the Series EV to 70 and the Summoner second. I also leveled a female Monk (Initiate) and specced her for auras, so I could use my original Monk as a DPS hero. Again, I looked up suggestions on the best DPS hero for nightmare, and the Monk was mentioned in several places, hence the pick. I now have seven heroes leveled to at least 70.
I also managed to reach wave 15 in insane hardcore survival a few times with the help of auras, traps and constant repairing / upgrading. As a result, I got a decent pet for my main builder. After all that leveling, I got a bunch more mana and decent armor.
Here are the final stats (so far) for all my heroes:
DPS Monk (lvl 71): hero stats: 243 / 320 / 162 / 66; abilities: 97 / 118; resists: 55 / 43 / 16 / 45
Squire (lvl 73): tower stats: 220 / 362 / 67 / 142
Initiate (lvl 70): aura stats: 207 / 274 / 183 / 89
Apprentice (lvl 70): tower stats: 134 / 367 / 92 / 108
Series EV (lvl 70): beam stats: 132 / 361 / 83 / 222
Summoner (lvl 70): minion stats: 175 / 296 / 81 / 114
Huntress (lvl 70): (forgot to write down updated stats; roughly in the same ballpark as above)
By this point, I had collected about 50 million mana. I dumped 10 million into upgrading the DPS gear for my Monk. I ended up with 88% physical resistance, 87% fire resistance and a ranged attack that actually deals damage. With my new band of heroes, I managed to beat The Summit on insane hardcore, using the Monk to kill the boss. The defense setup remained largely the same as in hard difficulty, only with minions added for extra damage output and some harpoons replaced with auras.
Even more thoughts:
What’s the deal with wave 10 on survival mode? It’s ridiculously tough compared to all previous waves. In Glitterhelm Caverns, the tenth wave had FIVE ogres, but every wave after that only had a single ogre (up to wave 15-16, which is the furthest I got). It's like some sort of a surprise wave to catch you off-guard.
The female versions of the main heroes (Countess, Initiate, Adept) have greater movement speed compared to their male counterparts, but can still build exactly the same defenses. It might be worth it to make all builders female later on.
The experience requirement past level 70 starts to increase exponentially, so until I find a more efficient method for powerleveling, I’ll stop there.
Achievements:
To the Lofty Summit (complete the final four campaign maps on insane difficulty)
Dungeon Defender (complete all twelve campaign maps, plus Glitterhelm Caverns on insane difficulty)
Day 6
Trying out survival mode on The Deeper Well on insane hardcore to test out the new build with minions, beams, auras and traps. The illustrated guide I linked to in the introduction was invaluable for creating the setup I used for the map. I managed to beat all 25 waves and got the Giraffe pet, which gave a ridiculously huge boost to all tower stats (around +50-70 to every stat). In fact, the setup worked so well that I tried the same build on nightmare hardcore difficulty (NMHC) for the campaign. It took a bit of kiting to kill the ogre on the first wave, but with the help of auras, I managed to take him out and continued building other defenses.
Bolstered by this success, I immediately tried survival mode on NMHC Deeper Well. I actually made it to wave 10 before being completely crushed. Despite holding up fairly well throughout wave 9, my defenses were overrun in a matter of seconds on wave 10. Like with Glitterhelm Caverns on insane, wave 10 seems to be the first "true" test of your defenses.
Build: [expired ddplanner link]
Next up, NMHC Foundries and Forges. I used similar overall strategy. Moving minions onto beams in Overlord Mode allowed them to stand much closer together and so I had more minions stand on a beam than would otherwise be possible. Harpoon turrets were placed to cover two entrances each. I didn’t even use up all my minion units. The auras barely covered the middle part, though. Larger aura radius would definitely have helped.
Build: [expired ddplanner link]
NMHC Magus Quarters. I placed physical beams at the bottom of the stairs, as well as extra archers on the parapet for anti-air defense. I beat the map without too much trouble and also tried the survival mode. I made it to wave 17 on my first attempt. By wave 16, virtually every item appeared on screen as green (superior stats). My mana shot up by about 100 million by the end of that one run. Not even kidding, I actually counted. After selling most of that, I got another 100 million mana.
Build: [expired ddplanner link]
NMHC Alchemical Laboratory. It was pretty hectic, as I rushed to build defenses in time. The high number of minions helped kill the boss much quicker. Also, the four lightning coils apparently stun the boss when they are destroyed, which made the fight even easier.
Build: [expired ddplanner link]
NMHC Servants’ Quarters. Didn’t use any actual towers, only auras, beams, minions and traps. Definitely the toughest map so far. Learning the layout of the map and the quickest paths between different choke points certainly helps a lot.
Build: [expired ddplanner link]
NMHC Castle Armory. Required a ton of restarts for the first wave, but I finally managed to beat it. The key was getting the minions down as quickly as possible. I’m fairly sure there’s a much more optimal build for this map, but meh.
Build: [expired ddplanner link]
Here's a thought:
The defensive setup on Deeper Well is a perfect example of a typical build that could be applied to virtually any nightmare difficulty map. It's also described in the illustrated guide I linked to in the introduction. I've explained the reasoning a bit more thoroughly in my FAQ guide.
Day 7
Next up, NMHC Hall of Court. I struggled a lot in this map, failing multiple times. I eventually went back to Magus Quarters survival mode in NMHC, in the hopes of getting some better gear. One of the pet rewards was actually a Serpent with +258/+228/+260/+228 to all builder stats. Needless to say, it was the single most powerful item I had gotten up to this point by a fair margin. I finally managed to beat Hall of Court after several attempts.
Build: [expired ddplanner link]
I spent about 100 million mana upgrading all the gear. This is the result:
DPS Monk (lvl74):
Hero stats: 428 / 637 / 263 / 244
Hero abilities: 144 / 358
Resists: (forgot to write down)
My ranged DPS against the training dummy in the tavern is 322k with all projectiles hitting the target and with the pet damage added in.
Day 8
Next up, NMHC Throne Room. I probably could’ve benefited from more defenses on the left side to kill the boss quicker, but it isn’t really all that tough once you get the boss inside the auras.
Build: [expired ddplanner link]
Before moving on to the final maps, I decided to get two more achievements out of the way – Team Effort and Brute Force. I used a controller emulator (link provided in introduction) to add three extra players in split-screen mode. That way, I could get the Teamwork award at the end of the map for Team Effort. Plus, I used one of the three extra heroes to kill a few enemies during each wave, so I could get the Gunslinger award at the end of each map for the Brute Force achievement.
The map provides decent XP and some pretty nice drops, but I couldn’t beat the survival mode. In the last couple of waves, enemy ogres each have more than 7 million health and I couldn’t kill them fast enough before my defenses went down. By this point, I’m instantly selling every piece of builder armor that doesn’t offer at least +100 stat points to both defense damage/health, as well as a decent bonus to the other two defense stats.
Achievements:
Brute Force (earn the Gunslinger award on all campaign maps, plus Glitterhelm Caverns on medium difficulty or higher)
Team Effort (earn the Teamwork award on all campaign maps, plus Glitterhelm Caverns on medium difficulty or higher)
Day 9
Still trying to beat The Throne Room on NMHC survival. While I’m failing countless attempts, I’m at least leveling up my builders at a fairly rapid pace. My defenses just can’t hold up against the enemies otherwise.
After what appeared to be dozens of attempts, I finally managed to beat the map. Got four transcendent-quality items in the last few waves as well. Unfortunately, they weren't really improvements over my current gear. By now, I have more than 3,5 billion mana banked up in the form of mana tokens.
To cap off the day, I did the No Towers Allowed challenge, now that I had semi-decent weapons and armor. Since my Huntress had reached level 74 with all those Throne Room runs, I chose to respec her for DPS, gave her a random grenade launcher and went to town on that challenge. I’ll admit it was still pretty hectic, trying to cover all sides at once, shooting grenades everywhere and casting Piercing Shot to help clear out mobs. Having a decent attacking pet helped me out greatly. It still took about 3-4 tries, though.
Achievements:
Where's the Blueprints? (complete the No Towers Allowed challenge on medium difficulty)
Weapon Master (complete the No Towers Allowed challenge on insane difficulty)
Day 10
Moving on with the rest of the insane challenges. I did Unlikely Allies and Warping Core without much difficulty. The Wizardry challenge was a bit tougher. I needed physical and reflection beams in addition to auras to delay the enemies while I hunted down the mages. The Chicken, Moving Core and Death From Above challenges were similar to Unlikely Allies and Warping Core – I simply put down aura stacks and harpoons and let them do all the work. I powered through the Assault challenge with the help of Hero Boost and used a single aura stack with a Healing aura for the Monster Fest challenge.
By far the hardest insane challenge was Zippy Terror. I had to try several strategies, eventually settling on using the Initiate, sitting on the ledge behind the western crystal and firing the ranged spread attack at the eastern stairs to kill the kobolds coming from that direction. I let my DarkBot pet (reward for reaching wave 15 in the Throne Room survival mode) kill the kobolds coming from the west and used the Initiate’s Enemy Drain ability to slow down the masses of kobolds during the final waves. It was still pretty darn close, though.
Next up, NMHC Royal Gardens. It wasn’t actually too difficult. I didn’t even complete the setup I’ve described in the link (I used that setup later for survival mode). The same applies to the following two maps – NMHC Ramparts and NMHC Endless Spires. Not too hard to beat with basic builds.
Build (Royal Gardens): [expired ddplanner link]
Build (The Ramparts): [expired ddplanner link]
Build (Endless Spires): [expired ddplanner link]
NMHC Summit, however, was truly hectic. The boss fight was very tough and I barely managed to kill him. Even NMHC Glitterhelm Caverns was much easier. Note that you can die in hardcore mode and still earn the achievement, you just won’t respawn for the remainder of the current wave. As long as the defenses hold up, you’ll be fine, because dying doesn’t void the achievement (although the description says "...without dying").
Build (The Summit): [expired ddplanner link]
Build (Glitterhelm Caverns): [expired ddplanner link]
Next on my list: collect all the 19 pets needed for the Catch ’em All achievement. I played NMHC survival mode on maps where I hadn’t yet earned the pet for reaching wave 15. In addition to the survival reward pets, I rounded up all the Guardians and Animus pets by replaying The Summit.
While playing the survival maps on NMHC, I also started leveling up the Adept (female Apprentice) and Countess (female Squire) so I could have faster builders later on. I even managed to beat a few of the NMHC survival maps, such as Magus Quarters, Royal Garden, etc. With the final pet added to my item box, I also unlocked the Legendary Defender achievement.
Achievements:
Speed Freak (complete the Zippy Terror challenge on medium difficulty)
Kobold Exterminator (complete the Zippy Terror challenge on insane difficulty)
Core Destroyer (complete the Assault challenge on medium difficulty)
Monster Mania (complete the Death From Above challenge on medium difficulty)
Monster Madness (complete the Death From Above challenge on insane difficulty)
A Challenger Approaches (complete all 13 original challenges on insane difficulty)
Catch 'em All (collect all 11 pets from the original survival maps, plus the 4 guardians and 4 animi from the Summit)
Legendary Defender (earn all non-DLC achievements in the game)
Day 11
Here we go, the Quest for the Lost Eternia Shards starts now!
But first, an overview of stats.
These are my builders after beating the campaign on NMHC and over 100 hours of gameplay:
DPS Monk (lvl 77):
Hero stats: 984 / 1399 / 709 / 602
Hero abilities: 293 / 533
Resists (NM): 90 / 45 / 56 / 45
My Monk’s damage output has barely increased, still doing only about 350k DPS on the training dummy in the tavern with the pet’s damage included and all projectiles connecting.
Ensnare Aura (1729 health, 13,68 range, 30% enemy speed)
Electric Aura (1886 health, 14,01 range, 3755 damage, 0,20 attack rate)
Strength Drain Aura (1083 health, 14,34 range, 30% enemy strength)
Harpoon Turret (22,264 health, 28,078 damage, 44,81 range, 0,28 attack rate)
Archer Minion (24,475 health, 52,334 damage, 28,63 range)
Mage Minion (13,365 health, 86,747 damage, 15,71 range)
Buff Beam (2,08 damage boost, 1,86 resistance boost, 1,55 range boost, 1,68 attack rate boost)
Ensnare Aura (2679 health, 17,41 range, 15% enemy speed)
Electric Aura (2922 health, 17,83 range, 6987 damage, 0,14 attack rate)
Strength Drain Aura (1560 health, 18,26 range, 28% enemy strength)
Harpoon Turret (47,830 health, 59,202 damage, 52,83 range, 0,19 attack rate)
Archer Minion (71,426 health, 112,866 damage, 36,08 range)
Mage Minion (44,338 health, 209,552 damage, 19,87 range)
Buff Beam (2,20 damage boost, 1,98 resistance boost, 1,57 range boost, 1,70 attack rate boost)
NMHC Mistymire Forest. First impressions: it’s an amazing-looking map. By far the best one yet, at least in my opinion. The shroomites (mushrooms with mustaches and monocles) are a nice touch. They provide extra mana (and occasionally items) if you pet them.
As for the map itself, I used a pretty basic build. The boss fight took forever thanks to my low hero DPS, but the defenses held up. The proximity mine is there to help kill spiders during the boss fight. The reflection beams behind harpoons prevent them from getting webbed by spiders that spawn within the ruins. The healing aura helps the hero survive the boss fight. The middle harpoons are placed to cover the entrances and directed towards the spawn point of the boss. The extra minion wall next to the western crystal is to shoot down approaching wyverns and goblin copters.
Build: [expired ddplanner link]
NMHC Moraggo Desert Town. The design is fantastic! I absolutely love it. The Shards campaign looks very promising indeed. The map is a real labyrinth of multiple levels and streets that’s very hard to navigate. I had no idea where I was going half the time. The donkeys provide mana similar to shroomites in the previous map. The flying carpets help you travel quickly from one part of the map to another.
Although you don’t need to beat the DLC campaign maps with hardcore enabled for any of the achievements, I still failed about five or six times before giving up. It’s far too hard to maintain defenses while trying to chase and find the boss – which is a real challenge all by itself. I'm not that familiar with the map, plus the boss' laser beams kill me in seconds. I also get the feeling that my build is not optimal, as defenses go down way too quickly. I decided to go back to playing survival mode on the original campaign maps on NMHC difficulty instead.
I started on Deeper Well, using the same builds for survival maps as I did for the campaign. It was actually quite tough to beat all 25 waves on Deeper Well, because the number of ogres in later waves became ridiculous (around 40 ogres per wave). The second map – Foundries and Forges – was much more relaxing. I’m also using extra heroes via the controller emulator to get multiple rewards from these survival maps, both for the wave 15 pets and for the Giraffes at the end. I’m getting a few pretty decent ones for my builders, with an average of +250 to all defense stats. On the other hand, Alchemical Laboratory awarded me with a Giraffe that had -89/-60/-92/-58 to all defense stats. Yay for randomness!
Achievements:
Eternia Shard Recovered: Purple (complete the Mistymire Forest map on any difficulty)
Nightmare Eternia Shard Recovered: Purple (complete the Mistymire Forest map on nightmare difficulty)
Day 12
Next up, more NMHC survival maps! The survival mode on Servants’ Quarters proved to be a real pain. The western auras kept getting unsummoned by djinns. It took quite a few attempts to actually beat the map. Castle Armory was much more relaxed and easier than expected. I accidentally jumped into the spike pit at the beginning of the final wave and still won.
Hall of Court wasn’t too hard either. Note that the achievement only requires you to reach wave 25, not actually beat it, despite the achievement description saying that you need to achieve "survival victory". So if you fail on the final wave, you can still get the achievement. The Rampart was another easy survival map. Endless Spires was tougher and took a few tries, but overall not too bad.
I’ve been leveling the builders to 74 on these survival maps. My DPS hero contributes virtually nothing anyway, so I’ve been sitting in the map with these heroes to get XP. I’ve so far gotten the Countess to 74, now going for the Adept as well. Short day today, overall.
Day 13
Next up, even more NMHC survival maps! The Summit took about 3 hours to beat. It was pretty challenging, although having those extra defense units from harpoons/buff beams that were previously used in the boss fight came in handy. Glitterhelm Caverns was also tough, but I had played that map so much before that I didn’t need too many tries.
I also got a really nice Hamster pet for my DPS hero from Glitterhelm Caverns: about 1300 base damage, 222 upgrades, 240 hero health, 140 hero damage, 250 tower boost, 260 hero boost. By far better than any other damage-dealing pet I’ve found. It’s taken about 140 hours to get to this point and beat all 13 campaign maps on NMHC survival. I still need to do the same with the City in the Cliffs map for the achievement to actually trigger, but it looks like that map requires much higher stats than the ones I currently have.
Day 14
Going to try the Portal Defense challenge for Mistymire Forest. Wasn’t hard at all. I basically needed only auras and some minions at key points to snipe spawning spiders. In retrospect, simply placing proximity mines everywhere would have probably been a simpler solution.
The next step would be to try and complete the survival mode on NMHC Mistymire Forest. I made it to wave 26 on my first attempt (Mistymire has 30 waves instead of 25). My defenses didn’t hold up past that point. The second attempt also ended on wave 26, as I was running around and trying to grab items off the ground, but ended up dying and was unable to maintain the defenses. The third attempt ended even sooner, as I failed to switch to my DPS hero by the start of wave 20 and died quickly, which led to defenses failing.
Achievements:
Portal Protector (complete the Portal Defense challenge on any difficulty)
Nightmare Portal Protector (complete the Portal Defense challenge on nightmare difficulty)
Day 15
I'm still trying survival mode on NMHC Mistymire Forest. I died instantly on wave 27 as a goblin copter fell on my head, with my defenses overrun shortly after that. I made it to wave 29 on the next attempt and died. To avoid further frustration, I turned off mix mode in the hopes that it’ll make things easier. I beat the map on my next attempt, so maybe that was the reason. I also found my first supreme-quality item on wave 29 (some leather gloves with mediocre stats).
I still haven’t upgraded any armor on my builders. I’m waiting until I get all of the builders to level 78 by playing these survival maps and then seeing which set works best for everyone, with transcendent items added in. Right now, only the Huntress is still under level 78.
I’ve also been trying to beat the City in the Cliffs bonus map for what feels like a dozen times. I’ve used many builds, all of them unsuccessful. Losing any defenses in the first few waves usually means instant failure. I’ve only made it to the final wave once. I’ll just stop trying to run my head against the wall and try something less stress-inducing. Like Moraggo Desert Town.
I actually beat Moraggo on my first attempt this time. Thanks to higher stats, my defenses had no problem holding. I was also able to fight the boss better with 130k hero health vs the 80k health I had previously. I also did the challenge map for Moraggo, which was almost a relaxing experience after all the hell the boss put me through.
Build: [expired ddplanner link]
EDIT: The above setup is actually a survival build for NMHCMM that I found on YouTube, because the build I used for the map was horribly suboptimal. The setup provided in the link works very well and was created by a user named taroun1048, so I can't take any credit for it.
Achievements:
Eternia Shard Recovered: Blue (complete the Moraggo Desert Town map on any difficulty)
Nightmare Eternia Shard Recovered: Blue (complete the Moraggo Desert Town map on nightmare difficulty)
Djinn Recruiter (complete the War of the Djinn challenge on any difficulty)
Nightmare Djinn Recruiter (complete the War of the Djinn challenge on nightmare difficulty)
Day 16
I tried NMHC Moraggo on survival mode, but failed on wave 11 as a wyvern slipped past the defenses and killed a crystal. I made it to waves 14 and 20 in the following attempts, but was very clearly struggling with keeping my minion walls healthy.
Towards that end, I spent 8 billion worth of mana tokens and upgraded each piece of armor, each weapon and each pet around 100 times (at least those that had that many upgrade levels to begin with). Pretty much every stat point went into defense damage (or in case of Series EV, defense health).
Builder stats post-upgrades:
Countess: 191 / 2782 / 1045 / 1312
Initiate: 1408 / 1955 / 1604 / 823
Series EV: 2060 / 2105 / 765 / 1347
Huntress: 1462 / 2567 / 1288 / 652
Summoner: 1830 / 2678 / 1120 / 1125
Adept: 876 / 2175 / 553 / 906
I was still unable to beat Moraggo, though. Note that I didn't use the build I listed in the previous section, so that's probably part of the reason.
Day 17
I tried Moraggo survival mode again, but even with upgraded gear, I only made it to waves 22 and 24 before being crushed. I guess I’ll have to come back to it later.
I tried the Real Time Strategist achievement next, because I felt that my Summoner had pretty decent stats at that point. I started with the hardest map – City in the Cliffs. It actually went a lot better than my previous attempts, mainly because I hadn’t really used the Summoner in the combat phase before and didn’t know how useful Overlord Mode could be. The main reason for failing City in the Cliffs before was my inability to reach different choke points to repair defenses in time. Overlord Mode offers an ability to quickly repair defenses anywhere on the map without any danger of being killed by enemies. Awesome! Plus, having the Summoner active in the combat phase doesn’t cause the "missing builder" damage penalty for minions. Even more awesome!
Once again, the achievement description is misleading. It should say that you can only KILL enemies with minions. You also don’t have to stay in Overlord Mode for the entire combat phase, you just can’t kill any enemies, so it’s best to use a non-attacking pet (Giraffe, Genie, etc.). You can still move around, pick up mana and items, and repair/upgrade defenses. I'm also fairly certain that you don't even have to use a Summoner for the combat phase, as long as you don't kill any enemies with your hero/pet.
It still took four attempts to beat the map, but I got an unpleasant surprise as I saw 197 hero kills at the score screen. Having only used the Summoner with a Giraffe pet during the combat phase, I had no clue how that could even have happened. Then I remembered that I had used reflection beams in my build, so I figured that was the reason. Makes sense, as a single reflected ogre poison projectile is enough to one-shot weaker enemies like goblins and spiders. I replayed the map with the exact same hero setup and build, but removed the reflection beams, which did the trick.
Build: [expired ddplanner link]
Day 18
The plan is to wrap up a bunch of achievements today.
First, I did the Etherian Holiday Extravaganza challenge on medium difficulty. Higher difficulties seemed way too hectic without having a very specific strategy and build.
Following that, I played NMHC Aquanos and failed horribly after beating the boss down to about 15 million health. That map design, though!
The second attempt was successful, although I got instantly one-shot by the boss before the fight even started, as he threw his water projectile from a great distance when my back was turned. My minions were enough to kill the boss without me, but the fight took quite a few minutes. I also met the requirements for Real Time Strategist, as I only added electric auras and some harpoon turrets to help with the boss in the final wave, otherwise using only minions, gas traps, buff beams and non-damaging auras.
Build: [expired ddplanner link]
Next I did the Riddle of the Deep challenge, which was basically the same as the campaign but without the boss, as I mostly ignored the puzzle portal altogether. The weapon I got from beating Aquanos - Lemurian Halberd - was far better than my current one. When upgraded, the Halberd had a ranged DPS of 470k in the tavern (with the entire middle cluster of projectiles connecting). Far better than my previous weapon. Kinda crazy that I’ve managed to make it this far with only 17k DPS in nightmare.
I then played the original campaign maps for the Real Time Strategist achievement. I failed The Summit, because I accidentally jumped off the parapet during the boss fight. Then I remembered that I don’t need to have hardcore mode turned on. After I had beaten the original 13 maps, as well as Mistymire and Moraggo (Aquanos and City in the Cliffs were already done), the achievement popped. I also attempted survival on City in the Cliffs and made it to wave 26, but failed as an ogre somehow navigated the rope bridge in the east and killed my crystal from behind. I still got the Transcendent Survivalist achievement, though, because I reached wave 25 (despite the map having 30 waves). Dem inaccurate descriptions...
Build: [expired ddplanner link]
Achievements:
Jingled All the Way (complete the Etherian Holiday Extravaganza challenge on any difficulty)
Eternia Shard Recovered: Yellow (complete the Aquanos map on any difficulty)
Nightmare Eternia Shard Recovered: Yellow (complete the Aquanos map on nightmare difficulty)
Puzzle Solver (complete the Riddle of the Deep challenge on any difficulty)
Nightmare Puzzle Solver (complete the Riddle of the Deep challenge on nightmare difficulty)
Transcendent Survivalist (reach wave 25 in survival mode on all 13 original campaign maps, plus City in the Cliffs on nightmare difficulty)
Real Time Strategist (complete the 13 original campaign maps, plus the City in the Cliffs, Mistymire Forest, Moraggo Desert Town and Aquanos maps by only using minions to kill enemies - except on the final wave - on any difficulty)
Day 19
Now trying NMHC Aquanos survival mode to get myself a Seahorse pet. I need some way to get my damage up in nightmare and the Seahorse is apparently one of the better DPS pets in the game. I made it to wave 19 on my first attempt (Seahorse is awarded for reaching wave 20) and failed because I lost the south crystal to wyverns flying in from behind. The second and third attempt also failed, mostly because of ogres messing things up for me. The fourth attempt was successful and yielded a nice seahorse with builder stats of 400/400/321/234. Not a whole lot in terms of damage, though.
I tried to get a couple more seahorses by using the controller emulator and adding three more players in the combat phase of wave 19, just before reaching wave 20. This gave me four Seahorses instead of just one. I still can’t make it past wave 23, as the golden (buffed) wyverns keep killing the eastern crystal from behind, because my defenses lack the DPS to kill them fast enough.
I also tried NMHC Sky City and made it to the boss on my first attempt, but I accidentally jumped off the map before I could kill him. On a related note, it seems to be a running theme that the Shards DLC maps have absoutely awesome design. All four have been really great.
Day 20
I tried to get some more Seahorses with the help of the controller emulator. I got only mediocre pets from two Aquanos runs, but a nice supreme random drop Monk weapon for my Initiate with around +350 aura health and damage, as well as +150 aura radius.
I also tried Sky City again and finally beat it after two more unsuccessful attempts. The main problem was falling to my death when trying to jump off the skyship. I didn’t immediately realize that there are also air streams on board the ship, which makes escaping it much easier. The build is also unique, as the north and south crystals have essentially no defenses. The way the AI works, no enemies are drawn to those crystals, because there are no actual physical defenses there, only auras, traps and beams. Virtually all enemies head to the eastern crystal, where I’ve amassed all of my minions. I also didn't upgrade any of the defenses in north and south, otherwise djinns will attempt to unsummon them (djinns virtually never unsummon unupgraded defenses).
Build: [expired ddplanner link]
The build I’ve listed is actually pew pew pew’s build for Sky City survival mode, but I used a very similar build when I first played the map before discovering pew pew pew’s guides. Most of my previous losses were due to buffed wyverns simply tanking the single electric aura and killing the crystal. Higher builder stats would likely mean that less defenses are needed, because I only placed about half of the minions and traps shown in the setup and could probably do with even less if I had better stats.
The next map was NMHC Tavern Defense. It was actually a lot easier than I had feared, although it included three bosses, each with a TON of health. With three extra players in the game via the emulator, the bosses have around 615 million, 75 million and 340 million health. Needless to say, I failed my first attempt. However, playing without extra heroes, the first two bosses basically suicided themselves into my minion walls, so I only had to kill the third one in the east. I needed to constantly jump back inside the healing aura to restore my health between taking chunks out of the boss’ health, but eventually I wore him down. I had also placed a minion wall on the right of the northern crystal on my first attempt, but it was not needed, as nothing really attacks from that direction.
Build: [expired ddplanner link]
Next on the list was the Halloween Spooktacular 2 challenge. The map was basically Endless Spires with a few kinks, so I used a similar build with different placement for the minion walls and harpoons to cover the extra entry points. I don't want to spoil the surprise for anyone who hasn't played it, but I didn’t even realize that it was possible to have these types of enemies in the game. Through some incredible stroke of luck, I actually managed to beat this map on my first try while being completely unprepared for the final wave. I guess it means that my stats are close to end-game worthy, which is encouraging.
Achievements:
Eternia Shard Recovered: Red (complete the Sky City map on any difficulty)
Nightmare Eternia Shard Recovered: Red (complete the Sky City map on nightmare difficulty)
Anniversary Defender (complete the Tavern Defense map on any difficulty)
Nightmare Anniversary Defender (complete the Tavern Defense map on nightmare difficulty)
Pumpkin Party (complete the Halloween Spooktacular 2 challenge on any difficulty)
Pumpkin Party Nightmare (complete the Halloween Spooktacular 2 challenge on nightmare difficulty)
Day 21
Next up, Karathiki Jungle. This is definitely a real end-game map. For one, it’s absolutely huge and difficult to navigate. The crystals are placed so far apart, it’s hard to run from one to another to repair defenses in time. Plus, the passages are so narrow that you’ll likely get stuck behind a clump of enemies while trying to reach your defenses. I like the look of the map, but in terms of difficulty, it’s definitely one of the harder and more frustrating ones. The first few waves are especially hectic, because there’s very little time to place enough defenses everywhere to survive the initial attack.
Build: [expired ddplanner link]
I also played the survival mode on NMHC Karathiki to get the Cowboy Monkey pet. I got a pretty decent one with about 200 upgrades, 5300 base damage and +250-260 hero health and damage. I died on the very next wave, though.
The next step is to level up a Barbarian to level 78 and try to beat the Assault Pack challenges. My current Monk is definitely not up to the task. Towards that end, I used a powerleveling strategy that was suggested in the Steam forums and played Tavern Defense on NMHC pure strategy mode. I've described the exact method (and its benefits) more thoroughly in my FAQ guide.
After two Tavern Defense runs, I had leveled a Barbarian and three Summoners (to be used later for nefarious purposes) to level 78. I then turned my attention back to Sky City to play the survival mode for the Propeller Cat pet (supposedly the best pet for a Barbarian). The map is nowhere near easy, because the Propeller Cat is awarded for reaching wave 25, which is no simple feat. I literally failed seven times, reaching around wave 21-23 every time, before giving up and doing the map on insane difficulty instead.
Since my current Barbarian weapon was just a random drop, I decided to get a Steam Saw from Sky City (again, supposedly one of the better weapons for Barbarians). However, the few Steam Saws I got were pretty terrible, mostly with negative hero stats, less than 50 upgrades and pitiful starting damage. I attempted Assault challenges anyway with the best weapon I had. Boy, was I in for a rude awakening.
First off, since the hero’s health is halved on assault maps and I lacked DPS, I got killed pretty quickly, even with maxed physical resistance. Because pets don’t attack enemies on Assault maps, I was in serious trouble as soon as I ran across the first ogre. Add all that to the heavily nerfed movement speed and jump height, as well as the inability to use things like Battle Leap and Turtle Stance, I was barely able to reach the second crystal on the first map, never mind destroy it.
Although the projectile distance is also heavily nerfed in Assault, I decided to try a ranged hero class instead. The one decent ranged weapon reward I could reasonably hope to get was a Pawn Shot from The King’s Game, so I tried playing that map. I just made some extra Huntresses to get more Pawn Shots via the controller emulator.
Build: [expired ddplanner link]
Long story short, I got my first-ever ultimate-quality item - an awesome Pawn Shot - from my very first King's Game run:
http://steamcommunity.com/sharedfiles/filedetails/?id=299096132
That basically sealed the deal for me and I started leveling up a Jester (the last hero class I didn’t yet have).
Next step: Tinkerer’s Lab. Unfortunately, the ddplanner website doesn’t have a template for Tinkerer’s Lab, but the layout I used was... sub-optimal at best. For a great setup for this map, check out pew pew pew’s guide. That’s exactly the build I used to later beat the survival mode for this map (on insane HC difficulty) and it works for the campaign as well, if you manage to place the defenses in time.
Achievements:
Tinkerer's Defender (complete the Tinkerer’s Lab map on any difficulty)
Nightmare Tinkerer's Defender (complete the Tinkerer’s Lab map on nightmare difficulty)
Day 22
This day was basically dedicated to powerleveling. The Pawn Shot I got from King’s Game was an ultimate-quality item, so I needed a level 90 character to use it. Even with such an efficient powerleveling method as Tavern Defense, it was gonna take some time. I got the Kobold pets for beating the map a few times, but they were barely an upgrade to my current builder pets because pure strategy rewards are junk compared to survival rewards.
I did eventually manage to get the Jester to level 90, simultaneously acquiring a ton of XP for all my other characters as well. I upgraded a set of DPS armor for the Jester to max out the physical and fire resistances on nightmare. I then upgraded the Pawn Shot 200 times to get the base damage up to 106k.
It took less than five minutes to power through all three maps. This was pretty much the first time I actually had enough firepower to kill enemies with my hero, rather than leaving it all up to my defenses.
I also did the No Towers Allowed challenge on NMHC with the Jester. I brought in an AFK Summoner with two pets (a Seahorse and a Cowboy Monkey) and positioned him on one side, while I covered the other. In the last few waves, I occasionally hopped on the Summoner’s side and helped clear some mobs once their number became too large.
Achievements:
Dungeon Raider (complete all three parts of the Assault Challenge Pack on any difficulty)
Day 23
I continued with the original challenges in NMHC. Not much to say about them, really. Even some of the more tricky challenges didn’t prove to be much of a problem.
The hardest one was probably Zippy Terror again, but using three AFK Summoners with a mix of Seahorses and DarkBots (farmed from the Throne Room) as pets, I was able to cruise through this challenge without any difficulty.
Next up: Sky O’ Love. This map was MUCH easier than I had originally feared after looking at some comments about this challenge. I even turned off hardcore mode, because I didn’t really know what to expect in terms of environmental hazards (mainly the fear of falling off the map) or the toughness of the boss. I also didn’t have a Fairy pet, which is by far the best choice for this challenge. However, I beat this challenge on my first attempt, with a time of 20:39 and without dying once. Don’t really see what the fuss was about.
Build: [expired ddplanner link]
I’m pretty much ready to start farming stuff for the real endgame now. There’s a single random achievement left before I can focus on the really hard maps, so I’ll get it out of the way first. By this point, I’m missing only 3 of the 31 pets required for the I’ve Got Monsters in my Pocket achievement, so I might as well get it done.
I played Talay Mining Complex survival on insane to get the Pet Rock. I first beat it on NMHC to unlock insane survival mode and it was certainly one of the hardest maps I've played so far.
Build: [expired ddplanner link]
I didn’t have enough time to actually complete the build on campaign, so I skipped building the harpoons in most choke points, for instance. The map is disorienting enough to make my head spin, so I could barely find the places where I needed to place defenses. Using the Overlord Mode to place minions is also quite a pain because of the multi-layered structure of the map. Again, like Karathiki Jungle, it’s another map I absolutely love design-wise, but in terms of difficulty, it’s ramped up all the way to eleven thanks to the layout.
I ended the day by upgrading my Pawn Shot from level 200 to 300. Total cost: 2,3 billion mana. The base damage of that weapon is now 150k and I still have 70 upgrades left. Wicked.
Achievements:
Transcendent Challenge Champion (complete all original 13 challenges on nightmare hardcore difficulty)
Playin' Cupid (complete the Sky O’ Love challenge on any difficulty)
Day 24
I kicked off the day by doing the Presidential Battle Royale challenge for the final two pets needed for the pet achievement. I just added three extra AFK heroes and kept killing them until I reached the required score to beat the challenge.
Ready to get some serious farming done now! These are the stats of my heroes about 240 hours into the game before farming any end-game gear:
Initiate (lvl 90): aura stats: 1569 / 2308 / 2000 / 686
Series EV (lvl 78): beam stats: 2507 / 1966 / 1268 / 1257
Countess (lvl 78): tower stats: 448 / 2864 / 1060 / 1376
Huntress (lvl 78): trap stats: 1992 / 2523 / 1280 / 656
Adept (lvl 78): tower stats: 810 / 2598 / 1247 / 1024
Summoner (lvl 91): minion stats: 1984 / 3117 / 997 / 956
Monk (lvl 99):
Hero stats: 1467 / 2198 / 478 / 890
Hero abilities: 717 / 671
Pet: Cowboy Monkey (5342 base, 19,266 lightning)
Weapon: Lemurian Halberd (4058 melee, 8685 ranged, 14,502 lightning)
Resists (NM): 90 / 70 / 70 / 70
Note: The weapon and pet were upgraded before I found out that elemental damage doesn't scale with hero damage...
Barbarian (lvl 82):
Hero stats: 1291 / 2289 / 822 / 769
Hero abilities: 113 / 1021
Stances: 203 / 140 / 704 / 828
Pet: Propeller Cat (77 boost, 1 range, 1 hero)
Weapon #1: random sword (13,208 base, 2858 lightning)
Weapon #2: random hammer (16,194 base, 396 lightning)
Resists (NM): 90 / 67 / 66 / 66
Jester (lvl 92):
Hero stats: 1715 / 2847 / 788 / 1255
Hero abilities: 1256 / 741
Pet: Genie (8622 base)
Weapon #1: Pawn Shot (150,452 base, 1507 lightning)
Weapon #2: Pawn Shot (basically just for its high hero stats: 301 / 438 / 460 / 371; hero abilities 411 / 436)
Resists (NM): 90 / 72 / 70 / 66
The award for Tavern Defense survival (Kobold on Treadmill) has equally high stats for insane as for nightmare difficulty. So, let the farming for Kobolds commence! Playing insane difficulty with the aforementioned stats looks like overkill, to be honest. I can get four Kobolds per run by adding three extra AFK heroes on the build phase before wave 35. I got really lucky on my first run, as all four Kobolds had +600 defense damage and fairly decent other stats. I did two more runs to get nice Kobolds for all my builders.
Next up, the Volcanic Eruption challenge. The Huntress reward for this challenge (The BF Drill) is a very useful weapon for farming a certain challenge map – Lab Assault, which was suggested on the Steam forums. I played it on insane HC difficulty, as the weapon's damage is not all that important. I added three level 1 Huntresses before the final wave and switched my main hero to my builder Huntress in order to get four BF Drills as rewards. Regarding the challenge itself, I placed an AFK hero on top of the crystal with a shooting pet (Cowboy Monkey) to help me survive the first few waves. Again, consult pew pew pew’s guide for the exact build (it’s what I used).
EDIT: Another nice trick to use on this challenge (which I only figured out later) is to place a harpoon turret on the stairs near the crystal on the first wave and keep moving it with the Jester's "move tower" ability, so you always have something covering the crystal even if you don't have an AFK hero or if the hero gets killed.
I picked the best out of those four Drills and upgraded it. The Drill had only 80 possible upgrades, so I got the damage up to 7400 and projectile speed to 30k. It already had a decent clip size and not too terrible hero stats, so I guess I got lucky in that regard.
Next, I played the Lab Assault challenge. Unlike other Assault maps where you just blast through enemies, there's a very unique method for beating this particular challenge. I again refer you to wat's guide if you want to see a helpful video and get a better idea of how it's done. However, I've also written a separate guide, detailing exactly why Lab Assault is the single best map for farming items in the game and just what you can expect to gain from it.
Achievements:
I've Got Monsters in My Pocket (collect 31 unique pets – 11 from the original survival maps, 4 Guardians and 4 Animi from the Summit, 4 from the shards survival maps, 3 from the bonus survival maps (Cowboy Monkey, Pet Rock, Djinnlet), challenge rewards from Sky o’ Love (Goblin Cupid), Assault Pack (Rainbow Unicorn) and Presidential Battle Royale (Democrat Donkey and Republican Elephant)
EV Reprogrammer (complete the Lab Assault challenge on any difficulty)
Nightmare EV Reprogrammer (complete the Lab Assault challenge on nightmare difficulty)
Day 25
I’m setting up a sort of a farming rotation, playing different maps for different rewards:
1. XP farming on Tavern Defense pure strategy nightmare difficulty.
2. Kobold farming on Tavern Defense survival insane HC difficulty.
3. Cat farming on Sky City survival NMHC difficulty.
4. Lab Assault farming on NMHC for accessories, armor and mana.
5. Chicken farming on Tinkerer’s Lab survival insane HC difficulty.
The XP farming ends when I have all my heroes at sufficiently high level. I’m not aiming for level 100 for all of my heroes, but likely at least level 90 for each builder.
The Kobold farming ends when I have good Kobolds for all my builders. Kobolds that start with +600 to one or two defense stats are fairly common, so if they have enough upgrade levels, it's possible to get a Kobold with +600 to three defense stats.
Cat farming ends when I have a good enough Propeller Cat for my Barbarian. To the best of my knowledge, the highest starting damage boost stat is 140, so I’m looking for something close to that, with enough upgrades and decent hero stats.
Lab Assault farming really never ends, as it’s one of the easiest and most efficient methods for farming.
Chicken farming ends when I get a Mega Chicken with sufficiently high starting damage and good hero stats. Chickens always have 200 upgrades, so base damage is really the only thing to look for. The highest possible starting damage should be around 24-25k, so I’m looking for something close to that. Plus, Tinkerer’s Lab survival mode also grants Blaster Rifles as rewards. These are great weapons for Huntresses, as Blaster Rifles from insane difficulty can actually have a pretty good number of upgrades and high stats.
Day 26
I’m adding another map to the rotation to prepare for the ultimate endgame:
6. Weapon farming on Akatiti Jungle on nightmare hardcore difficulty.
Weapon farming ends when I have decent weapons for my Barbarian (dual Obsidian Gladius) and Monk (Obsidian Sparus). The third obsidian weapon – Obsidian Clava – is a nice off-hand stat booster for the Jester, because it can get very high hero stats. Of course, I’m also hunting for these weapons for all my builders, because they often have very high defense stats.
Akatiti Jungle is the only map I didn’t manage to actually complete, because I messed up the build pretty bad. I tried about three different builds, but none of them worked out. Oh well, tomorrow’s another day.
Day 27
Continuing the farming rotation. By now, all of my builders have reached level 90. They also have decent Kobolds, so I can remove the first two maps from the rotation.
I’ll also likely remove Sky City and Tinkerer’s Lab, because the pets that I’ve gotten from those maps seem to be fairly okay, although not really remarkable. That leaves only Lab Assault and Akatiti Jungle.
Speaking of which, I still can’t seem to beat Akatiti. The boss fight was way too hard and I lost a crystal before I managed to kill the boss. I had another three unsuccessful attempts today. Feels like I’m smashing my head against the wall with this map. Never fear, I will beat it.
Day 28
I finally realized that pristine armor is never awarded on Lab Assault. Since my Summoner has been using a pristine set all this time, I haven’t found superior replacements in AGES. I switched the sets for my Series EV and Summoner, and my minion health/damage stats shot up by +800/+1000. Aww yiss.
Two more unsuccessful attempts on Akatiti Jungle. I got the boss down to 200 million health before failing. I guess trying to kill the boss with three AFK heroes is just too much. The next attempt with only two AFK heroes was successful.
Build: [expired ddplanner link]
The double aura stack in the west was necessary to catch the buffed wyverns. The choke point in the river is placed close to the spawn point of the boss, so the minions could add their DPS during the boss fight and I’d have the support of all the auras. I used the Monk (with a Mega Chicken) as my main hero, so I could activate hero boost and tower boost. The two AFK heroes were the Jester (also with a Mega Chicken) and Barbarian (whose Propeller Cat boosted all heroes and pets).
It felt sooo good to finally beat the boss. Even the rewards were very nice. One Sparus had 492/290/400/429 builder stats with almost 400 upgrades, while another one had 368/417 hero health/damage and 369 upgrades. I immediately did three more runs, all successful. Things are definitely looking up.
Day 29
I tried Akatiti Jungle with three AFK heroes, this time successfully. The boss had 1,2 billion health, but I still managed to kill him before losing any of my defenses (the fourth AFK hero was a Summoner with two Mega Chickens). I did three more successful runs, picking up four Turtle pets on the last run as well. Nice easter egg, by the way *cough* Konami code *cough*
It should also be noted that in addition to Obsidian weapons, you get a bunch of other rewards at the end of the map as well. Much like Lab Assault, this includes random pets, weapons and armor. Unlike Lab Assault, however, the pet rewards in Akatiti are much better and varied. For example, I got a Genie with 21k mana collection bonus and over 200 upgrades, as well as a Fairy with about 1500 hero heal and also over 200 upgrades, both with decent hero stats. This map can also award pristine armor. No good accessories, though, which is a shame.
I’m collecting a nice number of Obsidian weapons to use for my DPS heroes. These already far outshine any weapon I had previously, but I’ll do a few more runs to get some more weapons for comparison’s sake. However, the best ones are all ultimate+ quality, so I need to level all my DPS heroes to 100 in order to actually use them. Back to Tavern Defense it is, then. I’m nearly ready to play the final maps!
Day 30
One final day of farming, to be double, triple, quadruple sure that I have good enough gear to make it through the rest of the game.
I did a ton of Lab Assault runs, Akatiti runs and even a few Tinkerer’s Lab and Sky City run for pets. Didn’t get any good ones, though. However, I did get several decent builder armors and a ton of mana from Lab Assault, which will no doubt come in handy when I start upgrading those Obsidian weapons.
Day 31 (part 1)
This is it. The day of reckoning. The final test. The hardest maps. Bring it!
First, some heavy upgrading for all the various armor pieces, pets and Obsidian weapons. I had 34,3 billion mana before applying any upgrades – this was all the mana I had saved throughout the entire game. After the upgrades, I had only 1,1 billion left. Sadface.
My heroes have all their stat points put into either defense damage (builders) or hero damage (DPS heroes). The only exception is the Series EV, whose stat points are put only into defense health.
Builders
Countess (lvl 93): tower stats: 3110 / 4540 / 723 / 2706
Adept (lvl 93): tower stats: 1462 / 4214 / 1903 / 1984
Series EV (lvl 93): beam stats: 3764 / 3438 / 1676 / 2091
Huntress (lvl 93): trap stats: 1727 / 4117 / 2199 / 1347
Initiate (lvl 98): aura stats: 2664 / 4479 / 2938 / 1263
Summoner (lvl 99): minion stats: 3305 / 4497 / 2053 / 1778
These are the stats for my most commonly-used defenses with end-game gear, calculated in the tavern without the builder present (all upgraded to three stars and boosted by a three-star buff beam):
Ensnare Aura (4152 health, 30,83 range, 15% enemy speed)
Electric Aura (4530 health, 31,59 range, 14,630 damage, 0,11 attack rate)
Strength Drain Aura (2310 health, 32,34 range, 20% enemy strength)
Harpoon Turret (77,364 health, 79,128 damage, 69,95 range, 0,10 attack rate)
Archer Minion (95,870 health, 74,495 damage, 40,81 range)
Mage Minion (56,485 health, 141,870 damage, 22,42 range)
Buff Beam (2,29 damage boost, 2,05 resistance boost, 1,60 range boost, 1,75 attack rate boost)
DPS heroes
Note: All damage is calculated on the training dummies in the tavern.
Barbarian (lvl 100):
Uses dual Obsidian Gladius and Propeller Cat (boost: 169)
Hero stats: 2254 / 4677 / 1740 / 931
Hero abilities: 194 / 2346
Resists (NM): 90 / 90 / 67 / 67
Pre-upgrade damage (with Propeller Cat):
Gladius #1: 8765 base, 1616 lightning, 1,806,342 DPS
Gladius #2: 5682 base, 1430 poison, 1,178,334 DPS
Dual combo: average ~6,831,280 DPS
Hawk Stance: 25,118,300 damage per hit
Post-upgrade damage (with Propeller Cat):
Gladius #1: 60,024 base (320 ups), 12,182,106 DPS
Gladius #2: 49,479 base (240 ups), 10,050,546 DPS
Dual combo: average ~40,8 to 52,3 million DPS
Hawk Stance: 190,413,216 damage per hit
Monk (lvl 100):
Uses Obsidian Sparus and Mega Chicken (30,3k base damage)
Hero stats: 2974 / 3964 / 1533 / 330
Hero abilities: 595 / 1711
Resists (NM): 90 / 90 / 68 / 68
Pre-upgrade damage:
Sparus: 4233 base, 2370 lightning, 578,327 DPS (1,816,039 DPS with hero boost)
Post-upgrade damage:
Sparus: 60,458 base (275 ups), 8,066,219 DPS (25,329,144 DPS with hero boost)
Chicken (no hero boost): 1,267,834 single projectile DPS, 4,963,266 melee DPS
Chicken (with hero boost): 3,981,192 single projectile DPS, 15,585,404 melee DPS
Jester (lvl 100):
Uses Pawn Shot, Blaster Rifle and Genie (21,4k mana collection bonus)
Hero stats: 2165 / 4426 / 966 / 780
Hero abilities: 205 / 1106
Resists (NM): 90 / 90 / 67 / 67
Pre-upgrade damage:
Blaster Rifle: 7447 base, 1441 lightning, 744,608 DPS
Post-upgrade damage:
Blaster Rifle: 65,815 base (220 ups), 6,491,536 DPS
Pawn Shot: 150,452 base (300 ups), 8,339,526 DPS
Day 31 (part 2)
First up, the Boss Rush challenge. I failed the first time, because one of the Krakens knocked me off the map. The second attempt was successful without really breaking a sweat. I used pew pew pew’s build, as I've often done lately.
Second, the Great Turkey Hunt challenge as a warm-up for the Greater Turkey Hunt. The BF Drill turns out to be very useful for quickly taking out a large number of turkeys.
Third, the Greater Turkey Hunt. This challenge was apparently designed by a real sadist, because it’s literally the worst thing ever created. So, what does the Greater Turkey Hunt entail, you wonder? How about:
One of the largest and most frustrating maps – Karathiki Jungle – with initial build time reduced from 240 seconds to just 60, and starting mana reduced from 1200 to 400 (only 300 mana is actually reachable due to the time limit).
Defense units and minion units reduced from 165 to 50.
All ranged towers (harpoon turrets, fireball towers, etc.) having their range nerfed into oblivion.
You being constantly chased by a swarm of dark elf warriors and spiders, as well as ALL the evil heroes (each of whom have over 50 million health, by the way).
Only having one life, even on non-hardcore mode. If you die even once, it’s all over.
Turkeys spawning at a painfully slow rate and constantly running away from you, coupled with an INCREDIBLY tight time limit for each wave.
Having to kill eight bosses with over 120 million health each, all the while trying not to die to that army of infinitely respawning enemies and evil heroes who are out for your blood.
Fun times!
Being able to beat this challenge on my second try is likely one of my greatest accomplishments in this game to date. My entire build consisted of a single buffed stack of all five auras in the middle of the map, with a gas and inferno trap thrown in. That’s it. I tried placing minions as well, but they were killed very quickly by dark elf warriors.
I ran out of time on wave 9 of my first attempt, as I couldn’t kill all the turkeys fast enough. This was almost the case with the second attempt as well, because I managed to kill the final turkey in the last wave with only about 3 seconds remaining on the timer. Fortunately, the boss fight was not timed, although I wouldn’t really have been surprised if it had been. This challenge, man...
I took my sweet time with killing the bosses, dealing about 30-50 million damage at a time and retreating to the safety of my auras to heal. I also lost the Buff Beam and Ensnare Aura because of djinns at the very start of the final wave. Eventually, all the bosses fell and I took this screenshot like taking a scalp:
http://steamcommunity.com/sharedfiles/filedetails/?id=315916442
Next up, Temple O’ Love. While the Sky O’ Love was easier than expected, this one gave me quite a bit of trouble. I used pew pew pew’s build, which worked out great. However, I messed up the final wave by allowing a single evil Squire to slip past on the middle lane and meet up with a Huntress. I made it to the boss fight on my second attempt, but I made the mistake of picking the Monk as my active hero. Protip: both bosses fly REALLY high above the ground, making melee attacks completely unfeasible.
The third attempt failed for the same reason as the first one. I tried the challenge a fourth time without any AFK characters, which reduced the number of evil heroes and actually made the final wave much easier. As long as all the Squires are killed, there’s no threat of enemies pairing up. This last attempt was successful, although in retrospect, I should have used the Propeller Cat for the boss fight, because the Mega Chicken's ranged attacks can’t even reach the bosses. It was still ridiculously easy once I made it to that point, though. My trusty Pawn Shot once again emerged triumphant.
The final map of the day: Winter Wonderland. Once again, I used pew pew pew’s build (seriously, they’re so solid that I haven’t even bothered looking up other builds for the final couple of maps). Compared to the previous maps, Winter Wonderland was basically AFK-able. There was never any real danger of failing the map. Even the final wave with eight bosses, each with about half a billion health, didn’t pose a threat. Ah, how far we’ve come...
Achievements:
Boss Crusher (complete the Boss Rush challenge on any difficulty)
Nightmare Boss Crusher (complete the Boss Rush challenge on nightmare difficulty)
Greater Turkey Hunter (complete the Greater Turkey Hunt challenge on any difficulty)
Nightmare Greater Turkey Hunter (complete the Greater Turkey Hunt challenge on nightmare difficulty)
Playin Anticupid (complete the Temple O’ Love challenge on any difficulty)
Nightmare Playin Anticupid (complete the Temple O’ Love challenge on nightmare difficulty)
Winter Wonderland (complete the Winter Wonderland bonus map)
Nightmare Winter Wonderland (complete the Winter Wonderland bonus map on nightmare)
Day 32
Only two maps to go until all the achievements are done!
I did the Silent Night challenge first, leaving the ultimate boss as the very last hurdle of the game. Would you be surprised if I told you that I used pew pew pew’s builds for both maps?
I failed the first attempt on Silent Night, because I hadn’t prepared my builders as was shown on the video. Serves me right for starting the map before actually watching the whole thing. I messed up the second attempt by running out of time on the first build phase before I had all my defenses ready. The third attempt was successful, however. I still managed to forget the healing aura, so I had a slightly harder time against the final boss, but other than that, there really weren’t any problems with the map.
Final map! Crystalline Dimension! Let’s go!
The start was very promising, as the game promptly crashed on the first wave. This was the first time in over 300 hours that the game had actually crashed. I’m assuming it’s a bug specific to this map, because it crashed a few more times on later attempts, and every time a crash happened, I was battling the evil Apprentice hero clone, so I’m assuming that’s somehow related, although I can’t figure out why. Sidenote: who had the bright idea of making the Apprentice’s mana bomb attack SO FREAKING LOUD?! Seriously, my poor ears!
Incidentally, I played this map on non-hardcore. Not willingly, mind you. I died during the final boss fight and thought the game was over, but I actually respawned. Turns out that I didn’t have hardcore mode selected in the tavern (you need to do that before entering the portal). Guess that spared me the trouble of doing the whole map again. Roll credits!
By the way, it was a really nice touch to switch the soundtrack for the final stage of the Old One boss fight. Gave the ending an extra bit of epicness.
Also, the short clips throughout the Shards of Eternia campaign, as well as the finale to the Crystalline Dimension, are all really well done in my opinion. It’s a nice and simple story and I like it. Tower defense games rarely have any story at all, so it’s a welcome change.
It took about 300–350 hours to beat the game from start to finish. Steam’s "hours played" shows over 400 hours at the time of writing this, but that also counts the time the game was alt-tabbed, which happened quite often.
Technically, the game is not actually *beaten*, as there are a lot of survival maps I haven’t completed, as well as tons of challenge maps I haven’t even played yet. For now, however, I’m content with admiring the massive Ultimate Defender trophy in my tavern and calling it a day. A very satisfying, rewarding day.
http://steamcommunity.com/sharedfiles/filedetails/?id=315923923
...
Oh, who am I kidding? Of course I’m not done with the game yet!
Achievements:
Not So Silent Night (complete the Silent Night challenge on any difficulty)
Nightmare Not So Silent Night (complete the Silent Night challenge on nightmare difficulty)
Heroes to the Rescue (complete the Crystalline Dimension challenge on any difficulty)
Nightmare Heroes to the Rescue (complete the Crystalline Dimension challenge on nightmare difficulty)
Ultimate Defender (earn all other achievements in the game*)
Day 33
Welcome to new game+ of Dungeon Defenders! But there is still a final challenge I intend to beat, namely completing the Crystalline Dimension solo on NMHC. No achievement for that one, only eternal fame and glory as rewards. Let’s go!
First attempt: died during the boss battle because I was standing right in front of the boss as he shot his triple laser beam. Died instantly, even with 350k health and 90% damage resist. Yikes!
Second attempt: I actually lost during the second wave, because a dark elf archer somehow managed to kill a crystal while I was on the other side of the map. No clue how that even happened.
Third attempt: I mistimed a jump in the boss fight and got one-shot by the shockwave from the double fist slam.
I’m ever-so-slightly miffed after two more unsuccessful attempts, making it a total of five failed NMHC runs. It takes me anywhere between 35-40 minutes to beat the six waves and the boss gauntlet leading up to the final boss fight. It’s become so routine that I don’t even bother with traps anymore. I don’t even place reflection beams until maybe the final 1-2 waves. Saves time and doesn’t really change the outcome. And then, in a matter of minutes – sometimes seconds – the boss stomps me and it’s back to square one.
Fortunately, there is help out there for anyone having the same problem. It’s a custom map titled Old One Practice, which can be played in Open mode. I downloaded the map via Steam Workshop, copied my profile into Open mode and started practicing the map. Having this map to practice on helps out a great deal. Here's what I learned:
There’s an option of using the Fairy as a pet during the boss fight. With a sufficiently powerful Fairy, you can’t really die, except from attacks that one-shot you. The downside is that without an attacking pet, the fight takes forever, which means more chances for the boss to kill you with a single sudden attack.
During the second phase, always stand in the middle of the platform and as far back as possible. The triple laser attack is quick, has little warning and will kill you in seconds if you’re caught by it, even if you have an impressive amount of health and resistances. Standing back also allows you to react to all of the Old One’s attacks in time.
The single blue laser attack, however, offers plenty of warning and is actually quite tankable. It’s usually a good idea to simply eat/dodge the laser, charge in towards the middle crystal and deal as much damage as possible.
Fire bad! While the fire rain attack is easy to avoid thanks to shadows revealing the landing spots of all fireballs, they also leave behind pools of fire which will drain your health VERY quickly if you stand in them. To be avoided at all costs.
This also means that after he does his triple laser attack, you can stand close to him and try to score some hits on the middle crystal until he does his fire rain again, as he can't repeat the triple laser until he does so.
Zooming the camera all the way out can be a good way to avoid accidentally falling off the edge of the map. It also allows you to see the all the pools of fire, so you don’t accidentally run (or jump) into them.
Using a Legendary hero skin (earned by beating Crystalline Dimension on any difficulty) can help a lot, because it greatly increases your health, which in turn gives you a wider margin for error.
EDIT: A new Steam guide was recently released by wat, detailing the Old One boss fight and providing a ton on help for anyone trying to beat him. I wish I had that guide back when I wrote this... Anyway, you should check it out if you need further help.
My general strategy for beating the Old One as a Monk is as follows:
As soon as the fight starts, activate hero boost and attack both crystals on the feet. My DPS combined with the Mega Chicken was high enough so that the boss couldn’t even use a single attack. Deactivate hero boost immediately to save mana after destroying both crystals.
The second phase is the only dangerous phase. Stand way back and dodge any attacks the boss throws at you. Whenever he does his single/double fist slam, charge in and attack the crystal in his palm. My combined DPS was barely sufficient to kill a crystal before the boss retracts his arm. You can easily take your time and kill each crystal over the course of multiple slams, though. The middle crystal is best attacked with the aid of hero boost while the boss does his blue laser beam.
As the boss raises you to his head level for the third phase, activate hero boost and hit the single crystal on his head as fast as you can. The combined DPS from the Monk and Chicken should be enough to prevent the boss from attacking you even once. Maintain hero boost as the boss drops you back to feet level, so you could kill the two crystals on the feet quickly once again.The combination of hero boost and the self-heal ability allowed me to remain fairly healthy throughout the fight. Really, as long as you avoid the pools of fire and dodge the insta-kill attacks, you’ll be fine. Some tips for the actual Crystalline Dimension itself:
Ignore the evil hero clone. He doesn’t count towards the total number of kills for each wave and respawns indefinitely.
Use Wheel O’ Fortuna when playing as a Jester to kill the final few enemies on the map if any of them get stuck or you just want to speed up the progress.
Don’t place minion walls too close to crystals or captive heroes, especially on the boss gauntlet stage. Ogre splash damage can really ruin your day.
After you shoot down the dragon in the boss gauntlet, wait until he’s done belching fireballs at you. Otherwise, he’ll likely fly away again as soon as you attack him.
Here endeth the lesson.
That’s not to say that I managed to beat the map on my first attempt after playing the practice map several times over. Oh no, it took five more attempts.
First attempt: I died as the boss hit me with the one-hand overhead smash as I jumped to avoid fire on the ground.
Second attempt: LITERALLY. THE. SAME. EXACT. DEATH. I jumped to avoid fire, boss slammed his hand down, instadeath.
Third attempt: Some archers managed to snipe a crystal on wave 5. How the hell does this keep happening?
Fourth attempt: The game crashed again on wave 1. Yay!
Fifth attempt: Victory. We have victory.
That’s it. I can now admire my Super Legendary Monk costume, as well as the head of the Old One hanging above the fireplace in the tavern. Nice and cozy...
Conclusion
Well, it's been quite a ride.
I hope this walkthrough gave you an idea what to expect from the game in terms of progression and the challenge it presents. Hopefully, the builds I described in this guide can help you in some way when creating your own. Or you can simply copy them, whatever works for you.
At the time of writing, Dungeon Defenders is my most played game on Steam by far. As someone who loves both tower defense and action RPG games, Dungeon Defenders was a match made in heaven for me. I'll likely keep playing it for a good while, at least until Dungeon Defenders 2 comes out...
There are three other guides I wrote about this game that you might want to check out:
Weapon Guide
FAQ Guide
Lab Assault Guide
I'd also like to thank a few people who helped me out on the Steam forums when I was just starting out and still learning the game:
DiGy
asas2007
pew pew pew
[NoVa]czThePROcz
BoogieMan
Palmer11
Jorkfriend
KamuroOnce again, your help was much appreciated.
Best of luck to everyone playing this great game!
Keep defending those dungeons!

LLK酱
2026-04-01 07:00:32 · 发布在 「Dungeon Defenders」
以前这里有游戏的翻译。如果有人想尝试自己制作翻译(我已经厌倦了在每个新版本和DLC中重新修改所有内容),我就只留下制作方法指南。本指南本质上包含《地牢守护者》10.2.18版本的非完整本地化内容。既有简单的纯翻译(文件替换),也有制作自己翻译的完整说明(以防游戏推出更新版本而翻译文件未被发布)。即当前情况)。注意!此翻译尚未完成,且可能永远不会完成!主要通过神经网络完成。
游戏翻译(已过时)
10.2.18版本游戏翻译安装指南
注意!为确保游戏能够运行,在安装翻译前,游戏必须至少启动过一次。
注意2!重要提示:
TFCInstaller会创建多个文件,但我们只需要修改后的UDKGame.upk文件。
操作完成后,从CookedPCConsole文件夹中复制生成的UDKGame.upk。
通过TFCInstaller删除其做出的修改。
将TFCInstaller生成的UDKGame.upk复制到游戏内的CookedPCConsole文件夹并替换原有文件。
现在翻译和字体已准备就绪。字体创建
如果您想创建自己的字体:
对于PF_DXT5字体:
在import文件夹(work目录)中有PF_DXT5文件夹。
那里存储的字体可以在图像编辑器(例如Paint. NET)中进行编辑。
对于B8G8R8A8字体:
使用DDDK(可在Steam中获取)。
生成新字体并将其添加到系统中。
您当然也可以尝试用于PF_DXT5的方法,但其中存在相当麻烦的潜在问题。我制作的字体(并非游戏所需的现成纹理,而是字体本身)位于Font文件夹中。
注意:
制作字体需要耗费大量精力。如果您不想花费数周时间进行设置,请使用我已制作好的字体。我已经提醒过您了!
5. 结论
字体翻译已基本完成,仅剩下少数几个问题(即4个UDK3默认系统字体)。这些不足之处对游戏理解并无影响。祝你翻译顺利!
问题与故障。
游戏无法在线运行:
如果无法创建在线游戏,该问题很可能与翻译无关。最简单的检查方法是按照说明删除翻译,然后尝试在没有翻译的情况下启动在线游戏。如果服务器无法创建(确切地说是无法创建,而非导致游戏崩溃),原因可能在于虚拟网络。我和朋友们测试过:在删除RadminVPN(一款用于创建虚拟局域网的程序)之前,游戏根本无法创建服务器。不过,此时可以连接其他玩家的服务器(也就是说,像Hamachi这类程序也可能会造成干扰等)。
如果游戏在使用翻译时崩溃,从技术层面来说,翻译需要按照文件生成指南进行操作。如果你自行生成翻译文件(详情请参考)创建或更新您游戏版本的.udk翻译文件,问题应该会消失——在这种情况下,将使用您游戏的文件。
可能崩溃与已购买或缺失的DLC有关。这个解决方法不太方便,但目前这是唯一已知的方法。
如果游戏在没有翻译的情况下崩溃,这种情况因人而异。最好寻求帮助。(内容包含外部链接及引导信息,已按规则处理)不要尝试将此翻译应用于与本指南标题中版本不符的其他游戏版本!
安装俄语翻译需下载相关文件。
只需将文件解压到游戏文件夹,并同意替换所有提示替换的文件。
翻译特点:翻译仅修改游戏的本地化文件,特别是UDKGame.upk。修改这些文件不会导致封禁。我个人成功进行了排位赛,目前没有遇到任何限制,包括影子封禁。
重要须知:翻译会替换游戏的英文本地化文件。若要恢复原始版本,需通过Steam或其他方式还原原始文件。
并非所有内容都已翻译。由于本地化文件结构复杂,游戏中的部分内容仍为英文。本次翻译的主要目的是尽量减少对游戏的改动,以确保玩家能够正常参与排位赛并获取Steam成就。限制:不支持俄语字符。若不使用额外的修改,在游戏中无法用俄语输入名称或文本。删除方法:若要删除翻译,需删除INT文件夹(路径为UDKGame Localization INT)。这样做的原因是:若游戏在万圣节、新年等节点更新后,而我未能及时发布对应版本的翻译,游戏内的文字可能会变成乱码,而非俄语或英语。删除该文件夹后,游戏至少会恢复为英语显示。我的游戏中语言显示为乱码:请参见上方“删除”部分。
创建或更新翻译
《地牢守护者》俄语支持:详情及说明
1. 俄语字符:技术限制
《地牢守护者》不支持俄语字符,这不仅仅是显示限制。游戏无法识别俄语字母的编码,也无法对其进行处理。为了绕过这一限制,俄语字母会被替换为不常用的拉丁字符(例如带有上划线的“O”)。在游戏中,通过更改字体,这些字符会显示为俄语文本。如果不将文本转换为这种“乱码”,它将无法在游戏中显示。2. 修改翻译若要对翻译进行修改,您需要专用脚本。下载工具:下载工具。快速文件夹
此文件夹包含一个脚本,该脚本可将俄语文本转换为“乱码”——一组能在游戏中正确显示的拉丁字符。
使用方法:
1. 将.int文件中的文本翻译成俄语。
2. 从快速文件夹中运行脚本,它会将俄语文本转换为“乱码”。
3. 将转换后的文件替换到游戏的Localization文件夹中。
UPK Explorer和work文件夹
包含用于处理纹理的工具:
运行UPK Explorer.exe。将work文件夹指定为工作目录。
通过“打开游戏文件夹”选项指定游戏所在文件夹。
在“创建材质包”选项卡中点击按钮,等待完成。
结果:您将创建一个材质包,使游戏能够将“乱码”正确显示为俄语文本。
3. 安装修改后的文件
运行TFCInstaller。
指定路径work Dungeon Defenders MyMod。
点击“升级Dungeon Defenders”按钮。
下载233乐园APP
专心推荐好游戏
纠纷处理及不良内容举报电话:
4006600910 (工作时间: 9:00-12:30,14:00-18:00)
北京市朝阳区启阳路4号院2号楼15层1803室
本公司产品适合10周岁以上玩家使用 未成年人家长监护