


《原神》开启帧生成功能 • 卡顿修复 • 优化设置 • NVCP • RTSS • 无损缩放
引用自:Estranged - UID: 702001639 Distante - UID: 776024645 本指南适用于任何游戏和任何电脑 已更新至3.2.1版本《Lossless Scaling》
(内容涉及引导收藏,已按规则处理)

「哦……」 抒情部分——可自行跳过 本指南包含官方手册中未提及但可能在关于Lossless Scaling、RTSS、NVCP、《原神》等的论坛讨论中偶尔出现的实用信息。 本指南仅为我个人使用而编写,作为个人笔记,旨在实现最流畅的帧生成和帧时间、开启帧生成时的最低输入延迟,并消除游戏引擎卡顿。如果你未获得预期结果并因此感到不满,请随意点击“不喜欢”按钮,关闭本指南,再也不要回来。感谢理解。

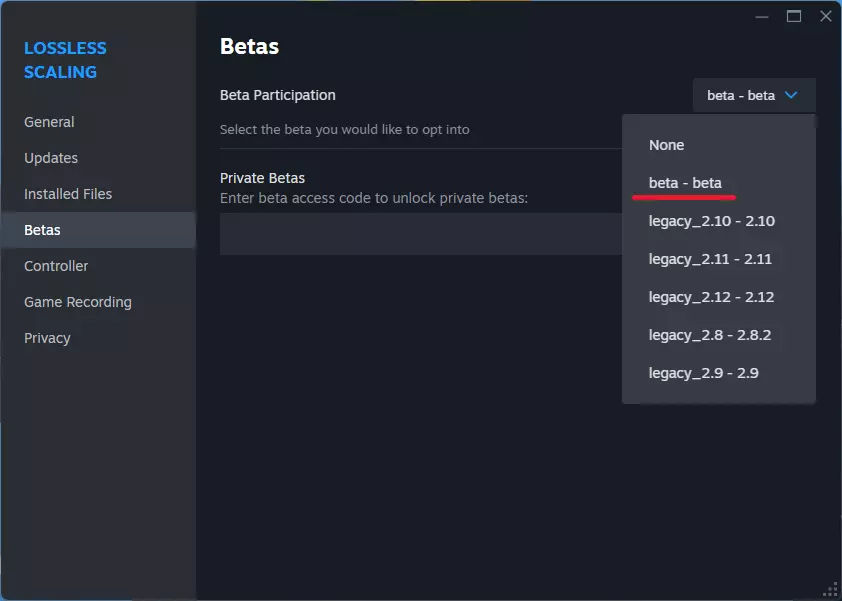
下载RTSS和FPS解锁工具 下载最新版本的RivaTuner(用于锁定FPS和获得更平滑的帧生成时间) https://www.guru3d.com/download/rtss-rivatuner-statistics-server-download/ 下载最新版本的FPS解锁工具“unlockfps_nc_signed.exe”(即使你以原生60 FPS运行游戏,它也能提供更平滑的帧生成时间) https://github.com/34736384/genshin-fps-unlock/releases 在Lossless Scaling中选择最新的测试版本
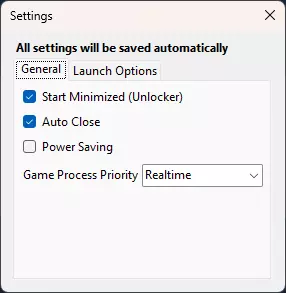
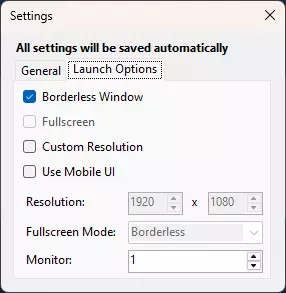
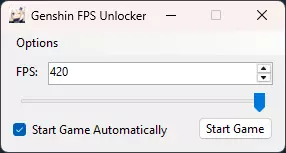
这将清除所有设置并完全卸载Lossless Scaling。 删除以下文件夹中的所有文件: (将<YourUsername>替换为你的Windows用户名) C: Users <YourUsername> AppData Local Lossless Scaling C: Users <YourUsername> AppData Local CrashDumps(删除所有名称为“Lossless Scaling”的.dmp文件) C: Program Files (x86) Steam steamapps common Lossless Scaling 打开你的Steam库 > 右键点击Lossless Scaling > 管理 > 卸载 FPS解锁器设置 将下载的“unlockfps_nc_signed.exe”文件移动到除包含“GenshinImpact.exe”的文件夹之外的任何文件夹。 右键点击“unlockfps_nc_signed.exe”,选择属性,进入兼容性选项卡,并勾选“以管理员身份运行此程序”。 运行“unlockfps_nc_signed.exe”。“exe”程序中,将FPS值设置为最高420,并勾选“自动启动”选项。然后进入设置部分,选择“启动选项”,并勾选“无边框窗口”旁边的复选框。
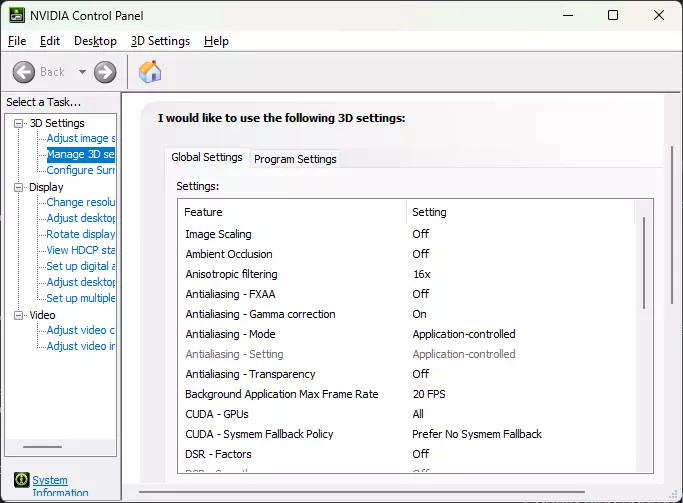
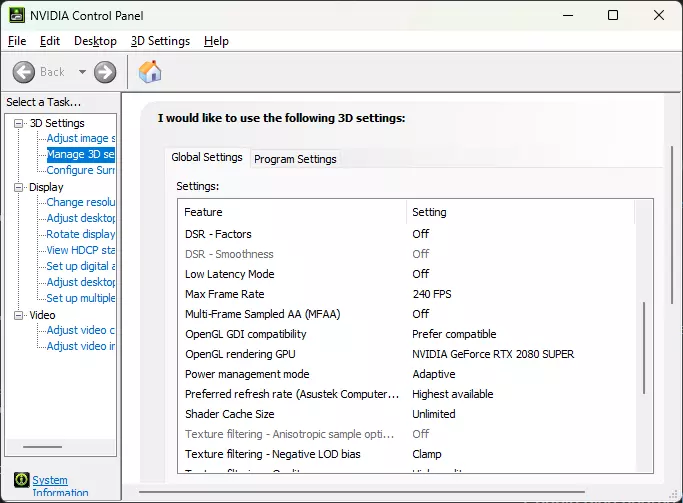
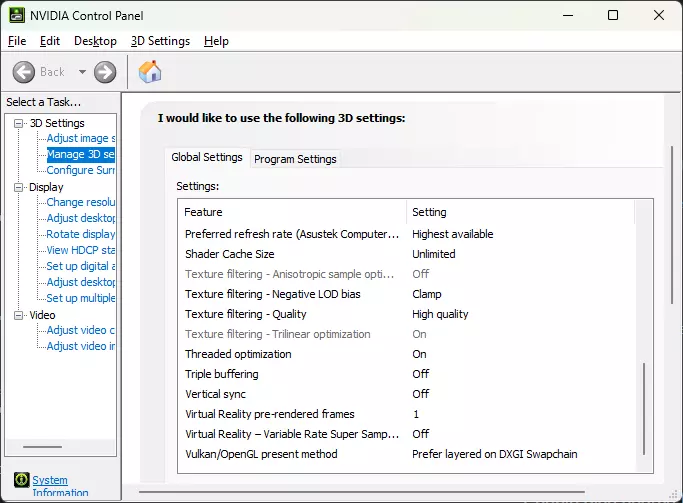
NVIDIA 控制面板设置 导航至“管理 3D 设置 > 全局设置”选项卡,并调整以下选项:
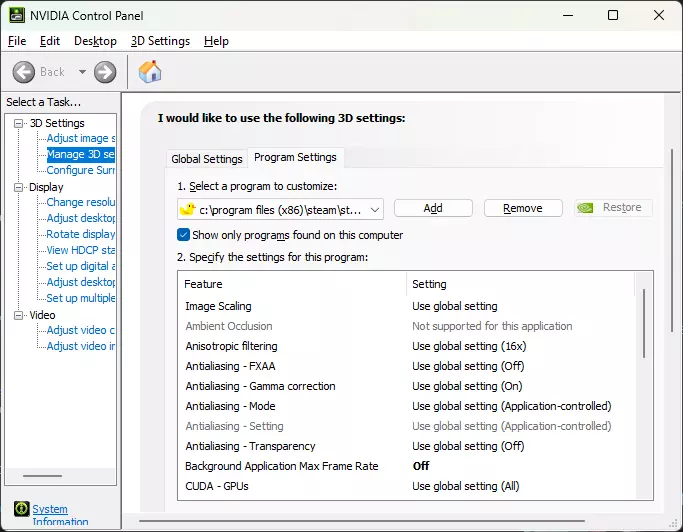
从主文件夹选项卡导航至“管理3D设置 > 程序设置 > 添加LosslessScaling.exe”(路径:C: Program Files (x86) Steam steamapps common Lossless Scaling LosslessScaling.exe),并调整以下选项:
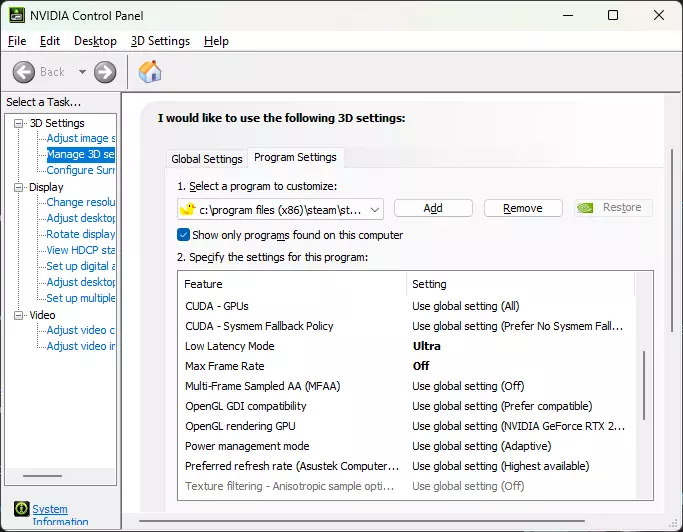
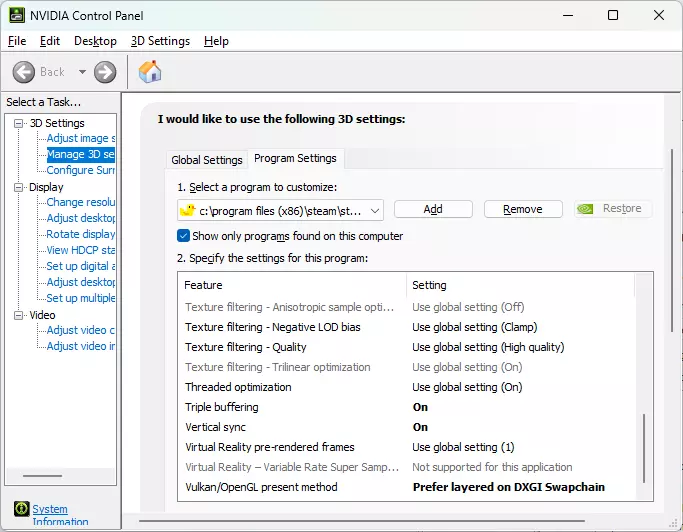
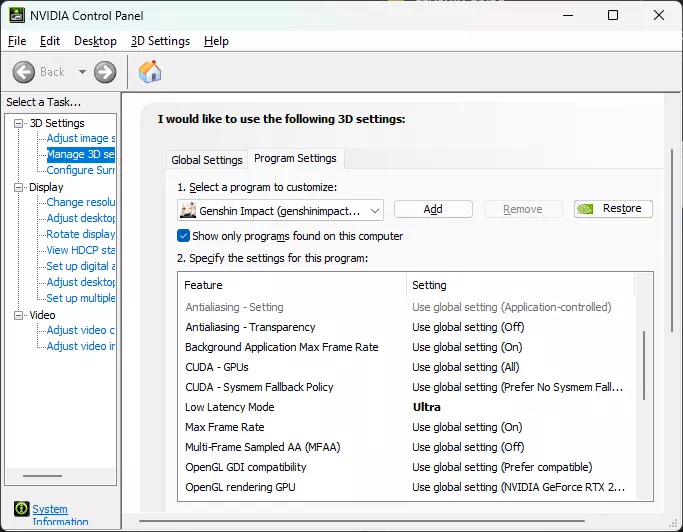
从主文件夹选项卡导航至“管理3D设置 > 程序设置 > 添加GenshinImpact.exe”(路径:C: Games HoYoPlay games Genshin Impact game GenshinImpact.exe),并调整以下选项:
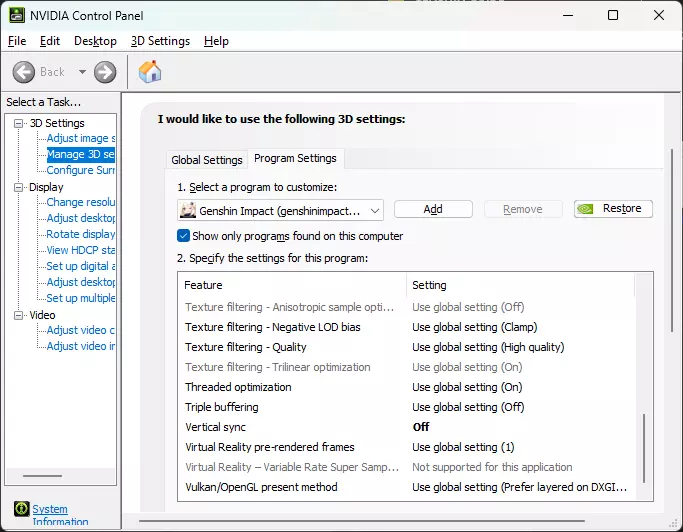

我建议在游戏内禁用垂直同步(V-Sync)以减少输入延迟,并通过NVIDIA控制面板启用垂直同步,配合Lossless Scaling来消除屏幕撕裂。根据我的经验,Lossless Scaling中的“同步模式 - 垂直同步”选项会导致更高的输入延迟,且处理撕裂的效果不如NVIDIA控制面板的垂直同步。 RivaTuner设置 1. 将列表中“全局应用程序检测级别”设为“无” 2. 点击绿色“添加”按钮,将GenshinImpact.exe添加到列表中(路径:C: Games HoYoPlay games Genshin Impact game GenshinImpact.exe)
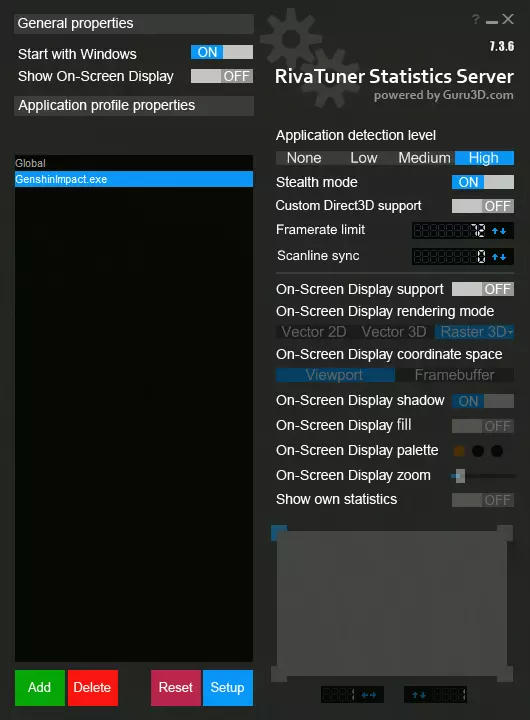
1. 点击列表中的GenshinImpact.exe 2. 将应用程序检测级别设置为“高” 3. 启用隐身模式:开启 4. 将帧率限制数值设置为显示器刷新率的一半、三分之一或四分之一(例如,我的显示器是144Hz,所以我将其设置为72、48或36。之后你可以调整这个数值,现在先输入你的系统运行《原神》时能够达到的FPS数值) (如需选择合适的RTSS帧率限制,请参考“Lossless Scaling设置”和“寻找最佳FPS上限”部分) (如果你使用的是165Hz等非偶数刷新率的显示器。减去1得到164,然后除以2,在RTSS帧率限制中设置为82 FPS锁定。 (为获得更稳定的帧时间、帧生成节奏、更低的输入延迟和更少的画面瑕疵,请避免超过显示器刷新率) 为RTSS帧率限制和无损缩放倍率设置添加书签,以下为各显示器对应的设置: 60Hz - 30x2 或 20x3 75Hz - 37x2 或 25x3 90Hz - 45x2 或 30x3 120Hz - 60x2 或 40x3 或 30x4 144Hz - 72x2 或 48x3 或 36x4 165Hz - 82x2 或 55x3 或 41x4 33x5 240Hz - 120x2 或 80x3 或 60x4 或 48x5 或 40x6 或 34x7 或 30x8 360Hz - 180x2 或 120x3 或 90x4 或 72x5 或 60x6 或 51x7 或 45x8 或 40x9 或 36x10 或 32x11 或 30x12 1. 点击蓝色的“设置”按钮 2. 选择以下两个选项: 3. **启用帧率限制器:异步** 4. **注入Nvidia Reflex睡眠调用:帧呈现后**
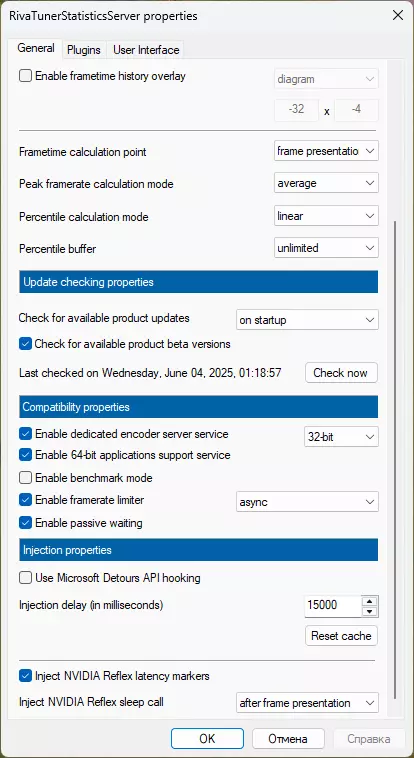
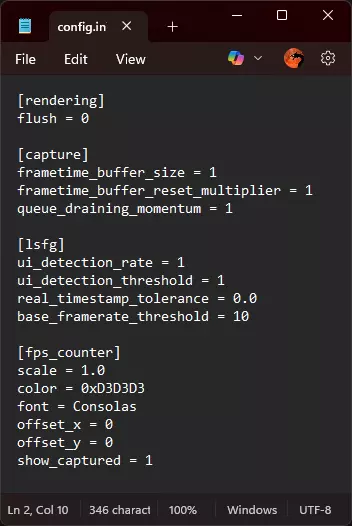
我建议避免使用“帧率限制器:NVIDIA Reflex”设置,因为它几乎会破坏任何游戏的帧生成节奏,尤其是在帧时间不稳定的情况下,且不会带来任何输入延迟的改善。 请记住,RTSS完全不会影响LosslessScaling.exe,但NVIDIA控制面板(NVCP)的设置会产生影响,例如帧率限制和垂直同步(V-Sync)。 ### Lossless Scaling 设置 1. 打开Lossless Scaling的主文件夹 (路径:C: Program Files (x86) Steam steamapps common Lossless Scaling config.ini) 2. 找到config.ini文件,打开进行编辑,将默认值更改为以下内容,然后保存文件: [rendering] flush = 0 [capture] frametime_buffer_size = 1 frametime_buffer_reset_multiplier = 1 queue_draining_momentum = 1 [lsfg] ui_detection_rate = 1 ui_detection_threshold = 1 real_timestamp_tolerance = 00 base_framerate_threshold = 10 [fps_counter] scale = 1.0 color = 0xD3D3D3 font = Consolas offset_x = 0 offset_y = 0 show_captured = 1
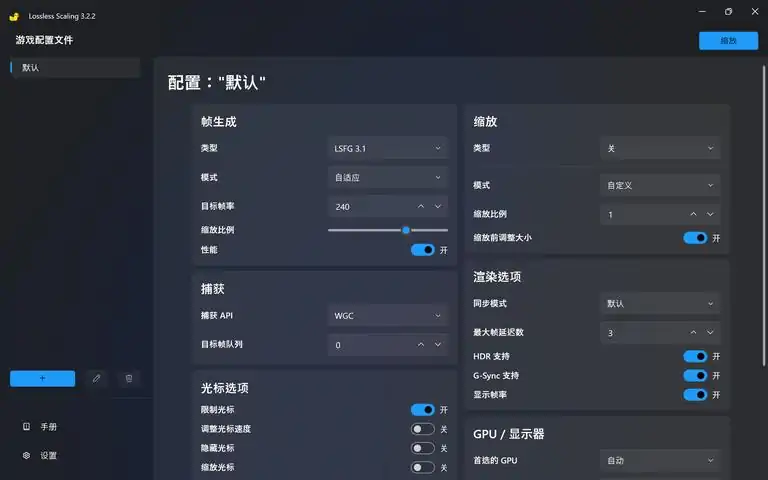
无损缩放配置文件设置 **帧生成模式**:固定 **帧生成倍率**:2 或 3 或 4 或最高 20(请根据显示器刷新率和游戏性能选择合适的倍率。如需选择合适倍率,请参考 RivaTuner 设置以及“寻找最佳 FPS 上限”部分) **流动缩放**:100 或 75 或 50 - 全高清(1080p)及以下显示器 - 100 - 2K(1440p)及以下显示器 - 75 - 4K(2160p)及以下显示器 - 50 **性能模式**:关闭(启用性能模式可提升 5%-10% 的 FPS,但会引入更多 artifacts,尤其是在第三人称角色进行快速镜头转动时。建议尽可能保持关闭) **G-Sync 支持**:开启(如果您的显示器支持)(可能需要在游戏内禁用G-Sync以避免屏幕发光bug) (帧生成技术也会占用部分电脑资源,可能会使原生帧率降低高达30%。在RTSS中选择所需帧率限制和帧生成倍率时,请记住这一点) 按照截图所示应用其余设置:
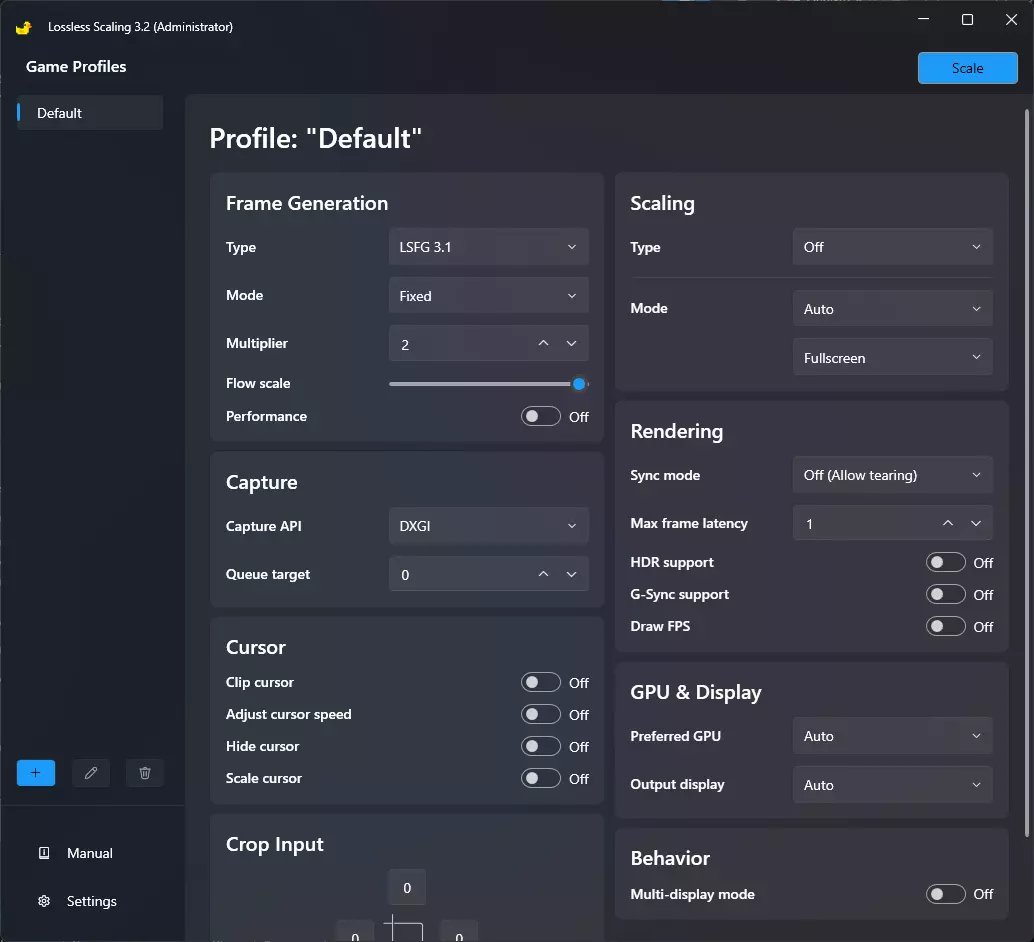
我建议在《Lossless Scaling》中避免使用可能破坏帧生成节奏的设置: - **捕获 API WGC**、**帧生成模式自适应**。 - 将“队列目标”设置为0以上没有意义——GPU负载不会改变,但输入延迟会增加。设置为2时,你可能会获得+2 FPS(笑)。 - “最大帧延迟”无论设置为何值,都完全不会影响帧生成节奏的稳定性或FPS,只会增加更多延迟——这在预期之中。 - 至于缩放类型,唯一值得注意的选项是LS1和BCAS。其他所有选项要么性能表现不佳,要么仅适用于特定游戏类型。LS1看起来效果不错,在使用帧生成时会消耗约10%以上的总FPS。BCAS看起来过于锐利——如果你离屏幕5米远,可能效果不错——并且消耗约5%的总FPS。总的来说,LS1和BCAS都应仅用于锐化,而非实际的放大(“LOSSLESS SCALING”这名字有点讽刺)。任何现代的FSR/DLSS(2.0或更高版本)在放大方面都能提供更好的效果。 不过,你仍应相信自己的感受和性能监控工具,来评估系统与游戏的互动情况。我建议尝试不同的游戏内设置和Lossless Scaling设置,以找到适合你特定配置的最佳数值。 自3.2.1版本起,LSFG性能开启选项不再像以前那样破坏帧生成节奏。现在启用它可带来5%-10%的帧率提升,但代价是会产生更多的画面瑕疵,尤其是在快速转动镜头时角色周围的区域。能稳定提升帧率的Lossless Scaling设置如下:降低Flow Scale、开启Performance ON、将Capture Queue Target设为2。 《原神》设置: - 显示模式:无边框 - 垂直同步:关闭 - 环境细节:中等(低或最低可显著减少游戏引擎卡顿) - 抗锯齿:FSR 2 - 动态模糊:极高(可减少生成帧的部分 artifacts) - 各向异性过滤:16x (其余设置可根据视频中的信息及下方简要总结进行选择) 启用帧生成: 通过unlockfps_nc_signed.exe启动游戏,然后按下键盘快捷键:CTRL + ALT + S
游戏设置对比
(低和最低环境细节设置几乎可以完全消除游戏中的帧率卡顿。中等设置在绘制距离和性能之间提供了平衡) @86Fallowcp 游戏卡顿 1年前 显然目前环境细节存在一个bug。当你过快移动镜头时,无论身处何处,高和极高设置都会导致严重卡顿。我认为这是游戏尝试加载资源时出现的流传输问题,而该问题在中等设置下不存在。我之所以这么说,是因为我平时能稳定保持60帧,但只要移动镜头就会出现卡顿 @G.E.P.Broken571 画质结论 1年前(已编辑) 我花了些时间对比不同画质,想弄清楚PS4(至少是PS4 Pro)的画质设置大概是怎样的——如果有像我一样好奇的人,以下是我的结论: **分辨率**:推测为原生2160P(若输出非2160P或未启用超级采样,则为1080P),抗锯齿采用TAA或FSR(没错,就是FSR),帧率30FPS。 为什么是FSR和推测的原生4K?因为当我将分辨率设为1080P时,主机完全没有噪音,游戏画面也明显不够锐利(即便用了“渲染1080P但输出2160P”的技巧);而切换到2160P后,主机噪音明显增大。此外,ElAnalistaDeBits的视频也印证了这一点。我觉得游戏可能是用FSR当作抗锯齿来使用,因为当米哈游决定移除FXAA和TAA后,我注意到了当时大家都在讨论的那些画面瑕疵,比如派蒙在迪奥娜护盾生效时出现的小变形,但我不确定现在是否又重新启用了TAA。 ** bloom(泛光):开启**(从普通视角就能明显看出,而且至少可能是设为中等)。 ** 阴影:意外地设为高**(我原以为会是中等,但在中等设置下,你看不到刻晴头发间的空隙以及她衣服飘动部分的孔洞)。 ** 环境细节:**我凭着我那不存在的地理猜测能力,花了大概30分钟寻找合适的场景后终于找到了。这个设置可能是中等或高,在那个场景下这两个设置看起来几乎一样。反射:开启(类似泛光效果,正常视角下可见。画质等级需至少为中等)。 体积雾:开启(同样在正常视角下可见。若有画质等级选项,大概率为中等)。 全局光照:至少为中等(已呈现光线着色效果,但各等级间差异不明显,无法确定具体等级)。 各向异性过滤:等级应为4x或8x(不排除使用16x的可能,因低等级设置下通常可见的明显线条在此未观察到,故无法确定)。动态模糊:这是唯一(如果不算垂直同步和亮度调节的话)可从“关闭”到“极高”进行设置的图像选项,所以具体效果取决于你的选择。 人群密度:若非设为“高”,则为“中”(另外必须说明,第二个示例中可能存在错误)。 视觉效果:我未发现“低”“中”“高”三档之间有任何差异。记得在电脑上试玩时,某图像选项会影响HUD的视觉效果,我猜也会影响3D场景中的部分特效,或许就是这一项。这种情况下,最可能的设置是“中”或“高”(此处略去我花了两小时寻找第一个场景的悲惨经历T_T)。 如果存在拼写或语法错误,那是因为这并非我的母语……非常抱歉。补充一点,我很确定PS5版本的所有设置都调到了最高,而且(显然)帧率上限为60FPS(我不知道是否支持120fps),如果PS4 Pro不能以原生4K运行游戏,那么PS5版本是可以的。 寻找最佳帧率上限 抒情部分——可自行跳过
This method helps you optimize Lossless Scaling Frame Generation Multiplier so you get most possible sharpest image with fewest artifacts and minimal input lag Why This Matters We use RTSS in Genshin Impact to eliminate virtually all stutters and to deliver perfectly smooth frametimes, it must stay active at all times. Enabling LSFG can reduce performance by up to 30%. Since Fixed Mode outperforms Adaptive Mode, it’s crucial to find your Sweet‑Spot FPS Why Fixed Mode? LSFG offers two modes - Adaptive and Fixed Adaptive Mode automatically adjusts frame generation based on your current in game framerate to hit your target FPS (e.g. 144 FPS on a 144 Hz monitor). The downside is a noticeably blurrier image, higher input lag and uneven framepacing than Fixed Mode. Moreover, using RTSS Framerate Limit together with FreeSync / G-Sync helps eliminate almost all stuttering in Genshin Impact, leaving no reason to use Adaptive Mode at all Fixed Mode can generate same number of interpolated frames for your monitor's refresh rate without these drawbacks, you keep a same crisp image, enjoy lowest possible additional input lag and get ultra smooth interpolated frames (If you’re able to run Genshin Impact at over 60 FPS with Lossless Scaling Frame Generation enabled ;'D) Because Fixed Mode outperforms Adaptive Mode in both latency and clarity, you should always use Fixed Mode provided you can sustain enough native FPS. Below 60 native FPS, interpolation quality suffers, so it’s crucial to find your own Sweet Spot FPS using LSFG - and that’s exactly what we’re going to do: (If your FPS drops below 60 FPS, image quality will suffer significantly due to way any frame generation system works, but it’s still worth giving it a try) Step by Step Guide 1. RTSS Settings: Frametime Limit: 0 (GenshinImpact.exe, disables FPS cap) 2. Lossless Scaling Settings: Mode: Fixed Multiplier: 2 or 3 or 4 (any value more than 2) Draw FPS: On 3. Genshin Impact FPS Test: Teleport to Natlan Run across the stadium Sprint between tribes Fight mobs using all party members skills Continuously spin camera in every direction 💬(This heavy load reveals your lowest sustained native FPS with LSFG enabled) 4. Determine Your Optimal FPS: Find Your Lowest Average FPS Record your lowest average FPS during gameplay (e.g. 54 - 78 FPS) Subtract 2 from the lower value: 54 - 2 = 52 Enter 52 as your RTSS Framerate Limit for GenshinImpact.exe Calculate Your LSFG Multiplier Use this formula: (LSFG Multiplier) ≈ (Your Monitor Hz) ÷ (Lowest Average FPS – 2) My Example: 144 Hz ÷ 52 FPS ≈ 2,769… Enter 2,769 as your LSFG Multiplier (Round to three decimal places 2,769) Verify Your Settings Ensure that: (RTSS Framerate Limit) × (LSFG Multiplier) ≤ (Your Monitor Hz) My Example check: 52 FPS × 2,769 ≈ 143.988 FPS ≤ 144 Hz (Since 143.988 FPS doesn’t exceed our 144 Hz monitor’s refresh rate, there’s no additional input lag or artifacts) My Final Example Settings: RTSS Settings (GenshinImpact.exe): Framerate Limit: 52 Lossless Scaling Settings: Mode: Fixed Multiplier: 2,769 💬(You don’t have to strictly follow this recommendations. What matters most is understanding how the program works in relation to your hardware and game) 🌕G-Sync Stutter Fix *I don't have a G-Sync monitor, so I can't test it or create a guide for it. Nvidia Text Guide To Set Up G-SYNC: https://www.nvidia.com/content/Control-Panel-Help/vLatest/en-us/mergedProjects/nvdsp/To_use_variable_refresh_rates.htm 60 Sec Video Guide: Alternative for users with FreeSync monitors 60 Sec Video Guide: To enable AMD FreeSync on your monitor, follow these steps: Check Compatibility: Ensure that both your monitor and graphics card support AMD FreeSync. You can usually find this information in the product specifications or on the manufacturer's website (ChatGPT) Connect via Compatible Cable: Use a DisplayPort or HDMI cable that supports FreeSync. DisplayPort is generally preferred for higher performance Enable FreeSync on Your Monitor: Access your monitor's on-screen display (OSD) menu by pressing the monitor's settings button. Navigate to the display settings or a similar section. Look for the FreeSync option and enable it (AMD GPUs only) Install the Latest AMD Drivers : Make sure you have the latest AMD Radeon Software installed. You can download it from the AMD website. Install the software and restart your computer if necessary (AMD GPUs only) Enable FreeSync in AMD Radeon Software: Open the AMD Radeon Software by right-clicking on your desktop and selecting "AMD Radeon Software." Go to the "Display" tab. Look for the FreeSync option and toggle it to "On" By following these steps, you should have AMD FreeSync enabled, providing a smoother and tear-free gaming experience. If you encounter any issues, consult your monitor's manual 💫Undervolt • UnPark • Low-Lag VSYNC AVOID USING QUICKCPU IF YOU'RE ON A LAPTOP OR A PC WITH A POOR COOLING SYSTEM QuickCPU is a tool used to monitor and optimize your CPU's performance, power settings, and temperature CPU Undervolting reduces its power consumption and heat output, helping to lower temperatures and improve energy efficiency without sacrificing performance GPU Undervolting is the practice of reducing the voltage supplied to your graphics card’s GPU while maintaining its clock speeds. It’s used to lower power consumption, reduce operating temperatures, and minimize fan noise without sacrificing performance Low-Lag VSYNC ON is a method of using vertical synchronization VSYNC with significantly reduced input lag, achieved by precisely capping the frame rate slightly below the monitor’s refresh rate typically using highly accurate tools like RTSS. This allows for smoother gameplay without tearing, while minimizing the input delay normally caused by VSYNC 💬(For example Low-Lag VSYNC ON, I measured a refresh rate of 144.0019 Hz. I subtract 0.01, giving 143.9919, which I then divide by Lossless Scaling Multiplier. In my case X2, that yields 71.99595, which I enter as Framerate Limit RTSS for Genshin Impact) Nvidia Control Panel MythBuster 21 Real Ways To Reduce Input Lag To Nearly Zero in 2025 Lossless Scaling Dual GPU Guide Steam Deck and Linux Compatibility Thread on Reddit https://www.reddit.com/r/SteamDeck/comments/1m29mt4/limiting_lossless_scaling_lsfgvk_decky_losslessLinux Compatibility https://github.com/PancakeTAS/lsfg-vkSteamOS and Bazzite Compatibility https://github.com/xXJSONDeruloXx/decky-lossless-scaling-vk Why this combination is great for gamers? Consistent Frame Delivery: Low-Lag VSync locks you to a tear free experience with minimal input lag. Thermal Headroom: Undervolting both GPU and CPU drops system temperatures by 5 - 15 C each, so components run cooler and sustain peak performance longer Stable Performance: Cooler, undervolted silicon stays in higher boost states more reliably, reducing frametime spikes and stutters Responsiveness Tuned: QuickCPU keeps your processor in the optimal performance window the instant you need it no more waiting on cores to wake up or ramp up clocks Together, they ensure you get smooth, cool, and ultra responsive gameplay without sacrificing raw FPS

ABOBA
2026-02-13 19:00:17 发布在  Lossless Scaling


说点好听的...
收藏
0
0