换一换
换一换 


这是一份详尽的100%成就指南,包含从0到100%的逐步流程。如果您正在寻找特定的成就或收集品,可以使用Ctrl+F并在搜索栏中输入相关内容以获取更直接的帮助。 我会为我的所有指南提供支持和调试帮助。如果您有任何问题、遇到困难或发现指南中的错误,请随时留言,我会尽快回复您。祝您游戏愉快! 简介:

成就分类:(33个) 剧情相关:(14个) 次要目标:(9个) 收集品:(1个) 击杀:(9个) 第1章和第2章的成就分类可在其对应的章节中查看。 重要声明! 【半衰期2】现已与【半衰期2:第一章】和【半衰期2:第二章】合并。如果您拥有单独的章节版本,它们将不再显示在您的库中,但仍可在库的工具选项卡中找到;切换游戏下拉栏,您可以访问工具选项卡,在那里可以找到半衰期2章节。您在这些游戏中的成就进度也将保持不变,并且仍可单独获取。请注意,如果你已经100%完成了两个章节且仍保留云存档,只需启动《半条命2》并在主菜单闲置几秒钟,即可自动解锁所有成就。 我们可以在单次通关《半条命2》的过程中获得所有成就。游戏中有容易错过的收藏品【λ缓存】,我们需要寻找它们,同时还有一些特定章节的成就。我建议经常存档,因为这些游戏线性度很高,很容易不小心推进得太远而无法回溯。幸运的是,如果你确实错过了某些内容,可以使用章节选择功能重新游玩。 以下是所有成就/隐藏成就的整理列表。这是我如何得出成就分解的方法,也是我开始100%完成游戏旅程前创建的第一个参考资料。 本指南包含重大剧透* 序列1:闻闻灰烬 1. 半条命2:点插入、红色字母日、运河路线 2. λ缓存:6/45 3. 成就:6/69 我们可以在半条命2的基础战役中获得首批33/69个成就。该游戏没有与难度相关的成就,因此你可以随意选择自己喜欢的难度进行游玩。 第一章 - 进入点:游戏开始时,走下火车,开始穿过17号城市的处理区;目前一切都是线性流程,只需按部就班游玩即可。

成就#1 - Defiant:用罐子砸中垃圾桶旁的警察。 当我们跳出窗户逃离审讯后,走上几段楼梯重新进入处理大楼。当我们靠近一扇大门时,一名联合军士兵会走向一个垃圾桶,并把上面的罐子碰掉到地上。在此处保存游戏! 要达成此成就,捡起罐子并扔向联合军士兵。

成就#2 - Submissive:将罐子扔进垃圾桶。 重新加载存档,这次把罐子扔进垃圾桶以获取这个替代成就。如果你选择攻击联合军士兵,之后再把罐子放进垃圾桶,将无法解锁该成就。

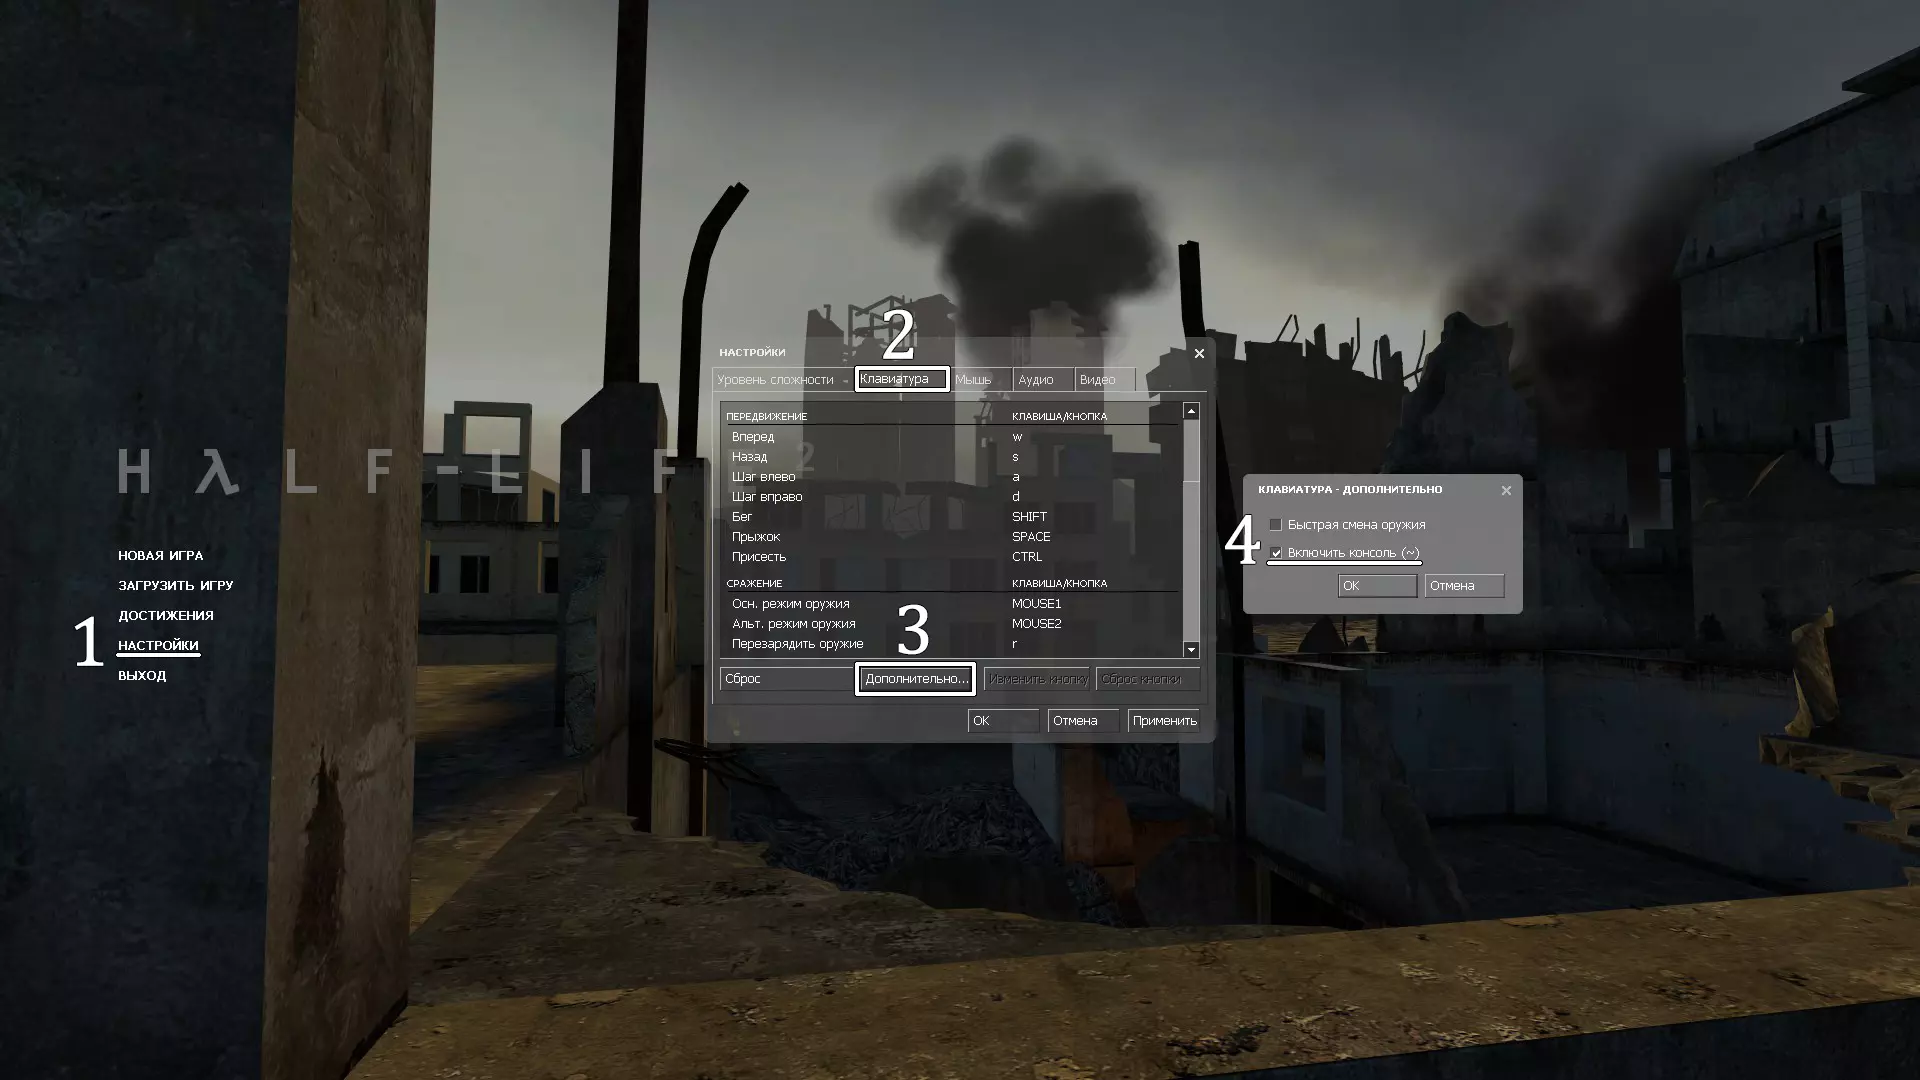
成就#3 - Malcontent:逃离公寓楼突袭。 剧情相关。现在我们只需完成本章即可;本章没有其他可获取的成就。进入一栋公寓楼,利用屋顶逃离正在执行突袭的联合军士兵…… 第2章 - 重要的一天: λ缓存#1:在被爱丽克斯救起后,第2章将开始,我们跟随她前往藏身处。要进入藏身处,爱丽克斯会打开一扇通往自动售货机的秘密门,售货机上画有橙色的λ符号;这些符号标记着λ缓存。 要获得“λ收集者”成就,我们需要找到游戏中所有45个λ缓存;它们通常是包含生命值和弹药的秘密地点。我们的第一个λ缓存是无法错过的。

成就#4 - What Cat?:破坏克莱纳博士实验室里的迷你传送器。 进入克莱纳博士的实验室,与众人交谈,最终会重新获得经典的HEV防护服。之后,所有人都会进入另一个房间;在我们跟上他们之前,必须先做一件事。 在实验室的后部,靠近我们进入时的那扇门附近,可以看到一个奇怪的装置,上面放着一盆仙人掌。按下装置上的按钮,它就会传送到旁边的平台上。要解锁这个成就,需要将仙人掌(或其他任何物体)通过传送器来回传送;第11次传送时,传送器会爆炸,成就随之解锁。

成就#5 - Trusty Hardware:获取撬棍。 剧情相关。跟随队伍进入密室,门会在身后关闭。当我们被传送到17号城市更深处后,需要躲避一些正在拍摄我们的城市扫描仪。逃跑时,会因前方有木板阻挡而无法继续前进。 返回刚才来的路,巴尼会出现并丢下一位“老朋友”…… 第三章 - 运河之路:手持撬棍,我们将跳入一个火车场,并遭到联合军的火力攻击。逃往车场的另一端,穿过前方的建筑即可进入第三章。 λ缓存#2:回到城市,继续躲避联合军。穿过行驶中的火车到达铁轨对面,然后爬上梯子继续前进。进入一座小建筑,看向最左侧的墙壁,会看到上面画着一个λ符号;λ缓存就在符号正下方的地面上,那里的地板已经破损。 λ缓存#3:从建筑后方离开,跳过一道栅栏。接下来需要穿过一个画有λ符号的通风管道;λ缓存就在管道内的必经之路上,不会错过。 λ缓存#4:继续你的逃生之旅,奋力穿过我们跳下去的运河。夺取一架固定机枪击退联合军的进攻,然后沿着右侧的走道顶部前进。下楼梯进入一根大型混凝土管道,一进去就看向左侧墙壁,会看到一个λ符号(Lambda符号)旁边有一辆破损的红色汽车。爬过汽车,就能在车后找到隐藏物(Cache)。

成就#6 - Barnacle Bowling:用1个桶杀死5只藤壶。 继续穿过运河战斗,并用爆炸桶炸毁挡路的木桥。沿着立交桥下的短斜坡向上走回到地下,你会看到前方有两只藤壶。滑向藤壶,你可能需要杀死其中一只或两只。从它们所在的位置环顾四周,你会看到一些爆炸桶以及前方一排14只藤壶。在此处保存游戏! 拿起一个爆炸桶,朝着藤壶群的中心滚过去,让其中一只藤壶抓住它。当桶被举到空中时,在它接近顶部时射击,尝试用爆炸杀死14只藤壶中的至少5只。λ缓存#5:继续穿过运河,最终会被一架猎人直升机追击。穿过一扇蓝色的门躲避它,然后下楼,我们可以看到下方墙上画着λ符号。在另一端格栅的右边有一个梯子,爬下去即可获取λ缓存。 λ缓存#6:继续躲避猎人直升机,之后会遇到一名铁路抵抗组织成员。击败在走廊中伏击我们的猎头蟹,游过有旋转涡轮机的隧道,你会到达一根需要穿过的、有蒸汽冒出的大型金属管道。要继续前进,你需要打破右侧靠近λ符号处的一些木板。向下跳,但不要掉进附近的水里,而是从管道下方爬回去,在一具尸体旁可以找到一个λ缓存。 序列2:高速追击 1. 半条命2:运河之路、水障碍 2. λ缓存:17/45 3. 成就:8/69 ----------------------------------------------------------------------------------------------------- 第三章 - 运河之路: λ缓存#7:继续穿过排水房间,你会掉进一个满是爆炸桶和猎头蟹的房间。想办法让房间充满水,以便继续前进。最终我们会爬上一个梯子,在梯子顶端的左侧会看到一个λ标志。在梯子顶端存档!小心沿着木板前进,不要掉落,一直走到木板的另一端,就能找到第二个λ符号;λ缓存就在对面。如果提前掉落,你将无法回到缓存那里! λ缓存#8:现在从走道上跳下去,我们会进入一个充满有毒废料的下水道隧道。一进入隧道,立即从你的左侧走上木板,利用生锈的管道到达对面,那里画着一个λ符号;λ缓存就在一个尸体旁边的壁架上。

Achievement #7 – Anchor’s Aweigh: Get the Air Boat. Story Related. Fight through the rest of the Chapter & link up with another group of Resistance members after evading the Combine’s “Headcrab Ordinance”. Here we will be given the Air Boat & enter into the next Chapter… You will come across the Air Boat at the end of this Chapter. Chapter #4 – Water Hazard:Once onboard the Air Board, drive it along & open up a sluice gate to be able to continue on down the canal & begin Chapter #4. Lambda Cache #9: Shortly after we take that big drop in the canal at the start of the Chapter, we will drive the Air Boat into an area that has a Lambda symbol painted on the wall to our right in the open sunshine. Dismount the Air Boat & we can spot a ladder heading up across from the symbol. Climb up & we will find a Lambda Cache on a broken piece of the metal walkway. Lambda Cache #10: Take the Air Boat out of the canal, & we will finally be outside of City 17 where we can see a red barn with a crane on top of it. Drive over towards it & carefully navigate all the way up to the upper loft where the crane controls are. Dislodge a Barrel that is blocking the release mechanism, & the crane will drop a large container of items that happens to be our Lambda Cache. Lambda Cache #11: Return to the Air Boat & now take it further down the canal away from the city. Complete a short puzzle to make a ramp for the Air Boat to continue, & a Combine Dropship will fly over us while another can be seen deploying reinforcements. Drive over to where the troops are (after killing them) & we can see a line of three drainage pipes stuck into the right wall. One of the three will have its grate removed & a Lambda symbol beside it. Exit the Air Boat & use the nearby Barrel to climb into the open pipe. The Lambda Cache can be found at the back end of the drainage pipe after passing through a flooded section. Lambda Cache #12: Return to the Air Boat & continue onwards evading the Combine assault. Exit the Air Boat to open up another canal sluice blocking our way by invading a Combine outpost. With the sluice open, keep driving forward through the canal & a Combine Rocket Artillery will begin bombarding us. Ignore this one, until you encounter a second further down the canal. Drive straight towards the wall below the APC & get underneath it where we can find a hole in the iron bars blocking our way. Crawl through them & we can find a Lambda Cache in the back left corner. Lambda Cache #13: Escape the Rocket Artillery & continue your Combine evasion through the canal. Drive past a third Rocket Artillery, & you will head into an underpass area of the waterway. Carry on through it until the tunnel opens up, making you take a right; we can see a Lambda symbol painted on a pillar right in front of us as we round the corner. Exit the Air Boat & you can see the Lambda Cache above us inside a small pulley. Across from it, is a pulley on the ground containing cinderblocks. Remove them & it will rise up lowering the Cache down to you. Lambda Cache #14: When we exit the underpass, the sluice doors of Gate 5 will close in front of us & we will need to get them open. Do just that, & use the Mounted Machine Guns in the control tower to drive off the Hunter-Chopper harassing us. Once this is done, return to the Air Boat & continue on & a different Hunter-Chopper will come after us. As we drive down the canal, we will take a right & see a bridge with a stalled train on it. Park underneath this bridge, exit the Air Boat, & quickly rush over to the left past the metal supports to find a Lambda Cache hidden in the darkness. Lambda Cache #15: Evade the Hunter-Chopper through the canal & we will eventually pass through a segmented set of concrete pipes, that will open up into a small square room before returning to piping that we can see daylight through. Before you leave this room, look up to your left from where we entered & you can see a Lambda symbol painted above a wooden platform; crash the Air Boat into it & loot the Lambda Cache that falls. Lambda Cache #16: Keep evading the Hunter-Chopper down the canal, & you will eventually come to a stretch where the canal has very narrow/slanted sides. In the distance ahead of us you can see two red/white smokestacks; off your left will be a chain fence leading to a red building. With speed, drive up the left bank towards the red building till you see a patch of green graffiti. Jump out of the Air Boat, & there will be a path leading to the Lambda Cache; you really need to drive fast to get up here otherwise you’ll stall out & just get shot by the Hunter-Chopper... Lambda Cache #17: Continue on down the canal & when we round the corner to the left, we will see two bridges with Barnacles hanging from their undersides. Before reaching the first bridge, look off to your left to see two open spaces in the canal walls. Enter into the second one, & we can find a Lambda Cache at the far back end of it near a bedroll.

成就#8 - 重型武器:获取气垫船的固定炮。 剧情相关。驾驶气垫船沿运河一路行驶,直至抵达反抗军 checkpoint。与一名特工讨论策略后,返回气垫船时会发现他们已为其安装了固定炮。 序列3:友好重逢 1. 半条命2:水障碍,黑山基地东区,我们不去拉文霍姆 2. λ缓存:20/45 3. 成就:13/69 ---------------------------------------------------------------------------------------------------- 第4章 - 水障碍: λ缓存#18:离开反抗军 checkpoint,吓退猎人直升机,联合军会关闭另一组水闸,我们可以驾驶气垫船绕过它们。沿着运河继续前进,一架联合军运输机将携带火箭 artillery从头顶飞过。 不久之后,我们会遇到两座桥,桥下有藤壶怪。过了桥不远,我们会到达运河的一个岔路口,有左右两条路。选择右边的路,消灭沿途的一些联合军以及远处的一些猎头蟹僵尸。离开气垫船,我们可以爬上附近的梯子,进入一个临时避难所,那里就是我们的λ缓存所在之处。

成就#9 - Revenge!:在《半条命2》中摧毁猎人直升机。 剧情相关。沿着运河继续前进,直到进入一个大型室外水库,此时会响起警报,预示着烦人的猎人直升机即将出现。用你的新炮塔向它射击几次,摧毁它即可解锁该成就。

成就#10 – Vorticough:在第四章【水障碍】中发现隐藏的 Vortigaunt 歌唱洞穴。 摧毁猎人直升机并打开下一个水闸后,你需要驾驶气垫船通过一段破损的木制栈道前往上方区域。但在此之前,先向左驶过栈道,你会看到一面混凝土墙,墙上有两个管道排水口。其中一个排水口的格栅是松动打开的。将气垫船倒退到排水口旁,从发动机风扇上方跳进去;这个跳跃很棘手,你可能会不断从气垫船上滑下来。 进入后立即存档;隧道内充满无法避开的有毒废料,你很可能无法活着返回!沿着隧道尽快向前跑,在尽头左转进入一个秘密洞穴。洞穴深处有一堆营火,旁边站着一个弗地冈人;靠近弗地冈人应该就能解锁成就。 部分玩家可能会遇到成就延迟解锁的情况。如果没有立即解锁,请耐心等待弗地冈人唱完歌,搜刮洞穴深处的箱子,并在附近稍作停留;无论成就何时解锁,离开洞穴前务必检查成就列表,确保已成功解锁。 第五章 - 黑山基地东区:回到气垫船上,打开水道闸门,这样我们就能离开运河,进入黑山基地东区。 λ缓存#19:本章只有一个λ缓存,且无法错过。我们从水电站下来后,需要爬上标有Lambda符号的梯子才能到达伊莱的实验室;这算作我们的Lambda Cache。

成就 #11 – Zero-Point Energy:获取重力枪。 剧情相关。到达伊莱的实验室并与一位老朋友重逢。在实验室稍作停留后,最终会前往室外与爱丽克斯汇合,届时即可获得重力枪并进行使用。

成就#12 - Blast From the Past:在伊莱的废料场找到HEV防护服充电器面板。 获得重力枪后,看向拿枪位置正右侧的墙壁,我们可以爬上箱子到一些旧终端机上。从这里上下跳跃,透过栏杆查看,可以看到一个来自黑山基地的旧HEV充电站的亮黄色金属面板。用重力枪将其拾起,即可解锁该成就。

成就#13 - Two Points:在伊莱的废品场用狗的球投进篮筐。 获得重力枪后,我们会深入废品场并遇到狗。狗会开始向我们投掷板条箱,我们需要用重力枪接住并小心地放在身边。接住三个板条箱后,狗会去取它的球,这个球本质上是一个被解除武装的滚雷。当狗的球出现后,建议保存游戏,因为有时如果等待太久,章节会推进,我们将被迫离开废品场。 要完成这个成就,我们需要用重力枪将狗的球投进篮筐。当然,你完全可以用传统的反复尝试来练习瞄准,但我们也可以通过堆叠箱子爬上去,然后直接把狗的球扔进篮筐来“走捷径”。 狗的球:在下一章中,要解锁【Zombie Chopper】成就,我们需要仅使用重力枪完成该章节。为了击杀敌人,我们必须向他们发射易碎物品,但这些物品很容易丢失或被摧毁。狗的球是不可摧毁的,可以无限次发射而不会损坏。需要注意的是,唯一能摧毁狗的球的东西是火焰和爆炸物…… 当我们投进篮筐,联合军发现我们的位置后,一定要用重力枪带上狗的球!第六章 - 我们不去拉文霍姆...:一旦开始本章,请立即存档;再次提醒,为了达成Zombie Chopper成就,除了重力枪外,我们不能使用任何武器击败敌人,甚至撬棍也不行。在本章推进过程中,请尽量随身携带狗的球、煤渣块、锯片或其他任何重型投射物,以防遭遇敌人袭击。 如果不慎丢失了狗的球(这很容易发生),不必过于紧张;游戏中有大量物体和爆炸桶可用于自保... λ缓存#20:在拉文霍姆继续前进,很快会遇到一名幸存者提供帮助。要继续前进,必须先关闭带电的围栏。扑灭我们看到幸存者下方的火焰,我们就能进入一个房间,房间上方有两台绿色发电机。前往发电机处,爬上第一台发电机,就能看到墙上的通风口。穿过通风口,会回到外面,然后我们会落到一个λ缓存上。 序列4:轻举妄动 1. 半条命2:我们不去拉文霍姆,17号公路 2. 联合军炮艇击杀数:1/6 3. λ缓存:25/45 4. 成就:16/69 第6章 - 我们不去拉文霍姆...: λ缓存#21:关闭带电的围栏,再次遇到幸存者后,我们将能够进入拉文霍姆的一个新区域,那里有两个手动汽车掉落陷阱。靠近第二个汽车掉落陷阱,启动它,在汽车缓缓升起时跳上去。从这里向上看,会有木板通向前面;但不要理会这些。相反,沿着墙壁向下看,会看到一个λ符号画在一面木墙上,挡住了一个黑暗区域。小心地跳过墙壁进入黑暗中,我们可以在一个奇怪的金属结构后面找到一个λ缓存。 λ缓存#22:再次乘坐汽车掉落陷阱回到走道,会再次看到那个幸存者,他会自我介绍是格里高利神父。穿过下一栋建筑,我们会掉进一条满是猎头蟹僵尸的街道。使用梯子爬上一些钢梁继续前进。我们应该走的路是通往右侧一栋建筑的木制栈道。暂时先忽略它,沿着钢梁再往前走一点,从左侧的小路进入另一栋建筑。虽然在有λ符号的地方能直接看到战利品,但真正的λ缓存(Lambda Cache)在更里面的阁楼空间,位于右上角第二个符号旁边。 逃离拉文霍姆:在拉文霍姆,我们不用再操心λ缓存了,现在只需专注于逃出去(仍然只能使用重力枪)。与神父格里高利会合,他会扔给我们霰弹枪(可惜我们现在还不能用)。很多时候,我们会在屋顶上与快速僵尸战斗,这是最糟糕的情况。尽可能在室内战斗,这样更容易追踪当前用作武器的物品,包括等待电梯和缆车的时候。如果无法在室内战斗,街道也是不错的选择。 当开始遇到剧毒僵尸时,如果可能的话,直接逃离它们,因为仅使用重力枪对付它们会相当棘手。

成就#14 – Hallowed Ground:护送格里戈里安全穿过教堂墓地。 剧情相关。在乘坐贡多拉后与格里戈里神父联手,你们将穿过墓地迷宫,全程与僵尸战斗。和我们不同,格里戈里神父能用他的枪轻松杀死僵尸,让他多承担些战斗任务。 最终,他会抬起一道栅栏门让你爬过去。爬过去到达另一边,成就就会解锁。

成就#15 - Zombie Chopper:仅使用重力枪通关拉文霍姆。 格里高利神父现在会离开我们,在拉文霍姆的最后一段路程中,我们将独自行动。幸运的是,我们不需要走很远。跳入猎头蟹泛滥的矿井,忽略被淹没区域的藤壶怪,它们对我们来说意味着必死无疑,继续向水下游到安全地带。当我们到达远处的铁轨隧道时,启动带刀片的轨道车,跟随它穿过僵尸群到达地面。 如果你在拉文霍姆全程只使用重力枪,从未开过一枪,也未使用过手榴弹或撬棍,那么当你走出矿井回到17号城市后,这个成就就会解锁。λ缓存#23:当你一出矿坑,正对着17号城市的一节火车车厢时,转身抬头,会看到一个λ符号正指向出口上方。爬上你左边的一堆板条箱,跳上 ledge;λ缓存就在通风管道下方。 第7章-17号高速公路:现在我们终于可以安全地再次使用所有武器了。避开联合军狙击手,沿着铁轨一直走,直到遇到另一群抵抗军战士。通过无线电与艾利克斯交谈,确定下一步行动,之后我们将进入第7章。 【λ缓存24】:离开海岸哨站后,会获得侦察车“越野车”,以便“安全”前往诺瓦矿场。越野车会由起重机吊放下来,但需要用重力枪将其翻转。沿着海滩的路径行驶,直到驶上混凝土道路。驾车跳跃后向右转,最终会来到一个隧道,隧道左侧的小屋里画有λ符号。进入小屋,在屋子中央即可找到λ缓存。 【λ缓存25】:驾车穿过隧道回到海滩,然后开上前方的小山,会发现一座废弃房屋。房屋的门是锁着的。门的右侧是一个堆满杂物的地窖。破门而入,爬上堆叠的板条箱来到一楼。跳到旁边有剧毒僵尸的房间,在角落里可以找到λ缓存。 联合军炮艇#1:回到越野车,继续往前开,直到抵达新小敖德萨的下一个抵抗军前哨站。与卡伯奇上校交谈,他会告知有一架联合军炮艇即将发动袭击。要解锁【One Man Army】成就,需要在游戏中总共摧毁6架联合军炮艇。使用刚收集到的火箭筒将其击落;炮艇需要承受3发火箭弹的直接命中才会被摧毁。

成就#16 - 卡比奇不敢踏足之地:防御小敖德萨免受炮艇攻击。 剧情相关。摧毁袭击新小敖德萨的联合军炮艇即可解锁此成就。干得好! 序列5:崎岖之路 1. 半条命2:17号公路,沙坑 2. 联合军炮艇击杀数:4/6 3. Lambda缓存:29/45 4. 成就:18/69 ----------------------------------------------------------------------------------------------------- 第7章 - 17号公路:

成就#17 - OSHA Violation:使用起重机击杀3名敌人。 离开前哨站N.L.O.,前往一个小型货运站。要继续前进,我们需要使用磁力起重机移动越野车。爬上梯子并进入起重机。在继续之前,建议现在保存游戏,以防接下来的步骤出错。 立即将起重机向右转,面向北方石油仓库,此时一个车库门会打开,一些联合军士兵会出来。使用起重机的磁铁吊起一个大型集装箱;在士兵出来位置的对面,一个独立的平台上有一个红色集装箱。吊起集装箱,然后在移动时放下它,将其扫向士兵;在起重机内击杀所有3名士兵即可解锁该成就。这是游戏中唯一能获得该成就的机会;如果联合军士兵全部死亡,而你没有解锁成就,请重新加载并再次尝试! 联合军炮艇#2:驾驶越野车通过货运站后,在我们准备过桥时会遭到另一架联合军炮艇的攻击。继续沿着道路过桥,我们可以在路边一辆 wrecked red semi 附近找到一个火箭弹补给点。保存游戏,然后击落炮艇! λ缓存#26:摧毁炮艇后,使用重力枪清理前方路障开辟道路。从路障往下走一小段路,我们可以在道路左侧看到一辆 wrecked blue van;在车内可以找到λ缓存。

Achievement #18 – Targeted Advertising: Pin a Soldier to the billboard in Chapter #7 – Highway 17. Carry on down the road past a blockade of Combine Soldiers & eventually you will see another group of structures across from us that is barred off by a lasered gate at the end of a bridge. As you approach, there will be another car blockade in front of us – this one with a tipped over oil truck in it. Before we go to clear the blockade, head up the small hill to its right & you will find the Crossbow. Pick it up & look through the scope back at the far end of the bridge to see a Petrol billboard with a Combine Soldier standing directly in front of it as a lookout. Line up your shot, & pin the poor lad to that billboard to unlock the Achievement; this is the only point in the game we can unlock this Achievement… Lambda Cache #27: Disconnect the Combine APC from the laser field gate in the community. From here, you will see a large gas tank behind a chain link fence off the left of the bridge exit. Drive the Buggy over & jump off it over a bent section of the fence into the enclosure & we can find a Lambda Cache in behind the gas tank. Lambda Cache #28: Drive through the next tunnel & you will see a Dropship flying away from another small community. Make your way past the first house & chain link fence to the right of the road but stop just before the fence ends. Hop out of the Buggy & cross the road to the left side towards a jagged line of rocks a little bit behind you. Walk around these rocks & you will see a square of wooden fencing where we can find a Lambda Cache inside. Combine Gunship #3: Drive up to the long bridge ahead, but it will be blocked off by a laser gate. Travel down into the community on foot & head across the bridge underside to disable the forcefield. As soon as we do, another Combine Gunship will arrive to harass us; we can find multiple Rocket caches all along the underside of the bridge to take it down. Chapter #8 – Sandtraps:With the laser gate down, cross over the bridge & use all the nitrous you have to get past the oncoming train! Enter into the next tunnel, & we will begin Chapter #8. Lambda Cache #29: Clear your way through the infested tunnel & carry on a ways down the road until our progress is blocked by a closed gate. As we approach the gate, two Combine Dropships will arrive to send reinforcements that we will need to deal with (they do not count as Gunships we need to destroy). After the Combine is dealt with, we need to collect two batteries & place them inside the red shack to open the gate. Just across from where the batteries go will be a small bathroom. The Lambda Cache is located just on top of this bathroom roof. If you jump on a table or bring in a barrel or two to stand on, you can use the Gravity Gun to collect the contents of the Cache. Combine Gunship #4: Continue on down the road now & we will reach the Lighthouse outpost. Stash the Buggy & get prepared to fight off a large scale Combine assault. Kill off the Combine Soldiers & eventually a Gunship will arrive – take it down. If you need Rockets, we can find some stashed inside the lighthouse’s upper floor. Sequence 6: Jail Break 1. Half Life 2: Highway 17, Sandtraps, Nova Prospekt 2. Combine Gunship Kills: 6/6 3. Lambda Caches: 33/45 4. Achievements: 22/69 ----------------------------------------------------------------------------------------------------- Chapter #8 – Sandtraps:Stay Off the Sand!: Leave the outpost through a secret exit, & head along the cliffs till you find two Resistance members. One will shout at you to stay on the rocks! We must do just that for Keep Off the Sand Achievement. We have to make it all the way to the end of this stretch without touching the sand once. If we do, Antlions will attack us & void the Achievement. Make land bridges out of whatever you can find using the Gravity Gun. After making it to solid rock, ferry your bridge parts forward & reuse the pieces as often as possible. Save at the very beginning of this section, & make separate Saves afterwards/Quick Saves to be safe! Patience is everything. Take your time, & if at any point Antlions spawn, then you have failed & must reload… Lambda Cache #30: Carefully make your way along until you eventually reach a wooden bridge you will need to counter-balance to get across. Complete the puzzle & from where we get across, look up to your left to see a wind turbine on a rock connected to another off in the distance. Below the closest turbine, will be a tiny white shack that will have a Lambda symbol painted on it. To reach it, you can either head the long way around heading towards a small red shack using our land bridges or you can use a very long wooden plank on the hill directly across from it before we drop down to bridge the gap. Either way, you will have to climb onto the roof of the ruined red below the white one & use the Gravity Gun to collect the contents of the Lambda Cache.

成就#19 – Keep Off the Sand!:在第八章【沙坑】中,不触碰沙子穿过蚁狮海滩。 收集完λ缓存后,现在我们只需在不触碰沙子的情况下通过本章的这个区域。记得经常存档,当你跳入有所有爆炸桶的大型沙坑时,该成就应该就会解锁。 如果你成功且没有触发任何蚁狮攻击,成就就会生效;如果没有,只需重新加载存档再试一次。 蚁狮守卫:成功穿过蚁狮区域后,我们会跳入一个大型沙质竞技场,一只蚁狮守卫会出现。向它投掷爆炸桶、手榴弹,如果你有多余的火箭筒也可以使用,以此来击败它。它死后,我们就能收集信息素诱饵了。

成就#20 – Bug Hunt:利用蚁狮杀死50名敌人。 收集信息素诱饵后,沿着海滩前往诺瓦矿场。沿途会有大量联合军士兵试图阻止我们;如果可能,尽量只使用蚁狮来消灭他们。此区域的敌人数量足够完成该成就。 联合军炮艇#5:与你的蚁狮同伴一起战斗至诺瓦矿场的外围区域,很快我们会遭到另一架炮艇的伏击。 幸运的是,当炮艇发动攻击时,我们可以在前方区域找到更多火箭弹弹药。尽可能节省火箭弹……在该区域的最深处,我们能找到一个装满火箭弹的补给箱。联合武装直升机6号:在我们摧毁前一架武装直升机后,第二架会立即前来攻击我们。在建筑群周围搜寻火箭弹并击败它。

成就#21 - One Man Army:在《半条命2》中摧毁6架炮艇机。 如果你在17号公路摧毁了3架炮艇机,并且在本章中摧毁了3架,就能解锁这个成就。 第9章 - 诺瓦矿场:如果可以的话,当我们受到猎头蟹的攻击时,试着用重力枪抓住它们并发射到联合军士兵身上。为了解锁Hack Attack成就,我们需要用这种方式杀死5名联合军士兵。

成就#22 – Flushed:用马桶击杀一名敌人。 进入诺瓦矿场后即可解锁该成就。章节开始时,沿着牢房区走,在左侧最后一间牢房里可以找到一个马桶。用重力枪拿起马桶,然后下楼。从这里进入楼梯左侧的牢房,爬过墙上的洞口。进入洞口后,会有一只猎头蟹向你扑来,用马桶击杀它即可获得该成就。 用马桶攻击可能会打偏,马桶也会损坏。如果发生这种情况,请重新加载最近的存档并再次尝试。 λ缓存#31:穿过诺瓦矿场,最终你会到达A5牢房区。穿过对面区域并前往下一层,我们需要摧毁两门由光圈科技提供的联合军哨戒炮。上楼后,我们能看到白色双门附近的墙上画着一个λ符号。砸掉窗户上的木板并爬进去,就能在门后找到一个λ缓存。 λ缓存#32:击败另一只蚁狮守卫小 boss,进入下一个牢房区域,在那里我们可以用猎头蟹投掷器消灭更多联合军士兵。关闭力场继续前进,然后登上附近的楼梯,清理上方 checkpoint 塔楼里的联合军。靠近塔楼时,我们会遇到一个激光绊雷。 穿过对面的一扇敞开的门,可以看到墙上画着一个λ符号。走到它旁边,用重力枪轰击其左侧的牢房大门以打开它,里面有一个隐藏的λ缓存。 λ缓存#33:继续在诺瓦矿场战斗,经过B2、B4牢房区,最终你会进入监狱里的一个大型洗衣房。清理联合军士兵后,前往房间右侧。 那里有两条被小栏杆挡住的通道。跳过其中任意一条,在后面进入一个小侧室,在医疗站附近可以找到λ缓存;有血迹通向的那个侧室里会有一只剧毒僵尸,要小心! 序列7:弗里曼! 1. 半条命2:纠缠,反公民一号 2. λ缓存:40/45 3.成就:27/69 第十章 - 纠缠:跳入C2牢房区,我们需要再次击退蚁狮守卫;幸运的是,房间里有很多爆炸桶可以用来对付它。逃离建筑,然后在一些"爬行墙"像垃圾压缩机一样把我们压扁之前,迅速爬上一个壁架,开始下一章。 λ缓存#34:与爱丽克斯汇合,帮助她在诺瓦矿场深处联系她的父亲。爱丽克斯会接管一个控制台,并开始打开监狱大门,让我们进一步深入诺瓦矿场。当她为我们打开第一道门时,我们可以在左手边发现一台自动售货机,其上方画有λ符号。使用重力枪将售货机顶部的物品拉下来,即可获取λ缓存。

成就#23 – Hack Attack!:用猎头蟹机器人杀死5个敌人。 你可能在前一章没有获得这个成就,但理想情况下,到现在你应该已经用猎头蟹机器人杀死了1到2个敌人。本章中有两个部分,我们需要坚守阵地并抵御联合军士兵,同时猎头蟹机器人也会出现在这些区域。 任何时候看到猎头蟹机器人,用重力枪抓住它并将其发射到联合军士兵身上来杀死他们。用这种方式杀死第五个敌人后,该成就就会解锁。

成就#24 – Warden Freeman:在诺瓦矿场的第二次炮塔对峙中存活下来。 剧情相关成就。含义十分明确。在第一个使用炮塔自卫的区域之后,不久你会遇到另一个需要同样操作的房间。抵御住敌人波次,当爱丽克斯再次到达时,该成就将解锁。 第11章 – 反公民一号:再次与爱丽克斯会合,并找到被俘的莫斯曼博士。然后我们必须保护爱丽克斯,在她重新校准联合军传送门原型机时抵御联合军士兵的波次进攻。与她一起通过传送门逃脱,之后我们将进入下一章…… λ缓存#35:章节一开始,我们会从电梯井落下并前往室外。你的右侧会有一个大型的翻转储物箱,旁边有两个绿色的垃圾桶。跳到垃圾桶上,再借助旁边的箱子登上它们上方的 ledge,在最右侧角落可以找到一个【λ缓存】。

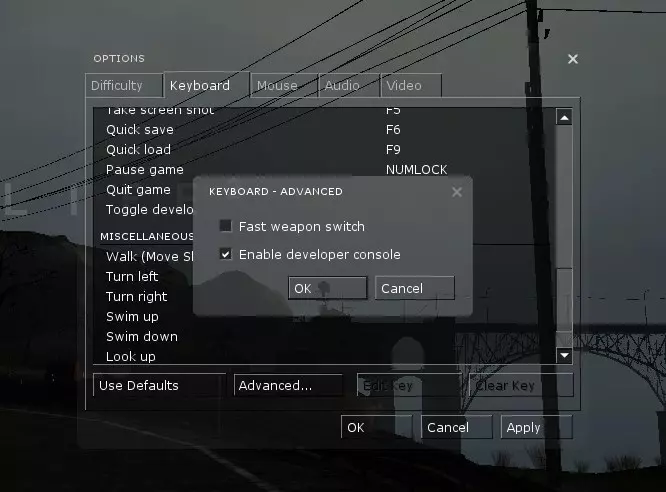
成就#25 – Follow Freeman:在起义中获得一队反抗军的指挥权。 在章节推进过程中,你会与狗(Dog)分开,必须独自继续前进。很快你会遇到第一名反抗军战士。在选项-键盘中查看你的【发送/召回小队】热键设置,默认是C键。如果使用手柄,默认指令是返回键。 将这名反抗军成员纳入你的小队,继续前进一小段路,会发现另外3名反抗军战士正在拆除播放布林博士(Dr. Breen)影像的显示器。靠近他们并将其也纳入小队。一旦你拥有四名队员,该成就就会解锁。λ缓存#36:与新小队一起,在17号城市中奋勇前进,穿过布满跳跃地雷的小巷。沿着街道继续前进,会遭遇一台三脚机甲的袭击,同时还会部署更多跳跃地雷。在街道尽头进入下一条小巷,会遭到联合军士兵的伏击。在这条小巷里,靠近红色金属棚屋处可以看到一个λ符号涂鸦。移开爆炸桶旁边的金属板条,会露出一个隐藏着λ缓存的爬行通道。 λ缓存#37:一路战斗穿过一系列建筑,直到抵达一个大型联合军路障。击退联合军并通过路障,继续战斗穿过一栋满是士兵的办公楼,之后会进入一个设有三台联合军自动炮塔的地下室。关闭它们,我们就能从墙上的洞里下去。 我们本该沿着走廊向左走,但先从右侧的楼梯上到城市街道。在这里,我们可以在一个有栅栏挡住的地方后面找到一个λ缓存,我们无法直接拿到它;用重力枪来获取它。 λ缓存#38:现在按原定路线走,我们会进入一个大型地下通道区域……里面全是猎头蟹。在隧道尽头会有一个塌陷的部分,我们需要绕过去。绕过去之后,我们会在隧道里遇到更多猎头蟹和一些联合军士兵。在我们前往联合军士兵所在/曾经所在的地方之前,转身往洞穴坍塌处的对面走,会看到一个有营火燃烧的小避难所;λ缓存就在它旁边。

成就#26 – Radiation Levels Detected:在《半衰期2》中穿过17号城市下方的有毒隧道。 剧情相关。在猎头蟹隧道之后,你会进入一个充满辐射水的区域。可以跳箱子过去,或者如果生命值足够的话,直接冲刺到另一边。一旦你爬上断裂的管道并通过通风口落下,就会解锁该成就。 λ缓存#39:最终,在一名反抗军战士为你放下一座桥后,你需要在前方自己放下另一座桥。就在那座桥之前,当你沿着一些碎石台阶向上走时,在通往桥的出口外面,你可以找到这个λ缓存。 λ缓存#40:放下桥并穿过它,一路战斗到下一栋建筑的地下室。进入一个有联合军士兵正在与僵尸战斗的房间,你会发现一个画在通往外面的门旁边的λ符号。走出去后,你会看到左右两边都有铁栅栏;λ缓存就是左边的补给箱,你可以用重力枪收集它。

成就#27 - Plaza Defender:在“反公民一号”章节中,于发电机广场的对峙中存活下来。 剧情相关。当你与艾利克斯重新会合后,你将接到任务,在广场上保护她破解阻挡道路的联合军大门。抵御联合军的波次攻击,成功到达大门另一侧后,该成就将解锁。 序列8:至死方休 1. 半条命2:反公民一号,追随弗里曼 2. 联合军狙击手:5/5 3. Lambda缓存:45/45 4. 成就:31/69 第11章 - 反公民一号: Lambda缓存#41:在广场战斗结束后,继续穿过旁边的地下隧道前进。沿着管道攀爬并通过通风口进入一个房间,房间上方的走道上有联合军士兵。沿着楼梯向下走两层,你会看到下方的壁架上画着一个λ符号。从它上方的走道跳下,或使用重力枪获取补给箱。 λ补给箱#42:当你进入下水道,看到联合军士兵绳降下来与一些僵尸战斗时,跟着他们一起跳下。沿着左侧的通道前进,直到在右侧找到一个梯子。继续沿着通道向下走,经过梯子,你会看到前方墙上有两个插槽,通向一个有剧毒僵尸的房间。在右侧的墙壁插槽中,通风孔上方画着一个λ符号。透过洞口,使用重力枪收集后方λ缓存的物品。 λ缓存#43:继续沿着隧道向下走,经过有毒僵尸所在的房间,会看到一条被一系列黄色金属盖挡住的通道。跳过这些金属盖到通道尽头,就能在死胡同里找到一个λ缓存。 λ缓存#44:走出地下隧道后,会进入一个大型仓库。乘坐“慢速电梯”到达上层,然后爬上连接在青色钢制支撑结构上的梯子。在梯子顶端,向对面望去,能看到仓库顶部红色金属棚屋后方的黑暗角落里画着λ符号。要到达那里,你需要使用最后一个梯子爬到仓库的最顶部,然后跳回到我们下方的走道继续前进。要逃离仓库,我们需要再往下一层,那里有蓝色灯光的大厅;先忽略这个,而是绕到那个红色金属小屋的外面去收集这个λ缓存。 第十二章 - 追随弗里曼:沿着大厅逃离仓库,我们将立即开始下一章。在本章中,我们需要找到并消灭所有5名联合军狙击手以获得Counter Sniper成就。消灭狙击手的方法是向他们所在的窗户投掷手榴弹;在尝试每次投掷前保存游戏,这样你就不会浪费或耗尽手榴弹!联合军狙击手1:我们一在外面停下,就能看到街道尽头有联合军狙击手的蓝色激光瞄准器。跑到尽头,往他所在的窗户里扔一颗手榴弹就能杀死他。 联合军狙击手2:在前往狙击手1的路上,我们会经过一条小巷,里面有狙击手2。折返到左边的小巷,冲向挡住去路的瓦砾堆。把手榴弹扔过瓦砾堆,投进他的窗户里就能杀死这个狙击手;事先存档,因为这一步可能特别难操作,你可能会为了找角度而用完所有手榴弹。 联合军狙击手3:清除第二个狙击手后,我们会进入一栋满是僵尸的建筑,并且必须把它们从被水淹没的地下室里清除出去。离开地下室回到地面,会有更多僵尸出现,对面大楼里还有另一个联合军狙击手。按老办法来:存档,然后扔手雷! 联合军狙击手#4、#5:最后两名狙击手就在我们上方。前往下一层巴尼藏身的地方,可以看到两个不同的狙击手激光瞄准线。存档,然后把他们都炸掉。

成就#28 - 反狙击:消灭17号城市中的所有5名狙击手。在消灭攻击巴尼的最后两名狙击手后,你将解锁该成就。

成就#29 - Fight the Power:通过关闭发电机来停用镇压装置。 剧情相关。与巴尼一起,一路战斗进入守望先锋枢纽大楼并关闭所有三个发电机以推进章节;第三个发电机被关闭后解锁该成就。 λ缓存#45:到达守望先锋枢纽的屋顶,需要摧毁一架联合军炮艇才能继续。一路战斗进入庭院,然后必须使用从周围区域搜集到的火箭筒击败5台三脚机甲。清理它们后,突破联合军的封锁,在被一台三脚机甲追逐穿过隧道后,继续穿过一系列地下房间。一路战斗到前方废墟建筑的顶层,在后方破损的楼梯间里会有另一个猎头蟹以及一个火箭筒补给箱。火箭筒补给箱对面有一个通往另一栋建筑的洞口。跳过去后,λ缓存就在你的正前方。

成就#30 - Lambda定位器:在【半条命2】中找到全部45个Lambda缓存。如果你一直按照本指南进行操作,那么在收集到最后一个Lambda缓存时,就会解锁该成就。

成就#31 - Giant Killer:在17号城废墟中,于屋顶的猎头蟹之战中存活下来。 与剧情相关。忽略之前的猎头蟹,继续经过最后的λ缓存器,穿过联合军和更多猎头蟹所在的街道。到达屋顶上有火箭补给箱的地方,杀死在这里遇到的两只猎头蟹即可解锁该成就。 序章9:跨维度操作者 1. 半条命2:我们的恩人,暗能量 2. 成就:33/69 ---------------------------------------------------------------------------------------------------- 第13章 - 我们的恩人:从屋顶出发,沿着顶部向附近可见的黄铜马雕像移动,然后跳入下方街道,与巴尼和狗汇合。狗会抬起联合军的攀爬墙脚趾,我们可以从它弄出的洞里跳下去进入这一章……

成就#32 - Atomizer:将15名士兵扔进联合军能量球区域使其瓦解。 入侵城堡,使用一个囚犯棺材(离我们最远的那个,不是最近的)深入城堡内部。当我们离开棺材后,会掉进一个没收区域,该区域会摧毁我们所有的装备……但重力枪除外,它会变得超级充能。从现在开始,重力枪的力量足以吸起敌人并将他们扔出去。 击退一波又一波来袭的联合军,直到我们掉进一个中央有蓝色激光束的圆形房间。这个区域的敌人似乎是无限的,待在这里,抓住联合军士兵并将他们抛向激光束使其瓦解。这样做15次即可解锁该成就。注意,他们的身体必须接触中央光束才会被瓦解,否则他们只会进入零重力状态并从另一侧掉出去…… 第14章 - 暗能量:一路战斗至城堡的其余区域,放下电梯然后乘坐电梯上去,用能量球杀死猎头蟹,带着另一个囚犯棺材继续前进,我们就能找到布林博士。

成就#33 - 奇点崩塌:摧毁城堡的反应堆核心。 剧情相关。到达城堡的暗能量反应堆核心,并在布林博士登上反应堆顶部时追击他。到达顶部后,使用重力枪向核心发射能量球以摧毁城堡! 完成率47% 章节10:第1集 1. 第1集:不当警报、直接干预、底层生活 2. 成就:39/69 ---------------------------------------------------------------------------------------------------- 成就分类 - 第1集:(13个) 剧情相关:(5个) 易错过:(1个) 次要目标:(2个) 击杀:(5个) 【半条命2:第1集】的所有成就可在单次通关中获得。我们要达成的主要成就是The One Free Bullet Achievement。允许使用的武器只有:撬棍、重力枪、手榴弹和火箭筒。虽然我们可以发射一发子弹,但必须通过射击挂锁来推进游戏进程。 难度不影响成就解锁,所以选择简单难度会让流程轻松很多。 第一章 - 不当警报:章节开始时,我们会发现自己身处城堡外,正处于暗能量奇点爆发后的场景中。 超级重力枪:仅装备重力枪,在狗和爱丽克斯的帮助下返回城堡内部。当我们和艾利克斯在城堡中穿行时,被困在另一个没收力场中时,我们将重新获得超级充能重力枪。 守望先锋精英:在获得超级充能重力枪后不久,我们将开始遭遇敌人。其中包括守望先锋精英,他们是穿着白色盔甲、头盔中央有一只红色眼睛的联合军士兵;他们看起来像《传送门》中的光圈科技炮塔…… 守望先锋精英能够用他们的AR2脉冲步枪发射能量球。要完成【Think Fast!】成就,我们需要接住发射出的能量球并杀死发射它的士兵。此外,要完成【Conservationist】成就,我们还需要用一个能量球杀死5个敌人。玩游戏时要记住这些成就,留意好的机会;如果你自己没找到,攻略里提到了两个不错的位置……

成就#34 – Watch Your Head!:完好无损地抵达城堡主电梯井底部。 剧情相关。最终你和艾利克斯会踏上一个玻璃电梯,电梯会开始缓慢下降进入城堡。在下降过程中,碎石会从上方掉落并开始损坏电梯;用重力枪将空中的碎石击落。 安全到达底部并离开电梯,即可解锁此成就。 第二章 – 直接干预:在电梯底部,穿过防爆屏蔽门进入下一个区域,即可进入第二章…

成就#35 – Think Fast!:用精英士兵自己的能量球杀死他。 本章开始后,你将通过防爆门进入一条狭窄的走廊。在这里存档以防出错!离开门口后不久,一些守望先锋精英会转过拐角攻击我们;他们很有可能会立即向你发射能量球。当他们发射时,注意是谁发射的,抓住能量球,并将其扔回给他们以获得该成就。 在堡垒核心区域:艾利克斯很快会召唤一部电梯,带我们下到堡垒核心。从这里开始,为了获得“和平主义者”成就,我们不能杀死遇到的任何潜行者。潜行者非常烦人,会妨碍我们。一定要注意能量球的发射位置,以防不小心击杀目标。我建议每次通过桥梁后都进行快速保存,这样即使掉落也无需重新来过。

成就#36 – Conservationist:用同一个能量球消灭5个敌人。 解开有两个潜行者的硬光桥谜题,然后爬上堡垒核心中央的梯子到达下一层。穿过小型硬光桥后,在另一边快速保存,以防接下来的部分出错。 向左走,在进入前方狭窄走廊前拿起一个能量球。进入走廊时,会有5名联合军士兵冲出来。在走廊里稍作停留,让他们在你面前的走廊里聚集起来,然后向他们发射能量球即可获得该成就。如果失败,重新加载存档再试一次。

成就 #37 - Containment:收容城堡核心。 剧情相关。重新启动三个暗能量稳定器,即可成功阻止城堡即将发生的毁灭。

成就#38 - Pacifist:在不击杀任何潜行者的情况下控制城堡核心。 如果在城堡核心的第一区域没有击杀那两名潜行者,你也将解锁此成就。 第三章 - 底层生活:与艾利克斯一起乘坐潜行者货船逃离城堡;货船停下后离开货船即可进入第三章。 一发子弹:当我们穿过通风管道寻找给上锁的门供电的方法后,会掉进一个有挂锁锁住大门的房间。在这个房间里,我们可以收集到霰弹枪和手枪;用手枪只发射一发子弹射击挂锁。 从这里开始,我们完全不能使用枪械!在游戏剩下的全部流程中,我们只能使用:重力枪、撬棍、破片手榴弹或火箭筒。信号棒:当我们处于这个地下区域时,会遇到信号棒。用重力枪拾取它们时,信号棒会被点燃。要达成【Zombie-que】成就,我们需要用信号棒点燃15只僵尸!只要看到信号棒和僵尸,就使用它们;你也可以用同一根信号棒点燃多只僵尸!

成就#39 - 汽车碾压者:在第一章中使用汽车压扁15只蚁狮。 继续穿过地下通道,最终你会到达一个需要转动轮子来打开车库门的区域。这个房间里有一个会无限生成蚁狮的坑,你需要用一辆汽车盖住它。在盖住之前,使用重力枪将汽车弹向蚁狮。在本章剩余部分还有其他一些可以利用的坑,或者你也可以直接在这里刷满15个击杀来获取该成就。 序列11:别跟我提概率 1. 第一章:低等生物、城市飞行、17号出口 2. 成就:46/69 ----------------------------------------------------------------------------------------------------- 第三章 - 低等生物:

成就#40 – Zombie-que:使用信号弹点燃15只僵尸。 如果不尽快着手完成,这个成就可能会给你带来麻烦。通过蚁狮区域后,最终你会到达一个需要等待电梯到来的地方。在此期间,会有一波波僵尸开始攻击你。 如果你运气好,之前可能已经用遇到的少量信号弹点燃过一些僵尸。在召唤电梯前保存游戏,以防需要重新加载游戏来获取更多击杀数…… 1. 电梯正前方有两枚信号弹 2. 一枚信号弹在房间入口附近的最右侧角落左侧往下一点的位置,在方形铁丝网围栏后面有两个信号弹。 4. 另一个信号弹位于带挂锁的铁丝网围栏区域内,需要用爆炸物破坏挂锁。 5. 最后一个信号弹与电梯控制箱在同一个房间里。

成就#41 - 电梯行动:存活足够长时间以登上停车场电梯。 剧情相关。进入电梯并开始前往下一章后解锁。 第4章 - 城市逃亡:从僵尸横行的隧道乘坐电梯出来后,本章随即开始。

成就#42 - Live Bait:在第一章中协助艾利克斯用狙击枪消灭30名敌人。 在章节中推进,直到在街上遇到联合军狙击手。消灭他们后,艾利克斯会爬上他们的位置并装备狙击步枪。如果你正在冲击“The One Free Bullet”成就,这个成就会相当容易;只需让艾利克斯用狙击枪消灭你遇到的所有敌人,该成就就会解锁。 在第二个街道区域,有一个蚁狮产卵坑,如果你担心错过的话,可以在这里刷这个成就。 蚁狮守卫:在艾利克斯完成狙击后,我们会穿过一个联合军封锁线,然后回到外面……那里会有一只蚁狮守卫正在攻击一些联合军士兵。只用重力枪战斗会困难得多。尽量让联合军士兵活着来吸引卫兵的注意力或对其造成伤害,同时专注于找到并发射该区域内所有的爆炸桶。

成就#43 – Attica!:摧毁医院阁楼中的炮艇。 剧情相关。继续穿过17号城市,直到你能与巴尼及更多幸存者汇合。登上医院屋顶,使用火箭筒摧毁正在骚扰我们的联合军炮艇即可解锁该成就。 第五章 – 17号出口:穿过遍布敌人的医院,从火车站离开,进入最终章节……

成就#44 - 市民护送:护送市民前往逃生列车时,确保无一人死亡。 章节开始后,你需要带领14名市民穿越一片区域,并将他们安全送到撤离列车。全程你都会受到联合军的骚扰,每次成功运送后记得存档。 带领市民转移时,留意你的小队。如果有人伤亡,就重新读取上一个存档。尽量快速冲过大部分区域,但要小心。使用火箭筒快速消灭挡路的联合军士兵。在接下一批市民前,先清除区域内的跳跃地雷或联合军狙击手。 你需要分5批运送市民,最后一批会有巴尼。当巴尼到达出口且你没有失去任何平民时,成就将解锁。

成就#45 – Escape From City 17:与艾利克斯一同逃离17号城市。 剧情相关。当平民和巴尼成功撤离后,你和艾利克斯需要找到你们自己的火车。在此之前,你们需要在火车场击败一台猎头蟹,方法是前往高处收集火箭筒。 消灭猎头蟹,并在城堡爆炸前与艾利克斯成功逃离17号城市,以完成第一章并解锁此成就。

成就#46 - 唯一的自由子弹:发射恰好一颗子弹完成游戏。使用手雷、撬棍、火箭筒和重力枪击杀敌人是允许的! 如果满足前提条件,此成就将与最后一个成就同时解锁。总体而言,它不算太难,只有少数几个部分可能具有挑战性,主要是当你被敌人包围时。请经常存档。 66% 完成度 序列12:章节#2 1. 章节#2:前往白森林 2. 蚁狮幼虫:30/333 3.成就:49/69 ----------------------------------------------------------------------------------------------------- 成就分类 - 第二章:(23个) 剧情相关:(8个) 易错过:(1个) 次要目标:(3个) 收集品:(4个) 击杀:(6个) 在本章中,要解锁【Get Some Grub】成就需要击杀333只蚁狮幼虫。每只幼虫都有固定位置,这意味着如果错过哪怕一只,你可能就需要重新游玩整个章节来寻找它。好消息是这些幼虫只在两个章节中出现。 但这还不是全部麻烦。另一个重要的成就是【Little Rocket Man】。在第一章中,我们会找到一个花园地精。然后我们必须把这个地精一路带到第六章,并把他发射到太空;如果你玩过《半条命:黑山》,这个地精就相当于紫帽子/披萨盒。记得经常存档!不过与第一章不同的是,我们不必担心【The One Free Bullet】成就,可以放心地重新使用所有武器了!

成就#47 - Gnome Alone:如果你正在查看这个成就,说明加布·纽维尔已成功将 gnome chompski 送入太空。如果你没有同时获得“Manufacturing Ascent”成就,那说明纽维尔已经放弃了将诺姆·乔姆斯基送入太空的计划。 我对这个成就背后的设定了解不多,但解锁它的方法很简单,只需进入《半衰期2:第二章》的主菜单,成就就会轻松解锁。 第一章 - 前往白森林:本章的成就同样与难度无关,你可以选择任意难度进行游戏。第二章的剧情将紧接着第一章展开,从我们逃离17号城市的火车上开始。

成就#48 - Grave Robber:夺取僵尸警察的手雷。 离开火车后,我们需要进入矿道继续前进。下到更深的竖井,就会开始遇到僵尸。在离开隧道前,记得存档!一出隧道,会看到一群僵尸正在和猎头蟹战斗,其中有一个僵尸警察。僵尸警察通常会掏出 grenades 并引爆自毁;当你看到这种情况时,迅速用重力枪从他们手中夺走 grenade,即可解锁该成就。 gnome chompski:在首次遭遇僵尸后,我们会进入通讯室。在室内,我们可以在房间出口右侧的木质架子下方找到 gnome chompski——它看起来就像普通的花园地精。用手或重力枪携带它,并准备带它踏上一段前所未有的旅程……要达成【Little Rocket Man】成就,我们必须将这个花园地精一路带到第六章“我们共同的敌人”,并把它放进火箭中射向太空。 虽然可以把它当作投射物,但这非常危险,很可能会丢失它。要经常存档,因为很多地方都可能出错…… 进入矿井:手持 gnome chompski,穿过矿井外部,我们会遇到联合军猎人。它离开后,我们需要护送一名友好的弗地冈人到地表下的安全地点,在此过程中我们将获得撬棍。 需要注意的是,要完成【Bone Breaker】成就,我们需要用重力枪投掷物体杀死30个敌人;我建议立即着手完成这个成就,在使用其他武器杀敌前先把它搞定。 带着地精玩偶时,小心地从电梯上取下撬棍,然后在开始下降前立即捡起地精玩偶;地精玩偶很容易掉下去并卡在电梯下面…… 蚁狮幼虫#1-5:乘坐带摇把的电梯上到一个竖井,然后带着地精玩偶迅速跳下,在那里我们会捡到手枪。小心地从下一个竖井的几个洞口落下,我们会掉进水里……我们的挣扎就此开始。从现在起,我们会开始遇到蚁狮幼虫。它们是白色的,会发出黄色的光芒,同时还会发出刺耳的叫声,这有助于定位它们;如果你不确定某个幼虫是否真的死了,就用手枪“补枪”。话虽如此,我也建议节省所有手枪弹药,用来射击那些难以够到的地方的幼虫! 在有水的房间里,回头向上看你掉落的地方,可以看到墙上的前5只幼虫。 蚁狮幼虫#6-8:从这些幼虫处开始,沿着前方的隧道前进,在到达蛛网墙之前,会在墙上找到3只幼虫。蚁狮幼虫#9-11:挡路的蛛网墙上附着1只幼虫,其正下方地面上还有2只幼虫。 蚁狮幼虫#12-14:穿过蛛网墙后,进入下一个房间,我们可以在左侧找到2只幼虫,还有1只幼虫在小池塘对面、较高处的蛛网附近。 蚁狮幼虫#15-19:离开这个房间,进入下一条隧道,会发现挡路的地面上有3只幼虫,再往前走还有2只幼虫。 蚁狮幼虫#20-23:前方隧道会被另一堵蛛网墙挡住,墙内有1只幼虫,墙下方地面上有2只幼虫,蛛网墙左侧的墙壁高处还有1只幼虫。

Achievement #49 – Acid Reflex: Kill an Acid Antlion Worker. From the previous Grubs, drop down the hole ahead & we will be attacked be a glowing green Antlion. These guys fire toxic goop at us & more often than not will kill Grubs making it irritating finding them afterwards. Kill the Acid Antlion Worker to unlock the Achievement. Antlion Grubs #24-26: With the Acid Antlion dealt with, turn around from where we dropped down from to see a dead end made up of webbing – there will be 3 Grubs to the right of this webbing on the ground. Antlion Grubs #27-28: Carry on further & we will collect the Shotgun after dispatching another two Acid Antlions. In the room with the Shotgun, we can find 1 Grub directly across from the hole we have to drop down next. Do not drop down the hole yet though! Before we do, walk around the hole towards where Grub #27 was, & there will be a blue locker; open it up to find 1 Grub. Antlion Grubs #29-30: Remove the wooden boards from the hole now & we can immediately see 1 Grub near the top along the wall. Before dropping down, make sure you have the Gnome! Drop down the hole & we can find another 1 Grub at the very bottom. Sequence 13: Grubbing In the Dark 1. Episode #2: To the White Forest 2. Web Cache: 1/9 3. Antlion Grubs: 91/333 4. Achievements: 49/69 ----------------------------------------------------------------------------------------------------- Chapter #1 – To the White Forest: Antlion Grubs #30-32: Start heading down this next tunnel & we can find 1 Grub in our way inside some webbing on the ground with another 1 Grub at the tunnel exit on our side of the rubble blocking the way ahead. Antlion Grubs #33-34: Up ahead will be a massive chamber that will be full of Antlion Grubs. There are also some Acid Antlions you will want to deal with asap before they kill off Grubs without us knowing; Grubs killed by Antlions still of course count towards the Achievement, but it can make tracking your count & missing some very likely. Do your best. For simplicity’s sake with how many Grubs are in this chamber, don’t kill them until you are directly below them; focus on how I’ve listed them in their clusters. The first 2 Grubs of this room will be right in front of you on the first rock slab leading up. Antlion Grubs #35-49: Progress along the slab & there will be a web wall in your way with 1 Grub on it. Another 2 Grubs will be on the floor directly in front of you with 4 more Grubs on the wall to your right – below a hole in the wall. Look above that hole in the wall now, & we can see another 3 Grubs just below some long webbing along the ceiling. Turn around & drop down into the water now to look even further up the same wall beyond that hole to see 2 more Grubs below a second hole & a final 3 Grubs above it near more webbing; you will need to shoot these ones down. Antlion Grubs #50-56: Head back up the ramp where you were previously & jump over into the water to access the second half of the chamber. Where we drop down, we will see 2 Grubs on the ground near the water. Look back where we jumped from & we can see another glowing hole in the wall with 4 Grubs around it & 1 Grub a little ways inside it. Gnome check! Do you have Gnome Chompski with you? Antlion Grubs #57-60: Drop over into the third section of the chamber now & we can find 2 Grubs in the second alcove on the left beside the water. Across from where we are here, we can find 1 Grub inside an underwater tunnel we need to pass through to continue, & 1 more Grub on the wall above it. Web Cache #1: While we are still in the same room of the large chamber, drop down into the water pool in front of us & swim down to the left. Down here we can find a glowing web with corpses behind it; smash it open, then swim down & bust a second web wall to raid our first Web Cache. For the Piñata Party Achievement, we need to raid all 9 Web Caches. Antlion Grubs #61-64: Swim through the underwater tunnel we found one of the Grubs in to enter the fourth section of the chamber. Where we emerge from the water, there are 2 Grubs immediately on the wall off our right, with another 2 Grubs on the ground ahead of us. Antlion Grubs #65-67: Further past the previous Grubs, we can see some Barnacles hanging from the ceiling & a small aluminum rowboat. To the right of the rowboat, we can see 2 Grubs up in a small alcove in the wall. To the left of the rowboat a little ways further, we can see 1 Grub in another small alcove beside the water. Antlion Grubs #68-70: Carry on to the back of this room now, past all the Barnacles, & we will have to deal with another Acid Antlion. Once it is dealt with, we can find 2 Grubs on the ground near a wooden crate with 1 more Grub on the wall to the right of the chamber’s exit. Antlion Grubs #71-72: Leave this large flooded chamber now & we will encounter 2 Grubs on the ground in our way just past the final Barnacle; watch out for an Antlion ambush… Antlion Grubs #73-77: Enter the next part of the tunnel & there will be more water here along with another Acid Antlion. Close to where we enter the flooded portion of the tunnel, we can find 4 Grubs in a web along the wall. We can find 1 more Grub at the far end of this flooded tunnel at the back on the ground though it is likely it may have been killed by the Acid Antlion… Antlion Grubs #78-80: Head down the next tunnel & we can find 2 Grubs in our way on the ground. We can find 1 more Grub shortly afterwards off our right on the ground before entering the next large chamber. Antlion Grubs #81-87: In the next chamber, you will want to quickly dispatch the three Acid Antlions before you do anything else. Once they are dealt with, return to where we entered to find 1 Grub off our right on the ground. Directly across from this Grub, look up to your left to see a small side tunnel where 1 more Grub will be on one of the walls. In the main section of the chamber will be a large stone pillar. On the opposite side of it, we can find 3 Grubs on the ground (that may have been crushed by the Antlions). When you go to leave this chamber, we can find 2 more Grubs near the exit beside a ribcage in the tunnel. Antlion Grubs #88-91: To progress through the tunnel, we will have to destroy another web wall where we can find 1 Grub on the web & another 2 Grubs just below it. We can then find 1 more Grub on the ground just past the web wall. Sequence 14: The Alyx Vance 1. Episode #2: This Vortal Coil 2. Web Cache: 5/9 3. Antlion Grubs: 156/333 4. Achievements: 51/69 ----------------------------------------------------------------------------------------------------- Chapter #2 – This Vortal Coil:Continue through the tunnel & we will take a small drop that we cannot get back up to enter into Chapter #2. Gnome check! Do you have Gnome Chompski with you? Antlion Grubs #92-93: 2 Grubs are found right in front of you in the tunnel as soon as the Chapter begins.

成就#50 - 致命收获:通过放置跳跃地雷杀死一名敌人。 当我们跳下前方的洞口时,会发现两名反抗军战士正在保护为艾利克斯疗伤的 Vortigaunt(弗地冈人)。我们即将遭到蚁狮的袭击,所以要做好准备;找个安全的地方存放小矮人恰姆普斯基,确保他不会碍事…… 隧道附近的侧面有两个箱子,里面装满了跳跃地雷。把它们全部放置好,这样你至少能确保用跳跃地雷杀死一只蚁狮。

Achievement #51 – Into the Breach: Help Griggs & Sheckley hold off the Antlion invasion inside the mine shaft. Story Related. Hold off the initial nine waves of Antlions assaulting us & eventually we will be aided by three more Vortigaunts. Complete the final stand against the Antlions, & we will unlock the Achievement. Leaving Gnome Chompski Behind: For the rest of this Chapter, we will be leaving & returning back to this central area to revive Alyx. If you leave Gnome Chompski somewhere close to Alyx (or just somewhere you will remember him) he will stay here for when we return. This takes a lot of hassle out of this Chapter, as we can just focus on killing Grubs. Before you leave Gnome though, make sure you make a Save & do not Save over it until we return back just on the rare chance something happens to him while we are gone! Antlion Grubs #94-98: Follow the Vortigaunt down the tunnel & into the side passage where we can find 3 Grubs right in our way. Another 2 Grubs will be found a little ways further ahead. Antlion Grubs #99-102: Blast open a web wall, & we can find 1 Grub just outside of Web Cache #2; open up the Web Cache to find another 3 Grubs inside the it. Web Cache #2: We will break open Web Cache #2 to destroy Grub #99. Antlion Grubs #103-105: Just to the right of the Web Cache, will be a web wall in the tunnel; there are 3 Grubs just to the left of it on our side of the web. Antlion Grubs #106-111: Destroy the web wall & we will enter a large chamber. There are 3 Grubs on the ground in front of us as soon as we enter with another 1 Grub below us. Follow the path along left to find 2 more Grubs hanging off the wall to the left; we will soon be attacked by some Acid Antlions. Antlion Grubs #112-114: Carry on further down the path to find 1 Grub on the ground with 2 more Grubs ahead of us on the wall to our left; we will be ambushed by more Acid Antlions from behind us. Antlion Grubs #115-118: Continue on to the exit of the chamber, around the backside of a large stalactite & look directly up from here to find 2 Grubs on the ceiling. Go to exit the chamber now & we can find 2 Grubs on the ground at the tunnel entrance. Web Cache #3: Head down the tunnel out of the large chamber & we can find a Web Cache off our right containing some Grubs. Antlion Grubs #119-120: 2 Grubs found inside Web Cache #3; one can be hard to see as it is on the ground over the lip of the hole. Antlion Grubs #121-130: Enter into the next large chamber & fight off an Acid Antlion. From where we enter, we can find 2 Grubs on the ground. Continue along the upper left path of the chamber, fighting off more Acid Antlions, & we can find 4 Grubs clinging to the wall just above where the path starts dipping down; one of the Grubs is hidden in webs here & can be hard to see! Follow the path along a narrow ledge where 1 Grub will be in our way with another 1 Grub on the ground where the path switchbacks. Another 2 Grubs can be found at the entrance to the tunnel leading out of the large chamber (these may have been killed by Antlions). Antlion Grubs #131-134: Continue down the tunnel ahead to find 2 more Grubs on the ground just before we reach a Web Cache (these also may have been killed by Antlions). Carry on & we can see a blood spatter on the ground near a skeleton with a glowing Web Cache up in the wall to our left – it will have 2 Grubs behind it. Web Cache #4: On the ceiling up to the left after leaving the latest large chamber. Antlion Grubs #135-139: From the Web Cache, continue down the tunnel to find 3 Grubs in our way. Another 2 Grubs can be found on the wall to our right further down. Antlion Grubs #140-142: Walk down the tunnel until you see a red blood spatter on the ground. Look up to your right to see 2 Grubs on the wall below a Web Cache with 1 Grub inside it. Web Cache #5: Web Cache #5 is found above a blood spatter in the tunnel near Grubs #140 & #141; it will drop a live Grenade when it is opened! Antlion Grubs #143-148: Leave the tunnel & we will drop back into the mine. Where we land, we can find 3 Grubs off our left on the ground. Ignore the Grubs behind a fence ahead of us for now, & remove the wooden boards off the gate to let us into the room with the Zombies. Eliminate the Zombies (remember to try killing as many as you can with Gravity Gun objects for the Bone Breaker Achievement), & we can find 3 Grubs clumped up together near a red fuel can. There are two Antlion Grubs that are pinned to the wall here as well, but they are already dead, & do not count for us… Antlion Grubs #149-156: Continue to ignore the Grubs in the other room, & use the weighted elevator ahead of us to reach a room lower down. At the bottom of the shaft, look back up & we can spot 3 Grubs clinging to the side of the wall above our heads. Step off the elevator, & we can kill another two groups of 2 Grubs & 3 Grubs here. Sequence 15: Grub’ocalypse 1. Episode #2: This Vortal Coil 2. Web Cache: 5/9 3. Antlion Grubs: 256/333 4. Achievements: 52/69 ----------------------------------------------------------------------------------------------------- Chapter #2 – This Vortal Coil: Antlion Grubs #157-165: Leave the elevator room, & we can spot 3 Grubs in behind a fence ahead of us. Go into the next room & there will be 1 Grub on the ground to our left, 1 Grub underneath the elevator, & another 2 Grubs across from us past the elevator. Before we activate it, stand on the elevator & look up the shaft to spot another 2 Grubs stuck to the wall. Antlion Grubs #166-171: Activate the elevator (use the steel girders to weigh it down so we can get on in time) & take it up to the next level. Defeat the Zombies up here, & we can find 1 Grub on the wall behind the elevator & a set of 3 Grubs & 2 Grubs along an old railway track. Antlion Grubs #172-176: The Vortigaunt will open up the path for us to go forward & we will reach a junction. To the right, we can see 1 Grub inside a minecart that will fall off of the edge when bumped. Walk to the edge where the minecart falls, & we can see 4 Grubs across from us to the right around a glowing hole. Antlion Grubs #177-185: Return to the junction & take the path straight ahead along the rail line. Break some wooden boards in our way, & we can find 9 Grubs along the track ahead. Not only will a minecart detach & crush 7/9 of the Grubs, but we will also be attacked by Zombies & Acid Antlions. Be sure to double check the track & beside it to make sure all the Grubs were killed. Antlion Grubs #186-197: Climb up a ladder, & drop down through an ore chute to land inside a minecart… that will begin to move. We will pass a lot of Grubs; do not try to kill them yet. We can walk back up the track to kill them accordingly. From where we fall into the water, climb up the ladder & we can see 3 Grubs on the wall just above the water. At the top of the ladder, we can find 3 Grubs along the wall at the top of the pit with another 1 Grub just over the edge near the ladder. Looking down into the pit, we can see another 2 Grubs along the wall to our right with 3 more Grubs on the same wall further down. Antlion Grubs #198-209: Now turn around & begin heading up the tracks; note that any number of these Grubs may have been killed by the minecart or the Vortigaunt fighting off the Zombies. At the bottom of the tracks, there are 3 Grubs hanging off the ceiling in a small alcove to our left with another 3 Grubs beside the tracks on a red fuel can. Further up the track we can find 3 Grubs on the ceiling along with another 3 Grubs beside the track. Antlion Grubs #210-216: Head back down the rail track near where the pit is, & we can enter into the next large chamber through a hole in the wall. From where we drop down, we can see 3 Grubs off our left, 2 Grubs in a small crevice in the wall to their right, & another 2 Grubs near the ledge above the trench ahead. Antlion Grubs #217-226: Walk across the small land bridge to the other side of the trench, & look up above us to see 4 Grubs inside a glowing hole with 1 Grub on the wall just above it. Stay standing where you are, & look all the way to the chamber’s ceiling above that glowing hole to spot 5 Grubs way up there near another glowing hole; you’ll have to carefully snipe them.

Achievement #52 – Bone Breaker: Kill 30 enemies with thrown physical objects. Drop down into the area with the Antlions & the “vibratory device” & we will be in another great location to earn more Gravity Gun kills. If you have been chipping away at this when you could, you may unlock this Achievement here. If not, there are so many opportunities to earn this Achievement over the course of Episode 2 so do not fret. Note that thrown Exploding Barrels, Propane Tanks, or Fuel Cans do not count as physical objects for the Achievement as they are explosives. Antlion Grubs #227-230: After holding off the Zombies & Antlions waiting for the elevator, take it up to the top & wait for the Vortigaunt to open up the path ahead. Carry on ahead & we will encounter the Ancient Guardian… it couldn’t be easy now, could it? Drop down through a hole in the floor & break down a barred off section of the mine to progress. Just past the wall we knock down, we can find 2 Grubs on the wall in front of us with 2 more Grubs on the ceiling above them. Antlion Grub #231-236: The path forks here. First, look down the tunnel off our left to find 2 Grubs on the wall; the rest of this tunnel is a dead end. Take the path off our right next & break down another barred off section of the mine tunnel to find 4 Grubs beside a rail track. Antlion Grubs #237-240: Continue down the mine tunnel & leap across a gap near the elevator shaft to reach a lower level that will take us to the inner chamber. Unfortunately, we will become separated from our Vortigaunt friend here… Get passed the vent turbine & follow the duct along to encounter 1 Grub in front of a hole in the floor. Before dropping through the hole, we can kill another 2 Grubs on the opposite side of the hole along with 1 Grub down the hole along the wall lower down. Antlion Grubs #241-246: Drop down the hole & there will be 2 Grubs immediately below the web we break through. Break through two more webs, & there will be 4 Grubs below the last web. Most will die when we break it through it, but some may not; be sure to look back up at the hole to shoot any you may have missed. Antlion Grubs #247-248: In the water, we can find 2 Grubs on a large stalagmite in the center of the cavern. Antlion Grubs #249-256: Swim down under the water & break through a web wall to be able to swim over to the far side that has some Barnacles hanging from the ceiling. From where we emerge, we can find 2 Grubs on the ceiling of a small alcove off your right. Further down the cavern in another alcove near some Barnacles, we can find 4 more Grubs. Lastly, we can find 2 Grubs on the ground near the cavern’s exit. Sequence 16: Be Adequate! 1. Episode #2: This Vortal Coil 2. Web Cache: 9/9 3. Antlion Grubs: 333/333 4. Achievements: 54/69 ----------------------------------------------------------------------------------------------------- Chapter #2 – This Vortal Coil: Antlion Grubs #257-259: Enter a yellow & bloody tunnel to leave the cavern & there will be 1 Grub in your way upon entering, another 1 Grub further down in some blood, & a final 1 Grub around the corner on the side of the wall. Antlion Grubs #260-263: Drop down into a new tunnel & we will have to dispatch some Acid Antlion. When they are dead, we can go left or right; it is a big circle. Take the path to the right & you will see another yellow tunnel off your left. Inside, there is 1 Grub on the wall near the entrance with 3 more Grubs at the back of the cave. The Ancient Guardian: Progress further down the tunnel, & we will be ambushed by the Ancient Guardian. We cannot kill it, & we must flee! Antlion Grubs #264-272: Flee from the Guardian, & it will chase us into another yellow tunnel. Here, there will be 2 Grubs right in the entrance which you will probably crush when you enter. There are 3 more Grubs a little bit further inside. Drop lower down in the tunnel & you will crush 1 Grub when you land; there will be 1 more Grub hanging off the wall to the left before a web wall. Break the web wall, & before you rush out of the tunnel, we can kill 2 Grubs clinging on the wall outside the exit. Antlion Grubs #273-278: Evade the Ancient Guardian again, & quickly rush down the tunnel to find another yellow one off our left a short ways along; there will be 2 Grubs on the wall outside it. Inside the yellow tunnel, we can find 1 Grub in our way on the ground with 3 more Grubs further down before a drop. Antlion Grubs #279-286: Drop down in the yellow passage & there will be 3 Grubs immediately on the ground in front of us with 3 more Grubs close by them. Once again, we can also find 2 Grubs hanging on the wall just outside the yellow tunnel exit. Antlion Grubs #287-292: Exit the yellow tunnel, but take the path to our right this time to run over to the next yellow tunnel; there are another 3 Grubs hanging on the wall outside it with immediately 3 Grubs inside. Antlion Grubs #293-295: Take the drop in the yellow tunnel, & there will be 1 Grub on the wall beside a web wall. Destroy the web wall, & we can find 2 more Grubs hanging on the wall just outside of the tunnel. Antlion Grubs #296-300: Leave the tunnel, & we will have to maneuver around the Ancient Guardian to get through the tunnel it is protecting. Rush down the tunnel, & we can find another yellow tunnel refuge a little ways down off our left; there will be 2 Grubs outside it. Inside the yellow tunnel, we can find 3 more Grubs. Antlion Grubs #301-311: Unlike the other yellow tunnels, this one leads nowhere & we will have to leave it. Continue rushing down the tunnel away from the Ancient Guardian & we will drop down at crossroads. Take the path to the right & we can find another yellow tunnel with 3 Grubs outside it. Inside the tunnel we can find 3 Grubs immediately in front of us with another 3 Grubs near the web wall at the tunnel exit; 2 Grubs will be outside on the walls past the web wall. Web Cache #6: Exit the yellow tunnel & take the path off our left where we can find a boarded up doorway we can break through. Do just that, & we will drop down into a mine passage. At the end of the rail track, break through a web wall to enter a massive chamber… we will work our way around it counterclockwise. Immediately to the right of were we entered, we can find a Web Cache inside the wall close to some Grubs. Antlion Grubs #312-316: We can find 1 Grub inside the Web Cache we just looted along with 3 Grubs in the corner beside us. Continue to follow the room around counterclockwise, & we another Web Cache with 1 Grub in front of it. Web Cache #7: Destroy the Web Cache where we found the previous Grub; be careful as there is a Poison Headcrab hidden inside it. Antlion Grubs #317-322: From the Web Cache, keep going right along the wall; there will be 3 Grubs on the ground in our way. From here, look across from us to see a Barnacle hanging down in between some steel beams. Beside it, there will be 2 Grubs around another Web Cache in the ceiling; there will also be 1 Grub behind this Web Cache. Web Cache #8: Close to the Barnacle in the ceiling; destroy it. Antlion Grubs #323-328: Head across the room towards the elevator now & we can find 3 Grubs near the back wall behind it. Lastly, head towards the center of this chamber & we can find another Barnacle on the ceiling with the final Web Cache beside it. There will be 2 Grubs on the ceiling outside the Web Cache & 1 Grub inside it.

成就#53 – Piñata Party:在第二章中找到并破坏所有9个网络缓存。 如果你一直按照本指南操作,破坏所有9个网络缓存后就能解锁该成就。 蚁狮幼虫#329-332:找到缺失的齿轮并启动电梯,让我们的朋友弗地冈下来。跟随他进入隧道,在他启动的发电机旁可以找到1只幼虫。在他打开的大门另一侧,有3只幼虫。 幼虫提取物:我们终于到达了蚁狮巢穴的内室,可以收集提取物样本。拿到样本后,返回艾利克斯身边并复活她。追上她之后,你将可以乘坐中央电梯上去,离开这个洞穴系统,结束这漫长的一章。离开前:获取 gnome chompski! 蚁狮幼虫 #333:与同伴一起乘电梯上楼,开始沿着小路走,直到远古守护者试图从我们右侧的墙破墙而入。当它离开后,透过墙上的洞可以看到最后一只幼虫在一个炸药桶的侧面。

成就#54 – Get Some Grub:在第二章中消灭全部333只蚁狮幼虫。 如果你一直按照本指南操作,那么在消灭最后一只幼虫后应该就能解锁该成就。如果没有解锁,说明你在某处遗漏了一只。除非你明确知道遗漏位置,并且在章节中有存档,否则你将不得不重新游玩整个章节并重新消灭全部333只幼虫。 序列17:通往白森林之路 1. 第二章:弗里曼教皇,搭便车 2. 成就:58/69 ----------------------------------------------------------------------------------------------------- 第三章 – 弗里曼教皇:手持 gnome chompski,从矿井竖井跳下以完全离开矿井,随后我们将开始第三章。当我们离开时,会目睹一支庞大的联合军部队正将一个异常的顾问运往白森林。我们必须抢在他们前面赶到那里!

成就#55 - Twofer:击败白森林外的两只蚁狮守卫。 剧情相关。使用【振动装置】穿过谷底,躲避试图骚扰我们的蚁狮。在山谷尽头,远古守卫会从封闭的矿洞入口冲出并发起攻击。在远古守卫出现后不久,另一只“普通”的蚁狮守卫也会从对面的隧道中出现。 将 gnome chompski 放在其中一个振动装置附近以确保其安全,然后开始用武器攻击守卫;是时候结束这一切了!两只守卫都无法突破振动装置提供的安全区域,所以我们可以将其作为避难所。当两只守卫都被击败后,我们将解锁该成就。再次留下 gnome chompski:蚁狮被击败后,我们将继续前进到一个区域,在这里必须留下艾利克斯和 Vortigaunt,去取停在下方一座桥上的汽车。离开他们之前,查看附近控制台的左侧,可以看到一扇钢制舱门,它似乎将一个僵尸切成了两半。当我们拿到汽车后,会到达这扇舱门的另一侧,并为艾利克斯和 Vortigaunt 打开它。问题在于,舱门在他们身后几乎立即关闭,如果我们把 gnome chompski 留在这里,将只有很少的时间去拿它。 面向舱门时保存游戏,用重力枪拿起 gnome chompski,尽可能安全地把它扔到另一边。当你确认他在 bay door 后面的路上某处时,为了谨慎起见,再次进行不同的存档。当我们开车到达 bay door 的另一边时,Gnome 已经在等我们了,我们不必担心他会被困住。 寻找车辆:现在去取那辆车。穿过僵尸横行的下层区域,到达车辆所在的桥。要将桥用作斜坡,我们需要用重力枪(Gravity Gun)将远端的一些废弃车辆击落,使其向下倾斜。一旦调整好角度,从桥上加速冲下去,回到我们的朋友……以及 Gnome 身边。和诺姆·乔姆斯基一起开车:接下来的两章中,我们将使用汽车四处行驶,但同时也需要运送诺姆·乔姆斯基。我们不能一边开车一边拿着他,所以要把诺姆放在汽车的座椅后面,并且要非常缓慢地驾驶。由于物理碰撞和弹跳,诺姆经常会因为各种原因被弹出车外,所以要时刻检查确保他还在车里。随着游戏进程(让地精仍在车里时)要经常存档,这样如果出现问题,你就不会损失大量时间。 我个人喜欢把地精放在脚边的地板上,就在油门/刹车踏板的位置(或者在艾利克斯旁边),这样我既能开车,又能一直看到他。这样,如果我看到他太靠近某一边缘,就可以用车把他弹开。在急转弯时,他很容易掉出去,但不管你把他放在哪里,他最终还是会掉出去的。 第四章 - 搭便车:在你和艾利克斯开车穿过隧道后,我们将进入下一章。

成就#56 – Payback:用猎人自身的镖弹杀死一名猎人。 和爱丽克斯以及地精一起前进,最终会遇到一座无线电塔。为无线电塔供电后,会遭到五名联合军猎人的袭击。 猎人会发射镖弹,这些镖弹击中物体后会附着在上面,随后爆炸。使用重力枪拾取轮胎、手推车、钢桶等中等大小的物体,用该物体阻挡镖弹,然后将其射回猎人。这可能需要尝试几次,但如果能通过这种方式利用爆炸杀死一名猎人,就能解锁该成就。

成就#57 - 遭遇猎人:与艾利克斯一起在猎人的伏击中存活下来。 剧情相关。在无线电塔的伏击中击败所有5名猎人即可解锁该成就。 顾问:离开无线电塔,带着地精慢慢开车,直到抵达一个有谷仓和房屋的废弃农场。将地精留在车里,我们会在破败的谷仓内遇到一名顾问。

成就#58 - Hot Potat0wned:用联合军士兵自己的手雷杀死他。 在击退顾问后,你所在的谷仓会遭到联合军的突袭,这是尝试获取该成就的好时机。先杀死前三个联合军士兵,然后从我们获取十字弩并存档的地方沿着走廊前进。 朝着外部方向走到下一条走廊的大约一半位置,触发下一波联合军士兵,然后跑回你刚走过的门口。等待艾利克斯走到你身后(这样她就不会杀死他们),然后观察士兵向你跑来。 等待某个联合军投掷手雷,用重力枪接住手雷并用它杀死那个士兵,即可解锁该成就。如果战斗空间太狭窄,你总是把手雷扔过敌人头顶,可以用重力枪抓住手雷,然后举着手雷冲向敌人。这样杀死他也算数。可能需要多试几次才能让他扔出手雷。 猎人直升机:先处理农场里攻击我们的联合军,很快就会有一架猎人直升机出现;我们目前的装备不足以对抗它。找到汽车,记得检查 gnome chompski 是否还在车里;如果你把车停得离农场太远,汽车会被传送到更近的位置,而 gnome 会掉在汽车原来停放的地面上! 上车,带着 gnome 小心翼翼地驾驶,同时躲避猎人直升机。猎人直升机不仅能极快地杀死艾利克斯,还能直接把 gnome chompski 从车里打出去;这是个很糟糕的组合。你要一点一点地前进,并且尽可能频繁地存档(在合适的时候)。 序列18:危险线路 1. 第二章:搭车,雷达之下 2. 雷达缓存:5/5 3. 成就:63/69 第四章 - 搭车: 躲避猎人直升机:当你到达火车轨道时,它们会通向一个隧道。存档,把 gnome chompski 留在轨道尽头,然后把车尽可能快地开到隧道所在的尽头。开车穿过隧道,直到出现加载界面,然后立即掉头,沿着来时的路返回,重新捡起你之前放下的地精;此时猎人直升机不会出现! 带着地精恰姆普斯基返回隧道,非常小心地驶过前方的跳跃点。慢慢驾驶车辆前进,最终会到达一面画有λ符号的木墙。驾车加速冲过木墙……木墙会被撞毁……我是说,车会被撞毁。 继续前进前,确保你带着地精恰姆普斯基!

成就#59 – Puttin’ On A Clinic:在第二章中无伤击败猎人直升机。 车辆已被摧毁,我们现在无处可逃。带上小矮人,你会发现一群抵抗军战士;在这里我们终于可以把这家伙打下来了!保存进度……并把小矮人放在安全的地方/你能记住的地方! 现在我们必须与猎人直升机战斗,但要达成这个成就,我们不能有任何射击失误。更糟的是,我们不会获得火箭筒!相反,我们必须使用重力枪将猎人直升机自己的地雷扔回给它。如果你在放置小矮人的地方进行了手动存档,那么在用它的地雷成功击中猎人直升机后进行快速保存。如果失手,就重新加载上一个快速存档。在简单难度下,使用猎人直升机的地雷直接命中三次即可摧毁它,我们将解锁成就。 第五章 - 雷达之下:猎人直升机被摧毁后,我们需要先修理汽车,然后才能继续前往白森林。幸运的是,这里的抵抗军会提供帮助,之后我们将进入下一章… 继续前进前确保携带了 gnome chompski! 等待汽车修理期间:在等待汽车修理时,我们的任务是摧毁限制前往白森林的联合军自动炮塔。我们可以将 gnome chompski 留在车库里,但要把它放在角落或靠墙的位置;不要把它放在桌子等实体物体上,否则它很可能会完全消失。在离开车库前,请进行手动存档!

成就#60 – Gunishment!:摧毁废料场中的联合军自动炮塔。 剧情相关。潜入废料场,一直到达联合军自动炮塔所在的建筑,消灭里面的联合军士兵,然后向控制台内投掷手榴弹以摧毁自动炮塔并解锁该成就。 回到驾驶座:自动炮塔被摧毁后,我们将返回停放汽车和 gnome chompski 的车库。反抗军还为汽车配备了雷达信标——从现在开始,这一点至关重要! 需要注意的是,我们需要通过碾压杀死20个敌人来完成Hit & Run成就。在车里带着gnome chompski做这件事有风险,但很难避免。如果出现好机会,就干掉那家伙,但之后一定要记得重新找到乔姆斯基…… 我们一出车库,外面就会有一大群僵尸;这是刷汽车击杀数的绝佳机会。往前开,碾压僵尸,捡起 gnome chompski 把它放到安全的地方,然后继续开车去杀更多僵尸……我们获得汽车击杀的机会有限,所以要抓住每一个机会! 雷达缓存 #1:当我们开车离开废料场时,爱丽克斯会提到雷达上有东西。等她过一会儿提示时停车,调查附近那辆里面有一个爆炸桶的货车。摧毁爆炸桶,我们就能拿到里面的缓存了。

成就#61 - Gordon Propelled Rocket:在第五章【雷达之下】中解锁火箭筒的λ缓存。 沿着大水塔行驶,继续沿街前进。从水塔右转后,会接收到另一个雷达信号,信号来自左侧的一个仓库,仓库后方的墙上卡着一辆白色货车。 爬进货车进入建筑,里面有一块大金属板,可用重力枪将其击落。使用附近的手榴弹箱补充弹药,向金属板下方投掷手榴弹,站在板上被弹到走道上。扳动开关解锁栅栏门,即可解锁该成就。雷达缓存#2:完成前一个谜题后,我们不仅可以收集到火箭筒,还能找到第二个雷达缓存! 雷达缓存#3:离开仓库,但先不要回到车上。相反,穿过街道走向那个有很多集装箱的围栏区域。在该区域的后方会有一个小型金属棚屋。进入棚屋后,会看到地板上插着一个锯片;用重力枪拿起锯片,其下方的雷达缓存就会显露出来。 雷达缓存#4:回到车内(确保 gnome chompski 在车里),继续开车穿过前方的隧道。沿着蜿蜒的小路向上前往白森林旅馆,经过两次道路转弯后,我们会看到左侧有一棵倒下的树,道路从两块岩壁之间穿过。 把车停在倒下的树附近,绕过树走向悬崖壁。在这附近搜索,会发现悬崖上有一个可以蹲下钻进去的洞穴。使用重力枪炸开挡路的岩石,就能在里面找到雷达缓存。

成就#62 - Quiet Mountain Getaway:在白森林旅馆遭遇伏击并存活下来。 剧情相关。沿着山路向上行驶,我们会抵达白森林旅馆;行驶过程中,我们最终会被联合军的激光屏障困住。突破联合军的波次进攻,消灭伏击部队即可解锁该成就。 雷达缓存#5:离开白森林旅馆,沿着道路向前,从下方的缺口跳下去。沿着之字形道路向下行驶,经过一辆燃烧的汽车,继续绕行,直到接收到最后一个缓存的信号。绕过一些岩石,会看到一个箭头指向树上悬挂的板条箱。用重力枪拿起附近的石块,将板条箱击落。

成就#63 - 缓存检查者:在第5章 - 雷达之下找到所有5个雷达缓存。 如果你一直按照指南进行,在突袭最后一个雷达缓存后,我们将解锁此成就。 序列19:意外后果 1. 第2集:雷达之下、我们共同的敌人、倒计时开始 2. 成就:69/69 ---------------------------------------------------------------------------------------------------- 第5章 - 雷达之下:

成就#64 – Pedal to the Metal:在前往白森林基地的比赛中击败Dog。 继续前进,最终我们需要离开道路,沿着小溪前往水闸。去打开水闸时,我们会与Dog重逢! 简单交流后……Dog会帮我们打开水闸,艾利克斯会向Dog发起比赛挑战。上车前,建议先保存游戏!带着 gnome chompski(地精恰姆普斯基)是不可能在车里击败Dog的,所以把它放在地上安全的地方,赛后再回来找它。 一旦艾利克斯说“踩油门”,就立刻行动!距离很短——沿着河往下走,然后右转上小路,绕过拐角,差不多就到了。如果成功的话,爱丽克斯会说“下次好运,慢动作”。 当成就解锁时,一定要转身并开车回去拿 gnome chompski! 第六章——我们共同的敌人:当我们到达白森林时,将无法继续乘坐汽车。下车,拿起 gnome chompski,然后我们步行前进。进入地堡,我们将开始下一章……

成就#65 - Little Rocket Man:将花园地精送入太空。 与爱丽克斯和地精一同穿过白森林,找到伊莱。重逢后,前往1号发射井,在那里可以找到克莱纳博士和马格努森博士。克莱纳博士会走下楼梯来见我们,我们则走上楼梯,那里有一个通往火箭的开放式舱门。 将地精恰姆普斯基(显然还有拉马尔)放入舱内并关闭舱门。确保一定要关闭舱门,仅将它放入火箭内就走开是无法解锁该成就的!舱门一关闭,我们就终于解锁了这个成就。去吧你这个小(被Steam屏蔽)……不过还是没有《半条命:黑山》里的披萨盒或紫帽子那么麻烦。

成就#66 - Secondary Silo Secured:封锁2号导弹发射井的发射门。 剧情相关。当我们沉浸在完成“地精恰姆普斯基”任务的喜悦中时,警报响起,我们将接到调查2号发射井情况的任务。在前往的途中……联合军攻破了白森林。他们来了。 在2号发射井中一路战斗后,关闭发射井的头顶大门即可解锁该成就。 红色警报:猎头蟹机甲正前往攻击白森林。要获得“邻里守望”成就,我们不能让它们摧毁任意3座建筑。我们总共需要击败13只猎头蟹,其中一些会有2-3名联合军猎人护送;如果你还未解锁【Hit & Run】成就,联合军猎人是非常适合开车碾死的目标。 猎头蟹有两种类型:建筑破坏者和基地突破者。建筑破坏者是我们需要重点关注的,因为它们的主要目标自然是摧毁建筑,这类猎头蟹通常移动速度极快。而基地突破者则会一路向南进攻白森林,通常移动速度慢得多。攻击时应优先集中火力对付建筑破坏者,但要注意,如果基地突破者抵达白森林,同样会导致“游戏结束”。请多保存存档,以防在错误的时机快速保存,导致无法及时赶到某个区域拯救建筑。【猎头蟹机甲】必须使用【马格努森装置】才能消灭,而【联合军猎人】则可以/应该使用汽车、火箭筒、十字弩、左轮手枪或脉冲枪来击杀,以获得最佳效果。
步行机甲1-2:驾驶至山谷北端,我们会找到锯木厂。在此处与抵抗军简短交谈后,战斗将开始。步行机甲1号是基地破坏者,将从锯木厂西北方的【起重机】区域出现。 击败它后,步行机甲2号会立即从东北方出现并冲向锯木厂进行破坏。你需要迅速应对!如果让它发射充能光束,锯木厂就会被摧毁;若发生这种情况,你需要重新加载存档。 步行机甲3-4:接下来的两台步行机甲将分别从西北方和东方出现,它们同样是基地破坏者。追上它们并消灭它们。 步行机甲5-8:接下来的四台步行机甲将以相当快的速度接连出现。第五号漫游者将从北方出现并前往锯木厂,但它是一名基地破坏者。在我们与它战斗后不久,第六号漫游者将从东方抵达,幸运的是它也是一名基地破坏者,你不必急于摧毁它。 摧毁第五号漫游者后,第七号漫游者将从西北方向出现,并径直前往西部补给站进行破坏。我们必须在它到达建筑前将其消灭!如果你没能杀死第六号漫游者,继续无视它,立即前去迎战第七号漫游者! 杀死第七号漫游者后,你应该有时间在第六号漫游者向基地移动的过程中将其消灭。最终,第八号漫游者将从东方出现,并径直前往东部补给站进行破坏。理想情况下,你已经在附近击败了第六只“潜行者”,这样就能为第八只“潜行者”做好准备。击败第八只“潜行者”后保存游戏——最艰难的部分已经过去了!

成就#67 – Hit & Run:在第二章中用车碾过20个敌人。 理想情况下,你至少已经为这个成就获得了15/20的击杀数。只要有可能,就用车撞击联合猎人,这不仅是击杀他们的有效方法,还能帮你获得这个成就所需的最后几个击杀数。 用车碾死任意20个敌人,我们就能解锁这个成就。 步行机甲#9-13:幸运的是,步行机甲#8是最后一个建筑破坏者,最后的5个步行机甲都是基地突破者。利用东部和西部补给站补充弹药,并在剩余的步行机甲出现时将它们消灭。它们移动缓慢,但如果我们不尽快处理联合猎人,仍然可能被他们淹没。

成就#68 - 邻里守望:拯救导弹发射井外的所有3座建筑,使其免遭摧毁。若你成功击杀2号、7号和8号【猎头蟹】,且未让它们摧毁任何建筑,即可解锁此成就!

成就#69 - 军备防御:从联合军的进攻中保卫导弹发射井。 剧情相关。在从猎头蟹入侵部队手中保卫白森林后,你还将解锁游戏的最终成就! 第七章 - T-减一:本章没有成就,好好享受这个伴随你余生的悬念吧…… 总结: 《半衰期2》是PC平台的经典之作,而两部资料片则是故事的精彩延续。为什么没有《半衰期3》讲述戈登追寻“北极光号”的故事呢?我也不知道……不过我们可以在《传送门2》中找到这艘跨维度传送破冰船作为彩蛋,这相当酷。故事的时间线顺序是怎样的?《半衰期2》和《传送门2》哪个先发生?无论如何,完成《半衰期2》本体及两部资料片的100%成就大约花了我30小时。